

Page 1

PC
Social Network Compatible GPS Camera
Website
https://www.cateyeatlas.com
Pat. and Design Pat. Pending
Copyright© 2014 CATEYE Co., Ltd. MSCGC10-140416
This device complies with Part 15 of the FCC Rules and Industry Canada licence-exempt RSS
standard(s). Operation is subject to the following two conditions: (1) this device may not cause
harmful interference, and (2) this device must accept any interference received, including
interference that may cause undesired operation.
L’appareil est conforme à la réglementation FCC, section 15 et Industrie Canada RSS standard
exempts de licence (s). Son utilisation est soumise à deux conditions :
1. L’appareil ne doit pas provoquer d’interférences nuisibles, et
2. L’appareil doit supporter les interférences reçues, y compris les interférences empêchant
son fonctionnement correct.
Modifi cations The FCC requires the user to be notifi ed that any changes or modifi cations
made to this device that are not expressly approved by CatEye Co., Ltd. May void the user’s
authority to operate the equipment.
Before using the computer, please thoroughly read this
manual and keep it for future reference.
It is necessary to read the Preparation guide edition, “Mounting the main
unit” and “Preparing your PC” before use.
MSC-GC100
For more information, visit
our website or mobile site.
4
ENG
What you can do with this unit
Dedicated application
microSD card
• Recording the trip route
Positional information from GPS is recorded while
recording the trip. The recorded positional information (route) can be saved as your own trail by
superimposing it on a Google map on the website
“CATEYE Atlas™”.
• Taking a photo and video containing positional
information
You can look at a photo and/or video while checking
the shooting spot on the route on “CATEYE Atlas™”.
• Uploading and arranging trip data
You can download the trip data from a microSD card to your PC, and
upload it to the website “CATEYE Atlas™.” You can also arrange the
data, or handle the downloaded photo and video as a fi le.
Internet
Package contents
Main unit
H-34N bracket for bicycle
microSD card/
SD card adapter
Helmet mount bracket
AAA alkaline
battery x 2
CAUTION
• The manufacturer shall in no event be liable for the loss of recording and recorded
data due to malfunction or defect of this product, its accessories or recordable media.
• Pay careful attention to the surrounding situation when you operate the main unit.
• When you use this unit with your bicycle, mount it fi rmly to the bicycle with
the bracket, and check before use that it is not loose.
• Avoid leaving the main unit in direct sunlight for a long period of time.
• Do not disassemble the main unit.
• Do not drop the main unit. It may result in damage.
• Do not expose the camera lens to direct sunlight for a long period of time.
• Dispose of used batteries according to local regulations.
• Do not use this unit in rain, although it is waterproof.
• Remove and store the batteries when you do not use the unit for a long time.
• When using, observe general moral rules.
Camera shooting
• Keep in mind that photographing and releasing a person’s appearance may
infringe on their portrait rights, etc.
• Do not use this unit to record any books on the market or any literature information that
is not permitted to be photograhped, or in any way against public order and morals.
microSD card
• Do not touch the terminal when you handle a microSD card.
• To insert into the main unit, check the correct insertion direction, and
press it in until it clicks.
GPS
GPS (Global Positioning System) is a system to identify the current position
on the earth by receiving highly precise positional information sent from a
satellite. GPS may not correctly record the current position in the following
locations and environments because of insuffi cient data acquisition.
• In a tunnel, underground, between high-rise buildings, under an overpass, etc.
• In bad weather (snow, rain, etc.)
• Near a high-voltage line or a mobile telephone relay station.
• When the antenna on the main unit does not face the sky.
The current speed and the distance may slightly differ from the actual value,
since they are measured only by GPS.
When you use this unit with your bicycle, combining with a CATEYE analog
speed sensor (supplied with CC-RD300W, etc.) improves the trip distance
accuracy, since the measurement values are corrected by sensor signals.
* In this case, it is necessary to set the tire circumference with CATEYE Atlas™.
* This manual has been prepared on the assumption that the user has suffi cient
basic knowledge, including operation and terminology of PCs (Windows/Mac).
Usage edition
Element names
Lock strap
Power /
Measurement button
Video buttonCamera
Cover
Camera button
Antenna
Back
Inserting a microSD card and batteries
Removing/installing the cover
1
Pinch the right end of the lock
strap with your fi ngers to remove it
from the hook on the main unit.
The cover is removed together with
the lock strap.
When the unit is wet, remove
moisture sufficiently before
opening the cover.
2
Be sure to fi t the cover fi rmly to the unit and install the lock strap,
after removing/inserting a microSD card or replacing batteries.
Removing/inserting a microSD card
Insert
1
microSD card
Remove
Press in
* When the yellow lamp fl ashes slowly, the remaining microSD card
capacity is approx 200MB.
* When the microSD card capacity is full, all lamps will be turned on.
After that, no more recording is possible.
1 Insert a microSD card with its label surface faced up, fi rmly
to the end until it clicks.
2 To remove the microSD card, press it in until it clicks.
3 Pinch the popped-up section with your fi ngers to pull
out the card.
Replacing the battery
Battery life
(Reference value at a
temperature of 20 °C)
* When the red lamp fl ashes slowly, the available battery capacity is
small. (With alkaline cells, it is characteristic for the indication to be
shown a little earlier).
1
Press downward
1 Open the battery case cover while pressing the lever, and
install the batteries in the correct direction.
Be sure to install the batteries in the correct direction.
2 Replace the battery case cover, fi t the cover fi rmly to the unit, and
install the lock strap.
2
No photographing
About 6.5 hours About 6 hours About 2.5 hours
Lamp
Recording a trip is nec-
essary to upload data
to CATEYE Atlas™.
Cover
Lock strap
microSD card
Pull out
Automatic photo-
graphing (1 minute)
AAA battery x 2
Red lamp:
Power / GPS acquired
Yellow lamp:
Measurement / Memory
Green lamp:
Photo / Video
microSD card slot
Battery case
cover
Hook
3
Videographing time
Using
Recording the trip
This unit records the whole trip after it is turned on until turned off
as a single trip. Turn off the unit during recording to save it as a
separate trip.
* If batteries are replaced during recording, the trip is divided into
two records.
1 Turn on the unit.
Press and hold button until the
red lamp lights up.
Once GPS is acquired, it will change
to fl ashing.
* It may take several minutes to acquire
GPS depending on the receiving
condition.
2 Start recording a trip.
Press button to start recording.
The yellow lamp fl ashes during recording.
* When an analog speed sensor is used, the yellow lamp changes to
double fl ashing to indicate that the unit is receiving a sensor signal.
3 Take a photo and video.
Shoot according to the following procedure.
* You can take images whenever the main unit is turned on, whether
recording a trip or not.
Taking a photo
Press the button.
The green lamp lights up every time a
photo is taken.
* This operation is enabled even during automatic photographing.
Taking a photo automatically
Press and hold button to start/
stop automatic photographing at a
specifi ed interval.
During automatic photographing, the green lamp lights up, and
the lamp fl ashes with a buzzer sound when photographing.
1
* The photographing interval is set from INOU Sync™ (default: 1
minute). For details, see [Setting] on INOU Sync™.
Taking a video
Press button to start/stop
videographing.
During videographing, the green lamp
fl ashes and a buzzer sounds every minute.
Once you start videographing during automatic photographing, the automatic photographing pauses in the meantime.
4 Stop recording a trip.
Press the button.
The yellow lamp lights off.
5 Turn off the unit.
Press and hold button until the
red lamp lights off.
Uploading a trip recorded
Trips recorded with INOU are saved in your PC and uploaded to a
web server together with photo and video data, using the dedicated
application software “INOU Sync™.” On the website “CATEYE Atlas™”
you can check a route, or open a trip.
1 Remove a microSD card from the main unit, and insert it
into your PC ( Removing/inserting a microSD card).
* Use an SD card adapter to insert a microSD card into your PC.
* When your PC has no SD card slot, an SD card reader is
required.
2 Start INOU Sync™.
Double click [INOUSync] on the desktop or shortcut to start
INOU Sync™.
3 Click [One-button upload].
* Data is saved in your PC, and then uploaded to the website
“CATEYE Atlas™” automatically.
* It may take time to upload, depending on the data size and the
line condition.
Uploading data after organizing
With INOU Sync™, you can organize the photos and videos saved
in your PC, and then upload them to CATEYE Atlas™. In that case,
click [Download data from SD card] to load data into your PC. Then,
select the desired photos and videos from [Data List] > [Detail],
and click [Upload].
Press
& hold
Press
Press
Press
& hold
Press
Press
Press
& hold
Red lighting
Red fl ashing
(GPS acquired)
Yellow fl ashing
Green lighting
momentarily
Green lighting
Green fl ashing
Yellow turned off
Red turned off
Page 2
Rubber pad
Preparation guide edition
Mounting the main unit
When using the bracket for bicycles
Bracket for bicycles
Rubber pad
1
Strap
1 Wind the bracket strap around the handlebar, and put the
strap through the opening.
2 Screw the dial into the bracket to secure it temporarily.
3 Mount the main unit to the bracket (
unit to the bracket), and adjust the shooting angle.
Screw *1
Loosen the dial on the bracket to adjust the shooting angle. After
adjusting, fi rmly tighten the dial.
For good shooting, we recommend you make adjustments
so that the main unit is in a horizontal position.
* The bracket is adjustable by 10 degrees in both horizontal
directions.
* Check the dial and screw (*1) on the bracket periodically, and use
them without any loosening.
4 Securely tighten the dial by hand, and cut off the excess
bracket strap.
• Be sure to tighten the dial by hand. When you tighten it too
hard with a tool, the screw thread may be stripped.
• Round off the cut edge of the bracket strap to prevent
injury.
5 Mount the main unit to the bracket.
Mount the main unit
fi rmly until it clicks.
* To remove the main unit,
pull it out forward while
pressing the lever.
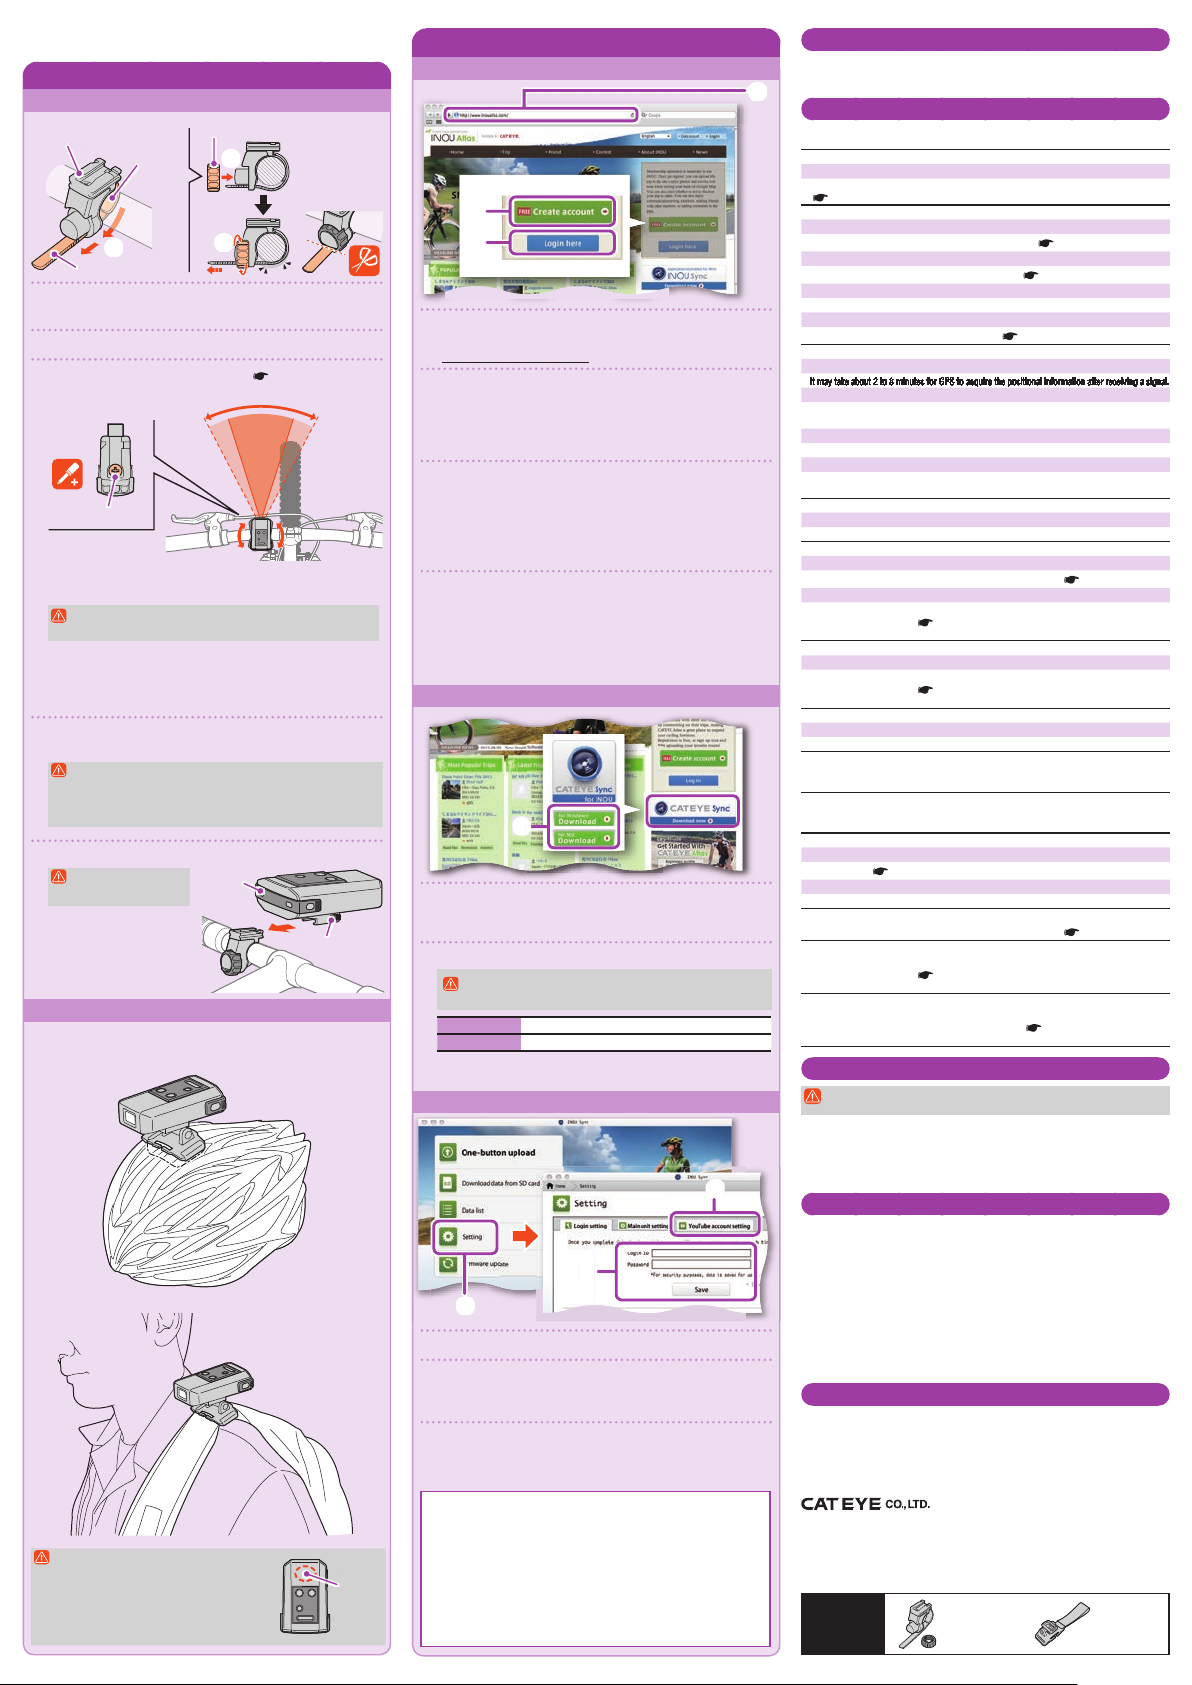
When using the bracket for helmets
The main unit can be mounted to various locations as shown in the
following fi gures, using the bracket for helmets.
Mounting to a helmet
Mounting to a backpack
• Be sure to mount the bracket so that
the antenna on the main unit faces
the sky.
• For good shooting, adjust the bracket
so that the main unit is in a horizontal
position.
Dial
2
3
5 Mount the main
Main unit
Lever
Antenna
Preparing your PC
Register as a member to CATEYE Atlas™
1
2
3
1 Access to CATEYE Atlas™.
Access the website “CATEYE Atlas™” from your browser.
(https://www.cateyeatlas.com)
2 Click [Create account].
Follow the procedure for membership registration indicated on
the screen. Once you are registered, an e-mail will be sent to you
from CATEYE Atlas™.
* Membership registration is free of charge.
3 Enter your ID (e-mail address) and password, and then
click [Login here].
Enter correctly the registered ID (e-mail address) and password to login.
After login, enter your user information. Now, your membership
registration is completed.
* Make a note of your ID and password, and keep it at hand.
4 Click [Create YouTube account].
Acquire a YouTube account, according to the procedure indicated
on the screen.
* YouTube account is required to upload a video. Acquire an account
now if you do not yet have one.
Then, install INOU Sync™.
Install INOU Sync™
1
1 Click [Download].
Download the fi le according to the procedure indicated on the
screen.
2 Double click the execution fi le downloaded.
Administrative rights are required to run the program on
Windows Vista / 7.
For Windows [InousSyncInstaller.zip] > [InousSync.exe]
For Mac [Install INOUSync.dmg] > [Install INOUSync.app]
Install according to the procedure indicated on the screen. Once
installation is completed, INOU Sync™ will start.
Setting the INOU Sync™
3
2
1
1 Click [Setting].
2 Enter your ID (e-mail address) and password on the [Login
setting] tab, and then click [Save].
Enter correctly your ID and password for CATEYE Atlas™.
3 Enter your YouTube account on the [YouTube account
setting] tab, and then click [Save].
Now, preparation of your PC is completed.
What you can do with INOU Sync™
• One-button upload to INOU Atlas.
• Download trip data (from a microSD card to your PC).
• Edit the photos and videos saved.
• Specify and upload a trip.
• Display folders of original data.
• Set the shooting interval of automatic photographing with the main
unit, and the image quality.
• Firm up the main unit software.
Maintenance
To clean the main unit or accessories, wipe with a soft cloth dampened in diluted neutral
detergent, then wipe with a dry cloth.
Wipe the camera lens gently with commercial cleaning paper.
Troubleshooting
The following troubles are not due to breakdown.
See also “FAQ” on CATEYE Atlas™ (Web).
A microSD card cannot be inserted.
Is the insertion direction of a microSD card correct?
Inserting it forcedly in a wrong direction may result in failure.
Removing/inserting a microSD card)
(
The unit cannot be turned on.
Is the battery drained? Or, is the battery in the wrong direction?
Replace the battery, or check the direction of the battery. (
Is a microSD card inserted?
The unit is not turned on unless a microSD card is inserted. ( Removing/inserting a microSD card)
Is the microSD card broken?
Do not to touch the terminal when you handle a microSD card.
Is the cover mounted appropriately?
The unit is not turned on when the cover is open. ( Removing/inserting a microSD card)
The red lamp does not fl ash. (GPS is not acquired).
Is it immediately after turning on the unit?
It may take about 2 to 3 minutes for GPS to acquire the positional information after receiving a signal.
Is it out of the GPS service area?
GPS radio waves do not reach inside a tunnel, underground, between high-rise buildings,
under an overpass, etc., so GPS cannot be acquired.
Is the weather not suitable for acquiring GPS?
GPS may not be acquired when it is raining or snowing.
Is the main unit mounted so that the antenna faces the sky?
Be sure to mount the main unit so that the antenna faces the sky. GPS cannot be acquired
when the antenna does not face the sky.
Photos and videos have been taken, but the track has not been recorded.
Was the yellow lamp fl ashing during recording?
Turn on the unit, and press the Power/Measurement button to start recording.
Recording is terminated in mid-course.
Is the red lamp fl ashing slowly?
The batteries are almost dead. Replace them with new batteries. ( Replacing the battery)
Is the yellow lamp fl ashing slowly?
The microSD card capacity is almost full.
Replace the microSD card (
saved in the microSD card to INOU Sync™ to save the capacity.
No photo or video can be taken.
Is the yellow lamp fl ashing slowly?
The microSD card capacity is almost full.
Replace the microSD card (
saved in the microSD card to INOU Sync™ to save the capacity.
Automatic photographing is partially interrupted.
Is it videographing?
Automatic photographing is interrupted during videographing.
Moving images are shaky and rippling.
Severe vibration when shooting may produce a shaky and rippling image.
Firmly fi xing the main unit may improve the image.
Photos are out of focus.
The camera on this unit does not support macro photographing.
It may be out of focus when a subject is too close.
The photos and videos taken are not clear.
Is the camera lens on the front of the main unit dirty?
Clean the lens. (
Is the shot taken facing sunlight or a strong light source?
Shooting an image facing a strong light may produce a foggy image.
The red lamp fl ashes slowly.
The batteries are almost dead. Replace them with new batteries. ( Replacing the battery)
The yellow lamp fl ashes slowly.
The remaining microSD card capacity is approx 20%.
Replace the microSD card (
saved in the microSD card to INOU Sync™ to save the capacity.
All lamps are turned on.
The microSD card capacity is full.
Stop recording the trip, and replace the microSD card (
card), or move the trip(s) saved in the microSD card to INOU Sync™ to save the capacity.
Removing/inserting a microSD card), or move the trip(s)
Removing/inserting a microSD card), or move the trip(s)
Maintenance)
Removing/inserting a microSD card), or move the trip(s)
Replacing the battery)
Removing/inserting a microSD
Operating environment for INOU Sync™
Downloading INOU Sync™ and accessing to CATEYE Atlas™ are not available with a
PC without Internet access.
OS : Windows XP SP3 / Vista / 7
Mac OS 10.6 or later
Memory : Recommend environment for respective OS
HDD :
Available capacity required 64 MB or more (Additional capacity to save photos and videos required)
Browser :
Internet Explorer 7 or later, Safari 4.0 or later, Firefox, and Google Chrome 5.0 or later
* SD cards shall be usable.
Specifi cation
Battery ......................................... AAA alkaline battery / Rechargeable battery x 2
Battery life .................................... Continuous trip recording time: About 6.5 hours
Recording medium ...................... microSD card HC (up to 32GB)
Automatic photographing interval 1 minute, 2 minutes, 5 minutes, 10 minutes (to be set using the dedicated applica-
Record pixels ............................... 640 x 480 pixels (VGA) 30 fps
Speed sensor receiving distance
Working temperature ................... 32 °F - 104 °F (0 °C - 40 °C)
Dimensions/weight ...................... 3-51/64” x 2-3/4” x 1-15/32” (96.5 x 70 x 37.5 mm) / 5.29 oz (150 g) (Including
* The battery life is for reference only. It may vary depending on the service condition. The battery life packaged might be
shorter than the above-mentioned specifi cation. The battery life may be extremely short at a low temperature.
* The specifi cations and design are subject to change without notice.
(when automatic photographing is used in combination: About 6 hours)
tion software “INOU Sync™”)
... In the range of 20 to 70 cm (equivalent to the cyclocomputer applied)
* The speed sensor may be out of the receiving range when INOU is mounted
somewhere other than the handlebar.
battery, bracket, and microSD card)
LIMITED WARRANTY
2-Year Main unit only (Accessories/Battery Consumption excluded)
CatEye products are warranted to be free of defects from materials and workmanship for a period of two years from original
purchase. If the product fails to work during normal use, CatEye will repair or replace the defect at no charge. Service
must be performed by CatEye or an authorized retailer. To return the product, pack it carefully and enclose the warranty
certifi cate (proof of purchase) with instruction for repair. Please write or type your name and address clearly on the warranty
certifi cate. Insurance, handling and transportation charges to CatEye shall be borne by person desiring service.
For UK and REPUBLIC OF IRELAND consumers, please return to the place of purchase. This does not affect your
statutory rights.
2-8-25, Kuwazu, Higashi Sumiyoshi-ku, Osaka
546-0041 Japan
Attn: CATEYE Customer Service
Phone : (06)6719-6863
Fax : (06)6719-6033
E-mail : support@cateye.co.jp
URL : http://www.cateye.com
STANDARD
PARTS
[For US Customers]
CATEYE AMERICA, INC.
2825 Wilderness Place Suite 1200, Boulder
CO80301-5494 USA
Phone : 303.443.4595
Toll Free : 800.5CATEYE
Fax : 303.473.0006
E-mail : service@cateye.com
5338827N
H-34N Bracket
5341831
Helmet mount
 Loading...