

Page 1
Metal Halide Lighting System
STADIUM LIGHT 3
HL-MH310
INSTRUCTION MANUAL
U.S. Pat. No. 5735441 and Design Patented
Copyright© Jul.1999 CAT EYE Co., Ltd.
Printed in Japan MH31W-011120 0688540 3
Battery: Ni-MH 12V
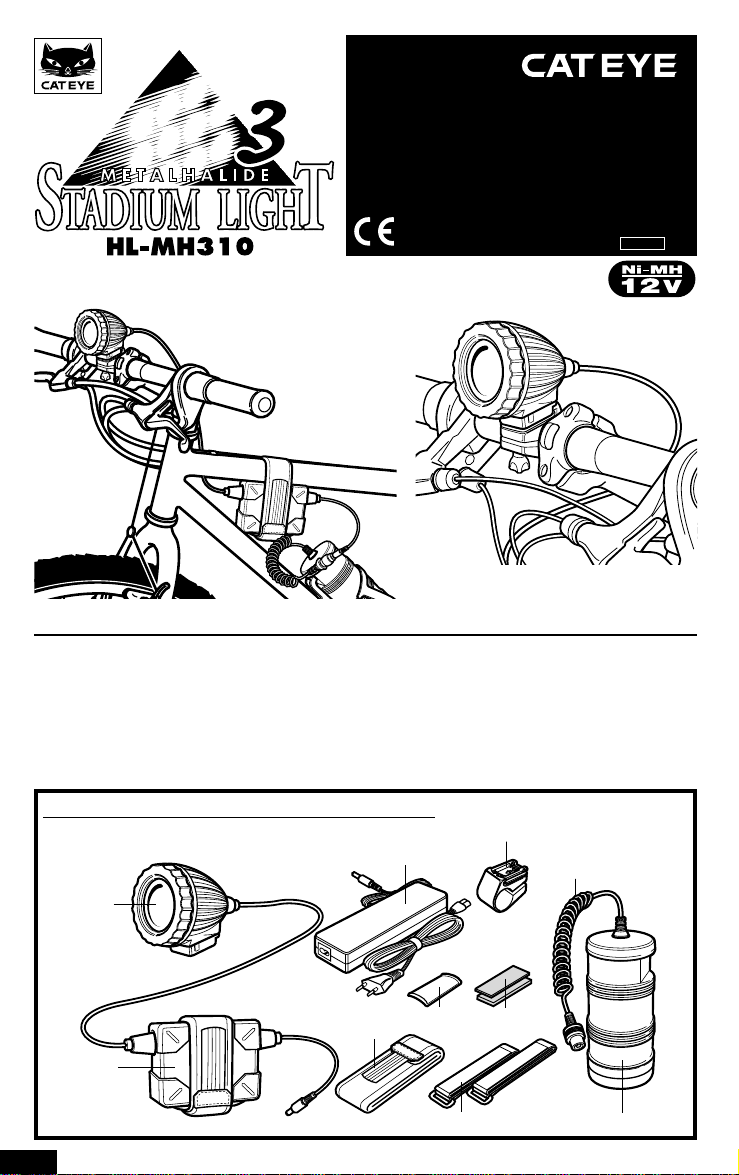
Mounting Example
INTRODUCTION
Read all instructions before first use
Thank you for purchasing the CAT EYE STADIUM LIGHT Model HL-MH310. Designed for high performance
night cycling, this rechargeable lighting system adopts powerful metal halide technology - the same lighting
system used for sports arenas. This is a unique high power 12 volt system. Before operating, thoroughly
familiarize yourself with this manual so that you understand the light's safe and correct operation. Please
keep this manual, along with the warranty card, for future reference.
NAMES
Make sure that the following parts are included in the package.
Lamp Body
Supporter
Ballast
E
AC Adapter
Stopper
Bracket(H-27)
Rubber Pad
Battery Belts
Cord
Bottle Battery
Stadium Light 1
Page 2
FOR SAFE OPERATIONS (IMPORTANT)
• Pace maker users should never use this device.
• The lamp body becomes extremely hot when turned on. Never touch the lamp body
Warning!!! Important Note
or lens until thoroughly cooled. Injury may result.
• Never gaze at the light when it's turned on. It may harm your eyesight.
• Do not use this light on public roads. The light output is equal to an automobile’s
halogen bulbs. Adjust the light accordingly so as not to blind oncoming traffic.
• Stop using the light at once if the lamp unit, cord or bottle battery has broken. Hazards may result due to a high voltage system.
• Never short-circuit the terminal of the bottle battery and the plug of the AC adapter.
It may cause the battery to over heat, resulting in fire or damage of the components.
• Safely and properly dispose of the old Ni-MH batteries according to your local regulations. To remove the battery, turn the bottom part of the bottle battery counterclockwise.
• Never place it within children’s reach.
• Although the lamp body and the battery are water-resistant (under normal weather conditions of rain, etc.), never intentionally submerge them under water.
• The battery used with the Stadium Light is 12 volts. Never attempt to alter this lighting
system. Never use the battery with any other lighting system.
• Never disassemble the lamp body, ballast and battery.
• The battery has unique characteristics. The light output will remain high until the batteries
run out, and will drop suddenly. Always pay attention to the remains of the charge and take
precautions by preparing a spare light.
• Never replace the bulb unit by yourself. It is not user-replaceable. It can never regain its
best performance.
• Never touch the metal halide bulb with bare-fingers; natural skin oils can cause the bulb to
over heat and break.
• Never touch or wipe the inside of the reflective mirror. This may degrade the quality of the
light output.
• The ballast is loaded with sensitive electronic components. Severe impact may result in
malfunction.
• The AC adapter is only for indoor use. After charging the battery, be sure to unplug it from
the power outlet.
• Never use the bottle battery for other equipment.
• A long period of non-use will lower the voltage of the battery due to natural self discharge.
Always charge the battery before using.
• Overdischarge (leaving the light on after the power is completely gone) shortens the performance life of the battery.
• If the lamp body or parts become dirty with mud, etc., gently wipe it away with a dish towel which
is moistened with mild soap. Never apply paint thinner, benzene or alcohol; damage will result.
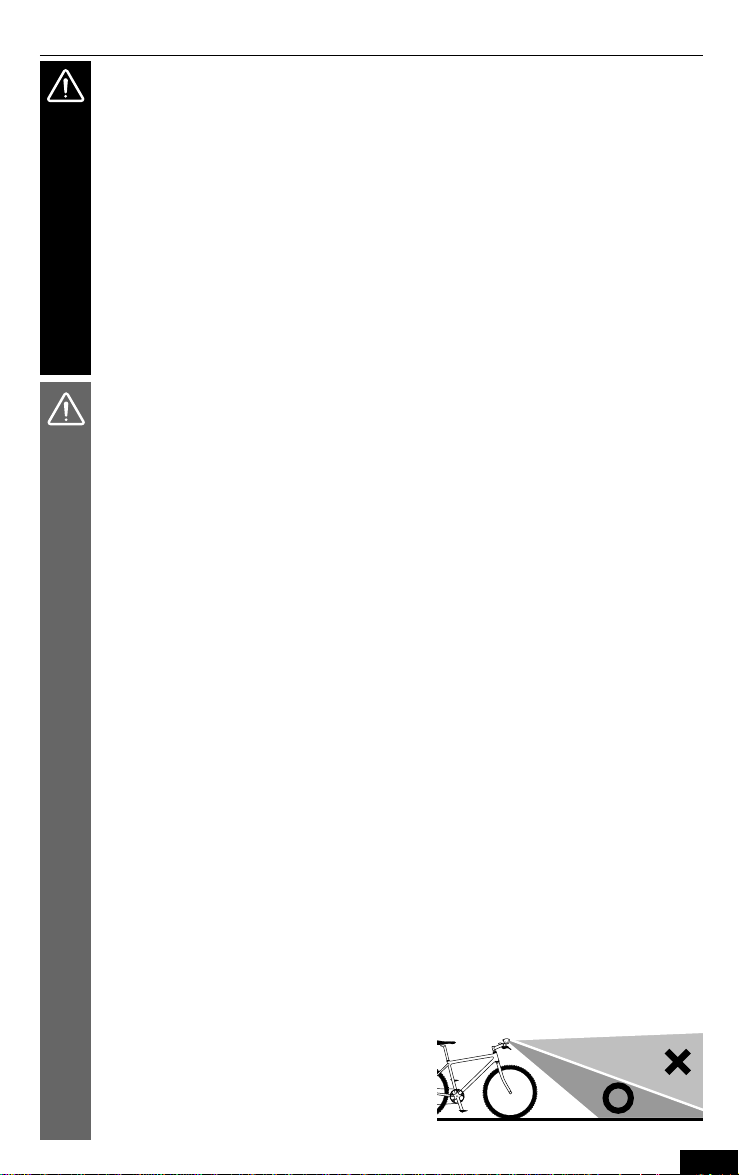
How to Adjust the Angle of Beam
Switch on the light at night in flat place, and adjust the angle vertically. It can also be adjusted
10° horizontally. To adjust it, loosen the screw of the bracket a little.
Warning!!! In addition to its high brightness, the
beam is widely diffused. In case you
should use this light on public roads,
he sure to adjust the angle downward
so as not to blind oncoming traffic.
2 Stadium Light
E
Page 3

bracket
ballast
stopper
run-time
is
switch
power indicator
E
bracket (H-27)
rubber pad
slide
battery belt
lever
3
bolt
lamp body
bottle battery
supporter
hours
HOW TO MOUNT
Mount the lamp unit to the bracket, the ballast to your frame and bottle
battery to your bottle cage. Then connect the jack of the bottle battery
with the plug of the ballast.
Installing Bracket
1. Attach the bracket to the handlebar using the appropriate rubber pads.
Hand-tighten the bolt.
2. Before tightening the bolts securely, adjust the angle of the beam and
the position of the lamp body. (See “How to Adjust the Angle of Beam”
in the “Important Note”.)
3. Tighten the bolt securely. (For a more secure fit, use a screwdriver.)
Mounting Lamp Unit
Warning !!! Never touch the lamp body until it is thoroughly cooled.
You may get burnt.
• To mount the lamp body, slide it backward onto the bracket until it
clicks into position.
• To remove the lamp body, slide it forward while pushing the lever.
Mounting Ballast
bottle cage
Attach the ballast under the top tube and round the belt. If it is not
secure, use the supporter and stopper as shown in the figure. If your
frame is Y-frame, attach the ballast at the side of the frame.
Note !: Be sure that the ballast is tightly attached to the frame.
Installing Bottle Battery
Insert the bottle battery into your bottle cage. Secure it with the battery belts.
Note !: The bottle battery might jump out of the bottle cage during
ride. Be sure that it is tightly and firmly fixed.
Connecting Cord
Connect the jack of the bottle battery’s cord and the plug of the ballast’s
cord. Wind the cord round the frame so that it will not hinder riding.
Note: Securely connect the jack to the plug.
HOW TO USE
The continuous run-time is 3 hours from the fully-charged condition.
Note !: When the temperature is very high or low (even within the operating
temperature range), the operation time might become shorter than
the standard time due to the characteristics of the battery.
• To switch on/off, press the yellow button on the ballast. When the light
is on, the GREEN power-indicator turns on.
• After switched on, it takes about 30 seconds for the light to reach its full
brightness.
• Because of the characteristics of the bulb, the beam may flicker or discolor
during operation due to change of the temperature or fluctuation of voltage.
Note !: In case the light does not turn on, switch it off once and wait for
more than 15 seconds; then try again.
After switching off, wait more than 15 seconds until switching on again.
Note !: If the light does not turn on although you have tried several times,
charge the battery.
Note !: In case there are frequent failure when switching on, the bulb
needs to be replaced.
Power Indicator
The light goes off in about 10 minutes after the RED power indicator turns on.
Switch off the light and charge the battery, or use a spare battery.
Note !: The indicator is only an estimation of the battery life.
Stadium Light 3
Page 4

1
charging
indicator
plug
charging jack
charging
time is
battery cap
output jack
o-ring
3
2
hours
HOW TO CHARGE
Use only the included AC adapter with an AC outlet.
1. Turn the battery cap counterclockwise and remove it.
2. Connect the plug of the AC adapter to the charging jack inside of
the bottle battery.
Warning!!! Never connect the plug of the AC adapter to the
output jack. It may cause fire or damage of the
components.
3. Plug the AC adapter into an AC outlet. During quick charge, the
charging indicator inside of the bottle battery turns on. When charging is completed, the indicator turns off. Unplug the AC adapter.
Note !: The standard charging time is 3 hours if no charge is left in
the battery. (The charging time varies depending on the battery condition.) Avoid charging the battery for the excessive
period of time.
Note !: After charging, close the battery cap. Pay attention so that the
o-ring does not catch any objects.
Note !: After charging, unplug the AC adapter.
Note !: If the battery does not serve the proper run time even if it is
fully charged, it might be at the end of it's useful life. Disconnect the output jack and connect it to a new battery.
SAFETY SYSTEM (AUTO-RESET FUSE)
When an malfunction or short-circuit occurs in the circuit or the temperature of the battery rises, the auto-reset fuse blows as a safety
system and the circuit will be cut off. In this case, turn off the light, find
the cause of the malfunction and remove it. After being left for a while,
the fuse will automatically recover.
Note !: If the fuse continues to blow or does not recover even after
the malfunction is removed, call the appropriate service center for assistance.
ABOUT THE BULB UNIT
The bulb unit is not user-replaceable. If it is burned out or comes to
the end of its useful life, please return it to us, along with the ballast.
We will replace it for pay.
SPECIFICATIONS
Bulb: 21W Metal Halide Bulb
Battery: Bottle battery /12V-4500mAH Ni-MH Bat-
tery
Charger: CATEYE AC Adapter for Charger (12V
AD1622)
Operation Time:
approx. 3 hours of continuous use
Charging Time:
approx. 3 hours
Operating Temperature Range:
Charging 0°C - 40°C (32°F - 104°F)
Operating -15°C - 45°C (5°F - 112°F)
Recharge/Discharge Number of Times:
at least 500 (until rated capacity drops to 50%)
* The specifications and design are subject to change
without notice. For the information of the products,
please also see CAT EYE website.
4 Stadium Light
LIMITED WARRANTY
2-Year Warranty: Only Lamp Unit, Ballast and AC Adapter
If trouble or damage occurs during normal use, the product will be repaired
or replaced free of charge. Type your name, address, date of purchase and
the situation of trouble clearly, and send it back to the appropriate service
center together with the product. Insurance, handling and transportation
charges shall be borne by the customer. After being repaired or replaced,
the product will be shipped back to the customer.
Address for service:
For United States Consumers:
CATEYE Service & Research Center
1705 14th St. #115 Boulder, CO 80302
Phone: 303-443-4595 Toll Free: 800-5CATEYE
Fax: 303-473-0006 URL: http://www.cateye.com
CAT EYE CO., LTD. Japan Office
2-8-25 Kuwazu, Higashi Sumiyoshi-ku Osaka 546-0041 JAPAN
Attention: CAT EYE Customer Service Section
Phone: 81-6-6719-7781 Fax: 81-6-6719-2362
(Excluding bulb and battery)
Registration
Please register your HL-MH310 to validate the warranty. Registration of the
product will bring you free technical and customer service support as well
as updates and information on new products. Register today (online at our
web site, or) by completing the registration card included in the package.
E
 Loading...