

Page 1

PO Box 188 | Terrell, TX 75160 | 972.563.8065
www.catcoUSA.com | [email protected]
INSTALLATION, OPERATION, AND
MAINTENANCE MANUAL
FOR
CATCO CATALYTIC HEATERS
Page 2
1
Contents
SAFETY ............................................................................................................................................ 2
INSTALLATION & MOUNTING .................................................................................................... 2
FUEL GAS SET-UP .......................................................................................................................... 3
ELECTRICAL SET-UP ...................................................................................................................... 4
HAZARDOUS LOCATION INSTALLATIONS ............................................................................... 6
OPERATION ................................................................................................................................... 7
MAINTENANCE ............................................................................................................................. 7
Class I, Division 1 or 2
Group D, T2A
-30 < Ta < +45
FM17US0373X
⚠ WARNING:
Keep the face of the heater clear from combustible materials.
Improper installation, adjustment, alteration, service or maintenance can cause property damage, injury or
death. Read the installation, operating and maintenance instructions thoroughly before installing or servicing
this equipment.
Do not use heater if the catalytic pad becomes torn or damaged. Continuous use may result in injury or death
due to fire, explosion, or carbon monoxide poisoning. The heater must be serviced by a licensed and qualified
service person.
Do not attempt to clean catalytic pad. Follow cleaning instructions accompanying heater.
Page 3
2
SAFETY
We value the safety of everyone using our products and Catco catalytic heaters have an
outstanding track record of safety. They’re ideal heating solutions for many applications
because they never require or produce a flame or spark during any phase of their
operation.
Catco products are intended for industrial use only and should only be installed and
operated by professionals with appropriate training in gas, electrical, and general
personnel safety. If at any time you need guidance on how to safely install or operate
Catco products, please contact your Catco distributor or the factory at 972-563-8065.
INSTALLATION & MOUNTING
The installation must conform with local building codes or, in the absence of local codes,
with the National Fuel Gas Code, ANSI Z223.1/NFPA 54 or the Natural Gas and Propane
Installation Code, CSA B149.1.
It’s critical the unit be installed so the face of the heater is protected from rain and snow.
Install the heater in a fixed position so that it can’t be tipped over, dislocated, or otherwise
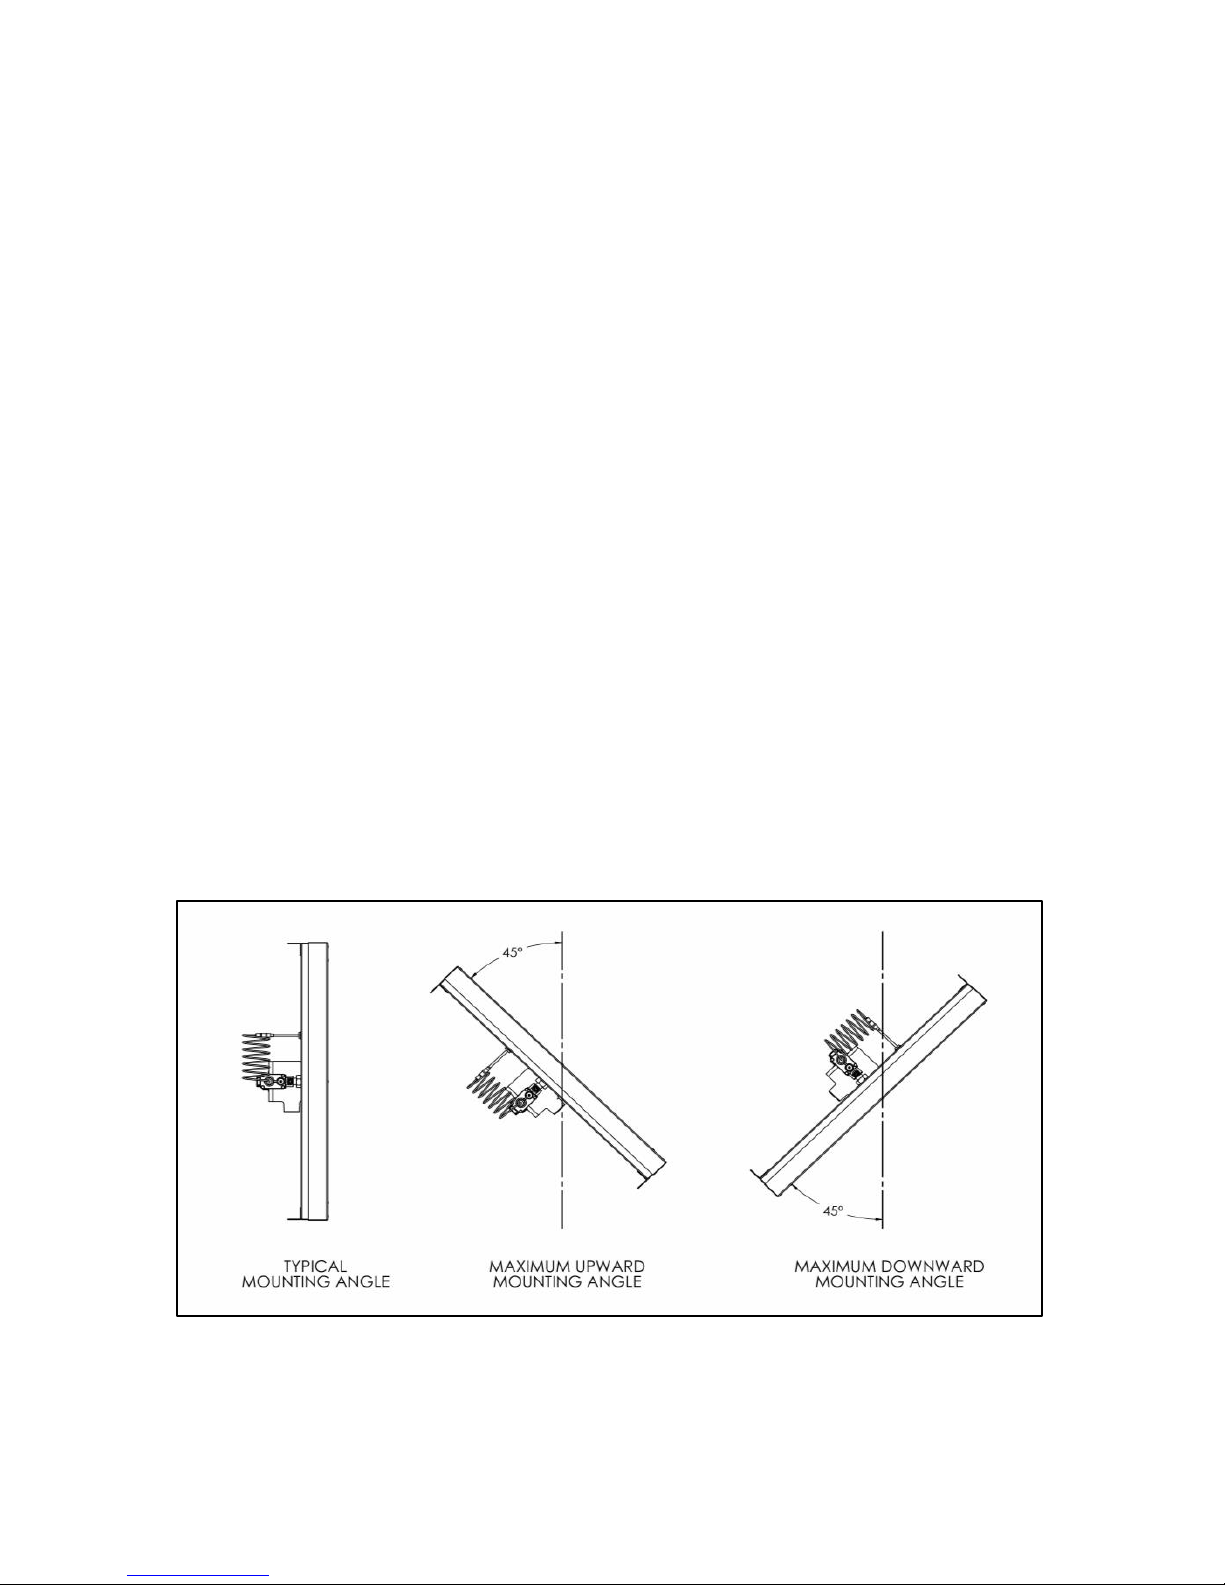
compromised. When installed, the face of the heater shouldn’t be angled up or down
more than 45° from vertical as shown in Figure 1.
Figure 1. Typical and maximum mounting angles.
Page 4
3
FUEL GAS SET-UP
Catco catalytic heaters are best operated at a pressure of 4.5 inches water column (wc)
for natural gas fueled heaters or 11 inches wc for LP gas fueled heaters. Operating
pressures in Table 1 below indicate the flowing pressure measured at the heater orifice.
Table 1. Input pressure limits for catalytic heaters.
Fuel
Minimum
Input Pressure
Standard
Input Pressure
Maximum
Input Pressure
Natural Gas
2.0 inches wc
4.5 inches wc
6.5 inches wc
LP Gas
5.5 inches wc
11.0 inches wc
15.5 inches wc
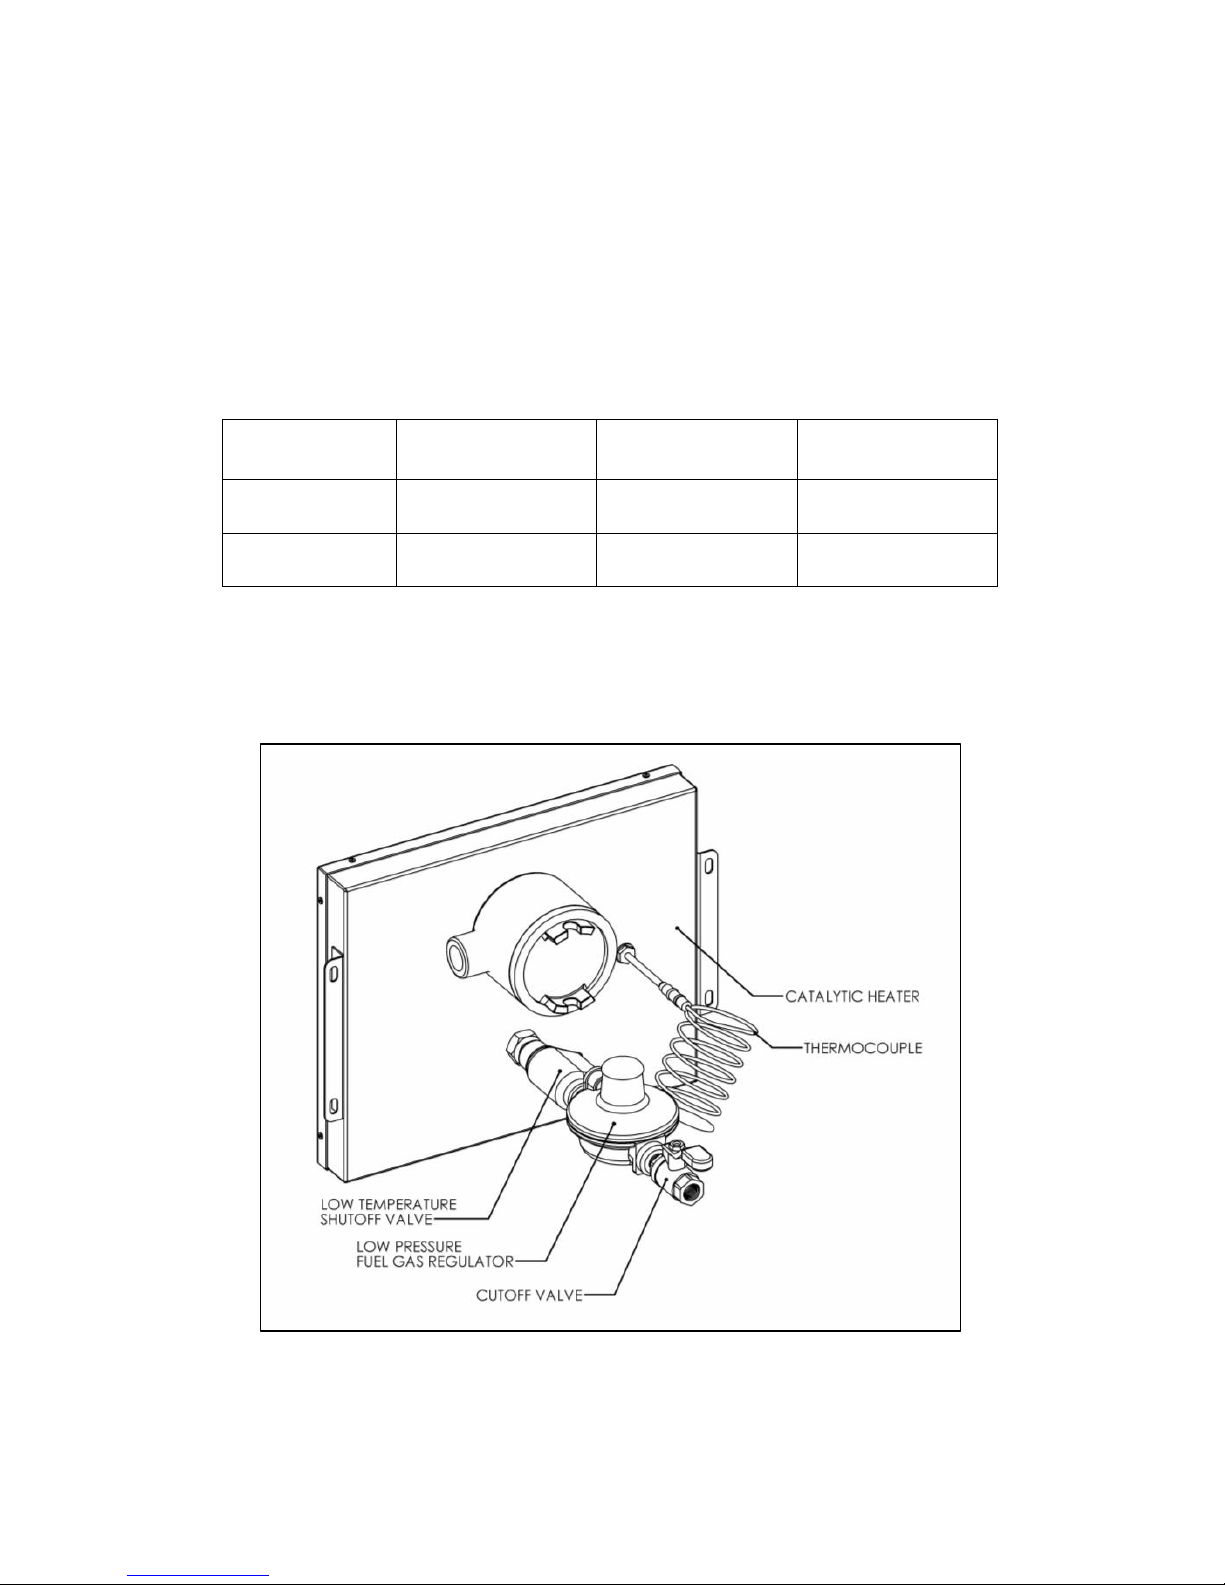
Below, Figure 2 shows a common piping arrangement for Catco catalytic heaters.
Figure 2. Simple fuel gas piping arrangement.
Page 5
4
ELECTRICAL SET-UP
When applicable, the heater must be electrically grounded in accordance with the
National Electrical Code, ANSI/NFPA 70 or current Canadian Electrical Code, CSA C22.1.
Before the catalytic reaction can begin, the catalyst bed must be preheated to
approximately 250° F (121° C). This is accomplished by energizing internal electric heating
elements using the voltage specified on the heater’s label. Electrical power is only required
during the start-up phase of operation (typically no more than 30 minutes).
The posts for the electric heating element terminate in the junction box mounted to the
back of the heater. Depending on the heater model, there are slight differences between
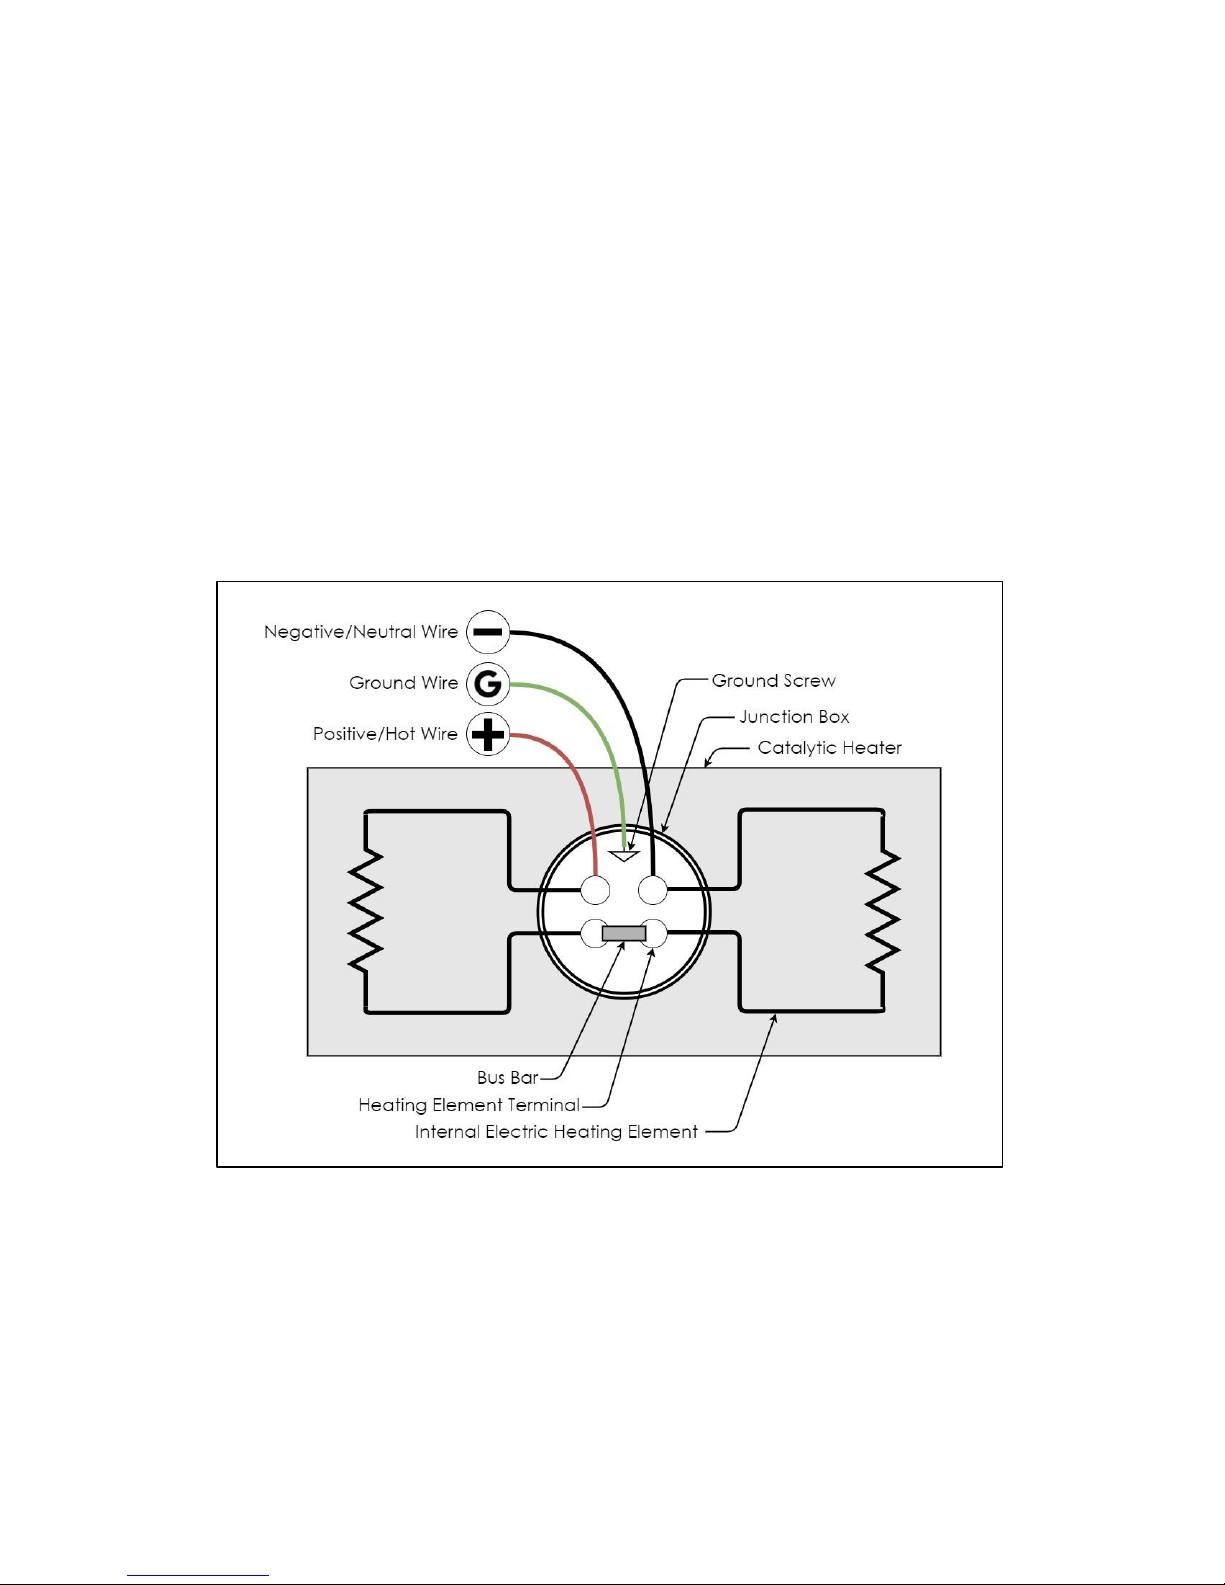
the electrical connections and each one is described below. Figure 4 shows symbols for
the wiring diagrams in this section.
Figure 4. Legend for wiring diagrams.
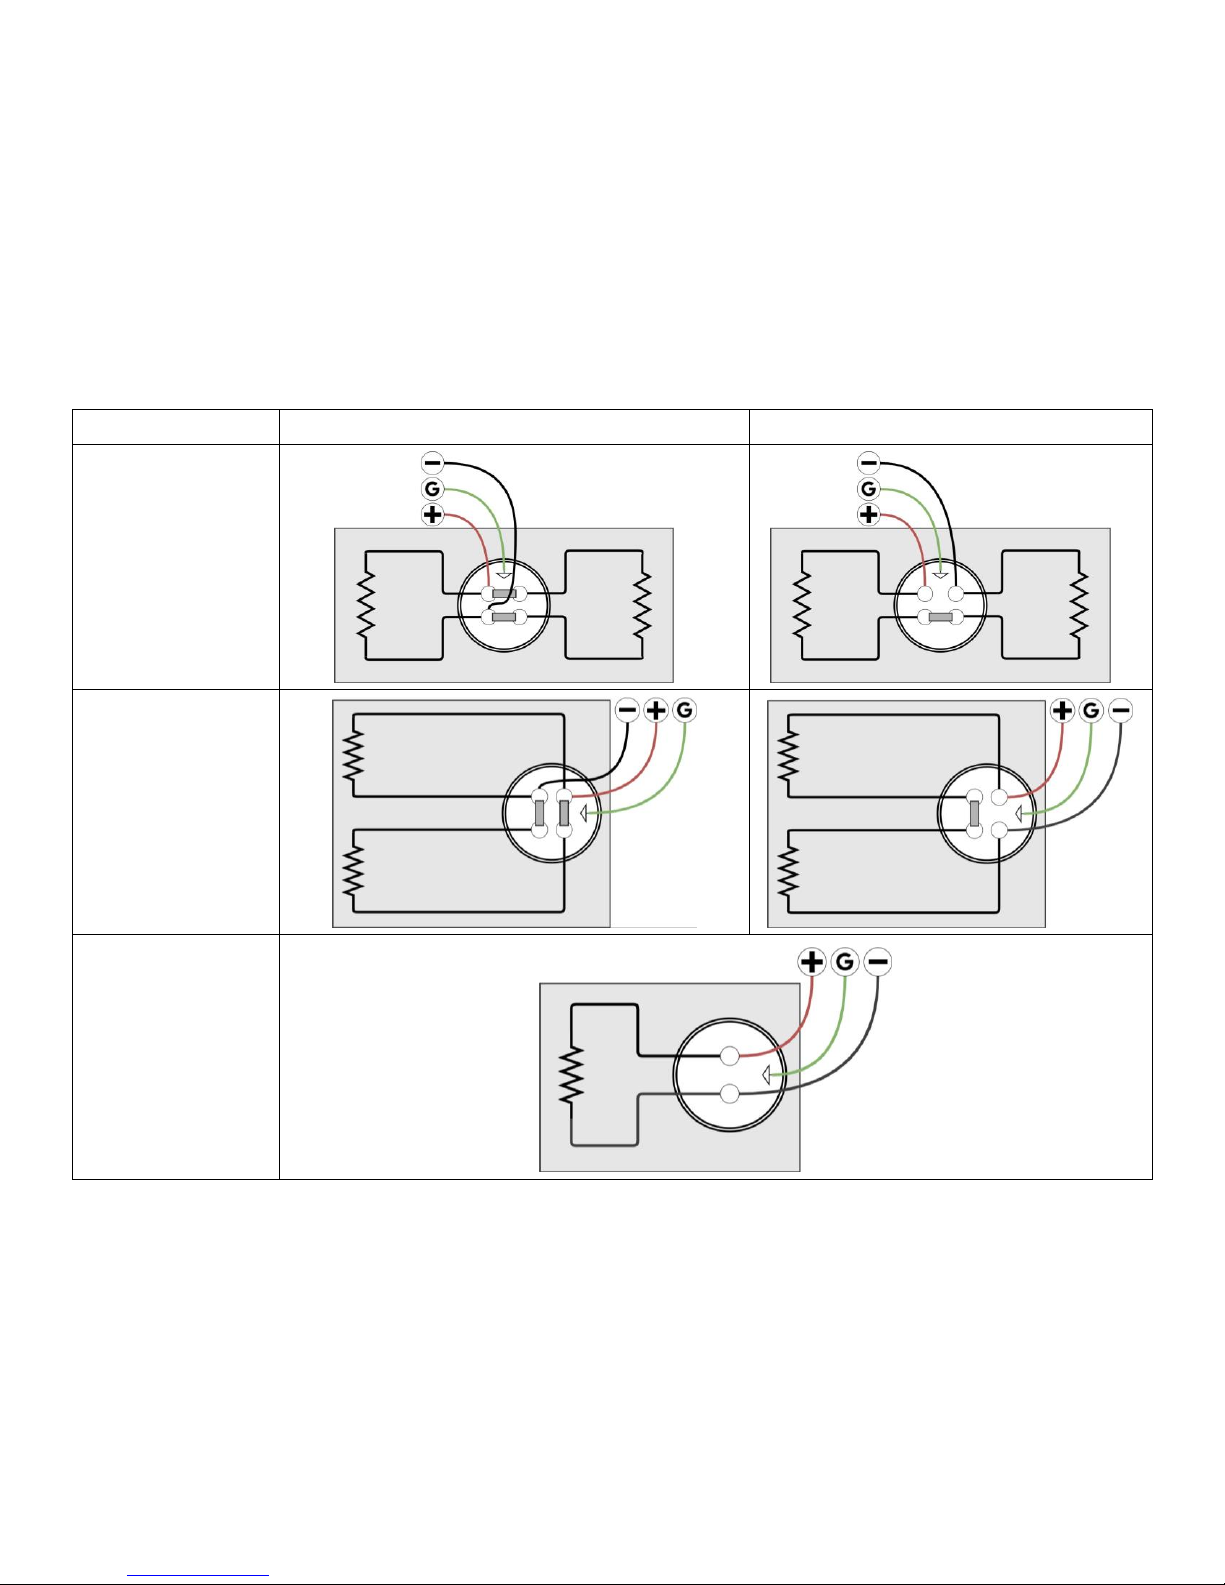
When the heater has two heating elements, the posts are connected with either one or
two bus bars. Proper connection for all models and element configurations are shown in
Table 2 on the following page. Please note that on all models, the location of the
hot/positive wire and neutral/negative wire are interchangeable because the heating
element connections have no polarity.
Page 6
5
Table 2. Electrical connections for heating elements
Parallel (12V or 120V)
Series (24V, 240V, or 480V)
Left/Right
Configuration
Models 1224, 1236,
1248, 1260, 1836
Top/Bottom
Configuration
Models 1848, 1860,
2424, 2448, 2460,
2472
Single Element
Configuration
Models 8RD, 12RD,
66, 88, 612, 1012,
624, 1212
Page 7
6
HAZARDOUS LOCATION INSTALLATIONS
When installing a Catco heater in a Class I, Division 1 or Division 2, Group D area, ensure
that all associated electrical equipment is appropriately rated for the area where it will be
installed.
Class I, Division 1 Installations
In Class I, Division 1 installations the heater shall be supplied with an on/off switch
connected by a suitable wiring method in accordance with Article 501.10 of the NEC. The
switch, when located within the hazardous area, shall be suitably rated for the intended
application. The switch shall be located within the vicinity of the heater as the installation
permits. A mushroom, push-button or equivalent emergency shut-off switch shall be
located near the unit.
Specific Condition of use:
1. Seal all conduits within 18 inches
2. For supply connection, use wires rated for at least 90° C (194° F)
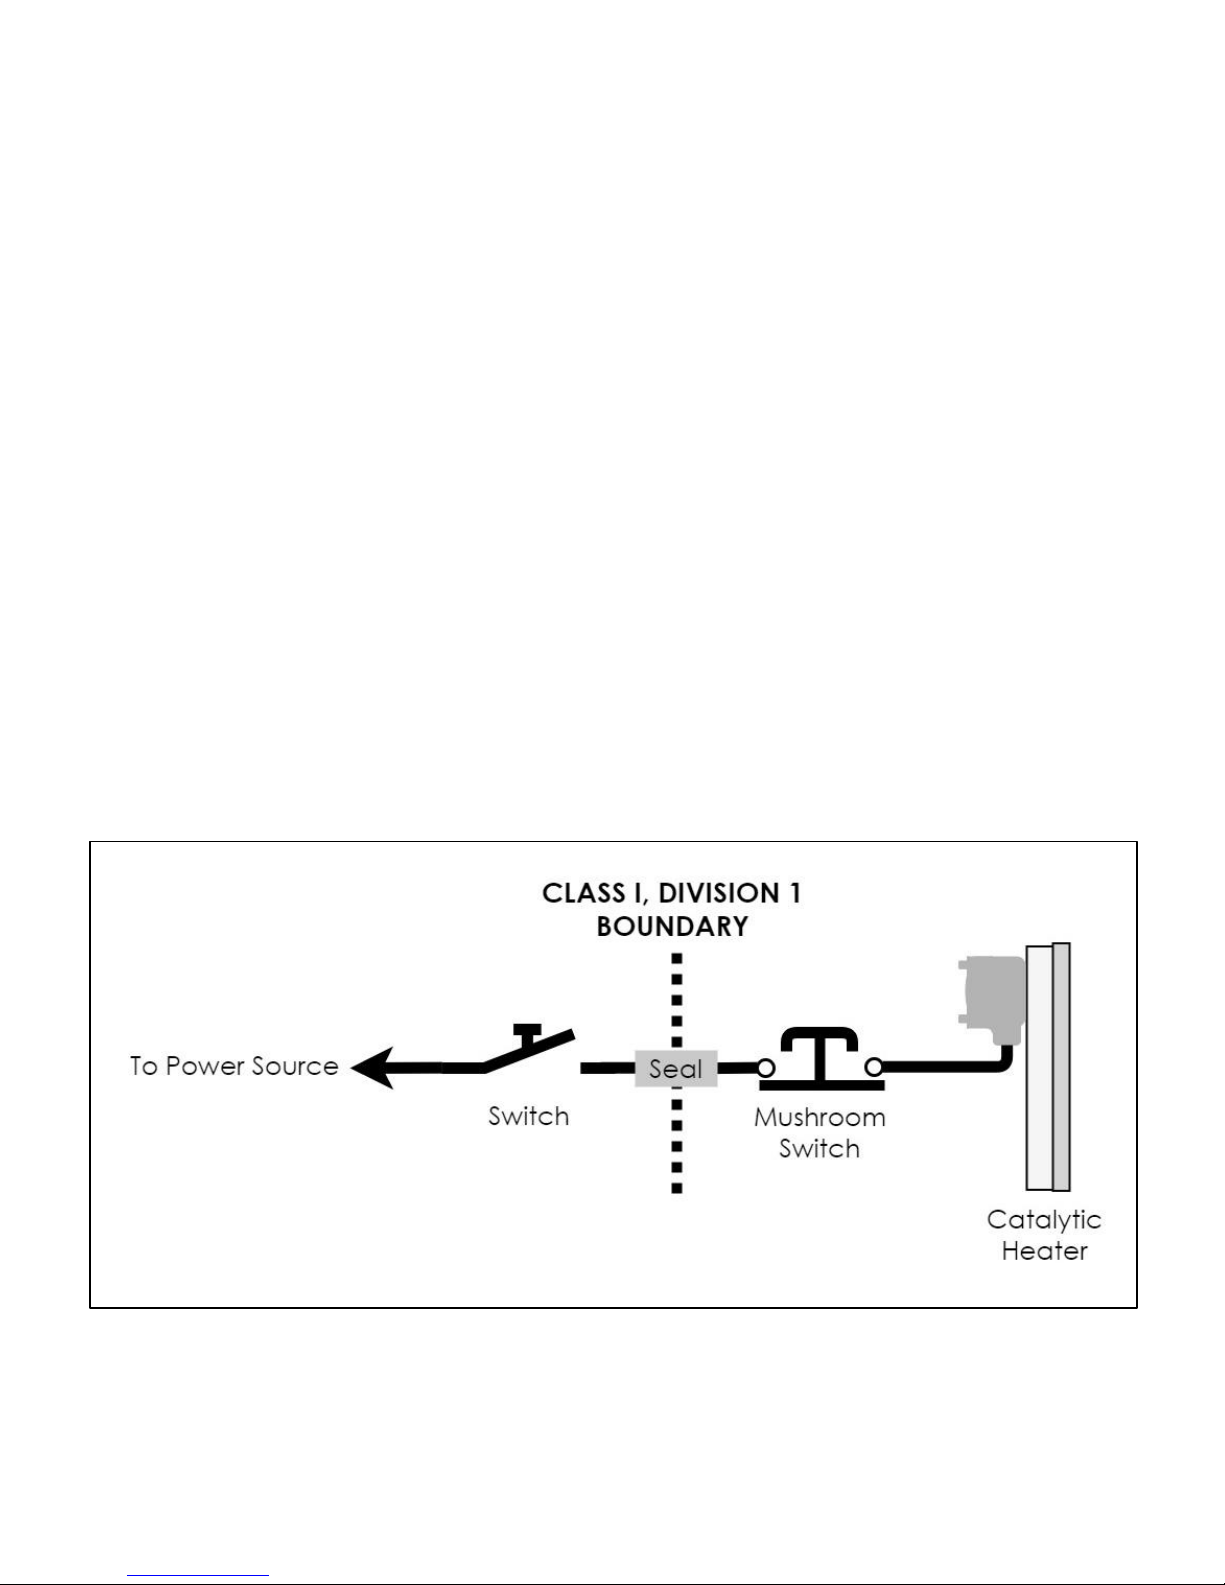
Figure 5 shows a common Catco catalytic heater installation for a Class I, Division 1
environment.
Figure 5. Typical Class I, Division 1 installation.
Page 8

7
OPERATION
Start-up
1. Verify the unit has been installed in accordance with this instruction manual and all
applicable codes.
2. Make sure the electrical supply matches the voltage specified by the product label
and turn on the electrical supply.
3. Wait 15 minutes to allow the catalyst bed to come up to temperature (this may take
longer in extremely cold weather).
4. Press and release the button on the shutoff valve to start the flow of fuel gas to the
heater. This will start the catalytic reaction.
5. Continue electrical power until the catalytic reaction is fully established. This will be
indicated by a rapid rise in face temperature and the emission of hot exhaust gases.
Under normal conditions, this phase will take 5-10 minutes.
6. Once the reaction is established, turn off the electrical power. The heater is now in
normal operation.
Normal operation
The catalyst material is not consumed or destroyed by the catalytic reaction, and the
reaction will continue as long as the heater is provided with a clean fuel supply and
adequate combustion air.
Shut-down
1. Ensure the electrical power is turned off.
2. Turn off the fuel supply.
3. Removing the fuel supply will cause the catalytic reaction to stop. Don’t handle the
unit until it’s sufficiently cooled.
MAINTENANCE
Catco catalytic heaters contain no moving parts and maintenance is minimal. Sheet
metal surfaces may be cleaned to prevent rust or corrosion, but take care to protect the
face of the heater from contact with water, cleaners, or other foreign substances. If an
area is being cleaned with high pressure water spray or air pressure, shield the face of the
heater, as the catalyst can be damaged by water or rough contact. When not in use,
heaters should be stored in a clean, dry area or covered to prevent damage from the
environment, insects, and rodents.
01123 Rev C
 Loading...