

Page 1

C O N T E N T S
01 – WARNINGS AND WARRANTY (READ FIRST!)
02 – CONTROLS
03 – STEPS TO GET IN THE AIR
04 – TARANIS BINDING AND SETUP (BNF 210-R)
05 – TROUBLESHOOTING
Page 2
Section 1: Warnings and Warranty
Page 3

• You must register your 210-R! You must go here www.registermyuas.faa.gov and register your drone. This is a
federal requirement per the FAA.
• Anytime you plan to power up the quad for any activity other than flying it, TAKE THE PROPS OFF. This is the number
one rule of racing drones.
• The use of this product may be prohibited in your country/region/state, please verify that the RF output power and
frequencies used by this transmitter comply with local rules and regulations, this product may require a license to
operate.
• Catalyst Machineworks advocates the safe use of their products, always make sure your equipment is in proper
working order, is checked prior to every flight and that you are familiar with and respect the equipment's
capabilities and limitations. Do NOT fly recklessly, do NOT fly near airports, freeways, towns, people, etc. Do NOT fly
anywhere where an equipment failure or pilot error can result in injury or damage to people and/or property.
• NEVER land near yourself or any other person.
• NEVER walk back to the pilot area with a powered-up quad. When retrieving a model, unplug the battery before
walking back to the pilot area.
• During a race, always launch your Speed Addict 210R from a safe distance; we recommend 10 meters or more
from your piloting position .
• ALWAYS warn in-air pilots before powering up a quad, even if you know it is on a different channel. Warn pilots,
and be ready to power down IMMEDIATELY if a pilot is affected, and wait until he lands. Remember that it only
takes a second or two, when flying race quads at speed, to crash and damage the quad, and whatever
(whoever) it hits.
• Never charge batteries unattended. When charging LiPo batteries you should always remain in constant
observation to monitor the charging process and react to potential problems that may occur.
Page 4

• Lithium Polymer batteries are volatile. Failure to read and follow instructions may result in fire, personal injury and
damage to property if charged or used improperly.
• Always inspect LiPo batteries for damage. If the pack has sustained any damage from a crash dispose of it
according to manufacturers recommendations.
• LiPo batteries have a life cycle. A damaged pack will appear “puffy” or bloated. If you see any indication of this
replace the battery immediately. Dispose of it according to manufacturers recommendations.
210-R Warranty Agreement
The purchase of your 210-R comes with a 15 day warranty beginning from the date you receive the quad in the mail. We test
fly each 210-R before it leaves our doors so we verify everything is functioning correctly. This warranty only covers
manufacturer defects within that 15 day period. Changes to the flight controller or transmitter will void your 15 day warranty.
The 210-R is unbelievably tough and can take quite a beating, however, due to the abuse racing quads endure (such as
being smashed into trees at 50 MPH, or hitting the ground at 60 MPH and falling upside down in a mud puddle) we cannot
replace parts damaged from general use. The 210-R is a high performance racing machine sometimes operating near the
limits of its mechanical components. Eventually, with enough time in the air, and enough time hitting the ground parts are
going to break. This is the reality of racing and a byproduct of improvement. If you are not comfortable performing the
repairs yourself, we offer an in house repair service; email us at [email protected] for more details, but the best
way to truly enjoy your racer is to learn how to maintain and repair it yourself. We have tutorials on our site that can help you
with this. Or email us with specific questions about a given repair and we can answer your questions. In addition we have a
Facebook group of skilled and experienced Speed Addict owners all willing and ready to help you. Your RTF 210-R comes
with our world famous and world class customers service. Don't worry, we have your back, but please keep in mind that any
changes you make to the quad's programming / setup in any way may make it difficult for our team to help you diagnose
problems or troubleshoot.
Page 5
Section 2: Controls
Page 6
Page 7

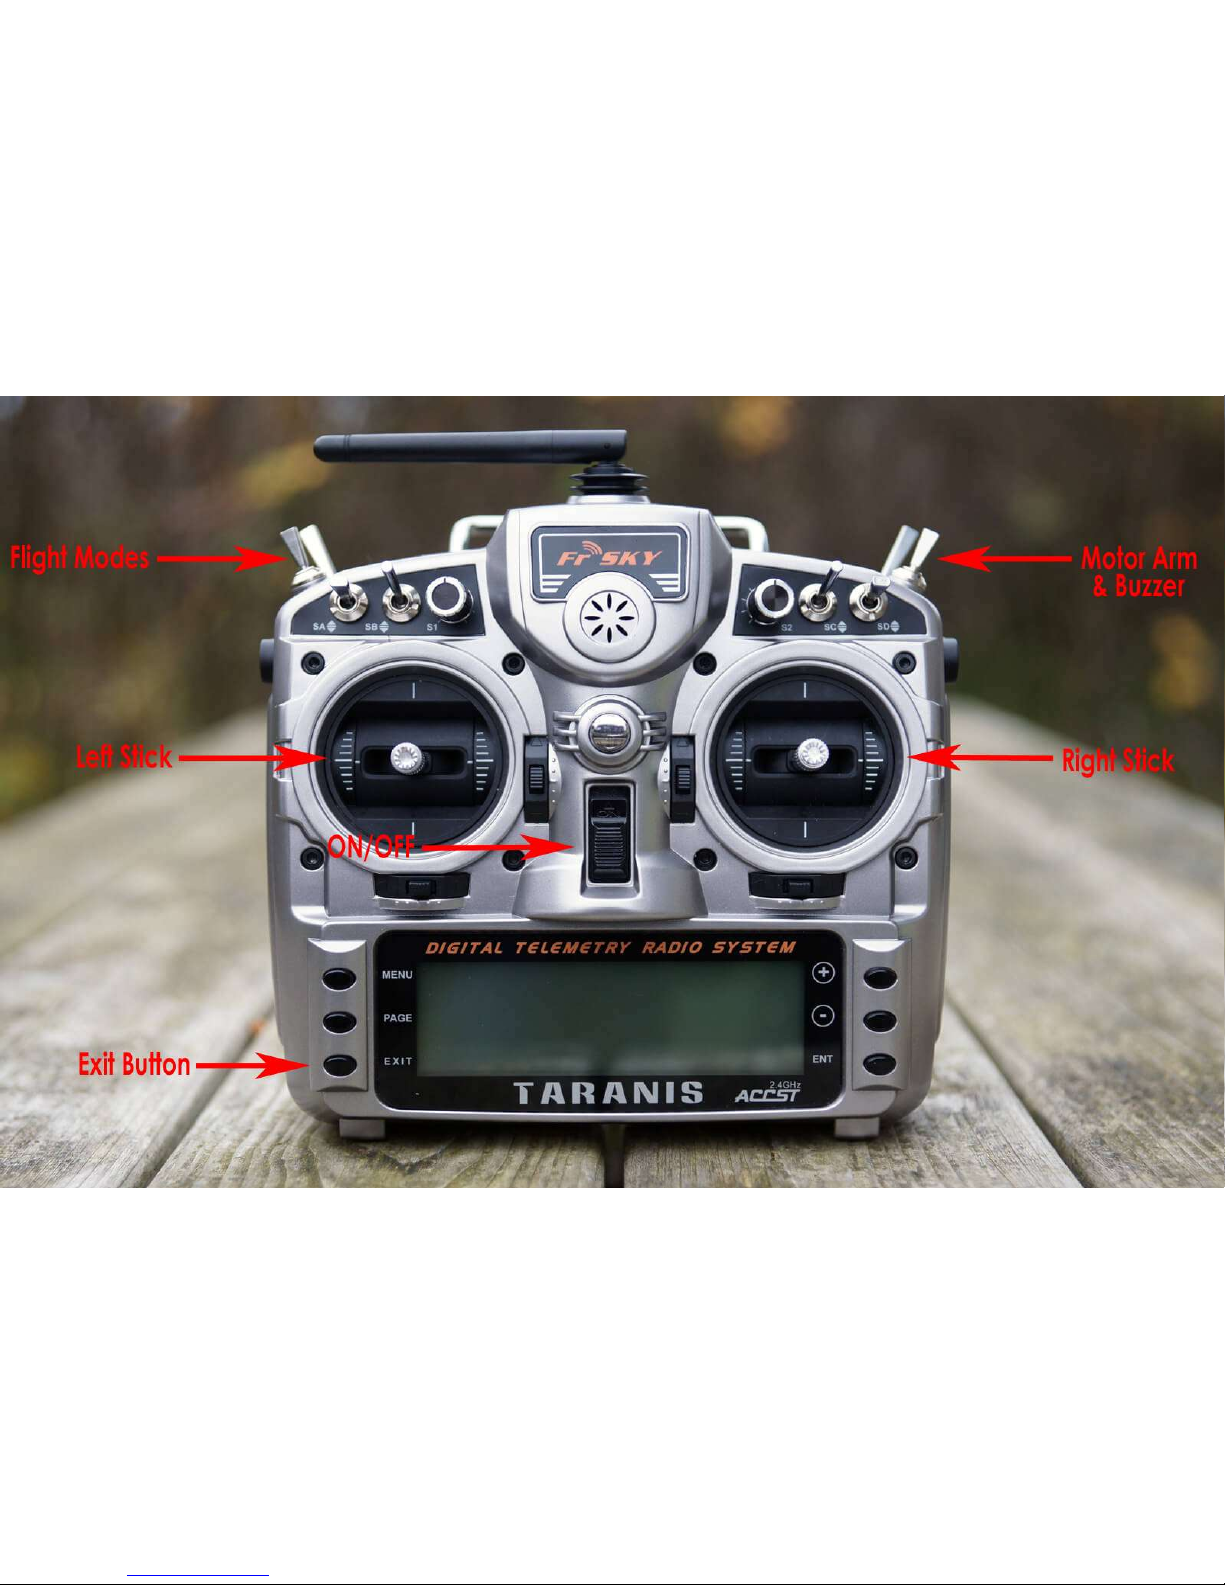
General: This section of the manual applies to the RTF version of our 210-R. If you purchased the BNF 210-R you can
reference this section and section 4 for Taranis setup information. On the RTF transmitter you will find an abundance of
switches, knobs and dials on your transmitter; do not let this freak you out as most will remain unused. Please note that
since we are selling you a ready to fly system everything in your transmitter has already been setup; we suggest against
accessing any of the menus within the transmitter and changing any settings. If you alter any of the settings on your
transmitter we may not to able to help you get them back into the correct state without opening a service request
with our shop!
Transmitter Sticks: There are two sticks you manipulate to control your Speed Addict in flight; a left stick and a
right stick. Adjacent to each stick is a small, black trim adjustment tab; these are preset from the factory and do not
need to be adjusted for normal flight. If you accidentally bump this tab, simply adjust back to the original setting
(centered) by pressing gently in the appropriate direction - you will hear a 'beep' from your transmitter when the
setting is centered
Left Stick Channel Controls:
1) Throttle – Moving the left stick up increases RPM on your motors, moving the left stick down decreases RPM on your
motors. In flight this will allow your craft to gain or lose altitude.
2) Yaw – Moving the left stick left and right will command the craft to spin left or spin right on the horizontal axis.
Right Stick Channel Controls:
1) Pitch – Moving the right stick up and down pitches your craft forward and backward; drones fly differently than
planes in this way. For a drone to move forward the nose of the craft will point down toward the ground. This will cause
the craft to begin moving forward. Conversely, if the nose points up the craft will begin to move backwards, or slow
Page 8

down forward movement depending on where you place your stick.
2) Roll – Moving the right stick left will cause the craft to roll to the left, moving the stick right will cause the craft to roll to
the right.
Flight Mode 3 Position Switch:
1) Beginner Line of Sight Mode – Setting this switch away from you enables the “beginner” flight mode for line of sight
flying. In this mode, your craft will self level horizontally once pressure is removed from the right control stick; this setting
is especially helpful when the craft is far away and visually determining orientation or pitch is very difficult. This mode
also prevents the craft from 'rolling' or 'pitching' past 45* thereby preventing new pilots from accidentally rolling the
craft upside down and crashing. Controls are also 'muffled' in this flight mode; throttle, pitch and yaw control response
is limited - keep this in mind when you transition to a more advanced setting. We suggest against using this mode to fly
FPV.
2) Amateur Line of Sight Mode – Setting the switch in the center enables the “amateur” flight mode for line of sight
flying. This mode has the same attributes as the previous, but unlocks the pitch and roll angular limitation and will allow
the pilot to completely roll or pitch the craft over on itself “upside down”. In this mode barrel rolls, back flips, and front
flips are possible. We suggest against using this mode to fly FPV.
3) Professional FPV Flight Mode – Setting the switch towards you enables the “prefessional” flight mode for first person
view flight “FPV”. We have set this mode for maximum performance to allow you to get the most out of your 210-R. In
this mode the craft will not self level but instead will stay in the orientation you set. During FPV flight this ability allows you
to set the pitch and attain the speed and altitude you desire, similar to flying a plane. We have also set this mode to
simultaneously enable “air mode”. Air mode keeps the motors spinning and flight controller PID's active even at zero
throttle input. This allows for control of the craft for the entire range of throttle input, making “Zero-G” maneuvers
Page 9

possible!
Motor Arm Switch: The motor arm and buzzer functions reside on the same three position switch. Set the switch
away from you to disarm the motors. Flipping the switch towards you arms the motors and they begin to spin at a low
RPM. When the motors are armed and throttle input is at 0, they will not spin fast enough to lift the craft. The craft will
only gain altitude when you provide some throttle input. WARNING: Always stand clear of the craft when arming the
motors. Before approaching the craft always make sure to disarm the motors. Never handle the craft with the motors
armed.
Buzzer Switch: The motor arm and buzzer functions reside on the same three position switch. Flipping the switch to
the center disarms the motors and enables the buzzer. This buzzer can be heard from a distance and may allow you to
hone in on the quad's location. This is handy if you lost the 210-R in tall grass or crashed into tree canopy, keep in mind
your quad must have power for the buzzer to work!
Exit Button: When you turn on your Taranis X9D, warning codes are activated in the event throttle is not at 0 setting
or a switch is accidentally flipped. Once you have moved the throttle stick back down to 0 and the switches are all set
in the correct position you can use the exit button to clear any warnings.
Page 10
Section 3: Steps to Get in the Air
Page 11

Page 12
Page 13
Page 14

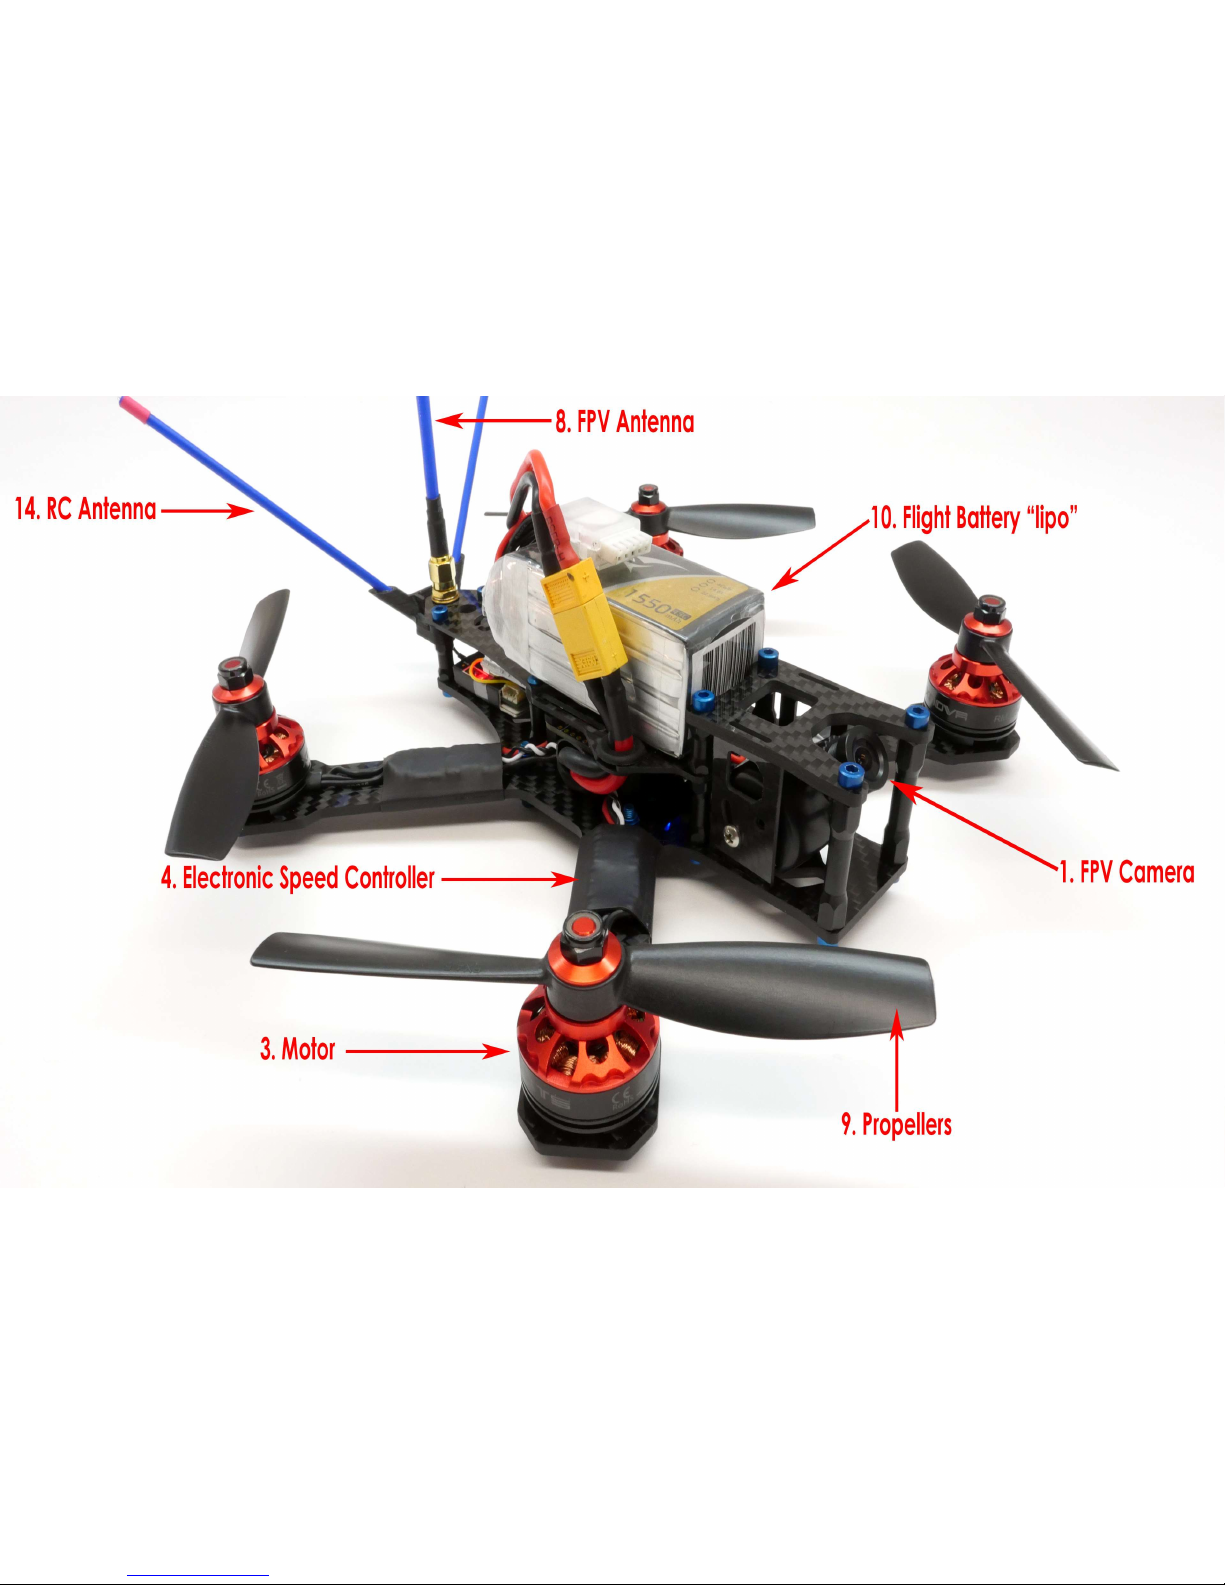
Understanding The Machine:
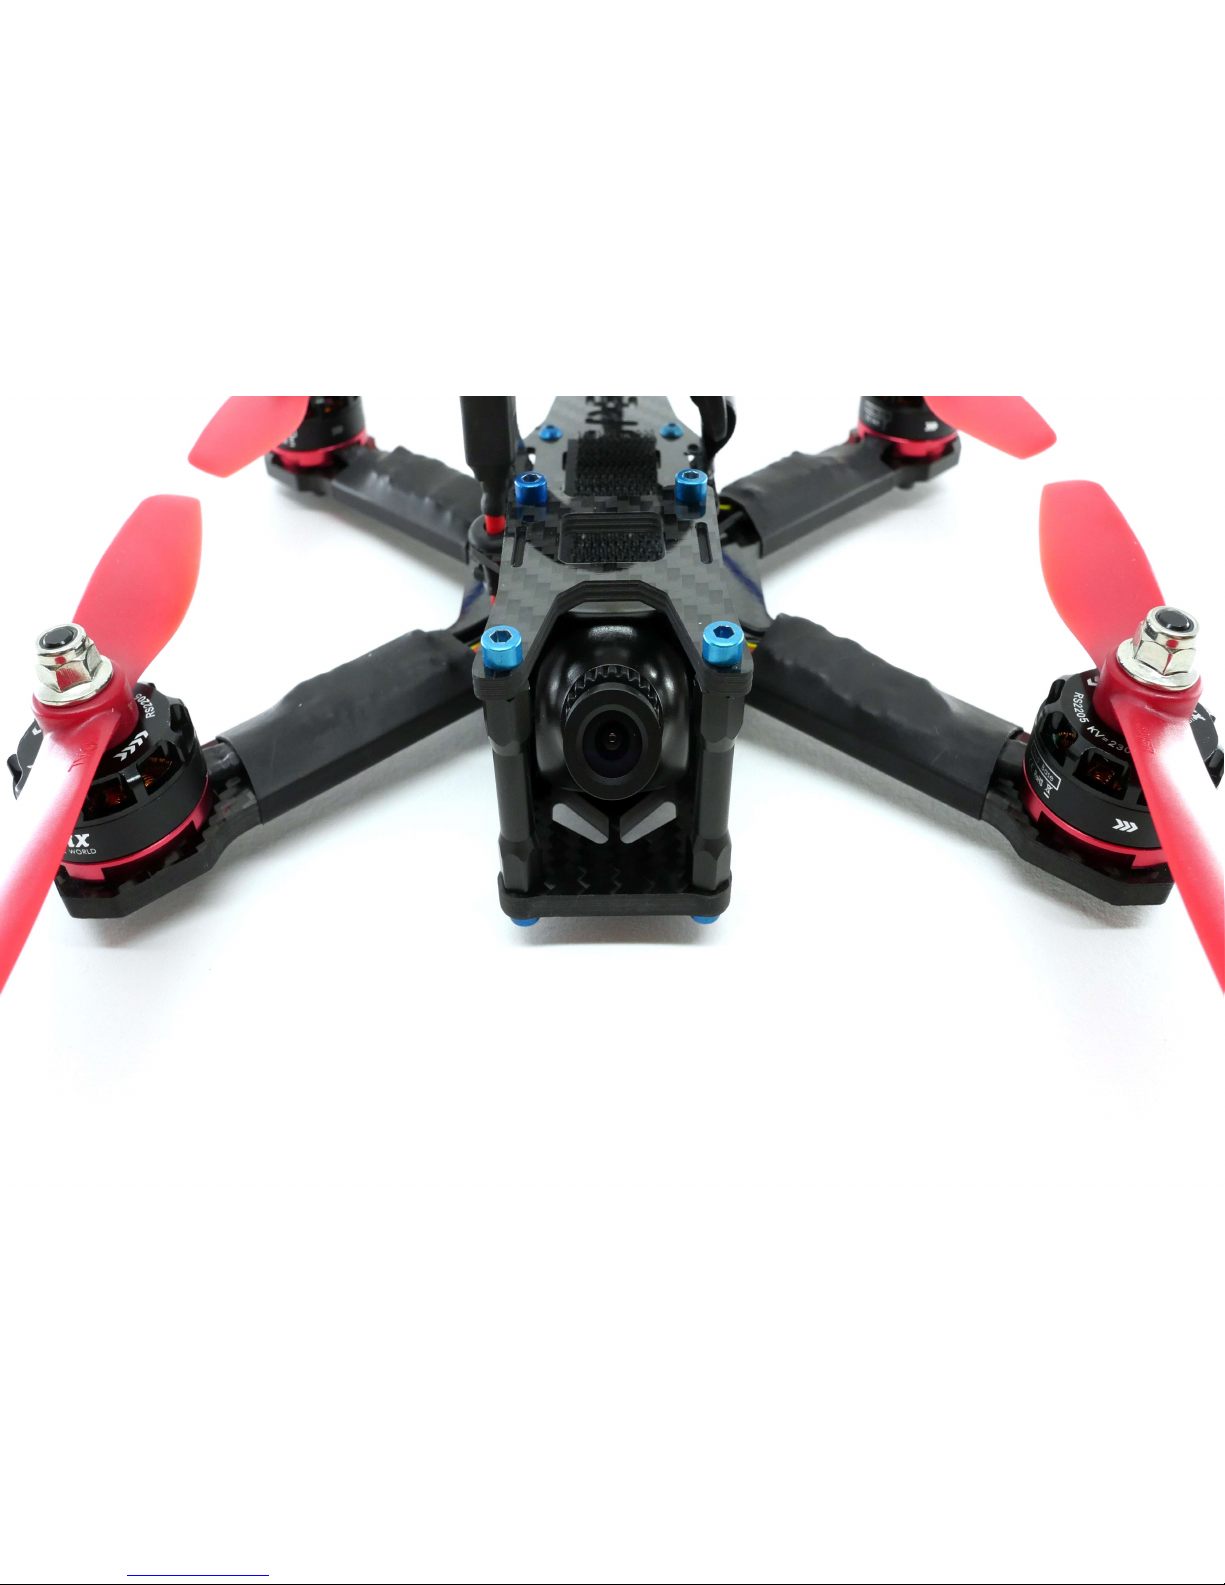
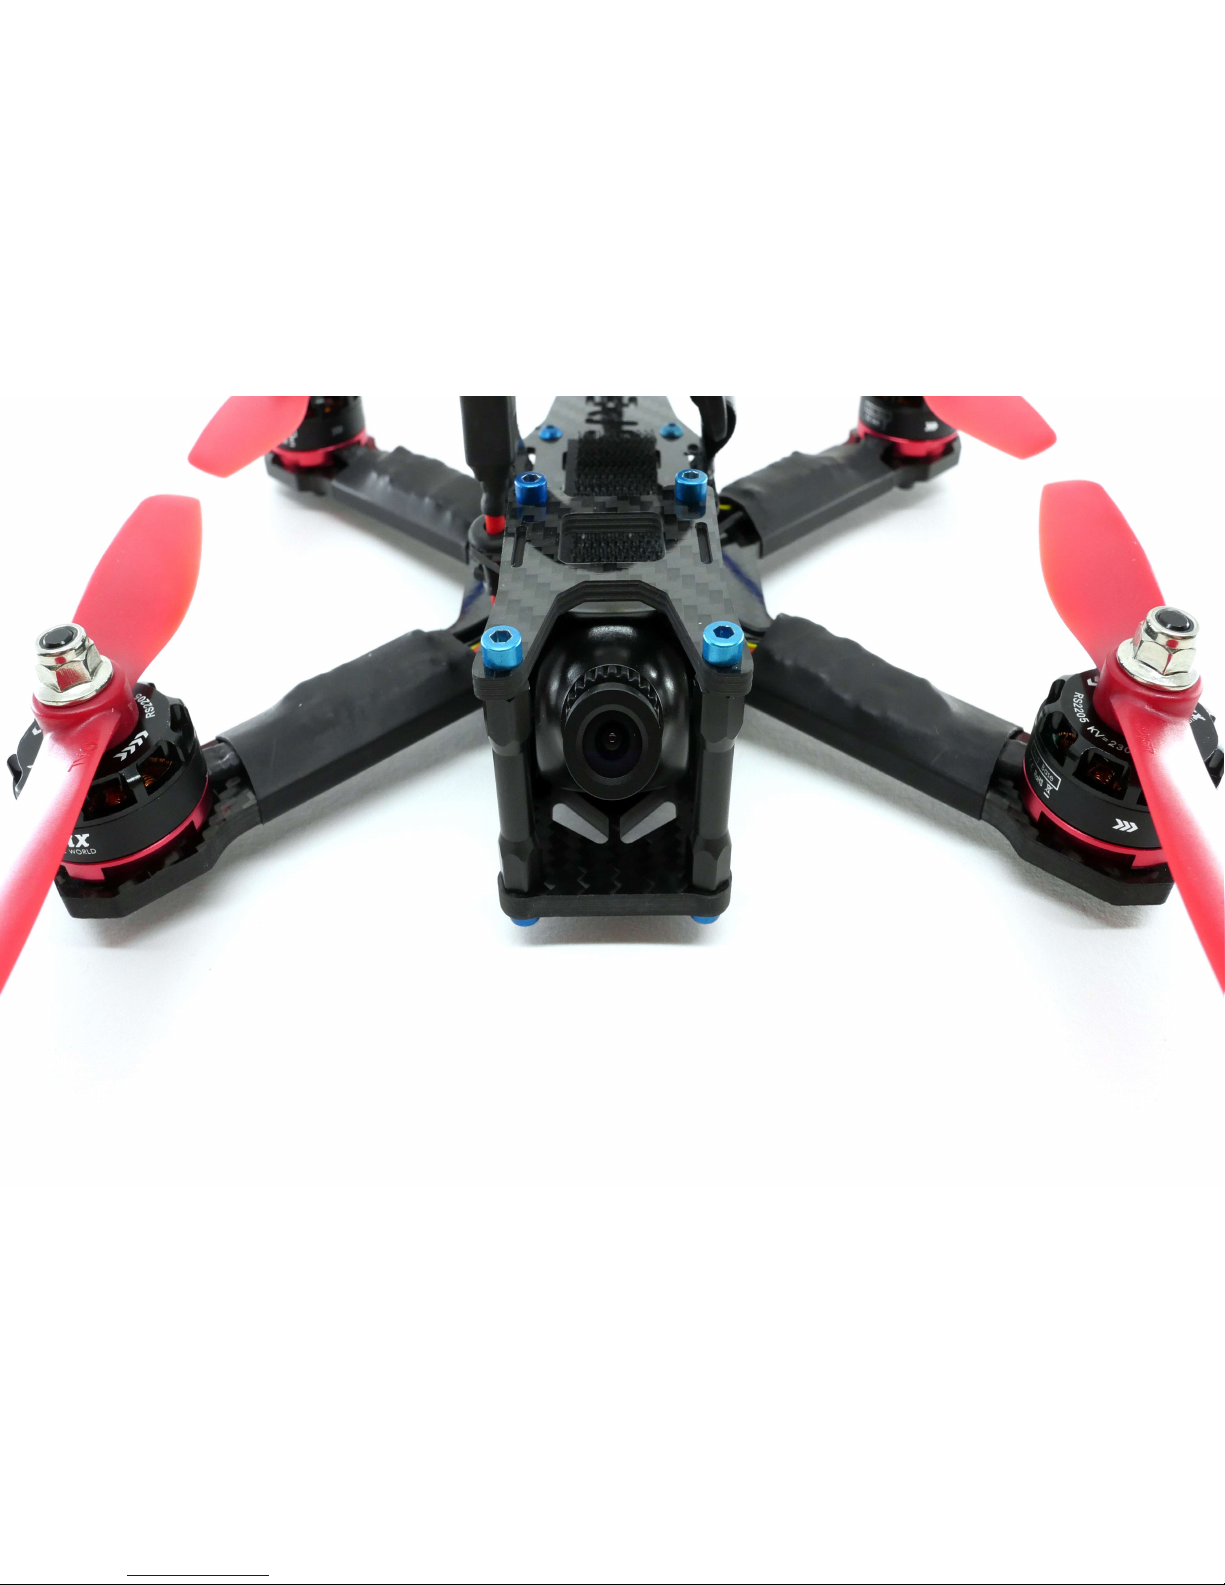
1) FPV Camera: This sends signal back to your FPV goggles allowing you to view the flying experience as if you are
actually in the “cockpit”. You can adjust the angle of the FPV camera from 0° - 45°, the higher the angle you set for
your FPV angle the faster you are capable of flying; as the 210R flies through the air, increased speed means increased
angle of attack and therefore a higher degree of angle is required to see from the FPV camera perspective. We have
preset your FPV camera to 20° as we feel this is the ideal angle to learn FPV flight. As your skills improve and you feel
more comfortable flying at higher speeds, you can change the angle by simply loosening the adjustment screws on
either side, making your adjustment then re-tightening. Be careful not to over tighten the screws, they only need to be
tight enough to hold the camera in place.
2) HD Camera: This is an optional item and sold separately. The 210-R accepts a wide range of cameras and we sell
mounts to fit each type. These mounts are also optional items not included with your RTF package. Camera types
accepted are Gopro 4 and 3. Xiaomi Yi, Runcam 2, Mobius, Foxeer Legend, and Gopro Session. Most people run with
some type of HD camera to record their adventures and share on Youtube or Vimeo. Visit our website for more
information on what mounts we sell and how to attach the mount of your choice to the craft.
3) Motors: The motors are the “engines” of your craft, they spin propellers to produce thrust (aka “Go Juice”). They
include a M5 nut on the prop shaft, this nut requires an 8MM socket driver for prop installation and removal.
4) Electronic Speed Controllers: The speed controllers regulate power to the motors which results in a change in RPM.
The 'ESC' commands happen in milliseconds, meaning the ESC will send commands to the motor thousands of time a
second.
Page 15
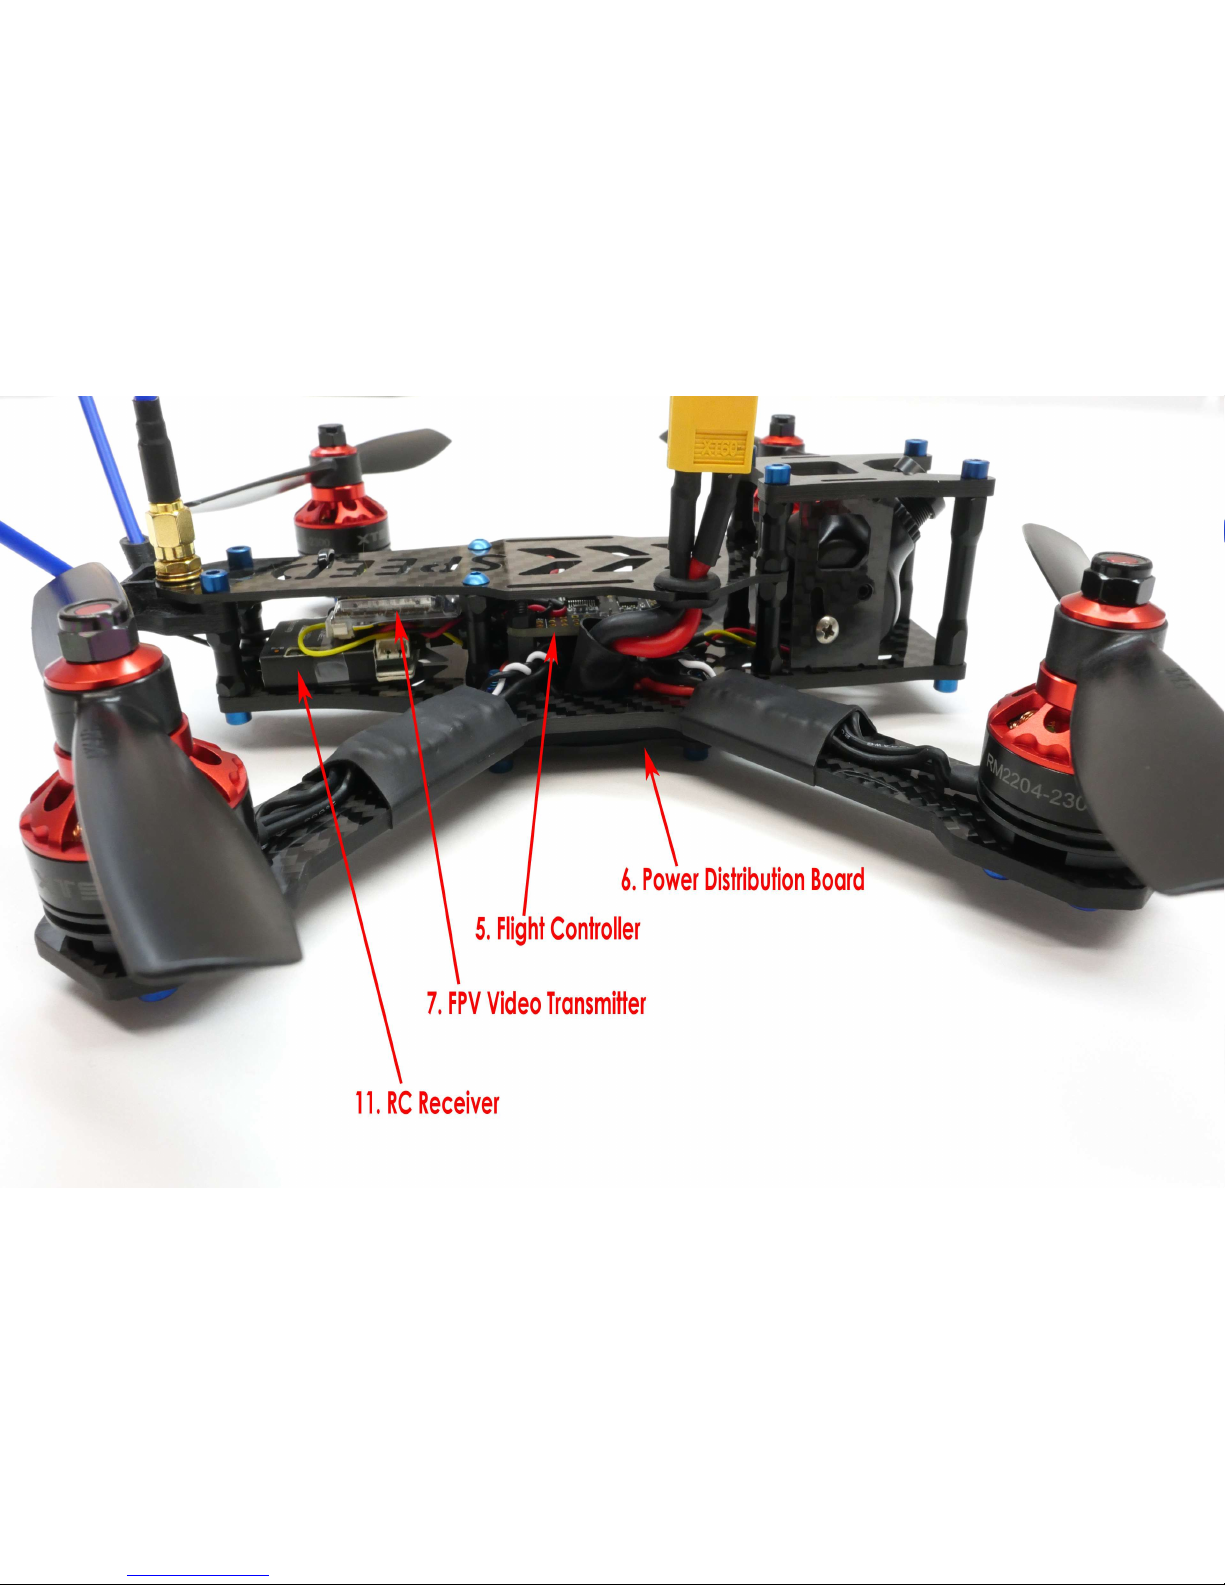
5) Flight Controller: The flight controller can be considered the “brain” of the system, it takes input from the pilot and
information from the environment to feed commands to the speed controller.
6) Power Distribution Board: The PDB is a central location where all of the various pieces of electronics get power from
the flight battery.
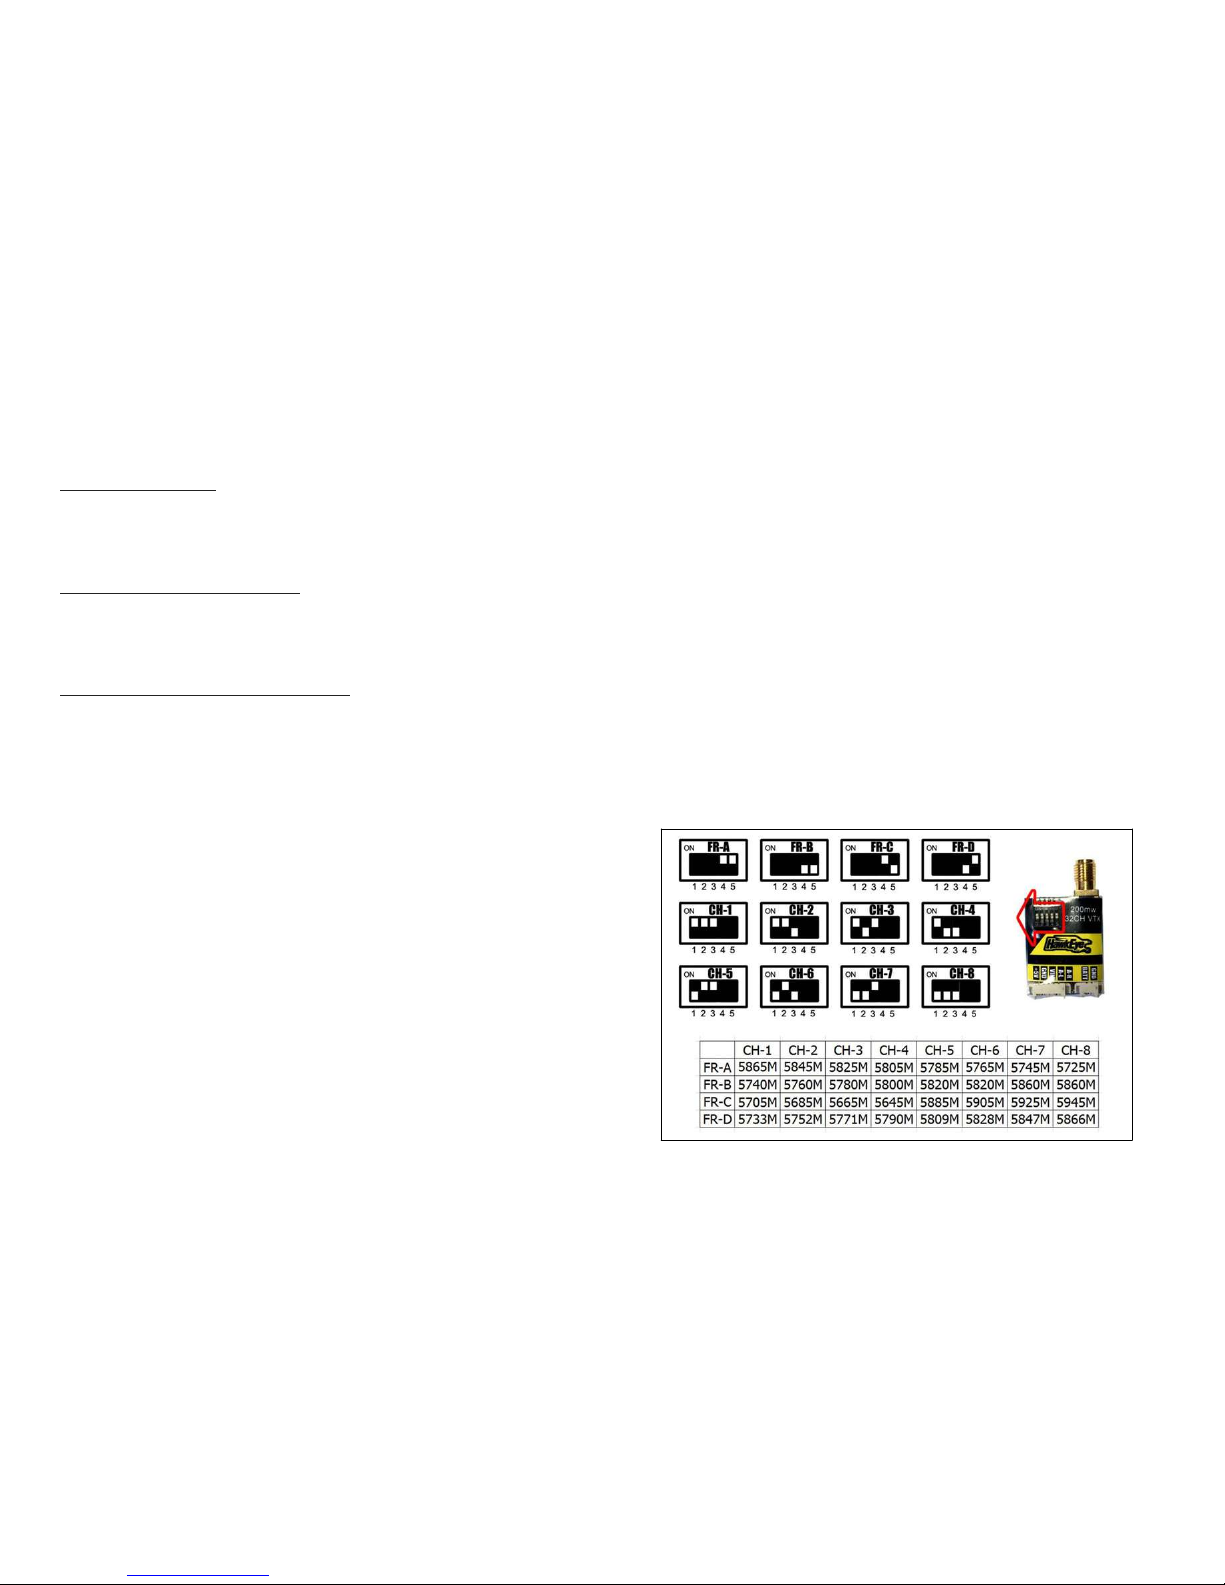
7) 5.8 Ghz FPV Video Transmitter: The FPV Vtx takes signal from the FPV camera and sends it through time and space
out to your FPV goggle's video receiver. There are tiny dip switches on the Vtx which allow you to change channel and
band. There are 32 channels available and 4 bands, each channel and band combo associates to one frequency.
From the factory your Vtx is set at channel 1 band A. To get a video feed on your goggles you will need to set them to
channel 1 band A. If you want to race with others it will be necessary to make sure each craft is set to a different
frequency! See the available dip switch settings below.
Page 16

8) FPV Antenna: There are two FPV antenna included with your package. One screws onto the brass SMA threads at
rear of the fuselage, the other screws onto the brass SMA threads on your goggles. Be careful when screwing down
your antennas, brass is a soft material. It is important to inspect this antenna after every crash for any damage, if you
have any damage to the antenna itself repair before you fly again!
9) Propellers: These are analogous to the tires on a car, they get the power to the air! These are rotated by the motors
to cut into the air thereby moving the air in one direction causing the craft to be propelled in the opposite direction.
The props on your 210-R are almost identical to a propeller on an airplane and are considered an expendable item
when FPV racing. Crashes take their toll on your propellers, make sure you replace any that are bent or broken. Buy a
ton of them so you have plenty of spares. Our RTF package includes 5” x 4.5 bullnose double blade props, these are
the ideal propeller type for general FPV racing and freestyle flying. Once you become skilled at piloting the 210-R you
can step up the props to triple blade versions or props with higher pitch, but be warned; propeller configuration and
angle can increase the load on your lipo, ESCs and motors - do your research before you accessorize! Make sure to
install your props correctly or bad things will happen once you throttle up! See the graphic below for correct prop
rotation direction:
Page 17
10) Flight Battery: Referred to as 'the LiPo,' the Lithium Polymer battery is the source of power for your Speed Addict
quad and it needs some special attention. Never leave a LiPo battery unattended while charging as they can catch
fire. Never use a LiPo battery that has sustained visible damage such as holes or sharp bends; if the contents of one cell
come in contact with the contents of another, they can catch fire. If you spot damage to your LiPo, dispose of it
immediately in a safe manner (see local guidelines for procedures on how to properly dispose of a LiPo battery.) Never
run your battery down to 0% power, you always want to bring the craft back in when the charge level reaches 15-20%.
Included in your kit is a low voltage alarm which can be attached to the info plug on your battery, we suggest you use
this to provide an audible alert for when it is time to land and recharge. The low voltage alarm will emit a repeating
'beep' when it is time to land; you may hear the occasional single 'beep' from it while in flight, this is normal and does
not mean the battery voltage is low. As a redundancy safety measure we also set a counter within your Taranis
transmitter, after every minute that passes a really cool robot voice will let you know how many minutes have passed
since you took off. This will give you an additional indicator of when it is time to land. Using a 1550mah lipo under
normal flying you will have around 4 to 5 minutes of flight time. Under heavy throttle flying you will have around 3
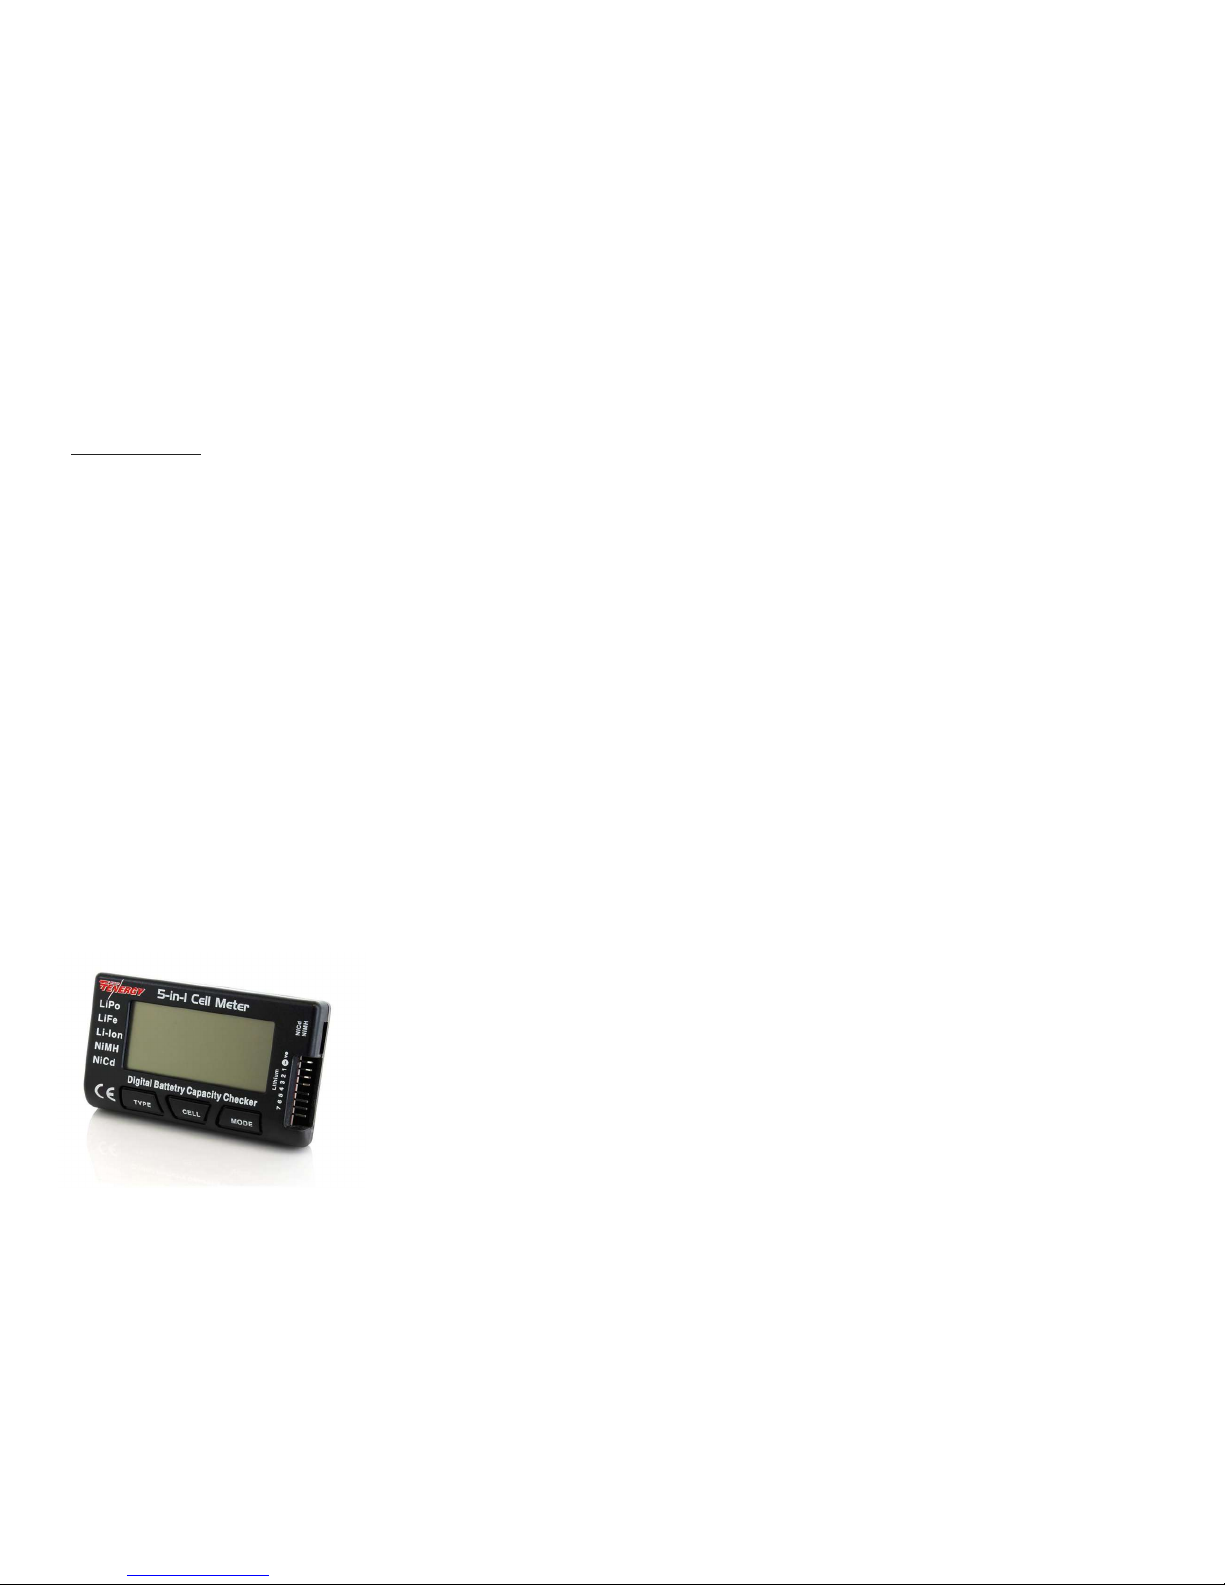
minutes of flight time. We suggest to purchase a battery capacity checker such as the one pictured below. These sell
for only around $20. After your first few flights you can use this capacity checker to gauge your flights and determine if
you need to adjust the time you stay aloft. Keep in mind your goal is to land with around 15-20% capacity left. For
instructions on how to charge the lipo see the manual included with your charger.
Page 18

11) RC Receiver: This receives signal from the RC Transmitter. The transmitter is commonly referred to as the “TX” and
the receiver the “RX”. The TX and RX must be bound to one another, our RTF kit comes pre-bound.
12) RC Transmitter: This sends signal to the RC receiver. Instructions on how to use your TX are listed in section 2 of this
manual.
13) 5.8 Ghz FPV Goggles: These allow you to experience flying the machine as if you are sitting in the cockpit. To get a
video feed on your goggles you will need to set them to channel 1 band A. If you want to race with others it will be
necessary to make sure each craft is set to a different frequency! See the user manual of your goggles for more
information on how to change goggle FPV receiver frequency and band. Due to the numerous options out there for
goggles we don't include them in your RTF package. We recommend you join the Facebook groups for Catalyst
Machineworks: 'Speed Addicts Owners Group' for more information regarding goggle choice and other feedback
from experienced pilots before making your goggle purchase. Talk to many people before making a decision of which
brand and model is best for you. Make sure to purchase one with a receiver operating at 5.8 Ghz.
14) RC Antenna: These increase the range of your RC transmitter to RC receiver link. There are two antenna which
connect into your receiver, it is important to inspect these antenna after every crash for any damage, if you have any
damage to the antenna itself repair before you fly again!
Page 19
Steps To Get In The Air (Maiden Flight):
Now that you understand the 210-R it is time to have some fun. It is time to fly! Follow these steps exactly. Remember,
don't get cocky. This is a very fast and powerful machine. Have respect for it, take it slow, and be patient. Your maiden
flight should be line of sight, meaning no FPV goggles. Get use to how the machine will react to your inputs. Take some
time and run through a few lipo packs before attempting FPV flight.
Step 1: Charge all batteries – Charge all your batteries. This includes your lipo, transmitter, and goggle batteries. See
manufacturer instruction manuals for charging procedures.
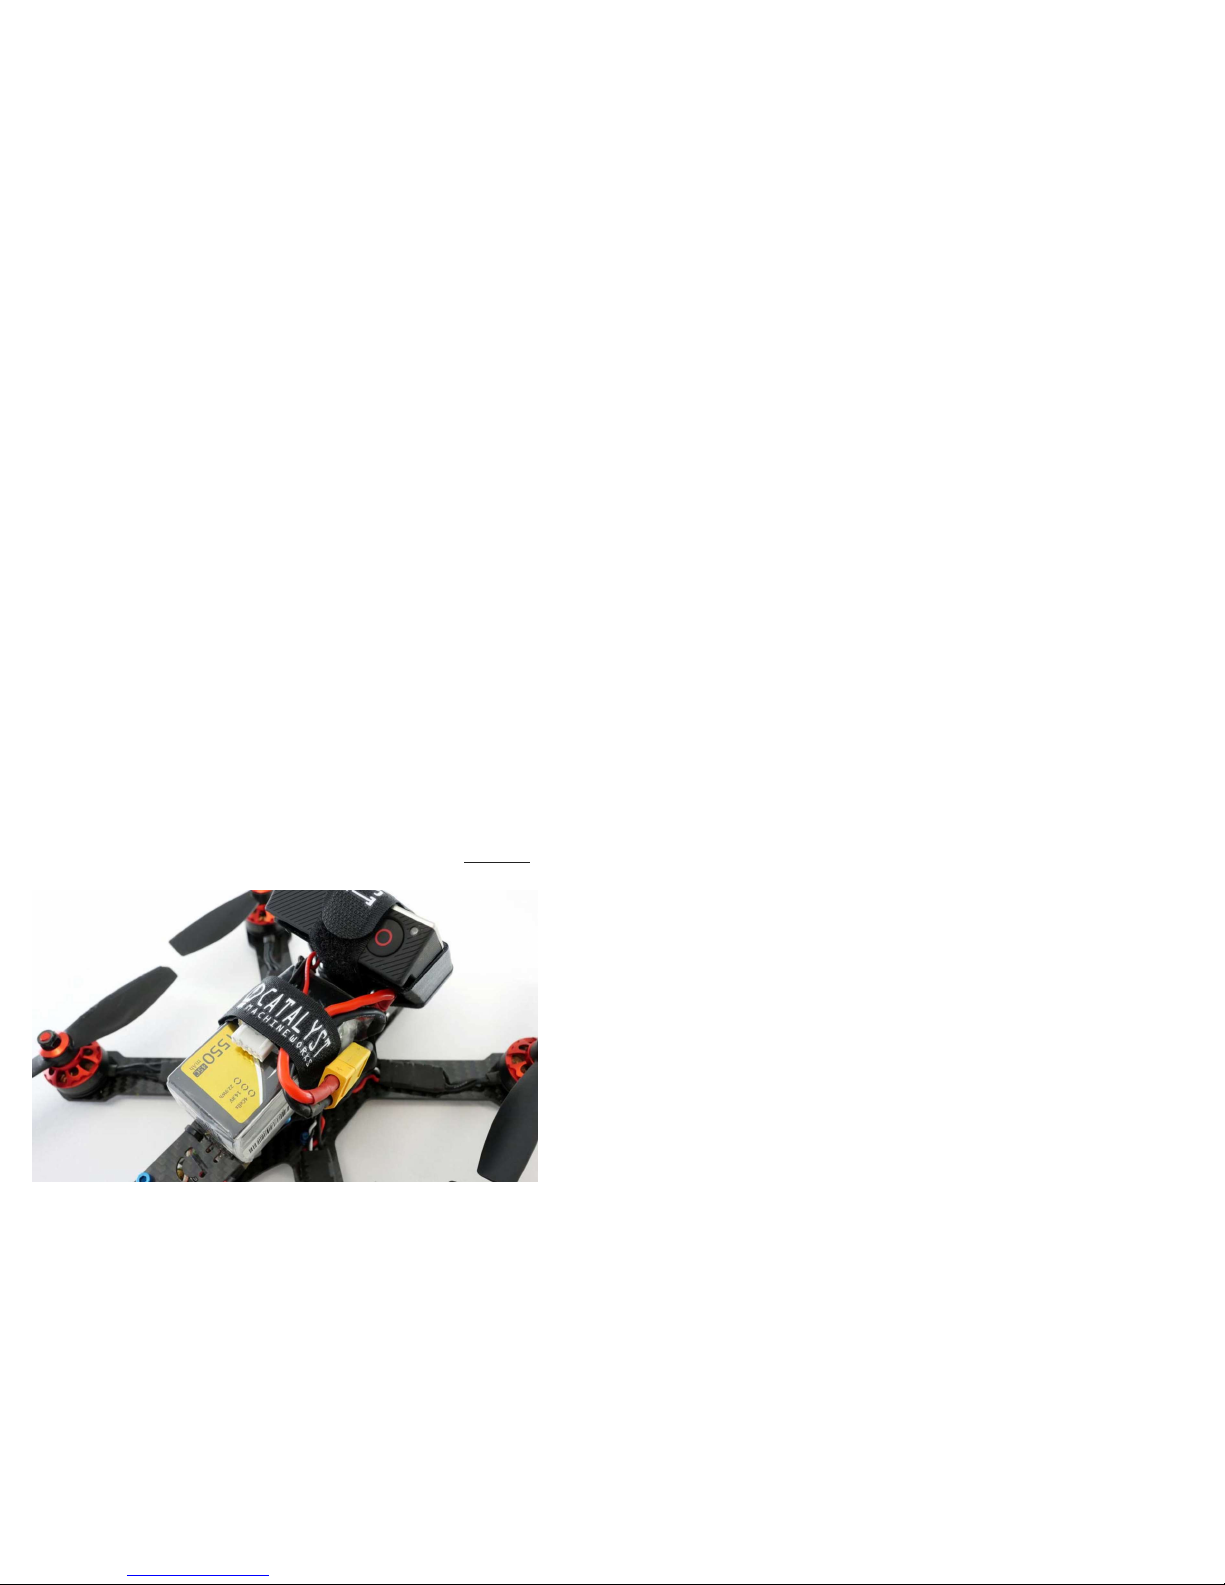
Step 2: Install the lipo - Install exactly as pictured below. You want the wire pigtail pointing toward the front of the
craft. Push the lipo down firmly. Make sure to pass the velcro strap over the lipo balance plug, then loop the strap
through the plastic hoop and pull it tight. Make sure to route the pigtail under the strap. It is very important the lipo is
centered on the fuselage and solidly located. The tips of the props spin very close to the edge of the lipo. During a
crash it is Important the lipo does not move. Do not plug the lipo in yet.
Page 20
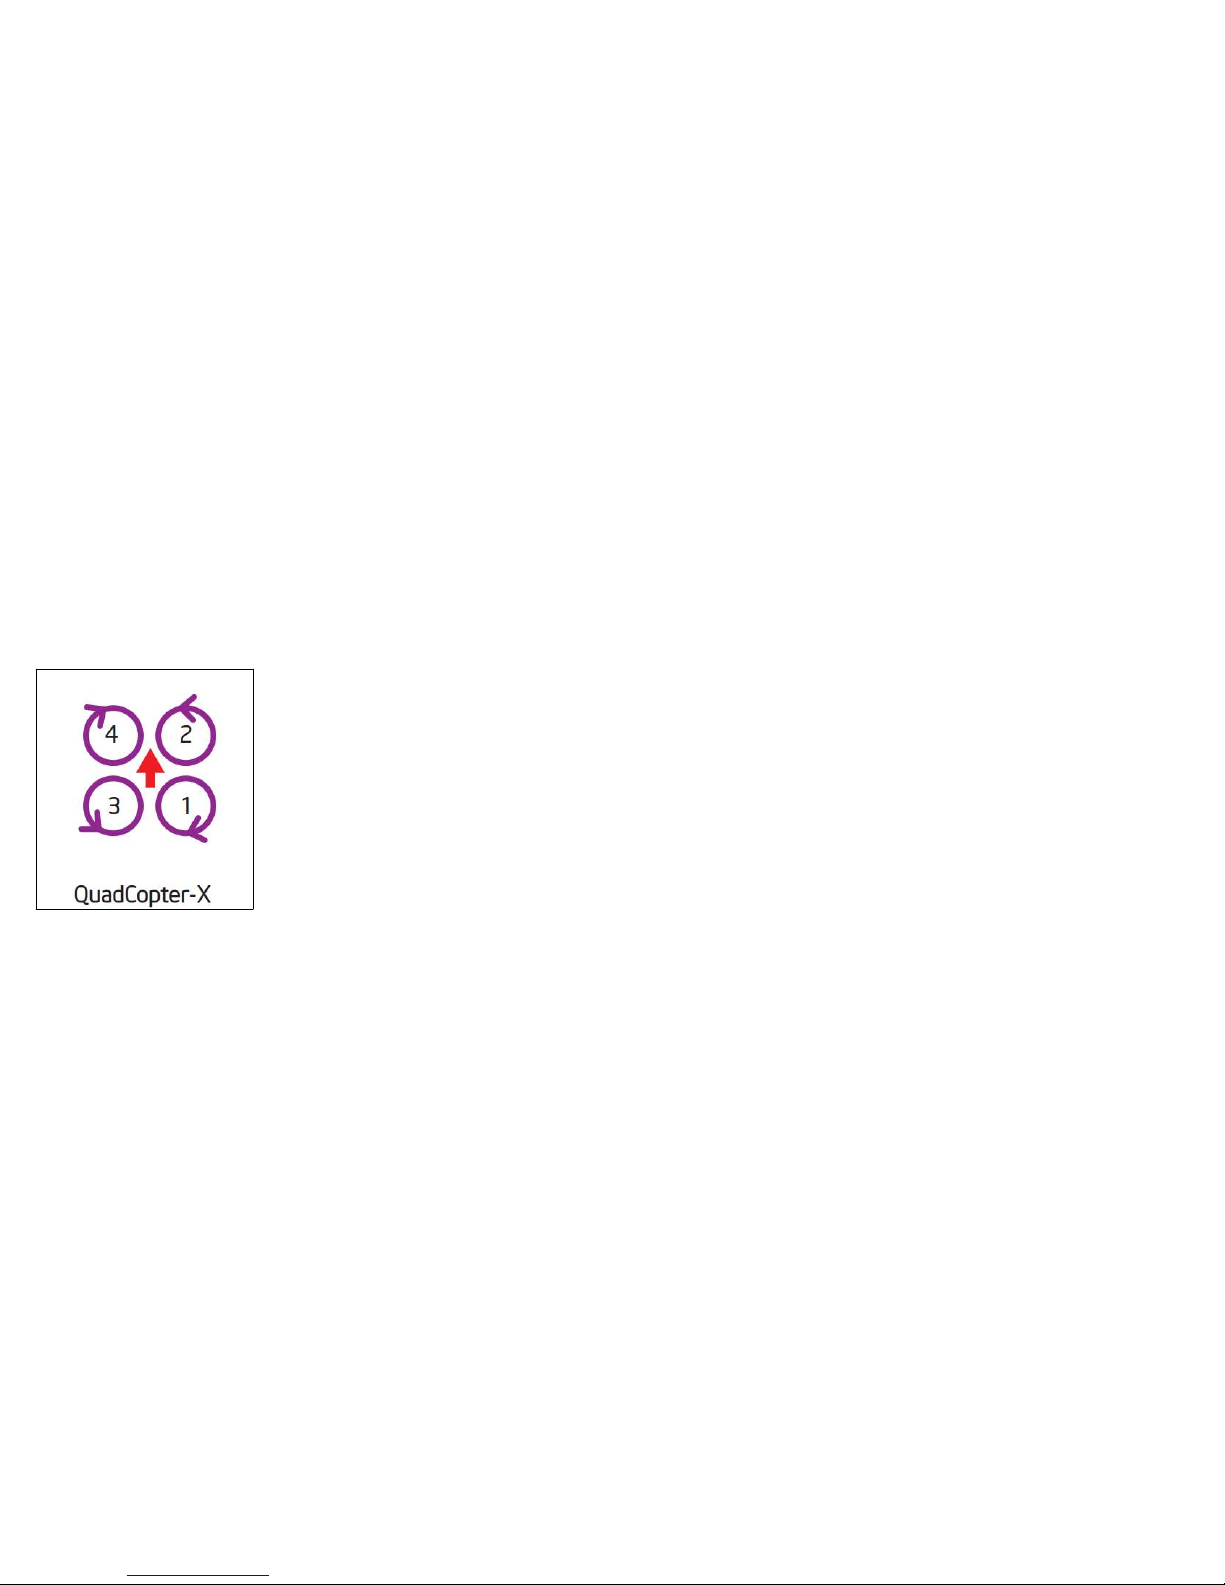
Step 3: Install the props – Use an 8mm socket head driver and install the props such that rotation is per the graphic
below. Tighten the props while holding the motor with your hand. Do not use a tool to hold the motors or you will
damage them. Please be aware your motors may come with either right hand or left hand threaded props shafts.
Please take note of which direction each motor has. You need to remember which direction is correct when taking the
nut off the motor. A CCW motor has a right hand threaded prop shaft and requires the nut to be rotated CCW to
remove the nut. A CW motor has a left hand threaded prop shaft and requires the nut to be rotated CW to remove
the nut.
Step 4: Power up the system – Go outside. Find a location that is free of obstacles, people, bodies of water, trees,
shrubs, cars, etc. An ideal location is an open park, baseball field, or soccer field. Turn on your Taranis. Verify all
switches are facing up and away from you. Verify the throttle stick is set to zero “all the way down”. Verify the flight
mode is set to “Beginner Line of Sight”. Set the craft on the ground and plug in the lipo. Step back to a safe distance.
Step 5: Get air born – Flip the motor arm switch towards you. This will cause the motors to begin spinning at a low RPM.
The craft will not gain altitude until you give some throttle input. Increase throttle until you are airborn!
Page 21

Steps for FPV Flight:
If you have never flown FPV before your first few flights may be somewhat disorienting. This is typical with most people.
Make sure to bring a spotter with you for your first few flights. This is important because it takes practice to be able to
quickly access your surroundings from the sky and determine where it is safe to direct the craft from one second to the
next. A second person can warn you of any approaching dangers that may not be in your field of view. It is also
important to be very familiar with the flight area BEFORE you go up. The FPV vision system has a range that is
determined by a number of factors. In general your FPV signal will be clearest when nothing is between you and the
craft. For your first few flights try to stay relatively close to yourself. Don't venture too far away. If you notice a
degradation in the signal turn the craft around and fly back towards your position. There is no way for us to teach you
in the scope of this manual how to fly FPV. The only way to learn is by trial and error. The instructions below are not
intended to be your bible for flying. They are simply general guidelines to aid you in your very first flight. Ideally, you
should seek out someone whom is skilled in flying FPV and ask for their assistance. This sport is becoming very popular
with many clubs popping up in communities around the world. Seek help from experienced pilots!
Step 1: Preparations – With your 210-R powered up, transmitter and goggles on, flip the three position mode switch to
towards yourself into 'Professional FPV flight mode'.
Step 2: Lift off – Arm the motors then slowly creep up on the throttle 'left stick' while slightly pushing forward on the
pitch 'right stick'. From here you are on your own. Have fun and be careful!
Step 3: Landing – When you are ready to land flip the flight mode switch over to 'Beginner Line of Sight'. Most people
find landing to be easier in this 'self level mode' since the craft will tend to slow down and automatically work to stay
parallel to the ground. Make sure to flip the 'Motor Arm' switch back away from yourself to disarm the motors before
approaching the craft.
Page 22
Section 4: Taranis Binding and Setup
(BNF 210-R)
Page 23

General: This section only applies to the BNF version of the 210-R. Please be aware that only a Taranis X9D will work
with our system.
Taranis Setup Procedure: You must perform this setup procedure prior to binding to the craft.
1. From the homepage, Press the menu button once and select the second slot.
2. Press and hold the 'ENT' button until the menu pops up.
3. Select 'Create Model'.
4. Use the '-/+' buttons to move to the Multirotor/Quad picture. Hold down the 'ENT' button to select it.
5. At the 'Assign Throttle Channel' screen press the 'ENT' button, then use the '-/+' buttons to assign Throttle to CH1. Hit
the 'ENT' button again once the selection is made. Press the 'PAGE' button.
6. At the 'Assign Roll/Aileron Channel' screen press the 'ENT' button, then use the '-/+' buttons to assign Roll to CH2. Hit
the 'ENT' button again once the selection is made. Press the 'PAGE' button.
7. At the 'Assign Pitch/Elevator Channel' screen press the 'ENT' button then use the '-/+' buttons to assign Pitch to CH3.
Hit the 'ENT' button again once the selection is made. Press the 'PAGE' button.
8. At the 'Assign Yaw Channel' screen press the 'ENT' button then use the '-/+' buttons to assign Yaw to CH4. Hit the
'ENT' button again once the selection is made. Press the 'PAGE' button.
9. At the 'Ready To Go?' page long press on the 'ENT' button.
10. Now you're back at the model page. Press the 'PAGE' button.
11. Enter a model name by pressing the 'ENT' button. Select letters and/or numbers using the '-/+' buttons. Hit the 'ENT'
button after each selection. Example name “SA-210R”.
Page 24

12. Press the PAGE button until you find the INPUTS menu page.
13. Scroll down using the '-/+' buttons to the I05 label and press the 'ENT' button.
14. Name this channel AUX 1. Select letters and/or numbers using the '-/+' buttons. Hit the 'ENT' button after each
selection.
15. Scroll down to SOURCE and press the 'ENT' button. Flip the 'SG' three position switch. This will auto assign the switch
to the I05 channel. Press the 'ENT' button again and then hit the 'EXIT' button until you reach the INPUT menu page.
This process will allow you to use the 'SG' three position switch for your motor arm/disarm and buzzer.
16. Scroll down using the '-/+' buttons to the I06 label and press the 'ENT' button.
17. Name this channel FMOD. Select letters or numbers using the '-/+' buttons. Hit the 'ENT' button after each
selection.
18. Scroll down to SOURCE and press the 'ENT' button. Flip the 'SE' three position switch. This will auto assign the switch
to the I06 channel Press the 'ENT' button again and then hit the 'EXIT' button until you reach the INPUT menu page. This
process will allow you to use the 'SE' three position switch for your three flight modes.
19. Press the 'PAGE' button and go to the MIXER menu page.
20. Scroll down using the '-/+' buttons and select CH5. Press and HOLD the 'ENT' button. Select EDIT. Name this mix
“ARM_BUZZ”. Scroll down using the '-/+' buttons to SOURCE and hit the 'ENT' button. Flip the 'SG' three position switch.
Hit the 'EXIT' button until you reach the mixer page.
21. Scroll down using the '-/+' buttons and select CH6. Press and HOLD the 'ENT' button. Select EDIT. Name this mix
“F_MODE”. Scroll down using the '-/+' buttons to SOURCE and hit the 'ENT' button. Flip the 'SE' three position switch. Hit
the 'EXIT' button until you reach the mixer page.
22. Hit the 'EXIT' button until you back out of all menus and reach the home screen.
23. Congratulations your Taranis X9D is now all setup and ready to talk with your BNF 210-R! Go to the bind procedure.
Page 25
Taranis / RC Receiver Bind Procedure:
1. Remove your props!
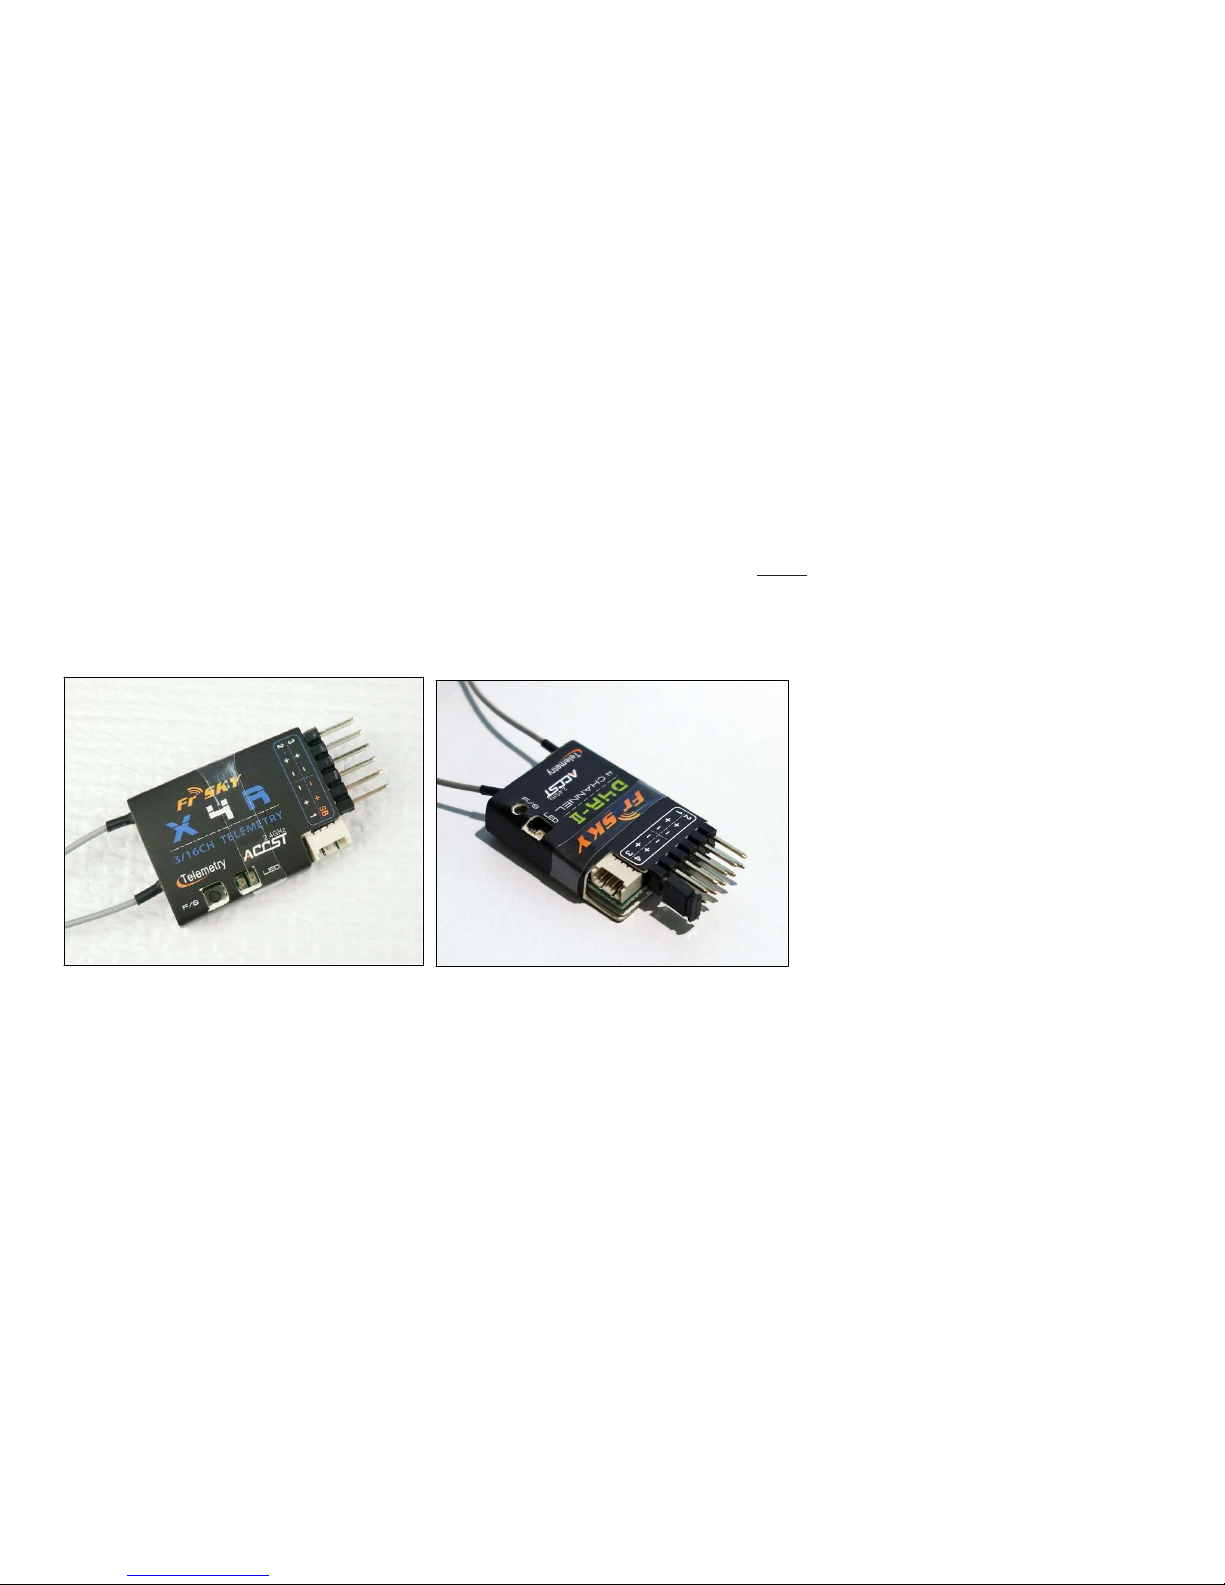
2. Press and HOLD DOWN the 'BIND' button on the DR4-II or X4R receiver, while you power up the craft. This is a small
black button labeled 'FS' located on the top of the receiver. You can release the button after power is applied.
See the pictures below for visual aid.
3. Turn on your Taranis.
4. Hit the 'MENU' button, then the 'PAGE' button.
5. Scroll down using the '-/+' buttons until you find the MODE field. Verify this field is set to 'D8' for a D4R-II receiver or
'D16' for a X4R SBUS receiver.
Page 26

6. Scroll down using the '-/+' buttons until you find the BIND field. Hit the 'ENT' button and the BIND field will begin to
flash. You should also see flashing LED's on your craft's receiver.
7. Remove power from the craft.
8. Apply power to the craft.
9. You should see a solid green LED on your craft's receiver indicating you have successfully bound.
10. Now go fly!
Page 27
Section 5: Troubleshooting
Page 28

HELP!
Any number of things can happen to an FPV racing quad in the course of it's life. A racing quad is different than any
other type of RC aircraft in that it's owner continually abuses it! Other RC aircraft are designed with just over a 1.0
factor of structural safety. Meaning that if you crash a standard RC airplane or helicopter either the craft will be
completely destroyed or sustain heavy damage, not an FPV racing quad! These machines are designed to crash and
be light weight all at the same time. These two attributes existing at the same time is what makes FPV racing quads so
special. The 210-R is an engineering marvel. Most crashes will only result in a bent or broken prop and perhaps a shifted
lipo! You have not purchased your typical FPV racing quad. Far from it. A good analogy for how this machine
compares to other RTF racing quads out there is similar to how a sports car comes to a super car. The 210-R is not a
Corvette Z06. Its not even a Porche 911 Turbo. This is the RTF quad equivalent of a Pagani Zonda R super car.
Eventually, with enough time in the air, and enough time hitting the ground parts are going to break. This is the reality
of racing quads. If you are not comfortable repairing your quad we do offer repair services.
Page 29

• My quad flips over when I try to take off.
• Possible Solution: Verify the props are installed correctly.
• My quad will power up but the motors will not arm.
• Possible Solutions: Three things must happen before the motors will arm.
1) The throttle must be at zero stick (all the way down).
2) The quad must be completely motionless while the flight controller boots up just after power is applied.
3) Any warning must be cleared from the transmitter by hitting the “exit” button just after you turn on the
transmitter.
• My FPV camera feed seems out of focus.
• Possible Solution: The FPV camera has a removable lense that we pre-focus for you. But, it is possible the lense can
move due to vibration or crashes. To refocus the FPV camera you simply loosen the retaining ring then turn the
lense to refocus the camera.
• My HD camera footage has jello in it!
• Possible Solutions:
1) HD camera are very sensitive to vibration. Even the slightest bit of vibration will show up in your footage. For this
reason it is imperative you pay attention to the condition of your props. Even a prop that has a small nick, dent, or
bend may result in a degradation of your footage. Replace damaged props for the best possible HD camera
footage. Do not use low quality props or your HD footage may suffer!
Page 30

2) During a crash it is possible to bend the shaft on your motor. If you have jello in your footage but your props are
all brand new inspect the motors for a bent motor shaft. If the shaft is bent replace the motor.
3) Verify your HD camera is secured well into it's mount. At high speeds environmental forces can bounce the
camera around; degrading footage.
• My FPV video signal seems poor.
*Please note the RTF/BNF 210-R uses a 200mW Vtx. This has become the standard for most FPV racing and freestyle applications.
Please keep in mind there are limits to your video system! As you move farther and farther away from your position the video
signal will degrade to some extent. If you move far enough away you may get to the limits of the transmission power of the
Vtx/Vrx and completely loose video signal. Also, be aware that 5.8Ghz FPV systems work best in “line of sight”, meaning if you
travel behind obstacles such as trees or buildings video quality may degrade and in some cases cut out all together. In general
you can travel behind of set of trees without loosing complete video signal. We suggest to “test the waters” at a new flight
location which has many trees at low speeds to verify you have sufficient video signal prior to really getting into it!*
• Possible Solutions:
1) You have damaged the FPV antenna attached to your craft. Or it has become loose. Carefully inspect the
antenna for damage. Replace the antenna if any damage is present. If found loose, tighten it up!
2) You are on the wrong FPV video channel / band. Verify the channel / band setting on your video transmitter dip
switched matches the setting on your FPV goggles.
3) You are in a location that is causing interference with your video signal.
4) You have damaged one of the components of your FPV video system. During a crash it is possible to damage
something in the video system that may not be visible to the human eye or just very hard to see.
5) The goggles you have chosen use a FPV video receiver that is sub par or bad quality. A set of high quality
Page 31

goggles with a good 5.8 Ghz receiver is very important.
 Loading...