

Page 1

THIS INSTRUCTION BOOKLET CONTAINS
IMPORTANT SAFETY INFORMATION. PLEASE
READ AND KEEP FOR FUTURE REFERENCE.
Item No: 63607149
Swivel
Lot Number:
Date:
MAX:
±90°
+5°
: NIM
ni49.3
/
ni57.51
1
/4
Tilt
MM00
MM00
MIN :
MAX:
2.91in
15.91in
/
74
MM
/
404MM
MIN :
MAX:
3.94in
15.75in
00MM
1
/
/
00MM
4
-15°
Congratulations on your Catalyst purchase. Follow these simple instructions and you’ll
have your TV mounted in no time.
This kit fits most TVs 26in. - 52in. (60cm - 132cm), up to 66lbs (30kgs).
Keep this Instruction Manual for future reference.
Keep your original proof of purchase (store receipt).
If you have any questions and/or wish to order parts, please call us toll free at 800-747-2660.
Page 2

Before Proceeding any further please make sure your kit has the following items.
1 x Heavy Duty Full-Motion Mount
2 x 8.66in. (220mm) Velcro Cable Ties
Tools Needed ( Not Included)
Safety Glasses
Wood
Drill Bit
(4mm)
5/32in.
1 x 6 ft. HDMI
™
cable
Philips
Screwdriver
Hammer
Drill
Stud
Finder
Masonry/Concrete
Drill Bit
(9,5-10mm)
3/8in.
Masonry/
Concrete
Wall Anchor
1
Page 3

Parts List
Item
A
B
C
Components
Wall Bracket
TV Plate
Extended Arm
Extended Arm
Item
1
1
2
E
F
G
Components
Lag Bolt
Screw
Allen Wrench
Magnetic Leveler
tQytQ
y
3
8
1
D 2
Hardware List
Mounting Hardware List Qty
I
J
K
L
M
M8 X 16MM
M6 X 12MM
M5 X 12
M4 X 12MM
M8 X 40
MM
MM
H
Mounting Hardware List
4
4
4
4
4
O
P
Q
R
S
M5 X 30MM
M4 X 30MM
M4 / M5washer
M6 / M8washer
M6 / M8spacer
Qty
1
4
4
4
4
4
N
M6 X 35MM
4
T
2
M4 / M5spacer
4
Page 4

Assembly Tips:
Become familiar with the instructions and all parts.
Make sure that all parts are in the box and in good condition.
Assemble the product on the open flat carton or a rug to protect the product and
your floor.
Some heavy products need a second person to assist in the assembly.
Do not install on sloping surface.
This TV mount is designed for use on a vertical wall that is constructed with wood
studs, masonry or solid concrete.
Never let children climb on product or play with product.
Do not sit or stand on product.
Do not fasten a TV that is heavier than the recommended loading to the mount.
Improper installation may cause property damage and or personal injury, so the installation is
recommended to be done by two qualified contractors. The manufacturer is not liable
for damage or injury caused by incorrect mounting, assembly or use.
The size and weight of your TV must be not exceed 26in. - 52in. (66cm - 132cm) diagonally
or 66lbs (30kgs). The wall must be capable of supporting five times the weight of TV plus the
mount.
0
This mount allows the TV to tilt -15
Improper handling can result in cuts and lacerations.
Pictures for reference only, subject to our available products.
- +50, swivel -900 - +900.
3
Page 5

PLEASE CHOOSE BEST INSTALLATION OPTION BASE ON TV BACK PANEL HOLE SPACING:
Option 1: 3.94 in x 3.94 in / 100 mm x 100 mm, 3.94 in x 7.87 / 100 mm x 200 mm
or 7.87 in x 7.87 in / 200 mm x 200 mm
1
A
A
B
Remove TV Plate (B) from Wall Bracket (A) using allen wrench (G), keep the screws for future use in
Step 4.
2
Wood Stud Installation
E
UP
A
Using a stud finder, locate the center of wall stud, then hold wall bracket (A) against the wall at your
desired position. Next use a pen or pencil to mark the location of where the 3 mounting Lag Bolts (E)
will go into the center of the wall stud. Before marking, ensure the wall plate is level using the included
magnetic leveler (H).
Remove wall plate. Drill pilot holes at the marked 3 holes using 5/32 in. (4mm) drill bit. Fasten Wall
Bracket (A) to wall with Lag Bolts (E).
Do not over-tighten Lag Bolts (E).
4
Page 6

Masonry/Concrete Installation
E
Wall Anchor
(Not Included)
Use a pen or pencil to mark the location of where the 3 mounting Lag Bolts (E) will go into wall while
holding Wall Plate (A) against the wall at your desired position. Before marking, ensure the wall plate
is level using the included magnetic leveler (H).
Remove wall plate. Drill holes at the marked 3 holes using 3/8 in. (9,5-10mm) drill bit. Sink Lag Bolt
Anchors (not included) into holes with hammer until flush with wall surface. Fasten Wall Bracket (A)
to wall with Lag Bolts (E).
Do not over-tighten Lag Bolts (E).
UP
3
Washer Q or R
B
Carefully lay your TV face-down on a rug or flattened carton. Hand thread screws into the
threaded inserts on the back of your TV to determine which screw diameter (M4, M5, M6, or M8)
to use.
If your TV has a flat back, use the shorter screws. Spacers and longer screws are supplied to
accommodate:
Irregular / round back TVs
TVs with inset mounting holes
Extra space is needed to access cable connections
Position your TV plate (B) over your TV hole pattern, making sure the TV Plate is centered
and level, Install using the short screw and washer
combination you selected for your TV.
, or long screw with washer and spacer
Spacer S or T
DO NOT TIGHTEN SCREWS WITH ELECTRIIC DRILL/SCREWDRIVER. HAND TIGHTEN ONLY.
5
Page 7

4
H
Hang TV to Wall Bracket as shown above. It is recommended two people, one on each side of
TV participate in hanging TV to wall plate..
Tilt the top of the TV towards the wall and carefully position TV Plate (B) over the Wall Bracket (A)
until locking into place. Then fasten it with screws you disassembled in Step 1.
Option 2: 15.75 in x 7.87 in / 400 mm x 200 mm, 7.87 in x 15.75 in / 200 mm x 400 mm
or 15.75 in x 15.75 in / 400 mm x 400 mm
1
C
B
D
D
C
F
G
Repeat Step 1 of OPTION 1 prior to this step.
Attach Extended Arm (C&D) to TV Plate (B), make sure the bolts of extended arm go through the
holes of TV plate. Then secure with screws (F) and tighten with allen wrench (G).
6
Page 8

2
Spacer Q or R
Spacer S or T
Carefully lay your TV face-down on a rug or flattened carton. Hand thread screws into the threaded
inserts on the back of your TV to determine which screw diameter (M4, M5, M6, or M8) to use. If
your TV has a flat back, use the shorter screws. Spacers and longer screws are supplied to
accommodate:
Irregular / round back TVs
TVs with inset mounting holes
Extra space is needed to access cable connections
Position your TV Plate (B) over your TV hole pattern, making sure the TV Plate is centered and
level. Install using the short screw and washer, or long screw with washer and spacer combination
you selected for your TV.
DO NOT TIGHTEN SCREWS WITH ELECTRIC DRILL/SCREWDRIVER. HAND TIGHTEN ONLY.
3
Hang TV to Wall Bracket as shown above. It is recommended two people, one on each side of
TV participate in hanging TV to wall plate.
Tilt the top of the TV towards the wall and carefully position TV Plate (B) over the Wall Bracket (A)
until locking into place. Then fasten it with screws you disassembled in Step 1.
7
Page 9
±90°
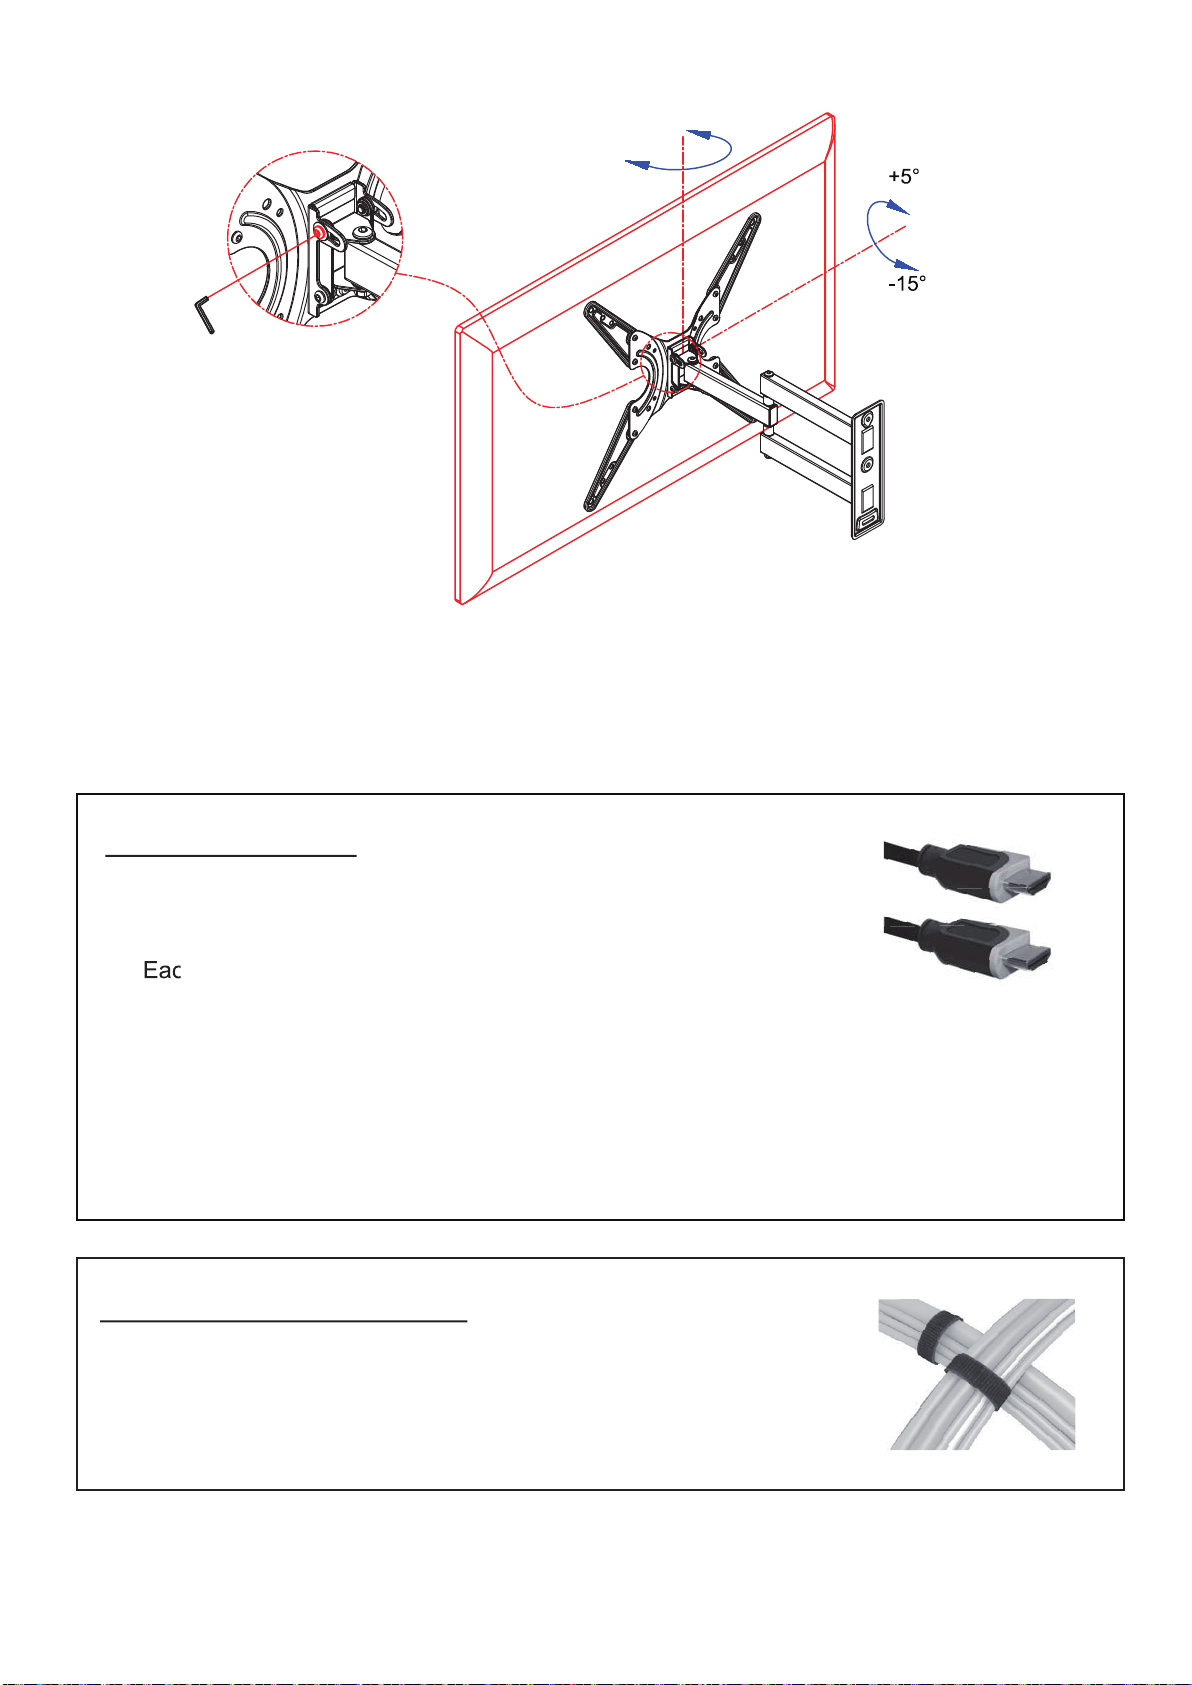
To adjust angle of your TV, hold the TV lightly, then swivel or tilt it to your desired position. If you tilt
the TV angle, first loosen the screw as shown above with allen wrench (G), tilt the TV to your
desired angle. When TV is at desired angle then you can retighten the screw.
HDMI Cables
Information:
This Kit includes 1 HDMI™ cable.
Each HDMI cable measures 6 feet (1829 mm) in length.
Technical Specifications:
1.4 Version
Supports Ethernet, 3D and 4K Definition.
O.D.: 6.0mm
Double molding
In-Wall CL2 Rated
Velcro Cables Ties
Information:
This kit includes 2 velcro cable ties to help manage your cords.
Each Velcro cable tie measures 8.66in. (220mm)
8
Page 10

Product Warranty
This Limited Warranty covers any defects in material or workmanship for purchases made in the
U.S.A and Canada, and excludes claims from conditions, malfunctions or damage not resulting
from defects in material or workmanship. The warranty duration is one year. Keep your original
proof of purchase (store receipt). If after inspection you find the product is defective, damaged
or missing parts. DO NOT return to the store. Please contact customer service
at (800) 747-2660 M-Th, 8am-5pm; Fri, 8am-12pm (Pacific Time).
Or email [email protected]
Please keep this Instruction Manual for future reference.
2015
U.S. and other foreign patents pending /
Patentes de los EUA y países extranjeros en trámite /
Brevets en cours pour les États-Unis et autres pays /
U.S. und andere ausländische Patente sind hängig
All rights reserved / Derechos Reservados /
Tous droits réservés
Made in China / Hecho en China /
Fabriqué en Chine
9
 Loading...