


USER’S GUIDE
USER’S GUIDE
Yay!!! I’m so glad you’re reading this! Excited to tell you all about the Octapussy!
So, what is it? Essentially, it’s an octave-up fuzz in the tradition of the Octavia. But it’s not a clone of that circuit!
Nope, it’s an original circuit utilizing 3 silicon transistors and two diodes that takes the tradition to the next level!
The preamp section is custom voiced to give you an extremely dynamic playing response. You’ll get those famous
high-octave lead tones up high on the guitar neck but you’ll also get an amazing array of fuzz tones anywhere
else on the neck - just by how you play it and how your GUITAR’s volume, tone, and pickup selector is set.
The more you play the Octapussy, the more sounds you’ll nd in it!
With the Octapussy, you can:
• Play sweet, breathy, delicate octave-up melodies up high on the neck.
• Play epic soaring leads that are full sounding with upper harmonics that bloom and bloom as you
hold that bend.
• Get tough sounding almost ring modulated double-stops that growl when you sustain it.
• Obtain sounds that evoke Caribbean steel drums.
• Get massively huge grinding, industrial-strength power chords.
• Riff out with a textured, harmonically rich fuzz tone that can achieve cello/sax-like qualities.
• Play otherworldly sounding arpeggios.
• Make strange, atonal soundscapes.
• Evoke the texture of a sitar.
• Achieve mysterious sounding droning melodies.
• And more!
.... All without changing any of the settings on the pedal! Between your playing technique and your
guitar’s volume, tone, and pickup settings, you’ll be able to discover an entirely new universe of expressive
sounds!
What you won’t get with the Octapussy:
An overly compressed and pinched-off response. Octapussy remains open and responsive at any setting!
You’ll never feel like you’re “ghting” the pedal. It invites you to enter its mystical world and explore the huge
range of textures available.
Check out the Catalinbread YouTube Channel for videos that demonstrate some of the range of sounds
obtainable with the Octapussy.
The more you play the Octapussy, the more sounds you’ll nd in it!
QUICK START GUIDE
OK, let’s try it out! Why don’t we start by plugging your guitar straight into the Octapussy and then to your amp.
(Although throwing a delay pedal after it is a helluva good time!)
Now turn all three knobs on the Octapussy full counter-clockwise. This is your starting position.
Flip over to your neck pickup and play some single note phrases up around
the 12th fret of the guitar. You should get a nice, sweet tone with a strong
upper-octave voice. Now play a few power chords. You should be experiencing a subtle grinding texture.
Now turn up the Body and Gain some and play some more. (I’ll describe
them fully in the next section.) You’ll get more gain, fullness, sensitivity,
and intensity. Now turn the volume on your guitar down low. Yup! You still
have those pure, sweet octave tones with no hiss from excessive gain!
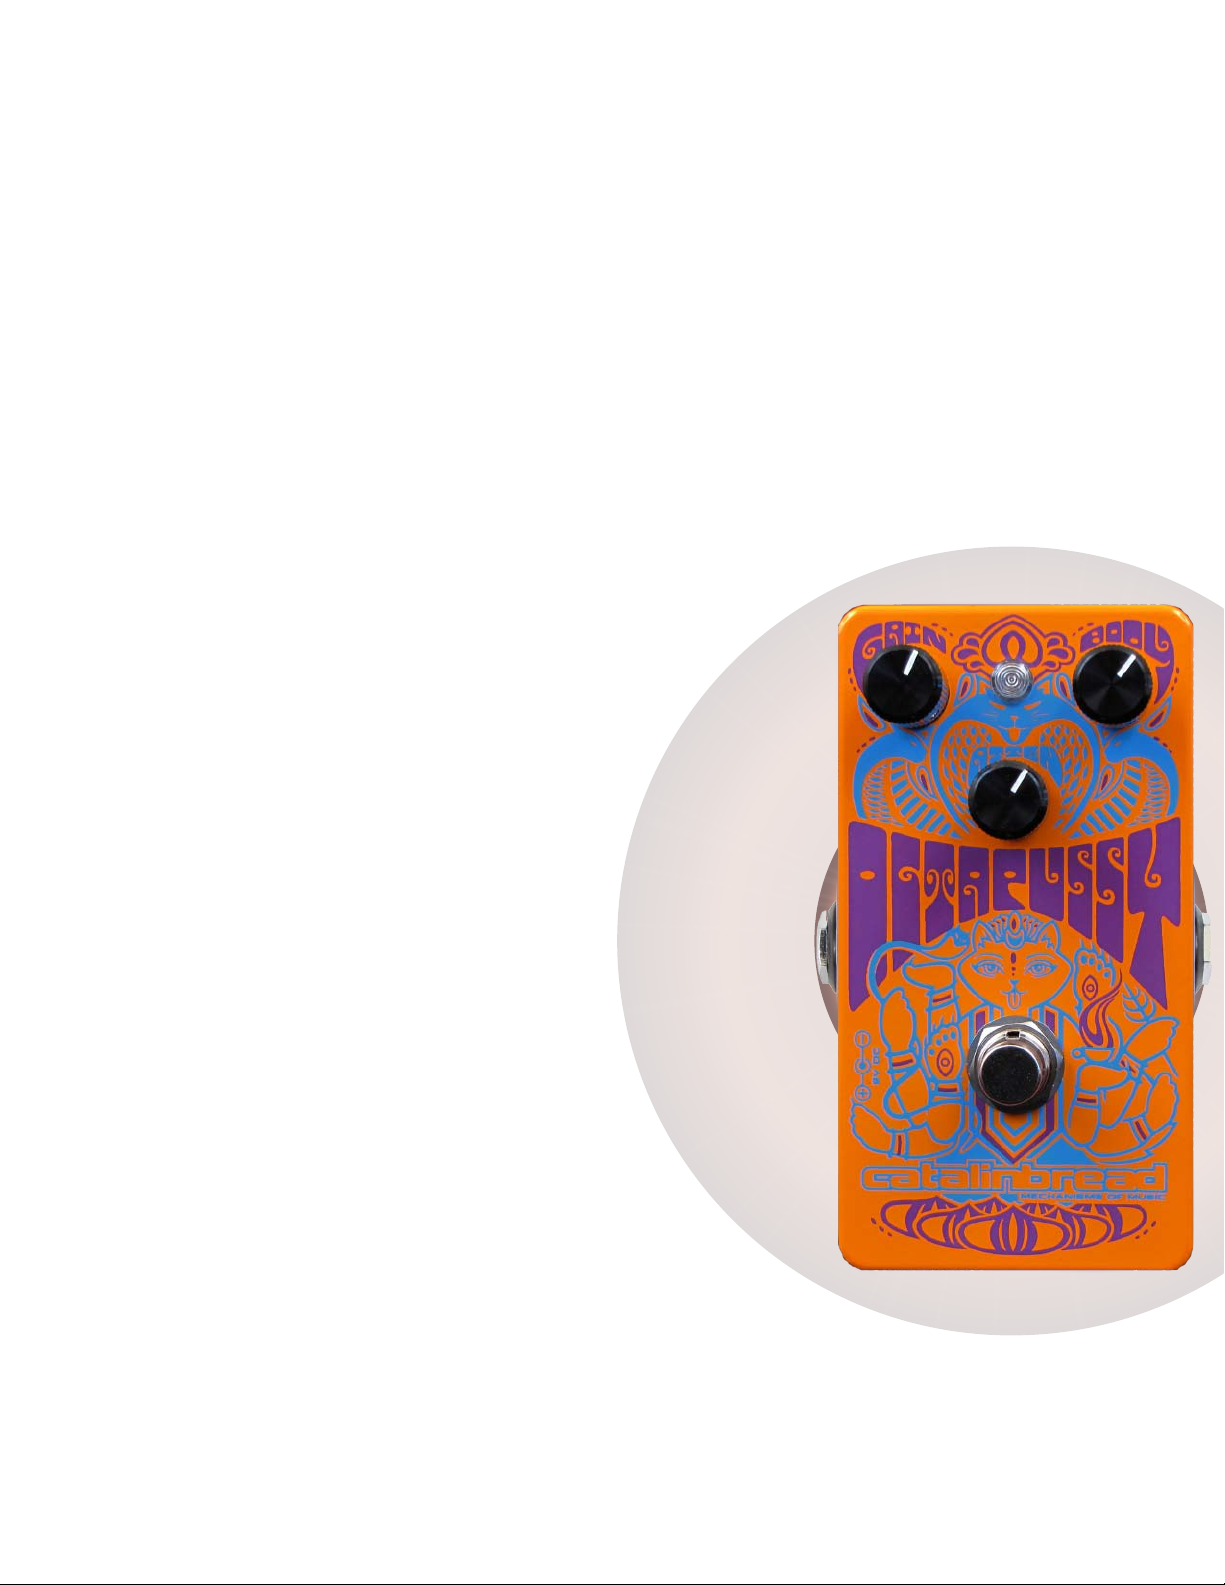
CONTROLS
Octapussy features three carefully voiced controls that are responsive and
musical as you want to be throughout the entire range of the knobs.
Attn (Attenuate) This control should normally be set full counter-
clockwise. For best tone and response, only attenuate when you’ve got the
Gain and Body knobs really cranking and need to reduce the output some.
Gain This control increases the gain for more fuzz, harmonics, and upper-
midrange frequency boost. It is voiced to be usable throughout its range
from minimum all the way to maximum.
Body This control increases the bass response or “thump” frequencies. Like the Gain knob, it also increases
output and harmonic content. Technically, it is a negative-feedback loop with variable frequency response.
But let’s not dwell on technicals.... this is another MOAR knob!
To get the best feel for what this knob does, set it at minimum and then slowly bring it up as you thump the
low E string on your guitar. You’ll hear (and feel!) the low end thump increase as you turn up the Body.

How to approach setting the knobs First, an experiment! Crank the Gain and Body all the way up. Yes,
all the way ;-) You might want to Attenuate a bit since by now you’re freakin’ loud! Turn your guitar up and riff
out.... Gnarly! Intense! OK, now back your guitar’s volume waaay down. You’re back to a completely pure and
sweet octave-up generator!
So, that means you can use Octapussy’s controls to set the *maximum* gain and intensity you wish to have and
do all your actual adjustments from the guitar! While you’re playing! You’re welcome. ;-)
Speaking of your guitar’s controls, let’s cover them here since Octapussy was designed to have your guitar’s
controls be part of its “control surface”.
Pickup Selector For the best pure octave-up sounds, always use the neck pickup on your guitar. Flipping to
the bridge pickup will get you a less obvious octave-up tone but what you’ll get instead is a soaring lead sound
where the upper harmonics start cascading in as you hold the note. So awesome.
Volume Control Essentially, your guitar’s volume control is the Octapussy’s “intensity” control. Crank up the
volume for epic soaring leads and grinding ring-mod power chords, turn down the guitar for pure octave melodies and other more subtle expressions.
Tone ControlFor the purest upper-octave sound, roll back your guitar’s tone control while on the neck
pickup. You can get a smoother, ute-y tone this way.
So remember, your guitar’s controls are just as important as the controls on the Octapussy! Experiment!!!
The more you play the Octapussy, the more sounds you’ll nd in it!
STACKING WITH OTHER PEDALS
Since Octapussy is expressly designed to be interactive with your guitar’s controls, it should best be placed as early
in the signal chain as possible, preferably right after your guitar and denitely not after any buffered pedal. Pedal
buffers will kill the interaction that the Octapussy was designed for. You can, however, use a boost pedal before it
such as our Naga Viper since the Naga Viper retains dynamics and presents the Octapussy with the proper impedance.
Fuzz pedals are great stacked after the Octapussy. The Octapussy will match up great with the fuzz and cut right
through it.
Amp-style overdrives should denitely be placed after the Octapussy. The Octapussy into the DLS MkII is an amazing combination ;-)
Delays and modulations should usually go after the Octapussy. Denitely try some delay after it though!

POWER SUPPLY
Octapussy can run on 9volts DC all the way up to 18volts DC. But for the absolute best response, denitely try
a carbon battery in it. Trust me!
Psst....There’s a Little Switch Inside
If you take the bottom plate off the Octapussy, you’ll see a little switch up at the top of the circuit board. What’s
that for?
It disables the LED indicator.
What?!! Why would I want to do that?! How am I gonna know if the pedal is on or off?! Is it to save battery juice?
Nope!.........
I’m on the quest for the best sound and response possible out of a pedal circuit. To this end, I’ve discovered that
in certain circuits, the LED will have a subtle negative effect on the pedal’s responsiveness. An LED is a Light
Emitting Diode. Diodes can limit and clamp the audio response even though they are in the power rail circuitry.
Since a lot of people nd this hard to believe, we’ve decided to allow you the ability to switch off the LED so you
can check it out for yourself!
I invite you to try it for yourself! First, play a little bit before ipping the internal switch. Pay close attention to
the picking feel and the way the sound decays. Now ip the internal switch so that the LED won’t come on even
though the pedal is engaged. Play again. You should feel the picking response be more open and touch sensitive and the decay is more natural and not like there’s a limiter engaged.
You’ll have to decide for yourself whether the sonic benets outweigh not having the LED indicator. But c’mon,
you know when this pedal is on! ;-)
We’re giving you the choice to fully tune your Octapussy for maximum goodness and touch sensitivity. So, the
recommended best conguration for setting up your Octapussy is: use a 9volt carbon battery, turn the internal
LED switch off, and make sure the Octapussy is the rst pedal after your guitar. OK? OK!
I’m curious as to your observations! Email me with your thoughts and observations about this!
kittycaster@catalinbread.com.
AMPLIFIERS
Octapussy loves all amps, clean or distorted. Just go for it! But, for maximum goodness, play it into an overdriven amp or a good overdrive pedal.

Playing Technique
Octapussy is VERY responsive to your playing technique. Let’s explore a few of the tricks...
Pure Octave Melody Put your guitar on the neck pickup and set your guitar’s volume for a not too-hot
response (this will vary depending on where the Octapussy’s controls are set). Using a light, delicate picking
hand, play some bluesy, melodic single-note passages from the 10th fret on up. Be careful not to let other
strings ring while playing. This is how you’ll get the purest, sweetest upper-octave tone.
Droning Mysterious Octave Melodies Using the same settings as above, rst lightly play the low E
string and let it ring out continuously while playing some licks at the 12th fret in the key of E. The low E string
combined with the upper notes creates a slight ring mod texture that gives your lines a very subtle mysterious quality. Just try it! You can extend this idea anywhere on the neck actually by playing an open string or
fretted note on the bass side of the neck and letting it ring while playing stuff on top of it.
Full-bore Grinding Power Chord Pwnage Bridge or neck pickup... guitar wide open... Gain and
Body set up a ways... play basic root-fth-octave voicings... hit it hard and let it sustain... pwnage!
Otherwordly Arpeggios Use the bridge pickup and turn the guitar’s volume quite far down and set
the Gain and Body knobs on the low side of things. Arpeggiate through some open chord progressions while
picking as delicately as possible. It’ll sound really cool in a band context!
Emulating a Sitar Use the bridge pickup and get a mild to moderate sound by setting your guitar and
the Octapussy accordingly. Now, drone the D string continuously while playing your best raga melodies up
and down the G string. Do subtle microtonal bends on the G string against that droning D string. Hi Ravi!
What up?!
Big Sounding Horn/Cello-like riffs Use the neck pickup and set all your controls to a moderate to
high setting. Play single note riffs on the wound strings using a clean picking technique. Play with the tone
knob on your guitar. Keep playing, there’s a lot in there to uncover!
Growling Double-Stops Let’s pick the key of E. Set your controls to high intensity and play double-
stops on the G and B string together (bar the G and B strings) at the twelfth fret. Let the double-stop ring out
to let the harmonics develop. If you do this correctly you get a noticeable “blooming” effect. Very cool.
Epic Soaring Lead Bends Set your controls to kill and ip to the bridge pickup and do your best wailing
bends preferably with the amp cranked up. Hold that epic bend and let the upper-harmonics develop and
blossom and sustain. You’re a god!
These are just a few of the techniques you can do as you explore the world of Octapussy. Keep playing, keep
experimenting!
Now, you could also just ignore all this nesse B.S. and treat Octapussy like a badass fuzz pedal and just play
punk and doom chords on it too. It doesn’t care!

DESIGNER'S NOTES
I’ve been looking forward to getting the time to develop this pedal for some time now. I’m a major octave-up
fuzz fanatic and own several ne examples from other makers. What I wanted to do was take what I loved about
them, eliminate what I thought were their shortcomings, and add a little bit of my own vision to it.
A lot of octave-up fuzzes do the upper fretboard octave thing just ne. But then maybe they didn’t sound very
good on chords or low strings. Others were cool but way too compressed and pinched sounding for my tastes.
It is an absolute requirement for me that the circuit responds to changes in playing dynamics and guitar settings,
and also be able to stack into other dirt pedals.
So, I broke out the breadboard and went to work. I knew the circuit had to be “simple” and essential. Usually, the
more parts and circuit complexity the more compressed and less dynamic the response. I also knew I wasn’t
going to do a direct clone of any existing circuit.
After much experimentation, I ended up with a very elegant design that needs only 3 silicon transistors and two
diodes at the heart of the circuit. There are two main blocks in an octave fuzz circuit - the driver and the inverter.
I came up with a driver design that is very very open and gives a wide range of response while being dead quiet
even with the controls maxed out. It incorporates a special variable frequency negative feedback loop
of what gives Octapussy such an extreme range of
touch sensitivity. The inverter circuit is where the
“octaving” happens. For it to work the best it must be
completely balanced at its positive and inverted
outputs. To that end, there is a trimmer pot on the
circuit board that allows us to tune each one for the
perfect balance. It is not recommended that you ddle
with this trimmer. Should it get moved by accident
(not sure how that would happen, but!..), contact us
and we can tell you how to recalibrate it.
that is part
Another key parameter I worked is parts selection. I
spent much time comparing the qualities of different
types of capacitors and resistors in each position in the
circuit and selected the types that gave the best possible tone and response. Many pedals are designed with
no regard to the type of parts used, only considering
the nominal value (e.g. 2.2uf or 1kOhm). It makes a
difference! Sometimes subtle, sometimes epic! I don’t
like to leave stones unturned so I investigate this area
with every pedal I design in order to achieve the best
sound and response I can.
I’m gonna stop writing now so you can stop reading
now and get back to exploring the wonderful, mystical
world of the Catalinbread Octapussy!
Play on brother, play on sister...
- Howard Gee, Catalinbread
Guitarist, Circuit Designer, and Audio Janitor
 Loading...