

Castlewood USB ORB 2.2GB Owner's Manual

USB ORB 2.2GB
• Installation Guide
• User’s Guide
• Troubleshooting
• How to Get Help
• Warr anty
• Registration
Owner’s Manual

TABLE OF CONTENTS
SECTION 1 INSTALLATION GUIDE
Things to Consider . . . . . . . . . . . . . . . . . . . . . . . . . . . . . . . . . . . . . . .2
1.1 Introduction . . . . . . . . . . . . . . . . . . . . . . . . . . . . . . . . . . . . . . . .3
1.2 System Requirements . . . . . . . . . . . . . . . . . . . . . . . . . . . . . . . .3
1.3 Hardware and Tools for Installation . . . . . . . . . . . . . . . . . . . .3
1.4 Package Contents . . . . . . . . . . . . . . . . . . . . . . . . . . . . . . . . . . .4
1.5 Installation Safety Precautions . . . . . . . . . . . . . . . . . . . . . . . .4
1.6 Hardware Setup . . . . . . . . . . . . . . . . . . . . . . . . . . . . . . . . . . . . .4
1.7 PC Driver Installation . . . . . . . . . . . . . . . . . . . . . . . . . . . . . . . .6
1.7.1Windows 98 Utilities . . . . . . . . . . . . . . . . . . . . . . . . . . . . . . . . .7
1.8 Mac Driver Installation . . . . . . . . . . . . . . . . . . . . . . . . . . . . . . .8
1.8.1ORB Tools for Mac . . . . . . . . . . . . . . . . . . . . . . . . . . . . . . . . . . .9
1.9 Connecting ORB to an ORB SCSI Chain . . . . . . . . . . . . . . . . . .9
SECTION 2 USERS GUIDE
2.1 Operating your ORB Drive . . . . . . . . . . . . . . . . . . . . . . . . . . . . .11
2.2 Using ORB Disks . . . . . . . . . . . . . . . . . . . . . . . . . . . . . . . . . . . . .12
2.3 Accessing Your ORB Drive . . . . . . . . . . . . . . . . . . . . . . . . . . . . .14
2.4 Reassigning Drive Letters . . . . . . . . . . . . . . . . . . . . . . . . . . . . .14
2.5 Large Drive Support . . . . . . . . . . . . . . . . . . . . . . . . . . . . . . . . .15
2.6 Partitioning a Disk . . . . . . . . . . . . . . . . . . . . . . . . . . . . . . . . . . .15
SECTION 3 TROUBLESHOOTING . . . . . . . . . . . . . . . . . . .17
SECTION 4 SPECIFICATIONS . . . . . . . . . . . . . . . . . . . . . . .20
SECTION 5 CUSTOMER SUPPORT . . . . . . . . . . . . . . . . . .22
SECTION 6 WARRANTY . . . . . . . . . . . . . . . . . . . . . . . . . . . .23
SECTION 7 SOFTWARE LICENSE AGREEMENT . . . . .24
SECTION 8 STANDARDS AND REGULATIONS . . . . . .26
1

THINGS TO CONSIDER:
Look through this Installation Guide. If you feel in any way unsure of
performing this installation, then we strongly recommend contacting a qualified computer technician to install or assist in the installation.
This ORB Owner’s Manual is designed to provide efficient instructions for safe installation of the ORB Drive.WARNINGS are clearly
marked throughout the manual. Please read these WARNINGS carefully when installing and/or removing your ORB drive. Use of the
practices and techniques described in this manual should help assure
that your installation of the ORB drive is simple and safe.
2

SECTION 1 INSTALLATION GUIDE
WELCOME TO ORB!
The ORB USB Drive offers you everything that you want in a portable, removable
disk drive – high capacity, easy installation and hot pluggable, at an affordable
price that can be easily connected to your system using a USB interface.
ORB USB Drive is a SCSI Drive that connects to a USB port on your computer system through a USB to SCSI cable.
1.1 INTRODUCTION
This installation guide provides detailed instructions, and illustrations, as well as
safety precautions that will help you to configure and install your ORB USB drive. It
is recommended that you use this guide along with your computer’s manual.
If you intend to connect the ORB SCSI drive to your computer system’s SCSI interface, refer to SCSI ORB Owner’s Manual. You can download this manual in PDF
format from the Support Center on our web site at www.castlewood.com.
1.2 SYSTEM REQUIREMENTS
Hardware
PC – Intel Pentium 100, AMD K6, Cyrix MMX with a USB port.
Mac – iMac, new (Bondi-blue) Power Macintosh G3, G4+.
Operating Systems
PC – Windows 2000, Windows 98.
Mac – Mac OS 8.5.1 with Firmware update 1.1, USB update 1.1 or later.
Mac OS 8.6 and above
1.3 HARDWARE/TOOLS FOR INSTALLATION
A #0 Phillips screw driver is needed to change your ORB Drive’s SCSI ID.
You may require tools if you need to install an add-on USB adapter card. In this
case, follow the instructions provided by the vendor of the add-on card to perform
this installation.
3
INSTALLATION GUIDE
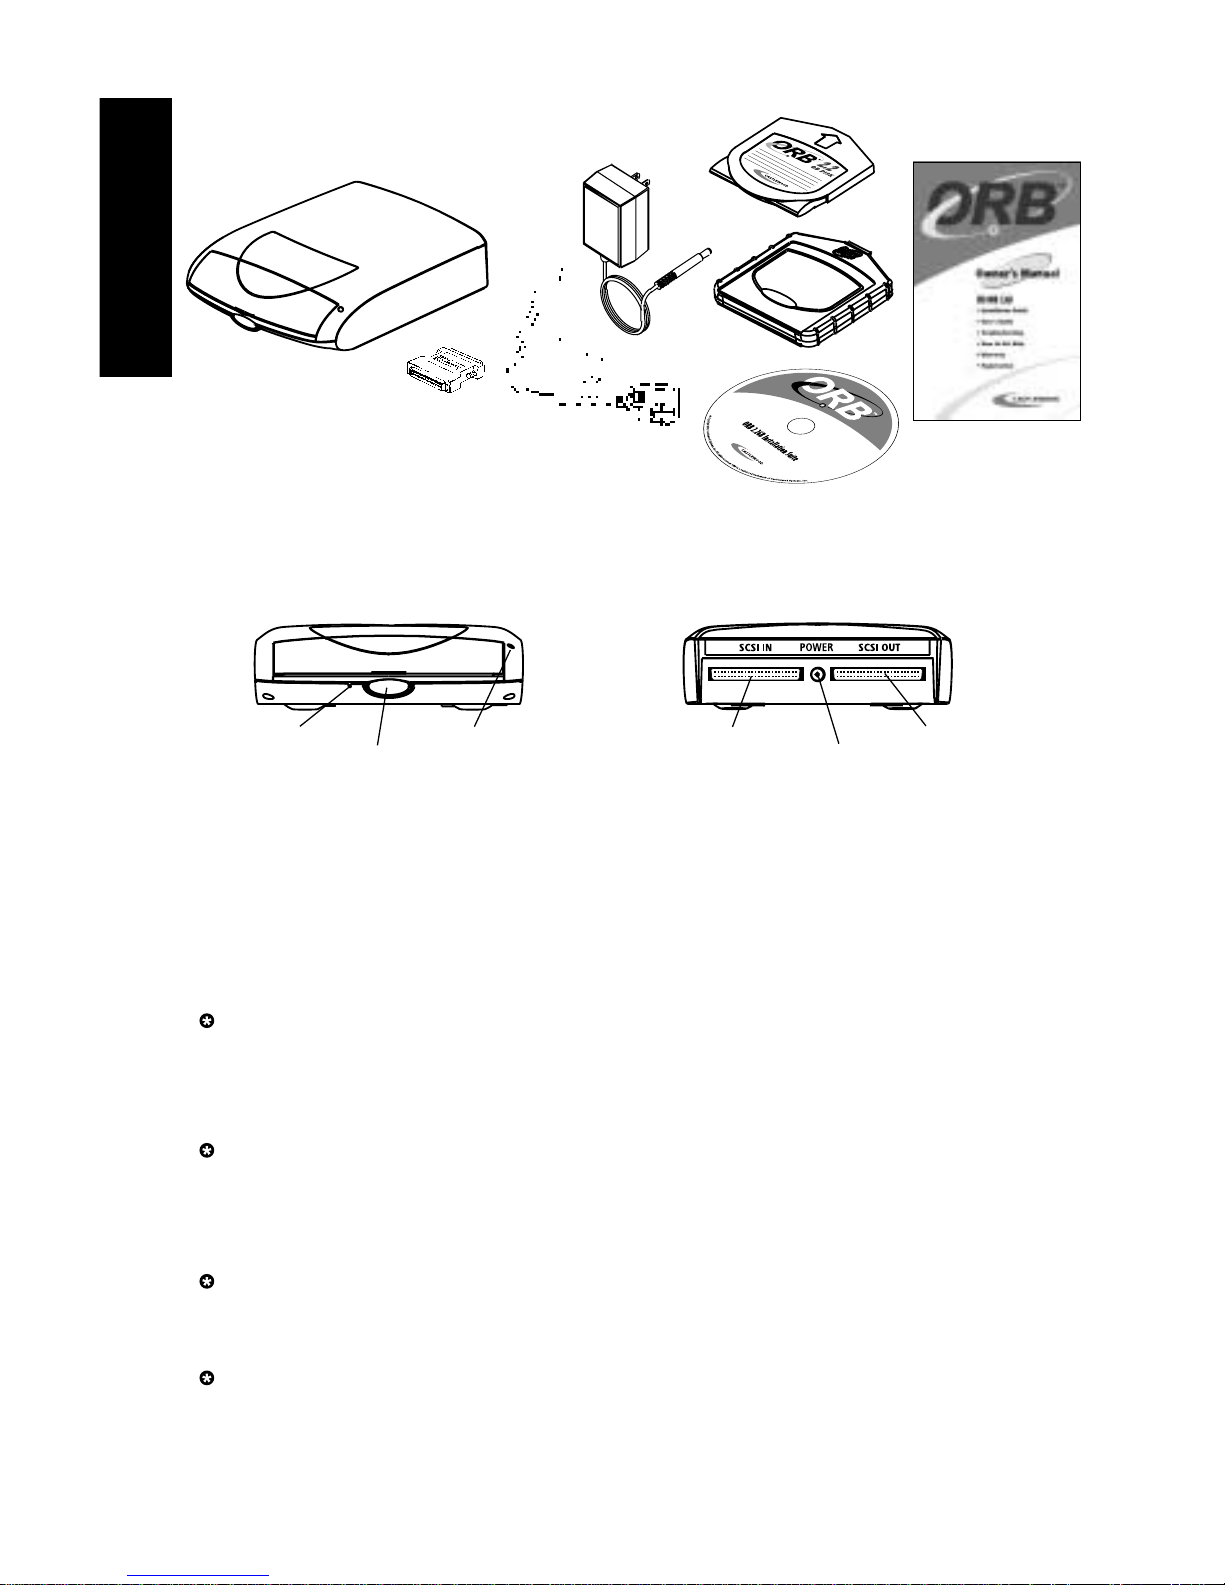
1.4 PACKAGE CONTENTS
The ORB USB Drive consists of:
The ORB Installation Suite CD contains USB drivers for PC and Mac platforms.
Become familiar with your ORB Drive:
Figure 2 Figure 3
Front View Rear View
1.5 INSTALLATION PRECAUTIONS
Be sure to read the following Installation Safety Instructions before moving on to the
actual installation steps. Damage may occur to the drive and disk if these precautions
are not followed. If for any reason you do not understand these instructions, please
contact a qualified computer technician to install or assist in the installation.
Temperature Stabilization - Before removing the drive from its protective
plastic bag, ensure the drive has reached room temperature. This is accomplished by allowing the drive to sit in its protective plastic bag in the room environment for at least one hour.
Shock - Dropping, jarring, or moving the drive while the disk is spinning can
cause catastrophic damage. The drive should be placed on a flat, horizontal sur-
face whenever an ORB disk is installed. The ORB disk should always be
removed from the drive before the ORB Drive is moved.
Power - Always attach cable(s) to the drive then the power supply. Then the
USB connector can be attached to/detached from your computer system with
drive power either on or off.
Magnetic Interference - Do not place the drive and/or disk near a monitor
or speaker as interference from such a device may affect the normal operation
of the drive.
Emergency eject hole Power/Activity light SCSI IN connector SCSI OUT connector
Disk insert/eject button Power supply connector
4
INSTALLATION GUIDE
ORB 2.2GB SCSI Disk Drive, Power Supply, SCSI cable
adapter, USB to SCSI cable, ORB Disk with Disk Case,
ORB Installation Suite CD , and ORB Owner’s Manual.
Figure 1
1.6 HARDWARE SETUP
In this section you will be physically connecting your ORB SCSI Drive through a
USB to SCSI cable to your computer system.
1. Unpack your ORB Drive and accessories.
You should have: An ORB 2.2GB SCSI Disk Drive, Power Supply, DB25 to HD50
cable adapter, USB to SCSI cable, ORB Disk with Disk Case, ORB Installation Suite
CD, and this Owner’s Manual. (see Section 1.4 Package Contents – Figure 1 –
page 3)
2. Connecting to an existing SCSI chain.
ORB USB Drive is an ORB SCSI Drive that connects to a USB port on your computer system through a USB to SCSI cable. If you want to daisy-chain ORB SCSI Drives
to a PC, refer to Section 1.9, Connecting ORB Drive to an ORB SCSI chain, before
proceeding further. Otherwise, go to the next step.
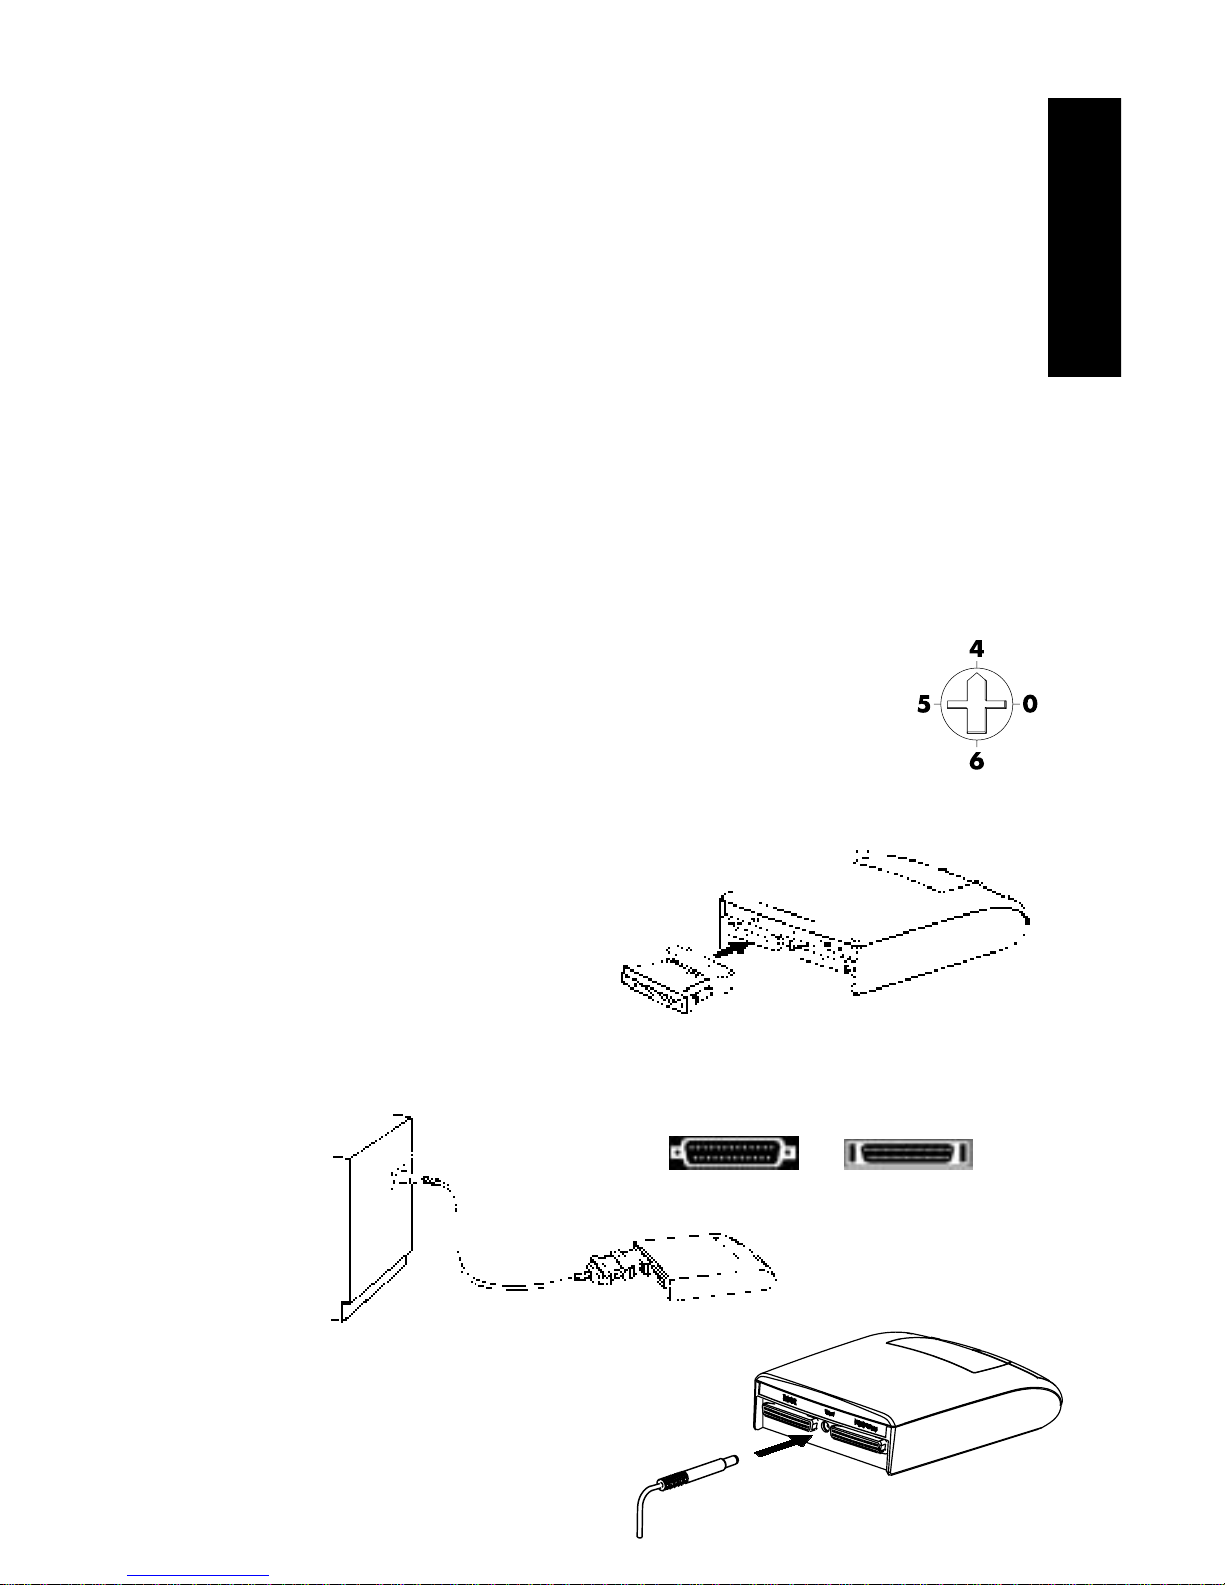
3. Assign a SCSI ID to your ORB Drive.
A SCSI ID is an integer, ranging from 0 to 7, each identifies a SCSI device on the
same SCSI chain. ID 7 is used by the USB to SCSI cable.
You can find ORB Drive’s ID switch on the bottom of the drive as shown
in Fig ur e 4 . The available IDs for the ORB Drive are ID 0, 4, 5 and 6.
The switch shown in Figure4 is set to ID 4 . If you are connecting this
drive to a Mac, the drive has to be set to ID 0 only.
You will need a #0 Philips screw driver to change the ID setting.
Figure 4
If the ORB SCSI Drive is the only SCSI device connected to the USB to SCSI cable,
you can set the ID to any value. Otherwise, refer to section 1.9, Connecting ORB
Drive to an ORB SCSI Chain, before proceeding futher.
4. Connect the HD50 end of the SCSI cable
adapter to the ORB Drive’s SCSI IN
connector (left connector when
facing the rear of the drive). Figure 5
5. Connect the DB25 (male) end of the SCSI cable adapter to the
DB25 (female) end of the USB to SCSI cable.
Figure 6
6. Connect the ORB Drive power supply.
First, attach the round power connector from
the power supply to the ORB Drive (center,
rear of the drive). Then plug the power
supply into an AC outlet.
Figure 7
5
INSTALLATION GUIDE
DB25 HD50

!
!
!
PROBLEM! If the Power/Activity light is not glowing green or
does not light, refer to Section 3, Troubleshooting.
Caution! Power should not be applied to the ORB Drive until
the SCSI to ORB Smart cable is attached to the drive.
Afterwards, the USB connector can be attached to/detached
from your computer system with Drive power either on or off.
7. Insert the ORB Disk supplied with your drive, into the drive.
Press the Insert/Eject button on the front of the drive. The drive door will open for
aproximately 5 seconds.
To insert the ORB disk, slide the disk all the way into your ORB Drive. Push in and
then firmly press down on the disk until it snaps into place. You can refer to Section
2.2, Using ORB Disks, for further information about inserting disks.
Within a few seconds the door should close and the Power/Activity light should
begin flashing amber.
Within approximately 15 seconds the Power/Activity light should stop blinking and
will glow green. This indicates that the disk is mounted and your drive is ready.
PROBLEM!: The disk ejects (does not mount), refer to Section
3, Troubleshooting.
8. Connect the ORB Drive to the computer.
Connect the USB connector end of the USB to SCSI cable to an available USB port
on your computer system. A USB port is labeled with the USB icon.
If you set up the ORB Drive on a PC, continue with
Section 1.7. If the setup is on a Mac system, go to Section 1.8.
1.7 PC DRIVER INSTALLATION
The ORB USB driver has to be installed before Windows 98 is able to recognize and
assign a driver letter to your ORB Drive.
You will see a "New Hardware Found" message right after the USB
drive is connected to your system.
1. Insert the ORB Installation CD into your CD-ROM drive.
2. Click "Next" when Windows searches for the driver for eUSCSI Bridge Ver 1.11.
6
INSTALLATION GUIDE

!
3. Choose the option to "Search for the best driver for your device" then
click "Next".
4. Check only "Specify a location" then click "Browse".
5. In the browse window,
• double-click on the CD-ROM drive icon
• double-click on the PC folder
• double-click on the Driver folder
• then click OK.
6. Click "Next" when Windows searches for eUSB SCSI Adapter.
7. Make sure the location specified is the same as in Step 5 then click on OK.
8. After the installation is completed, you should see a new removable drive icon in
My Computer.
You can also install the driver at a later time by
1. Close all open applications.
2. Insert the ORB Installation CD into your CD-ROM drive.
3. Run the installation by
• double-click on My Computer on the Windows desktop
• double-click on the CD-ROM drive icon
• double-click on the PC folder
• double-click on the file named Setup (Setup.exe).
4. To install your ORB USB driver, follow the instructions displayed.
5. After the installation is completed, you should see a new removable drive icon in
My Computer.
PROBLEM! If you still see a "New Hardware Found" message
after the computer is restarted, refer to Section 3,
Troubleshooting.
CONGRATULATIONS! YOUR ORB DRIVE IS NOW READY TO USE.
1.7.1 WINDOWS 98 UTILITIES
You can utilize the following native Windows 98 utilities with your ORB USB drive.
Eject – You can eject an ORB disk by a right-click on the Removable Drive icon
under My Computer or Windows Explorer, then choose Eject.
Partition – The ORB disk is shipped with a FAT16 extended partition. It can be re-
partitioned with fdisk under DOS Command Prompt. You can get to DOS Command
prompt on a Windows 98 System from Start/Programs/MS-DOS prompt. For help
and information on fdisk, refer to Microsoft Windows 98 Users Manual.
Format – The disk can be formatted with Microsoft’s format utility by right-click on
the Removable Drive icon under My Computer or Windows Explorer, then choose
7
INSTALLATION GUIDE

!
Format. For help and information on Format, refer to Microsoft Windows 98 Help
menu by going to Start/Help, click on Index tab and type in formatting in the space
provided.
ScanDisk – This Windows utility scans your ORB Disk(s) for bad blocks. Go to
Start/Programs/Accessories/System Tools/ScanDisk to launch this program. For
help and information on ScanDisk, refer to Microsoft Windows 98 Help menu by
going to Start/Help, click on Index tab and type in scandisk in the space provided.
Backup – You can backup data to your ORB drive with Microsoft Backup. It can be
accessed from Start/Programs/Accessories/System Tools/Backup. Once the application is launched, you can access its help from the Help menu.
1.8 MAC DRIVER AND SOFTWARE INSTALLATION
The ORB USB driver has to be installed before Mac OS is able to mount your ORB
USB Drive. This will also install ORB Tools for Mac on your system.
Close all open applications and disable virus protection before
proceeding further.
1. Insert the ORB Installation CD into your CD-ROM.
2. Launch the installation by
• double-click on the CD-ROM icon
• double-click on the MAC folder
• double-click on the file named ORB Tools Installer.
3. To install your ORB USB driver, follow the instructions displayed.
4. After the driver installation is completed, your ORB USB Drive should appear as
an ORB Drive icon on the desktop.
PROBLEM! If no drive icon appears, refer to Section 3,
Troubleshooting.
5. The ORB disk is PC formatted, You can re-format it to Mac format through the
OS or ORB Tools for Mac.
CONGRATULATIONS! YOUR ORB DRIVE IS NOW READY TO USE.
8
INSTALLATION GUIDE
 Loading...