

Page 1

WWW.CASTLE.UK.COM
Tel: Fax:01480 447700 01480 431767
CSLASSIC ERIES
LR
OUDSPEAKER ANGE
IAG House, Sovereign Court, Ermine Business Park, Huntingdon, Cambridgeshire, PE29 6XU, England
IM
NSTRUCTION ANUAL
Page 2
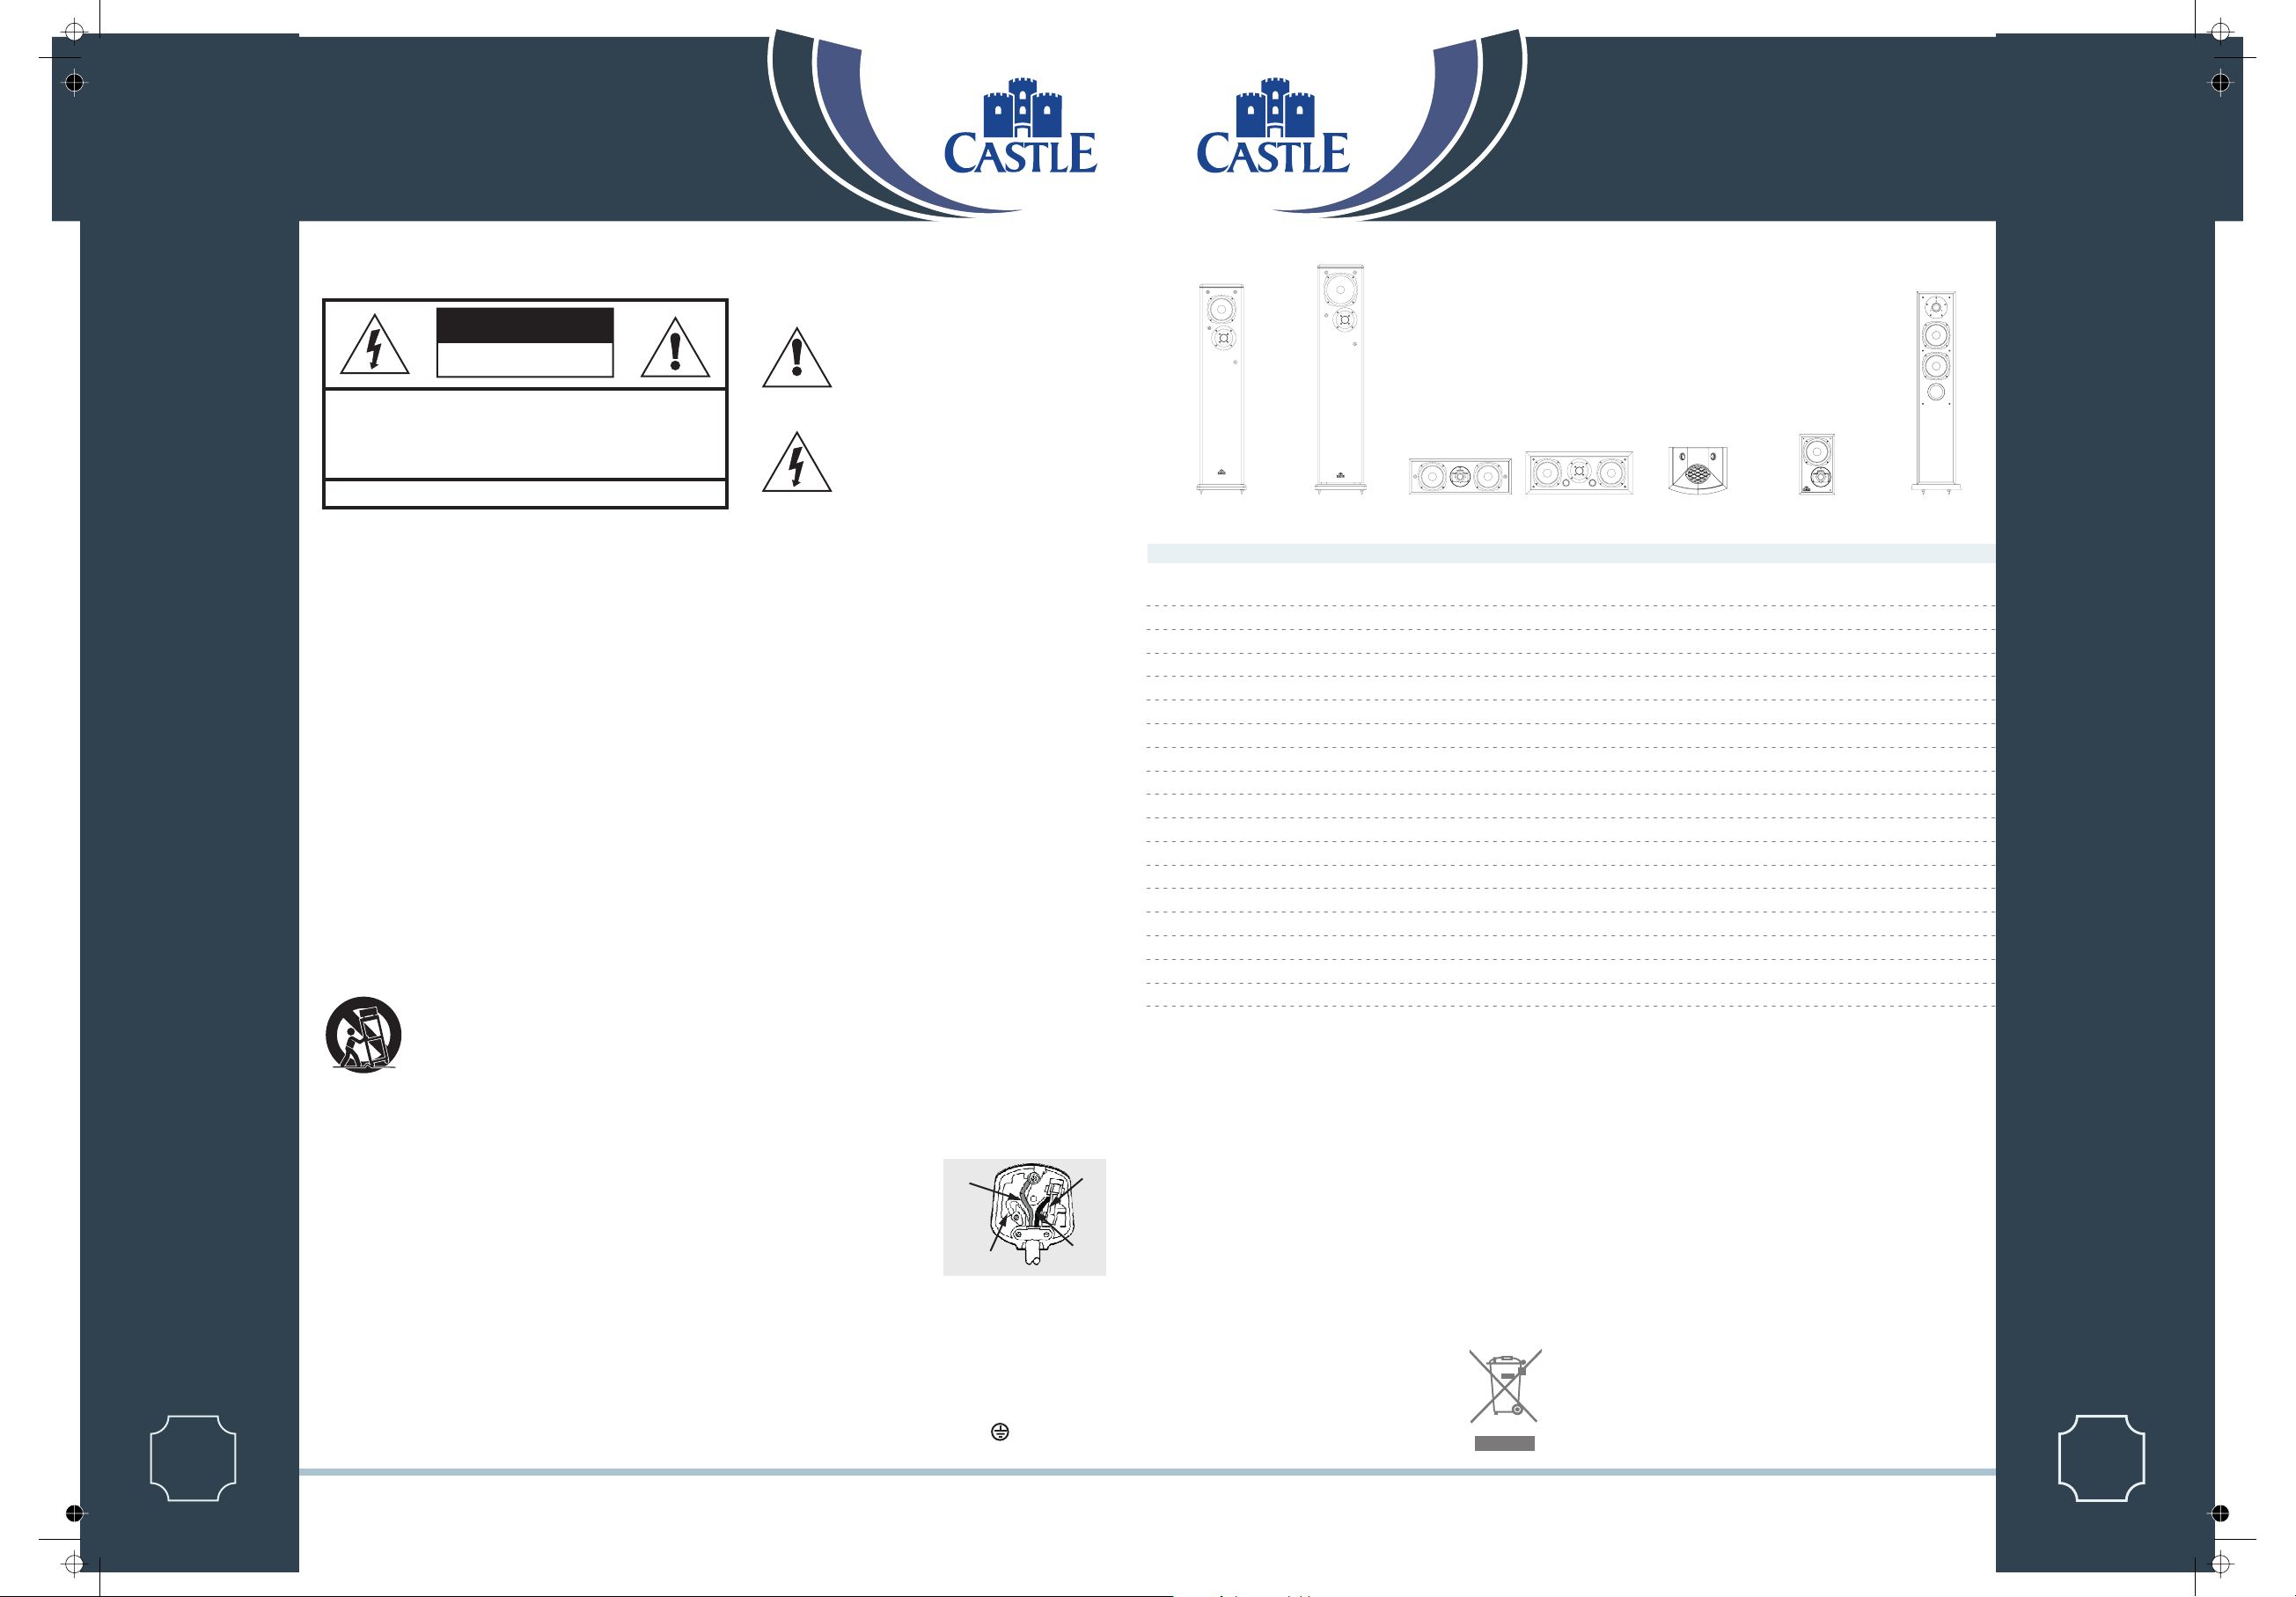
User Cautions
CAUTION!
RISK OF ELECTRIC SHOCK
DO NOT OPEN
TO REDUCE THE RISK OF ELECTRIC SHOCK
CS
ADVERTISSEMENT: RISQUE DE CHOC ELECTRIQUE- NE PAS OUVRIR
LASSIC ERIES
1
IMPORTANT SAFETY INFORMATION
Read these instructions.
Keep these instructions.
Heed all warnings.
Followall instructions.
Do not usethis apparatus near water.
Clean only withdry cloth.
Do not blockany ventilationopenings.
Install in accordancewith the manufacturer's instructions.
Do not install near any heat sources such as radiators, heat
registers, stoves, or other apparatus (including amplifiers) that
produce heat.
Do not defeat the safety purpose of the polarized or grounding
type plug. A polarized plug has two blades with onewider thanthe
other. A grounding type plughas two bladesand a third grounding
prong. The wider blade or the third prong are provided for your
safety. If the provided plug does notfit intoyour outlet, consultan
electrician for replacementof theobsolete outlet.
Protect the power cord from being walked on or pinched,
particularly at plugs, convenience receptacles, and the point
where they exitfrom the apparatus.
Use only attachments/accessories specified by the
manufacturer.
Unplug this apparatus during lightning storms or when unused
for long periodsof time.
Refer all servicing to qualified service personnel. Servicing is
required when the apparatus has been damaged in any way, such
as power-supply cord or plug is damaged, liquid has been spilled
or objects have fallen into the apparatus, the apparatus has been
exposed to rain or moisture, does not operate normally, or has
been dropped.
Warning:Toreduce the risk of fireor electricalshock,donotexpose
thisproducttorainormoisture. Theproduct must not beexposedto
drippingandsplashing andnoobjectfilled with liquids-such asavase
of flowers-shouldbeplacedontheproduct.
No naked flamesources such ascandles should be placed on the
product.
Caution: Changes or modifications not expressly approved by
the manufacturer could void the user's authority to operate this
device.
WarningCastle Subwoofer:
DO NOT REMOVE COVER (OR BACK)
NO USER-REMOVEABLE PARTS INSIDE
REFER SERVICING TO QUALIFIED PERSONNEL
Use only with a cart, stand, tripod, bracket, or
table specifiedby the manufacturer,or sold with
the apparatus. When a cart is used, use caution
when moving the cart/apparatus combination
to avoid injury from tip-over.
The mainspower switchfor this
appliance is located on the rear panel. To permit free access to this
switch, the apparatus must be located in an open area without any
obstructions.
NOTE: Castle Subwoofer:
This equipment has been tested and found to comply with the
limits for a Class B digital device, pursuant to part 15 of the FCC
Rules. These limits are designed to provide reasonable protection
against harmful interference ina residential installation.
This equipment generates, uses and can radiate radio frequency
energy and, if not installed and used in accordance with the
instructions, may cause harmful interference to radio
communications. However, there is no guarantee that interference
will not occur in a particular installation. If this equipment does
cause harmful interference to radio or television reception, which
can be determined by turning the equipment off and on,the user is
encouraged totry tocorrect theinterference by oneor moreof the
following measures:
Reorient or relocate thereceiving antenna.
!
Increase the separationbetween theequipment and receiver.
!
Connect the equipment into an outlet on a circuit different
!
from that towhichthe receiver is connected.
Consult the dealer or an experienced radio/TV technician for
!
help.
IMPORTANT NOTICE TO UK USERS
The power cord on your subwoofer may be supplied with a plug
incorporating afuse, the valueof which is indicated onthe pin face
of the plug. Should the fuse need to be replaced, an ASTA or BSI
approved BS1362 fuse must beused of the same rating.If the plug
is cutoff it must NOT be re-used. Disposeof any such plug safely.
There is a danger of electric shock if a cut-off plug is inserted into
a mains socket.
Connecting aMains Plug
The wires in the mains lead are
coloured in accordance with the
code:
Blue: NEUTRAL, Brown: LIVE:
Green/Yellow: Earth.
As these colours may not
correspond to the coloured markings identifying the terminals in
your plug, proceed as follows: The BLUE wire must be connectedto
the terminal marked withthe letter Nor coloured BLUEor BLACK.
The BROWN wire must be connected to the terminal marked with
the letterL or colouredBROWNor RED.The GREEN/YELLOW
wire must be connected to the terminal marked with the letter E or
coloured GREEN ormarked withthesymbol
This symbol indicates that there are
important operating and maintenance
instructions in the literature accompanying
this unit.
This symbol indicates that dangerous
voltage constituting a risk of electric shock
is present within this unit.
GREEN
&
YELLOW
(EARTH)
BLUE
(NEUTRAL)
FUSE
BROWN
(LIVE)
Harlech S2
2 channel
Floorstanding
2 x 130mm
28mm
25 - 150W
8 ohms
no
89 dB
45Hz - 20kHz
40Hz
1.8kHz
915 x 200 x 335
951
225x375
22kg ( 48.4 lbs)
1105 x 295 x 440
(55lbs)
25kg (55kg )
Howard S3 Classic Keep 2 Bastion
2 channel
Floorstanding
2 x 150mm
28mm
25 - 175W
8 ohms
no
90 dB
35Hz - 20kHz
40Hz
250Hz, 1.8kHz
1000 x 210 x 335
1043
230x375
26kg ( 57.2 lbs)
1165 x 310 x 425
28.5 kg (62.7 lbs)
AV Centre
Centre position
2 x 130mm
19mm
15 - 110W
8 ohms
yes
89 dB
70Hz - 20kHz
65Hz
2.1kHz
162 x 465 x 195
-
-
6.8kg (14.96 lbs)
580 x 305 x 265
7.5kg ( 16.5 lbs)
AV Centre
Centre position
2 x 130mm
28mm
25 - 150W
8 ohms
yes
91 dB
65Hz - 20kHz
60Hz
2.1kHz
195 x 486 x 240
-
-
10.2kg (22.4 lbs)
590 x 345 x 310
11.5kg ( 25.3 lbs)
Produced after 13thAugust2005.
Waste electrical productsshould not bedisposed of with household
waste.Please recycle wherefacilities exist.
Check with your Local Authority or retailerfor recycling advice.
Page 21 Page 21IFC
Oriel
AV Surround
Wall Mount
100mm
2 x 25mm
15 - 75W
8 ohms
no
87 dB
70Hz - 20kHz
90Hz
3.9kHz
245 x 275 x 130
4.0kg (8.8 lbs)
330 x 330 x 310
5.6kg (12.3 lbs )
RICHMOND CLASSIC SERIES
Classic 3i
2Ch&AV
Stand Mount
130mm
19mm
15-80W
8 ohms
yes
88 dB
65Hz -20kHz
65Hz
2.8kHz
280 x 165 x 235
-
-
4.85kg (10.6 lbs)
365 x 445 x 345
11kg (24.2 lbs)
Classic 7i
2Ch&AV
Floorstanding
2 x 130mm
25mm
15 - 150 W
8 ohms
yes
90 dB
45Hz - 22kHz
45Hz
2.6kHz
900 x 180 x 275
945
210 x 317
17.2kg (37.8 lbs)
410 x 1085 x 315
19.7kg (43.4 lbs)
CS
LASSIC ERIES
1
Page 3
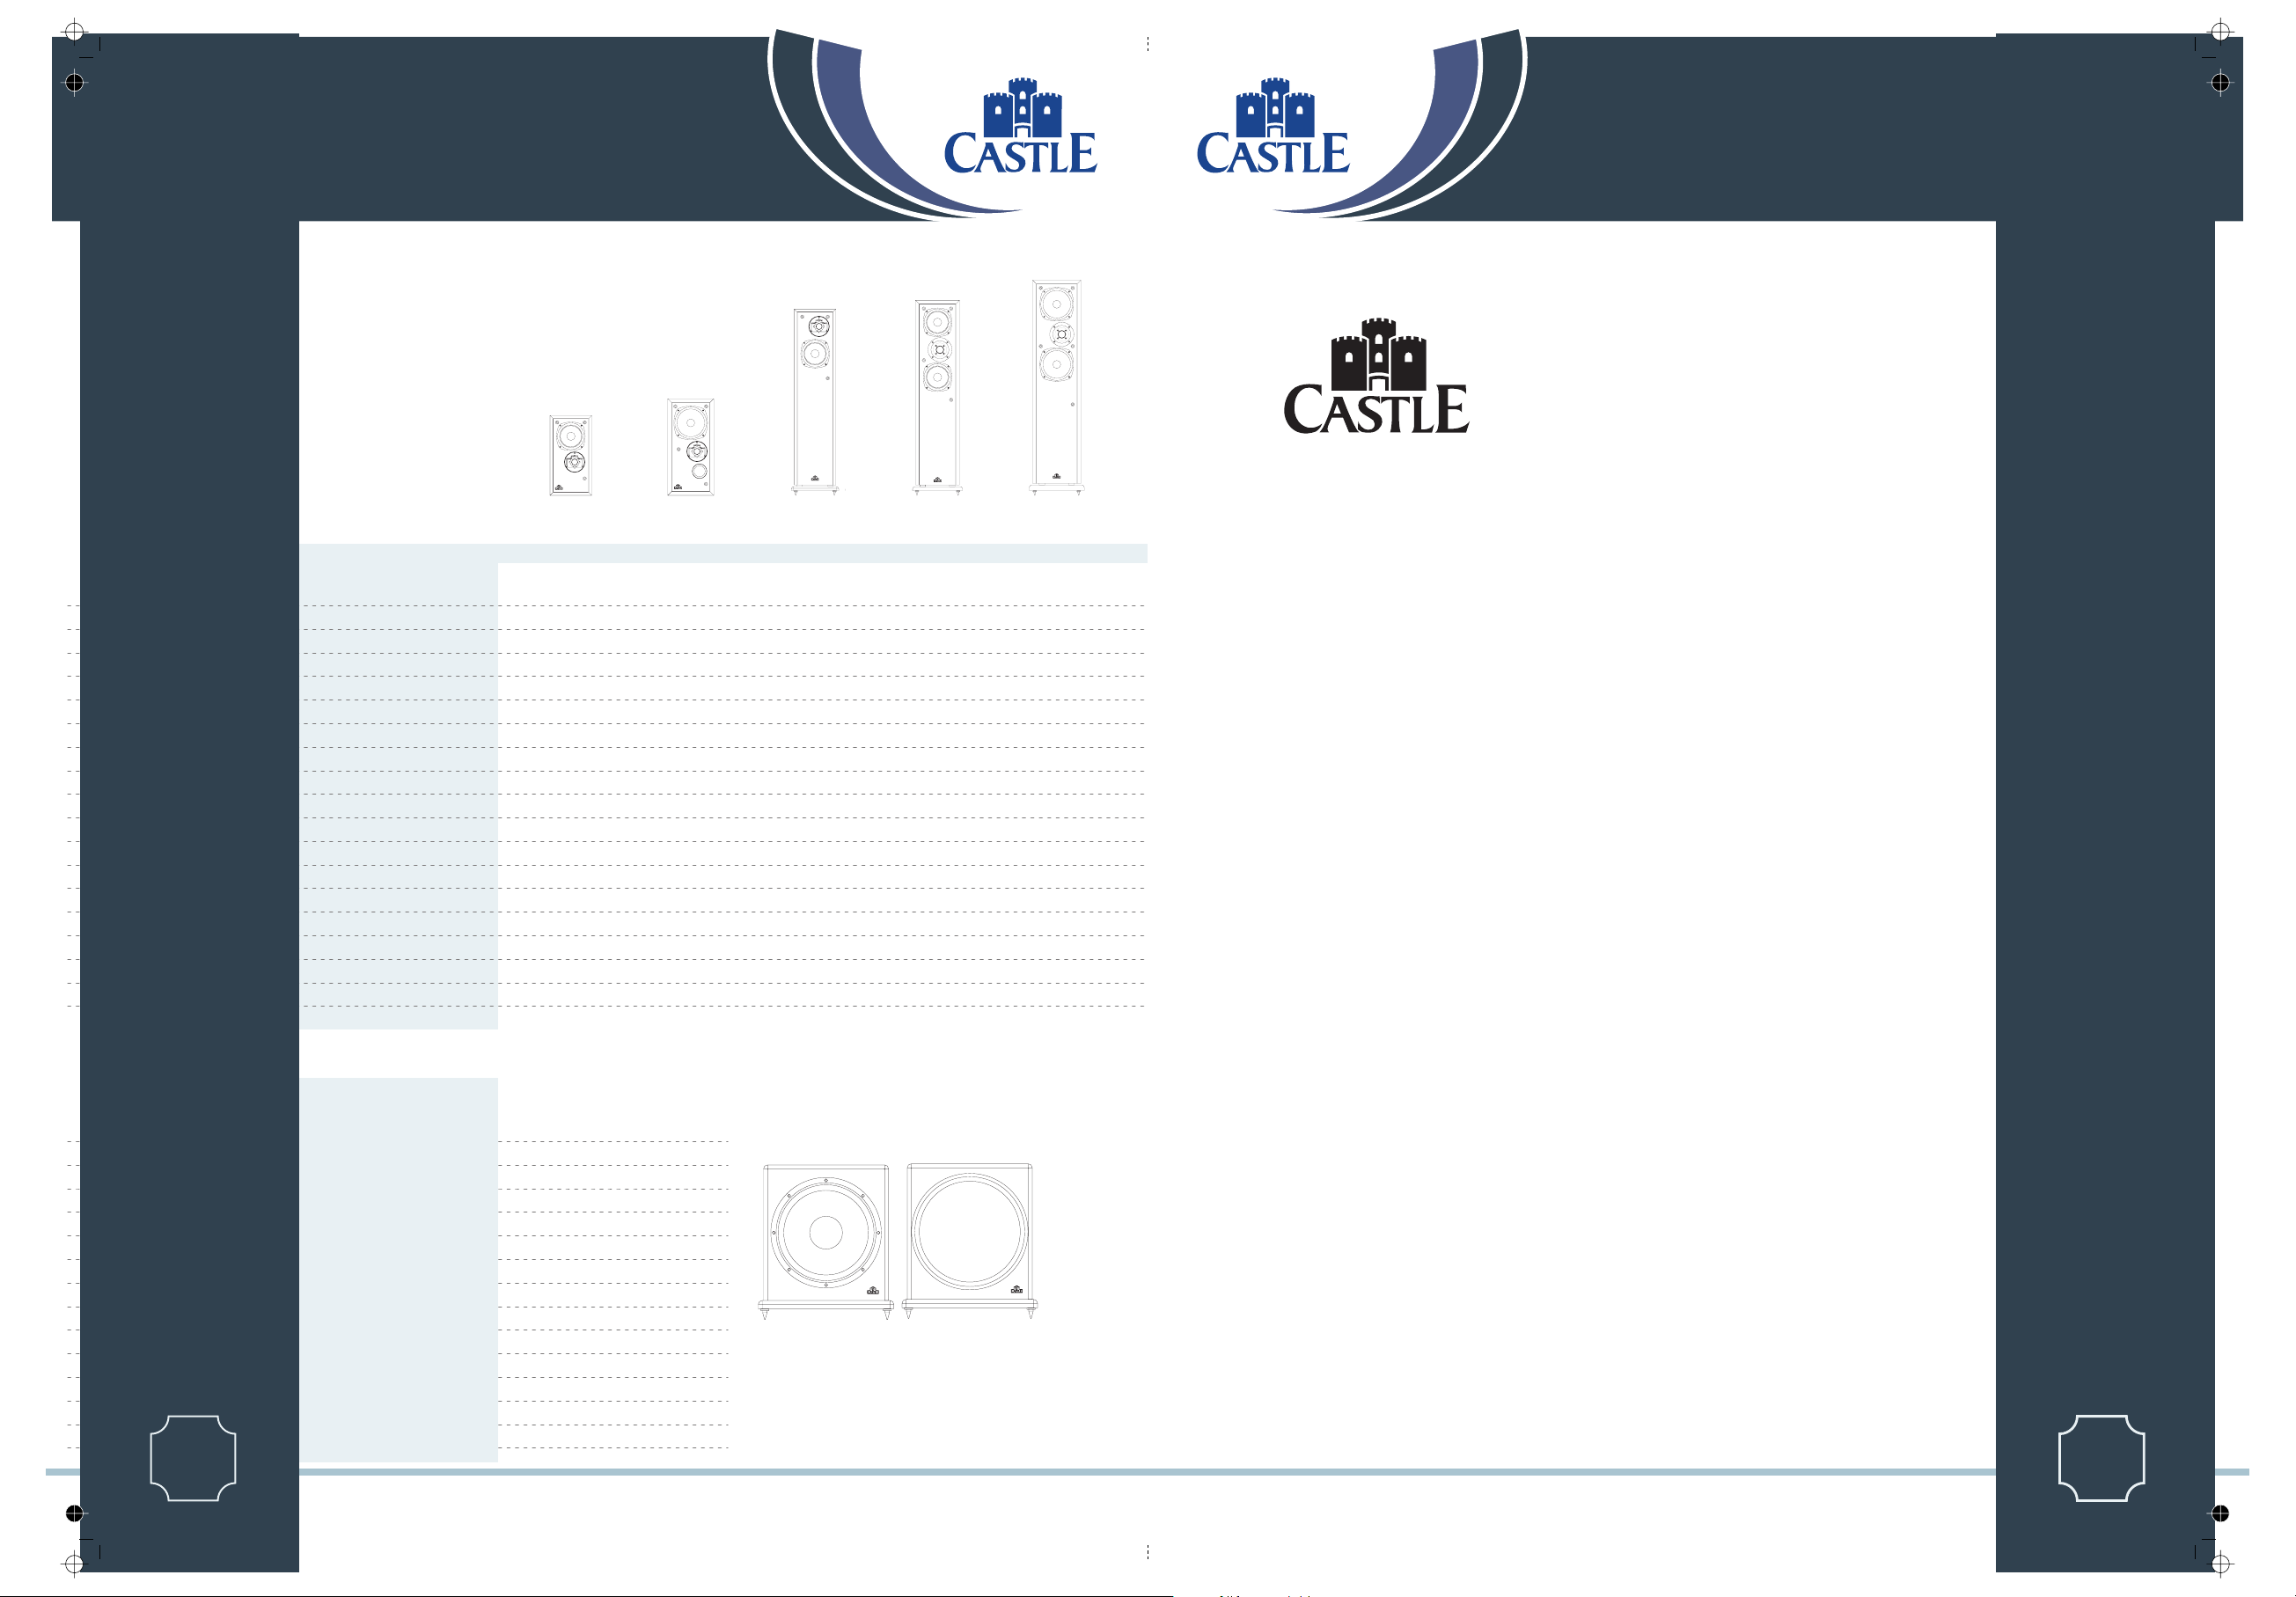
Specifications
Introduction – A Tradition Renewed
Castle Acoustics was founded in 1973 by a group of six senior
designers then working for one of the world’s oldest and most
respected hi-fi brands, Wharfedale. They had a vision of a new
direction for loudspeaker development.
CS
LASSIC ERIES
Bass Driver
Amplifier power (rec.)
Impedance (Nominal)
A/V shielded
Sensitivity (1W@1M)
Nominal Frequency Range
Crossover Frequency
Dimensions (HxWxD) (mm)
Height on plinth and spikes
Plinth Size (W x D) (mm)
Net weight
Carton size (mm)
Gross weight
Bass Driver
A/V shielded
Amplifier power
Line Input Sensitivity
Avg. Max output at 1 metre
Boundary response
Crossover Range
Dimensions (HxWxD) (mm)
Height on spikes (mm)
Plinth Size (W x D) (mm)
Net weight
Carton size (mm)
Gross weight
1
Page 20
Function
Format
Tweeter
Freq. Fb
Finishes
Finishes
CLASSIC SERIES
Durham 3 Warwick 3 Pembroke Stirling 3Parameter
2 channel
Stand Mount
130mm
19mm
15 - 75W
8 ohms
yes
88 dB
55Hz - 20kHz
60Hz
3kHz
365 x190 x 225
-
-
6.3kg ( 13.9 lbs)
460 x 605 x 295
14kg (30.8 lbs)
Real wood veneer: cherry, maple, natural oak, black oak, antique oak, mahogany, walnut, rosewood
Classic SubParameter
300mm
no
300W
325mv for 150W
120dB
35Hz - 120Hz
35 - 85Hz (in 6x10dB steps)
435 x 380 x 420
460 mm
410 x 375
28kg ( 61.6lbs )
515 x 495 x 615
30.5 kg ( 67.1kg )
(67.1lbs)
To match Castle range
2 channel
Stand Mount
150mm
19mm
15 - 110W
8 ohms
yes
87 dB
50Hz - 20kHz
45Hz
2.2kHz
440 x 210 x 245
-
-
(18.7lbs)
8.5kg ( 18.7kg )
585 x 615 x 345
19kg ( 41.8 lbs )
2 channel
Floorstanding
130mm
19mm
15 - 75W
8 ohms
no
87 dB
45Hz - 20kHz
50Hz
2.5kHz
710 x 190 x 220
746
215x265
9.7kg (21.3 lbs)
1000 x 605 x 295
22kg ( 48.4 lbs)
2 channel
Floorstanding
2 x 130mm
28mm
25 - 150W
8 ohms
yes
91 dB
45Hz - 20kHz
45Hz
2.2kHz
845 x 200 x 245
881
225 x 275
15kg (33 lbs )
1015 x 295 x 345
(36.3lbs)
16.5kg ( 36.3kg )
Conway 3
2 channel
Floorstanding
2 x 150mm
28mm
25 - 175W
8 ohms
yes
91 dB
40Hz - 20kHz
45Hz
1.8kHz
925 x 220 x 270
968
245 x 295
21kg (46.2 lbs)
1085 x 315 x 365
23kg ( 50.6 kg )
(50.6lbs)
This gifted group of engineers rated craftsmanship and quality of
materials as fundamental in loudspeaker design. The newly founded Castle Acoustics decided to go
its own way and manufacture each Castle loudspeaker to the finest furniture-quality standard using
the most sought after woods and veneers allied to the most advanced acoustic materials and
technology of the time.
Now part of the International Audio Group, and under the watchful eyes of Chief Engineer, Steve
Hewlett, Castle Acoustics faces a bright future. The new Classic series re-establishes Castle
products at the very cutting edge of research into acoustics, while retaining the traditional virtues
of impeccable design and presentation – a perfect balance of form and function.
Contents
Cautions ...........................................................................Ifc
Introduction .........................................................................1
Good Practice Guide..................................................................2
Unpacking The Equipment ............................................................3
Fitting Spikes
Cables and Connectors 4
Crossovers 5
Positioning Stereo Loudspeakers........................................................6
Connecting Stereo Loudspeakers -1 .....................................................7
Connecting Stereo Loudspeakers -2 .....................................................8
Positioning Castle AV Loudspeakers.....................................................9
Wall Mounting the Castle Oriel ........................................................10
Connecting Castle AV Loudspeakers ...................................................10
The Castle Classic Subwoofer .........................................................11
Preparing The Subwoofer.............................................................12
Connecting The Subwoofer ...........................................................13
Operating the Subwoofer .............................................................15
Fine Tuning Procedures ..............................................................16
Setting Up a Home Theatre System ....................................................17
Final Thoughts ......................................................................19
Service And Warranty ................................................................19
Specifications .......................................................................20
.........................................................................3
................................................................
...........................................................................
CS
LASSIC ERIES
1
Page 1
Page 4
Foreword
Before connecting and using your loudspeakers, please bear the following points in mind:
CS
Switch off the amplifier and all sources before making connections to your sound system. When you switch on
#
the system or change sources, set the volume control to minimum and turn up the level gradually.
The position of your Volume Control is NOT a reliable guide as to the maximum capabilities of your sound system.
#
LASSIC ERIES
Playing the systemwith extremesettings of volume andtone controls may damagethe amplifier and loudspeakers.
Do not connectloudspeakerterminals tothe mains supply.
#
Ensure that yourloudspeakers are correctly wired and arein phase.
#
Do not subjectyour loudspeakersto excessivecold, heat orsunlight.
#
If you are shelf mounting your loudspeakers, make sure they are not placed on the same shelf as your source
#
components.
Do not place heavy objects on top of loudspeaker cabinets. If you play the loudspeakers with the grilles removed be
#
careful to protectthe driveunits from children andpets.
Do not use makeshift stands. Always fit a manufacturer's approved stand using the instructions and the fixings
#
provided. Yourdealer will adviseyou.
Do not attempt to dismantle the loudspeaker. There are no user serviceable parts inside and you will invalidate the
#
warranty.
Some Front and all Centre loudspeakersare magnetically screened. You should site front loudspeakers at least 0.5 m
#
away from TV sets and magnetic storage media. AllCastle centreloudspeakers may be sited close to aTV screenwith
no adverse effects. The specificationson Pages 20 and21 have AV shielding detailsfor yourloudspeakers.
When connecting your loudspeakers, do not run cable across areas of open floor where they may be a source of
#
danger. Run them safely, aroundroom boundaries if necessary.
Final Thoughts
Looking After Your Loudspeaker
#
Your Castle Loudspeakers use a specially hardwearing sealed finish. They should bot be waxed or treated with
spray polishes which will smear and dim their lustrous finish.. Occasionally polish them with a dry or barely
moist cloth to remove dust and finger marks, etc.
Occasionally, remove the loudspeaker grilles and brush them gently with a soft brush before replacing them
#
carefully.
Never stand objects on your loudspeakers. In particular do no stand flowers atc on them - they are not
#
jardinieres!
##Avoid getting any liquid behind the grille. If you accidentally spill liquid on your loudspeakers, take them to
your dealer for attention before using them again.
Do not open the speakers; there are no user serviceable parts inside. Never touch the drive units either with
an object or your hands.
Quality Assurance
Your Castle loudspeakers have been constructed to the highest standards. From the top grade furniture
construction and finish to the carefully designed and selected acoustic components, the Castle range is a
testament to fine design, fine engineering and fine craftsmanship. Our speakers are built to provide a lifetime of
pleasure to the eye, the ears and through the music they play, the soul. We hope you will derive many years of
good service from our products.
Servicing
Servicing of Castle products should only be carried out by authorised service agents. If service is required the
equipment should be returned, securely packaged, preferably using original packaging, to your dealer.
In the UK equipment may be returned to the IAG Service Centre. In the USA equipment may be returned to the
Service address shown on this page. Always telephone before returning any equipment. A note should be
enclosed giving your name, address, telephone number, and a brief description of the reason for return.
CS
LASSIC ERIES
If you require service outside the Warranty period, do not hesitate to contact your dealer.
Service Addresses
For technical support, servicing or product queries and information please contact either your local retailer or the
offices below.
UK
IAG Service Dept.
Unit 4
St Margaret’s Way
Stukeley Meadows Industrial Estate
Huntingdon
Cambs
PE29 6EB
England
Tel:+44 (0)1480 452561
Fax: +44 (0)1480 413403
1
Page 1Page 2
USA
IAG America, Inc.
8440 154th Avenue NE
Redmond, Washington 98052
USA
Tel: +1 425 861 3909
Fax: +1 425 861 3906
Asia
IAG
Room 2310 - 2311 Press Building,
Shennan Road C,
Shenzhen,
China
Tel: +86-755-82091200
Fax: +86-755-82091205
1
Page 19
Page 5
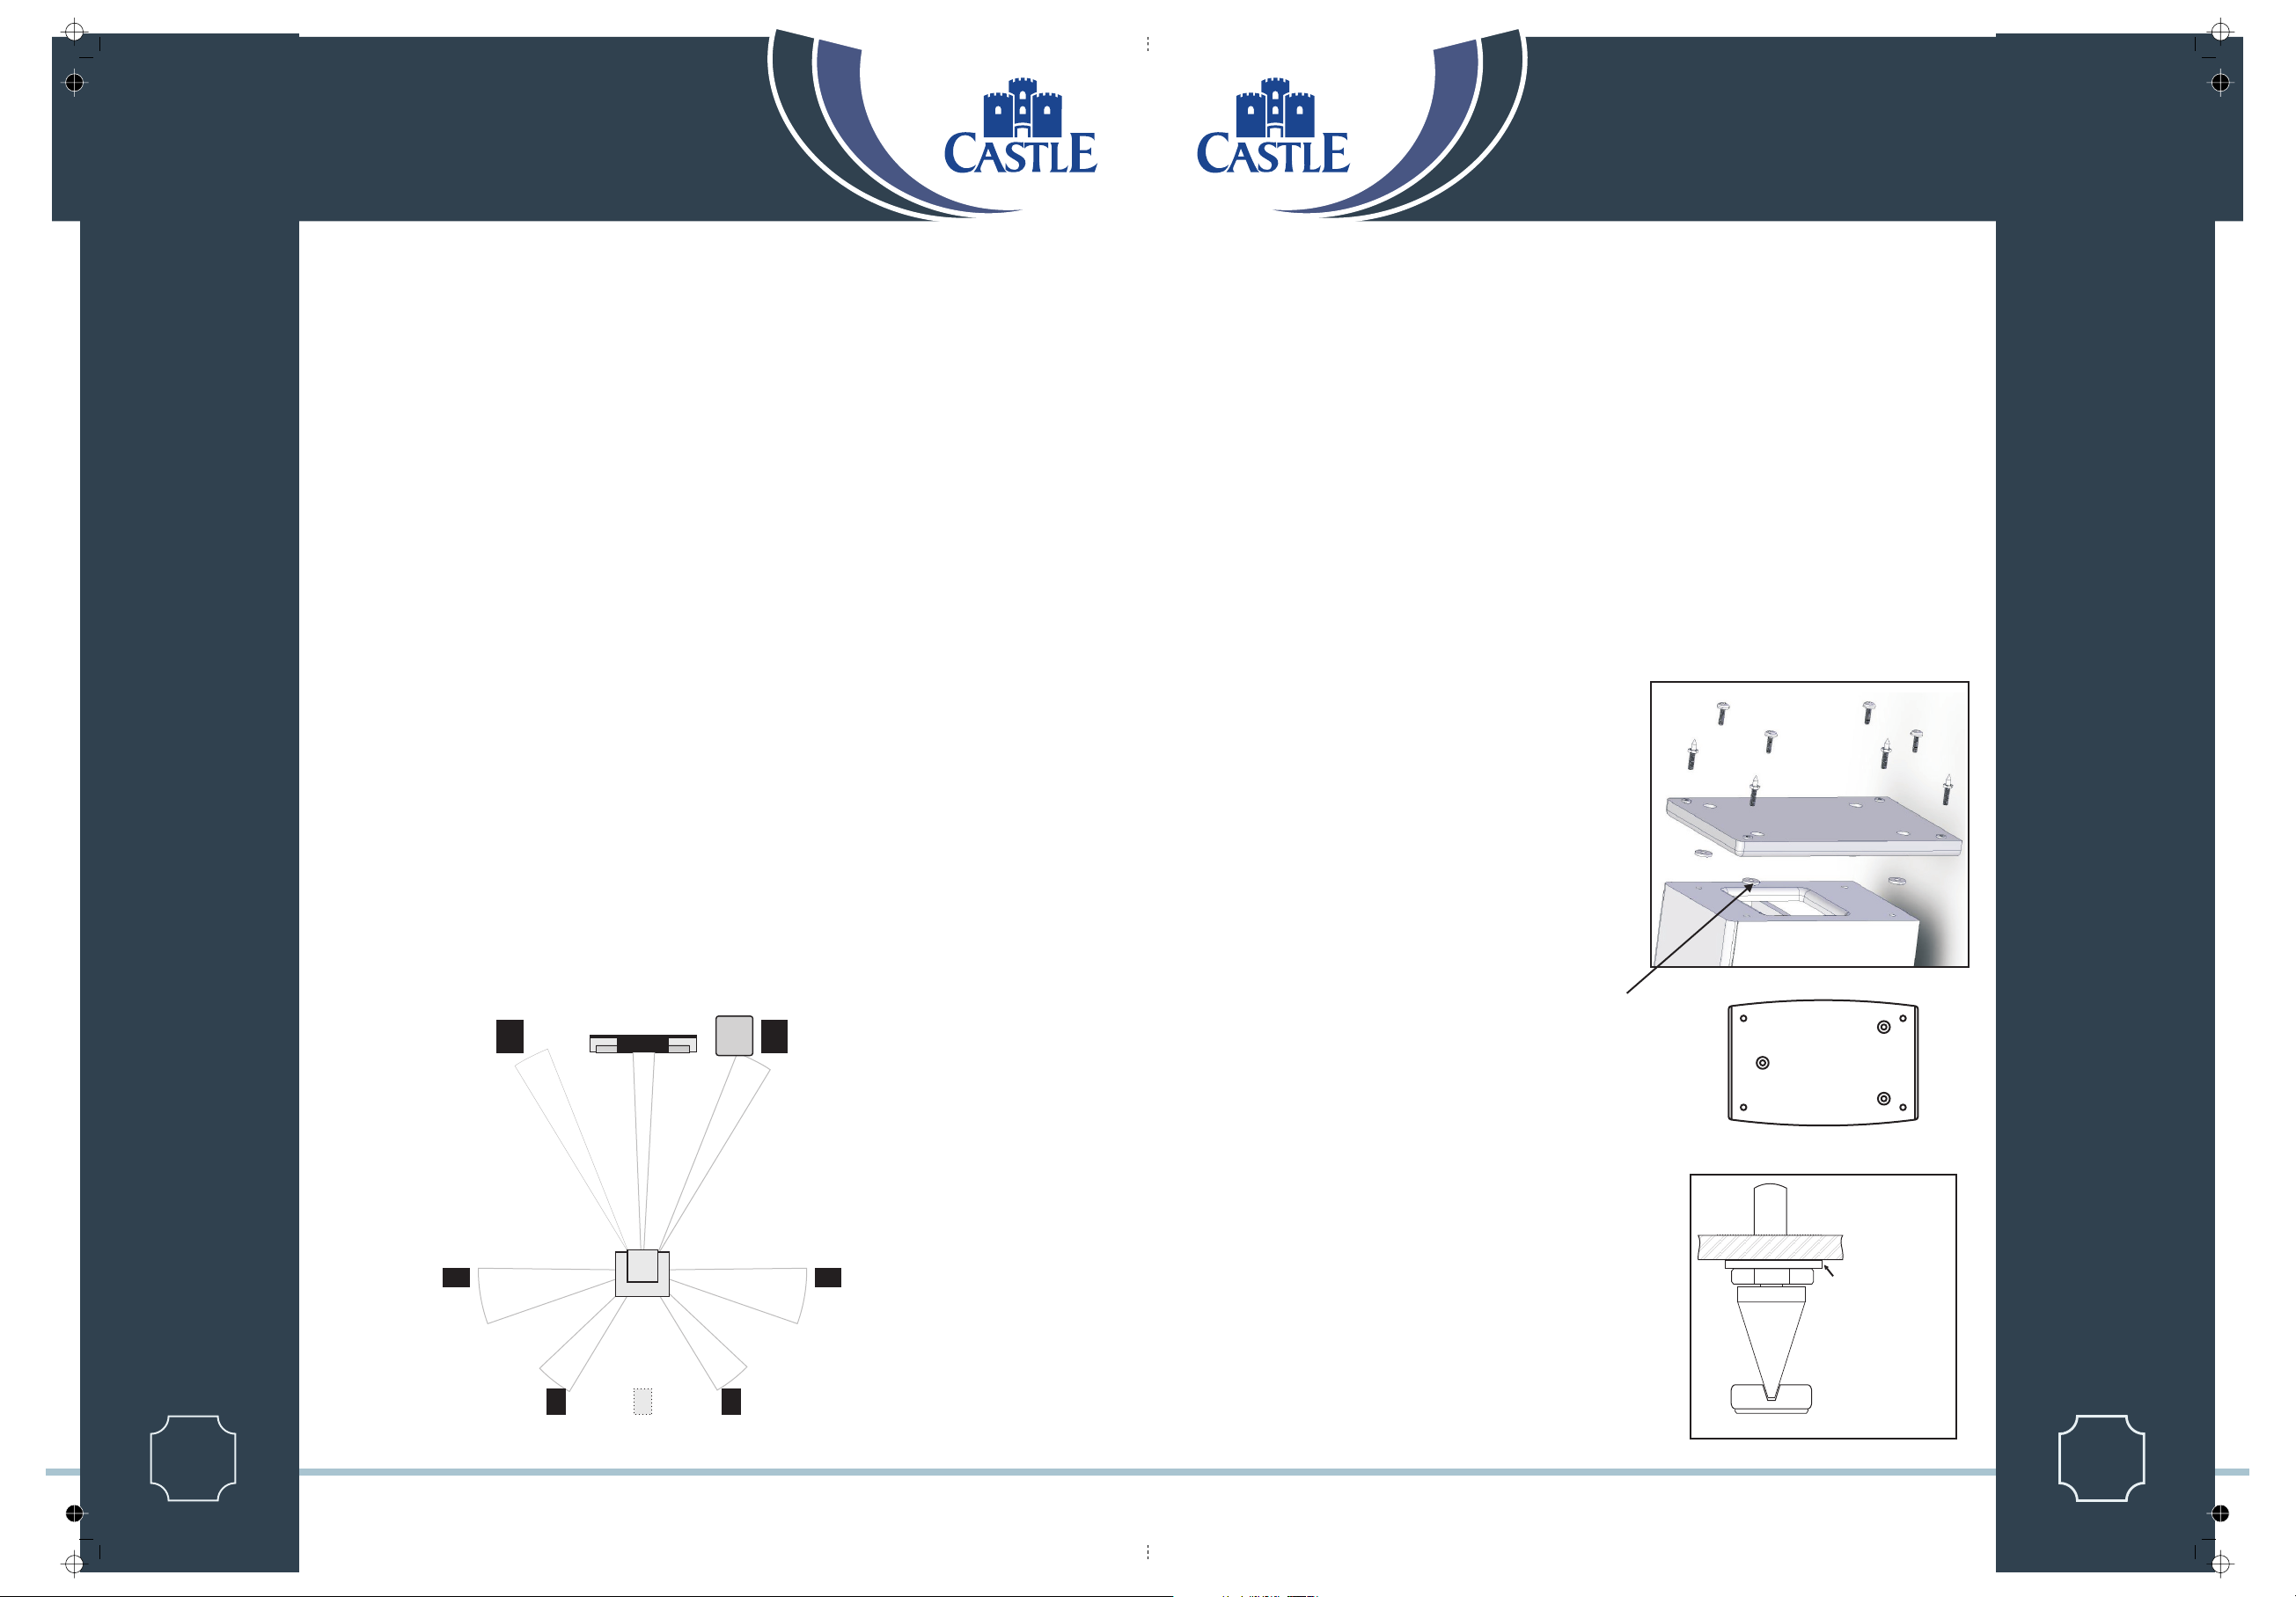
Delay and LFE Settings
The purpose of delay is to enable surround and dialogue information to arrive at the listener’s ears at the same
CS
LASSIC ERIES
time as the Front channels, even when the listening seat is in a non-ideal position.
Rear Delay: If the listening position is equidistant from the Front and Rear speakers, a low delay setting should be
set. The closer the listener is to the Rear speakers the higher should be the delay setting used,
Centre Delay: If the Centre speaker is level with (or slightly behind) the Front speakers, set the delay to zero. If
the Centre speaker is forward of the Front speakers, increase the delay.
LFE: In domestic systems the LFE channel typically feeds into the subwoofer. Where no subwoofer is used, the
LFE signal is combined with Front Channel information. When you set the LFE level at your AV processor, use
care as the powerful low frequencies can overload domestic loudspeakers.
If you hear popping or thumping noises coming from the front loudspeakers or subwoofer, immediately turn the
AV Processor's volume level down and then back off the LFE level. This should cure the problem. If it does not,
back off the volume level at the subwoofer (if you are using one) until the problem disappears.
Please read the relevant sections of your AV amplifier manual and familiarise yourself with the various issues. If
you are unsure, consult your dealer for help.
Expanding the System
Dolby Labs, DTS and THX offer 6.1 and 7.1 formats. Although the precise configuration of these systems will
depend on the capabilities of your processor and you should be guided by those instructions, we would make
some observations.
For most 6.1 and 7.1 formats, and especially Dolby ES, the listening seat should not be too close to the rear wall.
Optimising the time delay so that information from all speakers arrives at the listening seat coherently is critical if
the benefits of these systems are to be fully realised.
Dolby Labs Recommended 7.1 Placement
Unpacking Your Loudspeakers
#
Castle loudspeakers come in many shapes and sizes. Now you have opened the carton, we hope you are reading this
manual.
If you are unpacking the larger loudspeakers or the Classic Subwoofer, please remember that these units are heavy. We
#
suggest that you have someone to assist you.
Lift the loudspeaker carefully out of the packing. Do NOT try and lift the loudspeaker using the cloth bag.
#
Unpack any accessories carefully. The larger loudspeakers will need to be assembled on their plinths and spike kits.
#
If there is any sign of damage or if the contents are incomplete, report this to your dealer as soon as possible.
#
Retain the packing for future safe transport of the product. If you dispose of the packing, do so with respect to any
#
recycling provisions in your area.
Stand mounting and AV loudspeakers are ready to be connected after unpacking.
#
assembled on their plinths and spike kits.
The Castle Oriel has a specific requirement for wall mounting. Instructions are on Page 10.
#
Attaching the Plinth and Spikes to Floorstanding Models
Castle Pembroke, Stirling 3, Conway 3, Harlech S2, Howard S3:
Make you have plenty of unobstructed working space.
#
Place a soft cloth on the floor to protect the loudspeaker.
#
Invert the loudspeaker onto the cloth.
#
Thread a locknut onto each spike and loosely run it up the thread
#
Castle Howard and Harlech models ONLY:
#
plastic spacing washers over the holes as indicated.
Attaching the Plinth:
#
washer over each of the four round head screws. Insert the screws
into the threaded holes on the loudspeaker and tighten securely.
Thread the spikes onto the spike inserts. Tighten them finger tight.
#
Invert the loudspeaker. Be careful not to damage the floor with the
#
spikes.
*The four spacers are for the Howard and Harlech
Place the plinth on the loudspeaker. Place a
Place the provided
The larger loudspeakers will need to be
CS
LASSIC ERIES
1
Page18
Left Front
Left Surround
Left Back
Centre
150º
(Single Back channel for 6.1
LFE
22º
135º
Right Front
30º
90º
110º
Right Back
Right Surround
Castle Richmond Classic 7i
The procedure is the same as that outlined above except that the
#
plinth uses three fixing screws
Richmond Classic 7i Plinth
Levelling the Loudspeakers
When the speaker is upright:
#
will wobble with one spike not contacting the floor. Adjust this spike until
all four spikes are on the floor. With the aid of a spirit level move each
spike in and out until the loudspeaker is level and sitting squarely on all
four spikes with no rocking.
Now tighten each locknut securely against the collar in the plinth to
#
secure the spike
A spike seat is provided for use on wood or stone floors etc. and should
#
be placed as shown.
* On most models four self leveling soft rubber feet are included as an
alternative to spikes.
You will probably find that the speaker
Nut
Collar (In Plinth)
Spike
Using the Spike Seat
1
Page 3
Page 6
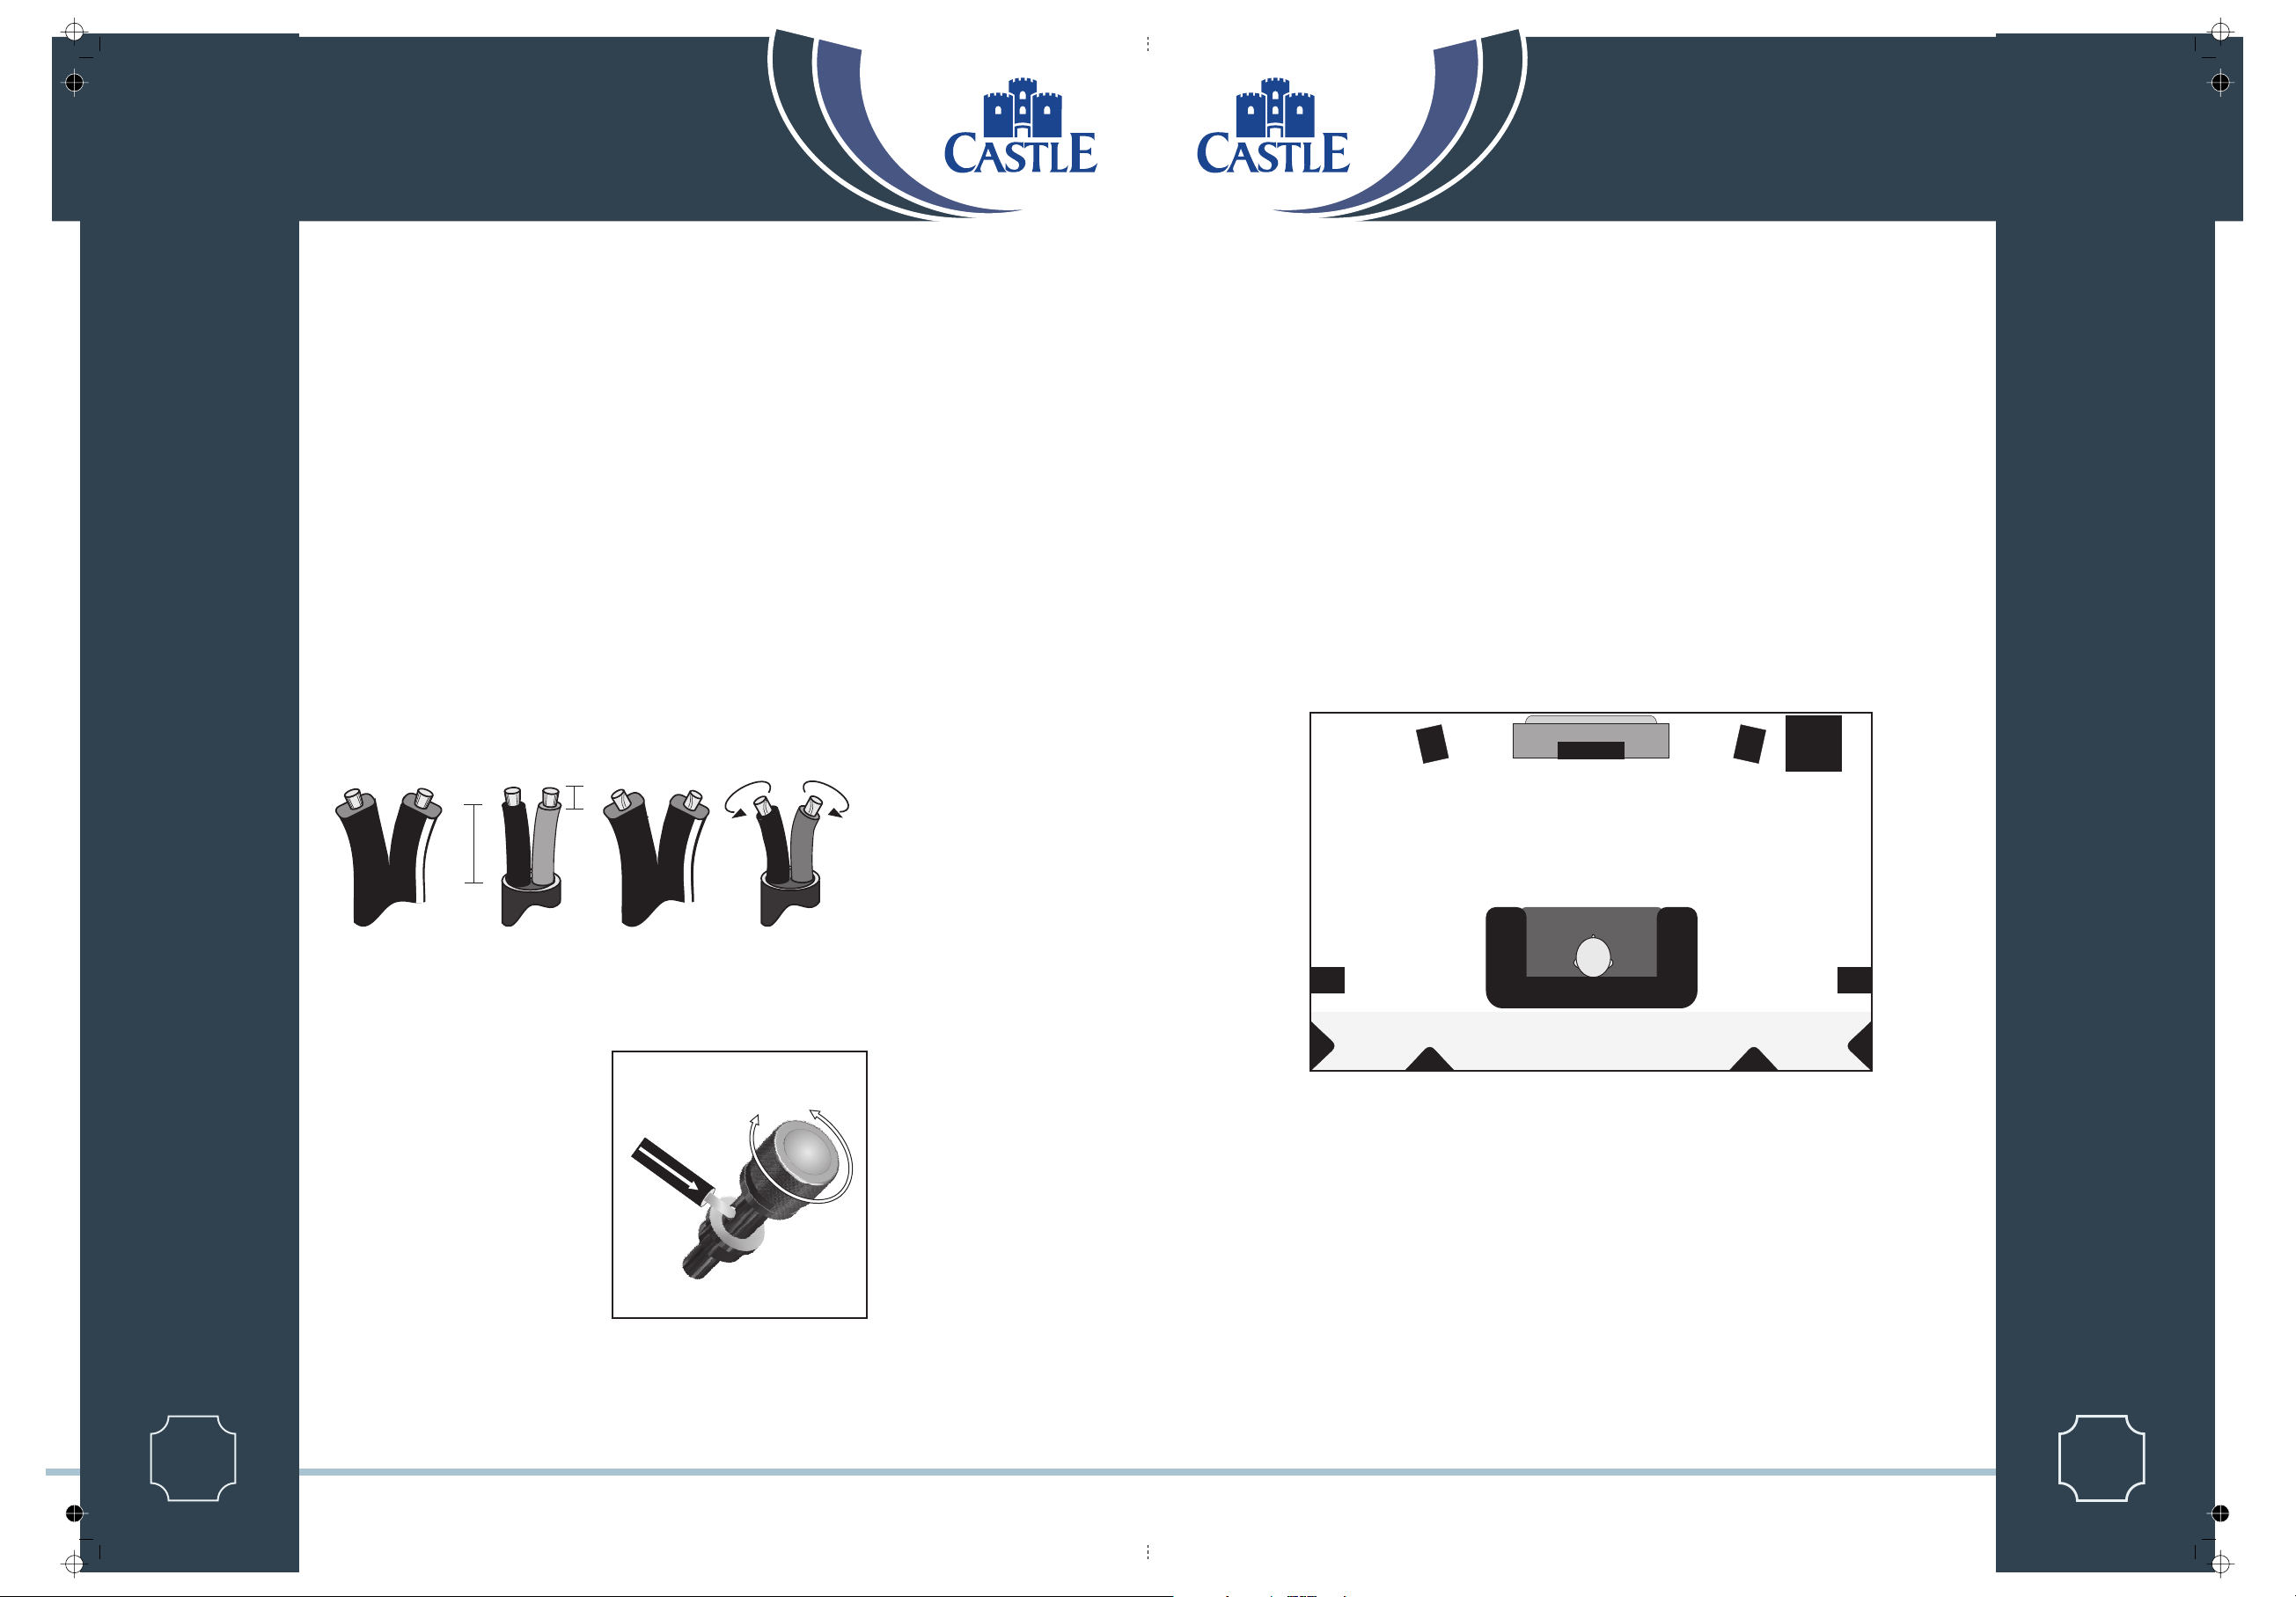
Cables and Connectors
Setting Up a Home Theatre System
Some of this chapter may appear to repeat the content of the Subwoofer pages - the context however is different.
Choosing Loudspeaker Cable
Specialist audio cable usually offers better performance than general purpose ‘bell’ or
‘zip’ wire.
CS
LASSIC ERIES
Choose a cable of suitable diameter – cable that is too thin will limit the dynamics of
the sound and may impair the bass response. Audio cable is polarised, with two cores of
different colours, or often a raised rib or coloured tracer in the case of twin cable.
Before you purchase your cable, we suggest that you give careful thought to the
positioning of your loudspeakers. This is especially the case if you are bi- or tri-wiring
your loudspeakers.
Cable lengths to loudspeaker pairs should be the same for left and right channels in
order to equalise the signal transmission. Allow some slack in your speaker cables so you
can alter their position to best advantage, but do not have your cables over-long.
Preparing Loudspeaker Cable
Split the twin cores to a depth of about 40mm. Carefully strip the insulation from each
end, leaving about 10mm of bare wire. If the cable is stranded, lightly twist to gather
any loose strands.
10mm
Placement
Front And Effects Channels
The front loudspeakers are placed on either side of the television screen, 2 to 3 metres apart. The speakers should be angled
slightly so they are aimed towards the listeners.
We recommend placing the rear effects speakers in a high position, behind the listener’s head. If the rear or side walls are a
long way from the listening seat, consider stand mounting the loudspeakers. If the centre loudspeaker is very high or low,
angle it towards the listener's ear level. The front faces of the centre and surround loudspeakers should also be in line as far
as possible. Note the special position for the Castle Oriel.
Subwoofer
As the ear is unable to detect the direction from which deep bass originates, this allows you freedom to position the unit.
Varying the distance from the wall alters the bass. Placing the subwoofer across a corner boosts the bass but may impair
clarity. The performance of Home Theatre systems can often be enhanced by using a pair of subwoofers.
SUB
WOOFER
FRONT
RIGHT
CENTRE
FRONT
LEFT
CS
LASSIC ERIES
40mm
Connecting Screw Terminals
All the Castle loudspeakers use screw terminals.
Safe Connection of Terminals
Unscrew the terminal. Insert the bare end of
the cable into the hole in the base of the
terminal. Tighten securely.
When connecting terminals make sure you
leave no strands of bare wire that can short
across to adjacent terminals.
As an alternative to bare wire you can use
specialist spade connectors. Your Castle
dealer will be pleased to advise you.
REAR
LEFT
ALTERNATIVE POSITIONS FOR CASTLE ORIEL
AA
Setting Loudspeaker Sizes
Many digital AV Processors ask you to specify the size of speakers in all channels - usually ‘Large’ or ‘Small’.
The Floor standing Castle loudspeakers may be safely set to 'Large'. The other loudspeakers should be set to ‘Small’
If you are not using a subwoofer: Set the Front Speakers to ‘Large’. Set the ‘Subwoofer’ option on the processor to 'Off' or
‘No'. The Front channels will now receive all the system bass.
If you are using a subwoofer: When set to ‘Small’ all the system bass will go into the subwoofer. If you choose ‘Large’ the
Front channel bass will be reproduced from the Front speakers.
Once the loudspeaker settings have been finalised, put the AV amplifier into its “Test” mode (see instructions supplied with
your processor). Adjust the level of each channel until all channels are reproduced at equal loudness.
You may need to adjust the subwoofer output level. Avoid setting too high a level or you will swamp the sound with bass and
may limit the subwoofer’s ability to respond to large bass transients. You should also set a sensible level going into the
subwoofer from the AV processor.
REAR
RIGHT
BB
1
Page 4
1
Page 17
Page 7
Fine Tuning Procedures
Crossover Networks
Setting up of the subwoofer should be performed with all tone controls and filters on your amplifier or processor set ‘ flat’.
Listening rooms are not ideal. Because of room geometry and construction there will be areas with severe peaks at some
frequencies and severe troughs at others. If you site loudspeakers in such areas the response will be highly non-linear. It is
easier to treat high frequency irregularities by the use of drapes, soft furnishings etc., but very hard to do the same at bass
frequencies due to the very long wavelengths.
CS
To help locate standing waves in your listening room, one idea is to sit in the listening seat and recruit a friend with a deep
voice to speak as he moves around the area where you propose to site your subwoofer - you will soon find out where to
site it! Where the voice sounds most natural is a good place to start.
LASSIC ERIES
Although the subwoofer's bass output is enhanced by walls or corners, so often is coloration. The floor will influence the
sound. The surface under the subwoofer should be stable and unobstructed. If the carpet is very thick, consider placing the
subwoofer on a solid surface such as a marble slab. If you place the subwoofer where it amplifies the irregularities of the
room or the main speakers the result will be bloated, coloured bass. If acoustic guitar and male voice sounds coloured when
the subwoofer is operating at normal level and less coloured if the subwoofer volume is reduced, you need to address the
positioning first before adjusting any controls.
Loudspeaker Phasing:
the loudspeakers are connected, check their phasing by playing a mono source - the sound should appear from a point
midway between the front loudspeakers. If this position is indefinite, reverse the connections to one speaker. Correctly
connected loudspeakers give a definite centre sound source with fuller bodied tenor and bass registers.
Setting the Phase of the Subwoofer:
temporarily set the low pass filter to ‘off’ and the phase to 0º and play some bass heavy music in Stereo through the main
speakers and the subwoofer. From the listening position, switch the phase between 0º and 180º. The setting which appears to
give the greater bass output is correct. Now follow the instructions below for setting the low pass filter.
Crossover Control:
have its own bass management system.
Make sure that all loudspeaker channels are connected in phase. If there is a doubt about the way
Phase at very low frequencies is not straightforward to detect. Initially we suggest you
If you are using a digital AV processor the initial subwoofer setting should be 85Hz as the processor will
not
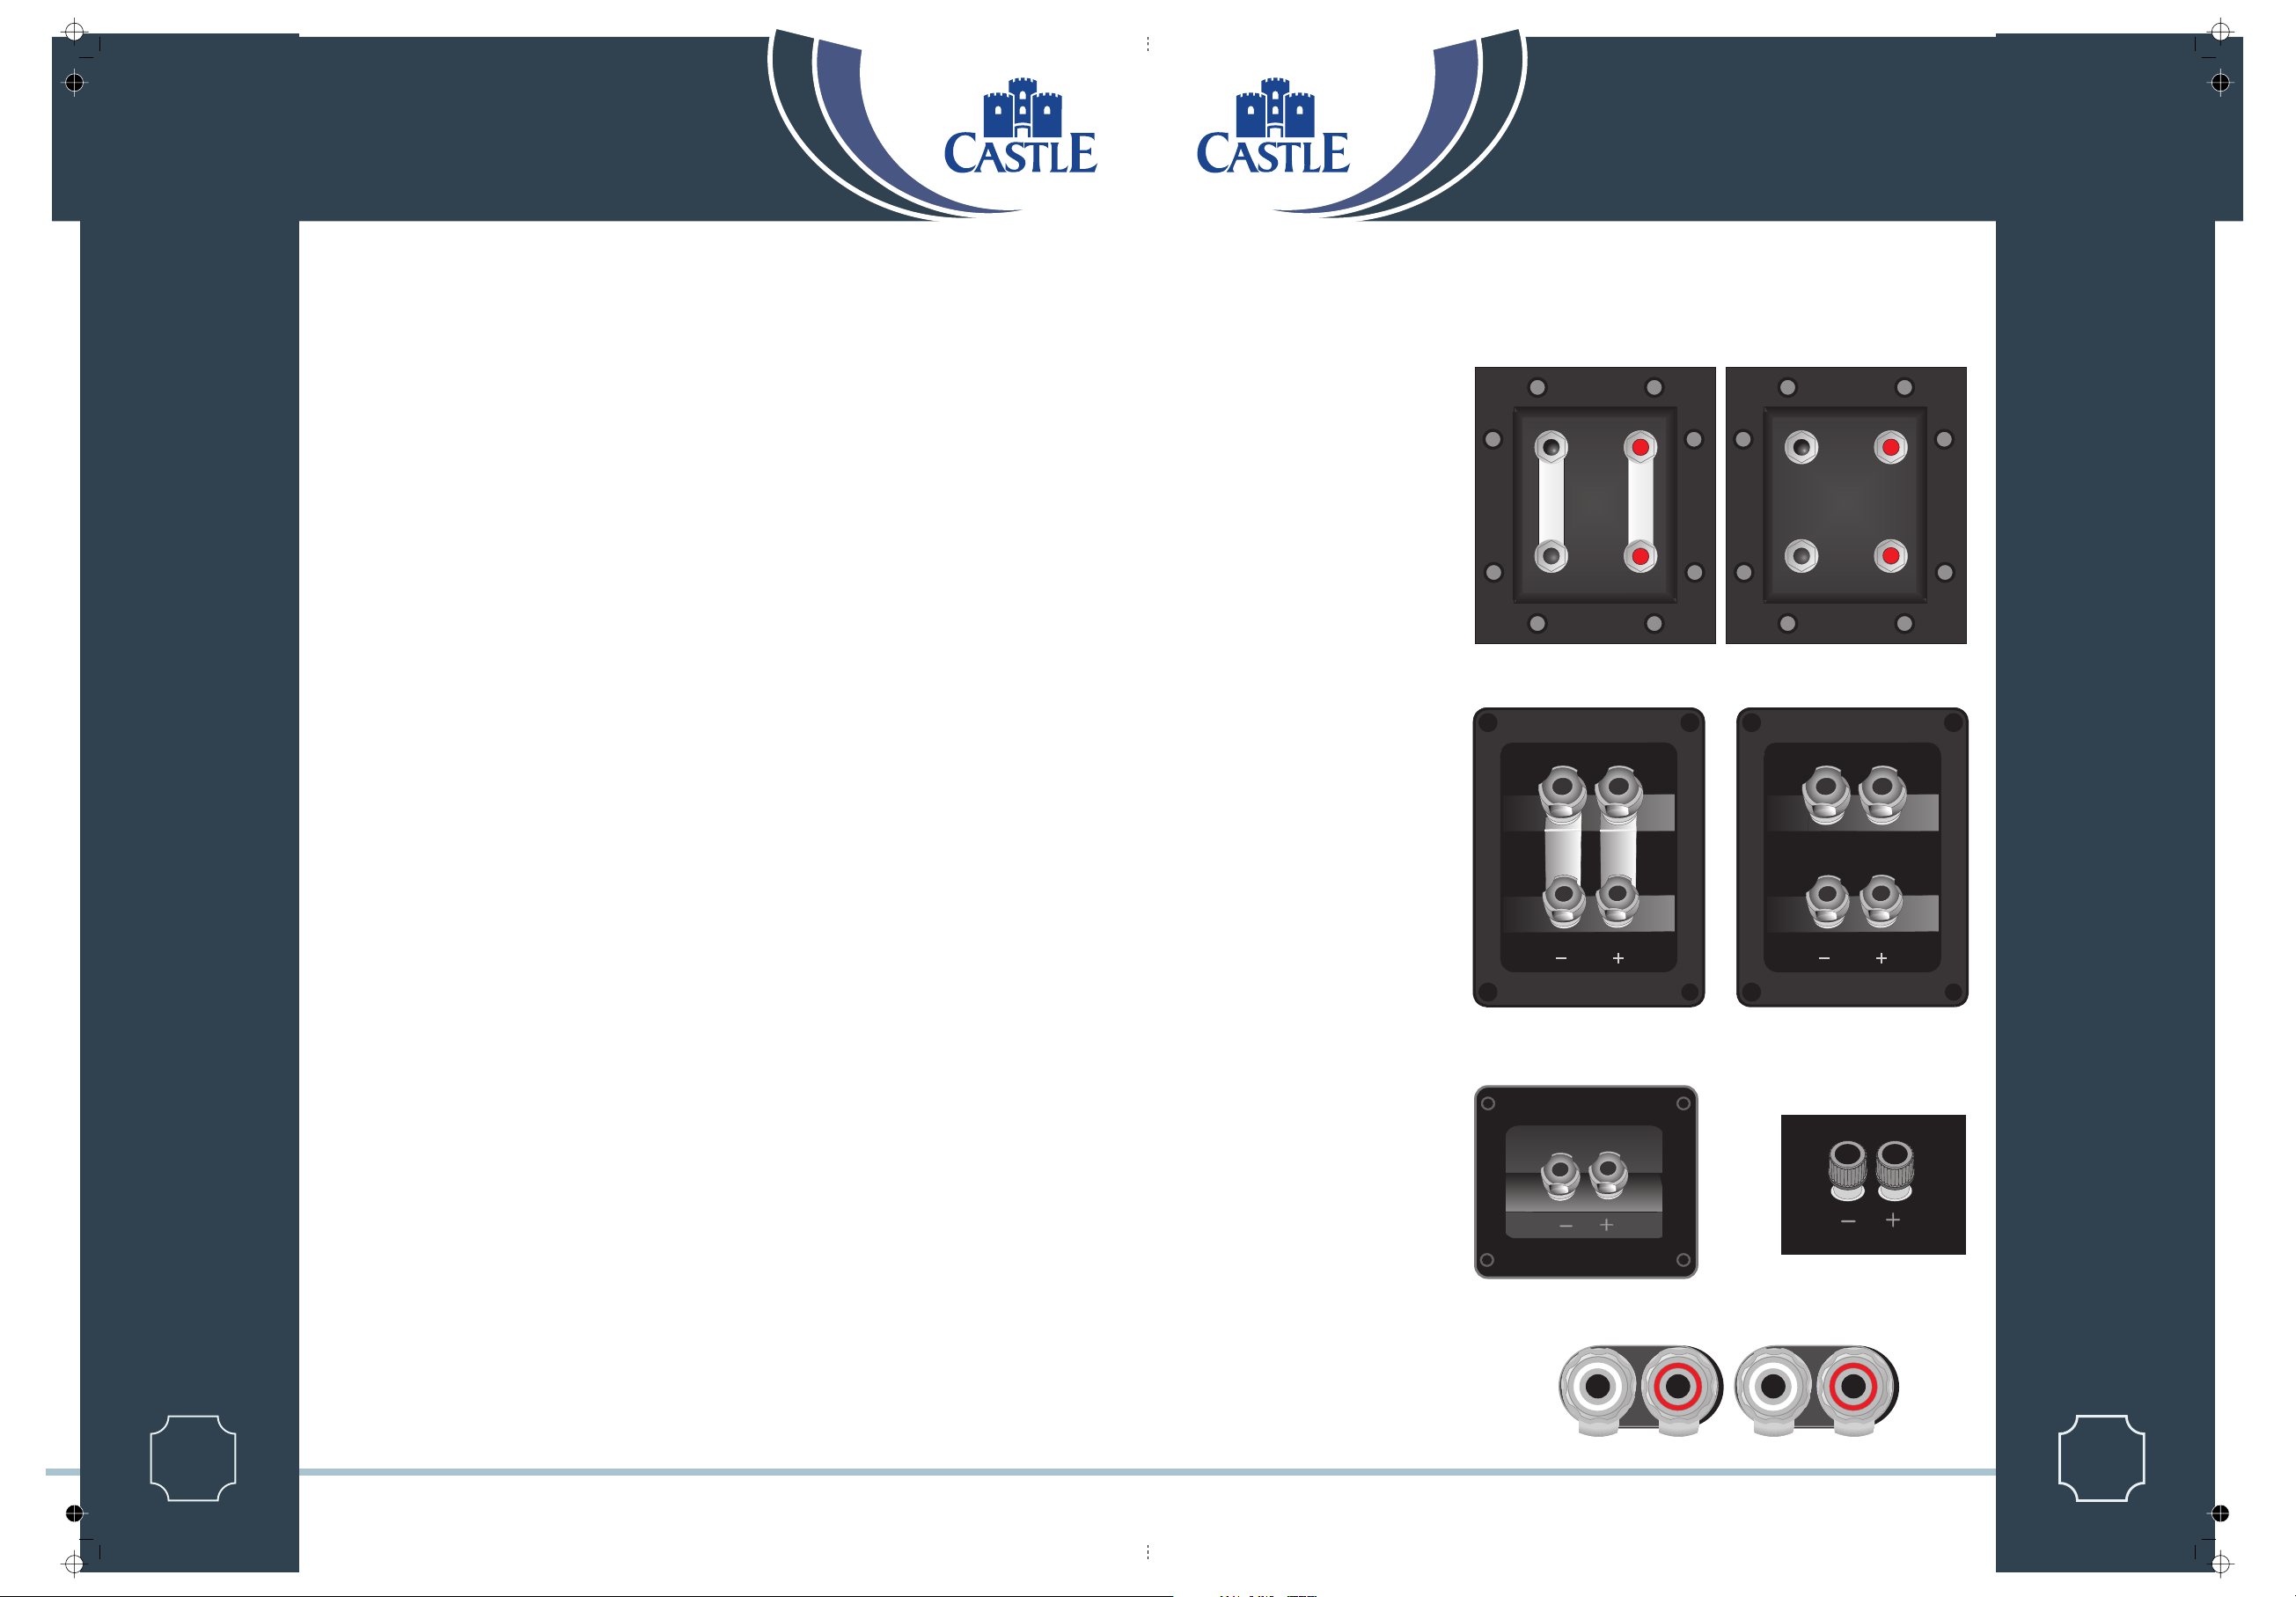
Castle loudspeakers use a variety of terminal panels. These fall into three types.
Biwireable Crossovers
A bi-wiring panel has four terminal binding
posts. The upper terminals connect to the
treble units, the lower pair to the bass unit.
As supplied the treble and bass terminal
pairs are connected via removeable straps.
This arrangement facilitates standard single
wiring, and advanced bi-wiring which offers
significant performance advantages. Follow
the drawings carefully to see the correct
orientation of the loudspeaker terminals.
Why Bi-Wire?
Bi-wiring involves the use of two separate
cables between the amplifier and the
loudspeakers. One pair connects to the
treble unit the other to the bass driver.
Using separate cables for treble and bass
units in a Bi-Wiring configuration reduces
intermodulation effects and improves
headroom and clarity. To bi-wire, you will
need to install two lengths of twin core
cable between the amplifier and each
loudspeaker.
Castle Classic Range except Howard and Oriel
As supplied In bi-wiring mode
Castle Richmond Classic 7i
CS
LASSIC ERIES
1
Page 16
Setting Loudspeaker Sizes: Most digital AV Processors ask you to specify the size of speakers in the various channels. These
are usually ‘Large’ or ‘Small’. This sets the bass management for the system. Castle floor standing loudspeakers can be set to
'Large' Smaller loudspeakers (including stand mounted units) should be set to 'Small' for the Front channels. Choose 'Small'
for the surround channels and also for the Centre channel, so that any bass from these channels will be directed to the
subwoofer. Set the ‘Subwoofer’ option on the processor to 'On’ or 'Yes'.
After experimenting with various sources you may need to adjust the Subwoofer Crossover settings. Try to ensure the
subwoofer blends into the sound stage - the more invisible the subwoofer component of the sound field is, the better.
Setting levels:
Once the loudspeaker settings have been finalised, put the AV amplifier into its “Test” mode (see instructions supplied with
your processor.) Adjust the levels until all channels are reproduced at equal loudness.
When adjusting the subwoofer output level avoid setting too high a level or you will swamp the sound with bass which be
tiring to listen to and may limit the subwoofer’s ability to respond to large bass transients. Set a sensible level going the
subwoofer from the processor.
LFE: This channel was originally an additional bass channel with its own dedicated subwoofer. In practice however, if any
speakers are set to ‘Small’, the LFE channel is combined with the bass from those channels and fed into the subwoofer.
When you set the LFE level from your AV processor, use care as the LFE channel contains powerful low frequencies which,
although normal in a cinema, may overload a domestic subwoofer. If, during a programme, you hear popping or thumping
noises from the subwoofer, turn the AV Processor volume level down and back off the LFE level. If this does not cure the
problem, lower the subwoofer volume level.
into
Standard Crossovers
The Richmond Classic 3i and Oriel use
standard crossovers.
The Oriel uses a special version built into
the rear wall of the loudspeaker.
Castle Howard
The Howard uses separate terminal panels
for the treble and bass sections of the
loudspeaker. We recommend that the
Howard should only be bi-wired.
As supplied In bi-wiring mode
Richmond Classic 3i
Oriel (detail)
Castle Howard Terminals
1
Page 5
Page 8
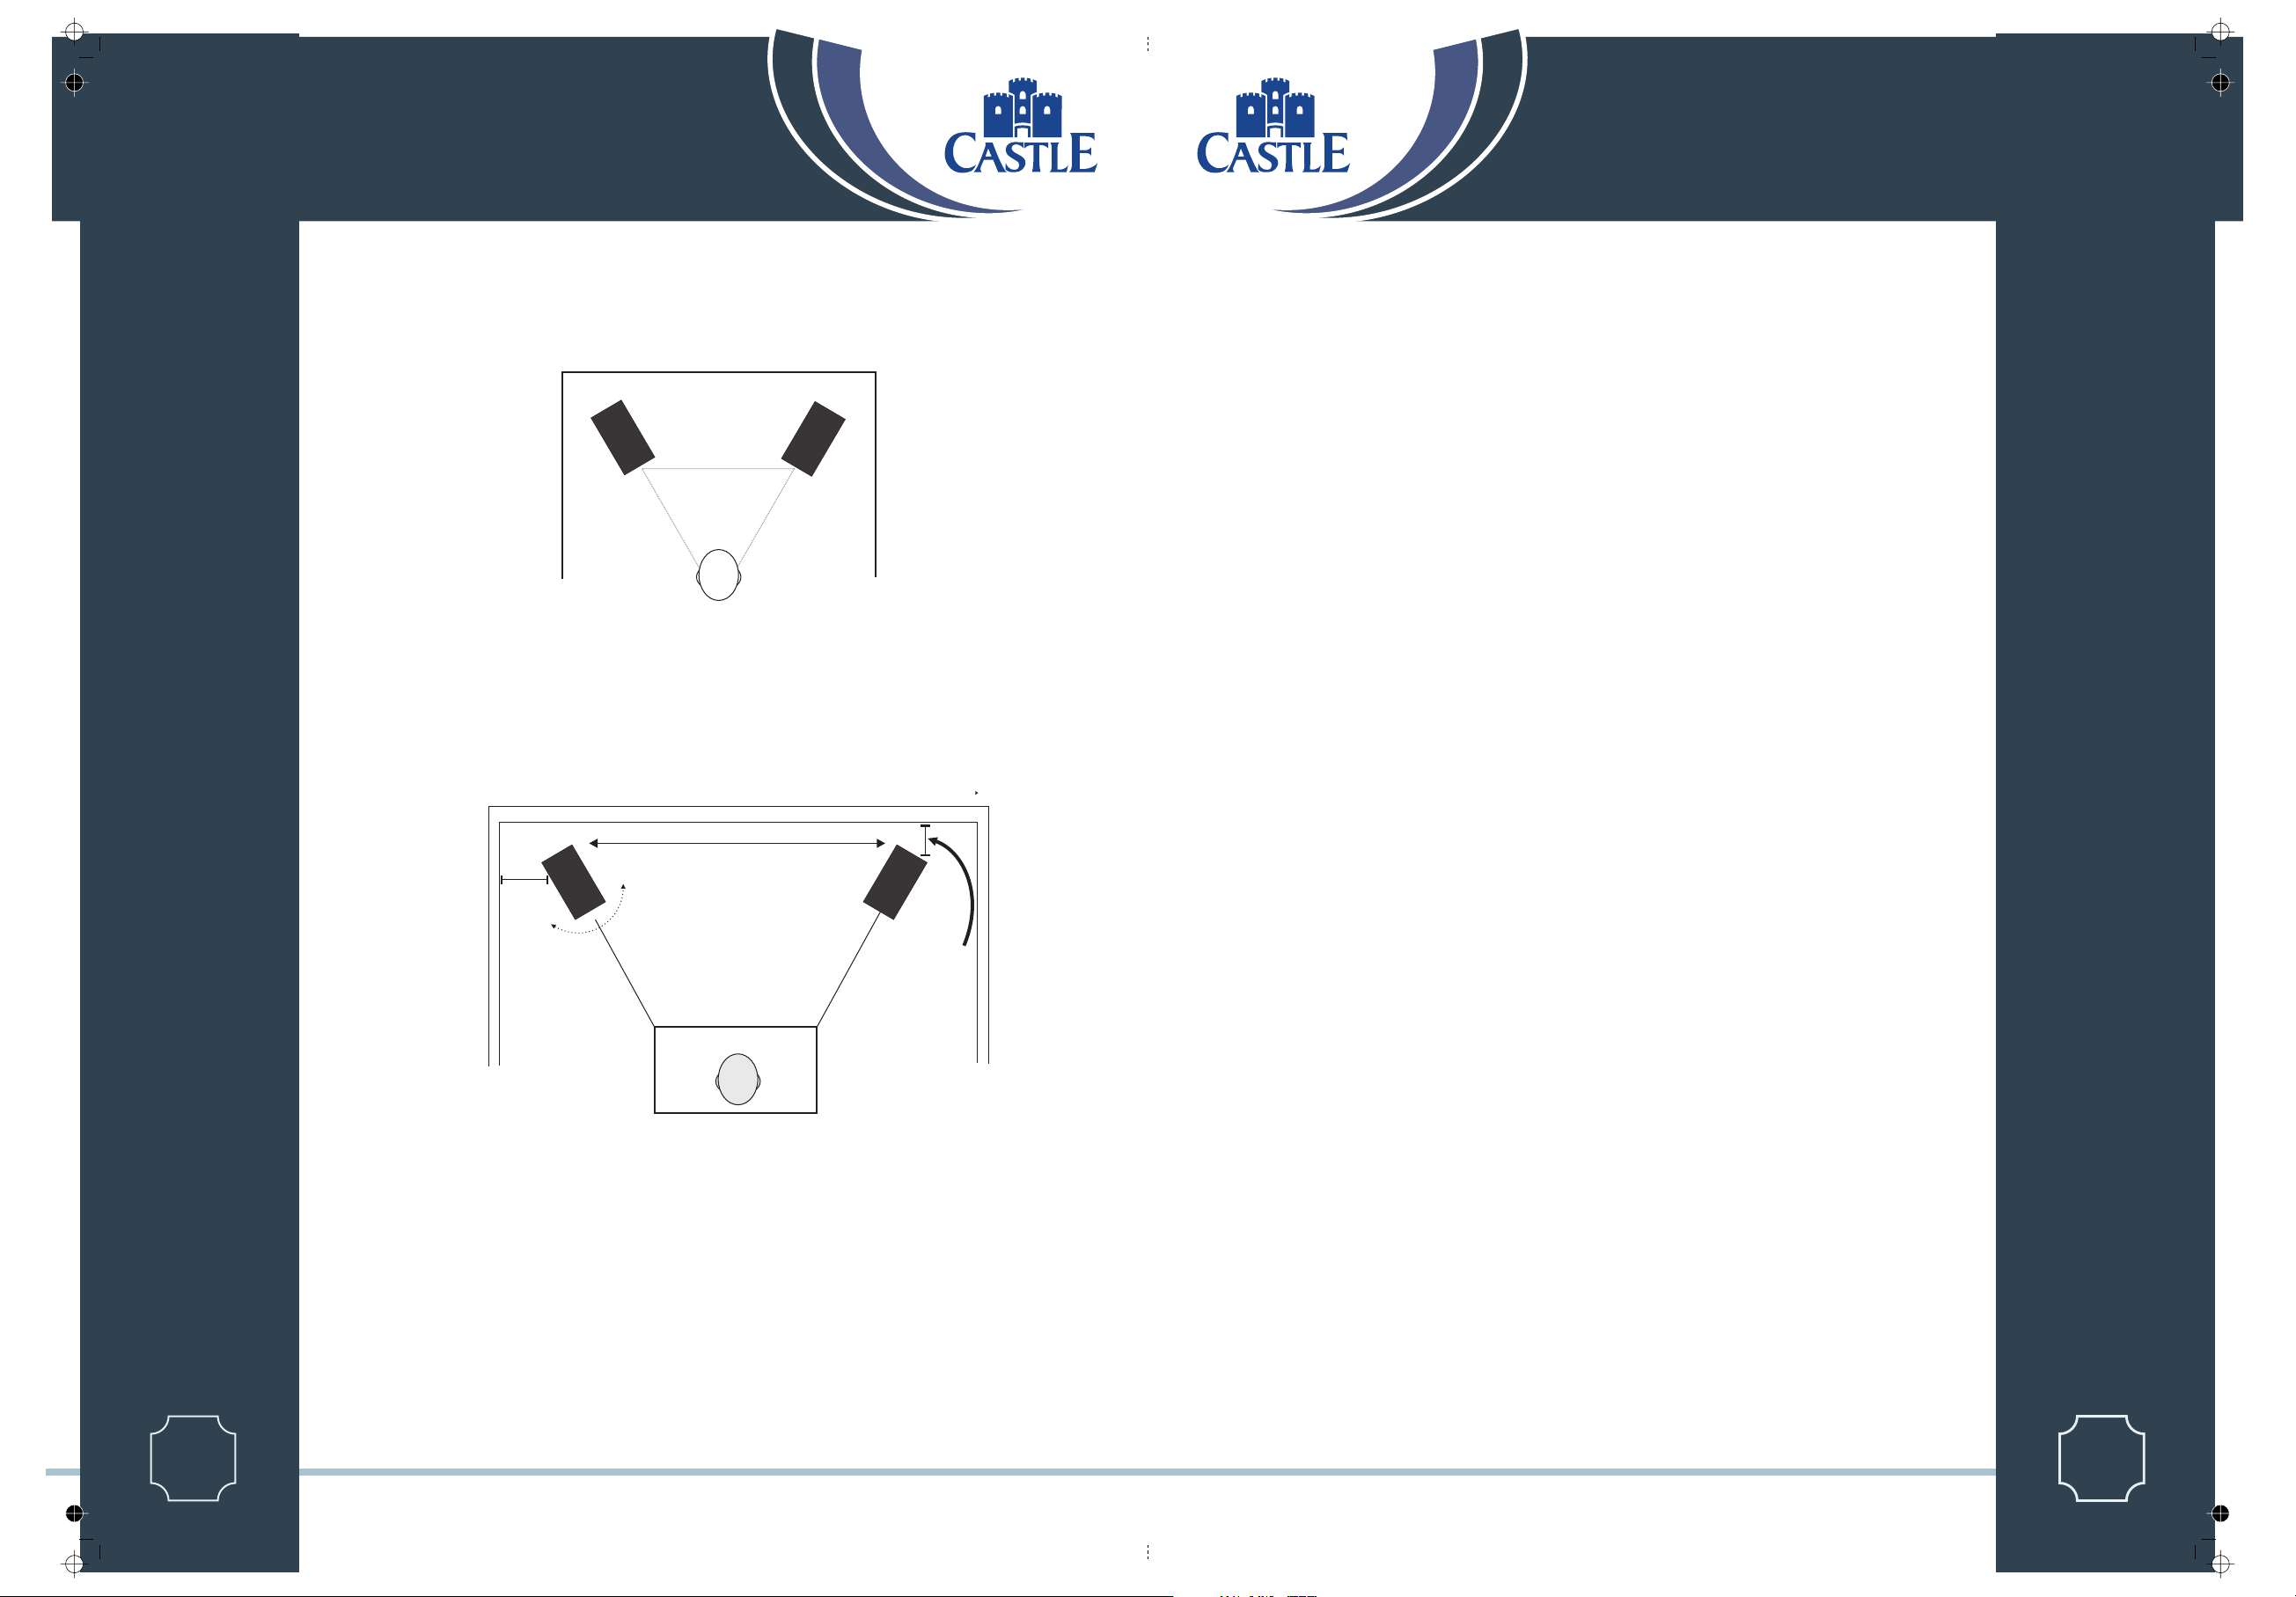
Positioning Stereo Loudspeakers
Operating Your Subwoofer
The distance between the speakers should be the same as between you and the speakers.
CS
LASSIC ERIES
If the loudspeakers are placed too close to the walls the bass will increase but may be boomy and indistinct. If the
loudspeakers are placed further away from the walls, the inward angle ("toe in") may be increased by up to 30% As personal
taste plays a large role, experiment with different configurations and play a wide range of programme material before finalising
the position of your speakers.
The optimum listening position is in the area broadly known as the ‘sweet spot’. The more extreme the angle the narrower the
sweet spot is. Castle loudspeakers are designed to cover a medium sonic perspective so there should be no need fo extreme
settings.
2-4 metres
Check that all connections to the subwoofer have been properly made and that the main volume control is at
minimum. Plug the supplied power cord into the mains socket on the rear panel.
Initial Settings
Volume Control:
Crossover Control:
bookshelf speakers and to 35or 40 Hz when used with large floor standing speakers.
Phase Switch:
Set the subwoofer volume control to the mid position (12 o'clock) before proceeding.
This control should initially be set to 45 or 55 Hz when the subwoofer is used with small
The Phase switch should be initially set to 0°.
Switching On
Plug in the mains plug and switch the power on. Now switch the subwoofer on with the rest of your system.
The subwoofer ON/OFF switch has a rocker action; press the upper part to switch the equipment on and the
lower part to switch it off. When switched on the light above the power switch will glow and the subwoofer will be
operational.
Basic Tuning
Volume Setting:
subwoofer volume control to produce the desired level of bass. The bass should be even and an extension of the
main loudspeakers. Do not set the control too high or you will swamp the sound with too much bass and clarity
and definition will suffer.
Play a programme with extended bass and set the system volume to a reasonable level. Adjust the
CS
LASSIC ERIES
700mm
°
0
3
-
°
5
1
Listening
Sweet Spot
Stand Mounting Loudspeakers
The Castle Durham, Warwick and Richmond 3i are designed for stand mounting.
The stands should be sturdy and offer optimum support for the loudspeaker. As an
alternative the speakers may be wall mounted on rigid brackets or placed on rigid
shelves.
Ideally the top of the speaker should be at ear level to a seated listener. If the rear
panels of the speakers are placed close to the walls the amount of bass will be
increased but the clarity may well suffer - you should experiment until you get the
best result.
Floorstanding:
>200mm
Stand mounted:
>100mm
Phase Switch
and listen carefully to some music with extended bass. If there is insufficient bass output from the sub-woofer set
the Phase switch to 180º. Select the position which produces the most natural, extended bass.
Crossover Adjustment.
system to be set up for optimum bass performance. The higher settings are for use with small bookshelf
loudspeakers, the lower settings for large floorstanding models. If you choose too low a setting with small speakers,
there will be a ‘hole’ in the bass response; too high a setting with large speakers will result in the upper bass
becoming bloated. Again the subwoofer should be an extension of the main loudspeakers.
: If the bass is indistinct or lacks depth, the Phase switch may need adjustment. Set the switch to 0º
This adjusts the blend between the subwoofer and the main speakers. and enables the
Mains Operation
When the system is not in use for extended periods, we suggest you switch off the subwoofer to protect it from
switching noises caused by domestic appliances, etc. The best practice is to switch the complete system on and off
from a central point. Bear in mind that if you play the system with the subwoofer switched off you will get no
bass!
Always turn the main volume control to minimum when you switch the system on or off.
1
Page 6
1
Page 15
Page 9
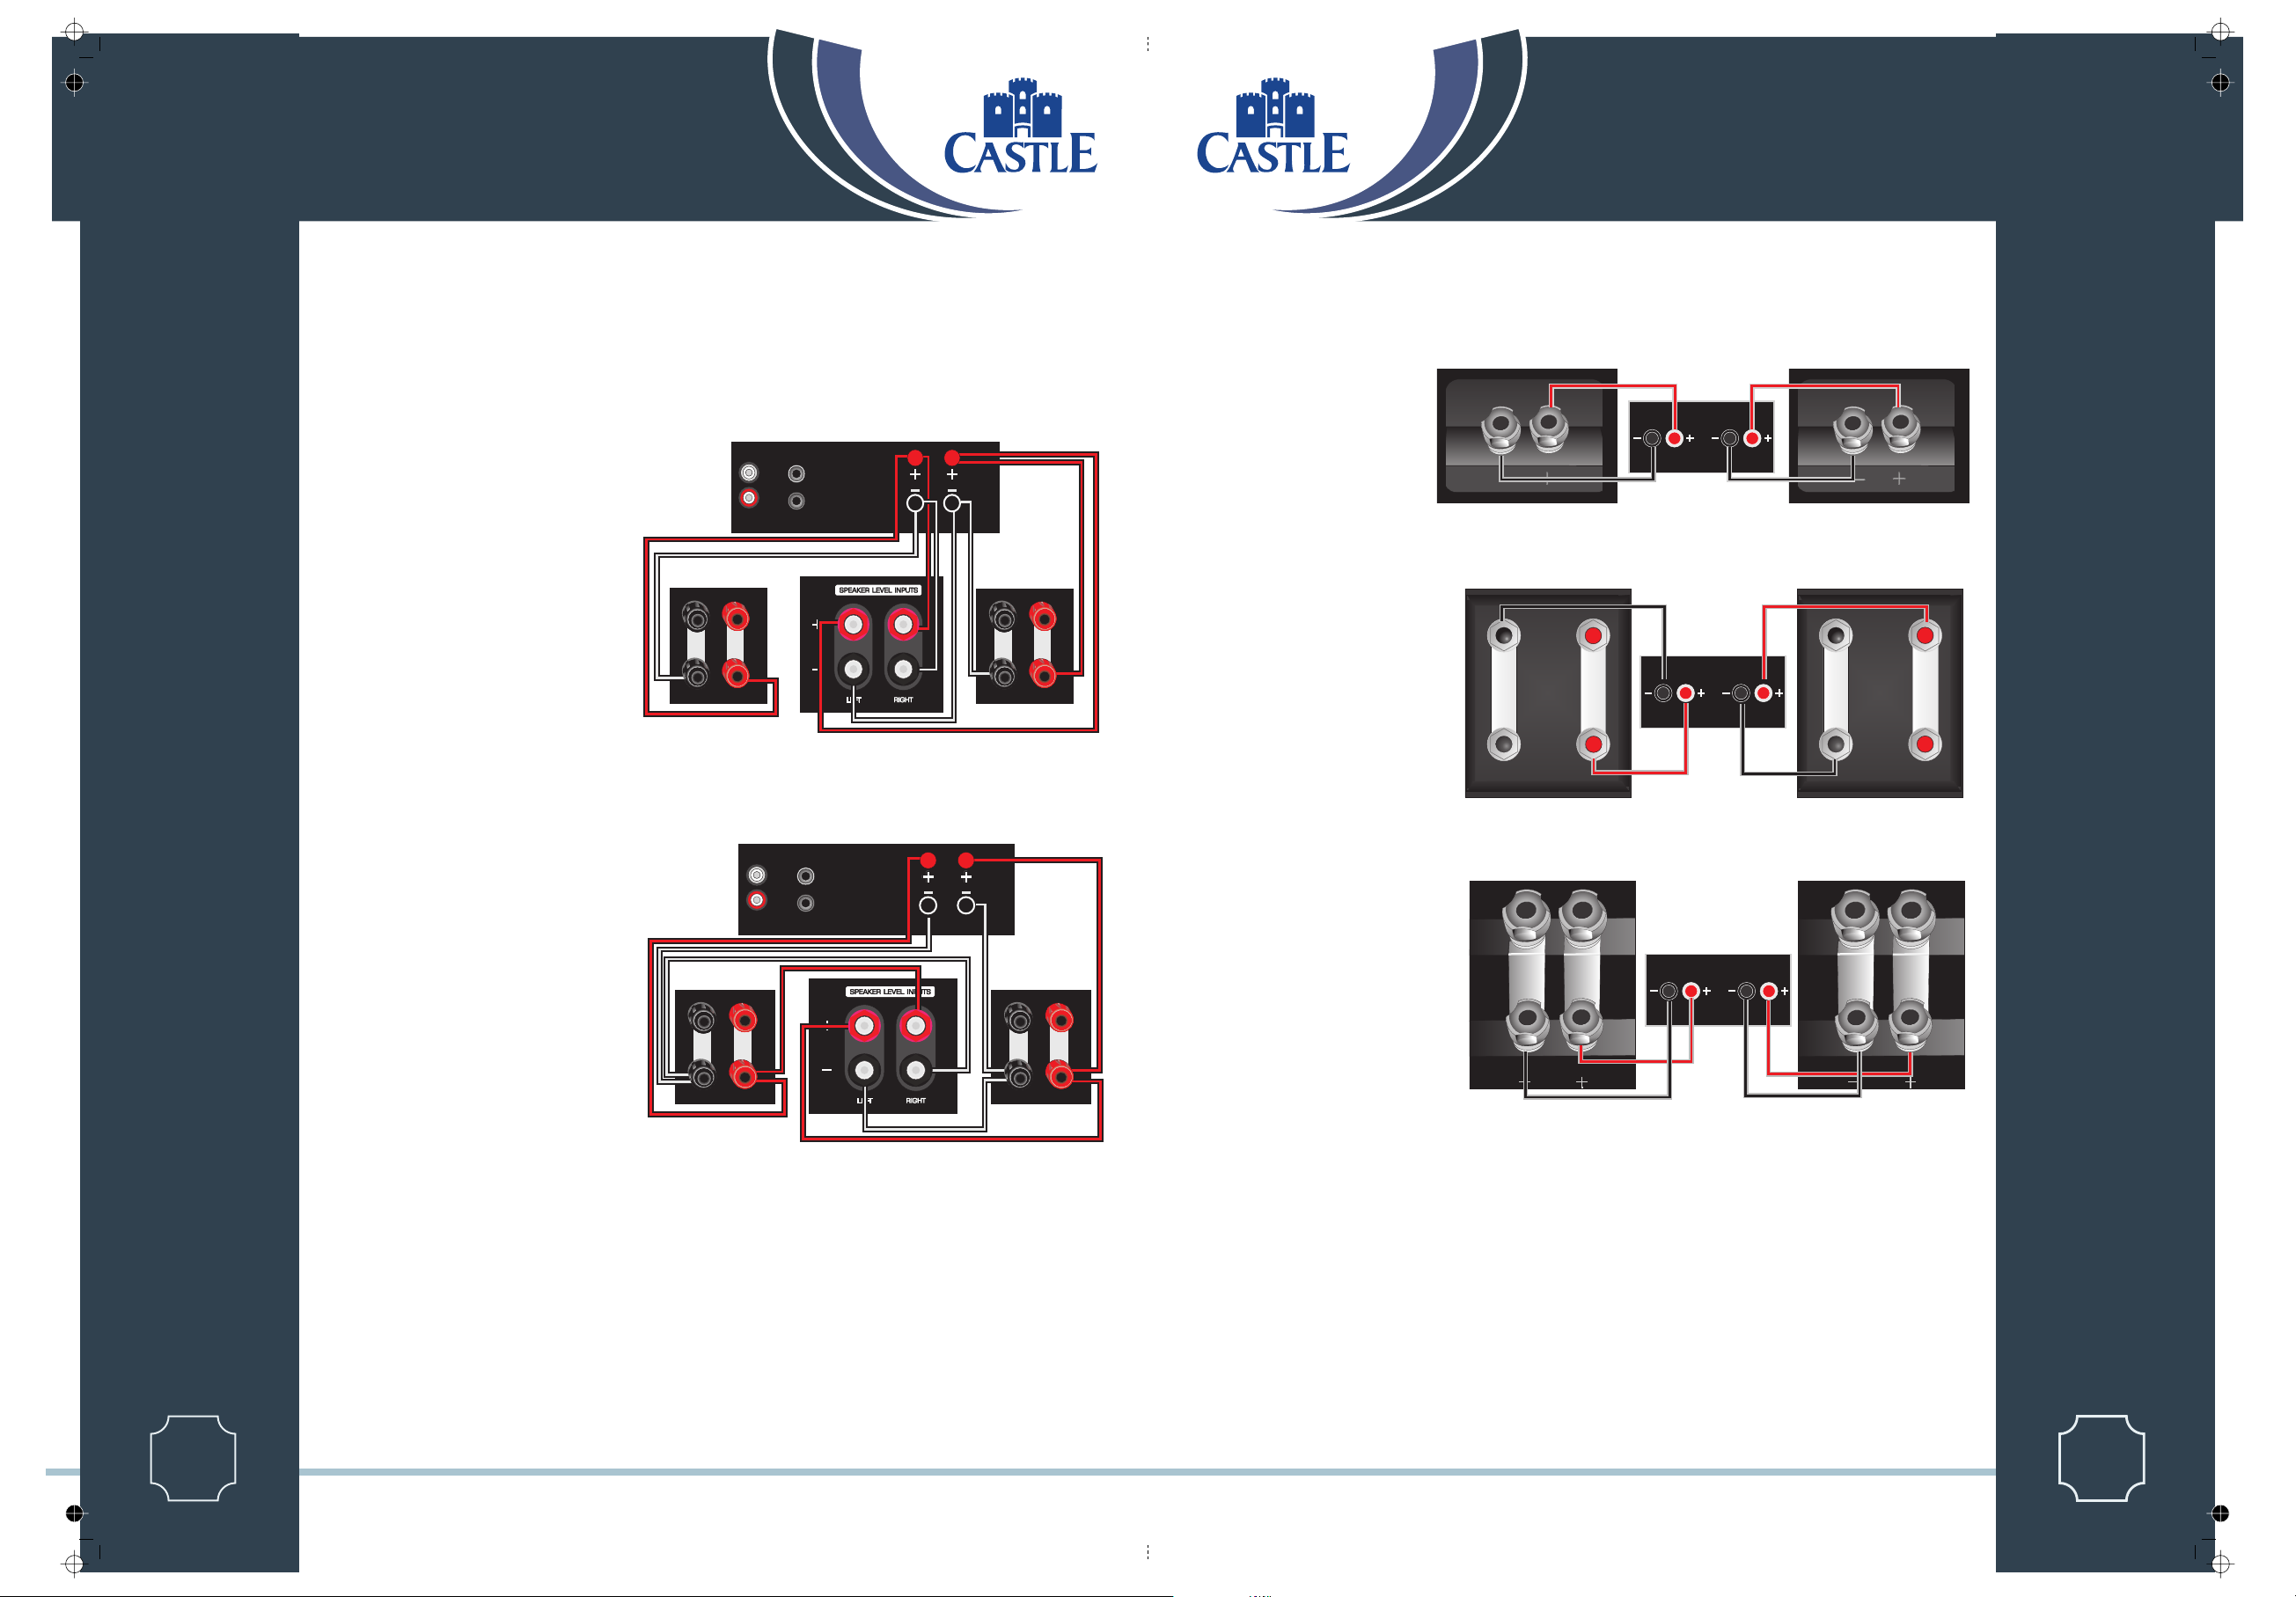
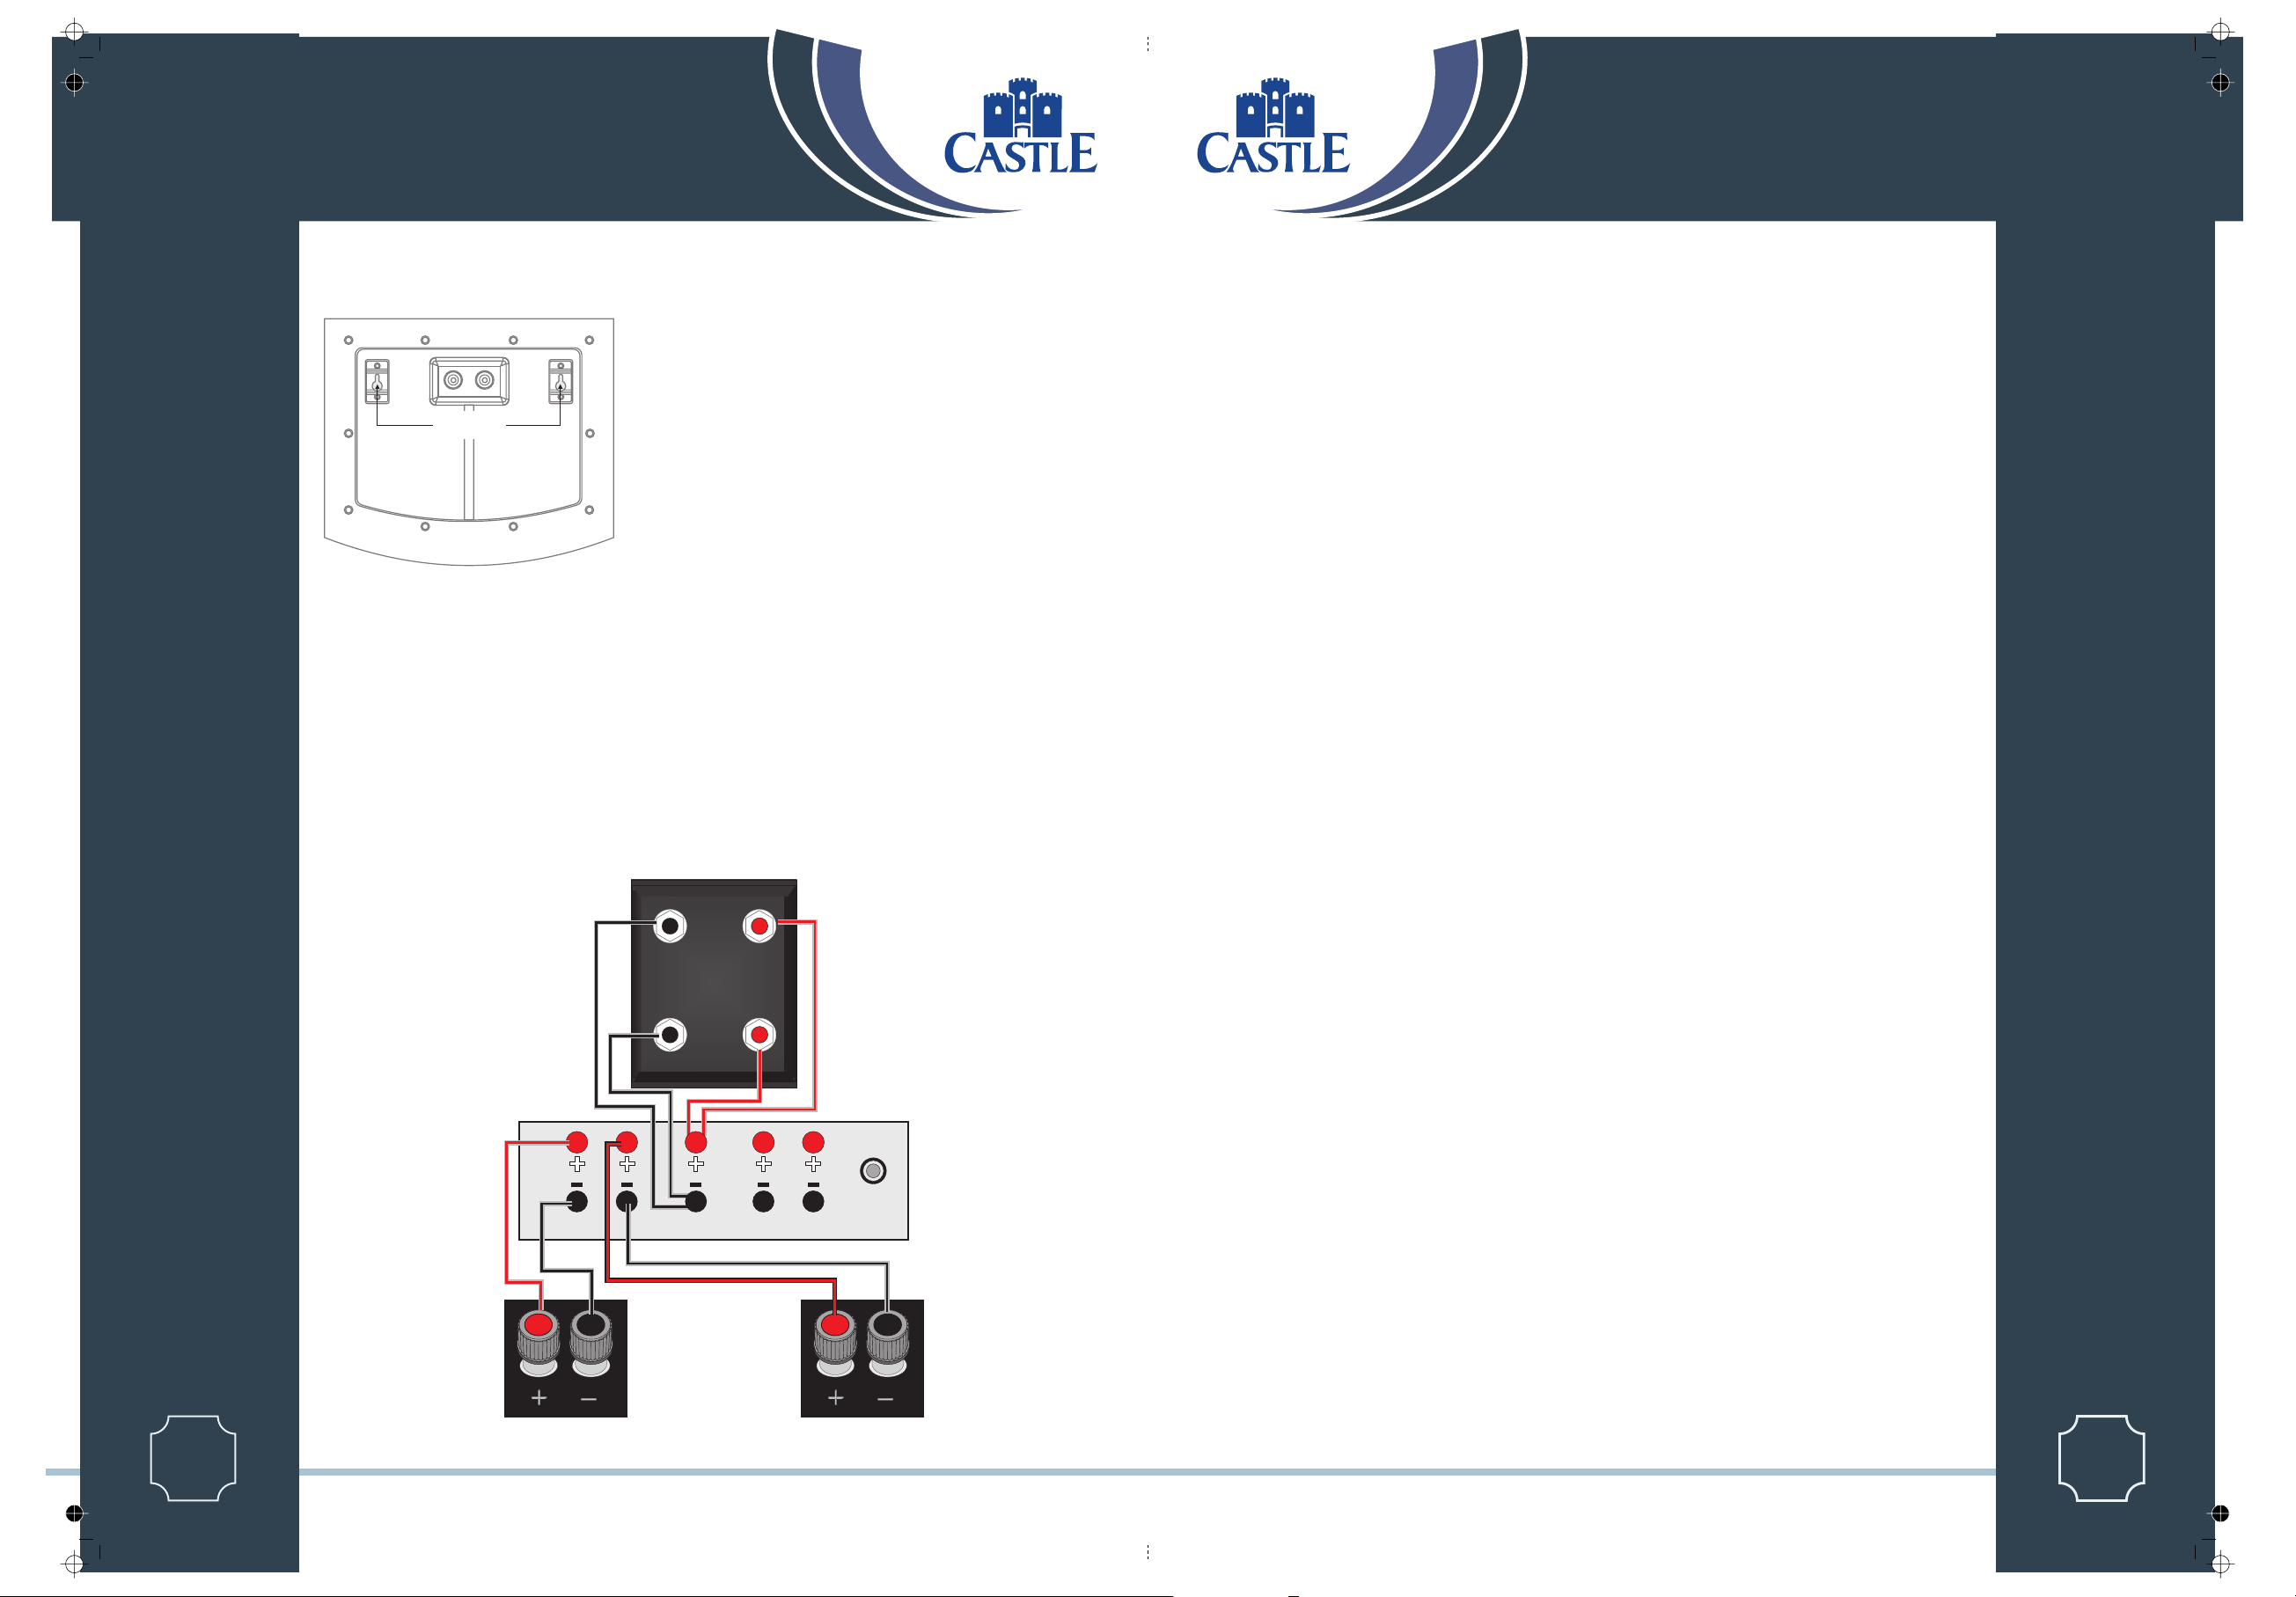
Connecting Your Subwoofer -3
High Level Connections
Parallel Connection to the Amplifier
CS
LASSIC ERIES
You will need two lengths of Loudspeaker
cable.
Ensure the Front loudspeakers are correctly
connected.
Connect the Left Speaker Terminals on the sub
bass unit to the Front Left speaker terminals on
the amplifier. Connect the Red (+) speaker
terminal on the amplifier to the Red (+) terminal
on the subwoofer. Connect the Black (-) speaker
terminal on the amplifier to the Black
(-)Terminal on the subwoofer.
Now connect the Right Speaker terminals on the
subwoofer to the Front Right speaker terminals
on the amplifier.
FRONT RIGHT
TREBLE
BASS
L
R
AMPLIFIER
RIGHT
LEFT
FRONT LEFT
TREBLE
BASS
Connecting Stereo Loudspeakers -1
Standard Loudspeaker Wiring
Choose a suitable length of twin core
speaker cable for each channel, and
prepare the ends. Unscrew each
terminal a few turns.
Connect the red, positive (+) terminal
of the Left loudspeaker to the
corresponding red, positive (+)
amplifier terminal. Connect the black,
negative (-) terminals similarly.
Tighten the terminals securely. Repeat
this procedure for the Right Channel.
If you are standard wiring a bi-wiring
panel make sure that the binding
straps are securely in place.
Right Speaker
Castle Classic Range except Howard and Oriel
Richmond Classic 3i
AMPLIFIER
R.SPKR
R.SPKR
L.SPKR
AMPLIFIER
L.SPKR
Left Speaker
CS
LASSIC ERIES
Parallel Connection to the Loudspeakers
Alternatively you may connect the subwoofer to the
Front speakers instead of to the amplifier.
FRONT RIGHT
TREBLE
BASS
Right Speaker
L
R
AMPLIFIER
RIGHT
LEFT
FRONT LEFT
TREBLE
BASS
Right Speaker
Castle Richmond Classic 7i
AMPLIFIER
R.SPKR
L.SPKR
Left Speaker
Left Speaker
1
Page 14
1
Page 7
Page 10
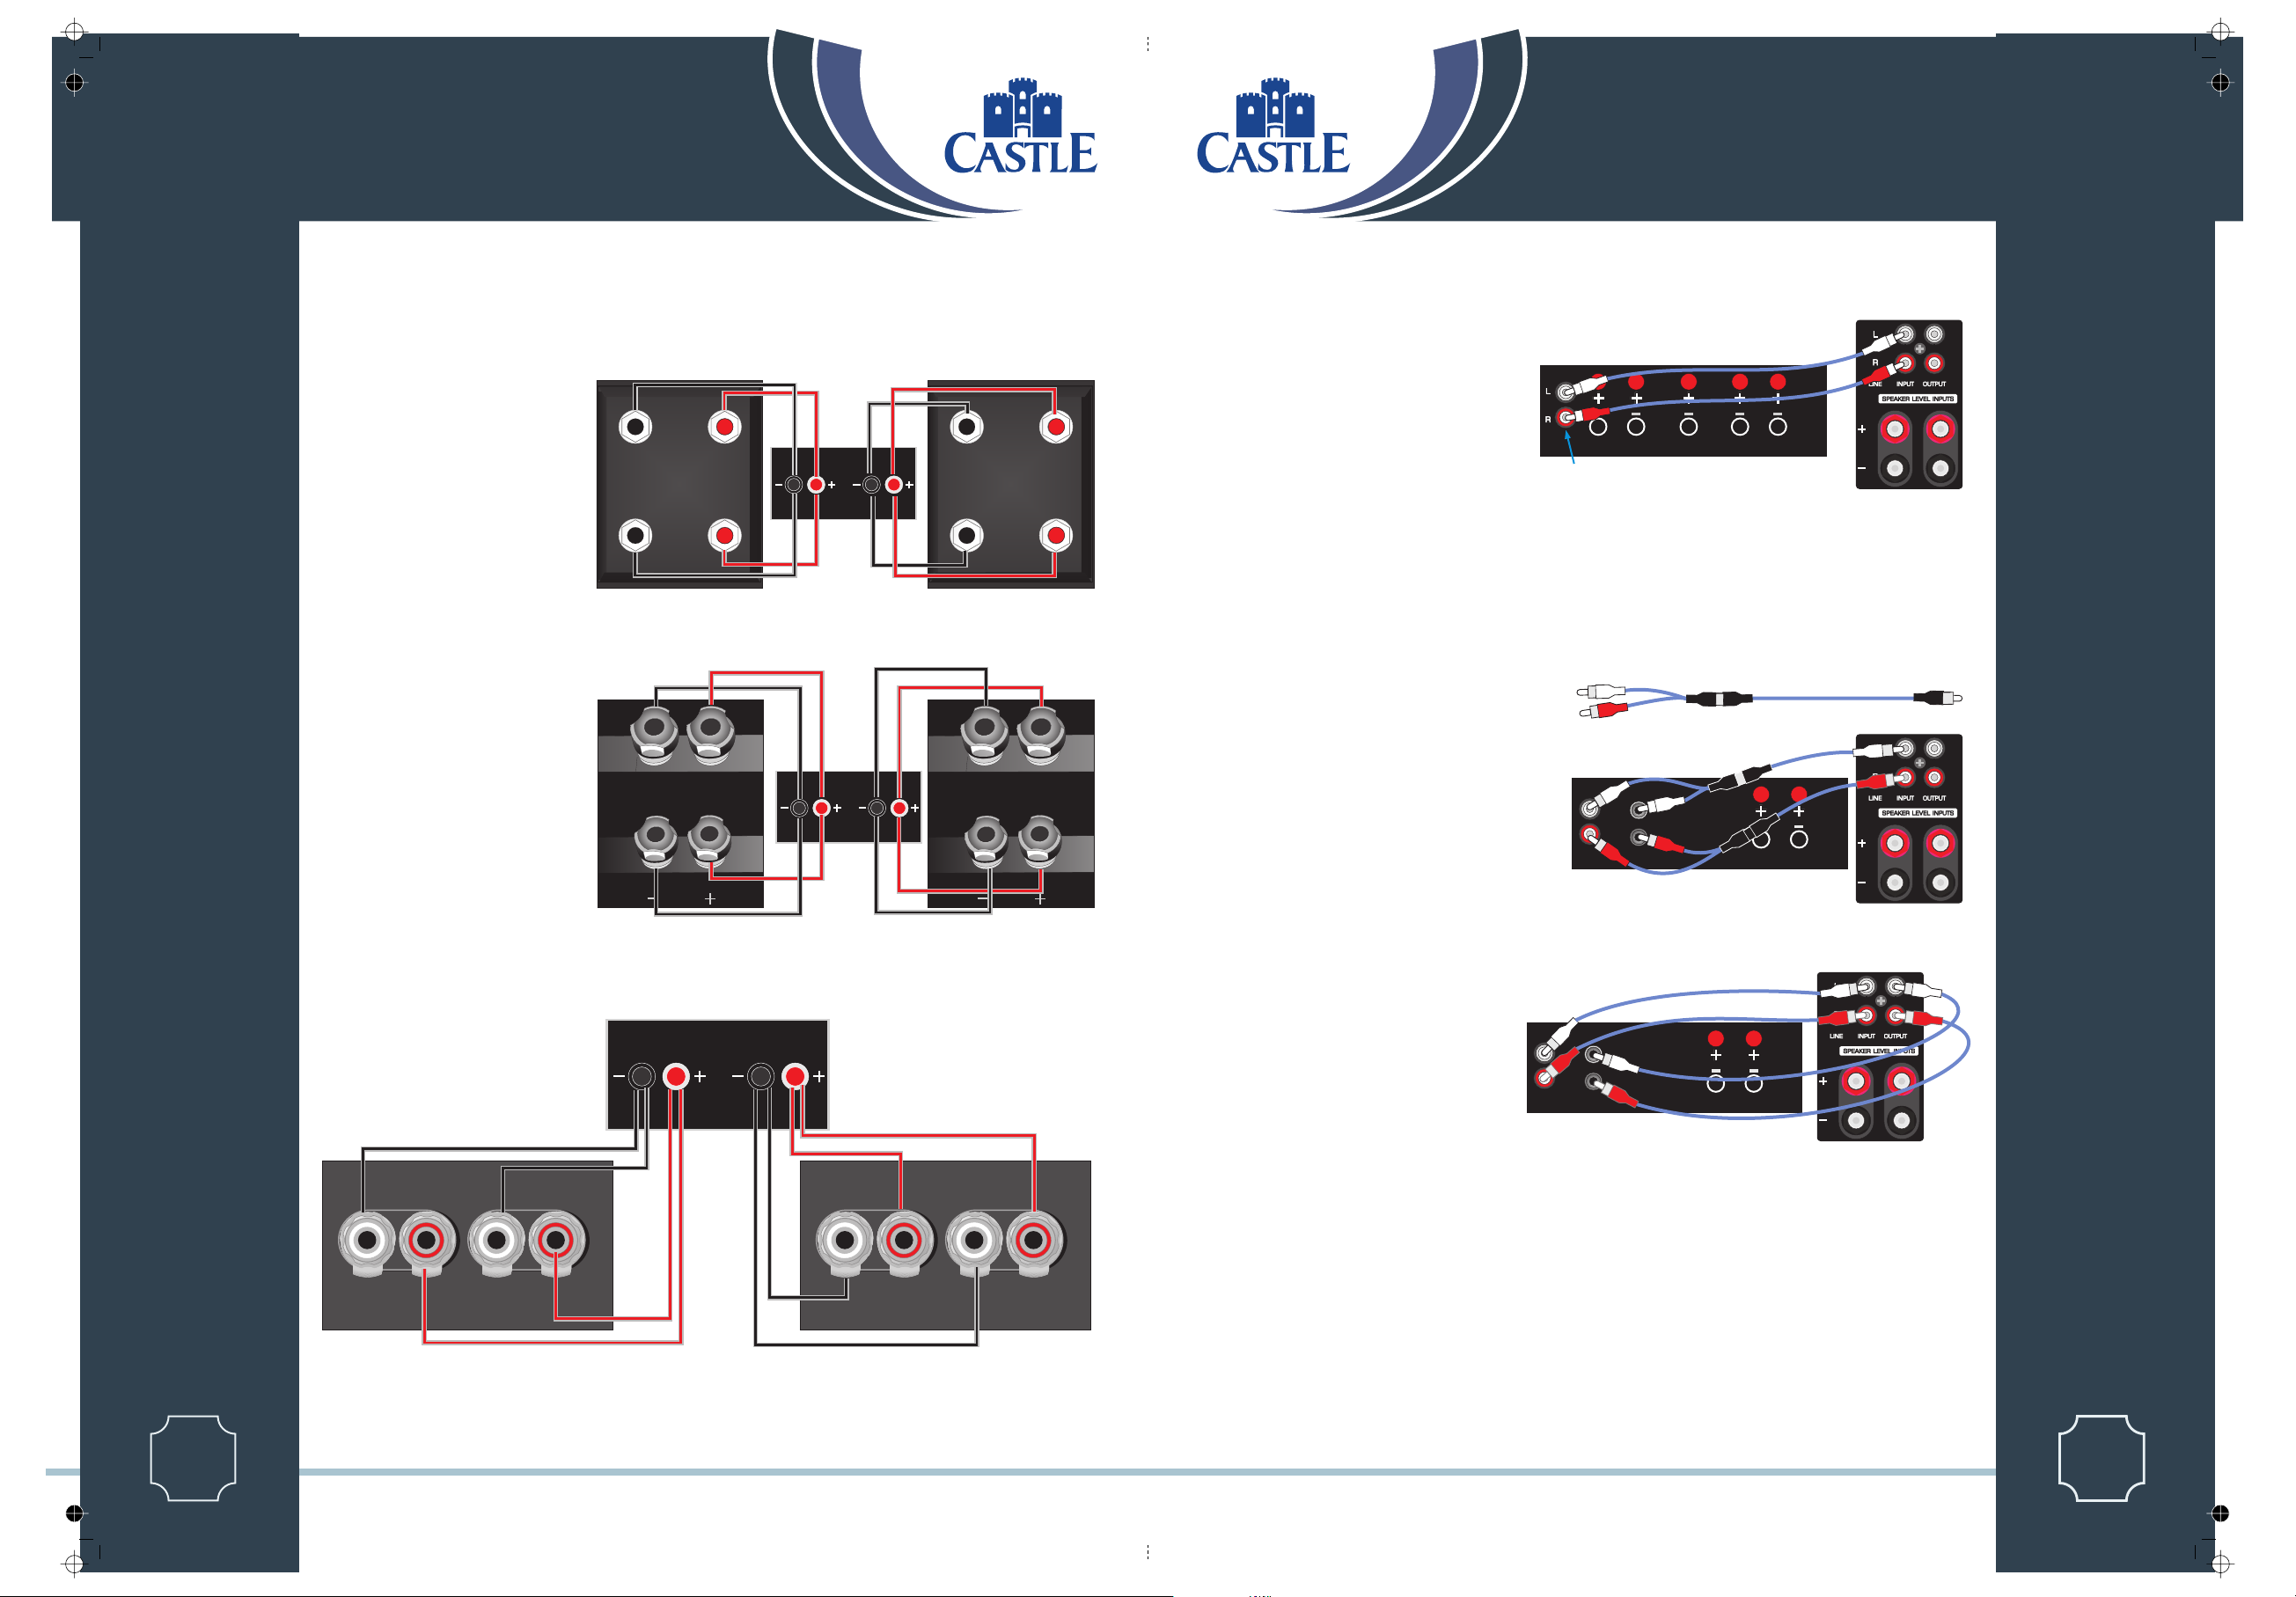
Connecting Stereo Loudspeakers -2
Connecting Your Subwoofer -2
Bi- Wiring
To Bi-wire, you will need to install two
lengths of twin core cable between the
CS
LASSIC ERIES
amplifier and each loudspeaker.
Note:
Some amplifiers have two pairs of
output terminals to facilitate bi-wiring but
this is not essential. The advantages of bi-
wiring are fully retained if your amplifier
has only one pair of loudspeaker terminals
per channel (as in the illustrations).
Castle Classic Range except Howard and Oriel
AMPLIFIER
R.SPKR
Right Speaker
R.SPKR
L.SPKR
AMPLIFIER
L.SPKR
Left Speaker
Stereo Line Level Connections
If your amplifier has a spare preamplifier output or a
stereo sub-woofer output, connect the sub-woofer as
shown.
You will need a stereo screened RCA phono cable.
Connect a stereo RCA phono cable from the line output
of the preamp to the Subwoofer line inputs.
A-V AMPLIFIER/STEREO AMPLIFIER
CENTRE FRONTREAR
Subwoofer or Pre Out (Line Level)
LEFTLEFT RIGHTRIGHT
PreOut -Main In Connections
If you use a separate stereo pre and power amplifier, or an amplifier where the pre and main amplifier can be separated, connect the sub-
woofer as shown. There are two alternative methods.
(x2)
Using a Y Adaptor
You will need two screened RCA ‘Y’ adaptors and two single
RCA phono cables. Remove the Pre-Main links on your
amplifier. Connect the socket (common) of an RCA ‘Y’ adaptor
to one of the mono cables. Connect one leg of the ‘Y’ adaptor
to the Left Channel Pre Out socket on the amplifier and the
other leg to the Left Channel Main In socket. Connect the
remaining plug on this combination to the Left Channel Line
Level Input on the sub-woofer. Repeat this for the Right
Channel.
PRE
OUT
R
L
MAIN
IN
AMPLIFIER
RIGHT
LEFT
CS
LASSIC ERIES
Wiring the Castle Howard
Right Speaker
Right Speaker
AMPLIFIER
R.SPKR
L.SPKR
Left Speaker
Left Speaker
Placing the Subwoofer in the System Loop
You will need two stereo (or four single) screened RCA
cables.
Connect a Stereo cable from the Line Level Inputs of
the sub-woofer to the Pre Out sockets of the amplifier.
Now connect a second Stereo cable from the Line
Level Outputs of the sub-woofer to the Main In
sockets of the amplifier. Make sure that the Right and
Left Channels are not mixed up! The sub-woofer is
now inserted within the system loop.
PRE
OUT
L
R
MAIN
IN
AMPLIFIER
RIGHT
LEFT
1
Page 8
1
Page 13
Page 11
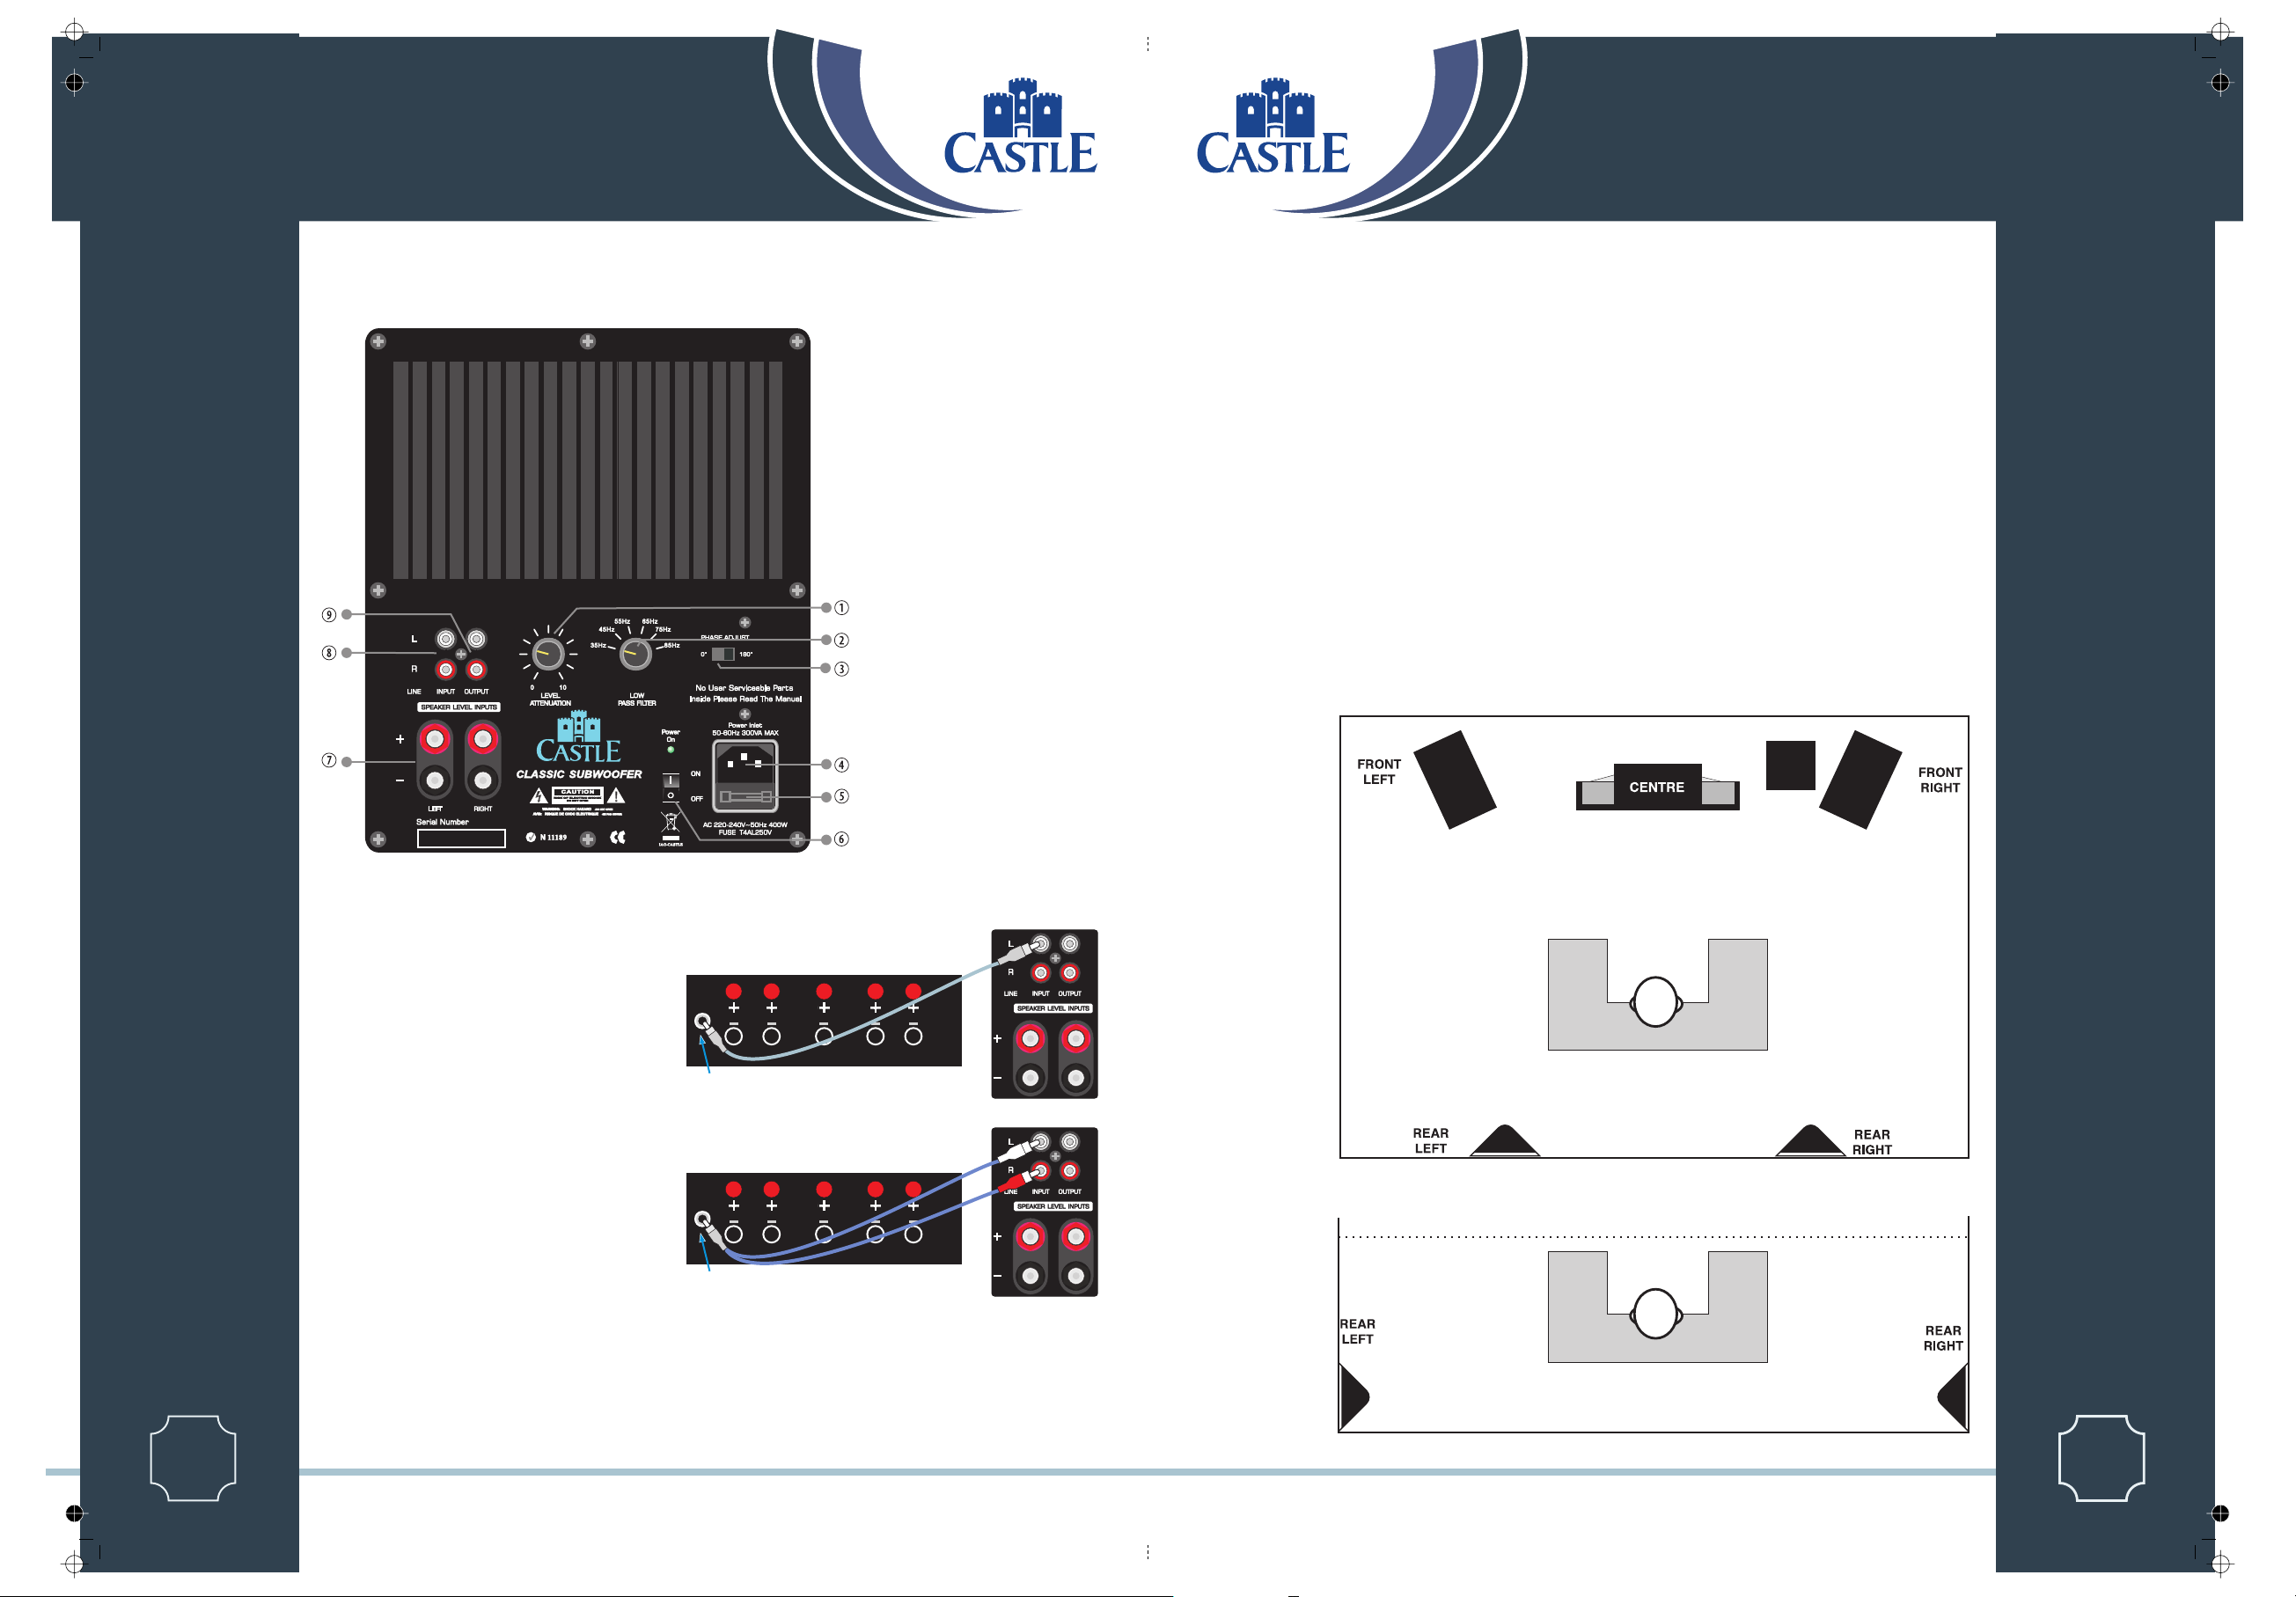
Connecting Your Subwoofer
Control Panel
CS
LASSIC ERIES
b
Subwoofer Volume Control
Crossover Frequency Control
c
Phase Control
d
IEC Mains Input Socket
e
Mains Power Fuse
f
Mains Power Switch
g
Speaker Level Inputs
h
Line Level Inputs
i
Line Level Outputs
j
Positioning Castle Classic AV Speakers
Front Loudspeakers: The front loudspeakers are placed on either side of the TV monitor, 2 to 3
metres apart. The speakers should be angled slightly so they are aimed towards the listeners.
Rear Surround channels: The reproduced sound should be as room filling as possible. We
recommend placing the speakers in a high position, behind the listeners head. If the rear wall is
more than 1 metre behind the listening seat, an alternative position is on the side walls. If the walls
are a long way from the listening seat, consider stand mounting the loudspeakers.
Centre Channel: Most of the dialogue comes from the centre loudspeaker. Speech should appear to
originate from the actors mouths. Operating height is important. Ideally the front and centre
channel speakers should be at the same height. The front of the cabinet should be level with the TV
screen.
The Castle Bastion and Keep centre channel loudspeakers may be mounted on a shelf or placed on
top of the TV cabinet if it is safe to do so.
The Castle Oriel is designed for wall mounting. The unique design of this loudspeaker enables its
use either on the rear or the side walls of the room presenting both direct and ambient reflected
sounds
SUB
CS
LASSIC ERIES
Connecting to a Digital AV Processor
If your AV processor has a line level or LFE subwoofer
output you should use this connection. You will need to
purchase a single screened RCA phono lead from your
dealer. Connect this lead to the Left line input of the
Subwoofer as shown.
Alternatively, you may use a split mono lead from the
processor to both inputs of the subwoofer. In this case
the input level at the subwoofer will be slightly higher.
A-V AMPLIFIER
CENTRE FRONTREAR
Subwoofer Out (Line Level)
A-V AMPLIFIER
CENTRE FRONTREAR
Subwoofer Out (Line Level)
LEFTLEFT RIGHTRIGHT
Alternative Side Mounting for Castle Oriel
LEFTLEFT RIGHTRIGHT
1
Page 12
1
Page 9
Page 12
Wall Mounting the Castle Oriel
Ensure the wall is sound, free of obstructions, hidden pipes etc. and
capable of supporting the loudspeaker plus a small amount of pulling
force. You will also need suitable wall fixings and some No 8 Round
Head screws of sufficient depth to suit your wall.
CS
176mm
LASSIC ERIES
Draw a horizontal line on the wall and mark off two mounting holes
at 176mm centres.
Drill and plug two holes.
Screw 2 No.8 screws into the holes leaving 7mm protruding. .
Connect the connecting wire to the loudspeaker but do not connect
the cable to the amplifier. You will need to use low profile cable -your
dealer will recommend a suitable product.
Lift the loudspeaker up to the mounting position.
Align the keyhole slots over the screw headers and gently pull down
until the speaker is securely fastened. You may now connect the
loudspeaker to the amplifier.
This operation may need two people. If you are in any doubt about
your ability to carry out this procedure, consult a suitably qualified
builder or domestic electrician.
Connecting AV Speakers
Castle Classic Keep or Bastion
The Castle Classic Subwoofer
Introduction
The Castle Classic subwoofer is intended for use with high quality domestic sound reproducing. Your subwoofer
will probably be used in conjunction with Castle loudspeakers though it will partner any audiophile or top-quality
home cinema amplification and loudspeakers.
Unpacking the Subwoofer
Open the carton and remove all the top packing pieces. Lift the subwoofer out taking care not to damage the
cabinet. When lifting the unit from the carton support it from the bottom. DO NOT attempt to lift the
subwoofer out of the carton using the cloth bag. The unit is heavy; if you cannot manage it easily, get someone to
assist you.
Positioning the Subwoofer
Although the unit may be placed almost anywhere in the room, we recommend that it be placed in front of the
listener and as central to the listening position as possible. There should be a mains outlet within easy reach. The
subwoofer should not be operated within 450mm of a television set as the drive unit magnet may distort the
picture. Remember that there should be a line of sight between the listening position and the front of the
subwoofer otherwise the handset remote functions will not be operable.
We suggest you initially position the subwoofer about 20cm (8 inches) from the wall. Placing the unit close to the
wall will enhance the bass; placing it across the corner of the room will increase the bass further, possibly at the
expense of clarity. Do not place the subwoofer close to surfaces or objects that may rattle. The floor under the
subwoofer should be sound with no loose floorboards, etc. Experiment with locations and sources before making
a final decision.
CS
LASSIC ERIES
1
Page 10
Centre
CENTRE FRONTREAR
Rear Right Rear Left
Castle Classic Oriel
LEFTLEFT RIGHTRIGHT
SUB
WOOFER
Before Connecting the Subwoofer
#
Level the subwoofer taking care to make sure it sits squarely on all its spikes. To protect sensitive floors a set
of spike seats is provided. Refer to Page 3 for instructions on levelling the speakers and the use of spike
seats.
#
Switch off your amplifier and all connected source units at the mains.
#
Unplug the power cords to all system components if necessary
#
Make sure the subwoofer is disconnected from the mains and that the ON/OFF switch is OFF
#
Before re-connecting your system to the AC power supply, check that all the connections are properly made
#
Check that all speaker terminals are done up tightly.
#
Ensure that there are no strands of wire shorting adjacent speaker terminals
#
Signal cables should be properly terminated and fully screened to minimise hum. If you connect your
subwoofer via the low level signal inputs, the cable between your control unit or processor and the subwoofer
could be quite long so screening is particularly important. Consult your dealer if in doubt
.
1
Page 11
 Loading...