

Page 1
D
C
B
A
3
2
1
6
5
4
9
8
7
#
0
*
d
e
f
a
b
c
m
n
o
jk
l
g
h
i
w
x
y
z
tu
v
p
q
rs
C
15 -0 5- 20 06
05 :2 2P M
PH ON E
RE DI AL
FA ST DI AL
ST AT US
ME NU
Personal Emergency Response System
User Guide
RINS1181-2
Page 2

2
3
Your Professional Installer:
CONTACT NUMBER
Ten step quick setup
Every possible feature of your Voice-garde system is covered
within this user guide. However, we realise that you may be in
a hurry and need to begin by using only the standard features.
Here are the ten essential steps to get your Voice-garde working:
Entering the settings menu Page 7
Changing the language Page 9
Entering the date and time Page 10
Entering the alarm sequence contact numbers Page 11
Recording the alam messages Page 16
Adjusting speaker volume levels Page17
Entering fastdial numbers Page 19
Changing the security PIN number Page 20
The speech pendant Page 21
The speech pullcord Page 21
Cancelling an alarm Page 25
Making Calls Page 26
Answering Calls Page 29
COMPANY AND INSTALLER NAME
Page 3

3
3
Contents
2 Ten step quick setup
4 Introductio
n
5 Using your Castle Care-Cal
l
5 The home unit
6 The home unit standby scree
n
7 Entering the Settings men
u
8 Options within the Settings men
u
9 Changing the languag
e
10 Entering the date and tim
e
11 Entering the alarm sequence contact number
s
16 Recording your alarm message(s
)
17 Adjusting speaker volume level
s
18 Setting a pre-alarm tim
e
19 Entering fastdial number
s
20 Changing the security PIN numbe
r
21 The speech pendant
21 The speech pullcord
22 Common question
s
23 Triggering an alar
m
24 When the called party respond
s
25 Cancelling an alar
m
26 Making call
s
29 Answering call
s
30 Status
32 Other informatio
n
32 Standby screen configuration alarm
33 Troubleshooting
35 Replacing the home unit backup batter
y
36 Inserting speech pendant batterie
s
37 Inserting speech pullcord batterie
s
38 Registering the pendant(s) and pullcord(s
)
39 Deregistering a pendant or pullcor
d
40 Monitoring protocol
s
41 Safety
41 Rechargeable battery detail
s
41 Ringer equivalence number (REN
)
41 Battery disposa
l
42 Warranty
Page 4
4
5
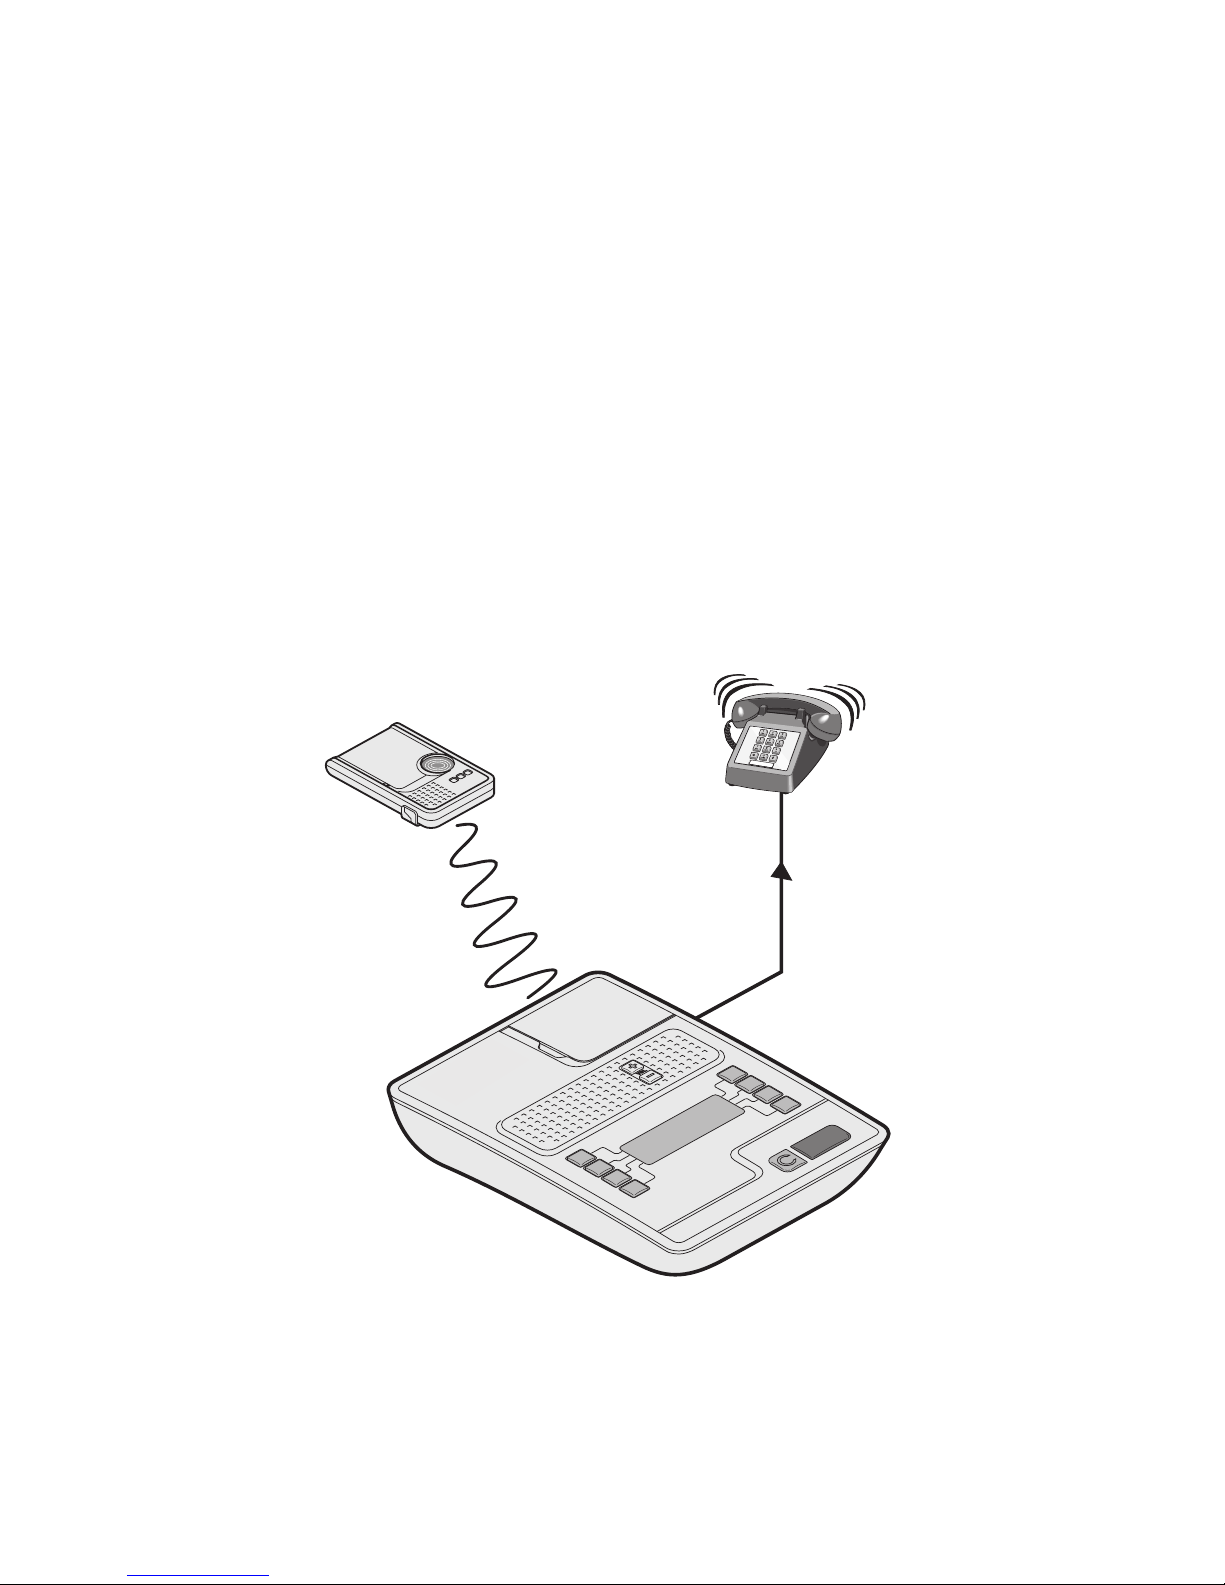
1 Press the
button on
your
speech
pendant
or pull a
speech
pullcord.
2 The home unit
begins dialling
your emergency
contacts.
3 When a
response is
achieved, you
can talk directly
with the person
through your
speech
pendant,
speech
pullcord or the
home unit.
speech
pendant
home
unit
Introduction
Welcome to Castle Care-Call, a system that provides the great reassurance of
direct communication with people who can help when you need them most.
The Castle Care-Call system comprises two (or possibly three) main items:
• A
home unit that connects to a power socket and a telephone line;
• A
speech pendant which you carry with you at all times while at home,
• One or more optional
speech pullcords, which can be mounted in areas of
particular hazard, such as your bedroom or near to your toilet.
The idea is simple, whenever you require assistance, just press the large red
button on either the speech pendant or home unit, or pull the cord of a nearby
speech pullcord. Your home unit will then begin to dial the first of your chosen
phone numbers. Once a successful call is made, you can then speak directly
with the person through whichever device you used to sound the alarm: the
speech pendant, the speech pullcord, or the home unit.
The list of phone numbers that your home unit calls is up to you. They could
include your near neighbours, friends, family, the emergency services or a
specialised 24-hour monitoring centre. We recommend that your professional
installer make these changes for your convenience and peace of mind.
Page 5

5
5
Using your Castle Care-Call
Your Castle Care-Call system has been designed to be straightforward to use
and a reassuring addition to your home. Castle Care-Call comprises three
items:
• Speech pendant: you need to carry this compact device with you at all times
around your home - see page 21
• Speech pullcord: this can be fixed to the ceiling like a light switch to help you
raise an alarm when if your pendant is unavailable - see page 21
• Home unit: this is the main control centre and the unit that does the dialling.
D
C
B
A
3
2
1
6
5
4
9
8
7
#
0
*
d
e
f
a
b
c
m
n
o
jk
l
g
h
i
w
x
y
z
tu
v
p
q
rs
C
15 -0 5- 20 06
05 :2 2P M
PH ON E
RE DI AL
FA ST DI AL
ST AT US
ME NU
Red alarm button
Press this to trigger
an alert.
Display panel
Indicates current
mode and shows the
options available.
Soft buttons
These eight buttons illuminate
whenever they are available
and, when pressed, select the
option shown on the adjacent
line of the display panel.
The home unit
Top corner keypad
These buttons, hidden
behind a flap, are used
to enter numerals and
characters.
Volume buttons
These two buttons illuminate whenever
they are available and increase or
decrease volume at necessary stages,
such as during a call. However, they
also serve as up/down controls within
certain menus.
Green cancel button
Press this to cancel an
alarm or cancel incoming/
outgoing calls.
Microphone
Speaker
Page 6
6
7
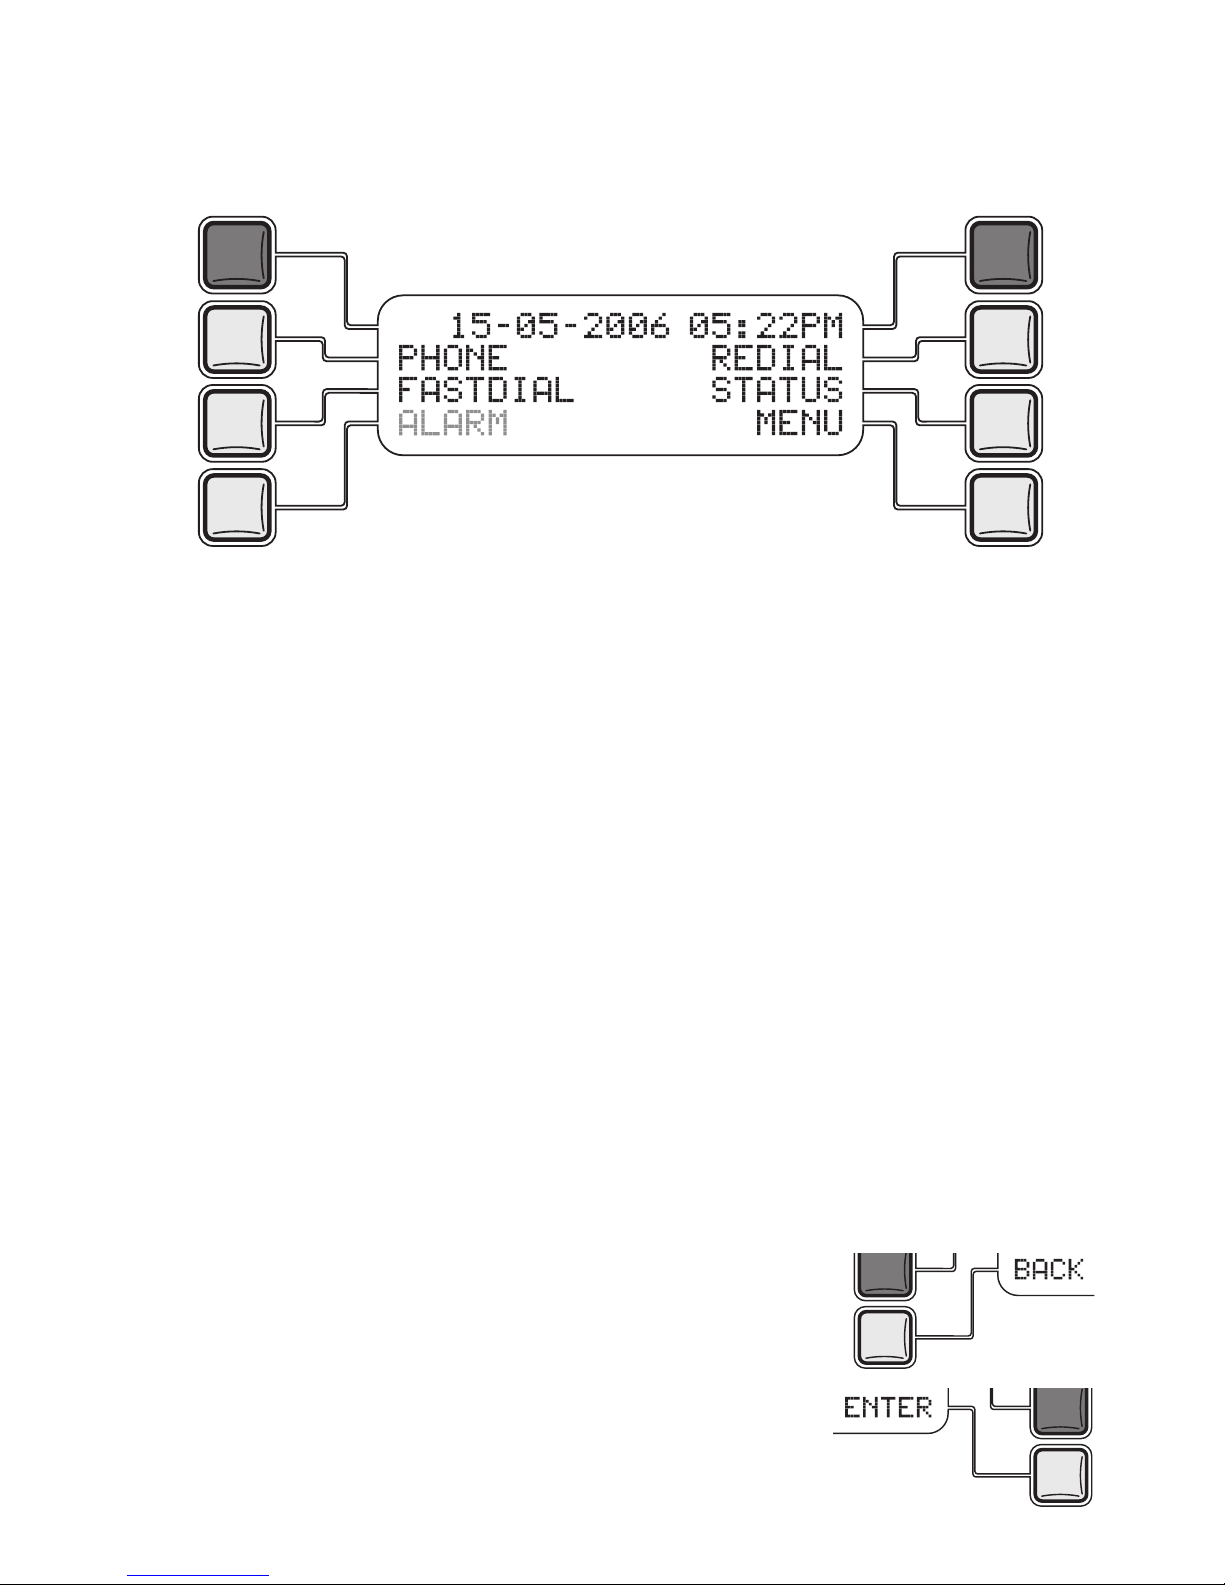
Press one of the illuminated buttons to choose the adjacent option shown on
the display panel.
From the standby screen you can choose:
PHO NE Use the top corner keypad to make a phone call just as if using a
normal telephone – see page 26
FAS TDIA L Allows you to quickly call any of six named people (their numbers
are stored within the home unit) – see page 27
RED IAL Allows you to re-call the last phone number dialled from the
home unit – see page 29
STA TUS Allows you to check the condition of various items, such as the
various batteries, the mains supply and the alarm log – see
page 30
MEN U Choose this option to enter the main settings menu. You will be
requested to enter a four-digit PIN number – See page 7
ALA RM This option appears (accompanied by warning beeps) only when
either a problem has been detected, or an alarm call from either
the home unit, speech pendant or speech pullcord has been
registered - see page 32
Other options that are regularly available within menus
BAC K The lower left soft button is most often
used as a way to exit from your current
menu level to the previous level.
ENT ER/ST ORE The lower right soft button is usually
the one that you press to move to the
next level or confirm an action.
The home unit standby screen
When the home unit is switched on but not involved in any operation or alarm
state, the display panel will show the following:
This is called the standby screen
and offers a number of options.
Page 7
7
7
Entering the Settings menu
The Settings menu is where all of the configuration steps for the home unit,
speech pendant(s) and speech pullcord(s) take place.
To enter the Settings menu
1 From the standby screen, press the
MENU soft button (the lower right button).
The display will show ENT ER P IN.
2 Open the flap and use the top corner keypad to enter the four digit PIN
number. At default the PIN number is
1234.
3 Press the
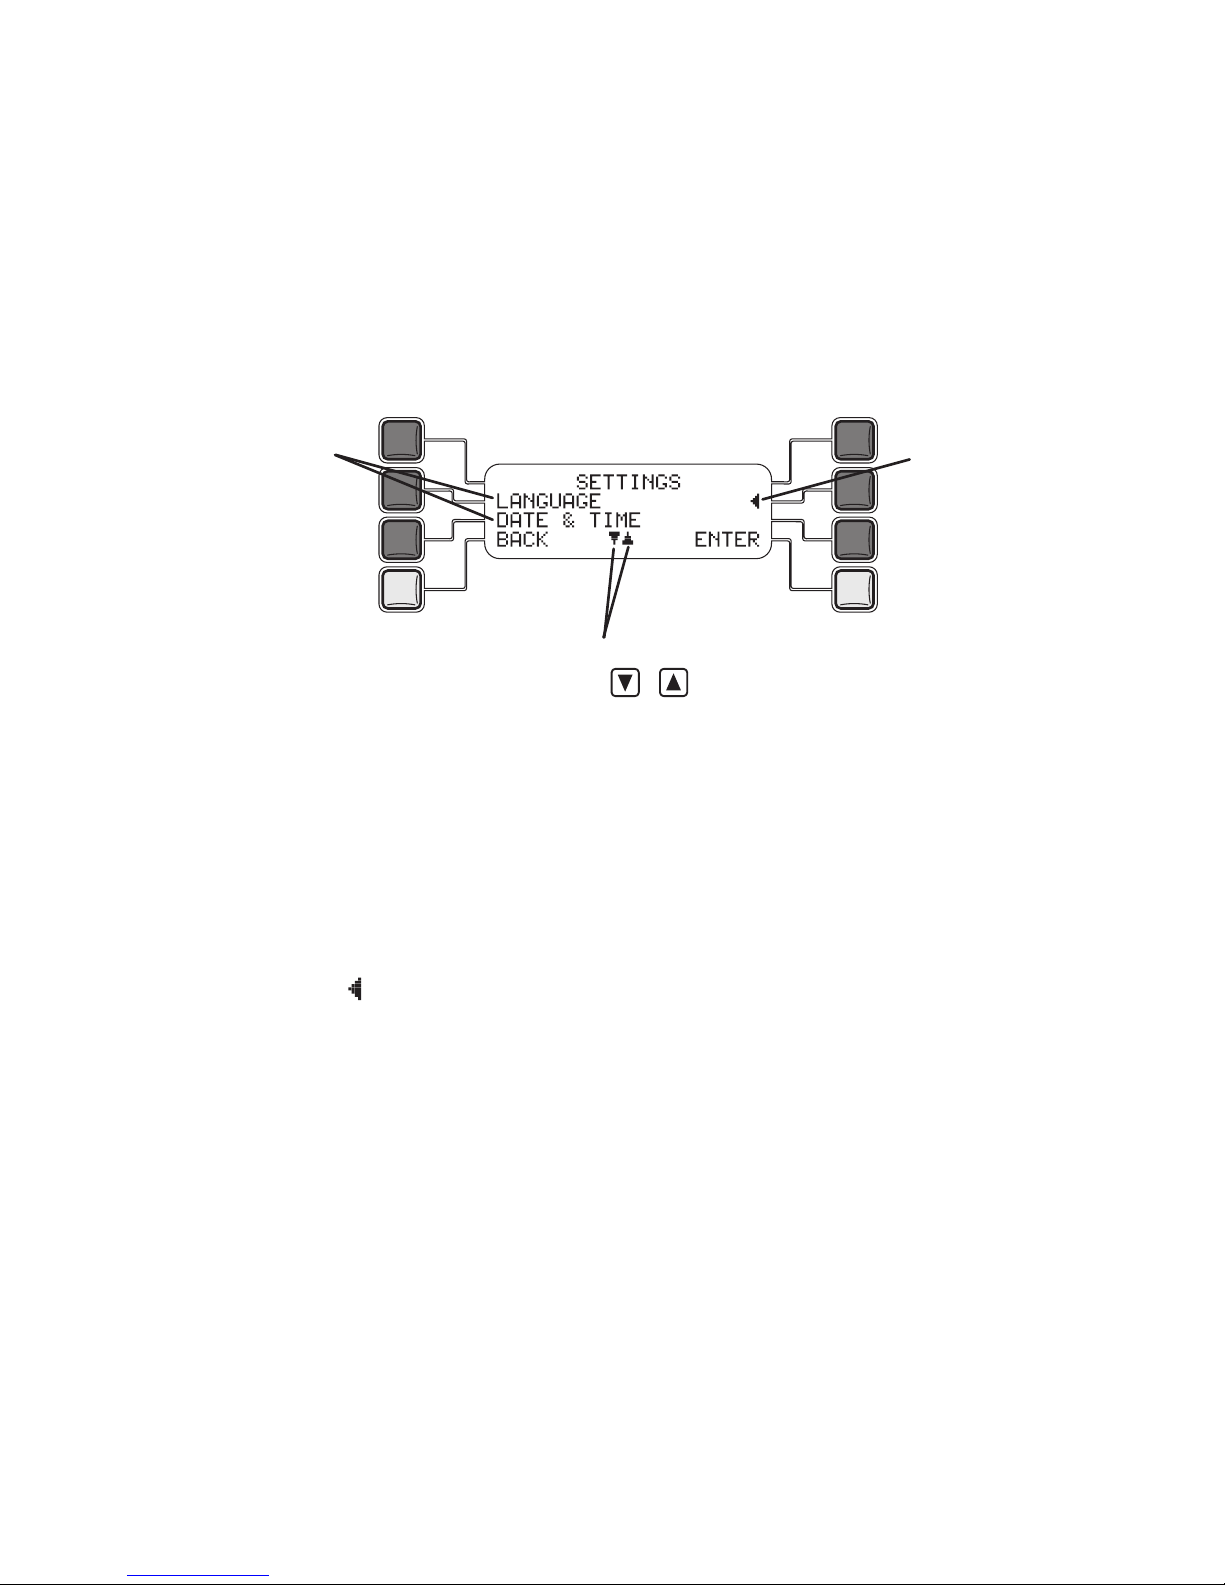
ENT ER soft button. The SE TTING S menu screen will be displayed:
The full list of settings options are shown on the next page.
Note: If no button is pressed, the home unit will automatically revert back to
the standby screen after one minute.
To select an option
1 Use the volume buttons to move up and down the list until the required option
is level with the
symbol.
2 Press the
ENT ER soft button to select the option.
These symbols indicate that the
volume keys ( & ) can be used
to move down and up the menu.
This symbol
indicates the
option that will
be selected if
you press the
ENTER button.
These are the two
options that are
currently visible
within the list. Use
the volume keys
to show the other
options within the
list.
Page 8

8
9
Options within the Settings menu
The SET TING S menu comprises the following options:
LANGUA GE Chooses the language in which the menu prompts are
displayed.
DATE & TI ME Sets the date and time details that are used within the
standby screen and the alarm log.
ALARM SEQ UENCE This is where the emergency contact details are stored. The
phone numbers listed in this section will be dialled when an
alarm is triggered.
ALARM MES SAGE Allows you to record the voice message that will be played
to the emergency contact when they respond to the call.
REGIST ER Allows you to form a bond between the home unit and all
speech pendants and speech pullcords that will be used
with it.
DEREGI STE R Allows you to cancel the bond between the home unit and a
speech pendant or speech pullcord.
ALARM VOL UME Allows you to individually set the speaker volume levels
on the home unit, the speech pendant and any speech
pullcords.
PREALA RM This sets an optional waiting period that must elapse
between an alarm being triggered and the first emergency
call being placed. This delay provides time to cancel an
alarm if it was triggered accidentally.
PERIOD IC CALLS This optional setting allows you to instruct the home unit to
place test calls to a particular monitoring centre at specific
intervals. This allows the home unit’s operation to be
verified.
HARDWI RED I/P Allows you to configure the required response to an
external alarm input (if fitted) into the home unit. Such an
external input could be an intruder alarm or smoke detector.
HARDWI RED O/P Allows you to configure the switching of an external device
(if fitted) when the home unit alarm is triggered. Such an
external output device could be a sounder or flashing
beacon.
FASTDI AL Allows the phone numbers of up to six contacts to be
stored (these are stored separately from the emergency
contact list). These contacts can be quickly selected from
the standby screen when needed.
SET PI N N O Allows you to change the four digit PIN code that is
required to enter the settings menu and to cancel alarms.
RESTOR E D EFAULTS Select this option to return the home unit to its factory state.
All stored information/settings will be erased.
Page 9
9
9
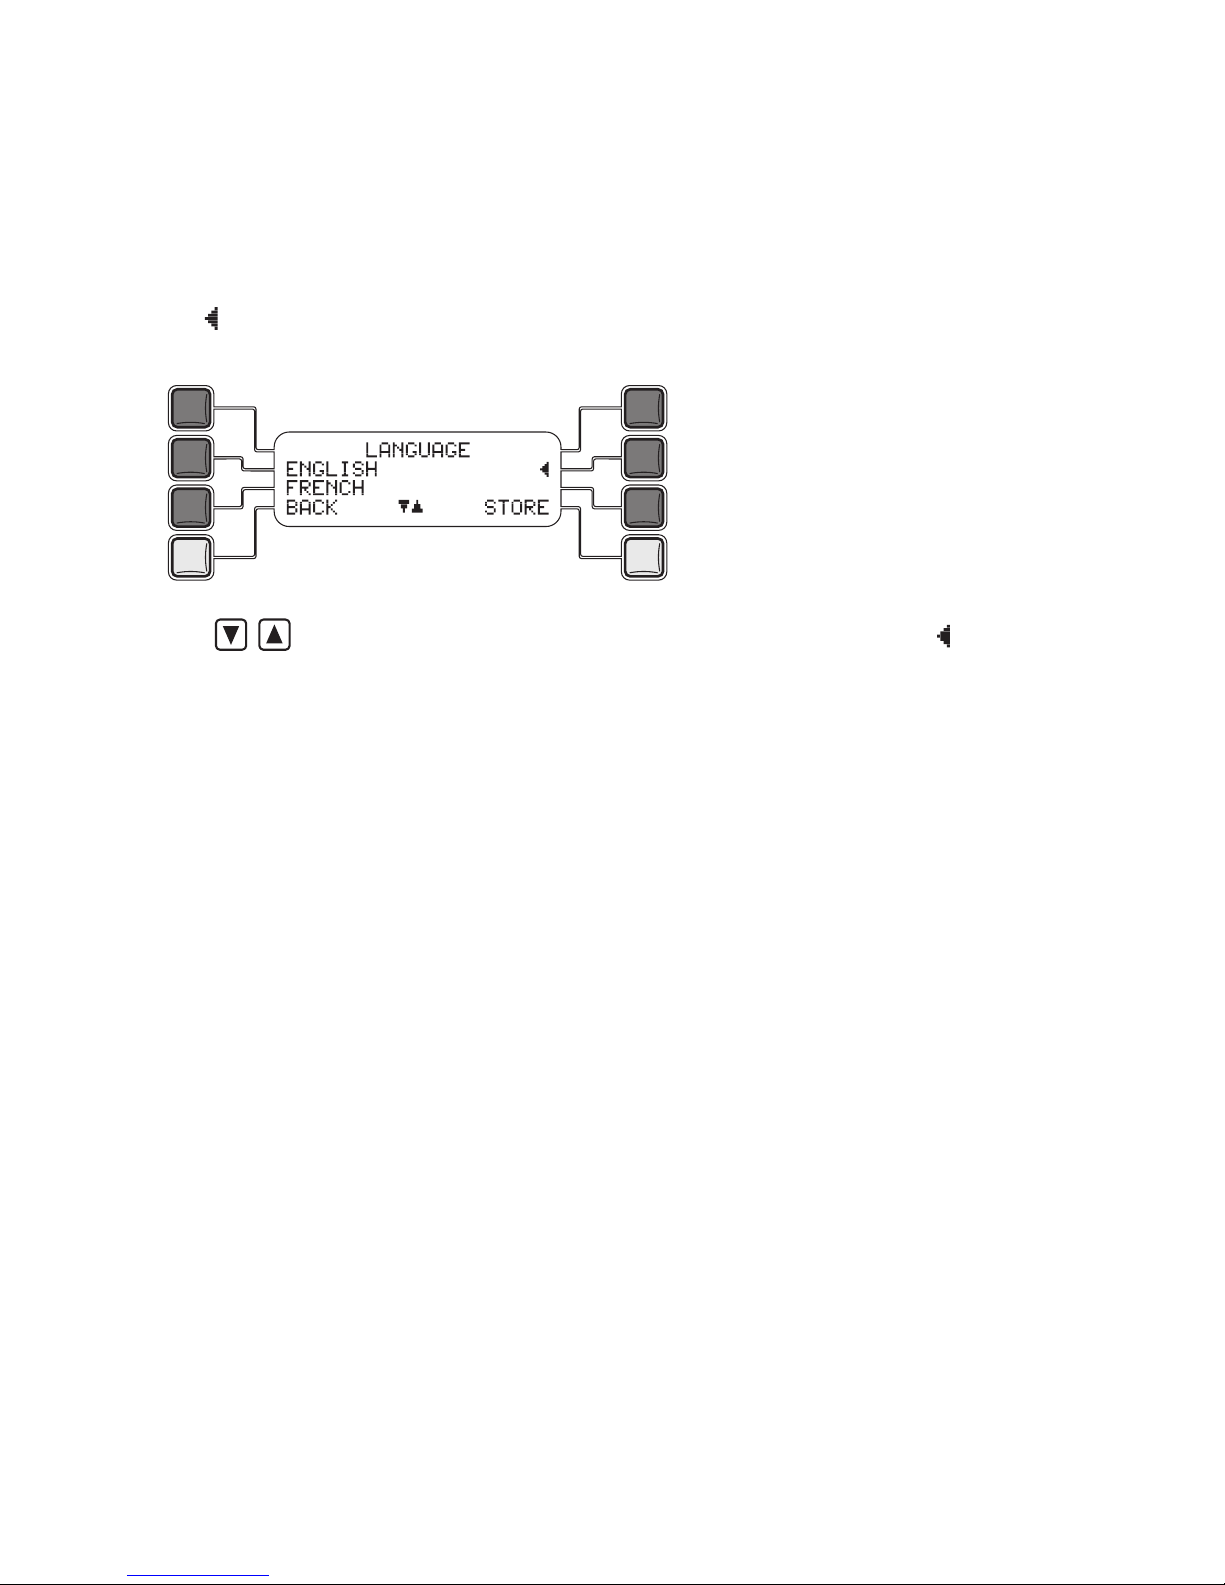
Changing the language
When supplied the home unit menus operate in English. If required, the menus
can be changed to use one of many languages that are available.
To change the language
1 Select the
SET TING S menu screen. See page 7 for details.
2 Ensure that the
LAN GUAG E option (it is the first option in the list) is level with
the symbol, then press the EN TER soft button.
The display will show the current language first in the list:
3 Use until the appropriate language option is level with the symbol,
then press the ST ORE soft button to save the language and return to the
SET TING S menu.
Page 10
10
11
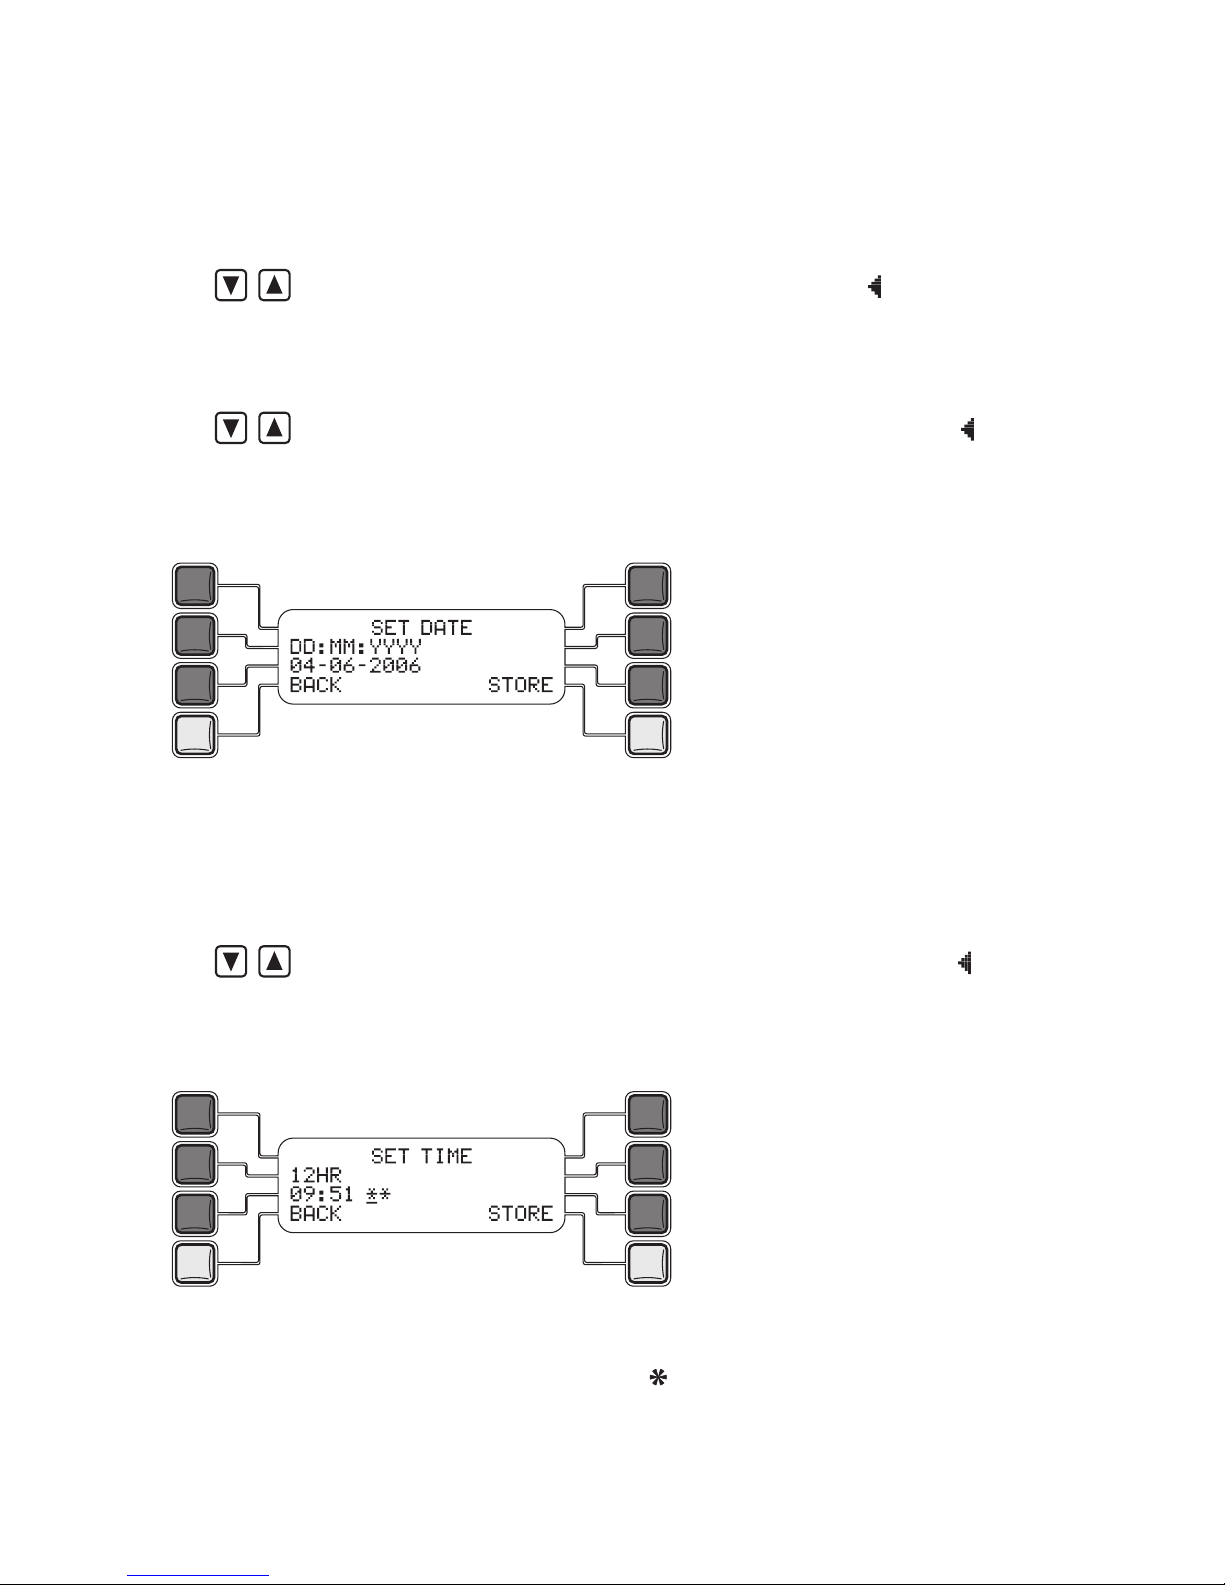
Entering the date and time
The home unit maintains a log of all alarms and when they occurred. To do this
it needs to have the correct date and time.
To enter the date and time
1 Select the
SET TING S menu screen. See page 7 for details.
2 Use
until the DAT E & TIME option is level with the symbol,
then press the EN TER soft button.
The display will then show two date format options:
DD: MM:Y YYY and
MM: DD:Y YYY.
3 Use
until the appropriate date format option is level with the symbol,
then press the ST ORE soft button.
The display will now prompt you to enter the correct date using the chosen
format:
4 Enter the current date using the top corner keypad. Remember to use a
0
before any single-digit day or month. To erase a digit, use the large green C
(cancel) button.
5 Press the
STO RE soft button. The display will show two time format options:
24H R and 12H R.
6 Use
until the appropriate time format option is level with the symbol,
then press the ST ORE soft button.
The display will now prompt you to enter the correct time using the chosen
format:
7 Enter the correct time using the top corner keypad. Remember to use a
0
before any single-digit hour or minute. When using the 12 HR format, after
entering the hour and minutes, press the button to choose AM or the #
button to choose PM. To erase a digit, use the large green C (cancel) button.
8 Press the
STO RE soft button to save the new date and time values and return
to the SET TING S menu.
Page 11
11
11
Entering the alarm sequence contact numbers
When an alarm is triggered, the home unit needs to make contact with someone who can help. It can be made to do this in one of two slightly different
ways, either:
• Sequentially call through a list of up to ten friends, family or neighbours until
one of them responds, whereupon a recorded message will greet them and
tell them what to do next, or
• Call directly to a central 24-hour monitoring agency and automatically report
your details, whereupon assistance can be summoned.
The first option is called
PRI VATE and the second option is known as
CEN TRAL . In both cases, once contact is made, you can then talk to the
person at the other end of the line.
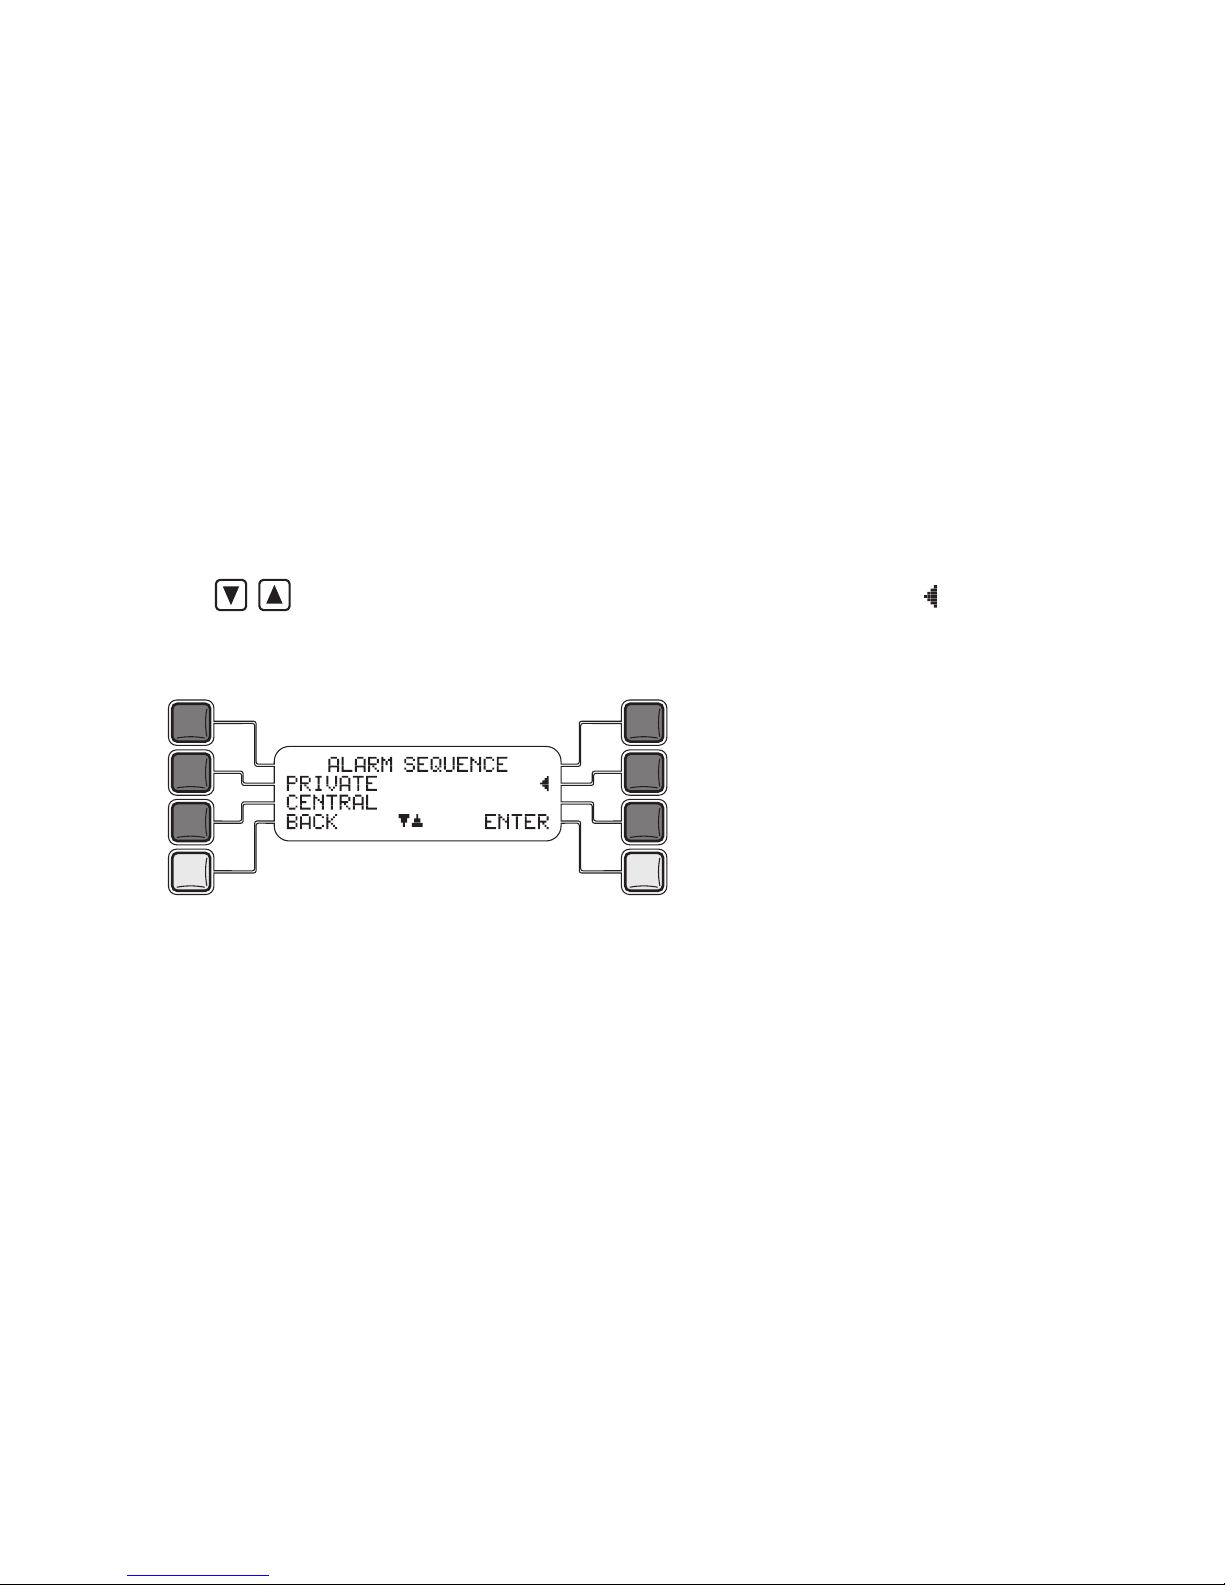
To select the required alarm sequence
1 Select the
SET TING S menu screen. See page 7 for details.
2 Use
until the ALA RM S EQUEN CE option is level with the symbol,
then press the EN TER soft button.
The display will then show two options:
PRI VATE and CENTR AL.
3 If you will be using a central monitoring agency choose the CENT RAL option,
otherwise select the PRI VATE option.
For further details:
• PRI VATE see ‘To enter private alarm sequence contacts’ on page 12
• CEN TRAL see ‘To enter a central alarm sequence contact’ on page 14
Note: If any contact details are stored within the CENTR AL section, the home
unit will only use those details during an alarm. Any stored PRI VATE contact
details will be ignored. Be sure that the CENTR AL section is set to EMP TY
if you wish to use PRI VATE dialling. See ‘To permanently remove a central
entry’ on page 15.
Page 12
12
13
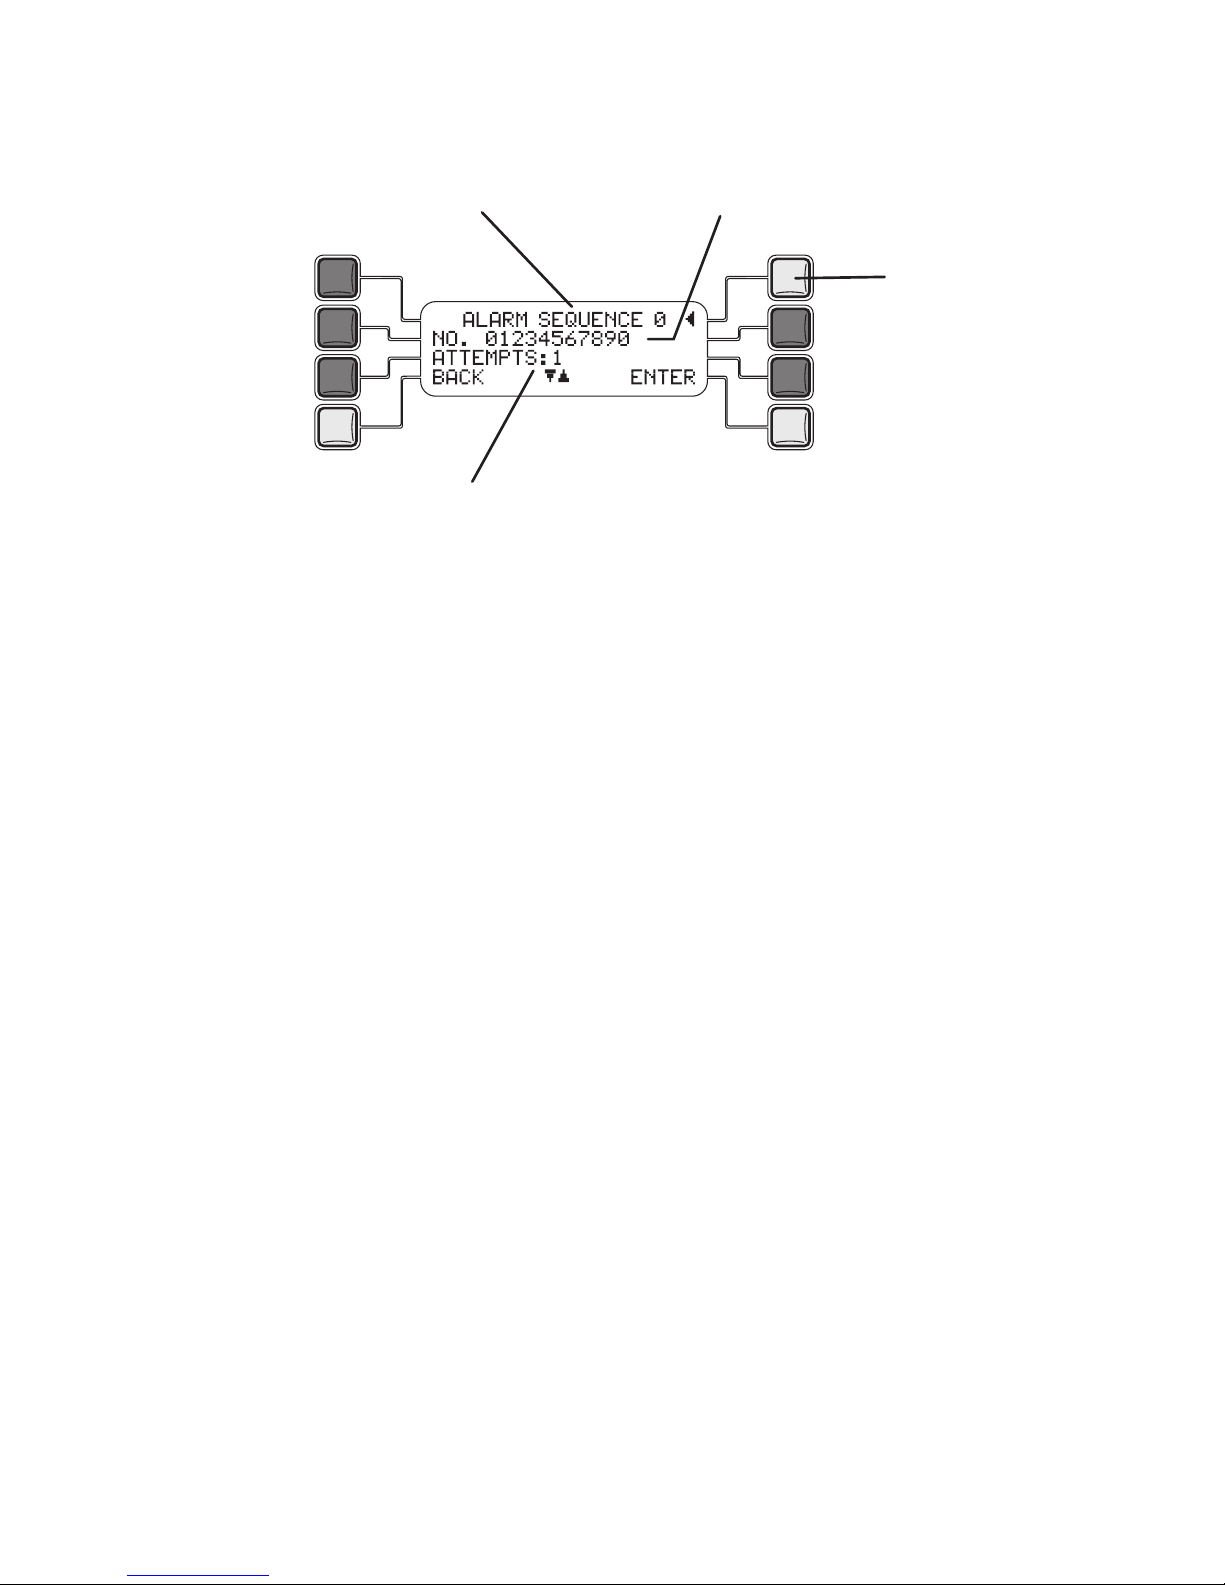
To enter private alarm sequence contacts
After you select the
PRI VATE option, the display will show the details for the
first of up to ten alarm sequence contact entries (numbered 0 to 9):
4 Either press the top right soft button to move to the next entry or press the
ENT ER soft button to edit the current entry. You can now edit the PHONE NO
for this entry. This is the telephone number that will be dialled during an alarm.
• IMPORTANT: Do not enter any spaces within the phone number.
• Use the top corner keypad to add the required phone number.
• If required, use the large green C (cancel) button to erase digits.
5 Press the
STO RE soft button to save the phone number and edit the
ATT EMPT S value. This is the number of times in succession that the phone
number for this entry will be attempted before moving to the next entry. The
value can be between 0 (i.e. the entry will be ignored) and 5.
• If required, use the large green C (cancel) button to erase the existing
number.
• Use the top corner keypad to add the required number of attempts.
6 Press the
STO RE soft button to save the attempts value and edit the
TIM E OU T period. This is the time (in seconds) that the home unit will allow
to: dial the number and for the respondent to answer the call, listen to your
recorded message and then press the star button on their phone. It is important that this value is not too short that the recipient is not given chance to
respond or too long that valuable time is wasted if the called phone number is
engaged, unanswered or unavailable. The standard time is 60 seconds.
• If required, use the large green C (cancel) button to erase the existing time
out period.
• Use the top corner keypad to add the required time out period (the system
will not allow a time out period less than 10 seconds).
The sequence number (0 to 9)
The phone number for sequence 0
Dialling attempts that should
be made to contact this
number before moving to the
next number.
[off screen] TIME OUT: 60 - The time
in seconds that should be allowed
during each dialling attempt (the
standard setting is 60 seconds).
Press this soft
button to choose
the next sequence
number.
Page 13

13
13
To enter private alarm sequence contacts
7 Press the
STO RE soft button to save the time out period and finish editing the
current sequence entry. The next entry will be shown. You can now either:
• Edit the next entry (as per steps 4 to 6), or
• Skip through the next entry to get to others later in the list (press the
ENT ER and ST ORE soft buttons at each stage to leave the existing values
unchanged), or
• Press the
BAC K soft button to exit the list.
To temporarily prevent an entry from being used
At times it may be necessary to temporarily cease using a sequence contact
number, for instance if that person is away on holiday for a long period. In this
case, edit the list as described in this section and set the
ATT EMPT S value to
0. To reinstate the contact, change the value back to its previous setting.
To permanently remove an entry
1 When the overall details for the sequence entry are displayed, press the
large green C (cancel) button. The display will show
DEL ETE?
2 Press the
ENT ER soft button to confirm or the BAC K soft button to decline.
Page 14
14
15
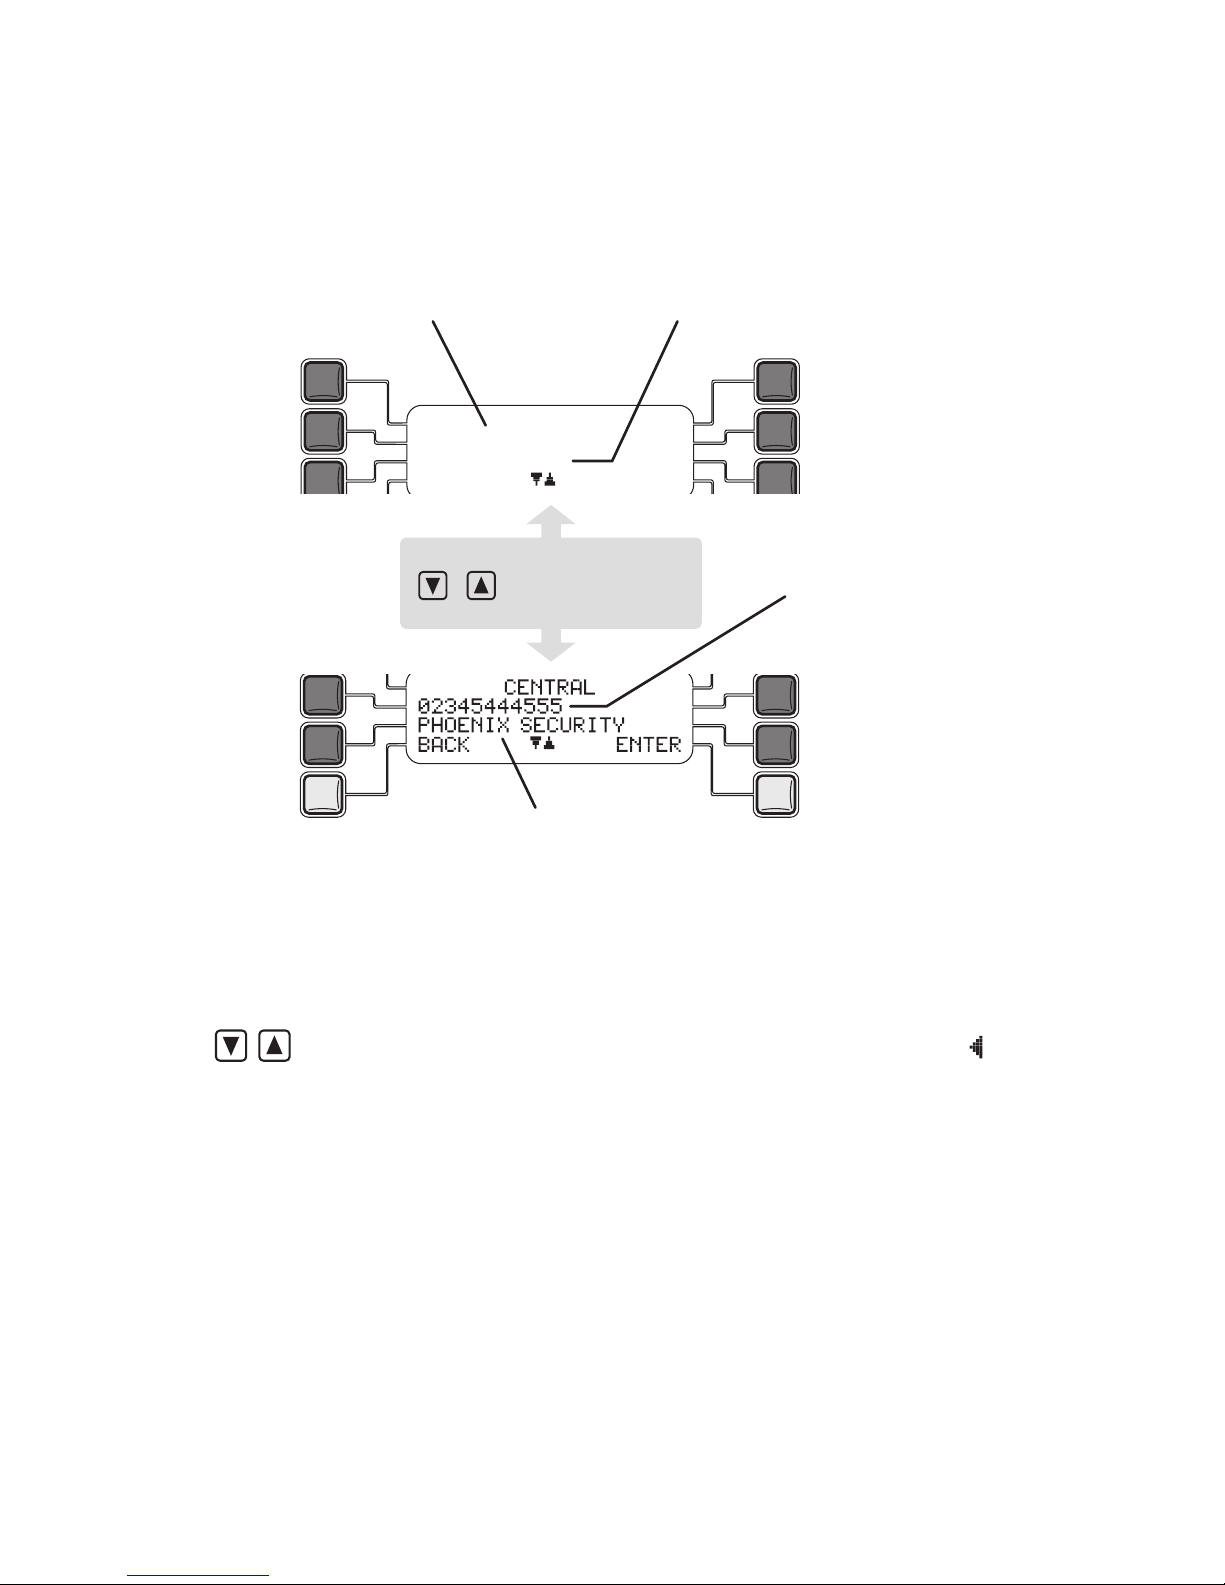
To enter a central alarm sequence contact
After you select the
CEN TRAL option, the display will either state that the
option is EMP TY or it will show the current entry:
4 Press the
ENT ER soft button to edit the entry. You can now select the alarm
reporting format that will be used to identify you to the central monitoring
centre. There are two options: COM -CARE MPS 1 and COM -CARE MPT 1.
Your monitoring centre will advise on which to select.
5 Use
until the required reporting format name is level with the symbol,
then press the ST ORE soft button. The display will show H OME U NIT ID
NUM BER. This is where you enter the home unit ID number that has been
given to you by the central monitoring centre. It is vital that the number entered
matches exactly with the one declared because this is used to identify you.
• If required, use the large green C (cancel) button to erase the existing
number.
• Use the top corner keypad to add the declared home unit ID number.
CEN TRA L
COM -CA R E MPS 1
012 345 6 789 0
BAC K ENT ER
The reporting format that will
be used to send your details to
the central monitoring centre
Your home unit ID number
The name of the central
monitoring centre
Use the volume keys
( & ) to move between
the information
Page 15

15
15
To enter a central alarm sequence contact
6 Press the
STO RE soft button to save your home unit ID number and edit the
CEN TRAL NUMB ER. This is where you enter the alarm contact number of
your central monitoring centre.
• IMPORTANT: Do not enter any spaces within the phone number.
• If required, use the large green C (cancel) button to erase the existing
number.
• Use the top corner keypad to add the central phone number.
7 Press the
STO RE soft button to save the central phone number and edit the
CEN TRAL NAME . Here you need to enter the name of the central monitoring
centre - this helps to make it clear how your home unit is operating.
• If required, use the large green C (cancel) button to erase existing
characters.
• Use the top corner keypad to add the central name:
Repeatedly press the button containing the required character until that
character is shown on the display.
Press the
button to move the cursor to the next position and then enter
the next character. Note: If the next character is on a different button to the
last one pressed, you don’t need to press the button.
To enter a space, press the
button twice.
8 Press the
STO RE soft button to save the central name and return to the
ALA RM S EQUEN CE menu. The details are now stored and you can review
them by selecting the CEN TRAL option from this menu.
Notes
• When using a central monitoring centre, you do not need to record an alarm
message because your contact details are sent automatically.
• If you wish to change to
PRI VATE mode on a home unit that was
previously used in CE NTRA L mode, ensure that the CEN TRAL section is
set to EMP TY. If any contact details are stored within the CENTR AL section,
the home unit will always use only those details during an alarm. Any stored
PRI VATE contact details will be ignored.
To permanently remove a central entry
1 When the overall details for the entry are displayed, press the large green C
(cancel) button. The display will show
DEL ETE?
2 Press the
ENT ER soft button to confirm or the BAC K soft button to decline.
Page 16

16
17
Recording your alarm message(s)
When the home unit makes alarm calls it repeatedly plays your voice message
to inform the called person of your name and what they need to do. The home
unit can be triggered in two main ways: by a speech trigger (home unit button,
pendant or pullcord) or by hardwired input (from a different source, such as a
smoke alarm or intruder alarm). You can record separate messages for the two
types of alarm.
Note: If you are using a central monitoring agency (i.e. the AL ARM SEQUE NCE
option is set to CEN TRAL ), no alarm message is required.
To record your emergency message
1 Select the
SET TING S menu screen. See page 7 for details.
2 Use
until the ALA RM M ESSAG E option is level with the symbol,
then press the EN TER soft button.
The display will now offer two options: SPEECH TRIGGER and HARDWIRED I/P.
3 Use
until the required option is level with the symbol,
then press the EN TER soft button. The display will show the following:
For best results:
• Ensure that there is minimum background noise,
• Practice your message,
• Speak clearly, approximately 30cm (12”) away from the front edge of the
home unit (the microphone is under the lower front corner beneath the large
red button).
A sample message
“This is a personal alarm call from
[your name] on phone number [your phone
number]. You must press * to acknowledge the call and you must press # to
end the call.”
Note: Whichever message you choose to use, ensure that it clearly informs the
recipient to press the star button on their phone and the # key to end it.
4 When you are ready, press the
RECORD soft button and clearly read your message.
5 Press the
STO P soft button when complete. You can then press the
PLA YBAC K soft button to hear your message.
If necessary, repeat steps 4 and 5 to re-record your message.
6 When complete, press the
BAC K soft button until the standby screen is
displayed.
Page 17

17
17
Adjusting speaker volume levels
The speaker volume levels for the home unit and every speech pendant
and/or speech pullcord can be individually set to suit the general background
noise level or the requirements of individuals.
Note: The only way to test the speaker volumes for each device is to use that
device to create an alarm - you should always discuss such a test alarm with
the recipient(s) of the alarm call before carrying it out.
To adjust speaker volume levels
1 Select the
SET TING S menu screen. See page 18 for details.
2 Use
until the ALA RM V OLUME option is level with the symbol,
then press the EN TER soft button.
The display will then allow you to choose between the three types of device:
HOM E UN IT,
PEN DANT S and PULL COR DS.
3 Use
until the required device type is level with the symbol,
then press the EN TER soft button.
• If you selected the HOM E UN IT then its current volume level will be shown.
• If you selected either
PEN DANT S or PULL COR DS, ensure that the
required device name is level with the symbol (if there is more than one
device name, use ), then press the ENTE R soft button.
4 Use
to adjust the speaker volume between 0 and 9, where 0 is silent
and 9 is full volume. The standard level is 5 and this is sufficient for most
situations.
6 Press the
STO RE soft button to save the speaker volume for the selected
device and return to the ALA RM V OLUME menu.
Page 18

18
19
Setting a pre-alarm time
As standard, the home unit will begin to dial its alarm sequence contact
numbers as soon as the alarm is triggered. However, you may prefer a short
delay between the alarm being triggered and the first contact being made.
For instance, this might allow time to cancel false alarms before the calls were
placed. This delay is known as a pre-alarm, and it can be set between 0 and
180 seconds.
Note: Once a pre-alarm has been set, it will affect all registered devices.
To set a pre-alarm time
1 Select the
SET TING S menu screen. See page 7 for details.
2 Use
until the PRE ALAR M option is level with the symbol,
then press the EN TER soft button.
3 Use the top corner keypad to enter a pre-alarm time (in seconds) up to a
maximum of 180.
4 Press the
STO RE soft button.
Page 19

19
19
Entering fastdial numbers
In addition to operating as an emergency alarm, the home unit allows you to
store the phone numbers of up to six regular contacts so that you can quickly
select and dial them from a list. These numbers are stored independently of
the alarm contact numbers.
To enter fastdial numbers
1 Select the
SET TING S menu screen. See page 7 for details.
2 Use
until the FAS TDIA L option is level with the symbol,
then press the EN TER soft button.
The display will show the list of current fastdial contacts. If an entry is not
used, it will show
EMP TY within the list.
3 Use
until the required fastdial entry is level with the symbol,
then press the EN TER soft button.
The display will prompt you to enter or edit the name for the contact.
4 Use the top corner keypad to enter/edit the contact name:
• Repeatedly press the button containing the required character until that
character is shown on the display.
• Press the
button to move the cursor to the next position and then enter
the next character. Note: If the next character is on a different button to the
last one pressed, you don’t need to press the button.
• To enter a space, press the
button twice.
• If required, use the large green C (cancel) button to erase characters.
5 Press the
STO RE soft button.
The display will prompt you to enter or edit the phone number for the contact.
6 Use the top corner keypad to enter/edit the contact phone number and press
the
STO RE soft button to return the FA STDIA L menu.
• IMPORTANT: Do not enter any spaces within the phone number.
To delete a complete entry
1 Display the
FAS TDIA L list, as discussed above, and use
until the
required fastdial entry is level with the symbol.
2 Press the large green C (cancel) button. The display will show
DEL ETE?
3 Press the
ENT ER soft button to confirm..
Page 20

20
21
Changing the security PIN number
The PIN number is used within the home unit to control access to the Settings
menus and also to cancel an alarm. As standard the PIN number is set to
1234, however, this can be changed and you are recommended to do so.
To change the security PIN number
1 Select the
SET TING S menu screen. See page 7 for details.
2 Use
until the SET PIN NO option is level with the symbol,
then press the EN TER soft button.
The display will prompt you to enter your new 4-digit PIN number.
3 Use the top corner keypad to enter your new PIN number and press the
STO RE soft button.
The display will prompt you to repeat your new 4-digit PIN number.
4 Use the top corner keypad to re-enter your new PIN number and press the
STO RE soft button.
If the entered numbers match, the display will show SE T PI N NO CORR ECT
and then return to the SET TING S menu. Otherwise, you will be asked to
repeat steps 3 and 4.
Page 21

21
21
The speech pullcord
The speech pullcord works in a similar manner to the speech pendant except
that it can be attached to the ceiling and you pull its cord to raise an alarm.
Once connected, you will be able to hear your respondent and speak to them
via the sensitive microphone within the speech pullcord housing.
The speech pendant
This wireless compact unit should be your constant companion around your
home. When you press the large red button, it instructs the home unit to begin
dialling your trusted respondents. When contact is made, you can then speak
to the other person using your speech pendant like a small wireless telephone.
IMPORTANT: The speech pendant is not waterproof, do not allow it to come
into contact with liquids.
Speaker
Emits confirmation beeps and
also allows you to hear your
respondent.
Microphone
Allows you to speak to
your respondent.
Alarm button
Press this button until
all three indicators flash
and you hear two beeps.
Indicators
The red, amber and
green indicators show
the progress of your
alarm.
Speaker
Emits confirmation
beeps and also
allows you to hear
your respondent.
Microphone
Allows you to
speak to your
respondent.
Alarm cord
Pull this until all three
indicators flash and
you hear two beeps.
Indicators
The red, amber and
green indicators show
the progress of your
alarm.
Page 22

22
23
Common questions
What happens if more than one alarm triggers occur at the same time?
In situations where you are not the only person to carry a speech pendant (or
have access to a speech pullcord), it is not inconceivable that multiple alarm
triggers could take place at the same time. This is particularly so if people are
responding to the same emergency, e.g. a fire. The Castle Care-Call system is
specifically designed to handle such situations.
The first alarm trigger will initiate the emergency call(s). Once contact
has been made with the emergency contact, anyone who also raised an
alarm will be added to the existing alarm call, where all parties are able to
speak with each other. The Castle Care-Call system can support a total of
four simultaneous home unit/pendant/pullcord triggers in what is called a
‘conference alarm call’.
What happens if my speech pendant is out of range?
When you press the red button on the speech pendant it will go through a
sequence as it tries to make contact with the home unit. First you will hear two
beeps and see all three of its indicators flash. Then, only the red indicator will
remain on while contact is being made. If contact fails, the speech pendant
will keep re-trying for two and half minutes, after which time it will stop. If it
is possible for you to move closer to the home unit then you should try this.
Alternatively, wait for a short while and then try pressing the button again in
case short-term outside interference was causing the problem.
How do I know if my pendant or pullcord has a low battery?
In order to maximise battery life, pendants and pullcords remain completely
dormant until you use them to trigger an alarm. At this point, they not only
communicate with the home unit, but also check their battery status. If your
pendant or pullcord detects low battery power, it will:
• Display a flashing red indicator along with intermittent beeps, and
• Register the low battery alarm with the home unit.
If you are using a central monitoring centre, (once the alarm situation has been
dealt with) the home unit will automatically call the centre and report that you
have a low battery.
Note: If two or more speech triggers are involved in a conference alarm
call, only the first speech pendant/pullcord will be listed within the home
unit’s alarm log. This means that a low battery indication for the secondary
device would not be logged or reported to a monitoring centre. However, the
device itself would continue to show a flashing red indicator and produce an
intermittent beep.
Page 23

23
23
Triggering an alarm
Whenever you get into difficulty, you can trigger an alarm in any of three ways:
Using the speech pendant
Press the large red button
Press until all three indicators
flash and you hear two beeps.
You should see:
• All three indicators initially illuminate,
then:
• Red only: Contact is being made with
the home unit, then:
• Amber only: Home unit is dialling the
first emergency contact number, then:
• Green only: Respondent has pressed
the star button on their phone*.
You should hear:
• The device emit two beeps.
• Then: The call being placed, your
emergency message being played
repeatedly* and the respondent as
they answer.
• When they press their star button,
you will be able to speak with them
via your pendant or pullcord.
Using the speech pullcord
Pull the pullcord
Press until all three indicators
flash and you hear two beeps.
IMPORTANT NOTE:
Having used the panic button in the
case of a misactivation, the user or the
first attendee in the
case of an emergency call needs to
check that the base unit has been reset,
having first attended to the caller.
See page 5 for the location of the cancel
button.
Page 24

24
25
Using the home unit
D
C
B
3
2
1
6
5
4
9
8
7
#
0
*
d
e
f
a
b
c
m
n
o
jk
l
g
h
i
w
x
y
z
tu
v
p
q
rs
C
15- 05- 200 6
05: 22P M
PHO NE
RED IAL
FAS TDI AL
STA TUS
MEN U
Press the large red button
Press and release.
You should hear:
• Your emergency message being
played repeatedly* and the
respondent as they answer.
• When they press their star button,
you will be able to speak with them.
You should see:
• HOME UN IT AL ARM CA LL
displayed on the screen.
When the called party responds
When your home unit makes a call to your chosen emergency contacts, they
will hear your recorded message* which will ask them to press the star button
on their phone to accept the alarm call. When they do this, the recorded
message will cease and you will be able to speak with them.
When you have finished your conversation, if the caller merely hangs up, the
alarm state will continue. However, if they press the
# button on their phone,
they can remotely cancel the alarm.
Please see Page 44 for more details about ending a call
* If you have opted to use a central monitoring centre, no message will be played
because your details are sent automatically. You will be able to speak with the operator.
Microphone
Page 25

25
25
2 Lift the flap in the top right corner of
the home unit and use the keypad to
enter the four-digit security PIN number.
The display will show a * character for
every digit that you enter.
Cancelling an alarm
The alarm can be cancelled in three ways, either:
• Locally using the home unit
1 At any time during an alarm call, press
the large green C (cancel) button in the
lower right corner of the home unit. The
display will prompt you to EN TER PIN.
3 Press the button adjacent to the ENT ER
option on the lower right side of the
display.
If your PIN number was correct, the
alarm will cease immediately.
• Remotely by the respondent
On their phone, the respondent can press the
# (hash) button at any time
during the alarm call. The alarm will cease and hang up the call.
• Remotely by a monitoring centre
If your home unit has been programmed to use a monitoring centre, the
operator can cancel the alarm once they have made contact and checked on
your situation.
Notes
• If the alarm was triggered from an external source such as a hardwired
intruder alarm or smoke detector, the external source must be cancelled
before the home unit alarm can be cancelled.
• The alarm cannot be cancelled from a speech pendant or a speech pullcord.
Page 26

26
27
Making calls
In addition to making emergency alarm calls, you can use your home unit as
a handsfree phone to make and receive normal calls. You can make calls in
three ways:
• Normal dialling - use the top corner keypad to dial any phone number,
• Fastdial - quickly choose any of six frequently used, pre-stored numbers,
• Redial - call the last number that was dialled from the home unit.
Note: If an alarm is triggered while an outgoing call is in progress (initiated
either from the Castle Care-Call unit or from an attached phone), it will
automatically terminate the call and begin dialling its emergency contacts.
To make a call by normal dialling
1 Ensure that the home unit display is showing its normal set of options (i.e. the
standby screen):
2 Press the button adjacent to the PHO NE option (the second button down on
the left side of the display).
The display will show:
3 Lift the flap in the top right corner of the home unit and use the keypad to dial
the required phone number.
4 Press the button adjacent to the
DIA L option (lowest button on the right
side of the display). The home unit will make the call and you can use the
handsfree microphone and speaker to talk to your recipient.
During the call you can use the volume buttons (
) to adjust the speaker
volume.
To end the call
• Press the large green C (cancel) button.
Page 27

27
27
To make a call using fastdial
1 Ensure that the home unit display is showing its normal set of options (i.e. the
standby screen):
2 Press the button adjacent to the FAS TDIAL option (the third button down on
the left side of the display).
The display will show the first two entries (of up to six) available within your
fastdial list:
3 If necessary, use the volume buttons (
) to bring the required fastdial
contact name level with the indicator.
4 Press the button adjacent to the
ENT ER option (lowest button on the right
side of the display). The display will show the phone number for the chosen
contact.
5 Press the button adjacent to the
DIA L option (lowest button on the right
side of the display). The home unit will make the call and you can use the
handsfree microphone and speaker to talk to your recipient.
During the call you can use the volume buttons (
) to adjust the speaker
volume.
To end the call
• Press the large green C (cancel) button.
To add entries to your fastdial list
The contacts within your fastdial list can be updated via the Settings menu.
Please see the following page.
Two of your (up to six)
fastdial contacts.
The entry that is level with the
indicator when you press the
ENTER button will be selected.
These symbols indicate that you can use the volume
buttons to move up and down the list of contacts.
Page 28

28
29
To make a call using redial
1 Ensure that the home unit display is showing its normal set of options (i.e. the
standby screen):
2 Press the button adjacent to the RED IAL option (the second button down on
the right side of the display).
The display will show the last number dialled:
3 Press the button adjacent to the DIA L option (lowest button on the right
side of the display). The home unit will make the call and you can use the
handsfree microphone and speaker to talk to your recipient.
During the call you can use the volume buttons (
) to adjust the speaker
volume.
To end the call
• Press the large green C (cancel) button.
Last number dialled from the
home unit.
Press this button to dial the
number.
Page 29

29
29
Answering calls
When you receive an incoming call, you can choose to pick up the call using
the home unit or use your normal telephone (if it is connected to the home
unit).
Note: If an alarm is triggered while an incoming call is in progress, the Castle
Care-Call unit will play its recorded alarm message over the conversation
to warn the callers. However, if the unit has been programmed to use a
monitoring centre, then it will have no message to play and can do nothing
until the call is terminated by the callers.
To answer an incoming call
1 When an incoming call is received, the display will show:
15- 05- 2 006 0 5:2 2 PM
SIL ENT
VOL UME 5
012 345 6 789 0
ANS WER
2 You can either:
• Press the button adjacent to the
ANS WER option (lowest button on the right
side of the display). The home unit will answer the call and you can use the
handsfree microphone and speaker to talk to your recipient.
• Press the button adjacent to the
SIL ENT option (lowest button on the left
side of the display). The home unit leave the call unanswered but will cease
the call ringer.
To end the call
• Press the large green C (cancel) button.
Press this button to silence
the call ringer.
Press this
button to dial
the number.
Telephone
number (will
be displayed if
you subscribe
to Caller ID
with your phone
company)
Page 30

30
31
Status
The home unit allows you to check upon various aspects of operation to
ensure that the constituent parts of the system are operating correctly. Using
the status option, you can check:
2 Press the button adjacent to the STA TUS option (the third button down on the
right side of the display).
The display will show the first two of the five status options:
3 Use the volume buttons (
) to bring the required status option level with
the indicator.
4 Press the button adjacent to the
ENT ER option (lowest button on the right side
of the display). The display will show the results for the chosen status option:
• HU BATT ERY - This option will indicate the status of the home unit backup
battery. The response will either be: HU BA TTERY : GOO D or
HU BATT ERY : F AIL.
• MAI NS - This option will indicate the status of the home unit power supply.
The response will either be: MA INS : GOOD or M AINS : FAIL.
continued
• The home unit backup battery
• The mains power supply
• Speech pendant batteries
• Speech pullcord batteries
• The Alarm log
To check the status
1 Ensure that the home unit display is showing its normal set of options (i.e. the
standby screen):
Press this button
to show the status
menu.
Page 31

31
31
• PEN DANT S / PULL COR DS - These options will indicate the battery status
of each pendant or pullcord, as reported when they last made an alarm
call. The battery status will be presented as a percentage of charge, where
100 % is fully charged. If the NEX T option is shown in the lower right portion
of the display, press the lower right hand button to view the status for the
next pendant or pullcord.
Note: If no alarm call has been made by a pendant or pullcord, its battery
status will be reported as 0%. A low battery warning from a pendant or
pullcord can only be issued when that device is making an alarm call.
• ALA RM L OG - This option allows you to view a log of the last ten alarm
calls. Beginning with the last alarm call, you can view the following
information:
Use the volume keys
( & ) to move between
the information
Use the volume keys
( & ) to move between
the information
Event type: Either AL ARM
CALL or HA RDW IRED I/ P
The time the alarm was
triggered
The time the alarm was
cancelled
The phone number to which a
successful call was made
The source of the alarm
The battery status of the device
causing the alarm.
IMPORTANT: The alarm log will only store one trigger per alarm call. If any
further alarm triggers (from other speech devices) occur before the initial
alarm call has been dealt with and cancelled, they will not be added to the
log.
Press the button adjacent to the
NEX T option (lowest button on the right
side of the display) to view the next alarm log.
Page 32

32
33
Other information
Standby screen configuration alarm
In normal conditions the standby
screen offers five option choices.
However, if the home unit detects one
or more problems with any part of
the system, a sixth choice appears,
called ALA RM. The corresponding soft
buttons will flash and initially warning
beeps will also be sounded. Press
the ALA RM soft button to discover the
problem(s).
To check the standby screen configuration alarm
1 Press the flashing
ALA RM soft button.
The display will indicate the first discovered problem. Common causes could
be:
• XXX ALA RM - Either the home unit, a registered pendant or registered
pullcord with the name XX X has triggered an alarm.
• PHO NE L INE F AIL - Check the connection to, and the correct operation
of, the phone wall socket.
• MAI NS F AIL - Check the mains supply from the adapter.
• HOM E UN IT LO W BA TTERY - Allow the backup battery time to charge
within the home unit. If this message does not cease after 24 hours, seek a
replacement backup battery pack.
• BAT T FA IL - Check the connection of the backup battery within the home
unit.
• XXX LOW BATT ERY - A registered pendant or pullcord with the name
XXX has reported a low battery. The low battery alarm can be cancelled
by pressing the AL ARM soft button when the low battery alarm screen is
visible. Press the large green C (cancel) button.
2 If there is more than one problem, the
NEX T option will be shown in the lower
right corner of the display. Press the NEXT soft button to view the next
problem.
Page 33

33
33
Troubleshooting
If you experience any difficulties or the system does not operate as you
expected, please take a moment to read through this section.
The home unit button and display do not illuminate when power is switched
on
• Check that the power adapter is correctly connected to the home unit and
the mains socket.
• Check that the mains socket is switched on.
• Try an alternative appliance, that is known to work, using the mains socket.
When I press the large red alarm button on the home unit, it does not raise
an alarm
• Check that the home unit is correctly connected to the telephone line.
Check any extension leads that may be used between the home unit and
the wall socket.
• Check that the wall socket is operating correctly by temporarily replacing
the home unit with a standard telephone.
• Try connecting the home unit to a different wall socket, if one is available.
• Check whether there is a fault with any other telephone that is also
connected to the same line. Try disconnecting all other telephones
connected to the line and then raise the alarm on the home unit.
Important: Remember to reconnect the other telephones after your test and
to check that they are operating correctly.
• Check that you have entered the alarm sequence information correctly.
Since connecting the home unit I cannot receive telephone calls
• Disconnect all telephones, with the exception of the home unit. Then ask
someone to call you. The home unit should ring and you will be able to
answer the call, as discussed on
page 11.
If the home unit rings when it is the only telephone device connected to the
line, this may be because one of your other phones is faulty. Alternatively, it
may be that there are too many phones connected to the telephone line.
You should not connect more than four telephone devices (phones,
answering machines, fax machines, computer modems, etc.) to a single
line. The home unit counts as one telephone.
Important: Remember to reconnect the other telephones after your test and
to check that they are operating correctly.
Page 34

34
35
The date and time on the home unit are not correct
• When the home unit is plugged into the mains and a telephone socket,
it should automatically update its date and time from the telephone line
(optional services may be required from your telephone service provider).
If your home unit cannot update its date and time automatically, you will
need to set them manually, as discussed on
page 10.
The red indicator on my speech pendant or speech pullcord is flashing and
beeping (during an alarm call)
• The batteries are getting low on power, replace the batteries for a new set
as soon as possible -
see pages 36 and 37
My speech pendant or speech pullcord does not trigger an alarm
• Check the indicators on the pendant or pullcord when you press the button
or pull the cord respectively. If no indicators illuminate then change the
batteries for a new set -
see pages 36 and 37.
• Check that you are within range of the home unit: 50 to 60 metres (160 to
200 feet).
• Check that the pendant or pullcord is correctly registered with the home unit
-
see page 38.
My speech pendant or speech pullcord does not switch off after the alarm
call has ended
• Press the large green C (cancel) button on the home unit, use the top
corner keypad to enter the four-digit PIN number and press the
ENT ER soft
button.
I cannot cancel an alarm from my intruder alarm system which is hardwired
to the home unit
• Depending on how the alarm system and home unit are configured, if the
intruder alarm system triggered the alarm, it must be reset first followed by
the home unit. If, however, the home unit or one of its device triggered the
alarm, reset the home unit first followed by the intruder alarm.
When an alarm is triggered the home unit does not call my private contacts
• The home unit may be configured to use a central monitoring centre rather
than private contacts. Within the
SET TING S menu, unless the CENT RAL
option within the ALA RM S EQUEN CE section is set to EM PTY, the home
unit will not use the private contacts - see page 11.
Page 35

35
35
Replacing the home unit backup battery
The home unit is fitted with a backup battery pack which is accessible via
a flap on the underside of the unit. You will not normally need to access the
backup battery unless it requires replacement.
Note: Remove the mains power and telephone connections before proceeding.
To replace the backup battery
1 On the home unit rear panel, use a small Philips screwdriver to loosen and
remove the retaining screw from the battery
compartment cover.
2 Slide the battery compartment
cover in the direction of
the arrow shown upon it
and then lift it out.
3 Carefully unplug the
battery lead from the
home unit’s recessed
connector. You can now
remove the battery and replace
it with a new unit.
Remove the retaining
screw and slide off the
cover
4 Carefully attach the battery lead to the recessed three-pin connector within
the compartment. The home unit will begin to beep intermittently to signify
that it does not have mains power - ignore this for the moment - once power is
connected and the battery becomes fully charged, it will cease.
5 Replace the battery compartment cover. Press down on the end of the cover that is
furthest from the arrow and simultaneously slide the cover until it locks into place.
6 Replace and gently tighten the retaining screw.
Attach the battery plug
to the recessed three
pin connector
Page 36

36
37
Inserting speech pendant batteries
The speech pendant is operated by three Duracell MN2400 super alkaline
(AAA) batteries. In order to maximise the life of its batteries, the speech
pendant uses no power until the panic button is pressed.
IMPORTANT: The speech pendant is not waterproof, do not allow it to come
into contact with liquids.
2
1
To insert the speech pendant
batteries
1 If fitted, carefully remove
the clip from the speech
pendant.
2 Using the supplied
screwdriver, loosen the
retaining screw of the battery
compartment cover.
3 Lift off the battery
compartment cover and
insert three AAA batteries
according to the orientation
marks shown for each
battery position.
4 Replace the battery
compartment cover and
tighten the retaining screw.
5 Replace the clip onto the
speech pendant body.
Page 37

37
37
Inserting speech pullcord batteries
The speech pullcord is an essential requirement in situations where it is
difficult to wear the speech pendant, such as in bed or in a toilet. The speech
pullcord is operated by three Duracell MN2400 super alkaline (AAA) batteries.
In order to maximise the life of its batteries, the speech pullcord uses no
power until the cord is pulled.
Note: The speech pullcord is not suitable for use in bathrooms or other steamy
environments.
To insert the speech pullcord
batteries
1 Grip the body of the speech
pullcord (if the speech pullcord
is not yet mounted, you will also
need to hold the base plate with
your other hand) and twist it in an
anti-clockwise direction so that it
disengages from the base plate.
2 Within the main body, disengage the
battery holder from its retaining clips
and slide off its top cover.
3 Insert three AAA batteries into the
holder according to the orientation
marks shown for each battery
position.
4 Slide on the top cover of the battery
holder and place it into the retaining
clips within the speech pullcord
body.
5 Offer up the speech pullcord body
to the base plate. Within the inner lip
of the main body there are two tabs
of differing sizes. These must be
aligned with the correct slots within
the base plate. Once engaged,
twist the main body clockwise until it
clicks into place.
Page 38

38
39
Registering the pendant(s) and pullcord(s)
Before a speech pendant or speech pullcord can be used with the home unit,
each must be registered. It is often easier to register pullcords before they are
mounted in place so that you can bring them closer to the home unit.
To register the pendant(s) and pullcord(s)
1 Select the
SET TING S menu screen. See page 18 for details.
2 Use
until the REG ISTE R option is level with the symbol,
then press the EN TER soft button.
The display will then show two options:
PEN DANT and PULLC ORD.
3 Use
until the required option is level with the symbol,
then press the EN TER soft button. The display will now ask you to either press
the button on the pendant or pull the cord of the pullcord. This screen will
remain for one minute.
4 On the pendant or pullcord, either push the button or pull the cord until
all three of the device’s indicators illuminate and two sets of beeps have
sounded. Two of the indicators will then extinguish to leave just the red one lit
and the home unit should respond at this stage with either:
REG ISTE R SUC CESS FUL or REGIST ER UNSUCC ESSF UL.
Note: It can take up to one minute to register a pendant or pullcord.
• If unsuccessful, try the procedure again. If it still does not register, try
changing the batteries in the device or try a different pendant or pullcord.
Please wait until the device has reset (after a further two minutes) before
trying to register it again.
• If successful, the display will now prompt you to enter a name for the new
device.
5 Use the top corner keypad to enter a name (e.g. John) or location (e.g.
Bedroom) for the device:
• Repeatedly press the button containing the required character until that
character is shown on the display.
• Press the
button to move the cursor to the next position and then enter
the next character. Note: If the next character is on a different button to the
last one pressed, you don’t need to press the button.
• To enter a space, press the
button twice.
• If required, use the large green C (cancel) button to erase characters.
6 Press the
STO RE soft button to save the name or location of the device and
return to the REG ISTE R menu. The device is now stored and can be used to
trigger an alarm.
To deregister a pendant or pullcord
Please see page 39 for details.
Page 39

39
39
Deregistering a pendant or pullcord
It may sometimes be necessary to remove or replace a pendant or pullcord.
When you do this, remember to deregister the device that is being removed.
To deregister a pendant or pullcord
1 Select the
SET TING S menu screen. See page 18 for details.
2 Use
until the DER EGIS TER option is level with the symbol,
then press the EN TER soft button.
The display will show a list of the currently registered pendant and/or
pullcords.
3 Use
until the required pendant or pullcord name is level with the
symbol, then press the EN TER soft button.
The selected device will be wiped from the home unit memory and the
message DER EGIS TER S UCCE SSFUL will be shown.
Page 40

40
41
Monitoring protocols
Your Castle Care-Call system provides two reporting protocols for use with
monitoring centres. Your monitoring centre will advise you on which format to
use.
Comcare MPS1 (compatible with the Scancom fast format protocol)
This monitoring protocol has the following functions and reporting capabilities:
1 Locally programme the home unit with a unique identifying number and
monitoring centre phone number.
2 Raise an alarm call triggered by the home unit, speech pendant or speech
pullcord, allowing the operator to open a two way conversation and to close
down the alarm call when finished.
3 Raise an alarm call from a hardwired input device such as an intruder alarm.
4 Raise a call automatically reporting a mains failure and, once reported, shut
down the call.
5 Raise a call automatically reporting a low battery alarm on either a speech
trigger or on the home unit and, once reported, shut down the call.
6 Carry out periodic test calls where the home unit will automatically raise a pre-
programmed test alert and then shut down the call.
Comcare MPT1 (compatible with the TTnew protocol)
This monitoring protocol has the following functions and reporting capabilities:
1 Locally programme the home unit with a unique identifying number and
monitoring centre phone number.
2 Remotely re-programme the home unit with a new unique identifying number
and/or monitoring centre phone number.
3 Raise an alarm call triggered by the home unit, speech pendant or speech
pullcord, allowing the operator to open a two way conversation and to close
down the alarm call when finished.
4 Raise an alarm call from a hardwired input device such as an intruder alarm.
5 Raise a call automatically reporting a mains failure and, once reported,
shutdown the call.
6 Raise a call automatically reporting a low battery alarm on either a speech
trigger or on the home unit and, once reported, shut down the call.
7 Carry out periodic test calls where the home unit will automatically raise a pre-
programmed test alert and then shut down the call.
Page 41

41
41
Safety
• The home unit, the power adapter, the speech pendant and speech
pullcord devices are designed for indoor use. Do not allow moisture to enter
any of the devices.
• Do not attempt to open the home unit, the power adapter, the speech
pendant or speech pullcord devices, except in accordance with the
instructions given in this guide regarding battery replacement. There are no
user serviceable parts within these devices.
• Use only the supplied and approved power adapter with the home unit.
Power safety instructions
Use only the power adapter supplied with and designed specifically for
the Castle Care-Call home unit. Always plug the power adapter to a mains
outlet socket that is nearest to the equipment and is most accessible without
causing a trip hazard.
Caution
Risk of personal harm and/or damage to the equipment if the rechargeable
battery is replaced by an incorrect type. Dispose of used batteries as
instructed by your local authorities.
Rechargeable battery details
Use only with Hunan Corun Hi-Tech Co. Ltd, type no: AA1200 x 6 7.2VDC
1200mAh NiMH rechargeable battery pack.
Ringer equivalence number (REN)
The Ringer Equivalence Number (REN) is used to determine the number of
devices that can be connected to the telephone line. The sum of all RENs of
all telephone devices simultaneously connected to the telephone line should
not exceed four (4). Exceeding a REN of 4 on a telephone line may result
in the devices not ringing in response to an incoming call. Check with your
telephone service provider to confirm the maximum REN number for your
telephone line.
Battery disposal
The speech pendant and speech pullcord devices use three AAA alkaline
batteries. The devices employ a zero power policy when in standby mode in
order to maximise the operating period of the batteries. When new batteries
must be fitted, dispose of the old batteries in an environmentally friendly
manner using local recycling facilities where available.
Page 42

42
43
Warranty
Castle Care-Tech Ltd and or its subsidiaries and its affiliates (“the Manufacturer”) warrants its products hereinafter referred to as “the Product” or “Products” to be in conformance with its own plans and specifications and to be
free of defects in materials and workmanship under normal use and service
for a period of twelve months from the date of shipment by the manufacturer.
The manufacturer’s obligations shall be limited within the warranty .period, at
its option, to repair or replace the product or any part thereof. The manufacturer shall not be responsible for dismantling and/or reinstallation charges. To
exercise the warranty the product must be returned to the manufacturer freight
prepaid and insured.
This warranty does not apply in the following cases: improper installation; mis
use, failure to fallow installation and operating instructions, alteration, abuse,
accident or tampering, and repair by anyone other than the Manufacturer.
This warranty is exclusive and expressly in lieu of all other warranties; obli
gations or liabilities; whether written, oral, express or implied, including any
warranty of merchantability or fitness for a particular purpose, or otherwise. In
no case shall the Manufacturer be liable to anyone far any consequential or
incidental damages for breach of this warranty or any other warranties whatsoever, as aforesaid.
This warranty shall not be modified, varied or extended, and the Manufacturer
does not authorise any person to act on its behalf in the modification, variation
or extension of this warranty. This warranty shall apply to the Product only. All
products, accessories or attachments of others used in conjunction with the
product, including batteries shall be covered solely by their own warranty, if
any. The Manufacturer shall not be liable for any damage or loss whatsoever,
whether directly, indirectly, incidentally, consequentially or other wise, caused
by the malfunction of the product due to products, accessories, or attach
-
ments of others, including batteries, used in conjunction with the products.
The manufacturer does not represent that its product may not be compro
mised and/or circumvented, or that the product will prevent any death, personal and/or bodily injury and/or damage to property resulting from burglary,
robbery. fire, or otherwise, or that the product will in all cases provide adequate warning or protection. User understands that a properly installed and
maintained alarm may only reduce the risks of events such as burglary, robbery and fire without warning, but it is not insurance or a guarantee that such
will not occur or that there will be no death, personal damage and/or damage
to property as a result.
The manufacturer shall have no liability for any death, personal and or bodily
injury and/or damage to property or other loss whether direct, indirect, inci
dental, consequential or otherwise, based on a claim that the product failed to
function. However if the Manufacturer is held liable whether directly or indi
-
Page 43

43
43
rectly for any loss or damage arising under this limited warranty or otherwise
regardless of cause or origin, the Manufacturers maximum liability shall not
in any case exceed the purchase price of the product, which shall be fixed
as liquidated damages and not as a penalty, and shall be the complete and
exclusive remedy against the Manufacturer.
Warning: The user should follow the installation and operation instructions
and among other things test the product and the whole system at least once
a week. For various reasons, including, but not limited to, changes in environ
mental conditions electric or electronic disruptions and tampering, the product may not perform as expected. The user is advised to take all necessary
precautions for his/her safety and the protection of his/her property.
12 MONTH GUARANTEE REGISTRATION FORM
Customer details
Title Mr / Mrs / Miss / Ms / Other
First name ...................................................................
Surname .....................................................................
Address .......................................................................
....................................................................................
Town / City ..................................................................
County .........................................................................
Postcode .....................................................................
Country .......................................................................
Telephone ...................................................................
Email ...........................................................................
Product details
Name of system ........................................
Home unit serial no...................................
Pendant serial no ......................................
Retailer .....................................................
Date of purchase ......................................
In case of problems
1 Retain this warranty and your proof of purchase for future reference.
2 Contact the store or retailer and provide the above product details along with a clear
description of the problem.
Page 44

44
45
HOME UNIT RESET WARNING:
Please ensure that when you program the Home unit to call PRIVATE
individuals, that the user(s) are aware of the procedures to cancel hardwired
alarm calls and alarm calls made by either, the home unit, speech pendant
and speech pull cord.
After the recipient of the call has pressed the * (star key) to accept the alarm
call they MUST:
1) In the case of a hardwired alarm call made by the home unit
a) The recipient of the call MUST press the # key on their phone to reset the
home unit. If this is not actioned, the telephone line will remain open and your
telecommunications provider will charge you accordingly.
b) Arrange for the key holder to visit the property where the hardwired alarm
was made and reset the both the hardwired alarm device e.g. intruder alarm,
and check that the home unit has been reset.
2) In the case of an Alarm Call made by the home unit, speech pendant or
speech pullcord.
a) The recipient of the call MUST press the # key on their phone to reset
the home unit and / or speech pendant / pullcord. If this is not actioned, the
telephone line will remain open and your telecommunications provider will
charge you accordingly.
b) The individual who made the alarm call can reset the home unit and / or
speech pendant / pullcord by pressing the cancel button on the home unit and
then entering the 4 digit pin if programmed to do so.
If the home unit is linked to a monitoring centre:
1) In the case of a hardwired alarm call made by the home unit
The alarm call will go the monitoring centre who can then take the appropriate
action. (please check this bit) The operator has the ability to close down the
alarm call when finished.
2) In the case of an Alarm Call made by the home unit, speech pendant or
speech pullcord. This allows the operator to open a two way conversation and
to close down the alarm call when finished
Page 45

45
45
Page 46

46
47
Page 47

47
47
Page 48

A large print version of this manual is available on the website:
www.castle-care.com/carecall
Castle Care-Tech Ltd
North Street, Winkfield, Berkshire, SL4 4SY
Website: www.castle-caretech.com
 Loading...