

Page 1

FaxPress
The Integrated Network Fax Server
™
FaxPress Xerox Interface Guide
Page 2

IMPORTANT NOTICE
©2003, Castelle®. All Rights Reserved. Part No. 61-1273-001 Rev. B. This
material is protected by international copyright laws. Reproduction in any form is
prohibited without permission.
Castelle is a U.S. Registered Trademark of Castelle. FaxPress™ and Faxmain™ are
trademarks of Castelle. Xerox®, Centreware™,and WorkCentre® are Registered
Trademarks of Xerox, Inc.; Microsoft®, Windows®, Windows 95®, Windows 98®,
Windows 2000®, Windows NT®, Windows ME®, Windows 2003®, Microsoft
Word®, Microsoft Outlook®, Microsoft WordPad®, Microsoft PowerPoint® and
Microsoft Excel® are U.S. Registered Trademarks of Microsoft, Inc.; Network
Associates® is a Registered Trademark of Network Associates, Inc.; Lotus Notes® is
a Registered Trademark of IBM Corporation. All product names are U.S. Registered
Trademarks or trademarks of their respective owners.
Castelle makes no representations or warranties with respect to the contents or use of
this manual, and specifically disclaims any express or implied warranties on
merchantability or fitness for any particular purpose. Castelle reserves the right to
change, without notice, product offerings or specifications and the information in this
document. No publication may be reproduced in any form without written permission
from Castelle. Use, duplication, or disclosure is subject to the restrictions as set forth
in the Rights in Technical Data and Computer Software clause at DFARS 252.2277013 subparagraph (c)(1)(ii), or the Commercial Computer Software-Restricted
Rights at CFR 52.227-19, subparagraphs (c)(1) and (2), as applicable. If user is a unit
or agency of the United States Government, or if a license hereunder is acquired
pursuant to a contract with any such unit or agency, user agrees that the Software and
Documentation are provided with Restricted Rights.
Castelle Corporate Headquarters
855 Jarvis Drive
Morgan Hill, CA 95037
www.castelle.com
Castelle North America
Toll Free: +1(800) 289-7555
Fax: +1(408) 852-8100
Email: [email protected]
Castelle International Sales
Phone: +1 (408) 852-8000
Technical Support
Technical support is available by mail, fax, e-mail, or phone from 6am to 5PM Pacific
Standard Time.
Phone: +1(408) 852-8080
Fax: +1(408) 852-8180
E-mail: [email protected]
Page 3

Contents
Introducing the FaxPress Xerox Interface 1-1
Overview_____________________________________ 1-2
About the FaxPress Xerox Interface ______________ 1-3
Scanning Documents for Outgoing Faxes ________ 1-3
Printing Incoming Faxes and Notices ____________ 1-3
System Requirements________________________ 1-4
Overview of Installation and Configuration Procedures 1-5
Creating Fax Repository_____________ 2-1
Overview_____________________________________ 2-2
Creating the Fax Repository Folder_______________ 2-3
Configuring Server Fax Kit___________ 3-1
Overview_____________________________________ 3-2
Setting up the Server Fax Kit on Your Xerox System. 3-3
Xerox Print Driver Setup_____________ 4-1
Overview_____________________________________ 4-2
Installing Xerox Print Drivers ____________________ 4-3
Configuring the Xerox Print Driver ______________ 4-10
Setting up Paper Colors on the Xerox System ____ 4-13
Installing the FaxPress Xerox Interface 5-1
Overview_____________________________________ 5-2
Installing the FaxPress Client Software ___________ 5-3
Creating FaxPress Users for Each Fax Repository __ 5-3
Installing the FaxPress Xerox Interface Software ___ 5-4
Configuring the FaxPress Xerox Interface _________ 5-9
Accessing the FaxPress Xerox Interface Configuration Utility
5-21
iii
Page 4

Index ____________________________ IX-1
iv
Page 5

Introducing the FaxPress Xerox
Interface 1
What’s In This Chapter
Overview ________________________________________ 1-2
About the FaxPress Xerox Interface _________________ 1-3
Scanning Documents for Outgoing Faxes____________ 1-3
Printing Incoming Faxes and Notices _______________ 1-3
System Requirements ___________________________ 1-4
Overview of Installation and Configuration Procedures__ 1-5
Page 6

FaxPress Xerox Interface Guide
Overview
This chapter describes:
• The features and functions of the FaxPress Xerox Interface.
• How users can scan documents and send them as faxes over the
local area network, via the FaxPress server.
• How users can set up the Xerox machine to print out incoming
faxes and fax notices.
• An Overview of the setup procedures for installing and configuring
the software and hardware needed for the FaxPress Xerox Interface
1—2
Page 7

Introducing the FaxPress Xerox Interface
About the FaxPress Xerox Interface
Castelle's FaxPress™ Xerox Interface provides a means for users of
certain models of Xerox printer-scanners to scan printed documents and
deposit the digital versions of these documents in a repository directory
for subsequent faxing via the FaxPress server. Users can also print out
faxes received via the FaxPress server on the Xerox machine, and print
notifications for outgoing faxes on the Xerox system. Note that although
the FaxPress Xerox Interface is supported on some models of Xerox
Document Centre systems, the term ’Xerox WorkCentre Pro’ is used
throughout the procedures in this Guide.
Scanning Documents for Outgoing Faxes
When the FaxPress Xerox Interface has been set up, users can feed a
paper document into the scanner tray of a Xerox WorkCentre Pro (or
Document Centre), and press the ’Fax’ button, then enter the necessary
recipient information, such as the fax number, to send the fax via the
FaxPress server.
Printing Incoming Faxes and Notices
When the FaxPress Xerox Interface has been set up, incoming faxes can
be printed out on a Xerox WorkCentre Pro (or Document Centre), and
notices regarding outgoing faxes can also be printed.
1—3
Page 8

FaxPress Xerox Interface Guide
System Requirements
The FaxPress Xerox Interface is designed to run on a Local Area
Network with the equipment shown in the Figure below.
In order for the FaxPress Xerox Interface to function properly, the
following system requirements must be met.
• The FaxPress server must be running software version 8.0 or later.
Keep in mind that although the SBE series FaxPress servers
running FaxPress 8.0 support the FaxPress Xerox Interface, they
do not support email functions.
1—4
Page 9

Introducing the FaxPress Xerox Interface
• The Xerox WorkCentre Pro or Document Centre must be a model
that supports the Xerox Server Fax Kit.
• The FaxPress server must be configured in compliance with the
requirements of your local telephone service provider.
• The FaxPress Xerox Interface workstation must be running one of
the following operating systems: Windows NT 4.0 Workstation or
Server, Windows 2000 Pro or server, Windows 2003 Server, or
Windows XP; it must have a Pentium III 500 MHz CPU or faster
(or equivalent CPU), 256 MB of RAM and at least 256 MB of free
space on its hard drive. The FaxPress Xerox Interface will perform
best if this workstation is dedicated, but it will run on any
workstation or server that meets the above requirements.
• You must have a local area network (Windows NT or Novell) to
which you can connect your FaxPress server, the Windows
workstation on which the interface will run, and the Xerox
WorkCentre Pro.
See the FaxPress and Xerox Administrator Guides for details.
Note: The requirements listed above are for a minimal FaxPress
Xerox Interface; you can connect several Xerox systems to a
FaxPress server, and for high-volume faxing, more than one
FaxPress server can be configured for use with numerous
Xerox systems.
Overview of Installation and Configuration
Procedures
To set up your FaxPress server and Xerox WorkCentre Pro system for the
FaxPress Xerox Interface, complete the following procedures.
1. Connect the FaxPress server hardware and the Xerox WorkCentre
Pro system to the same segment of your LAN.
2. Create a Fax Repository for each Xerox system connected to your
LAN, placing these repositories on the Windows workstation you
plan to use for your FaxPress Xerox Interface (preferably, a dedicated PC).
1—5
Page 10

FaxPress Xerox Interface Guide
3. Configure the Server Fax Kit on each Xerox WorkCentre Pro.
4. Install and Configure the necessary Xerox print drivers.
5. Install the FaxPress Client software on the workstation that you
intend to use for this FaxPress Xerox Interface, and create a FaxPress user for each WorkCentre Pro.
6. Install the FaxPress Xerox Interface software on the workstation.
7. Configure theFaxPress Xerox Interface software, using the FaxPress Xerox Interface Configuration utility.
After completing these procedures, test the system by scanning a
document and sending a fax, then sending a fax to a user on the local area
network who is registered in the system’s user map, then checking the
notices generated for these transactions.
1—6
Page 11

Creating Fax Repository 2
What’s In This Chapter
Overview ________________________________________ 2-2
Creating the Fax Repository Folder __________________ 2-3
Page 12

FaxPress Xerox Interface Guide
Overview
This chapter describes:
• How to create a Fax Repository folder on a workstation that will be
your FaxPress Xerox Interface host machine
2—2
Page 13

Creating Fax Repository
Creating the Fax Repository Folder
Take the following steps to create the folder where all fax files that have
been scanned on each Xerox WorkCentre Pro will be stored until they are
sent out by the FaxPress server.
1. Open Windows Explorer on the workstation you plan to use as the
FaxPress Xerox Interface machine.
2. Browse to the hard drive on which you plan to create the Fax
Repository folder. This workstation and the hard drive should
meet the
be the same workstation you have selected as the FaxPress Xerox
Interface machine, but it may also be a network server on the
same network with your Xerox system.
System Requirements on page 1-4. Typically, it will
2—3
Page 14

FaxPress Xerox Interface Guide
3. Right-click on a blank space in the window displaying the contents of your chosen hard drive, and select
below.
New>Folder, as shown
4. Give the folder a unique, meaningful name, such as
(if you have several Xerox WorkCentre Pro systems, create repository folders for each, with names such as XeroxDrop2,
XeroxDrop3, etc.).
5. Right-click on the XeroxDrop1 folder and select the
option.
2—4
XeroxDrop1
Properties
Page 15

6. Click the Sharing tab.
Creating Fax Repository
7. Click the radio button for
meaningful Share name, such as
above.
8. Click
OK to confirm these settings for the XeroxDrop1 folder.
9. Repeat this procedure for each Xerox WorkCentre Pro on your
LAN, creating a unique fax repository folder for each system
Share this folder, and enter a unique,
XeroxDrop1. See the figure
2—5
Page 16

FaxPress Xerox Interface Guide
2—6
Page 17

Configuring Server Fax Kit 3
What’s In This Chapter
Overview ________________________________________ 3-2
Setting up the Server Fax Kit on Your Xerox System. ___ 3-3
Page 18

FaxPress Xerox Interface Guide
Overview
This chapter describes:
• How to set up the Server Fax Kit on your Xerox WorkCentre or
Document Centre system.
3—2
Page 19

Configuring Server Fax Kit
Setting up the Server Fax Kit on Your
Xerox System.
After you have set up the Xerox WorkCentre or Document Centre system
on your local network, assign the unit a static IP address. Then take the
following steps to configure the Server Fax Kit for operation with the
FaxPress server and the FaxPress Xerox Interface.
1. Open your Web browser on a workstation connected to the local
network.
2. Type the static IP address of the Xerox system in the address bar
of the Web browser; for example, http://192.128.128.14. When
you press enter, a screen similar to the figure below will appear.
3—3
Page 20
FaxPress Xerox Interface Guide
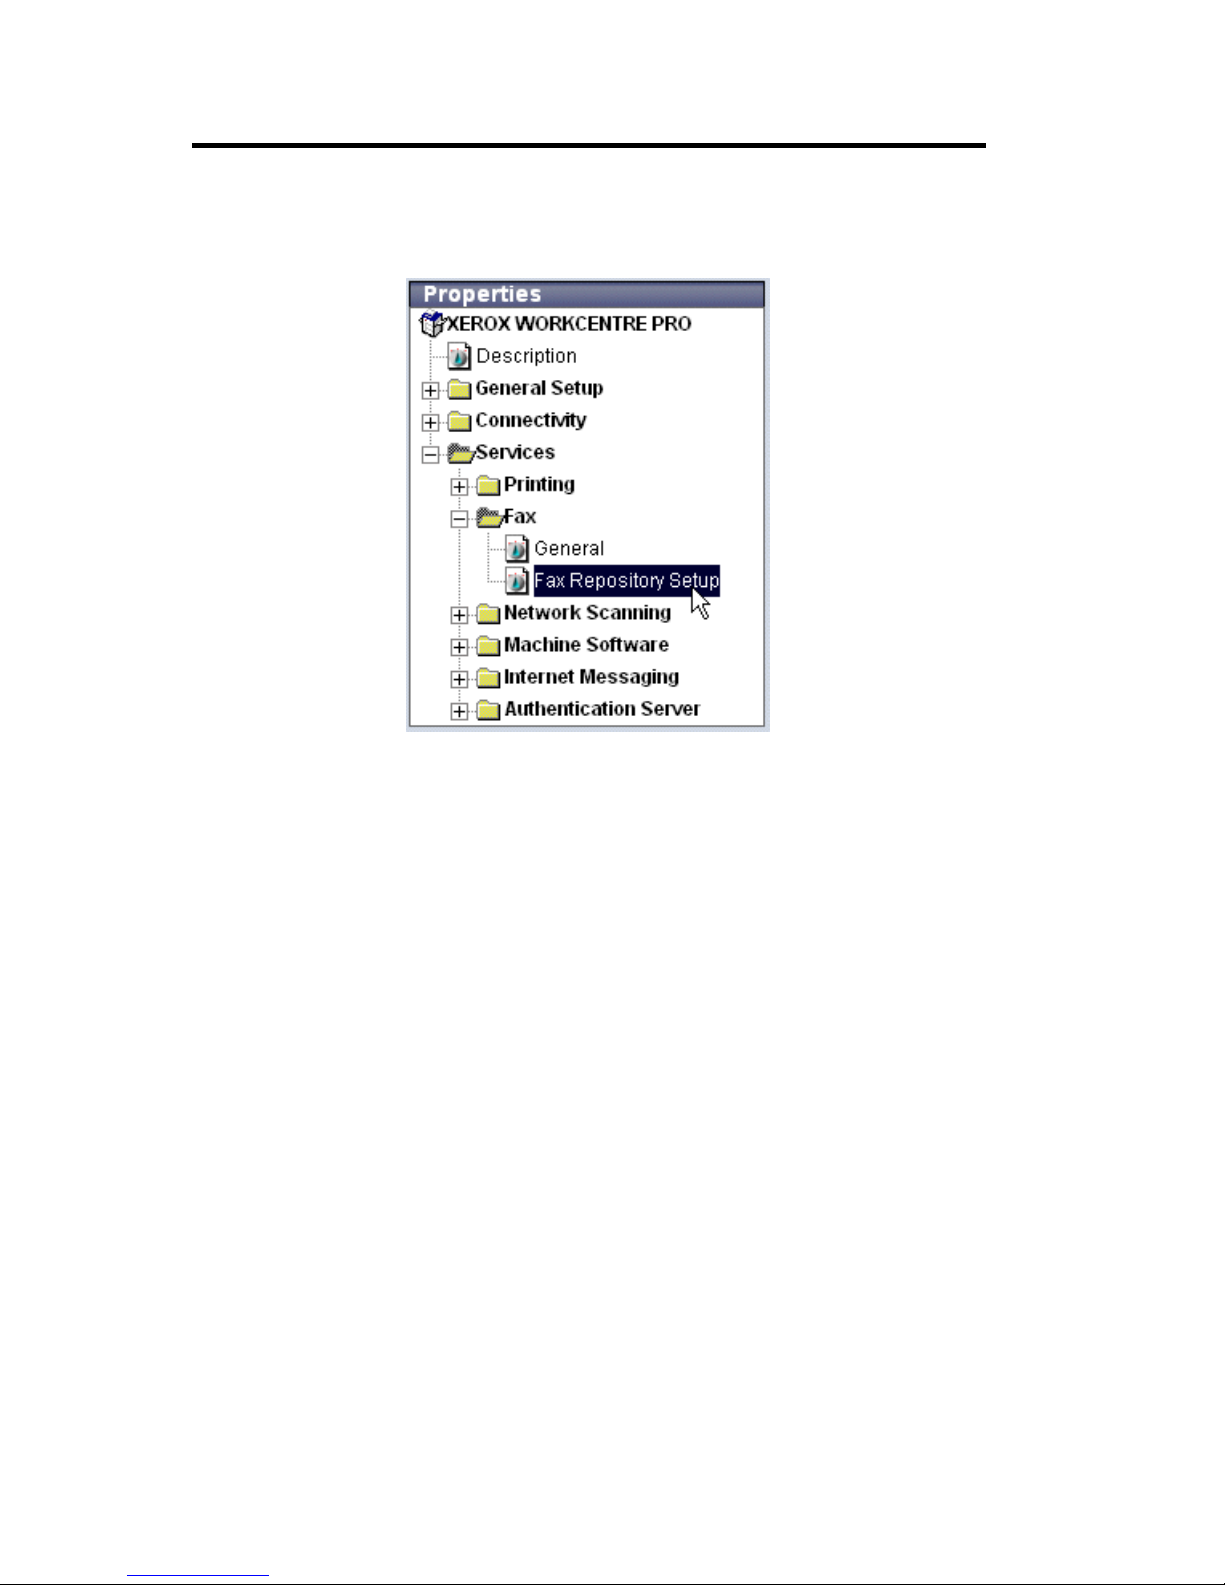
3. Click on the Properties tab, then expand the Properties tree to
reveal the Services and Fax folders, as in the figure below.
3—4
Page 21

Configuring Server Fax Kit
4. Select the Fax Repository Setup item, as shown. A setup window will appear, as shown below.
5. From the
Protocol pull-down menu, select SMB. this is the Win-
dows share option. There are also options for TCP\IP (FTP), and
Netware.
6. Click the
IP Address radio button, then specify the IP address of
the workstation on which you set up the fax repository in
ing the Fax Repository Folder on page 2-3
7. In the
folder you created in
page 2-3. XeroxDrop1
8. Leave the
9. Enter the
Share text box, enter the Sharename of the fax repository
Creating the Fax Repository Folder on
is used in the Figure above.
Document Path field blank.
Login Name and Password of a user account on the
.
workstation or server where the repository folder is located (typically, the FaxPress Xerox Interface workstation). Castelle recommends that you use the workstation’s local administrator account.
Creat-
3—5
Page 22

FaxPress Xerox Interface Guide
10. Click Apply. A login dialog box appears.
11. The User Name and Password of the account required for the
Xerox system are entered in the appropriate text fields. By
default, the User Name is
these fields at their default settings and click
admin and the password is 1111. Leave
OK.
After you have made these settings and installed and configured the
FaxPress Xerox Interface as described in the next chapter, faxes will be
routed to the fax repository folder. When you send a fax from the Xerox
system, a ****.XSM folder will appear in the repository folder. the ****
will be a number starting with 0001.XSM and incrementing as you send
more faxes.
3—6
Page 23

Xerox Print Driver Setup 4
What’s In This Chapter
Overview ________________________________________ 4-2
Installing Xerox Print Drivers _______________________ 4-3
Configuring the Xerox Print Driver__________________ 4-10
Setting up Paper Colors on the Xerox System _______ 4-13
Page 24

FaxPress Xerox Interface Guide
Overview
This chapter describes:
• How to install printer drivers for printing on your Xerox system
from the Faxpress Xerox Interface workstation and Faxpress user
workstations.
• How to configure the Xerox printer driver on the FaxPress Xerox
Interface workstation and Faxpress user workstations.
• How to set up the Xerox system to print incoming faxes and fax
notices on different colors of paper.
4—2
Page 25

Xerox Print Driver Setup
Installing Xerox Print Drivers
Use the following procedure to install the printer drivers for printing on
your Xerox system on the FaxPress Xerox Interface workstation, and the
workstations of all users who wish to print faxes, fax notifications, or
other documents on the Xerox system.
1. Insert the Xerox CentreWare print and fax driver CD into the CDROM drive on your workstation. The CD will be labelled
Ware 5.55 Print and Fax Drivers
CentreWare welcome screen appears.
(version number will vary). The
Centre-
2. Select your language and click
OK.
4—3
Page 26

FaxPress Xerox Interface Guide
3. A set of installation options appears.
4—4
4. Click the
Print & Fax Drivers option, as shown.
Page 27

5. A set of Print and Fax options appear.
Xerox Print Driver Setup
6. Click
Install Your Windows Print Driver.
4—5
Page 28

FaxPress Xerox Interface Guide
7. The Printer Installation Utility screen appears.
8. Click on the appropriate language option.
4—6
Page 29

9. The Configuration tab appears.
Xerox Print Driver Setup
10. Select your Xerox system from
11. Select the print driver for this printer from the
pull-down menu.
Select Printer pull-down menu.
Choose Driver
4—7
Page 30

FaxPress Xerox Interface Guide
12. Click the Connection button. The Connection dialog box opens.
13. Enter the IP address of the Xerox system, then click
OK.
4—8
Page 31

14. The Configuration tab reappears.
Xerox Print Driver Setup
15. Check the checkbox to the left of your printer in the list box, as
shown.
16. Click the
To configure the installed driver, continue with the next section of this
chapter.
Install button to install the driver.
4—9
Page 32

FaxPress Xerox Interface Guide
Configuring the Xerox Print Driver
Take the following steps to configure the Xerox Print driver once you
have installed it on the FaxPress Xerox Interface workstation or a user’s
workstation.
1. From the Windows desktop, choose the command:
Start>Settings>Printers
4—10
Page 33

Xerox Print Driver Setup
2. The Printers window opens, displaying all available printers.
3. Right-click on the Xerox system icon and select
Properties.
4—11
Page 34

FaxPress Xerox Interface Guide
4. The Properties screen for the Xerox system appears. Click the
Printing Preferences button to open the Preferences screen.
5. Typically, you can leave all the settings at their defaults. One
exception; if you have enabled Network Accounting on your
Xerox WorkCentre Pro, you must specify the default User ID and
the System ID in the Device Settings tab (Accounting>Setup) of
the printer driver properties. If your situation requires special settings, make them with caution. Castelle recommends that you do
NOT change any of the advanced options unless you ar certain
that the changes will work without any unwanted side-effects.
6. When you have the settings as you want them, click
OK.
7. Test the printer from the workstation, and test printing a fax or fax
notification.
If you want to set up the Xerox system so it prints faxes and/or fax
notifications in special colors proceed to the next section of this chapter.
4—12
Page 35

Xerox Print Driver Setup
Setting up Paper Colors on the Xerox System
If you wish to use more than one paper color when printing with the
FaxPress Xerox Interface - for example, one color for fax print-outs, and
another color for fax notices - take the following steps. This procedure
assumes that you have 2 trays with different colored paper in your Xerox
system.
Note: This procedure requires that the FaxPress Xerox Interface
software be installed on your FaxPress Xerox Interface
workstation. See
Interface" for details.
1. For each special paper color, create an extra local print driver for
your Xerox system on your FaxPress Xerox Interface workstation, using the procedure in
page 4-3
.
Chapter 5 "Installing the FaxPress Xerox
Installing Xerox Print Drivers on
2. Rename the extra printer drivers for each color. For example, if
you have a driver you want to use for Red paper, first choose
Start>Settings>Printers
3. In the Printers window, select the new driver you have created
and add RED to the name; so
would become
Xerox WorkCentre Pro 35 PCL6 RED.
Xerox WorkCentre Pro 35 PCL6
4. Rename each of the drivers for the different colors in this way.
5. Open the Properties screen for each driver, then click the
ing Preferences
in
"Configuring the Xerox Print Driver" earlier in this chapter.
button to open the Preferences screen, as you did
Print-
4—13
Page 36

FaxPress Xerox Interface Guide
6. The Printing Preferences screen opens.
7. Set the paper color for the driver as shown. Click
erences screen, and
8. Open the FaxPress Xerox Interface configuration utility, with the
command
Start>Programs>FaxPress>Add On Products>Xerox Interface>Configuration
9. In the User Map tab, select a user, for example, Xerox1, then click
the
Edit button. This Step and those that follow require that you
4—14
OK in the Pref-
OK in the Driver Properties screen.
Page 37

Xerox Print Driver Setup
have installed the FaxPress Xerox Interface software. See Chap-
ter 5 "Installing the FaxPress Xerox Interface"
for details.
10. In the User to Email address Mapping dialog box you can set up
each printer setting for
fax notification
with a different print driver.
Print Incoming fax and Print outgoing
11. To set the RED driver for Incoming faxes, click the
ting
button for Print Incoming fax. Then choose the driver that
ends in RED from the
OK. See the procedure in Configuring the FaxPress Xerox Interface on page 5-9
12. Repeat this procedure for the other color driver, this time clicking
the
Printer Setting button for Print outgoing fax notification.
Incoming faxes and outgoing fax notifications will now print out on
different colored paper.
Printer Set-
Printer Name pull-down menu and click
for details.
4—15
Page 38

FaxPress Xerox Interface Guide
4—16
Page 39

Installing the FaxPress Xerox
Interface 5
What’s In This Chapter
Overview ________________________________________ 5-2
Installing the FaxPress Client Software_______________ 5-3
Creating FaxPress Users for Each Fax Repository _____ 5-3
Installing the FaxPress Xerox Interface Software_______ 5-4
Accessing the FaxPress Xerox Interface Configuration Utility5-21
Page 40

FaxPress Xerox Interface Guide
Overview
This chapter describes:
• How to install the Client software on the Windows workstation you
intend to use for the FaxPress Xerox Interface.
• How to create FaxPress Users for each Fax Repository on your
FaxPress Xerox Interface workstation
• How to Install the FaxPress Xerox Interface software on the
Windows workstation you intend to use for the FaxPress Xerox
Interface.
5—2
Page 41

Installing the FaxPress Xerox Interface
Installing the FaxPress Client Software
The procedures in this section assume that you have met the
requirements listed in
Before you can install the FaxPress Xerox Interface software, you must
have the FaxPress Client installed on the Windows workstation you
intend to use as your FaxPress Xerox Interface.
See your FaxPress Administrator’s Guide for Client software installation
details.
System Requirements on page 1-4.
Creating FaxPress Users for Each Fax
Repository
Before you can map Xerox users to FaxPress users in order to connect to
and use the Fax Repository folder you created in
Repository Folder on page 2-3
FaxPress users. One naming scheme that makes sense, especially if you
have more than one Xerox system, and therefore, more than one Fax
Repository folder, is to give the FaxPress users names that relate to the
names of the Fax Repository folders. For example, if you have named the
Fax Repository folders XeroxDrop1, XeroxDrop2, etc., you can name
your FaxPress users Xerox1, Xerox2, etc. Remember that these same
names must be used as the Xerox User names when you do your user
mapping for the FaxPress Xerox Interface, as described in
the FaxPress Xerox Interface on page 5-9
FaxPress users, see the FaxPress Administrator’s Guide.
, you must create the appropriate
Creating the Fax
Configuring
. For details on adding
5—3
Page 42

FaxPress Xerox Interface Guide
Installing the FaxPress Xerox Interface
Software
The procedures in this section assume that you have met the
requirements listed in
have created a Fax Repository folder for each Xerox WorkCentre Pro on
your system, as described in
page 2-3.
Take the following steps to install the FaxPress Xerox Interface software.
1. Create a folder on the C: drive of the workstation you will use for
the FaxPress Xerox Interface, and name the folder Xerox.
2. Download the file FXI_Install.zip from the Castelle Web
site.
System Requirements on page 1-4, and that you
Creating the Fax Repository Folder on
3. Place this file in the Xerox folder.
4. Double-click the FXI_Install.zip file. The files it dontains
will self-extract, provided you have the WinZip program installed
on your PC.
5—4
Page 43

Installing the FaxPress Xerox Interface
5. Double-click the Setup.exe file. The welcome screen for the
InstallShield Wizard appears, as shown below.
6. Click
Next.
5—5
Page 44

FaxPress Xerox Interface Guide
7. The Destination Location screen appears. The Exchange Connector will be installed by default to
Press\Xerox Interface
C:\Program Files\Castelle\Fax-
directory.
5—6
8. Click
Browse to change this location or Next> to accept the
default location and continue.
Page 45

Installing the FaxPress Xerox Interface
9. The User Information screen appears.
10. Enter the
User Name and Password for a FaxPress user with
Supervisor privileges who is also an authenticated user with
Administrator privileges on the FaxPress Xerox Interface workstation. For simplicity, the name ’supervisor’ is used in the example above. You do not need to enter the
Domain of this user, since
the user is authenticated on the FaxPress Xerox Interface workstation.
11. When you have entered the logon account information you want,
click
Next.
5—7
Page 46

FaxPress Xerox Interface Guide
12. The InstallShield installs the software, then the Complete screen
appears.
13. Click
Finish.
14. The FaxPress Xerox Interface Configuration screen appears. Continue with your setup of the FaxPress Xerox Interface, following
the procedure in the next section of this chapter.
5—8
Page 47

Installing the FaxPress Xerox Interface
Configuring the FaxPress Xerox
Interface
Use the following procedure to configure your FaxPress Xerox Interface.
You will already be in the FaxPress Xerox Interface Configuration
screen if you have just finished installing the FaxPress Xerox Interface
software on the workstation you are using for it. If you have exited from
the Installation/Configuration program, you can access the configuration
utility by choosing this command:
Start>Programs>FaxPress>Add On Products>Xerox Interface>Configuration
See Accessing the FaxPress Xerox Interface Configuration Utility on
page 5-21
Interface Configuration screen, follow these steps.
1. The tabs in this screen let you make settings for your FaxPress
for details. Once you have accessed the FaxPress Xerox
Xerox Interface, so it can send and receive faxes from the Xerox
system via the FaxPress server, and establish the mappings for
5—9
Page 48

FaxPress Xerox Interface Guide
Xerox system users on the FaxPress server. Email and Trace Tool
settings are also provided, for administrative purposes.
2. In the FaxPress tab, click the
server to the lists of Incoming and Outgoing FaxPress Servers. If
there are several FaxPress servers available, and you want to use
more than one for the FaxPress Xerox Interface, add all servers
you intend to use.
5—10
Add button to add your FaxPress
Page 49

Installing the FaxPress Xerox Interface
3. The FaxPress Server selection dialog box appears, displaying a
list of available servers.
4. Select a server (or servers) in the list that is running version 8.0 or
later FaxPress software, and enter the user name and password for
the FaxPress supervisor for this server. Click
OK when you are
satisfied with your entries. The FaxPress tab appears again, with
the added server listed in both Incoming and Outgoing FaxPress
servers lists.
5. Repeat the last two steps of this procedure to add other available
FaxPress servers.
6. If you want the supervisor to be notified of fax failures, check the
Notify supervisor on all failures checkbox and add the email
address of the supervisor.
5—11
Page 50

FaxPress Xerox Interface Guide
7. Click the Repository tab.
5—12
8. Click
Add to specify a fax repository folder.
Page 51

Installing the FaxPress Xerox Interface
9. The Repository Folder Data dialog box appears.
Browse to and select the fax repository folder you have created
10.
on the FaxPress Xerox Interface workstation. For details on this
folder, see
Creating the Fax Repository Folder on page 2-3.
11. Enter the
User Name and Password of an authenticated user on
the workstation, so the FaxPress Xerox Interface can connect to
the fax repository folder. In the example above, the Administrator
account name was used.
12. Enter a
FaxPress User Name, to be used to send out the scanned
fax jobs from the Xerox system if the sender’s mail ID is not
available. A user with a name related to the Fax Repository is an
obvious choice, such as Xerox1 in the example above. If the fax is
sent using this repository default user, printed notification of fax
success and failure will be sent to the repository default user, too.
If there are several Xerox WorkCentre Pro systems, each will
have a unique drop directory (such as XeroxDrop2. XeroxDrop3,
etc.) and each can have a default user for the fax repository
(Xerox2, Xerox3, etc.). Each of these users must be mapped so
they have the same FaxPress User Name and Xerox User name.
See Step 19 and following in this procedure.
Note: To simplify printing of incoming faxes, you may want to route
them all to a specific WorkCentre Pro; do this by assigning the
incoming fax line to the default repository user (Xerox1 in the
example above). To make this line setting, start Faxmain
5—13
Page 52

FaxPress Xerox Interface Guide
(Start>Programs>FaxPress>Faxmain) then log in to the
FaxPress server, right-click on it and choose
select the
click the
Line Settings tab, and in the Routing Type section,
Assign Line to User radio button and select the
default repository user (such as Xerox1) from the pull-down
user menu.
Properties, then
13. Click
OK when you have entered the settings you want. The
Repository tab appears again, with the repository information
listed.
5—14
Page 53

Installing the FaxPress Xerox Interface
14. Click the Incoming_outgoing faxes tab.
15. Make the settings you want for the
Received Fax Notification
choices. If you choose to notify the recipient by email you can
choose to
Attach the fax to the email notice, and then choose the
format for the attached fax from the radio buttons on the right.
You can also choose to
Delete the incoming fax after the notice
(and attached fax) are emailed. Finally, if the Xerox system is
unable to handle the number of faxes being received by the FaxPress server, you can limit the number that are retrieved during
each scan period. Typically, you can leave the default ’
ALL’ set-
ting.
16. Make the settings you want for
Outgoing Faxes. Enter a Reposi-
tory/incoming fax Scan Period in minutes; the FaxPress Xerox
Interface will check this repository for outgoing fax jobs, and
check the FaxPress server for incoming faxes at the specified
5—15
Page 54

FaxPress Xerox Interface Guide
interval. Typically, you will want notifications to be sent for both
successful and failed faxes, and you will want to leave the checkboxes for deleting failed faxes, and NOT sending cover pages
unchecked, as shown.
17. When you have made the settings you want, click the
Email tab.
18. Enter your Email server’s IP address if you want email notifications concerning faxes to be sent from the FaxPress Xerox Interface. Leave the default settings for the Address of the interface,
the SMTP port, the timeout, and the scan period, unless changes
are required by special circumstances, and Castelle technical support asks you to make the changes.
5—16
Page 55

Installing the FaxPress Xerox Interface
19. When you have made the email settings you want, click the User
Map
tab.
20. Leave the
the starting ID at ’1’. Click
21. In the FaxPress User to Email Address Mapping dialog box, you
can map a
Note: If you are configuring the FaxPress Xerox Interface for use
with an SBE series FaxPress server, keep in mind that the
email functions are not supported.
22. In the example below, the default FaxPress Fax Repository user
for XeroxDrop1, Xerox 1, is mapped to the same Xerox User
Name. you MUST create a user map such as this for each default
Auto Registration checkbox checked (the default), and
Add to add user mappings to the list.
Xerox User to a FaxPress User Name.
5—17
Page 56

FaxPress Xerox Interface Guide
Fax Repository user for each Fax Repository, and the FaxPress
User Name must be the same as the Xerox User name in each
case.
23. After mapping the user, you can enter their
want them to get email notifications of received and outgoing fax
events. Leave the Email Address field blank if you do not want
them to receive email notifications.
24. Enter an optional mapping for any user who wants to use their
mailbox ID to authenticate themselves when they are sending
faxes from a Xerox WorkCentre Pro; if they are mapped as Xerox
and FaxPress users, they can enter their mailbox ID, then the fax
number of their recipient, and be authenticated to send the fax.
5—18
Email Address if you
Page 57

Installing the FaxPress Xerox Interface
25. To set up the user for receiving print-outs of incoming faxes,
check the
Setting
Print Incoming fax checkbox, then click the Printer
button.
26. In the Printer dialog box, select the printer from the pull-down
menu; typically, you will choose the Xerox system, as in the figure below.
27. Select the
are the defaults for the printer, then click
Paper Source, Paper Size, and Binding settings that
OK. The FaxPress User
Mapping dialog box reappears, with the printer settings displayed.
28. Repeat this process to
mapped user. Check the checkbox, click the
Print outgoing fax notification for the
Printer Setting but-
ton, and use the Printer dialog box to make the printer settings,
then click
OK. The FaxPress User Mapping dialog box reappears,
with the printer settings displayed.
29. Click
OK in the FaxPress User Mapping dialog box when you
have completed all mapping and printer settings for the user. The
User Map tab reappears, with the user added to the list. Repeat
this process for each user you wish to map.
30. When all users are mapped, click the
Trace Tool tab.
5—19
Page 58

FaxPress Xerox Interface Guide
31. In the Trace Tool tab, you can check the Trace to file checkbox to
log traces of fax transactions.
32. Enter a complete filename for the trace file, and a maximum size,
then enter a path to the location for Xerox Temp files.
33. When you have completed all configuration settings for the FaxPress Xerox Interface, click the
34. Send test faxes from the Xerox system, and send test faxes to FaxPress users from a remote location, to make sure the FaxPress
Xerox Interface is configured properly.
5—20
OK button.
Page 59

Installing the FaxPress Xerox Interface
Accessing the FaxPress Xerox Interface
Configuration Utility
To access the FaxPress Xerox Interface Configuration utility if you have
exited the installation/configuration program, use the command:
Start>Programs>FaxPress>Add On Products>Xerox Interface>Configuration
as shown in the figure below.
5—21
Page 60

FaxPress Xerox Interface Guide
5—22
Page 61

Index
A
administrator account
fax repository 3-5
Xerox interface 5-7
attached faxes 5-15
Auto Registration, of users 5-17
C
cover pages 5-16
CPU speed, requirement 1-5
E
email notice 5-15
email notifications 5-16
F
fax
email notificaton 5-16
notifications 1-3
Fax Repository
creating 1-5
setup 3-5
Share name 2-5
FaxPress
server selection for Xerox
interface 5-11
server software requirement 1-4
supervisor 5-11
, 3-5
I
incoming faxes, color paper 4-15
Installation and Configuration,
overview 1-5
IP address, of Xerox system 3-3
L
local area network, requirement 1-5
M
mapping, user 5-17
mappings 5-17
N
network server, as interface
machine 2-3
notices 1-3
notification
received faxes 5-15
notifications 5-16
O
operating system, required for Xerox
interface 1-5
P
paper colors
configuration 4-13
paper source and size, for printer 5-19
Password
for Fax Repository account 3-5
printer drivers
configuration 4-9
installing 4-3
printing
fax success notification 5-13
incoming faxes 1-3
notices 1-3
preferences 4-12
, 4-10
R
RAM, requirement 1-5
S
scan period 5-15
scanning documents, for faxing 1-3
service provider, requirements of 1-5
Share name 3-5
Share name, fax repository 2-5
SMB, protocol 3-5
SMTP port 5-16
system requirements 1-4
Page 62

FaxPress Xerox Interface Guide
T
testing
Xerox Interface 5-20
testing,
Xerox interface system 1-6
Trace Tool 5-20
U
User Map 5-17
user mapping 5-17
X
Xerox Interface software
accessing configuration utility 5-
21
configuration 1-6
destination location 5-6
installation file 5-4
Xerox Interface workstation 1-6
3-5, 5-4, 5-7
Xerox print drivers
configuration 1-6
installation 1-6
Xerox Server Fax Kit
configuration 1-5
requirement 1-4
XeroxDrop 2-4
XSM folder 3-6
, 5-9
, 2-3,
IX—2
 Loading...