

Page 1
®
Apollo 1-Pocket Currency Discriminator
USER MANUAL
Page 2

Page 3

Apollo
®
Page 4

Page 5
Battery Warning: (1) Keep out of the reach of children. Swallowing may lead to serious
injury or death in as little as 2 hours due to chemical bums and potential perforation
of the esophagus. Immediately see doctor; have doctor phone (202) 625-3333. Keep
in original package until ready to use. Dispose of used batteries immediately.
(2) Risk of injury due to re, explosion or leakage. Do not disassemble, charge, crush
or expose to re or high temperatures. California Only: Perchlorate material - special
handling may apply.
California Proposition 65 Warning: This product contains chemicals known to the
State of California to cause cancer and birth defects or other reproductive harm.
Warning: Moving parts present. May cause serious injury to hands or ngers.
Page 6

In the event of incorrect operation or care of the unit, the manufacturer is not
responsible for damage caused to the unit or the operator. Cassida is not liable
for damages resulting from use of the unit for purposes other than for the intended
purpose without prior written consent from Cassida. Modications made to the unit
by persons other than Cassida or its authorized contractor/subcontractor are strictly
prohibited. Any damages resulting from the unauthorized modication of the unit are
not the responsibility of Cassida. For proper installation and/or transport of the unit,
please consult an authorized Cassida distributor or sales representative.
Please Note:
• The contents of this manual are subject to change without notice.
• While every effort has been made to include all the features and functionality of
your unit, specications stated in this manual may not reect all the features of
software updates. You may encounter differences in operation or functionality
of your unit.
• No part of the manual may be reproduced for commercial purposes without
prior written consent from Cassida.
• Due to power and safety specications, this product has been developed for
use in specic countries as described in the specications. Use in unspecied
countries is prohibited.
• This equipment has been tested and complies with the limits to a Class A digital
device, pursuant to Part 15 of the FCC Rules.
If you have questions about the operation of the Cassida Pro Series Apollo, please contact
your Cassida licensed reseller or refer to Cassida’s user portal at www.CassidaPro.com.
Page 7
IMPORTANT SAFETY INSTRUCTIONS
When using this unit, basic safety precautions should always be observed including:
• Read this manual in its entirety.
• Do not use areas that could expose the unit to water or other liquids.
• Install on a at surface.
• Do not use in areas exposed to high temperature, humidity or smoke.
• For indoor use only.
• Store and operate the unit in a well ventilated environment, and away from
direct sunlight, high intensity lighting and magnetic elds that could interfere
with suspect bill sensors.
• Do not touch moving parts during operation.
• Keep foreign objects - paper clips, staples, etc. - away from moving parts or
from falling into the unit.
• Operate using a surge suppressor or power conditioner. When not in operation
for extended periods of time, disconnect the power cord from the wall outlet.
• Prior to and during cleaning, unplug the unit from the wall. Follow the cleaning
instructions and maintenance schedule contained in this manual.
• Do not service your unit. Contact your authorized Cassida technician, distributor
or sales representative for technical assistance.
Page 8

Table of Contents:
1. INTRODUCTION
1.1 About the Cassida Pro Series Apollo _______________________________________ 1
1.2 Box Contents _____________________________________________________________ 1
1.3 Views of the Cassida Pro Series Apollo _____________________________________ 2
1.4 Control Panel _____________________________________________________________ 3
1.5 Display ___________________________________________________________________ 5
1.6 Glossary of Terms _________________________________________________________ 6
2. OPERATION
2.1 Getting Started ___________________________________________________________ 6
2.2 Loading Bills ______________________________________________________________ 7
2.3 Counting Modes __________________________________________________________ 8
2.3.1 [MIX]: MIX Mode _________________________________________________________ 8
2.3.2 [SORT]: SORT Mode _______________________________________________________ 9
2.3.3 [CNT]: COUNT Mode ______________________________________________________ 9
2.3.4 [FACE]: FACE Mode ______________________________________________________ 10
2.3.5 [ORT]: ORIENTATION Mode _______________________________________________ 10
2.3.6 [VSORT]: VALUSORT Mode ________________________________________________ 11
2.4 [ADD]: Adding/Sum Function _____________________________________________ 11
2.5 [STRAP]: Strapping/Batching Function _____________________________________ 12
2.5.1 STRAP by Number ________________________________________________________ 13
2.5.2 STRAP by Amount ________________________________________________________ 13
2.5.3 STRAP by Denomination __________________________________________________ 13
2.6 [REPRT]: Post-Count Summary and Detail __________________________________ 14
2.6.1 [+GT]: Add to Grand Total ________________________________________________ 14
2.6.2 [PRINT]: Print Totals Function ______________________________________________ 15
2.6.3 [REJCT]: View Reject Report and Reasons _________________________________ 15
2.7 Manual Entry of Rejected Bills to Count Total ______________________________ 15
3. MENU SETTINGS AND DESCRIPTIONS
3.1 Auto/Manual Start _______________________________________________________ 16
3.2 Speed __________________________________________________________________ 16
3.3 Mode Enable/Disable ____________________________________________________ 17
3.4 Counterfeit Settings ______________________________________________________ 17
3.5 Settings Menu ___________________________________________________________ 18
3.5.1 Date & Time _____________________________________________________________ 18
3.5.2 Print/Interface/Beep _____________________________________________________ 19
3.5.3 Thousands Separator _____________________________________________________ 20
3.5.4 Maintenance Reminder __________________________________________________ 20
Page 9

3.5.5 Language _______________________________________________________________ 21
3.5.6 Clear Remote Count _____________________________________________________ 21
3.5.7 Pocket Capacity ________________________________________________________ 22
3.5.8 LAN Settings _____________________________________________________________ 22
3.5.9 Skin Menu _______________________________________________________________ 23
3.6 Report Formatting and Setup _____________________________________________ 23
3.7 User Information _________________________________________________________ 24
3.7.1 Machine ID ______________________________________________________________ 24
3.7.2 Receipt Header _________________________________________________________ 24
3.7.3 S/W Version _____________________________________________________________ 24
3.7.4 Factory Default Setting ___________________________________________________ 25
3.8 Setting Hotkeys __________________________________________________________ 25
4. OPTIONAL FEATURES
4.1 [STRAP]: Zero Count at Strap ______________________________________________ 25
4.2 Barcode Scanning Mode ________________________________________________ 26
4.3 Barcode and Cash Concurrent Scanning _________________________________ 26
4.4 Using Serial Number Mode _______________________________________________ 27
4.5 Multi-Currency Software __________________________________________________ 27
5. ERROR MESSAGES
6. MAINTENANCE, CONTACTS AND SPECIFICATIONS
6.1 Maintenance and Cleaning ______________________________________________ 30
6.2 Contact Information _____________________________________________________ 31
6.3 Cassida Pro Series Apollo Specications ___________________________________ 31
Page 10

1.
INTRODUCTION
1.1 About the Cassida Pro Series Apollo
Thank you for choosing the most innovative 1-pocket currency discriminator, the Cassida Pro
Series Apollo. The Apollo is a professional grade, compact, high performance value counter
and sorter combined with the industry’s leading suspect counterfeit currency detection
technology.
Ergonomic with a convenient and intuitive control panel, Cassida Pro Series Apollo features
numerous counting modes and professional detection. Its small footprint makes the Apollo a
welcome addition to any small teller’s table or in the limited space of any exchange of ce.
Adaptive and easy-to-use, the Cassida Pro Series Apollo can be used for a number of
applications including bank branches, casinos, high cash volume retailers, cash centers,
exchange of ces, and in high-cash transaction environments.
1.2 Box Contents
• Cassida Pro Series Apollo 1-Pocket Currency Discriminator
• Power Cord
• User Manual
• Quality Control (QC) Checklist
• Desiccant Packet
1
Page 11
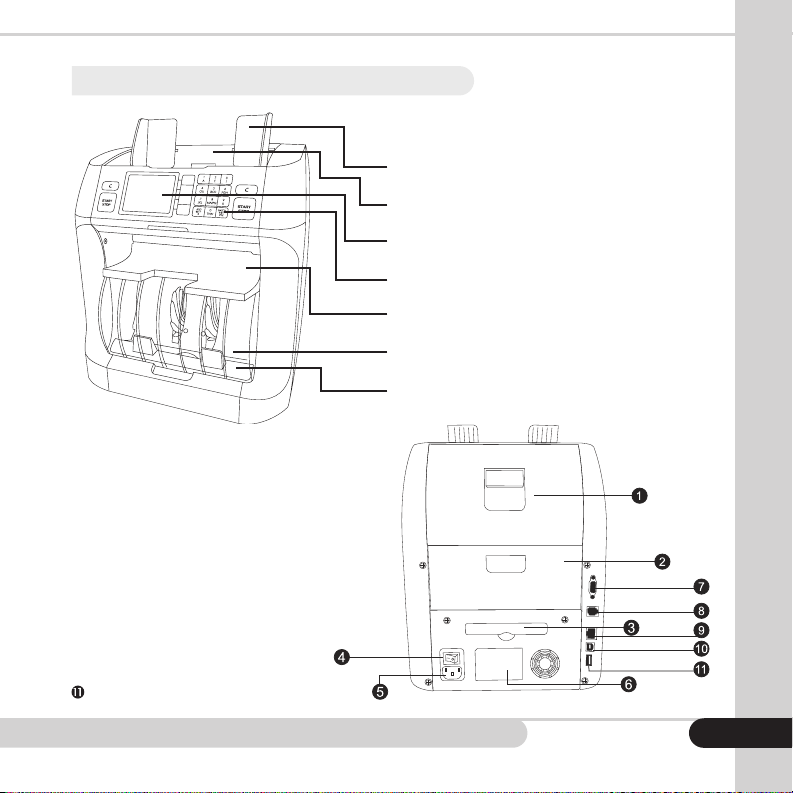
1.3 Views of the Cassida Pro Series Apollo
Bill Guides
Hopper
LCD Display
Control Panel
Storage Shelf
Stacker
Dust Cover
Upper Door
Lower Door
Dust Drawer
Power Switch
Power Plug (AC Inlet)
Unit Label
Thermal Printer Connection Port (DB-9)
External Display Connection Port (RJ-11)
Ethernet Port (RJ-45)
USB (TYPE B)
USB (TYPE A)
2
Page 12
CC
4
5 6 7 8 9
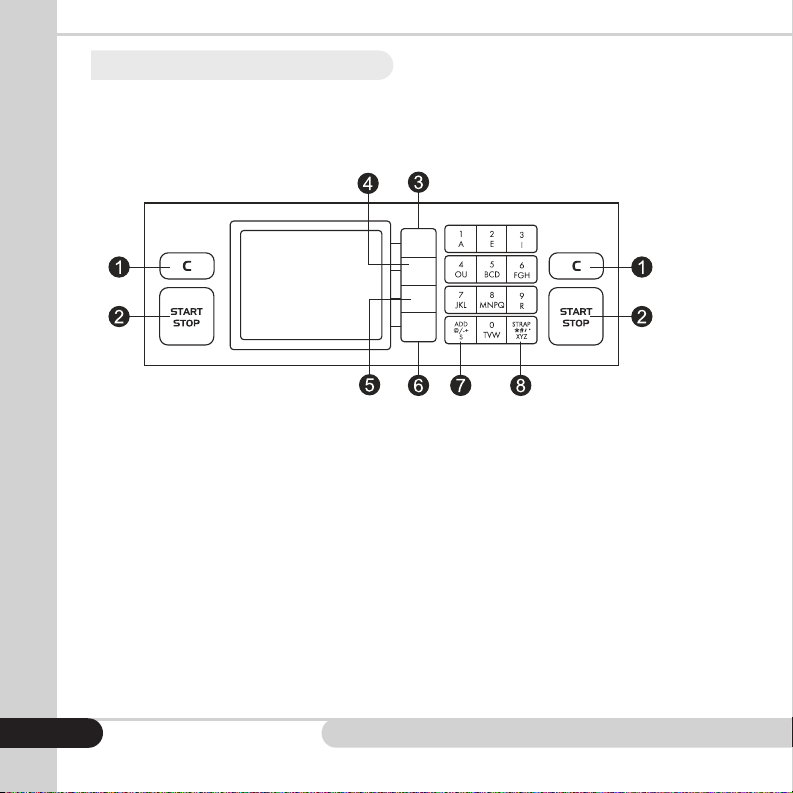
1.4 Control Panel
3
Page 13
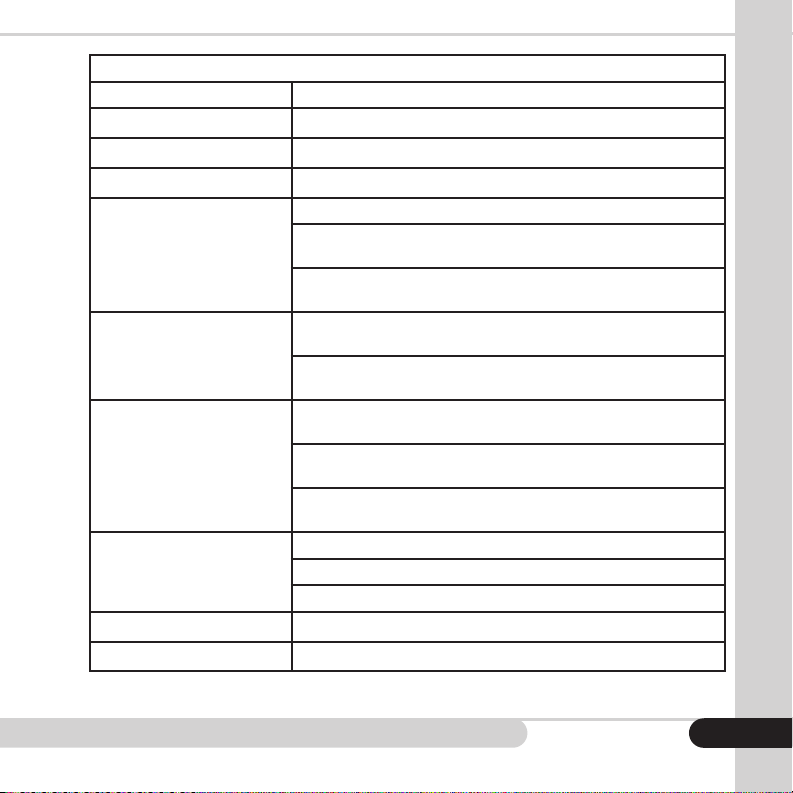
CONTROL PANEL
Key Function
[C]
[START/STOP]
Function Keys (
-) Menu navigation
[CUR], [+GT] or [EXIT]
[MODE] or ▲
[REPRT], [REJCT] or ▼
[MENU], [PRINT],
[SET]
[ADD]
[STRAP]
Clear key; clear errors, counted result and escapes from menu
[START/STOP] operation key
In counting screen, press [CUR] to select a currency (if present)
In count detail screen, push [+GT] to add to and display grand
total
In mode and menu screens, push [EXIT] return to previous
screen
In counting screen or count detail screen, press [MODE] to
select a counting mode: MIX/SORT/CNT/FACE/ORT/VSORT
In currency or mode screens, press ▲ to move the selection
cursor up
In counting screen press [REPRT] to access a detailed report
of counted bills
In count detail screen, press [REJCT] to see a detailed report
of rejected bills
In currency or mode screens, press ▼ to move the selection
cursor down
In counting screen press [MENU] to access machine settings
In count detail screen, press [PRINT] to print the detailed report
In currency or mode screens, press [SET] to select a setting
[ADD] function key / press and hold for space key
Preset selection key for STRAP settings
4
Page 14
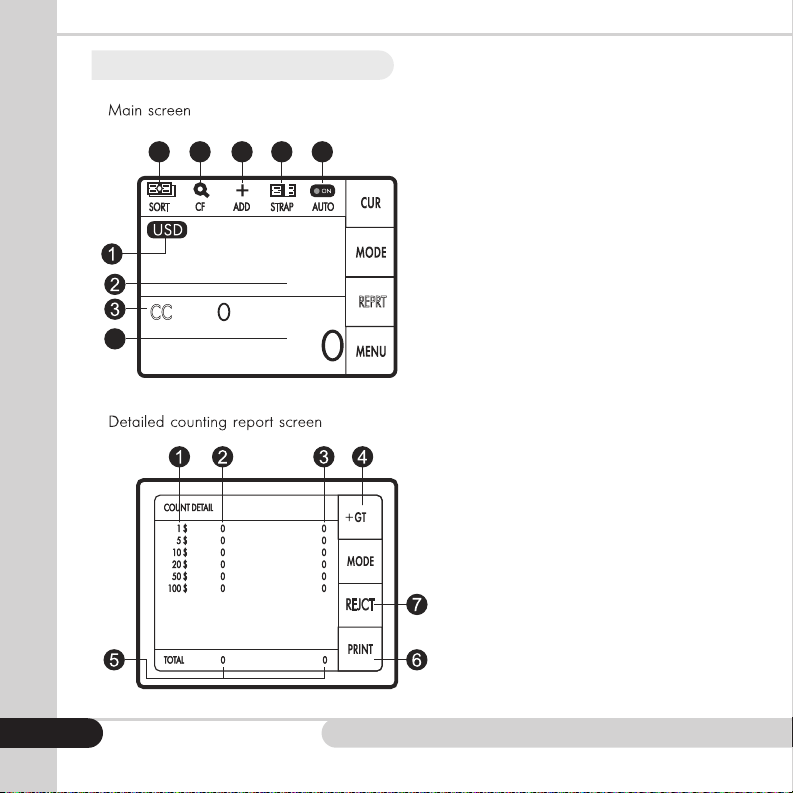
CC: Current Count of bills - or strap
MIX/ORT/CNT/SORT
4. Total number counted
5
6.
7.
9.
8. Strap: Selected strap quantity
4. GT (Grand Total) key: Press to
access grand total counting report
5. Total indicates result for counted bills
(total number and total value)
6. Print Key: Press to print count results
7. REPRT Key: Press to access reject
report detail
1.5 Display
5 6 7 8 9
STRAPSORT
Currency Mark: Selected Currency
Total Value Counted
CC/STRAP: Current Count of Bills, or
Current Number of Bills in STRAP
Total Number of Bills Counted
$0
REPRT
CC
4
MIX/SORT/CNT/FACE/ORT/VSORT:
Selected Count Mode
CF: Counterfeit Detection Active/
Inactive
ADD: Add Mode Active/Inactive
STRAP: Selected Strap Quantity
AUTO: Auto/Manual Start On/Off
Denomination of Counted Bills
Number of Counted Bills for Each
Denomination
Sum of Counted Bills for Each
Denomination.
[+GT]: Press to Access Grand Total
Counting Report
Total Indicates Result for Counted Bills
5
(Total Number and Total Value)
[PRINT]: Press to Print Count Results
[REJCT]: Press to Access Reject Report
Detail
Page 15

1.6 Glossary of Terms
Bills:
Hopper:
IR:
MG:
Pocket:
Reject:
Refers to any currency or denomination to be counted.
Location where user places bills to be counted.
May refer to either the Apollo infrared sensors, or infrared features
built into modern currencies.
May refer to either the Apollo magnetic sensors, or magnetic features
built into modern currencies.
Locations where sorted bills pass to.
A bill that either is agged as a suspected counterfeit note or a note
which cannot be identied or read by the Apollo due to wear, soiling,
wrinkling, tearing, or various other blemishes. Rejected bills pause unit
operation and prompt the user for input.
Stacker:
Strap:
Suspect:
UV:
2.
2.1 Getting Started
Location where bills are passed.
A user-determined quantity of bills to be bundled or batched
together.
Bills which are rejected as suspect are agged by the Apollo, for
absent, different, or indeterminable counterfeit features.
May refer to either the Apollo ultraviolet sensors, or ultraviolet features
built into modern currencies.
OPERATION
Connect the power cable to the AC inlet port on the back of the Apollo unit, making
sure the hopper is empty. Turn the power on by engaging the power switch on the
back of the unit. The unit will automatically self-test. Upon self-test completion, the
main screen will become active and the unit is ready for operation.
Note: Before operation, the unit should be left powered on for 10 to 15 minutes to
allow the unit’s detection sensors to reach optimal operation conditions.
6
Page 16
2.2 Loading Bills
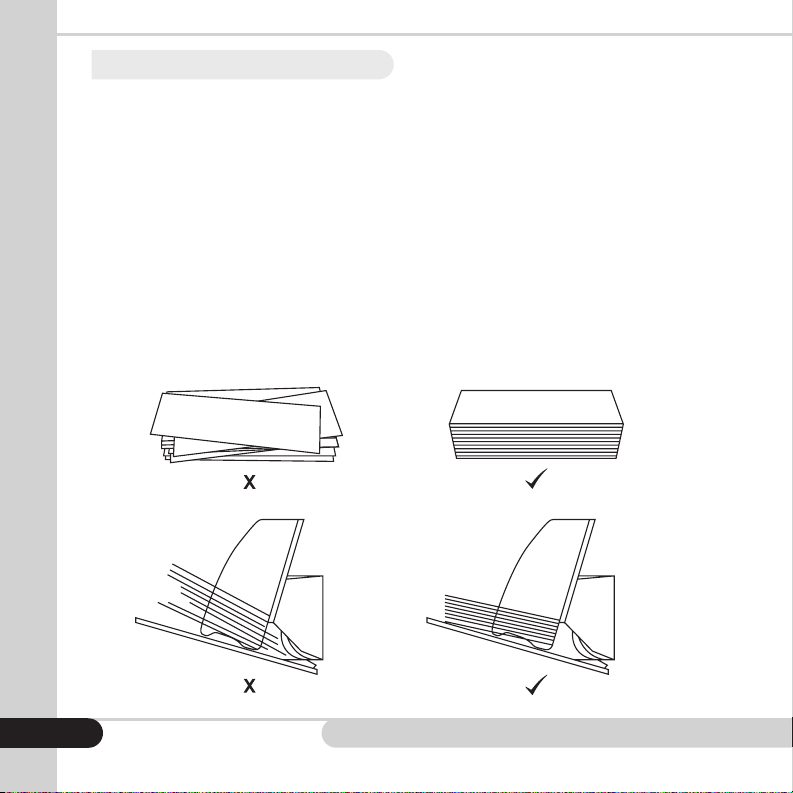
Before loading bills into the Apollo, ensure the desired currency and operation
modes are selected. Proper placement of bills into the hopper reduces feed
errors, jamming, and identication reject errors caused by misaligned bills. Bills
should be stacked neatly prior to loading, and placed between the hopper bill
guides at the center of the hopper.
Avoid counting bills that are wet, excessively dirty, folded, curled, or otherwise
misshapen. Ensure no objects are present in the bills being loaded, including
coins, paper clips, rubber bands, or other foreign materials. These objects will
damage the Apollo and cause failures.
To Reduce Rejects:
• Place the bills evenly arranged as shown below.
• Adjust bill guides to t to the size of the bills.
• Correct the bills if they are severely wrinkled or damaged.
7
Page 17
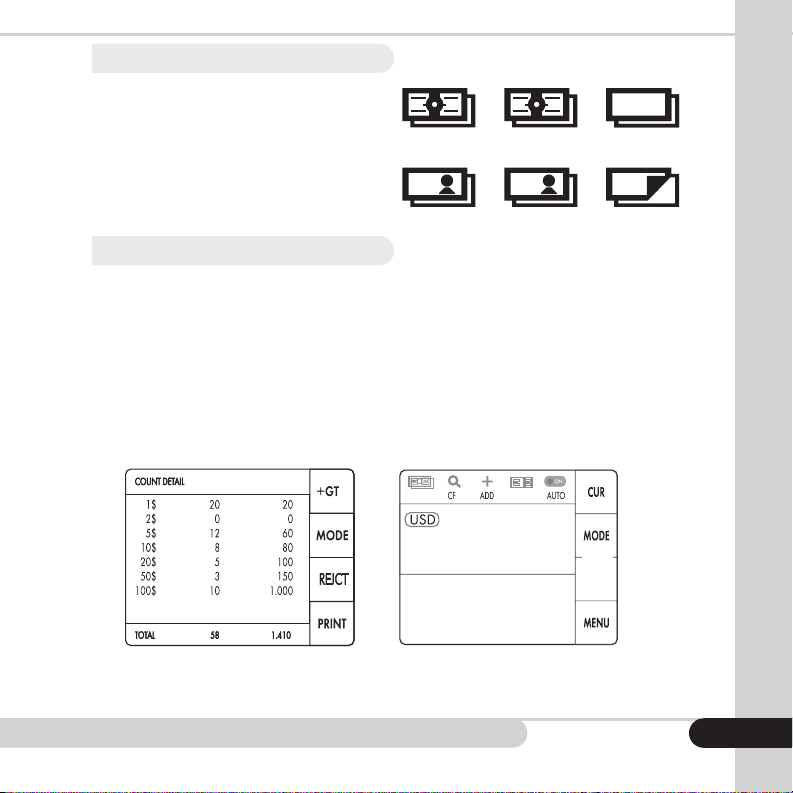
2.3 Counting Modes
1 Skew
2 Double
3 Suspect
There are 6 counting modes
available on the Apollo:
Toggle between the modes by
▲/▼
pressing the
keys. Press the
[SET] key to select the desired mode.
2.3.1 [MIX]: MIX Mode
MIX
MIX mode
FACE
FACE mode
SORT
SORT mode
ORT
ORIENTATION mode
CNT
COUNT mode
10
$
VSORT
VALUSORT mode
5
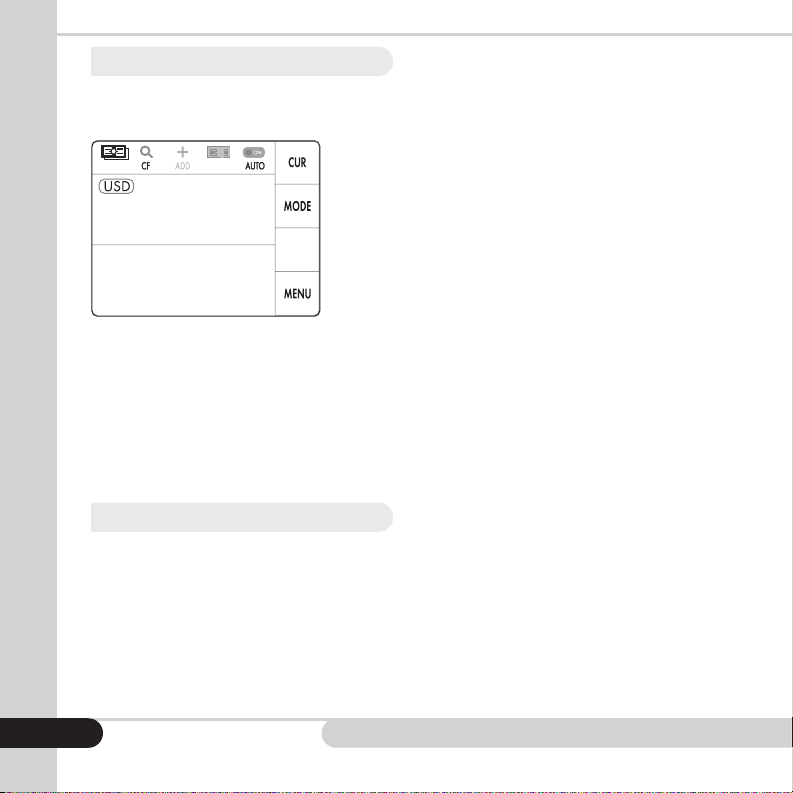
Mixed mode is the default sorting mode for the Apollo. Mixed mode counts a stack of
mixed bills regardless of denomination changes, and sums the total while applying all
selected counterfeit detection features. After running a mixed stack of denominations,
the Apollo will display the dollar amount total, and the number of bills counted. In
this mode, only suspect bills or error bills will be rejected which pauses operation and
prompts the user for input. The Apollo will display an ID ERROR and prompt user to
check the top bill in the stacker. No sorting will occur for per-denomination detail and
rejects report, press the [REPRT] key on the main menu once counting has completed.
Detailed Report Screen Main View Screen
STRAPMIX
CC
$1410
58
REPRT
REPRT
58
When a bill is rejected, operation will pause, and the user will be prompted for input.
To access information regarding rejected bills, press the [REJCT] key once counting
is complete.
8
Page 18
2.3.2 [SORT]: SORT Mode
1 Skew
2 Double
3 Suspect
$1410
REPRT
CC
STRAPMIX
58
58
$0
REPRT
CC
STRAP
58
Total count
of banknotes
Does not
increment
58
CNT
PCS
$0
CC
STRAP
58
Count
of banknotes
in current batch
Does not
increment
234
Cumulative
count of banknotes
ON
CNT
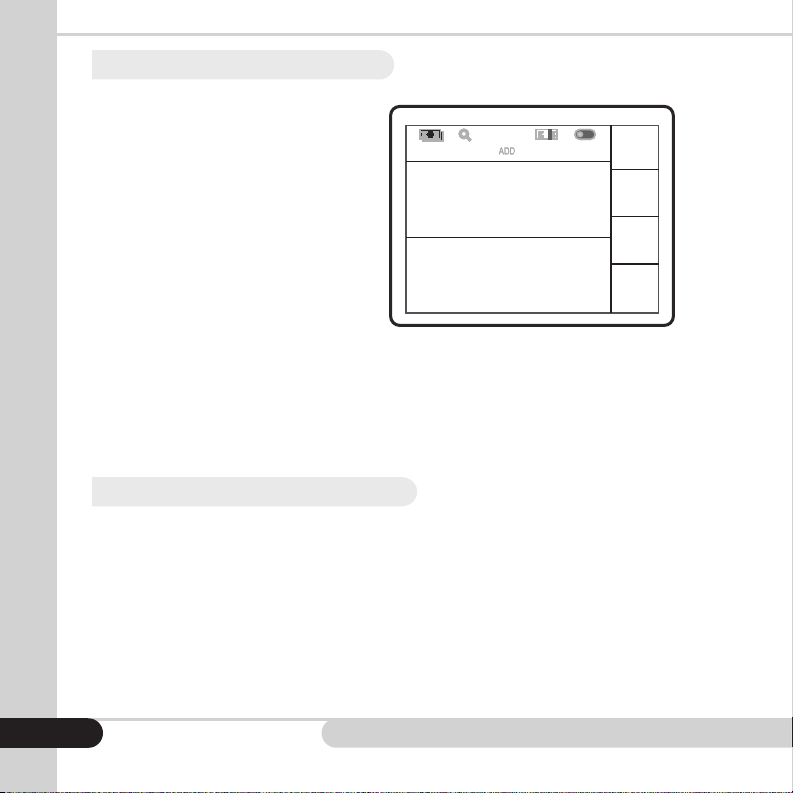
Sort mode is intended to sort out a single denomination from a mixed stack of bills
while running all selected counterfeit detection features. This mode is primarily
CC
of banknotes
the stacker. By clearing the stacker and hopper, the Apollo will reset the rst bill
through to the next stack. This allows for sorting of mixed stacks without having to
choose each denomination manually.
After running a stack of bills the Apollo will display the dollar amount total, and the
number of bills counted. For per-denomination detail and rejects report, press the
[REPRT] key on the main menu.
SORT
6
Total count
STRAP
$120
PCS
6
used for ‘rogue’ or ‘stranger’ checking in a stack
of bills intended to be of the same denomination.
All bills of the selected denomination will pass to
the stacker. All other denominations and any
error or suspect bills will not be counted and will
pause operation and prompt the user for input.
REPRT
Sort mode defaults to [1] FIRST BILL THROUGH
as the denomination of choice. The rst bill
placed in the stacker will be recognized by the
Apollo and set as the denomination to send to
2.3.3 [CNT]: COUNT Mode
Count mode is intended to count the number of physical pieces placed in the
hopper. In this mode counterfeit detection is disabled. Only the count [CC]
and the number of pieces [PCS] will update. This mode may be used to count
the number of pieces of any article that will pass through the Apollo, including
tickets, tags, barcodes, papers, etc. and no bills will be rejected unless a physical
counting error occurs (DOUBLE, CHAIN, etc.)
9
Page 19

2.3.4 [FACE]: FACE Mode
Face mode is used to sort a stack of mixed orientation bills to all face up or face
down which is determined by the rst bill placed in the hopper. This mode will not
account for rotation of the bill, but will retain all enabled counterfeit detection
features. Mixed or sorted bills will pass to the stacker regardless of denomination. All
bills which are opposite facing compared to the rst bill through will be rejected and
prompt user for removal, as well as any recognition errors, or suspected counterfeit
bills. After running a stack of bills, the Apollo will display the dollar amount total, and
the number of bills counted. For per-denomination detail and rejects report, press the
[REPRT] key on the main menu.
2.3.5 [ORT]: ORIENTATION Mode
Orientation mode is similar to Face mode in that the Apollo is sorting bills by the
physical orientation each bill is scanned. In orientation mode, the Apollo accounts
for all 4 possible rotations as follows:
1. Face up, reading orientation
2. Face up, upside-down wording
3. Face down, reading orientation
4. Face down, upside-down wording
The orientation being sorted is determined by the orientation of the rst bill placed in
the hopper. All selected counterfeit detection features will remain active during the
sorting process. All bills which are of different orientations compared to the rst bill
through will be rejected, as well as any recognition errors, or suspected counterfeit
bills. Upon rejection, the unit operation will pause and the user will be prompted for
input. After running a stack of bills the Apollo will display the dollar amount total, and
the number of bills counted. For per-denomination detail and rejects report, press the
[REPRT] key on the main menu.
10
Page 20
2.3.6 [VSORT]: VALUSORT™ Mode
EXIT
▲
▼
SET
SELECT MODE
1 MIX
2 SORT
3 COUNT (CNT)
4 FACE
5 ORIENTATION (ORT)
6 VALUSORT
Updated Mode Screen
First bill through ($100) moves to stacker
GT
MODE
REJCT
PRINT
COUNT DETAIL
1$ 0 0
2$ 0 0
5$ 0 0
10$ 0 0
20$ 0 0
50$ 0 0
100$ 1 100
TOTAL 1 $100
Added to
count and value
on count detail
GT
MODE
REJCT
PRINT
COUNT DETAIL
1$ 0 0
2$ 0 0
5$ 0 0
10$ 0 0
20$ 0 0
50$ 0 0
100$ 1 100
TOTAL 1 $100
ValuSort Function Tree
REVISED 8/1/2016
Valusort™ mode is used to quickly sort
a stack of mixed bills. In this mode, the
Apollo will accept a mixed stack of
bills and begin by setting the rst bill
through as the ‘sort’ bill. All sequential
bills of the set denomination will pass
to the stacker. When a different
denomination is sensed, the different
bill will be passed to the stacker,
and Apollo will pause and ash the
“DIFFERENT DENOMINATION!” message.
The user should then remove the bills
from the stacker, remove the top bill,
and place each denomination in its
own pile. The Apollo will then sense the next bill in the hopper and set this bill as
the ‘sort’ bill. This operation repeats until all bills have been passed through. After
running a stack of bills the Apollo will display the dollar amount total, and the
number of bills counted. For per-denomination detail and rejects report, press
the [REPRT] key on the main menu.
$
$
VSORT CF STRAP AUTO
VSORT CF
$
$
ON
ON
STRAP AUTO
$100
$100
PCS
PCS
1
1
CUR
CUR
MODE
MODE
REPRT
REPRT
MENU
MENU
2.4 [ADD]: Adding/Sum Function
The Add function on the Apollo is used to keep a continuous count through
various different scans. The Apollo will sum the total denomination and count of
all bills being scanned until the user clears the sum. To clear the sum from the on-
screen count, press the [C] key while on the main menu. A prompt will appear:
“You are about to clear your on-screen count. Do you want to continue?” Press
[YES] to clear, or [EXIT] to close the prompt without clearing. The other option
is to add the on-screen count to the grand total by pressing the [+GT] key. This
will add the on-screen count to the grand total, and clear the count display.
11
Page 21
2.5 [STRAP]: Strapping/Batching Function
Strapping is a term used to describe a set of bills of a predetermined value or number
of bills. A ‘strap’ in this context refers to the physical strap or band placed around a
set of bills as seen often in the banking industry. For example, a stack of ten $100 bills
would be a strap of 10 pieces, or a strap to $1000. Various strapping modes are built
in to the Apollo to allow for a large range of applications from creating a uniform
stack of a single denomination, to a mixed denomination stack of a predetermined
dollar amount.
Strapping is available in all modes, though some are more intuitive than others. In
general, strapping is most commonly used in Mixed or Sort modes. To enable basic
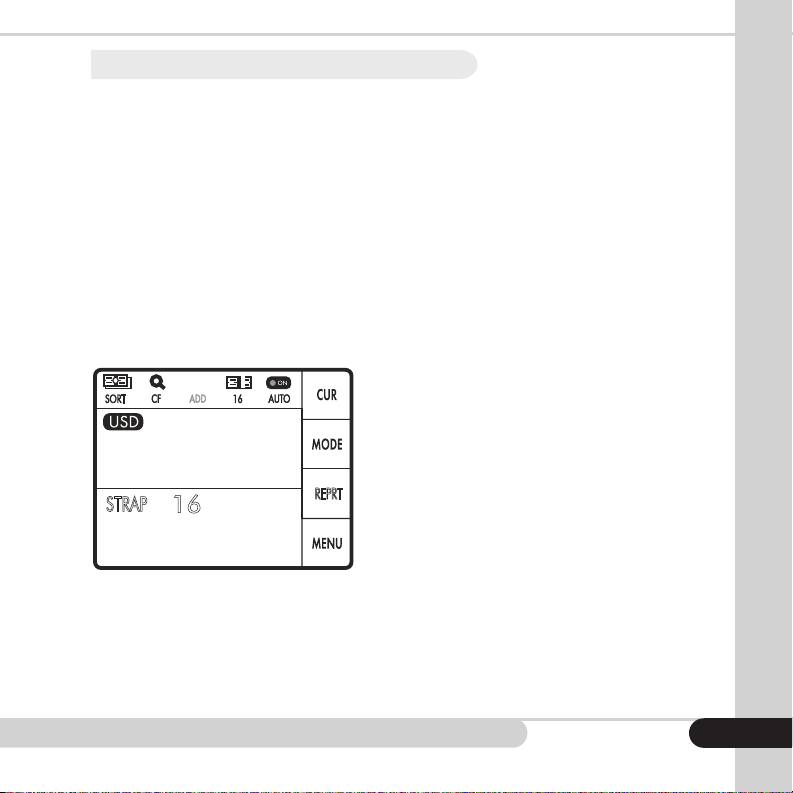
strapping, press the [STRAP] key and select the number of bills desired in the strap:
Keys [1]-[5] for values 100-10 bills per strap. On the main screen, [CC] will change to
[STRAP] and display how many bills have been counted for the current strap. The
Mode selected will take precedence over the strapping function and will sort or
count as selected.
STRAP
16
16SORT
$160
32
Once a strap has been completed, the Apollo
will pause, an on-screen message will ash
indicating a strap is completed, and the user will
be prompted to remove the bills from the
stacker. This will continue until all bills in the
hopper have been passed through. If all bills
have passed, and the stacker does not contain
REPRT
a full strap, a message will appear warning the
user “INCOMPLETE STRAP!”
12
Page 22

2.5.1 STRAP by Number
This option performs identical to the base strapping function. This sub-menu
allows the user to choose non-standard strap bill counts between 1 and
maximum stacker capacity (150 by default, 200 maximum).
2.5.2 STRAP by Amount
This option allows the user to set a strap to a dollar amount regardless
of the number of bills in a strap. The only modes enabled with this
feature are Mixed mode and Sort mode. For mixed bills in Mixed mode, the
Apollo will add all denominations needed to create the selected dollar amount
and reject the rest, pausing and prompting the user to remove the unnecessary
bills. All bills that did not meet the strapping requirement will be rejected. Please
note that the number of pieces/bills per strap may vary if different denominations
are present.
In sort mode, the Apollo will attempt to make a strap with the specied sorting
bill. If the strap value cannot be reached by the selected sort value available,
the Apollo will reject all remaining bills, pause operation, prompt user for input,
and ash the “INCOMPLETE STRAP!” message.
2.5.3 STRAP by Denomination
This option allows the user to count a desired number of bills for each denomination
typically used for setting up cashier drawers, tills and registers. To activate, press
the [STRAP] key to enter [STRAP SETTINGS] then select [DENOMINATION STRAP].
2.5.3.1 [STRAP] -> [9] Denomination Strap -> [1] Multiple
Choosing MULTIPLE allows all denominations to enter the stacker at once. When this
mode is chosen, the user will be presented with a menu and a list of denominations.
Select the number of bills of each denomination desired in the strap. In this mode,
a mixed stack of bills will be automatically sorted into a single strap of mixed bills to
reach the total number of each bill count selected. Once a strap target value has
been reached, the Apollo will send an audible alert and display an on-screen message
that the strap is completed. This mode is typically used to quickly strap multiple
denominations concurrently. All bills which are not specied for the current strap will be
rejected, pausing operation and prompting the user for input.
13
Page 23
Choosing SINGLE allows the user to sort a stack of mixed bills into a straps of a single
denomination. All bills not dened in the strap will be rejected, pausing operation and
prompting the user for input. All bills dened in the denomination menu will be passed to
the stacker. When the Apollo senses a difference in denomination that is dened in the
strap, one bill of the new denomination will be passed into the stacker, the Apollo will
beep and display the “DIFFERENT DENOMINATION” message. The user is to remove the
bills in the stacker, remove the top bill, and place each denomination in its own stack.
When a strap of the single denomination is completed, the Apollo will beep and display
a message that the strap is completed. The user will then set aside the complete strap
and begin another of the same denomination. This mode is used to sort a mixed stack
of bills into multiple straps of a single denomination in one pass, instead of sorting bills by
each denomination, then strapping.
2.5.3.2 [STRAP] -> [9] Denomination Strap -> [2] Single
2.6 [REPRT]: Post-Count Summary and Detail
The report screen is used to display details of the counting that has just been
completed. Once bills have been run through the Apollo, the [REPRT] screen is used
to view details on per-denomination breakdown, print the current sum of the most
recent run, and display additional detail in STRAP -> SINGLE and STRAP->MULTIPLE
modes.
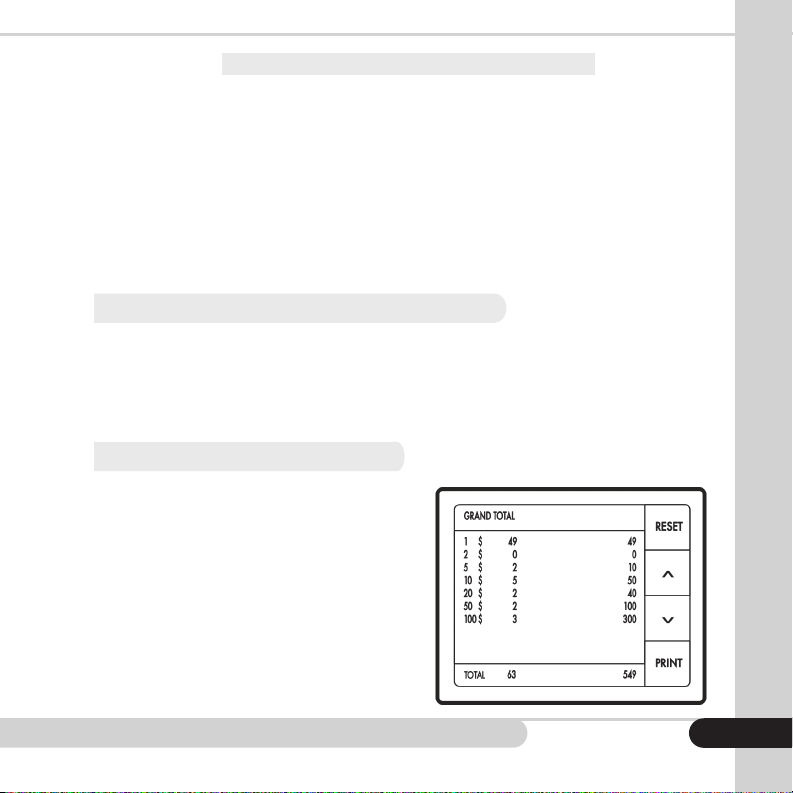
2.6.1 [+GT]: Add to Grand Total
Press [+GT] and the Apollo adds the current
counting result to the grand total, and opens
the grand total report screen. If a printer is
connected and automatic printing is selected,
the Apollo will automatically print the receipt
of the current counting results.
• Press the [RESET] key to reset the grand
total to zero.
• Press the [PRINT] key to print the grand
total report.
• To exit from the grand total window,
press [C] or place bills on the hopper to
start a new count.
14
Page 24
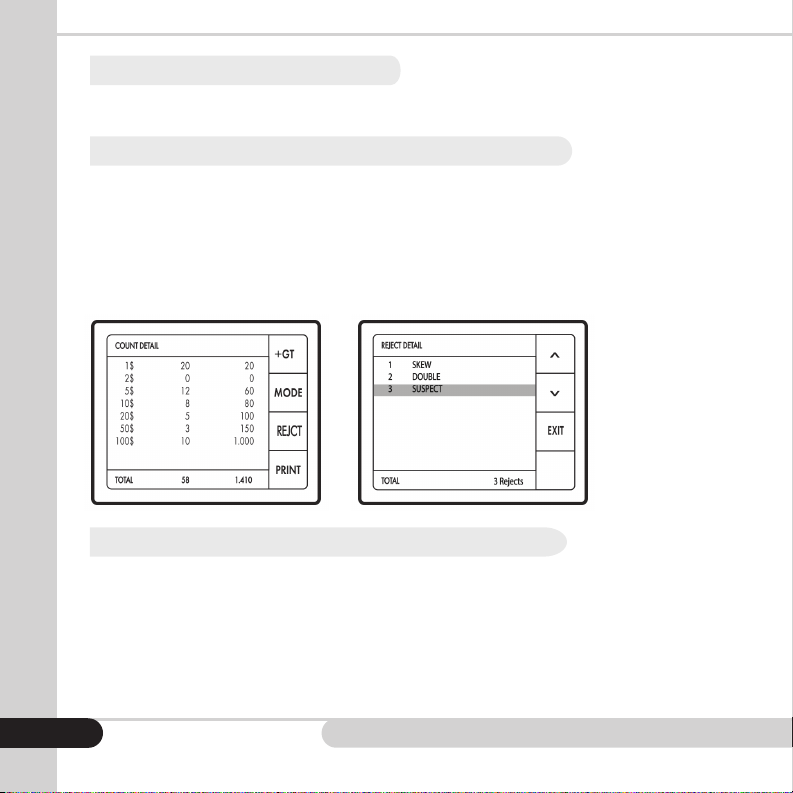
2.6.2 [PRINT]: Print Totals Function
From the report menu, press the [PRINT] key to print out a receipt of the totals from
the most recent count.
2.6.3 [REJCT]: View Reject Report and Reasons
To access information about any rejected banknote, from the COUNT DETAIL
screen, press [REJCT] key to view the detailed reject report. This report contains
information from the most recent count including reject reason, and the numerical
order in which bills were rejected. If STRAP->SINGLE or STRAP->MULTIPLE have been
enabled, the count detail screen will display the [DENOM] button in place of the
[REJCT] button. To access the reject report, enter the [DENOM] menu and then
enter the [REJCT] button.
2.7 Manual Entry of Rejected Bills to Count and Total
For genuine currency that is rejected due to stains, soiling, tearing, or various other
conditions, the Apollo offers the option to manually add unrecognized bills to the
grand total. Upon rejection of each bill the user will be prompted to either select
the denomination of the bill to be added manually to the count, or to remove the
bill from the stacker and continue. Please note that if the user adds a bill manually,
this will override counterfeit detection rejection.
15
Page 25
3.
MENU SETTINGS AND DESCRIPTIONS
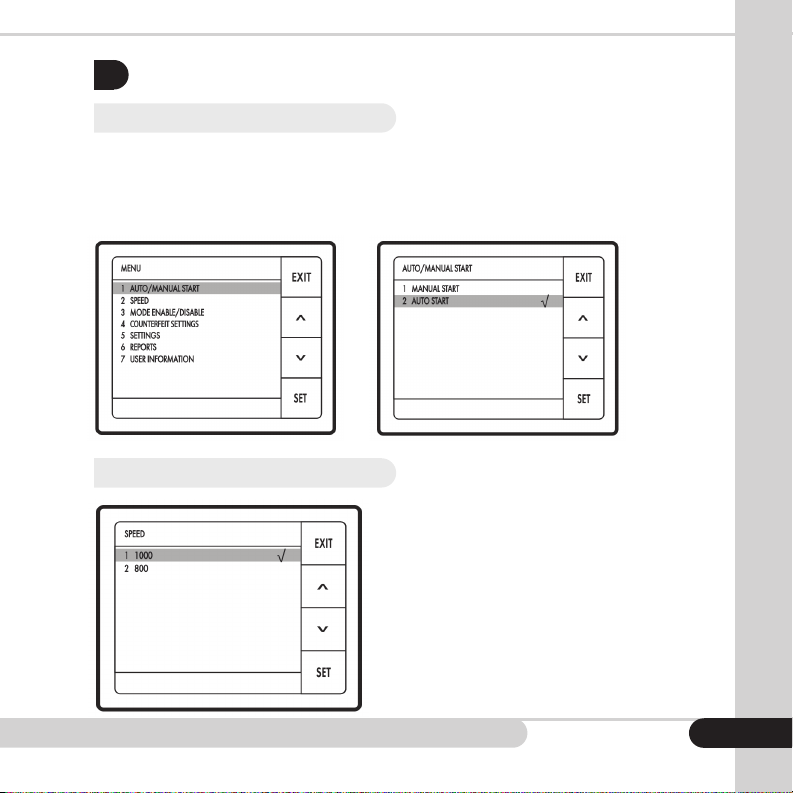
3.1 Auto/Manual Start
This feature allows user to set how the Apollo will operate once currency is placed
in the hopper. The Apollo is preset to [2] AUTO START which means that once the
currency is placed in the hopper, the Apollo will start counting immediately. If [1]
MANUAL START is selected, then user will need to press [START/STOP] button to initiate
operation.
3.2 Speed
This feature allows the user to choose the
speed setting the Apollo will operate. The
Apollo defaults to counting 1000 notes per
minute. User has the ability to select between
800 notes per min or 1000 notes per min.
16
Page 26
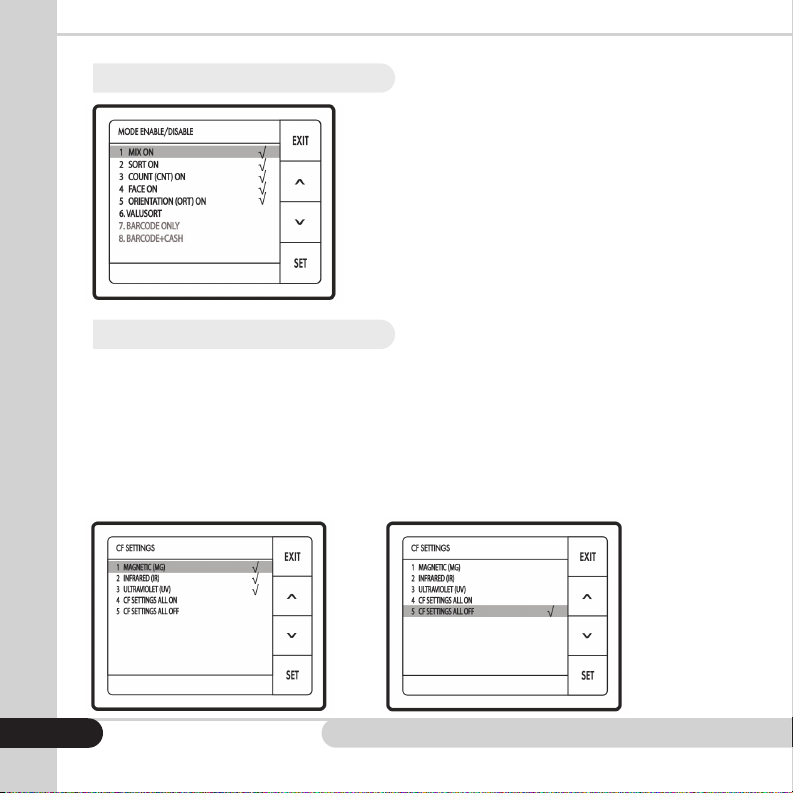
3.3 Mode Enable/Disable
This feature determines which mode options
are displayed when the [MODE] key is
selected on the main screen. The Apollo is
factory preset with MIX, SORT, COUNT, FACE,
ORT, VALUSORT. If any of these modes are
disabled, they will display as OFF in the mode
menu except for SORT mode. If [2] SORT by
denom is disabled, Sort mode will default to
FIRST BILL THROUGH as the bill sort method.
3.4 Counterfeit Settings
This menu provides access to each individual counterfeit detection technique,
and has the option to enable or disable each technique independently. The
Apollo is factory preset with [1] MAGNETIC, [2] INFRARED, and [3] ULTRAVIOLET
counterfeit setting enabled. It is recommended to always operate with all
techniques enabled under normal conditions. All modes may be enabled by
pressing [4] COUNTERFEIT ALL ON, or all disabled by pressing [5] COUNTERFEIT ALL
OFF. The spyglass symbol above the CF indicator will be fully lit if all techniques
are enabled, partially displayed if modes are disabled, and fully off if all
counterfeit detection is turned off.
17
Page 27
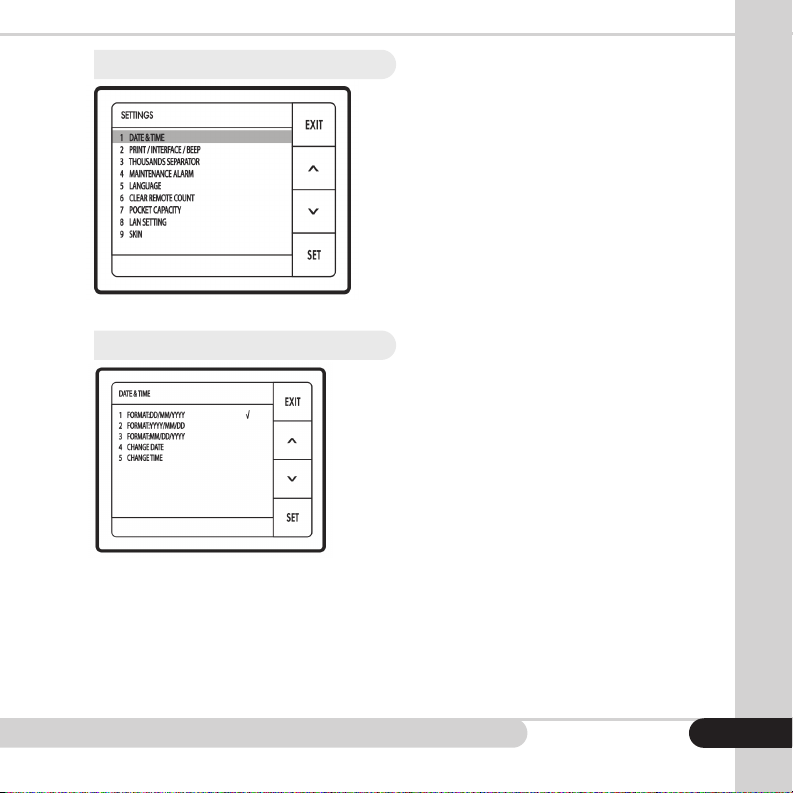
3.5 Settings Menu
The Apollo allows users to control
setup and operation according to
their own customization standards.
Through the settings menu the user
can control functions such as printer
setup, language, and appearance.
3.5.1 Date & Time
This feature allows user to select the date
format for the Apollo (options [1] through
[3]) as it will appear in reports and printing
on receipts. Use [4] CHANGE DATE to
set the machine date, and option [5]
CHANGE TIME to set the machine time.
18
Page 28
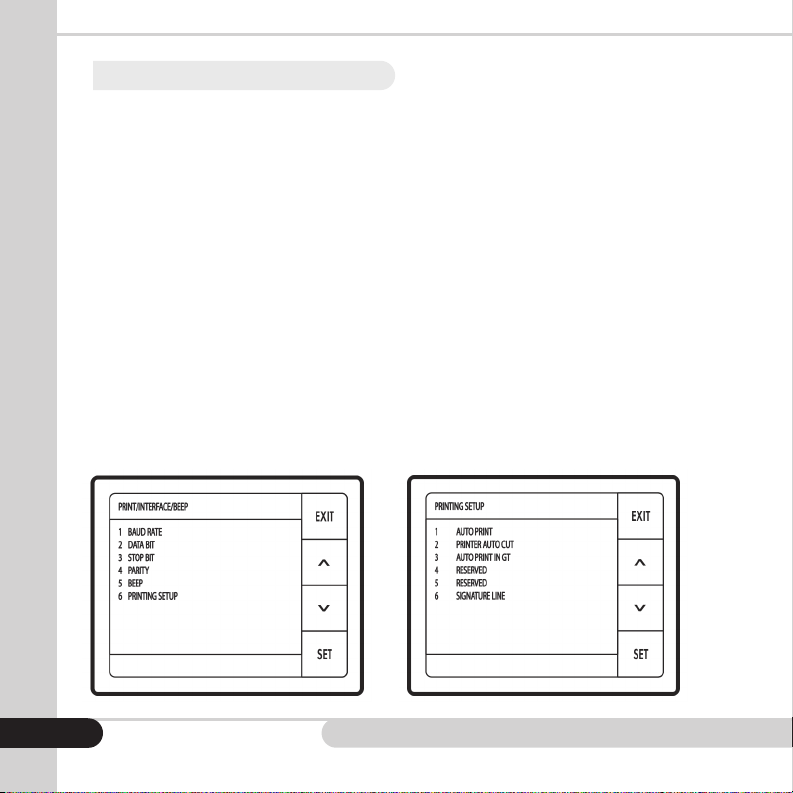
3.5.2 Print/Interface/Beep
This menu is intended to allow connection to many third party printers by
allowing customization of the printing interface and data format. Standard
receipt printers typically require setup of the serial interface as specied by the
printer manufacturer. The below list of options provides access to common serial
connection setup:
[1] Set BAUD RATE - from [1] 4800 to [7] 115200 (default 9600)
[2] Set DATA BIT - from [1] 5 to [4] 8 (default 8)
[3] Set STOP BIT - [1] 1 or [2] 2 (default 1)
[4] Set PARITY - [1] NONE, [2] ODD or [3] EVEN (default NONE)
[5] Set BEEP - [1] ON or [2] OFF (default ON)
[6] PRINTING SETUP
Options are also available to customize the way the printer functions with the following:
[1] AUTO PRINT (default OFF)
[2] PRINTER AUTO CUT (default OFF)
[3] AUTO PRINT IN GT (default ON)
[4] RESERVED (for optional features)
[5] RESERVED (for optional features)
[6] SIGNATURE LINE (default ON)
19
Page 29
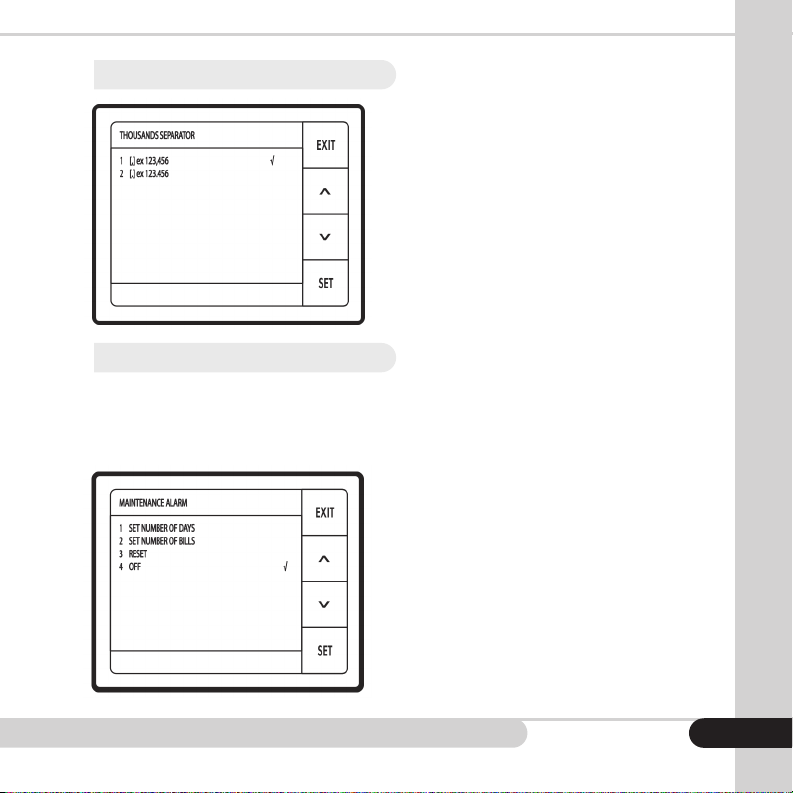
3.5.3 Thousands Separator
Depending on application and region, the
user is able to customize the thousands
separator by choosing to employ a comma
as the separator [1] [,] ex123,456 or a period
as the separator by choosing [2] [.] ex123.456
3.5.4 Maintenance Reminder
The Apollo features an automatic service and maintenance reminder that may be
used to schedule regular maintenance. Use the following menu options to set a
maintenance schedule by various methods. Due to the wide range of applications
of the Apollo, multiple selections are available based on use case and service
contracts.
[1] SET NUMBER OF DAYS - Reminder that
maintenance is due the number of days
entered from today.
[2] SET NUMBER OF BILLS - Reminder that
maintenance is due when the number of bills
entered is counted through the unit.
[3] RESET
[4] OFF (default)
20
Page 30
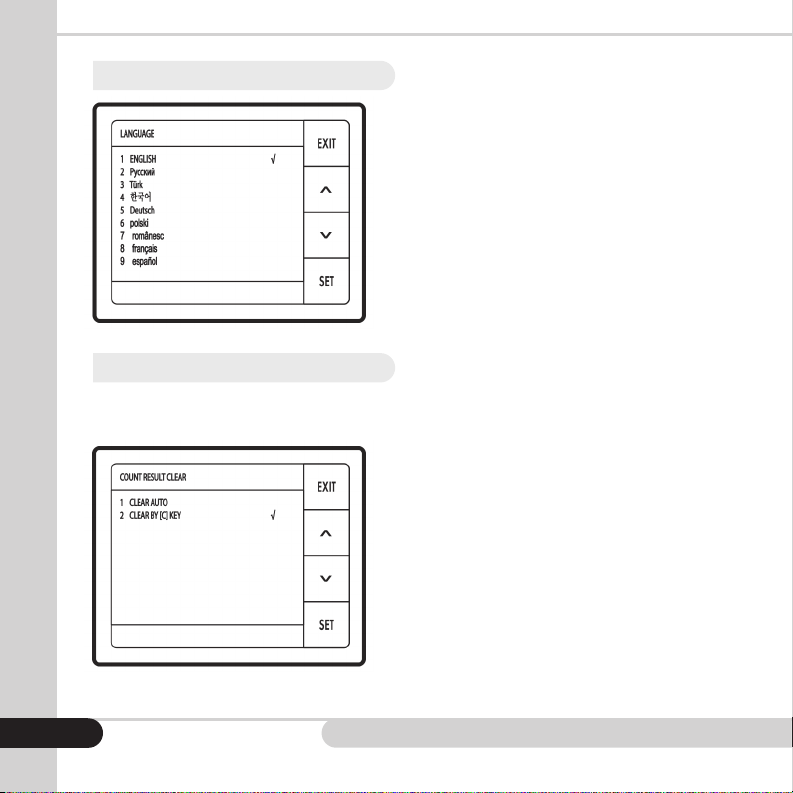
3.5.5 Language
This feature allows the user to select
the preferred language for on-screen
communication. English is the default
language.
3.5.6 Clear Remote Count
The Apollo has the capability to connect to an external display. This feature
allows the user to dene how the external display will clear.
[1] AUTO CLEAR - if selected the external
display will clear all values approximately
3 seconds after the bills are cleared from
the stacker. The counting result on the
Apollo main screen remains until cleared.
[2] CLEAR BY [C] KEY - The counting result
is not cleared on the external display or
on the Apollo screen until the [C] key is
pressed (default).
21
Page 31
3.5.7 Pocket Capacity
This feature allows user to set the maximum number of notes passed to the stacker. If
the stacker becomes full, the Apollo will stop and ash the “STACKER FULL” message.
Clear the pocket and the Apollo will resume normal operation. The stacker has
selectable capacities of 100, 150, or 200 notes maximum..
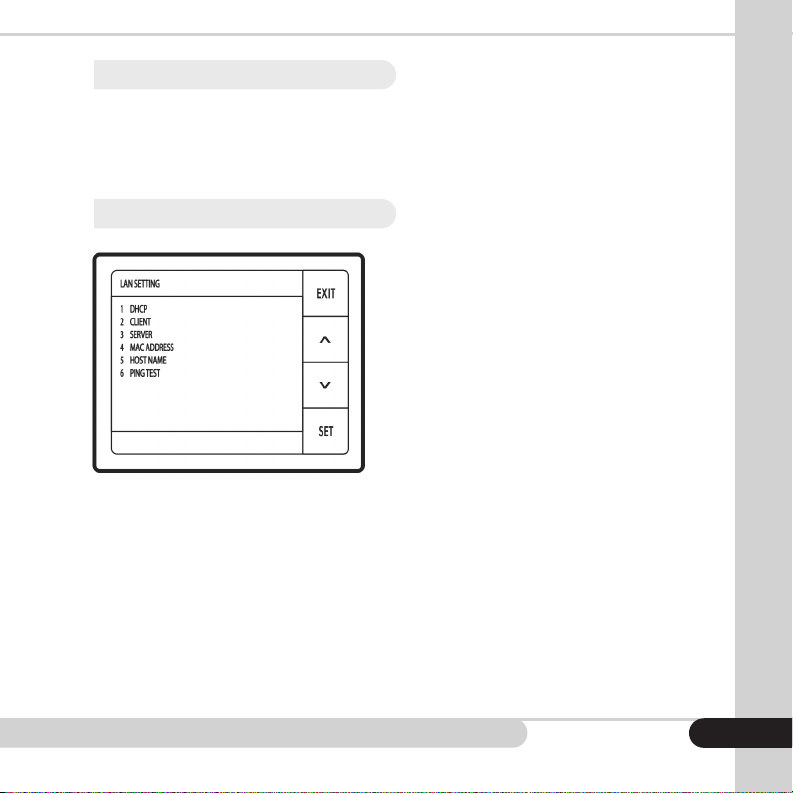
3.5.8 LAN Setting
[1] DHCP Toggle - Enable or disable Dynamic Host Conguration Protocol
[2] CLIENT - Congure client settings
[3] SERVER - Congure server IP Address and Port
[4] MAC ADDRESS - View the Apollo MAC Address
[5] HOST NAME - View the hostname.
NOTE: This value will remain through power off and depleted battery events.
[6] PING TEST - Send pings to test communication
The Apollo is equipped with an Ethernet port
for network connectivity. To enable network
operation, various settings will need tuning
and testing depending on the network
conguration where the Apollo is installed.
Cassida does not provide networking solutions
at the moment, though an API manual is
available upon request to create custom third
party applications. The following menu settings
are available to setup and test the network:
22
Page 32
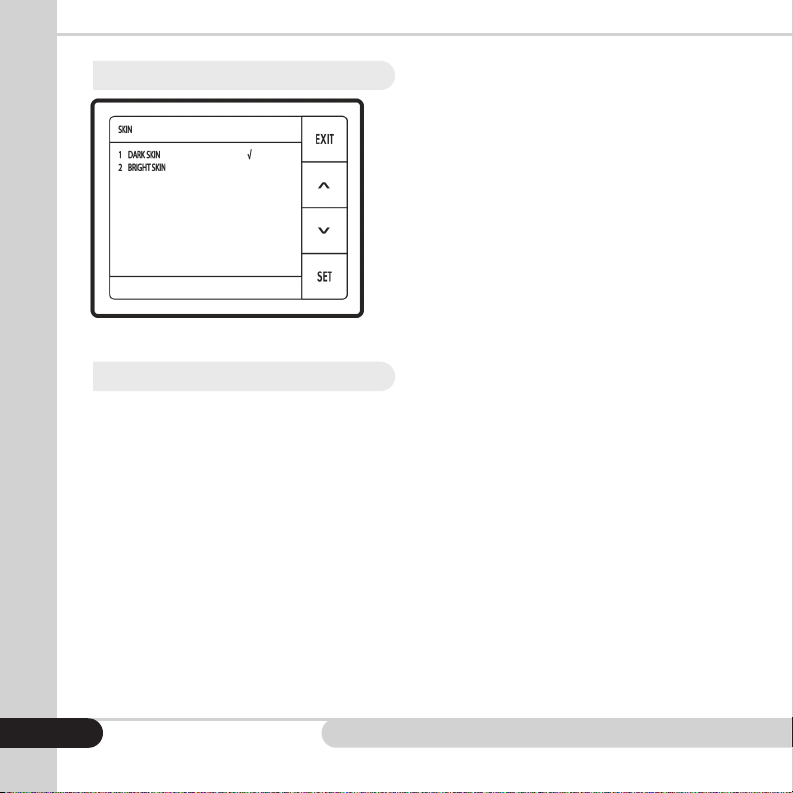
3.5.9 Skin Menu
This feature allows user to select how the
interface is displayed. By default, the
Apollo is set to the [1] DARK SKIN for lower
light environments with high contrast and
low eye strain. The second option listed is
the [2] BRIGHT SKIN for brighter working
conditions.
3.6 Report Formatting and Setup
This feature allows the user to access daily, weekly, and yearly counting reports.
In order to use this function, a FAT32 formatted external storage device such as
a ash drive or hard drive must be connected to the USB port on the back of
the unit. The external storage device must be present during all counting and
data collection in order for the reports to be correctly stored. It is recommended
that a dedicated storage device is paired with each Apollo tool that requires
reporting.
Reporting intervals are dened as [1] DAILY REPORT, [2] WEEKLY REPORT, or [3]
MONTHLY REPORT.
For a DAILY REPORT, choose a date within the last 30 days to run the report and
press [ENTER] once the desired date is highlighted. This will display the report
contents and present the option to print the report using the [PRINT] key. Similarly
for weekly and monthly reports, select the preferred end date for the report or
month to view.
23
Page 33
3.7 User Information
The user information screen displays and allows editing of common user features and
unit specic information.
3.7.1 Machine ID
The MACHINE ID is the custom name given to the unit if desired. By default, all units
are set to “CassidaPRO”. This eld is identical to the HOST NAME as used in the
networking screens, and may be used for network identication. Once this value is
set, it is stored in a special memory that will retain this value through power cycling,
unplugging, and battery depletion.
3.7.2 Receipt Header
This menu provides options to customize what is printed on receipts from the Apollo.
Fields included are NAME, ADDR, TEL, and FAX. If these values are set, every receipt
printed by the Apollo will contain this information at the top of the print. Follow on-
screen instructions for typing and saving these values.
3.7.3 S/W Version
Access this menu to view the current software version, UI version, and further detailed
information about the unit.
24
Page 34

3.7.4 Factory Default Set
Once selected and conrmed, this action returns the Apollo to default factory
settings.
3.8 Setting Hotkeys
Up to three user preferences, or hotkeys, can be saved. Hotkeys load the mode
and all related settings active at the time the user preference was saved to the
selected hotkey.
The [4], [5], and [6] keys on the number pad are hotkeys. To activate a hotkey,
from the main screen, press and hold the [4], [5], or [6] key. Select [SAVE] to save
the current conguration for future use. To load a user setup, press and hold
the desired hotkey and select [LOAD] to load a saved conguration. The saved
conguration will load automatically.
4.
OPTIONAL FEATURES
4.1 Zero Count at Strap
This function can be activated by an Apollo service provider. Once activated,
this function works with all strapping functions. Zero Count at Strap engages when
the user enables strapping. Once a strap is complete and bills are removed from
the stacker, the on-screen value, piece count, and strap counts will return to
zero. This function also works with ADD, enabling the user to count multiple stacks
of bills, while keeping track of the total number of bills and value of bills counted.
25
Page 35

4.2 Barcode Scanning Mode
This mode is used to count barcoded tickets. Tickets are placed into the hopper with
the barcode facing down. During processing, only the number of tickets is counted.
Counterfeit detection is disabled for ticket counting and Barcode mode. The screen
will display the number of processed tickets under CURRENT COUNT (CC) and the
value will remain “0.”
Barcode data may be printed for further records. If the auto print function is enabled,
the data will print automatically as soon as the tickets are removed from the stacker,
or after the stacker capacity has been reached. Processing is interrupted by the
“PRINTING” message.
If auto print is disabled, the warning will display asking the operator to print the
barcode data.
4.3 Barcode and Cash Concurrent Scanning
This mode is used to count mixed barcoded tickets and bills simultaneously. Tickets
must be placed into hopper with the barcode facing down; bills may be placed in
any orientation. All tickets and bills will be passed into stacker. The screen will display
the total number of processed tickets, the total value of counted bills, and the bill
count.
During ticket processing, bar code data is collected and can be printed for a physical
record. Is the AUTO PRINT function is enabled, the data will print automatically as
soon as bills and tickets are removed from the stacker, or after the stacker capacity
has been reached. Processing is interrupted by the “PRINTING” message.
If auto print is disabled, the warning will display asking the operator to print the
barcode data.
26
Page 36

4.4 Using Serial Number Mode
Two options are available for capturing serial numbers: saving the data to an external
storage device, or printing the numbers directly. To count to external storage, insert
the device into the USB-A port on the back of the unit prior to power on, then turn on
the unit and operate as normal. To connect to a printer for serial capture, turn on the
unit with the printer turned off. Upon completion of the Apollo self-test (rollers turn,
and then main menu is displayed) power on the printer.
To use Serial Number Mode, all bills must be facing the same orientation and be
placed face down in the hopper. It is suggested the user runs the stack of bills to be
scanned in FACE mode and ORT mode prior to attempting serial capture to verify
the orientation. Any incorrectly oriented bills will be rejected. Place bills face down
in the hopper. The Apollo will count the bills as normal (pieces and sum) and tally on
screen. To send the captured serial data to the external storage or printer, press the
[PRINT] key.
To view the captured serial number information on a computer, remove the external
storage media from the Apollo and plug into a computer. In the root folder of the
device, a new folder has been created titled “Serial Number Data”. This directory
contains the serial information in a folder titled with the date and count, followed
with a count sequence number, and nally and .XML le and images of the serial
numbers in .bmp format.
4.5 Multi-Currency Software
The Apollo is equipped with the option to count various worldwide currencies upon
request. Please contact CassidaPro for more information on how to use the Apollo
with international or multiple currencies.
27
Page 37
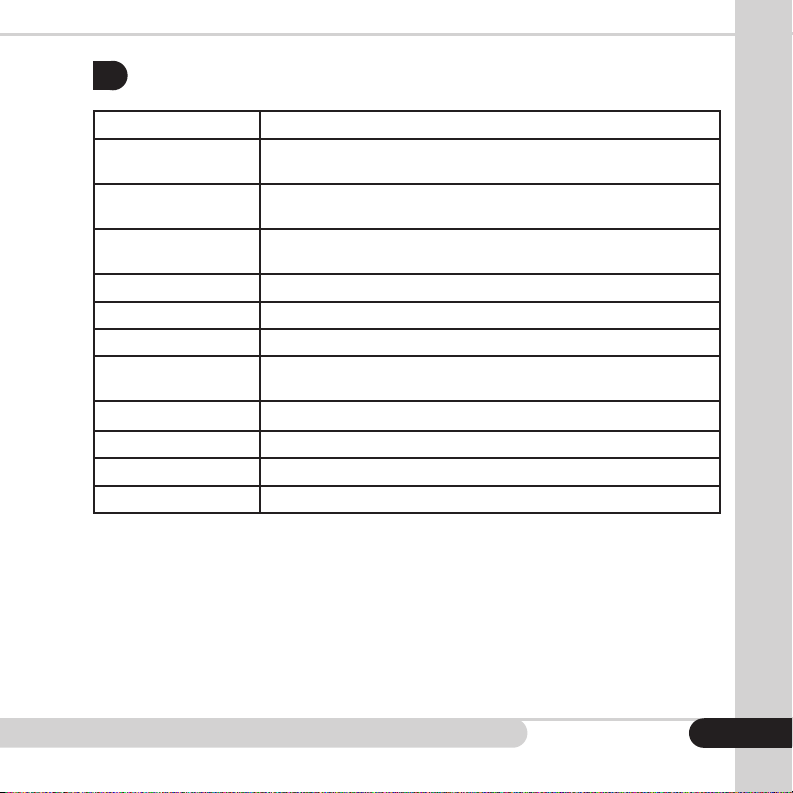
5.
ERROR MESSAGES
Error message Reject Reason
SUSPECT IR Unrecognized or missing expected anti-counterfeit infrared
SUSPECT MG Unrecognized or missing expected anti-counterfeit magnetic
SUSPECT UV Unrecognized or missing expected anti-counterfeit ultraviolet
ID ERROR Unable to recognize bill as selected currency type
DIFF Different denomination
CHAIN Bills fed too close to each other in transport path
DOUBLE Two or more bills passed together, thickness out of range for
HALF Half note detected, typically torn bills
SKEW Bills misaligned through transport path
SRL MISMATCH Serial numbers of the bill did not match
NO SRL No serial number found on the bill
features. May be due to marked, taped, or stained currency
features. May be due to wrinkling or wear on notes
features. May be due to marked or stained currency
expected currency
28
Page 38
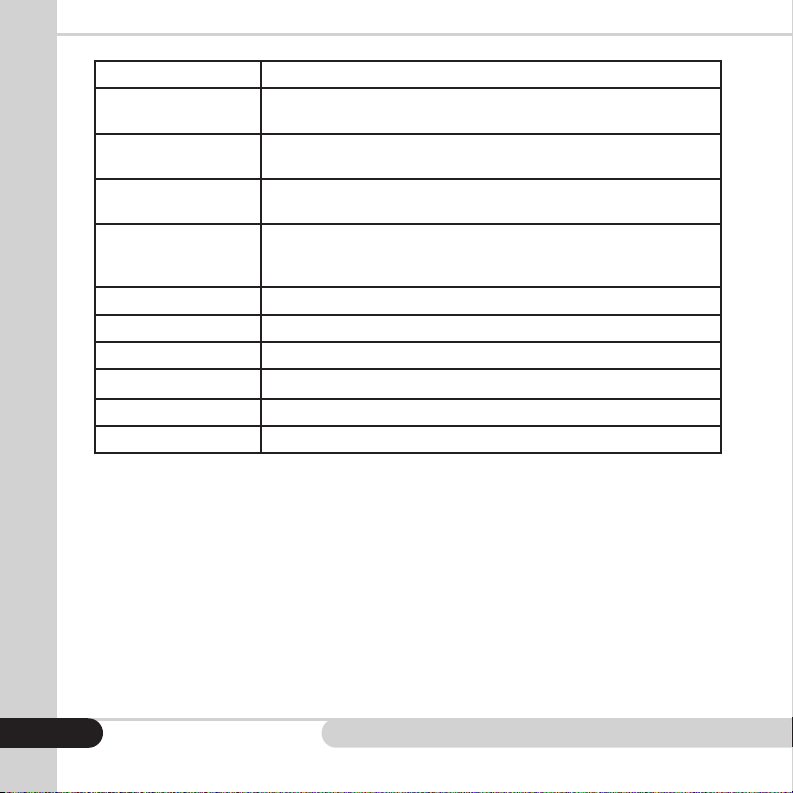
Error message Solution
JAM1 Open the upper door and remove the bills from the bill path.
JAM2 Open the lower door and remove the bills from the bill path.
FEED ERROR Remove the bills on the hopper. Adjust the gap if it is too
MOTOR ERROR Open the upper and the lower doors, remove all the bills
UPPER DOOR OPEN Close the upper door
LOWER DOOR OPEN Close the lower door
CLEAR STACKER Remove the bills from the stacker
CLEAR HOPPER Remove the bills from the hopper
CHECK PS1 Check if the upper door is open or if a bill is in the bill path
CHECK PS2 Check if the lower door is open or if a bill is in the bill path
Close the door and Press [C]
Close the door and Press [C]
tight. Place the bills again
from the bill path. Turn the power off and on and check if the
motor runs. If not, consult with a service provider
29
Page 39

6.
MAINTENANCE, CONTACTS, AND SPECIFICATIONS
6.1 Maintenance and Cleaning
Regular maintenance is required for optimal performance. All parts of the Cassida Pro Series
Apollo require daily care and cleaning. Apollo’ sophisticated sensors are very sensitive and
delicate components. Any dust or foreign matter that may adhere to the sensors may
impact the unit’s performance and operation.
NOTE: Clean the sensors before contacting a service technician.
Cleaning Instructions
Unplug the unit from all power sources before beginning the cleaning procedure.
•Do not use solvents or harsh chemical cleaning solutions.
•Clean the unit daily.
•Clean sensors with a damp cloth or an air duster, soft bristled brush, or the Cassida
Cleanbill Pro cleaning card.
•Clean the rubber rollers with the Cassida Cleanbill Pro cleaning card.
•Empty the dust drawer daily.
•Perform complete maintenance once every 3 months. Contact your
authorized Cassida service technician to schedule regular maintenance.
WARNING
Before performing any cleaning procedure, switch off the unit by pressing the power button
on the back of the unit to the “off” position.
Once powered off, unplug the unit from all power sources.
DO NOT use solvents or harsh chemicals such as alcohol to clean the unit.
Replace battery yearly with a CR2302.
30
Page 40

6.2 Contact Information
Technical support contact information:
Tel: (888) 800-0303
www.CassidaPro.com
6.3 Specications
Feeding System Type:
Counting Speed:
Hopper Capacity:
Stacker Capacity:
Banknote Size Range:
Power Supply:
Battery Supply:
Size (WxDxH):
Ambient Temperature:
Relative Humidity:
31
Display:
Interface:
Detections:
Weight:
Roller Friction
800/1000 Notes/Min
500 Note
100, 150, 200 Notes
4.7” x 2.4” - 7.1” x 3.5” (120 x 60 mm - 180 x 90 mm)
LCD 2.8” (71 mm)
USB-A, USB-B, RS-232, RJ-11, RJ-45, DB9
MG, UV, IR, CIS
100-240V, 50/60Hz
CR 2302
10.9” x 9.8” x 12” (276 x 250 x 305 mm)
17.6 lbs
50°F - 95°F (10°C - 35°C)
20% - 90% R.H. (Non - Condensing)
Page 41

Page 42

Cassida Corporation - North America
2018 Cassida Corporation. All rights reserved.
Specications subject to change without notice.
ValuSort is a registered trademark of Cassida Corporation.
FN ApolloREV 0318
 Loading...