

Page 1
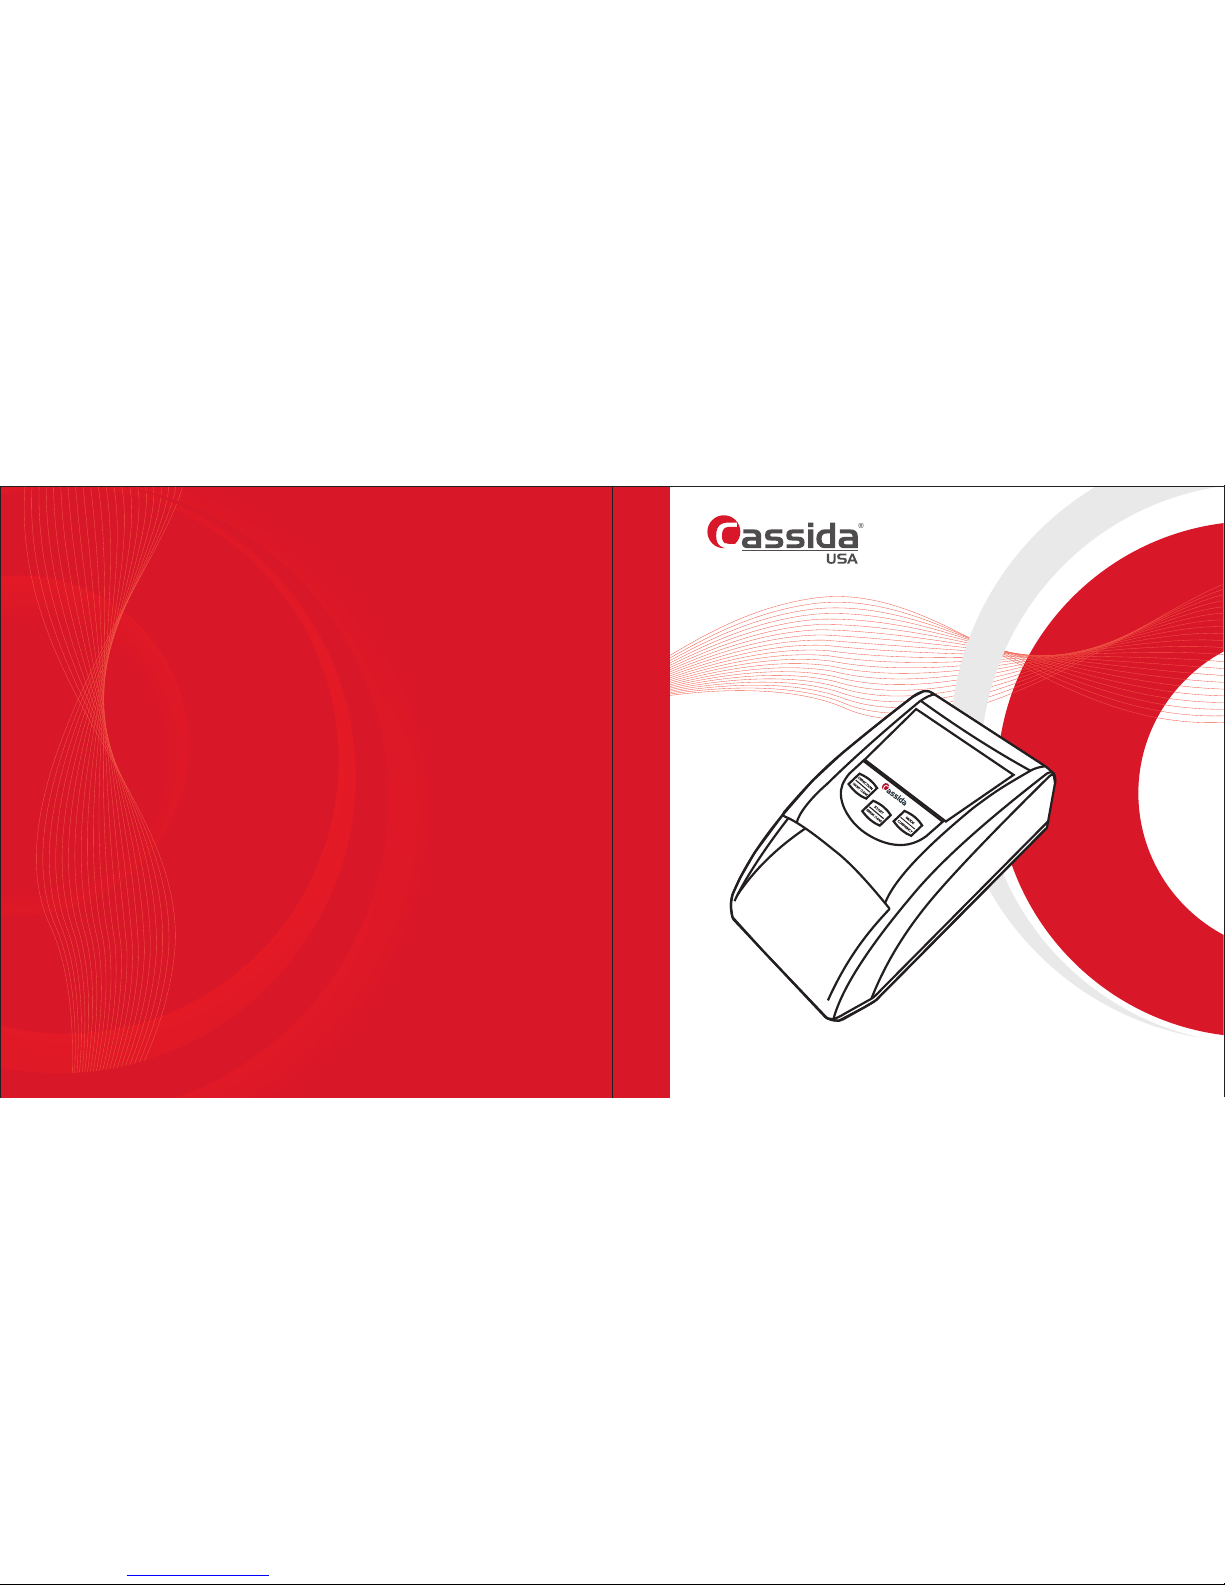
Designed by Cassida Corporation, USA
Assembled in China
©Copyright 2017 Cassida Corporation. All rights reserved.
Specifications subject to change without notice. Cassida is a registered trademark of Cassida Corporation.
3200 AUTOMATIC COUNTERFEIT DETECTOR
USER MANUAL
ver.:190917
Page 2
Cassida 3200 AUTOMATIC COUNTERFEIT DETECTOR
This manual contains important information on safety
measures and operational features. Please read it carefully
before operating your counterfeit detector, and keep it for future
reference.
Page 3
Congratulations on your purchase of the Cassida 3200 which incorporates the most
powerful counterfeit – detection technology available to the industry.
The Cassida 3200 verifies Infrared security marks, the most reliable anti-counterfeit
protection available for paper currency. Thanks to advanced sensors, the detector checks
for magnetic marks, conducts bill color spectrum analysis and verifies Infrared security
marks. The detector displays a number of verified bills and their grand total value.
About the Cassida 3200
• Automatic counterfeit detector the Cassida 3200
• Power adapter
• User manual
• Cleaning brush
10
10
10
11
12
13
13
14
Cassida 3200 AUTOMATIC COUNTERFEIT DETECTOR
INTRODUCTION
UPDATE THE CONTENT:
1 Introduction
1.1 About the Cassida 3200.......................................................................................................
1.2 Box contents.............................................................................................................................
1.3 View of the Cassida 3200....................................................................................................
1.4 Control panel...........................................................................................................................
1.5 LED display...............................................................................................................................
1.6 Specifications............................................................................................................................
1.7 Important safety notes............................................................................................................
2.1 Powering up.......................................................................................................................................
2.2 Setting bill ejection direction...........................................................................................................
2.3 Selecting a different currency (available as an option).............................................................
2.4 Authenticating a bill..........................................................................................................................
3.1 Error codes..................................................................................................................................
3.2 Maintenance................................................................................................................................
3.3 Warranty......................................................................................................................................
3.4 Contact information...................................................................................................................
3 Maintenance and Warranity
2 Operation
1.2 Box contents
moving money forward
5
5
6
7
8
8
9
Page 4
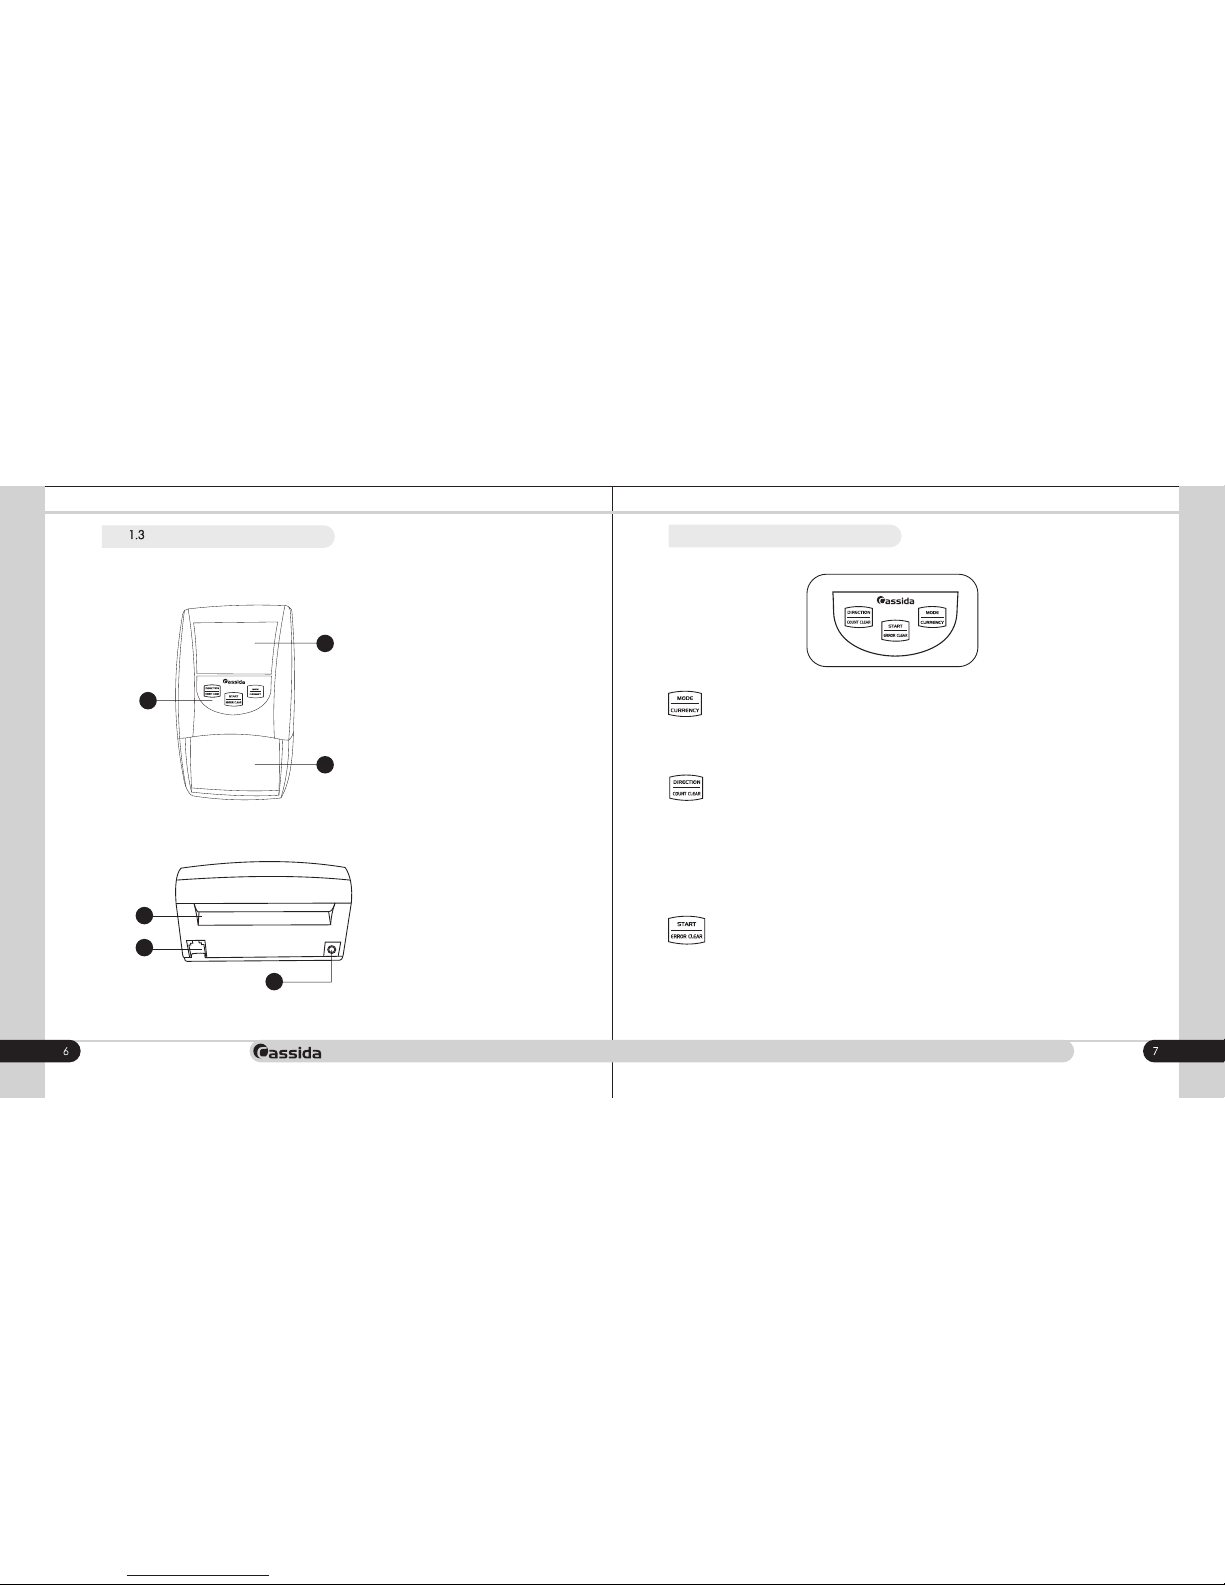
5. RJ11 port
This interface is used for connection
between PC and the detector for
software upgrade
6. AC adapter power jack
Power adapter connection port.
4. Rear slot
4
• The Cassida 3200 can eject recognized bills through either the front (insertion) slot
or the rear slot.
NOTE: Rejected (non-authenticated) bills are always ejected through the front slot
with 2 beep signals.
To change ejection direction, press the "Direction/Count clear" button until the
indicator of a bill ejection direction appears on the display.
To clear the total value of authenticated bills, press and hold this button for
approximately two seconds.
• Press "the Start/Error code" button to clear the error message.
To switch on/off the detector press and hold this button for approximately two
seconds.
• To switch between Addition and Denomination modes, press this button. ADD or
DENO appears accordingly on the display.
To select a different currency, press and hold the "Mode/Currency" button. The new
selected currency symbol will appear in the top right corner of the display. Repeat as
necessary to select the desired currency.
5
6
Cassida 3200 AUTOMATIC COUNTERFEIT DETECTOR
Rear view
1.4 Control panel
1. Front slot
Put a banknote into the feeding track.
The detector will automatically process
the bill.
1
2
3
2. LED Display
3. Control panel
View of the Cassida 3200
Front view
moving money forward
Page 5
Processing speed:
Display:
Detections:
Bill ejection direction:
PC connection
(software upgrade):
Power supply:
Power consumption
(wait mode/operation):
Temperature:
Humidity:
Dimensions (WõDõH):
Net weight :
< 0.5 note/sec
LED
IR detection (Infrared security marks)
MG detection (MG marks)
UV detection
Magnetic thread
Banknote size detection
Color spectrum analysis
RJ11 port (using PC)
100 - 240V / 50-60Hz
(option): Li-ion battery
12V, 700mAH (about 2500 checks)
<1W / <10W
0°Ñ - 40°Ñ (32°F - 104°F)
30 - 80%
115x200x76 mm (4,5”x7,8”x3”)
0,6 kg (1,3 lbs)
Cassida 3200 AUTOMATIC COUNTERFEIT DETECTOR
1.6 Specifications
1.7 Important safety notes
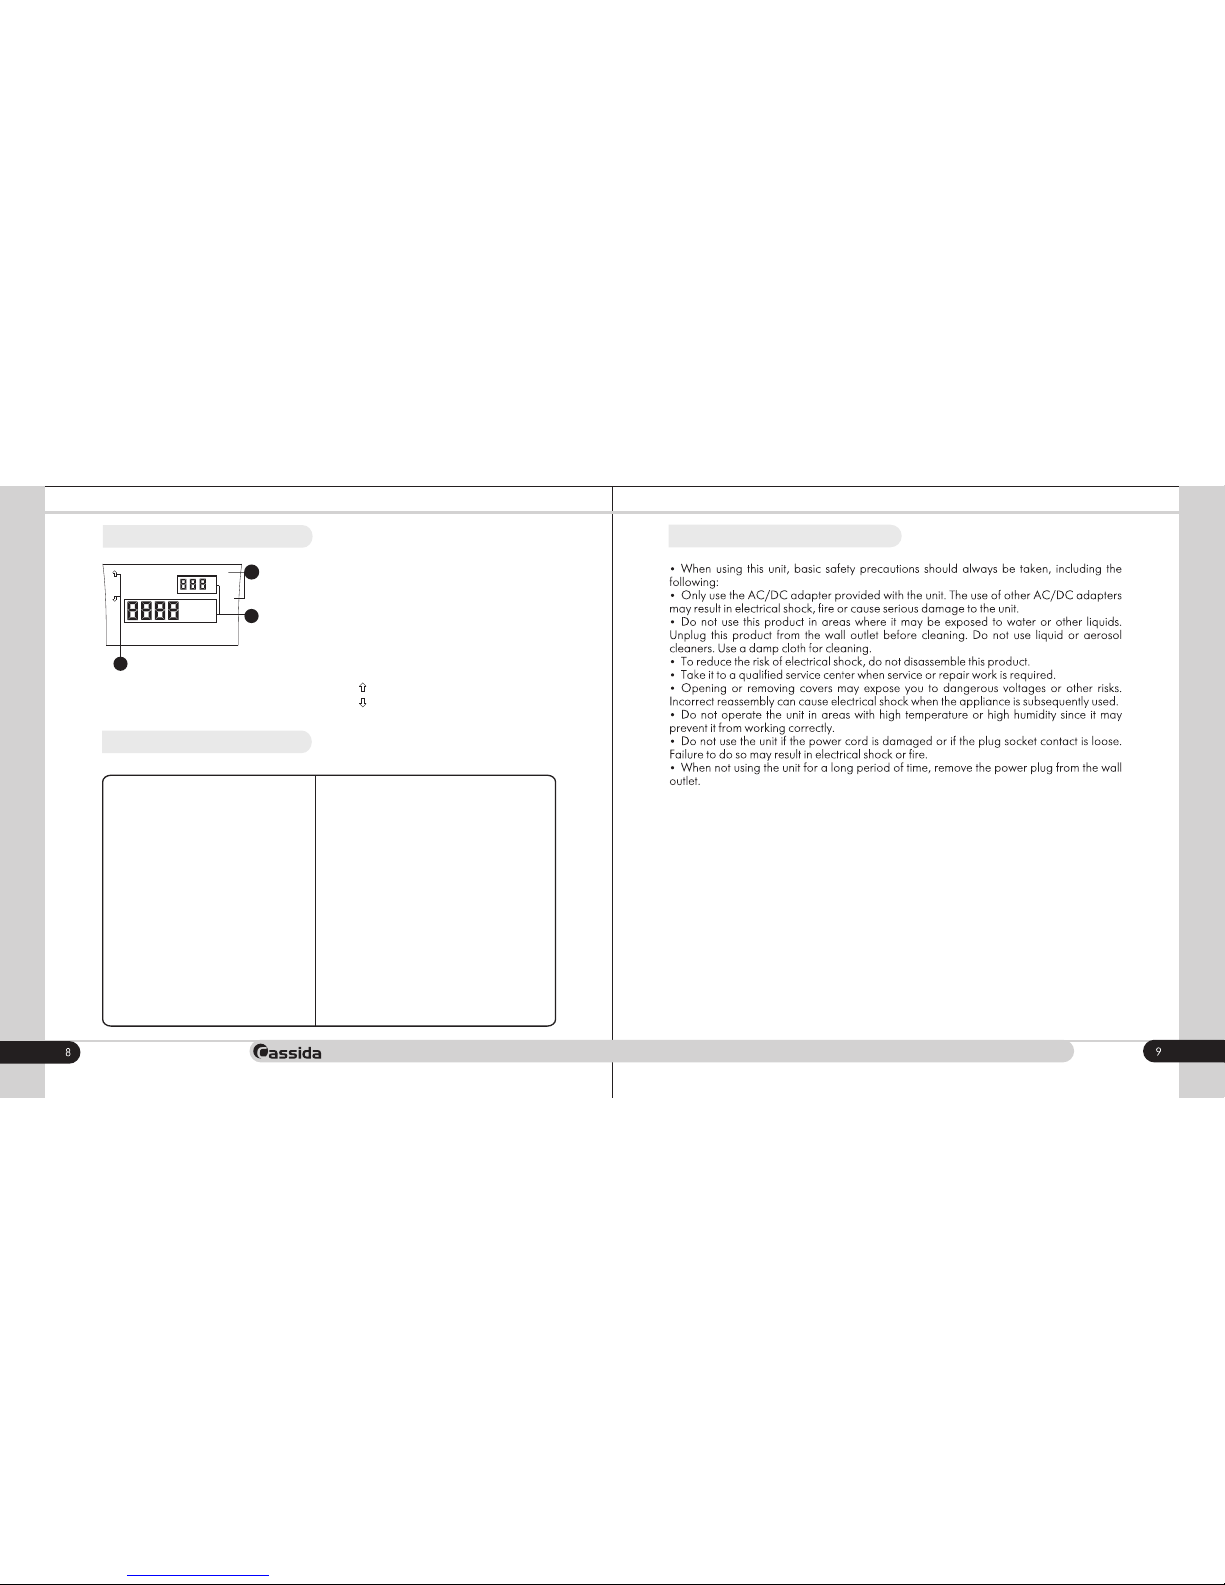
1.5 LED display
1. Currency symbol
€
SEC
1
2
3
2. 3 digit LED display
· Display the number of verified bills.
· Displays the abbreviation of the selected
currency.
4 digit LED display
· Displays a bill denomination in
"Denomination mode" and a grand total
value of all authenticated bills in "Add mode".
3. The bill ejection direction indicator
· Front.
· Rear.
moving money forward
Page 6
Turn the Cassida 3200 on by pressing the START button to switch the unit. The unit will
emit a beep and conduct a short self-test. If the battery is low, connect the power
adapter provided with the unit to the Cassida 3200 unit, and plug the adapter plug
into a power outlet.
The unit will conduct a short self-test. The screen will then display "0", indicating it is
ready to operate.
The Cassida 3200 can eject recognized bills through either the front (insertion) slot or the
rear slot. NOTE: Rejected (non-authenticated) bills are always ejected through the front
slot.
To change ejection direction, press the "Direction/Count clear" button and the
symbol " " or " " appears on the left top part of the display.
To clear the result press and hold the "Direction/Count clear" button 2 sec.
2.2 Setting bill ejection direction
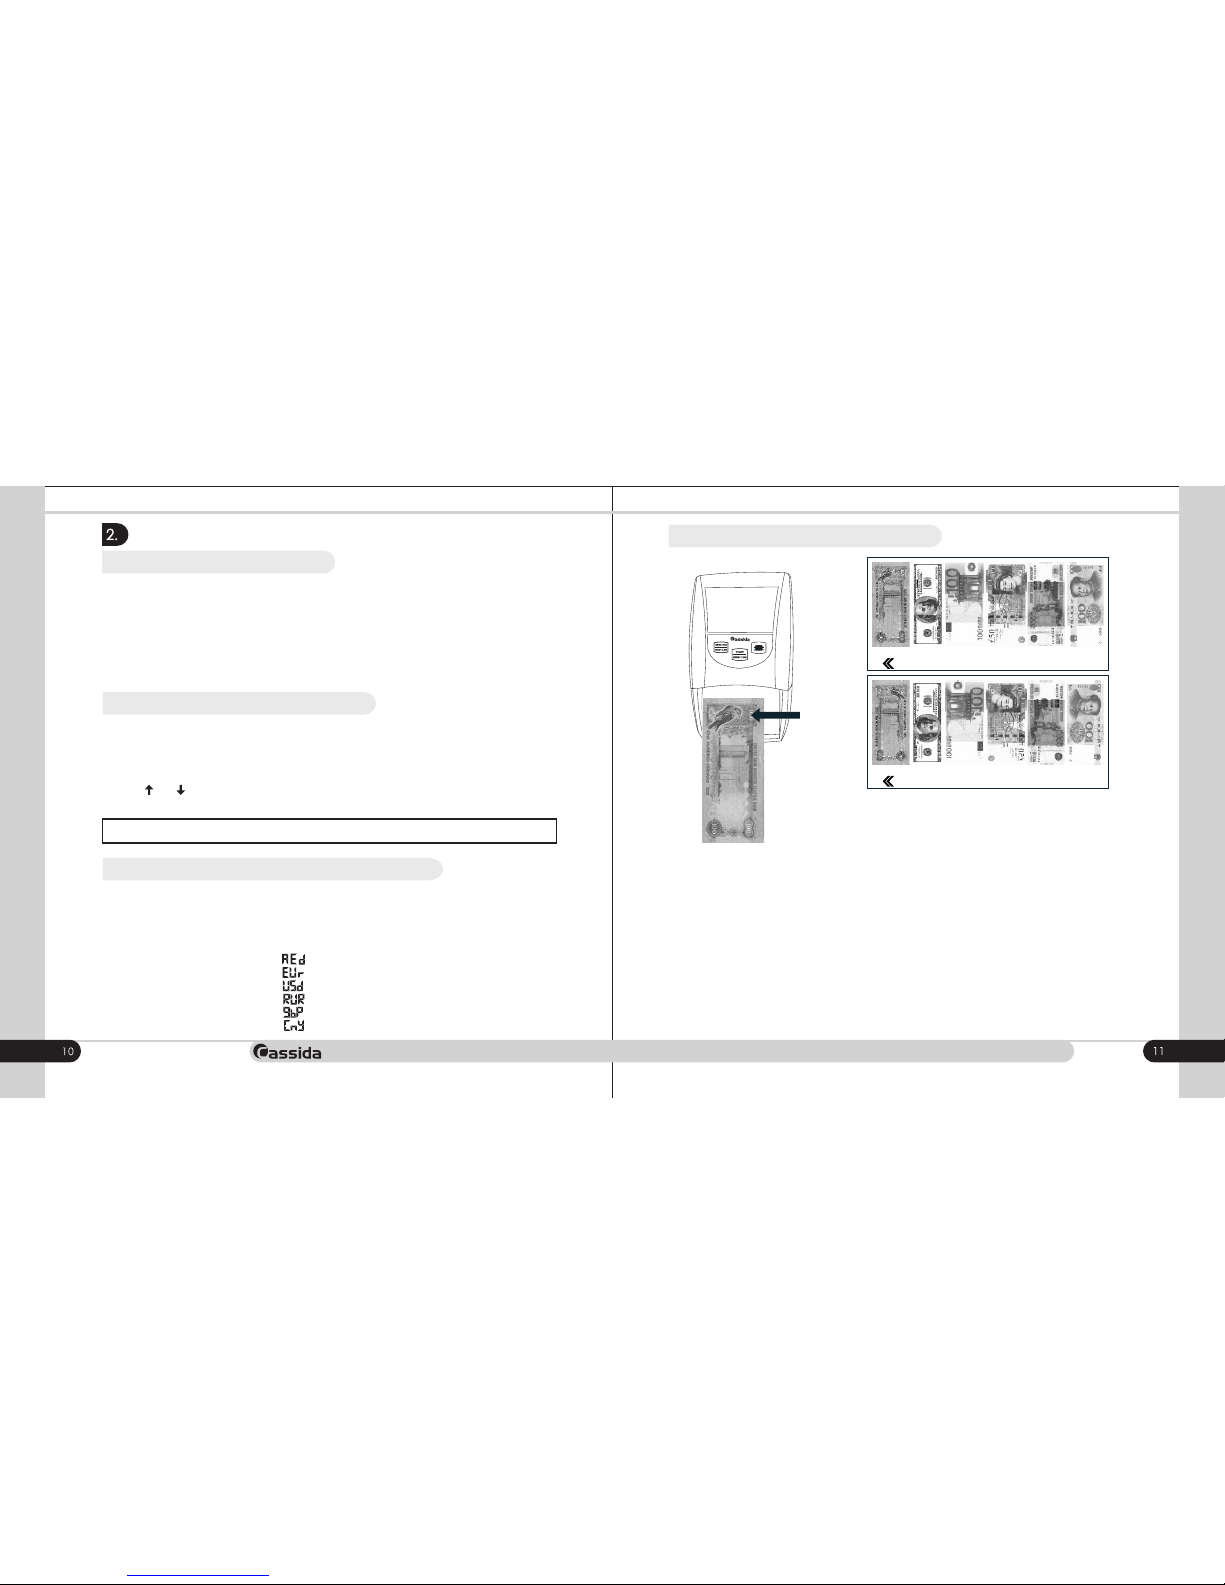
The Cassida 3200 supports up to six different currencies. To select a different currency,
press and hold the "Mode/Currency" button. The new selected currency abbreviation
will appear in the top right corner of the display. Repeat as necessary to select the desired
currency.
Most common currency abbreviations:
2.3 Selecting a different currency (available as an option)
- UAE Dirham
- Åuro
- USA Dollar
- Russian Roubles
- Great Britain Pounds
- Chinese Yuan
2.4 Authenticating a bill
Cassida 3200 AUTOMATIC COUNTERFEIT DETECTOR
OPERATION
2.1 Powering up
Suspicious bills are always eject back to the front feeding slot with 2 beep signals.NOTE:
Insert a bill face up as shown above, flush along the left edge of the front slot
(Note: not all the currencies should be inserted face up). Due to its sensitive,
highly advanced design, the 3200 requires the bill to be precisely aligned
when it is inserted. Slight deviations when inserting a bill may result in the bill
not being properly recognized.
Correct orientation of notes
Incorrect orientation of notes
Attention! If the bill isn't placed right on the front slot, then the bill won't be recognized as an authentic
bill and will result in an error code. If an error occurs, please check the orientation of the bill and put the
bill on the front slot again.
After the bill is positioned in the insertion slot, the detector will automatically feed and scan the bill. If a
bill is recognized as authentic, the following will occur:
1. The bill will be ejected through the rear slot of the machine. (please see Section 2.2 to change eject
direction of authenticated bills).
2. The bill's denomination will appear in the LED display. If a bill is not recognized, the error code will be
displaied (please consult Section 3.1 to see the reason of the error message).
Attention! Errors can occur when testing authentic wrinkled, dirty, washed, torn, taped,
or faded bills. Additionally, bills that have been exposed to harsh environments including laundry
detergent or bleach may result in errors during authentication.
Attention! If updated versions of bills are released into circulation, the detector may return an error
while checking these bills. It is necessary to install a new version of the detector's software to ensure
proper detection of newly released bills.
moving money forward
Page 7
13
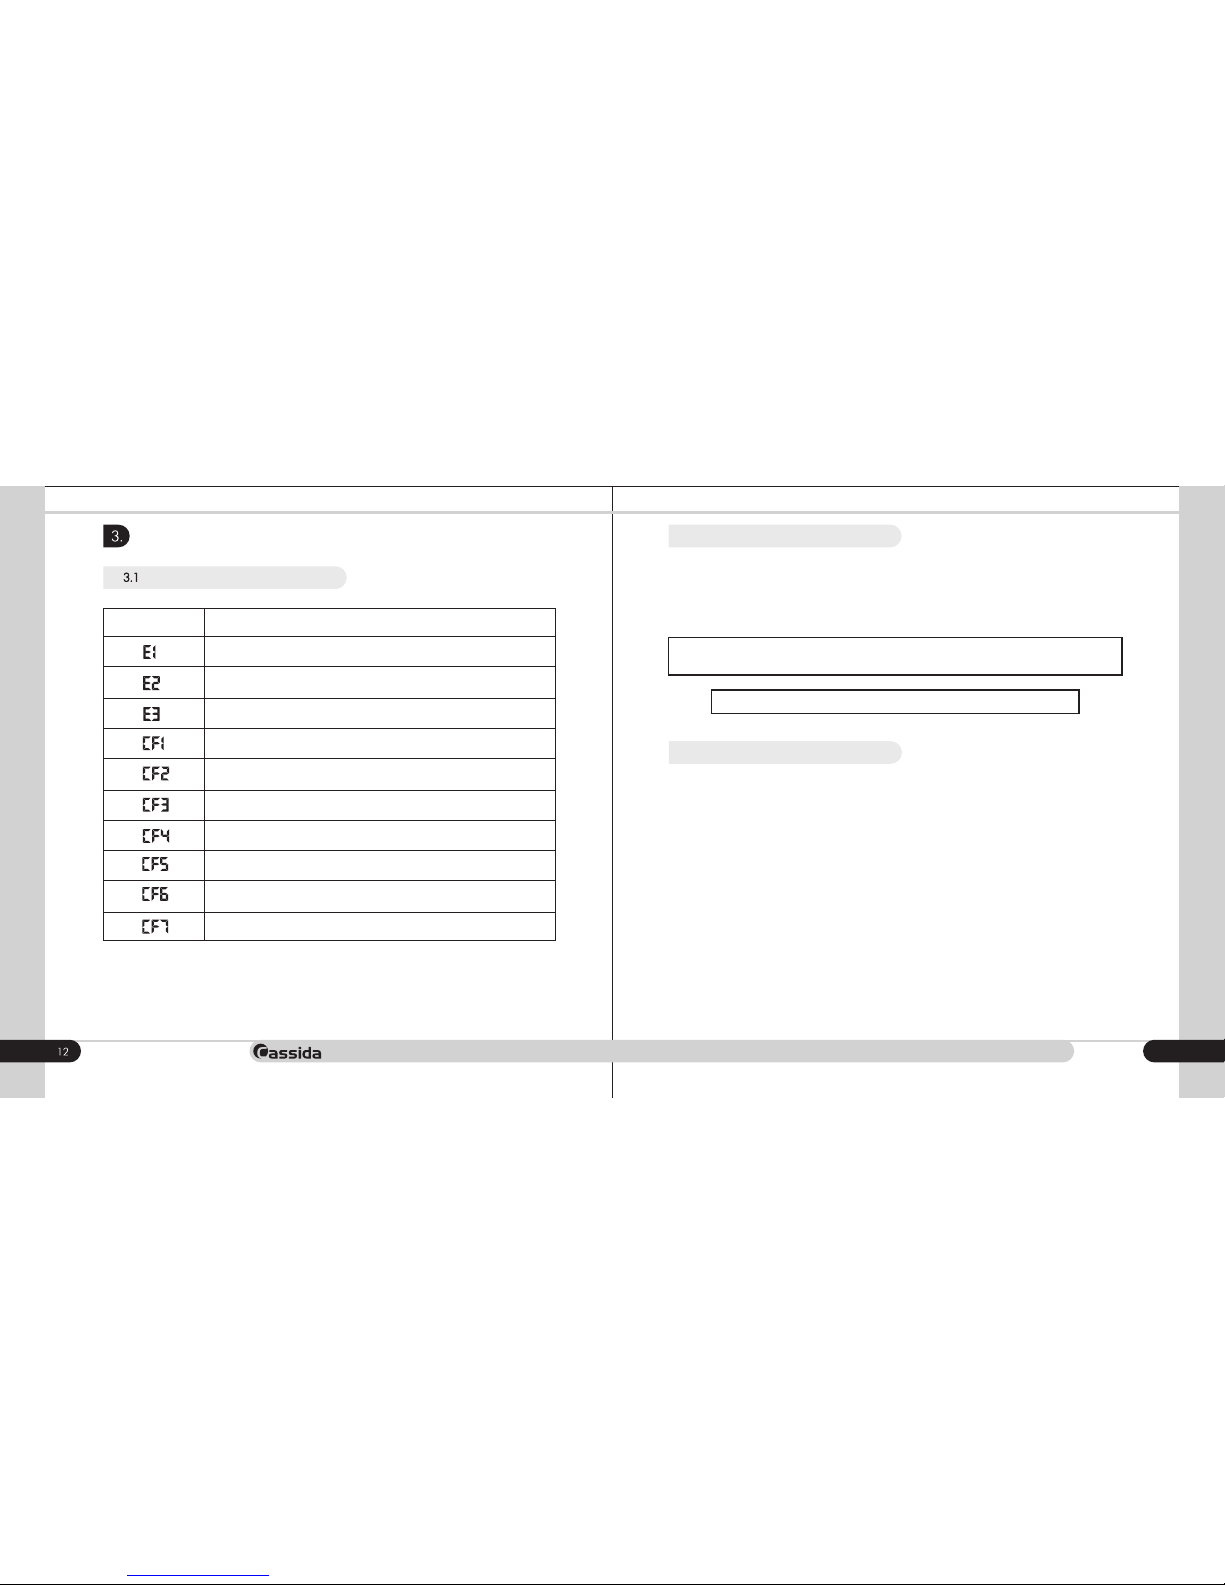
The start sensor error
The count sensor error
The encoder sensor error
Mismatch of a background luminescence of paper (UV)
Mismatch of magnetic properties (MG)
Mismatch of magnetic thread properties (MT)
Mismatch of infrared properties (IR)
Mismatch of water marks (WM)
Mismatch of length
Mismatch of visible image
Code Description
Cassida 3200 AUTOMATIC COUNTERFEIT DETECTOR
MAINTENANCE AND WARRANITY
Error codes
Regular maintenance procedures are not included into the warranty
3.2 Maintenance
Regular maintenance will ensure accurate operation of the unit, and will prolong its
service life. Use an air duster to remove dust from the sensors. Insert approximately 1/4
(one quarter) inch of the duster nozzle through the front bill insertion slot to blow off any
debris that may have accumulated inside the unit. Do not insert the nozzle more than 1/4
inch, as it may damage the sensor mechanism inside the Cassida 3200 unit.
ATTENTION!
The interior cleaning of the unit should be made only by
professional engineers.
3.3 Warranty
moving money forward
Warranty is effective for a period of one year from the date of purchase. In most cases, the
malfunction of the machine can be resolved by cleaning the unit.
• Customer should allow Cassida the time and opportunity to test and diagnose the
machine to determine warranty and non- warranty claims.
• After receiving and unpacking the units, Customer shall keep the package and its user
manual. Warranties are canceled in the event the device is transported in a non-original
packaging or operation/ maintenance conditions are not met.
• Company is not responsible for unit malfunction due to improper maintenance, storage
and transportation including mechanical damage.
• Manufacturer is entitled to introduce updated software, not described in the current user
manual.
Non-warranty service:
Cassida can perform maintenance and cleaning for an extra fee. For a non-warranty
repair or maintenance quotation, contact Cassida Technical Support.
Page 8
14
3.4 Contact information
moving money forward
Warranty service is not available in the following cases:
• Cleaning of the unit from dust and mud
• Absence of a warranty card or an incorrectly filed warranty card
• Operation or maintenance requirements detailed in the user manual are not met
• There is mechanical damage to the unit or the seal portions of the unit have been
opened or tampered with
• There are foreign objects or liquid inside of the unit.
Shipping:
The warranty does not cover shipping cast to or from Cassida Technical Service Center.
Before shipping the unit to the Cassida Technical Service Center the warranty card must
be filled out with model full name and number, serial number, cause for service, errors
occurred.
Technical Support contact information:
e-mail: [email protected]
tel: 042 739 328
www.cassida.me, www.cassidausa.com
When contacting Cassida Technical Support, please have the following:
• Product model – Located on the back side of your currency counter
• Serial number – Located on the back side of your currency counter
• Nature of the problem – What happens, and when did it happen? Did the machine
display an error message?
• Steps already taken to resolve the problem, and the results.
Office # 101,
Biyat Complex (Landmarks: Emirates Billiard Centre)
Hor Al Anz East, Behind Al Mamzar Centre
Dubai - United Arab Emirates
PO box 454867
 Loading...