

Page 1
Original
Instruction Manual
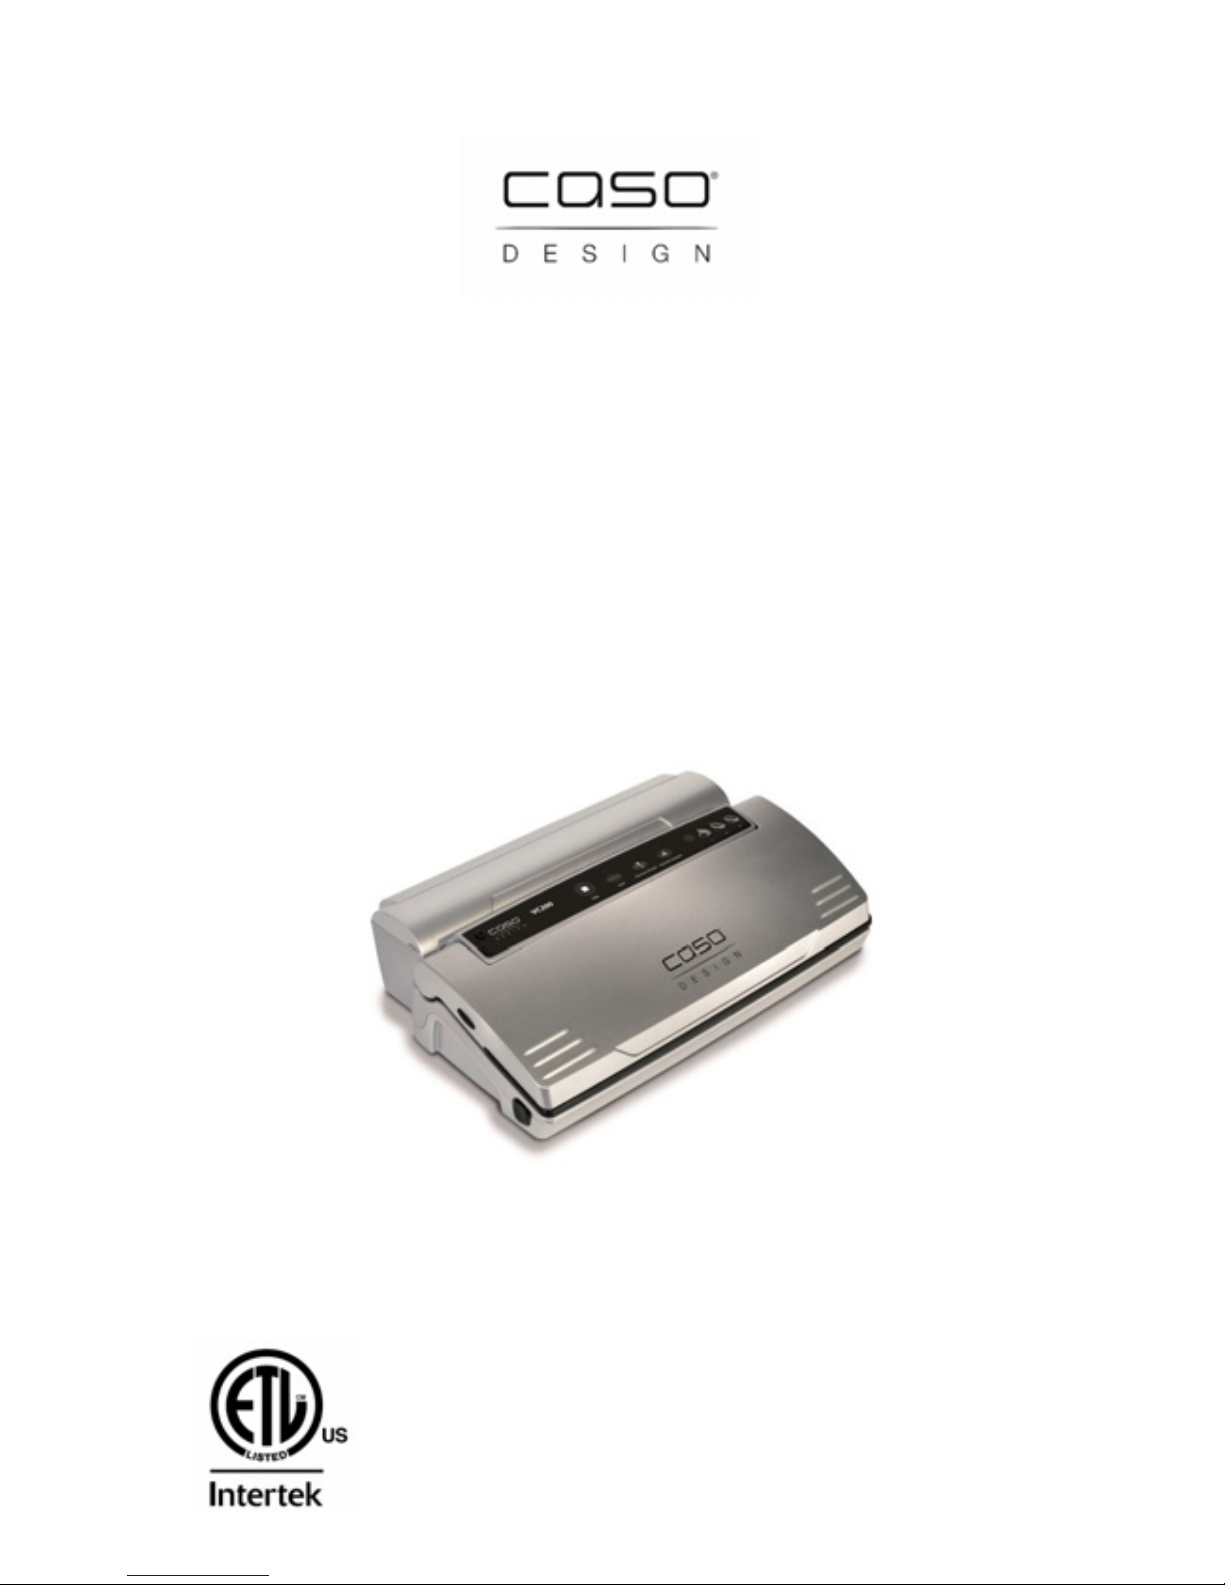
Vacuum Sealer System
VC200
Item No. 11390
Page 2

CASO VC 200 2
USA Branch
CASO Design USA LLC
50 Mountain View Rd
Warren, NJ, 07059
Info@CasoDesignUSA.com
www.CasoDesignUSA.com
T.: 908.604.0677
Document-Number: 11390 13-08-2018
Printing and typographical errors reserved.
© 2018 CASO Design USA LLC
Page 3

CASO VC 200 3
1. Instruction Manual ................................................................................... 5
1.1 IMPORTANT SAFEGUARDS...................................................................................... 5
1.2 General ............................................................................................. 5
1.3 Use of this manual ............................................................................................. 5
1.4 Warning notices ............................................................................................. 6
1.5 Limitation of liability ............................................................................................. 6
1.6 Copyright protection ............................................................................................. 6
2 Safety ................................................................................................... 7
2.1 Intended use ............................................................................................. 7
2.2 General safety information ........................................................................................ 7
2.3 Sources of danger ............................................................................................. 8
2.3.1 Burn danger ......................................................................................... 8
2.3.2 Fire danger ......................................................................................... 8
2.3.3 Electrocution warning ......................................................................................... 8
2.4 About vacuum sealing foods .................................................................................... 8
3 Getting Started .................................................................................... 9
3.1 Packaging safety information ................................................................................... 9
3.2 What’s included ............................................................................................. 9
3.3 Uses and advantages of vacuum sealing ............................................................. 10
3.4 Unpacking ........................................................................................... 10
3.5 Disposal of the packaging ....................................................................................... 10
3.6 Setup ........................................................................................... 10
3.6.1 Setup location requirements: ..................................................................................... 10
3.7 Electrical connection ........................................................................................... 11
3.8 Interference ........................................................................................... 11
3.8.1 Extension cords ....................................................................................... 12
3.8.2 Polarization instruction ....................................................................................... 12
4 Complete Overview ........................................................................... 12
4.1 Appliance diagram ........................................................................................... 12
4.2 Control Panel ........................................................................................... 13
INDICATOR LIGHTS ........................................................................................... 13
A. Sealing Indicator Light ........................................................................................... 13
Red light indicates that sealing process is taking place. ...................................................... 13
4.3 Rating plate ........................................................................................... 13
5 Operation ........................................................................................... 14
5.1 Basics of sealing ........................................................................................... 14
5.2 Bags and rolls ........................................................................................... 14
Page 4

CASO VC 200 4
5.3 Cutting a new bag ................................................................................................. 15
5.4 Sealing a new bag ................................................................................................. 15
5.5 Vacuuming and sealing ....................................................................................... 16
5.6 Vacuuming Sealing Tips ...................................................................................... 17
5.7 Opening a sealed bag........................................................................................... 18
5.8 Resealing store-bought bags .............................................................................. 18
5.9 Storage ................................................................................................................... 18
6 Cleaning and Maintenance ................................................................ 19
6.1 Safety information ................................................................................................ 19
6.2 Cleaning ................................................................................................................. 19
7 Troubleshooting ................................................................................ 20
7.1 Safety notices ........................................................................................................ 20
7.2 Troubleshooting table .......................................................................................... 20
8 Disposal of the Old Device ................................................................ 21
9 Guarantee ........................................................................................... 21
10 Technical Data ................................................................................ 22
Page 5

CASO VC 200 5
1. Instruction Manual
1.1 IMPORTANT SAFEGUARDS
1. Read all instructions before using.
2. This appliance generates heat. Do not touch hot surfaces.
3. To protect against electrocution do not immerse any part of the unit in liquid.
4. Children must be closely supervised when near the unit. Do not let children operate unit.
5. Unplug the unit when not in use and before
cleaning. Allow unit to cool before cleaning.
6. Inspect the unit, its power cord and plug for any damage before using. If there appears to
be any damage or if the unit shows signs of malfunctioning, do not use the appliance.
Return the appliance to the nearest authorized service facility for inspection and repair.
7. Do not use accessory attachments that have not been recommended by the
manufacturer.
8. Do not use outdoors.
9. Do not allow cord to touch hot surfaces or hang over sharp edges such as those on
countertops.
10. Do not place the unit on or near a hot gas or electric burner, or heated oven.
11. Exercise caution when moving cookware containing hot oil or other hot liquids.
12. To unplug the unit, turn off the unit then remove the plug from its outlet.
13. Do not use this appliance for any unintended use.
14. SAVE THESE INSTRUCTIONS.
1.2 General
Thank you for purchasing the VC200 Vacuum Sealer System. Please read this manual
carefully before using your new appliance to familiarize yourself with all its features.
In the following pages, you’ll learn to properly care for and safely operate your appliance,
helping it to perform at peak efficiency for years to come.
1.3 Use of this manual
This manual provides important information on the initial setup, safe operation, intended use,
care and cleaning of the appliance. It also includes a helpful troubleshooting section to
address common questions that may arise during operation. The manual should be read by
anyone planning to use the appliance.
Please store this manual in a safe place near the appliance for easy reference.
Page 6

CASO VC 200 6
1.4 Warning notices
Please pay special attention to the following alerts and notices found throughout the manual:
Warning
This alert indicates a potentially dangerous situation.
If the dangerous situation is not avoided, it can lead to possible injury or death.
► Observe the instructions in this alert to avoid life-threatening situations and/or personal
injury.
Please note
This notice precedes additional tips and helpful information that will help you get the most out
of your appliance.
1.5 Limitation of liability
All the technical information, data and notices with regard to the installation, operation and
care are completely up-to-date at the time of printing and are compiled to the best of our
knowledge and belief, taking our past experience and findings into consideration.
No claims can be derived from the information provided, the illustrations or descriptions in
this manual.
The manufacturer does not assume any liability for damages arising as a result of the
following:
Non-observance of the manual
Uses for non-intended purposes
Improper repairs
Technical alterations
Use of unauthorized spare parts
All translations are carried out to the best of our knowledge. We do not assume any liability
for translation errors, not even if the translation was carried out by us or on our instructions.
The original German text remains solely binding.
1.6 Copyright protection
This document is copyright protected.
CASO Design USA LLC reserves all the rights, including those for photomechanical
reproduction, duplication and distribution using special processes (e.g. data processing, data
carriers, data networks), even partially.
Subject to content and technical changes.
Page 7

CASO VC 200 7
2 Safety
This chapter provides you with important safety notices when handling the device.
The device corresponds with the required safety regulations. Improper use can result in
personal or property damages.
2.1 Intended use
This device is only intended for non-commercial use indoors or in sheltered, enclosed spaces
for vacuuming compatible bags and sealing compatible vacuum foils.
Warning
Danger due to unintended use.
Failure to operate this unit only as intended can be dangerous.
► Use the device exclusively for its intended use.
► Follow all instructions in this instruction manual.
Claims of all kinds due to damages resulting from unintended uses are excluded.
The User bears the sole risk.
2.2 General safety information
Please note
Please observe the following general safety rules to prevent possible injury.
► Examine the unit for any visible damage prior to use. Do not use the unit if it appears
damaged.
► If the power cord is damaged, do not use the unit. You will need to have it repaired by an
authorized electrician.
► Persons, who may not be able to safely operate the unit due to any physical, mental or
motor disabilities may only use the unit under the direct supervision of a responsible person.
► Do not permit children to use the unit. Children should also be supervised when they are
anywhere near the unit during operation.
► Do not leave the unit unsupervised during operation.
► Only qualified electricians, who have been trained by the manufacturer, may carry out any
repairs on the unit.
► Only customer service departments authorized by the manufacturer may carry out repairs
during the guarantee period, otherwise the guarantee entitlements will be null and void in the
event of any subsequent damages.
► Defective components must always be replaced with original replacement parts. Only such
parts will guarantee that the safety requirements are fulfilled
► Do not immerse the unit in water or other liquids, and do not put it in the dishwasher.
Page 8

CASO VC 200 8
2.3 Sources of danger
2.3.1 Burn danger
Warning
Some of the appliance’s surfaces can become very hot.
Adhere to the following safety guidelines to reduce the risk of burns:
► The sealing bar can become very hot during operation. Never touch the sealing bar while
the unit is on.
2.3.2 Fire danger
Warning
There is a danger of fire if the appliance isn’t used used properly.
Observe the following safety notices:
► Do not set up the unit near flammable materials.
► Keep this appliance away from all other sources of heat, such as stovetops, ovens, etc.
2.3.3 Electrocution warning
Warning
There is a risk of electrocution if the unit is used improperly.
Due to the risk of electrocution, never attempt to touch or repair live wires or subassemblies!
Observe the following safety guidelines to avoid dangers due to electrical power:
► If the power cord connection to the main unit is damaged, you will need to have it repaired
or replaced by an authorized electrician.
► Do not operate the unit if its power cord or plug appears to be damaged, malfunctioning or
if the unit has been dropped. If the power cord is damaged, you will need to have it repaired
or replaced by an authorized electrician or the manufacturer to avoid risk of injury.
► Never attempt to open the unit’s housing under any circumstances. There is a danger of
electrocution whenever the housing is open. In addition, the unit will not function properly if
the housing is opened.
► Never touch the appliance or its plug with wet hands.
2.4 About vacuum sealing foods
This vacuum sealer system offers a safe, efficient, cost-effective way to preserve the fresh
taste and nutritional benefits of a wide variety of foods. The following guidelines and tips will
help you get the most out of your new vacuum sealer:
We recommend you observe the following temperature guidelines for storing foods:
Refrigerator: 40°F or below
Freezer: 0°F or below
Page 9

CASO VC 200 9
Please note
► Once perishable foods have been heated, defrosted or un-refrigerated, consume them
immediately.
► Before vacuum sealing, wash your hands, any utensils and all surfaces that may come in
contact with food.
► Refrigerate or freeze the perishable foods immediately after vacuum sealing them. Do not
leave perishable foods sitting at room temperature.
► The shelf life of dry foods such as nuts, coconut or cereals that have been vacuum sealed
will be extended significantly if they are stored in a cool, dark place. Exposure to oxygen and
warm temperatures will cause high-fat content foods to become rancid.
► Before vacuum sealing some fruit and vegetables such as apples, bananas, potatoes and
other root vegetables, it is best to peel them to extend their shelf lives.
► Some vacuum-sealed fresh vegetables such as broccoli, cauliflower and cabbage can emit
gases. Blanch and freeze these foods before vacuum sealing to reduce this effect.
3 Getting Started
This chapter will guide you through safely unpacking and setting up your new unit.
3.1 Packaging safety information
Warning
Packaging materials are not toys and should be disposed of properly.
► Do not allow children to play with packaging materials due to risk of suffocation.
3.2 What’s included
The vacuum sealer system VC200 includes the following components:
Vacuum sealer system VC200
Detachable vacuum bag roll holder
Vacuum hose (found inside vacuum bag roll holder)
2 vacuum bag rolls
Instruction manual
Please note
► Examine the shipment to ensure the unit and manual are included and inspect the unit for
any visible damage.
► Immediately notify the carrier and/or the supplier about an incomplete shipment or any
damage as a result of inadequate packaging or mishandling.
Page 10

CASO VC 200 10
3.3 Uses and advantages of vacuum sealing
Vacuum sealing foods prolongs shelf life while preserving food’s freshness, flavor and
nutrients . Vacuum sealing can maintain a food’s freshness for up to five times as long as
standard storage methods. Below are just a few of the ways you can use your vacuum
sealer:
Cook in advance then vacuum seal and store individual portions or entire meals.
Prepare foods in advance for picnics, camping trips and barbecues.
Keep frozen food safe from freezer burn.
Package foods, such as meat, fish, poultry, seafood and vegetables for refrigerated
storage.
Maintain the freshness of dry foods, such as beans, nuts, and cereals.
Besides storing food, there are many other uses for vacuum sealing: Protect moisture-
sensitive items such as camping supplies, matches, first aid kits, roadside flares and
clothing. Protect prized collectibles from dust and moisture.
3.4 Unpacking
Carefully remove the packaging material and unit from the carton.
3.5 Disposal of the packaging
Caso believes in the importance of recycling and has selected packaging
materials that not only protect your unit from damage during transit, but can be
recycled to minimize any ecological impact.
Recycling the packaging materials preserves raw materials and reduces waste. Take any
packaging materials that are no longer required to a recycling collection point for proper
disposal.
Please note
► If possible, keep the original packaging for the duration of the guarantee period in the
event a return is necessary.
3.6 Setup
3.6.1 Setup location requirements:
In order to ensure the safe and trouble-free operation of the device, the setup location must
meet the following prerequisites:
The device must be set up on a solid, even, horizontal surface capable of supporting the
vacuum sealer and any items to be vacuum-sealed.
Select a setup location where children cannot reach the hot sealing strip of the device.
Do not set up the unit in a hot or damp environment or near flammable material.
Page 11

CASO VC 200 11
To operate correctly, the unit requires sufficient air flow. Leave at least 4 inches of space on
all sides when setting up the unit.
Do not move the vacuum sealer when it is in operation.
The electrical outlet must be easily accessible so that the plug can be quickly disconnected
in the case of an emergency.
The setup of this unit in non-stationary locations (e.g., boats, airplanes, motor homes) must
be carried out by a qualified electrician, provided they guarantee the prerequisites for the
safe use of the unit.
3.7 Electrical connection
In order to ensure the safe and trouble-free operation of the device, the following instructions
must be observed for the electrical connection:
Before plugging in the unit, compare the voltage and frequency data on the vacuum sealer’s
rating plate (found on the bottom of the unit) with that of your electrical network. This data
must be compatible. If in doubt consult a qualified electrician.
The electrical outlet must be protected by a 16A safety cut-out switch.
The use of a multi-plug outlet adapter is not recommended due to fire danger.
Inspect the power cord for damage and ensure it doesn’t run under the unit or over hot or
sharp surfaces.
The electrical safety of the unit is only guaranteed if it is connected to a properly installed
protective conductor system. Use of the unit without a protective conductor is prohibited. If in
doubt, consult a qualified electrician. The manufacturer cannot be made responsible for
damages due to a missing or damaged protective conductor.
3.8 Interference
This device complies with Part 15 of the FCC Rules.
This equipment has been tested and found to comply with the limits for a Class B digital
device, pursuant to Part 15 of the FCC Rules. These limits are designed to provide
reasonable protection against harmful interference in a residential installation. This
equipment generates, uses and can radiate radio frequency energy and, if not installed and
used in accordance with the instructions, may cause harmful interference to radio
communications.
However, there is no guarantee that interference will not occur in a particular installation. If
this equipment does cause harmful interference to radio or television reception, which can be
determined by turning the equipment off and on, the user is encouraged to try to correct the
interference by one or more of the following measures:
Reorient the affected device’s receiving antenna.
Increase the separation between the vacuum sealer and receiver.
Connect the vacuum sealer to an outlet on a circuit different from that to which the
receiver is connected.
Consult the dealer or an experienced radio/TV technician for help.
Page 12

CASO VC 200 12
Control Panel
3.8.1 Extension cords
If an extension cord is used:
► The electrical rating of the extension cord should be at least as great as the electrical rating of
the unit.
► The cord should be arranged so that it does not drape over a countertop or table top where it can
be pulled on by children or tripped over.
3.8.2 Polarization instruction
► To reduce the risk of electric shock, this product has a polarized plug (one blade is wider than
the other). This plug is intended to fit in a polarized outlet only one way.
► If the plug does not fit fully in the outlet, reverse the plug and try again.
► If it still does not fit properly, contact a qualified electrician to install the proper outlet.
► Do not alter the vacuum sealer’s plug in any way.
4 Complete Overview
This chapter provides you with an overview of your vacuum sealer and explains some of its
key features.
4.1 Appliance diagram
Lift up the top cover. Underneath you’ll find:
Sealing Strip: Gold strip inside the top cover heats up to seal bags.
Cutter: After pressing the Cover Unlock buttons, the Cutter will swing down into place for
cutting. Push it back into place until a click is heard to re-lock.
Vacuum Hose Connector
For attaching hose to vacuum a compatible
canister (canisters sold separately).
Cover Locks
To lock the cover, firmly press
on the right and left corners of
the top cover until a click is
heard.
Cover Unlock buttons Press
buttons on right and left side to
unlock top cover after sealing.
Cutter Unlock
buttons Press buttons
on right and left side to
unlock cutter for use.
Page 13

CASO VC 200 13
Warning
Please observe the following safety notice to reduce the risk of burns.
► Never touch the sealing bar while the unit is operating.
4.2 Control Panel
INDICATOR LIGHTS
A. Sealing Indicator Light
Red light indicates that sealing process is taking place.
B. Vacuum Indicator Light
Red light indicates that vacuuming process is taking place.
C. Canister Indicator Light
Indicates that canister vacuum process is taking place. Compatible canisters sold
separately.
CONTROL PANEL BUTTONS
D. Stop Button
Immediately terminates any sealing or vacuuming.
E. Seal Only Button
Press button to seal a bag without vacuum.
F. Vacuum & Seal Button
Press button to first vacuum bag then automatically seal it.
G. Canister Button
Press button to vacuum canisters. Compatible canisters are sold separately.
4.3 Rating plate
The rating plate with the connection and performance data can be founded on the bottom of
the unit.
A
E
B F C
G
D
Page 14

CASO VC 200 14
5 Operation
This chapter provides instructions on the proper operation of your vacuum sealer:
5.1 Basics of sealing
After each sealing session and before starting up, check to make sure the unit and all
accessories are clean and free of leftover food. Follow the cleaning instructions on in
Chapter 6.
Step 1: Open the lid and insert the open side of a compatible bag
into the clear plastic vacuum chamber.
Step 2: Press the cover down firmly on each corner of the top
cover until it locks into place with an audible click. To seal, press
the Seal Only Button. To vacuum and seal, press the Vacuum &
Seal Button.
Step 3: Once the Sealing Indicator Light is no longer lit, press
the Cover Unlock Buttons to unlock the top cover.
5.2 Bags and rolls
Please only use specified bags and rolls designed for vacuum sealing. Do not use other
materials such as plastic wrap.
All vacuum rolls and bags delivered by Caso International are appropriate for cooking under
vacuum (sous vide).
Furthermore the vacuum rolls and bags can be used for defrosting and heating in the
microwave at up to 158° F.
Please make sure when vacuum rolls and bags of other producers are used, whether they
are also microwaveable and suitable for cooking under vacuum.
Page 15

CASO VC 200 15
5.3 Cutting a new bag
1. Place vacuum bag roll inside the detachable vacuum bag roll holder.
2. Attach vacuum bag roll holder to the back of the vacuum sealer. There are small tabs
on the back of the unit that should slide into corresponding slots on the vacuum bag roll
holder.
3. Open the top cover of the vacuum sealer and pull the desired length of bag through the
slot in the top cover.
4. Push the Cutter Unlock Buttons located on either side of the top cover to release the
cutter arm.
5. Firmly press the cutter arm down over the bag roll where you’d like to make the cut.
Then move the slider on top of the cutter arm across the bag roll to make the cut.
Please note
► Cut the bag at least 3 inches longer than needed. The sealed ends will take up the extra
space.
5.4 Sealing a new bag
1. Open the lid and insert one end of the bag into the clear plastic vacuum chamber then
close the cover (see Chapter 5.1, Step 1).
2. Press the cover down firmly on both sides by using two hands until you hear it click into
place (see Chapter 5.1, Step 2).
3. Press the Seal Only Button. The Sealing Indicator Light will light.
4. When the Sealing Indicator Light turns off, the bag is sealed.
5. Unlock the cover by pressing the Cover Unlock Buttons and remove your finished bag (see
Chapter 5.1, Step 3).
Page 16

CASO VC 200 16
Please note
► Make sure the bag you want to use is at least 3 inches longer than the food you’re
bagging.
5.5 Vacuuming and sealing
Place the unit on a dry surface. Make sure the area in front of the unit is unobstructed and
wide enough to accommodate the food bags.
1. Place the food to be preserved inside the bag.
2. Clean and straighten the open end of the bag--ensure there are no wrinkles or ripples.
3. Insert the open end of the bag into the clear plastic vacuum chamber. (see Chapter 5.1,
Step 1)
4. Close the cover and press down firmly on both sides by using two hands until you hear
two clicks (see Chapter 5.1, Step 2).
5. Press the Vacuum & Seal Button. The Vacuum Indicator Light, then the Sealing Indicator
Light with light as the bag is automatically vacuumed and sealed. Once it is finished, both
lights will turn off.
6. Unlock the cover by pressing the Cover Unlock Buttons and remove your finished bag (see
Chapter 5.1, Step 3).
Check the appearance of the sealed bag; it should have a stripe across the seal and no
wrinkles, otherwise the seal may not be complete.
If you need to interrupt the vacuum operation for any reason first press the Stop Button. It is
then safe to unlock the cover.
Please note
► Do not overstuff the bag; leave enough empty length in the open end of the bag (at least a
few inches) so that the bag can be properly placed in the vacuum chamber.
► Do not wet the open end of the bag. Wet bags may not seal properly.
► Clean and straighten the open end of the bag before sealing. Foreign matter or creases on
the bag may result in a faulty seal.
► Press the bag to expel excess air before vacuuming it. Too much air inside the bag may
result in a poor vacuum.
► If the food you’re sealing has sharp edges (such as bones or shells) pack the edges with
kitchen paper to avoid tearing the bag
► We suggest you allow one minute of time in between sealing sessions to allow the sealer
to cool.
► When vacuum sealing liquid-based foods (such as soups or stew) freeze them first in a
baking pan or tempered dish before bagging and vacuum sealing them.
► Blanch vegetables by cooking them briefly in boiling water. Allow them to cool then
vacuum seal them in convenient portions.
Page 17

CASO VC 200 17
Please note
► When vacuum sealing unfrozen food, allow at least two additional inches of bag length for
expansion while freezing. Place unfrozen meat or fish on a paper towel and vacuum seal with
the paper towel in the bag to absorb any extra moisture.
► Before storing foods such as tortillas, crepes or bread, use wax or parchment paper
between them to stack the pieces. This will make it easier to remove an individual piece,
reseal the rest and immediately replace them in the freezer.
5.6 Vacuuming Sealing Tips
This vacuum sealer will keep your food fresh and protect the quality and nutritional value of
your food. By eliminating the air from the bag or container, you will cut down on oxidation and
make your food last longer.
Vacuum sealing will also prevent mold, yeast, and bacteria from growing on your food. These
can all be dangerous and affect your food if you do not store your food in a cool environment.
To greatly lower the growth of these microorganisms, we suggest that you keep your food at
or below 40F. Keeping your food at 0F will not kill the microorganisms but will stop them
from growing. Freeze food for long term storage and, after thawing, keep in refrigerator.
Microwave
When thawing food, do so in a microwave or refrigerator.
Cut the corner off of the bag when reheating food in a microwave. We advise against
reheating greasy foods or bone-in meats in the microwave, instead put them in 170F water
on a low simmer.
Meats and Fish
For meats and fish, best to portion out and seal while fresh.
Our double sealing system provides a secure seal for added protection
Vacuum seal hard cheese after each use.
When sealing, leave one inch of extra space for each time you will reseal the bag.
Never vacuum seal soft cheeses because they are susceptible to bacteria.
Vegetables
To vacuum seal leafy vegetables, first wash and then dry using paper towels or a salad
spinner. Use a container as opposed to a bag and then seal as normal.
Page 18

CASO VC 200 18
Coffee / Powdery Foods
At the top of the bag, place a coffee filter or paper towel when vacuum sealing coffee or
powdery foods.
You can also vacuum seal these foods in their original packaging by putting them in a
vacuum sealing bag.
Liquids
Freeze all liquids before vacuum sealing in a bag. Keep the vacuum sealed liquid in your
freezer. When you need to use your liquid, cut the corner off of the bag and put in a bowl in a
microwave or put them in water on a low simmer.
Non- Food items
Non-food items can also be stored using a vacuum sealer. This will prevent moisture and
oxygen from ruining your items. Seal like you would with food.
Sous Vide Cooking
Sous Vide is a French term that translates to “under vacuum”. It is the process used by
gourmet restaurants of vacuum sealing food in a bag and cooking at a precise temperature in
a water bath. This technique provides healthier, better tasting meals that are never
overcooked…never dried out! Sous vide cooking enables your foods to retain all of their
unique tastes, vitamins, nutrients and minerals. The CASO vacuum bags are perfect for Sous
Vide cooking.
5.7 Opening a sealed bag
Cut the bag straight across with scissors or the cutter, just inside the seal.
5.8 Resealing store-bought bags
You can reseal many foods in their original store packages (e.g. potato chip bags). Follow
the steps shown in Chapter 5.5 Vacuuming and sealing.
Please note
► The vacuum sealer can’t be used directly for vacuum sealing canisters or canning jars.
5.9 Storage
Store the unit in its upright position, out of the reach of children.
Please note
► Always unplug the appliance from its outlet immediately after using and before cleaning.
► For the correct storage, please slightly close the cover, do not lock, it will deform the
gaskets and affect the machine function.
Page 19

CASO VC 200 19
6 Cleaning and Maintenance
This chapter provides important information on properly cleaning and maintaining your
vacuum sealer.
6.1 Safety information
Warning
Please observe the following safety notices, before cleaning the unit to avoid damage to the
unit or personal injury:
► To ensure optimum performance, the unit must be cleaned regularly. Failure to clean the
unit regularly can lead to potential malfunctions, as well as safety and health risks.
► Turn off and unplug the unit prior to cleaning.
► The sealing strip remains hot after use. Wait a few minutes until the strip has cooled
before cleaning.
► Clean the unit after every use as soon as it has cooled. Leaving the unit uncleaned for
long periods can make it very difficult to remove leftover food and grime and may even
damage the unit.
► If moisture penetrates the unit’s housing, it can damage the electronic components.
Please ensure that no moisture enters the device.
► Do not use any harsh or abrasive cleaning agents.
► Do not attempt to scrape off stubborn grime with hard or abrasive tools.
► Dry all parts thoroughly before using after cleaning.
► Do not immerse the unit in water or other liquid.
6.2 Cleaning
Outside of the unit
Wipe with a damp cloth or sponge and mild dish soap.
Inside of the unit
Wipe away any food or liquids with a paper towel.
Cleaning bags for reuse
Wash the bags in warm water with a mild dishwashing soap, then rinse them well and allow
them to dry completely before reusing.
Warning
► Bags used to store raw meats, fish or greasy foods should never be reused due to risk of
contamination.
Page 20

CASO VC 200 20
Please note
► Allow the vacuum chamber border to dry thoroughly before placing it back in the unit.
► Carefully return all removable parts to their original positions to avoid air leakage or faulty
operation.
7 Troubleshooting
The following table may help you narrow down and address minor malfunctions:
7.1 Safety notices
Warning
► Only qualified electricians, who have been trained by the manufacturer may carry out
any repairs on electrical equipment.
► Improperly performed repairs may result in personal injury or damage to the device.
7.2 Troubleshooting table
Fault
Possible Cause
To Rectify
Device does not turn
on
Defective power cord
Send device to Customer
Service
A complete vacuum is
not being created in
the bag.
The open end of the bag is
not completely inside the
vacuum chamber
Position the bag correctly
The bag is defective
Select another bag
There is residue on the
welding and the seal
Clean the welding / seals and
retry once they are dry
The bag is not being
sealed correctly
The sealing bar is
overheating so that the bag
melts
Open the cover on the unit and
let it cool down for a few
minutes. Please use only
specified bags and rolls
Carefully follow all the steps in
Chapter 5.
Roll / bag is not positioned
correctly.
The bag does not hold
the vacuum after it has
been sealed
The bag is defective
Select another bag; wrap
paper around any sharp edges
within the bag.
There are leaks along the
welding seam as a result of
creases, crumbs, grease or
liquids.
Open the bag again and clean
the upper internal part of the
bag. Remove any foreign
matter that might be on the
welding bar before sealing.
Page 21

CASO VC 200 21
Please note
► In the event of technical troubles, faulty devices or missing parts, please contact Customer
Service at (855)230 – 9284.
8 Disposal of the Old Device
To protect the environment, it’s important to dispose of old electronic devices
properly. Do not place your old unit in the non-recyclable waste under any
circumstances.
Please note
► Please take your old unit to the nearest recycling center for safe disposal.
► Until it can be disposed of properly, store your old unit away from children.
9 Guarantee
12 Months Limited Warranty
Caso Design USA warrants that for a period of 12 months from the date of purchase, this
product will be free from defects in material and workmanship. Caso Design USA at its
option, will repair or replace this product or any component of the product found to be
defective during the warranty period. Replacement will be made with a new or
remanufactured product or component. If the product is no longer available, replacement
may be made with a similar product of equal or greater value. This is your exclusive
warranty. DO NOT attempt to repair or adjust any electrical or mechanical functions on this
product. Doing so will void this warranty.
This warranty is valid for the original retail purchaser from the date of the initial retail
purchase and is not transferable. Keep the original sales receipt. Proof of purchase is
required to obtain warranty performance.
This limited warranty does not cover normal wear of parts or damage resulting from any of
the following: negligent use or misuse of the product, use on improper voltage or current,
use contrary to the operating instructions, disassembly, repair or alteration by anyone other
than Caso Design USA service center. Further this limited warranty does not cover: Acts of
God, such as fire, flood, hurricanes and tornadoes.
What are the limits on Caso Design USA’s Liability?
Caso Design USA shall not be liable for any incidental or consequential damages caused by
the breach of any express, implied or statutory warranty or condition.
Except to the extent prohibited by applicable law, any implied warranty or condition of
merchantability or fitness for a particular purpose is limited in duration to the duration of the
above warranty.
Page 22

CASO VC 200 22
Caso Design USA disclaims all other warranties, conditions, or representations, express
implied, statutory or otherwise.
Caso Design USA shall not be liable for any damages of any kind resulting from the
purchase, use or misuse of, or inability to use the product including incidental, special,
consequential or similar damages or loss of profits, or for any breach of contract,
fundamental or otherwise, or for any claim brought against purchaser by any other party.
Some provinces, states or jurisdictions do not allow the exclusion or limitation of the
incidental or consequential damages or limitations on how long an implied warranty lasts, so
the above limitations or exclusions may not apply to you.
This warranty gives you specific legal rights, and you may also have other rights that vary
from province to province, state to state, or jurisdiction to jurisdiction.
10 Technical Data
Device
Vacuum sealer system
Name
VC 200
Model
VS2500
Item No.:
11390
Mains data
120 V, 60 Hz
Power consumption
120 W
External measurements
(W x H x D):
15.35” x 3.46” x 9.76”
 Loading...