

Page 1

(WITHOUT PRICE)
SERVICE MANUAL
& PARTS LIST
REF. NO. S/M-692
AUGUST 2000
QW-2174
QW-2177
MODULE NO.
R
BGC-110B
(QW-2174)
BG-152
(QW-2177)
Page 2
- 1 -
CONTENTS
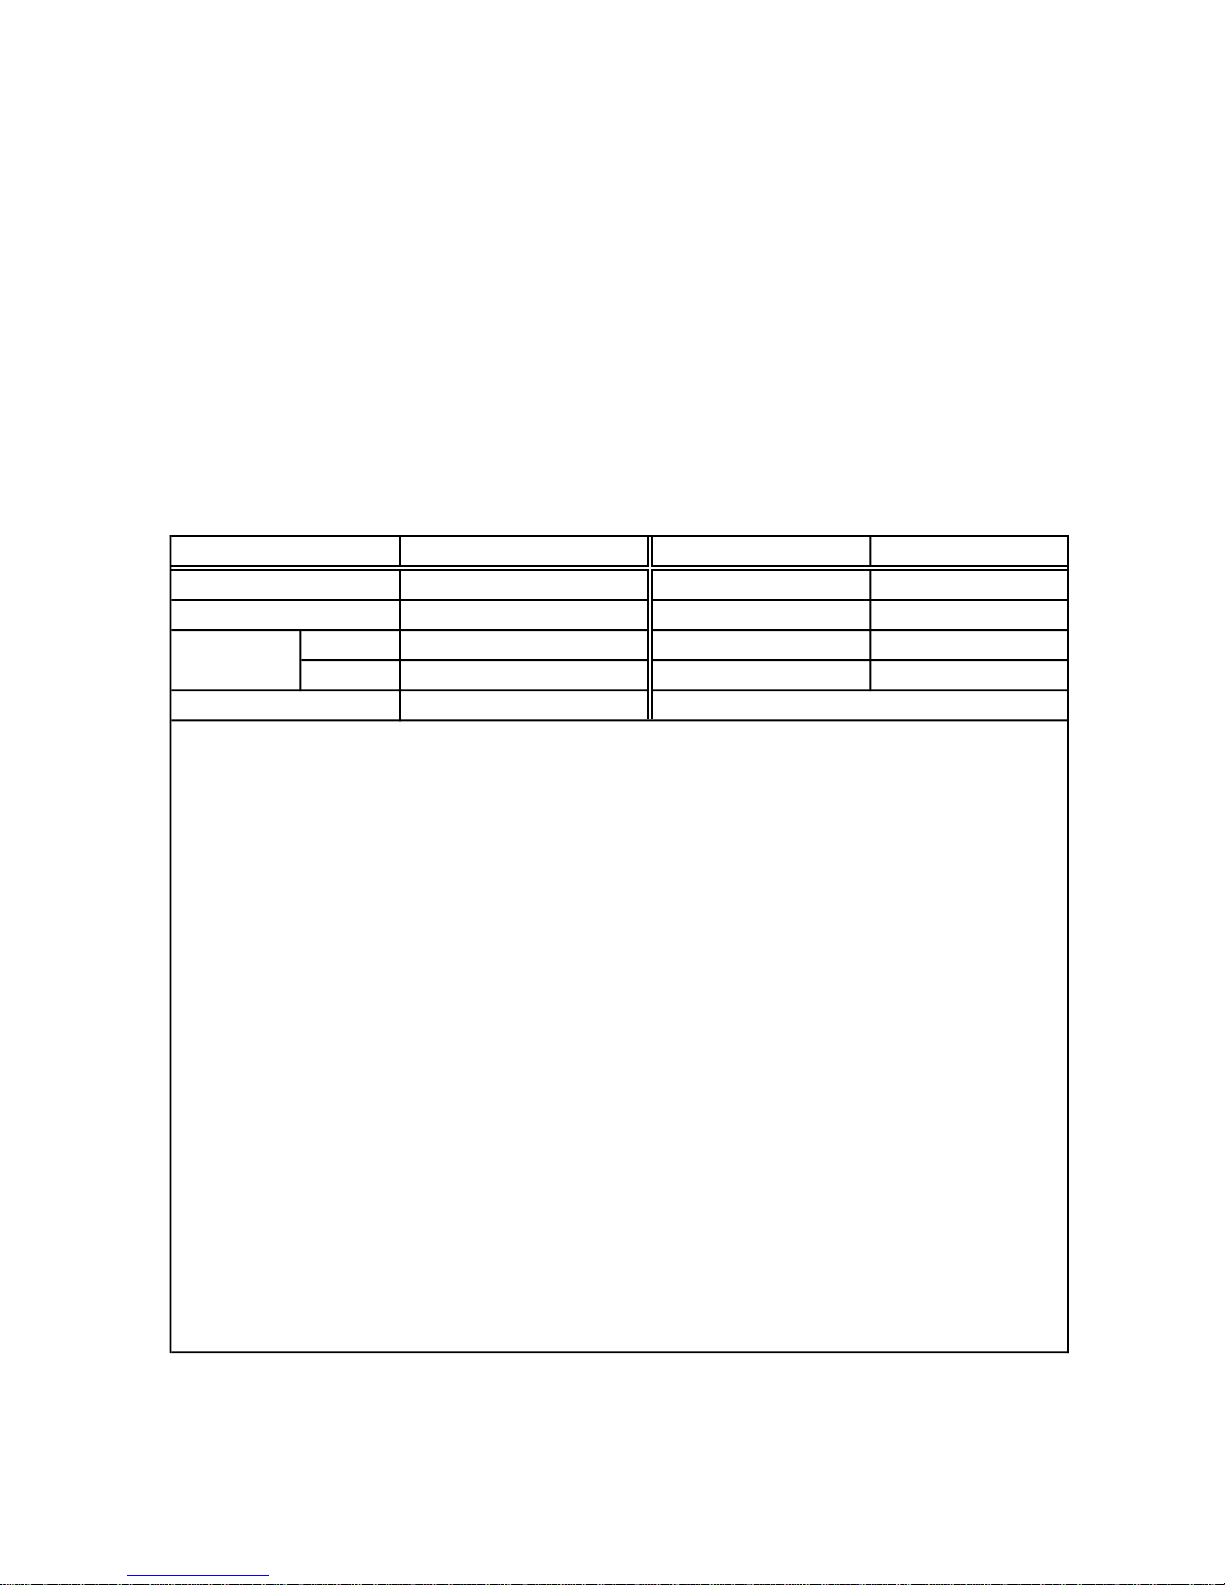
1. SPECIFICATIONS : QW-2174 / 2177
1. SPECIFICATIONS • • • • • • • • • • • • • • • • • • • • • • • • • • 1
2. OPERATION CHART • • • • • • • • • • • • • • • • • • • • • • • • 2
3. DRAWINGS • • • • • • • • • • • • • • • • • • • • • • • • • • • • • • • 6
3-1. BLOCK DIAGRAM • • • • • • • • • • • • • • • • • • • • • • • • 7
3-2. CHECKING TERMINALS AND COMPONENTS• • • • 9
4. EXPLODED VIEW • • • • • • • • • • • • • • • • • • • • • • • • • • 10
5. PARTS LIST • • • • • • • • • • • • • • • • • • • • • • • • • • • • • • 11
6. PRECAUTIONS FOR REPAIR • • • • • • • • • • • • • • • • • • 12
6-1. AC (ALL CLEAR) AND REMOVING OF MODULE • • 12
6-2. ACCURACY CHECKING • • • • • • • • • • • • • • • • • • • 12
Function
QW-2174
• Shock resistant
• Electro-luminescent backlight
Afterglow
• World time
27 time zones (40 cities), city code display, daylight
saving on/off
• Memory function
Memory capacity: Up to 20 sets of data, each set
including; Name (8 characters) and telephone
number (12 digits)
• Day Countdown with 5 Memories Automatically
counts down the days from the current date to a
target date. A mark appears on the display to let you
know when a target date is reached.
• 1/100-second stopwatch
Measuring capacity: 23:59'59.99"
Measuring modes: Elapsed time, split time,
1st-2nd place times
• Daily alarm
• Hourly time signal
• Auto-calendar (to year 2039)
• 12/24-hour formats
• Regular timekeeping: Hour, minutes, seconds,
am/pm, month, date, day
QW-2177
• Shock resistant
• Electro-luminescent backlight
Afterglow
• Memory function
Memory capacity: Up to 10 sets of data, each set
including; Name (8 characters) and telephone
number (12 digits)
• Day Countdown with 10 Memories Automatically
counts down the days from the current date to a
target date. A mark appears on the display to let you
know when a target date is reached.
• Countdown timer
Input range: 1 minute to60 minutes
Unit: 1 second
• Daily alarm
• Hourly time signal
• Auto-calendar (to year 2039)
• 12/24-hour formats
• Regular timekeeping: Hour, minutes, seconds,
am/pm, month, date, day, daylight saving on/off
Item Detail Item Detail
Battery CR1616 Accuracy ±15sec./month
Battery life Approx. 24 months Accuracy setting system Trimmer capacitor
Current QW-2174 0.815 µA maximum Accuracy checking See page 12
consumption QW-2177 1.46 µA maximum Accuracy setting +0.25~+0.35sec./day
Alarm system Piezo plate on Back cover
Page 3
- 2 -
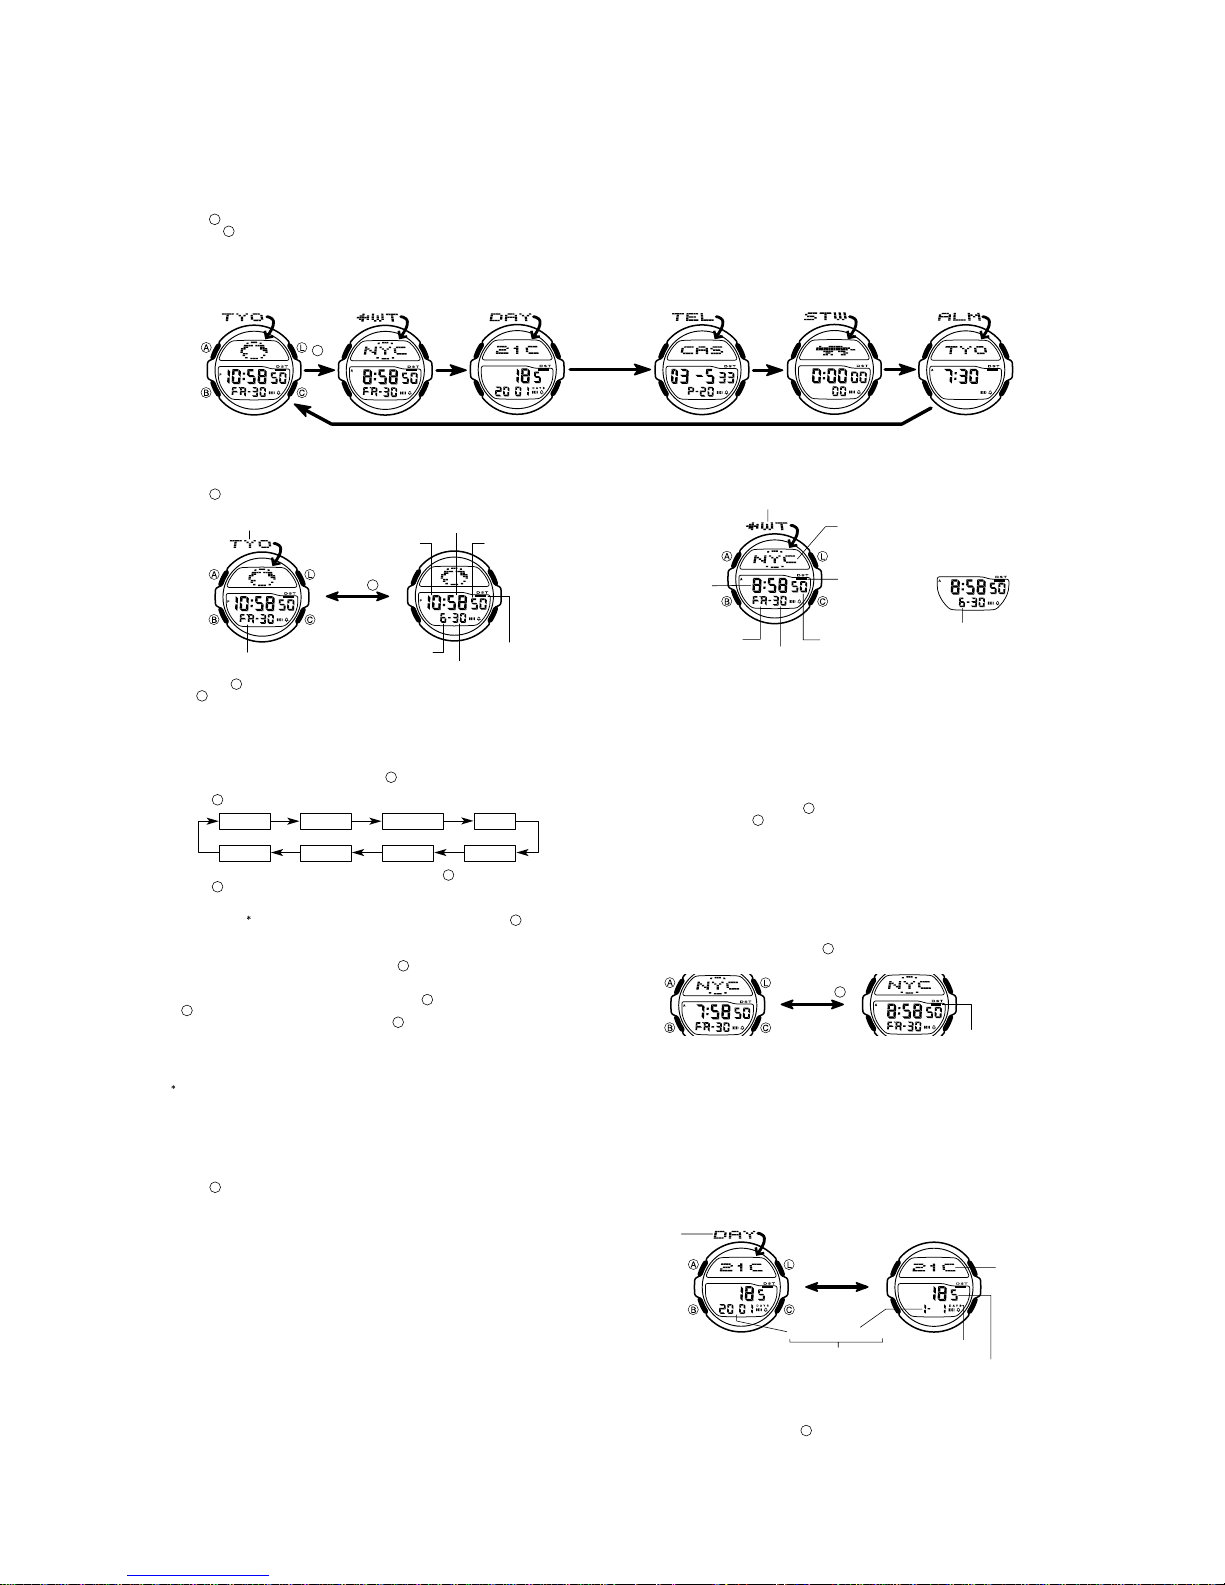
2. OPERATION CHART : MODULE QW-2174
GENERAL GUIDE
•Press to change from mode to mode.
•Pressing in any mode illuminates the display for about 3 seconds.
•If you do not perform any operation for a few minutes while a setting screen (with flashing digits) is on the display, the watch automatically exits the setting screen.
•If you do not perform any operation for a few minutes in the Day Counter Mode or Telememo Mode, the watch automatically reverts to the normal timekeeping screen.
•When making settings, note that you can scroll only forward, you cannot scroll back. This means that if you go past the setting you want, you must scroll through all of the available
settings again until the one you want reappears.
Timekeeping Mode
World Time Mode
Day Counter Mode
Telememo Mode Stopwatch Mode
Press
.
Alarm Mode
TIMEKEEPING MODE
•Press to toggle the display between the day of the week and month, as shown
below.
Press .
Hour
Minutes
City code
Seconds
DST on
indicator
Day
Month
Day of week
•Hold down to toggle between 12-hour and 24-hour timekeeping. Note that pressing also switches the display between the day of the week and month screens
as described above.
•With 12-hour timekeeping, times between midnight and noon are indicated by A
(am), while times between noon and midnight are indicated by P (pm).
•The A and P indicators do not appear when you are using 24-hour timekeeping.
To set the time and date
1.While in the Timekeeping Mode, hold down until the seconds digits flash on the
display, indicating the setting screen.
2.Press to move the flashing in the sequence shown below.
DST
Seconds
Month
Day
City code
Minutes
Year
Hour
3. While the seconds setting is selected (flashing), press to reset it to 00. If you
press while the seconds setting is in the range of 30 to 59, the seconds are
reset to 00 and 1 is added to the minutes. If the seconds setting is in the range of
00 to 29, the minutes count is unchanged.
•While the DST
setting is selected (DST on indicator is flashing), press to toggle
it on (ON) and off (OF).
•The DST on/off setting you make for the Timekeeping Mode does not affect the
World Time Mode.
•While the city codes setting is selected, use to scroll thorough the available
codes until the one you want to use as your home time city is displayed.
•For full information on city codes, see the “CITY CODE TABLE”.
4.While any other setting is selected (flashing), press to increase it. Holding down
changes the setting at high speed.
5.After you make the settings you want, press to exit the setting screen.
•The day of the week is automatically set in accordance with the date.
•The date can be set within the range of January 1, 2000 to December 31, 2039.
•The watch’s built-in full automatic calendar automatically makes allowances for different month lengths and leap years. Once you set the date, there should be no
reason to change it except after the replacement of the watch’s battery.
Daylight Saving Time (DST), which is also sometimes called “summer time” advances the time for one hour, as is the custom in some areas during the summer.
Remember that not all countries or even local areas use Daylight Saving Time.
ABOUT THE BACKLIGHT
•Press to illuminate the display for about three seconds.
•The backlight of this watch employs an electro-luminescent (EL) light, which loses
its illuminating power after very long term use.
•Frequent use of the backlight shortens the battery life.
•The watch emits an audible sound whenever the display is illuminated. This does
not indicate malfunction of the watch.
•The illumination provided by the backlight may be hard to see when viewed under
direct sunlight.
•The backlight automatically turns off whenever an alarm sounds.
WORLD TIME MODE
Hour : Minutes
Seconds
DST on indicator
Day
Day of week
Mode indicator
City code
Month
[Month-day display]
The World Time Mode shows the current time in 40 cities (27 time zones) around the
world. The lower part of the display shows either the day of the week and day, or the
month and day. The format used is the one you select in the Timekeeping Mode
before entering the World Time Mode.
•For full information on city codes, see the “CITY CODE TABLE”.
•The time setting of the Timekeeping Mode and the World Time Mode are synchronized, except for the daylight saving time (summer time) setting. Whenever you
change the time setting for any city in the Timekeeping Mode, the settings of all
World Time cities are changed accordingly.
•The World Time Mode has its own daylight saving time (summer time) setting.
To select a World Time City and view its time
In the World Time Mode, press to scroll forward through the city codes (time
zones). Holding down scrolls at high speed.
•You can set up an alarm in the Alarm Mode so it operates based on the current time
in a city you specify in the World Time Mode.
Daylight Saving Time (DST)
Daylight Saving Time automatically advances the time setting by one hour from Stan-
dard Time. You cannot make individual Daylight Saving Time settings for each city
code (time zone). Turning on Daylight Saving Time affects all World Time time zones.
Remember that not all countries or even local areas use Daylight Saving Time.
To switch between Standard Time and Daylight Saving Time
In the World Time Mode, hold down toggle between Daylight Saving Time and
Standard Time.
Hold down .
DST on indicator
DST OFF
DST ON
DAY COUNTER MODE
The Day Counter Mode lets you count the number of days from the Timekeeping
Mode’s current date to a specific target date.
This watch has five day counters. You can assign text titles up to eight characters
long to each of the five Day Counters. Whenever the date specified by any one of the
day counters matches the date of the Timekeeping Mode (regardless of the day
counter’s year setting), the DAYS indicator flashes on the Timekeeping Mode. In the
Day Counter Mode, the DAYS indicator flashes on the screen of the particular day
counter whose date matches the date of the Timekeeping Mode.
The initial default date for all Day Counters is January 1, 2001.
Year
Month - Day
Target date
Numbers of days
Text
DAYS indicator
Mode
indicator
Alternate at the
1-second interval.
•The day counter on the display when you exit the Day Counter Mode appears first
the next time you enter the Day Counter Mode.
Recalling Day Counter Data
In the Day Counter Mode, press to scroll through the day counters.
C
C
C
C
C
C
C
C
C
C
C
C
C
L
L
B
B
B
A
A
A
A
Page 4

- 3 -
To set the target date
1.In the Day Counter Mode, press to display the day counter you want to set.
2.Hold down until the flashing cursor appears in the text area. This indicates the
input screen.
3.Press to move the flashing in the sequence shown below.
Press .
1st digit
Day
8th digit
YearMonth
4. While the cursor is in the text area, use to scroll through characters at the
current cursor position. Characters scroll in the sequence shown below. Holding
down scrolls at high speed.
Press .
(Space)
A to Z 0 to 9 . (Period) - (Hyphen)
5.While the cursor is in the date area, press to scroll through digits at the current
cursor position. Holding down scrolls at high speed.
Press and at the same time, and the message “CLR” appears in the display.
The characters in the text area is cleared and today’s date is set as the target date.
You can then make any changes in the date you want.
6.After you make the settings you want, press to exit the input screen.
The date can be set within the range of January 1, 1940 to December 31, 2039.
The text area display can show only three characters at a time. Longer text scrolls
continuously from right to left. The symbol “
” indicates that the character to the left
is the last, and the character to the right is first.
TELEMEMO MODE
The Telememo Mode lets you store up to 20 records, each
with a name (up to eight characters) and a phone number
(up to 12 digits). You can recall records by scrolling through
them on the display.
The page number on the display when you exit the Telememo Mode appears first the next time you enter the
Telememo Mode.
To input a new Telememo record
1. In the Telememo Mode, press to display the page
number of the record where you want to input data.
2.Hold down and a cursor appears on the text area.
3.Use to scroll through characters at the current cursor position. Characters scroll
in the sequence shown below.
Press .
(Space)
A to Z 0 to 9 . (Period) - (Hyphen)
Holding down scrolls at high speed.
4. When the character you want is at the current cursor position, press to move
the cursor to the right.
Press .
1st digit
8th digit
12th digit
1st digit
Text area
Number area
5.Repeat the steps 3 and 4 to input the rest of the characters.
You can input up to eight characters for the name, though only three characters are
visible at a time. If the name you input has fewer than eight characters, use to
move the cursor to the eighth space (which means you would press three times
after inputting a five-character name).
6.After you input the name, use to move the cursor to the number area.
Pressing while the cursor is located at the eighth character of the text area
advances to the number area. Pressing while the cursor is located at the 12th
digit of the number area returns to the text area.
7.Use to scroll through characters (hyphen, numbers, space) at the current cursor position on the number area. Characters scroll in the sequence shown below.
Press .
(Space)
0 to 9
-
(Hyphen)
Holding down scrolls characters at high speed.
8.When the character you want is at the cursor position, press to move the cursor
to the right.
9.Repeat steps 7 and 8 to input the rest of the numbers you want.
You can input up to 12 digits for the number.
10. After inputting the name and number of the record, press to store it and exit
the setting screen.
The display can show only three name characters at a time. Longer names scrolls
continuously from right to left. The symbol “
” indicates that the character to the left
is the last, and the character to the right is the first.
The number area can show up to six digits at one time. If a number has more than
six digits, the display automatically switched between the first six digits (counting
forward from the first digit) and the last six digits (counting backward from the last
digit) of the number. This means that if a number is 12 digits long, the number area
switches between the first six digits and the last six digits. If a number is seven
digits long, the number area switches between digits 1 through 6, and 2 through 7.
To recall Telememo data
In the Telememo Mode, press to scroll forward through the stored records.
Holding down scrolls at high speed.
To edit Telememo data items
1.In the Telememo Mode, use to display the data you want to edit.
2.Hold down until the cursor appears in the display.
3.Use to move the cursor to the character you want to change.
4.Use to change the character.
See step 3 of “To input a new Telememo record” for information on inputting name
characters, and step 7 for inputting number characters.
5.After making the changes that you want, press to store them and exit the set-
ting screen.
Mode indicator
Page number
Text area
Number area
To delete a Telememo record
1.In the Telememo Mode, use to display the record you want to delete.
2.Hold down until the cursor appears in the display.
3. Press and at the same time. The message “CLR” appears in the display,
indicating that the record was deleted.
After the record is deleted, the cursor appears in the text area, ready for input.
4.Input a new record or press to exit the setting screen.
STOPWATCH MODE
The Stopwatch Mode lets you measure elapsed time, split
times, and two finishes. The range of the stopwatch is 23
hours, 59 minutes, 59.99 seconds.
Changing to another mode while a split time is on the display clears the split time.
Elapsed time measurement
Start
Stop Re-start Stop Clear
Start
Split Split release Stop Clear
Start
Split Stop Split release Clear
Split time measurement
Split time and 1st-2nd place times
First runner
finishes.
Second runner
finishes.
Record time of
first runner.
Record time of
second runner.
ALARM MODE
When the Daily Alarm is turned on, the alarm sounds for
20 seconds at the preset time each day. Press any button
to stop the alarm after it starts to sound. When the Hourly
Time Signal is turned on, the watch beeps every hour on
the hour.
You can also specify a time zone for the Daily Alarm.
The alarm sounds when the alarm time matches the
current time in the time zone you specify.
The Hourly Time Signal also sounds in accordance with
the time zone you specify.
If the DST on indicator is on the display in the Alarm
Mode, it means that Daylight Saving Time (summer time)
is turned on for the time zone whose alarm you are setting.
To set the alarm time
1. While in the Alarm Mode, hold down until the city code flash on the display,
indicating the setting screen.
At this time, the alarm is turned on automatically.
2.Press to move the flashing in the sequence shown below.
Time zone MinutesHour
3. While the time zone is flashing, press to toggle between the city codes which
you selected in the Timekeeping Mode and the one you selected in the World Time
Mode.
4. While the hour or minutes digits of the alarm time are flashing, press to increase them. Holding down changes the setting at high speed.
5.After you make the settings you want, press to exit the setting screen.
The format (12-hour and 24-hour) of the alarm time matches the format you select
in the Timekeeping Mode.
When setting the alarm time using the 12-hour format, take care to set the time
correctly as morning or afternoon.
Changing the Home Time zone or the World Time city after setting an alarm causes
the alarm time to change as well.
To stop the alarm
Press any button to stop the alarm after it starts to sound.
To turn the Daily Alarm or the Hourly Time Signal on and off
Press while in the Alarm Mode to change the status of the Daily Alarm and Hourly
Time Signal in the following sequence.
Hourly Time
Signal only
Daily Alarm
only
Both OFFBoth ON
To test the alarm
In the Alarm Mode, hold down to sound the alarm.
Holding down to test the alarm also changes the Daily Alarm and Hourly Time
Signal on/off settings.
Mode indicator
Hours : Minutes
1/100 second
Seconds
Mode indicator
Hour : Minutes
Alarm on indicator
Hourly time signal on
indicator
Time zone
C
C
C
C
C
C
C
C
C
C
C
C
C
C
C
C
C
C
C
C
C
C
C
C
C
C
L
L
B
B
B
B
B
B
B
B
B
B
B
B
A
A
A
A
A
A
A
A
A
A
•
•
•
•
•
•
•
•
•
•
•
•
•
•
•
•
•
•
•
•
•
•
Page 5
- 4 -
CITY CODE TABLE
–11 PAGO PAGOPPG
PAR
LON
RIO
DXB
THR
JED
GUM
ADL
TYO
WLG
SEL
NOU
HKG
SIN
BKK
SYD
RGN
DAC
DEL
JRS
CAI
MLE
IST
KHI
KBL
CCS
BER
ROM
MIL
NYC
MIA
CHI
MEX
DEN
LAX
SFO
YVR
ANC
HLN
—
–10 HONOLULU PAPEETE
–9 ANCHORAGE NOME
–8
VANCOUVER
LAS VEGAS, SEATTLE, DAWSON CITY
SAN FRANCISCO
LOS ANGELES
–7 DENVER EL PASO, EDMONTON
–6
MEXICO CITY
HOUSTON, DALLAS/FORT WORTH,
CHICAGO
NEW ORLEANS, WINNIPEG
–5
MIAMI
MONTREAL, DETROIT, BOSTON,
NEW YORK
PANAMA CITY, HAVANA, LIMA, BOGOTA
–4 CARACAS LA PAZ, SANTIAGO, PORT OF SPAIN
–3
RIO DE JANEIRO
SAO PAULO, BUENOS AIRES, BRASILIA,
MONTEVIDEO
+0 LONDON
DUBLIN, LISBON, CASABLANCA, DAKAR,
ABIDJAN
+1
PARIS
MADRID, FRANKFURT, AMSTERDAM
,
MILAN
VIENNA ALGIERS, STOCKHOLM, HAMBURG
ROME
BERLIN
+2
ISTANBUL
ATHENS, HELSINKI, BEIRUT, DAMASCUS,
CAIRO
CAPE TOWN
JERUSALEM
+3 JEDDAH
MOSCOW, KUWAIT, RIYADH, ADEN,
ADDIS ABABA, NAIROBI
+3.5 TEHRAN SHIRAZ
+4 DUBAI ABU DHABI, MUSCAT
+4.5 KABUL —
+5
KARACHI
—
MALE
+5.5 DELHI MUMBAI, CALCUTTA
+6 DHAKA COLOMBO
+6.5 YANGON —
+7
BANGKOK
JAKARTA, PHNOM PENH, HANOI,
VIENTIANE
+8
SINGAPORE
KUALA LUMPUR, TAIPEI, PERTHBEIJING,
HONG KONG
MANILA, ULAANBAATAR
+9
SEOUL
PYONGYANG
TOKYO
+9.5 ADELAIDE DARWIN
+10
GUAM
MELBOURNE, RABAUL
SYDNEY
+11 NOUMEA PORT VILA
+12 WELLINGTON CHRISTCHURCH, NADI, NAURU ISLAND
GMT City
City Other major cities in the same time zone
differential
Code
*Based on data as of December 1999.
Page 6

- 5 -
OPERATION CHART : MODULE QW-2177
GENERAL GUIDE
•Press to change from mode to mode.
•Pressing in any mode illuminates the display for about 3 seconds.
•If you do not perform any operation for a few minutes while a setting screen (with flashing digits) is on the display, the watch automatically exits the setting screen.
•If you do not perform any operation for a few minutes in Day Counter Mode and Telememo Mode, the watch automatically reverts to the normal timekeeping screen.
•When making settings (except Easy Timer setting), note that you can scroll only forward, you cannot scroll back. This means that if you go past the setting you want, you must scroll
through all of the available settings again until the one you want reappears.
Timekeeping Mode
Day Counter Mode Telememo Mode
Easy Timer Mode Alarm Mode
Press .
TIMEKEEPING MODE
•Press to toggle the display between the day of the week and month, as shown
below.
Hour : Minutes
Seconds
DST on indicator
Day
Month
Day of week
•Press to toggle the display between the 12-hour and 24-hour timekeeping.
•With 12-hour timekeeping, times between midnight and noon are indicated by A
(am), while times between noon and midnight are indicated by P (pm).
•The A and P indicators do not appear when you are using 24-hour timekeeping.
To set the time and date
1.While in the Timekeeping Mode, hold down until the seconds digits flash on the
display, indicating the setting screen.
2.Press to move the flashing in the sequence shown below.
DST
Seconds
Day
Hour
Year
Month
Minutes
3. While the seconds setting is selected (flashing), press to reset it to 00. If you
press while the seconds setting is in the range of 30 to 59, the seconds are
reset to 00 and 1 is added to the minutes. If the seconds setting is in the range of
00 to 29, the minutes count is unchanged.
•While the DST
setting is selected (DST on indicator is flashing), press to toggle
it on (ON) and off (OF).
4.While any other setting is selected (flashing), press to increase it. Holding down
changes the setting at high speed.
5.After you make the settings you want, press to exit the setting screen.
•The day of the week is automatically set in accordance with the date.
•The date can be set within the range of January 1, 2000 to December 31, 2039.
•The watch’s built-in full automatic calendar automatically makes allowances for different month lengths and leap years. Once you set the date, there should be no
reason to change it except after the replacement of the watch’s battery.
Daylight Saving Time (DST), which is also sometimes called “summer time” advances the time for one hour, as is the custom in some areas during the summer.
Remember that not all countries or even local areas use Daylight Saving Time.
ABOUT THE BACKLIGHT
•Press to illuminate the display for about three seconds.
•The backlight of this watch employs an electro-luminescent (EL) light, which loses
its illuminating power after very long term use.
•Frequent use of the backlight shortens the battery life.
•The watch emits an audible sound whenever the display is illuminated. This does
not indicate malfunction of the watch.
•The illumination provided by the backlight may be hard to see when viewed under
direct sunlight.
•The backlight automatically turns off whenever an alarm sounds.
Press .
DAY COUNTER MODE
The Day Counter Mode lets you count the number of days from the Timekeeping
Mode’s current date to a specific target date.
There are ten day counters, each identified by a counter number. You can assign text
titles up to eight characters long to each of the 10 Day Counters. Whenever the date
specified by any one of the day counters matches the date of the Timekeeping Mode
(regardless of the day counter’s year setting), the DAYS indicator flashes on the
Timekeeping Mode. In the Day Counter Mode, the DAYS indicator flashes on the
screen of the particular day counter whose date matches the date of the Timekeep-
ing Mode.
The initial default date for all Day Counters is January 1, 2001.
The page number on the display when you exit the Day Counter Mode appears first
the next time you enter the Day Counter Mode.
Year
Day
Target date
Numbers of days
Text
DAYS indicator
Mode indicator
Month
Page number
Alternate at the
1-second interval.
Recalling Day Counter Data
In the Day Counter Mode, press (+) or (–) to scroll through the day counters.
To set the target date
1.In the Day Counter Mode, press (+) or (–) to display the number of the counter
you want to set.
2.Hold down until the flashing cursor appears in the text area. This indicates the
input screen.
3.Press to move the flashing in the sequence shown below.
•Holding down to move the flashing at high speed.
Press .
1st digit
Day
8th digit
YearMonth
4. While the cursor is in the text area, use to scroll through characters at the
current cursor position. Characters scroll in the sequence shown below. Holding
down scrolls at high speed.
Press .
(Space)
A to Z 0 to 9 . (Period) - (Hyphen)
5.While the cursor is in the date area, press to scroll through digits at the current
cursor position. Holding down scrolls at high speed.
•Press and at the same time. The message “ CLR” appears in the display. The
characters in the text area is cleared and today’s date is set as the target date. You
can then make any changes in the date you want.
6.After you make the settings you want, press to exit the input screen.
•The date can be set within the range of January 1, 1940 to December 31, 2039.
•The text area display can show only three characters at a time. Longer text scrolls
continuously from right to left. The symbol “
” indicates that the character to the left
is the last, and the character to the right is first.
C
C
C
C
C
C
C
C
C
C
C
D
D
D
D
D
D
D
D
L
L
B
D
B
B
B
B
A
A
A
A
Page 7

- 6 -
TELEMEMO MODE
The Telememo Mode lets you store up to 10 records, each
with a name (up to eight characters) and a phone number
(up to 12 digits). You can recall records by scrolling through
them on the display.
The page number on the display when you exit the Telememo Mode appears first the next time you enter the
Telememo Mode.
To input a new Telememo record
1.In the Telememo Mode, press (+) or (–) to display
the page number of the record where you want to input
data.
2.Hold down and a cursor appears on the text area.
3.Use to scroll through characters at the current cursor position. Characters scroll
in the sequence shown below.
Press .
(Space)
A to Z 0 to 9 . (Period) - (Hyphen)
Holding down scrolls at high speed.
4. When the character you want is at the current cursor position, press to move
the cursor to the right.
Press .
1st digit
8th digit
12th digit
1st digit
Text area
Number area
Holding down to move the cursor at high speed.
5.Repeat the steps 3 and 4 to input the rest of the characters.
You can input up to eight characters for the name, though only three characters are
visible at a time. If the name you input has fewer than eight characters, use to
move the cursor to the eighth space (which means you would press three times
after inputting a five-character name).
6.After you input the name, use to move the cursor to the number area.
Pressing while the cursor is located at the eighth character of the text area
advances to the number area. Pressing while the cursor is located at the 12th
digit of the number area returns to the text area.
7.Use to scroll through characters (hyphen, numbers, space) at the current cursor position on the number area. Characters scroll in the sequence shown below.
Press .
(Space)
0 to 9 - (Hyphen)
Holding down scrolls characters at high speed.
8.When the character you want is at the cursor position, press to move the cursor
to the right.
9.Repeat steps 7 and 8 to input the rest of the numbers you want.
You can input up to 12 digits for the number.
10. After inputting the name and number of the record, press to store it and exit
the setting screen.
The display can show only three name characters at a time. Longer names scrolls
continuously from right to left. The symbol “ ” indicates that the character to the left
is the last, and the character to the right is the first.
The number area can show up to six digits at one time. If a number has more than
six digits, the display automatically switched between the first six digits (counting
forward from the first digit) and the last six digits (counting backward from the last
digit) of the number. This means that if a number is 12 digits long, the number area
switches between the first six digits and the last six digits. If a number is seven
digits long, the number area switches between digits 1 through 6, and digits 2 through
7.
To recall Telememo data
In the Telememo Mode, press (+) or (–) to scroll forward through the stored
records.
Holding down either button scrolls at high speed.
To edit Telememo data items
1.In the Telememo Mode, use (+) or (–) to display the data you want to edit.
2.Hold down until the cursor appears in the display.
3.Use to move the cursor to the character you want to change.
4.Use to change the character.
See step 3 of “To input a new Telememo record” for information on inputting name
characters, and step 7 for inputting number characters.
5.After making the changes that you want, press to store them and exit the set-
ting screen.
To delete a Telememo record
1. In the Telememo Mode, use (+) or (–) to display the record you want to de-
lete.
2.Hold down until the cursor appears in the display.
3. Press and at the same time. The message “CLR” appears in the display,
indicating that the record was deleted.
After the record is deleted, the cursor appears in the text area, ready for input.
4.Input a new record or press to exit the setting screen.
Minutes
Seconds
Mode indicator
Mode indicator
Hour
Minutes
DST on indicator
Alarm on indicator
Hourly time signal on
indicator
EASY TIMER MODE
The Easy Timer Mode lets you quickly and easily set a
countdown timer within the range of 1 to 60 minutes. When
the end of the countdown is reached, an alarm sounds for
10 seconds, or until you press any button on the watch.
When the alarm stops, the countdown start time is cleared
automatically.
Using the Easy Timer
1.In the Easy Timer Mode, use (+1 minute) and
(–1 minute) to change the start time setting. Holding
down either button changes the start time at high speed.
2.Release the button, and the countdown starts automati-
cally in about one second.
If you want to set the starting time to [ :60 00], press
while [ :00 00] is on the display in the Easy Timer Mode.
You can use (+) and (–) to change the start time setting while a countdown is
in progress. The seconds count is unchanged by pressing or .
3.An alarm sounds for about 10 seconds when the end of the countdown is reached.
To stop a countdown, press . This also resets the countdown time to [ :00 00].
ALARM MODE
When the Daily Alarm is turned on, the alarm sounds for
20 seconds at the preset time each day. Press any button
to stop the alarm after it starts to sound. When the Hourly
Time Signal is turned on, the watch beeps every hour on
the hour.
To set the alarm time
1. While in the Alarm Mode, hold down until the hour
digits flash on the display, indicating the setting screen.
At this time, the alarm is turned on automatically.
2.Press to move the flashing in the sequence shown
below.
Hour Minutes
3.Use to increase the setting. Holding down
changes the setting at high speed.
4.After you set the alarm time, press to exit the setting screen.
The format (12-hour and 24-hour) of the alarm time matches the format you select
in the Timekeeping Mode.
When setting the alarm time using the 12-hour format, take care to set the time
correctly as morning or afternoon.
If the DST on indicator is on the display, that indicate the DST on/off setting of the
Timekeeping Mode is on.
To stop the alarm
Press any button to stop the alarm after it starts to sound.
To turn the Daily Alarm or the Hourly Time Signal on and off
Press while in the Alarm Mode to change the status of the Daily Alarm and Hourly
Time Signal in the following sequence.
Hourly Time
Signal only
Daily Alarm
only
Both OFFBoth ON
To test the alarm
In the Alarm Mode, hold down to sound the alarm.
Mode indicator
Page number
C
C
C
C
C
C
C
C
C
C
C
D
D
D
D D
D
D
D
D
D
D
D
D
D
B
B
B
B
B
B
D
D
B
D
B
D
B
B
A
A
A
A
A
A
A
A
A
•
•
•
•
•
•
•
•
•
•
•
•
•
•
•
•
•
•
•
Page 8

- 7 -
3. DRAWINGS : QW-2174 / 2177
3-1. BLOCK DIAGRAM
QW-2174
T1
AC
BD2
VDD
XTB
Xtal
CT
XT
N1
N2
N3
N4
C4
BAT
KI4
KI3
KI8
KI5
KI6
KI7
KC4
KC3
KC2
KC1
KI2
KI1
BD1
LL1
LD
EL
FRONT
BACK
R
VSS2
LC1~LC5 L8~L48 L49~L52L1~L7
VCH VSS1 VSS3
LSI
TOTAL
BONDING
87PINS
80PINS
VC VCC
PZ
Tr
C1
C5
+
C2C6C3
V
C7
+
S4
S3
SA
S2
S1
LCD
1
1
1
3
3
1
2
1. No bonding.
2. Short (Soldering).
3. Open (No soldering).
Tr3
TE
PE
PF
TB
Tr2
Tns1
SE
SF
SEG.
COM.
LC1 LC2 LC3 LC4 LC5
L 8
X1Y3
X2Y3
X3Y3
X0Y3
X4Y3
X5Y3
X15Y1
X6Y3
X7Y3
X8Y3
X10Y3
X11Y3
X12Y3
X9Y3
X13Y3
X14Y3
X15Y3
X16Y3
X16Y1
X13Y1
X12Y1
X11Y1
X14Y1
X10Y1
X9Y1
X8Y1
X7Y1
X2Y1
X1Y1
X0Y1
X6Y1
X1Y2
X2Y2
X7Y2
X6Y2
X5Y2
K3
X3Y2
X0Y2
K4
X10Y2
K5
X12Y2
X9Y2
X13Y2
X14Y2
X15Y2
X16Y2
X1Y5
X2Y5
X3Y5
X0Y5
X4Y5
X5Y5
X6Y5
X7Y5
X8Y5
X10Y5
X11Y5
X12Y5
X9Y5
X13Y5
X14Y5
X15Y5
X16Y5
c4
X1Y4
X2Y4
X3Y4
X0Y4
X4Y4
X5Y4
X6Y4
X7Y4
X8Y4
X10Y4
X11Y4
X12Y4
X9Y4
X13Y4
X14Y4
X15Y4
X16Y4
b4
a0
g4a4
PM
X4Y6
d4
X5Y6
X6Y6
X7Y6
X8Y6
X10Y6
X11Y6
X12Y6
X9Y6
ALMe4f4 SIG
f5K0e5
DAYSb5DST
b1c2
HYP g1a1 d1 b2
f1
hi3 e3
c5
c6K2 b6
d5a5X12Y0
X11Y0 X11Y2
X10Y0
X9Y0
X8Y0 X8Y2
X7Y0
X6Y0
g5
e6
c7K1 b7
d7g7a7
a9
d6a6
a3b0 c0
b3g3 g0 d0
d3 h2c3 f0 e0
a2g2 c1
g6
f2e1d2e2
f3
X4Y1 X4Y0 COL
a8 f8
X4Y7c8
e7
e9AM
b9 d9g9
f7
f9
X5Y0X5Y1
b8 d8X3Y1 g8
c9e8
L 9
L 10
L 11
L 12
L 13
L 14
L 15
L 16
L 17
L 18
L 19
L 20
L 21
L 22
L 23
L 24
L 25
L 26
L 27
f6
L 28
L 29
L 30
L 31
L 32
L 33
L 34
L 35
L 36
L 37
L 38
L 39
L 40
L 41
L 42
L 43
L 44
L 45
L 46
L 47
L 48
Y0
d0
g0
a0
c0
b0
f0
e0
d1
g1
a1
c1
b1
f1
e1
d9
g9
a9
c9
b9
f9
e9
d2
g2
a2
h2
c2
b2
f2
e2
d3
g3
a3
hi3
c3
b3
f3
e3
d4
g4
a4
c4
b4
f4
e4
d5
g5
a5
c5
b5
f5
e5
d6
g6
a6
c6
b6
f6
e6
d7
g7
a7
c7
b7
f7
e7
d8
g8
a8
c8
b8
f8
e8
AM
PM
DST
DAYS
SIG
HYP
COL
ALM
Y2
Y3
Y4
Y5
Y6
K3 K5
K0 K2
K4
K1
X0 X16
Y1
L8
L9
L10
L11
L12
L13
L14
L15
L16
L17
L18
L19
L20
L21
L22
L23
L24
L25
LC1
LC2
LC3
LC4
LC5
L48
L47
L46
L45
L44
L43
L42
L41
L40
L39
L38
L37
L36
L35
L34
L33
L32
L31
L30
L29
L28
L27
L26
Page 9

- 8 -
QW-2177
T1
AC
BD2
VDD
XTB
Xtal
CT
XT
N1
N2
N3
N4
C4
BAT
KI4
KI3
KI8
KI5
KI6
KI7
KC4
KC3
KC2
KC1
KI2
KI1
BD1
LL1
LD
EL
FRONT
BACK
R
VSS2
LC1~LC5 L8~L48 L49~L52L1~L7
VCH VSS1 VSS3
LSI
TOTAL
BONDING
87PINS
80PINS
VC VCC
PZ
Tr
C1
C5
+
C2C6C3
V
C7
+
S4
S3
SA
S2
S1
LCD
1
1
1
3
3
1
2
1. No bonding.
2. Open (No soldering).
3. Open (No soldering).
Tr3
TE
PE
PF
TB
Tr2
Tns1
SE
SF
SEG.
COM.
LC1 LC2 LC3 LC4 LC5
L 8
X1Y3
X2Y3
X3Y3
X0Y3
X4Y3
X5Y3
b6 c6
X6Y3
X7Y3
X8Y3
X10Y3
X11Y3
X12Y3
X9Y3
X13Y3
X14Y3
X15Y3
X16Y3
f6
b7
g7
g6
f7
X16Y1
X15Y1
X14Y1
X2Y1
X1Y1
X0Y1
X13Y1
X12Y1 X12Y0
X11Y1 X11Y0
X10Y1 X10Y0
X9Y1 X9Y0
X8Y1 X8Y0
X7Y1 X7Y0
X6Y1 X6Y0
X1Y2
X2Y2
X7Y2
X6Y2
X5Y2
X4Y2
X3Y2
X0Y2
X8Y2
X10Y2
X11Y2
X12Y2
X9Y2
X13Y2
X14Y2
X15Y2
X16Y2
X1Y5
X2Y5
X3Y5
X0Y5
X4Y5
X5Y5
X6Y5
X7Y5
X8Y5
X10Y5
X11Y5
X12Y5
X9Y5
X13Y5
X14Y5
X15Y5
X16Y5
e9
X1Y4
X2Y4
X3Y4
X0Y4
X4Y4
X5Y4
X6Y4
X7Y4
X8Y4
X10Y4
X11Y4
X12Y4
X9Y4
X13Y4
X14Y4
X15Y4
X16Y4
i9
h9
AM
X4Y6
a9
X5Y6
X6Y6
X7Y6
X8Y6
X10Y6
X11Y6
X12Y6
X9Y6
f9
d6g9a6 b9
HYP
ALM
b8
e6c9d9
a2
SIG f2 e2
K1
h8
e7e8 f8
c7g8c8
a7 d7
d8
d0
DAYS
K2
a8
g0
f0 e0
DSTc1b1
a5
c0b0
d1a1 g1
f1 e1
b2 c2
d2g2
a3 d3g3
c3b3
X4Y1 X4Y0 K0
a4 f4
c4COL
e3
e5PM
b5 d5g5
f3
f5
X5Y0X5Y1
b4 d4X3Y1 g4
c5e4
L 9
L 10
L 11
L 12
L 13
L 14
L 15
L 16
L 17
L 18
L 19
L 20
L 21
L 22
L 23
L 24
L 25
L 26
L 27
a0
L 28
L 29
L 30
L 31
L 32
L 33
L 34
L 35
L 36
L 37
L 38
L 39
L 40
L 41
L 42
L 43
L 44
L 45
L 46
L 47
L 48
Y0
d0
g0
a0
c0
b0
f0
e0
d6
g6
a6
c6
b6
f6
e6
d7
g7
a7
c7
b7
f7
e7
d8
g8
a8
h8
c8
b8
f8
e8
d9
g9
a9
h9
i9
c9
b9
f9
e9
d1
g1
a1
c1
b1
f1
e1
d2
g2
a2
c2
b2
f2
e2
d3
g3
a3
c3
b3
f3
e3
d4
g4
a4
c4
b4
f4
e4
d5
g5
a5
c5
b5
f5
e5
AM
PM
K0 K1
K2
DAYS
ALM SIG
HYP
COL
DST
Y2
Y3
Y4
Y5
Y6
X0 X16
Y1
L8
L9
L10
L11
L12
L13
L14
L15
L16
L17
L18
L19
L20
L21
L22
L23
L24
L25
LC1
LC2
LC3
LC4
LC5
L48
L47
L46
L45
L44
L43
L42
L41
L40
L39
L38
L37
L36
L35
L34
L33
L32
L31
L30
L29
L28
L27
L26
Page 10

- 9 -
3-2. CHECKING TERMINALS AND COMPONENTS : QW-2174 / 2177
Top view of P.C.B. ass'y Bottom view of P.C.B. ass'y
KI8
KI8
KI1
KI1
KI3
KI3
KI4
KI4
VDD
VSS2
VSS2
VSS2
VSS2
VSS2
LD
BD1
L
VDD
L
L
L VDD
VDD
VDD
VCC
VDD
VDD
VC
VC
VCH
VCH
VDD
VDD TE
TE
TE
SF
SF
SE
SF
PE PE
TE
VSS2
VSS1
VSS3
AC
VDD
VDD
XT
XT
XTB
KI2 KI2
KI7 KI7
KC3
KC2
N3
N2
N1
N4
VDD
VDD
VDD
VDD
VDD
SE
KI5
KI5
SF(TB)
PF(VDD)
3a .PCB ass'y
(7640 3594)
3b .PCB ass'y
(7640 3595)
Resistor / Chip
R
Transistor
Tr
Transistor
Tr2
Transistor
Tr3
Transfurmer
Tns1
Capacitor / Tantalum
C5
Capacitor / Tantalum
C7
Capacitor / Chip
C4
4 .Capacitor / Trimmer
(7103 0458)
CT
7 .Cushion 506
(7211 9631)
8 .Cushion 6
(7211 0064)
Xtal
5 .Oscillator / Crystal
(7110 1263)
C1
Capacitor / Chip
C3
Capacitor / Chip
C2
Capacitor / Chip
C6
Capacitor / Chip
LL1
Coil
Page 11

- 10 -
14 (7230 0980)
12 (7230 0616)
9 (7010 4674)
3a (7640 3594)
3b (7640 3595)
PCB ass'y
2a(1001 3459)
2b(7020 6090)
2c(1002 4508)
2d(7020 6092)
13 (7230 0511)
Battery / Lithium (CR1616)
1a(1002 4503)
1b(1002 4504)
1c(1002 4506)
11 (7233 2736)
4. EXPLODED VIEW : QW-2174 / 2177
6 (7225 2080)
10 (7424 3212)
Page 12

- 11 -
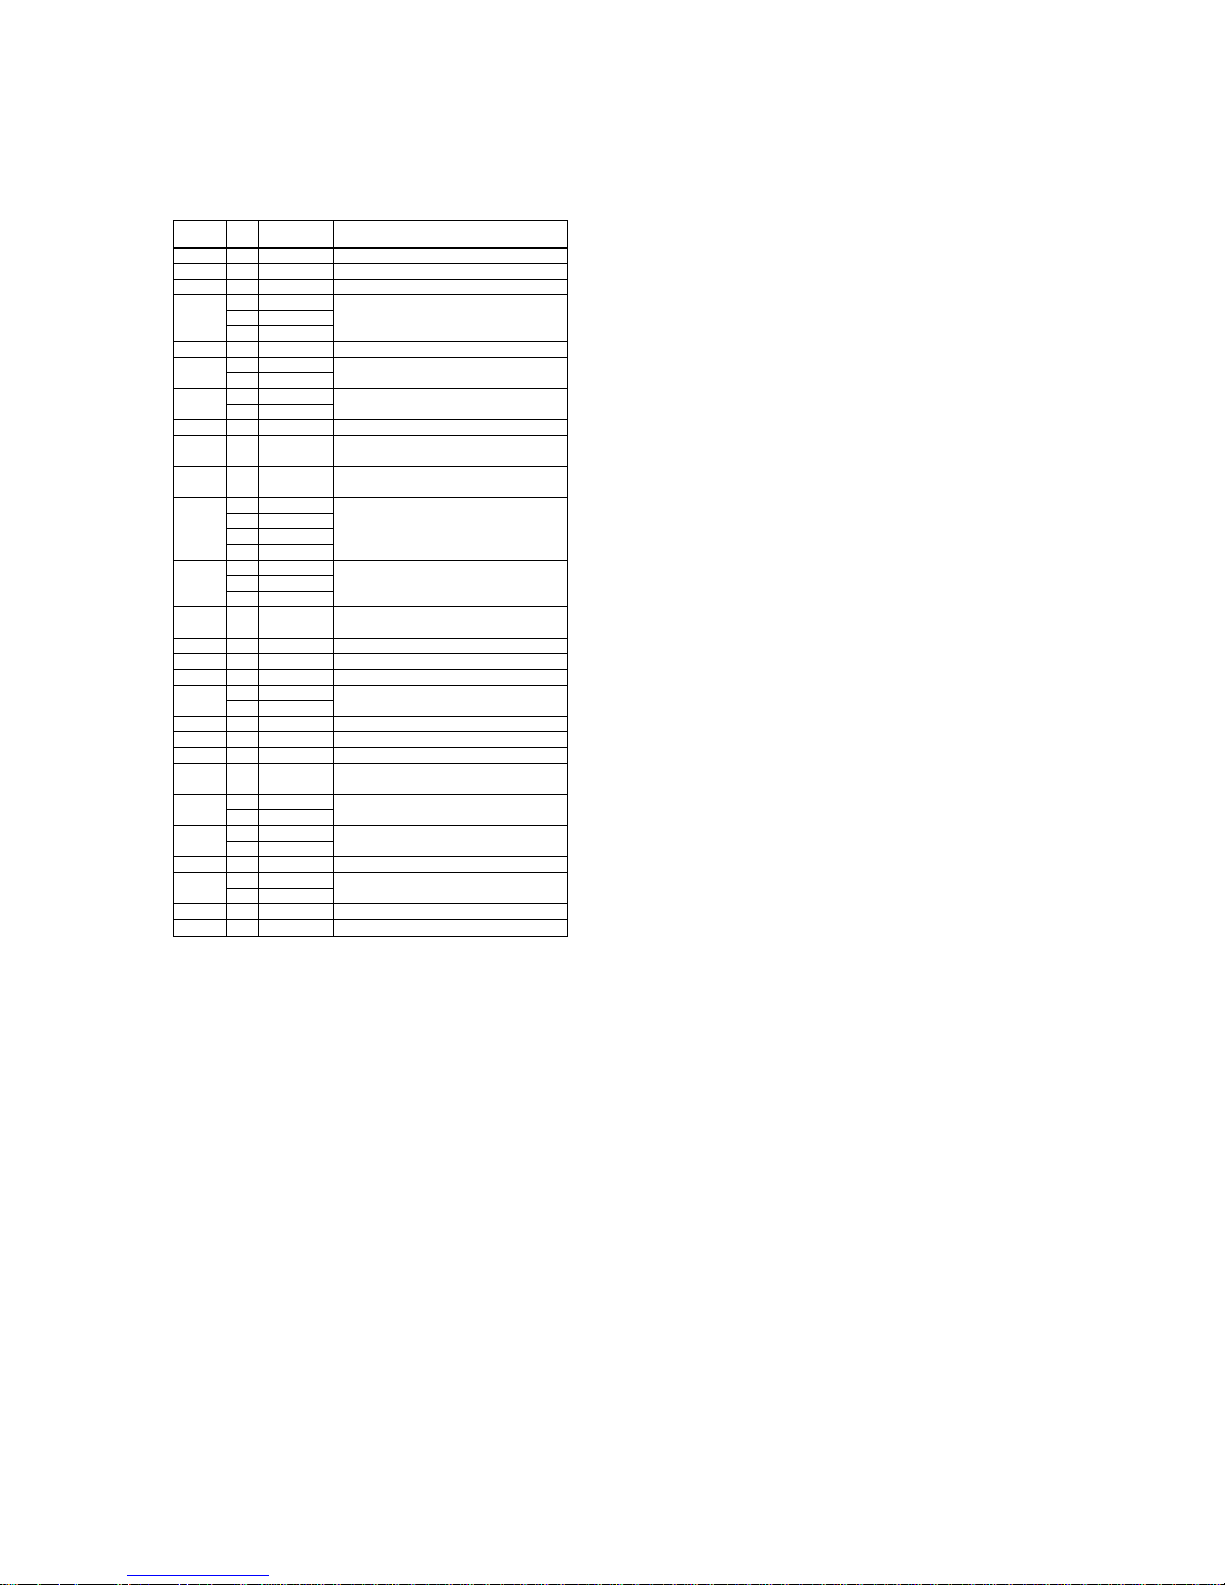
5. PARTS LIST : QW-2174 / 2177
Note: 1. Prices and specifications are subject to change without prior notice.
2. Spare parts are classified as follows according to their importance in after-sales service.
A Rank ............................... Very Important
B Rank ............................... Important
C Rank ............................... Less important
3. Batteries in Bulk pack on the tray will be supplied from our Overseas Spare Parts Section under charge basis.
Batteries in Brister pack will be supplied from our Sales Department.
4. As for order/supply of spare parts, refer to the separate publication “GUIDEBOOK for spare parts supply”.
Notes: Q – Used quantity
R – Rank
Item Code No. Parts name Specification Applicable Q R
7640 3611 MODULE/WITHOUT MOVEMENT QW-2174AT-01TK BGC-110B-5V/7V/9V 1 A
7640 3612 MODULE/WITHOUT MOVEMENT QW-2174AT-02TK BGC-110B-1V/2V/8V 1 A
7640 3613 MODULE/WITHOUT MOVEMENT QW-2177AT-01TK BG-152-1V/2AV 1 A
7640 3614 MODULE/WITHOUT MOVEMENT QW-2177AT-02TK BG-152-2BV/6V 1 A
7640 3615 MODULE/WITHOUT MOVEMENT QW-2177AT-04TK BG-152-3V 1 A
7640 3616 MODULE/WITHOUT MOVEMENT QW-2177AT-07TK BG-152-4V 1 A
1a 1002 4503 LCD C2174-01P QW-2174AT-01 1 A
1b 1002 4504 LCD C2174-02P QW-2174AT-02 1 A
1c 1002 4506 LCD C2177-01 QW-2177AT-01/02/04/07 1 A
2a 1001 3459 EL YEL-1951-A-01 QW-2177AT-01 1 A
2b 7020 6090 EL YEL-1951-A-03 QW-2174AT-01/02 / 1 A
QW-2177AT-02
2c 1002 4508 EL YEL-1951-A-33 QW-2177AT-04 1 A
2d 7020 6092 EL YEL-1951-A-63 QW-2177AT-07 1 A
3a 7640 3594 PCB ASS'Y Q254608*1TK QW-2174AT-01/02 1 A
3b 7640 3595 PCB ASS'Y Q254616*1TK QW-2177AT-01/02/04/07 1 A
4 7103 0458 CAPACITOR/TRIMMER TSF-2L2-120-4.2 QW-2174AT / 1 B
QW-2177AT Common
5 7110 1263 OSCILLATOR/CRYSTAL DT-26S07 QW-2174AT / 1 B
QW-2177AT Common
6 7225 2080 CONTACT/BATTERY (-) 156 Q39603A-1 QW-2174AT / 1 C
QW-2177AT Common
7 7211 9631 CUSHION/506 Q49364-1 QW-2174AT / 1 C
QW-2177AT Common
8 7211 0064 CUSHION/6 Q4914-1 QW-2174AT / 1 C
QW-2177AT Common
9 7010 4674 INTERCONNECTOR/1951 Q463662-1 QW-2174AT / 2 C
QW-2177AT Common
10 7424 3212 LABEL/1995 Q463482-1 QW-2174AT / 1 C
QW-2177AT Common
11 7233 2736 SPACER/1951-1 Q463659A-1 QW-2174AT / 1 C
QW-2177AT Common
12 7230 0616 SPRING/COIL 1199-1 Q437728B-1 QW-2174AT / 2 B
QW-2177AT Common
13 7230 0511 SPRING/COIL 1253-2 Q439219-1 QW-2174AT / 1 B
QW-2177AT Common
14 7230 0980 SPRING/COIL 1514 Q456768-1 QW-2174AT / 1 B
QW-2177AT Common
BATTERY/LITHIUM CR1616 QW-2174AT / 1
QW-2177AT Common
* For the price, new parts and minimum quantity of the above parts, please refer to the Parts Price List P.P.L.-561.
Page 13

- 12 -
6. PRECAUTIONS FOR REPAIR : QW-2174 / 2177
6-1. AC (ALL CLEAR) AND REMOVING OF MODULE
1.Perform AC (ALL CLEAR) when inserting a new battery, or else the memories and or counters may
give erratic displays.
Touch the AC contact and the positive (+) side of the battery or main plate with the metallic tweezers.
The contact should be made for about two seconds.
For 2 seconds after the AC operation, do not make any button operations on these modules.
2.On removing of the module from the case, please insert the precision screw driver between the module
and the case pointed by arrows.
6-2. ACCURACY CHECKING
Check the accuracy of the module with the quartz timer after switching the module to "ACCURACY CHECKING
MODE".
The operations are shown below:
A) SWITCHING TO "ACCURACY CHECKING MODE"
QW-2174: While pressing the C button, press the A and B buttons, at the normal time keepingmode.
QW-2177: While pressing the D button, press the A and C buttons, at the normal time keepingmode.
Then all the segments are displayed and the LCD drive signals are changed to the static drive signal of
"32 Hz" so that you can check the accuracy with the quartz timer.
B) CANCELLATION OF THE "ACCURACY CHECKING MODE"
QW-2174: Press any button except for C button.
QW-2177: Press any button except for D button.
Then the display is returned to its original state.
NOTE: The "ACCURACY CHECKING MODE"
will automatically return to the regular
mode in 1 ~ 2 hour(s) without any operation.
QW-2174
QW-2177
Metallic tweezers
Page 14

Nishi-Shinjuku Kimuraya Bldg. 1F
5-25, Nishi-Shinjuku 7-Chome
Shinjuku
-ku,
Tokyo 160-0023, Japan
Printed in Japan
Overseas Serv i ce Div is io n
CASIO TECHNO CO.,LTD.
EI0800601A
 Loading...