

Page 1
2012-1
Module No.2012
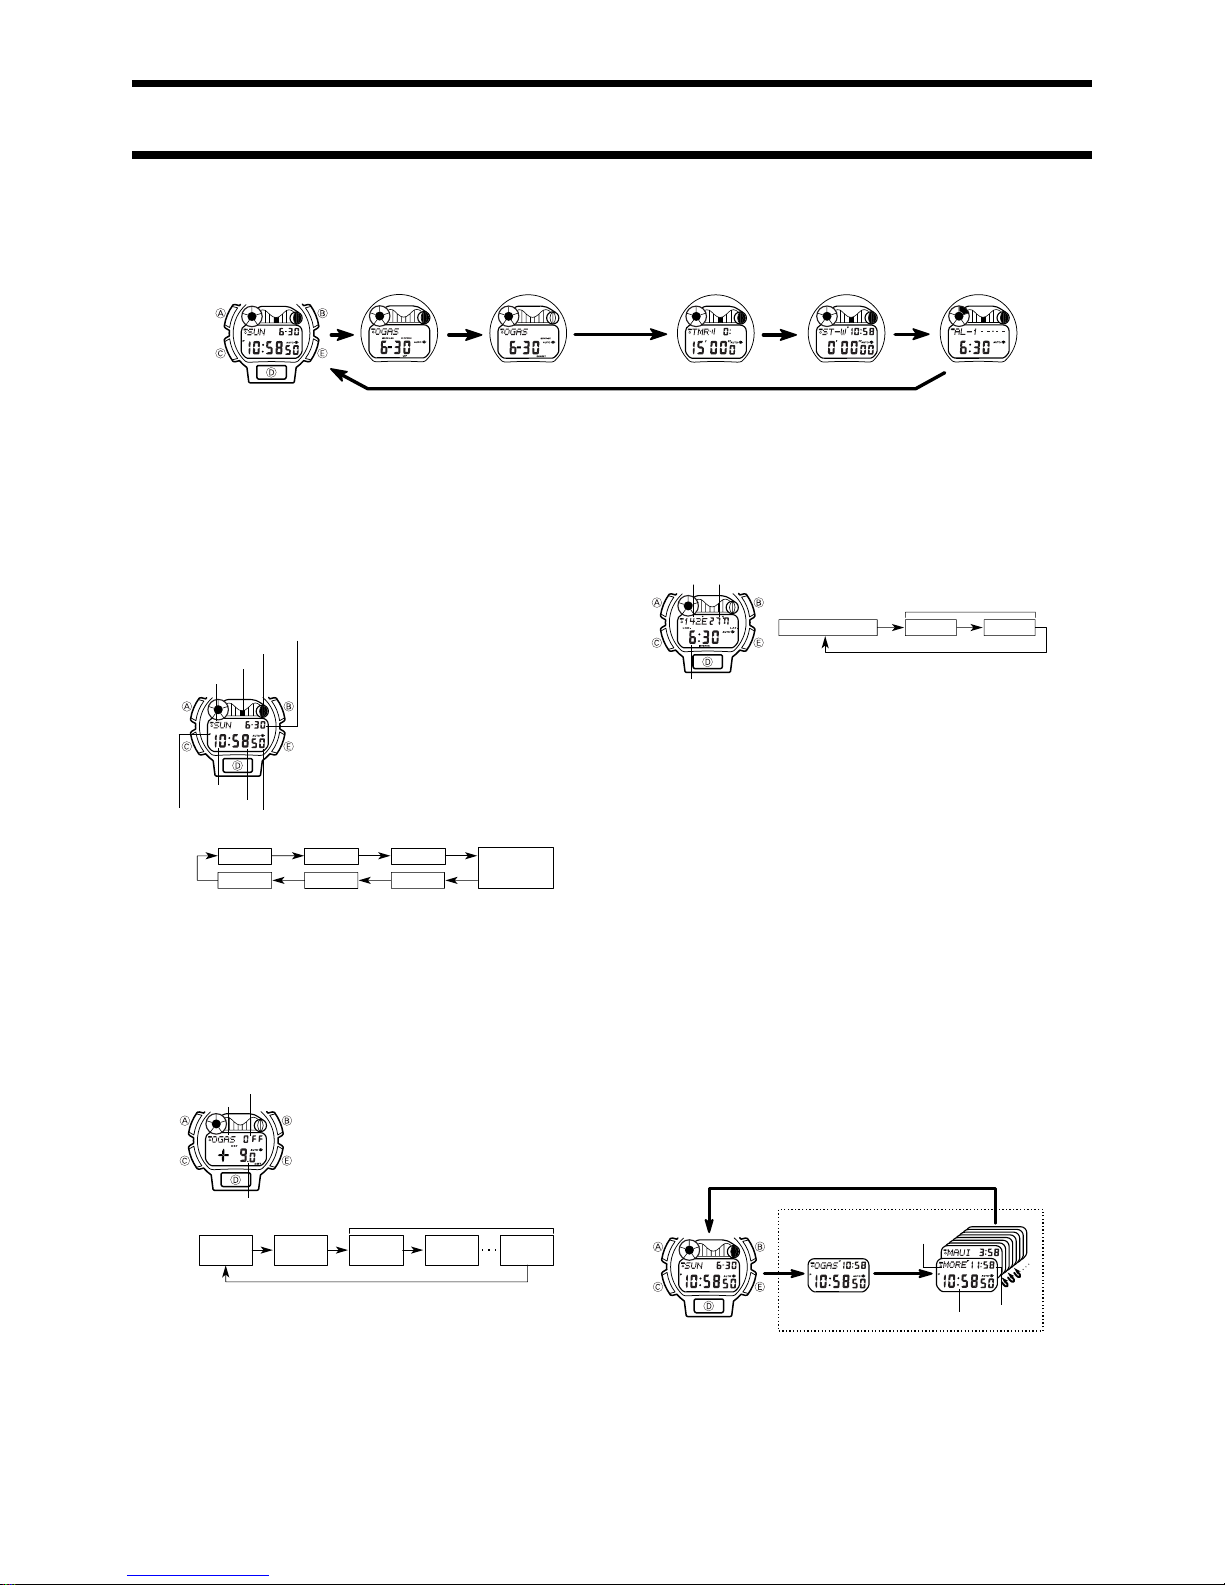
GENERAL GUIDE
• Press
CC
CC
C to change from mode to mode. After you perform an operation in Countdown Alarm Mode or Stopwatch Mode, pressing
CC
CC
C returns to the Timekeeping Mode.
• In the Timekeeping Mode, Moon Data Mode, Sunrise/Sunset Mode or Alarm Mode, press
DD
DD
D to illuminate the display for about two seconds. In the Countdown Mode or Stopwatch Mode,
press
EE
EE
E to illuminate the display for about two seconds.
TIMEKEEPING MODE
The settings you make in the Timekeeping Mode are very important, because they
affect the Moon Data, Tide Graph, and Sunrise/Sunset functions.
There are three setting screens in the Timekeeping Mode: the Time and Date Setting
Screen, DST, GMT Differential, Point Name Setting Screen, and Longitude/Latitude,
Lunar Tide Interval Setting Screen.
• For normal timekeeping, you need to set the time, and date, and turn daylight
saving time (summer time) on or off.
• To use the Moon Data, Tide Graph, and Sunrise/Sunset functions, you must set the
GMT differential, your current longitude and latitude, and the lunar tide interval on
your point.
• If you do not operate any button for a few minutes while a selection is flashing, the
flashing stops and the watch goes back to the Timekeeping Mode automatically.
To set the time and date
• Use this screen to set the current time and date, to
reset the seconds to 00, and to toggle between 12-hour
and 24-hour timekeeping.
1.In the Timekeeping Mode, check if the DST indicator is
displayed, and change the DST setting in accordance
with the timekeeping in your area.
• Turn on DST if daylight saving time (summer time) is
currently in effect in your area. If daylight saving time is
not currently in effect in your area, be sure to turn DST
off.
• See “To turn DST on and off” for details about turning
DST on and off.
2.In the Timekeeping Mode, hold down
AA
AA
A until the
seconds digits start to flash. This is the Time and Date
Setting Screen.
3.Press
CC
CC
C to move the selection around the display in the following sequence.
4. While the seconds digits are selected (flashing), press
EE
EE
E to reset the seconds to
00. If you press
EE
EE
E while the seconds count is in the range of 30 to 59, the seconds
are reset to 00 and 1 is added to the minutes. If the seconds count is in the range
of 00 to 29, the minutes count is unchanged.
5. While any other digits (besides seconds), are selected (flashing), press
EE
EE
E to in-
crease the number or
BB
BB
B to decrease it. Holding down either button changes the
current number at high speed.
• While the 12/24-hour setting is selected, press
EE
EE
E to switch between the two
formats.
• The day of the week is automatically set in accordance with the date.
• The date can be set with the range of January 1,1995 to December 31, 2039.
6. After you are finished making the settings you want, press
AA
AA
A to advance to the
DST, GMT Differential, Point Name Setting Screen. To return to the normal Timekeeping Mode screen, press
AA
AA
A three times.
DST, GMT Differential, Point Name Setting Screen
Use this screen to switch DST (daylight saving time or
summer time) on and off, to specify the GMT differential
from your current location and to input new point names.
To turn DST on and off
While ON or OFF and the small DST mark is flashing on the display, press
EE
EE
E to
toggle DST on and off.
Important!
• Be sure to use this procedure to turn daylight saving time (summer time) on and off.
Never manually change the timekeeping setting to adjust for daylight saving time.
Doing so will produce incorrect Moon Data, Tide Graph, and Sunrise/Sunset data.
Use
CC
CC
C to move the flashing to the GMT differential value.
To set the GMT differential
Note
• The GMT differential is the difference in time between the time zone where you are
currently located and Greenwich Mean Time (GMT).
• See “TIME ZONE CHART” at the back of this manual for information about determining the GMT differential in your area.
1.Press
EE
EE
E to increase the value or
BB
BB
B to decrease it. Holding down either button
changes the setting at high speed.
2.Use
CC
CC
C to move the flashing to the first character of the point name.
To change a point name
1.Press
EE
EE
E to scroll forward through the characters at the current flashing location, or
BB
BB
B to scroll backwards. Holding down either button changes the current characters
at high speed.
2.When the character you want is displayed, press
CC
CC
C to advance to the next
character.
3.Repeat steps 1 and 2 for all eight characters of the point name.
• After you are finished making the settings you want, press
AA
AA
A to advance to the
Longitude/Latitude, Lunar Tide Interval Setting Screen.
Longitude/Latitude, Lunar Tide Interval Setting Screen
Use this screen to specify the longitude, latitude, and
lunar tide interval of your current location.
To set the longitude and latitude of your current location
While the Longitude/Latitude is flashing on the display, use
EE
EE
E to change the longi-
tude value and
BB
BB
B to change the latitude value. To reverse the direction of the change
(from increase to decrease, or from decrease to increase), press
DD
DD
D.
• After you are finished making the settings you want, press
CC
CC
C to advance to the
Lunar Tide Interval Setting Screen.
To set the lunar tide interval at your current location
1.Press
EE
EE
E to increase the hour value or
BB
BB
B to decrease it. Holding down either button
changes the setting at high speed.
2.Press
CC
CC
C to move to the minutes digits.
3.Press
EE
EE
E to increase the minutes value or
BB
BB
B to decrease it.
4. After you are finished making the settings you want, press
AA
AA
A to return to the
normal Timekeeping Mode Screen.
About the lunar tide interval
The lunar tide interval is the period from the moon’s upper transit (moon up) to high
tide. If you know the lunar tide interval, tide changes can be determined using the
moon age. This watch calculates tide changes according to the current time and the
location setting, and displays them graphically.
To calculate the lunar tide interval
1.Look up the high tide time for the flood tide of the location whose tide changes you
want to know.
2. Use this watch to look up the moon up time that occurs immediately before this
time.
3.Subtracting the moon up time from the high tide time produces the lunar tide interval.
MULTI-TIME MODE
To view point data
1. In the Timekeeping Mode, press
BB
BB
B to enter the Multi-time Mode. The first point
that appears is the one you selected as your home time point.
2.Press
BB
BB
B to scroll through the data for the 10 points. The watch beeps and returns
to the Timekeeping Mode after the tenth point.
• Pressing
CC
CC
C at any time in the Multi-time Mode immediately returns to the Time-
keeping Mode.
• You can use the procedure under “DST, GMT Differential, Point Name Setting
Screen” and “Longitude/Latitude, Lunar Tide Interval Setting Screen” to change
the name and other data of a point.
This watch comes pre-programmed with data for 10 dolphin or whale watching points
around the world. The data for each point includes an 8-character point name, GMT
differential, longitude and latitude, and lunar tide interval. Setting the current time
and date for any of the points causes the time and date settings for all other points to
be adjusted accordingly. In the case of DST, however, you must make a separate
setting for each point. You can use the following procedure to select any one of the
ten points as your home time point.
• See the “PRESET LOCATION CHART” at the back of this manual for details on the
locations whose data is preset in watch memory when you purchase it.
To select a point for your home time
• While the point you want to use for your home time is displayed in the Multi-time
Mode, hold down
EE
EE
E for about two seconds.
• The watch automatically returns to the Timekeeping Mode if you do not perform
any key operation for two or three minutes in the Multi-time Mode.
Timekeeping Mode
Moon Data Mode Sunrise/Sunset Mode Countdown Alarm Mode
Stopwatch Mode
Alarm Mode
Day of week
Tide graph
Moon graph
Month - Day
Seconds
Minutes
Hour
PM indicator
Seconds Hour Minutes
12/24-Hour
Format
Day YearMonth
Point name
DST ON/OFF
GMT differential
Longitude/Latitude
Lunar tide interval
MinutesHour
Latitude
Longitude
Lunar tide interval
DST
ON/OFF
GMT
differential
1st
character
2nd
character
8th
character
Point name
Multi-time Mode
Point name
Home time
Local time
Page 2
2012-2
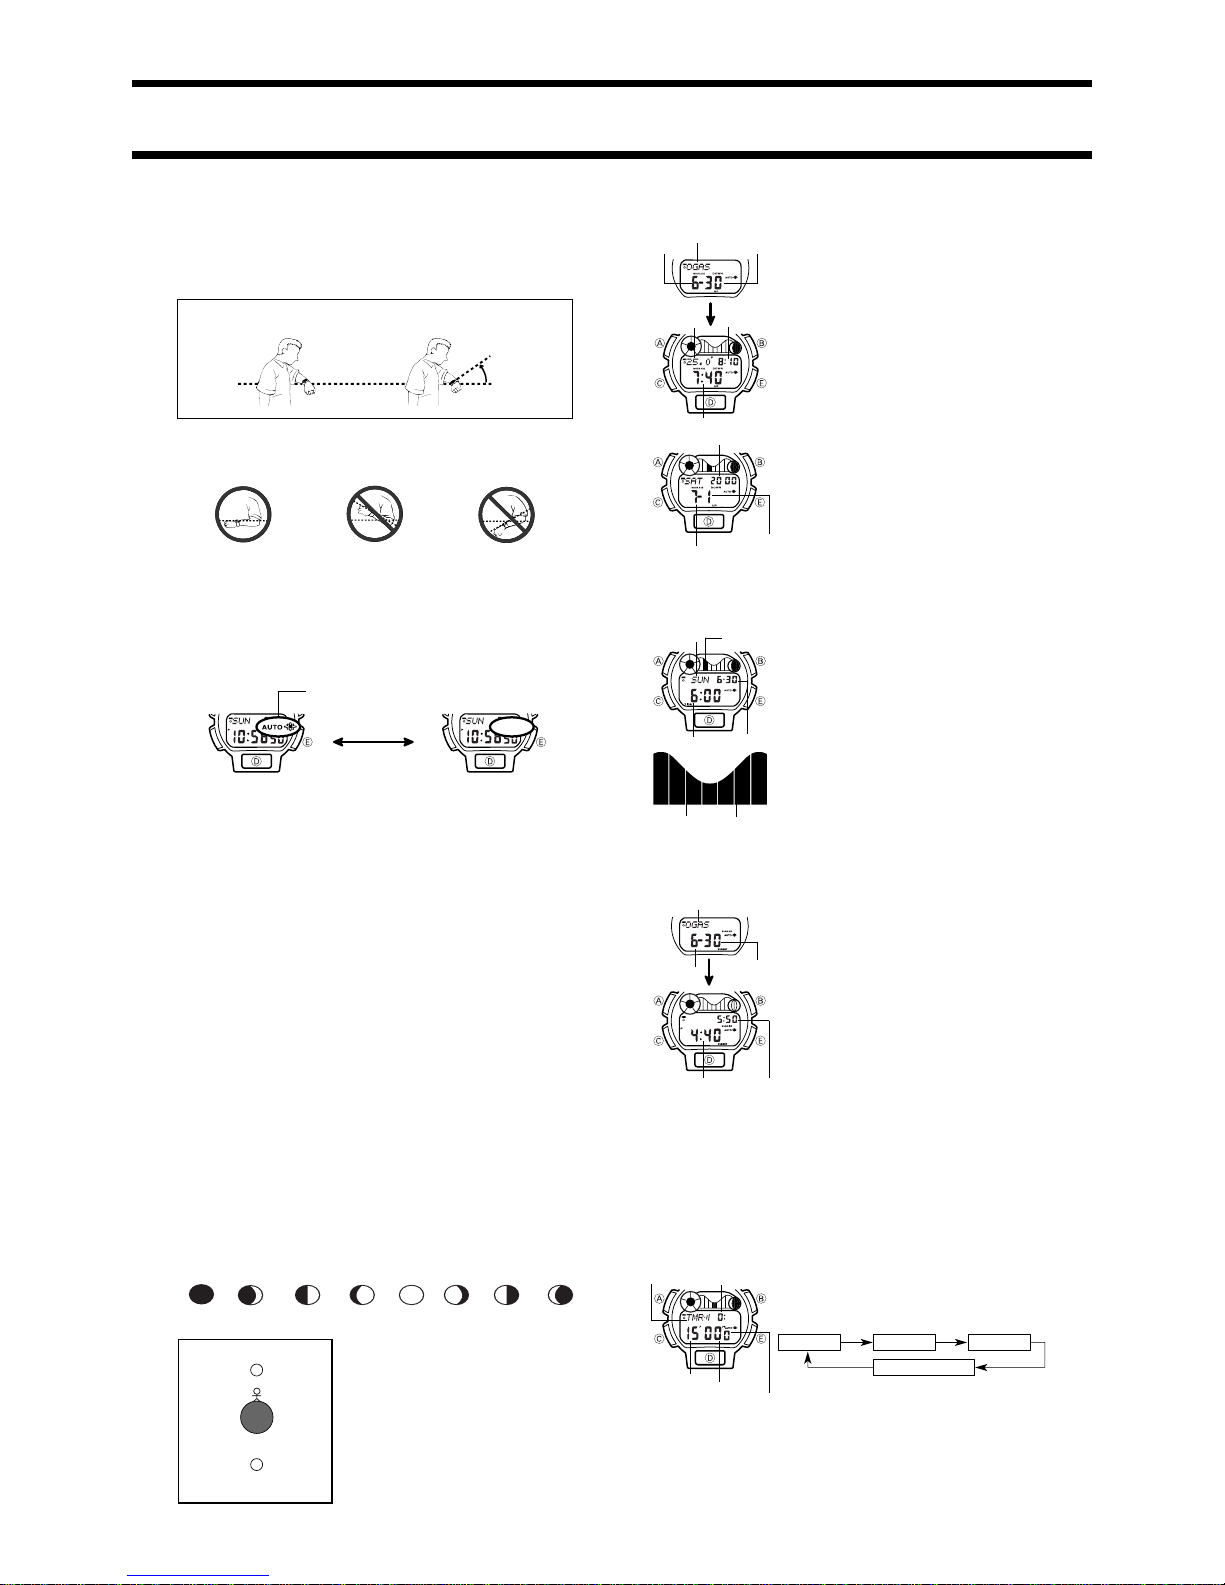
Moving the watch to a position that is parallel to the ground and then tilting it
towards you approximately 40 degrees causes the backlight to illuminate.
ABOUT THE BACKLIGHT
About the Auto Light Switch Function
When the auto light switch function is turned on, the backlight automatically turns on
for two seconds under the conditions described below. Avoid wearing the watch on
the inside of your wrist. Doing so causes the auto light switch to operate when not
needed, which shortens battery life.
• The backlight may not illuminate if the face of the watch is more than 15 degrees off
parallel to the left or right. Make sure that the back of your hand is parallel to the
ground.
• Static electricity or magnetic force can interfere with proper operation of the auto
light switch function. If the auto backlight does not illuminate, try moving the watch
back to the starting position (parallel with the ground) and then tilt it back toward
you again. If this does not work, drop your arm all the way down so it hangs at your
side, and then bring it back up again.
• Under certain conditions the backlight may not light until about one second or less
after turn the face of the watch towards you. This does not necessarily indicate
malfunction of the backlight.
To switch the auto light switch function on and off
In the Timekeeping Mode, hold down
EE
EE
E for one or two seconds to turn the auto light
switch function on and off.
• The auto light switch indicator is shown on the display in all modes while the auto
light switch function is on.
• In order to protect against running down the battery, the auto light switch function is
automatically turned off approximately six hours after you turn it on. Repeat the
above procedure to turn the auto light switch function back on if you want.
• Pressing
DD
DD
D (Timekeeping Mode, Moon Data Mode, Tide Graph Mode, Sunrise/
Sunset Mode, Alarm Mode) or
EE
EE
E (Countdown Alarm Mode, Stopwatch Mode)
illuminates the display, regardless of the auto light switch’s on/off setting.
Caution
• The backlight of this watch employs an electro-luminescent (EL) light, which loses
its illuminating power after very long term use.
• Frequent use of the backligfht shortens the battery life.
• The watch emits an audible sound whenever the display is illuminated. This is
because the EL light vibrates slightly when lit. It does not indicate malfunction of
the watch.
Warning!
• Never try to read your watch when mountain climbing or hiking in areas that
are dark or in areas with poor footing. Doing so is dangerous and can result
in serious personal injury.
• Never try to read your watch when running where there is the danger of accidents, especially in locations where there might be vehicular or pedestrian
traffic. Doing so is dangerous and can result in serious personal injury.
• Never try to read your watch when riding on a bicycle or when operating a
motorcycle or any other motor vehicle. Doing so is dangerous and can result
in a traffic accident and serious personal injury.
• When you are wearing the watch, make sure that its auto backlight function is
turned off before riding on a bicycle or operating a motorcycle or any other
motor vehicle.
Sudden and unintended operation of the auto backlight can create a distraction, which can result in a traffic accident and serious personal injury.
Parallel to ground 40
°
Parallel to ground
MOON DATA MODE
Be sure to set the current time and your current location before trying to use the
Moon Data Mode.
The Moon Data Mode display shows the current moon age, as well as moon up and
moon down times. Moon age is indicated both by a value and one of the following
graphics.
• The moon up time indicates when the moon will
reach its highest point relative to your current
location (upper transit), while the moon down
time indicates when it will reach its lowest point
(lower transit). Note that moon up and moon
down times are accurate up to ±30 minutes.
To display the moon up and moon down time for a specific date
• The moon data for your home time point appears first
when you enter the Moon Data Mode.
• Press
EE
EE
E (forward) or
BB
BB
B (back) within about two
seconds after entering the Moon Data Mode to scroll to
another point. Holding down either button scrolls at high
speed. It takes about 15 seconds before moon data
appears after you display the name of a point.
• If you do not perform any button operation, about two
seconds after you enter the Moon Data Mode the
display changes automatically to show the moon data
for today’s date. Pressing
EE
EE
E advances to the next date,
while
BB
BB
B goes back to the previous date. Holding down
either button scrolls the date at high speed. It takes about
15 seconds before moon data appears after you display
a date.
• Note that once the moon data display appears, you cannot change to another point. To change to another point,
press
AA
AA
A twice to return to the point name display and
make the changes you want.
• Moon data is displayed in 5-minute units.
• For days around the full moon (moon age 15) or new
moon (moon age 29.5), there are days where there is
no moon up or moon down. In such cases, the xx:xx
is shown for the moon up or moon down time.
Moon down
time
TIDE GRAPH MODE
1.Press
AA
AA
A while in the Moon Data Mode to enter the Tide
Graph Mode. The display shows the tide graph for 6:00
am on the date that was selected in the Moon Data
Mode.
2. Use
EE
EE
E (forward) and
BB
BB
B (back) to scroll the time in 1-
hour increments. Holding down either button changes
the time at high speed.
• Note that once you enter the Tide Graph Mode, you
cannot change to another point or date. To change to
another point or date, press
AA
AA
A to return to the Moon
Data Mode, make the changes you want, and then reenter the Tide Graph Mode.
SUNRISE/SUNSET MODE
• The today’s sunrise and sunset data for your home time
point appears first when you enter the Sunrise/Sunset
Mode.
• Press
EE
EE
E (forward) or
BB
BB
B (back) within about two
seconds after entering the Sunrise/Sunset Mode to scroll
to another point. Holding down either button scrolls at
high speed. It takes about 15 seconds before sunrise/
sunset data appears after you display the name of a
point.
• If you do not perform any button operation, about two
seconds after you enter the Sunrise/Sunset Mode the
display changes automatically to show the sunrise/
sunset data for today’s date. Pressing
EE
EE
E advances to
the next date, while
BB
BB
B goes back to the previous date.
Holding down either button scrolls the date at high
speed. It takes about 15 seconds before sunrise/sunset data appears after you display a date.
• Note that once the sunrise/sunset data display appears, you cannot change to
another point. To change to another point, press
AA
AA
A twice to return to the point
name display and make the changes you want.
• Sunrise/sunset data is displayed in 5-minute units.
COUNTDOWN ALARM MODE
The countdown alarm can be set within a range of 1 second to 24 hours. When the
countdown reaches zero, an alarm sounds for 10 seconds or until you press any
button.
To set the countdown start time and to switch auto repeat timing on and off
1.Hold down
AA
AA
A while in the Countdown Alarm Mode. The
minutes digits flash on the display because they are
selected
.
2.Press
CC
CC
C to change the selection in the following
sequence.
3. While the hour, minutes, or seconds digits are flashing, press
EE
EE
E to increase the
value or
BB
BB
B to decrease it. Holding down either button changes the value at thigh
speed.
More than 15 degrees too high More than 15 degrees too low
ON
Hold down
EE
EE
E
Auto light
switch indicator
OFF
New Moon Crescent
Moon
Half Moon
First Quarter
Full Moon Half Moon
Last Quarter
Point name
Hour
Minutes
Moom age
Moon up time
Year
Month
Day
High
Ebb Flood
High
Tide graph
Day of week
Month - Day
Time
Low
Point name
Hour
Minutes
Sunset time
Sunrise time
1/10 Second
Mode indicator
Hour
Seconds
Minutes
Minutes
Auto repeat on/off
Seconds Hour
Moon
Moon
Location
Earth
Moon-UP
Moon-Down
Page 3

2012-3
4.While the auto repeat indicator is flashing, press
EE
EE
E toggle auto repeat on and off.
The auto repeat indicator is on the display only while you are setting the countdown start time.
• To set the starting value of the countdown time to 24 hours, set 0:00' 00".
5.After you set the countdown start time and auto repeat timing on and off, press
AA
AA
A
to return to the Countdown Alarm Mode.
To use the countdown alarm
1.Press
DD
DD
D while in the Countdown Alarm Mode to start the countdown alarm.
2.Press
DD
DD
D again to stop the countdown alarm.
• You can resume countdown alarm operation by pressing
DD
DD
D.
3.Press
DD
DD
D to stop the countdown alarm, and then press
BB
BB
B to reset the countdown
time to its starting value.
• When the end of the countdown is reached and auto repeat timing is off, the alarm
sounds for 10 seconds or until you stop the alarm by pressing any button. Countdown timing stops and the countdown time is automatically reset to its starting
value after the alarm stops.
To turn the progress beeper on and off
1.While the Countdown Alarm Mode screen shows its starting value or while a count-
down operation is in progress, press
BB
BB
B to toggle the progress beeper on and off.
• When the end of the countdown is reached while auto repeat is on, the alarm sounds,
but the countdown restarts from the beginning without stopping. You can stop the
countdown by pressing
DD
DD
D and manually reset to the start time by pressing
BB
BB
B.
• If you set a starting time of 10 seconds or less and have Auto Repeat turned on, the
countdown alarm tone (which normally sounds for 10 seconds) sounds for only one
second.
• When the progress beeper is turned on, the watch beeps as the countdown time
passes the 10, 5, 4, 3, 2, and 1-minute marks, and the 50, 40, 30, 20, 10, 5, 4, 3, 2,
and 1-second marks.
OFF
STOPWATCH MODE
The stopwatch Mode lets you measure elapsed time, split
times, and two finishes. The range of the stopwatch is 23
hours, 59 minutes 59.99 seconds. You can use the EL
backlight at any time while the stopwatch is operating by
pressing
EE
EE
E.
• Pressing
AA
AA
A in the Stopwatch Mode While an elapsed
time operation is in progress or while an elapsed time
(other than all zeros) is stopped on the display causes
the upper right display to alternate between the current
time and stopwatch time.
Countdown Start
In addition to the normal instant start at the press of a button, the stopwatch can also
be set up to start timing automatically after five seconds have elapsed.
• While the stopwatch is stopped and cleared to all zeros, press
AA
AA
A to toggle count-
down start on and off. Turning on countdown start displays 5" in the lower part of
the display. 00' 00" 00 is displayed when countdown start is turned off. The upper
part of the display always shows the current time.
Elapsed time measurement
Start
Stop Re-start Stop Clear
Start
Split Split release Stop Clear
Start
Split Stop Split release Clear
Split time measurement
Split time and 1st-2nd place times
First runner
finishes.
Second runner
finishes.
Record time of
first runner.
Record time of
second runner.
• To set a date alarm
Set the month, day, hour and minutes for the alarm time. This type of setting causes
the alarm to sound at the specific time, on the specific date you set.
• To set a 1-month alarm
Set the month, hour and minutes for the alarm time. Set “xx” for the day. This type
setting causes the alarm to sound every day at the time you set, only during the
month you set.
• To set a month alarm
Set the day, hour and minutes for the alarm time. Set “x” for the month. This type of
the setting causes the alarm to sound every month at the time you set, on the day you
set.
To set the alarm time
1.Press
EE
EE
E while in the Alarm Mode to select Alarm 1 through Alarm 3 and Hourly
Time Signal.
2. After you select an alarm, hold down
AA
AA
A until the hour digits start to flash on the
display. The hour digits flash because they are
selected
. At this time the Alarm is
automatically switched on.
3.Press
CC
CC
C to change the selection in the following sequence.
4.Press
EE
EE
E to increase the number or
BB
BB
B to decrease it. Holding down either button
changes the current number at high speed.
• The format (12-hour and 24-hour) of the alarm time matches the format you select
for normal timekeeping.
• When setting the alarm time using the 12-hour format, take care to set the time
correctly as morning or afternoon.
5.After you set the alarm time, press
AA
AA
A to return to the Alarm Mode.
• If you do not operate any button for a few minutes while a selection is flashing, the
flashing stops and the watch goes back to the Alarm Mode automatically.
To stop the alarm
• Press any button to stop the alarm after it starts to sound.
To switch an alarm on and off
1.In the Alarm Mode, press
EE
EE
E to select an alarm.
2. When an alarm you want to is selected, press
BB
BB
B to
switch it on and off.
• The individual alarm indicators let you see at a glance
the on/off status of each alarm. The meaning of these
indicators depend on the mode you are in.
• The general alarm indicator is displayed in all modes.
To switch the Hourly Time Signal on and off
1.In the Alarm Mode, press
EE
EE
E to select the Hourly Time
Signal.
2.When Hourly Time Signal is selected, press
BB
BB
B to switch
it on and off.
• If Hourly Time Signal is on, the Hourly Time Signal On
indicator is shown on the display when you change to
another mode.
To test the alarm
Hold down
EE
EE
E while in the Alarm Mode to sound the alarm.
ALARM MODE
You can set three independent alarms with the hour,
minutes, month and day. Use the Alarm Mode to turn the
alarm and the Hourly Time Signal on and off.
• When an alarm is turned on, an alarm tone sounds for
20 seconds when the preset time reached.
• When the Hourly Time Signal is turned on, the watch
beeps every hour on the hour.
Alarm types
The types of alarm you get depends on the information
you set.
• To set a daily alarm
Set the hour and minutes for the alarm time. Set “x” for
the month and “xx” for the day. This type of setting
causes the alarm to sound everyday at the time you set.
Hourly time signal on
indicator
Auto repeat ON
Auto repeat OFF
Press
BB
BB
B
ON
Mode indicator
Hours
1/100
Second
Minutes
Seconds
Countdown start on
General alarm on indicator
Hour
Minutes
Day
Month
Alarm number
Individual alarm on
indicator
Mode
indicator
Alarm 1 Alarm 3Alarm 2
Hourly Time Signal
Hour Minutes Month Day
Alarm number
Individual alarm on
indicator
General alarm on indicator
AL-1
AL-2
AL-3
Individual alarm on
indicator
Page 4

2012-4
North America
NO.
CITY
THE DIFFERENCE
FROM GMT FOR
STANDARD TIME
LONGITUDE
LATITUDE
1. PAGO PAGO –11 171°W 14°N
2. HONOLULU –10 158°W 21°N
3. ANCHORAGE –9 150°W 61°N
4. NOME –9 165°W 65°N
5. LOS ANGELES –8 118°W 34°N
6. SAN FRANCISCO –8 122°W 38°N
7. LAS VEGAS –8 115°W 36°N
8. VANCOUVER –8 123°W 49°N
9. SEATTLE –8 122°W 48°N
10. DENVER –7 105°W 40°N
11. EL PASO –7 106°W 32°N
12. EDMONTON –7 114°W 54°N
13. CHICAGO –6 88°W 42°N
14. HOUSTON –6 95°W 30°N
NO.
CITY
THE DIFFERENCE
FROM GMT FOR
STANDARD TIME
LONGITUDE
LATITUDE
15.
DALLAS/FORT WORTH
–6 97°W 33°N
16. NEW ORLEANS –6 90°W 30°N
17. WINNIPEG –6 97°W 50°N
18. MEXICO CITY –6 99°W 19°N
19. NEW YORK –5 74°W 41°N
20. MONTREAL –5 74°W 45°N
21. DETROIT –5 83°W 42°N
22. MIAMI –5 80°W 26°N
23. BOSTON –5 71°W 42°N
Add 1 hour to the difference time if DST
(Daylight Saving Time) is used. (EX. if difference
of standard time is +2, that of DST is +3.)
180° 165° 150°
135° 120° 105° 90°
75°
180°
165°
0°
15°
60° 45°
60°
45°
30°
15°
.
.
.
.
.
.
.
.
.
.
.
.
.
.
.
.
.
.
.
.
.
.
1
2
3
4
12
8
9
6
5
7
.
10
11
15
14
18
22
16
21
13
19
23
20
17
TIME ZONE CHART
Central and South America
0°
15°
30°
105°
90°
75° 60° 45°
45°
1
2
3
4
5
7
10
6
11
1
12
9
8
.
.
.
.
.
.
.
.
.
.
.
.
NO.
CITY
THE DIFFERENCE
FROM GMT FOR
STANDARD TIME
LONGITUDE
LATITUDE
1. PANAMA CITY –5 80°W 9°N
2. LIMA –5 77°W 12°S
3. BOGOTA –5 74°W 5°N
4. CARACAS –4 67°W 10°N
5. LA PAZ –4 68°W 17°S
6. SANTIAGO –4 71°W 33°S
7. PORT OF SPAIN –4 61°W 11°N
8. RIO DE JANEIRO –3 43°W 23°S
9. SAO PAULO –3 47°W 24°S
10. BRASILIA –3 48°W 16°S
11. BUENOS AIRES –3 58°W 35°S
12. MONTEVIDEO –3 56°W 35°S
NO.
CITY
THE DIFFERENCE
FROM GMT FOR
STANDARD TIME
LONGITUDE
LATITUDE
Add 1 hour to the difference time if DST
(Daylight Saving Time) is used. (EX. if difference
of standard time is +2, that of DST is +3.)
Europe
NO.
CITY
THE DIFFERENCE
FROM GMT FOR
STANDARD TIME
LONGITUDE
LATITUDE
1. AZORES –1 25°W 38°N
2. LONDON +0 0°E 51°N
3. DUBLIN +0 6°W 53°N
4. CASABLANCA +0 8°W 34°N
5. LISBON +0 9°W 39°N
6. PARIS +1 2°E 49°N
7. MILAN +1 9°E 45°N
8. ROME +1 12°E 42°N
9. MADRID +1 4°W 40°N
10. AMSTERDAM +1 5°E 52°N
11. HAMBURG +1 10°E 54°N
12. FRANKFURT +1 9°E 50°N
13. VIENNA +1 16°E 48°N
14. STOCKHOLM +1 18°E 59°N
NO.
CITY
THE DIFFERENCE
FROM GMT FOR
STANDARD TIME
LONGITUDE
LATITUDE
15. ATHENS +2 24°E 38°N
16. HELSINKI +2 25°E 60°N
17. ISTANBUL +2 29°E 41°N
Add 1 hour to the difference time if DST
(Daylight Saving Time) is used. (EX. if difference
of standard time is +2, that of DST is +3.)
.
.
.
.
.
.
.
.
.
.
.
.
.
.
.
.
17
15
13
8
7
6
9
5
4
12
11
16
14
10
2
3
.
1
15° 0° 15° 30°
45°
45°
60°
Africa and Middle East
NO.
CITY
THE DIFFERENCE
FROM GMT FOR
STANDARD TIME
LONGITUDE
LATITUDE
1. BEIRUT +2 35°E 34°N
2. DAMASCUS +2 36°E 33°N
3. CAPE TOWN +2 18°E 34°S
4. KUWAIT +3 48°E 29°N
5. RIYADH +3 47°E 25°N
6. JEDDAH +3 39°E 21°N
7. ADEN +3 45°E 13°N
8. ADDIS ABABA +3 39°E 9°N
9. NAIROBI +3 37°E 1°S
10. DUBAI +4 55°E 25°N
11. ABU DHABI +4 54°E 24°N
12. MUSCAT +4 58°E 23°N
13. KARACHI +5 67°E 25°N
14. PRAIA –1 23°W 15°N
NO.
CITY
THE DIFFERENCE
FROM GMT FOR
STANDARD TIME
LONGITUDE
LATITUDE
15. DAKAR +0 17°W 15°N
16. ABIDJAN +0 4°W 5°N
Add 1 hour to the difference time if DST
(Daylight Saving Time) is used. (EX. if difference
of standard time is +2, that of DST is +3.)
30°
75°60°45°30°15°0°
15°
30°
15°
0°
15°
9
8
7
6
5
4
1
3
2
1
15
14
13
12
1
11
10
16
.
.
.
.
.
.
.
.
.
.
.
.
.
.
.
.
Asia and South Pacific
NO.
CITY
THE DIFFERENCE
FROM GMT FOR
STANDARD TIME
LONGITUDE
LATITUDE
1. DHAKA +6 90°E 24°N
2. BANGKOK +7 100°E 14°N
3. JAKARTA +7 107°E 6°S
4. PHNOM PENH +7 105°E 12°N
5. HANOI +7 106°E 21°N
6. VIENTIANE +7 103°E 18°N
7. HONG KONG +8 114°E 22°N
8. SINGAPORE +8 104°E 1°N
9. KUALA LUMPUR +8 102°E 3°N
10. BEIJING +8 116°E 40°N
11. TAIPEI +8 122°E 25°N
12. MANILA +8 121°E 15°N
13. PERTH +8 116°E 32°N
14. ULANBATOR +8 107°E 48°N
15. TOKYO +9 140°E 36°N
NO.
CITY
THE DIFFERENCE
FROM GMT FOR
STANDARD TIME
LONGITUDE
LATITUDE
16. SEOUL +9 127°E 38°N
17. PYONGYANG +9 126°E 39°N
18. SYDNEY +10 151°E 34°S
19. MELBOURNE +10 145°E 38°S
20. GUAM +10 145°E 13°N
21. NOUMEA +11 166°E 22°S
22. PORT VILA +11 168°E 18°S
23. WELLINGTON +12 175°E 41°S
24. CHRISTCHURCH +12 173°E 43°S
25. NADI +12 178°E 18°S
26. NAURU ISLAND +12 166°E 1°S
27. PAPEETE –10 150°W 18°S
Add 1 hour to the difference time if DST
(Daylight Saving Time) is used. (EX. if difference
of standard time is +2, that of DST is +3.)
..
.
.
.
.
.
.
.
.
.
.
.
.
.
.
.
.
.
.
.
.
.
1
11
2
4
9
8
6
14
5
7
10
17
16
15
3
12
20
26
22 252127
23
24
45°
30°
15°
0°
15°
30°
45°
150°165°180°165°150°135°120°105°90°
75°
60°
.
.
.
13
19
18
Page 5

2012-5
Point name Longitude Latitude
OGASAWARA 142° E27° N 9 6:30
MORETON 153° E27° S 10 10:00
MAUI 157° W21° N –10 4:00
VANCOUVER 126° W50° N –8 1:00
BAJA CA 110° W24° N –7 8:50
BAHAMAS 79° W27° N –5 7:40
CANARY IS 17° W28° N 0 0:00
CORSICA 9° E43° N 1 9:00
ZANZIBAR 39° E6° S 3 3:30
BALI 115° E9° S 8 10:50
GMT
differential
Lunar Tide
Interval
OGASAWARA
Area around Chichijima Island, which is one of the Ogasawara Islands located about 1,000 kilometers south of Tokyo.
MORETON Area around Moreton Island, located just off Brisbane, Australia.
MAUI Area around Maui, located northwest of Hawaii Island.
VANCOUVER Area around Johnstone Strait, Vancouver, Canada.
BAJA CA Area around the central part of the Baja Peninsula, located south
of California in Mexico.
BAHAMAS Area around the Little Bahama Bank, located north of the Grand
Bahama Island.
CANARY IS Area around Gomera Island, which is part of the Canary Islands
(Spain).
CORSICA Ligurian Sea, located north of Corsica (France).
ZANZIBAR Area off of Zanzibar, Tanzania.
BALI Area around Bali, Indonesia.
PRESET LOCATION CHART
OGASAWARA
CORSICA
■ MAUI
BAHAMAS
■
MORETON
VANCOUVER
CANARY IS
■
■
■
■
■ ZANZIBAR
■
■
■
BAJA CA
BALI
 Loading...