

Page 1

User’s Guide
Page 2

Introduction
Congratulations upon your selection of the CASIO PC-UNITE Watch and
PC-UNITE Watch Version 2.0 Software Application.
To get the most out of your purchases, be sure to carefully read this manual
and keep it on hand for later reference when necessary. The PC-UNITE
Watch also has a separate Module 1910 User’s Guide that also contains
information about watch operation during data transfer and synchronization.
• PC-UNITE is a trademark of CASIO COMPUTER CO., LTD.
• Microsoft, Windows 95, Windows 98, and Windows NT4.0 are either
registered trademarks or trademarks of Microsoft Corporation in the
United States and/or other countries.
• All other product and company names mentioned herein may be the
trademarks of their respective owners.
• The contents of this manual are subject to change without notice.
• No part of this manual may be reproduced, transmitted, transcribed,
stored in a retrieval system, or translated into any human or computer
language, in any form or by any means, without the written permission
of CASIO COMPUTER CO., LTD.
• CASIO COMPUTER CO., LTD. shall not be held responsible by you or
any third party for direct, incidental, or consequential damages, losses,
or expense caused by use of this application.
E
Page 3

About this Manual...
This manual provides detailed explanations of PC-UNITE Watch Software, an
application that lets you manage your PC-UNITE Watch data on a personal
computer. It also provides you with various data synchronization functions and
settings that help to ensure that the PC-UNITE Watch Software data and PCUNITE Watch data always match.
Important!
The procedures in this manual assume that you are already familiar with
common personal computer and Windows operations such as click, doubleclick, drag, drop, select, scroll bars, dialog boxes, etc. If you need information
on these or any other standard operations, see the documentation that comes
with your computer and with Windows.
Symbols and Terminology
The following explains the symbols and terminology used throughout this
manual.
Terminology
• The term “this application” refers to PC-UNITE Watch Version 2.0 Software
Application.
• The term “the watch” refers to your CASIO PC-UNITE Watch (Module
1910).
• The term “Windows” refers to Microsoft® Windows® 95, Windows® 98, or
Windows NT® 4.0.
• The term “PIM application” refers to Microsoft® OutlookTM or other data
organizer. “PIM” stands for “personal information management”.
On-screen Menus, Commands, Buttons, and Dialog Box Text
• All on-screen text (menu names, commands, buttons, dialog box text, etc.)
is indicated in bold.
Examples: Start button, OK button.
• The sequence required to perform a pull-down menu operation is indicated
by showing each step of the sequence separated by hyphens. For example,
the following sentence would indicate you should pull down the Edit menu,
and then click Insert: Click Edit – Insert.
Keyboard Keys
• Keyboard keys are indicated by their key cap text within square brackets:
[Enter] key, [Shift] key, [Ctrl] key.
E-1
Page 4

Contents
1. Getting Ready ..................................................................E-4
System Requirements ................................................................... E-4
Installing the Application................................................................ E-5
Starting Up and Quitting the Application........................................ E-5
2. Getting Acquainted .........................................................E-6
About the Toolbar ......................................................................... E-6
Moving the Toolbar ........................................................................ E-6
Changing T oolbar Orientation........................................................ E-7
Using the Control Menu................................................................. E-8
General Data Communication Procedure ..................................... E-8
3. Inputting Data .................................................................. E-9
Data Files and Data Modes ........................................................... E-9
Using the File Menu .................................................................... E-10
Data Input Basics ........................................................................ E-10
Editing Data ................................................................................. E-12
Deleting Data............................................................................... E-12
Cutting, Copying, and Pasting..................................................... E-13
Sorting Data ................................................................................ E-13
User Data .................................................................................... E-14
To Do Mode ................................................................................. E-14
Schedule Mode ........................................................................... E-16
Browser Mode ............................................................................. E-17
Contact Mode .............................................................................. E-20
4. Importing and Exporting Data ......................................E-22
Supported File Formats............................................................... E-22
Importing Data ............................................................................. E-22
Using the Import Format Dialog Box ........................................... E-23
Import Format Template Operations............................................ E-25
Contents and Options.................................................................. E-26
Exporting Data............................................................................. E-28
E-2
Page 5

5. Data Communication ....................................................E-29
Data Transfer Check Marks......................................................... E-29
Verifying Data .............................................................................. E-31
Synchronizing Data ..................................................................... E-32
Controlling Transfer Data Volume ............................................... E-34
Converting Data for Transfer to the Watch .................................. E-35
Positioning the Watch for Data Communication .......................... E-35
Data Transfer Troubleshooting.................................................... E-35
6. Reference .......................................................................E-37
Setting Up the Application ........................................................... E-37
Maximum Number of Input Characters for Each Data Field........ E-40
Online Help.................................................................................. E-40
Watch Name Error Messages ..................................................... E-41
Synchronize Dialog Boxes .......................................................... E-41
Uninstalling the Application ......................................................... E-43
E-3
Page 6

1 Getting Ready
This chapter describes the minimum computer system requirements for
running this application, how to install the application, and how to start up and
quit the application.
System Requirements
The following are the minimum requirements for installation and operation of
this application.
Minimum Requirements
• IBM PC/AT or compatible computer with D-Sub 9-pin connector running
Windows 95, 98, or NT4.0.
• 4 MB available hard disk space
• 640 × 480 256-color monitor or better
• CD-ROM drive
• Mouse or other pointing device
Infrared Adapter
Use of the CASIO PAD-2 Infrared Adapter that comes with the application is
recommended. The following infrared adapters are also supported.
• CASIO PAD-1
• ACTiSYS ACT-IR200L Infrared Interface
• Extended Systems JetEye PC (ESI-9680)
• Parallax litelink
• Tekram IR-210
• Built-in IrDA standard infrared port (Windows 95 only)
Important!
• Windows 95 Infrared Monitor must be disabled in order to use this
application. See the documentation that comes with Windows 95 for details
on how to disable Infrared Monitor.
• For a computer running Windows 98 or NT4.0, use the PAD-2 Infrared
Adapter or another compatible adapter.
E-4
Page 7

Installing the Application
1. Exit all Windows programs, including those that launch automatically at
startup.
2. Insert the CD-ROM that contains the application into your computer’s CD-
ROM drive.
3. On the Start menu, point to Settings and then click Control Panel.
4. Double-click Add/Remove Programs.
5. In the dialog box that appears, click Install.
6. Carefully follow the instructions that appear on your computer’s screen to
complete installation.
Starting Up and Quitting the Application
Use the following procedures to start up and quit the application.
To start up the application
Click Start, point to Programs and then point to PC-UNITE Watch. Next, click
PC-UNITE Watch.
Toolbar
• See “About the Toolbar” for a description of the toolbar.
To quit the application
Click the close box in the upper right corner of the toolbar to quit the
application.
E-5
Page 8
2 Getting Acquainted
This chapter provides you with basic information and terminology you need to
know about in order to navigate around the application.
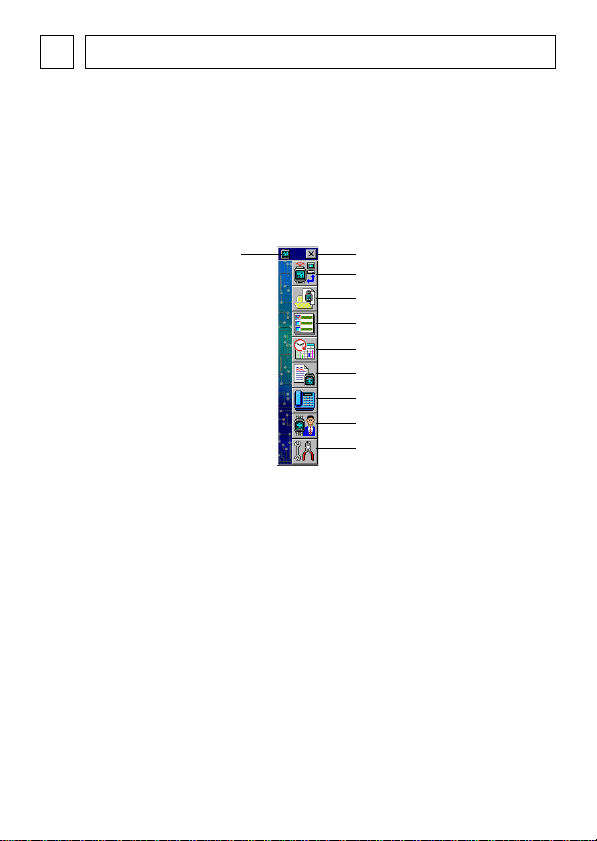
About the Toolbar
All functions can be accessed from the toolbar that is on your computer’s
screen whenever the application is running.
Toolbar
Control Menu icon
Moving the Toolbar
You can move the toolbar either with the mouse or with a Control Menu
command.
To move the toolbar with the mouse
1. Move the mouse pointer anywhere inside the toolbar’s title bar.
2. Holding down the left mouse button, drag the toolbar to the location where
you want it.
Close box
Transfer button
File button
To Do button
Schedule button
Browser button
Contact button
User button
Settings button
To move the toolbar with the Control Menu command
1. Display the Control Menu and click Move.
2. Use the arrow buttons of your computer’s keyboard to move the toolbar
around the screen.
3. When the toolbar is in the location where you want, click the mouse.
E-6
Page 9
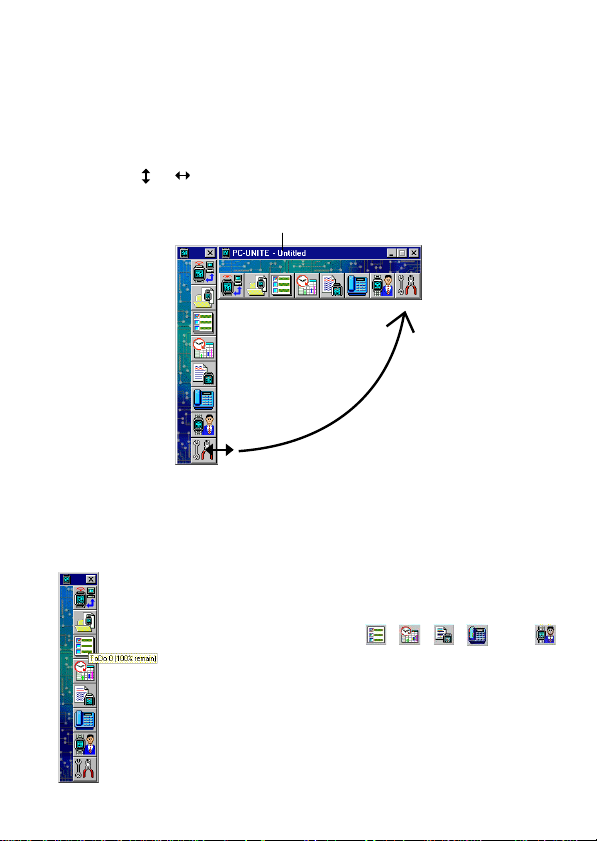
Changing Toolbar Orientation
Use the following procedures to change the orientation of the toolbar between
vertical and horizontal.
To change toolbar orientation
1. Move the mouse pointer anywhere along the lower edge of the toolbar
(when it is vertical) or the right edge (when horizontal), until the pointer
changes to or .
2. Drag the pointer down or up to change the toolbar orientation.
Title bar (current data file name)
• When you go from vertical to horizontal, you must drag to the right. The
orientation of the toolbar will not change if you drag to the left.
• See “Arrange” and “Icon” for other toolbar settings.
Pop-up Help
Moving the mouse pointer over any of the
toolbar buttons displays a pop-up help
message that shows the name of the button. In
the case of the , , , , and
buttons, pop-up help also shows values that
indicate how much watch memory would
remain if the data in the corresponding data
mode were downloaded to the watch.
E-7
Page 10
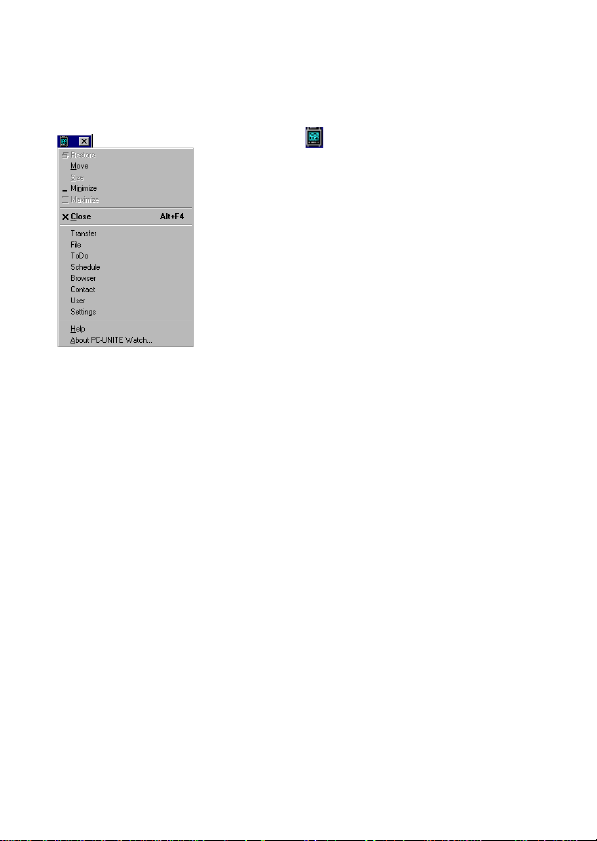
Using the Control Menu
The Control Menu provides you with a variety of commands for controlling the
toolbar and the application.
To open the Control Menu
Click the icon to open the Control Menu.
• Most of the commands in the Control Menu
can be performed using the toolbar buttons.
All of the procedures in this manual are
based on toolbar buttons, except when the
Control Menu is the only way a function can
be executed.
General Data Communication Procedure
The following is the general procedure you must follow when performing data
communication between this application and the watch. Full details on how to
perform each of these steps are explained in later sections of this manual.
Important!
The correct current date and time must be set on both the watch and your
computer for proper data communication. See the documentation that comes
with the watch and your computer for details on how to set the current time
and date.
1. Make the appropriate settings on your computer.
• Connect the PAD-2 adapter to your computer’s COM port.
2. Input the data in the application for transfer.
• See “3 Inputting Data” for data input procedures.
3. Set up the application.
• See “5 Data Communication” for data communication procedures.
4. Start data communication on the watch and your computer.
E-8
Page 11

3 Inputting Data
This chapter provides details about data files, including how to create them
and input data in each mode.
Data Files and Data Modes
This application has five
data: To Do, Schedule, Browser, Contact, and User. Data you input in the data
modes are saved in
Once you open a data file, any data you input in the To Do, Schedule,
Browser, Contact, and User modes can be saved in the currently open data
file. When you save the data, it is also assigned the watch name that is
currently selected on the General tab of the Option dialog box (displayed
when you click the button).
You can create as many data files as you like, which means you can maintain
separate files for multiple watches, each of which can be identified by its own
unique watch name.
The ability to assign specific watch names to files provides some security
against the wrong data accidentally being downloaded to the wrong watch.
Note
• Only one data file can be open at a time, and the name of the currently
open data file is shown in the Windows task bar.
• The currently open data file is closed automatically whenever you open a
data file or create a new one.
• Make sure you always keep the data stored in watch memory and the data
stored on your computer up to date with each other. If you do, you can
always restore the data in watch memory if it is deleted due to battery
replacement or any other reason.
data modes
data files
, which you can use to input and recall
.
E-9
Page 12
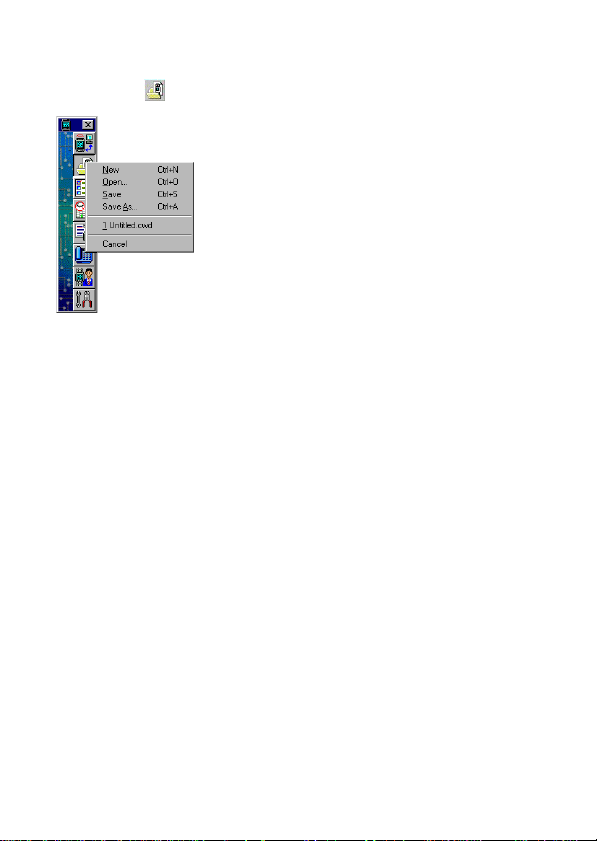
Using the File Menu
Data file operations are all performed using the File Menu. To display the file
menu, click the button.
To create a new data file
• When you first start up the application, it
automatically creates an unnamed data file
with the extension “cwd”.
• You can also create a new data file at any
time by clicking New on the File Menu.
To open an existing data file
• Click Open on the File Menu, and then use the standard Windows file
selection dialog box that appears to select the file you want to open.
• In addition to its commands, the File Menu also shows the last four files you
had open. You can re-open any of the files shown by clicking its name in the
File Menu.
To save a data file
After inputting or editing data in one of the application’s data modes, you can
save it by clicking Save (to save the file using its existing name) or Save As
(to assign a new name to the file) on the File Menu. Save and Save As are
standard Windows commands. See your Windows documentation for details.
Data Input Basics
This section contains general information about inputting text, dates, and
times. These procedures apply to all data modes, except where noted
otherwise.
E-10
Page 13
To input text
1. Click the field where you want to input the text.
• This causes a text input box to appear.
• If the field already contains text data, the existing text is shown inside the
text input box.
2. Input the text you want into the text box.
• See “Maximum Number of Input Characters for Each Data Field” for details
on the number of characters you can input into each field.
• You can select the text in a field and then use the Edit menu to cut or copy
from one field and paste it into another, or to clear the text in a field. These
are standard Windows commands, so see your Windows documentation for
details.
3. After the text is the way you want, press your computer’s [Enter] key to
register it and close the text input box.
To input dates
Use the following procedure to input dates in the Schedule Mode and To Do
Mode.
1. Click the Date field to display the two-month date selection dialog box.
• The format used for the date is the one you have selected for your Windows
Control Panel settings.
2. Set the date you want.
• Use the and arrows next to the year box to change the year.
• Click next to the month to open a menu of months, and click the one you
want.
E-11
Page 14
• Clicking a date inside a calendar sets the date and closes the calendar
window.
• You can specify a date within the range of January 1, 1995 to December
31, 2037.
To input times
1. Click the Time field to select it.
2. Set the time you want.
• You can change the displayed time using the and arrows next to
the Time field, or you can input values directly into the Time field.
Editing Data
Use the following procedure to edit records that have already been input.
1. Click the field whose data you want to edit.
2. Make any changes you want.
• Use the data input procedures in “Data Input Basics” to edit data.
Deleting Data
Use the following procedure to delete records.
1. Click the line number of the line you want to delete. This causes the entire
line to become highlighted.
• You can also select (highlight) multiple records using [Shift]-click and [Ctrl]click. See your Windows documentation for details about [Shift]-click and
[Ctrl]-click.
• To select all records on the screen, click Edit – Select All.
2. Click Edit – Clear.
E-12
Page 15

Cutting, Copying, and Pasting
You can cut, copy, and paste record or field data using the standard Windows
commands on the Edit menu.
To cut, copy, and paste data
1. Click the field or the line number of the record you want to cut or copy.
• You can also select (highlight) multiple records using [Shift]-click and [Ctrl]click. See your Windows documentation for details.
2. Click Edit – Cut or Edit – Copy.
3. Click the location where you want to paste the data.
4. Click Edit – Paste.
Sorting Data
After you input To Do and Schedule data, you can use the Sort menu to sort
it.
The options available on the Sort menu depend on the data mode you are in.
To Do Mode
• by Priority
• by Date (Ascending or Descending)
• Completed Items Last
Schedule Mode
• by Date & Time (Ascending or Descending)
• Past Items Last
Contact records are automatically sorted into alphabetical order on the name
data only.
E-13
Page 16

User Data
Use the User dialog box to input data about the user of the watch. To display
the User dialog box, click the button on the toolbar.
To input user data
1. Click to display the User dialog box.
2. Input the user data you want into the text boxes provided.
• See “Data Input Basics” for details on inputting text data.
3. Use the Transfer checkbox to specify whether you want the user data to
be transferred to the watch (checked) or not (unchecked) during data
transfer operations.
4. After you are finished inputting all the user data you want, click OK to save
it and close the dialog box.
To Do Mode
With the To Do Mode, you can keep track of tasks you need to perform to
ensure you do not forget them. To enter this mode, click the button on the
toolbar.
Data transfer check mark
Description
Completed check
Priority
Date
Line number
E-14
Page 17

To Do Data Fields
The To Do Mode has a total of 4 data fields: Description, Priority, Completed
check, and Date. In addition, there are two other fields at the head of each
line: a line number and a data transfer check mark field.
To input To Do data
1. Click to enter the To Do Mode.
2. Click Edit – Insert.
New line
• You can also create a new To Do task by clicking the Description field in
the line under the last task in the To Do screen.
3. Input the description text, priority, and date you want.
• You must input text into the Description field in order to create a new task.
The task will not be saved if it does not contain description text.
4. After you are finished inputting a task, click another task.
5. Repeat steps 2 through 4 to input more data if you want.
6. After you are finished inputting all the To Do Mode data you want, click OK
to exit.
• When you next enter the To Do Mode, all of the tasks will be sorted
automatically in accordance with the sort option selected in the Sort menu.
To set the priority of a task
1. In the To Do Mode, click the Priority field.
2. You can change the priority value using the and arrows next to
the field, or you can input values directly into the field.
• You can set a priority for a task in the range of 1 (highest) through 4
(lowest).
• If you input a priority value greater than 4, the priority will automatically
change to 4 when you click another field or press the [Enter] key.
E-15
Page 18

Completed Tasks
Once a task is completed, you can place a check mark into the C...
(Completed) field. Then you can use a simple operation to delete all
completed tasks in order to keep your To Do list up to date.
To check a completed task
In the To Do Mode, click the C... (Completed) field to toggle it between
checked (completed) and unchecked (pending).
To delete completed tasks
1. In the To Do Mode, click Edit – Delete Completed.
2. In response to the confirmation message that appears, click OK to delete
all completed tasks.
Schedule Mode
The Schedule Mode gives you an instant overview of your upcoming
appointments at a glance. To enter this mode, click the button on the toolbar.
Data transfer check mark
Description
All Day Event
Date
Line number
Time
Schedule Data Fields
The Schedule Mode has a total of 4 data fields: Description, All Day Event,
Date, and Time. In addition, there are two other fields at the head of each line:
a line number and a data transfer check mark field.
E-16
Page 19

To input Schedule data
1. Click to enter the Schedule Mode.
2. Click Edit – Insert.
New line
• The current date and time are input into the new line automatically.
• You can also create a new appointment by clicking the Description field in
the line under the last appointment in the Schedule screen.
3. Input the description text and date you want.
• You must input text into the Description field in order to create a new
appointment. The appointment will not be saved if it does not contain
description text.
4. Input the time you want, or click the Al... (All Day Event) field.
• Clicking the Al... (All Day Event) field stores the appointment as an All Day
Event. Note that an All Day Event is displayed without a time field on the
watch display.
5. After you are finished inputting an appointment, click another appointment.
6. Repeat steps 2 through 5 to input more data if you want.
7. After you are finished inputting all the Schedule Mode data you want, click
OK to exit.
• When you next enter the Schedule Mode, all of the appointments will be sorted
automatically in accordance with the sort option selected in the Sort menu.
To delete past appointments
Note
Appointments scheduled for the current date are not deleted, even if their
times are past.
1. In the Schedule Mode, click Edit – Delete Past Items.
2. In response to the confirmation message that appears, click OK to delete
all past appointments.
Browser Mode
The Browser Mode of this application provides you with a degree of text
processing and editing capabilities. To enter this mode, click the button on
the toolbar.
Data transfer
check mark
Page number
Open/Close
button
E-17
Page title
Page 20

Browser Data Fields
The Browser Mode has only one data field named Contents. In addition, there
are three other fields at the head of each line: a line number, a data transfer
check mark field and an open/close button.
Pages
• Browser data is grouped according to units called
have up to 200 lines, and one line can have up to 127 characters.
• The line number field initially shows only two digits. If your data has more
than 99 lines, the line number is initially displayed as “..” to indicate that the
number cannot fit in the field. Use the cursor to drag the field separator at
the top of the list to the right, which widens the field and displays all three
digits of the line number.
• The Browser Mode has a default page named Watch Page. Whenever you
input Browser data on the watch, it is always stored in the Watch Page.
• The Watch Page appears as äWATCHäPAGE on the display of the
watch. The Watch Page cannot be renamed, deleted, or moved.
pages
. Each page can
Open/Close Button
Each click of the open/close button toggles a Browser page between being
open and closed.
Open Closed
Field
separator
• You can close all open
pages by clicking Page
– Close.
• A page must be open in
order to input text into it.
E-18
Page 21

To create a new user page
1. Click to enter the Browser Mode.
2. Click Page – Append New Page.
• This appends a new page above the Watch Page.
Default page title
Page
number
Page range indicator
Line
number
• Pages are assigned titles automatically as soon as they are created. You
can leave this default name as it is or change it to something else. See
“Data Input Basics” for details.
3. Now you can input text into the new page using the procedure starting from
step 3 under “To input text into a page”.
To input text into a page
1. Click to enter the Browser Mode.
2. Click the open/close button of the page where you want to input text.
Page number
Line number
• Any text already in the pages appears at this time. In the above sample
screen, the page does not contain any text yet, so line number 1 appears.
3. Click the Contents field in the new line and then input the text you want.
• You can input up to 200 lines per page, and each line can have up to 127
characters.
4. After the contents of the page are the way you want, click somewhere
outside of the Browser screen or click the open/close button to close the
page.
E-19
Page 22

To move a user page or line
1. In the Browser Mode, move the mouse pointer to the user page or line
number you want to move.
2. While holding down the mouse button, drag the user page or line number
to its new location and release the mouse button.
• You cannot move the Watch Page.
• You cannot move a user page so it is under the Watch Page.
To jump between page titles
On the Page menu, click Next to jump to the nearest page title below the
currently selected (highlighted) line, or Previous to jump to the nearest page
title above.
• You can also press function key [F3] to jump to the next page title or [Shift]
+ [F3] to jump to the previous page title.
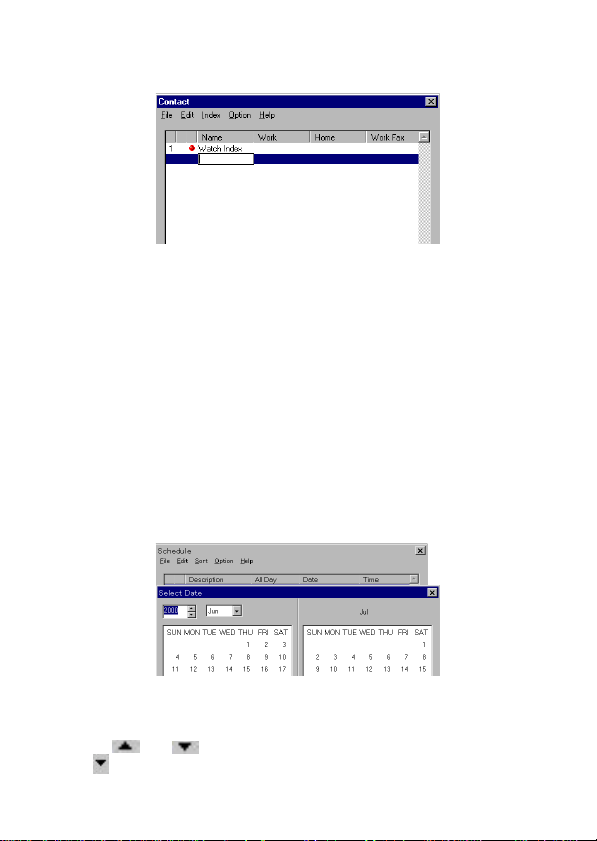
Contact Mode
The Contact Mode helps you keep track of all your telephone number and
other contact data. To enter this mode, click the button on the toolbar.
Data transfer check mark
Line number
Index marker
Data fields
Contact Data Fields
The Contact Mode has a total of 10 data fields: Name, Work, Home, Work
Fax, Home Fax, Call 1, Call 2, E-mail, Company, and OTHER. In addition,
there are three other fields at the head of each line: a line number, a data
transfer check mark field and an index marker. Only about four of the fields are
shown at any time on the Contact screen, so you need to use the left-right
scroll bar to shift the screen contents and view fields that are not shown.
Indexes
• An
index
is a kind of marker that you can use to group your data, making it
easier to manage.
• The Contact Mode has one default index named Watch Index.
E-20
Page 23

• Index titles are indicated by a red ball in the index marker field.
• Whenever you input Contact data on the watch, it is always stored in
Watch Index.
• Watch Index appears as äWATCHä on the display of the watch. Watch
Index cannot be renamed, deleted, or moved.
• Whenever you input a Contact record, the application automatically creates
a new index for the record. The name of the new index is the first letter in
the name field in the new record. The new index appears once you exit the
Contact Mode and then re-enter it.
• When you delete all of the Contact records under a letter (A, B, C) index,
the letter index remains on the display until you exit the Contact Mode. The
next time you enter the Contact Mode, the letter index will no longer be
shown.
To input Contact data
1. Click to enter the Contact Mode.
2. Click the line number of the line under which you want to insert a new
Contact item.
• If you want to input the new data into the Watch Index, you must select the
bottom line on the screen.
3. Click Edit – Insert.
4. Click the Name field in the new line and input a name.
5. Click the other fields and input the data you want.
• You can leave these other fields blank if you do not want to input any data.
• See “Data Input Basics” for details on inputting data.
6. After you are finished inputting data, click another record.
7. Repeat steps 3 through 6 to input more data if you want.
8. After you are finished inputting all the Contact Mode data you want, click
OK to exit.
To jump between indexes
On the Index menu, click Next to jump to the nearest index below the
currently selected (highlighted) line, or Previous to jump to the nearest index
above.
• You can also press function key [F3] to jump to the next index or [Shift] +
[F3] to jump to the previous index.
E-21
Page 24

4 Importing and Exporting Data
The procedures in this chapter can be used to import data from a file created
using another personal information management application into this
application, and to export this data from this application to a file that can be
read by another application.
Supported File Formats
This application supports import of files created using the following formats.
CSV
This is a text file in which fields are separated by commas. Its name normally
has the extension CSV or TXT.
TAB
This is a text file in which fields are separated by tabs. Its name normally has
the extension TAB or TXT.
Importing Data
1. Prepare the file.
• Use a personal information management, spreadsheet, or other application
to create a file in a format (CSV or TAB) that can be imported by this
application.
2. Import the file.
• You can use either of the following two procedures to import a file.
• Enter the Contact, Schedule, To Do, or Browser Mode, and then click File –
Import. Next, select the file you want to import.
• Drag the icon of the file you want to import to the (Contact),
(Schedule), (To Do), or (Browser) button and drop it onto the
button.
3. Make the required import format settings.
• Importing data automatically opens the Import Format dialog box, which is
for configuring the data imported and assigns it to the fields of the data
mode into which you are importing. See “Using the Import Format Dialog
Box”.
4. After the settings in the Import Format dialog box are the way you want
them, click OK to import the file into the mode you selected in step 2.
• The applicable mode screen appears when the data import operation is
complete.
5. On the mode screen that appears, click OK to save the data.
E-22
Page 25

Using the Import Format Dialog Box
The Import Format dialog box appears automatically whenever you import
data using either drag and drop or the File menu’s Import command. You can
also display the Import Format dialog box by clicking Option – Import
Format Settings and make your settings before starting the import operation.
Line numbers (displayed when a file is imported)
File contents
(displayed when
a file is imported)
• The above Import Format dialog box is for To Do Mode data. The dialog
boxes for other data modes are similar, except as noted below.
Contents/Option
Use the Contents list to specify the fields of this application that correspond to
the data being imported. Selecting None causes the corresponding import
data to be ignored.
Some fields have optional settings you can make with the list that appears
when you click an Option box arrow.
See “Contents and Options” for details on the Contents and Option settings
available for each data mode.
Template, Add, Delete
After you make the settings you want, you can save them as a template for
later recall. See “Import Format Template Operations” for details on using
Import Format templates.
E-23
Page 26

Priority
This setting appears in the To Do Mode Import Format dialog box only.
Though some applications support priorities from 1 to 10, this application
supports To Do priorities in the range of 1 to 4. To make it possible to import
priority data from an application that supports more than four priority levels,
you can specify up to three priority strings for each PC-UNITE Watch priority.
For example, data created with a PIM application that supports 10 priority
ranks can be set up as shown below.
Priority Import Strings
1 1, 2, 3
2 4, 5, 6
3 7, 8
4 9, 10
Completed
This setting appears in the To Do Mode Import Format dialog box only.
There are various ways for applications to describe “completed” items. As with
priority rankings, you can specify up to three strings for the Completed field.
Save Settings
Checking this box saves current settings when you close the Import Format
dialog box by clicking OK. The saved settings will be in effect the next time
you open the dialog box.
Don’t show window for drag & drop.
The Import Format dialog box normally opens automatically when you drop a
file onto a data mode (Contact, Schedule, To Do, etc.) button on the Toolbar.
Checking this option tells the application not to open the Import Format
dialog box for a drag and drop import operation. Note that this option is
available only while the Save Settings option is checked.
Overwrite
When this box is checked, importing data automatically overwrites any
existing data with the imported data. When this box is unchecked, the
imported data is appended to existing data, and then the data is sorted using
the currently selected sort method.
Ignore first line
Checking this option causes the first line of the data being imported to be
disregarded. Check this option when the first line of the file is a header or
other non-data.
E-24
Page 27

Import Format Template Operations
You can save Import Format settings as templates for later recall when you
want to use them. In addition, this application comes with a number of built-in
templates.
Built-in Templates
The following are the Import Format templates that come built in with the
application.
Template Name Description
Export Data
Organizer R2.1
Outlook 97
Schedule+7.0
Generic Text
To create a new template
1. Make the Import Format dialog box settings you want.
2. Click Add.
3. In the dialog box that appears, input the name you want to assign to the
template and then click OK.
• You cannot create a new Generic Text template.
To select a template
1. In an Import Format dialog box, click the Template text box button to
open a list of available templates.
2. Click the name of the template you want to select.
• If a file has already been imported, changing the template immediately
applies the applicable settings to the file’s data.
Use this template when reimporting data that was
exported from this application.
Use this template when importing Lotus
Organizer R2.1 data.
Use this template when importing Microsoft
Outlook 97 data.
Use this template when importing Microsoft
Schedule+7.0 data.
Use this template when importing a text file into
the Browser Mode.
E-25
Page 28

To delete a template
1. In an Import Format dialog box, click the Template text box button to
open a list of templates.
2. Click the name of the template you want to delete.
3. Click Delete.
4. In response to the confirmation message that appears, click OK to delete
the selected template.
• You cannot delete the Generic Text template.
Contents and Options
The contents and options available in the Import Format dialog box depend
on the data mode into which you are importing data. The following describes
the contents and options for each data mode.
To Do
Contents Options Description
None
Priority
Completed
Due Date
Due Date & Time
Description
• Time data does not appear on the display.
yy/MM/dd
MM/dd/yy
dd/MM/yy
yy/MM/dd hh:mm:ss
MM/dd/yy hh:mm:ss
dd/MM/yy hh:mm:ss
None. Ignore the field.
Priority field
Completed mark field
Due date field
Due date and time field
Item description field
E-26
Page 29

Schedule
Contents Options Description
None
From Date
yy/MM/dd
None. Ignore the field.
From date field
MM/dd/yy
dd/MM/yy
From Time
From Date & Time
yy/MM/dd hh:mm:ss
From time field
From date and time field
MM/dd/yy hh:mm:ss
dd/MM/yy hh:mm:ss
Description
All Day
Item description field
Checked to indicate all day
event.
Browser
Note that the Generic Text template of the Browser Mode Import Format
dialog box does not have Contents or Options settings. Other templates
have Contents settings only, without Options settings.
Contents Description
None
Page Title
Contents
Title & Content
None. Ignore the field.
Page title field
Contents field
Title and content field. When this field is selected, the
first line of the field is a page title.
E-27
Page 30

Contact
Contents Options Description
None
Name
Tel
Fax
Call
E-mail
Company
OTHER
NAME 1
NAME 2
NAME 3
Work
Home
Work Fax
Home Fax
Call 1
Call 2
Office 1
Office 2
OTHER 1
OTHER 2
OTHER 3
OTHER 4
OTHER 5
OTHER 6
OTHER 7
OTHER 8
None. Ignore the field.
Name fields
Phone number fields
Fax number fields
Mobile phone or pager number
field
E-mail address field
Company name fields
Other fields
Exporting Data
1. Enter the data mode whose data you want to export.
• Data can be exported from the To Do, Schedule, Browser, and Contact
modes and saved in a CSV format file.
2. Click File – Export.
3. In the dialog box that appears, maneuver to the folder where you want to
save the file, and then click Save to save it.
• See your Windows documentation for details about using the file save
dialog box.
E-28
Page 31

5 Data Communication
The procedures in this chapter transfer data between the application and watch.
Contact, Schedule, To Do, Browser, and User data can be sent in both directions:
from the application to the watch, and from the watch to the application.
• You must use the procedures under “Setting Up the Application” to set up
the application before trying to perform data communication operations.
Data Transfer Check Marks
Data transfer check mark
Clicking this field toggles the check mark on and off. Records that have a data
transfer check mark are sent to the watch during a data communication
operation, while unchecked items are not sent.
In addition to checking and unchecking individual items by clicking their data
transfer check mark fields, you can also select multiple records and click Edit
– Transfer (to check) or Edit – Do Not Transfer (to uncheck).
Note
• Note that you cannot check or uncheck Contact indexes. If you check one
or more of the records under an index, the index is sent along with the
checked record.
• You can individually check and uncheck each Browser Mode data page.
• Blank Browser Mode lines are not sent, regardless of their check mark on/
off settings.
• Transfer and non-transfer of user data is controlled by a checkbox rather than
a data field.
Transfer check
box
E-29
Page 32

To send data from the application to the watch
1. On the application toolbar, click .
Mode data transfer methods
• The transfer methods of all data modes that contain data are automatically
set to Synchronize, while data modes without data are set to No change.
2. Click the button to the right of the text box of the data mode whose data
you want to send, and select Overwrite.
• Note that Overwrite causes the data in the corresponding watch mode to
be replaced by the data sent from the application.
• See “Synchronizing Data” for details on using Synchronize.
3. Click the Execute button for the data mode whose application data you
want to send to the watch.
4. Align the infrared port of the watch with the infrared port of your computer,
as described under “Positioning the Watch for Data Communication”.
5. Press the IR key of the watch and then press its ENTER ( ) key to put
the watch into the infrared communication mode. The message FIND
PARTNER!
• See the User’s Guide that comes with the watch for full details on its
operations.
6. On the computer, click the OK button on the dialog box telling you to
prepare for transfer.
• The application first compares the watch name of the data file with the
name registered in watch memory. See “Watch Name Error Messages”
about what happens when there is a watch name mismatch.
7. A message dialog appears to let you know when data transfer is complete.
Click OK to close it.
8. Close the Transfer dialog box.
should be on the display of the watch at this time.
E-30
Page 33

Verifying Data
The following procedure checks whether the data in the application’s data file
or the watch memory has been modified.
To verify data contents
1. In the Transfer dialog box, click Verify.
2. Align the infrared port of the watch with the infrared port of your computer,
as described under “Positioning the Watch for Data Communication”.
3. Press the IR ke y of the watch and then press its ENTER ( ) ke y to put
the watch into the infrared communication mode. The message FIND
PARTNER!
• See the User’s Guide that comes with the watch for full details on its
operations.
4. On the computer, click the OK button on the dialog box telling you to
prepare for transfer.
• The application first compares the watch name of the data file with the
name registered in watch memory. See “Watch Name Error Messages”
about what happens when there is a watch name mismatch.
5. Check the application’s Transfer dialog box.
• The transfer methods of all modes whose application or watch data have
been modified are set to Synchronize.
• See “Synchronizing Data” for details about what happens when you click
the Execute button of a data mode for which Synchronize is selected as
the transfer method.
should be on the display of the watch at this time.
E-31
Page 34

Synchronizing Data
This section describes how to synchronize data between the application and
watch.
Using the Synchronize Dialog Box
Clicking the Execute button of a data mode for which Synchronize is
selected as the transfer method in the Transfer dialog box causes the
Synchronize dialog box to appear on the screen.
Application data status
Field names
• The above is the Synchronize dialog box for the Contact Mode. See
“Synchronize Dialog Boxes” for details on the appearance of the
Synchronize dialog box for other data modes.
Application data status
This area shows whether or not data in the application’s data file has been
modified.
Watch data status
This area shows whether or not data in watch memory has been modified.
Field names
These are the names of the data fields for the data mode whose data you are
synchronizing. This part of the Synchronize dialog box differs according to
data mode.
➔
➔ Watch data status
Transfer
method icons
E-32
Page 35

Transfer method icons
These icons control the transfer method applied to each of the records in the
Synchronize dialog box. You can specify the transfer method you want to
apply by clicking the icon in the dialog box. This opens a menu of the icons
shown in the list below. Click the one that corresponds to the transfer method
you want to specify.
Menu Item/Icon
Check
Uncheck
Check
Transfer/Delete
None
None
Transfers application data
Data File’s Data Transfer
Check Mark Status
Checked
Unchecked
Checked
to watch.
Check
Transfers watch data to
Checked
application.
Uncheck
Transfers watch data to
Unchecked
application.
Uncheck
Deletes watch data.
Deletes watch data.
Unchecked
No change
Deletes PC data.
Deletes application and
watch data.
• Data file data that is checked is transferred to the watch the next time a data
transfer operation is performed, while data that is unchecked is not
transferred. See “Data Transfer Check Marks” for details about the data
transfer check mark.
• When there is a large volume of data to transfer, you can scroll the list in the
dialog box up and down to check the transfer methods for each record.
Execute
After the contents of the Synchronize dialog box are the way you want them,
click Execute and then proceed from step 4 under “To send data from the
application to the watch”.
Upload Only
Click Upload Only to transfer data from the watch to your computer only. This
is helpful when you want to transfer data to your computer, edit it, and then
transfer it back to the watch.
E-33
Page 36
Controlling Transfer Data Volume
Since watch memory is limited, the application is equipped with a number of
tools that let you monitor and control the amount of data being transferred.
Data Transfer Check Marks
These are the check marks in each data mode that let you specify whether
each individual record should be transferred to watch memory or not. See
“Data Transfer Check Marks” for details on using data transfer check marks.
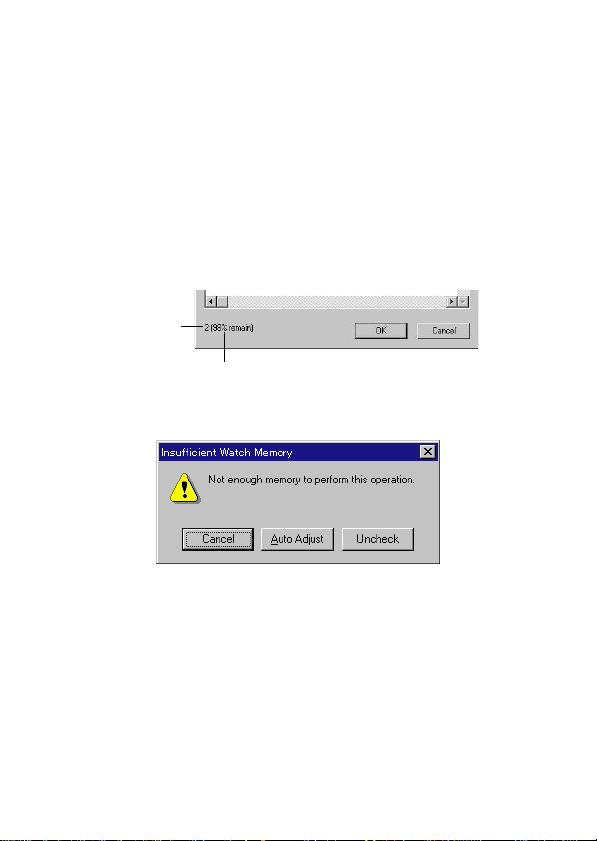
Data Count and Memory Usage
The lower left hand corner of the data screen in each data mode shows two
values that indicate the number of records selected for transfer (checked) and
how much watch memory would remain if the selected records were
transferred to the watch.
Number of selected
(checked) records
Remaining watch memory value
The following message appears on the screen whenever the selected records
cause remaining watch memory value to reach 0%.
Cancel
Cancels the operation and closes the dialog box.
Auto Adjust
Automatically adjusts the data to allow transfer of the maximum number of
records by removing data transfer check marks from records in other data
modes.
Uncheck
Removes the data transfer check mark from the last record that you input,
edited, or checked.
E-34
Page 37

Converting Data for Transfer to the Watch
Checking the Convert to Watch Data item on the Option menu of a data
mode causes unnecessary spaces inside the data of the mode to be deleted.
Positioning the Watch for Data Communication
The following shows the maximum tolerances when positioning the watch and
computer infrared ports for data communication.
Maximum Distance: approximately 20 cm (7.9 inches)
Maximum Angle: approximately 30 degrees
Infrared port
Infrared port
20 cm (7.9 inches)
maximum
30 degrees maximum
Data Transfer Troubleshooting
Problems with transferring data between your watch and computer can be due
to the causes listed below. Correct the problem and try again.
Hardware Problems
• Something blocking the path between the infrared ports of the computer
and watch. Remove the blockage.
• Movement of the watch during infrared data transfer. Keep the watch still
during communication.
• More than 20 cm (7.9 inches) between the infrared ports of the computer
and watch. Move the ports closer together.
• Infrared ports of the computer and watch are too close together. Move the
ports farther apart.
• Surrounding light is too bright. This problem often occurs outdoors, near
windows, or near fluorescent or incandescent lighting. Move the infrared
ports closer together.
E-35
Page 38

• Another infrared communication operation performed in the vicinity while
data transfer is being performed between the watch and computer. Stop the
other infrared operation or wait until it is finished.
• Low watch battery power.
Computer Setting Problems
See the documentation that comes with your computer and Windows for
details about changing their settings.
• If you are using the PAD-2 infrared adapter or another supported infrared
adapter, check the following points.
Is the infrared adapter connected securely and correctly to your
computer?
Are the settings of the Advanced tab of the Option dialog box correct?
See “Advanced Tab” for details.
If you are runnging Windows 95, is its Infrared Monitor disabled?
See the documentation that comes with Windows 95 for details on how
to disable Infrared Monitor.
• If you are running Windows 95 and your computer’s built-in infrared port,
check the following points.
Are the settings of the Advanced tab of the Option dialog box correct?
See “Advanced Tab” for details.
Is the Windows 95 Infrared Monitor disabled?
See the documentation that comes with Windows 95 for details on how
to disable Infrared Monitor.
Is the IrDA mode of the infrared port enabled?
See the documentation that comes with your computer for details on
how to enable its infrared port.
Is power management disabled?
Power management may go into the power save mode during data
communication, which breaks the connection. Disable power
management and try the communication operation again.
E-36
Page 39

6 Reference
This chapter contains information about how to perform operations that you
need to perform only once or only for special purposes. It also contains
technical information about the application.
Setting Up the Application
The following procedure describes how to make a number of settings to
change the basic set-up to suit your needs.
Set-up settings are made using the Option dialog box, which you can display
by clicking on the toolbar.
• After you make the settings you want, click OK to close the Option dialog
box. Then you can save the settings to a file by clicking the File button.
Option Dialog Box Settings
The following describes the settings you can make using the Option dialog
box tabs.
E-37
Page 40

General Tab
Tabs
Watch Name
This is the watch name that is assigned to the currently open data file. To add
a new watch name, click Add and then input the name you want.
• Assigning a watch name to a data file helps to avoid sending the wrong
data to the wrong watch by mistake. When you download a data file from
the application to a watch, the application compares the name in watch
memory with the watch name assigned to the data file. An error message
appears if the names do not match or if there are no watch names
assigned. See “Watch Name Error Messages” for details.
Add
Clicking this button opens a dialog box for adding a new watch name to the
list. You can have up to four watch names in the list, each of which can be to
16 characters long.
Delete
Clicking this button deletes the watch name currently selected in the list.
E-38
Page 41

Display Tab
Arrange
Clicking the button to the right of this text box displays a list of toolbar
orientations. Select either Vertical or Horizontal as the orientation.
Icon
Clicking the button to the right of this text box displays a list of toolbar icon
sizes. Select either Small or Large as the size.
Advanced Tab
Watch
Clicking the button to the right of this text box displays a list of watch types.
Note: This setting is not supported by the current version of this application,
but will be supported by future versions.
Adapter
Clicking the button to the right of this text box displays a list of supported
adapters. Select the one you are using to communicate with the watch.
• If you are running Windows 95 and want to use your computer’s built-in
infrared port, select “Built-in Infrared port on laptop or desktop.”
E-39
Page 42

Port
Click the COM port to which the infrared adapter you are using to
communicate with the watch is connected. If you are running Windows 95 and
want to use your computer’s built-in infrared port, click the port used by your
computer for infrared communication.
• See the documentation that comes with your computer for details about its
COM ports.
Maximum Number of Input Characters for Each Data Field
Contact Mode and User Mode
• Name: 63
• Work, Home, Work Fax, Home Fax, Call 1, Call 2: 12 numbers, hyphens,
spaces, each
• E-mail: 63
• Company: 63 (Inserted into “Other” field when downloaded to a watch.)
• OTHER: 63 (Inserted into “Other” field when downloaded to a watch.)
To Do Mode
• Description: 127
• Priority: Value from 1 to 4
• Date: Year, month, day
Schedule Mode
• Description: 127
• Date/Time: Year, month, day, hour, minutes
Browser Mode
• Page Title: 127
• Body Text: 127 characters per line
Online Help
This application features extensive online help that can be used to instantly
find information about specific topics. Depending on the type of window or
dialog box that is currently open, there are two methods that you can use to
access online help.
• From the application’s toolbar, click the Control Menu icon. In the menu
that opens, click Help.
• From a data mode screen, click Help – Help Topics.
Note
Some dialog boxes have Help buttons that you can click to directly access
information about that particular dialog box.
E-40
Page 43

Watch Name Error Messages
The following messages appear whenever there is a mismatch between the
watch name assigned to the application’s data file and the watch name
registered in watch memory.
Message
Watch name and
data name are
different. Do you
want to synchronize
watch “xxx” with
data “zzz”?
The data does not
have a name.
Assign the name
“xxx” to the data.
The watch does not
have a name.
Assign the name
“zzz” to the watch.
Data and watch do
not have names.
Assign a name to
the data first.
• In the above messages, “xxx” stands for the watch name assigned to the
watch, while “zzz” stands for the watch name assigned to the data file.
Clicking NO closes the error message so you
can check the data file and the watch name
assigned to it. Clicking YES causes the watch
name registered in watch memory to be
overwritten with the name assigned to the
application data file. Next, data transfer begins.
Clicking Cancel closes the error message so
you can check the data file and the watch name
assigned to it. Clicking OK causes the watch
name registered in watch memory to be sent to
and assigned to the application data file. Next,
data transfer begins.
Clicking Cancel closes the error message so
you can check the data file and the watch name
assigned to it. Clicking OK causes the name
assigned to the application data file to be sent to
and assigned to the watch name. Next, data
transfer begins.
Clicking OK displays the Option dialog box for
assigning a watch name to the data file. See
“Setting Up the Application” for details about
assigning a watch name.
Action
Synchronize Dialog Boxes
The following shows the appearance of the Synchronize dialog box for each
data mode, and contains information about each of them. See “Synchronizing
Data” for details about using the Synchronize dialog box.
E-41
Page 44

To Do Mode
Schedule Mode
Contact Mode
E-42
Page 45

Browser Mode
• Click the open/close button to view the contents of a page.
User Data
Uninstalling the Application
Use the following procedure whenever you want to uninstall the application.
To uninstall the application
1. Click Start – Settings – Control Panel.
2. Double-click Add/Remove Programs.
3. Follow the instructions that appear on your computer’s screen.
• Note that the above procedure removes the application only. It does not
remove files you created with the application. Files must be deleted
separately.
E-43
 Loading...