

Page 1
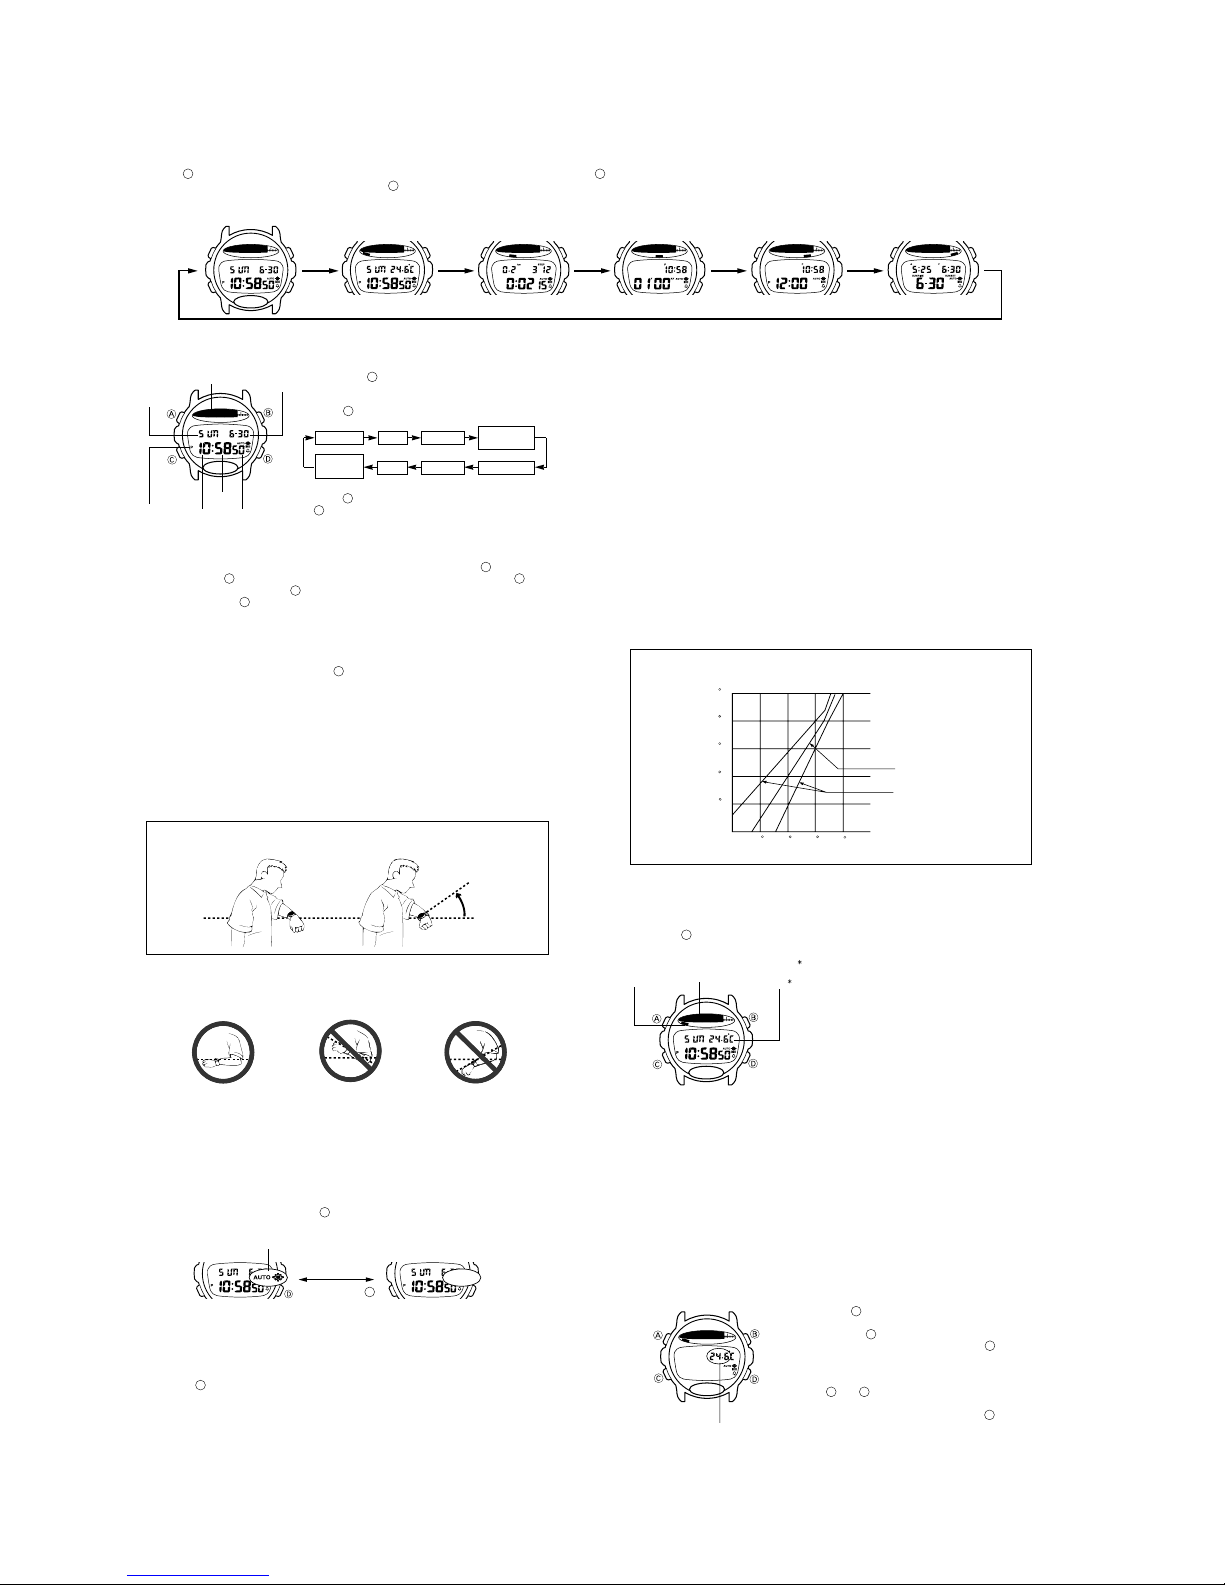
OPERATION CHART : MODULE QW-1626
C C
• Press to change from mode to mode. After you perform an operation in any mode, pressing returns to the Timekeeping Mode.
• In any mode (except when making settings) press to illuminate the display for about two seconds.
B
Thermometer Mode Alarm Mode Sunrise/Sunset ModeTimekeeping Mode Countdown
GENERAL GUIDE
Trekking
Counter Mode
Alarm Mode
TIMEKEEPING MODE
Temperature
graph
Day of
week
Minutes
PM
Hour
indicator
4.While any other digits (beside seconds) are selected (flashing), press to increase
the number or to decrease it. While the day of the week is selected, press to
advance to the next day and to move back. While the 12/24-hour format setting
is selected, press to toggle it between 12 and 24.
• Except for when adjusting the seconds or setting the 12/24-hour format, holding
down a button changes the current selection at high speed.
• When the 12-hour format is selected, the indicator A appears on the display to
indicate “A.M.” times or indicator P appears on the display to indicate “P.M.” times.
Selecting the 24-hour format causes the indicator 24 to appear on the display.
5.After you set the time and date, press to return to the Timekeeping Mode.
• The date can be set within the range of January 1, 1995 to December 31, 2039.
• If you do not operate any button for a few minutes while a selection is flashing, the
flashing stops and the watch goes back to the Timekeeping Mode automatically.
Seconds
B
D
To set the time and date
Month
1. Hold down while in the Timekeeping Mode
and Day
2. Press to change the selection in the following
3. While the seconds digits are selected (flashing),
B
A
until the seconds digits flash on the display
because they are selected.
C
sequence.
Seconds
press to reset the seconds to 00. If you press
D
to 59, the seconds are reset to 00 and 1 is added
to the minutes. If the seconds count is in the
range of 00 to 29, the minutes count is
unchanged.
Hour Minutes
Day of
Day Month Year
week
D
while the seconds count is in the range of 30
A
12/24-Hour
Format
D
D
ABOUT THE BACKLIGHT
About the Auto Backlight Function
When the auto backlight function is turned on, the backlight automatically turns on for
two seconds under the conditions described below. Avoid wearing the watch on the
inside of your wrist. Doing so causes the auto backlight to operate when not needed,
which shortens battery life.
Moving the watch to a position that is parallel to the ground and then tilting it
towards you approximately 40 degrees causes the backlight to illuminate.
Parallel to
ground
• The backlight may not illuminate if the face of the watch is more than 15 degrees off
parallel to the left or right. Make sure that the back of your hand is parallel to the
ground.
Parallel to ground
More than 15 degrees
too high
40˚
More than 15 degrees
too low
Warning!
• Never try to read your watch when mountain climbing or hiking in areas that are dark
or in areas with poor footing. Doing so is dangerous and can result in serious
personal injury.
• Never try to read your watch when running on a roadside or in any other location
where there might be vehicular or pedestrian traffic. Doing so is dangerous and can
result in serious personal injury.
• Never try to read your watch when riding on a bicycle or when operating a motorcycle
or any other motor vehicle. Doing so is dangerous and can result in a traffic accident
and serious personal injury.
• When you are wearing the watch, make sure that its auto backlight function is turned
off before riding on a bicycle or operating a motorcycle or any other motor vehicle.
Sudden and unintended operation of the auto backlight can create a distraction,
which can result in a traffic accident and serious personal injury.
THERMOMETER MODE
A built-in temperature sensor measures temperature and shows the measured value
on the display. The thermometer can be calibrated to correct for errors.
Important!
Temperature measurements are affected by your body temperature (while you are
wearing the watch), direct sunlight, and moisture. To achieve a more accurate
temperature measurement, remove the watch from your wrist, place it in a well
ventilated location out of direct sunlight, and wipe off all moisture from the case. It
takes approximately 20 to 30 minutes for the case of the watch to reach the actual
surrounding temperature.
Accurate temperature measurements cannot be achieved while you are wearing the
watch. The following graph illustrated affects of body temperature on actual
temperature.
Temperature
About Temperature Measurement
• A temperature graph which is automatically updated every five minutes, is shown on
the display in all modes (except when making settings). Measured temperature
values can be viewed in the Thermometer Mode only.
• Pressing while in the Thermometer Mode performs temperature measurement and
causes the measured value to appear on the display.
Mode
indicator
40 C
C
30
20
C
C
10
0
C
10
Temperature measured when watch is worn on wrist
C20C30C
D
Temperature
graph
Current
temperature
40
C
The display shows “– – . – ˚C” if a measured
value falls outside the range of –20˚C to 60˚C.
The normal display will return as soon as the
temperature returns within the allowable range.
Approximate
Differences caused by
individual body
temperature or clothing
• Static electricity or magnetic force can interfere with proper operation of the auto
backlight function. If the auto backlight does not illuminate, try moving the watch
back to the starting position (parallel with the ground) and then tilt it back toward you
again. If this does not work, drop your arm all the way down so it hangs at your side,
and then bring it back up again.
• Under certain conditions the backlight may not light until about one second or less
after turn the face of the watch towards you. This does not necessarily indicate
malfunction of the backlight.
To switch the auto backlight function on and off
In the Timekeeping Mode, hold down for one or two seconds to turn the auto
backlight function on and off.
• The auto backlight indicator is shown on the display in all modes while the auto
• In order to protect against running down the battery, the auto backlight function is
• Pressing at any time illuminates the display for about two seconds, regardless of
Caution
• The backlight of this watch employs an electro-luminescent (EL) light, which loses its
• Frequent use of the backligfht shortens the battery life.
• The watch emits an audible sound whenever the display is illuminated. This is because the
Auto backlight indicator
backlight function is on.
automatically turned off approximately three hours after you turn it on. Repeat the
above procedure to turn the auto backlight function back on if you want.
B
the auto backlight's on/off setting.
illuminating power after very long term use.
EL light vibrates slightly when lit. It does not indicate malfunction of the watch.
D
Holding down
D
Calibrating the Temperature Measurement
The temperature sensor of this watch is calibrated at the factory before shipment and
further adjustment is normally not required. If noticeable error is found in the
temperature readings produced by the watch, you can adjust it to correct the error.
Important!
Incorrectly calibrating the temperature measurement of this watch can result in
incorrect readings. Carefully read the following before doing anything.
• Compare the readings produced by the watch with those of another reliable,
accurate thermometer.
• If calibration is required, remove the watch from your wrist and wait for 20 or 30
minutes to give the temperature of the watch time to stabilize.
• Perform the temperature calibration before procedure as quickly as possible to avoid
the temperature of the watch being affected by your body temperature.
• You can also perform temperature calibration underwater, if the water temperature is
stable.
OFFON
To calibrate the temperature
1.Hold down while in the Thermometer Mode
2.Each press of increase the displayed
• You can calibrate the temperature within a range
• Press and at the same time to reset the
Flashes
3.After calibrating the temperature, press to
• If you do not operate any button for a few minutes
A
and the current temperature digits flash.
temperature by 0.1˚C, and pressing the
decrease it by 0.1˚C.
of –9.9˚C to +9.9˚C.
temperature calibration to the factory setting.
return to the Thermometer Mode.
while a selection is flashing, the flashing stops and
the watch goes back to the Thermometer Mode
automatically.
D
D
B
B
A
- 5 -
Page 2

TREKKING COUNTER MODE
Mode
indicator
Distance
•To improve the accuracy of measured data, be sure to turn off the Trekking Counter
whenever you are taking a break or stop walking for any other reason.
•Be sure to take care not to drop the watch while walking.
Elapsed time
To set your stride length
Stride length
Important!
•The Trekking Counter is not intended for use as an all-day pedometer. Trekking
Counter operation requires considerable battery power, so be sure to press to
stop its operation after you are through using it. Next, press to return to the
Timekeeping Mode.
•To protect against prematurely running down the battery, Trekking Counter operation
turns off automatically and the watch emits a 2-second beep to alert you if the
Trekking Counter is left on for more than 24 hours. Note that measured values up to
the point that the Trekking Counter turns off are retained, so you can start the next
operation from the displayed values.
To use the Trekking Counter
D
1.Press to start Trekking Counter operation.
•Elapsed time, number of steps, and distance covered are all shown on the display
while the Trekking Counter is operating.
D
2.Press to temporarily stop Trekking Counter Operation.
•You can use to stop and re-start Trekking Counter operation as many times as
you like. Each time you press to re-start, the elapsed time, number of steps and
distance values start from point they were at when you pressed to stop Trekking
Counter operation.
3.After you are finished using the Trekking Counter, press to stop operation and
then press to clear all of the values to zero.
D
A
The Trekking Counter counts how many steps you
take and elapsed time while walking. After you input
the length of your stride, it also automatically
calculates and displays the distance you have
covered.
Important!
•The Trekking Counter cannot count the number of
Steps
steps you take if the watch is on your wrist. Be
sure to wear the watch on your waist as described
in “USING THE BAND CLIP”.
•Note that the accuracy of data measured by the
Trekking Counter can be affected when you are
walking on sand or other soft ground, on a steep
upgrade, or on a steep downgrade.
1.In the Trekking Counter Mode, hold down until
the stride length value flashes on the display.
D
2.Press to increase the setting or to decrease
it.
•Holding down either button changes the current
selection at high speed.
•You can set a stride length in the range of 10 cm
to 250 cm.
3.After you finish making the setting, press to
return to the normal Trekking Counter Mode (no
flashing on the display).
•If you do not operate any button for a few minutes
while the stride length is flashing, the flashing
stops and the watch goes back to the normal
Trekking Counter Mode automatically.
C
D
D
D
A
B
A
D
COUNTDOWN ALARM MODE
Mode
indicator
Minutes
Seconds
To use the countdown timer
D
1.Press while in the Countdown Alarm Mode to start the countdown timer.
D
2.Press again to stop the countdown timer.
•You can resume countdown timer operation by pressing .
3.Stop the timer and then press to reset the countdown time to its starting value.
The countdown timer can be set within a range of
Current
1 minute to 60 minutes. When the countdown
time
reaches zero, an alarm sounds for 10 seconds or
until you press any button.
To set the countdown time
1.Hold down while in the Countdown Alarm
2.Press to increase the minutes digits or to
3.After you set the countdown alarm time, press
•If you do not operate any button for a few minutes
A
A
Mode. The minutes digits flash on the display
because they are selected.
D
decrease them. Holding down either button
changes the setting at high speed.
to return to the Countdown Alarm Mode.
while a selection is flashing, the flashing stops and
the watch goes back to the Countdown Alarm
Mode automatically.
D
B
ALARM MODE
Mode
indicator
Minutes
Hourly time signal on
Hour
indicator
D
3.Press to increase the selected digits or to decrease them. Holding down
either button changes the selection at high speed.
•The format (12-hour and 24-hour) of the alarm time matches the format you select
for normal timekeeping.
•When setting the alarm time using the 12-hour format, take care to set the time
correctly as morning (A) or afternoon (P).
When the Daily Alarm is turned on, the alarm
sounds for 20 seconds at the preset time each day.
Current
Press any button to stop the alarm after it starts to
time
sound. When the Hourly Time Signal is turned on,
the watch beeps every hour on the hour.
To set the alarm time
1. Hold down while in the Alarm Mode. The hour
2. Press to change the selection in the following
Alarm on
indicator
A
digits flash on the display because they are
selected. At this time the Daily Alarm is turned on
automatically.
C
sequence.
Hour Minutes
B
4.After you set the alarm time, press to return to the Alarm Mode.
•If you do not operate any button for a few minutes while a selection is flashing, the
flashing stops and the watch goes back to the Alarm Mode automatically.
To switch the daily alarm and hourly time signal on and off
D
Press while in the Alarm Mode to change the status of the daily alarm and hourly
time signal in the following sequence.
Both ON Both OFF Daily Alarm
To test the alarm
D
Hold down while in the Alarm Mode to sound the alarm.
A
Alarm on indicator
Hourly time signal on indicator
only
Hourly Time
Signal only
SUNRISE/SUNSET MODE
Be sure to set the current time and your current
Sunrise time
< Longitude >
0˚E~180˚E 179˚W~1˚W
5.After you set the location data, press to return to the Sunrise/Sunset Mode.
•If you do not operate any button for a few minutes while a selection is flashing, the
flashing stops and the watch goes back to the Sunrise/Sunset Mode automatically.
•You can set a latitude within the range of 65 ˚ south to 65˚ north.
•For the Longitude, always set 0˚ as 0˚E, and 180˚ as 180˚E.
•Be sure to advance the GMT differential by one hour when summer time (daylight
saving time) is applicable.
Important!
After you change a setting in the above procedure, the watch needs a bit of time to
calculate certain information. During this calculation, the patterns in the graphic
display move. Wait until these patterns stop before trying to perform the next
procedure.
To display the sunrise and sunset times for a specific date
C
1.Use to enter the Sunrise/Sunset Mode.
•When you enter the Sunrise/Sunset Mode from other mode, the display shows the
A
sunrise/sunset data for today's date (as set in the Timekeeping Mode).
D D
2.Press to advance the date. Holding down returns to the current date.
3.When the date you want is displayed, you will have to wait for about 15 seconds as
the watch performs its internal calculations before displaying the sunrise/sunset
time for the date.
Notes
•If you think that the watch is not showing the correct information, check the settings
of the watch in the following order: year, GMT differential, longitude, latitude,
east/west, north/south.
•Sunrise and sunset times are for sea level locations. Actual times may differ sightly
depending on your elevation.
•Sunrise and sunset times are correct with a range of 5 minutes at latitudes less than
50, and 10 minutes at latitudes greater than 50.
Sunset time
DateMonth
Press
Mode
location before trying to use Sunrise/Sunset
indicator
functions. The Sunrise/Sunset functions tell you the
time of sunrise and sunsets for specific dates.
To set the location data
•See the Time Zone Chart at the back of this
manual.
1.Holding down while in the Sunrise/Sunset
Mode causes the GMT differential data to start
flashing because it is selected.
2.Press to change the selection in the following
sequence.
GMT differential Longitude/Latitude
3.While the GMT differential is selected (flashing),
press to increase it. Holding down changes
the current selection at high speed.
4.While the longitude/latitude is selected (flashing),
press to change the longitude or to change
the latitude. Holding down either button changes
the corresponding setting at high speed.
D
A
C
D
< Latitude >
Press
0˚N~65˚N 65˚S~1˚S
A
DD
B
B
- 6 -
Page 3

TIME ZONE CHART
North America
Central and South America
Europe
THE DIFFERENCE
CITY
FROM GMT FOR
NO.
STANDARD TIME
1. PAGO PAGO –11 171 W14N
2. HONOLULU –10 158 W21N
3. ANCHORAGE –9 150 W61N
4. NOME –9 165 W65N
5. LOS ANGELES –8 118 W34N
6. SAN FRANCISCO –8 122 W38N
7. LAS VEGAS –8 115 W36N
8. VANCOUVER –8 123 W49N
9. SEATTLE –8 122 W48N
10. DENVER –7 105 W40N
11. EL PASO –7 106 W32N
12. EDMONTON –7 114 W54N
13. CHICAGO –6 88 W42N
14. HOUSTON –6 95 W30N
THE DIFFERENCE
CITY
NO.
FROM GMT FOR
STANDARD TIME
1. PANAMA CITY –5 80 W9N
2. LIMA –5 77 W12S
3. BOGOTA –5 74 W5N
4. CARACAS –4 67 W10N
5. LA PAZ –4 68 W17S
6. SANTIAGO –4 71 W33S
7. PORT OF SPAIN –4 61 W11N
8. RIO DE JANEIRO –3 43 W23S
9. SAO PAULO –3 47 W24S
10. BRASILIA –3 48 W16S
11. BUENOS AIRES –3 58 W35S
12. MONTEVIDEO –3 56 W35S
THE DIFFERENCE
CITY
FROM GMT FOR
NO.
STANDARD TIME
1. AZORES –1 25 W38N
2. LONDON +0 0 E51N
3. DUBLIN +0 6 W53N
4. CASABLANCA +0 8 W34N
5. LISBON +0 9 W39N
6. PARIS +1 2 E49N
7. MILAN +1 9 E45N
8. ROME +1 12 E42N
9. MADRID +1 4 W40N
10. AMSTERDAM +1 5 E52N
11. HAMBURG +1 10 E54N
12. FRANKFURT +1 9 E50N
13. VIENNA +1 16 E48N
14. STOCKHOLM +1 18 E59N
LONGITUDE
LONGITUDE
LONGITUDE
LATITUDE
LATITUDE
LATITUDE
THE DIFFERENCE
CITY
FROM GMT FOR
NO.
STANDARD TIME
15. DALLAS –6 97 W33N
16. NEW ORLEANS –6 90 W30N
17. WINNIPEG –6 97 W50N
18. MEXICO CITY –6 99 W19N
19. NEW YORK –5 74 W41N
20. MONTREAL –5 74 W45N
21. DETROIT –5 83 W42N
22. MIAMI –5 80 W26N
23. BOSTON –5 71 W42N
Add 1 hour to the difference time if DST
(Daylight Saving Time) is used. (EX. if difference
of standard time is +2, that of DST is +3.)
THE DIFFERENCE
CITY
FROM GMT FOR
NO.
STANDARD TIME
Add 1 hour to the difference time if DST
(Daylight Saving Time) is used. (EX. if difference
of standard time is +2, that of DST is +3.)
THE DIFFERENCE
CITY
FROM GMT FOR
NO.
STANDARD TIME
15. ATHENS +2 24 E38N
16. HELSINKI +2 25 E60N
17. ISTANBUL +2 29 E41N
Add 1 hour to the difference time if DST
(Daylight Saving Time) is used. (EX. if difference
of standard time is +2, that of DST is +3.)
LONGITUDE
LONGITUDE
LONGITUDE
LATITUDE
LATITUDE
LATITUDE
Africa and Middle East
Asia and South Pacific
- 7 -
THE DIFFERENCE
CITY
FROM GMT FOR
NO.
STANDARD TIME
1. BEIRUT +2 35 E34N
2. DAMASCUS +2 36 E33N
3. CAPE TOWN +2 18 E34S
4. KUWAIT +3 48 E29N
5. RIYADH +3 47 E25N
6. JEDDAH +3 39 E21N
7. ADEN +3 45 E13N
8. ADDIS ABABA +3 39 E9N
9. NAIROBI +3 37 E1S
10. DUBAI +4 55 E25N
11. ABU DHABI +4 54 E24N
12. MUSCAT +4 58 E23N
13. KARACHI +5 67 E25N
14. PRAIA –1 23 W15N
THE DIFFERENCE
CITY
FROM GMT FOR
NO.
STANDARD TIME
1. DHAKA +6 90 E24N
2. BANGKOK +7 100 E14N
3. JAKARTA +7 107 E6S
4. PHNOM-PENH +7 105 E12N
5. HANOI +7 106 E21N
6. VIENTIANE +7 103 E18N
7. HONG KONG +8 114 E22N
8. SINGAPORE +8 104 E1N
9. KUALA LUMPUR +8 102 E3N
10. BEIJING +8 116 E40N
11. TAIPEI +8 122 E25N
12. MANILA +8 121 E15N
13. PERTH +8 116 E32N
14. ULAN BATOR +8 107 E48N
15. TOKYO +9 140 E36N
LONGITUDE
LONGITUDE
LATITUDE
LATITUDE
THE DIFFERENCE
CITY
FROM GMT FOR
NO.
STANDARD TIME
15. DAKAR +0 17 W15N
16. ABIDJAN +0 4 W5N
Add 1 hour to the difference time if DST
(Daylight Saving Time) is used. (EX. if difference
of standard time is +2, that of DST is +3.)
THE DIFFERENCE
CITY
FROM GMT FOR
NO.
STANDARD TIME
16. SEOUL +9 127 E38N
17. PYONGYANG +9 126 E39N
18. SYDNEY +10 151 E34S
19. MELBOURNE +10 145 E38S
20. GUAM +10 145 E13N
21. NOUMEA +11 166 E22S
22. PORT VILA +11 168 E18S
23. WELLINGTON +12 175 E41S
24. CHRISTCHURCH +12 173 E43S
25. SUVA +12 178 E18S
26. NAURU ISLAND +12 166 E1S
27. PAPEETE –10 150 W18S
Add 1 hour to the difference time if DST
(Daylight Saving Time) is used. (EX. if difference
of standard time is +2, that of DST is +3.)
LONGITUDE
LONGITUDE
LATITUDE
LATITUDE
Page 4

USING THE BAND CLIP
To attach the band clip
1.Remove the band from the watch.
2.Insert the band clip into band attachment at
the bottom (6 o’clock position) of the watch,
and fasten the button to secure it in place.
How to wear the watch during Trekking Counter operation
Note that the Trekking Counter cannot take
measurements correctly while the watch is on
your wrist. When using the Trekking Counter,
be sure to use the band clip to attach the
watch to your belt. Your belt must pass
through the metal part of the band clip for
proper operation. If you are not wearing a belt,
attach the watch to a belt loop.
Trekking Counter Precautions
Be sure to turn off the Trekking Counter in the following cases. If you don’t the Trekking
Counter may interpret your movements as steps and produce incorrect measurements.
•Any activity involving jumping, bending, stretching, etc.
•Resting
•Riding on a bicycle, train, bus, or any other vehicle that generates vibration
Any of the following conditions can cause Trekking Counter measurements to lose accuracy.
• Walking on loose ground, or steep up slopes or down slopes
• Running
• Shuffling your feet while walking
• Uneven stride
• Walking in sandals, shower shoes or similar footwear
• Walking up or down stairs
Trekking Counter measurements may become inaccurate or even fail entirely if the watch is
exposed to strong magnetic force.
Always be sure to fasten the band clip to the bottom (6 o’clock position) of the watch, and not
to the top (12 o’clock position).
Take care to avoid dropping the watch while walking.
When using the Trekking Counter, make sure the watch is not resting against your clothing or
waist pack. If the watch is not hanging loosely, the Trekking Counter will not be able to count
your steps correctly.
Band
Attachment
Top of watch
(12 o’clock position faces down)
Band Clip
- 8 -
 Loading...