

Page 1
2. OPERATION CHART: QW-1456
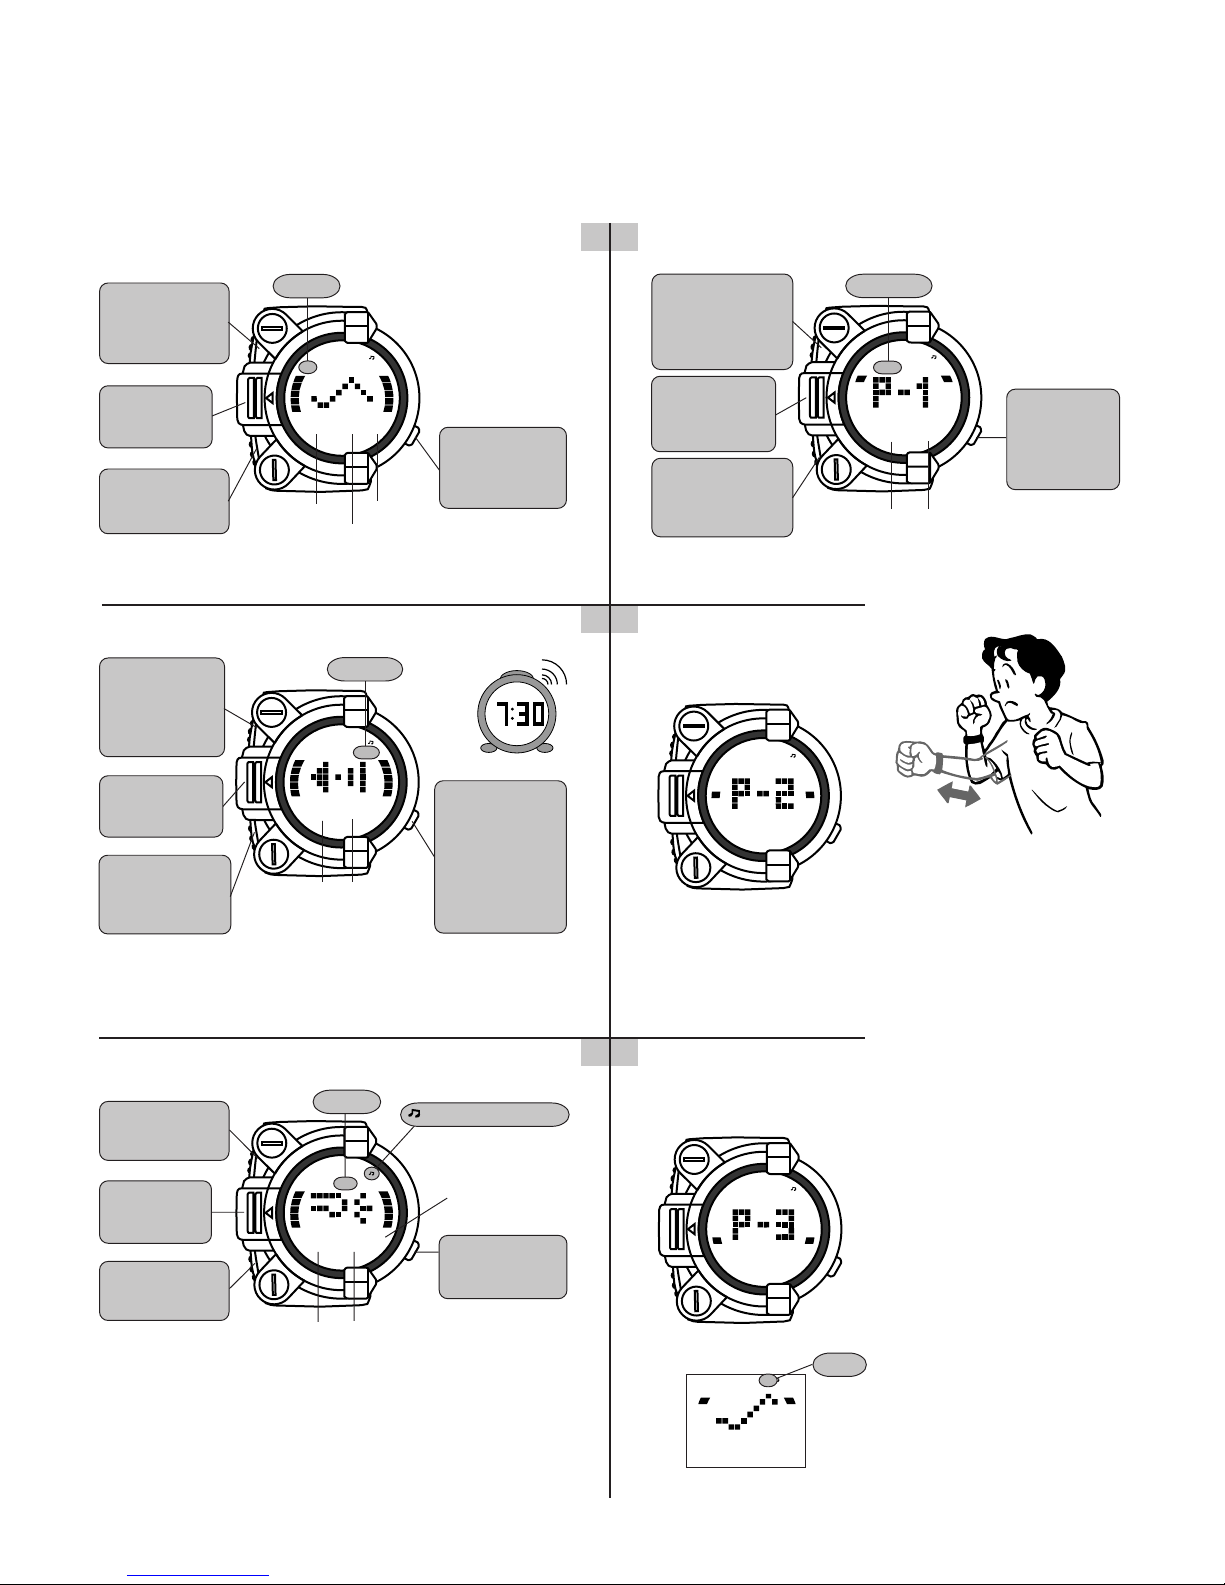
CHANGING BETWEEN MODES
Press the C button to change from mode to mode.
• The watch automatically returns to the Timekeeping Mode if you do not perform any button operation for two or three minutes in any other mode.
Timekeeping Mode
BB
B Button
BB
Hold down to
display the time
setting screen.
XX
X Button
XX
Illuminates
the display.
CC
C Button
CC
Advances to the
Meter Mode.
TIME
TIME
P
10:58
Hour
35
Seconds
Minutes
EL backlight
Turns on the EL
backlight to
illuminate the
display for about
three seconds.
AA
A Button
AA
Switches
between 12 and
24-hour format.
Alarm Mode
A
7:30
Hour
ALARM
ALARM
Minutes
AA
A Button
AA
Turns the alarm
and hourly time
signal on and
off. Holding
down this button
sounds the
alarm.
BB
B Button
BB
Hold down to
display the
alarm setting
screen.
XX
X Button
XX
Illuminates the
display.
CC
C Button
CC
Advances to the
Timekeeping
Mode.
• Use this mode to set an alarm time.
• It can also be used to turn the hourly time signal (which sounds at
the top of each hour) on and off.
• Holding down the A button sounds the alarm.
Game Mode
12
Wins
GAME
GAME
–
9
Losses
RANK
20
Sound on indicator
RANK
AA
A Button
AA
Displays the
number of KOs.
BB
B Button
BB
Turns sound on
and off.
XX
X Button
XX
Starts the
game.
CC
C Button
CC
Advances to the
Alarm Mode.
This game is a virtual boxing match where you test your punch power
and reaction in a battle against the watch’s built-in computer. You
start out ranked 30th, and try to work your way up to the top where
you are crowned the Champion of the World.
• Holding down the A button displays the number of KO wins and
KO losses.
21
Meter Mode (Memory P-1)
BB
B Button
BB
Hold down to
display the
personal data
setting screen.
XX
X Button
XX
Starts
measurement
operation.
CC
C Button
CC
Advances to P-2,
P-3, and the
Game Mode.
A built-in shock sensor can be used to measure the power (destructive force) and speed of a punch, kick, throw, swing, or other action.
3
6
Meter Mode
POWER
POWER
2 98
POWER SPEED
Power
53
Speed
AA
A Button
AA
Displays the
maximum
measured
value screen.
(Memory P-2)
POWER
0
0
POWER SPEED
• The Meter Mode can be used to
measure the power and speed of
a punch or kick.
• The Meter Mode has three memories, named P-1, P-2, and P-3.
Measured data is automatically
saved to the memory whose indicator is on the display when the
measurement is performed.
45
Meter Mode
(Memory P-3)
POWER
3 65
POWER SPEED
POWER
6 06
POWER SPEED
MAX
59
MAX
76
• When you press the C button to
change to another Meter Mode
memory, any power and speed
data already stored in that memory appears on the display.
• Whenever you display a Meter
Mode memory’s contents, a
wave graph moves across the
display. The height of the wave
is according to the size of the
measurement data stored in the
memory.
• Holding down the A button while
in the Meter Mode displays the
maximum measured power value.
• Pressing the A and B buttons at
the same time while in the Meter
Mode clears the measured data
from the memory whose screen
is displayed (P-1, P-2, P-3), and
the maximum measured power
value.
— 2 —
Page 2
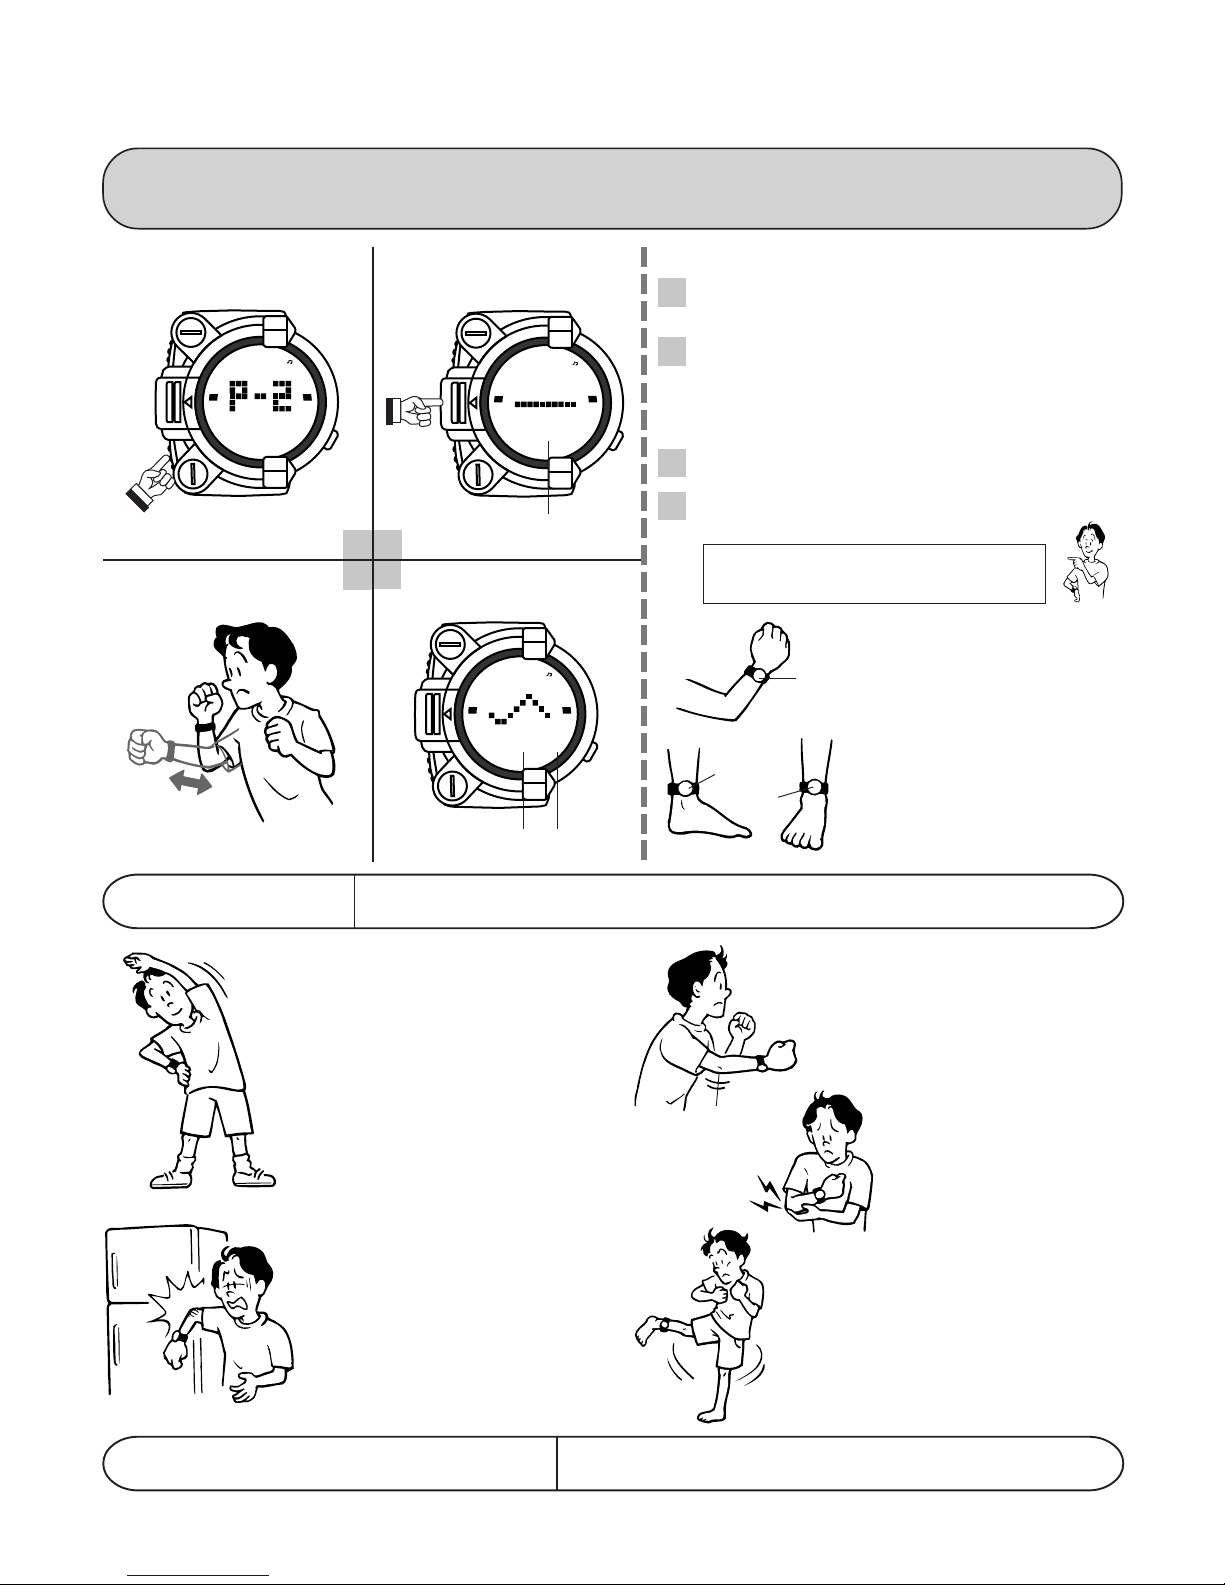
USING THE METER MODE
The built-in sensor used to measure power and speed is preset to measure in the direction of a punch motion. This means that the values
produced in the Meter Mode cannot be used to compare the relative power and speed between two different motions (between punching
and kicking, for example).
Select a Meter Mode memory.
POWER
0
0
CC
C
CC
Punch, Kick
POWER SPEED
Start a measurement operation.
XX
X
XX
2
1
43
Look at the display.
POWER
Countdown
POWER
4 16
POWER SPEED
Power Speed
3
63
To perform a measurement in the Meter Mode
In the Timekeeping Mode, press the
1
twice (P-2) or three times (P-3) to display the Meter Mode
memory screen you want to use.
Press the
2
down, with each second indicated by a beep and the numbers 3, 2, 1, 0 appearing successively on the display. After
the fourth beep, perform a punching or kicking motion.
• Measurement is performed for about two seconds after the
Be sure to read the “SAFETY PRECAUTIONS” and “Impor-
3
tant!” before performing a punching or kicking motion.
Measured power and speed values are expressed in special
4
units defined by CASIO.
• If you want to compare your power with a friend’s,
XX
X button and the watch performs a 4-second count-
XX
fourth beep.
you need to input some personal data. See “To
Input Personal Data”.
• For punching, affix the watch securely
to either your left or right wrist. The
watch should be high enough on your
Wrist
Side
Front
arm and tightened snug enough so it
does not ride down to the back of your
hand when you punch.
• For kicking, affix the watch securely
to either your left or right ankle. The
body of the watch should be located
so it is either at the front or side of
your leg. The watch should be high
enough on your leg and tightened
snug enough so it does not ride down
to the top of your foot when you kick.
CC
C button once (for P-1),
CC
Important!
Note the following important precautions before performing any operations in the Meter Mode or
before using the Game Mode.
• Always warm up for about five
minutes before punching, kicking, or any other strenuous activity. Punching or kicking without warming up can result in injury. Take special care to warm
up and stretch your shoulders,
arms, and back. Do not overdo
punching and kicking, and
avoid performing too many
punches or kicks during the
same session.
• When punching and kicking,
take care to avoid hitting any
people, animals, or objects
nearby. Hitting another person
or object can result in personal
injury to you or another person.
Remember those around you.....
• Fully extending your arm or leg
when punching or kicking can
produce pain in your joints,
bones, and muscles. To avoid
this, you should stop your
punch or kick just of full extension so your arm or leg joints
are still relaxed and slightly
Slightly bent
When using the Meter Mode or Game Mode, never hit or kick another
person, an animal, or an object, and never throw an object or this watch.
bent.
• Should you experience any
pain when performing a measurement, immediately stop the
activity you are performing and
consult a physician.
• Whenever performing a measurement with the watch affixed
to your ankle, take particular
care that you do not lose your
balance and fall over, possibly
injuring yourself or others. Do
not try to raise your leg too high
when kicking.
— 3 —
Page 3
Rules
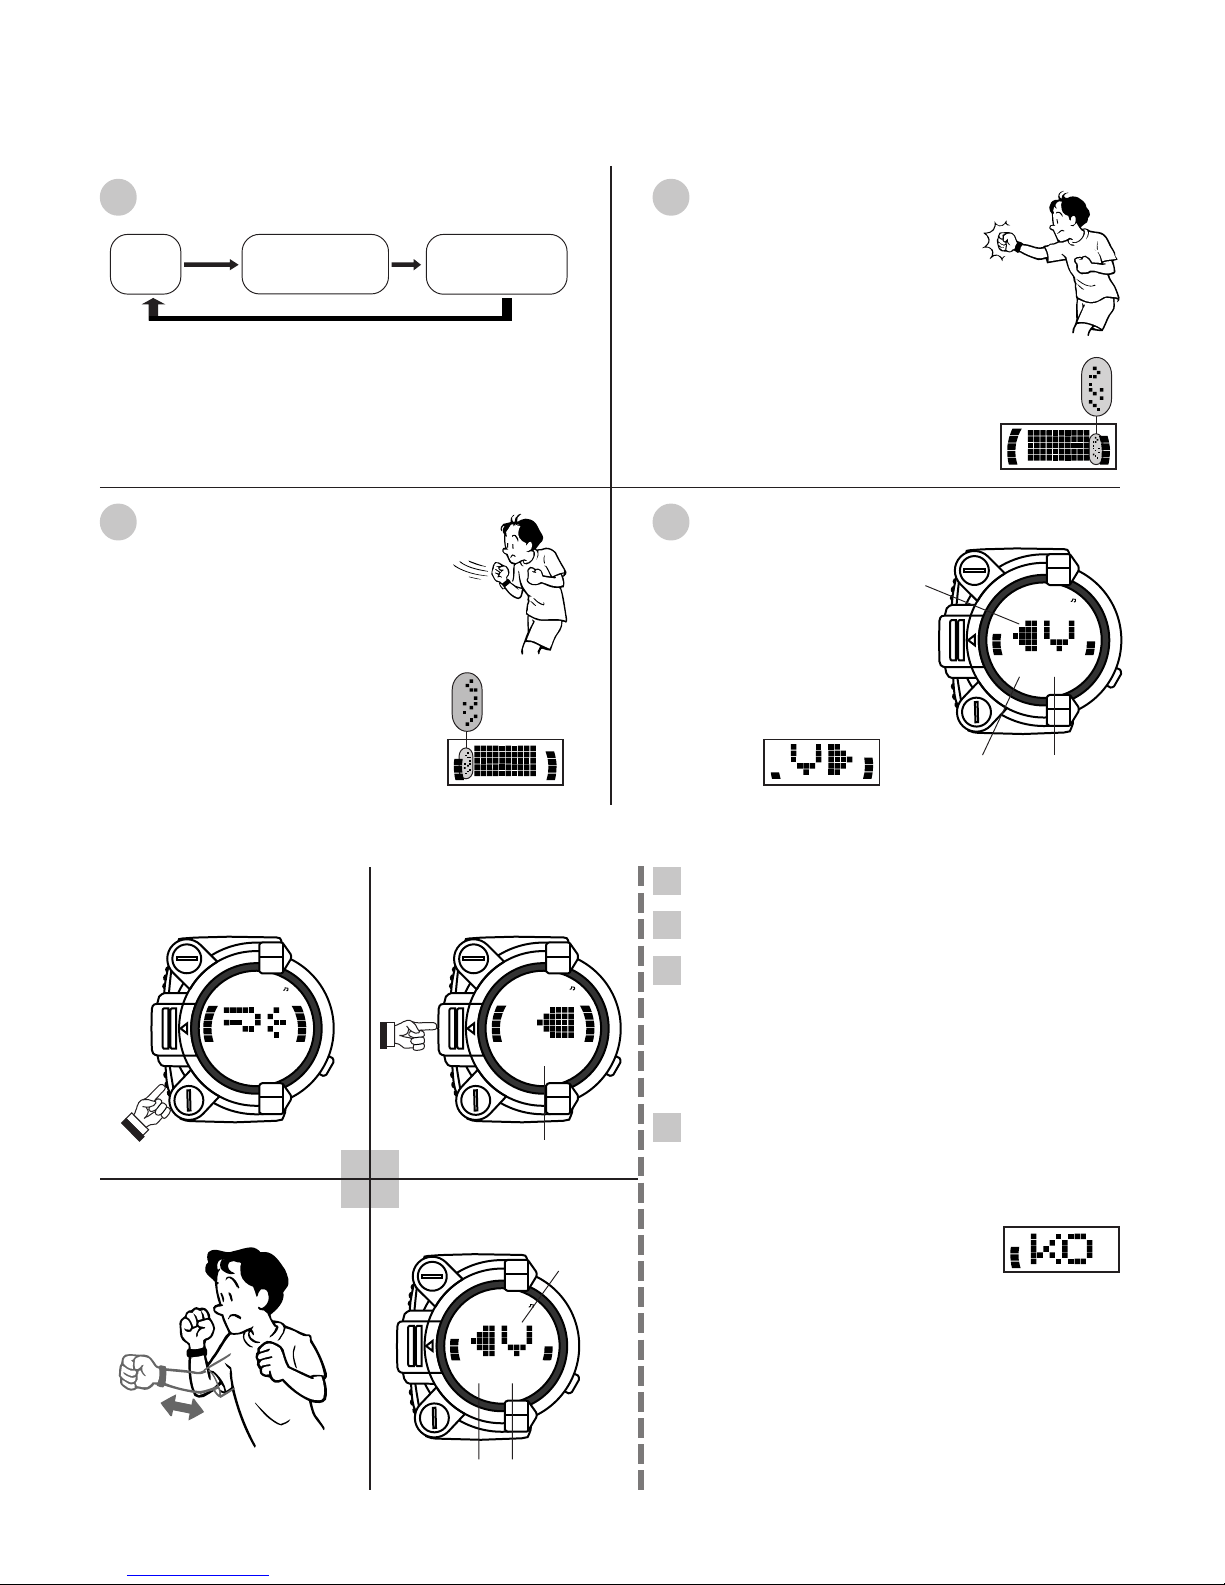
USING THE GAME MODE /1
Each game has three rounds.
1 2
About 4
seconds
Start
• Respond to the attack signals and block signals the watch emits
during the fight time with an attack movement or block movement.
Anywhere from three to six signals are produced during each round.
• During the rest time between rounds, the result of the last round is
indicated by an animated figure on the display.
When you hear the block signal, block. The result of the game is determined by stamina.
3 4
• The block signal is a two-beep sound. Defend by pulling back on your arm where you
are wearing the watch. The speed that you
pull back your arm determines how many
stamina points you lose.
• At the end of the round, a series of animated displays appear on the screen to shows
you whether each of your block motions
were winners or losers.
Fight time
(10 to 15 seconds)
Repeats 3 times.
Rest time
(about 5 seconds)
Losing block
animation
When you hear the attack signal, punch.
• The attack signal is a short beep. The
amount of power produced by your punch
determines how many stamina points the
computer loses.
• The power of your punch is not affected by
the body weight you set for your personal
data settings.
• At the end of the round, a series of animated displays appear on the screen to shows
you whether each of your punch motions
were hit or misses.
• A game ends with a graph
that shows how much
stamina you and the computer have left. The winner
of the game is the one with
more stamina remaining.
• Each side starts out with 50
stamina points.
Computer wins
You win
Winning punch
animation
GAME
25–15
Computer’s staminaYour stamina
To play the game
Enter the Game Mode.
–
CC
C
CC
Punch and block.
12
GAME
9
RANK
20
Start the game.
2
1
4
3
XX
X
XX
- 1 -
Game over display
GAME
25–15
Computer’s staminaYour stamina
GAME
Round
Win indicator
3
In the Timekeeping Mode, press the C button four times.
1
Press the X button to start the game. The first round starts
2
about four seconds after you press the X button.
Be sure to read the “SAFETY PRECAUTIONS” and “Impor-
3
tant!” before performing a punching or blocking motion.
• Whenever your ranking is in the top ten in the world, the computer
will start to use feints. The signals that indicate a feint are lower
pitch than normal, so watch out so you don’t get fooled.
• Be sure to perform the procedure under “To Input Personal Data” to
tell the watch whether you will wear the watch on your left wrist or
right wrist before playing the game. Otherwise, the sensor will not
be able to detect your punch and block motions correctly.
After three rounds are done, the display shows how much
4
stamina you and the computer have remaining, and who is
the winner.
Knockouts
A knockout (KO) is scored whenever the
other party’s stamina becomes zero. A running count of KOs is stored in memory.
World Champion
Your rank is indicated by “C” (champion) on the display when you
reach the World Champion ranking. The number of times you have
defended your title is also indicated by stars as shown below.
* : 1 to 10
** : 11 to 20
*** : 21 or more
Example: KO
— 4 —
Page 4

To input personal data
Display the Meter Mode’s P-1
memory screen.
POWER
CC
2 98
C
CC
Input your body weight.
POWER SPEED
SET
POWER
53
USING THE GAME MODE /2
Display the setting screen.
BB
B
BB
Hold down the B button for
2
1
4
3
about two seconds.
Advance to the left wrist/right
wrist setting.
SET
SET
POWER
35
SET
POWER
R
In the Timekeeping Mode, press the C button once.
1
• Use the Meter Mode’s P-1 memory screen to input personal data.
Hold down the B button for about two seconds and the cur-
2
rent body weight setting will appear, flashing on the display.
• The body weight setting is flashing because it is
Use the A button to input your body weight in kilograms.
3
• Each press of the A button increases the displayed weight by one.
• You can set a body weight within the range of 10 to 199 kg.
• If you want to change the body weight setting only, press the B
button after you finish inputting the weight you want.
Specify whether you will wear the watch on your left wrist or
4
right wrist. Pressing the C button causes “R” or “L” to flash.
Each press of the A button toggles between “R” (right wrist)
5
and “L” (left wrist).
Press the B button to stop the flashing and complete the
6
setting procedure.
• The above procedure clears all measurement data in Meter Mode Memories P-1
through P-3. However, it does not clear
the maximum measurement value.
• If you do not operate any button for a few
minutes while a selection is flashing, the
flashing stops and the watch goes back
to the Meter Mode automatically.
selected
.
setting.
36
Body weight
3 8
R
SET
POWER
L
Left wrist indicator
AA
A
AA
AA
A
AA
CC
C
CC
5
6
Quit the setting procedure.Change the left wrist/right wrist
BB
B
BB
3 8
R
Right wrist indicator.
POWER
0
0
POWER SPEED
Important!
The watch can measure punch and kick power
and speed regardless of the current left wrist/right
wrist setting. When playing the game, however,
the watch needs to know which wrist the watch is
on so it can tell whether you are punching or blocking. Before playing the game, make sure that the
left wrist/right wrist setting is correct.
Clearing the Number of Wins and Losses
If either you or the computer reaches
99 wins, the number of wins and losses will no longer increase. The rank
also will not change. (Although you still
will be able to play the game.) When
you or the computer reaches 99 wins,
press A and B at the same time while
in the Game Mode to clear the wins
and losses. Doing so also sets your
world ranking to 30th place.
BB
B
BB
AA
A
AA
Game Hints
World Rankings
The first time you play the game, your world ranking is 30th. How many places your ranking goes up or down depends on how you win or lose a
game.
Example:Winning by stamina points: 1 rank up
There are other factors that determine your change in ranking, so be sure to do your best.
Winning by 3rd Round KO: 2 ranks up
Computer Stamina
Whenever the computer’s stamina points drop below a certain level, your punches become stronger and the computer’s punches become weaker.
Other Information
Body Weight and Power
If two people deliver a punch with the same speed, the person who weighs more will generate more
power. Because of this, when you are using this watch to compare power with your friends, make sure that
each person inputs their body weight before punching or kicking.
— 5 —
Page 5

SETTING THE ALARM
Enter the Alarm Mode.
A
12:00
CC
C
CC
Set the minutes.
SET
A
7:01
Minutes
CC
C
CC
11
1
11
ALARM
ALARM
AA
A
AA
22
2
22
3
Set the hour.
BB
B
BB
11
1
11
A
21
4
Exit the setting screen.
BB
B
BB
A
SET
SET
1:00
Hour
7:30
ALARM
ALARM
In the Timekeeping Mode, press the
1
Hold down the
2
digits start to flash on the display. Use the
BB
B button for about two seconds until the hour
BB
CC
C button five times.
CC
AA
A button to change
AA
the hour setting.
• The hour digits flash on the display because they are selected.
• This operation automatically turns on the Daily Alarm.
• Each press of A increases the hour setting by one.
• Holding down A changes the setting at high speed.
AA
A
AA
22
2
22
Press the
3
the
• Each press of A increases the minutes setting by one.
• Holding down A changes the setting at high speed.
Press the
4
alarm setting.
• If you do not operate any button for a few minutes while a selection
is flashing, the flashing stops and the watch goes back to the Alarm
Mode automatically.
CC
C button so the minutes setting is flashing. Use
CC
AA
A button to change the minutes setting.
AA
BB
B button to stop the flashing and complete the
BB
To turn the alarm and hourly time signal on and off
In the Alarm Mode, press the
AA
A button to turn the alarm and hourly
AA
time signal on and off in the following sequence.
AA
A button
AA
Alarm
Hourly Time Signal
OFF
OFF
ON
OFF
OFF
ON
To stop the alarm
Press any button to stop the alarm after it starts to sound.
To test the alarm
Hold down
AA
A while in the Alarm Mode to sound the alarm.
AA
• The alarm and hourly time signal do not sound in the Meter Mode
or Game Mode, even if they are turned on.
ON
ON
Seconds become “00”.
SET
SET
TIME
P
10:59
11
1
11
BB
B
BB
Set the minutes.
SET
TIME
A
11
1
11
CC
C
CC
9:59
Minutes
00
Seconds
12
AA
A
AA
AA
A
AA
22
2
22
22
2
22
1
Set the hour.
TIME
P
11:59
Hour
C
11
1
11
CC
CC
2
43
Exit the setting screen.
BB
B
BB
TIME
A
9:30
SETTING THE TIME
SET
AA
A
AA
05
24
22
2
22
Switching between 12-hour and 24-hour Timekeeping
With 12-hour timekeeping, the “A” (am) indicator appears for times
between midnight and noon, while “P” (pm) appears for times between noon and midnight. With 24-hour timekeeping, each hour is
represented by a unique value from 0 to 23.
Pressing the
tween 12-hour and 24-hour timekeeping.
Hold down the
1
onds digits start to flash on the display. Press the
BB
B button for about two seconds until the sec-
BB
AA
A button
AA
to reset the seconds count to “00”.
• If you press A while the seconds count is in the range of 30 to 59,
the seconds are reset to 00 and 1 is added to the minutes. If the
seconds count is in the range of 00 to 29, the minutes are unchanged.
• You can ensure accurate timekeeping by resetting the seconds to
“00” on a time signal from the radio or TV about once a month.
• If you want to only reset the seconds to “00” without changing other
settings, press B here to exit the time setting screen.
Press the
2
AA
A button to change the hour setting.
AA
• Each press of A increases the hour setting by one.
• Holding down A changes the setting at high speed.
Press the
3
the
• Each press of A increases the minutes setting by one.
• Holding down A changes the setting at high speed.
Press the
4
time setting.
• If you do not operate any button for a few minutes while a selection
is flashing, the flashing stops and the watch goes back to the Timekeeping Mode automatically.
CC
C button so the hour setting is flashing. Use the
CC
CC
C button so the minutes setting is flashing. Use
CC
AA
A button to change the minutes setting.
AA
BB
B button to stop the flashing and complete the
BB
Example: The 12-hour time of 3:00 P (pm) would appear on the
display as 15:00 with 24-hour timekeeping.
AA
A button while in the Timekeeping Mode toggles be-
AA
— 6 —
Page 6

TO FASTEN THE BAND ON YOUR WRIST
Pass the band through the bottom hole in the buckle (see figure).
TO ADJUST THE LENGTH OF THE BAND
1
2
Double the band back through the loop of the buckle and pull it
tight.
Push the band so it raises up in the center of band ring A, and
extend the length of the band.
Ring A
Push up.
Extend.
Pull both ends of the band to tighten it.
• The band can be adjusted to a circumference from 12cm to 21cm.
1 2
3
Slide band ring A into position and pass the free end of the
band through it.
EL Backlight
Pressing the X button in the Timekeeping Mode or Alarm Mode
illuminates the display for about three seconds.
• The display does not illuminate while any number is flashing during input operations.
• The EL (electro-luminescent) panel used to illuminate the display
of this watch tends to lose its brightness after long hours of use.
• Frequent use of the backlight shortens battery life.
Important!
• Backlight illumination may be difficult to see under bright sunlight.
• The backlight automatically turns off if an alarm starts to sound
while it is lit.
— 7 —
Page 7

SAFETY PRECAUTIONS
Improper use of this watch can result in personal injury. Make sure you carefully read all of the warnings, cautions, and important notes of this
User’s Guide before using the watch.
Adults supervising a child who will be using this
product...
• Make sure the child thoroughly understands the important precautions below before using this watch.
• Some of the activities described in this User’s Guide may be dangerous for young children up to the age or about 10, so adult supervision is required.
Check with a doctor first!
In order to ensure against personal injury, the following types of
individuals must check with a physician before using this watch to
perform measurements or before playing the game built into this
watch.
• Any person currently under the care of a physician
• Any person who has recently suffered from general illness, joint,
bone, or muscle problem (such as a broken bones, tennis elbow,
etc.)
• Any person currently suffering from fatigue, fever, etc.
Double check the band!
A damaged band can result in the watch flying off your wrist while
taking a measurement or playing the game, possible causing personal injury to those nearly. Be sure to double check the band for
any damage or other irregularities before measurements or playing
the game.
Fasten the watch securely to your wrist or ankle!
An improperly fastened band can result in the watch flying off your
wrist while taking a measurement or playing the game, possible
causing personal injury to those nearby. Be sure to double check
the band for proper fastening before measurements or playing the
game. The band should feel very snug, almost to the point of being
too snug. This watch is designed to be worn on the wrist or ankle
only, and should never be used on any other part of the body.
(See “TO FASTEN THE BAND ON YOUR WRIST” and “TO ADJUST THE LENGTH OF THE BAND”.)
— 8 —
 Loading...