

Page 1
MA1310-EA
© 2013 CASIO COMPUTER CO., LTD.
Operation Guide PQ-75
2
3
2
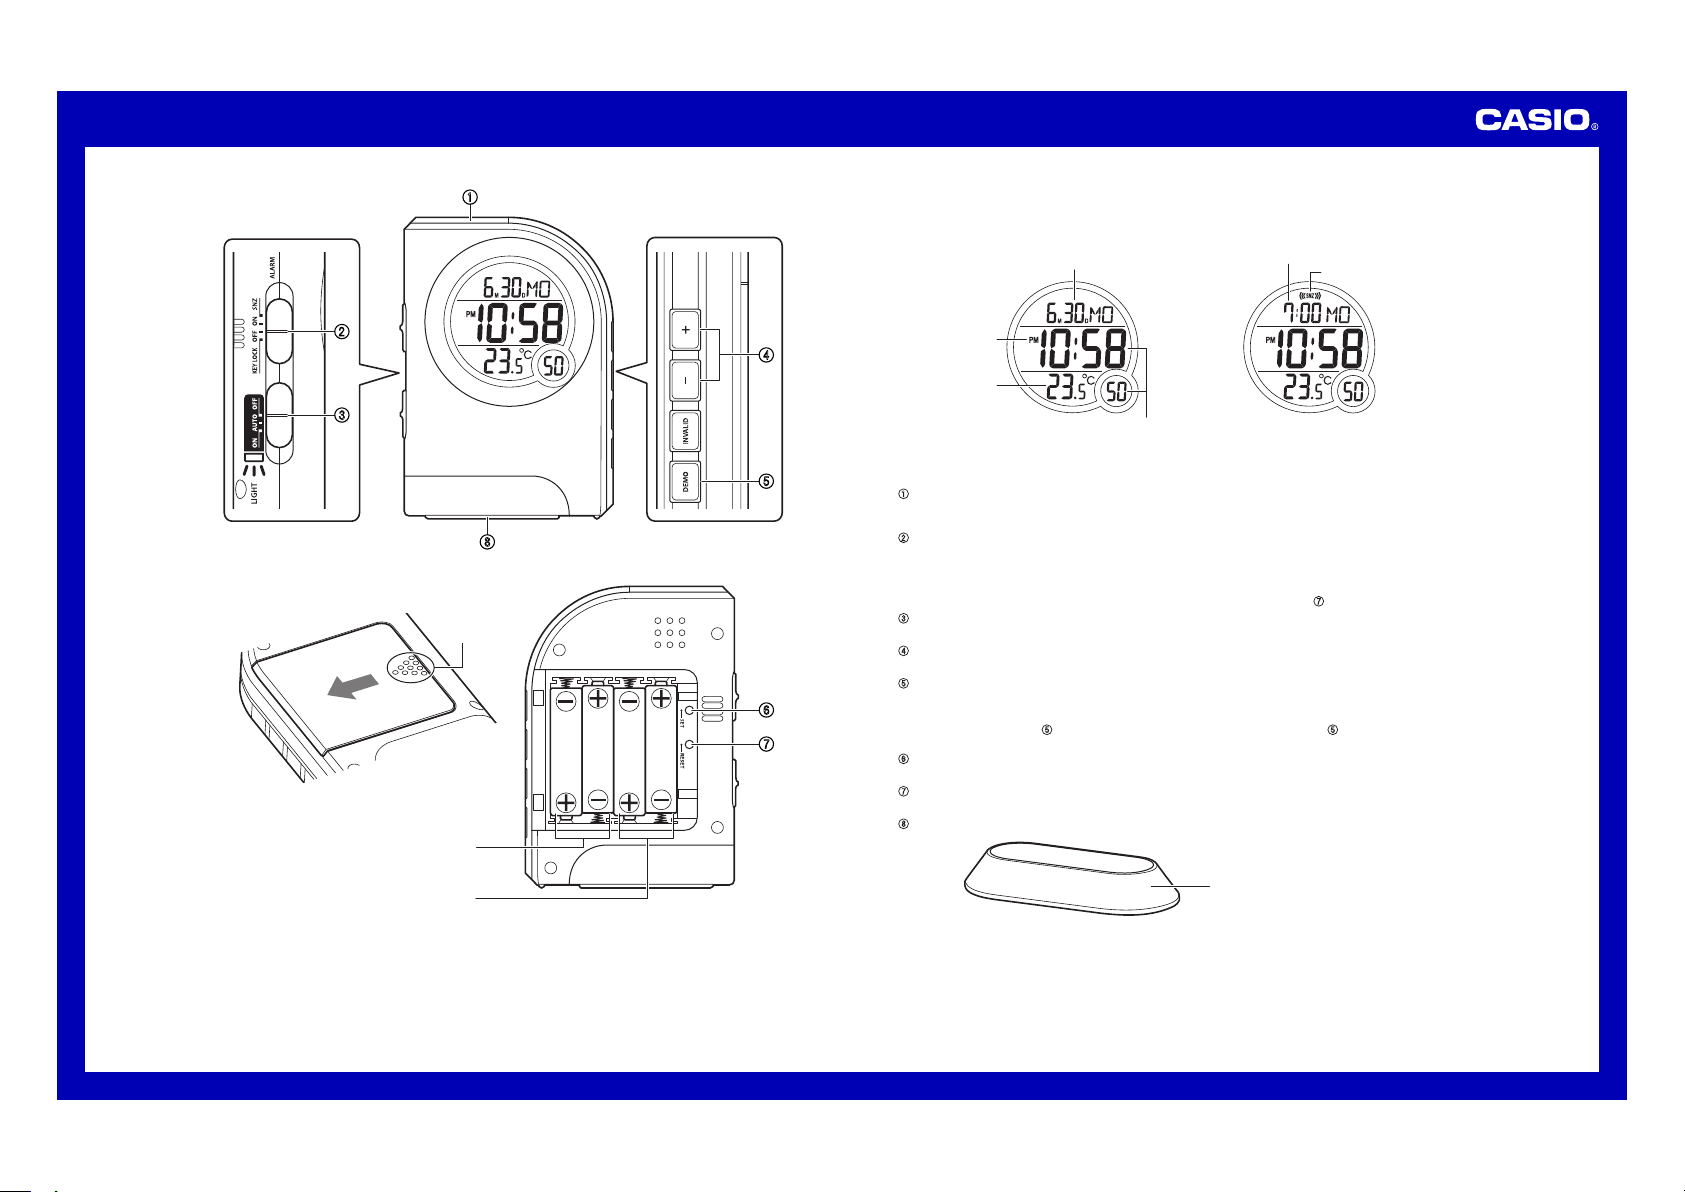
1
Clock batteries
Pilas del reloj
Pilhas do relógio
LED flashlight bat teries
Pilas para la lin terna LED
Pilhas da lantern a LED
1
••• A•stick er•is•a ffixed•t o•the• glass•o f•the•c lock•wh en•you• purchas e•it.•B e•sure• to•rem o ve•the •sticke r•befor e•using•
the•clo ck.
••• Dependi ng•on•t he•cloc k•mode l ,•its• configur ation•m ay•diff er•some what•fr om•that •shown •in•the •illust ration.
Alarm Off
Date (month - day - day of the week )
PM indicator
Snooze Alarm On
Alarm time
Alarm on indicato r
4
Current temperatu re
Current time (Hou r, minutes, second s)
5
8
6
7
General Guide
1
SNOOZE/ LIGHT b utton
••• •Press•t his•but ton•to • illumin ate•th e•displ ay•for• about•fi ve•seco nds.
••• •Pressin g•this• button •while• the•ala rm•is•s ounding •stops• the•ala rm.
2
ALARM S NZ/ON/O FF, KEY LOCK s witch
••• •Use•thi s•switc h•to•sw itch•t he•alar m•betwe en•snoo ze,•on, •and•of f.
••• •This•sw itch•is •also• u sed•to •lock•b uttons• to•disa ble•the ir•oper ations.
Important!
When•bu ttons•a re•lock ed,•op eration •of•all •button s•excep t•for•t he•RESE T butto n•(7)•i s•disab led.
3
LIGHT O N/AUTO/ OFF swi tch
Use•thi s•switc h•to•sw itch•t he•LED• flashlig ht•betw een•on, •auto,• and•off .
4
+ / – b uttons
Use•the se•butt ons•to• change •the•al arm•tim e•or•th e•setti ng•that •is•flas hing•on •the•d isplay.
5
DEMO bu tton
Press•t o•test• the•ala rm•ton e .
To test the a larm tone
Press•t he•DEMO button •(5)•to •sound• the•ala rm•tone .•Press ing•the •DEMO b utton• (5)•agai n•while •the•al arm•
tone•is •soundi ng•will •stop• it.
6
SET but ton
Use•thi s•butto n•when • setting •the•c urrent• time.
7
RESET b utton
Press•t his•but ton•to • reset• the•clo ck•afte r•repla cing•it s•batte ries.
8
LED Fla shlight
Stand (included w ith clock)
Use•the•stand•to• hold•the•clock•ve rtically•
upright.
••• Buttons •marked •“INVAL ID”•ha ve•no•f unction .
1
Page 2
Operation Guide PQ-75
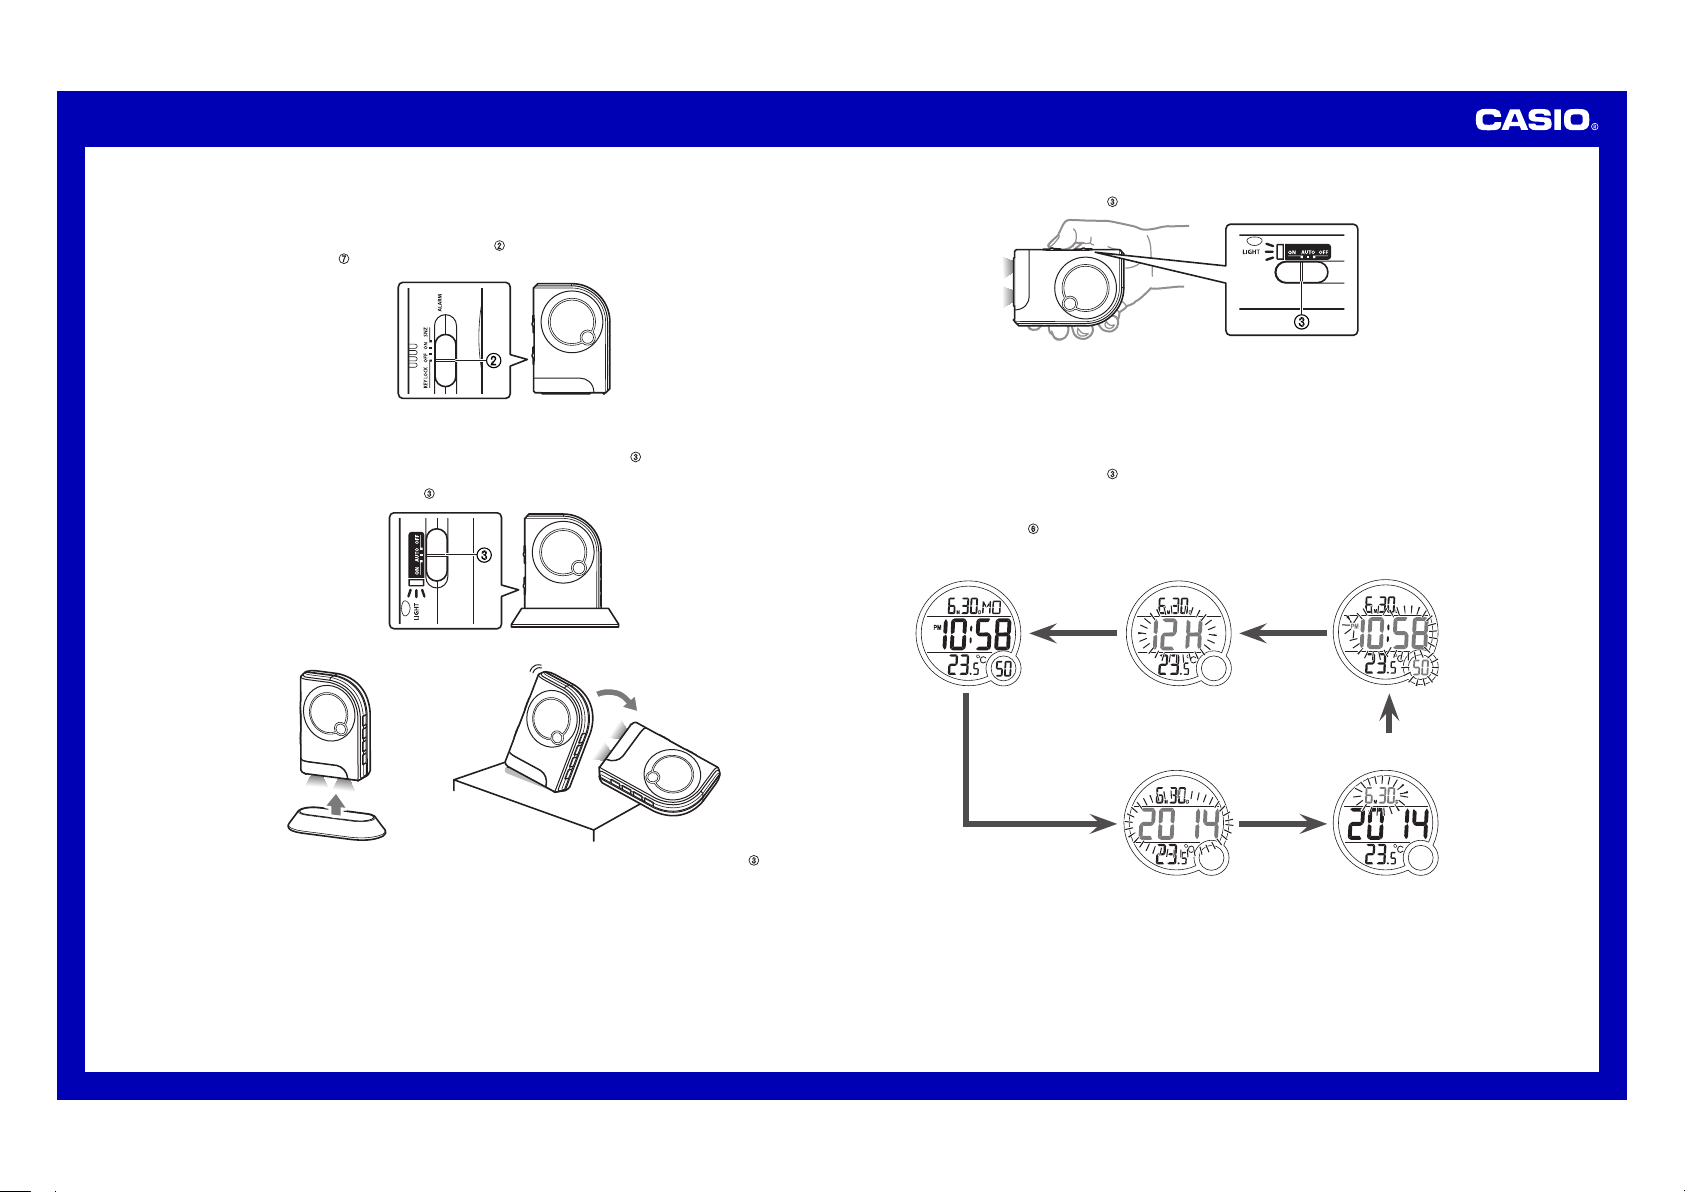
Locking Clock Buttons
You•can •lock•t he•butt ons•of •the•cl ock•to• protect •agains t•unint entiona l•opera tion•w hen•pac king•th e•clock •in•a•b ag,•
or•whil e•using •the•cl ock’s• LED•lig ht•for• illumin ation,• etc.
Slide•t he•ALAR M SNZ/O N/OFF, KEY LOC K switc h•(
••• The•RES ET butt on•(
7)•remai ns•enab led•whi le•clo c k•butt ons•are •locked .
2)•to•th e•KEY•L OCK•pos ition.
2
Using the LED Flashlight for Illumination
You•can •select •the•LE D•flashl ight•m ode•usi ng•the• LIGHT O N/AUTO/ OFF swi tch•(3) .
To have the L ED light turn on whenever t he clock is removed from th e stand
Set•the •LIGHT ON/AUTO /OFF sw itch•( 3)•in•th e•AUTO• positio n•and•p lace•t h e•cloc k •onto• the•sta nd.
3
Remove• the•clo ck•from •the•s tand•wi ll•caus e•the•L ED•ligh t•to•li ght•for •about• two•min utes.
To keep the L ED light lit
Slide•t he•LIGH T ON/AU TO/OFF switch •(3)•to• the•ON• positio n.
3
••• Do•not• forget• to•turn •off•t he•LED• light.• Leaving •the•LE D•light •on•not •only•s hortens •batte ry•life ,•it•ca n•also• cause•
its•bat teries• to•leak •and•d amage•t he•cloc k.
••• If•the• LED•flas hlight• does•n ot•turn •on•whe n•expec ted,•re place•i ts•batt eries• a s•soon •as•pos sible.
Caution!
LED Flashligh t Precaution
Do•not• look•di rectly • into•t he•LED• flashlig ht.•Doi ng•so•c an•caus e•eye•i njury.
To disable th e LED light
Slide•t he•LIGH T ON/AU TO/OFF switch •(3)•to• the•OFF •positi on.
USING THE CLOCK
1.•Pres s•the•S ET butt on•(6)• to•cycl e•throu gh•the• setting •screen s•as•sh own•be low.
Normal Timekeepin g Screen 12-hour/24-hour T imekeeping
Screen
Year Setting Scre en
Time Setting Scre en
Month and Day Set ting
Screen
••• If•you• want•th e•LED•l ight•t o •remai n •on•lo nger•th an•two• minutes ,•set•t he•LIGH T ON/AU TO/OFF switch •(3)•in•
the•ON• positio n.
Note•th at•the• LED•lig ht•wil l •turn• on•even •if•the •clock• acciden tally•t ips•ove r•from •a•vert ical•po sition. •Be•sur e•to•us e•
the•sta nd•when •standi ng•up• the•clo ck•in•a •vertic al•posi tion.
2
Page 3

Operation Guide PQ-75
2.•Whil e•the•s creen•y ou•wan t •is•di splayed ,•use•t he•+•an d•– but tons•( 4)•to•ch ange•th e•flashi ng•digi ts.
Press – to decrea se the flashing dig its. Press + to increa se the flashing dig its.
••• Holding •down•+ •or•–•c hanges •the•fla shing•d igits•a t•high• speed.
••• You•can •set•th e•year• in•the • range• of•2000 •to•209 9.•The• day•of• the•wee k•is•se t•autom aticall y•in•a ccordan ce•
with•th e•date• setting .
••• Pressin g•+•or• –•while •the•T i me•Set ting•Sc reen•is •on•the •displa y•cause s•the•s econds •count• to•be•r eset•to •00.
••• Each•pr ess•of• +•or•–• while• t he•12- h our/24- hour•T imekeep ing•Scr een•is• on•the• display •toggl es•betw een•
12-hour •and•24 -hour•t imekeep ing.
3.•Afte r•makin g•the•s ettings •you•w ant,•us e•the•S ET butt on•(
••• The•clo ck•auto matical ly•ret urns•to •the•No rmal•Ti mekeepi ng•Scre en•if•y ou•lea v e•a•se tting•s creen•o n•the•
display •for•ab out•five •minute s•with out•per forming •any•op eration .
USING THE ALARM
The•ala rm•soun ds•when •the•a larm•ti me•you• set•is• reached .•You•c an•also •use•th e•ALARM SNZ/ON /OFF, K EY
LOCK sw itch•(
Setting the A larm Time
Use•the •+•and• – butto ns•(4)• to•set• the•ala rm•time .•
Pressin g•the•+ •and•– buttons •(
••• Holding •down•+ •or•–•c hanges •the•di gits•at •high•s peed.
Turning the A larm On and Off
Use•the •ALARM SNZ/ON/ OFF, KE Y LOCK switch •(2)•on• the•sid e•of•th e•clock •to•tu rn•the• alarm•o n•and•o ff,•and•
to•sele ct•the• snooze • feature .
••• The•ala rm•time •appear s•in•p lace•of •the•da te•on•t he•disp lay•whe never•t he•ALAR M SNZ/O N/OFF, KEY LOC K
switch• (
••• The•ala rm•soun d•chang es•ove r •four• levels• as•it•s ounds.
Stopping the Alarm
••• When•al arm•is• soundin g,•pre ss•the• SNOOZE/ LIGHT b utton•( 1)•to•s t op•it. •When•t he•snoo ze•feat ure•is• turned•
on,•the •alarm• will•so und•ag a in•in• about•fi ve•minu tes.
••• To•turn •off•th e•snooz e•feat u re,•sl ide•the •ALARM SNZ/ON/ OFF, KE Y LOCK switch •(
2)•to•se lect•th e•snooz e•alar m •featu re.
4)•cause s•the•a larm•ti me•to• appear• in•plac e•of•th e•date• on•the• display .
ALARM SN Z/ON/OFF, KEY LOCK swi tch
SNZ
ON
OFF
2)•is•se t•to•ON •or•SNZ .
6)•to•di splay•t he•Norm al•Tim e keeping •Scree n.
The•ala r m•sound s•at•the •preset •time•fo r•one•m inute,•a nd•
up•to•s even•mor e•times • every•fi ve•minut es•ther eafter.• Even•
if•you• stop•the •alarm•b y•press ing•the• SNOOZE/ LIGHT
button• (1),•the •alarm•s ounds•a gain•five •minutes •later.
••• The•i ndicator •
the•sno o ze•feat ure•is•a ctivate d.
The•ala r m•sound s•at•the •preset •time•fo r•one•m inute.
The•ala r m•does• not•soun d.
Descript ion
•flashes •on•the• display • to•indi cate•tha t•
2)•to•OF F.
BATTERY REPLACEMENT
Replace •batter ies•whe never• the•dis play•of •the•cl ock•bec omes•di m•and•d ifficult •to•re ad.
1.•Open •the•ba ttery•c ompartm ent•co ver•as• shown•i n•the•i llustra tion.
2.•Remo ve•all• of•the• old•ba t teries.
3.•Load •a•full •set•of •new•b a tteries .•Make •sure•t hat•the ir•posi tive•(+ )•and•n egative •(–)•e nds•fac e•in•th e•corre ct•
directi ons.•If •you•lo ad•bat teries• incorre ctly,•t hey•can •burst• and•dam age•th e •clock .
4.•Pres s•the•R ESET bu tton•(
5.•Repl ace•the •batter y•comp a rtment •cover.
Battery preca utions
••• Keep•ba tteries •out•of •the•r each•of •small• childre n.•If•a •batter y•is•ac cidenta lly•sw allowed ,•conta ct•your •physic ian•
immedia tely.
••• Be•sure •to•loa d•the•b atterie s•with •their• positiv e•(+)•a nd•nega tive•(– )•ends• facing •correc tly.
••• Never•m ix•old• and•new •batter ies,•o r•batte ries•of •differ ent•bra nds.
••• Never•c harge•t he•batt eries• that•co me•with •the•cl ock.
••• Should• batteri es•ever •leak• while•i n•the•c lock,•w ipe•out •the•flu id•with •a•clot h,•tak ing•car e•not•t o•let•a ny•get• onto•
your•sk in.
••• Replace •the•ba tteries •at•le ast•onc e•a•yea r,•even •if•the •curren t•batte ries•ar e•work i ng•pro perly.
••• The•bat teries• that•co me•wit h•the•c lock•lo se•some •of•the ir•powe r•durin g•trans port•a nd•stor age.
7).•Be•s ure•to• press•t he•RES ET butt on•(7)•a fter•re placing •batter ies.
SPECIFICATIONS
Accurac y at no rmal te mperatu re:•±3 0•secon ds•a•mo nth
Calenda r syste m:•Auto -calend ar•pre -progra mmed•fr om•the• year•20 00•to• 2 099
Alarm:• Setting •unit: • minutes ;•Alar m•durat ion:•1• minute
Alarm b eeper:• •Daily• a larm
Snooze• alarm:• •(Alarm •sounds •up•to• 7•times •at•5-m inute•i nterval s.)
Demo•al arm•(al arm•ton e•test )
Thermom eter Fu nctions :••Meas uring•r ange:•0 °C•to•4 0°C•
Though• tempera ture•r e adings •are•di splayed •up•to• 0°C•and •greate r•than• 41°C,• n ote•th at•such •readin gs•are•
actuall y•outsi de•the • guarant eed•te mperatu re•rang e•of•th is•cloc k.
Tempera ture Se nsor Pr ecision :••±2°C •in•ran ge•of•0 °C•to•4 0°C
Other:• •12/24-h our•ti m ekeepin g;•LED •face•i llumina tion;•L ED•flash light
Include d•acces sories: ••Stand
Operati ng temp erature :••0°C• to•40°C
Clock b atterie s:••2•AA A-size •mangan ese•bat teries• (R03)
LED•flas hlight• batteri es:•2• AAA-siz e•manga nese•ba tteries •(R03)
Clock b attery life:• •Approxi mately• 1•year• (5•seco nds•of• face•il luminat ion•pe r•day;• 1•minut e•of•al arm•sou nd•per•
LED•flas hlight• battery •life: •Approx imately •12•hou rs•cont inuous• operati on
day)
USING THE LIGHT
Pressin g•the•S NOOZE/L IGHT bu tton•( 1)•turns •on•the •light• and•ill uminate s•the• display •for•ea sy•read ing•in• the•
dark.
Important!
••• Overuse •of•the •light• can•sh o rten•b attery• life.
THERMOMETER FUNCTIONS
••• A•built -in•sen sor•mea sures• tempera ture•an d•shows •the•me asured• value•o n•the• display .
••• The•tem peratur e•displ ay•sho ws•“LL” •for•te mperatu res•bel ow•–20° C•and•“ HH”•for •tempe r atures •above• 50°C.
••• Though• tempera ture•r e adings •are•di splayed •up•to• 0°C•and •greate r•than• 41°C,• n ote•th at•such •readin gs•are•
actuall y•outsi de•the • guarant eed•te mperatu re•rang e•of•th is•cloc k.
3
 Loading...