

Page 1
PL40NE01-1.book 1 ページ 2002年7月23日 火曜日 午後6時52分
Page 2
PL40NE01-1.book 2 ページ 2002年7月23日 火曜日 午後6時52分
426-E-002A
Page 3
PL40NE01-1.book 1 ページ 2002年7月23日 火曜日 午後6時52分
Safety Precautions
Safety Precautions
Congratulations on your selection of the CASIO Digital
Piano. This piano is a sophisticated musical instrument that
blends the very best of traditional piano feel and sound
quality with the latest that modern electronics technology has
to offer.
Before using the instrument, be sure to carefully read
through the instructions contained in this manual.
Please keep all information for future reference.
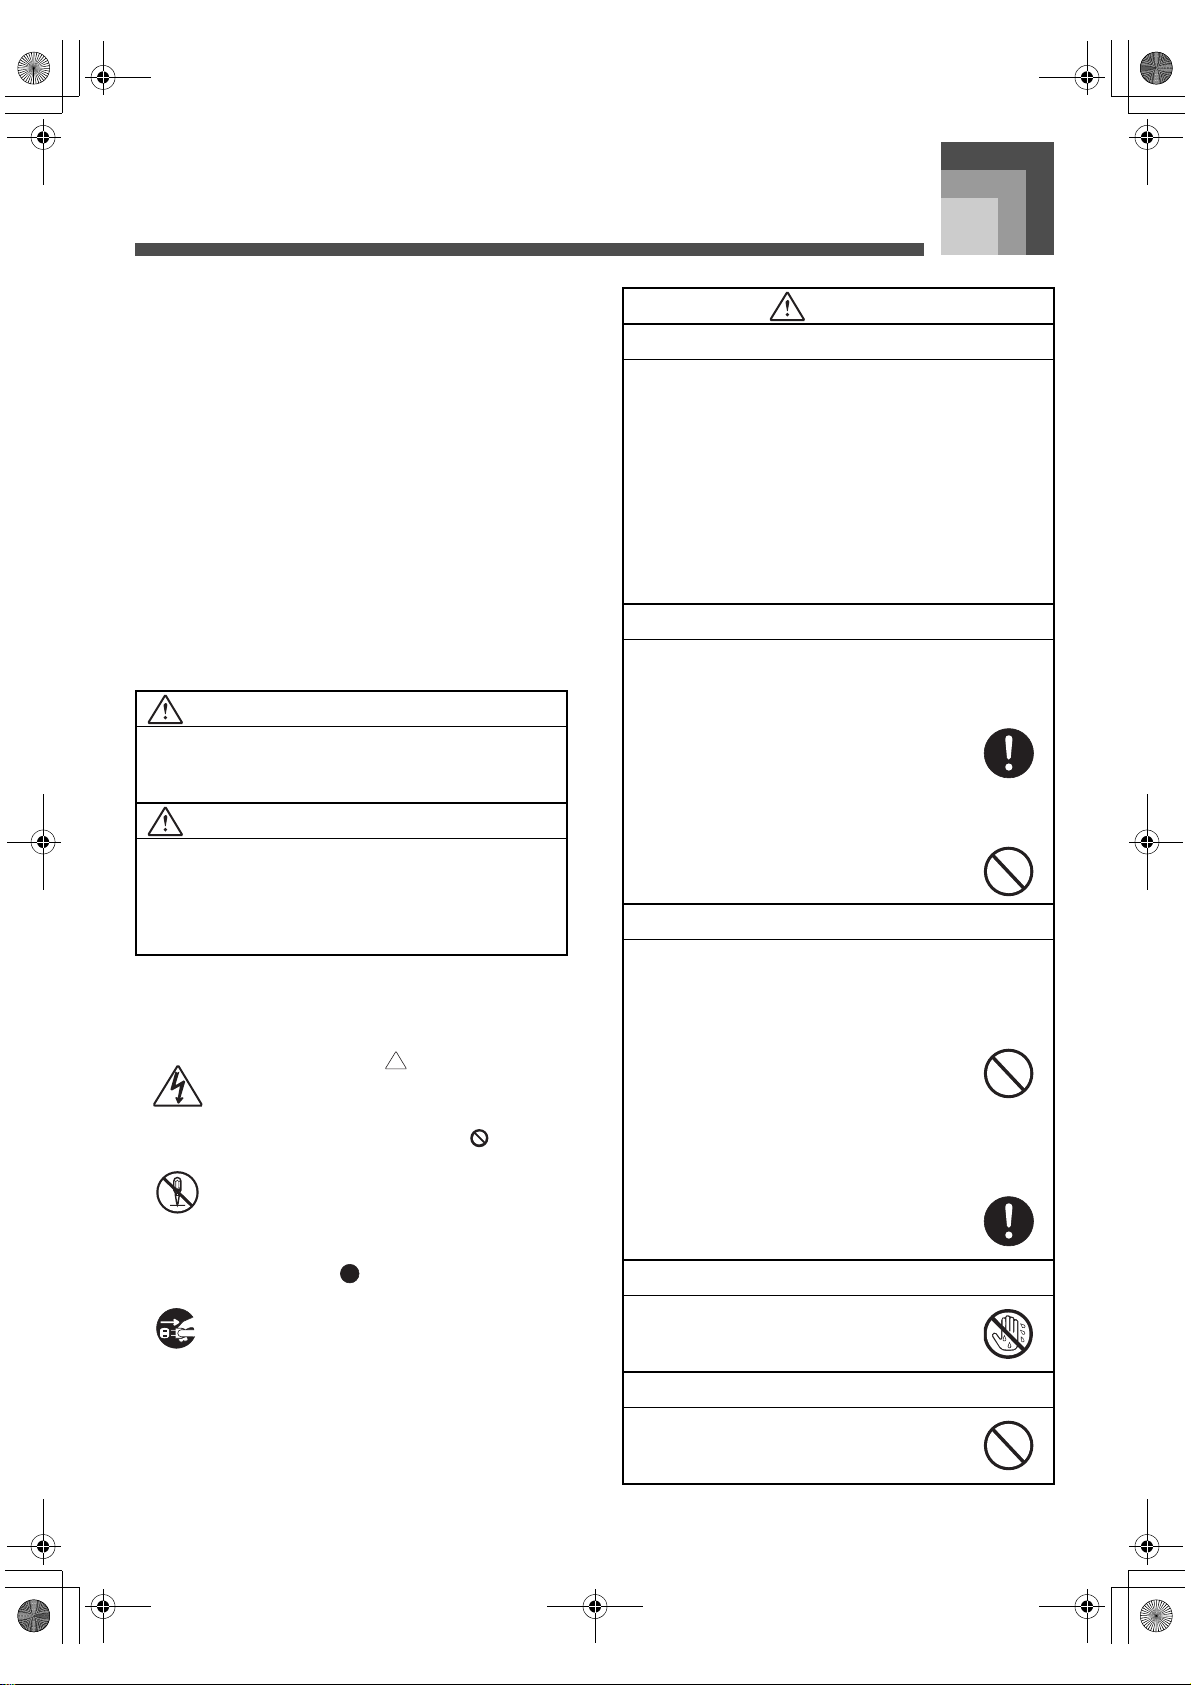
Symbols
Various symbols are used in this user’s guide and on the
product itself to ensure that the product is used safely and
correctly, and to prevent injury to the user and other
persons as well as damage to property. Those symbols
along with their meanings are shown below.
WARNING
This indication stipulates matters that have the risk of
causing death or serious injury if the product is operated
incorrectly while ignoring this indication.
CAUTION
This indication stipulates matters that have the risk of
causing injury as well as matters for which there is the
likelihood of occurrence of physical damage only if the
product is operated incorrectly while ignoring this
indication.
Symbol Examples
This triangle symbol ( ) means that the user
should be careful. (The example at left
indicates electrical shock caution.)
This circle with a line through it ( ) means
that the indicated action must not be
performed. Indications within or nearby this
symbol are specifically prohibited. (The
example at left indicates that disassembly is
prohibited.)
The black dot ( ) means that the indicated
action must be performed. Indications within
this symbol are actions that are specifically
instructed to be performed. (The example at
left indicates that the power plug must be
unplugged from the electrical socket.)
WARNING
Smoke, Strange Odor, Overheating
Continued use of the product while it is
emitting smoke, a strange odor, or heat
creates the risk of fire and electric shock.
Take the following steps immediately.
1. Turn off power.
2. If you are using the AC adaptor for
power, unplug it from the wall outlet.
3. Contact your original retailer or an
authorized CASIO Service Provider.
AC Adaptor
Misuse of the AC adaptor creates the risk of
fire and electric shock. Always make sure
you observe the following precautions.
Be sure to use only the AC adaptor that is
specified for this product.
Use only a power source whose voltage
is the within the rating marked on the AC
adaptor.
Do not overload electrical outlets and
extension cords.
AC Adaptor
Misuse of the AC adaptor’s electric cord can
damage or break it, creating the risk of fire
and electric shock. Always make sure you
observe the following precautions.
Never place heavy objects on the cord or
subject it to heat.
Never try to modify the cord or subject it
to excessive bending.
Never twist or stretch the cord.
Should the electric cord or plug become
damaged, contact your original retailer
or authorized CASIO Service Provider.
AC Adaptor
Never touch the AC adapter while your
hands are wet.
Doing so creates the risk of electric shock.
Do not incinerate the product.
426-E-003A
Never throw the product into fire. Doing so
can cause it to explode, creating the risk of
fire and personal injury.
E-1
Page 4
PL40NE01-1.book 2 ページ 2002年7月23日 火曜日 午後6時52分
Safety Precautions
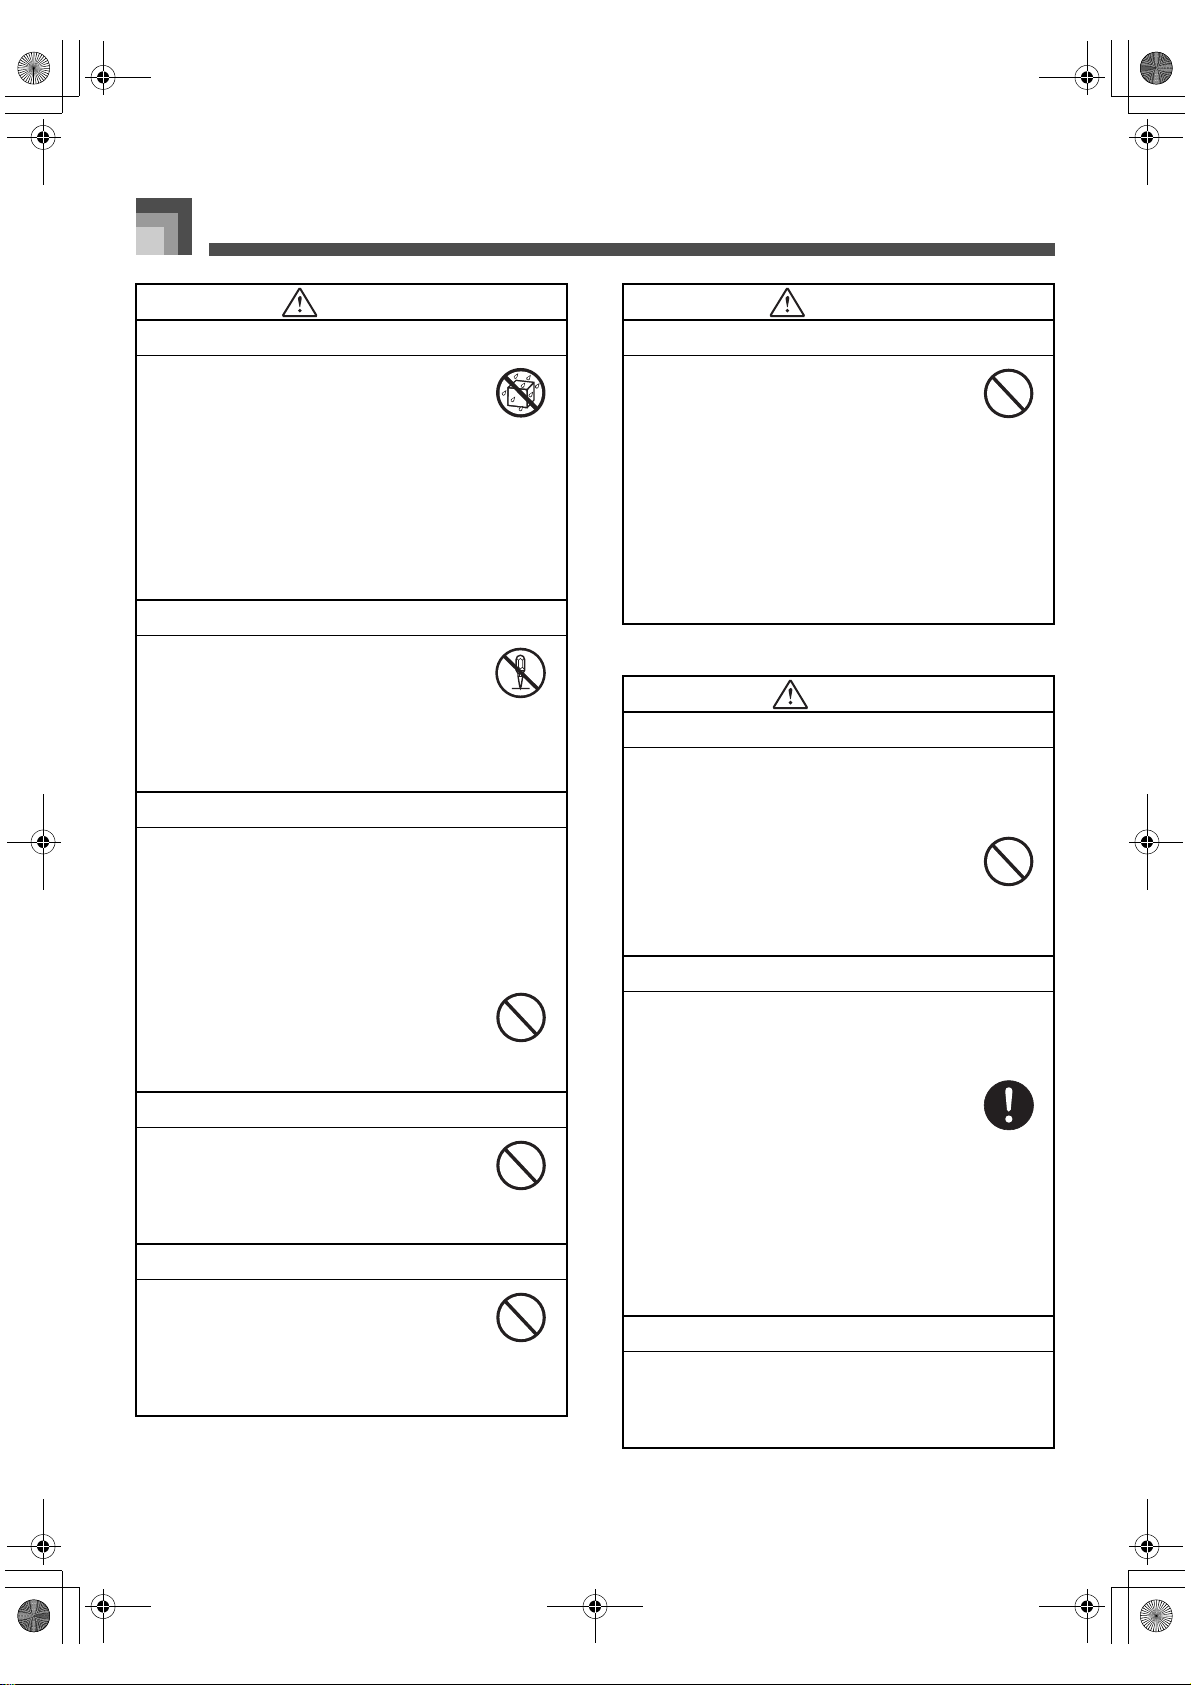
WARNING
Water and Foreign Matter
Water, other liquids, and foreign matter
(such as pieces of metal) getting into the
product create the risk of fire and electric
shock. Take the following steps immediately.
1. Turn off power.
2. If you are using the AC adaptor for
power, unplug it from the wall outlet.
3. Contact your original retailer or an
authorized CASIO Service Provider.
Disassembly and Modification
Never try to take this product apart or
modify it in any way. Doing so creates the
risk of electric shock, burn injury, or other
personal injury. Leave all internal inspection,
adjustment, and maintenance up to your
original retailer or authorized CASIO Service
Provider.
Dropping and Impact
Continued use of this product after it has
been damaged by dropping or subjecting it to
strong impact creates the risk of fire and
electric shock. Take the following steps
immediately.
1. Turn off power.
2. If you are using the AC adaptor for
power, unplug it from the wall outlet.
3. Contact your original retailer or an
authorized CASIO Service Provider.
Plastic Bags
Never place the plastic bag the product
comes in over your head or in your mouth.
Doing so creates the risk of suffocation.
Particular care concerning this precaution is
required where small children are present.
Never climb onto the product or stand.*
Never climb onto the product or hang from
its edges. Doing so can cause the product to
fall over, creating the risk of personal injury.
Special care concerning this point is required
in households where there are small
children.
WARNING
Do not locate the product on an unstable surface.
Never locate the product on a surface that is
wobbly, tilted, or otherwise unstable
unstable surface can cause the product to fall
over, creating the risk of personal injury.
Avoid areas where there are multiple
layers of carpeting, and where cables are
running under the product.
Always make sure you secure the product to
the stand with the screws that are provided.
An unsecured product can fall from the
stand, creating the risk of personal injury.
CAUTION
AC Adaptor
Misuse of the AC adaptor creates the risk of
fire and electric shock. Always make sure
you observe the following precautions.
Do not locate the electric cord near a
stove or other sources of heat.
Never pull on the cord when unplugging
from the electrical outlet. Always grasp
the AC cord plug when unplugging.
AC Adaptor
Misuse of the AC adaptor creates the risk of
fire and electric shock. Always make sure
you observe the following precautions.
Insert the AC cord into the wall outlet as
far as it will go.
Unplug the AC cord from the wall outlet
during lightening storms or before
leaving on a trip or other long-term
absence.
At least once a year, unplug the AC cord
from the wall outlet and wipe away any
dust that is built up in the area around
the prongs of the plug.
AC Adaptor
When in use, do not locate the AC adaptor
inside a bookcase or other confined space,
and never place paper, books, or other
similar objects on the AC adaptor.
. An
E-2
426-E-004A
Page 5
PL40NE01-1.book 3 ページ 2002年7月23日 火曜日 午後6時52分
Safety Precautions
CAUTION
Relocating the Product
Before relocating the product, always unplug
the AC cord from the wall outlet and
disconnect all other cables and connecting
cords. Leaving cords connected creates the
risk of damage to the cords, fire, and electric
shock.
Cleaning
Before cleaning the product, always unplug
the AC cord from the wall outlet first.
Leaving the AC adaptor plugged in creates
the risk of damage to the AC adaptor, fire,
and electric shock.
Connectors
Connect only the specified devices and
equipment to the product’s connectors.
Connection of a non-specified device or
equipment creates the risk of fire and electric
shock.
Location
Avoid the following locations for this
product. Such locations create the risk of fire
and electric shock.
Areas subject to high humidity or large
amounts of dust
In food preparation areas or other areas
subject to oil smoke
Near air conditioning equipment, on a
heated carpet, in areas exposed to direct
sunlight, inside of a vehicle parked in the
sun, or any other area that subjects the
product to high temperatures
Liquid Crystal Display (LCD) Precautions
Avoid subjecting the piano’s LCD to
strong impact, which can crack or break
the LCD’s glass creating the danger of
personal injury.
Should the LCD glass ever crack or
break, do not allow the liquid inside the
LCD to come into contact with your skin,
which can cause inflammation and
reddening.
* Should the LCD liquid get into your
mouth, immediately wash out your
mouth with water and then consult a
physician.
CAUTION
* Should the LCD liquid get in your
eyes or on your skin, immediately
flush with water for at least 15
minutes and then consult a
physician.
Sound Volume
Do not listen to music at very loud volumes
for long periods. Particular care concerning
this precaution is required when using
headphones. High volume settings can
damage your hearing.
Health Precaution
In extremely rare cases, exposure to strong
sudden light or flashing light can cause
momentary muscle spasms, loss of
consciousness, or other physical problems
with some individuals.
If you suspect that you might be
susceptible to any condition such as this,
be sure to consult with your physician
before using this product.
Use this product in an area that is well
illuminated.
Should you ever feel any symptoms
similar to those described above when
using this product, stop using it
immediately and contact your physician.
Heavy Objects
Never place heavy object on top of the
product.
Doing so can make the product top heavy,
causing the product to tip over or the object
to fall from it, creating the risk of personal
injury.
Correct Stand* Assembly
Failure to do so can cause the stand to fall
over and the digital piano to fall from the
stand, creating the risk of personal injury.
Make sure you assemble the stand in
accordance with the instructions that come
with it, and ensure that all connections are
secure. Also make sure that you choose an
appropriate location for the stand.
When placing the digital piano onto the
stand, take care that you do not pinch
your fingers between the digital piano
and the stand.
426-E-005A
E-3
Page 6
PL40NE01-1.book 4 ページ 2002年7月23日 火曜日 午後6時52分
Safety Precautions
CAUTION
At least two people should lift the digital
piano when placing it onto the stand or
moving it. Trying to move the digital
piano alone can cause the stand to fall
over, creating the risk of personal injury.
Do not drag the stand or tilt it forward or
back when placing the digital piano onto
the stand or moving it. Doing so can
cause the digital piano to fall over,
creating the risk of personal injury.
Periodically check the screws that secure
the digital piano to the stand for
looseness. If a screw is loose, retighten it.
Loose screws can cause the stand to tip
over and the digital piano to fall, creating
the risk of personal injury.
* Stand is available as an option.
IMPORTANT SAFETY INSTRUCTIONS
WARNING – When using electric products, basic
precautions should always be followed, including the
following:
Read these instructions.
Keep these instructions.
Heed all warnings.
Follow all instructions.
Do not use this apparatus near water.
Clean only with dry cloth.
Do not install near any heat sources such as radiators,
heat registers, stoves, or other apparatus (including
amplifiers) that produce heat.
Protect the power cord from being walked on or pinched
particularly at plugs, convenience receptacles, and the
point where they exit from the apparatus.
Only use attachments/accessories specified by the
manufacturer.
Unplug this apparatus during lightning storms or when
unused for long periods of time.
Refer all servicing to qualified service personnel.
Servicing is required when the apparatus has been
damaged in any way, such as power-supply cord or
plug is damaged, liquid has been spilled or objects have
fallen into the apparatus, the apparatus has been
exposed to rain or moisture, does not operate normally,
or has been dropped.
E-4
426-E-006A
Page 7
PL40NE01-1.book 5 ページ 2002年7月23日 火曜日 午後6時52分
Main Features
Main Features
J Simple, compact design
A simple, compact design fits right in and complements just about any interior layout.
J Advanced Lesson System (pages E-35, 39)
Choose from among 70 built-in auto accompaniment tunes for your listening pleasure, or turn off the melody or another part and
practice by playing along.
The lesson function lets you select one of three different arrangement levels to suit your abilities and need. Simply select the part
you want to practice, and then follow along on the keyboard as keys light. First master the timing. Next, play along at your own
pace. Finally, you can try playing along with the accompaniment at normal speed.
J Big display with a wealth of musical information (page E-12)
A big, information-packed display shows you which fingers to use, which keys to press, staff notation of the notes being played,
and much more.
J Sequencer (page E-53)
A 17-track sequencer provides a System Track for recording of the auto accompaniment plus 16 tracks, each of which can be used
to record with a different tone.
J 100 rhythms (page E-23)
100 preset rhythms including rock, pops, jazz, and much more are at your fingertips.
J Auto Accompaniment (page E-23)
Simply play a chord, and the corresponding rhythm, bass, and chords parts play along automatically. One Touch Presets instantly
recalls the most suitable tone and tempo settings to match the rhythm you are using.
J 271 realistic tones (page E-18, 71)
A simple operation selects one of 271 TONE button tones, including “Grand Piano”, “Vibraphone”, and much more.
A Sound Quality Adjustment feature lets you select the optimal sound quality setting to match the environment and acoustic
conditions of the location where you are playing.
J General MIDI compatibility (page E-66)
General MIDI compatible tones let you connect to a personal computer for quick and easy “desktop music” capabilities, which
means you can use the piano as a desktop music input device or sound source.
J Mixer (page E-46)
You can specify tone, volume, pan position, and other parameters for each built-in auto accompaniment part and each track
recorded with the sequencer. You can also control the same parameters for each channel during MIDI input.
J Effects (page E-33)
The piano’s powerful effector provides three blocks: DSP + Chorus + Reverb. A different effect can be assigned to each block, and
blocks can be turned on and off as required.
J Registration Memory (page E-50)
Keyboard setups can be stored in memory for later recall and instant settings whenever you need them. Up to 16 setups (4 setups
× 4 banks) can be stored in registration memory.
426-E-007A
E-5
Page 8
PL40NE01-1.book 6 ページ 2002年7月23日 火曜日 午後6時52分
Contents
Safety Precautions ........ E-1
Main Features ................ E-5
Contents ......................... E-6
General Guide ................ E-9
About the Display ................................E-12
Connecting to
a Power Outlet ............. E-14
Using the AC Adaptor .........................E-14
Power On Alert....................................E-15
Settings and Memory Contents...........E-15
Connections ................ E-16
Accessories and Options ....................E-16
Playing a Rhythm ............................... E-23
Using Auto Accompaniment ............... E-23
Adjusting the Tempo .......................... E-26
Adjusting the Accompaniment
Volume ............................................... E-26
Using an Intro Pattern ........................ E-26
Using a Fill-in Pattern ......................... E-27
Using the Variation Patterns............... E-27
Using a Break..................................... E-27
Using Synchro Start ........................... E-27
Finishing with an Ending Pattern........ E-28
Using Auto Harmonize ....................... E-29
Using One-touch Preset ..................... E-30
Using the Metronome ......................... E-30
Transposing the Piano ....................... E-31
Basic Operations
Basic Operations ......... E-18
Getting Started ....................................E-18
Selecting a Tone .................................E-18
Upper1, Upper2, Lower1, Lower2 .......E-19
Using Layer .........................................E-19
Using Split ...........................................E-20
Using Layer and Split Together...........E-20
Turning the Key Light System
On and Off...........................................E-21
Using the Pedals .................................E-21
Auto Accompaniment
.................. E-22
About the MODE Button......................E-22
Selecting a Rhythm .............................E-23
Tuning the Piano ................................ E-31
Using Touch Response ...................... E-32
Applying Effects to Tones
.................. E-33
Effect Blocks....................................... E-33
Configuring Effect Settings................. E-33
Using the Advanced Lesson
System to Play Back a Music
Library Tune ................ E-35
Selecting a Tune ................................ E-35
Playing a Tune ................................... E-36
Adjusting the Tempo .......................... E-36
Pausing Playback............................... E-37
Skipping Back..................................... E-37
Skipping Forward ............................... E-37
E-6
426-E-008A
Page 9
PL40NE01-1.book 7 ページ 2002年7月23日 火曜日 午後6時52分
Contents
Looping a Musical Phrase...................E-37
Using the Advanced Lesson
System to Practice Along
with a Music Library Tune
.................. E-39
Arrangement Levels ............................E-39
Selecting the Part
You Want to Practice ..........................E-39
3-Step Lesson .....................................E-40
Step 1 – Master the timing. .................E-40
Step 2 – Master the melody. ...............E-41
Voice Fingering Guide.........................E-42
Step 3 – Play at normal speed............E-42
Changing the Lesson Part Tone .........E-43
Advanced Operations
Using the Sequencer
.................. E-53
How the Sequencer Works................. E-53
Sequencer Main Menus
and Sub Menus .................................. E-56
Realtime Recording............................ E-57
Modifying Recorded Data
with Punch In Recording .................... E-59
Changing Song Header Data ............. E-60
Playing Back
from Sequencer Memory.................... E-60
Configuring Global Recording
Settings and Operations..................... E-61
Using MIDI .................... E-66
What is MIDI?..................................... E-66
Sending and Receiving MIDI
Messages ........................................... E-67
Using the Mixer ........... E-46
Parts....................................................E-46
Changing the Parameters
of a Part...............................................E-47
Mixer Parameters................................E-48
Registration Memory
.................. E-50
Registration Memory Features............E-50
To save a setup
in registration memory.........................E-51
To recall a setup
from registration memory ....................E-52
MIDI Settings...................................... E-68
Connecting to a Computer ................. E-69
USB Mode and MIDI Mode ................ E-69
Obtaining USB Driver Upgrades
and the Latest
PL-40R Information ............................ E-70
Keyboard Settings ....... E-71
Using the Keyboard Setup Menus...... E-71
Parameter Setting Items..................... E-73
426-E-009A
E-7
Page 10
PL40NE01-1.book 8 ページ 2002年7月23日 火曜日 午後6時52分
Contents
Reference
Troubleshooting .......... E-84
Specifications .............. E-87
Operational Precautions
.................. E-90
Appendix ........................A-1
Tone List ...............................................A-1
Drum Assignment List ...........................A-7
Rhythm List .........................................A-10
Effect Table .........................................A-11
Fingered/Full Range Chord Table.......A-12
Song List .............................................A-15
Parameter List.....................................A-17
MIDI Data Format ......... A-22
Channel Messages .............................A-22
System Messages...............................A-31
Index .............................A-40
MIDI Implementation Chart
E-8
426-E-010A
Page 11
PL40NE01-1.book 9 ページ 2002年7月23日 火曜日 午後6時52分
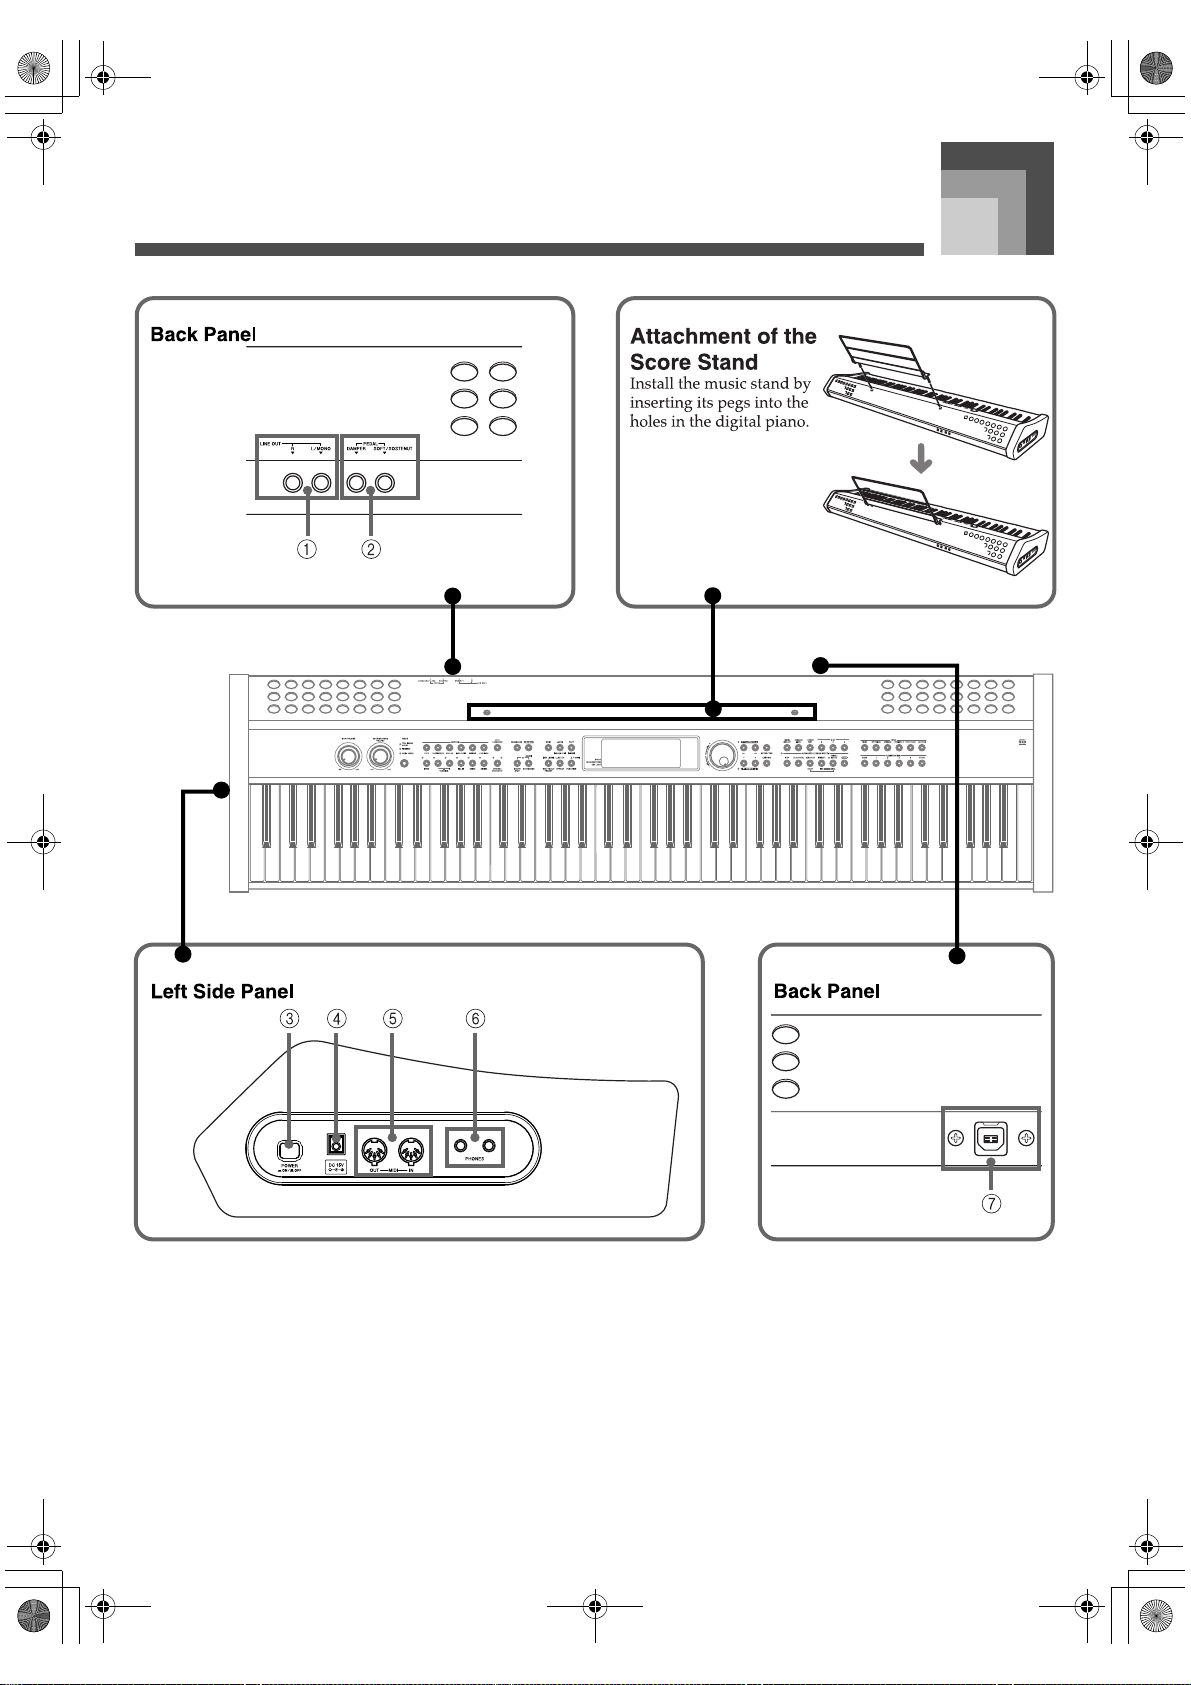
General Guide
General Guide
1 LINE OUT jacks (R, L/MONO)
2 DAMPER PEDAL jack, SOFT/SOSTENUTO PEDAL jack
3 POWER button
4 DC 15V jack
5 MIDI IN terminal, MIDI OUT terminal
6 PHONES jack
7 USB port
426-E-011A
E-9
Page 12
PL40NE01-1.book 10 ページ 2002年7月23日 火曜日 午後6時52分
General Guide
8 MAIN VOLUME knob
9 ACCOMP/SONG VOLUME knob
bk MODE button
bl RHYTHM buttons
POPS button
ROCK/DANCE button
E-10
BALLAD button
JAZZ/LATIN button
VARIOUS button
FOR PIANO button
bm AUTO HARMONIZE button
bn SEQUENCER button
bo RECORD button
426-E-012A
Page 13
PL40NE01-1.book 11 ページ 2002年7月23日 火曜日 午後6時52分
General Guide
bp SPLIT button
bq LAYER/(GROUP A/B) button
br PART/(MIXER) button
bs INTRO button
bt VARIATION 1/2 buttons
ck FILL-IN button
cl BREAK button
cm ENDING button
cn SYNCHRO START/STOP button
co START/STOP button
cp METRONOME/(BEAT) button
cq ONE TOUCH PRESET/(KEY LIGHT) button
cr EFFECT/(L. METER) button
cs FUNCTION/ button
ct Selector dial
dk TRANSPOSE buttons [ ]/[ ], [ ]/[ ] buttons
dl ENTER/YES button
dm ADVANCED LESSON SYSTEM
MUSIC LIBRARY button
ARRANGE. LEVEL button
LESSON PART button
STEP 1 button
STEP 2 button
STEP 3 button
STOP button
PLAY/PAUSE button
REW/PREV button, START button
FF/NEXT button, END button
PHRASE REPEAT button, AREA button
DEMO button*
dn TONE buttons
PIANO button
EP/ORGAN button
GT/BASS button
ENSEMBLE button
REED/BRASS button
GM/DRUM button
do TEMPO buttons [ ]/[ ], [+]/[–]buttons
dp EXIT/NO button
dq Music Library Mode lamp
dr REGISTRATION buttons
BANK button
STORE button
ds Display
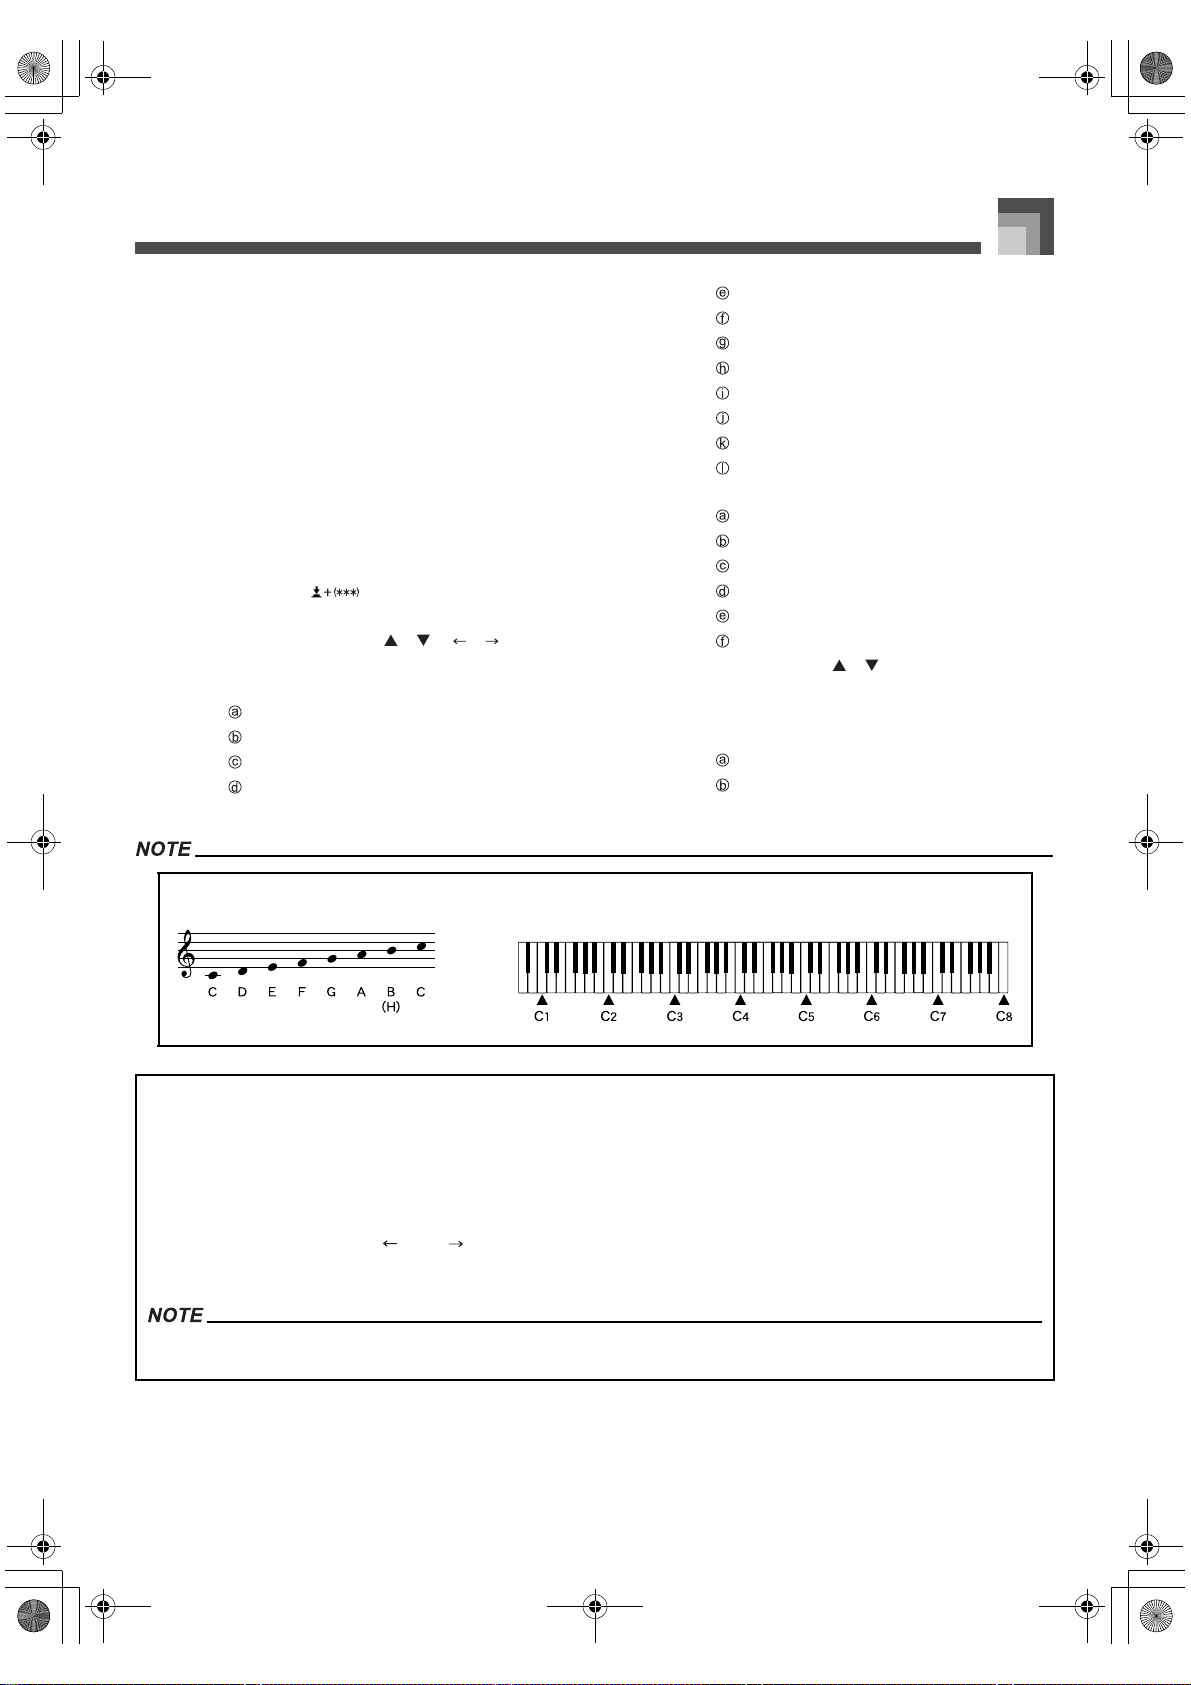
Note Names
A value next to a note name indicates the relative position of the note on
the keyboard as shown below.
∗ Playing a Demo Tune
1. Press the DEMO button to start demo tune play.
This causes the indicator lamp above the MUSIC LIBRARY button to light.
Demo tune play plays all of the songs in the Music Library, starting from the first song, in an endless loop. Songs in
the user group, however, are not played. (See the “Song List” on page A-15.)
You can use the [+] and [–] buttons or the selector dial to change the currently playing demo tune.
You can also use the [ ] and [ ] buttons to change the Music Library group.
2. To stop demo tune play, press the DEMO button or the START/STOP button.
You can play along with a demo tune on the keyboard using the tone setting of the demo tune.
MIDI/USB is disabled while a demo tune is playing.
426-E-013A
E-11
Page 14
PL40NE01-1.book 12 ページ 2002年7月23日 火曜日 午後6時52分
General Guide
About the Display
1. Operation Indicators
These indicators show what type of settings you are
making and the type of information currently
displayed in the message area. The applicable
indicator appears while you are making tone
(TONE), part (U1, U2, L1, L2), song (SONG), rhythm
(RHYTHM), mixer (MIXER), or function
(FUNCTION) settings.
2. Message area
This area shows the currently selected tone name
(and number when a General MIDI tone is selected),
rhythm name, or song number and name. You can
determine the type of information that is currently
displayed by checking the current operation indicator
1. This area is also used to display other types of
information, depending on the mode. During lessons
and while playing along with built-in tunes, this area
shows keyboard fingerings and fingering numbers.
3. Octave symbol 1
One symbol indicates the note being produced by the
keyboard is one octave higher than the note shown in
the staff notation area
octaves higher.
4. Two symbols indicate two
4. Staff notation area
Notes you play on the keyboard, lesson part notes,
notes played back from memory, chord forms, and
received MIDI data are shown here.
5. Pedal mark
The pedal mark appears when you depress the pedal,
and during a lesson to indicate you should press the
pedal.
6. Octave symbol 2
This symbol indicates the note being produced by the
keyboard is one octave lower than the note shown in
the staff notation area
4.
7. Dynamics symbols
These indicators appear during lessons and while
playing along with built-in tunes to show the relative
strength of a note.
8. Beat number
Shows the beat number during rhythm and auto
accompaniment play, and while the Advanced
Lesson System or sequencer is turned on.
9. Measure
Shows the measure number from the start of play
during rhythm and auto accompaniment play, and
while the Advanced Lesson System or sequencer is
turned on.
10. Tempo indicator
Shows the tempo as a value indicating the number of
beats per minute during rhythm and auto
accompaniment play, and while the Advanced
Lesson System or sequencer is turned on.
E-12
426-E-014A
Page 15
PL40NE01-1.book 13 ページ 2002年7月23日 火曜日 午後6時52分
11. Chord name display
Shows chord names while auto accompaniment is
being used.
12. Pointers
A pointer appears next to the applicable function
when you have voice fingering guide, touch
response, or key lighting turned on.
Display examples shown in this User’s Guide are intended
for illustrative purposes only. The actual text and values
that appear on the display may differ from the examples
shown here.
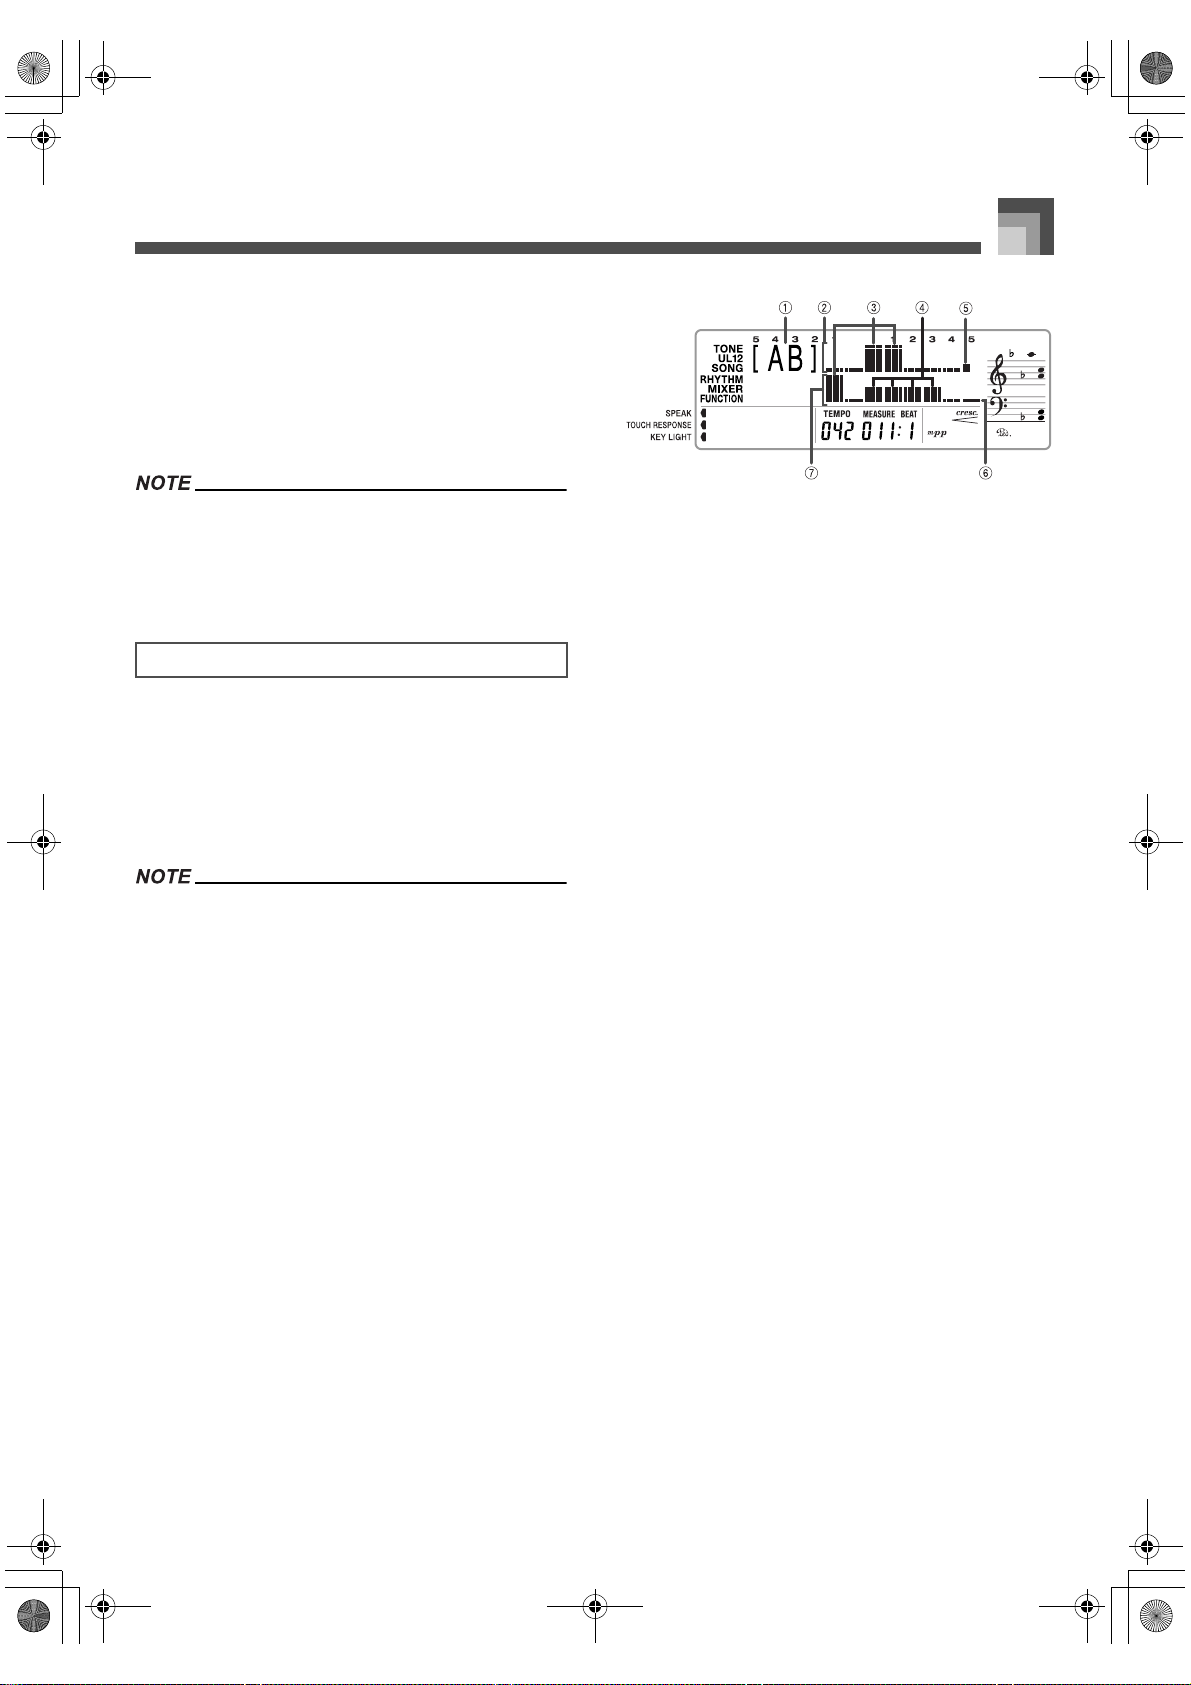
Level Meter Screen
Under certain conditions, you can display a digital level
meter secreen. The level meter has 16 segments, divided
between two lines of eight segments each. Besides showing
the volume level of each part that is turned on, the level meter
also indicates the current on/off status of each track. During
Squencer playback standby, the level meter can be used to
check which track has data stored in it.
You can display the level meter in the following cases.
While the tone/rhythm screen is on the display
In the Music Library Mode
During sequencer playback standby
During sequencer playback
J To display the level meter
1. While holding down the FUNCTION button,
press the EFFECT/(L. METER) button.
General Guide
Currently selected mixer group
1
2 Upper row
3 High level
4 Low level
5 Indicates part is off or does not exist
6 Indicates part is on
7 Lower row
2. Hold down the FUNCTION button and press the
LAYER/(GROUP A/B) button to cycle through
the mixer group settings.
The information being displayed in the upper
row and lower row of the level meter depends on
the currently selected mixer group (page E-46), as
shown below.
* [A ] ..... Group A (Internal)
The upper level meter row shows this:
Upper 1, Upper 2, Lower 1, Lower 2,
Harmonize 1, Harmonize 2
The lower level meter row shows this:
Percussion, Bass, Chord 1, Chord 2, Chord 3,
Chord 4, Chord 5
* [ B] ..... Group B (External)
The upper level meter row shows this:
Part 1 through Part 8
The lower level meter row shows this:
Part 9 through Part 16
*[AB]
Displaying the level meter screen while in the
Music Library Mode displays the parts of
both mixer groups (A and B).
426-E-015A
3. To exit the level meter display, press the EXIT/
NO button.
E-13
Page 16
PL40NE01-1.book 14 ページ 2002年7月23日 火曜日 午後6時52分
Connecting to a Power Outlet
Connecting to a Power Outlet
You can power this digital piano by plugging it into a
standard household power outlet.
Be sure you turn off power and unplug the power cord from
the electrical outlet whenever the digital piano is not in use.
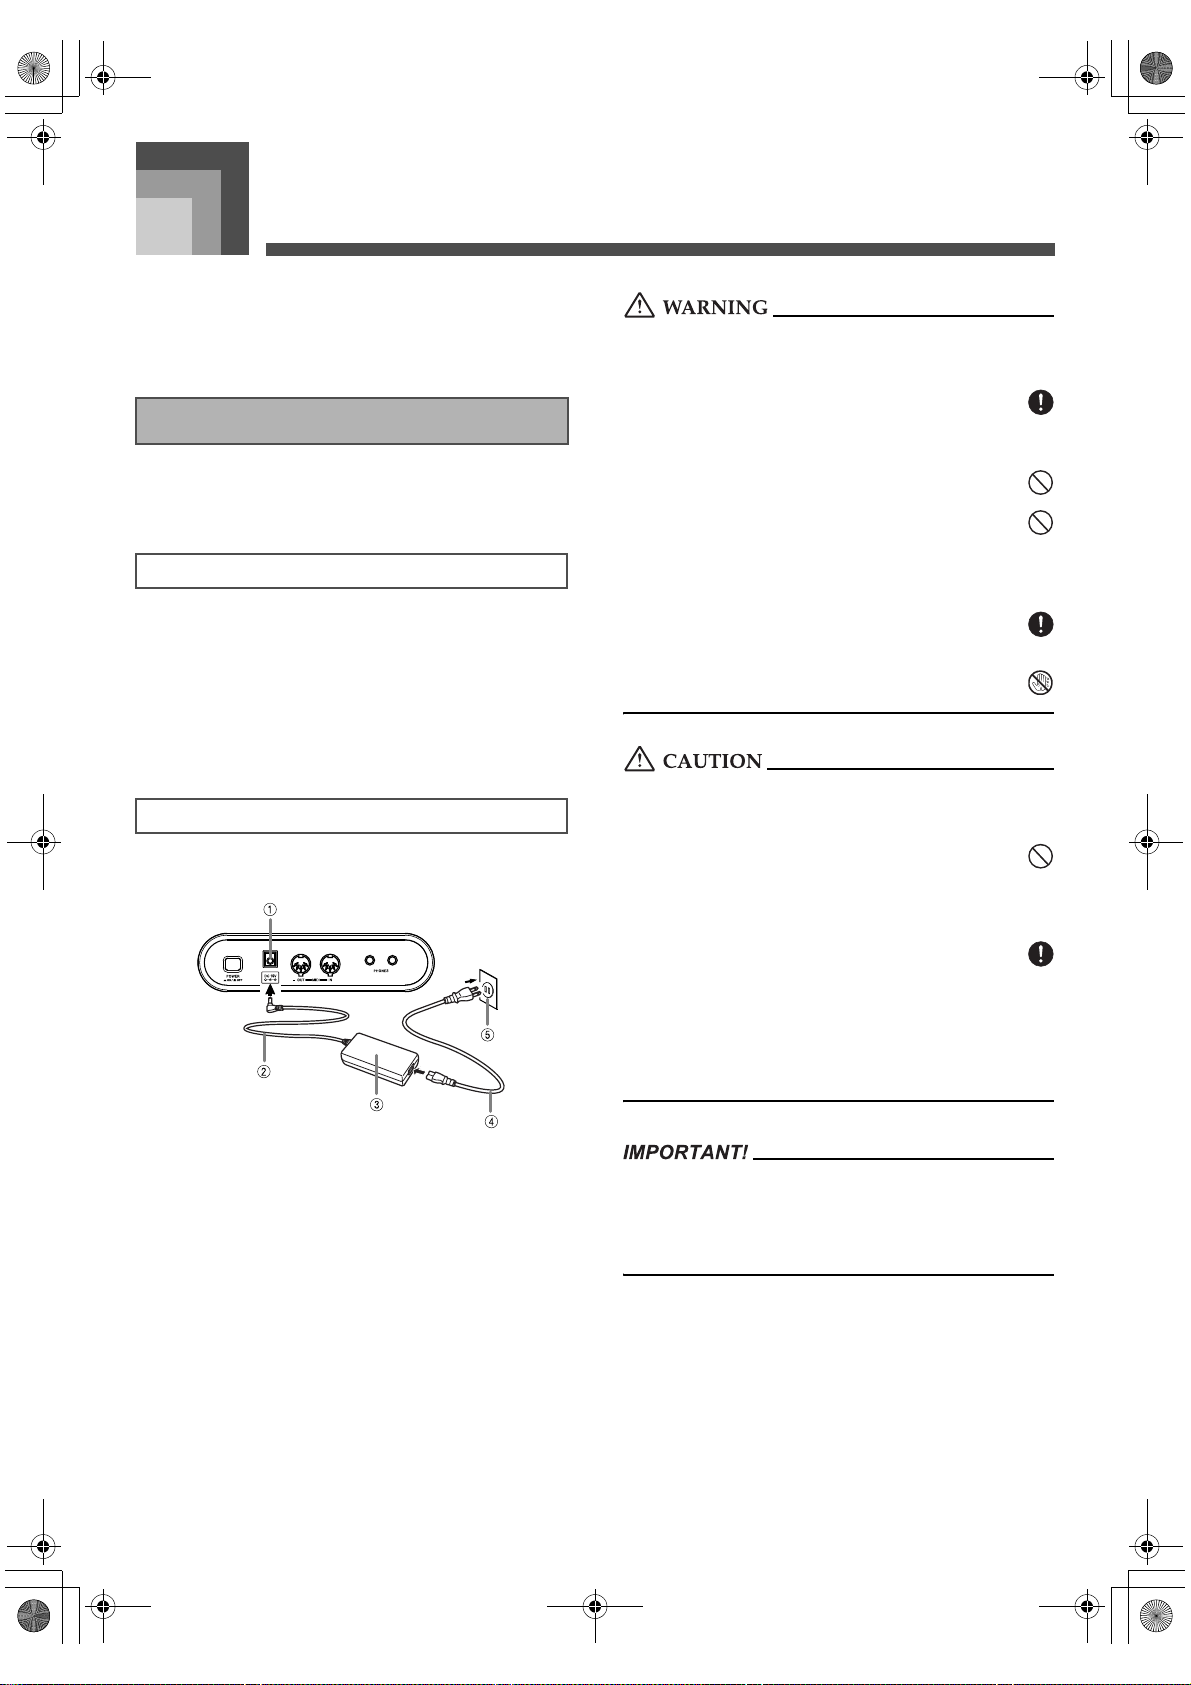
Using the AC Adaptor
Make sure that you use only the AC adaptor specified for this
digital piano.
Connecting the AC Adaptor
1. Plug the AC power cord into the AC adaptor.
2. Plug the AC power cord into a household
electrical wall outlet.
3. Plug the adaptor cord into the power terminal
(DC-15V) on the back of the digital piano.
Misuse of the AC adaptor creates the risk of fire and electric
shock. Always make sure you observe the following
precautions.
Be sure to use only the AC adaptor and AC cord that
is specified for this product.
Use only a power source whose voltage is within the
rating marked on the AC adaptor.
Do not overload electrical outlets and extension
cords.
Never place heavy objects on the cord or subject it to
heat.
Never try to modify the cord or subject it to excessive
bending.
Never twist or stretch the cord.
Should the electric cord or plug become damaged,
contact your original retailer or authorized CASIO
Service Provider.
Never touch the AC adaptor while your hands are
wet. Doing so creates the risk of electric shock.
Specified AC Adaptor: AD-15ML
[Left Side Panel]
1 DC 15V jack
2 Adaptor cord
3 AC Adaptor AD-15ML
4 AC cord
5 AC outlet
Also note the following important warnings and
precautions when using the AC adaptor.
Misuse of the AC adaptor creates the risk of fire and electric
shock. Always make sure you observe the following
precautions.
Do not locate the electric cord near a stove or other
sources of heat.
Never pull on the cord when unplugging from the
electrical outlet. Always grasp the AC cord plug when
unplugging.
Insert the AC cord into the wall outlet as far as it will
go.
Unplug the AC cord from the wall outlet during
lightening storms or before leaving on a trip or other
long-term absence.
At least once a year, unplug the AC cord from the wall
outlet and wipe away any dust that is built up in the
area around the prongs of the plug.
Make sure that the product is turned off before connecting
or disconnecting the AC adaptor.
Using the AC adaptor for a long time can cause it to
become warm to the touch. This is normal and does not
indicate malfunction.
E-14
426-E-016A
Page 17
PL40NE01-1.book 15 ページ 2002年7月23日 火曜日 午後6時52分
Connecting to a Power Outlet
Power On Alert
Keyboard keys light to alert you if you leave power on and do
not perform any operation for about 6 minutes. Note that keys
light only, and no sound is produced. When this happens,
press any button or keyboard key to clear the power on alert.
To disable power on alert
See “Keyboard Settings” on page E-71 for information about
disabling power on alert.
When this function is turned off, the piano does not turn
off automatically and no alert is performed no matter
how long it is left with no operation being performed.
Settings and Memory Contents
The following describes what happens to settings and
memory contents when power is turned off.
Settings
Power Requirements
The piano comes with a built-in lithium battery that supplies
power to the memory to retain sequencer and other data
while piano power is turned off. If the power of the lithium
battery is low, turning off piano power can result in deletion
of all data stored in its memory.
The normal life of the original battery is five years from the
time it is loaded at the factory. Due to time spent in transit and
storage, the original battery probably will not provide a full
five year s of ser vice life. I t is up t o you to contact y our nea rest
CASIO service provider about having the lithium battery
replaced periodically.
Note that you will be charged separately for lithium battery
replacement.
Initializing the Piano
Use the procedure on page E-81 to initialize the digital piano,
which clears all memory data and returns settings to their
initial factory defaults.
When you turn off the piano by pressing the POWER button,
it “remembers” the current settings of certain parameters.
These settings remain in effect the next time you turn on the
piano.
For information on which parameters the piano remembers,
see the “Power Off Backup Items” of the “Parameter List” at
the back of this manual (page A-17).
Memory Contents
In addition to the settings described above, the digital piano
also retains registration memory and sequencer contents
when power is turned off.
426-E-017A
E-15
Page 18
PL40NE01-1.book 16 ページ 2002年7月23日 火曜日 午後6時52分
Connections
Connections
Connecting to an audio or musical instrument amplifier provides even clearer, more powerful sound through external speakers.
Whenever connecting external equipment, first set the
MAIN VOLUME knob of the digital piano and the volume
controller of the external equipment to relatively low
volume settings. You can later adjust volume to the level
you want after connections are complete.
Be sure also to refer to the documentation that comes with
the external equipment for its proper connection
procedures.
Connecting Headphones 1
Connect commercially available headphones to the digital
piano’s headphones jack. This cuts off the built-in speakers,
which means you can practice even late at night without
disturbing others. To protect your hearing, make sure that
you do not set the volume level too high when using
headphones.
Connecting to a PEDAL Jack 2
Depending on the type of operation you want the pedal (SP-
20) to perform, connect the pedal’s cable to the digital piano’s
DAMPER ja ck or SO FT/SOS TENUTO jack. If you want to use
both jacks at the same time, you need to purchase another
optionally available SP-20 pedal.
See “Using the Pedals” on page E-21 for information about
using a pedal.
Connecting to Audio Equipment 3
Use commercially available cables to connect the external
audio equipment to the digital piano’s LINE OUT jacks as
shown in Figure
while L/MONO jack output is left channel sound. It is up to
you to purchase connecting cables like the ones shown in the
illustration for connection of audio equipment. Normally in
this configuration you must set the audio equipment’s input
selector to the setting that specifies the terminal (such as AUX
IN) to which the digital piano is connected. Use the digital
piano’s MAIN VOLUME knob to adjust the volume level.
3. R jack output is right channel sound,
Connecting to a Musical Instrument
Amplifier
Use commercially available cables to connect the amplifier to
the digital piano’s LINE OUT jacks as shown in Figure
jack output is right channel sound, while L/MONO jack
output is left channel sound. Connecting to the L/MONO jack
only outputs a mixture of both channels. It is up to you to
purchase connecting cable like the one shown in the
illustration for connection of the amplifier. Use the digital
piano’s MAIN VOLUME knob to adjust the volume level.
4
4. R
Accessories and Options
Use only the accessories and options specified for this digital
piano. Use of non-authorized items creates the danger of fire,
electric shock, and personal injury.
E-16
426-E-018A
Page 19
PL40NE01-1.book 17 ページ 2002年7月23日 火曜日 午後6時52分
426-E-019A
Page 20
PL40NE01-1.book 18 ページ 2002年7月23日 火曜日 午後6時52分
Basic Operations
Basic Operations
1 MAIN VOLUME 2 SPLIT 3 LAYER/(GROUP A/B)
4 [ ]/[ ] 5 TONE 6 GM/DRUM
7 Selector dial 8 [+]/[–]
This section provides information on performing basic piano
operations.
Getting Started
To play the piano
1. Press the POWER button to turn on the piano.
2. Use the MAIN VOLUME knob to set the volume
to a relatively low level.
3. Play something on the keyboard.
Selecting a Tone
The built-in tones are divided among 6 groups, with each
group assigned to a TONE button on the control panel.
To select a tone
1. See the “Tone List” at the back of this manual
(page A-1) for information about the TONE
button names for each of the built-in tones.
Example:
To select “Bright Piano”, first press the PIANO
button.
1 Tone Group
2 Tone Name
3. Use the [ ]/[ ] buttons to select the tone you
want.
Example:
For this example, press [ ] button four times.
You can also change the tone setting by rotating
the selector dial.
The display exits the tone setting screen if you do
not perform any operation for about 10 seconds.
You can also exit the tone setting screen by
pressing the EXIT/NO button.
2. Press the TONE button of the tone you want to
select.
This causes the button’s indicator lamp to light,
and displays the tone that is currently selected for
that button.
E-18
The GRAND PIANO tone was recorded using stereo
sampling.
When one of the drum sets is selected (tone numbers 261
through 270), each keyboard key is assigned a different
percussion sound. See page A-7 for details.
426-E-020A
Page 21
PL40NE01-1.book 19 ページ 2002年7月23日 火曜日 午後6時52分
Basic Operations
Polyphony
The term polyphony refers to the maximum number of notes
you can play at the same time. This piano has 64-note
polyphony, which includes the notes you play as well as the
rhythms and auto-accompaniment patterns that are played
by the piano. This means that when a rhythm or autoaccompaniment pattern is being played by the piano, the
number of notes (polyphony) available for keyboard play is
reduced. Also note that some of the tones provide only 32note polyphony.
Digital Sampling
A number of the tones that are available with this piano have
been recorded and processed using a technique called digital
sampling. To ensure a high level of tonal quality, samples are
taken in the low, mid, and high ranges and then combined to
provide you with sounds that are amazingly close to the
originals. You may notice very slight differences in volume or
sound quality for some tones when you play them at different
positions on the keyboard. This is an unavoidable result of
multiple sampling, and it is not a sign of malfunction.
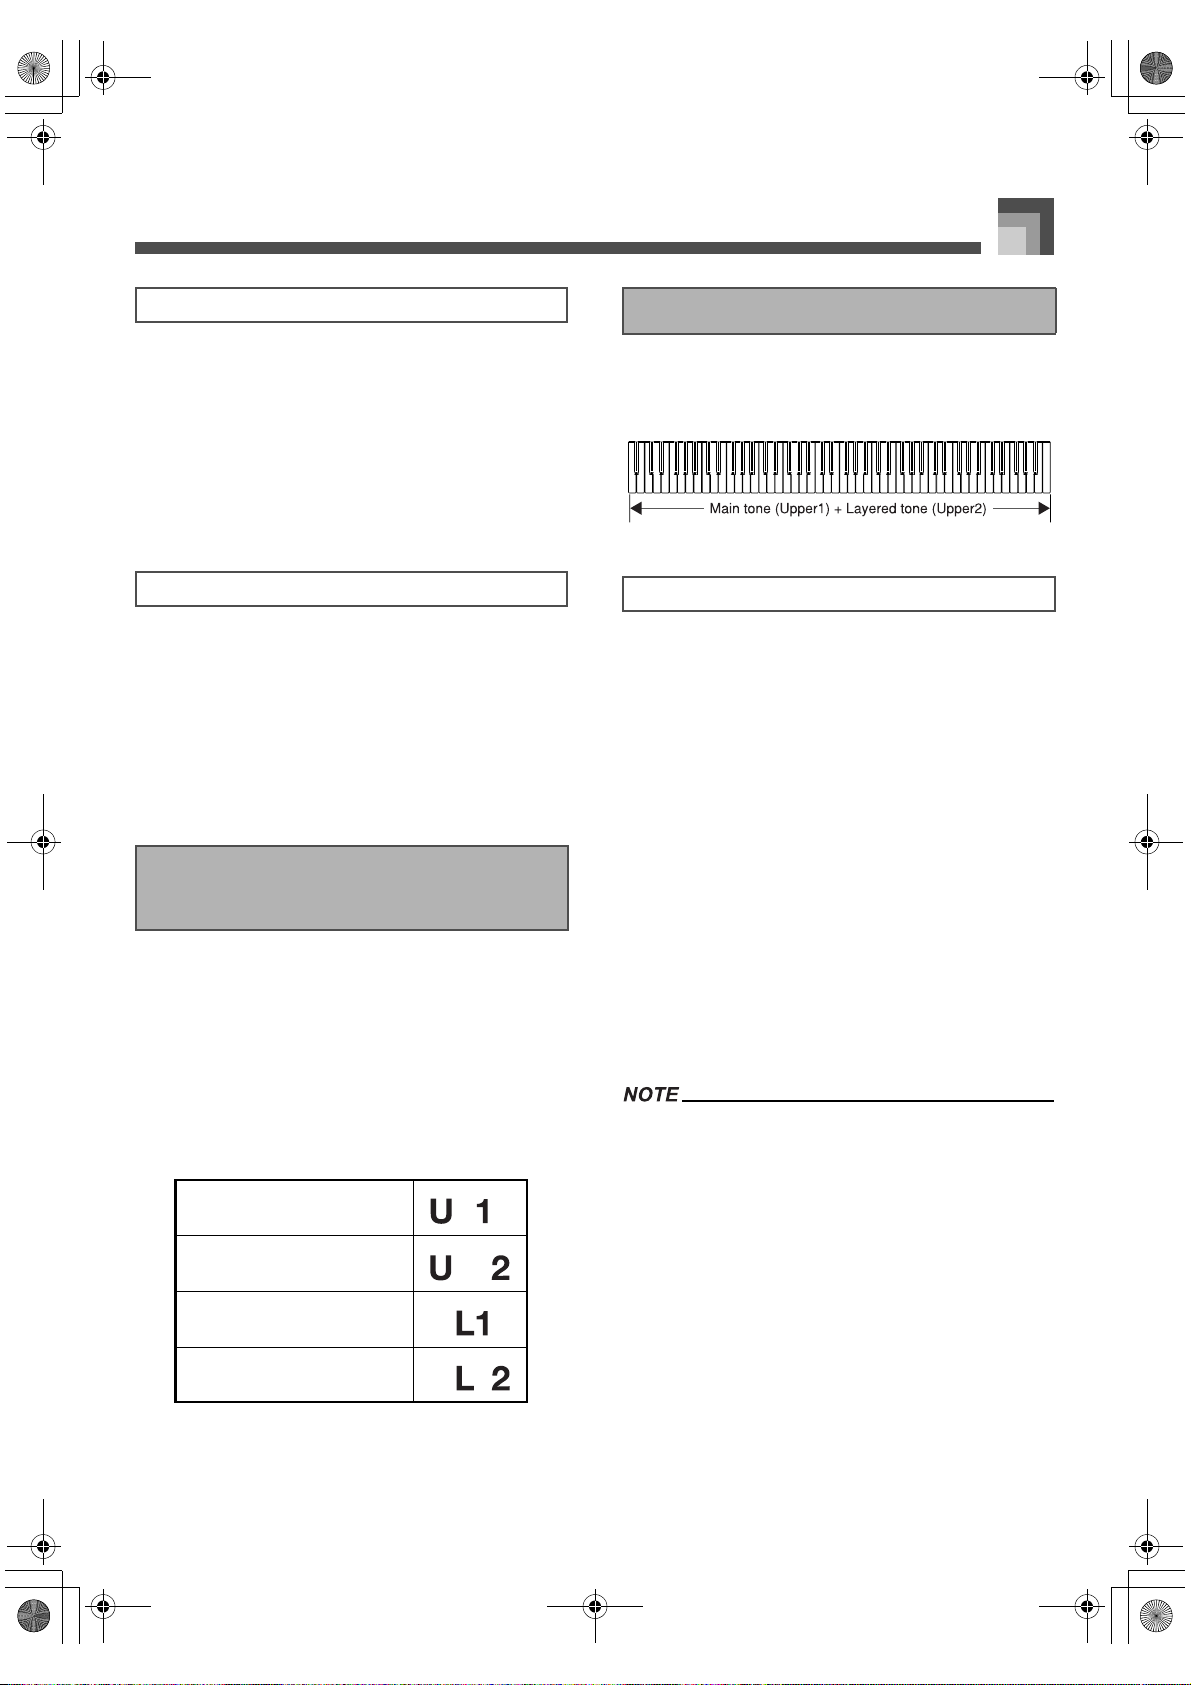
Upper1, Upper2, Lower1,
Lower2
Using Layer
With layer you can assign two different tones (a main tone
and a layered tone) to the keyboard, both of which play
whenever you press a key.
To layer two tones
1. Select the main tone.
2. Press the LAYER/(GROUP A/B) button to turn
on tone layering.
This causes the indicator lamp of the button to
light.
The currently layered tone name appears on the
display. You can use the TONE buttons to change
the layered tone if you want.
3. Select the layered tone.
4. Now try playing something on the keyboard.
Both tones are played at the same time.
This piano lets you use up to four parts simultaneously for
your performances. The parts are named Upper1, Upper2,
Lower1, and Lower2, and the display shows the tone
currently assigned to each.
You can use the PART/(MIXER) button to display the tones
that are assigned for each part (Upper1, Upper2, Lower1,
Lower2). Each press of PART/(MIXER) button cycles through
the parts in the sequence shown below. While a part is
displayed, you can change the tone assigned to it (page E-18).
Upper1
Upper2
Lower1
Lower2
426-E-021A
5. Press the LAYER/(GROUP A/B) button again to
unlayer the tones and return the keyboard to
normal.
This causes the indicator lamp of the button to go
out.
Layering is disabled during demo tune play and in the
Music Library Mode (while Music Library Mode lamp is lit).
Layering is achieved by sounding Upper1 and Upper2 of
mixer Group A. This means you can use the mixer to
change the volume balance and stereo pan position
parameters for both the main tone and layered tone. See
“Using the Mixer” on page E-46 for details.
E-19
Page 22
PL40NE01-1.book 20 ページ 2002年7月23日 火曜日 午後6時52分
Basic Operations
Using Split
With split you can assign two different tones (a main tone and
a split tone) to either end of the keyboard, which lets you play
one tone with your left hand and another tone with your right
hand.
To split the keyboard
1. Select the main tone.
2. Press the SPLIT button.
This causes the indicator lamp of the button to
light.
The current split tone name appears on the
display. You can use the TONE buttons to change
the split tone if you want.
To change the location of the split point
While holding down the SPLIT button, press the keyboard
key where you want the lowest note (the leftmost key) of the
upper range (right side range) to be.
No sound is produced when the keys are pressed.
Using Layer and Split Together
You can use layer and split together to create a layered/split
keyboard. When you use layer and split in combination, the
high range of the keyboard is assigned two tones (main tone
+ layered tone), and the low range two tones (split tone +
layered/split tone).
To layer/split the keyboard
3. Select the split tone.
4. Now try playing something on the keyboard.
The lower range (left side) of the keyboard is
assigned the split tone, while the upper range
(right side) is assigned the main tone.
The location on the keyboard where the
changeover between the two tones occurs is
called the split point. See “To change the location
of the split point” on this page for details on
changing the location of the split point.
5. Press the SPLIT button again to unsplit the
keyboard and return it to normal.
This causes the indicator lamp of the button to go
out.
Split is disabled during demo tune play and in the Music
Library Mode (while Music Library Mode lamp is lit).
Split is achieved by sounding Upper1 and Lower1 of mixer
Group A. This means you can use the mixer to change the
volume balance and stereo pan position parameters for
both the main tone and split tone. See “Using the Mixer” on
page E-46 for details.
1. Select the main tone, layered tone, split tone,
and layered/split tone.
Use the mixer to select the tones, following the
procedure under “Changing the Parameters of a
Part” on page E-47. The main tone is Upper1, the
layered tone is Upper2, the split tone is Lower1,
and the layered/split tone is Lower2.
2. Turn on both layer and split to layer/split the
keyboard.
Press the LAYER/(GROUP A/B) button once to
turn on layer.
Press the SPLIT button to turn on split.
This causes the indicator lamps of both the
buttons to light.
The layered/split tone name appears on the
display. You can change the layered/split tone if
you want.
3. Now try playing something on the keyboard.
4. Press the LAYER/(GROUP A/B) button and the
SPLIT button again to unlayer/unsplit the
keyboard and return it to normal.
E-20
426-E-022A
Page 23

PL40NE01-1.book 21 ページ 2002年7月23日 火曜日 午後6時52分
Layer/split is produced by using mixer Group A Upper1,
Upper2, Lower1, and Lower2 at the same time. This means
you can use the mixer to change the volume balance and
stereo pan position parameters for each of the tones. See
“Using the Mixer” on page E-46 for details.
You can use the mixer to turn off individual channels (layer/
split tones). This means you could turn off Lower2, for
example, to sound a single tone in the lower range and two
layered tones in the upper range. See page E-46 for
details.
Turning the Key Light System
On and Off
Use the following procedure when you want to turn the key
light system on or off.
1. While holding down the FUNCTION button,
press the ONE TOUCH PRESET/(KEY LIGHT)
button to toggle the key light system on and off.
The pointer next to KEY LIGHT appears when
the key lighting system is turned on, and
disappears when it is turned off.
Basic Operations
Pedal functions
Damper pedal
Pressing this pedal causes notes to reverberate and to
sustain longer.
Soft pedal
Pressing this pedal dampens notes and slightly reduces
their volume. Only notes played after the pedal is
depressed are affected, and any notes played before the
pedal is pressed sound at their normal volume.
Sostenuto pedal
Like the damper pedal, this pedal causes notes to
reverberate and to sustain longer. The difference
between the two pedals is the timing when they are
pressed. With the sostenuto pedal, you press the pedal
after depressing the notes you want to sustain. Only
the notes whose keyboard keys are depressed when the
sostenuto pedal is pressed are affected.
During memory playback and demo tune play, pedal
effects are applied to notes played on the keyboard only.
Using the Pedals
The digital piano is equipped with two pedal jacks, one for a
damper pedal and one for a soft/sostenuto pedal. Use the
“Assign Left” setting described under “Setting: Pedal” on
page E-77 to assign the function you want to the SOFT/
SOSTENUTO jack. The power on default setting of the SOFT/
SOSTENUTO jack is SOFT.
426-E-023A
E-21
Page 24
PL40NE01-1.book 22 ページ 2002年7月23日 火曜日 午後6時52分
Auto Accompaniment
Auto Accompaniment
1 MODE 2 RHYTHM 3 AUTO HARMONIZE
4 Selector dial 5 TRANSPOSE [ ]/[ ] 6 INTRO
7 VARIATION 1/2 8 FILL-IN 9 BREAK
bk ENDING bl SYNCHRO START/STOP bm START/STOP
bn METRONOME/(BEAT) bo ONE TOUCH PRESET/
(KEY LIGHT)
bq [+]/[–] br TEMPO [ ]/[ ]
bp FUNCTION
This piano automatically plays bass and chord parts in
accordance with the chords you finger. The bass and chord
parts are played using sounds and tones that are
automatically selected to match the rhythm you are using. All
of this means that you get full, realistic accompaniments for
the melody notes you play with your right hand, creating the
mood of an one-person ensemble.
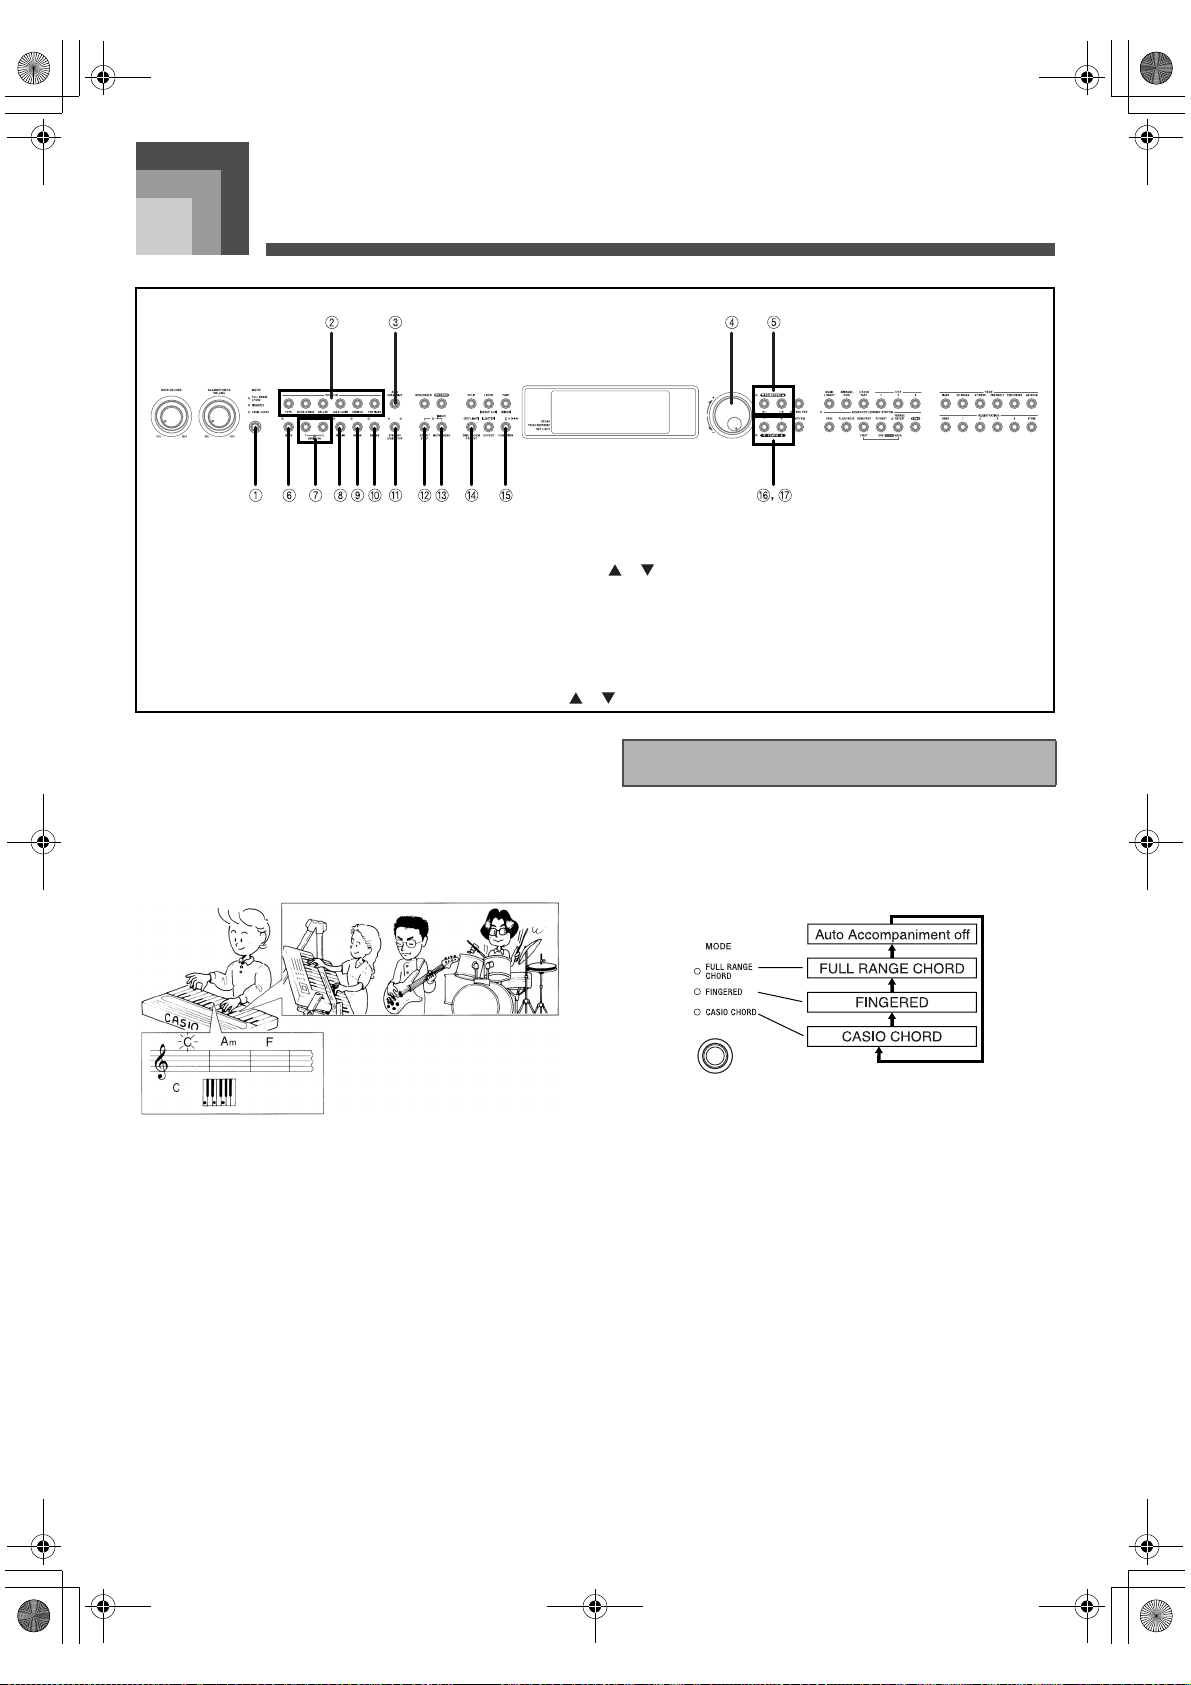
About the MODE Button
Use the MODE button to select the accompaniment mode you
want to use. Each press of the MODE button cycles through
the available accompaniment modes as shown in the
illustration below.
Only rhythm sounds are produced when all
accompaniment mode lamps are off.
The currently selected accompaniment mode is shown by
the mode lamps above the MODE button. Information on
using each of these modes starts from page E-24.
E-22
426-E-024A
Page 25
PL40NE01-1.book 23 ページ 2002年7月23日 火曜日 午後6時52分
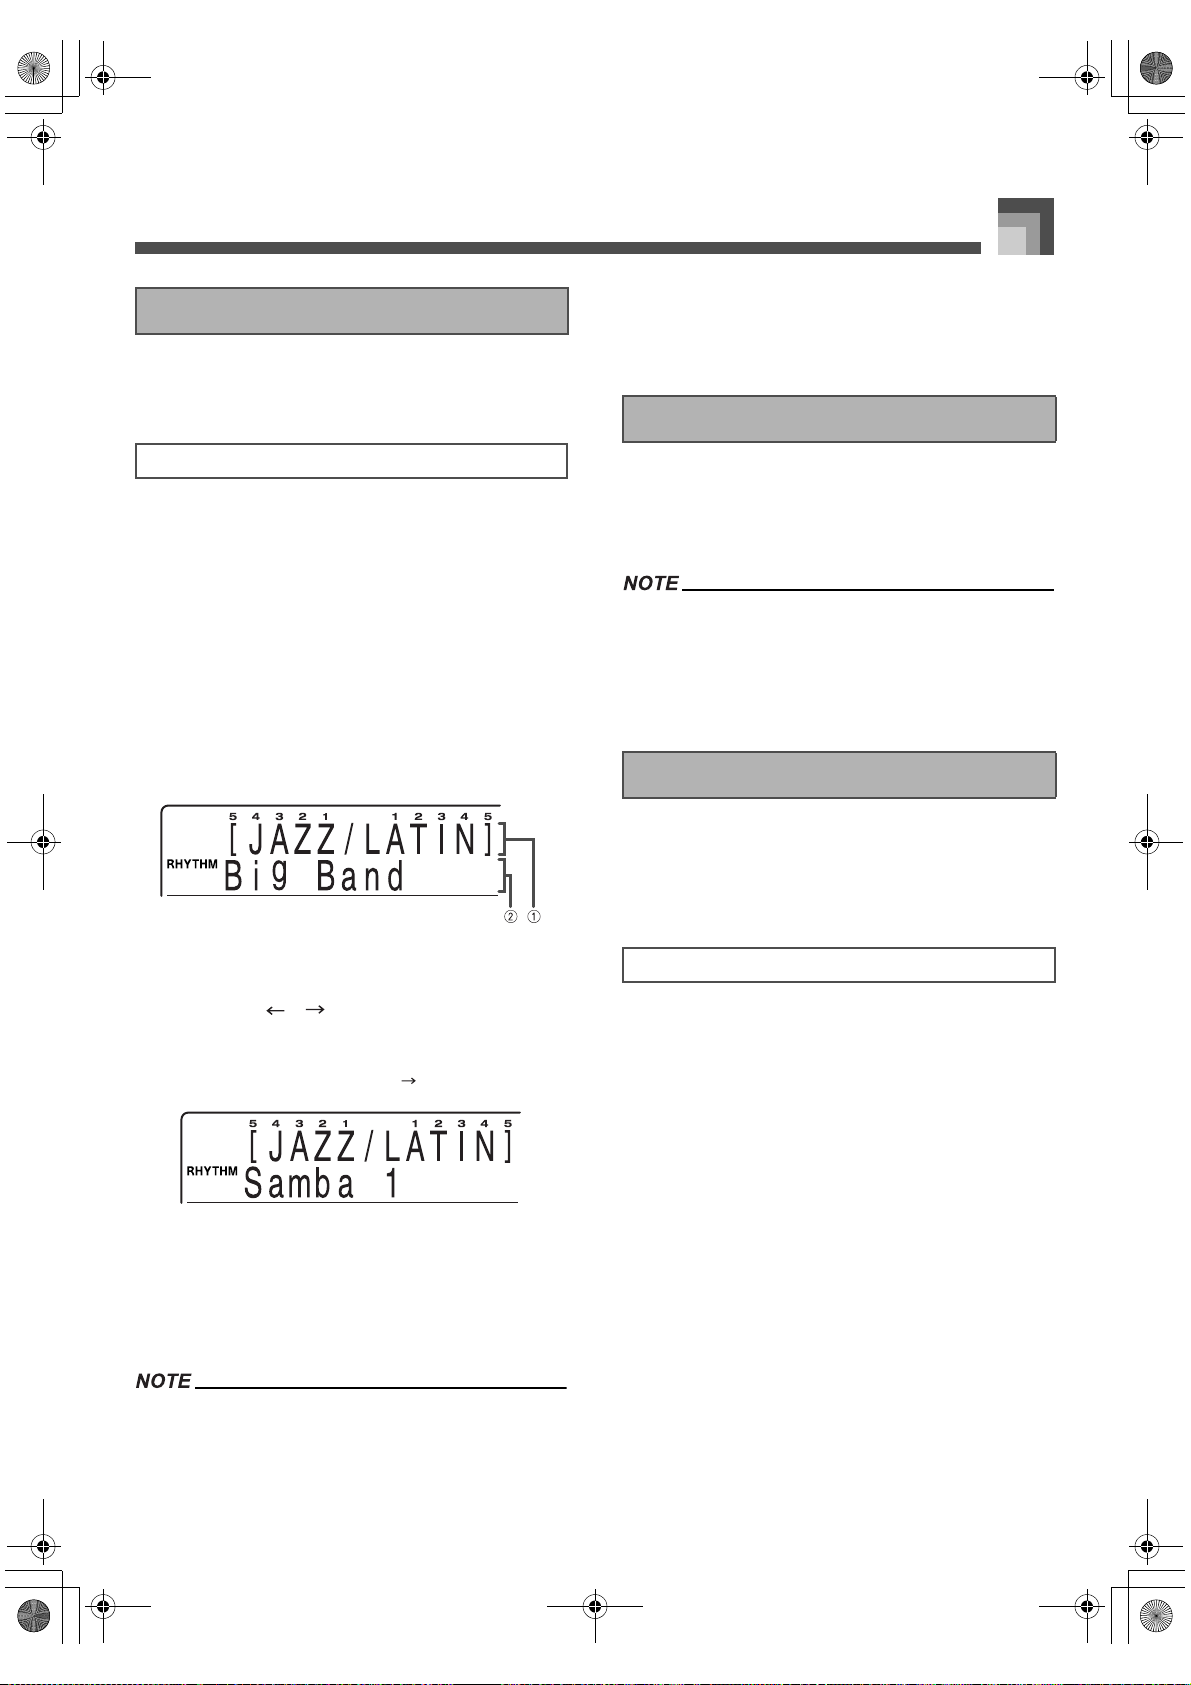
Selecting a Rhythm
The built-in rhythms are divided among 6 groups, with each
group assigned to a RHYTHM button on the control panel.
Auto Accompaniment
accompaniment mode. Make sure the applicable indicator
lamp is lit above the MODE button when using these
rhythms.
Playing a Rhythm
To select a rhythm
1. See the Rhythm Reference at the back of this
manual (page A-10) for information about the
RHYTHM button names for each of the built-in
rhythms.
2. Press the RHYTHM button of the rhythm you
want to select.
This causes the button’s indicator lamp to light,
and displays the rhythm that is currently selected
for that button.
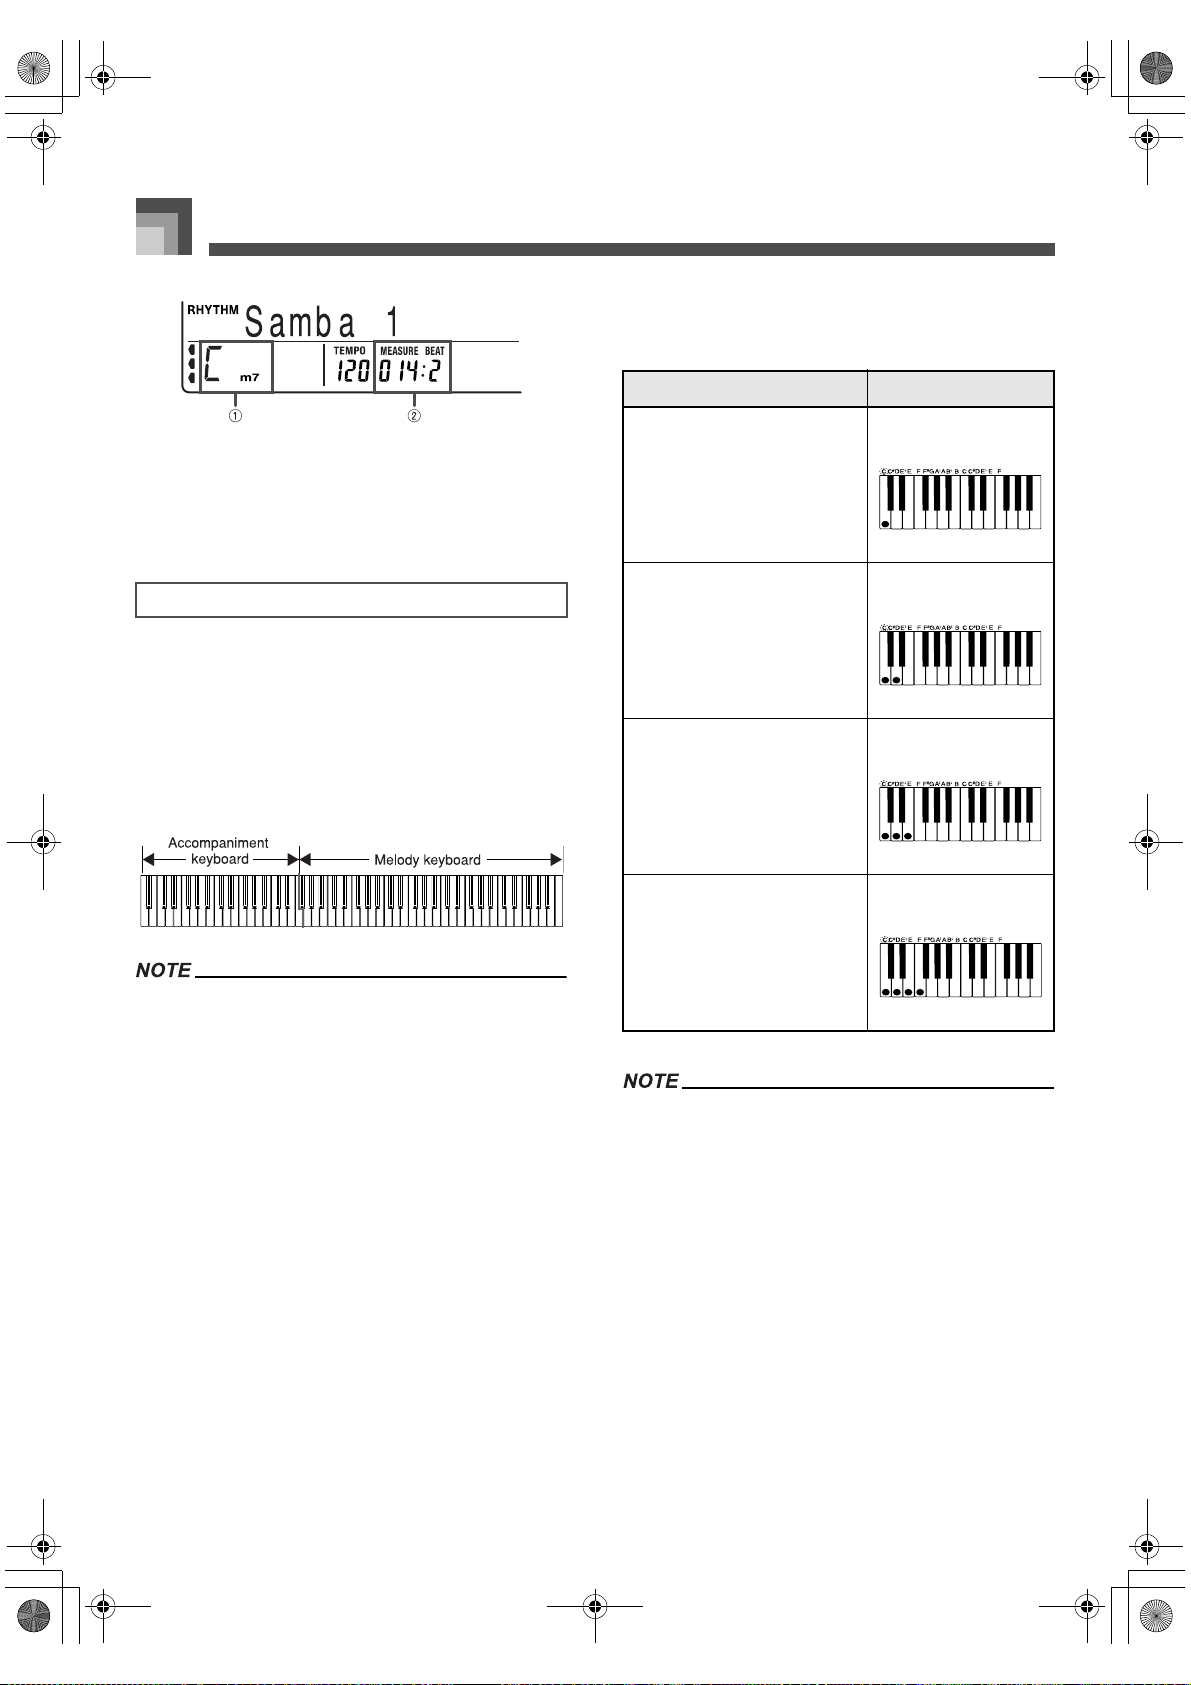
Example:
To select “Samba 1”, first press the JAZZ/LATIN
button.
1 Rhythm Group
2 Rhythm Name
3. Use the [ ]/[ ] buttons to select the rhythm
you want.
Example:
For this example, press [ ] button eight times.
Press the START/STOP button to start play of the currently
selected rhythm. You can then play along with the rhythm on
the keyboard.
To stop rhythm play, press the START/STOP button again.
Chords will sound along with the rhythm if any of the three
accompaniment mode lamps above the MODE button is lit.
If you want to play the rhythm pattern without chords, press
the MODE button until all of the accompaniment mode
lamps are off.
Using Auto Accompaniment
The following procedure describes how to use the piano’s
auto accompaniment feature. Before starting, you should first
select the rhythm you want to use and set its tempo to the
value you want.
To use Auto Accompaniment
1. Use the MODE button to select FULL RANGE
CHORD, FINGERED, or CASIO CHORD as the
accompaniment mode.
2. Press the START/STOP button to start play of
the currently selected rhythm.
You can also change the rhythm setting by
rotating the selector dial.
The display exits the rhythm setting screen if you
do not perform any operation for about 10
seconds. You can also exit the rhythm setting
screen by pressing the EXIT/NO button.
Some rhythms consist of chord accompaniments only,
without any drums or other percussion instruments. Such
rhythms do not sound unless CASIO CHORD, FINGERED,
or FULL RANGE CHORD is selected as the
426-E-025A
3. Play a chord to start auto accompaniment.
The actual procedure you should use to play a
chord depends on the currently selected
accompaniment mode. Refer to the following
pages for details on chord play.
CASIO CHORD ........................... Page E-24
FINGERED ................................... Page E-25
FULL RANGE CHORD .............. Page E-25
E-23
Page 26
PL40NE01-1.book 24 ページ 2002年7月23日 火曜日 午後6時52分
Auto Accompaniment
J Chord Types
CASIO CHORD accompaniment lets you play four types of
chords with minimal fingering.
Chord Types Example
1 Name of chord being played
2 Current measure and beat
4. To stop auto accompaniment play, press the
START/STOP button again.
CASIO CHORD
This method of chord play makes it possible for anyone to
easily play chords, regardless of previous musical knowledge
and experience. The following describes the CASIO CHORD
“accompaniment keyboard” and “melody keyboard”, and
tells you how to play CASIO CHORDs.
J CASIO CHORD accompaniment keyboard and
melody keyboard
On the keyboard shown above, Lower1 and Lower2 are
assigned to the accompaniment keyboard range and
Upper1 and Upper2 are assigned to the melody keyboard
range.
When split is turned off (page E-20), the accompaniment
keyboard range keys do not sound any melody notes. In
this case, they are used to specify chords for the
accompaniment pattern.
You can expand the range of the accompaniment keyboard
by moving the keyboard’s split point to the right (page
E-20).
Major chords
Note that the chord produced
when you press an
accompaniment keyboard key
does not change octave,
regardless of which key you
use to play it.
Minor chords (m)
To play a minor chord, keep
the major chord key depressed
and press any other
accompaniment keyboard key
located to the right of the major
chord key.
Seventh chords (7)
To play a seventh chord, keep
the major chord key depressed
and press any other two
accompaniment keyboard keys
located to the right of the major
chord key.
Minor seventh chords (m7)
To play a minor seventh chord,
keep the major chord key
depressed and press any other
three accompaniment
keyboard keys located to the
right of the major chord key.
It makes no difference whether you press black or white
keys to the right of a major chord key when playing minor
and seventh chords.
C Major (C)
C minor (Cm)
C seventh (C7)
C minor seventh (Cm7)
E-24
426-E-026A
Page 27
PL40NE01-1.book 25 ページ 2002年7月23日 火曜日 午後6時52分
Auto Accompaniment
FINGERED FULL RANGE CHORD
In this mode, you specify chords by playing them as you
would on a piano, inside the accompaniment keyboard range.
To specify a C-chord, you would play C-E-G.
J FINGERED accompaniment keyboard and melody
keyboard
On the keyboard shown above, Lower1 and Lower2 are
assigned to the accompaniment keyboard range and
Upper1 and Upper2 are assigned to the melody keyboard
range.
When split is turned off (page E-20), the accompaniment
keyboard range keys do not sound any melody notes. In
this case, they are used to specify chords for the
accompaniment pattern.
You can expand the range of the accompaniment keyboard
by moving the keyboard’s split point to the right (page
E-20).
Recognized Chords
See the “Fingered/Full Range Chord Table” at the back of
this manual (page A-12) for information about the chords
that can be recognized in the Fingered Mode.
This mode can be used to play up to 238 different types of
chords. Pressing three or more keys in a pattern that is
recognized as a chord pattern by the keyboard causes the
corresponding chord to be played. Playing chords in a pattern
not recognized by the keyboard or pressing two keys or one
key causes the corresponding notes to be played as melody
notes. This means that the entire range of the keyboard acts as
both a melody keyboard and accompaniment keyboard.
J FULL RANGE CHORD accompaniment keyboard
and melody keyboard
Recognized Chords
See the “Fingered/Full Range Chord Table” at the back of
this manual for more information (page A-12).
Example:
To play the chord C major.
Either of the fingerings shown in the illustration below
will produce C major.
The chords that are recognized by the keyboard in the
FINGERED Mode depend on the current “On Bass
Chord”, “6th Chord”, and “Tension Chord” Accomp
settings. See “Keyboard Settings” on page E-71 for
information about Accomp settings. Information about
how settings affect the type of chords recognized by the
keyboard can be found “Fingered/Full Range Chord
Table” at the back of this manual (page A-12).
In the FINGERED Mode, you can use standard fingering
(C-E-G for a C-chord, for example) or you can use inverted
fingerings (G-E-C, for example), as long as you play chords
within the accompaniment keyboard range. Note, however,
that using an inverted fingering will produce a different
chord entirely if the “On Bass Chord” Accomp setting is
turned on.
Generally, you must press all of the keys that make up
chords. Omitting a note or playing only a single note will not
produce a chord.
426-E-027A
1 Chord C
2 Chord
If there are more than six semitones between the lowest
note and the next note to the right, the lowest note is
interpreted as a bass note.
E-25
Page 28
PL40NE01-1.book 26 ページ 2002年7月23日 火曜日 午後6時52分
Auto Accompaniment
Adjusting the Tempo
You can adjust the tempo (number of beats per minute) of
rhythm play within a range of 30 to 255.
To adjust the tempo
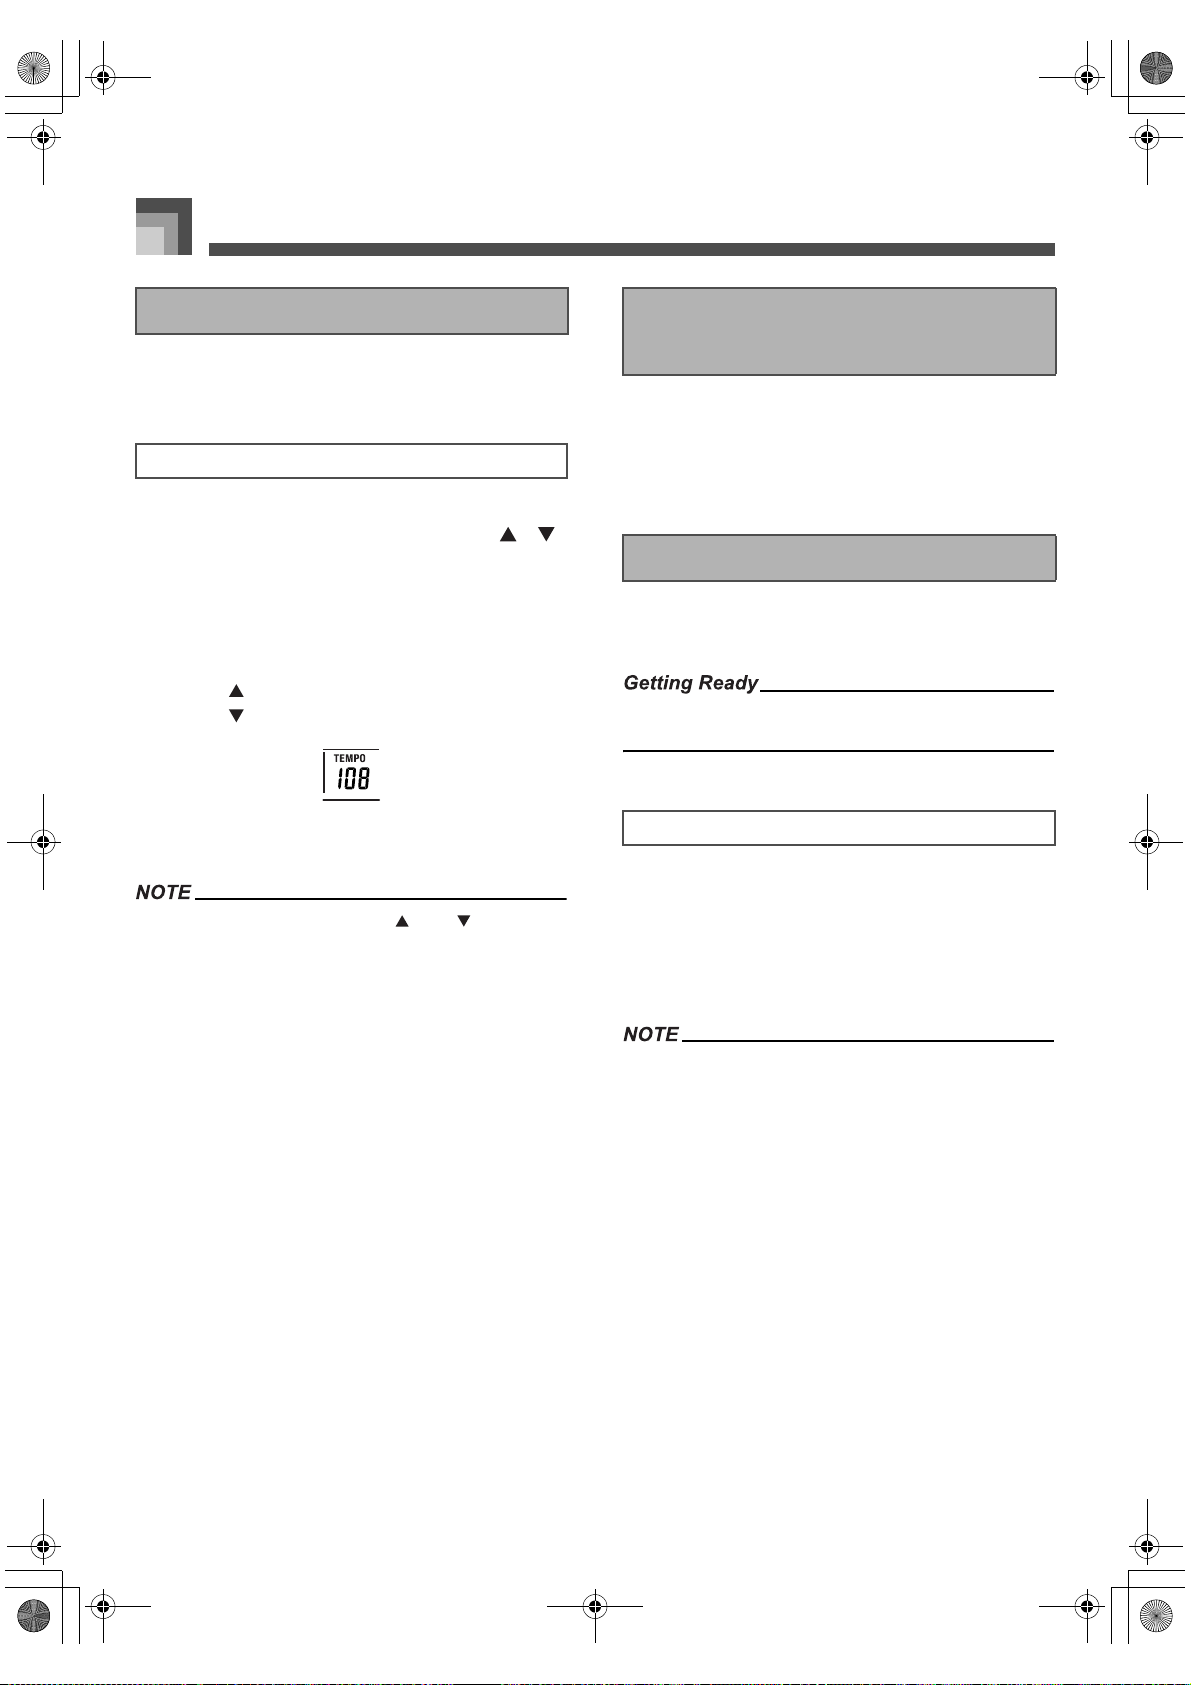
1. While the indicator lamp above the TEMPO
buttons is lit, use the TEMPO buttons [ ]/[ ]
to adjust the tempo.
The TEMPO button indicator lamp is not lit and
tempo adjustment cannot be performed while the
menu screen is on the display. To exit the menu
screen and return to the tone/rhythm screen,
press the FUNCTION button.
[ ] (+) ..... Increase tempo (make it faster)
[ ] (–) ..... Decrease tempo (make it slower)
You can also change the tempo setting by rotating
the selector dial.
Pressing both TEMPO buttons [ ] and [ ] at the same
time resets the tempo to the default value of the currently
selected rhythm.
The tempo value indicates the number of quarter note
beats per minute.
Adjusting the Accompaniment
Volume
You can adjust the volume of the accompaniment part
separately from the overall volume.
1. Use the ACCOMP/SONG VOLUME knob to
adjust the accompaniment volume.
Using an Intro Pattern
This piano lets you insert a short intro into a rhythm pattern
to make startup smoother and more natural.
Select a rhythm and set its tempo.
Select the accompaniment mode you want to use.
To insert an intro
1. Press the INTRO button to start the selected
rhythm with an intro pattern.
With the above setup, the intro pattern is played
and the auto accompaniment with intro pattern
starts as soon as you play chords on the
accompaniment keyboard.
E-26
The standard rhythm pattern starts to play after the intro
pattern is complete.
426-E-028A
Page 29

PL40NE01-1.book 27 ページ 2002年7月23日 火曜日 午後6時52分
Auto Accompaniment
Using a Fill-in Pattern
Fill-in patterns let you momentarily change the rhythm
pattern to add some interesting variation to your
performances.
To insert a fill-in
1. Press the START/STOP button to start rhythm
play.
2. Press the FILL-IN button to insert a fill-in pattern
for the rhythm you are using.
Using the Variation Patterns
Each rhythm/auto accompaniment pattern has two different
variations. You can vary the mood of your music by switching
to a different variation while rhythm/auto accompaniment
play is in progress.
Select a rhythm and adjust its tempo.
Use the MODE button to specify the chord fingering mode
you want to use.
Listen to the two variations available for the rhythm you are
using to get some idea of what they sound like.
1. Press the START/STOP button to start rhythm
play.
It does not make any difference which
VARIATION 1/2 button is depressed at first.
Using a Break
A break inserts a moment of silence into a rhythm/auto
accompaniment pattern. Pressing the BREAK button stops
the rhythm/auto accompaniment pattern until the beginning
of the next measure, when the pattern starts to play again.
Using Synchro Start
Synchro Start lets you set up the keyboard so rhythm and
chord accompaniment starts automatically when you press
keys inside the accompaniment keyboard range.
Select a rhythm and adjust its tempo.
Use the MODE button to specify the chord fingering mode
you want to use.
1. While the rhythm is not playing yet, press the
SYNCHRO START/STOP button.
This causes the left lamp above the button to
light, indicating that the keyboard is in synchro
start standby.
2. Press one of the VARIATION 1/2 buttons to
select the rhythm variation you want to start
with.
3. Play a chord in the accompaniment keyboard
range.
Both rhythm and chord accompaniment starts at
the same time. The lamp above the SYNCHRO
START/STOP button goes out when the rhythm/
auto accompaniment starts.
2. Press another VARIATION button to switch to a
different variation of the same rhythm.
When you press a VARIATION button the
change to the new rhythm variation is performed
in time with the beat of the rhythm.
426-E-029A
Only the rhythm sounds if no lamp above the MODE button
is lit.
If you press the INTRO button so the lamp above it is lit
before step 2 of the above procedure, playing a chord
causes accompaniment to start after the corresponding
intro pattern is played.
Pressing the SYNCHRO START/STOP button again while
the keyboard is in synchro start standby exits synchro start
standby, which causes the lamp above the SYNCHRO
START/STOP button to go out.
E-27
Page 30
PL40NE01-1.book 28 ページ 2002年7月23日 火曜日 午後6時52分
Auto Accompaniment
Using Synchro Start/Stop while Auto
Acompaniment is Playing
Synchro stop is the opposite of synchro start. It causes the
currently playing auto accompaniment pattern to stop when
the keys in the accompaniment keyboard range are released.
This feature is more than just a simple way to stop auto
accompaniment play. It plays auto accompaniment only
when valid chords are played inside the accompaniment
keyboard range.
The following procedures do not work in the normal Mode,
when all lamps above the MODE button are turned off.
J Using Synchro Stop to stop Auto Accompaniment
Select a rhythm and adjust its tempo.
Use the MODE button to specify the chord fingering mode
you want to use.
1. Press the START/STOP button to start play of
the selected rhythm.
J Auto Accompaniment in Synchro Stop
The following are the auto accompaniment operations you
can perform while the keyboard is in synchro stop (both
lamps above the SYNCHRO START/STOP button lit).
Playing a chord in the accompaniment keyboard range
causes auto accompaniment to play (only while the chord
note keys are depressed). Releasing the keys causes auto
accompaniment play to stop, and the keyboard enters
synchro stop again.
Pressing the SYNCHRO START/STOP button while
playing a chord in the accompaniment keyboard range
causes the lamps above the button to go out, indicating
that the keyboard is no longer in synchro stop.
With synchro stop, you can easily create a break in auto
accompaniment play to allow for ad libbing, and then restart
accompaniment when you want.
Finishing with an Ending
Pattern
You can end your performances with an ending pattern that
brings the rhythm you are using to a natural-sounding
conclusion.
2. Press the SYNCHRO START/STOP button.
This causes the right lamp above the button to
light, indicating that the keyboard is in synchro
stop standby.
3. Play a chord in the accompaniment keyboard
range and then release the keys.
This causes the auto accompaniment pattern to
stop playing and both lamps above the
SYNCHRO START/STOP button to light,
indicating that the keyboard is in synchro stop.
To exit synchro stop, press the SYNCHRO
START/STOP button twice so the two lamps go
out.
The section below describes what auto
accompaniment operations you can perform
while the keyboard is in synchro stop.
To finish with an ending pattern
1. While the rhythm is playing, press the ENDING
button.
This causes the ending pattern to play, which
brings rhythm accompaniment to an end.
The timing when the ending pattern starts depends on
when you press the ENDING button. If you press the button
before the second beat of the current measure, the ending
pattern starts playing immediately. Pressing the button at
any point in the measure after the second beat results in
the ending pattern playing from the beginning of the
following measure.
E-28
426-E-030A
Page 31

PL40NE01-1.book 29 ページ 2002年7月23日 火曜日 午後6時52分
Auto Accompaniment
Using Auto Harmonize
When you are using auto accompaniment, auto harmonize
automatically adds an additional note to your melody in
accordance with the chord that is being played. The result is a
harmony effect that makes your melody line richer and fuller.
To use Auto Harmonize
1. Use the MODE button to select FINGERED or
CASIO CHORD as the accompaniment mode.
2. Press the AUTO HARMONIZE button to turn on
auto harmonize.
This causes the button’s indicator lamp to light,
indicating that auto harmonize is turned on.
At this point you could use the [ ] and [ ]
buttons or the selector dial to select the type of
auto harmonize you want to use. See “Auto
Harmonize Types” below for more information.
If you have two tones (Upper1, Upper2) layered on the
keyboard, harmonize notes are added to both.
Auto harmonize is enabled only when the auto
accompaniment mode is Fingered or CASIO Chord.
J Auto Harmonize Types
You can select from among the 12 different types of auto
harmonize listed below.
Type
(parameter Name)
Duet1 Adds a 1-part harmony to
keyboard play.
Duet2 Adds a 1-part harmony to
keyboard play. Duet2 harmony is
more open than Duet1.
Country Adds a country-flavor harmony to
keyboard play.
Octave Adds notes one octave below notes
played on the keyboard.
5th Adds fifth notes above notes
played on the keyboard.
3-Way Open Adds two open harmony parts to
notes played on the keyboard
(creating three-part harmony).
3-Way Close Adds two close harmony parts to
notes played on the keyboard
(creating three-part harmony).
Description
The display exits the auto harmonize setting
screen if you do not perform any operation for
about 10 seconds. You can also exit the auto
harmonize setting screen by pressing the EXIT/
NO button.
3. Start auto accompaniment play, and play
something on the keyboard.
Harmonize notes are added automatically to the
notes you play in the melody keyboard range.
4. To turn off auto harmonize, press the AUTO
HARMONIZE button again.
This causes the button’s indicator lamp to go out,
indicating that auto harmonize is turned off.
426-E-031A
Strings Adds harmony suitable for strings.
4-Way Open Adds three open harmony parts to
notes played on the keyboard
(creating four-part harmony).
4-Way Close Adds three close harmony parts to
notes played on the keyboard
(creating four-part harmony).
Block Adds block chord notes.
Big Band Adds harmony suitable for big
band play.
You can use the following procedure to select an auto
harmonize type using the [ ]/[ ] buttons or the selector
dial, immediately after turning on auto harmonize.
E-29
Page 32

PL40NE01-1.book 30 ページ 2002年7月23日 火曜日 午後6時52分
Auto Accompaniment
About Auto Harmonize notes and tones
The notes you play on the keyboard are called “melody
notes”, while the notes added to the melody by auto
harmonize are called the “harmonize notes”. Auto harmonize
normally uses the tone you selected for the melody notes as
the tone for the harmonize notes, but you can use the mixer
(page E-46) to specify a different tone for the harmonize notes.
Harmonize tones correspond to mixer auto harmonize 1 and
2. This means you can specify the harmonize tones by
changing the tones assigned to auto harmonize 1 and 2.
In addition to the tone, you can also use the mixer to change
a number of other parameters, such as volume balance. See
“Changing the Parameters of a Part” on page E-47 for details
on these procedures.
The default harmonize note tone when you first turn on
auto harmonize is the same tone as the melody note tone.
Changing the melody tone setting automatically changes
the harmonize note tone to the same setting.
Using One-touch Preset
One-touch preset automatically makes the settings listed
below in accordance with the rhythm pattern you are using.
Keyboard tone and volume
Layer or Split on/off
Layered tone and volume (when layer is turned on), or
split tone (when split is turned on)
Tempo
Effects
Harmonize (Type, on/off)
Using the Metronome
The metronome feature of this piano produces a bell sound
for the first beat of each measure, followed by click sounds for
each successive beat of the measure. It is the perfect tool for
practicing tunes without accompaniment (rhythm).
To start the metronome
1. While holding down the FUNCTION button,
press the METRONOME/(BEAT) button.
2. Use the [ ] and [ ] buttons to select the beat
setting you want.
You can also change the beat setting by rotating
the selector dial.
The bell (indicating the first beat of a measure) does not
sound while “0” is specified. All beats are indicated by a
click sound. This setting lets you practice with a steady
beat, without worrying about how many beats there are in
each measure.
Available choices for the meter are 0, 2/4 to 7/4, plus 9/4,
12/4, 3/8, 5/8, 6/8, 7/8, 9/8, or 12/8 time.
The display exits the metronome setting screen if you do
not perform any operation for about 10 seconds. You can
also exit the metronome setting screen by pressing the
EXIT/NO button.
To use one-touch preset
1. Select the rhythm you want to use.
2. Use the MODE button to select the
accompaniment mode you want to use.
3. Press the ONE TOUCH PRESET/(KEY LIGHT)
button.
This automatically makes the one-touch preset
settings in accordance with the rhythm you
selected.
4. Start rhythm and auto accompaniment, and
play something on the keyboard.
Accompaniment is played using the one touch
preset settings.
E-30
3. Press the METRONOME/(BEAT) button to start
sounding the metronome.
The lamp above the START/STOP button flashes
in time with the metronome beat.
4. While the indicator lamp above the TEMPO
buttons is lit, use the TEMPO buttons [ ]/[ ]
to adjust the tempo.
The TEMPO button indicator lamp is not lit and
tempo adjustment cannot be performed while the
menu screen is on the display. To exit the menu
screen and return to the tone/rhythm screen,
press the FUNCTION button.
[ ] (+) ..... Increase tempo (make it faster)
[ ] (–) ..... Decrease tempo (make it slower)
426-E-032A
Page 33

PL40NE01-1.book 31 ページ 2002年7月23日 火曜日 午後6時52分
5. To turn off the metronome, press the
METRONOME/(BEAT) button.
Auto Accompaniment
Tuning the Piano
Transposing the Piano
Transpose lets you raise and lower the overall key of the
piano in semitone units. If you want to play accompaniment
for a vocalist whose sings in a specific key, for example, you
can use transpose to change the key of the piano without
having to learn to play the song in another key.
To transpose the piano
1. While the indicator lamp above the
TRANSPOSE buttons is lit, use the
TRANSPOSE buttons [ ]/[ ] to change the
transpose setting.
The TRANSPOSE button indicator lamp is not lit
and transpose adjustment cannot be performed
while the menu screen is on the display. To exit
the menu screen, press the FUNCTION button.
Example:
To transpose the piano five semitones upwards.
The tuning feature lets you fine tune the piano to match the
tuning of another musical instrument.
To tune the piano
1. Press the FUNCTION button.
2. Use the [ ] and [ ] buttons or the selector
dial to display the “Tune” menu screen.
3. Press the ENTER/YES button once to display
the tuning screen.
4. Use [+] and [–] to change the tuning setting of
the piano.
Example:
To lower the tuning by 10.
You can change the setting on the transpose
setting screen using the [ ] and [ ] buttons or
the selector dial.
Note that the display exits the transpose setting
screen if you do not change the setting within 10
seconds after displaying it. To exit the transpose
setting screen, press the EXIT/NO button.
The piano can be transposed within a range of –12 (one
octave downwards) to +12 (one octave upwards).
To return the transpose setting its initial default of “0”,
display the transpose screen and press the [ ] and [ ]
buttons at the same time.
The transpose setting also affects the sequencer and auto
accompaniment. It does not, however, affect auto
accompaniment drum parts.
426-E-033A
You can also change the tuning setting by
rotating the selector dial.
The piano can be tuned within a range of 415.3Hz to
466.2Hz (±100 cents*).
* 100 cents is equivalent to one semitone.
To return the tuning setting to its initial default of 440.0Hz,
display the tuning screen and press the [+] and [–] buttons
at the same time.
The tuning setting also affects the sequencer and auto
accompaniment.
When you have baroque pitch turned on, the tuning range
becomes 390.6Hz to 441.5Hz. In this case, holding down
the [+] and [–] buttons at the same time sets an initial
default value of 415.3Hz.
E-31
Page 34

PL40NE01-1.book 32 ページ 2002年7月23日 火曜日 午後6時52分
Auto Accompaniment
Using Touch Response
Turning on touch response causes the volume and sound
quality of piano output to change in accordance with the
amount of pressure applied to the keyboard.
To set the touch response sensitivity
1. Press the FUNCTION button.
2. Use the [ ] and [ ] buttons or the selector
dial to display the “General” menu screen.
3. Press the ENTER/YES button once to display
the touch response setting screen.
4. Use the [+] and [–] buttons to scroll through the
sensitivity settings in the following sequence.
“Light” outputs powerful sound even with light
key pressure, while “Heavy” requires very heavy
key pressure to output powerful sound.
Pressing the [+] and [–] buttons at the same time
returns sensitivity to the “Normal” setting.
You can also change the touch response setting
by rotating the selector dial.
Touch response operations affect the piano’s internal
sound source as well as MIDI OUT data.
Touch response settings do not affect sequencer playback,
accompaniment, or MIDI note data received from an
external source.
Touch response affects different tones in different ways.
E-32
426-E-034A
Page 35

PL40NE01-1.book 33 ページ 2002年7月23日 火曜日 午後6時52分
Applying Effects to Tones
Applying Effects to Tones
1 Selector dial 2 []/[] 3 EFFECT/(L. METER)
4 [+]/[–]
This piano provides you with a selection of effects that you
can apply to tones.
Configuring Effect Settings
Effect Blocks
The following shows how the effects of this piano are
organized.
J DSP
DSP effects are applied to the connection between the sound
source and output (PA). You can select distortion and
modulation effects.
J REVERB
Reverb simulates the acoustics of specific types of
environments. You can choose from among 8 different reverb
effects, including “Room” and “Hall”.
J CHORUS
The chorus effect gives sound greater depth by causing it to
vibrate. You can choose from among 8 different chorus
effects, including “Chorus” and “Flanger”.
Use the following procedures to configure the DSP, reverb, or
chorus effects.
To configure the DSP effect setting
1. Press the EFFECT/(L. METER) button.
2. Press the [ ] button twice to display the DSP
effect setting screen.
3. Use the [+] and [–] buttons or the selector dial to
select a DSP effect type.
Select “OFF” to turn off the DSP effect.
The display exits the DSP effect setting screen if
you do not perform any operation for about 10
seconds. You can also exit the DSP effect setting
screen by pressing the EXIT/NO button.
See the list on page A-11 for information about the types of
DSP, CHORUS and REVERB effects that are available.
426-E-035A
E-33
Page 36

PL40NE01-1.book 34 ページ 2002年7月23日 火曜日 午後6時52分
Applying Effects to Tones
To configure the reverb effect setting
1. Press the EFFECT/(L. METER) button.
2. Use the [+] and [–] buttons or the selector dial to
select a reverb effect type.
Select “OFF” to turn off the reverb effect.
The display exits the reverb effect setting screen if
you do not perform any operation for about 10
seconds. You can also exit the reverb effect setting
screen by pressing the EXIT/NO button.
To configure the chorus effect setting
1. Press the EFFECT/(L. METER) button.
2. Press the [ ] button to display the chorus
effect setting screen.
Playing a demo tune (page E-11) automatically changes
the effect to the one that is assigned to the tune. You
cannot change or cancel a demo tune effect.
Changing the effect setting while sound is being output by
the piano causes a slight break in the sound when the
effect changes.
A number of tones, called “DSP tones” include automatic
DSP settings to bring out the full effect of the tone. If you
assign a DSP tone to a keyboard part (Upper1, Upper2,
Lower1, or Lower2), DSP turns on automatically and the
DSP selection changes*1 in accordance with the settings of
the DSP tone. Also, the mixer Mode DSP on/off setting for
the keyboard part to which the DSP tone is assigned is
turned on.*
*1. When the mixer Mode DSP setting is turned on for
*2. The mixer Mode DSP on/off settings for all the other
Whether or not an effect is applied to the parts that are
sounding also depends on mixer Mode Reverb Send,
Chorus Send, and DSP on/off settings. See “Using the
Mixer” on page E-46 for more information.
The reverb and chorus of parts whose mixer Mode DSP
setting is turned on is determined by the system setting of
the keyboard settings, and not by mixer Mode settings. See
“Keyboard Settings” on page E-71 for more information.
2
Upper1, the DSP selection and mixer Mode DSP on/off
setting of Upper2, Lower1, and Lower2 are
unchanged, even if you assign a DSP tone to them.
parts are automatically turned off. Because of this,
DSP effects previously applied to these parts are
cancelled, which can make their tone sound different.
3. Use the [+] and [–] buttons or the selector dial to
select a chorus effect type.
Select “OFF” to turn off the chorus effect.
The display exits the chorus effect setting screen
if you do not perform any operation for about 10
seconds. You can also exit the chorus effect
setting screen by pressing the EXIT/NO button.
E-34
426-E-036A
Page 37

PL40NE01-1.book 35 ページ 2002年7月23日 火曜日 午後6時52分
Using the Advanced Lesson System to
Play Back a Music Library Tune
Using the Advanced Lesson System to Play Back a Music Library Tune
1 Selector dial 2 []/[] 3 MUSIC LIBRARY
4 [+]/[–] 5 TEMPO [ ]/[ ] 6 STOP
7 PLAY/PAUSE 8 REW/PREV 9 FF/NEXT
3. While the Music Library tune selection screen is
Selecting a Tune
The music library contains a wide variety of built-in tunes,
ranging from the classics to popular standards.
on the display, use the [ ] and [ ] buttons to
select the Music Library group you want.
Example:
To select “Nocturne 9-2”, first press the [ ]
button once to select the Music Library group.
To select a tune
1. See the Tune Reference at the back of this
manual (page A-15) for information about the
Music Library group for each of the built-in
tunes.
2. Press the MUSIC LIBRARY button.
This causes the Music Library Mode indicator
lamp to light, and displays the Music Library
tune selection screen.
If you do not perform any operation within about
10 seconds, the display changes to the main
Music Library screen.
4. Use the [+] and [–] buttons or the selector dial to
select the song you want.
Example:
Press the [+] button six times.
The display exits the Music Library tune selection
screen if you do not perform any operation for
about 10 seconds. You can also exit the Music
Library tune selection screen by pressing the
EXIT/NO button.
When you press the EXIT/NO button again to exit the
Music Library Mode, a number of parameters are restored
to settings that were in effect when you entered the Music
Library Mode. See the “Recall Items” column of the
“Parameter List” at the back of this manual (page A-17) for
information about which parameter settings are restored.
426-E-037A
Pressing the MUSIC LIBRARY button or the [ ]/
[ ] buttons displays the Music Library tune
selection screen again.
E-35
Page 38

PL40NE01-1.book 36 ページ 2002年7月23日 火曜日 午後6時52分
Using the Advanced Lesson System to Play Back a Music Library Tune
Playing a Tune
To play a tune
1. Select the tune you want to play.
2. Press the PLAY/PAUSE button to start play of
the tune.
Measure number
1
2 Beat number
3. To stop play, press the STOP button.
The tune you select continues to play until you
stop it.
To turn off repeat play, select “Off” for the
“Repeat” setting on the “Setting: Lesson” screen
(page E-75).
While a tune is playing, you can change to another tune.
The change is made as soon as you select a different tune,
even if the current tune is not finished playing.
Key Lighting System Operation and Display
Contents During Music Library Play
Keyboard keys light to show the keys that should be pressed
to play along with Music Library tunes as they play back. At
the same time, the display shows fingerings, chord forms,
notes, tempo and other information.
1 Fingering
2 Note pitch
3 Tempo value
4 Measure number
5 Beat number
6 Dynamic mark
Key Lighting Precaution
Avoid using the key lighting system in a dark or dimly lit
room. The lighting or flashing of the red key lights can
cause an unpleasant effect in the dark.
Adjusting the Tempo
Each tune has a preset default tempo (beats per minute) that
is set automatically whenever you select a tune. While the
tune is playing, you can change the tempo setting to a value
in the range of 30 to 255.
To adjust the tempo
1. While the indicator lamp above the TEMPO
buttons is lit, use the TEMPO buttons [ ]/[ ]
or the selector dial to adjust the tempo.
The TEMPO button indicator lamp is not lit and
tempo adjustment cannot be performed while the
menu screen is on the display. To exit the menu
screen and return to the tone/rhythm screen,
press the FUNCTION button.
[ ] (+) ..... Increase tempo (make it faster)
[ ] (–) ..... Decrease tempo (make it slower)
E-36
Pressing both the [ ] and [ ] TEMPO buttons at the
same time automatically returns the currently selected
rhythm to its default tempo.
A number of tunes have tempo changes part way through
in order to produce specific musical effects.
426-E-038A
Page 39

PL40NE01-1.book 37 ページ 2002年7月23日 火曜日 午後6時52分
Using the Advanced Lesson System to Play Back a Music Library Tune
Pausing Playback
To pause playback
1. Press the PLAY/PAUSE button while a tune is
playing to pause it.
2. Pressing the PLAY/PAUSE button again
resumes play from the point where it was
paused.
After you press STOP to stop playback, pressing PLAY/
PAUSE restarts play from the beginning of the tune.
Skipping Back
To skip back
1. While a tune is playing or paused, hold down
the REW/PREV button to skip back, in onemeasure steps.
The measure and beat numbers on the display
change to indicate the current location.
Skipping Forward
To skip forward
1. While a tune is playing or paused, hold down
the FF/NEXT button to skip forward, in onemeasure steps.
The measure and beat numbers on the display
change to indicate the current location.
2. Release the FF/NEXT button to start song
playback from the measure whose number is
shown on the display.
Skipping forward cannot be performed while playback is
stopped.
Looping a Musical Phrase
Each of the built-in tunes is divided into fixed-length phrases.
You can select the phrase you want and “loop” it, which
means that the phrase plays again and again until you stop it.
You can also define your own phrase for looping.
2. Release the REW/PREV button to start song
playback from the measure whose number is
shown on the display.
Skipping back cannot be performed while playback is
stopped.
426-E-039A
To loop a preset phrase
1. While tune playback is paused or in progress,
press the PHRASE REPEAT button.
This causes the indicator lamp above the button
to light. After a short beat count*, the first phrase
of the current tune starts to loop.
* Only when Pre Count is turned on. See
“Setting: Lesson” on page E-75 for more
information.
To move to the phrase before the current one,
press the REW/PREV button once. To move to the
phrase following the current one, press the FF/
NEXT button.
E-37
Page 40

PL40NE01-1.book 38 ページ 2002年7月23日 火曜日 午後6時52分
Using the Advanced Lesson System to Play Back a Music Library Tune
To create and loop your own phrase
Use the following procedure when you want to define your
own phrase for repeat play.
1. While the tune that contains the phrase you
want to create is playing, hold down the
PHRASE REPEAT button and press the REW/
PREW button when playback reaches the point
you want to define as the beginning of the loop.
2. Next, hold down the PHRASE REPEAT button
and press the FF/NEXT button when playback
reaches the point you want to define as the end
of the loop.
This causes playback to loop between the start
point and the end point you defined.
E-38
426-E-040A
Page 41

PL40NE01-1.book 39 ページ 2002年7月23日 火曜日 午後6時52分
Using the Advanced Lesson System to
Practice Along with a Music Library Tune
Using the Advanced Lesson System to Practice Along with a M usic Library Tune
1 ARRANGE. LEVEL 2 LESSON PART 3 STEP 1~3
4 START 5 END 6 AREA
Arrangement Levels
The built-in tunes have three different arrangements, which
differ according to level of difficulty. You can select the
arrangement level that suits your particular abilities and
needs. The following describes the level of difficulty for each
of the arrangement levels.
J Arrangement Level A
Much easier than the original arrangement of the tune. (1 or 2
notes for left-hand and right-hand parts, 1 or two notes per
measure for left hand part)
J Arrangement Level B
Easier than the original arrangement of the tune. (1 note for
left-hand part, rhythm same as original)
J Arrangement Level C
Same level of difficulty as the original arrangement of the
tune.
To select an arrangement level
1. Press the ARRANGE. LEVEL button to cycle
through the arrangement level settings (LevelA, Level-B, Level-C) until the one you want is
displayed.
Some tunes have fewer than three arrangement levels. If a
tune has only one arrangement level, the arrangement is
the same, regardless of which arrangement level is
selected. If a tune has only two arrangement levels, the
arrangement is the same for Arrangement Level A and
Arrangement Level B. For details, see the “Song List” at the
back of this manual (page A-15).
Selecting the Part You Want to
Practice
You can set up 3-step lesson for practice of the left-hand or the
right-hand part only, or for practice of the parts for both
hands at the same time.
To select a part for practice
1. Press the LESSON PART button to cycle
through the practice parts (L, R, L+R (BOTH))
until the one you want is displayed.
L : Practice the left-hand part
R : Practice the right-hand part
L+R (BOTH) : Practice the part for both hands
426-E-041A
E-39
Page 42

PL40NE01-1.book 40 ページ 2002年7月23日 火曜日 午後6時52分
Using the Advanced Lesson System to Practice Along with a Music Library Tune
Tune Types and Supported Parts
J Two-hand Accompaniment Tunes
Piano Right Hand + Piano Left Hand (+ Obbligato)
J Auto Accompaniment Tunes
Melody (Right Hand) + auto accompaniment (Left Hand) +
Obbligato
3-Step Lesson
The 3-step lesson feature takes you through the three distinct
steps described below to help you learn to play tunes on the
piano.
Step 1 – Master the timing.
In this step, pressing any key on the keyboard plays the
correct note, so you can concentrate on getting the timing
right without worrying about playing the right note. The submelody (obbligato) waits until you press a key before
proceeding to the next phrase.
3. Press any keyboard keys to play the melody
(right hand part).
The key for the next note to be played flashes
while the keyboard waits for you to play it. When
you press any key to play the note, the key
remains lit as the note plays.
Accompaniment (or the left-hand part) waits
until you press any keyboard key. The
accompaniment notes stop playing automatically
if you do not press any key within about 10
seconds after the flashing starts. Pressing a
keyboard key restarts accompaniment.
If you accidentally press more than one key in
succession, accompaniment is played for the
corresponding number of notes.
Pressing more than one key at the same time
counts as a single melody note. Pressing a key
while another key is held down is counted as two
melody notes.
4. To stop play at any time, press the STOP or
START/STOP button.
1. Select the Music Library tune you want to use.
2. Press the STEP 1 button to start Step 1 play.
After a count sounds*, the keyboard stands by
and waits for you to play the first note of the tune.
* Only when Pre Count is turned on. See
“Setting: Lesson” on page E-75 for more
information.
1 Fingering
2 Note pitch
You can also use fast forward and fast reverse operations
with Step 1 play.
You can use phrase repeat with Step 1.
Key Lighting and Display Indicators During
Step 1 and Step 2
During lesson Step 1 and Step 2, notes, their lengths, and keys
you need to press to play them are indicated as described
below.
J Note
The keyboard key you should press lights. The actual note is
shown in the staff notation area of the display. The display
also shows the fingers you should use to play notes.
J Note length
The length of a note is indicated by how long the note remains
in the on-screen staff after you press the required key.
E-40
426-E-042A
Page 43

PL40NE01-1.book 41 ページ 2002年7月23日 火曜日 午後6時52分
Using the Advanced Lesson System to Practice Along with a Music Library Tune
J Next note
The keyboard key you will need to press next flashes. One
beat before you need to press the keys, the rate of flashing
becomes twice as fast.
With lesson Step 1 and Step 2, keyboard lighting and on-
screen keyboard indication is turned off as soon as you
press the applicable keyboard key. For information aout
note length, check the on-screen staff notation.
Step 2 – Master the melody.
In this step, you use the display to learn which fingers you
should use and how loud or soft to play, and the key light
system to learn which keyboard keys to press. The submelody (obbligato) waits until your play the correct note, so
you can learn at your own pace.
1. Select the Music Library tune you want to use.
2. Press the STEP 2 button to start Step 2 play.
After a count sounds*, the keyboard stands by
and waits for you to play the first note of the tune.
* Only when Pre Count is turned on. See
“Setting: Lesson” on page E-75 for more
information.
Step 1 and Step 2 Key Light System Operation
The following describes how the key light system works
during Step1 and Step 2 play.
■ The key for the next note to be played
flashes relativly slowy.
↓
■ One beat before you need to play the
note, the key starts to flash quickly.
↓
■ The key remains lit, without flashing,
when the digital piano is standing by
waiting for you to play it.
↓
■ The key light goes out when you press
the key.
3. Follow the key light system to press the correct
keyboard keys and play the melody (right hand
part).
The key for the next note to be played flashes
while the keyboard waits for you to play it. When
you press any key to play the note, the key
remains lit as the note plays.
Accompaniment (or the left-hand part) waits
until you press the flashing keyboard key. The
accompaniment notes stop playing automatically
if you do not press the flashing key within about
10 seconds after the flashing starts. Pressing the
flashing key restarts accompaniment.
If more than one key lights when you are using a
two-hand tune, it means that you must press all
of the keys that are lit.
4. To stop play at any time, press the STOP or
START/STOP button.
You can also use fast forward and fast reverse operations
with Step 2 play.
You can use phrase repeat with Step 2. See “Looping a
Musical Phrase” on page E-37.
426-E-043A
E-41
Page 44

PL40NE01-1.book 42 ページ 2002年7月23日 火曜日 午後6時52分
Using the Advanced Lesson System to Practice Along with a Music Library Tune
Dynamic Marks
The dynamic marks listed below appear on the display while
Music Library tunes are playing. Adjust the pressure you
apply to the keyboard in accordance with the mark that is on
the display.
pianissimo: Very soft
piano: Soft
mezzo piano: Moderately soft
mezzo forte: Moderately loud
forte: Loud
fortissimo: Very loud
crescendo: Gradually louder
decrescendo: Gradually softer
Use the lesson setting menu to turn voice fingering guide
on and off. See “Setting: Lesson” on page E-75 for more
information.
Note that voice fingering guide is available in either English
or Japanese. Use the lesson setting menu to select the
language you want to use. See “Setting: Lesson” on page
E-75 for more information.
Step 3 – Play at normal speed.
This is where you enjoy actually playing the tunes you learn
using Step 1 and Step 2. The key light system still shows you
which keyboard keys to press, but accompaniment proceeds
at normal speed regardless of whether or not you play the
correct notes.
Crossed Finger Indications
The display also shows when you have to cross fingers to play
notes, and in which direction your fingers should cross.
Example:
Display for playing the notes below with the right hand
only
1 Crossed finger display
The display indicates that the index finger should cross
over the thumb.
Voice Fingering Guide
Voice fingering guide uses a simulated human voice to call
out fingering numbers during Step 1 and Step 2 one-hand
part practice. If you need to press a key with your thumb, for
example, voice fingering guide says, “One!” In the case of a
chord to be played with your thumb, middle and little finger,
voice fingering guide says, “One, three, five!”
voice fingering guide calls out fingerings only when you do
not press the proper key when you should.
1. Select the Music Library tune you want to play.
2. Press the STEP 3 button to start Step 3 play.
Accompaniment (left hand part) starts to play at
normal speed.
3. Follow the key light system to press the correct
keyboard keys and play the melody (right hand
part).
4. To stop play at any time, press the STOP or
START/STOP button.
With Step 3 of two-hand practice, key lighting also indicates
note length. In this case, lighting indicates the keys you
should press, but the next key to be pressed does not flash.
With Step 3, the finger number for the next note does not
appear on the display. Only the finger number of the
current note is displayed.
You can also use pause, fast forward and fast reverse
operations with Step 3 play.
If you change the step, arrangement level, or lesson part
during step lesson playback, the change goes into effect
from the currently playing measure.
E-42
426-E-044A
Page 45

PL40NE01-1.book 43 ページ 2002年7月23日 火曜日 午後6時52分
Using the Advanced Lesson System to Practice Along with a Music Library Tune
Key Lighting and Display Indicators During
Step 3
During lesson Step 3, notes, their lengths, and keys you need
to press to play them are indicated as described below.
J Note
The keyboard key you should press lights. The actual note is
shown in the staff notation area of the display. The display
also shows the fingers you should use to play notes.
J Note length
You should keep a keyboard key depressed as long as it
remains lit. The note remains in the on-screen staff notation
and the on-screen fingering remain on the display for the
duration of the note.
J Next note
In Step 3, the key for the next note to be played does not flash.
3-Step Lesson Tempo Setting
Use the procedure under “Adjusting the Tempo” on page
E-26 to adjust the tempo for 3-step lesson play.
Changing the Lesson Part Tone
You can select from among 271 built-in tones for the lesson
part. You can even change the lesson part tone setting while
lesson play is in progress.
See “Selecting a Tone” on page E-18 for more information.
Specifying the tune number for the same tune that is
currently selected returns the tone to the default setting for
that tune.
Things you can do during 3-Step Lesson
Pressing the PLAY/PAUSE button during Step 1, 2, or 3
play pauses the step lesson. Pressing PLAY/PAUSE again
resumes normal (non-lesson) playback of the tune from
the measure where you paused the step lesson. Pressing
a step selector button while the lesson is paused resumes
accompaniment for the corresponding step from the
measure where the lesson was paused.
Pressing the step selector button for the same step where
you paused the lesson restarts the lesson from the
beginning, using the same step.
You can use repeat during a lesson (Step 1, 2, or 3) and
during normal playback.
You can turn on a pre-count to sound at the beginning of
the song or at a repeat start point. See “Setting: Lesson”
on page E-75 for more information.
426-E-045A
E-43
Page 46

PL40NE01-1.book 44 ページ 2002年7月23日 火曜日 午後6時52分
426-E-046A
Page 47

PL40NE01-1.book 45 ページ 2002年7月23日 火曜日 午後6時52分
426-E-047A
Page 48

PL40NE01-1.book 46 ページ 2002年7月23日 火曜日 午後6時52分
Using the Mixer
Using the Mixer
1 LAYER/(GROUP A/B) 2 PART/(MIXER) 3 Selector dial
4 [ ]/[ ] 5 ENTER/YES 6 [+]/[–]
7 EXIT/NO
Parts
As mentioned above, the word “part” as used in relation to
this piano has the same meaning as it does in an orchestra or
band. It also refers to the Upper1, Upper2, Lower1, and
Lower2 parts of the keyboard that you use when layering or
splitting keyboard tones (page E-19).
The following example shows a typical list of parts when you
are using auto accompaniment with Upper1 and Upper2
tones layered in the melody keyboard range.
1
Melody Keyboard
2 Upper2
3
4 Drum
5 Bass
6 Chord1
Accompaniment
7 Chord2
8 Chord3
9 Chord4
10 Chord5
Upper1
Perc. (Percussion)
Types of Parts
This piano is capable of producing a total of 30 different parts.
Parts can be broadly classified as one of two different groups:
Group A and Group B.
J Group A
Group A parts are the ones the piano normally uses for auto
accompaniments and to produce the notes you play. There
are 14 Group A parts, including six “melody parts” (for
keyboard notes), and eight “accompaniment parts” (for auto
accompaniment).
J Group B
There are 16 Group B parts that the piano uses for sounding
MIDI input from an external source. Each of the Group B
parts also corresponds to one of the 16 tracks of the piano’s
sequencer (page E-53).
Much like a real band, auto accompaniment patterns and
patterns you create with the sequencer are played using
multiple “parts”, such as chords, bass, and drum parts. The
mixer provides you with the means to turn individual parts
on (so they sound) and off (so they don’t), and to change the
tone, volume, pan, effect, and other parameters of each part.
E-46
426-E-048A
Page 49

PL40NE01-1.book 47 ページ 2002年7月23日 火曜日 午後6時52分
Using the Mixer
The following is a general overview of the parts described above.
Group Name Part Type Part Name Description
Upper1 These parts are used for keyboard play. See
Upper2
Lower1
Lower2
Harmo1 (auto harmonize 1) Harmonize notes used for auto harmonize. See
Harmo2 (auto harmonize 2)
Perc. (Percussion) Auto accompaniment parts. See “Using Auto
Drum
Bass
Chord1 to Chord5
Group A
Internal
[A]
Group B
External
[B]
Melody
Accompaniment
— Pt1 to Pt16 (Part 1 to Part 16)
Changing the Parameters of
a Part
“Upper1, Upper2, Lower1, Lower2” on page
E-19.
“Using Auto Harmonize” on page E-29.
Accompaniment” on page E-23.
These parts correspond to external tracks 1 to
16 when recording or playing back with the
sequencer. They are also used when sounding
MIDI input from an external source. See
“Using MIDI” on page E-66.
Select the Group A to make layer, split, or auto
accompaniment settings.
Select the Group B to make MIDI or sequencer
settings.
Use the following procedure to change the parameters of each
individual part.
To change part parameters
1. While holding down the FUNCTION button,
press the PART/(MIXER) button.
This causes “MIXER” to appear on the display.
2. While holding down the FUNCTION button,
press the LAYER/(GROUP A/B) button to
toggle between the two groups and display the
one you want.
Group A: [A]
Group B: [B]
426-E-049A
3. Use the [ ] and [ ] buttons or the selector
dial to select the part you want.
4. Press the ENTER/YES button to display the sub
menu.
5. Use the [ ] and [ ] buttons to select
parameter whose setting you want to change.
See “Parameter List” on page A-17 for more
information about parameters.
E-47
Page 50

PL40NE01-1.book 48 ページ 2002年7月23日 火曜日 午後6時52分
Using the Mixer
6. Use the [+] and [–] buttons or the selector dial to
change the setting of the currently selected
parameter.
Press the EXIT/NO button to return to the part
selection screen in step 3 of this procedure.
Any time during the above procedure, you can
select another part by pressing the PART/
(MIXER) button.
7. Repeat steps 2 through 6 to change the settings
of other parameters if you want.
When changing parameter settings, you can play
notes on the keyboard as you change parameter
settings to see what effect your settings have.
8. After you are finished making the settings you
want, press the EXIT/NO button.
Mixer Parameters
This section provides detailed explanations of each of the
mixer parameters, and their setting ranges.
Tone Parameters
J Part On/Off: On, Off
This parameter can be used to turn each part on (sounds) and
off (does not sound). The current on/off status of a part is
indicated by the on-screen level meter. See “Level Meter
Screen” on page E-13 for more information.
J Volume: 0 to 127
This parameter adjusts the overall volume of each part.
J Pan: –64 to 63*
Use this parameter to adjust the pan setting (volume balance
between the left and right speakers). A value of 0 puts the
speakers in balance, so the stereo center is halfway between
the two speakers. A smaller value shifts the stereo center left,
while a larger value shifts it right.
* When “On” is selected for the DSP you are using, these
settings are applied in accordance with each DSP
parameter setting.
Effect Parameters
The mixer lets you control the effects applied to each
individual part, making it different from the Effect Mode,
whose settings are applied to all parts in general.
J Tone: 271
This parameter controls the tones assigned to each part.
You can also change the tone assignment with the TONE
buttons. The tone you select is applied to the currently
selected part.
Use DRUM tone group values for the “Drum” and
“Percussion” parts.
You cannot select DRUM tone group values for “Bass”, or
“Chord” parts.
Changing the tone assigned to the Upper1 also changes
the tone assigned to Harmo1. Changing the tone assigned
to the Upper2 also changes the tone assigned to Harmo2.
J Reverb Send: 0 to 127
This parameter controls how much re ver b is app lied to a part.
A setting of 0 turns reverb off, while a setting of 127 applies
maximum reverb.
J Chorus Send: 0 to 127
This parameter controls how much chorus send is applied to
a part. A setting of 0 turns chorus send off, while a setting of
127 applies maximum chorus send.
“Chorus Send” does not work with drum sounds.
J DSP: On, Off
You can use this parameter to turn DSP off for a particular
channel, or to turn it on.
E-48
426-E-050A
Page 51

PL40NE01-1.book 49 ページ 2002年7月23日 火曜日 午後6時52分
Tuning Parameters
You can use these parameters to individually tune each of the
parts individually.
J Coarse Tune: –24 to 24
This parameter tunes individual parts in semitone units,
which means that changing the value by 1 changes the tuning
by one semitone.
The setting you make here is added to the transpose
setting described in “Transposing the Piano” on page
E-31.
“Coarse Tune” does not work with drum sounds.
J Fine Tune: –64 to 63
This parameter allows fine tuning of individual parts. A
setting of –64 lowers the tuning by one semitone from normal,
while 63 represents a rise of one semitone. This setting is
applied by combining it with the “Tune setting” item of the
Keyboard Settings.
Using the Mixer
426-E-051A
E-49
Page 52

PL40NE01-1.book 50 ページ 2002年7月23日 火曜日 午後6時52分
Registration Memory
Registration Memory
1 ENTER/YES 2 EXIT/NO 3 REGISTRATION
4 BANK 5 STORE
Registration Memory Features
Reigstration memory lets you store uo to 16 keyboard setups
(4 sets × 4 banks) for instant recall whenever you need them.
The following is a list of settings that are saved in registration
memory.
Registration Memory Settings
Rhythm
Tempo
Layer on/off
Split on/off
Auto harmonize on/off
Auto harmonize type
Sustain length
Reverb type
Chorus type
DSP type
Part on/off (Group A)
J The following settings are saved for the melody
part.
Part tone setting
Part pan
Part volume
Coarse tuning
Fine tuning
Part reverb level
Part chorus level
Part DSP on/off
Registration memory contents can be saved and recalled
while any one of the following conditions exists.
* While the normal tone name and rhythm name screen
is on the display
* During song sequencer playback or playback standby
* During song sequencer recording (registration
memory recall only)
Initial Settings
BANK A
Area TONE RHYTHM
1 004:E.Piano1 16Beat 1
2 Stereo Piano 8Beat 1
3 004:E.Piano1 Pop Rock 2
4 Full Organ R&B
BANK B
Area TONE RHYTHM
1 022:Harmnica Shuffle Pop 1
2 Flute 8Beat Ballad 2
3 091:SpaceChr 16Beat Ballad 3
4 030:Dist.Gt1 Rock 1
E-50
426-E-052A
Page 53

PL40NE01-1.book 51 ページ 2002年7月23日 火曜日 午後6時52分
BANK C
Area TONE RHYTHM
1 Clavi Dance 1
Registration Memory
To save a setup in registration
memory
2 017*PercOrg2 Swing 1
3 Flute Bossa Nova 1
4 Strings 1 Broadway
BANK D
Area TONE RHYTHM
1 Stereo Piano Piano Ballad 1
2 Mellow Piano Jazz Waltz
3 Stereo Piano Arpeggio 1
4 Stereo Piano 2Beat
Setup Names
You can assign setups into one of 16 areas, which you can
select using BANK buttons 1 through 4 and the four
REGISTRATION buttons. Area names range from A-1
through D-4 as shown below.
1. Select a tone and rhythm, and otherwise set up
the keyboard the way you want it.
See “Registration Memory Settings” on page E-50
for details on what data is stored in the
registration memory.
2. Use the BANK button to select the bank you
want.
Note that the display exits the registration
memory save screen if you do not change the
setting within 10 seconds after displaying it. If
this happens, press the BANK button again.
Example:
BANK A selected.
3. While holding down the STORE button, press a
REGISTRATION button (1 to 4).
Example:
The following display appears when you press
the 2 button.
1 Use the BANK button to select the bank. Each press
of the BANK button cycle through the bank numbers
from A to D.
2 Pressing one of the REGISTRATION buttons (1 to
4) selects the corresponding area in the currently
selected bank.
Whenever you save a setup and assign it a setup name,
any setup data previously assigned to that name is
replaced with the new data.
426-E-053A
4. The bank (A to D) and area (1 to 4) where the
setup was stored appears on the display
momentarily. After the bank and area
disappear, release the REGISTRATION and
STORE buttons.
E-51
Page 54

PL40NE01-1.book 52 ページ 2002年7月23日 火曜日 午後6時52分
Registration Memory
To recall a setup from
registration memory
1. Use the BANK button to select the bank.
2. Press the REGISTRATION button (1 to 4) for
the area whose setup you want to recall.
The bank (A to D) and area (1 to 4) from which the
setup was recalled appears on the display
momentarily.
Pressing a REGISTRATION button without using the
BANK button to select a bank first recalls the setup from the
area in the bank you last selected.
E-52
426-E-054A
Page 55

PL40NE01-1.book 53 ページ 2002年7月23日 火曜日 午後6時52分
Using the Sequencer
Using the Sequencer
1 SEQUENCER 2 Selector dial 3 []/[]
4 ENTER/YES 5 START/STOP 6 [+]/[–]
7 EXIT/NO
The sequencer provides you with powerful tools for
recording up to 10 songs into piano memory. You can record
auto accompaniments and the notes you play with them, or
you can build your creation part-by-part using the
sequencer’s 17 tracks.
How the Sequencer Works
About Songs and Tracks
The sequencer provides you with capabilities that are similar
to a tape recorder. You can record things you play on the
keyboard and play them back. There is enough memory to
store about 15,500 notes, and this total memory can be
divided between up to 10 “songs”.
Each song consists of up to 17 tracks, one system track and 16
tracks numbered 1 through 16. You can record tracks one at a
time and then play them back at the same time, which layers
everything together and give you the potential of becoming a
one-person orchestra.
About Tracks
The sequencer’s system track is used for recording auto
accompaniments. More precisely, it records the eight parts
that make up auto accompaniment, the four melody parts
(Upper1, Upper2, Lower1, Lower2), and two parts required
for harmony when auto harmonize is turned on.
Each of the 16 tracks can be used to record the notes played
for one particular musical instrument (tone).
Each track is independent of the others. This means that if
you make a mistake while recording, you need only to rerecord one track.
You should use Tracks 1 through 9 and Tracks 11 through
16 mainly for non-drum sound tones, and Track 10 mainly
for drum sound tones. Otherwise, tones may not be correct
during playback or when saving data to an SMF file.
Recording Techniques
There are two techniques you can use for sequencer
recording: realtime recording and punch in recording.
426-E-055A
J Realtime Recording
With realtime recording, you record what you play on the
keyboard as you play it.
J Punch In Recording
This method lets you re-record from a specific section of a
song that is already in memory. You can use punch-in
recording to correct mistakes you made during real-time
recording.
E-53
Page 56

PL40NE01-1.book 54 ページ 2002年7月23日 火曜日 午後6時52分
Using the Sequencer
Sequencer Record Data
The following are the three basic types of data recorded by the
sequencer.
The time signture setting (stored in the song header).
Initial track parameters (stored in the song header).
Parameter changes and operations performed during
recording (stored at the point in the recording where you
make them).
You should also note that the data you can record in the
system track is different from the data you can record in
the 16 tracks.
For more detailed information about the data that can be
recorded in each track, see the “Parameter List” at the back
of this User’s Guide (page A-17).
Parameters Applied to All Tracks
The settings of the parameters listed below are stored as
header data and applied to all tracks. You cannot change
these settings part way through a song or for a particular
track.
Time signature (0, 2/4 to 7/4, 9/4, 12/4, 3/8, 5/8, 6/8, 7/8, 9/
8, 12/8)
Effect type
Tune setting (Master Tune, Baroque Pitch, Temperament)
System Track Data
J Parameter Changes and Operations During
System Track Recording
Notes played on the keyboard (including chords in the
accompaniment keyboard range)
Pedal operations
Rhythm changes
Tone changes
Tempo changes
Auto accompaniment mode changes
Auto accompaniment controller operations (except for
START/STOP button): INTRO, FILL-IN, BREAK,
VARIATION 1/2, SYNCHRO START/STOP, ENDING.
Accompaniment keyboard range chords
Effect type changes
Track 1 to 16 Data
J Initial Track Parameters
When you start recording of the track, the settings of these
parameters are stored in the song header. You can change
these settings using the procedure under “Changing Song
Header Data” on page E-60.
Tone assignment
Mixer settings
J Parameter Setting Changes and Operations
During Track 1 to 16 Recording
Melody notes played on the keyboard
Pedal operations
Tone changes
J System Track Initial Parameters
When you start recording of the track, the settings of these
system tarck parameters are stored in the song header. You
can change these settings using the procedure under
“Changing Song Header Data” on page E-60.
Rhythm selection
Tone settings
Upper1, Upper2, Lower1, Lower2 tones, on/off status,
split point setting
Tempo
Transpose
Mixer settings
Settings are recorded for each auto accompaniment and
melody part and cannot be changed (except for mixer
volume) once recording starts.
Auto accompaniment mode
Auto harmonize on/off status
E-54
426-E-056A
Page 57

PL40NE01-1.book 55 ページ 2002年7月23日 火曜日 午後6時52分
Sequencer Memory Capacity
You can store about 15,500 notes in sequencer memory, which
can be divided among up to 10 songs. You can use all 15,500
notes for a single song, if you want.
Remaining memory capacity is indicated by a percentage
value that appears for a few seconds after you enter
record standby.
Recording stops automatically when memory becomes
full. Play of the auto accompaniment or rhythm pattern
you are using also stops when memory becomes full.
You can record up to 1,000 measures per tune.
Memory Data Notes
Using the Sequencer
Starting a record operation deletes any data currently
stored in the selected song area.
Sequencer memory contents are retained even when you
turn off the piano. Power required for memory storage is
supplied by a built-in back-up lithium battery. See
“Lithium Battery” on page E-90 for important
information about the lithium battery.
Turning off piano power while a record operation is in
progress or standing by causes all sequencer contents to
be deleted.
426-E-057A
E-55
Page 58

PL40NE01-1.book 56 ページ 2002年7月23日 火曜日 午後6時52分
Using the Sequencer
Sequencer Main Menus and Sub Menus
The following describes how to navigate around the sequencer mode’s main menus and sub menus to select functions and configure
settings.
Each press of the SEQUENCER button toggles between the play standby screen and the Main Menu.
When you press the EXIT/NO button to exit the sequencer Mode, a number of parameters are restored to settings that were in effect
when you entered the sequencer Mode. See the “Recall Items” column of the “Parameter List” at the back of this manual for
information about which parameter settings are restored (page A-17).
Each press of ENTER/YES while the “Delete” menu is on the display accesses the “Delete” sub menu.
The main menu that appears first is the one that was on the display when you last exited the main menus to the play standby screen.
The “Delete” sub menu that appears first is the one that was on the display when you last exited the “Delete” sub menus.
E-56
426-E-058A
Page 59

PL40NE01-1.book 57 ページ 2002年7月23日 火曜日 午後6時52分
Realtime Recording
Realtime Recording to the System Track
The following procedure contains only the most basic steps
for realtime recording. For other techniques you can use
during this procedure, see “Other System Track Realtime
Recording Techniques” on page E-58.
1. Press the SEQUENCER button.
This causes the button’s indicator lamp to light,
indicating that sequencer is turned on.
Using the Sequencer
6. If you want to change mixer parameter settings,
hold down the FUNCTION button and press
PART/(MIXER) button and then configure the
settings you want.
You can use the mixer to change the parameters
of auto accompaniment and melody parts.
After making the settings you want, press the
EXIT/NO button to return to the recording
screen.
7. Press RECORD button to enter the Realtime
Record Mode.
The button’s indicator lamp flashes and the
sequencer goes into system track record standby.
2. Select the song area to which you want to
record.
Use [+]/[–] buttons or the selector dial to select a
song area number in the range of 1 to 10.
After a few seconds, the display changes to the
play standby. You can also display the play
standby by pressing the EXIT/NO button.
3. Press the SEQUENCER button to display the
main sequencer menu.
Use the [ ]/[ ] buttons to select the setting you
want.
4. Specify the time signature and make any
metronome settings you want to use while
recording.
Use “Metronome Setting 5 : “Metro”” in the
Setting Mode on page E-63 to make metronome
settings.
After you select a setting, press the SEQUENCER
button or the EXIT/NO button to return to the
play standby screen.
5. Make the piano control panel settings you want
to use when you start your recording.
Select the tone, rhythm, and auto accompaniment
mode using the same procedures as those for
normal keyboard play. “Other System Track
Realtime Recording Techniques” on page E-58
also contains related information about these
settings.
See “System Track Data” on page E-54 for
information about what parameters you can set
prior to recording.
8. Play something on the keyboard to start actual
recording.
Current measure and beat numbers
1
If you want to input rests (blank spaces) at the
beginning of a song, press the START/STOP
button to start recording, and then input as many
rests as you want. Next, play what you want on
the keyboard.
During recording, the metronome sounds (but is
not recorded) according to the settings you made
in step 4.
9. Play what you want on the keyboard.
Auto accompaniment chord changes, as well as
pedal and other operations are also recorded.
See “System Track Data” on page E-54 for more
information about the type of data that is
recorded.
10. After you are finished playing what you want,
press the START/STOP button to stop
recording and change to the sequencer’s
playback screen.
Pressing the START/STOP button at this time
plays back what you just recorded. See “Playing
Back from Sequencer Memory” on page E-60 for
more information about playback.
426-E-059A
E-57
Page 60

PL40NE01-1.book 58 ページ 2002年7月23日 火曜日 午後6時52分
Using the Sequencer
Using the Realtime Record Mode to record to a track that
already contains data replaces the existing data with the
new recording.
If you make a mistake while recording, you can start over
again from step 1 of the above procedure, or you can use
punch in recording (page E-59) to make modifications.
Other System Track Realtime Recording
Techniques
J To record without auto accompaniment
In step 5 of the above procedure, turn off auto
accompaniment (so none of the lamps above the MODE
button are lit).
You can turn auto accompaniment on or off part way
through a recording, if you want.
J To use synchro start to start recording
At any time before you perform step 5 of the above
procedure, press the SYNCHRO START/STOP button.
Both auto accompaniment and recording will start when
you play a chord in the accompaniment keyboard range
during record standby prior to step 7.
Realtime Recording to Tracks 1 to 16
Use Tracks 1 through 16 to add other parts to the
accompaniment and keyboard notes you record in the system
track. You can then turn tracks on and off during playback to
create the arrangement you want.
The recording procedure for tracks 1 through 16 is basically
the same as that for recording to the system track. Skip the
first two steps of the procedure if you go into the recording of
other tracks directly after you finish recording the system
track.
1. Press the SEQUENCER button.
This causes the button’s indicator lamp to light,
indicating that sequencer is turned on.
2. Select the song area to which you want to
record.
Use [+]/[–] buttons or the selector dial to select a
song area number in the range of 1 to 10.
After a few seconds, the display changes to the
play standby. You can also display the play
standby by pressing the EXIT/NO button.
3. Select the track you want to record.
Press the SEQUENCER button to display the
main menu, and then select “TrackSelect”.
J To insert an intro, fill-in, break, etc.
You can use any of the following buttons during realtime
system track recording: INTRO, FILL-IN, BREAK,
VARIATION 1/2, SYNCHRO START/STOP, ENDING.
J To synchro start recording with an intro pattern
At any time before you perform step 5 of the above
procedure, press the SYNCHRO START/STOP button and
then press INTRO.
Recording will start and the intro will play, followed by
auto accompaniment when you play a chord in the
accompaniment keyboard range during record standby
prior to step 7.
J To start rhythm pattern play part way through a
recording
In step 6 of the above procedure, turn off auto
accompaniment (so none of the lamps above the MODE
button are lit). After recording is started, press one of the
VARIATION 1/2 buttons to start rhythm play (without
chords). Now you can use the MODE button to select an auto
accompaniment mode and play chords on the
accompaniment keyboard.
A track that already contains recorded data is
indicated on the display by “
Use the [+] and [–] buttons or the selector dial to
select a track.
”.
∗
4. Specify the time signature and make any
metronome settings you want to use while
recording.
You do not need to specify a time signature here
if you already have one recorded in the system
track.
After you select a setting, press the SEQUENCER
button or the EXIT/NO button to return to the
play standby screen.
5. Make the piano control panel settings you want
to use when you start your recording.
Select the tone and tempo setting using the same
procedures as those for normal keyboard play.
The tempo setting you used for last track
recorded in a song is used as that song’s initial
default tempo setting for playback.
E-58
426-E-060A
Page 61

PL40NE01-1.book 59 ページ 2002年7月23日 火曜日 午後6時52分
6. If you want to change mixer parameter settings,
hold down the FUNCTION button and press
PART/(MIXER) button and then configure the
settings you want.
After setting the parameters you want, press the
EXIT/NO button to return to the recording
screen.
7. Press the RECORD button. This puts the
sequencer into record standby.
8. Play something on the keyboard to start actual
recording.
If you want to start recording without playing
anything on the keyboard, press the START/
STOP button. A blank space (a series of rests) is
recorded until you play something.
During recording, the metronome sounds (but is
not recorded) according to current metronome
parameter settings.
9. Play what you want on the keyboard.
Pedal and other operations are also recorded.
See “Track 1 to 16 Data” on page E-54 for more
information about the type of data that is
recorded.
Using the Sequencer
Modifying Recorded Data with
Punch In Recording
Use punch in recording to make changes in parts you have
already recorded in a track.
With punch in recording, you listen to the playback of
previous recording, and start playing on the keyboard from
the point where you want to make your modifications.
Everything up to the point where you start playing is
retained, but everything after that point is replaced with your
new input.
Using Punch In Recording
Note that you should skip the first two steps of the following
procedure when you go into punch in recording to modify
something you have just recorded.
1. Press the SEQUENCER button.
This causes the button’s indicator lamp to light,
indicating that sequencer is turned on.
10. After you are finished playing what you want,
press the START/STOP button to stop
recording and change to the sequencer’s
playback screen.
Pressing the START/STOP button at this time
plays back what you just recorded. See “Playing
Back from Sequencer Memory” on page E-60 for
more information about playback.
Using the Realtime Record Mode to record to a track that
already contains data replaces the existing data with the
new recording.
If you make a mistake while recording, you can start over
again from step 1 of the above procedure, or use punch in
recording (page E-59) to make modifications.
2. Select the song area that contains the song
whose data you want to modify.
Use [+]/[–] buttons or the selector dial to select a
song area number in the range of 1 to 10.
3. If you want to use the metronome during
recording, make the required metronome
settings.
4. Select the track whose contents you want to
modify.
Use the [ ] button to select “TrackSelect”.
Use the [+] and [–] buttons or the selector dial to
select a track.
After you select a setting, press the SEQUENCER
button or the EXIT/NO button to return to the
play standby screen.
5. Press the ENTER/YES button.
This enters the punch-in mode and causes the
RECORD button’s indicator lamp to flash.
426-E-061A
E-59
Page 62

PL40NE01-1.book 60 ページ 2002年7月23日 火曜日 午後6時52分
Using the Sequencer
6. Press the START/STOP button to start
playback of the selected track.
Playing Back from Sequencer
7. When playback reaches the point from which
you want to modify the track contents, start
playing the new notes on the keyboard.
Recording starts and playback of the track’s
current contents stops as soon as you play
something on the keyboard.
8. After you are finished playing what you want,
press the START/STOP button to stop
recording and change to the sequencer’s
playback screen.
You can change the playback tone after starting playback
of the track’s contents in step 6, but the tone setting you
make is not recorded. After you start punch in recording (in
step 7), any changes you make in parameter settings are
recorded just as they are during normal recording.
Changing Song Header Data
You can use the following procedure to change the initial
mixer, tempo and other settings stored in the song header.
To change the song header data
1. Press the SEQUENCER button.
Memory
Use the following procedure when you want to play back the
contents of sequencer memory.
Skip steps 1 and 2 of the following procedure if you have
just finished a real-time recording operation.
To play back from Sequencer memory
1. Press the SEQUENCER button.
This causes the button’s indicator lamp to light,
indicating that sequencer is turned on.
2. Select the user song area that contains the
song you want to play back.
Use the [+] and [–] buttons or the selector dial to
select the song area (Song 1~10).
3. Press the START/STOP button to start
playback.
Use the TEMPO buttons [ ] and [ ] to adjust
the playback tempo.
See the notes below for other operations you can
perform during playback.
4. Press the START/STOP button again to stop
playback.
2. Select the song area that contains the song
whose header data you want to change.
Use the [+]/[–] buttons or the selector dial to select
a song area number in the range of 1 to 10.
3. Set the tempo, mixer, and other song header
parameters you want.
4. Press the RECORD button.
This causes the current panel settings to replace
the song header parameter settings of the
currently selected song.
Press the EXIT/NO button to change from the
remaining memory screen to the record standby
screen (which shows the tone and rhythm). The
record standby screen appears automatically
after about 10 seconds if you do not perform any
operation while the remaining memory screen is
on the display.
5. Press the EXIT/NO button.
E-60
Pressing the START/STOP button starts playback from the
beginning of the selected song.
You can play along on the keyboard during sequencer
playback. You can use layer and split for keyboard play.
You can use the mixer to adjust the volume level and
stereo points of the playback track. Such settings are
output from MIDI OUT when they are made.
You cannot change the MODE button setting during
sequencer playback.
During song playback, you can display a level meter screen
that shows the volume level of each part, as well as the
each part’s on/off status. See “Level Meter Screen” on
page E-13 for more information.
426-E-062A
Page 63

PL40NE01-1.book 61 ページ 2002年7月23日 火曜日 午後6時52分
Using the Sequencer
Configuring Global Recording Settings and Operations
The following are global settings you can configure and operations you can perform for recording with the sequencer.
1 Song selection
2 Recording track
3 Quantize execute
4 Meter
5 Metronome setting
6 Song name
7 Track delete
8 Song delete
9 All song delete
To make global settings
1. Press the SEQUENCER button once.
This causes the button’s indicator lamp to light, indicating that sequencer is turned on.
2. Select the user song area that contains the song whose global settings you want to change.
Use the [+] and [–] buttons or the selector dial to select the song area (Song 1~10).
After a few seconds, the display changes to the play standby. You can also display the play standby by pressing the
EXIT/NO button.
3. Press the SEQUENCER button to display a main menu, and then use the [ ] and [ ] buttons to display the
item whose setting you want to change.
To display the “Delete” sub menu, first display the “Delete” main menu, and then press the ENTER/YES button.
The numbers to the right of the sample displays below correspond to the following sections that provide details on each
setting.
4. When the item you want is on the screen, change it to the setting you want.
See the explanations following this procedure for details on making each setting.
5. After the settings are the way you want, press the SEQUENCER button or the EXIT/NO button.
This returns to the sequencer play standby screen.
426-E-063A
E-61
Page 64

PL40NE01-1.book 62 ページ 2002年7月23日 火曜日 午後6時52分
Using the Sequencer
Song Selection 1 : “Song Select”
You can use this screen to specify a song number from 1 to 10.
It comes in handy if you did not have a song selected when
you displayed the sequencer main menu, or if you want to
change the current song setting.
Recording Track
This setting selects the track for recording.
Quantize Execute
This setting determines the quantize* value after recording.
After recording, quantize adjusts the timing of notes input to
each track on the keyboard to match those selected by the
setting you make here.
* The track that is affected by the quantize operation is the
one that was selected when you displayed the global
setting screen.
2 : “TrackSelect”
3 : “Quantize”
1. Use the [+] and [–] buttons or the selector dial to
change the setting.
Display Indicator Meaning
4
4T
8
8T
16
16 T
32
32 T
64
Quantize quarter notes
Quantize quarter triplicate notes
Quantize 8 th notes
Quantize 8 th triplicate notes
Quantize 16 th notes (initial value)
Quantize 16 th triplicate notes
Quantize 32 nd notes
Quantize 32 nd triplicate notes
Quantize 64 th notes
2. Press the ENTER/YES button.
3. In response to the confirmation message
(SURE?) that appears, press the ENTER/YES
button to execute the quantize operation, or the
EXIT/NO button to cancel the operation.
This performs the quantize operation.
The message “Completed!” appears on the
display for about one second, and then the piano
returns to main menu (Quantize) screen.
If there is not enough sequencer memory available, the
message “Error! Memory Full” appears on the display and
the quantize operation is not performed.
Meter 4 : “Beat”
This setting specifies the meter of the song.
If a song is already recorded with a rhythm, the meter of the
rhythm is set automatically.
Setting Setting
0 12 / 4
2 / 4 3 / 8
3 / 4 5 / 8
4 / 4 (initial value) 6 / 8
5 / 4 7 / 8
6 / 4 9 / 8
7 / 4 12 / 8
9 / 4
Use the [+] and [–] buttons or the selector dial to change the
setting.
E-62
426-E-064A
Page 65

PL40NE01-1.book 63 ページ 2002年7月23日 火曜日 午後6時52分
Using the Sequencer
Metronome Setting 5 : “Metro”
This setting controls whether or not the metronome sounds
during sequencer recording.
Display Indicator Meaning
Off Metronome off
On Metronome on
Metronome sound:
The first beat is a chime, followed by a standard metronome
click for the other beats.
Use the [+] and [–] buttons or the selector dial to change
the metronome setting.
Song Name 6 : “SongName”
You can use this screen to assign a name to the currently
selected song.
1. On the sequencer sub menu, select
“SongNameEdit”, and then press the ENTER/
YES button.
2. Use [+] and [–] or the selector dial to scroll
through letters at the current cursor location.
Use the [ ]/[ ] buttons to move the cursor left
and right.
3. After you are finished inputting the name, press
the ENTER/YES button to save the song under
the name you specified.
The message “Completed!” appears on the
display for about one second, and then the piano
returns to main menu (SongNameEdt) screen.
J Letters and Numerals
The table below shows the letters and numerals that you can
input for a song name.
Track Delete 7 : “DeleteTrack”
Use the following procedure to delete the track associated
with the currently selected track. A track that already contains
recorded data is indicated on the display by “
”.
∗
1. Use the [+] and [–] buttons or the selector dial to
select the track you want to delete, and then
press the ENTER/YES button.
In response to the confirmation message (SURE?)
that appears, press the ENTER/YES button to
execute the delete operation, or the EXIT/NO
button to cancel the operation.
To exit the procedure without deleting anything,
press the EXIT/NO button here.
2. Press the ENTER/YES button to delete the
track.
The message “Completed!” appears on the
display for about one second, and then the piano
returns to Delete sub menu (DeleteTrack) screen.
426-E-065A
E-63
Page 66

PL40NE01-1.book 64 ページ 2002年7月23日 火曜日 午後6時52分
Using the Sequencer
Song Delete 8 : “DeleteSong”
Use this operation to delete a song from a specific user song
area. A song that already contains recorded data is indicated
on the display by “
”.
∗
1. Use the [+] and [–] buttons or the selector dial to
select the song you want to delete, and then
press the ENTER/YES button.
In response to the confirmation message (SURE?)
that appears, press the ENTER/YES button to
execute the delete operation, or the EXIT/NO
button to cancel the operation.
Press the EXIT/NO button to abort the delete
operation without deleting anything.
2. Press the ENTER/YES button to delete the
song.
The message “Completed!” appears on the
display for about one second, and then the piano
returns to Delete sub menu (DeleteSong) screen.
All Song Delete
Use the following procedure when you want to delete all
songs in memory.
9 : “DeleteSongAll”
1. Press the ENTER/YES button.
In response to the confirmation message (SURE?)
that appears, press the ENTER/YES button to
execute the delete operation, or the EXIT/NO
button to cancel the operation.
To exit the procedure without deleting anything,
press the EXIT/NO button here.
2. Press the ENTER/YES button to delete all the
songs.
The message “Completed!” appears on the
display for about one second, and then the piano
returns to Delete sub menu (DeleteSongAll)
screen.
E-64
426-E-066A
Page 67

PL40NE01-1.book 65 ページ 2002年7月23日 火曜日 午後6時52分
426-E-067A
Page 68

PL40NE01-1.book 66 ページ 2002年7月23日 火曜日 午後6時52分
Using MIDI
Using MIDI
What is MIDI?
MIDI Channels
The letters “MIDI” stand for “Musical Instrument Digital
Interface”, which is the name of a worldwide standard for
digital signals and connectors that makes it possible to
exchange musical data between musical instruments and
computers (devices) produced by different manufacturers.
MIDI compatible equipment can exchange keyboard key
press, key release, tone change, and other data as “messages”.
Though you do not need any special knowledge about MIDI
to use this piano as a stand-alone unit, MIDI operations
require a bit of specialized knowledge. This section provides
you with an overview of MIDI that will help to get you going.
MIDI Connections
MIDI messages are sent out through the MIDI OUT terminal
of one device to the MIDI IN terminal of another device over
a MIDI cable. To send a message from this piano to another
device, for example, you must use a MIDI cable to connect the
MIDI OUT terminal of this piano to the MIDI IN terminal of
the other device. To send MIDI messages back to this piano,
you need to use a MIDI cable to connect the other device’s
MIDI OUT terminal to the MIDI IN terminal of this piano.
To use a computer or other MIDI device to record and
playback the MIDI data produced by this piano, you must
connect the MIDI IN and MIDI OUT terminals of both devices
in order to send and receive data.
There is a third MIDI terminal named MIDI THRU, which
passes any MIDI messages received by the MIDI IN terminal
on to another device.
1 Computer, etc.
This piano also has a USB terminal that can be used to
connect to a computer. See “Connecting to a Computer” on
page E-69 for more information.
MIDI allows you to send the data for multiple parts at the
same time, with each part being sent over a separate “MIDI
channel”. There are 16 MIDI channels, numbered 1 through
16, and MIDI channel data is always included whenever you
exchange data (key press, pedal operation, etc.).
This piano is equipped with “multi-timbre” capabilities,
which means it can receive messages over all 16 MIDI
channels and play up to 16 parts at the same time. Keyboard
and pedal operations performed on this piano are sent out by
selecting a MIDI channel (1 to 16) and then sending the
appropriate message.
General MIDI
Though MIDI makes it possible to exchange musical data
between devices produced by different manufacturers, MIDI
musical data does not indicate the actual notes themselves,
but rather information on whether a keyboard key is pressed
or released, and the tone number.
If tone number 1 on a keyboard produced by Company A is
PIANO while tone number 1 on a Company B’s keyboard is
BASS, for example, data that is played using the PIANO tone
on Company A’s keyboard will be played using the BASS
tone on Company B’s keyboard. If a computer, sequencer or
other device with auto accompaniment capabilities is used to
produce music data for the Company A keyboard which has
16 parts (16 channels) and then that data is sent to the
Company B keyboard which can receive only 10 parts (10
channels), some of the parts will not sound.
To overcome problems such as these, the industry has come
up with standard numbering for tones, pads, and other
general factors that determine the sound source
configuration. This standard is called “General MIDI”.
General MIDI defines the tone numbering sequence, the
drum sound numbering sequence, the number of MIDI
channels that can be used, and other general factors that
determine the sound source configuration. Because of this,
musical data produced on a General MIDI sound source can
be played back using similar tones and identical nuances as
the original, even when played on another manufacturer’s
sound source.
This piano conforms to General MIDI standards, so it can be
connected to a computer or other device and used to play
back General MIDI data that has been purchased,
downloaded from the Internet, or obtained from any other
source.
E-66
426-E-068A
Page 69

PL40NE01-1.book 67 ページ 2002年7月23日 火曜日 午後6時52分
Using MIDI
Sending and Receiving MIDI
Messages
This piano can send notes you play on the keyboard, as well
as auto accompaniment patterns and sequencer playback as
MIDI messages to another device.
MIDI Send Data
J Keyboard Play
Each keyboard part (Upper1, Upper2, Lower1, Lower2) can
be sent over its own individual MIDI channel. When auto
harmonize is turned on, harmonize notes are also sent over
each individual MIDI channel.
J Auto Accompaniment Play
Each accompaniment part can be sent over its own individual
MIDI channel. The “Accomp MIDI Out” parameter (page
E-79) is used to specify whether a part is sent.
J Sequencer Playback
The following describes how track data can be sent over
individual MIDI channels.
System Track
Each part (Group A) that makes up the system track can
be sent over its own individual MIDI channel.
Tracks 1 through 16
Tracks 1 through 16 correspond to Group B parts 1
through 16. Each part can be sent over its own individual
MIDI channel.
MIDI Message Receive
J Multi Channel Receive
The 16 external parts can be used to receive data over 16 MIDI
message channels at the same time. Receive channel
assignments for each part can be made using the “MIDI
Receive Channel” parameter (page E-80).
J Chord Changes when Using Auto Accompaniment
MIDI messages received from an external device can be
interpreted as chord changes as specified by the fingerings
supported by the auto accompaniment system of this piano.
Use the “MIDI In Chord Judge” parameter (page E-79) to turn
this capability on and off.
See the MIDI Implementation Chart at the back of this
User’s Guide for more information about each MIDI
message.
J Part Send Channels
Use the procedure on page E-71 and the information on page
E-79 to assign a send channel for each part.
426-E-069A
E-67
Page 70

PL40NE01-1.book 68 ページ 2002年7月23日 火曜日 午後6時52分
Using MIDI
MIDI Settings
You can change the settings of a number of parameters that control how MIDI messages are sent and received.
MIDI Parameters
You can use the keyboard settings procedure (page E-71) to change the settings of the MIDI parameters described in the table below.
See page E-72 for details about the setting procedure. The reference pages in the table show where you should go for more
information about each parameter.
Setting/Menu Description Reference Page
Navigate Channel
(Navi. Ch)
Accomp MIDI Out
(Accomp MidiOut)
MIDI In Chord Judge
(MidiIn ChordJdg)
Real Time Message Out
(RealTim Message)
Device ID Specifies the MIDI device ID for this piano. E-79
Local Control
MIDI Transmit Channel
(MIDI Tx Ch)
MIDI Receive Channel
(MIDI Rx Ch)
* The term “local control” as used here refers to keyboard play, playback of song data, and other control operations and functions
setting of this piano.
J MIDI In Chord Judge
This parameter determines whether note data received from
an external device should be interpreted as an auto
accompaniment chord fingering. Turn on this parameter
when you want to control auto accompaniment chords from
a computer or other external device.
On
Causes note data input through MIDI IN to be interpreted
as auto accompaniment chord fingerings. Note data
received over the channel specified as Part 1 by the
receive channel setting parameter described on page E-80
is interpreted as auto accompaniment chord fingerings.
Off
Turns off “MIDI In Chord Judge”.
Specifies the MIDI channel whose Note On message data lights the
keyboard keys.
Specifies whether this piano’s accompaniment is sent as MIDI
messages.
Specifies whether MIDI messages received from an external device
should be interpreted as auto accompaniment chord changes.
Specifies whether real-time messages (FA, FC, F8) should be output.
Specifies whether or not this keyboard should sound each part in
accordance with the piano’s local control* settings. MIDI send/receive
is performed regardless of local settings.
Specifies whether MIDI messages are sent for each part of this piano,
and the send channel for each part.
Specifies whether MIDI messages are received for each part of this
piano, and the receive channel for each part.
J Accomp MIDI Out (Accompaniment MIDI Out)
Turn on this parameter when you want sound auto
accompaniment on an external devices sound source.
On
Outputs auto accompaniment as MIDI messages through
the piano’s MIDI OUT terminal.
Off
Does not output auto accompaniment.
E-79
E-79
E-79
E-79
E-79
E-79
E-80
E-68
426-E-070A
Page 71

PL40NE01-1.book 69 ページ 2002年7月23日 火曜日 午後6時52分
J Device ID
A device ID is a number used by system exclusive messages
to tell one device from another. When you specify a device ID
for this piano, it recognizes (receives) only system exclusive
messages that include the same device ID number.
You should assign device IDs when you are using an external
synthesizer to control multiple PL-40R units. Doing so makes
it possible to send a system exclusive message to a specific PL40R unit.
Connecting to a Computer
Using MIDI
You can use the digital piano’s USB terminal to connect to a
computer.
Using the USB Port
Note that you need to purchase a commercially available USB
cable to connect the digital piano to a computer using the USB
port. Once you establish a USB connection between the digital
piano and a computer, you can exchange data between them.
To connect to a computer using the USB
port
1. On the computer to which you plan to connect,
install the USB driver that comes on the CDROM that comes bundled with the digital piano.
For information about installing the driver,
navigate to one of the language directories
located in the root directory of the bundled “PL40R USB Manual and Driver CD-ROM”, and read
the contents of the “readme.txt” file.
2. Use a commercially available USB cable to
connect the digital piano to the computer.
Computer USB port
1
2 USB cable
3 USB connector
4 Digital piano USB port
USB Mode and MIDI Mode
Your digital piano has two data communication modes: a
USB Mode and a MIDI Mode.
The MIDI Mode is used when sending and receiving data
over the PL-40R’s MIDI terminals.
The USB Mode is used when sending and receiving data over
the PL-40R’s USB port. In the USB Mode, the digital piano’s
MIDI IN/OUT terminals can be used for MIDI transfer of data
from a computer. They cannot be used to send data from the
digital piano.
The MIDI (USB) function is disabled during demo tune
play, in the Music Library Mode (while Music Library
Mode lamp is lit), and while the keyboard is lit due to
Demo2 (power on alert) operation.
426-E-071A
E-69
Page 72

PL40NE01-1.book 70 ページ 2002年7月23日 火曜日 午後6時52分
Using MIDI
USB Mode/MIDI Mode Switching
The digital piano enters the USB mode automatically
whenever a connection is established between the digital
piano and the USB driver running on a connected computer.
Any other time (when there is no USB connection between the
digital piano and a computer), the digital piano is in the MIDI
Mode.
USB Mode
MIDI Mode
If you connect to a computer via the USB port before
turning on power, the initial screen displays “USB” for
about one second when you turn on power.
The “USB” indicator appears for about one second to
indicate the USB Mode whenever you connect to a
computer via the USB port.
“MIDI” is displayed for about one second to indicate the
MIDI Mode whenever you disconnect the USB cable from
the digital piano.
Obtaining USB Driver
Upgrades and the Latest
PL-40R Information
J CASIO MUSIC SITE
The CASIO MUSIC SITE is an Internet site where you can
download the most update version of the USB driver, and
find out the latest news and important announcements about
the PL-40R. It is recommended that you occasionally visit the
CASIO MUSIC SITE to keep up to date about the PL-40R.
∗ CASIO MUSIC SITE
http://music.casio.com/
1. Go to the above URL.
2. Select a region or country.
3. Select the PL-40R service you want.
Note that the service you should use depends on
the area or country.
E-70
426-E-072A
Page 73

PL40NE01-1.book 71 ページ 2002年7月23日 火曜日 午後6時52分
Keyboard Settings
Keyboard Settings
1 Selector dial 2 []/[] 3 ENTER/YES
4 FUNCTION 5 [+]/[–] 6 EXIT/NO
This section provides details of all the settings you can make on this piano.
Using the Keyboard Setup Menus
Setting Types
The table below shows the parameters whose settings you can change.
Setting/Menu Description Page
Tune Fine adjustment of overall piano tuning E-31, 73
Sound Brilliance and equalizer settings E-75
Lesson Specifies settings related to Music Library play and lessons. E-75
General
Display Display brightness, language, etc. E-76
Pedal Assignment of effects to pedals, and effect settings E-77
Accomp Settings for auto accompaniment E-78
MIDI MIDI settings E-79
MIDI Transmit Channel
(MIDI Tx Ch)
MIDI Receive Channel
(MIDI Rx Ch)
Touch response, metronome volume, memory back up, and other
general settings
MIDI send channel setting
MIDI receive channel setting
E-76
E-79
E-80
System Piano master volume, effect adjustments, etc. E-80
Initialize
426-E-073A
Reset operations to initialize all settings to initial factory defaults or to
reset specific settings
E-81
E-71
Page 74

PL40NE01-1.book 72 ページ 2002年7月23日 火曜日 午後6時52分
Keyboard Settings
To use the keyboard setup menus
1. Press the FUNCTION button.
2. While a main menu screen is on the display, use the [ ] and [ ] buttons to display the main menu item
whose settings you want to configure.
3. Press ENTER/YES to display the sub menu of the displayed main menu item.
4. Use the [ ] and [ ] buttons to display the sub menu item you want.
Keyboard Settings Main Menus and Sub Menus
Text inside the boxes above show what appears on the digital piano’s display.
E-72
426-E-074A
Page 75

PL40NE01-1.book 73 ページ 2002年7月23日 火曜日 午後6時52分
Keyboard Settings
5. Use [+] and [–] or the selector dial to change the setting.
Settings you make are applied even if you do not press the ENTER/YES button.
Pressing [+] and [–] at the same time returns the display value to its initial default.
See the following section titled “Parameter Setting Items” for details on each setting.
6. After making the settings you want, press the FUNCTION button or EXIT/NO button to clear the setting screen.
Parameter Setting Items
See the “Parameter List” at the back of this manual for initial default settings (page A-17).
Setting: Tune
Main Menu Sub Menu Settings Description
Tune Master Tune
(Master)
Baroque Pitch
(Baroque)
Stretch Tune
(Stretch)
Temperament Type
(Temp Type)
415.3 Hz ~ 466.2 Hz Specifies the frequency of A4. The initial default setting is
On (A4=415.3Hz),
Off
On, Off Selecting Off disables the piano tone tuning curve (higher
Equal Temperament
(Equal)
Just Major
Intonation (JustMaj)
A
4=440.0Hz. See “Tuning the Piano” on page E-31 for
more information.
Turning on Baroque Pitch automatically changes the
tuning of the keyboard to Baroque era standard pitch,
which is about a semitone lower than modern pitch. The
initial default setting is Off.
high range, lower low range). The initial default setting is
On.
The tuning curve is not suitable for classical tuning.
Specifying classical tuning as the temperament type
causes the Stretch Tune setting to return to Off
automatically. Even when Stretch Tune is turned on, the
tuning curve is not applied to non-piano tones.
Besides the normally used Equal Temperament, you can
select from among six other classical temperaments. The
initial default setting is Equal Temperament (Equal).
The octave is divided into 12 equal parts and assigned to
white and black keys. This is the tuning normally used for
today’s keyboard musical instruments.
Historically, this temperament came into being with the
development of triads. Within a single tonality (major
key), essential major triads produce perfectly
harmonious, beautiful sound. Just Major Intonation also,
however, includes dissonant intervals, and its weakness
is a lack of modulation freedom, etc.
426-E-075A
E-73
Page 76

PL40NE01-1.book 74 ページ 2002年7月23日 火曜日 午後6時52分
Keyboard Settings
Main Menu Sub Menu Settings Description
Temperament Root
(Temp Root)
Just Minor
Intonation (JustMin)
Pythagorean System
(Pythago)
Mean – Tone System
(Mean)
Werckmeister
(Werck)
Kirnberger (Kirnber) This is also a type of unequal temperament, which is also
C, C#, D, Eb, E, F, F#,
G, Ab, A, Bb, B
This temperament arranges just major intonation to
provide perfect harmony within a single tonality (minor
key). Within the 12 notes, 11 of the notes are the same
pitch as just major intonation.
This temperament, which uses a 12-note octave, is
thought to be the oldest. Of the 12 types of perfect fifths
that can be played, 11 are in perfect harmony. Thirds are
unharmonious and dissonant, and are appropriate for
melody play.
This highly practical temperament provides many of the
merits (beautiful triads) of just intonation, plus
mo dul ati on c apabi lit ies . It was used a s a k eyb oar d tu ning
method for a long period following the Renaissance.
This is a kind of unequal temperament that allows play of
all tonality. It is believed that Bach’s “The Well-Tempered
Clavier” was written using this temperament. Using a
root of C makes the dominant tonality of the white keys
close to mean-tone, and the dominant tonality of the
black keys close to Pythagorean System.
similar to the Werckmeister tuning described above. The
chromatic differential of the white key dominant tonality
and black key dominant tonality is more pronounced.
Specifies the root of a temperament. The initial default
setting is C. Selecting a different root for equal
temperament does not make a difference in the sound,
but a difference can be noted with classical
temperaments. For classical temperaments other than
Werckmeister and Kirnberger, specify the tonality
keynote of the piece you are playing when using a
classical temperament.
E-74
426-E-076A
Page 77

PL40NE01-1.book 75 ページ 2002年7月23日 火曜日 午後6時52分
Keyboard Settings
Setting: Sound
Main Menu Sub Menu Settings Description
Sound Brilliance –12 to 0 to 12 Controls the brilliance of the tone. A negative value
produces a softer are tone, while a positive value
produces a harder tone.
Equalizer : Speaker 1, 2, 3 Adjusts speaker sound quality in accordance with the
location of the speakers. This setting is not applied to
headphone output.
1 : Bright sound
Recommened when the digital piano is located away
from walls, in front of a curtain, etc.
2 : Normal sound
Recommended when the digital piano is located in front
of a covered wall or other surface that absorbs sound, and
when the audience is located in back of the digital piano.
3 : Soft sound
Recommened when the digital piano is located in front of
a wall or other hard surface that reflects sound.
Setting: Lesson
Main Menu Sub Menu Settings Description
Lesson Speak English (Eng),
Japanese (Jpn), Off
Repeat On, Off Turns loop play on and off.
Pre Count On, Off Switches the count that sounds before accompaniments
Controls voice fingering guide.
or lessons on and off.
426-E-077A
E-75
Page 78

PL40NE01-1.book 76 ページ 2002年7月23日 火曜日 午後6時52分
Keyboard Settings
Setting: General
Main Menu Sub Menu Settings Description
General Touch Light Relatively light touch
Normal Normal touch response
Heavy Relatively heavy touch required to increase sound
Off Touch response off. Sound output not affected by
Metronome Volume
(MetroVol)
Memory Back Up
(Back Up)
Demo 2 On, Off Turns the power on alert feature on and off.
000 to 127 Specifies metronome volume. Also controls voice
On, Off Specifies whether settings should be backed up when the
volume.
pressure applied to the keyboard.
fingering guide volume.
piano is turned off. See the “Parameter List” at the back
of this manual for information about what items are
backed up (page A-17).
Setting: Display
Main Menu Sub Menu Settings Description
Display Contrast 0 to 127 Adjusts screen brightness.
Display Hold (Hold) On, Off Turning on this item leaves the current screen on the
display without auto return to the main display.
Language English (Eng),
Japanese (Jpn)
Specifies Japanese or English as the display language.
E-76
426-E-078A
Page 79

PL40NE01-1.book 77 ページ 2002年7月23日 火曜日 午後6時52分
Setting: Pedal
Main Menu Sub Menu Settings Description
Keyboard Settings
Pedal Assign Left
(Assign L)
Sustain Length
(Sus Length)
Specifies the function of the pedal connected to the SOFT/SOSTENUTO jack.
Soft Soft pedal
Sostenuto Sostenuto pedal
Fill-In Pedal performs same function as the FILL-IN button.
Break Pedal performs same function as the BREAK button.
Synchro Pedal performs same function as the SYNCHRO START/
Auto Harmonize
(AutoHarmo)
On Bass Chord
(OnBassChord)
Chord Judge
Available
(ChordJudge)
DSP Pedal toggles DSP on and off.
1 to 63, Hold This setting specifies how long the volume of the sound
STOP button.
Pedal applies “Auto Harmonize”.
Pedal toggles on bass on and off. See page E-78 for more
information about “On Bass Chord”.
Makes chord judge available in the FULL RANGE
CHORD mode, only while the pedal is depressed.
This feature makes it possible to momentarily turn FULL
RANGE CHORD on and off as required.
is sustained while the damper pedal is depressed. Hold is
the maximum sustain time, and with an organ type tone
the sound continues as long as the damper pedal is
depressed. A value specifies the sustain time, with
sustain being maintained longer as the value becomes
greater.
426-E-079A
E-77
Page 80

PL40NE01-1.book 78 ページ 2002年7月23日 火曜日 午後6時52分
Keyboard Settings
Setting: Accomp
Main Menu Sub Menu Settings Description
Accomp Chord Hold
(Hold Chord)
Lower Hold
(Hold Lower)
Mixer Hold
(Hold Mixer)
On Bass Chord
(Chord OnBass)
Tension Chord
(Chord Tension)
6th Chord
(Chord 6th)
On, Off Specifies whether auto accompaniment chords should
continue to play after the keys in the accompaniment
keyboard range are released. On causes auto
accompaniment chords to continue, while Off causes
chords to stop, but rhythm continues.
On, Off Specifies whether the lower parts (Lower1, Lower2)
should continue (On) to play or stop (Off) during auto
accompaniment after keys are released. On adds more
depth to accompaniments.
On, Off Specifies whether accompaniment part mixer settings
should be retained. Off causes settings assigned to each
rhythm to be applied each time a rhythm is selected. On
saves mixer settings to be retained, even when you
change to another rhythm.*
1
On, Off Specifies whether the lowest note you play when using
an inverted fingering of a chord in the accompaniment
keyboard range during auto accompaniment should be
interpreted as a bass note. On causes the lowest note of an
inverted form chord to be interpreted as a bass note,
while Off causes the inverted form chord to sound
normally.*
2
On, Off Enables and disables recognition of tension chords
during auto accompaniment play. On enables
recognition, while Off disables recognition.
On, Off Enables and disables recognition of 6th and m6th
fingerings during auto accompaniment play. On enables
recognition, while Off disables recognition.*
3
*1. Rhythm elements are preset with optimum default mixer settings, which are normally applied automatically when you use
auto accompaniment. Turning on “Mixer Hold” uses your settings instead of the preset defaults.
*2. This setting is mainly used with the FINGERED auto accompaniment mode, and it helps to turn it on when you want to play
“on bass chords” within the relatively limited accompaniment keyboard range. You can leave this setting off if you are playing
both the bass note and the other notes of the chord in the accompaniment keyboard range. Even when “On Bass Chord” is
turned off, a chord in the accompaniment keyboard range with a fingering that separates the lowest note and the next lowest
note by five tones or more is always interpreted as an “on bass chord” whose root is the lowest note.
*3. Examples
Off: Interpreted as Am
7
On: Interpreted as C6
E-78
426-E-080A
Page 81

PL40NE01-1.book 79 ページ 2002年7月23日 火曜日 午後6時52分
Setting: MIDI
Main Menu Sub Menu Settings Description
Keyboard Settings
MIDI Navigate Channel R
(Navi. Ch R PART)
Navigate Channel L
(Navi. Ch L PART)
Accomp MIDI Out
(Accomp MidiOut)
MIDI In Chord
Judge
(MidiIn ChordJdg)
Real Time Message
Out
(RealTim Message)
Device ID 1 to 32 Specifies the MIDI device ID for this piano.
Local Control On, Off Specifies whether or not this piano should sound each
MIDI Transmit
Channel
(MIDI Tx Ch)
Group A, B, Off Specifies whether this piano’s Group A part or Group B
1 to 16, Off Specifies the MIDI channel whose Note On message data
lights keyboard keys for the right hand part.
1 to 16, Off Specifies the MIDI channel whose Note On message data
lights keyboard keys for the left hand part.
On, Off Specifies whether this piano’s accompaniment is sent as
MIDI messages.*
On, Off Specifies whether accompaniment range MIDI Note On
messages received from an external device should be
interpreted as auto accompaniment chords.
On, Off Specifies whether real-time messages (FA, FC, F8) should
be output.
part in accordance with the piano’s local control settings.
part accompaniment should be sent as MIDI channel
messages, or whether neither should be sent. When
Group A is specified, you can specify send channels for
each of the Group A parts (Upper1 to Chord5) noted
below. When Group B is specified, you can specify send
channels for each of the Group B parts (Part1 to 16) noted
below.
426-E-081A
Group A Upper1 1 to 16, Off Specifies whether MIDI messages are sent for Group A
Upper2 1 to 16, Off
Lower1 1 to 16, Off
Lower2 1 to 16, Off
Harmo1 1 to 16, Off
Harmo2 1 to 16, Off
Percussion (Perc.) 1 to 16, Off
Drum 1 to 16, Off
Bass 1 to 16, Off
Chord1 1 to 16, Off
Chord2 1 to 16, Off
Chord3 1 to 16, Off
Chord4 1 to 16, Off
parts of this piano, and the send channel for Group A
parts.
E-79
Page 82

PL40NE01-1.book 80 ページ 2002年7月23日 火曜日 午後6時52分
Keyboard Settings
Main Menu Sub Menu Settings Description
Chord5 1 to 16, Off
Group B Part1 1 to 16, Off
∼
Part16 1 to 16, Off
″
MIDI Receive
Channel
(MIDI Rx Ch)
* Whenever you turn on Accomp MIDI Out, the MIDI Tx setting becomes Group A and a message appears asking if you want to
make the settings (initial defaults, etc.) required for each part.
Part1 1 to 16, Off Specifies whether MIDI messages are received for Group
∼
Part16 1 to 16, Off
″
B parts of this piano, and the receive channel for Group B
parts.
Setting: System
Main Menu Sub Menu Settings Description
System DSP Volume 0 to 127 Adjusts the volume of the part to which effect DSP is
being applied. This volume setting is multiplied by the
mixer Volume setting.
DSP Pan – 64 to 63 Adjusts the pan (stereo position) of the part to which
effect DSP is being applied.
DSP Reverb Send
(DSP RevSend)
DSP Chorus Send
(DSP ChoSend)
0 to 127 Adjusts the reverb send of the part to which effect DSP is
being applied. The mixer Mode reverb send setting is
disabled.
0 to 127 Adjusts the chorus send of the part to which effect DSP is
being applied. The mixer Mode chorus send setting is
disabled.
E-80
Total Master
Volume
(Total M.Volume)
Total Master Pan
(Total M.Pan)
0 to 127 Adjusts overall piano volume.
–64 to 63 Adjusts overall piano pan (stereo position).
426-E-082A
Page 83

PL40NE01-1.book 81 ページ 2002年7月23日 火曜日 午後6時52分
Setting: Initialize
Main Menu Sub Menu Description
Initialize Group B Initializes Group B parts when MIDI IN is used.
Parameter All Returns all parameters to their initial default settings.
Keyboard Settings
All Returns the piano to its initial factory defaults. Deletes all data, including
sequencer data.
426-E-083A
E-81
Page 84

PL40NE01-1.book 82 ページ 2002年7月23日 火曜日 午後6時52分
426-E-084A
Page 85

PL40NE01-1.book 83 ページ 2002年7月23日 火曜日 午後6時52分
426-E-085A
Page 86

PL40NE01-1.book 84 ページ 2002年7月23日 火曜日 午後6時52分
Troubleshooting
Troubleshooting
Problem Possible Cause Action See page
No sound when keyboard keys
are pressed.
Auto accompaniment does not
sound.
1. Power cord is not connected
correctly.
2. Power is not turned on.
3. MAIN VOLUME knob setting is
too low.
4. Playing in the accompaniment
keyboard range while the
accompaniment mode is CASIO
CHORD or FINGERED.
5. “Local Control” is off.
6. The melody part is off.
7. The melody part volume setting
is too low.
8. MIDI IN command has lowered
the master volume setting.
9. “DSP Volume” setting is too low.
1. ACCOMP/SONG VOLUME knob
setting is too low.
2. Auto accompaniment parts are
turned off.
3. The volume settings of the auto
accompaniment parts are too low.
1. Check to make sure the power
cord is connected correctly.
2. Press the POWER button to turn
on power.
3. Use the MAIN VOLUME knob to
increase volume.
4. Auto accompaniment is turned
off, which is indicated when none
of the accompaniment mode
indicators are lit.
5. Turn on “Local Control”.
6. Use the mixer to turn on the
melody part.
7. Use the mixer to increase the
volume setting for the melody
part.
8. Use “System” to raise the “Total
M.Volume” setting.
9. Use “System” to raise the “DSP
Volume” setting.
1. Use the ACCOMP/SONG
VOLUME knob to increase the
volume.
2. Use the mixer to turn on the auto
accompaniment parts.
3. Use the mixer to increase the
volume settings of the applicable
parts.
Page E-14
Page E-18
Page E-18
Page E-23
Page E-79
Page E-47
Page E-47
Page E-80
Page E-80
Page E-26
Page E-47
Page E-47
Sound output does not change
when key pressure is varied.
No sound produced by demo
tune play.
Memory contents deleted. Lithium battery is dead. Contact your CASIO Service Provider
Nothing happens when the
LAYER or SPLIT button is
pressed.
Some parts don’t play at all
during sequencer playback.
Touch response is turned off. Use the FUNCTION button to select a
touch curve.
1. MAIN VOLUME knob set to
MIN.
2. Headphones connected to the
piano.
1. Upper2, Lower1, or Lower2 is off.
2. Upper2, Lower1, or Lower2
volume is too low.
1. Mixer Mode part on/off setting is
off.
2. Mixer Mode part volume setting
is 0.
3. Song volume setting is too low.
4. “DSP Volume” setting is too low.
1. Move MAIN VOLUME knob
more towards the MAX side.
2. Disconnect the headphones from
the piano.
for replacement of the lithium battery.
1. Use the mixer Mode to turn on the
part on/off setting.
2. Use the mixer Mode to raise the
part volume.
1. Use the mixer to make sure that
parts are turned on.
2. Use the mixer to check the
volume setting.
3. Use the ACCOMP/SONG
VOLUME knob to raise the song
volume.
4. Use “System” to raise the “DSP
Volume” setting.
E-84
Page E-32
Page E-18
Page E-16
Page E-90
Page E-47
Page E-47
Page E-47
Page E-47
Page E-26
Page E-80
426-E-086A
Page 87

PL40NE01-1.book 85 ページ 2002年7月23日 火曜日 午後6時52分
Problem Possible Cause Action See page
Troubleshooting
Some parts stop playing at some
point during sequencer
playback.
Cannot record auto
accompaniment rhythm.
No sound is produced when
playing MIDI data from a
computer.
Playing on the keyboard
produces strange sound when
connected to a computer.
Cannot record data played on
the piano to a computer.
Playback exceeds the maximum
polyphony of the piano.
Trying to record auto accompaniment
to a non-system track (non-system
tracks: Tracks 1 to 16).
1. MIDI cables are not connected
properly.
2. The part is turned off or its
volume setting is too low.
3. Receive channels are turned off.
4. MIDI IN command has lowered
the master volume setting.
5. The USB cable is not connected
properly.
The computer’s MIDI THRU function
is turned on.
1. “Accomp MIDI Out” is turned
off.
2. Receive channels are turned off.
3. The USB cable is not connected
properly.
4. “Real Time Message Out” is
turned off.
Use the mixer Mode to turn off some
tracks (parts) to reduce the number of
playback tracks.
Select the system track and try
recording auto accompaniment again.
1. Connect MIDI cables properly.
2. Use the mixer to turn on the part
or increase its volume.
3. Specify the channel using the
receive channel setting.
4. Use “System” to raise the “Total
M.Volume” setting.
5. Check to make sure the USB cable
is connected properly.
Turn off the computer’s MIDI THRU
function or turn off “Local Control” on
the piano.
1. Turn on “Accomp MIDI Out”.
2. Specify the channel using the
receive channel setting.
3. Check to make sure the USB cable
is connected properly.
4. Turn on “Real Time Message
Out”.
Page E-47
Page E-57
Page E-66
Page E-47
Page E-80
Page E-80
Page E-69
Page E-79
Page E-79
Page E-80
Page E-69
Page E-79
Piano cannot receive exclusive
messages over MIDI IN.
No sound from the left speaker
or right speaker.
DSP effects are not applied even
when they are turned on.
The mixer Mode pan effect is
not being applied.
Auto harmonize effect does not
work.
426-E-087A
The exclusive message device ID does
not match the piano’s device ID.
1. The mixer pan setting is at either
extreme.
2. MIDI IN command has shifted
master pan to either side.
3. DSP Pan setting is shifted to
either side.
1. The mixer DSP setting is turned
off for the part to which you are
trying to apply an effect.
2. The mixer reverb send and chorus
send settings are 0.
3. DSP reverb send and chorus send
are 0.
DSP is turned on for the part. Change the DSP pan setting. Page E-48
The current accompaniment mode is
normal or FULL RANGE CHORD.
Make sure the exclusive message
device ID matches the piano’s device
ID.
1. Check the mixer pan setting.
2. Use “System” to adjust the “Total
M.Pan” setting.
3. Use “System” to adjust the “DSP
Pan” setting.
1. Turn on the mixer DSP setting.
2. Use the mixer to change the
reverb send and chorus send
settings.
3. Change the DSP reverb send and
chorus send setting.
Change the accompaniment mode to
CASIO CHORD or FINGERED.
Page E-79
Page E-48
Page E-80
Page E-80
Page E-48
Page E-48
Page E-48
Page E-23
E-85
Page 88

PL40NE01-1.book 86 ページ 2002年7月23日 火曜日 午後6時52分
Troubleshooting
Problem Possible Cause Action See page
Keyboard keys do not light. Key Lighting is turned off. Turn on Key Lighting. Page E-21
Keyboard keys do not light
during sequencer playback.
Keyboard keys do not light
during MIDI data play.
No sound when playing back
from the Music Library.
1. The selected track does not have
any data recorded in it.
2. Key Lighting is turned off.
1. The data channel and navigate
channel are different.
2. Key Lighting is turned off.
Song volume setting is too low. Use the ACCOMP/SONG VOLUME
1. Select the track that contains the
data you want to control the key
lighting.
2. Turn on Key Lighting.
1. Make the tune’s channel whose
notes you want to light the same
as the navigate channel.
2. Turn on Key Lighting.
knob to raise the song volume.
Page E-60
Page E-21
Page E-79
Page E-21
Page E-26
E-86
426-E-088A
Page 89

PL40NE01-1.book 87 ページ 2002年7月23日 火曜日 午後6時52分
Specifications
Specifications
Models: PL-40R
Keyboard
Type: Piano
Number of Keys: 88 (A0 to C8)
Touch Response: Three sensitivity levels; on/off
Key Light System: Can be turned on and off
Key Lighting Polyphony: 10
Tones
Number of Tones: 271 (63 panel tones + 128 GM tones + 70 variation tones + 10 drum sounds)
Maximum Polyphony: 64
Layering: on/off
Split: on/off (variable split point)
Effects
Number of Effects: {
Type: 3-channel
Other: DSP settings (volume, pan, reverb send, chorus send)
Metronome
Time Signatures: 0, 2/4 to 7/4, 9/4, 12/4, 3/8, 5/8, 6/8, 7/8, 9/8, 12/8
Tempo Range: 30 to 255
Metronome Volume: 0 to 127
Auto Accompaniment
Number of Rhythms: 100
Number of Rhythm Sound
Sources:
Tempo Range: 30 to 255
Controllers: INTRO, FILL-IN, BREAK, VARIATION 1/2, SYNCHRO START/STOP, ENDING,
Modes: Normal; CASIO CHORD; FINGERED; FULL RANGE CHORD
Parts: Drum; Percussion; Bass; Chord 1 to Chord 5
Accompaniment/Song Volume: Adjustable
Accomp Settings: Chord Hold on/off, Lower Hold on/off, Mixer Hold on/off, On Bass Chord on/off,
Auto Harmonize: 12 types; adds harmony notes to melody in accordance with auto accompaniment
One Touch Presets
Number of Presets: 100 (1 set per rhythm)
Setting Data: Tone, tempo, other
Reverb (8 types) + Chorus (8 types) + DSP (16 types)
65
START/STOP
Tension Chord on/off, 6th Chord on/off
chord fingerings.
426-E-089A
E-87
Page 90

PL40NE01-1.book 88 ページ 2002年7月23日 火曜日 午後6時52分
Specifications
Mixer
Number of Channels: 30 (Group A: 14, Group B: 16)
Parameters: Tone, part on/off, volume, pan, effect send, fine tune, coarse tune
Sequencer
Number of Songs: 10
Number of Tracks: System Track + 16 Tracks
Type: Real-time recording
Capacity: 15,500 notes
Editing: Punch-in
Other Functions: Quantize, delete, time signature, metronome on/off
Music Library
Number of Tunes: 70 preset
Arrangement Levels: 3
Tempo: 30 to 255
Controller: Stop, Play/Pause, Fast Reverse/Back, Fast Forward/Next, Phrase Repeat
Repeat Function: Phrase repeat, section repeat
Demo: 70 preset songs, group repeat playback
Lesson Function
Step Lesson: 3-Step Lesson
Lesson Part: Left hand, right hand, both hands
Voice Fingering Guide: Selectable language (English, Japanese), on/off
Other: Repeat on/off, pre-count on/off
Other
Transpose: ±12 semitones, 25 steps
Master Tuning: A4 = 415.3Hz to 440.0Hz to 466.2Hz (Initial Default: 440.0Hz)
Sound: Brilliance, equalizer (for speaker, 3 types)
Baroque Pitch: on/off
Stretch Tune: on/off
Temperament Settings: 7 types (equal temperament, just major intonation, just minor intonation, Pythagorean
System: Total (master) volume, total (master) pan
Display
Backlight: Equipped
Contrast: Adjustable
Other: Selectable language (English, Japanese), Hold on/off
Unit: 0.1Hz 510 levels
system, mean-tone system, Werckmeister, Kirnberger); selectable root
E-88
426-E-090A
Page 91

PL40NE01-1.book 89 ページ 2002年7月23日 火曜日 午後6時52分
MIDI
System: 16-channel multi-timbre receive; GM Level 1 compliant
Setting: GM ON command
Rx/Tx channel setting; navigate channel setting
MIDI In-chord Judge on/off
Local on/off, realtime message on/off, device ID
Accomp MIDI out on/off
Pedals Damper; sostenuto/soft (selectable)
Input/Output:
Headphones: Stereo mini jacks × 2
Pedal: Standard jacks × 2
LINE OUT (R, L/MONO): Standard jacks × 2
Output Impedance; 2.3KΩ
Output Voltage; 1.8V (RMS) MAX
Power: 15V DC
MIDI (OUT) (IN)
USB Port
Speakers: (16cm × 8cm) × 2 (Output: 7.0W + 7.0W)
Power Supply: AC Adaptor: AD-15ML
Power Consumption: 15V 39W
Dimensions: 129.8 × 34.2 × 13.9cm (51 1/8 × 13 1/2 × 5 1/2 inch)
Weight: Approximately 22.0kg (48.5lbs)
Specifications
Design and specifications are subject to change without notice.
Use a commercially available USB cable.
426-E-091A
E-89
Page 92

PL40NE01-1.book 90 ページ 2002年7月23日 火曜日 午後6時52分
Operational Precautions
Operational Precautions
Locating the Unit
Avoid the following locations.
Areas exposed to direct sunlight and high temperature.
Areas subjected to very low temperatures.
Near a radio, TV, video deck, or tuner (unit can cause interference with audio or video signals).
Care of the Unit
Never use benzene, alcohol, thinner or other such chemicals to clean the exterior of the unit.
To clean the keyboard, use a soft cloth dampened with a weak solution of a mild neutral detergent and water. Wring out all
excess moisture from the cloth before wiping.
Severe impact can cause problems.
When transporting the piano, use soft cloth to pack around the keyboard and buttons to protect them against damage.
Never try to repair or modify any part of the piano.
Any attempt to repair or modify the piano can cause problems with operation.
Avoid using this piano near televisions, radios, etc.
Because this piano uses digital circuitry, it may cause interference with other electronic devices such as televisions, radios, etc.
In case of a problem, check that buttons and connections are correct, as indicated in this manual. If the piano still does not work
properly, contact your retailer or a nearby dealer. Never try to repair the piano yourself.
Lithium Battery
This unit is equipped with a lithium battery to provide power needed to retain memory contents while unit power is turned off.
Should the lithium battery go dead, all memory contents will be lost whenever you turn unit power off. The normal life of the
lithium battery is five years from the time that the battery was installed. Be sure to periodically contact your retailer or authorized
service provider to have the lithium battery replaced. Note that you will be charged separately for lithium battery replacement.
* Note that CASIO COMPUTER CO., LTD. shall not be held liable for any damages or losses or any claims by third parties arising
from corruption or loss of data caused by malfunction or repair of the unit, or from battery replacement.
You may notice lines in the finish of the case of this piano. These lines are the result of the molding process used to shape the
plastic of the case. They are not cracks or breaks in the plastic, and are no cause for concern.
Unauthorized reproduction of this manual in its entirety or in part is expressly forbidden. All rights reserved.
CASIO COMPUTER CO., LTD. shall not be held liable for any damages or losses or any claims by third parties arising from use of
this product or this manual.
The contents of this manual are subject to change without notice.
E-90
426-E-092A
Page 93

PL40NE01-1.book 1 ページ 2002年7月23日 火曜日 午後6時52分
Appendix
Tone List
Appendix
426-E-093A
A-1
Page 94

PL40NE01-1.book 2 ページ 2002年7月23日 火曜日 午後6時52分
Appendix
A-2
426-E-094A
Page 95

PL40NE01-1.book 3 ページ 2002年7月23日 火曜日 午後6時52分
Appendix
426-E-095A
A-3
Page 96

PL40NE01-1.book 4 ページ 2002年7月23日 火曜日 午後6時52分
Appendix
A-4
426-E-096A
Page 97

PL40NE01-1.book 5 ページ 2002年7月23日 火曜日 午後6時52分
Appendix
426-E-097A
A-5
Page 98

PL40NE01-1.book 6 ページ 2002年7月23日 火曜日 午後6時52分
Appendix
A-6
426-E-098A
Page 99

main19.fm 7 ページ 2002年7月30日 火曜日 午後3時27分
Drum Assignment List
Appendix
426-E-099A
A-7
Page 100

main19.fm 8 ページ 2002年7月30日 火曜日 午後3時27分
Appendix
A-8
426-E-100A
 Loading...