

Page 1
〒
151-8543
東京都渋谷区本町
1-6-2
CASIO COMPUTER CO., LTD.
CASIO Europe GmbH
Bornbarch 10,
D-22848 Norderstedt, Germany
6-2, Hon-machi 1-chome
再生紙を使用しております。
PN410410-002 PrintedinJapan MO0609-XXXX02A
Shibuya-ku, Tokyo 151-8543, Japan
Page 2
トリガーグリップ(HA-D51TG)取扱説明書
・本書はお読みになった後も大切に保管してください。
・本書はトリガーグリップの取り付け方のみ記載してあります。
・安全上のご注意については、DT-5200の取扱説明書をご覧ください。
J
トリガーグリップ(HA-D51TG)は、DT-5200のオ
プションです。DT-5200に取り付けて、スキャン
操作を行います。
同梱品 • ネジ(4本)
• 取扱説明書(本書)
仕 様
外形寸法
質量 105g
幅85×奥行77.8×高さ127mm
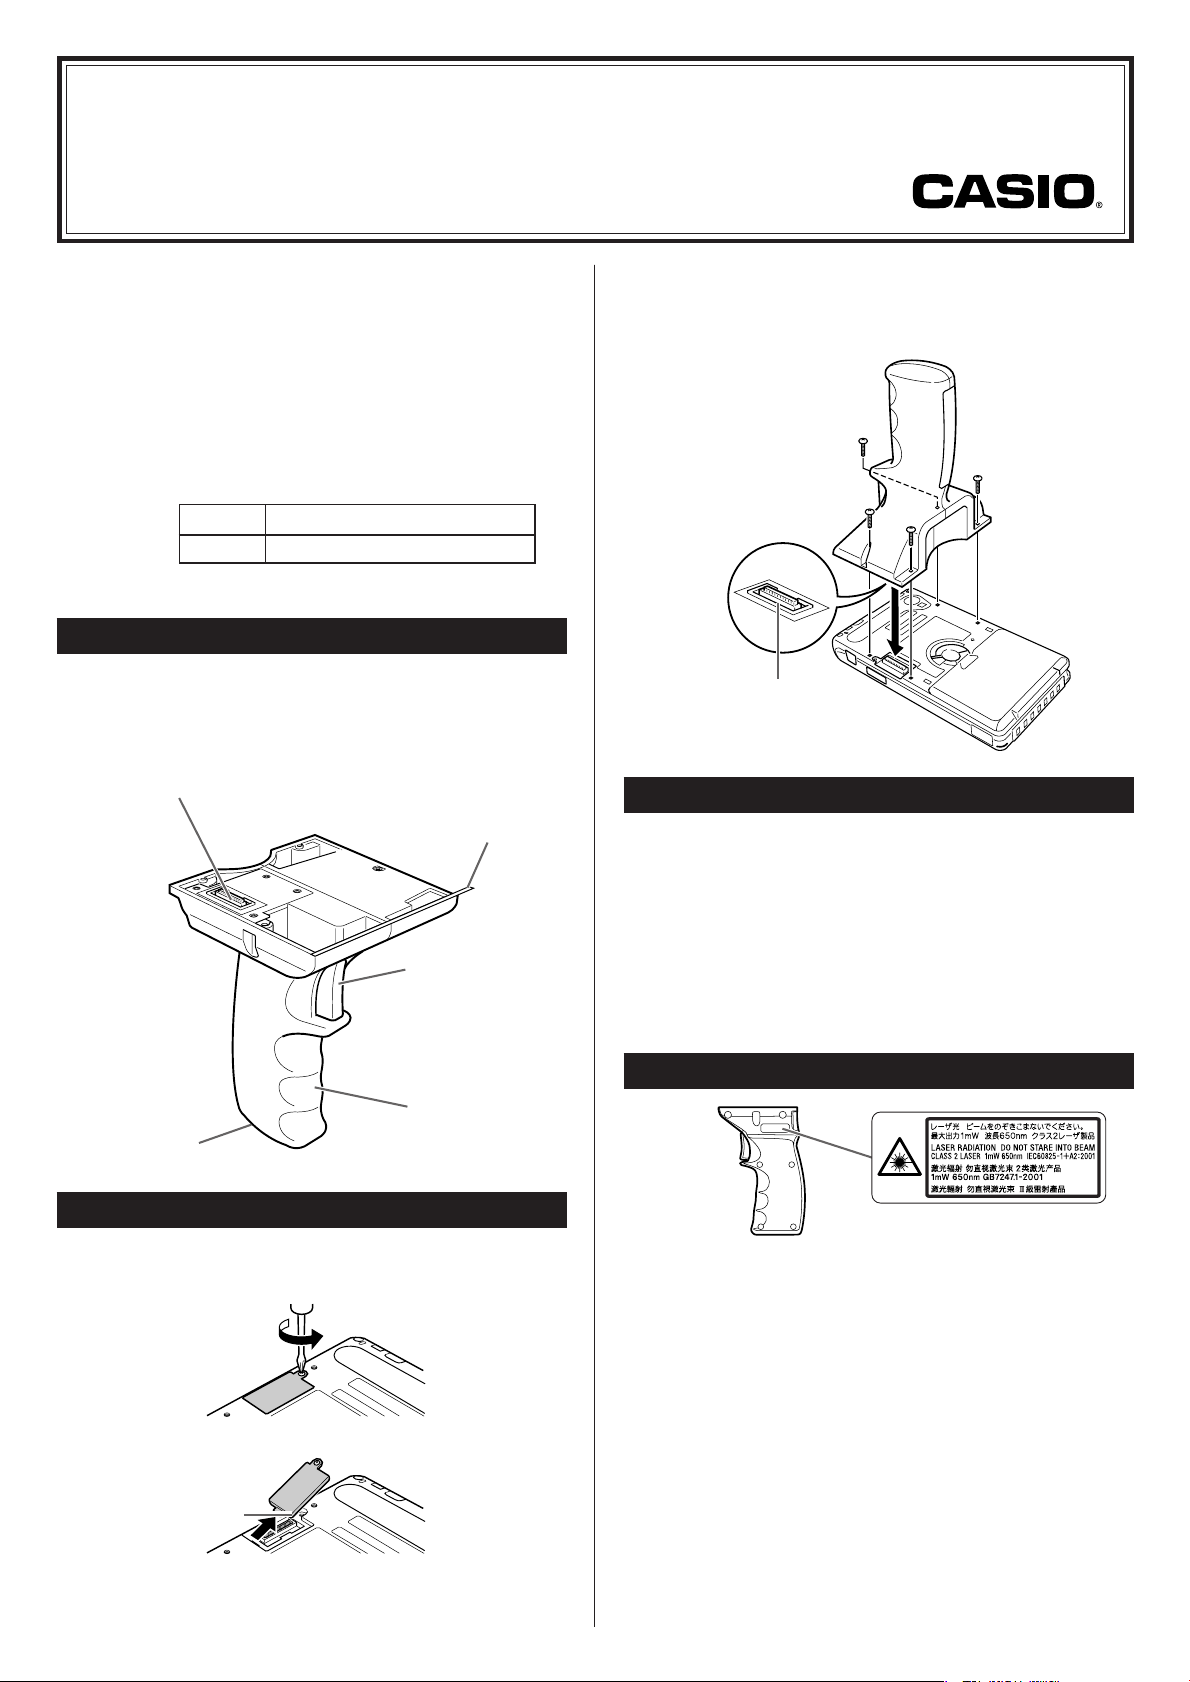
各部の名称とはたらき
本 体
接続コネクタ
DT-5200 のコ
ネクタを接続し
ます。
取付用シール
トリガーグリップに
DT-5200 を固定する
ためのシールです。
(ここから剥離紙をはが
してください。)
トリガーボタン
バーコードをス
キャンするとき
に押します。
2 取付用シールの剥離紙をはがし、接続コネクタ
が合うようまっすぐに取り付けた後、付属のネ
ジで固定します(4ヵ所)。
接続コネクタ
使用上のご注意
・DT-5200の画面に傷がつかないよう注意して取り付けてくだ
さい。また、取り付け後に画面を下にして置かないでくださ
い。画面が損傷する原因となります。
・トリガーグリップはDT-5200を装着した状態で防滴仕様で
す。グリップ部に入った水が水抜き穴より排出されることがあ
りますが、機能には影響ありません。
・一度取り付けたトリガーグリップは外さないでください。取り
外すと、取り付け用シールの粘着力が弱くなります。
グリップ部
水抜き穴
接続のしかた
1 DT-5200の拡張用ポートのカバーを取り外し
ます。
カバー
外したカバーは、なくさないように保管しておいてくださ
い。
警告ラベルについて
・このラベルはJISC6802に準じた、クラス2レーザ製品の警
告、注意ラベルです。
・クラス2レーザ光は瞬間露光ですが、ビーム光を直接のぞき込
むことは、絶対に避けてください。
・DT-5200取扱説明書に規定された内容以外の手順による取り
扱いは危険ですので絶対に行わないでください。
・レーザ光は最大出力1mW未満、波長650nmです。
Page 3

Trigger Grip (HA-D51TG) Instruction
• After reading this instruction, keep it in a safe place for future reference.
• This instruction describes only how to install the Trigger Grip on the IT-600.
• For information on safety precautions, operating precautions, etc., refer to the IT-600 User’s Guide.
E
The HA-D51TG Trigger Grip (hereafter referred to as
“the Grip” in this instruction) is an add-on option
available for the IT-600. Follow the instruction below
to install it.
Accessories
Specifications
• Screws (4 pcs)
• Instruction (this reference guide)
Dimensions
Weight 105 g (3.7 oz)
85 (W) × 77.8 (D) × 127 (H) mm
33/8"W × 31/16"D × 5"H
General Guide
Trigger Grip
1Connector
Plug this connector (male) into the
connector (female) of the expansion port on the back of the IT-600.
See the illustration in step no. 2 of
“Installing the Trigger Grip”.
2Adhesive Tape
Peel off the surface
on the tape before
installing the Grip.
3Trigger Lever
Trigger this lever
to scan bar
codes.
2 Peel off the surface on the adhesive tape. Slowly
descend the Grip straight down to the IT-600
and plug the connector of the expansion port.
Make sure that each screw hole of the Grip is
aligned with that of the IT-600 and then tighten
all the screws.
Connector
Handling Precautions
• While you are installing the Grip on the IT-600, take care not to
scratch or damage the screen. After installing the Grip, do not
place the IT-600 anywhere with the screen facing down as it
may be a cause of damage on the screen.
• The Grip is designed to meet a level of water-splash proof. In
any event if water gets the inside of the Grip, it will drain out
through the drip hole. Thus, the operability of the Grip will not
be affected by the ingress of water.
• The adhesive tape on the Grip may loose its adhesive power if
the Grip is removed from the IT-600.
4Grip
5Drip Hole
Installing the Trigger Grip
1 Remove the expansion port cover on the back of
the IT-600.
Cover
Keep the removed cover in a safe place for use in future.
Warning Label
• This label is a warning and caution label for Class 2 laser
products that comply with IEC60825-1:1993+A1:1997+A2:2001.
• Although Class 2 laser light is only emitted momentarily, never
look directly into the beam light.
• The laser light emitted by this laser scanner has a maximum
output of less than 1 mW and a wavelength of 650 nm.
• Use of controls or adjustments or performance of procedures
other than those specified in the IT-600 series User’s Guide
may result in hazardous radiation exposure.
Page 4

觸發器手柄(HA-D51TG)說明書
∑閱讀本說明書后﹐請妥善保存以備日后參考。
∑本說明書僅說明如何在IT-600上安裝本手柄。
∑關于安全須知﹑操作須知等內容﹐請參閱IT-600的用戶說明書。
C
HA-D51TG觸發器手柄(下文簡稱“手柄”)是用于
IT-600的附加型選購件。請按照以下說明進行安裝。
附 件 • 螺釘(4顆)
• 說明書(本參考指南)
規 格
外形尺寸
重量 105 g
85(寬)× 77.8(深)× 127(高)mm
一般指南
觸發器手柄
1 連接器
將此連接器(陽性)插入 IT-600 背面擴展端口
的連接器(陰性) 。請參閱“安裝觸發器手柄”
步驟 2 中的說明。
2膠帶
安裝手柄之
前﹐請剝下膠
帶的表層。
3 觸發杆
觸動此杆進行條
碼掃描。
2 剝下膠帶的表層。慢慢將手柄筆直下降到IT-600
上﹐插入擴展端口的連接器。務必讓手柄的每個
螺孔與IT-600的螺孔對準﹐然后旋緊所有螺釘。
連接器
使用須知
• 在IT-600上安裝手柄時﹐注意不要劃傷或損壞屏幕。安裝手柄
后﹐請勿將IT-600屏幕向下放置﹐否則可能會造成屏幕的損壞。
• 該手柄的設計達到了防水濺等級。在任何情況下手柄內部進水
時﹐水均會由滴水孔排出。因此﹐手柄的操作性能不會受到進水
的影響。
• 從IT-600上拆下手柄後﹐手柄上的膠帶可能會失去粘性。
5 滴水孔
安裝觸發器手柄
1 拆下IT-600背面上的擴展端口蓋。
擴展端口蓋
請妥善保存拆下的擴展端口蓋以便于日后使用。
警告標籤
4 把手
∑ 該標籤為遵守 IEC60825-1:1993+A1:1997+A2:2001的 2 類激光產品
的警告和注意標籤。
∑ 雖然 2 類激光僅為瞬間發光﹐但切勿直視激光束。
∑ 使用 IT-600 用戶說明書規定之外的控製鍵﹐或調整或進行 IT-600
用戶說明書規定之外的步驟可能會導致輻射暴露的危險。
∑ 該激光掃描儀所發出激光的最大輸出功率低於 1mW﹐波長為
650nm。
 Loading...