

Page 1
DELETING FILES
83
DELETING FILES
You can delete a single file, or you can delete all files
currently in memory.
IMPORTANT!
• Note that file deletion cannot be undone. Once you
delete a file, it is gone. Make sure you really do not
need a file anymore before you delete it. Especially
when deleting all files, make sure you check all the
files you have stored before proceeding.
• A protected file cannot be deleted. To delete a
protected file, unprotect it first (page 86).
• Delete cannot be performed when all the files in
memory are protected (page 87).
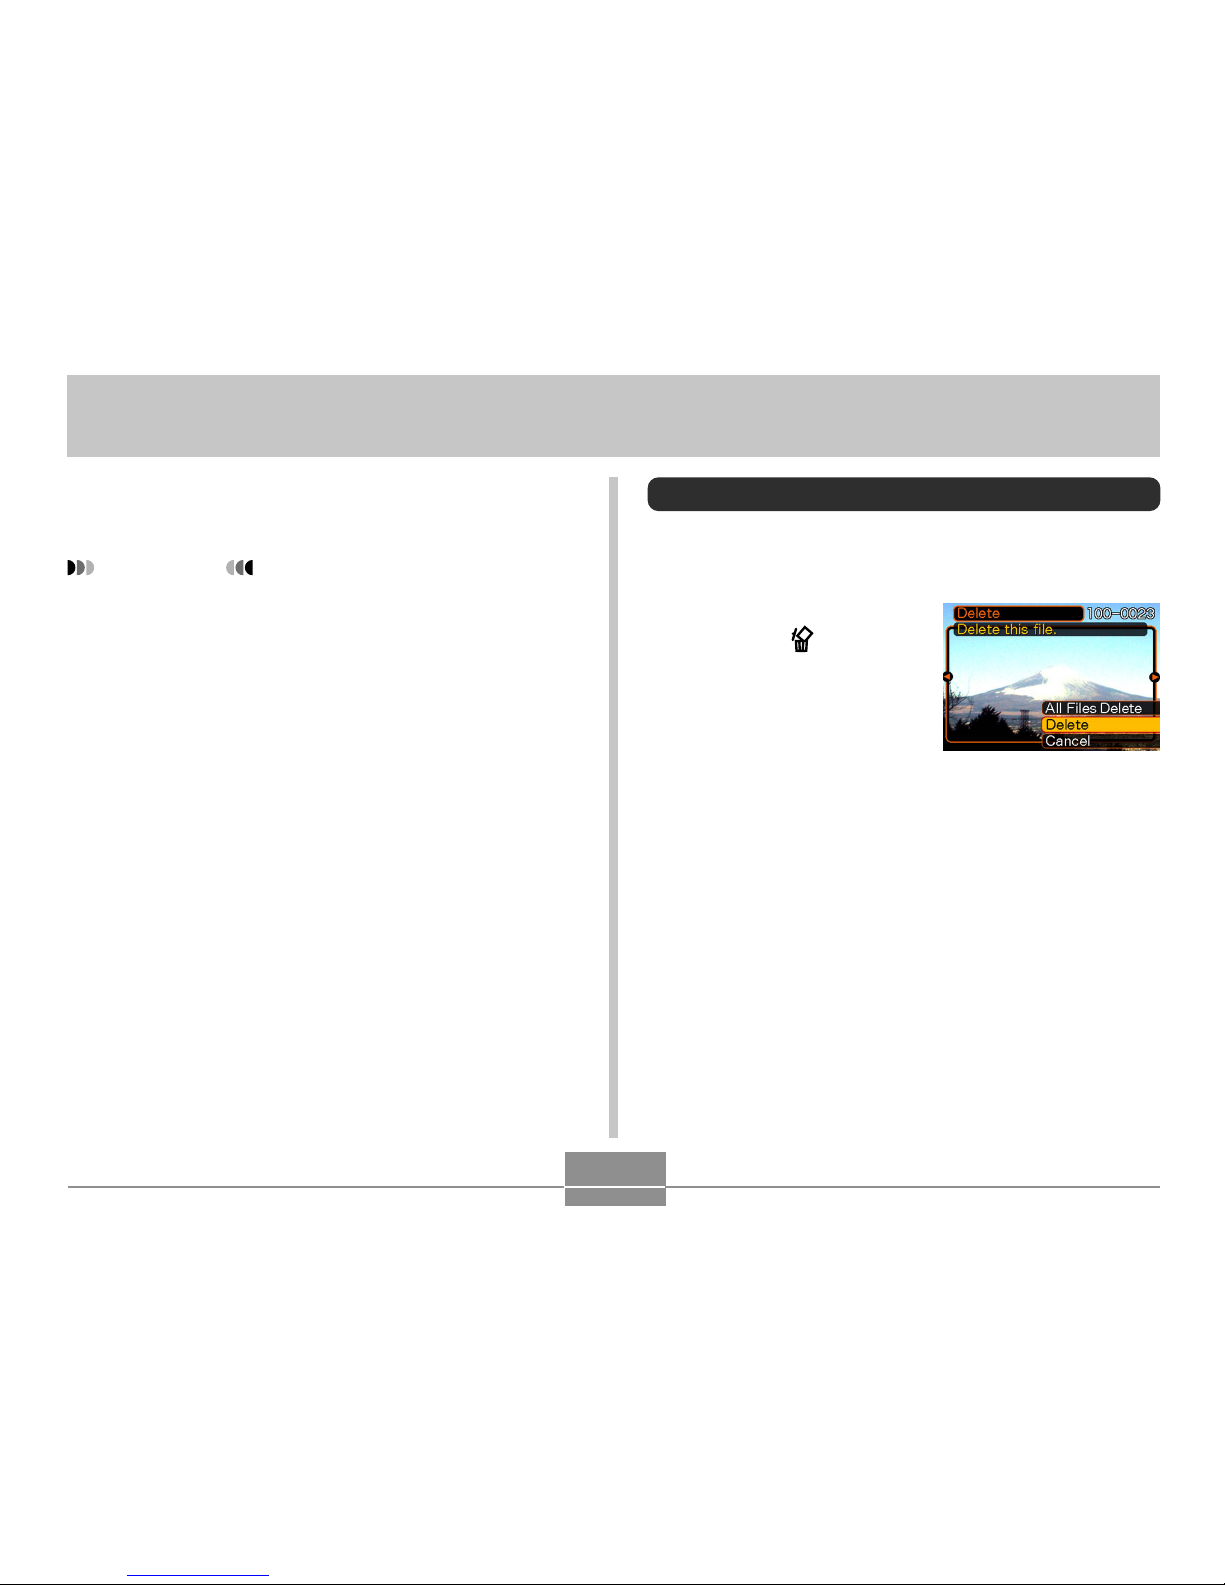
Deleting a Single File
Perform the following steps when you want to delete a
single file.
1.
In the PLAY mode,
press [왔] ( ).
2.
Use [왗] and [왘] to scroll through files and
display the one you want to delete.
3.
Use [왖] and [왔] to select “Delete”.
• To exit the file delete operation without deleting
anything, select “Cancel”.
4.
Press [SET] to delete the file.
• Repeat steps 2 through 4 to delete other files, if you
want.
5.
Press [MENU] to exit the menu screen.
Page 2
DELETING FILES
84
Deleting All Files
The following procedure deletes all unprotected files
currently in memory.
1.
In the PLAY mode, press [왔] ( ).
2.
Use [왖] and [왔] to select “All Files Delete”,
and then press [SET].
3.
Use [왖] and [왔] to select “Yes”.
• To exit the file delete operation without deleting
anything, select “No”.
4.
Press [SET] to delete all the files.
IMPORTANT!
• If a file cannot be deleted for some reason, the
message “The function is not supported for this file.”
appears when you try to delete it.
Page 3

FILE MANAGEMENT
85
FILE MANAGEMENT
The file management capabilities of the camera make it
easy to keep track of images. You can protect files against
deletion, and even use its DPOF feature to specify images
for printing.
Folders
Your camera automatically creates a directory of image
storage folders in its built-in Flash memory or on the
memory card.
Memory Folders and Files
An image you record is automatically stored in a folder,
whose name is a serial number. You can have up to 900
folders in memory at the same time. Folder names are
generated as shown below.
Example: Name of the 100th folder.
Each folder can hold files numbered up to 9,999.
Trying to store the 10,000th file in a folder causes the next
serially numbered folder to be created. Folder names are
generated as shown below.
Example: Name of the 26th file
Extension
CIMG0026.JPG
Serial number (4 digits)
• The actual number of files you will be able to store on a
memory card depends on the image quality settings,
capacity of the card, etc.
• For details about the directory structure, see “Memory
Directory Structure” on page 124.
100CASIO
Serial number (3 digits)
Page 4
FILE MANAGEMENT
86
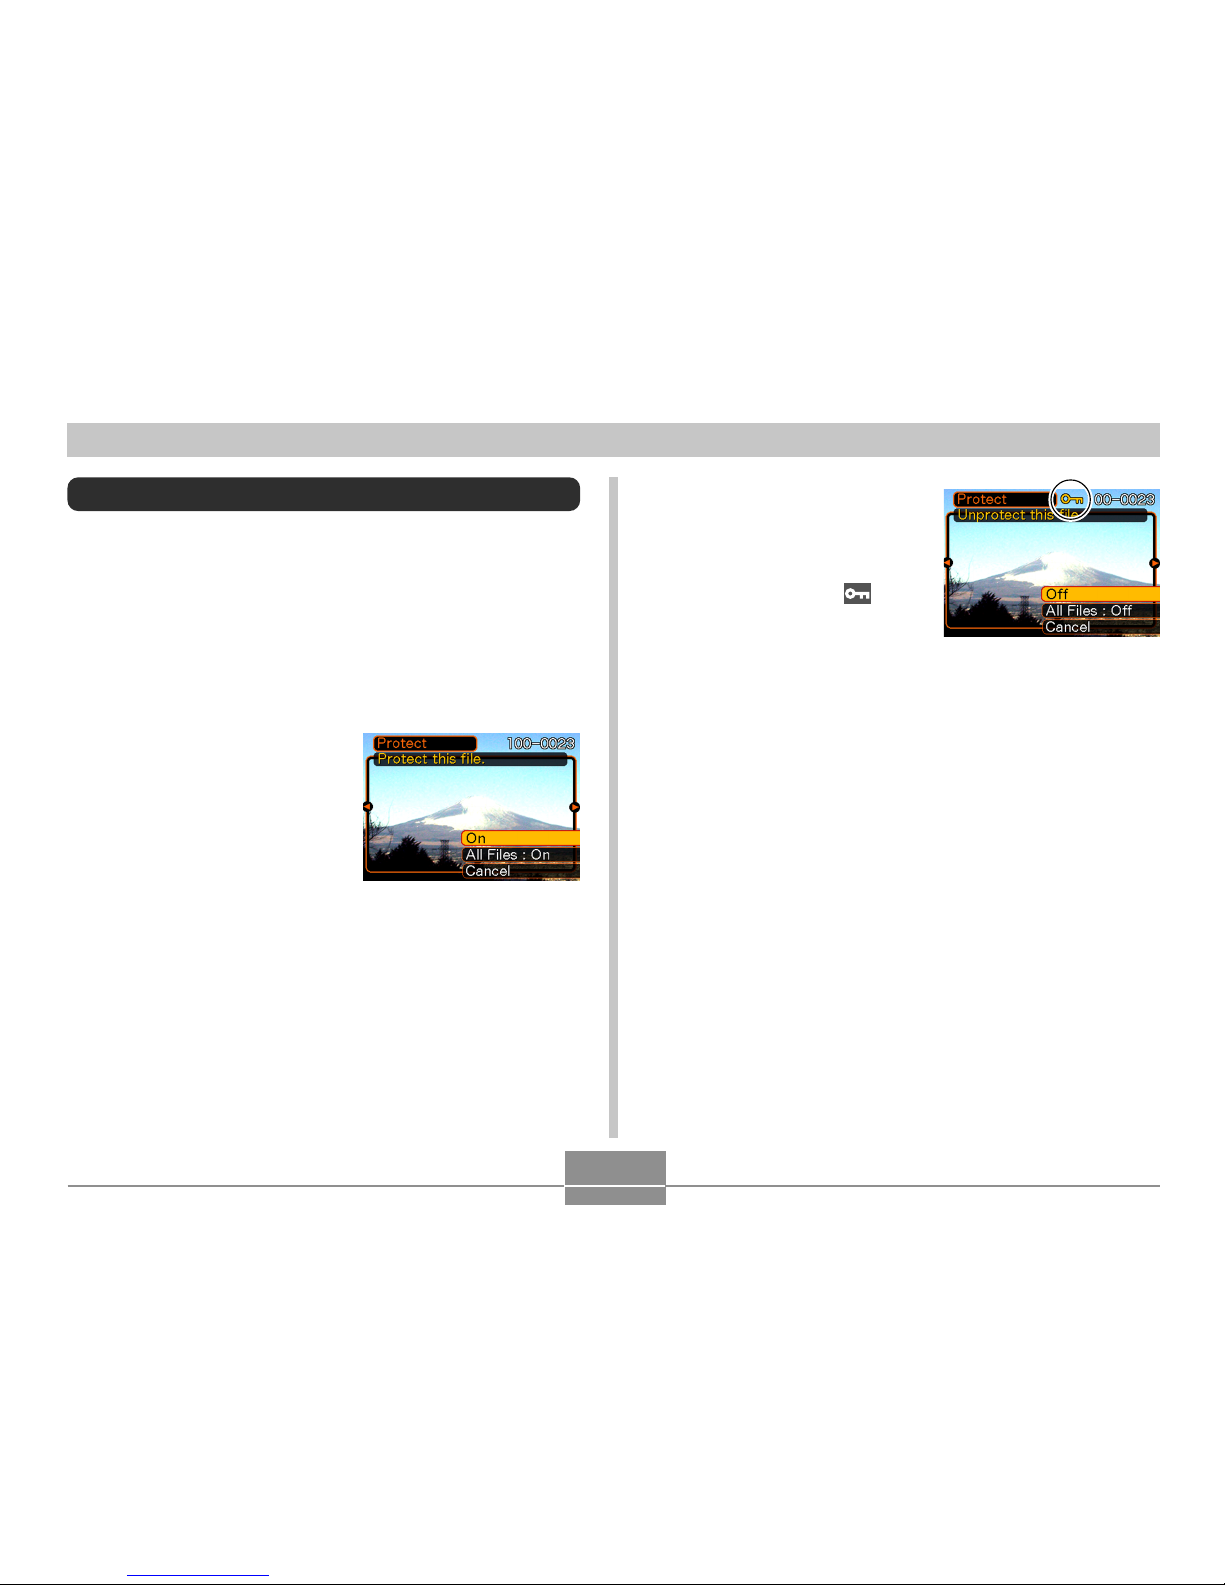
4.
Use [왖] and [왔] to
select “On”, and then
press [SET].
• A file that is protected is
indicated by the
mark.
• To unprotect a file, select
“Off” in step 4, and then
press [SET].
5.
Press [MENU] to exit the menu screen.
Protecting Files
Once you protect a file it cannot be deleted (page 83). You
can protect files individually or you can protect all files in
memory with a single operation.
To protect a single file
1.
In the PLAY mode, press [MENU].
2.
Select the “PLAY” tab,
select “Protect”, and
then press [왘].
3.
Use [왗] and [왘] to scroll through files and
display the one you want to protect.
Page 5

FILE MANAGEMENT
87
To protect all files in memory
1.
In the PLAY mode, press [MENU].
2.
Select the “PLAY” tab, select “Protect”, and
then press [왘].
3.
Use [왖] and [왔] to select “All Files : On”, and
then press [SET].
• To unprotect all files, press [SET] in step 3 so the
setting shows “All Files : Off”.
4.
Press [MENU] to exit the menu screen.
DPOF
The letters “DPOF” stand for “Digital Print
Order Format”, which is a format for
recording on a memory card or other medium
which digital camera images should be
printed and how many copies of the image
should be printed. Then you can print on a
DPOF-compatible printer or at a professional
print service in accordance with the file name
and number of copies settings recorded on
the card.
With this camera, you should always select images by
viewing them on the monitor screen. Do not specify images
by file name without viewing the file contents.
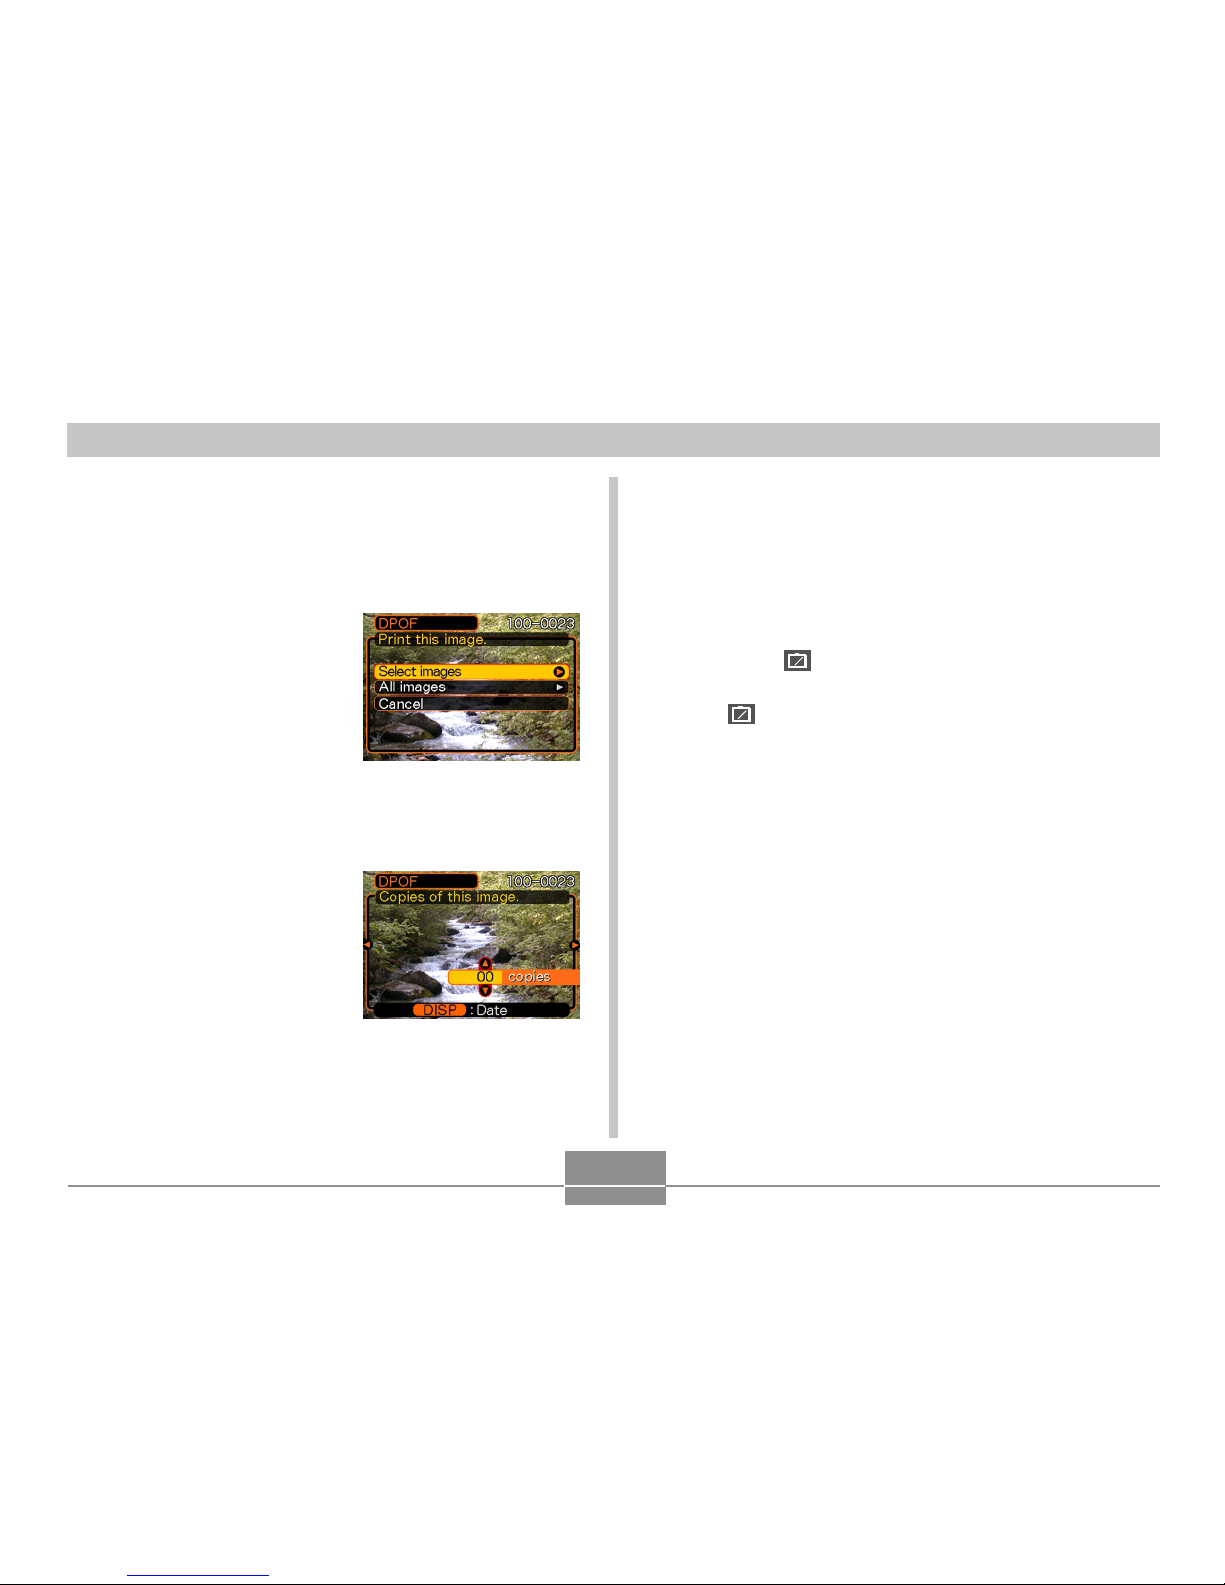
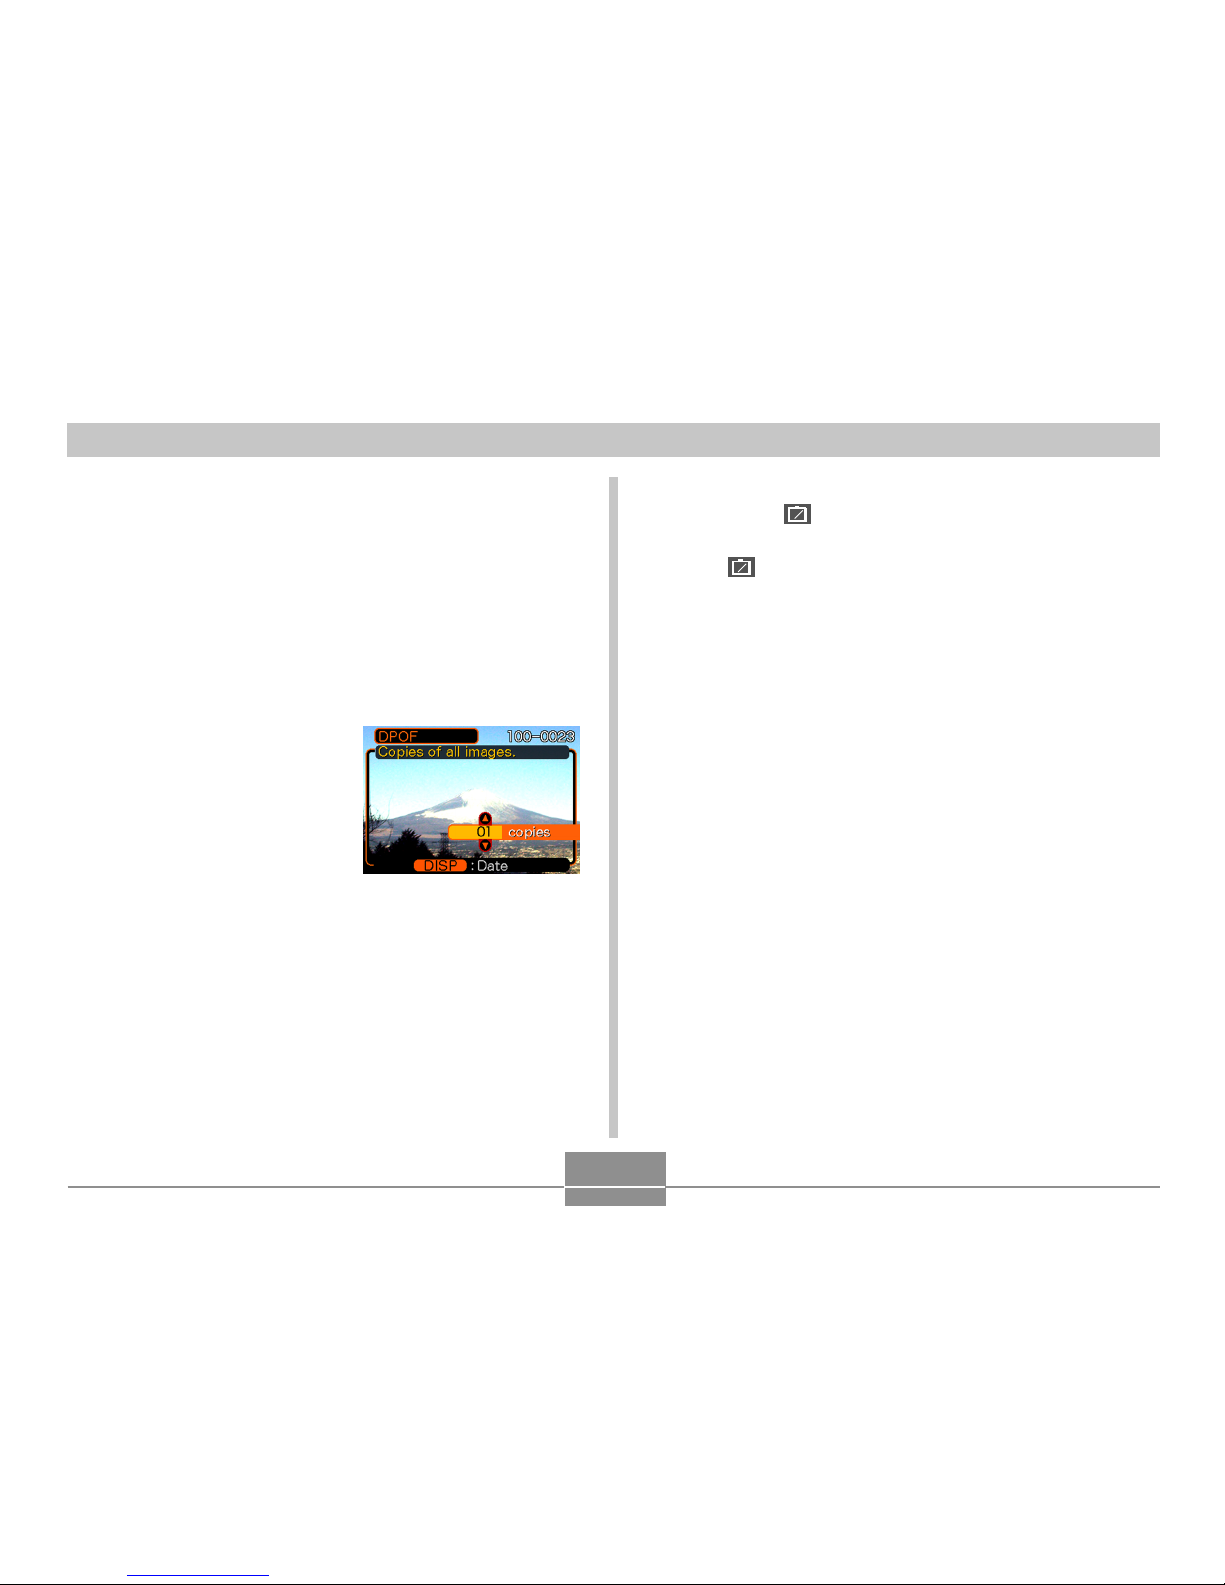
■ DPOF Settings
File Name,
number of copies,
date
Page 6
FILE MANAGEMENT
88
5.
Use [왖] and [왔] to specify the number of
copies.
• You can specify up to 99 for the number of copies.
Specify 00 if you do not want to have the image
printed.
6.
To turn on date stamping for the prints, press
[DISP] so
12
12
1
is displayed.
• To turn off date stamping for the prints, press [DISP]
so
12
12
1
is not displayed.
• Repeat steps 4 through 6 if you want to configure
other images for printing.
7.
After all the settings are the way you want,
press [SET] to apply them.
To configure print settings for a single
image
1.
In the PLAY mode, press [MENU].
2.
Select the “PLAY” tab,
select “DPOF”, and
then press [왘].
3.
Use [왖] and [왔] to select “Select images”,
and then press [왘].
4.
Use [왗] and [왘] to
display the image you
want.
Page 7
FILE MANAGEMENT
89
To configure print settings for all images
1.
In the PLAY mode, press [MENU].
2.
Select the “PLAY” tab, select “DPOF”, and
then press [왘].
3.
Use [왖] and [왔] to select “All images”, and
then press [왘].
4.
Use [왖] and [왔] to
specify the number of
copies.
• You can specify up to 99
for the number of copies.
Specify 00 if you do not
want to have the image
printed.
5.
To turn on date stamping for the prints, press
[DISP] so
12
12
1
is displayed.
• To turn off date stamping for the prints, press [DISP]
so
12
12
1
is not displayed.
6.
After all the settings are the way you want,
press [SET] to apply them.
Page 8
FILE MANAGEMENT
90
Exif Print
Exif Print is an
internationally supported,
open standard file format
that makes it possible to
capture and display vibrant
digital images with accurate
colors. With Exif 2.2, files
include a wide range of
shooting condition
information that can be
interpreted by an Exif Print
printer to produce betterlooking prints.
IMPORTANT!
• Information about the availability of Exif Print
compatible printer models can be obtained from each
printer manufacturer.
PRINT Image Matching II
Images include PRINT Image Matching
II data (mode setting and other camera
setup information). A printer that
supports PRINT Image Matching II
reads this data and adjusts the printed
image accordingly, so your images
come out just the way you intended
when you recorded them.
* Seiko Epson Corporation holds the
copyright for PRINT Image Matching and
PRINT Image Matching II.
Page 9

FILE MANAGEMENT
91
1.
Use the DPOF procedure on page 87 to
specify the images in file memory that you
want to print.
2.
Connect the USB cradle to the printer.
USB
P
H
O
T
O
C
HA
R
G
E
U
S
B
R
E
C
P
LA
Y
M
E
N
U
D
I
S
P
SE
T
• Also, connect the AC adaptor to the USB cradle and
plug the AC adaptor into an electrical outlet.
3.
Set the camera on the USB cradle.
4.
Turn on the printer.
5.
Press the USB cradle
[USB] button.
• This displays the print
menu on the camera’s
monitor screen.
Using USB DIRECT-PRINT
Your camera supports USB
DIRECT-PRINT, which was
developed by Seiko Epson
Corporation. When connected
directly to a printer that supports
USB DIRECT-PRINT, you can
select images to be printed and
start the print operation directly
from the camera.
DPOF settings (page 87) are used
to determine which images and how
many copies should be printed.
Page 10

FILE MANAGEMENT
92
6.
Load paper for printing the images into the
printer.
7.
Configure print quality, paper, and other
settings for your printer.
• See the user documentation that comes with your
printer for details about configuring its settings.
8.
On the camera’s monitor screen, use [왖] and
[왔] to select “Print”, and then press [SET].
• This automatically starts printing of the images you
specified with the DPOF procedure.
• If you want to print the same batch of images again,
press the [USB] button on the USB cradle.
• A message appears on the monitor screen, followed
by the DPOF setting screen (page 87), if there are no
DPOF settings currently configured on the camera to
control the printing operation. If this happens,
configure the required DPOF settings and then
perform step 6 of the above procedure again.
• If you want to change the current DPOF settings,
select “DPOF” on the print menu to display the
DPOF setting screen (page 87).
9.
After printing is complete, turn off the camera
and remove it from the USB cradle.
IMPORTANT!
• Contact your printer manufacturer for information
about models that support USB DIRECT-PRINT,
upgrades, etc.
• Never disconnect the USB cable, or perform any
camera or USB cradle operation while printing is in
progress. Doing so causes a printer error.
• To interrupt an ongoing print operation, perform the
required operation on the printer.
Page 11

FILE MANAGEMENT
93
Using the FAVORITE Folder
You can copy scenery shots, photos of your family, or other
special images from a file storage folder (page 124) to the
FAVORITE folder in built-in memory (page 124). Images in
the FAVORITE folder are not displayed during normal
playback, so it helps to keep your personal image private
as you carry them around. FAVORITE folder images are
not deleted when you change memory cards, so you can
always keep them on hand.
To copy a file to the FAVORITE folder
1.
In the PLAY mode, press [MENU].
2.
Select the “PLAY” tab,
select “Favorites”, and
then press [왘].
3.
Use [왖] and [왔] to
select “Save”, and
then press [SET].
• This displays the names
of the files in built-in
memory or on the loaded
memory card.
4.
Use [왗] and [왘] to select the file you want to
copy to the FAVORITE folder.
5.
Use [왖] and [왔] to select “Save”, and then
press [SET].
• This copies the displayed file to the FAVORITE
folder.
6.
After copying all of the files you want, use [왖]
and [왔] to select “Cancel”, and then press
[SET] to exit.
Page 12

FILE MANAGEMENT
94
NOTES
• Copying an image file with the above procedure
creates a 320 x 240-pixel QVGA-size image in the
FAVORITE folder.
• A file copied into the FAVORITE folder is
automatically assigned a file name that is a serial
number (0001 to 9999).
To display a file in the FAVORITE folder
1.
In the PLAY mode, press [MENU].
2.
Select the “PLAY” tab, select “Favorites”, and
then press [왘].
3.
Use [왖] and [왔] to select “Show”, and then
press [SET].
• If the FAVORITE folder is empty, the message “No
Favorites file!” appears.
4.
Use [왘] (forward) and
[왗] (back) to scroll
through the files in the
FAVORITE folder.
5.
After you are finished viewing files, press
[MENU] twice to exit.
File Name
Page 13

FILE MANAGEMENT
95
NOTE
• Holding down [왗] or [왘] scrolls images at high
speed.
IMPORTANT!
• Note that a FAVORITE folder is created in the
camera’s built-in memory only. No FAVORITE folder
is created on a memory card when you use one. If
you want to view the contents of the FAVORITE
folder on your computer screen, you need to remove
the memory card from the camera (if you are using
one) before placing the camera onto the USB cradle
to start data communication (pages 112, 124).
To delete a file from the FAVORITE
folder
1.
In the PLAY mode, press [MENU].
2.
Select the “PLAY” tab, select “Favorites”, and
then press [왘].
3.
Use [왖] and [왔] to select “Delete”, and then
press [SET].
4.
Use [왗] and [왘] to select the file you want to
delete from the FAVORITE folder.
5.
Use [왖] and [왔] to select “Delete”, and then
press [SET].
• This deletes the file from the FAVORITE folder.
6.
After deleting all of the files you want, use [왖]
and [왔] to select “Cancel”, and then press
[SET] to exit.
Page 14

FILE MANAGEMENT
96
IMPORTANT!
• You cannot use the delete operations on page 83 to
delete images from the FAVORITE folder.
Performing the memory format operation (page 106),
however, does delete FAVORITE folder files.
Page 15

OTHER SETTINGS
97
OTHER SETTINGS
Specifying an Image for the Startup Screen
You can specify an image you recorded with the camera as
the startup screen image, which causes it to appear on the
monitor screen for about two seconds whenever you turn
on the camera in the REC mode.
1.
In the REC mode or the PLAY mode, press
[MENU].
2.
Select the “Set Up” tab, select “Startup”, and
then press [왘].
3.
Use [왗] and [왘] to display the image you want
to use as the startup image.
4.
Use [왖] and [왔] to change the setting, and
then press [SET].
Select this setting:
On
Off
To do this:
Use the currently displayed image
as the startup screen image
Disable the startup screen
Turning the Key Tone On and Off
Use the following procedure to turn the tone that sounds
when you press a key on and off.
1.
In the REC mode or the PLAY mode, press
[MENU].
2.
Select the “Set Up” tab, select “Beep”, and
then press [왘].
3.
Use [왖] and [왔] to change the setting, and
then press [SET].
Select this setting:
On
Off
To do this:
Turn on the key tone
Turn off the key tone
Page 16

OTHER SETTINGS
98
IMPORTANT!
• You can select any one of the following types of
image as the startup image.
— The camera’s built-in startup image
— A snapshot you recorded with the camera
— A movie you recorded with the camera two
seconds or less in length and 200KB or less in
size
• The snapshot image or movie that you select as the
startup image is stored in a special memory location
called “startup image memory”. Only one image can
be stored in startup image memory at one time.
Selecting a new startup image overwrites anything
that is already stored in startup image memory.
Because of this, if you want to return to a previous
startup image, you need to have a separate copy of
that image in the camera’s standard image memory.
Note that you cannot delete an image from startup
image memory. You can only replace it with another
image.
Specifying the File Name Serial Number
Generation Method
Use the following procedure to specify the method for
generating the serial number used for file names (page 85).
1.
In the REC mode or the PLAY mode, press
[MENU].
2.
Select the “Set Up” tab, select “File No.”, and
then press [왘].
3.
Use [왖] and [왔] to change the setting, and
then press [SET].
Page 17

OTHER SETTINGS
99
Select this setting:
Continue
Reset
To do this for a newly saved file:
Store the last file number used and
increment it, regardless of whether
files are deleted or whether the
memory card is replaced with a new
one
Find the highest file number in the
current folder and increment it
Using the Alarm
You can configure up to three alarms that cause the
camera to beep and display a specified image at the time
you specify.
To set an alarm
1.
In the PLAY mode, press [MENU].
2.
Select the “PLAY” tab, select “Alarm”, and
then press [왘].
3.
Use [왖] and [왔] to select the alarm whose
setting you want to configure, and then press
[왘].
4.
Use [왗] and [왘] to select the setting you want
to change, and then use [왖] and [왔] to
change the selected setting.
• You can set an alarm time and configure the alarm to
sound either once or at the same time everyday. You
can also turn the alarm on or off.
Page 18

OTHER SETTINGS
100
5.
Press [DISP].
• You could press [SET] in place of [DISP] if you want
to configure the alarm without an image.
6.
Use [왗] and [왘] to select the scene you want
to appear at the alarm time, and then press
[SET].
7.
After all the settings are the way you want,
press [SET].
• You can configure up to three alarms, named “Alarm
1”, “Alarm 2”, and “Alarm 3”.
Stopping the Alarm
When an alarm time is reached while the camera is turned
off, the alarm will sound for about one minute (or until you
stop it), and then the camera will turn on. To stop the alarm
after it starts to sound, press any button. If the camera is
on the USB cradle when an alarm sounds, you can stop it
by pressing the USB cradle [USB] button or [PHOTO]
button, or any camera button.
IMPORTANT!
• Note that the alarm sounds only if the alarm time is
reached when any one of the following conditions
exists.
— While the camera is turned on
— While a USB data communication operation is in
progress
— While a Photo Stand operation is in progress
Page 19

OTHER SETTINGS
101
Setting the Clock
Use the procedures in this section to select a Home Time
Zone, and to change its date and time settings.
IMPORTANT!
• Make sure you select your Home Time zone (the
zone where you are currently located) before
changing the time and date settings. Otherwise, the
time and date setting will change automatically when
you select another time zone.
To select your Home Time zone
1.
In the REC mode or the PLAY mode, press
[MENU].
2.
Select the “Set Up” tab, select “World Time”,
and then press [왘].
• This displays the current World Time zone.
3.
Use [왖] and [왔] to select “Home”, and then
press [왘].
4.
Use [왖] and [왔] to select “City”, and then
press [왘].
5.
Use [왖], [왔], [왗], and [왘] to select the
geographical area that contains location you
want to select as your Home Time zone, and
then press [SET].
6.
Use [왖] and [왔] to select the city you want,
and then press [SET].
7.
After selecting the city you want, press [SET]
to register its zone as your Home Time zone.
Page 20

OTHER SETTINGS
102
Changing the Date Format
You can select from among three different formats for
display of the date.
1.
In the REC mode or the PLAY mode, press
[MENU].
2.
Select the “Set Up” tab, select “Date Style”,
and then press [왘].
3.
Use [왖] and [왔] to change the setting, and
then press [SET].
Example: October 23, 2003
Select this format:
YY/MM/DD
DD/MM/YY
MM/DD/YY
To display the date like this:
03/10/23
23/10/03
10/23/03
To set the current time and date
1.
In the REC mode or the PLAY mode, press
[MENU].
2.
Select the “Set Up” tab, select “Adjust”, and
then press [왘].
3.
Set the current date and the time.
Do this:
Press [왖] or [왔].
Press [왗] or [왘].
Press [DISP].
To do this:
Change the setting at the current
cursor location
Move the cursor between settings
Toggle between 12-hour and 24-
hour timekeeping
4.
When all the settings are the way you want,
press [SET] to register them and exit the
setting screen.
Page 21

OTHER SETTINGS
103
Using World Time
You can use the World Time screen to view a time zone
that is different from the home time zone when you go on a
trip, etc. World Time can display the time in one of 162
cities in 32 time zones.
To display the World Time screen
1.
In the REC mode or the PLAY mode, press
[MENU].
2.
Select the “Set Up” tab, select “World Time”,
and then press [왘].
• This displays the current World Time zone.
3.
Use [왖] and [왔] to select “World”.
To configure World Time settings
1.
In the REC mode or the PLAY mode, press
[MENU].
2.
Select the “Set Up” tab, select “World Time”,
and then press [왘].
• This displays the current World Time zone.
3.
Use [왖] and [왔] to select “World”, and then
press [왘].
4.
Use [왖] and [왔] to select “City”, and then
press [왘].
5.
Use [왖], [왔], [왗], and
[왘] to select the
geographical area you
want, and then press
[SET].
4.
Press [SET] to exit the setting screen.
Select this:
Home
World
To do this:
Display the time in your home time zone
Display the time in a different time zone
Page 22

OTHER SETTINGS
104
6.
Use [왖] and [왔] to
select the city you
want, and then press
[SET].
• This displays the current
time in the city you
select.
7.
When the setting is the way you want, press
[SET] to apply it and exit the setting screen.
To configure summer time (DST)
settings
1.
In the REC mode or the PLAY mode, press
[MENU].
2.
Select the “Set Up” tab, select “World Time”,
and then press [왘].
• This displays the current World Time Settings.
3.
Use [왖] and [왔] to select “World”, and then
press [왘].
• If you want to configure Home Time settings, select
“Home” instead.
4.
Use [왖] and [왔] to select “DST”, and then
press [왘].
5.
Use [왖] and [왔] to select the summer time
(DST) setting you want.
Select this:
On
Off
To do this:
Advance the current time setting by
one hour
Display the current time as-is
Page 23

OTHER SETTINGS
105
6.
After the setting is the way you want, press
[SET].
• This displays the current time in accordance with
your setting.
7.
Press [SET] again to exit the setting screen.
Changing the Display Language
You can use the following procedure to select one of ten
languages as the display language.
1.
In the REC mode or the PLAY mode, press
[MENU].
2.
Select the “Set Up” tab, select “Language”,
and then press [왘].
3.
Use [왖], [왔], [왗], and [왘] to change the
setting, and then press [SET].
: Japanese
English : English
Français : French
Deutsch : German
Español : Spanish
Italiano : Italian
Português : Portuguese
: Chinese (Complex)
: Chinese (Simplified)
: Korean
Page 24

OTHER SETTINGS
106
Formatting Built-in Memory
Formatting built-in memory deletes any data stored in it.
IMPORTANT!
• Note that data deleted by a format operation cannot
be recovered. Check to make sure you do not need
any of the data in memory before you format it.
• Formatting built-in memory deletes all files, including
files in the FAVORITE folder (page 93), protected
files (page 86), and Best Shot user setups (page 56).
• The startup screen image is not deleted by
formatting memory.
1.
Check to make sure there is no memory card
loaded in the camera.
• If there is a memory card loaded in the camera,
remove it (page 108).
2.
In the REC mode or the PLAY mode, press
[MENU].
3.
Select the “Set Up” tab, select “Format”, and
then press [왘].
4.
Use [왖] and [왔] to select “Format”, and then
press [SET].
• To exit the format operation without formatting,
select “Cancel”.
 Loading...