

Page 1
PLAYBACK
PLAYBACK
You can use the camera’s built-in monitor screen to view
images after you record them.
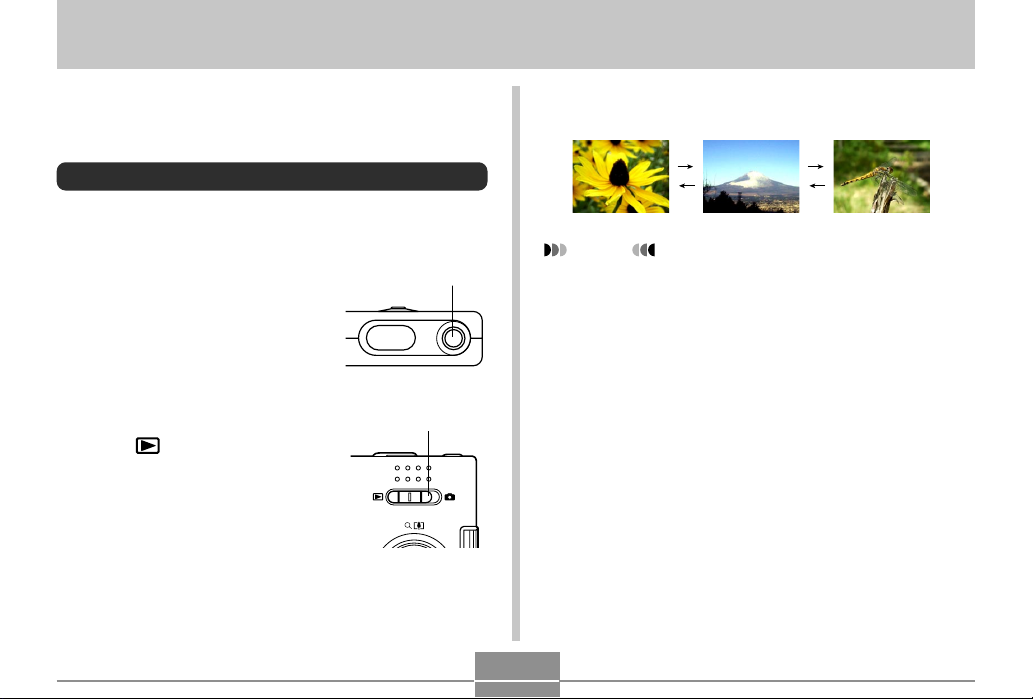
Basic Playback Operation
Use the following procedure to scroll through files stored in
the camera’s memory.
1.
Press the power button
to turn on the camera.
• This causes an image or a
message to appear on the
monitor screen.
2.
Align the mode selector
with “ ” (PLAY).
• This enters the PLAY
mode.
Power button
ON/OFF
Mode selector
76
3.
Use [왘] (forward) or [왗] (back) to scroll
through files on the monitor screen.
NOTES
• Holding down [왗] or [왘] scrolls images at high
speed.
• In order to allow for faster playback image scrolling,
the image that initially appears on the monitor screen
is a preview image, which is of somewhat lower
quality than the actual display image. The actual
display image appears a short while after the preview
image. This does not apply to images copied from
another digital camera.
Page 2
PLAYBACK
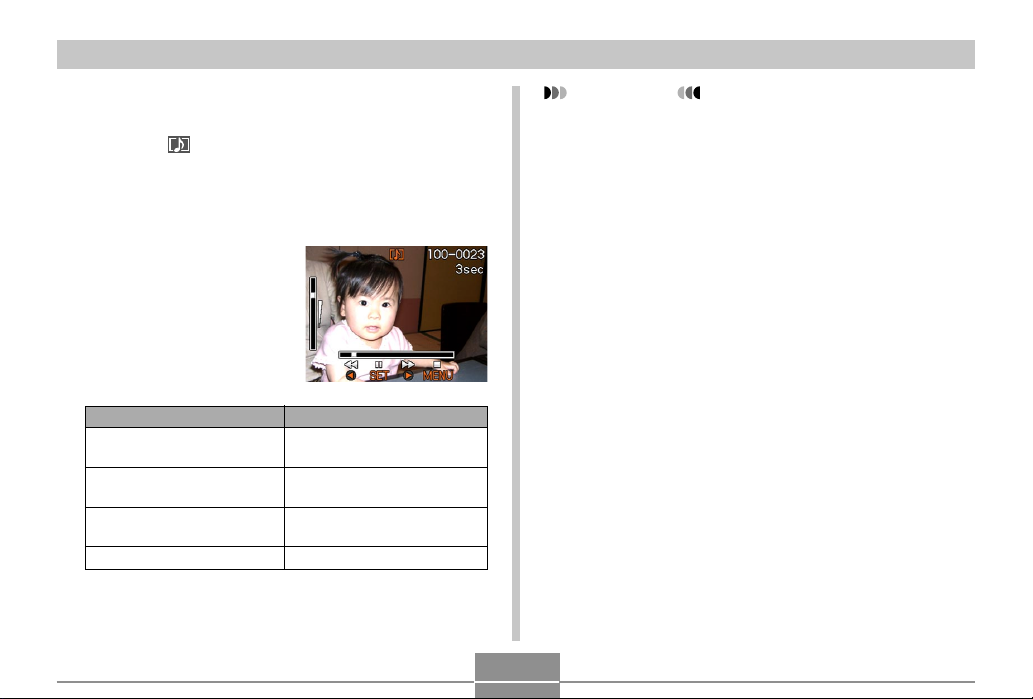
Playing an Audio Snapshot (EX-M20U Only)
Perform the steps below to display an audio snapshot
(indicated by a indicator) and play its audio.
1.
In the PLAY mode, use [왗] and [왘] until the
image you want is displayed.
2.
Press [SET].
• This plays back the
audio that accompanies
the displayed image.
• You can perform the
following operations
while audio is playing.
To do this:
Fast forward or fast reverse
the audio
Pause and unpause audio
playback
Adjust audio volume
Cancel playback
Do this:
Hod down [왗] or [왘].
Press [SET].
Press [왖] or [왔].
Press [MENU].
IMPORTANT!
• Audio volume can be adjusted only when playback is
being performed or is paused.
• When you have the LCD remote controller connected
to the camera, audio is output through the stereo
headphones (page 155) instead of the camera’s
speaker. Output through the headphones is
monaural.
• The volume of audio recorded with the camera
cannot be adjusted using the LCD remote controller.
Use the camera’s controller to adjust volume level in
this case.
77
Page 3
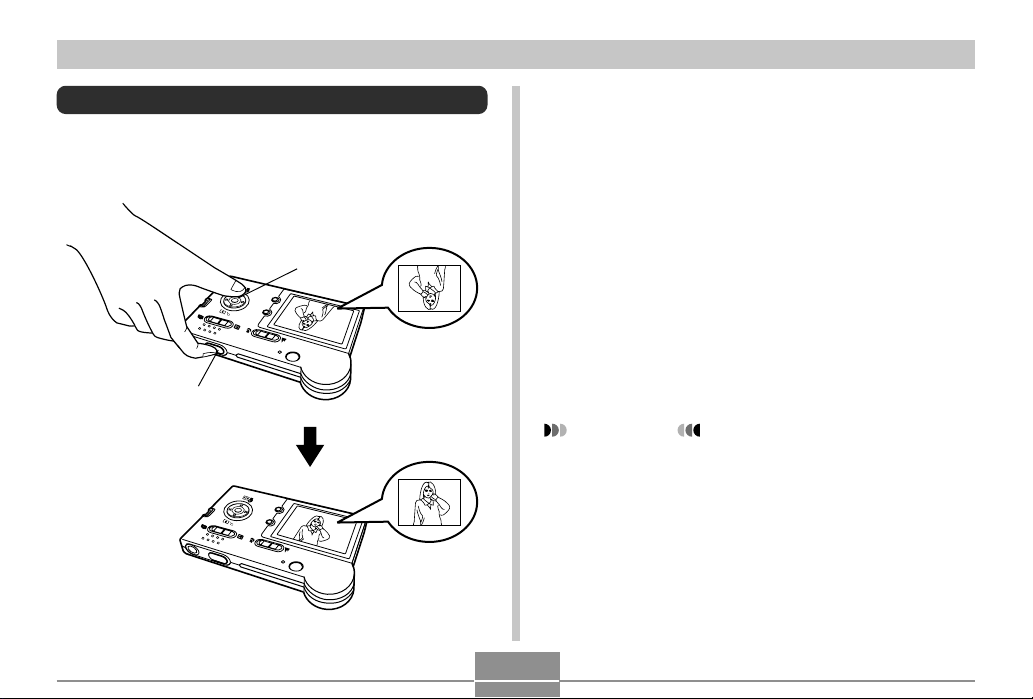
PLAYBACK
Flipping the Display
The following procedure flips the image 180 degrees. This
comes in handy when you want to show someone standing
in front of you an image on the monitor screen.
[SET]
DISP
MENU
Shutter release
button
DISP
MENU
1.
In the PLAY mode, use [왗] and [왘] to scroll
through images on the monitor screen and
display the one you want.
2.
Press the shutter release button and [SET] at
the same time.
• This flips the image 180 degrees. The histogram or
any other display information you had displayed is
cleared automatically whenever you flip the image.
• While an image is flipped, you can use [왗] and [왘] to
scroll to another image, if you want.
3.
To return the image to its normal orientation,
press any button other than [왖], [왔], [왗], or
[왘].
IMPORTANT!
• Note that you cannot play an audio snapshot (EXM20U only), or a voice recording file (EX-M20U only)
on the monitor screen while a flipped image is
displayed.
• You cannot use the above procedure to flip an image
while a zoomed image, calendar screen image, an
audio snapshot (EX-M20U only), or a voice recording
file image (EX-M20U only) is on the display.
78
Page 4
PLAYBACK
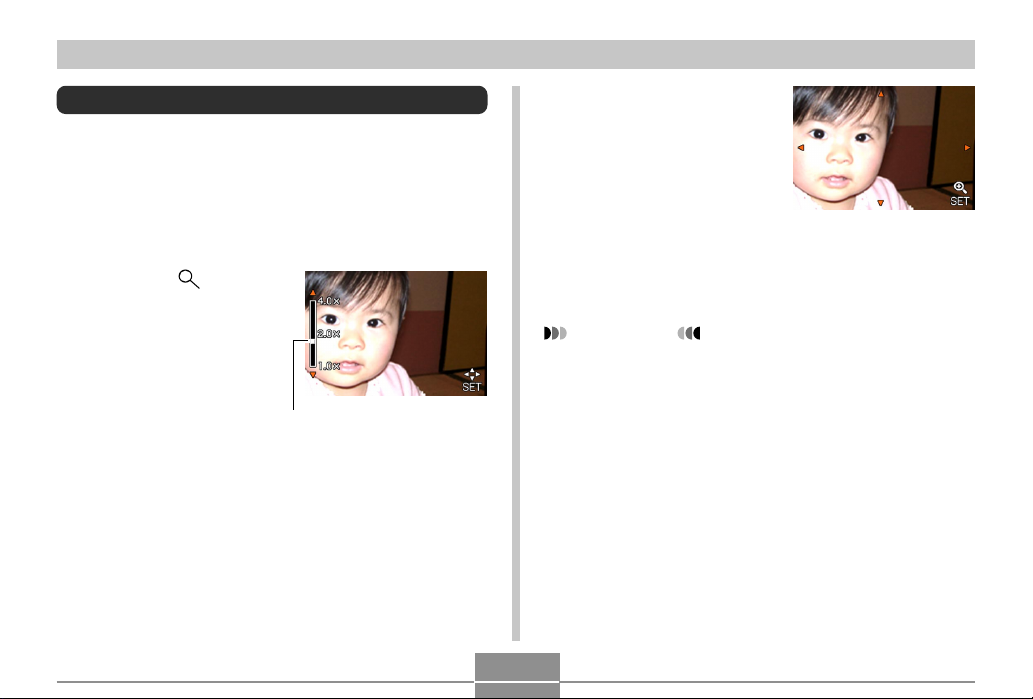
Zooming the Display Image
Perform the following procedure to zoom the image
currently on the monitor screen up to four times its normal
size.
1.
In the PLAY mode, use [왗] and [왘] to display
the image you want.
2.
Press [왖] ( ) to
enlarge the image.
• This displays an
indicator that shows the
current zoom factor.
Current zoom factor
3.
To scroll the image
on the display, press
[SET], and then press
[왖], [왔], [왗], or [왘].
• To display the indicator
for further zooming,
press [SET] again.
4.
Press [MENU] to return the image to its
original size.
IMPORTANT!
• Depending on the original size of the recorded
image, you may not be able to zoom a display image
the full four times its normal size.
79
Page 5

PLAYBACK
Resizing an Image
You can use the following procedure to change a snapshot
image to either SXGA size (1280 x 960 pixels) or VGA size
(640 x 480 pixels).
• VGA is the optimum image size for attachment to e-mail
messages or incorporation into Web pages.
1.
In the PLAY mode, press [MENU].
2.
Select the “PLAY”
tab, select “Resize”,
and then press [왘].
3.
Use [왗] and [왘] to scroll through images and
display the one you want to resize.
4.
Use [왖] and [왔] to select the setting you
want, and then press [SET].
To do this:
Resize to 1280 x 960 pixels (SXGA)
Resize to 640 x 480 pixels (VGA)
Cancel the resizing operation
IMPORTANT!
• Resizing an image creates a new file that contains
the image in the size you select. The file with the
original image also remains in memory.
• Images smaller than 640 x 480 pixels cannot be
resized.
• An image recorded using the 1600 x 1072 (3:2) pixel
size cannot be resized.
• Note that you can resize snapshots recorded with
this camera only.
• If the message “This function is not supported for this
file.” appears, it means that the current image cannot
be resized.
• The resize operation cannot be performed if there is
not enough memory to store the resized image.
Select this:
1280 x 960
640 x 480
Cancel
80
Page 6
PLAYBACK
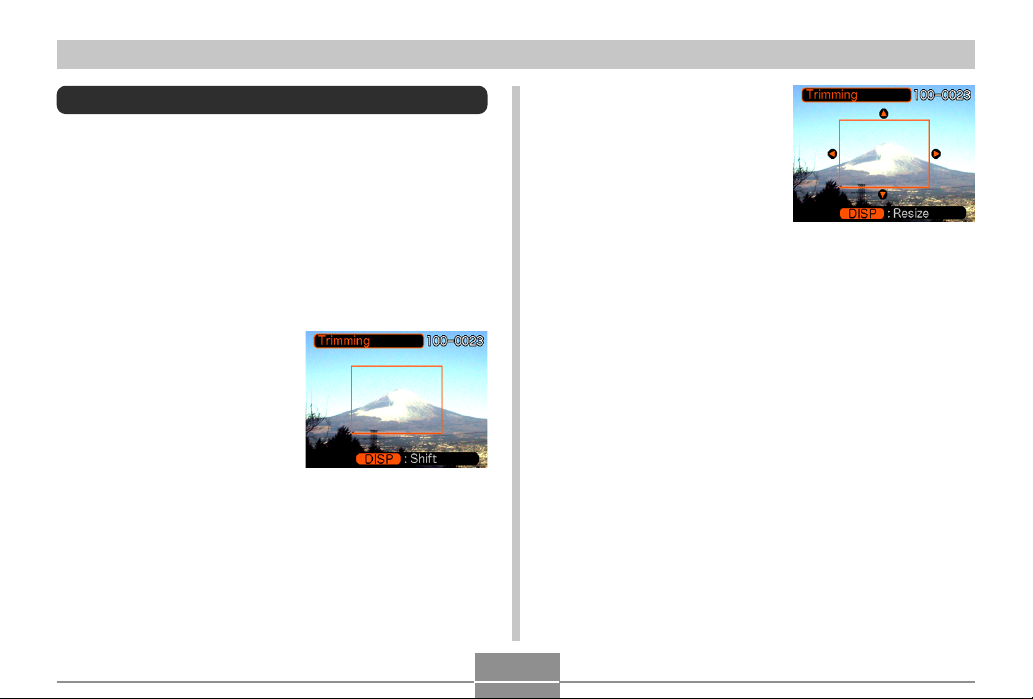
Cropping an Image
Use the following procedure when you want to crop a
portion of an enlarged image and use the remaining part of
the image as an e-mail attachment, Web page image, etc.
1.
In the PLAY mode, use [왗] and [왘] to scroll
through images and display the one you want
to crop.
2.
Press [MENU].
3.
Select the “PLAY”
tab, select
“Trimming”, and then
press [왘].
• This causes a cropping
boundary to appear.
4.
Use [왖] and [왔] to make the cropping
boundary smaller or larger.
• The size of the cropping boundary depends on the
size of the image on the display.
5.
When the cropping
boundary is the size
you want, press [DISP]
to lock it.
• After pressing [DISP] to
lock the size of the
cropping boundary, you
can press [DISP] again to
unlock it. After that, you
can repeat steps 4 and 5
to change the cropping
boundary size.
6.
Use [왖], [왔], [왗], and [왘] to move the
cropping boundary up, down, left, or right
until the area of the image you want to extract
is within the boundary.
7.
Press [SET] to extract the part of the image
enclosed in the cropping boundary.
• If you want to cancel the procedure at any point,
press [MENU].
81
Page 7

PLAYBACK
IMPORTANT!
• Cropping an image creates a new file that contains
the cropped image. The file with the original image
also remains in memory.
• An image recorded using the 1600 x 1072 (3:2) pixel
size cannot be cropped.
• Voice recording file images (EX-M20U only) cannot
be cropped.
• An image recorded using another camera model
cannot be cropped.
• If the message “This function is not supported for this
file.” appears, it means that the current image cannot
be cropped.
• The cropping operation cannot be performed if there
is not enough memory to store the cropped image.
Displaying the Calendar Screen
Use the following procedure to display a 1-month calendar.
While the calendar is on the display, you can select a date,
which displays the first image recorded on that date. This
helps to make it easy to find the images you want.
1.
In the PLAY mode, press [MENU].
2.
Select the “PLAY” tab, select “Calendar”, and
then press [왘].
3.
Use [왖], [왔], [왗], and
[왘] to move the date
selection cursor.
• Use the procedure
under “Changing the
Date Format” on page
116 to specify the date
format.
• The image displayed on
the calendar for each
date is the first image
that was recorded on
that date.
Date selection cursor
82
Month/Year
Page 8

PLAYBACK
• Pressing [왖] while the date selection cursor is
located anywhere in the top line of the calendar
causes the previous month to appear.
• Pressing [왔] while the date selection cursor is
located anywhere in the bottom line of the calendar
causes the next month to appear.
• To exit the calendar screen, press [MENU].
• is displayed in the calendar screen to indicate
voice recording file images (page 92, EX-M20U
only).
• appears in place of the image when the date
contains data that cannot be displayed by this
camera.
4.
To view the large version of a date’s image,
move the date selection cursor to the date,
and then press [SET].
• This displays the first image that was recorded on
the selected date.
Playing a Slide Show
Slide Show automatically plays back images in sequence
at a fixed interval.
1.
In the PLAY mode, press [MENU].
2.
Select the “PLAY” tab, select “Slideshow”,
and then press [왘].
83
Page 9

PLAYBACK
3.
Configure the slideshow settings.
• See the pages indicated below for more information.
For information about
configuring this setting:
Images
Time
Interval
4.
Use [왖] and [왔] to select “Start”, and then
Go here:
“To specify the slideshow
images” on page 85
“To specify the slideshow
time” on page 86
“To set the slideshow
interval” on page 86
press [SET].
• This starts the slide show.
5.
To stop Slide Show, press [SET].
• The slideshow will also stop automatically after the
amount of time you specified for “Time” elapses.
IMPORTANT!
• Note that all buttons are disabled while an image
change is in progress. Wait until an image is stopped
on the monitor screen before performing a button
operation, or hold down the button until the image
stops.
• When the slideshow comes to an audio snapshot or
voice recording file, it plays the audio once and then
advances to the next file (EX-M20U only).
• While audio is playing, you can use [왖] and [왔] to
adjust the volume level (EX-M20U only).
• Images copied from another digital camera or a
computer may take longer time to appear than the
slideshow interval time you specify.
84
Page 10

PLAYBACK
To specify the slideshow images
1.
Use [왖] and [왔] to select “Images”, and then
press [왘].
2.
Use [왖] and [왔] to select the setting you
want, and then press [SET].
To do this:
Include all files in file memory in the
slideshow
Display a single file
Include all files in the FAVORITE
folder (page 137) in the slideshow
3.
Use [왖] and [왔] to select “Start”, and then
press [SET].
• This starts the slideshow.
• With the EX-M20U, the audio of audio snapshot and
voice recording files is also played back.
Select this setting:
All images
One Image
Favorites
■ Selecting a Particular Image for a Slideshow
When you select “One image” as the slideshow type, the
slide show displays only one image, without changing it.
Use this setting when you want a particular image to
remain on the display while the camera is on the USB
cradle (Photo Stand feature).
1.
Select “One image”, and then press [왘].
2.
Use [왗] and [왘] to scroll through the images
until the one you want to use is on the
monitor screen.
3.
Press [SET] to
register your
selection and return
to the menu screen.
• Pressing [MENU]
instead of [SET] returns
to the menu screen
without registering the
setting.
85
Page 11

PLAYBACK
To specify the slideshow time
1.
Use [왖] and [왔] to select “Time”.
2.
Use [왗] and [왘] to specify the time setting
you want, and then press [SET].
• You can specify a time in the range of 1 to 60
minutes.
3.
Use [왖] and [왔] to select “Start”, and then
press [SET].
• This starts the slideshow.
To set the slideshow interval
1.
Use [왖] and [왔] to select “Interval”.
2.
Use [왗] and [왘] to specify the interval setting
you want, and then press [SET].
• You can specify “MAX”, or a value in the range of 1
to 30 seconds as the interval.
3.
Use [왖] and [왔] to select “Start”, and then
press [SET].
• This starts the slideshow.
86
Page 12

PLAYBACK
Using the Photo Stand Feature
The “Photo Stand” feature lets you specify what should
appear on the camera’s monitor screen while the camera is
on its USB cradle. You can play a Phot Stand slideshow
without worrying about remaining battery power, or you can
specify display of a particular image. Photo Stand feature
operations are performed in accordance with slideshow
setting. See page 87 for information about configuring
slideshow settings to suit your needs.
1.
After making sure the camera is turned off,
place the camera onto the USB cradle.
• Do not place the camera onto the USB cradle while it
is turned on.
2.
Press the USB cradle’s
[PHOTO] button.
• This starts the Photo
Stand slideshow with the
images or image you
specified under “To
specify the slideshow
images” (page 85).
[PHOTO]
M
E
N
U
D
IS
P
87
• Pressing [MENU] displays a screen for configuring
slideshow settings. To restart the slideshow, press
[MENU] while the menu screen is displayed, or
select “Start” and then press [SET].
• While audio is playing, you can use [왖] and [왔] to
adjust the volume level (EX-M20U only).
3.
To stop the Phot Stand slideshow, press
[PHOTO] again.
IMPORTANT!
• The battery is not charged while a Photo Stand
slideshow is in progress. To charge the battery, stop
the slideshow.
Page 13

PLAYBACK
Rotating the Display Image
Use the following procedure to rotate the image 90 degrees
and register the rotation information along with the image.
After you do this, the image is always displayed in its
rotated orientation whenever it appears during a slideshow
(page 83) or on your computer screen. Note that the image
is rotated automatically during a slideshow only. Rotating
an image ensures that images you recorded with the
camera held sideways appear correctly during a slideshow.
1.
In the PLAY mode, press [MENU].
2.
Select the “PLAY” tab, select “Rotation”, and
then press [왘].
3.
Use [왗] and [왘] to scroll through images until
the one you want to rotate is on the monitor
screen.
4.
Use [왖] and [왔] to
select “Rotate”, and
then press [SET].
• This rotates the image
90 degrees to the right.
5.
After you are finished configuring settings,
press the [MENU] button to exit the setting
screen.
IMPORTANT!
• You cannot rotate an image that is protected. To
rotate such an image, first unprotect it.
• You may not be able to rotate a digital image that
was recorded with another type of digital camera.
• You cannot rotate voice record images (EX-M20U
only).
88
Page 14

PLAYBACK
Using Image Roulette
Image Roulette cycles images like a slot machine on the
display, before stopping at one of them. When you start an
Image Roulette operation, images scroll randomly on the
screen. At first, images scroll at high speed. Then the
scrolling gradually slows down until a single image is
stopped on the screen. The image that finally appears is
random, and subject to no rules or system.
1.
Align the mode selector with “ ” (PLAY).
2.
While the camera is turned off, hold down [왗]
as you press the power button to turn it on.
• Keep [왗] held down until images appear on the
monitor screen.
• This starts the Image Roulette operation, scrolling
images on the display, finally stopping at one.
3.
Press [왗] or [왘] to restart the Image Roulette
operation.
4.
To turn off Image Roulette, align the mode
selector with “ ” (REC) to enter the REC
mode or press the power button to turn off
the camera.
IMPORTANT!
• Image Roulette does not display voice recording
images (EX-M20U only).
• Image Roulette is disabled when there is only one
snapshot image available.
• Note that Image Roulette works only with images
recorded with this camera. Image Roulette may not
operate properly when other types of images are in
memory.
• If you do not start another Image Roulette operation
for about one minute after the final image appears,
the camera enters its normal PLAY mode.
89
Page 15

PLAYBACK
Adding Audio to a Snapshot (EX-M20U Only)
The “after-recording” feature lets you add audio to
snapshots after they are recorded. You can also re-record
an audio image (one with a icon on it).
• Audio Format: WAVE/ADPCM recording format
This is the Windows standard format for audio recording.
The file extension of a WAVE/ADPCM file is “.WAV”.
• Recording Time:
Up to about 30 seconds per image
• Audio File Size:
Approximately 240KB (30-second recording of
approximately 8KB per second)
1.
In the PLAY mode, use [왗] and [왘] to scroll
through snapshots until the one to which you
want to add audio is displayed.
2.
Press [MENU].
3.
Select the “PLAY”
tab, select “Dubbing”,
and then press [왘].
4.
Press the shutter release button to start audio
recording.
5.
Recording stops after about 30 seconds or
when you press the shutter release button.
90
Page 16

PLAYBACK
To re-record audio
1.
In the PLAY mode, use [왗] and [왘] to scroll
through snapshots until the one whose audio
you want to re-record is displayed.
2.
Select the “PLAY” tab, select “Dubbing”, and
then press [왘].
3.
Use [왖] and [왔] to select “Delete”, and then
press [SET].
• If you merely want to delete the audio with rerecording, press [MENU] here to complete the
procedure.
4.
Press the shutter release button to start audio
recording.
5.
Recording stops after about 30 seconds or
when you press the shutter release button.
• This deletes the previous recording and replaces it
with a new one.
IMPORTANT!
• Keep the microphone on the
front of the camera pointed at
the subject.
• Take care that you do not
block the microphone with
your fingers.
Microphone
• Good recording results are not possible when the
camera is too far from the subject.
• Operating camera buttons during recording can
cause button noise to be included in the audio.
• The (Audio) icon appears on the monitor screen
after audio recording is complete.
• You will not be able to record audio when remaining
memory capacity is low.
• The following types of audio recording are not
supported.
— Adding audio to a protected snapshot (page 96)
• Audio that is re-recorded or deleted cannot be
recovered. Make sure you no longer need audio
before re-recording or deleting it.
91
Page 17

PLAYBACK
Playing Back a Voice Recording File
(EX-M20U Only)
Perform the following steps to play back a voice recording
file.
1.
In the PLAY mode, use [왗] and [왘] to display
the voice file (a file with on it) you want to
play.
2.
Press [SET].
• This starts playback of
the voice recording file
through the camera’s
speaker.
• You can perform the
following operations
while audio is playing.
To do this:
Fast forward or fast reverse
the audio
Pause and unpause audio
playback
Adjust audio volume
Cancel playback
Do this:
Hold down [왗] or [왘].
Press [SET].
Press [왖] or [왔].
Press [MENU].
IMPORTANT!
• Audio volume can be adjusted only when playback is
being performed or is paused.
• If your recording has index marks (page 67) inside it,
you can jump to the index mark before or after the
current playback location by pausing playback and
then pressing [왗] or [왘]. Next, press [SET] to
resume playback from the index mark position.
• When you have the LCD remote controller connected
to the camera, audio is output through the stereo
headphones (page 155) instead of the camera’s
speaker. Output through the headphones is
monaural.
• The volume of audio recorded with the camera
cannot be adjusted using the LCD remote controller.
Use the camera’s controller to adjust volume level in
this case.
92
Page 18

DELETING FILES
DELETING FILES
You can delete a single file, or you can delete all files
currently in memory.
IMPORTANT!
• Note that file deletion cannot be undone. Once you
delete a file, it is gone. Make sure you really do not
need a file anymore before you delete it. Especially
when deleting all files, make sure you check all the
files you have stored before proceeding.
• A protected file cannot be deleted. To delete a
protected file, unprotect it first (page 96).
• Delete cannot be performed when all the files in
memory are protected (page 97).
• On the EX-M20U, deleting an audio snapshot
deletes both the image file and the audio file
attached to it.
Deleting a Single File
Perform the following steps when you want to delete a
single file.
1.
In the PLAY mode,
press [] ( ).
2.
Use [] and [] to scroll through files and
display the one you want to delete.
3.
Use [] and [] to select “Delete”.
• To exit the file delete operation without deleting
anything, select “Cancel”.
4.
Press [SET] to delete the file.
• Repeat steps 2 through 4 to delete other files, if you
want.
5.
Press [MENU] to exit the menu screen.
93
Page 19
DELETING FILES
IMPORTANT!
• If a file cannot be deleted for some reason, the
message “This function is not supported for this file.”
appears when you try to delete it.
Deleting All Files
The following procedure deletes all unprotected files
currently in memory.
1.
In the PLAY mode, press [] ( ).
2.
Use [] and [] to select “All Files Delete”,
and then press [SET].
3.
Use [] and [] to select “Yes”.
• To exit the file delete operation without deleting
anything, select “No”.
4.
Press [SET] to delete all the files.
94
 Loading...