

Page 1
Digital Camera
EX-S770D
User’s Guide
Thank you for purchasing this CASIO product.
• Before using it, be sure to read the precautions
contained in this User’s Guide.
• Keep the User’s Guide in a safe place for future
reference.
• For the most up-to-date information about this
product, visit the official EXILIM
Website at http://www.exilim.com/.
E
K837PCM2DMX
1
Page 2
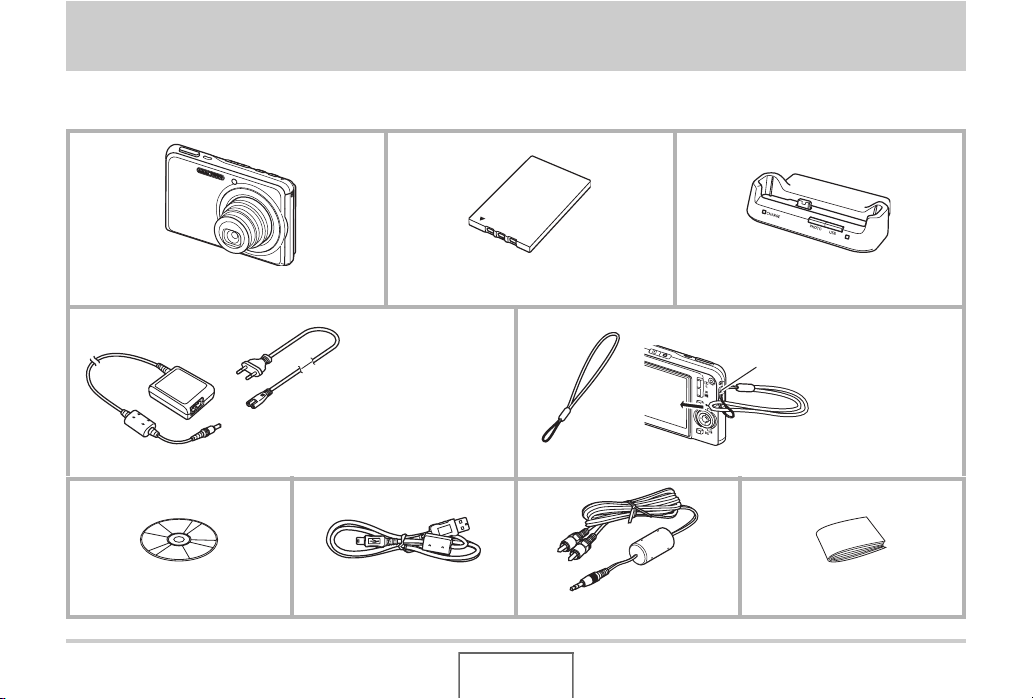
UNPACKING
As you unpack your camera, check to make sure that all items shown below are included. If anything is missing, contact your original
retailer.
Digital Camera
* The shape of the AC
power cord plug varies
according to country or
geographic area.
Special AC Adaptor (AD-C52S or AD-C52G)/AC Power Cord* Strap
CD-ROM USB Cable AV Cable Basic Reference
B
Rechargeable Lithium Ion Battery
(NP-20)
2
USB Cradle (CA-34)
To attach the strap to the camera.
Attach strap here.
UNPACKING
Page 3

CONTENTS
UNPACKING 2
QUICK START BASICS 10
First, charge the battery . . . . . . . . . . . . . . . . . . . . . 10
Configuring Display Language, Date, and
Time Settings . . . . . . . . . . . . . . . . . . . . . . . . . . . . . . 12
Using a Memory Card . . . . . . . . . . . . . . . . . . . . . . . 14
Shooting a Snapshot . . . . . . . . . . . . . . . . . . . . . . . . 16
Viewing Snapshots . . . . . . . . . . . . . . . . . . . . . . . . . 18
Shooting a Movie . . . . . . . . . . . . . . . . . . . . . . . . . . . 19
Viewing a Movie . . . . . . . . . . . . . . . . . . . . . . . . . . . . 20
Deleting a File . . . . . . . . . . . . . . . . . . . . . . . . . . . . . 21
INTRODUCTION 22
Features . . . . . . . . . . . . . . . . . . . . . . . . . . . . . . . . . . 22
Read this first! . . . . . . . . . . . . . . . . . . . . . . . . . . . . . 24
Precautions during Use . . . . . . . . . . . . . . . . . . . . . 27
GETTING READY 37
Charging the Battery . . . . . . . . . . . . . . . . . . . . . . . . 37
■ To load the battery 37
■ To charge the battery 38
■ Replacing the Battery 42
■ Battery Precautions 42
Turning Power On and Off . . . . . . . . . . . . . . . . . . .43
Using a Memory Card . . . . . . . . . . . . . . . . . . . . . . . 46
■ Loading a Memory Card into the Camera 48
■ Replacing the Memory Card 49
■ Formatting a Memory Card 50
Using On-screen Menus . . . . . . . . . . . . . . . . . . . . . 52
■ Configuring Monitor Screen Settings 53
■ Selecting a Screen Layout (Layout) 54
■ Turning Display Information On and Off (Info.) 57
■ Adjusting Monitor Screen Brightness (Brightness) 59
■ Adjusting Monitor Screen Image Quality (Type) 60
If you lose your way... . . . . . . . . . . . . . . . . . . . . . . . 61
Using the Camera on a Trip . . . . . . . . . . . . . . . . . .62
■ Extra Batteries 62
■ Using the Camera in another Country 62
CONTENTS
3
Page 4

SHOOTING A SNAPSHOT 63
SHOOTING A MOVIE 89
Holding the Camera Correctly . . . . . . . . . . . . . . . . 63
Shooting a Snapshot . . . . . . . . . . . . . . . . . . . . . . . . 64
■ Specifying Image Size 67
■ Specifying Image Quality 69
■ Turning Off the AF Assist Lamp 70
■ Snapshot Shooting Precautions 71
■ Auto Focus Restrictions 72
Shooting with Zoom . . . . . . . . . . . . . . . . . . . . . . . . 72
Using Flash . . . . . . . . . . . . . . . . . . . . . . . . . . . . . . . 76
Using the Self-Timer . . . . . . . . . . . . . . . . . . . . . . . . 81
Using Continuous Shutter . . . . . . . . . . . . . . . . . . . 83
■ Selecting the Continuous Shutter Mode 83
■ Recording with Normal-speed Continuous
Shutter, High-speed Continuous Shutter,
and Flash Continuous Shutter 84
■ Recording with Zoom Continuous Shutter 84
■ Continuous Shutter Precautions 85
Adding Audio to a Snapshot . . . . . . . . . . . . . . . . . 86
B
Movie Image Quality . . . . . . . . . . . . . . . . . . . . . . . .89
Shooting a Movie . . . . . . . . . . . . . . . . . . . . . . . . . . .90
■ Movie Recording Precautions 91
Using Short Movie . . . . . . . . . . . . . . . . . . . . . . . . . . 92
Using Past Movie . . . . . . . . . . . . . . . . . . . . . . . . . . .95
Shooting a Snapshot while Shooting a Movie
(Snapshot-In-Movie) . . . . . . . . . . . . . . . . . . . . . . . . 97
USING BEST SHOT 98
Reducing the Effects of Hand and Subject
Movement . . . . . . . . . . . . . . . . . . . . . . . . . . . . . . . .104
Taking Bright Images without Flash . . . . . . . . . .105
Shooting Images of Business Cards and
Documents (Business Shot) . . . . . . . . . . . . . . . . . 106
Restoring an Old Photograph. . . . . . . . . . . . . . . . 109
CONTENTS
4
Page 5

ADVANCED SETTINGS 112
Changing the Focus Mode . . . . . . . . . . . . . . . . . . 112
■ Using Auto Focus 113
■ Using Macro Focus 114
■ Using Fixed Focus (Pan Focus) 118
■ Using Infinity Focus 119
■ Using Manual Focus 119
Correcting Image Brightness (EV Shift) . . . . . . . 121
Controlling White Balance . . . . . . . . . . . . . . . . . . 123
Specifying ISO Sensitivity . . . . . . . . . . . . . . . . . . 126
Specifying the Metering Mode . . . . . . . . . . . . . . . 127
Using the Camera’s Filter Effects . . . . . . . . . . . . 129
Controlling Image Sharpness . . . . . . . . . . . . . . . . 129
Controlling Color Saturation . . . . . . . . . . . . . . . . 130
Adjusting Image Contrast . . . . . . . . . . . . . . . . . . . 130
Date Stamping Snapshots . . . . . . . . . . . . . . . . . . 131
Using the On-screen Histogram to
Check Exposure. . . . . . . . . . . . . . . . . . . . . . . . . . . 132
Other Useful Recording Functions . . . . . . . . . . . 135
■ Using Key Customize to Assign Functions
[W] and [X]135
■ Displaying an On-screen Grid 136
■ Displaying the Image You Just Recorded
(Image Review) 137
■ Using Icon Help 137
■ Using Mode Memory to Configure
Power On Default Settings 138
■ Resetting the Camera to
Its Initial Factory Defaults 140
VIEWING SNAPSHOTS
AND MOVIES 142
Viewing a Snapshot . . . . . . . . . . . . . . . . . . . . . . . . 142
■ Listening to the Audio of an Audio Snapshot 143
Viewing a Movie . . . . . . . . . . . . . . . . . . . . . . . . . . .144
■ Playing Back a Movie with Anti Shake 146
Playing a Slideshow on the Camera . . . . . . . . . . 147
Viewing Camera Images on a TV . . . . . . . . . . . . . 151
Zooming the Displayed Image . . . . . . . . . . . . . . . 154
Using the 12-image Screen . . . . . . . . . . . . . . . . . . 155
Using the Calendar Screen . . . . . . . . . . . . . . . . . .155
Using Image Roulette . . . . . . . . . . . . . . . . . . . . . .156
5
CONTENTS
Page 6

EDITING IMAGES 158
DELETING FILES 186
Resizing a Snapshot . . . . . . . . . . . . . . . . . . . . . . . 158
Cropping a Snapshot . . . . . . . . . . . . . . . . . . . . . . 159
Keystone Correction . . . . . . . . . . . . . . . . . . . . . . . 160
Using Color Restoration to Correct
the Color of an Old Photograph . . . . . . . . . . . . . . 162
Editing the Date and Time of an Image . . . . . . . . 164
Rotating an Image . . . . . . . . . . . . . . . . . . . . . . . . . 165
Editing a Movie on the Camera . . . . . . . . . . . . . . 166
Creating a Snapshot of a Movie Frame
(MOTION PRINT) . . . . . . . . . . . . . . . . . . . . . . . . . . 171
USING AUDIO 173
Adding Audio to a Snapshot . . . . . . . . . . . . . . . . 173
Recording Audio Only (Voice Recording) . . . . . .176
MANAGING YOUR FILES 179
Files and Folders . . . . . . . . . . . . . . . . . . . . . . . . . . 179
Protecting a File Against Deletion . . . . . . . . . . . . 180
Using the FAVORITE Folder . . . . . . . . . . . . . . . . . 181
Copying Files . . . . . . . . . . . . . . . . . . . . . . . . . . . . . 184
Deleting a Specific File . . . . . . . . . . . . . . . . . . . . . 186
Deleting All Files . . . . . . . . . . . . . . . . . . . . . . . . . . 187
Deleting FAVORITE Folder Snapshots . . . . . . . .187
OTHER SETTINGS 189
Configuring Camera Sound Settings . . . . . . . . . .189
Turning the Startup Screen On or Off . . . . . . . . . 191
Specifying the File Name Serial Number
Generation Rule . . . . . . . . . . . . . . . . . . . . . . . . . . .192
Changing the Camera Date and Time Setting . . .192
Using World Time . . . . . . . . . . . . . . . . . . . . . . . . . 194
■ Configuring World Time Settings 194
Changing the Display Language . . . . . . . . . . . . .196
Changing the USB Port Protocol . . . . . . . . . . . . . 196
[ ] (REC) and [ ] (PLAY) Button Settings . .197
Formatting Built-in Memory . . . . . . . . . . . . . . . . . 199
CONTENTS
6
Page 7

PRINTING 200
Types of Printing . . . . . . . . . . . . . . . . . . . . . . . . . . 200
Using Professional Print Service . . . . . . . . . . . . . 201
Using Your Printer to Print Images . . . . . . . . . . . 202
Using DPOF to Specify Images to be Printed
and the Number of Copies . . . . . . . . . . . . . . . . . . 205
■ Date Stamping 208
Supported Protocols . . . . . . . . . . . . . . . . . . . . . . . 209
USING THE CAMERA WITH A
COMPUTER 211
What you can do . . . . . . . . . . . . . . . . . . . . . . . . . . 211
Using the Camera with a Windows Computer . . 212
■ Viewing and Storing Images on a Computer 215
■ Transfer of Images from the Camera and
Management of Images on the Computer 224
■ Retouching, Reorienting, or Printing Snapshots 227
■ Playing Movies 228
■ Transferring Images to the Camera 229
■ Viewing User Documentation (PDF) Files 233
■ User Registration 234
■ Exiting the CD-ROM Menu 234
Using the Camera with a Macintosh . . . . . . . . . . 235
■ Viewing and Storing Images on a Macintosh 236
■ Transfer of Images from the Camera and
Management of Images on Your Macintosh 242
■ Viewing User Documentation (PDF Files) 243
■ Registering as a User 244
Reading Files Directly from a Memory Card . . . . 244
Memory Card Data . . . . . . . . . . . . . . . . . . . . . . . . .245
TRANSFERRING DOCUMENTS TO
YOUR CAMERA (DATA STORAGE) 249
Transferring Documents to the Camera . . . . . . .249
■ Transferring documents from a
computer running Windows 249
■ Transferring documents from a Macintosh 251
Viewing a Transferred Document on
the Camera . . . . . . . . . . . . . . . . . . . . . . . . . . . . . . . 253
Deleting Documents from Camera Memory . . . .255
■ Deleting a Document Page 255
■ Deleting Documents 256
7
CONTENTS
Page 8

APPENDIX 258
General Guide . . . . . . . . . . . . . . . . . . . . . . . . . . . . 258
Monitor Screen Contents . . . . . . . . . . . . . . . . . . . 260
Menu Reference . . . . . . . . . . . . . . . . . . . . . . . . . . . 262
Display Menu Reference . . . . . . . . . . . . . . . . . . . . 266
Indicator Lamps . . . . . . . . . . . . . . . . . . . . . . . . . . . 267
Troubleshooting Guide . . . . . . . . . . . . . . . . . . . . . 271
■ Find the Problem and Fixing It 271
■ If you have problems installing the USB driver... 275
■ Display Messages 276
Specifications . . . . . . . . . . . . . . . . . . . . . . . . . . . . 278
8
CONTENTS
Page 9
.
Getting the Most Out of Your Camera
Snapshots
Shooting with Optimum Setups
➞ USING BEST SHOT . . . . . . . . . . . . . . . . . . . . . . . . . . .98
Portrait, Scenery, Night Scene, Night Scene Portrait, Children, etc.
Adding Special Effects
➞ USING BEST SHOT . . . . . . . . . . . . . . . . . . . . . . . . . . .98
Monochrome, retro, etc.
Compensating for Hand or Subject Movement
➞
Reducing the Effects of Hand and Subject Movement . 104
Increasing Sensitivity when Lighting is Dim
➞ Taking Bright Images without Flash . . . . . . . . . . . . . .105
Making Images of Business Cards, Documents, and
Meeting Information (White Board) Easier to Read
➞ Shooting Images of Business Cards and Documents
(Business Shot) . . . . . . . . . . . . . . . . . . . . . . . . . . . . . .106
Selecting the Best Focus Mode for Shooting Conditions
➞ Changing the Focus Mode . . . . . . . . . . . . . . . . . . . . .112
Eliminating Light Source Color Cast
➞ Controlling White Balance . . . . . . . . . . . . . . . . . . . . . .123
Sharpening or Softening Subject Outlines
➞ Controlling Image Sharpness . . . . . . . . . . . . . . . . . . .129
Snapshots
Enhancing or Reducting Color Satuation
➞ Controlling Color Saturation . . . . . . . . . . . . . . . . . . . . 130
Increasing or Decreasing Contrast
➞ Adjusting Image Contrast . . . . . . . . . . . . . . . . . . . . . . 130
Movies
Normal Movie Recording
➞ Shooting a Movie . . . . . . . . . . . . . . . . . . . . . . . . . . . . . 90
Limiting Movie Length
➞ Using Short Movie . . . . . . . . . . . . . . . . . . . . . . . . . . . . 92
Capturing Action Occurring before
the Shutter Button is Pressed
➞ Using Past Movie . . . . . . . . . . . . . . . . . . . . . . . . . . . . . 95
9
CONTENTS
Page 10
QUICK START BASICS
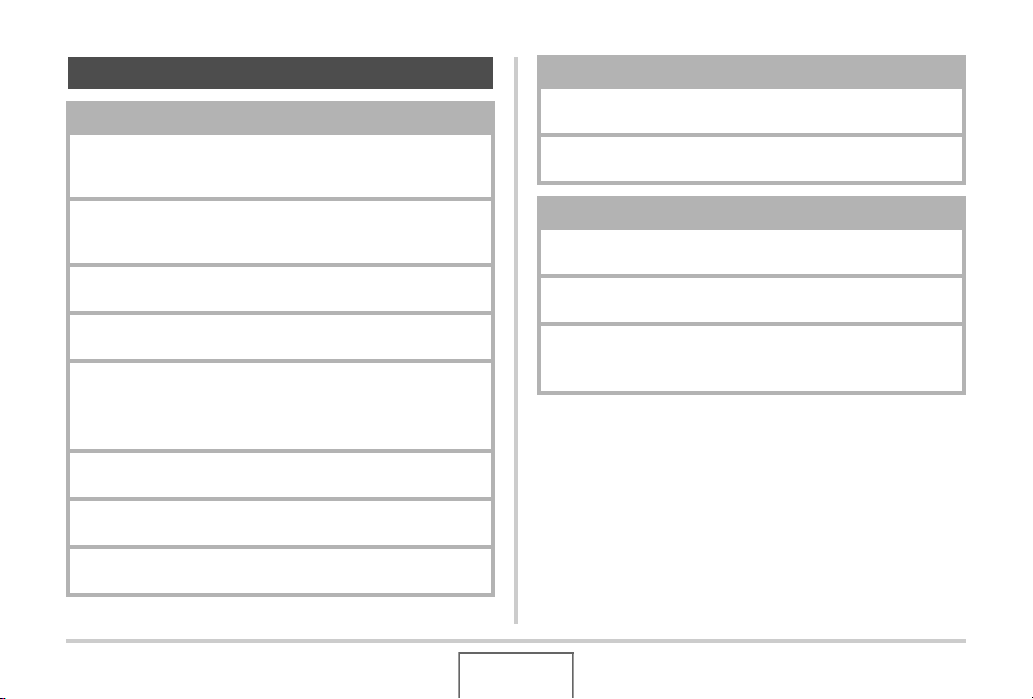
First, charge the battery
■ Loading the Battery into the Camera
1. Open the battery cover.
While pressing lightly on
the cover, slide it in the
direction indicated by the
arrow to open.
2. Load the battery into the camera.
(page 37)
3. Close the battery cover.
10
QUICK START BASICS
Page 11
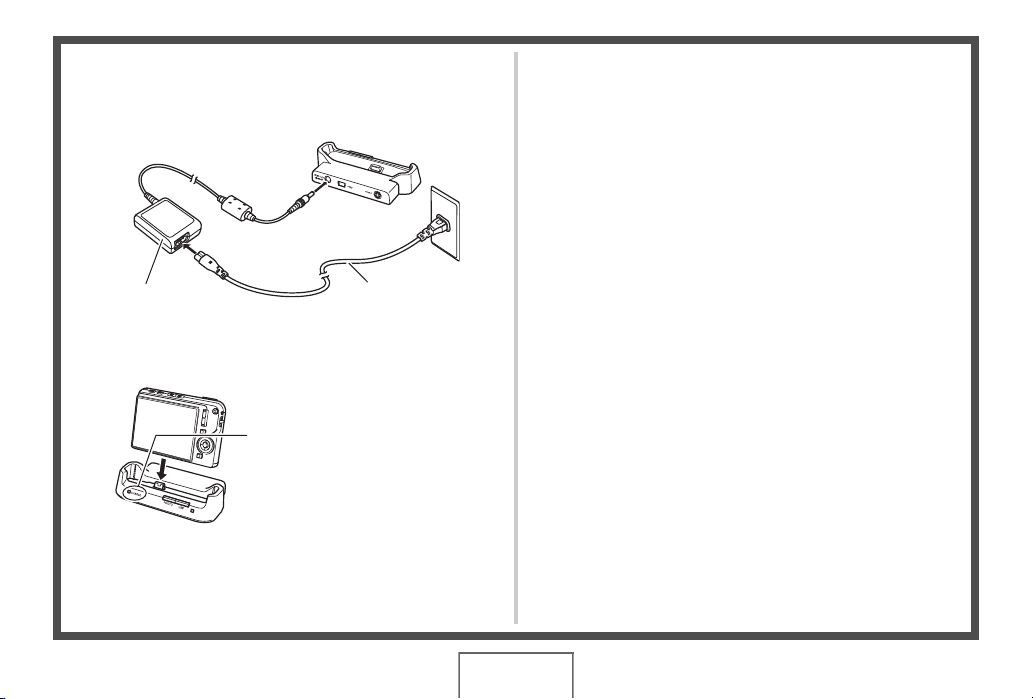
■ Using the USB Cradle to Charge
1. Plug the USB cradle into a household power
outlet.
AC adaptor
AC power cord
2. Place the camera onto the USB cradle.
[CHARGE] lamp
Red: Charging
Green: Charged (Full)
• It takes about two hours to
achieve a full charge.
11
QUICK START BASICS
Page 12
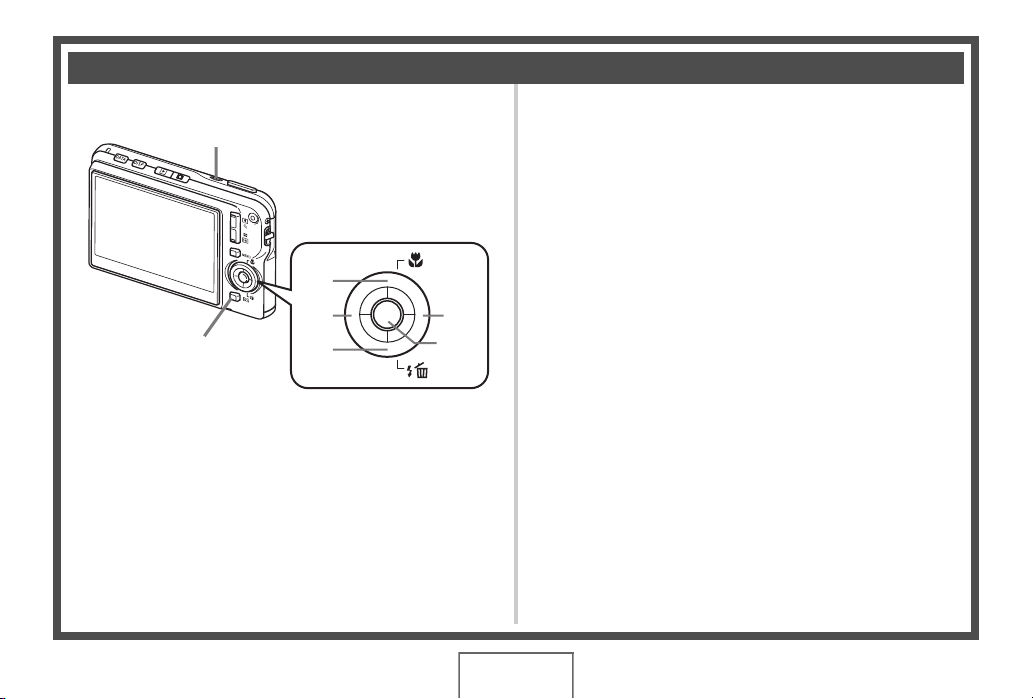
Configuring Display Language, Date, and Time Settings
[ON/OFF] (Power)
1. Press [ON/OFF] to turn on the camera.
2. Use [S], [T], [W], and [X] to select the
language you want and then press [SET].
3. Use [S], [T], [W], and [X] to select the area
where you will use the camera and then press
[SET].
[]
[]
[BS]
The settings on this page are required the first time you turn on
the camera after purchasing it.
[]
[]
[SET]
4. Use [S] and [T] to select the city where you
will use the camera and then press [SET].
5. Use [S] and [T] to select the summer time
(DST) setting you want and then press [SET].
(pages 192, 196)
12
QUICK START BASICS
Page 13
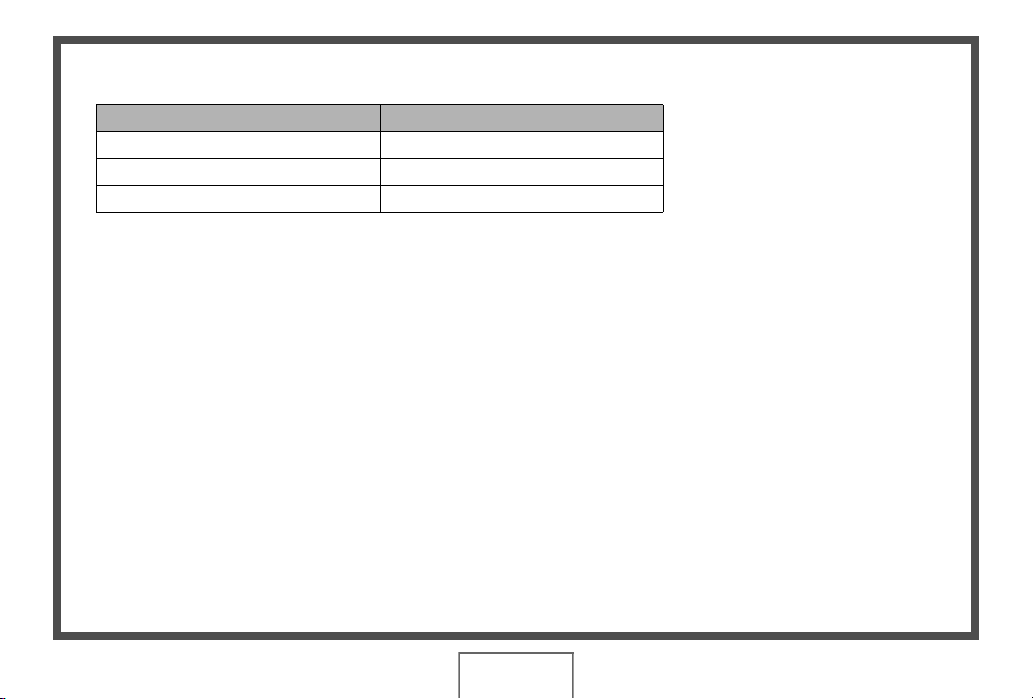
6. Use [S] and [T] to select the date format and then press [SET].
Example: December 19, 2006
To display the date like this: Select this option:
06/12/19 YY/MM/DD
19/12/06 DD/MM/YY
12/19/06 MM/DD/YY
7. Set the date and the time.
Use [W] and [X] to select the setting you want (year, month, day, hour, minute) and then use [S] and [T] to change the setting.
To switch between 12-hour and 24-hour format, press [BS].
8. When all the settings are the way you want, press [SET].
9. Press [ON/OFF] to turn off the camera.
• After finishing this procedure, advance to the procedure on the next page.
13
QUICK START BASICS
Page 14
E
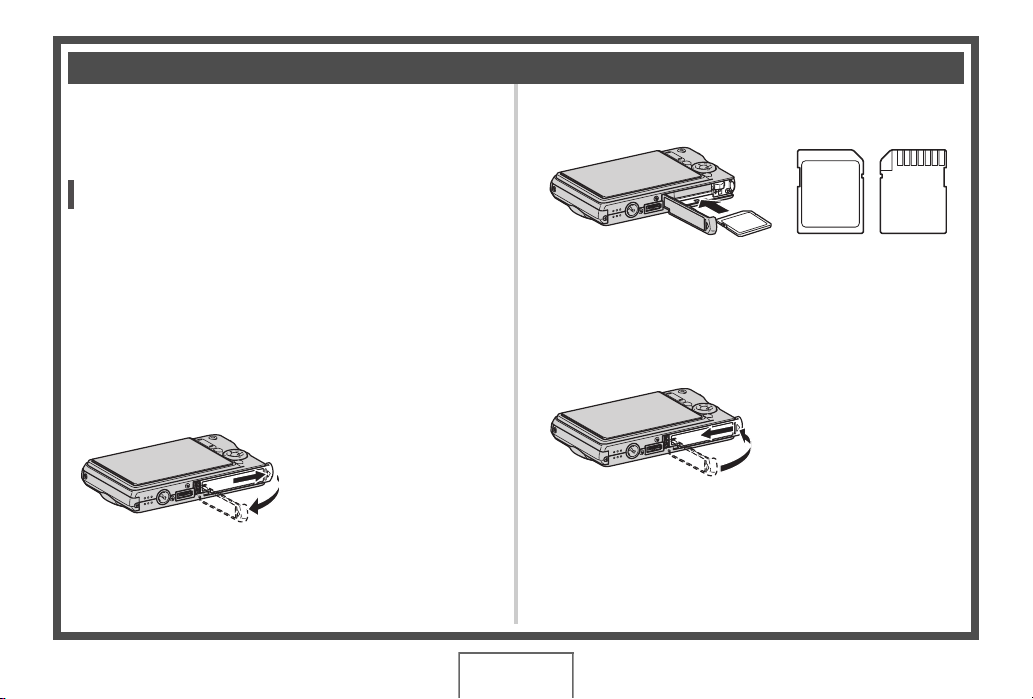
Using a Memory Card
■ Loading a Memory Card into the Camera
When a memory card is loaded, the camera stores images you
shoot on the card.
NOT
• Though the camera has built-in memory, using a memory
card provides additional capacity you can use to store more
images, high-quality and large-size images, and longer
movies.
• The camera will store images in its built-in memory if there
is no memory card loaded. If you prefer to use built-in
memory, skip this procedure and go to “Shooting a
Snapshot” on page 16.
1. Open the battery cover.
While pressing lightly on the
cover, slide it in the
direction indicated by the
arrow to open.
2. Load a memory card into the camera.
MEMORY
EMORY
M
CARD
With the front of the memory card facing upwards (towards
the monitor screen side of the camera), slide it into the card
slot and press until it clicks securely into place.
CARD
Front Back
3. Close the battery cover.
(page 46)
14
QUICK START BASICS
Page 15
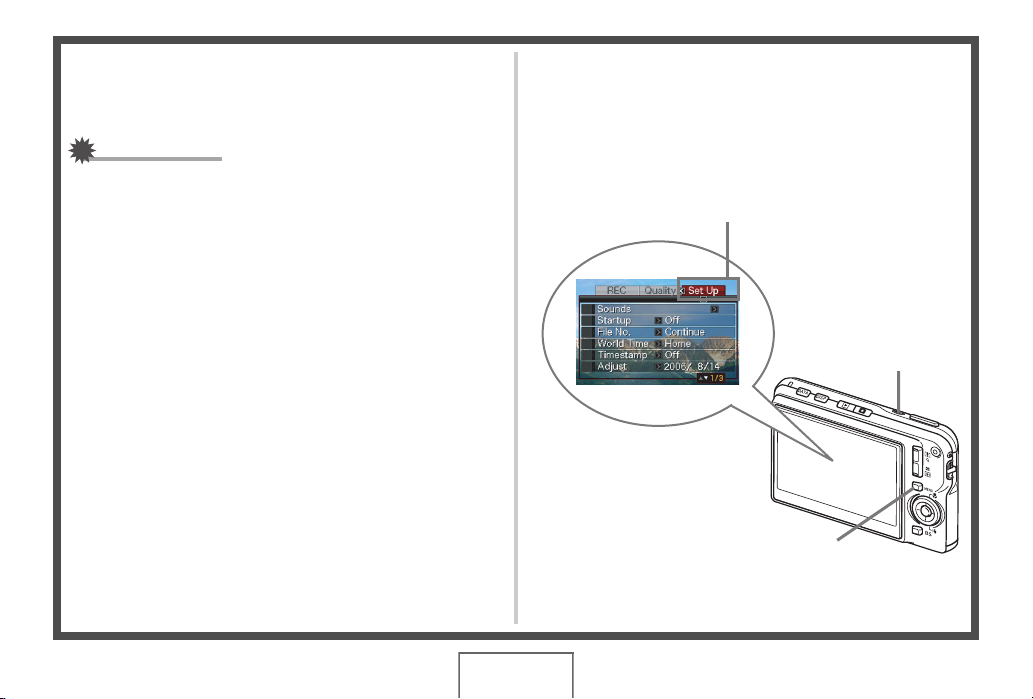
■ Formatting a Memory Card
Before you can use a memory card with your camera, you must
format it.
IMPORTANT!
• Formatting a memory card that already has snapshots or
other files on it, will delete its contents. Normally you do not
need to format a memory card again. However, if storing to
a card has slowed down or if you notice any other
abnormality, re-format the card.
• Be sure to perform the following procedure on the camera
to format the memory card.
5. Press [S] to select “Format” and then press
[SET].
• To cancel formatting, select “Cancel” and then press
[SET].
Wait until the “Busy... Please wait...” message disappears
from the monitor screen before doing anything else.
“Set Up” Tab
1. Press [ON/OFF] to turn on the camera.
2. Press [MENU].
3. Use [W] and [X] to select the “Set Up” tab.
4. Use [T] to select “Format” and then press [X].
[ON/OFF] (Power)
[MENU]
QUICK START BASICS
15
Page 16
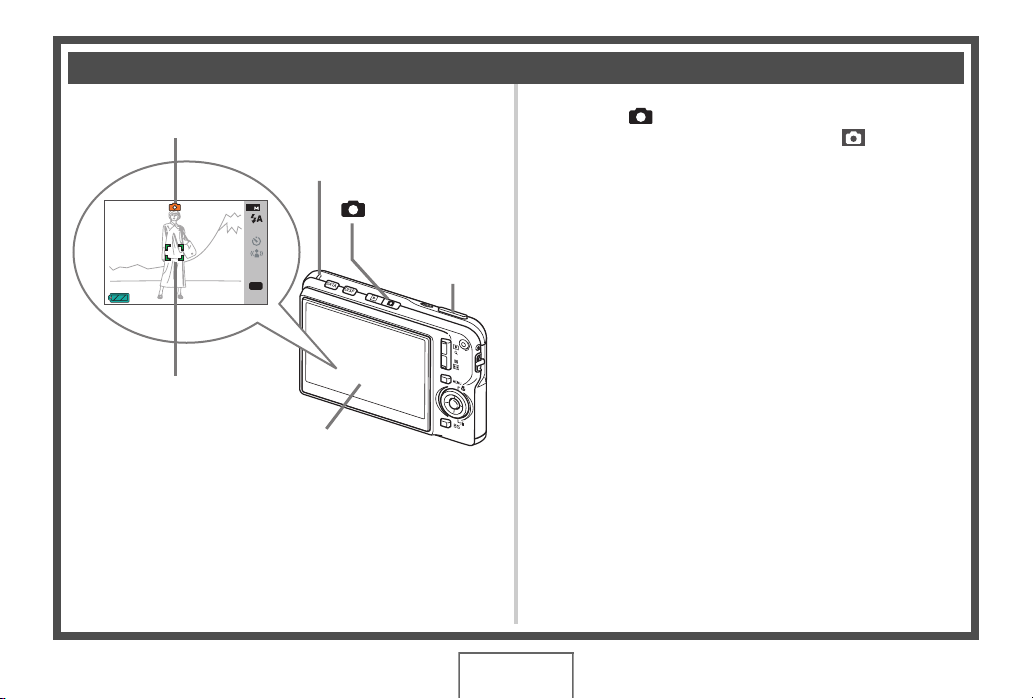
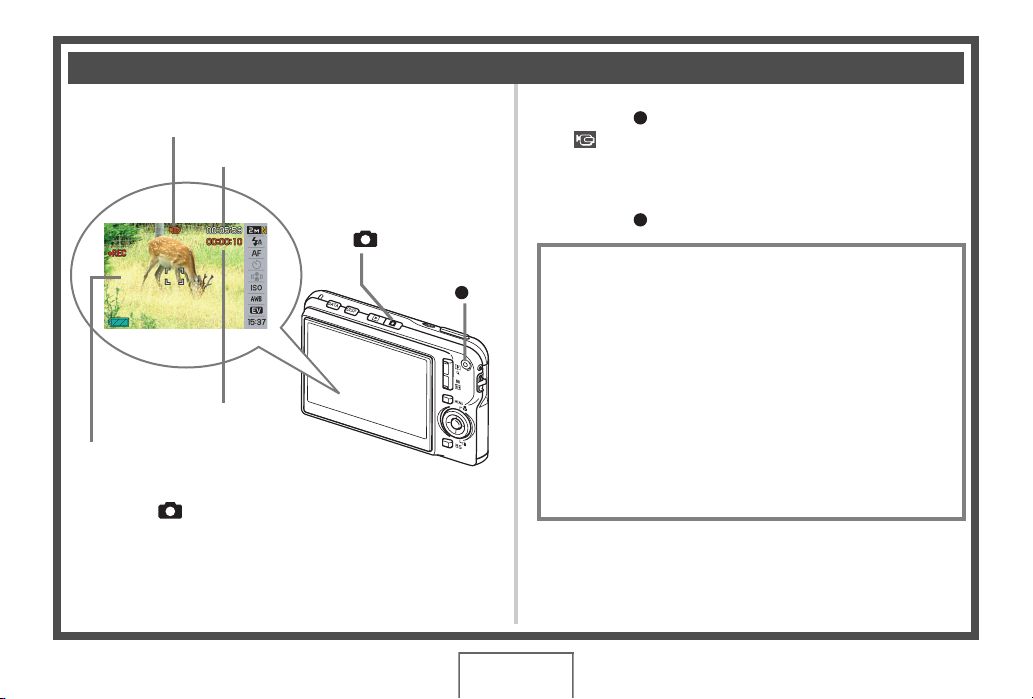
Shooting a Snapshot
62
Auto icon
2
62
N
AF
ISO
AWB
EV
15:37
Focus Frame
Monitor Screen
Operation Lamp
[] (REC)
Shutter Button
(page 63)
1. Press [ ] to turn on the camera.
This enters the REC mode and displays “ ” (Auto icon)
on the monitor screen.
2. Point the camera at the subject.
3. While taking care to keep the camera still, half-
press the shutter button.
When the image is in focus, the camera will beep, the operation
lamp will light green, and the focus frame will turn green.
4. Continuing to keep the camera still, press the
shutter button all the way down.
The recorded image will remain on the display for about one
second, and then it will be stored in memory. After that, the
camera will be ready to shoot the next image.
16
QUICK START BASICS
Page 17
Snapshot Image Size and Image Quality
Your camera lets you select from among various image size
and quality settings. Note that image size and quality
settings affect how many images can be stored in memory.
• You can change the image size and quality settings as
required to shoot a smaller or lower-resolution image for
attachment to an e-mail message, for publishing on a
website, etc. You can also select an image size that suits
the size of paper you plan to use for printing your images.
For details, see pages 67, 69, and 278.
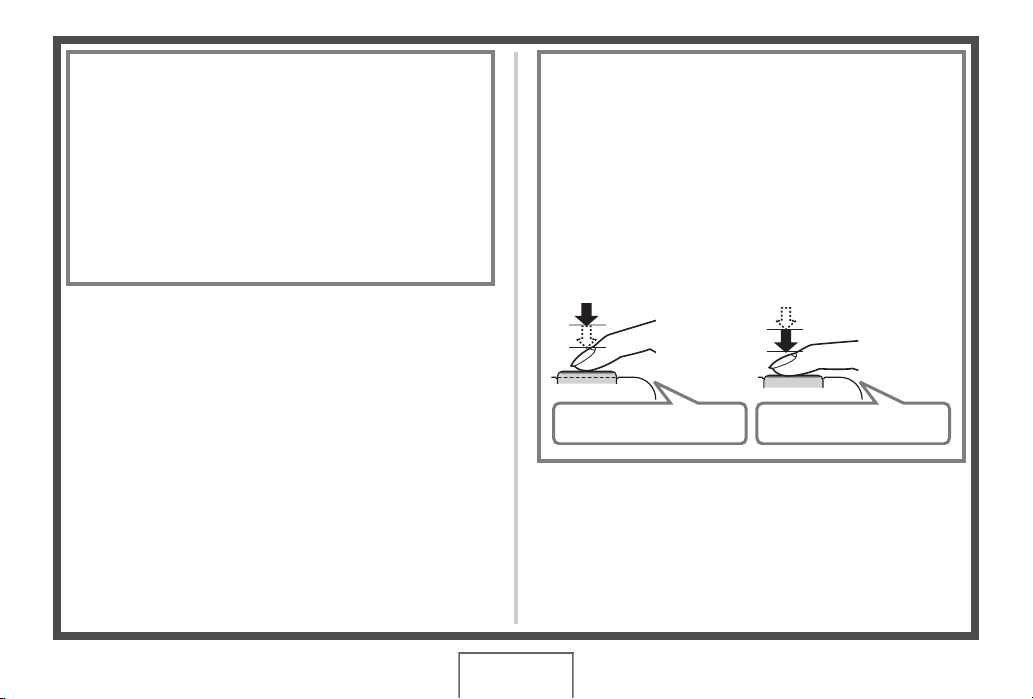
How do I half-press the shutter button?
The shutter button is designed to stop about half way down
when you press it lightly. Stopping at this point is called a
“half-press”. When you half-press the shutter button, the
camera automatically adjusts exposure and focuses on the
subject it is currently pointed at.
Mastering how much pressure is required for a half-press
and a full-press of the shutter button is an important
technique for good-looking images.
Half-press
Press lightly
until the
button stops.
Beep-beep! Click!
Full-press
All the way
17
QUICK START BASICS
Page 18
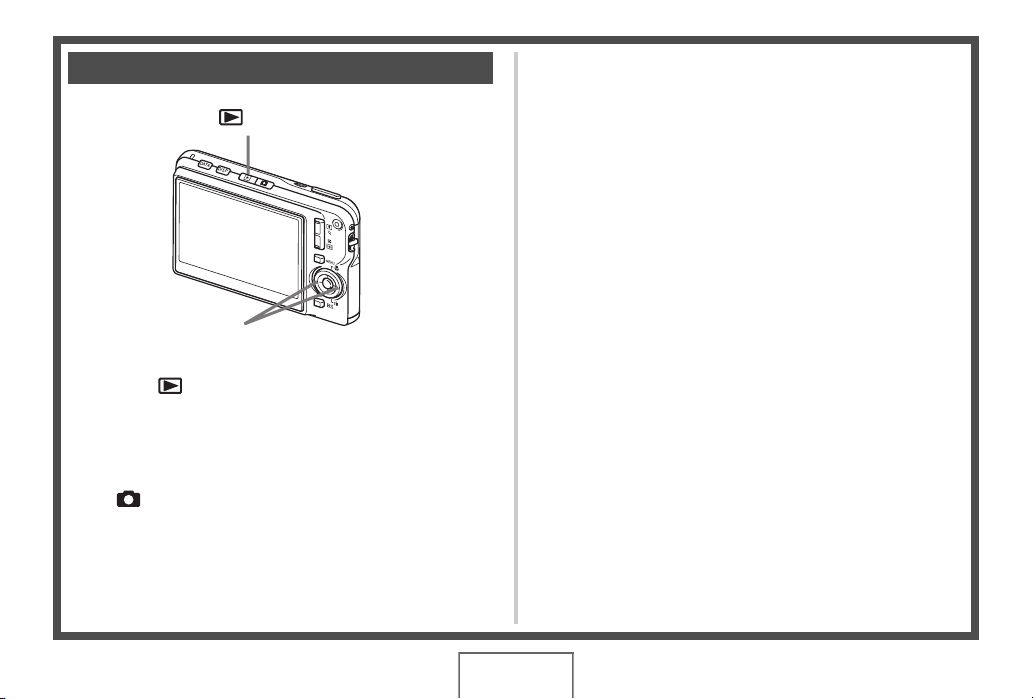
Viewing Snapshots
[ ] (PLAY)
[W][X]
1. Press [ ] to enter the PLAY mode.
If there are multiple images in memory, use [W] and [X] to
scroll through them.
■ To return to the REC mode
Press [ ].
(page 142)
18
QUICK START BASICS
Page 19
Shooting a Movie
Movie Icon
Remaining Recording Time
(page 89)
2. Press [ ] to start shooting the movie.
“ ” (movie icon) remains on the monitor screen while
movie recording is in progress.
• Audio is also recorded during movie recording.
[] (REC)
Recording Time
Movie Recording Screen
1. Press [ ] to enter the REC mode.
[]
3. Press [ ] again to stop recording.
Movie Image Quality
Your camera lets you select from among five image quality
settings (HQ, HQ Wide, Normal, Normal Wide, LP) for
movies. For best camera performance, use the “HQ” (High
Quality) or “HQ Wide” setting for movie recording.
Movie quality is a standard that determines the detail,
smoothness, and clarity of the image during playback.
Reducing image quality let’s you shoot longer, so you can
switch to “Normal”, “Normal Wide”, or “LP” conserve
remaining memory capacity if you start to run low.
For details, see pages 89 and 279.
QUICK START BASICS
19
Page 20
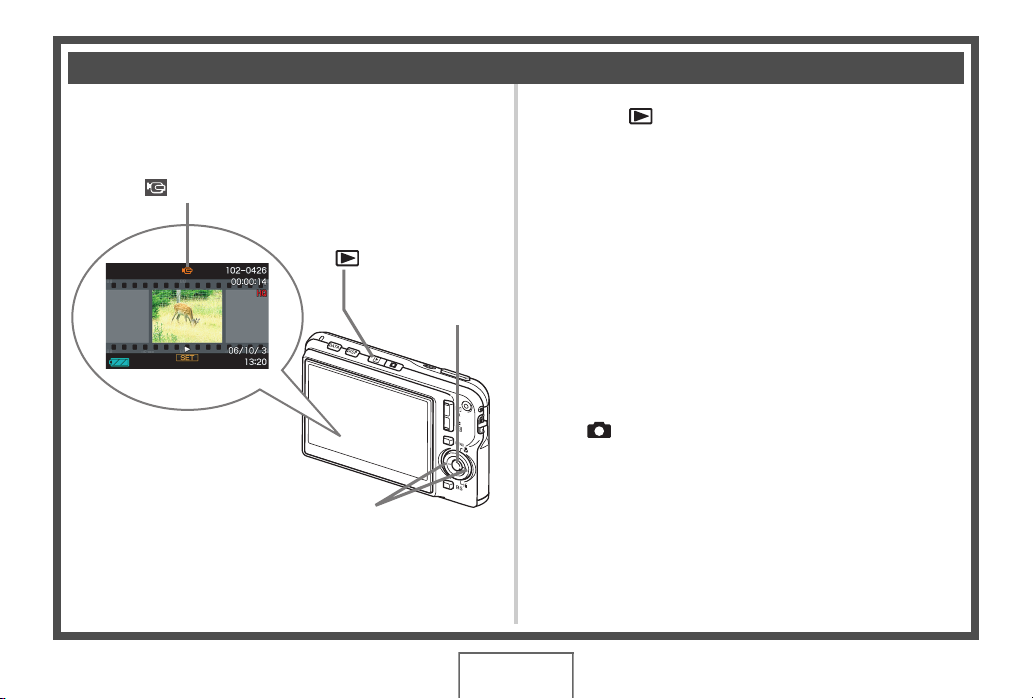
Viewing a Movie
The film-like frame that appears on the monitor screen indicates
that this is an image from a movie.
“ ” Movie icon
(page 144)
1. Press [ ] to enter the PLAY mode.
2. Use [W] and [X] to select the movie you want
to play.
When scrolling through images, a movie is displayed on the
monitor screen by showing its first frame.
[ ] (PLAY)
[W] [X]
[SET]
3. Press [SET] to start playback.
The monitor screen will return to the image selection screen
in step 2 after the end of the movie is reached.
• During movie playback, you can adjust volume, skip
forward and back, and perform other operations (page
145).
■ To return to the REC mode
Press [ ].
QUICK START BASICS
20
Page 21

Deleting a File
You can use the following procedure to delete files you have
transferred to your computer’s hard disk, images you have
printed, or files you simply no longer need. This frees up
memory for recording more images.
[] (PLAY)
[S]
[SET]
[W] [X]
[T] ( )
(page 186)
1. Press [ ].
2. Press [T] ( ).
3. Use [W] and [X] to select the snapshot or
movie you want to delete.
4. Press [S] to select “Delete”.
• To cancel the delete operation, select “Cancel”.
5. Press [SET].
This deletes the selected snapshot or movie.
• If you want to delete more, repeat the above procedure
from step 3.
• To quit the delete operation, press [MENU].
21
QUICK START BASICS
Page 22
INTRODUCTION
Features
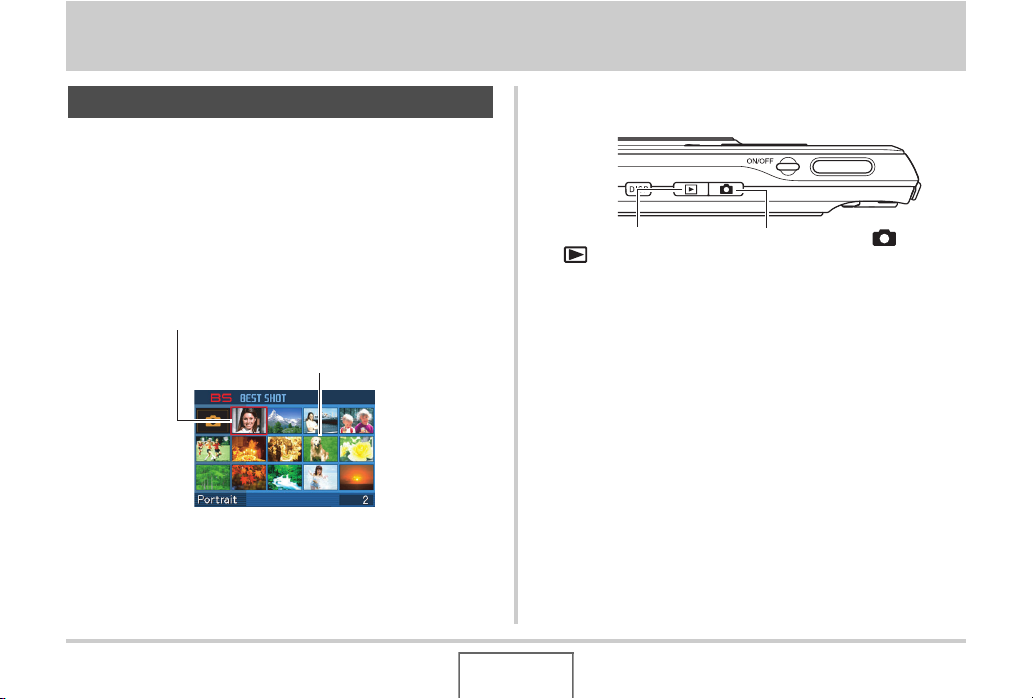
■ BEST SHOT for beautiful shots simply by
selecting a sample image built into the
camera
Simply select the scene that is similar to what you want to shoot
(Night Scene Portrait, Flower, etc.), for instant camera setups. A
dedicated [BS] button gives you direct access to the BEST
SHOT library of sample scenes.
Example: Select for skillful shots of a fast-moving pet.
Example: Select for beautiful portraits.
BEST SHOT Screen
■ Direct Mode Power On
To view images, press
[ ] to power up in the
PLAY mode.
To record, press [ ] to
power up in the REC mode.
■ A powerful collection of useful recording
features
• Hand movement and subject movement reduction using high
shutter speed (page 104)
• High-sensitivity recording avoids dark images, even when the
flash is not being used (page 105)
• Quick Shutter for very high-speed focus (page 118)
INTRODUCTION
22
Page 23
■ High-quality (MPEG-4, DivX) movie
recording
• Short Movie for shooting a short movie starting a few seconds
before [ ] is pressed and a few seconds after it is pressed
(page 92)
• Past Movie for shooting a movie that includes scenes a few
seconds before [ ] is pressed (page 95)
• Normal movie recording (page 90)
• Snapshot recording, even while a movie is being recorded
(page 97)
• MOTION PRINT for printing of a
movie scene as a single image
(page 171)
• DivX Play Bundle (page 213)
Official DivX
product.
Encodes DivX
R
Certified Encorder
R
video content.
■ Powerful Print Features
• DPOF feature for easy specification of date stamping and the
number of copies (page 205)
• Timestamp feature that stamps the date into the image data
(page 131)
• Support for PictBridge for easy at-home printing on a printer
that supports one of these standards, without a computer
(page 202)
■ Multi-function USB Cradle
You can place the camera on the USB cradle to perform the
following operations.
– Battery charging (page 37)
– Photo Stand slideshow of images (page 149)
– Connection to a TV for viewing on the TV screen (page
151)
– Connection to a printer for image printing (page 202)
– Connection to a computer for transfer of images to the
computer (pages 217, 237)
23
INTRODUCTION
Page 24

■ Document transfer to the camera
• Bundled Photo Transport software (page 229) lets you
transfer images saved on your computer or displayed on your
computer screen (website data, maps, etc.) to your camera.
• Bundled CASIO DATA TRANSPORT software lets you
transfer documents from your computer to the camera and
take it along with you (page 249).
Read this first!
■ LCD Panel
The liquid crystal panel of the monitor screen uses highprecision technology that provides a pixel yield in excess of
99.99%.
This means that some pixels may not light or may remain lit at all
times. This is due to the characteristics of the liquid crystal
panel, and does not indicate malfunction.
24
INTRODUCTION
Page 25

■ Copyrights
Except for your own personal enjoyment, unauthorized use of
image, movie, audio, or music files without permission of the
copyright holder is strictly prohibited by copyright laws and
international treaties. Also, regardless of whether such files are
purchased or obtained for free, posting them on the Internet or
distributing them to third parties without permission of the
copyright holder is strictly prohibited by copyright laws and
international treaties. Note that CASIO COMPUTER CO., LTD.
shall not be held liable for any misuse of this product that
infringes on the copyrights of others or that violates copyright
laws.
The following terms, which are used in this manual, are
registered trademarks or trademarks of their respective owners.
• SDHC Logo is a trademark.
• Windows, Internet Explorer, Windows Media, and DirectX are
trademarks of Microsoft Corporation of the United States.
• Macintosh is a trademark of Apple Computer, Inc.
• MultiMediaCard™ is a trademark of Infineon Technologies
AG of Germany, and licensed to the MultiMediaCard
Association (MMCA).
• MMCplus™ is a trademark of the MultiMediaCard
Association.
• Adobe and Reader are trademarks or registered trademarks
in the United States and other countries of Adobe Systems
Incorporated.
• DivX and associated logos are trademarks of DivX, Inc. and
are used under license.
• All other company or product names mentioned herein are
registered trademarks or trademarks of their respective
companies.
• Photo Loader, Photohands, Photo Transport, and CASIO
DATA TRANSPORT rights are owned by CASIO
COMPUTER CO., LTD. Except for the rights of other
companies as defined above, all rights related to these
programs and other rights shall revert to CASIO COMPUTER
CO., LTD.
25
INTRODUCTION
Page 26

• The contents of this manual are subject to change without
notice.
• The content of this manual has been checked at each step
of the production process. Please contact us if you notice
anything that is questionable, erroneous, etc.
• Any copying of the contents of this manual, either in part or
its entirety, is forbidden. Except for your own personal use,
and other use of the contents of this manual without the
permission of CASIO COMPUTER CO., LTD. is forbidden
under copyright laws.
• CASIO COMPUTER CO., LTD. shall not be held liable for
any damages or loss suffered by you or any third party due
to the use or malfunction of this product.
• CASIO COMPUTER CO., LTD. shall not be held liable for
any damages or loss suffered by you or any third party due
to the use of Photo Loader, Photohands, Photo Transport,
and/or CASIO DATA TRANSPORT.
• CASIO COMPUTER CO., LTD. shall not be held liable for
any damages or loss caused by deletion of memory contents
due to malfunction, repair, or any other reason.
• Note that the example screens and product illustrations
shown in this manual may differ somewhat by the screens
and configuration of the actual camera.
26
INTRODUCTION
Page 27

Precautions during Use
■ Take test shots before shooting the final
shot.
• Before shooting your final image, shoot a test shot to ensure
that the camera is recording correctly.
■ Avoid Use While In Motion
• Never use the camera to record or play back images while
operating an automobile or other vehicle, or while walking.
Looking at the monitor while in motion creates the risk of
serious accident.
■ Directly Viewing the Sun or Bright Light
• Never look at the sun or any other bright light through the
cameras viewfinder. Doing so can damage your eyesight.
■ Flash
• Never use the flash unit in areas where flammable or
explosive gas may be present. Such conditions create the risk
of fire and explosion.
• Never fire the flash in the direction of a person operating a
motor vehicle. Doing so can interfere with the drivers vision
and creates the risk of accident.
• Never fire the flash too close to the eyes of the subject. Doing
so creates the risk of loss of eyesight.
27
INTRODUCTION
Page 28

■ Display Panel
• Do not apply strong pressure to the LCD panel surface or
subject it to strong impact. Doing so can cause the display
panel glass to crack.
• Should the display panel ever become cracked, never touch
any of the liquid inside the panel. Doing so creates the risk of
skin inflammation.
• Should display panel liquid ever get into your mouth,
immediately rinse your mouth out and contact your physician.
• Should display panel liquid ever get into your eyes or onto
your skin, immediately rinse with clean water for at least 15
minutes and contact your physician.
■ Connections
• Never plug any devices that are not specified for use with this
camera into connectors. Connecting a non-specified device
creates the risk of fire and electric shock.
■ Transport
• Never operate the camera inside of an aircraft or anywhere
else where operation of such devices is restricted. Improper
use creates the risk of serious accident.
■ Smoke, abnormal odor, overheating, and
other abnormalities
• Continued use of the camera while it is emitting smoke or
strange odor, or while it is overheating creates the risk of fire
and electric shock. Immediately perform the following steps
whenever any of the above symptoms are present.
1. Turn off the camera.
2. If you are using the AC adaptor to power the camera,
unplug it from the wall outlet. If you are using battery
power, remove the battery from the camera, taking care to
protect yourself against burn injury.
3. Contact your dealer or nearest CASIO authorized service
center.
28
INTRODUCTION
Page 29

■ Water and Foreign Matter
• Water, other liquids, or foreign matter (especially metal)
getting inside the camera creates the risk of fire and electric
shock. Immediately perform the following steps whenever any
of the above symptoms are present. Particular care is
required when using the camera where it is raining or
snowing, near the ocean or other body of water, or in a
bathroom.
1. Turn off the camera.
2. If you are using the AC adaptor to power the camera,
unplug it from the wall outlet. If you are using battery
power, remove the battery from the camera.
3. Contact your dealer or nearest CASIO authorized service
center.
■ Dropping and Rough Treatment
• Continued use of the camera after it is damaged by dropping
or other rough treatment creates the risk of fire and electric
shock. Immediately perform the following steps whenever any
of the above symptoms are present.
1. Turn off the camera.
2. If you are using the AC adaptor to power the camera,
unplug it from the wall outlet. If you are using battery
power, remove the battery from the camera.
3. Contact your dealer or nearest CASIO authorized service
center.
■ Keep Away From Fire
• Never expose the camera to fire, which can cause it to
explode and creates the risk of fire and electric shock.
29
INTRODUCTION
Page 30

■ Disassembly and Modification
• Never try to take the camera apart or modify it in any way.
Doing so creates the risk of electric shock, burn injury, and
other personal injury. Be sure to leave all internal inspection,
maintenance, and repair up to your dealer or nearest CASIO
authorized service center.
■ Locations To Be Avoided
• Never leave the camera in any of the following types of
locations. Doing so creates the risk of fire and electric shock.
– Areas subject to large amounts of humidity or dust
– Food preparation areas or other locations where oil smoke
is present
– Near heaters, on a heated carpet, in areas exposed to
direct sunlight, in a closed vehicle parked in the sun, or
other areas subject to very high temperatures
• Never place the camera on an unstable surface, on a high
shelf, etc. Doing so can cause the camera to fall, creating the
risk of personal injury.
■ Backing Up Important Data
• Always keep backup copies of important data in camera
memory by transferring it to a computer or other storage
device. Note that data can be deleted in the case of camera
malfunction, repair, etc.
■ Memory Protection
• Whenever replacing the battery, be sure to follow the correct
procedure as described in the documentation that comes with
the camera. Incorrectly replacing the battery can result in
corruption or loss of data in camera memory.
■ Rechargeable Battery
• Use only the specified charger unit or the specified device to
charge the battery. Attempting to charge the battery by an
unauthorized means creates the risk of battery overheating,
fire, and explosion.
• Do not expose or immerse the battery in fresh water or salt
water. Doing so can damage the battery, and cause
deterioration of its performance and loss of service life.
30
INTRODUCTION
Page 31

• This battery is intended for use with a CASIO Digital Camera
only. Use with any other device creates the risk of the battery
damage, or deterioration of battery performance and service
life.
• Failure to observe any of the following precautions creates
the risk of battery overheating, fire, and explosion.
– Never use or leave the battery near open flame.
– Do not expose batteries to heat or fire.
– Make sure the battery is oriented correctly when it is
connected to the charger unit.
– Never carry or store the battery together with items that can
conduct electricity (necklaces, pencil lead, etc.)
– Never disassemble the battery, pierce it with a needle, or
expose it to strong impact (hit it with a hammer, step on it,
etc.), and never apply solder to it. Never place the battery
into a microwave oven, heater, high-pressure generating
device, etc.
• Should you ever notice leakage, strange odor, heat
generation, discoloration, deformation, or any other abnormal
condition while using, charging, or storing a battery,
immediately remove it from the camera or charger unit and
keep it away from open flame.
• Do not use or leave the battery under direct sunlight, in an
automobile parked in the sun, or in any other area subject to
high temperatures. Doing so can damage the battery, and
cause deterioration of its performance and loss of service life.
• If the battery charging does not end normally within the
specified charging time, stop charging anyway and contact
your local CASIO authorized service center. Continued
charging creates the risk of battery overheating, fire, and
explosion.
• Battery fluid can damage your eyes. Should battery fluid get
into your eyes accidentally, immediately rinse them with clean
tap water and then consult a physician.
31
INTRODUCTION
Page 32

• Be sure to read the user documentation that comes with the
camera and special charger unit before using or charging the
battery.
• If a battery is to be used by young children, make sure that a
responsible adult makes them aware of the precautions and
proper handling instructions, and make sure that they handle
battery correctly.
• Should fluid from a battery accidentally get onto clothing or
your skin, immediately rinse it off with clean tap water.
Prolonged contact with battery fluid can cause skin irritation.
■ AC Adaptor
• Misuse of the AC adaptor creates the risk of fire and electric
shock. Make sure you observe the following precautions
when using the AC adaptor.
– Use only the AC adaptor specified for this camera.
– Use the AC adaptor to supply power only to devices that
are specified for use with it.
– Use a 100 to 240V AC (50/60Hz) wall outlet as a power
source.
– Never plug the power cord into a wall outlet that is shared
by other devices, or into a shared extension cord.
• Misuse of the AC adaptor can cause it to become damaged,
creating the risk of fire and electric shock. Make sure you
observe the following precautions when using the AC adaptor.
– Never place heavy objects on the AC adaptor or subject it
to direct heat.
– Never try to modify the AC adaptor or subject it to bending.
– Do not twist or pull on the power cord.
– Should the power cord or plug ever become damaged,
contact your dealer or nearest CASIO authorized service
center.
32
INTRODUCTION
Page 33

• Never touch the AC adaptor while your hands are wet. Doing
so creates the risk of electric shock.
• Misuse of the AC adaptor creates the risk of fire and electric
shock. Make sure you observe the following precautions
when using the AC adaptor.
– Never locate the power cord near a stove or other heating
device.
– When unplugging from the wall outlet, grasp the plug on
the AC adaptor power cord. Never pull on the power cord.
– Insert the plug into the wall outlet as far as it will go.
– Unplug the AC adaptor from the wall outlet before leaving
the camera unattended for long periods, such as when
leaving on a trip, etc.
– At least once a year, unplug the AC adaptor from the wall
outlet and clean off any dust built up around the prongs.
■ USB Cradle and AC Adaptor Precautions
• Make sure you always remove the camera from the USB
cradle before connecting or disconnecting the AC adaptor.
• Charging, USB data communication, the Photo Stand
operation can cause the AC adaptor to become warm. This is
normal and does not indicate malfunction.
33
INTRODUCTION
Page 34

■ Battery Life
• Battery continuous operation times provided in this manual
represent the approximate amount of time before the camera
turns off due to low battery power when being powered by the
special battery under normal temperature (23°C (73°F)). They
do not guarantee that you will be able to achieve the indicated
level of operation. Actual battery life is greatly affected by
ambient temperature, battery storage conditions, the amount
of time spent in storage, etc.
• Leaving the camera on can run down battery and cause the
low battery warning to appear. Turn off the camera whenever
you are not using it.
• The low battery warning indicates that the camera is about to
turn off due to low battery power. Charge the battery as soon
as possible. Leaving low or dead batteries in the camera can
lead to battery leakage and data corruption.
■ Data Error Precautions
• Your digital camera is manufactured using precision digital
components. Any of the following creates the risk of
corruption of data in camera memory.
– While the camera is performing an operation, removing the
battery or memory card from the camera, or placing the
camera onto or removing it from the USB cradle
– While the operation lamp is flashing green after turning off
the camera, removing the memory card from the camera or
placing the camera onto or removing it from the USB cradle
– Disconnecting the USB cable, removing the camera from
the USB cradle, or disconnecting the AC adaptor from the
USB cradle while a data communication operation is being
performed
– Using a battery that is low
– Other abnormal operations
Any of the above conditions can cause an error message to
appear on the monitor screen (page 276). Perform the action
indicated by the message that appears.
34
INTRODUCTION
Page 35

■ Operating Environment
• The operating temperature range of the camera is 0°C to
40°C (32°F to 104°F).
• Do not place the camera in any of the following locations.
– In an area exposed to direct sunlight, or large amounts of
moisture or dust
– Near an air conditioner or in other areas subjected to
extreme temperature or humidity
– Inside of a motor vehicle on a hot day, or in an area
subjected to strong vibration
■ Condensation
• Sudden and extreme temperature changes, such as when the
camera is moved from the outdoors on a cold winter day into
a warm room, can cause water droplets called “condensation”
to form on the interior and the exterior of the camera. Note
that condensation can cause malfunction of the camera. To
avoid condensation, place the camera into a plastic bag
before subjecting it to sudden temperature change. Wait until
the air in the bag has had enough time to become acclimated
to the new temperature before removing the camera. After
that, open the battery cover and leave it open for a few hours.
■ Power Supply
• Use only the special rechargeable lithium ion battery (NP-20)
to power this camera. Use of any other type of battery is not
supported.
• The camera does not have a separate battery for the clock.
The date and time settings of the camera are cleared about
one day after power is totally cut off (from both the battery and
USB cradle). If this happens, be sure to reconfigure these
settings after power is restored (page 192).
■ Lens
• Never apply too much force when cleaning the surface of the
lens. Doing so can scratch the lens surface and cause
malfunction.
• You may sometimes notice some distortion in certain types of
images, such as a slight bend in lines that should be straight.
This is due to the characteristics of lens, and does not
indicate malfunction of the camera.
35
INTRODUCTION
Page 36

■ Caring for your camera
• Fingerprints, dirt, and other foreign matter on the lens surface
can interfere with proper operation of the camera. Avoid
touching the lens surface. To clean the lens surface, use a
blower to blow off dust or foreign matter and then wipe with a
soft, dry cloth.
• Fingerprints, dirt, and other foreign matter on the flash can
interfere with proper operation of the camera. Avoid touching
the flash. If the flash becomes dirty, wipe it clean with a soft,
dry cloth.
• To clean the camera, wipe it with a soft, dry cloth.
■ Monitor Screen Images
• The images that normally appear on the monitor screen
during image playback are smaller than normal, and so you
cannot see all of the detail of the actual image. Your camera
has an image zoom feature (page 154) which you can use to
enlarge the monitor screen image. You can use this feature
for on-the-spot checks of important images.
■ Other Precautions
• The camera becomes slightly warm during use. This is normal
and does not indicate malfunction.
36
INTRODUCTION
Page 37

GETTING READY
Charging the Battery
Your camera is powered by a rechargeable lithium ion battery
(NP-20).
IMPORTANT!
• Use of any type of battery other than NP-20 is not
supported.
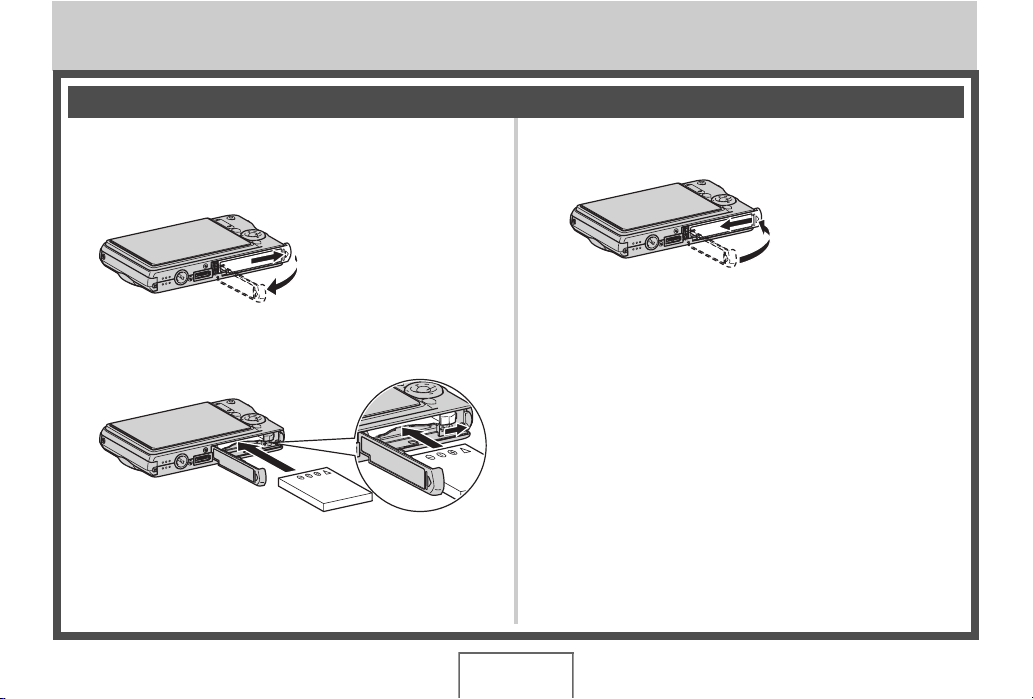
To load the battery
Open the battery cover.
1.
While pressing the battery cover, slide it in the direction
indicated by the arrow.
2. Load the battery into the camera.
With the EXILIM logo on the battery facing upwards (in the
direction of the monitor screen), hold the stopper in the
direction indicated by the arrow as you slide the battery into
the camera. Press the battery in until the stopper secures it
in place.
NP-20 Stopper
GETTING READY
37
Page 38

3. Close the battery cover.
Swing the battery cover closed, and then slide it securely
into place as you press it against the camera.
The battery is not fully charged when you use the camera
for the first time after purchasing it. Use the following
procedure to charge it.
To charge the battery
Plug the USB cradle into a household power
1.
outlet.
USB Cradle
[DC IN 5.3V]
AC Adaptor
2. Make sure the camera is turned off.
If the camera is on, be sure to press [ON/OFF] to turn it off
before placing it onto the USB cradle.
38
AC power cord
GETTING READY
Page 39

3. With the camera positioned so the monitor
screen is facing towards you as shown in the
illustration, place it onto the USB cradle.
The [CHARGE] lamp lights red and charging starts.
• It takes about two hours to achieve a full charge. Actual
charging time depends on current battery capacity,
remaining power, and charging conditions.
Cradle contact
Carefully insert the camera
as far as it will go.
[CHARGE] lamp
Camera contact
When charging is complete
The [CHARGE] lamp, which was lit red during charging,
changes to green.
Remove the camera from the USB cradle and unplug the AC
power cord from the power outlet.
If the [CHARGE] lamp lights amber
This indicates that charging cannot be performed because you
have just finished using the camera, or because the temperature
in your location is too hot or too cold. If this happens, wait until
the camera returns to normal temperature. When the camera
returns to a temperature where charging can be performed, the
[CHARGE] lamp will light red.
39
GETTING READY
Page 40

If the [CHARGE] lamp flashes red
This indicates that the camera or battery is faulty, or that the
battery is loaded in the camera incorrectly.
Remove the battery from the camera and check if its contacts
are dirty. If they are, wipe them off with a dry cloth and then
reload the battery into the camera. After confirming that the AC
adaptor is plugged into the power outlet and the USB cradle, set
the camera on the cradle again.
If an error still continues to occur after you perform the above
steps, it could mean that the battery is faulty. Contact your
nearest CASIO authorized service center.
IMPORTANT!
• Use only the bundled USB cradle or the separately
available special charger unit (BC-11L) to charge the
special rechargeable lithium ion battery (NP-20). The
battery cannot be charged using any other type of charger
device. Attempting to use a different charger can result in
unexpected accident.
• Use only the AC adaptor that comes bundled with the
camera. Never use any other type of AC adaptor. Use of
the separately available AD-C30, AD-C40, AD-C620, or
AD-C630 is not supported.
■ Battery Power Conservation Tips
• When you do not need to use the flash, select “ ” (flash off)
for the flash setting (page 76).
• Enable the Auto Power Off and the Sleep features to protect
against wasting battery power when you forget to turn off the
camera (page 45).
40
GETTING READY
Page 41

■ Checking Remaining Battery Power
E
As battery power is consumed, a battery indicator on the monitor
screen indicates remaining power as shown below.
Remaining
Power
Battery
Indicator
Indicator
Color
“ ” indicates that battery power is low. Charge the battery as
soon as possible.
Recording is not possible when “ ” is indicated. Charge the
battery immediately.
High Low
Light
blue
Orange Red Red
IMPORTANT!
• Due to differences in the power requirements of each
mode, the battery indicator may show a lower level in the
PLAY mode than what it shows in a REC mode. This is
normal, and does not indicate malfunction.
• Leaving the camera for about one day with no power
supplied while the battery is dead will cause its date and
time settings to be cleared. You will have to re-configure
the settings after power is restored.
NOT
• See page 282 for information about battery life.
41
GETTING READY
Page 42

Replacing the Battery
Open the battery cover.
1.
2. With the camera oriented with its monitor
screen facing upwards as shown in the
illustration, slide the stopper in the direction
indicated by the arrow and hold it there.
• This will cause the battery to come out part way.
Stopper
3. While still holding the stopper, pull the battery
out the rest of the way.
4. Load a new battery.
Battery Precautions
■ Precautions during Use
• Operation provided by a battery under cold conditions is
always less than operation under normal temperatures. This
is due to the characteristics of the battery, not the camera.
• Charge the battery in an area where the temperature is within
the range of 10°C to 35°C (50°F to 95°F). Charging outside
this temperature range can cause charging to take longer
than normal or even cause charging to fail.
• If a battery provides only very limited operation following a full
charge, it probably means that the battery has reached the
end of its service life. Replace the battery with a new one.
42
GETTING READY
Page 43

■ Storage Precautions
• Though a rechargeable lithium ion battery provides high
capacity in a compact configuration, long-term storage while
charged can cause it to deteriorate.
– If you do not plan to use a battery for some time, fully use
up its charge before storing it.
– Always remove the battery from the camera when you are
not using it. Leaving a battery in the camera can cause it to
discharge and go dead, which will require longer charging
when you need to use the camera.
– Store batteries in a cool, dry place (20°C (68°F) or lower).
Turning Power On and Off
■ Turning Power On
To turn power on and enter the REC mode
Press [ON/OFF] (Power) or [ ] (REC).
To turn power on and enter the PLAY mode
Press [ ] (PLAY).
Pressing a button causes the operation lamp to light green
momentarily and turns on power.
[ON/OFF] (Power)Operation Lamp
[] (PLAY) [] (REC)
43
GETTING READY
Page 44

IMPORTANT!
E
E
• Pressing [ON/OFF] or [ ] (REC) to turn on power also
causes the lens to extend. Take care there is nothing
pressing against or hitting the lens. Holding the lens with
your hand so it cannot extend creates the risk of
malfunction.
NOT
• Pressing [ ] (PLAY) while in the REC mode switches to
the PLAY mode. The lens retracts about 10 seconds after
switching modes.
• Auto Power Off (page 45) will turn off power automatically if
you do not perform any operation for a preset amount of
time. If this happens, turn power back on.
■ Turning Power Off
Press [ON/OFF] (Power).
NOT
• You can configure the camera so power does not turn on
when you press [ ] (REC) or [ ] (PLAY). You can
also configure the camera to turn off when you press [ ]
(REC) or [ ] (PLAY) (page 197).
44
GETTING READY
Page 45

Turning On Power for the First Time
The first time you load a battery into the camera, a screen
appears for configuring screen text language, date, and time
settings. Use the procedure under “Configuring Display
Language, Date, and Time Settings” (page 12) to configure
the settings correctly.
IMPORTANT!
• Failure to set the date and time will cause the wrong
date and time data to be recorded with images.
• If you make a mistake when configuring the language,
date, and time settings, you can change the settings
(pages 192, 196).
■ Battery Power Conservation Features
The camera is equipped with two features for conserving battery
power, as described below.
Feature
Name
Sleep
Auto Power
Off
Description Settings
In the REC mode, the monitor screen
turns off (goes into a sleep state) if no
operation is preformed for a preset
amount of time. Press any button to
turn the monitor screen back on.
Note that the Sleep feature does not
operate in the PLAY mode.
Power it turned off if no operation is
performed for a preset amount of
time.
30 sec
1 min
2 min
Off
2 min
5 min
1. Press [MENU].
2. Use [W] and [X] to select the “Set Up” tab.
3. Use [S] and [T] to select the item you want to
configure (“Sleep” or “Auto Power Off”) and
then press [X].
45
GETTING READY
Page 46

4. Use [S] and [T] to select the sleep or Auto
E
E
Power Off trigger time and then press [SET].
Selecting “Off” for the sleep setting disables the sleep
feature.
NOT
• Auto Power Off and sleep are disabled under the following
conditions.
– When there is a connection between the camera and
computer or other device via the USB cradle
– During a slide show
– During Voice Recording file playback
– During movie recording and playback
Using a Memory Card
You can store images you shoot with the camera on a memory
card. It is up to you to purchase a commercially available
memory card. In addition to memory card storage, the camera
also has built-in memory, which is enough to hold a few
snapshots or a short movie. Use built-in memory for test
purposes, emergency use, etc.
NOT
• Images can be copied between the camera’s built-in
memory and a memory card (page 184).
• The following data is stored in built-in memory. It cannot be
copied to a memory card.
– BEST SHOT mode user image information
– FAVORITE folder
– Mode memory settings
– Start-up screen image
46
GETTING READY
Page 47

Supported Memory Cards
Your camera supports use of SD,
SDHC, MMC (MultiMediaCard), or
MMCplus (MultiMediaCardplus)
memory cards.
Memory Used for Storage
Images recorded while a memory card is loaded are saved to
the memory card. When no memory card is loaded, images are
saved in built-in memory.
• Note that you cannot save images in built-in memory while a
memory card is loaded in the camera.
IMPORTANT!
• See the instructions that come with the memory card for
information about how to use it.
• Certain types of cards can slow down processing speeds. If
you are using a slow memory card, you may not be able to
record a movie using the “HQ” or “ HQ Wide” image quality
setting. Because of this, use of a memory card with a
maximum transfer speed of at least 10MB per second is
recommended.
• Certain types of memory cards take longer to record data,
which can cause movie frames to be dropped. “ ” and
“ ” flash on the monitor screen during recording to let
you know when a frame has been dropped. Use of a
memory card with a maximum transfer speed of at least
10MB per second is recommended.
• SD memory cards and SDHC memory cards have a write
protect switch. Use it when you need to guard against
accidentally deleting data. Note, however, if you write
protect a memory card you must then turn write protection
off whenever you want to record to the card, format it, or
delete any of its images.
47
GETTING READY
Page 48

• Electrostatic charge, electrical noise, and other
phenomena can cause data to become corrupted or even
lost. Make sure that you always back up important data on
other media (CD-R, CD-RW, MO disk, hard disk, etc.).
Loading a Memory Card into the Camera
IMPORTANT!
• Make sure you always turn off the camera before loading or
removing a memory card.
• Be sure to orient the card correctly when loading it. Never
try to force a memory card into the slot when you feel
resistance.
1. Open the battery cover.
While pressing the battery cover, slide it in the direction
indicated by the arrow.
48
GETTING READY
Page 49

2. Load a memory card into the camera.
Positioning the memory card so its front is facing upwards
(towards the monitor screen side of the camera), slide it into
the card slot all the way in until you hear it click securely into
place.
MEMORY
CARD
MEMORY
CARD
Front Back
3. Close the battery cover.
Swing the battery cover closed, and then slide it securely
into place as you press it against the camera.
Replacing the Memory Card
Remove the memory card from the camera.
1.
Press the memory card and then release it, so it comes part
way out. Pull the card out the rest of the way by hand.
ORY
EM
M
CARD
2. Load the other memory card.
49
GETTING READY
Page 50

IMPORTANT!
• Never insert anything besides an SD memory card, SDHC
memory card, MMC (MultiMediaCard), or MMCplus
(MultiMediaCardplus) into the memory card slot. Doing so
can lead to malfunction.
• Should water or any foreign object ever get into the card
slot, immediately turn off the camera, remove the battery,
and contact your retailer or nearest CASIO authorized
service center.
• Never remove a card from the camera while the operation
lamp is flashing green. Doing so can cause the image save
operation to fail and even damage the memory card.
Formatting a Memory Card
Before using a new memory card for the first time, you need to
format it. Once you format a memory card, you will not need to
format it each time you use it.
Formatting a memory card that already has files on it will delete
its contents.
IMPORTANT!
• Note that data deleted by a memory card format operation
cannot be recovered. Double-check to make sure that you
really want to delete all the contents of the memory card
before proceeding with the format operation.
• Even if the file data on a memory card is protected (page
180), formatting the card will delete all its data.
• Be sure to use the camera to format a memory card.
Formatting a memory card on a computer and then using it
in the camera can slow down data processing by the
camera. In the case of an SD memory card or SDHC
memory card, formatting on a computer can result in nonconformity with the SD format, causing problems with
compatibility, operation, etc.
50
GETTING READY
Page 51

1. Load the memory card you want to format into
the camera.
2. Turn on the camera and press [MENU].
3. On the “Set Up” tab, select “Format” and then
press [X].
4. Use [S] and [T] to select “Format” and then
press [SET] to start formatting.
After formatting is complete, enter the PLAY mode and
check to make sure the “There are no files.” message
appears on the monitor screen.
• To exit the format operation without formatting, select
“Cancel”.
■ Memory Card Precautions
• If a memory card starts to behave abnormally, you can restore
normal operation by reformatting it. However, it is
recommended that you always take along more than one
memory card whenever using the camera far away from the
home or office.
• If you experience problems while trying to playback recorded
images, try re-formatting the memory card.
• As you record data to and delete data from a memory card a
number of times, it loses its ability to retain data. Because of
this, periodic re-formatting of a memory card is
recommended.
• Make sure that the battery is charged fully before starting a
formatting operation. Formatting may not be performed
correctly and the memory card may be damaged if the
camera powers down while formatting is in progress.
• Never open the battery cover while formatting is in progress.
Doing so can damage the memory card.
51
GETTING READY
Page 52

Using On-screen Menus
The following are menu operations you will need to use to
configure camera settings. Take a few moments to become
familiar with them.
• See “Menu Reference” on page 262 for information about
menu contents.
Example Menu Screen
• Menu contents are different
in the REC mode and PLAY
mode. This screen shows a
REC mode menu.
Tabs
Settings
Menu Screen Operation Buttons
[W] [X] Select tabs. [X] is also used to apply a setting.
[S] [T] Select a setting option.
[SET] Applies the selected settings.
[MENU] Exits the menu screen.
The following is the procedure for menu operations in the REC
mode.
1. In the REC mode, press [MENU].
This displays the menu screen.
2. Use [W] and [X] to select the tab where the
item you want to configure is located.
Here, we will select the “REC” tab.
52
GETTING READY
Page 53

3. Use [S] and [T] to
select the item you
want to configure and
then press [X].
Example: Select
“Continuous” and then press
[X].
4. Use [S] and [T] to select the setting you want.
5. Apply the setting.
• Pressing [SET] applies the selected setting and exits the
menu screen.
• Pressing [W] instead of [SET] applies the selected setting
and returns to the menu screen. You can then continue
configuring other settings, if you want.
• To select another tab, press [W], use [S] to return to the
tab and then use [W] and [X] to switch to another tab.
Configuring Monitor Screen Settings
You can use the display menu to configure various monitor
screen settings.
• See “Display Menu Reference” on page 266 for information
about display menu contents.
Example Display Menu Screen
• Menu contents are different in
the REC mode and PLAY
mode. This screen shows the
REC mode menu.
Menu Screen Operation Buttons
[W] [X]
[S] [T] Selects a setting option.
[SET] Applies the selected settings.
[DISP] Exits the menu screen.
Selects a setting option. [X] is also used to apply a
setting.
53
GETTING READY
Page 54

The following is the procedure for menu operations in the REC
mode.
1. In the REC mode, press [DISP].
This will display the display menu screen.
2. Use [W] and [X] to select the setting you want.
3. Use [S] and [T] to select the setting you want.
• If you want to configure other settings, repeat steps 2 and
3.
4. After all the settings are the way you want,
press [SET].
• This will apply the settings and exit the menu screen.
Selecting a Screen Layout (Layout)
The contents of the layout setting menu depend on whether the
camera is in the REC mode or the PLAY mode.
■ REC Mode Screen Layout
For the REC mode, the screen layout settings let you select the
layout of icons.
Layout Type Description
Pressing [SET]
in the REC
mode while
“Panel”
(Operation
Panel
(Operation
Panel)
Panel) is
selected as the
layout type will cause the top icon of the
Operation Panel to become highlighted
(selected). You can then use the Operation
panel to change settings. Since there are few
icons superimposed on the displayed image,
they do not interfere with recording.
54
GETTING READY
Page 55

Layout Type Description
With this option,
the image being
composed
completely fills
the monitor
Normal
The following procedure shows how to use Panel (Operation
Panel).
screen. This
setting is best
when you want to display the subject on a large
16:9 aspect ratio monitor screen (page 68).
Icons are superimposed on the displayed
image.
1. In the REC mode,
press [SET].
This highlights (selects) the
top icon of the Operation
Panel.
2. Use [S] and [T] to select the icon of the
setting you want to change.
3. Use [W] and [X] to change the setting.
• If you want to configure other settings, repeat steps 2 and
3.
4. After all the settings are the way you want,
press [SET].
• This will apply the settings and return to normal operation
(no Operation Panel icon selected).
IMPORTANT!
• Image quality cannot be changed using Panel (Operation
Panel).
• Panel (Operation Panel) is not displayed while Short
Movie, Past Movie, Voice Recording, or Zoom Continuous
Shutter is being used.
• The date display format is always month/day and the time
display format is always 24 hours, regardless of the current
settings of the camera’s “Date Style” and “Adjust” (pages
193, 194).
55
GETTING READY
Page 56

■ PLAY Mode Screen Layout
The PLAY mode screen layout settings let you select how
display images are shown on the monitor screen.
Layout Type Description
With this
setting,
100% of the
display
Normal
image is
always
visible. With
some aspect ratios, black bands may appear
above and below, or to the left and right of
the image.
Layout Type Description
With this
setting, the
display
image is the
Wide
maximum
possible size
that allows
the entire image to be displayed horizontally.
With some aspect ratios, the top and bottom
of the image will be cut off.
56
GETTING READY
Page 57

Turning Display Information On and Off (Info.)
With “Info.” you can turn display information on and off. You can
configure separate settings for the REC mode and PLAY mode.
REC Mode (Layout: Panel (Operation Panel))
Show +Histogram
Display Information
Setting
Show
+Histogram
Hide Turns off display of all information.
Description
Turns on display of camera setting and
other information.
Turns on display of camera setting and
other indicators, along with a histogram
(page 132).
Hide
GETTING READY
57
Page 58

REC Mode (Layout: Normal) PLAY mode
Show
+Histogram
Show +Histogram
Hide
Hide
GETTING READY
58
Page 59

Adjusting Monitor Screen Brightness (Brightness)
You can use the “Brightness” setting to adjust the brightness of
the monitor screen. This setting is the same in the REC mode
and PLAY mode.
Brightness
Setting
Auto
+2
+1
Description
With this setting, the camera detects available
light levels and automatically adjusts the
brightness of the monitor screen accordingly.
This is the setting you should normally use.
In the PLAY Mode, the brightness of the monitor
screen remains constant even if the available
light level changes.
Brightness that is greater than +1, which makes
the screen easier to view. This setting consumes
more power.
Bright setting for outdoor use, etc. This setting
results in brightness that is greater than the 0
setting.
Brightness
Setting
0
–1
Description
Normal monitor screen brightness for indoor use,
etc.
Low monitor screen brightness for nighttime use,
indoor use under dark conditions, etc.
59
GETTING READY
Page 60

Adjusting Monitor Screen Image Quality (Type)
You can use the “Type” setting to adjust the quality of the
monitor screen image. This setting is the same in the REC mode
and PLAY mode.
Quality Setting Description
Increases contrast of the monitor screen
Dynamic
Vivid
Real
image so the subject stands out for easier
viewing and framing when shooting under
bright conditions.
Makes the monitor screen image a bit
brighter than the actual image for more
clarity. Makes recorded image brighter when
showing it to others.
Displays the monitor screen image so it is as
near as possible to the one recorded by the
camera.
Quality Setting Description
This setting provides a clearer screen image
Night
Power Saving
when shooting under dark conditions, and
comes in handy when recording at night with
a tripod.
Consumes slightly less power than the other
settings, and extends battery life. Note that
power saving is disabled when “Auto” is
selected for the monitor screen brightness
setting.
60
GETTING READY
Page 61

If you lose your way...
Perform one of the following operations if you find that you have
gotten lost while performing button operations during recording
or playback.
REC mode
Current Screen
Menu screen [MENU] or [ ]
Display Menu screen [DISP] or [ ]
BEST SHOT screen [BS] or [ ]
“There are no files.”
screen
PLAY mode screen Press [ ].
To return to the normal snapshot
or movie recording screen, press:
Press [ ].
PLAY mode
Current Screen
Menu screen [MENU] or [ ]
Display Menu screen [DISP] or [ ]
REC mode screen Press [ ]
Delete screen
To return to the normal playback
screen
Press [ ]. You could also select
“Cancel” and then press [SET].
61
GETTING READY
Page 62

Using the Camera on a Trip
Extra Batteries
Taking along extra fully charged batteries (NP-20) is
recommended while on a trip in order to avoid not being able to
shoot images due to the battery going dead.
Using the Camera in another Country
Note the following precautions.
• The bundled AC adaptor is designed for operation with any
power supply in the range of 100 V to 240 V AC, 50/60 Hz.
This means the AC adaptor can be used in various countries
around the world. Note, however, that there may be some
problems with the AC power cord withstand voltage and with
the configuration of power outlet shapes in certain geographic
areas. Before trying to use the AC adaptor in another country,
be sure to check with your travel agent concerning the local
power supply.
• Do not use a voltage adaptor with this camera.
62
GETTING READY
Page 63

SHOOTING A SNAPSHOT
Holding the Camera Correctly
Holding the camera with one hand can result in accidental hand
movement. Hold the camera securely with both hands when
shooting snapshots.
• To protect against accidentally dropping the camera, attach
the wrist strap and make sure it is around your fingers or wrist
while you are operating the camera.
• The supplied strap is intended for use with this camera only.
Never use it for any other purpose.
• Never swing the camera around by its strap.
Horizontal Vertical
Hold the camera as shown in the
illustration, with your arms firmly
against your sides.
Hold the camera so the
flash is above the lens.
IMPORTANT!
• Take care that your fingers and the strap do not cover any
of the areas indicated in the illustration.
Flash
Microphone
AF Assist/Self-timer Lamp
Lens
SHOOTING A SNAPSHOT
63
Page 64

NOT
E
N
• Good-looking images are impossible if you move the
camera when you press the shutter button or while the
Auto Focus operation is being performed. Holding the
camera correctly, carefully press the shutter button and
take care that you do not move the camera as the shutter
releases. This is especially important when available
lighting is low, which slows down the shutter speed.
Shooting a Snapshot
1. Press [ ] (REC) to
enter the REC mode.
Confirm that the subject
(people, scenery, etc.) and
the Auto icon “ ” are
displayed on the monitor
screen.
If any icon other than the
Auto icon “ ” is displayed,
switch to “Auto” (page 98).
Auto Icon
Focus Frame
2
AF
ISO
AWB
EV
15:37
N
64
SHOOTING A SNAPSHOT
Page 65

2. Focus the image.
While the focus frame is aligned with the subject, half-press
the shutter button.
Auto Focus will focus the image automatically, and the focus
frame and operation lamp will turn green. The shutter
speed, aperture, and ISO sensitivity also will be set
automatically.
Operation Lamp
Shutter Button
3. Shoot the image.
When the image is focused, press the shutter button the rest
of the way.
Shutter Button
This will shoot the snapshot and save it to the memory card
or the camera’s built-in memory.
65
SHOOTING A SNAPSHOT
Page 66

NOT
E
• The aperture value indicates the size of the opening that
lets light into the camera. A larger aperture value indicates
a smaller opening. The camera adjusts this setting
automatically.
• Shutter speed indicates the amount of time that light is
allowed into the camera. A slower shutter speed means
that light is allowed in for a longer time. Shutter speed is
indicated on the monitor screen as seconds (1/1000
second, etc.) The camera adjusts this setting automatically.
If the image does not focus...
If the focus frame stays red and the operation lamp is flashing, it
means that the image is not in focus (because the subject is too
close, etc.). Point the camera at the subject and try to focus
again.
.
Checking a Snapshot
A snapshot will remain on the monitor screen for a short while
after you shoot it and then disappear when the camera gets
ready for the next image.
Perform the following operation to view a snapshot after you
shoot it.
Press [ ].
This will display the snapshot you just shot.
Use [W] and [X] to scroll through other images in memory.
To return to the REC mode, press [ ].
66
SHOOTING A SNAPSHOT
Page 67

■ Using Quick Shutter
Pressing the shutter button all the way down without waiting at
the halfway point shoots the image using Quick Shutter (page
118). Quick Shutter lets you record right away, so you don’t miss
those special moments waiting for Auto Focus.
• Quick Shutter focuses much quicker than normal Auto Focus.
It comes in handy when shooting a fast-moving subject. It also
eliminates worries of spoiled shots when you ask someone
else to record and image for you, and they press the shutter
button all the way without waiting for Auto Focus.
• Quick Shutter is turned on as the initial factory default setting.
In cases when you want to take a little time for accurate focus,
turn off Quick Shutter.
Specifying Image Size
A digital camera image is a collection of small dots (pixels).
The size of an image indicates how many pixels it contains, and
is expressed as horizontal pixels × vertical pixels. The initial
factory default image size setting is 7M (3072 × 2304 pixels).
Note that a larger image takes up more memory.
• For information about image size, image quality, and number
of images that can be stored, see page 279.
This setting applies to snapshots only.
• For information about movie image size, see page 89.
1. In the REC mode, press [MENU].
2. On the “Quality” tab, select “Size” and then
press [X].
3. Use [S] and [T] to select an image size and
then press [SET].
B
67
SHOOTING A SNAPSHOT
Page 68

NOT
E
• You can also use the Panel (Operation Panel) (page 54) to
change the image size setting.
• The following information changes on the display during
the image size selection operation.
– Image size in megabytes (M) (5M, etc.)
– Image size in pixels (2560 × 1920, etc.)
– Optimum print paper size
Image Size (Pixels) Print Paper Size
Larger
Smaller
7M 3072 × 2304 A3 Print
3:2 3072 × 2048 A3 Print
16:9 3072 × 1728 HDTV
5M 2560 × 1920 A3 Print
3M 2048 × 1536 A4 Print
2M 1600 × 1200 3.5" × 5" Print
VGA 640 × 480 E-Mail
• Selecting 3:2 (3072 × 2048 pixels) records images with an
aspect ratio of 3:2, which matches the standard aspect ratio
(3:2) of print paper.
• VGA (640 × 480 pixels) is the optimum size when attaching
images to e-mail.
• Print paper sizes should be thought of as rough estimates
only (200 dpi print resolution).
• The letters “HDTV” stand for “High Definition Television”. An
HDTV screen has an aspect ratio of 16:9, which makes them
wider than the usual 4:3 aspect ratio of television screens of
the past. Your camera can record images that are compatible
with the aspect ratio of an HDTV screen.
68
SHOOTING A SNAPSHOT
Page 69

Specifying Image Quality
E
Your camera lets you select “Fine” (maximum image quality),
“Normal”, or “Economy” (maximum memory economy) for the
image quality setting. The initial setting is “Normal”. Select “Fine”
if you want to give priority to image quality, or “Economy” to give
priority to the number of images you can store in memory.
• For information about image size, image quality, and number
of images that can be stored, see page 278.
This setting applies to snapshots only.
• For information about movie image quality, see page 89.
1. In the REC mode, press [MENU].
2. On the “Quality” tab, select “ Quality” and
then press [X].
3. Use [S] and [T] to select the image quality
setting you want and then press [SET].
NOT
• The “Fine” setting helps to bring out details when shooting
a finely detailed image of nature that includes dense tree
branches or leaves, or an image of a complex pattern.
69
SHOOTING A SNAPSHOT
Page 70

Turning Off the AF Assist Lamp
The AF assist lamp emits light that helps the camera focus when
you half-press the shutter button under dark lighting conditions.
The AF assist lamp does not light when lighting is bright.
The initial factory default
setting is AF assist lamp on.
Turning off the AF assist lamp
using the following procedure
is recommended when
shooting the image of a
nearby person.
AF Assist/Self-timer Lamp
1. In the REC mode, press [MENU].
2. On the “REC” tab, select “AF Assist Light”
and then press [X].
3. Use [S] and [T] to select “Off” and then press
[SET].
When you want to turn on the AF assist lamp, select “On”
here.
IMPORTANT!
• Do not look directly into the AF assist/self-timer lamp or
point it directly at a person’s eyes.
70
SHOOTING A SNAPSHOT
Page 71

Snapshot Shooting Precautions
■ Operation
• While the operation lamp is flashing green, never open the
battery cover or place the camera onto or remove it from the
USB cradle. Doing so can result in incorrect storage of the
image you just shot, damage to other images stored in
memory, malfunction of the camera, etc.
• Shooting a dark subject while “Auto” is selected for the ISO
sensitivity (page 126) setting will cause the camera to
increase sensitivity and increase shutter speed automatically.
Such conditions can cause digital noise in the image.
• If unneeded light is shining directly onto the lens, shade the
lens with your hand when shooting an image.
■ Monitor Screen when Shooting Snapshots
• The image that appears on the monitor screen is for image
composition. The actual image will be recorded at the quality
set for the image quality setting.
• Subject brightness conditions can cause monitor screen
response to slow and can cause digital noise in the monitor
screen image.
• Shooting a very bright subject can cause a vertical band to
appear in the monitor screen image. This does not indicate
malfunction. The band will not be recorded in a snapshot, but
will be recorded in the case of a movie.
■ Shooting Indoors under Fluorescent
Lighting
• Minute flickering of fluorescent lighting can affect the
brightness or color of an image.
71
SHOOTING A SNAPSHOT
Page 72

Auto Focus Restrictions
• Proper focus may not be possible when shooting the following
types of subjects.
– Solid color wall or other very low contrast subject
– Strongly back lit subject
– Very shiny subject
– Blinds or other subject with a repeating horizontal pattern
– Multiple subjects at varying distances from the camera
– Subject in a dark location
– Subject that is too far away for light from the AF assist lamp
to reach
– Fast-moving subject
– Subjects outside the focus range of the camera
• Proper focus may not be possible if the camera is moved
while shooting.
• An image may be out of focus even though the operation
lamp is lit green and the focus frame is green.
If you cannot focus properly, try using focus lock (page 117)
or manual focus (page 119).
Shooting with Zoom
Your camera provides you with 3X optical zoom (which changes
the lens focal distance), which can be used in combination with
digital zoom (which digitally process the center portion of the
image to enlarge it) for total zoom capabilities of 12 - 42.6X.
IMPORTANT!
• Generally speaking, the higher the digital zoom factor, the
coarser the image that is recorded. However, digital zoom
can be used up to a certain point without causing
deterioration of the image.
1. Enter the REC mode.
[ ][ ] Zoom button
72
SHOOTING A SNAPSHOT
Page 73

2. Press the zoom button to change the zoom
E
factor.
To do this:
Enlarge the subject and narrow
the range
Reduce the size of the subject
and broaden the range
– For more information, see “Optical Zoom and Digital
Zoom Switch Point” on page 74.
Wide Angle Telephoto
Press this side of the
zoom button:
[ ] (telephoto)
[ ] (wide angle)
3. Press the shutter button to shoot.
NOT
• Performing a zoom operation changes the lens aperture.
• Use of a tripod is recommended to protect against hand
movement when using the telephoto setting (zoom in).
• Optical zoom is disabled while shooting a movie. Digital
zoom only is available while shooting a movie. Make sure
you select the optical zoom setting you want to use before
you press the shutter button to start shooting your movie.
73
SHOOTING A SNAPSHOT
Page 74

■ Optical Zoom and Digital Zoom Switch Point
If you hold down the [ ] side of the zoom button in step 2 of
the above procedure, the zoom operation will stop when the
optical zoom factor reaches its maximum. Momentarily releasing
the zoom button and then holding down its [ ] side will switch
to digital zoom, which you can use to set an even higher zoom
factor.
• When the zoom pointer moves past the maximum limit of
optical zoom. Also, the zoom bar indicates the approximate
zoom factor.
Digital Zoom Indicator
Focus Range
(Displayed when shooting
with Auto Focus, macro, or
manual focus.)
Zoom Bar
Undeteriorated Image Quality
Range
1X 12X to 42.6X
Optical/Digital Switch Point
Image Deterioration Point
Image starts to deteriorate from here.
(Point factor depends on image size.)
• The image deterioration point depends on the image size
(page 68). The smaller the image size, the higher the zoom
factor you can use before reaching the image deterioration
point. Though digital zoom generally causes a deterioration of
image quality, some digital zoom without image deterioration
is possible with image sizes of “5M (2560 × 1920 pixels)” and
smaller. The range in which you can use digital zoom without
image deterioration is indicated on the display. The
deterioration point depends on the image size.
• The digital zoom range of the zoom indicator is shown on the
monitor screen only while “Digital Zoom” is turned on.
Deteriorated Image Quality
Range
3X to 14.2X
Zoom Pointer
(Indicates current
zoom.)
74
SHOOTING A SNAPSHOT
Page 75

IMPORTANT!
• Digital zoom is not supported while “Timestamp” (page
131) is turned on.
■ Turning Off Digital Zoom
You can turn off digital zoom if you want to use optical zoom
only. This will help to avoid deteriorated images due to
accidentally switching over from optical zoom to digital zoom
when shooting snapshots.
1. In the REC mode, press [MENU].
2. On the “REC” tab, select “Digital Zoom” and
then press [X].
3. Use [S] and [T] to select “Off” and then press
[SET].
• If you want to show the entire digital zoom range, select
“On” here.
75
SHOOTING A SNAPSHOT
Page 76

Using Flash
Perform the following steps to select the flash mode you want to
use.
Flash Setting Description
Auto Flash Flash fires automatically in accordance with
exposure (amount of light and brightness)
conditions.
• Initial factory default setting.
Flash Off Flash does not fire.
Flash On Flash always fires.
• This setting can be used to brighten a
subject that normally comes out dark due
to daylight or backlight (daylight synchro
flash).
Soft Flash Always use soft flash, regardless of
exposure conditions.
• Use this setting when you want to
suppress the flash to avoid reflection, etc.
Red Eye Flash fires automatically in accordance
same conditions as Auto Flash. This setting
can be used to reduce the red eye effect that
occurs in images of people shot with flash.
Approximate Flash Range (ISO Sensitivity: Auto)
Wide Angle : 0.15 m to 3.9 m (0.5' to 12.8')
Telephoto : 0.4 m to 2.0 m (1.3' to 6.6')
• The flash range changes in accordance with optical zoom.
76
SHOOTING A SNAPSHOT
Page 77

1. In the REC mode, press [T] ( ) once.
E
Flash Mode
[T] ( )
2. Use [W] and [X] to select the flash setting you
want and then press [SET].
3. Press the shutter button to shoot.
NOT
• If you are using the “Normal” Screen Layout setting (page
54), each press of [T] ( ) will cycle through the
available flash settings.
IMPORTANT!
• When using flash, take
care that the flash window
is not blocked by your
fingers or the camera
strap.
• When the ISO sensitivity
setting is “Auto” (page
126), sensitivity is high
and there is increased
digital noise when flash is
used. Decreasing ISO sensitivity shortens the range of the
flash, but is also reduces digital noise.
Flash
77
SHOOTING A SNAPSHOT
Page 78

Red-eye reduction
Using the flash to shoot at night or in a dimly lit room can cause
red spots inside the eyes of people who are in the image. This is
caused when the light from the flash reflects off of the retina of
the eye. When red-eye reduction is selected as the flash mode,
the camera fires a pre-flash to cause the irises in the eyes of any
people in the image to close, which reduces the chance of red
eye.
IMPORTANT!
• Note the following important points when using red-eye
reduction.
– Red-eye reduction does not work unless the people in
the image are looking directly at the camera (flash).
Before pressing the shutter button, call out to the
subjects so they all look at the camera.
– Red-eye reduction may not work very well if the subjects
are located far away from the camera.
■ Checking the Flash Mode
The current flash mode is indicated on the monitor screen and
by the operation lamp when you half-press the shutter button.
Operation Lamp*
2
N
AF
“ ” indicates flash will fire.
* Operation lamp
When the operation lamp
is this:
Flashing Orange Flash is charging.
Lit or Flashing Green*
*1Flashes green when focusing is not possible with Auto Focus
or Macro Focus.
It means this:
1
Flash charging is complete.
78
SHOOTING A SNAPSHOT
Page 79

■ Changing the Flash Intensity
1. In the REC mode, press [MENU].
2. On the “Quality” tab, select “Flash Intensity”
and then press [X].
3. Use [S] and [T] to select the flash intensity
setting you want and then press [SET].
You can set one of five levels, from –2 (weakest) to +2
(strongest).
■ Using Flash Assist
The subject in an image will look too dark if flash intensity is not
enough to reach a subject that is too far away. When this
happens, you can use flash assist to supplement the brightness
of the subject so it appears as if flash illumination was sufficient.
IMPORTANT!
• Flash intensity may not change when the subject is too far
away or too close.
Flash assist not used
Flash assist is turned on as the initial factory default setting.
Use the following procedure to turn off flash assist when you do
not want to use it.
Flash assist used
SHOOTING A SNAPSHOT
79
Page 80

1. In the REC mode, press [MENU].
2. On the “Quality” tab, select “Flash Assist” and
then press [X].
3. Use [S] and [T] to select “Off” and then press
[SET].
When you want to use flash assist, select “Auto” here.
IMPORTANT!
• Flash assist may not produce the desired result for some
types of subjects.
• Any of the following can result in the flash assist effect
being canceled out.
– Changing the flash intensity (page 79)
– Correcting brightness (EV shift) (page 121)
– Changing ISO sensitivity (page 126)
– Changing the contrast setting (page 130)
• Using flash assist can cause an increase in digital noise.
■ Flash Precautions
• The desired effect may not be obtained when the subject is
too far away or too close.
• Flash charging time depends on operating conditions (battery
condition, ambient temperature, etc.) With a fully charged
battery, it takes anywhere from a few seconds to 7 seconds.
• Shooting with flash turned off when lighting is dim results in a
slow shutter speed, which can cause image blur due to hand
movement. Secure the camera with a tripod, etc. Noise is
generated in images shot under these conditions, which can
make the image appear rough.
• With red eye reduction, the flash is fired automatically in
accordance with exposure. It does not fire in areas where
lighting is bright.
• The presence of outdoor sunlight, fluorescent lighting, or
some other light source can cause abnormal image colors.
80
SHOOTING A SNAPSHOT
Page 81

E
Using the Self-Timer
With the self-timer, pressing the shutter button starts a timer,
and the shutter is released and the image is shot after a fixed
amount of time.
Self-Timer Type Description
10 sec 10-second self-timer
10
s
2-second self-timer
• When shooting under conditions that
2 sec
2
s
X3
x3
(Triple Self-timer)
Off Self-timer is disabled.
slow down the shutter speed, you can
use this setting to prevent blur due to
hand movement.
This option shoots three images: one
image 10 seconds after the shutter button
is pressed, the next image one second
after the camera gets ready to shoot after
the first image, and the final image one
second after the camera gets ready to
shoot after the second image.
1. In the REC mode, press [MENU].
2. On the “REC” tab, select “Self-timer” and then
press [X].
3. Use [S] and [T] to
select the self-timer
type and then press
[SET].
This causes an indicator
identifying the selected selftimer type to appear on the
monitor screen.
4. Press the shutter button to shoot.
NOT
• You can also use the Panel (Operation Panel) (page 54) to
change the self-timer setting.
81
SHOOTING A SNAPSHOT
Page 82

Using the Self-timer to Shoot an Image
E
• The image is not shot
right away after you
press the shutter button.
Instead, shooting starts
after the preset time
elapses. The AF assist/
self-timer lamp flashes
while the countdown is
being performed.
• You can interrupt an
ongoing self-timer countdown by fully pressing the shutter
button while the self-timer lamp is flashing.
AF Assist/Self-timer Lamp
NOT
• The indicator “1sec” appears on the monitor screen
between Triple Self-timer shots. How long it takes for the
camera to get ready to shoot again after it shoots an image
depends on the image size and quality settings, whether or
not a memory card is loaded in the camera, and the flash
charge condition.
• You cannot use the any self-timer to shoot with Normalspeed continuous shutter mode.
• The Triple Self-timer cannot be used when performing the
following recording operations.
– Recording with certain BEST SHOT scenes (Business
cards and documents, White board, etc., Old Photo)
– Recording with High-speed Continuous Shutter or Flash
Continuous Shutter
B
82
SHOOTING A SNAPSHOT
Page 83

Using Continuous Shutter
Your camera has four continuous shutter modes.
Continuous
Shutter Mode
Normal Speed
(Normal-speed
Continuous
Shutter)
High Speed
(High-speed
Continuous
Shutter)
Flash Cont.
(Flash Continuous
Shutter)
Z
Zoom Cont.
(Zoom Continuous
Shutter)
Description
Continually records images until memory
becomes full.
Record up to three consecutive images
at high speed.
Use this mode to record up to three
consecutive images, firing the flash for
each one.
In this mode, you select an area on the
monitor screen with a selection
boundary. Then when you press the
shutter button, the camera records the
monitor screen image and the area
enclosed in the selection boundary,
digitally zoomed to twice its normal size.
Selecting the Continuous Shutter Mode
In the REC mode, press [MENU].
1.
2. On the “REC” tab, select “Continuous” and
then press [X].
3. Use [S] and [T] to select the mode you want
and then press [SET].
This enables the continuous shutter mode you selected and
displays its icon on the monitor screen.
To turn off continuous shutter, select “Off”.
83
SHOOTING A SNAPSHOT
Page 84

Recording with Normal-speed Continuous Shutter, High-speed Continuous Shutter, and Flash Continuous Shutter
Press the shutter button to shoot.
1.
• With Normal-speed Continuous Shutter, images continue
to be shot as long as you keep the shutter button
depressed. Releasing the shutter button stops shooting.
• High-speed continuous shutter and flash continuous
shutter can shoot up to three images. Shooting stops if
you release the shutter button before three images are
recorded.
IMPORTANT!
• The speed of normal-speed continuous shutter recording
depends on the type of memory card loaded in the camera.
When shooting to built-in memory, continuous shutter
shooting is relatively slow.
Recording with Zoom Continuous Shutter
1.
Use [S], [T], [W], and
[X] to move the
selection boundary
around the image of
the subject on the left
side of the monitor
screen until it is
located at the part you want to enlarge, and
then press [SET].
This will enlarge the area within the boundary and display it
in the right side of the monitor screen.
2. Press the shutter button to shoot.
Both the left image and the right image will be recorded.
84
SHOOTING A SNAPSHOT
Page 85

IMPORTANT!
• Note that with zoom continuous shutter, you do not need to
keep the shutter button depressed.
• Digital zoom is disabled while shooting with zoom
continuous shutter.
• Zoom continuous shutter is not available when the image
size setting is 3:2 (3072 × 2048 pixels) or 16:9 (3072 ×
1728 pixels).
• When the image size setting is 7M (3072 × 2304 pixels) or
5M (2560 × 1920 pixels), the size of the zoomed image
produced by zoom continuous shutter is 3M (2048 × 1536
pixels).
• When Auto Focus is selected as the focus mode, the
metering mode automatically switches to “Spot” (pages
116, 127) and locates the Auto Focus area in the center of
the Zoom Continuous Shutter selection boundary.
Continuous Shutter Precautions
• Starting a continuous shutter operation causes the exposure
and focus settings to be fixed at the levels for the first image.
The same settings are applied to all subsequent images.
• Continuous shutter cannot be used in combination with any of
the following features.
– Some BEST SHOT scenes (Business cards and
documents, White board, etc., Old Photo, Short Movie,
Past Movie, Voice Recording)
– Movie mode
• When using a continuous shutter mode, keep the camera still
until all recording is finished.
• A continuous shutter operation may stop part way through if
memory capacity runs low.
• The continuous shutter rate depends on the current image
size and image quality settings.
• You can select the flash mode you want with normal-speed
continuous shutter mode.
• With high-speed continuous shutter, the flash mode
automatically becomes “ ” (flash off).
• With the flash continuous shutter mode, the flash mode
automatically becomes “ ” (flash on).
• You cannot use the self-timer in combination with the normalspeed continuous shutter mode.
• Triple Self-timer can be used in combination with the zoom
continuous shutter mode only.
85
SHOOTING A SNAPSHOT
Page 86

• Note that the resolution of images recorded with the highspeed continuous shutter mode or flash continuous shutter
mode is somewhat lower resolution and more prone to digital
noise than images recorded with the normal-speed
continuous shutter mode.
• “Auto” ISO sensitivity always is used for the flash continuous
shutter mode, regardless of the current ISO sensitivity setting.
• With the flash continuous shutter mode, the flash range is
narrower than normal.
Adding Audio to a Snapshot
You can add an audio recording to snapshots, if you want. Use
this feature to add a verbal explanation or a description of the
mood to a snapshot, or to capture the sounds of the people in
the snapshot.
• You can record up to about 30 seconds of audio for a single
snapshot.
■ Turning on Audio Snapshot
1. In the REC mode, press [MENU].
2. On the “REC” tab, select “Audio Snap” and
then press [X].
3. Use [S] and [T] to select “On” and then press
[SET].
86
SHOOTING A SNAPSHOT
Page 87

■ Recording Audio for a Snapshot
1. Press the shutter
button to shoot.
This monitor screen will
show the image you just
shot, along with the “ ”
icon.
• If you do not want to
record audio at this time,
press [MENU]. This will
display the monitor screen
for shooting the next image.
Remaining Recording Time
2. Press the shutter button to start audio
recording.
3. Press the shutter button again to stop audio
recording.
Recording will stop automatically after about 30 seconds if
you do not press the shutter button.
• To turn off the audio snapshot feature, select “Off” in step
3 of the procedure under “Turning on Audio Snapshot”.
Playing Back Snapshot Audio
Audio snapshots in the PLAY mode are indicated by the “ ”
icon.
Press [SET] while an audio snapshot is displayed to play back
its audio.
• For information about the playback operation, see page 143.
IMPORTANT!
• Audio snapshot capabilities are disabled while shooting
with the Triple Self-timer or with a continuous shutter mode.
You can, however, add audio to such a snapshot after you
record it (page 173).
87
SHOOTING A SNAPSHOT
Page 88

NOT
E
• After transferring an audio snapshot to your computer’s
hard disk, you can play back the audio using Windows
Media Player (page 228).
• The following shows the formats used for storing audio
snapshot data.
– Image Data: JPEG (.JPG extension)
– Audio Data: WAVE/ADPCM (.WAV extension)
– Approximate Audio File Size: 165 KB (30-second
recording at 5.5KB per second)
• You cannot turn off the monitor screen by pressing [DISP]
while audio recording is in progress.
88
SHOOTING A SNAPSHOT
Page 89

SHOOTING A MOVIE
Movie Image Quality
Before shooting a movie, you should specify a movie image
quality setting. Movie image quality is a standard that
determines the detail, smoothness, and clarity of a movie during
playback. Shooting with the high-quality (HQ) setting will result
in better image quality, but it also shortens the amount of time
you can shoot.
Image Quality (pixels)
HQ 640 × 480
HQ Wide 704 × 384
Normal 640 × 480
Normal Wide 704 × 384
LP 320 × 240
Approximate
Data Rate
4.0 Megabits/
second
4.0 Megabits/
second
2.1 Megabits/
second
2.1 Megabits/
second
745 Kilobits/
second
Frame Rate
30 frames/
second
30 frames/
second
30 frames/
second
30 frames/
second
15 frames/
second
1. In the REC mode, press [MENU].
2. On the “Quality” tab, select “ Quality” and
then press [X].
3. Use [S] and [T] to select the quality setting
you want and then press [SET].
• The “ ” indicator is on the monitor screen while “HQ
Wide” or “Normal Wide” is selected for the quality setting.
Movie File Formats
Movies are recorded in MPEG-4
standard AVI format, DivX.
Movies you shoot with your camera
can be played back on a computer
using the following software.
– Windows Media Player
– DivX Player (DivX Play Bundle)
• Movies you shoot with your camera cannot be played back on
a Macintosh (page 235).
SHOOTING A MOVIE
89
Page 90

Movie Size
The following shows the approximate movie file size for a oneminute movie.
Image Quality Approximate Size
HQ 28.4 MB
HQ Wide 28.4 MB
Normal 14.9 MB
Normal Wide 14.9 MB
LP 5.3 MB
Shooting a Movie
Audio is also recorded while you shoot a movie. Audio is
monaural.
1. In the REC mode, point the camera at the
subject.
2. Press [ ] to start
Remaining Recording Time
shooting the movie.
• “ ” is displayed while
movie recording is in
progress.
3. Press [ ] again to
stop shooting.
Movie recording also will
stop automatically if memory
becomes full before you
press [ ].
Recording Time
90
SHOOTING A MOVIE
Page 91

Shooting with BEST SHOT
With BEST SHOT (page 98), you select the preset scene that is
closest to the one you want to shoot, and the camera sets up for
it automatically. Selecting the “Night Scene” BEST SHOT scene,
for example, sets the camera to shoot bright, clear images at
night.
Anti Shake Movie Recording
You can also use Anti Shake to reduce the effects of hand
movement only while recording a movie (page 104). The effects
of subject movement are not limited.
Movie Recording Precautions
• You cannot use flash while shooting a movie.
• The camera also records audio. Note the following points
when shooting a movie.
– Take care that the
microphone is not
blocked by your fingers,
etc.
– Good results are not
possible when the
camera is too far away
from what you are trying
to record.
– Operating camera
buttons while shooting
can cause button noise to be picked up in the audio.
• Shooting a very bright subject can cause a vertical band to
appear in the monitor screen image. This does not indicate
malfunction. The band will not be recorded in a snapshot, but
will be recorded in the case of a movie.
• Certain types of memory cards take longer to record data,
which can cause movie frames to be dropped. “ ” and
“ ” flash on the monitor screen during recording to let you
know when a frame has been dropped. Use of a memory card
with a maximum transfer speed of at least 10MB per second
is recommended.
Microphone
91
SHOOTING A MOVIE
Page 92

• You can perform digital zoom while shooting a movie by
pressing [ ]. Optical zoom is not available while shooting a
movie. To use optical zoom for a movie, use [ ] to zoom as
required first and then press [ ] to start recording.
• The effects of camera movement in an image become more
pronounced when you shoot close up or a large zoom factor.
Because of this, use of a tripod is recommended under these
conditions.
• When the subject is outside the camera’s focus range,
focusing is not possible and the image will be out of focus.
• Auto Focus and Macro Focus become fixed focus while
shooting a movie (pages 113, 114).
Using Short Movie
With Short Movie, pressing [ ] will shoot a movie that starts a
few seconds before [ ] is pressed (first part) and ends a few
seconds after it is pressed (second part). You can specify how
long (in seconds) you want the first part and the second part of
the Short Movie to be.
• Since a few seconds of action before [ ] is pressed are
recorded, Short Movie is a good way to make sure you don’t
miss the action of kids or other active subjects.
• You can also use MOTION PRINT (page 171) to extract still
images of Short Movie scenes.
[ ] button pressed.
Short Movie
Recording Start
Few seconds Few seconds
92
SHOOTING A MOVIE
Page 93

■ Getting Ready to Shoot with Short Movie
1. In the REC mode, press [BS].
2. Use [S], [T], [W], and [X]
to select the “Short Movie”
scene and then press
[SET].
This causes “ ” to appear on the
monitor screen.
Pressing [ ] at this point will
shoot a Short Movie with a 4second first part and a 4-second
second part.
If you want to configure settings for
the length of the first part, the length of the second part, or
MOTION PRINT settings, continue from step 3.
[BS]
3. Press [SET].
4. Use [S] and [T] to
select how long (in
Past part
length
Future part
seconds) you want
the first part of the
Short Move to be and
then press [X].
5. Use [S] and [T] to
select how long (in
seconds) you want
the second part of the
Short Move to be and
then press [X].
The total length of a Short
Movie (first part plus second part) must be at least two
seconds and no longer than eight seconds.
If you specify five seconds for the first part in step 4, for
example, you can specify no more than three seconds for
the second part. Specifying a value greater than three, in
this case, will cause the length specified for the first part to
be reduced automatically.
MOTION PRINT settings
length
93
SHOOTING A MOVIE
Page 94

6. Use [W] and [X] to select the MOTION PRINT
setting you want and then press [SET].
To do this: Select this setting:
Create a snapshot with nine
movie frames, with the one
recorded when [ ] is
pressed in the center
Create a snapshot of the
frame recorded when [ ]
is pressed
Turn off MOTION PRINT Off
9 frames
1 frame
■ Shooting a Short Movie
1. With the camera pointed at the subject, press
[].
This will shoot a Short Movie of the length you specified and
then stop shooting automatically.
To stop shooting before the specified time is up, press [ ]
again.
IMPORTANT!
• Movie data is continually recorded and stored in a buffer
before you press [ ]. Keep the camera pointed at the
subject. Then at the right moment, press [ ]. When you
press [ ], the remaining recording time of part two of the
Short Movie counts down on the monitor screen.
94
SHOOTING A MOVIE
Page 95

To return to the REC mode
After Short Movie recording is complete, the camera stands by
for shooting of another Short Movie.
To exit Short Movie recording, press [BS], select something
other than “Short Movie” and then press [SET]. If you want to set
the camera up for normal snapshot shooting, for example, select
“Auto” and then press [SET].
Using Past Movie
Past Movie is similar to a normal movie, except that it captures
about five seconds of whatever happened in front of the lens
before [ ] was pressed to start shooting. Past Movie is a
great way to make sure that you never just miss that special
moment because you press the [ ] button too late.
[ ] button pressed.
Movie
[ ] button pressed.
Recording Start
Past Part Approximately 5 seconds
95
Recording End
SHOOTING A MOVIE
Page 96

■ Getting Ready to Shoot with Past Movie
■ Shooting a Past Movie
1. In the REC mode, press
[BS].
[BS]
2. Use [S], [T], [W], and [X] to select the “Past
Movie” scene and then press [SET].
This causes “ ” to appear on the monitor screen, which
indicates that Past Movie is enabled.
1. With the camera pointed at the subject, press
[].
2. Press [ ] again to stop shooting.
Movie recording also will stop automatically if memory
becomes full before you press [ ].
To return to the REC mode
After Past Movie recording is complete, the camera stands by
for shooting of another Past Movie.
To exit Past Movie recording, press [BS], select something other
than “Past Movie” and then press [SET]. If you want to set the
camera up for normal snapshot shooting, for example, select
“Auto” and then press [SET].
SHOOTING A MOVIE
96
Page 97

E
Shooting a Snapshot while Shooting a Movie (Snapshot-In-Movie)
You can shoot a snapshot while normal movie recording is in
progress. Note, however, that movie recording (image and
audio) is interrupted for a few seconds while the snapshot is
recorded.
IMPORTANT!
• Shooting a snapshot while shooting a movie is not
supported while any one of the following BEST SHOT
scenes is selected.
Short Movie, Past Movie, Business cards and documents,
White board, etc., Voice Recording.
■ Shooting a Snapshot During a Movie
1. While movie recording is in progress, press
the shutter button.
You can also half-press the shutter button to focus using
Auto Focus.
2. Movie recording continues after the snapshot
is recorded.
3. To stop movie recording, press [ ].
NOT
• You can use [T] ( ) while shooting a movie to
change the flash mode.
SHOOTING A MOVIE
97
Page 98

USING BEST SHOT
With BEST SHOT, you simply select the sample scene that is
like the one you are trying to shoot, and the camera sets up
automatically. Even difficult backlight scenes (which result in the
main subject being too dark if set up improperly) come out
looking great!
■ Some Sample Scenes
• Portrait • Scenery
• Night Scene • Night Scene Portrait
■ Selecting a Sample Scene
1. In the REC mode,
press [BS].
This enters the BEST SHOT
mode and displays a screen
showing thumbnails of 15
sample scenes.
• The currently selected
sample scene is the one
with the red boundary
around it.
• The initial default selection
is “ ” (Auto).
98
Red Boundary
Scene Name
Scene Number
USING BEST SHOT
Page 99

2. Use [S], [T], [W], and [X] to move the
boundary to select the scene you want to
select.
• Pressing [S] or [T] while the red boundary is at the edge
of the screen will scroll to the next screen of BEST SHOT
scenes.
• Pressing the zoom button will display text that explains
the settings configured by the selected scene. Press the
zoom button again to return to the scene selection
screen.
• To return to “Auto”, select Scene 1, which is “ ” (Auto).
Pressing [MENU] while the scene selection screen or
scene description text is on the monitor screen will cause
the red boundary to jump directly to “ ” (Auto).
3. Press [SET] to apply the settings of the
selected scene and return to the recording
screen.
• The settings of the scene you selected remain in effect
until you select a different scene.
• To select a different BEST SHOT scene, repeat the
above procedure from step 1.
4. Press the shutter button (if you are shooting a
snapshot) or [ ] (if you are shooting a
movie).
99
USING BEST SHOT
Page 100

BEST SHOT Scene Limitations
• Business cards and documents, White board, etc., and Old
Photo.
These scenes cannot be used to shoot a movie.
• Short Movie, Past Movie
These scenes cannot be used to shoot a snapshot.
• Voice Recording
These scenes cannot be used to shoot a snapshot or movie.
• Night Scene, Fireworks
These scenes use slow shutter speeds. Since a slow shutter
speed increases the chance of digital noise in the image, the
camera automatically performs a digital noise reduction
process on slow shutter images. Because of this, such
images take longer to store after you press the shutter button.
Do not perform any key operation while an image is being
stored. Also, it is a good idea to use a tripod to avoid image
blur due to camera movement when shooting at slow shutter
speeds.
IMPORTANT!
• BEST SHOT scenes were not shot using this camera.
• Images shot using a BEST SHOT scene may not produce
the results you expected due to shooting conditions and
other factors.
• You can change the camera settings that are made when
you select a BEST SHOT scene. Note, however, that the
BEST SHOT settings revert to their defaults when you
select another BEST SHOT scene or turn off the camera. If
you think you will later need to use a particular camera
setup you configured, save it as a BEST SHOT user setup
(page 102).
100
USING BEST SHOT
 Loading...