

Page 1

SERVICE MANUAL
ELECTRONIC CASH REGISTER
QT-6600
(EX-830)
NOV. 2008
QT-6600
Page 2

CONTENTS
QT-6600 PAGE
1. SPECIFICATIONS ...................................................................................1
2. MACHINE INITIALIZATION .....................................................................5
3. DISASSEMBLY .....................................................................................10
4. ASSEMBLY ...........................................................................................24
5. OPTION INSTALLATION ......................................................................36
6. INLINE / ONLINE ...................................................................................38
7. DIAGNOSTIC OPERATION ..................................................................40
8. CIRCUIT EXPLANATION ......................................................................81
9. ERROR CODE LIST ..............................................................................84
10. PCB LAYOUT ........................................................................................95
11. CIRCUIT DIAGRAM ..............................................................................99
12. PARTS LIST ........................................................................................119
To prevent malfunctions caused by the weak batteries, charge the memory
protection batteries for over 12-hours before installation or after a long-time
vacation (over 30 days).
Before installation, initialize the terminal and leave it turn on over 12-hours.
•
After a long-time vacation, initialize the terminal and restore the program
•
data if the terminal is in malfunction, and leave it turn on over 12-hours.
Over 48-hours charging makes the batteries fully charged.
•
Page 3
1. SPECIFICATIONS
1-1. Electrical Specifications
• Power consumption <AC input current at Adaptor>
100V 120V 220V 230V 240V
In operation Max. 1.5A 1.5A 1.5A 1.5A
Display off Max. 0.25A 0.25A 0.25A 0.25A
<DC input current at QT-6600>
In operation Max. 1.3A 1.3A 1.3A 1.3A
Display off Max. 0.5A 0.5A 0.5A 0.5A
• Memory protection Back-up battery
Battery life
Recharge time
• Clock & Calendar Accuracy
Auto calendar
• Clock protection Back-up battery
Battery
Recharge time
1-2. Environmental specifications
• Operating temperature 0 °C ~ 40 °C
• Operating humidity 20 % ~ 85 %
• Storage temperature -20 °C ~ 65 °C
• Storage humidity 10 % ~ 85 %
1-3. Main LSI specifications
• CPU Name
Number of control bit
NiMH (nickel-metal-hydride)
HHR-21HL3G1B (USA only)
HHR-21HL3G1C (Except USA)
Replace the battery every 1 year.
6 hours (full charge)
Within ± 40 sec. Per month (25 °C)
Effective until 2099 A.D.
Manganese dioxide lithium
CR2032/1HF1
Replace the battery every 1 year.
R5S77631AY266BGV
32 bits
• I/O controller Name
• Gate array Name UPD65945GJP16-JEUA
• DDR SDRAM Name
SDRAM Name
• Flash ROM (Back up) Name
• Flash ROM (Program) Name
• Display controller Name MB86276PB-G-ZE1
• Ethernet controller Name LAN9115-MT (10/100BASE)
Number of control bit
Capacity
Capacity
Capacity
Capacity
— 1 —
UPD70F3728GC-8BT-A
16 bits
HYB25DC256163CE-5
256 Mbits
MT48LC4M16A2P-75:G
64 Mbits
S29GL256P90TFCR20
256 Mbits
S29GL256P90TFCR2A*
256 Mbits
Page 4

1-4. Devices specifications
DISPLAY
SCANNER
PC/MODEM
COM3
COM6
COM2
COM5
COM1
COM4
SPK
PS/2
KEYBOARD
MIC
LAN
Brightness
COM3 COM6
COM2
COM5
COM1 COM4
Inline (10/100Base-T)
PS/2 Keyboard
AC Adaptor
Drawer 2
Drawer 1
Ext. microphone
Ext. speaker
Bottom side of the terminal
• LCD Display Name
Screen size
Resolution
Interface
Display color
Pixel pitch
Luminance
Contrast ratio
Power supply voltage
Back light
• Touch Panel Name
Size
NL10276BC30-32D
15.0 inch (38cm diagonal)
1024(H) x 768(V) pixels
LVDS (RGB 8 bits each)
16.77 M colors
0.297(H) x 0.297(V) mm
250 cd/m
2
500:1
3.3 V
Top and bottom, 1 CCFL each
N010-0527-T841
15 inch
• Panel brightness control 1 x VR controller
• Power supply External adaptor "SO1330A"
• Cleck key Magnetic ibutton prove "94-J-04"
1-5. I/O Ports
The following optional peripherals can be used by plugging them into the appropriate port.
RS-232C COM 1 port For MODEM, PC direct connection or Order man
RS-232C COM 2 port For Hand held scanner, Slip printer or Scale
RS-232C COM 3 port For Remote customer display or Scale
RS-232C COM 4 port For Remote printer, Slip printer or Scale
RS-232C COM 5 port For Remote printer or Scale
RS-232C COM 6 port For Remote printer or Scale
Inline port. Ethernet
Drawer port x 2 Drawer
CF card slot
(in the card slot cover)
PS-2 keyboard port PS-2 keyboard (Microsoft Wired Keyboard 500)
CF card
— 2 —
Page 5
1-6. Option List
CASIO sales options
DEVICE NAME MODEL NOTE
• Magnet i-Button QT-6011DLS
• Display set for customer QT-6060D Connect to Com 3
• Display cable for customer
(for mounting to the base)
• Display 5-meter cable for customer QT-6062CB
• Slip printer SP-1300 Connect to Com 2
• Slip printer cable PRT-CB-8C Length 1.5m
• Remote printer UP-400 Connect to Com 4 ~ 6
• Remote printer UP-360BB Connect to Com 4 ~ 6
• Printer cable PRT-CB-8A Length 3m
• Printer cable PRT-CB-8B Length 5m
• MCR QT-6046MCR
• Drawer extension cable MDL-11
• PC cable PRL-CB-2 Com1 port only
Local purchase options
DEVICE NAME MAKER MODEL NOTE
• Remote printer EPSON TM-T88 IV (Mark 4) Connect to Com 4 ~ 6
• Remote printer EPSON TM-U220 Connect to Com 4 ~ 6
• Remote printer EPSON TM-U230 Connect to Com 4 ~ 6
• Remote printer EPSON TM-J7100 Connect to Com 4 ~ 6
• Remote printer EPSON TM-T88 lll Connect to Com 4 ~ 6
• Printer AC adaptor EPSON PS-180
• Slip printer/AC adaptor Citizen AD31-U or E
• Power cord for power unit EPSON AC-170
• Laser scanner PSC PSC QuickScan6500 Connect to Com 2
• Laser scanner Metrologic Metrologic MS9544 Voyager Connect to Com 2
• Fixation scanner Metrologic Metrologic MS7120 Orbit Connect to Com 2
• Scanner Scale PSC PSC Megellan 8100 Connect to Com 2
• Modem U.S.Robotics 56k V.92 (RS232C) Connect to Com 1
• Modem D-Link DFM-560EL (RS232C) Connect to Com 1
• Orderman Orderman Orderman Don/Max2/
• External speaker ELECOM MS-76CH
• External microphone ELECOM MS-STM55
• Conversion plug OHM
• CF Memory card Sandisk 1GB (Ultra II),
• PS2 keyboard Microsoft Microsoft Wired Keyboard 500
• HUB NETGEAR FS-108
• HUB NETGEAR GS-108
• Ketchen alarm HERALD Kitchen Alarm System
• Video surveillance VHC2-VIDQT6
QT-6061CB
U: 100V / E: 200V
(For SP-1300)
Access Point
AP-2633
ELECTRIC
2/4/8GB (Extreme III)
— 3 —
Page 6
1-7. Drawer
Type Drawer Name Specification USA/Canada Other Countries
M DL-2808 D-24BC-B84M-4 X
M DL-2809 D-24BC-B84-SM-4 X
M DL-2434 D-24BC-B55SM-4 X
M DL-2810 D-24BC-A84SM-4 X
L DL-3622 D-11BH-B65SS-4 X
L DL-3623 D-11BH-B65-4 X
1-8. Duration of Life
TFT LCD (Main) 30,000 hours
STN LCD (Rear) 20,000 hours
Touch Panel (number of touch times) one million times
Battery 1 year
AC adaptor 5 year
Installing Precautions
■
When installing QT-6600, attach the ferrite core to the QT-6600 side. Wind the
AC adaptor cable around the ferrite core two times.
The ferrite core is packed with QT-6600.
RISK OF EXPLOSION IF BATTERY IS REPLACED
DISPOSE OF USED BATTERIES ACCORDING
CAUTION
BY AN INCORRECT TYPE.
TO THE INSTRUCTIONS
— 4 —
Page 7

Copyright(C) 2008
CASIO COMPUTER CO.,LTD.
All rights reserved.
ROM VER. xxxxxx xxxx
CREATE xxxx-xx-xx xx:xx
QT-6600 x.xx
APL VER. xxxxxx xxxx
Version
INIT
C
7 8 9
4 5 6
1 2 3
0
OK
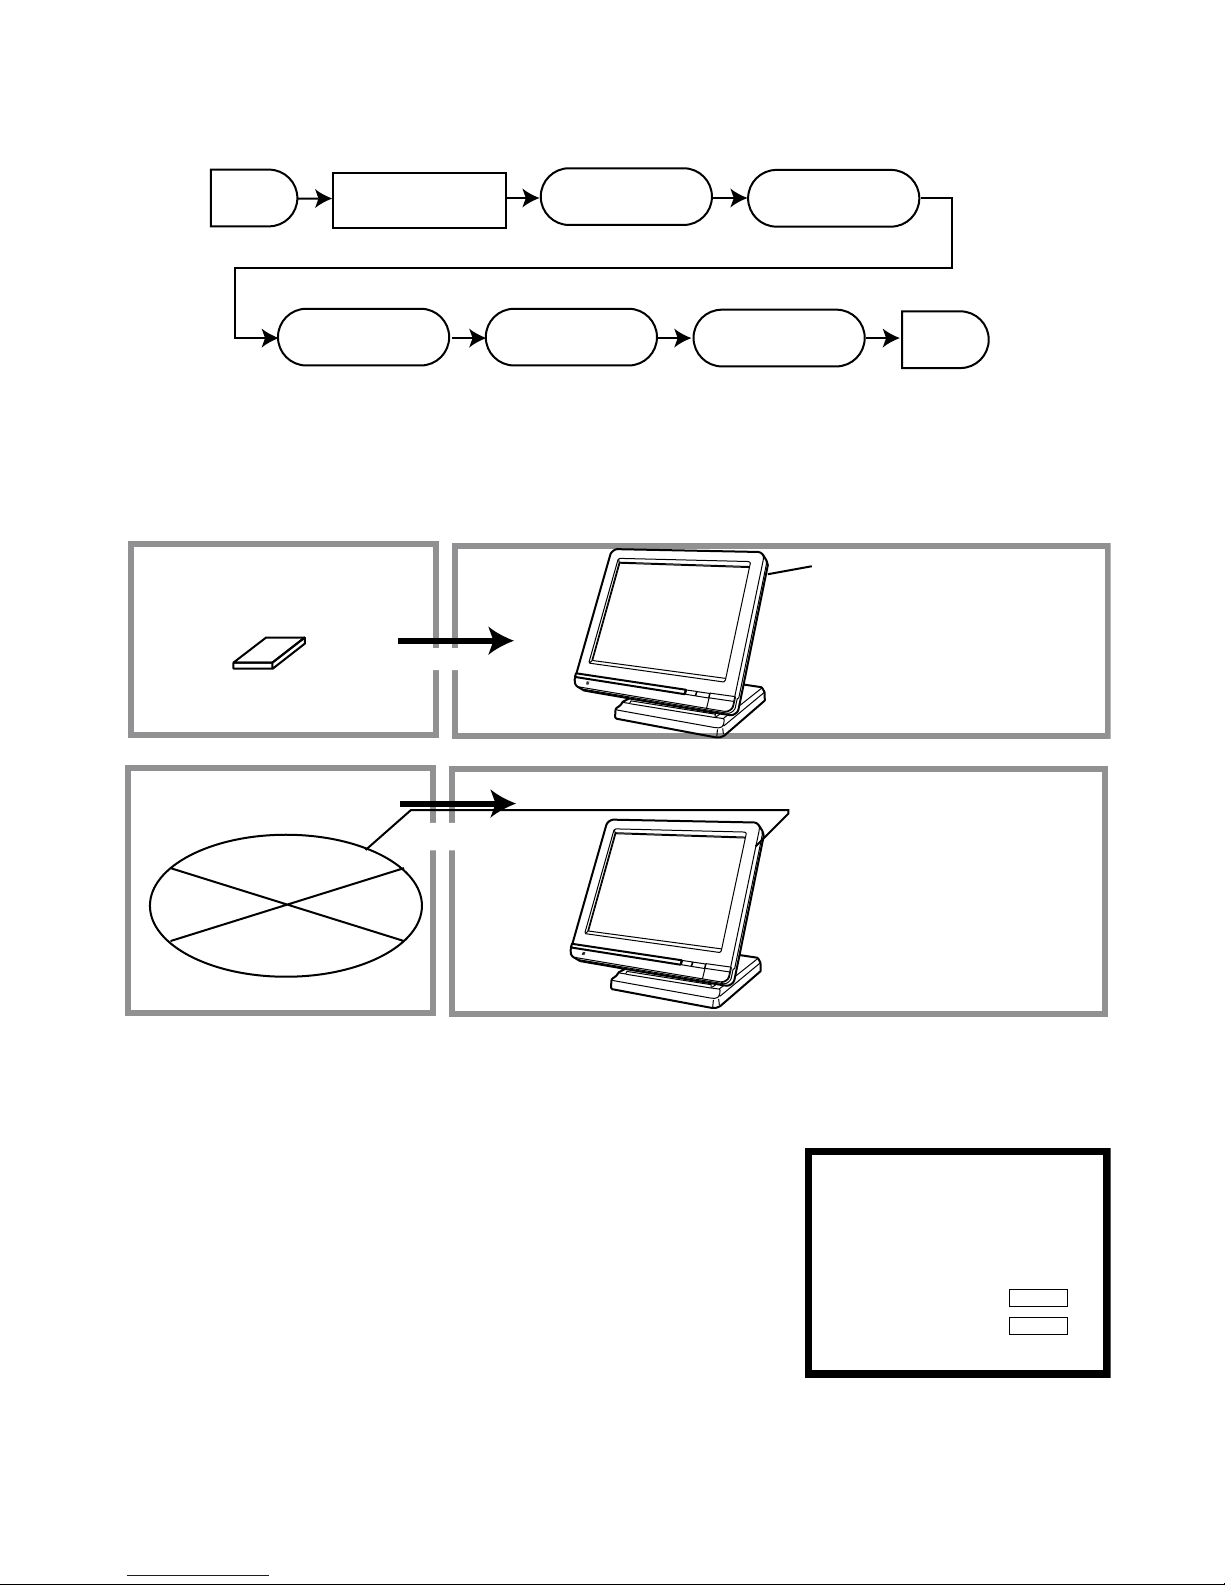
2. MACHINE INITIALIZATION
Init Sw
ID & IP ADDRESS
Terminal ID
ENTER ID
IP ADDRESS
AUTO
FTP Server
OK?
———
Terminal ID: 0,1 ~ 32
———
Press <YES> to continue.
Yes
Yes
2-1. How to initialize the terminal
Preparation:
1. All peripheral devices and terminals of this cluster should be turned off.
2. Connect all of the peripheral devices (such as printer, display etc.) to terminal.
3. Connect all terminals by inline.
Operation:
4. Turn on all peripheral devices of a terminal.
5. Turn on this terminal with pressing the initialize switch and release after beep sound.
6. After releasing the key, enter “20000” (U.S.), “10000” (other area: English), “40000” (other area:
German), “50000” (other area: French), “60000” (other area: Spanish) and press the <OK> key.
Enter terminal ID and IP address
— 5 —
Page 8

• Case 1: If your system has no LAN device = “0”
OK?
———
Press <YES> to continue.
Yes
——— Press <YES> to continue.
———
Select <YES>, if you want to use this terminal as an FTP server.
———
Select “CLIENT”, if you want to use this terminal as a DHCP client.
——— Enter IP address if you want to change.
IP AD D R E S S
FTP S e r v e r
DHCP SE R V E R
192. 1 6 8 . 0 .
1
MANUA L
OK?
Yes
Yes
——— Press <YES> to continue.
———
Select “MANUAL”, if you want to enter IP address manually.
(IP address setting line will appear on the screen.)
IP AD D R E S S AUTO
OK? Y e s
——— Enter cluster No. “1” ~ “ 9” , if using check cluster system.
——— Select the appropriate printer.
——— Select the appropriate printer.
——— Press <YES> to continue.
———
Master / Backup master / Satellite / Self master
———
Enter time if it is wrong.
———
Within 12 characters
——— Enter date if it is wrong.
OK?
Slip P r i n t e r
No
R/J/O r d e r P r i n t e r 3
No
R/J/O r d e r P r i n t e r 2
No
R/J/O r d e r P r i n t e r 1
No
Check C l u s t e r I D
0
Check S y s t e m
Maste r
ID C h a r a c t e r
MC #0 1
Time
12:34 0 0
Date
01-10 - 1 0
YES
• Case 2: Terminal ID = “1”
* The IP address of each terminal should be the unique number from 192.168. 0. 1 to
192.168.255.255.
• Case 3: Terminal ID = “2” ~ “32”
Declare terminal configuration
— 6 —
Page 9

Program restoration
INIT 1 0 - 1 0 - 0 1 12:34 0 0 00 01
AUTO PG
M
1.No R e s t o r e / Receive
2.PGM R e s t o r e ( CF Card)
3.PGM R e c e i v e ( Inline)
———
Select, if no need to download any data.
———
Select to download a program data from CF card.
———
Select to download a program data from other terminal.
INIT 1 0 - 1 0 - 0 1 12:34 0 0 0 0 0 1
Receive Data
PGM Receive from
OK
?
All PG
M
MC #05
YES
——— All Data (including totalizer) / All PGM (program only)
——— Select the machine to send the data.
• Restore from CF card.
Insert the CF card into the slot and select the appropriate file and press the <YES> key.
• Program receive from other terminal.
2-2. How to initialize the terminal (add / replace one terminal)
Preparation:
1. All peripheral devices and terminals of this cluster should be turned off.
2. Connect all of the peripheral devices (such as printer, display etc.) to this terminal.
3. Connect the added / replaced terminal to inline.
Operation:
Follow the steps shown on the page 5 to 7.
— 7 —
Page 10

2-3. How to flag clear the terminal (or INIT2)
FC
OK
Copyright(C) 2008
CASIO COMPUTER CO.,LTD.
All rights reserved.
ROM VER. xxxxxx xxxx
CREATE xxxx-xx-xx xx:xx
QT-6600 x.xx
APL VER. xxxxxx xxxx
Version
Start
Continue
to INIT
ROM check
Store the receiving
data to Flash
Preparation:
1. All peripheral devices and this terminal should be turned off.
2. Check the connection of all peripheral devices (such as printer, display etc.) of this terminal.
3. Check the connection of this terminal to inline.
Operation:
4. Turn on all peripheral devices of this terminal.
5. Turn on this terminal with pressing the <DISP ON/OFF> key.
6. Press <OK> key.
2-4. IPL (Initial Program Loading)
IPL should be made before initializing when the application software has been modified.
2-4-1. IPL
IPL via CF card or COM1 port
Initial program loading process is as follows: IPL code = 44449999
7. Select “1. Flag Clear” and press <YES> key to flag clear.
or select “2.Init2” and press <YES> key and enter “8888888888” and <YES> key to Init 2.
— 8 —
Page 11
IPL via LAN port
Start
END
Restore
all data
IPL from
CF card
Store IPL data
to CF card
Backup all data
to CF card
Clear IPL data
in the CF card
Insert more than
128MB CF card
CF card
IPL source
IPL target
IPL Data
CF card slot is located
on the leftside of the terminal.
IPL source
LAN port
defined as FTP server
IPL target
IPL Data
xxxxxxx
xxxxxxx
xxxxxxx
xxxxxxx
xxxxxxx
CANCEL
START
2-4-2. System configuration before IPL operation
Connect source terminal (cash register terminal) and target terminals or insert the IPL CF card to the
terminal.
2-4-3. IPL operation
Insert the CF card into the slot before this step.
1. Press the <START> key to proceed, in case of downloading
via inline, automatic ID definition is made by this timing. So
press the <YES> key terminal by terminal.
2. After finishing IPL, machine initialization is necessary.
— 9 —
Page 12

3. DISASSEMBLY
NOTE:
* Please make a back-up copy of the clients’ data before disassembling.
* When the power is turned off, the internal battery enables the hibernate function.
* There are several kinds of screws. Be sure to use the
correct type of screws when reassembling.
It is advisable to sort the screws as shown in the right
after removing them.
* When assembling/disassembling the Stand, be careful not to get the fingers caught.
* Use caution when handling the LCD unit and the inverter for the backlight as there is the risk of
high-voltage electrical shock.
* Internal battery:
• Do not disassemble or short-circuit the battery.
• Do not place the battery near a heat source or expose it to direct flame or heat.
• Place the battery with its (+) and (-) terminals in the correct orientation.
• Do not recharge the battery. (Primary battery)
* When assembling, be sure that it is free of dust and other foreign matters.
Pay special attention when replacing the touch panel and LCD
* Do not tangle the cables in principle.
— 10 —
Page 13

Disassembling
A.
Removing the Stand
B.Removing the B-case Assy Block
C.Removing the Rear Display Block
D.Disassembling the Rear Display
E.Removing the Mic PCB (E830-MIC)
F.Removing the LED PCB (E830-E6)
G.Removing the Inverter Unit
H.Removing the Touch Panel PCB (E830-TP)
I.
Removing the Power Supply PCB (E830-INLET)
J.Removing the COM PCB (E830-COM)
K.Removing the Main PCB (E830-1)
L.Removing the MCR
M.Removing the LCD/Touch Panel
■
See the flowchart below for the order of disassembling main parts.
— 11 —
Page 14

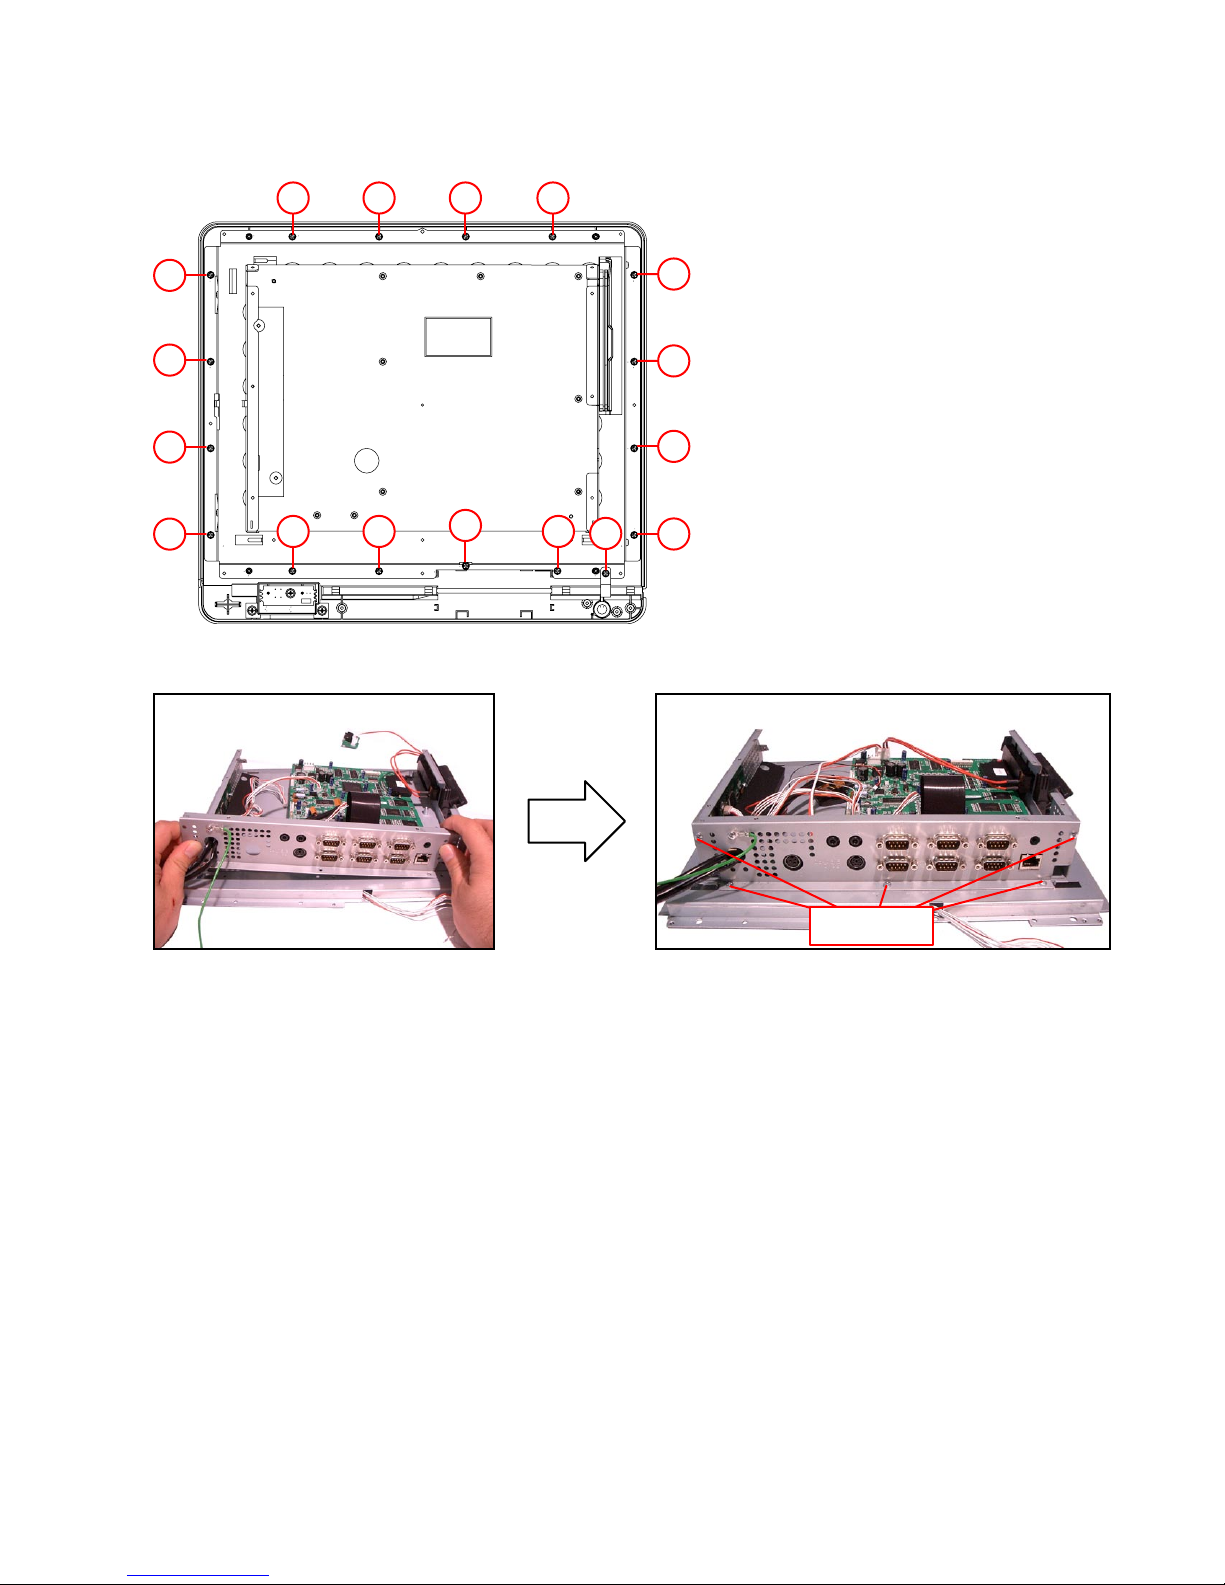
A. Disengage and remove the Main Unit from the Stand.
B. Removing the B-case Assy Block
B-1. Remove three screws.
B-2. Remove two covers.
Screws (S4)
HNG COVER
CONNECTOR COVER
— 12 —
Page 15
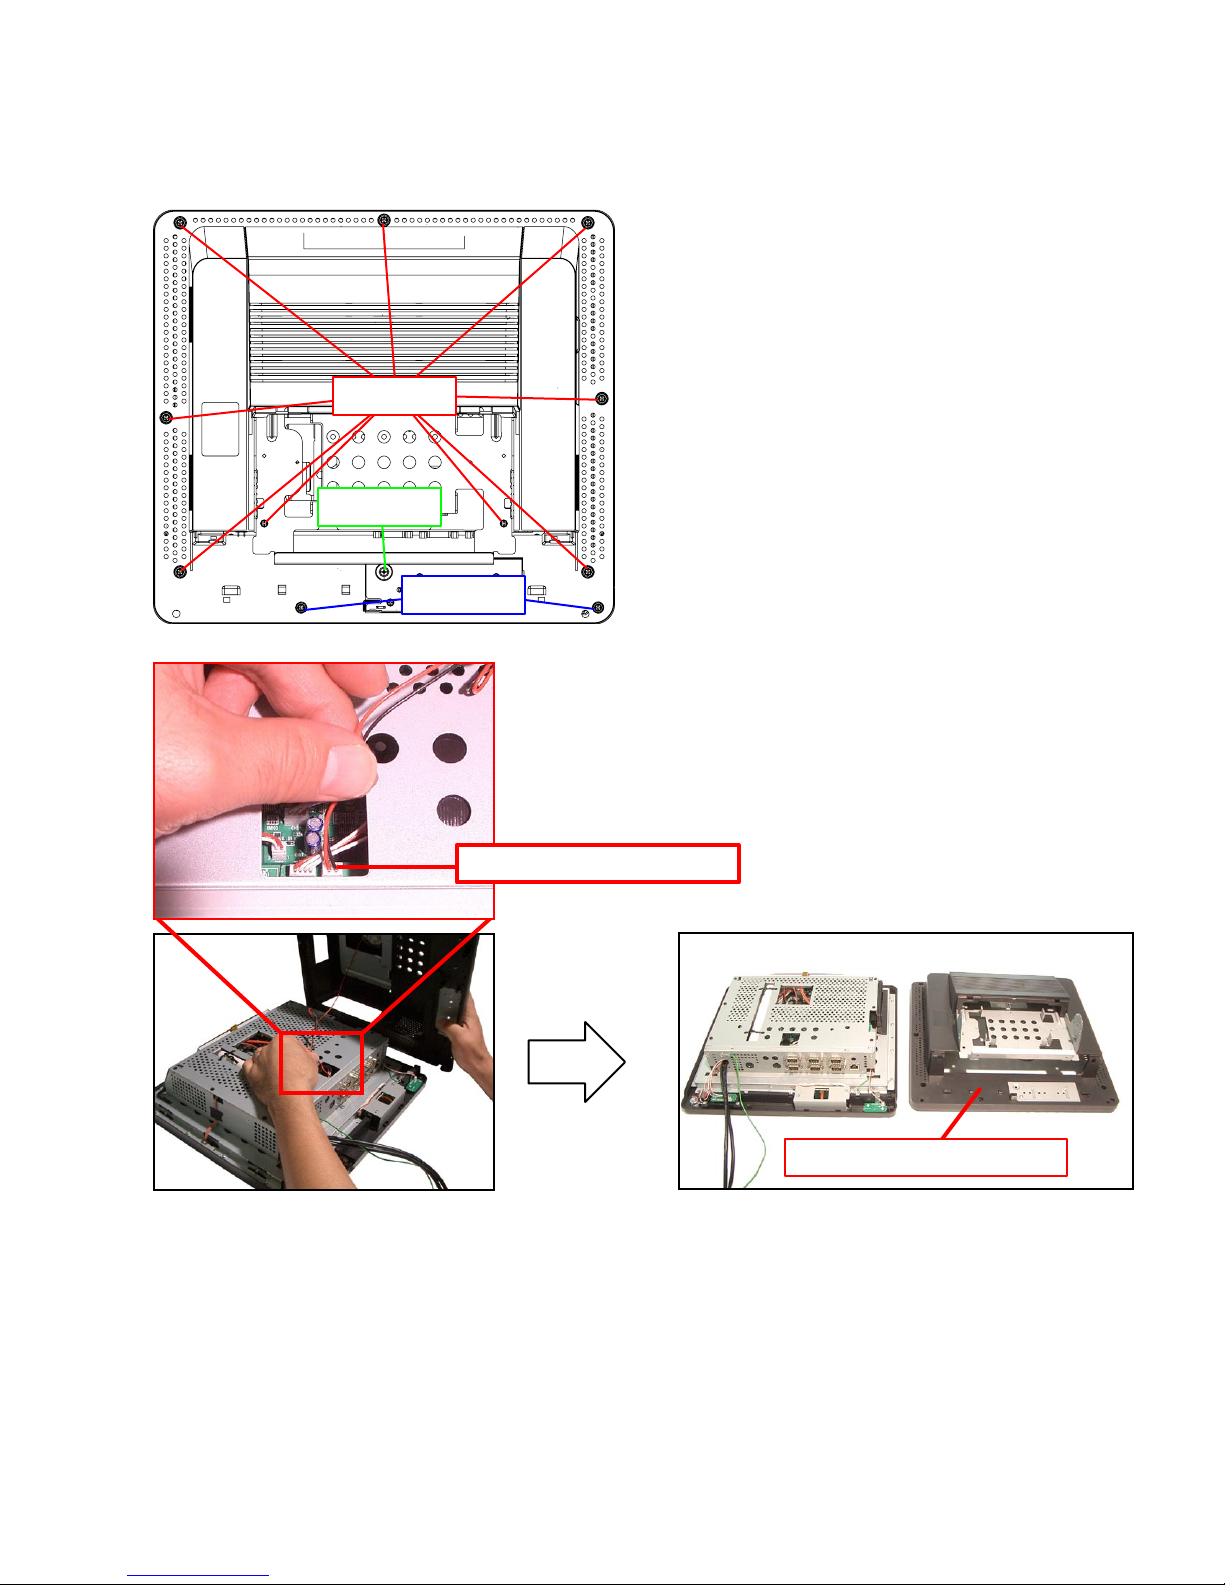
B-3. Remove 12 screws.
B-4. Remove the B-case Assy Block.
B-5. Unplug the connector to the speaker.
Screws (S1)
Screws (S2)
Screws (S3)
Connector (Speaker)
B-CASE ASSY BLOCK
— 13 —
Page 16
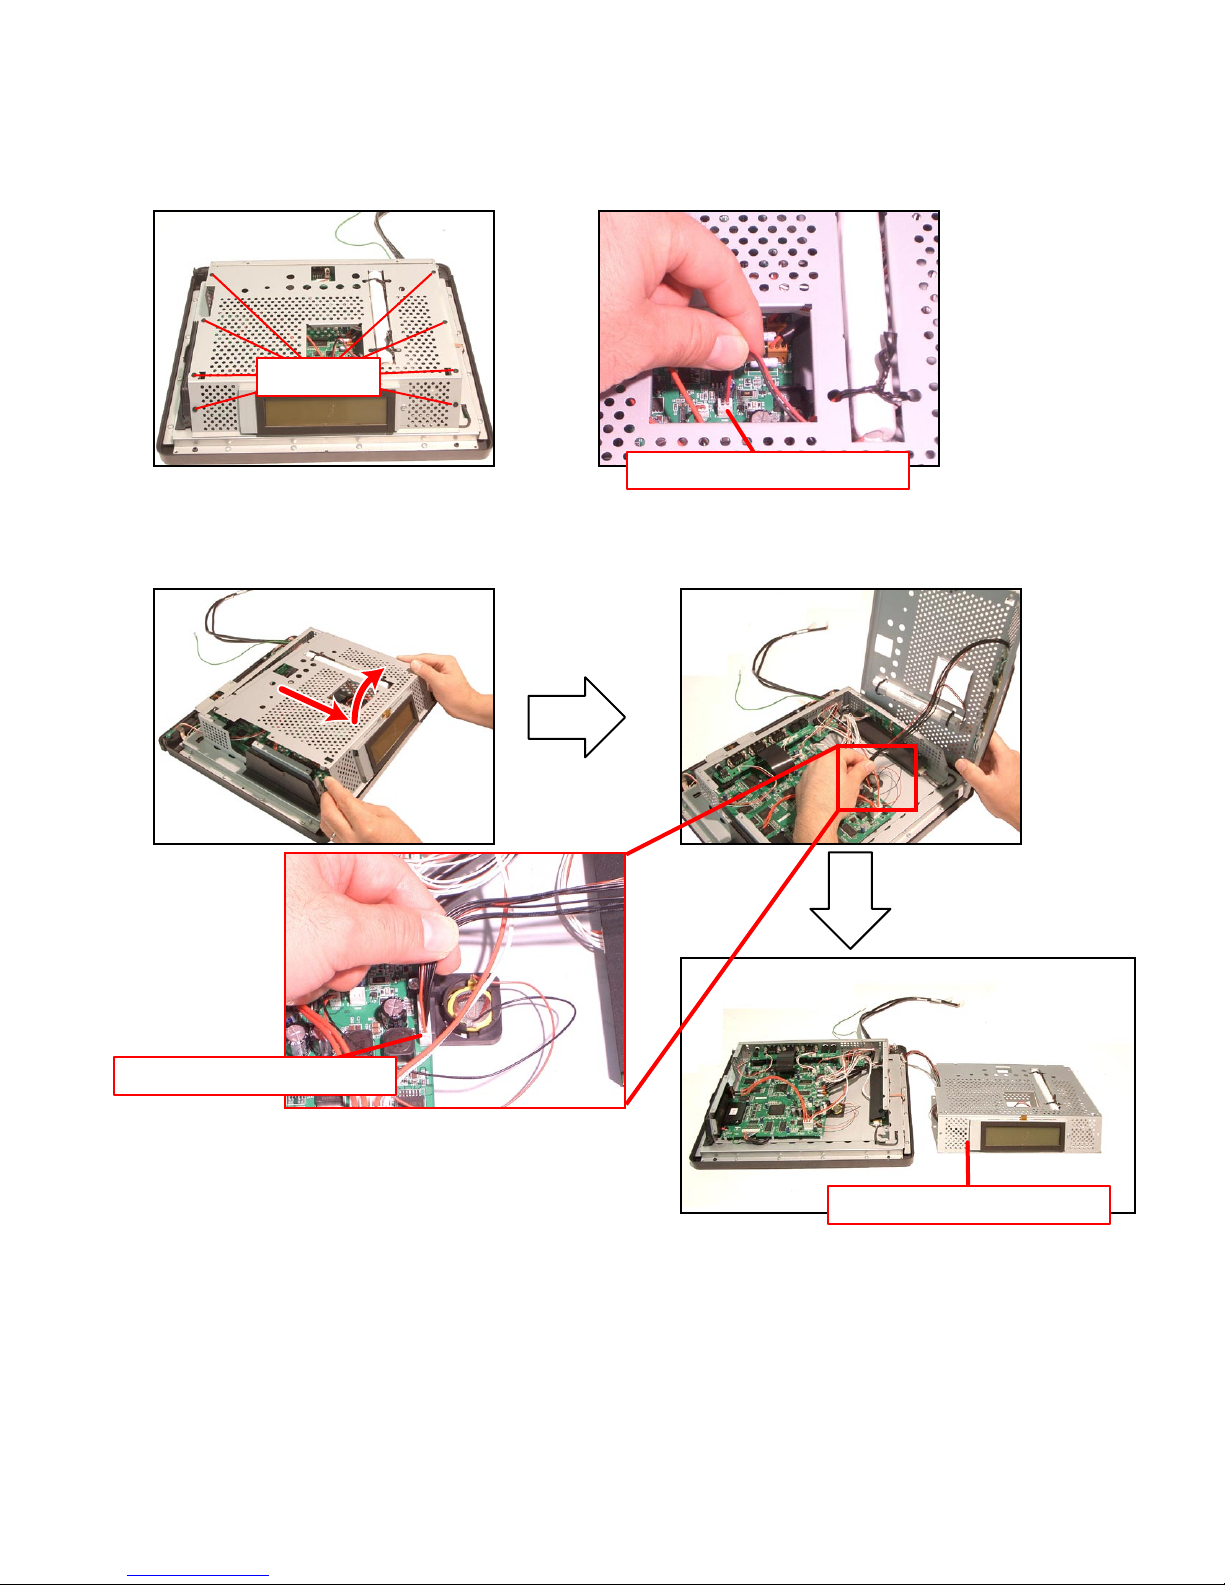
C. Removing the Rear Display Block
C-1. Remove eight screws.
C-2. Remove the connector to the battery.
Screws (S6)
C-3. Remove the Rear Display Block.
C-4. Unplug the connector to the Rear Display.
Connector (Battery)
Connector (REAR DISPLAY)
REAR DISPLAY BLOCK
— 14 —
Page 17
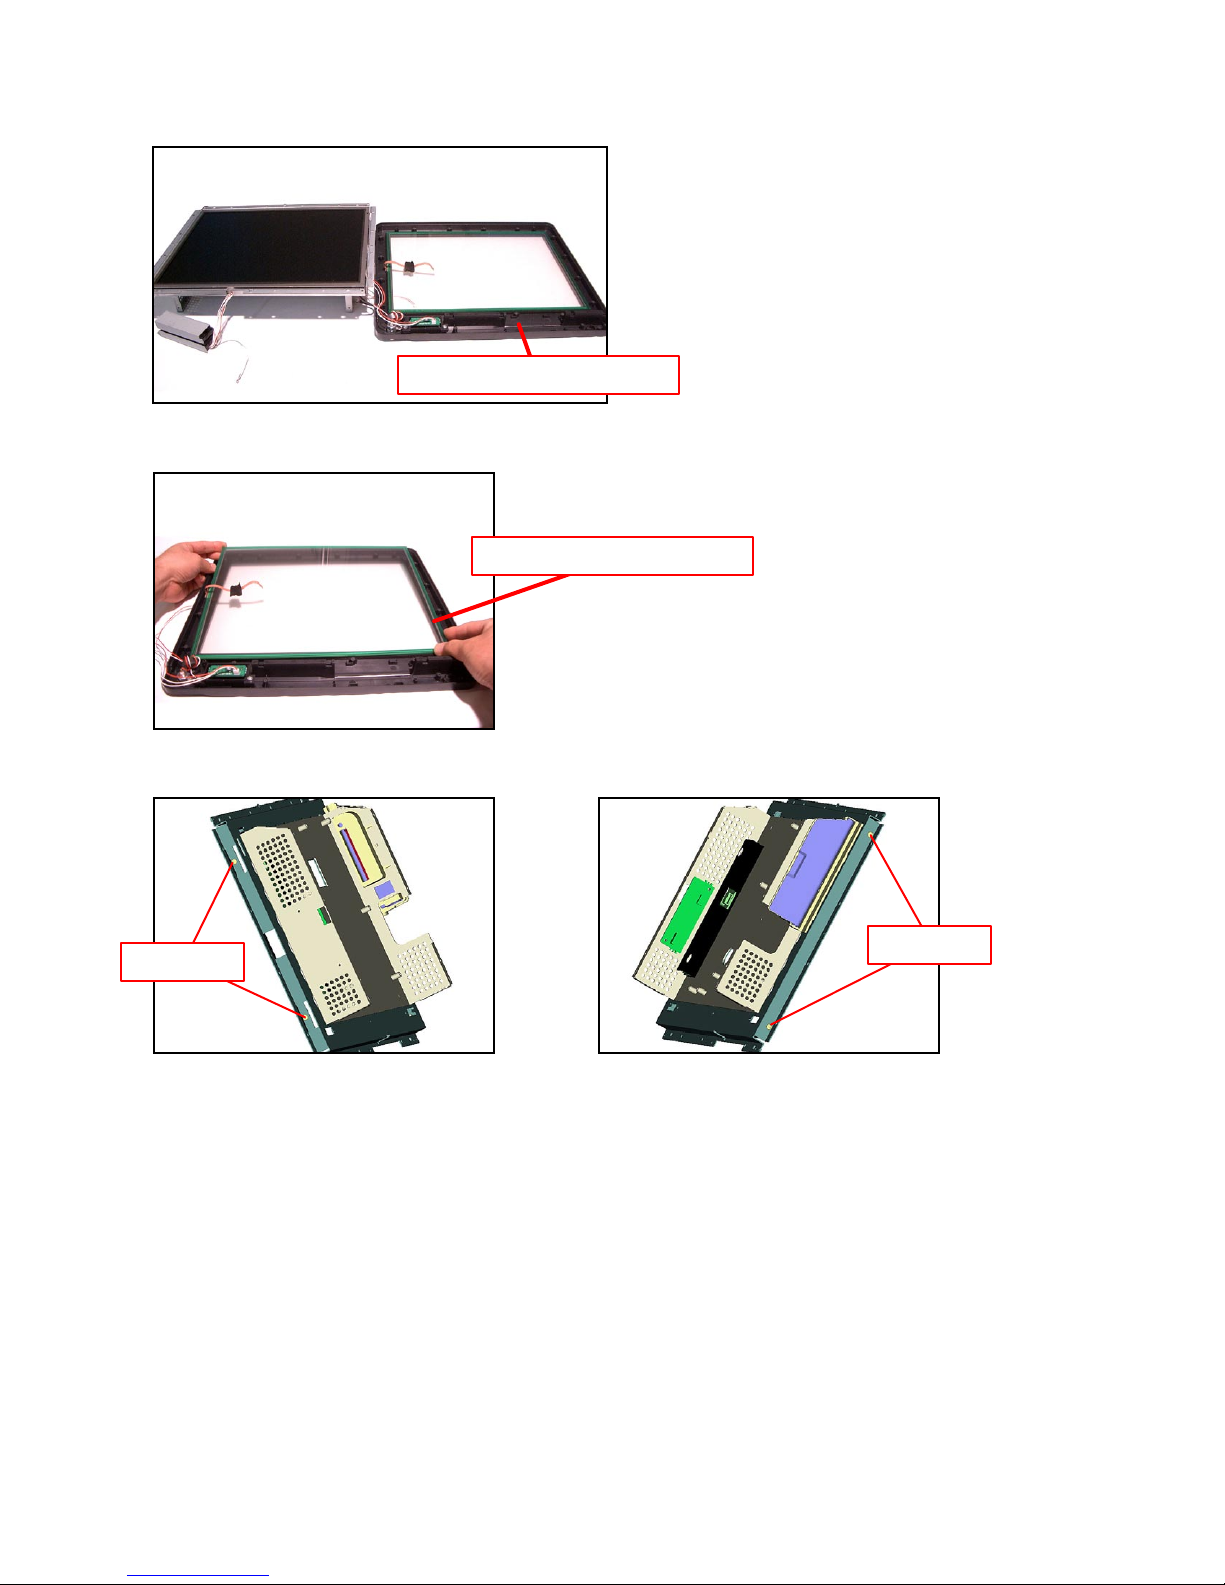
D. Disassembling the Rear Display
D-1. Remove the screw and remove the Rear Display Unit.
Screws (S5)
D-2. Remove two screws and remove the LCD Frame.
Screws (S7)
D-3. Use a solder to remove six lead wires.
D-4. Release the connector lock and disconnect the FPC.
D-5. Remove the Rear LCD PCB (E830-E22).
Black
White
Green
White
Black
— 15 —
Page 18

Mic PCB (E830-MIC)
COM PCB (E830-COM)
LED PCB (E830-E6)
LCD
i-Button key
MCR
Touch panel PCB(E830-TP)
Inverter unit
Power switch/code
Drawer 2
Drawer 1
PCBs and the Connectors to the Main PCB
LED PCB
(E830-E6)
Power supply PCB
(E830-INLET)
Inverter unit
Touch panel PCB
(E830-TP)
Main PCB
(E830-1)
COM PCB
(E830-COM)
Mic PCB
(E830-MIC)
■
PCBs and the Connectors to the Main PCB
■
— 16 —
Page 19
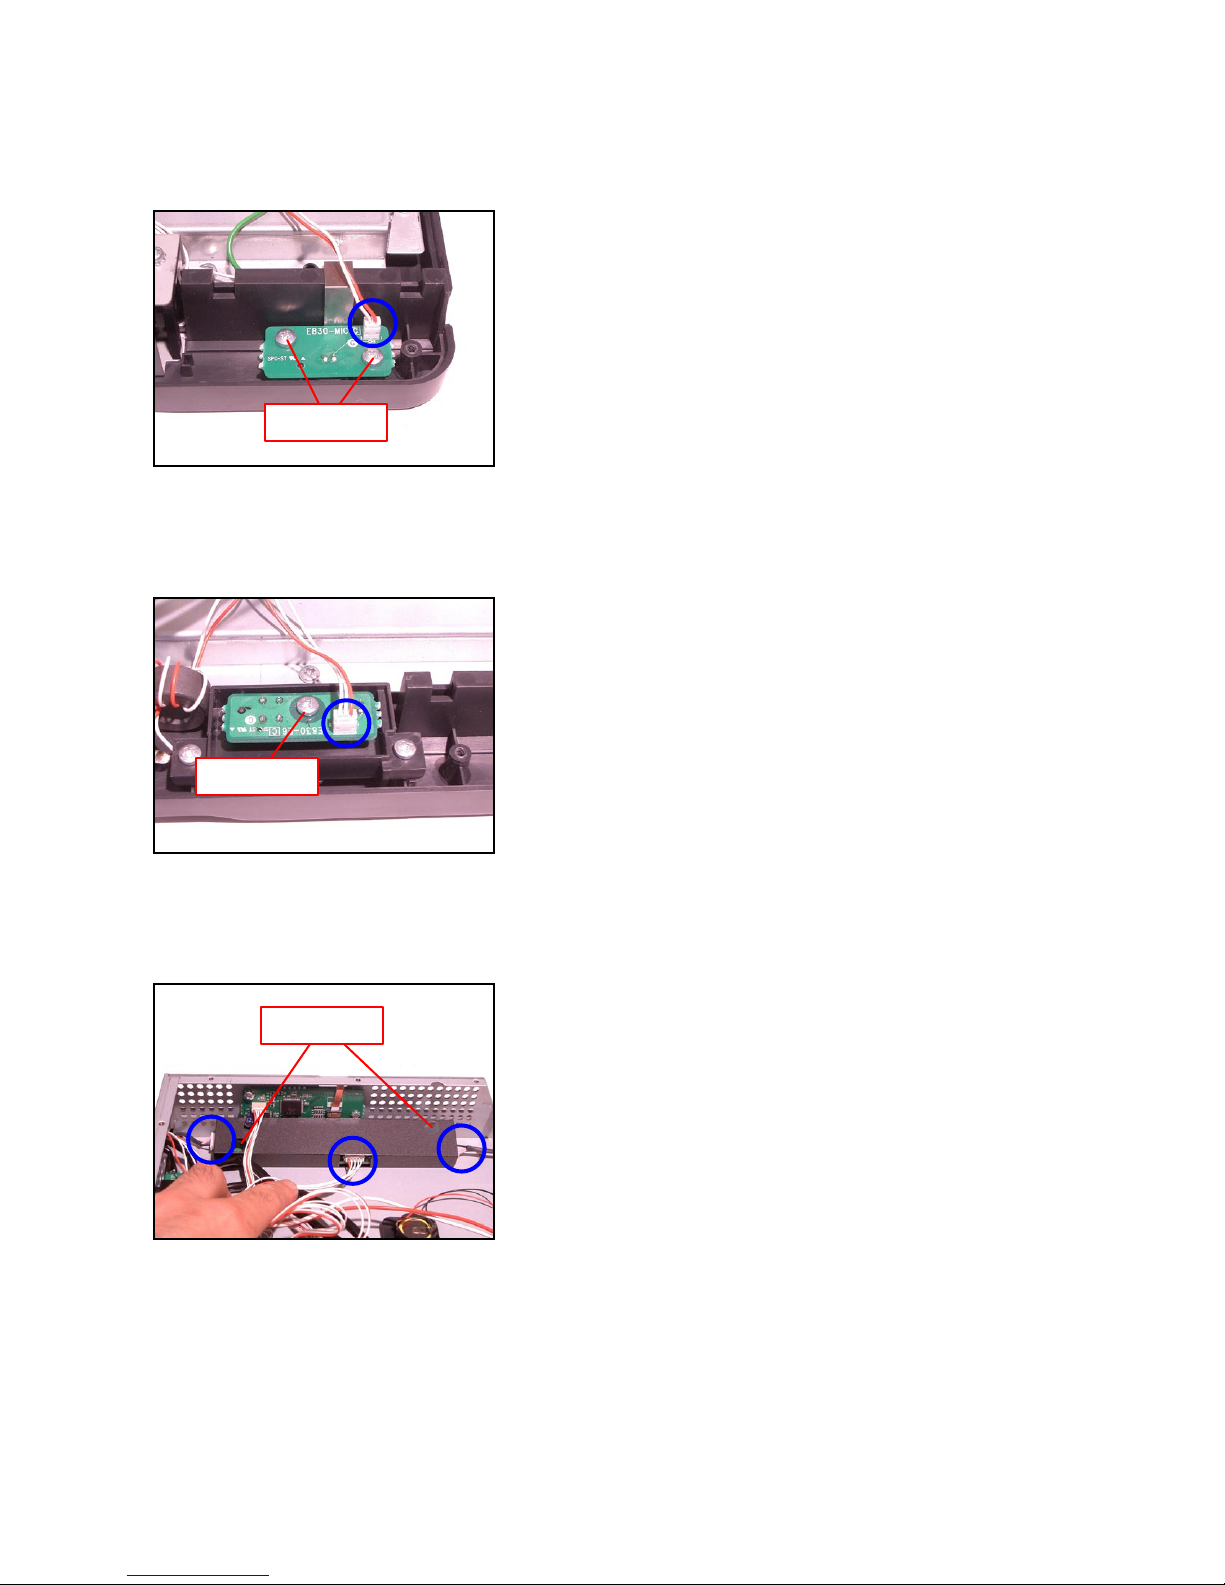
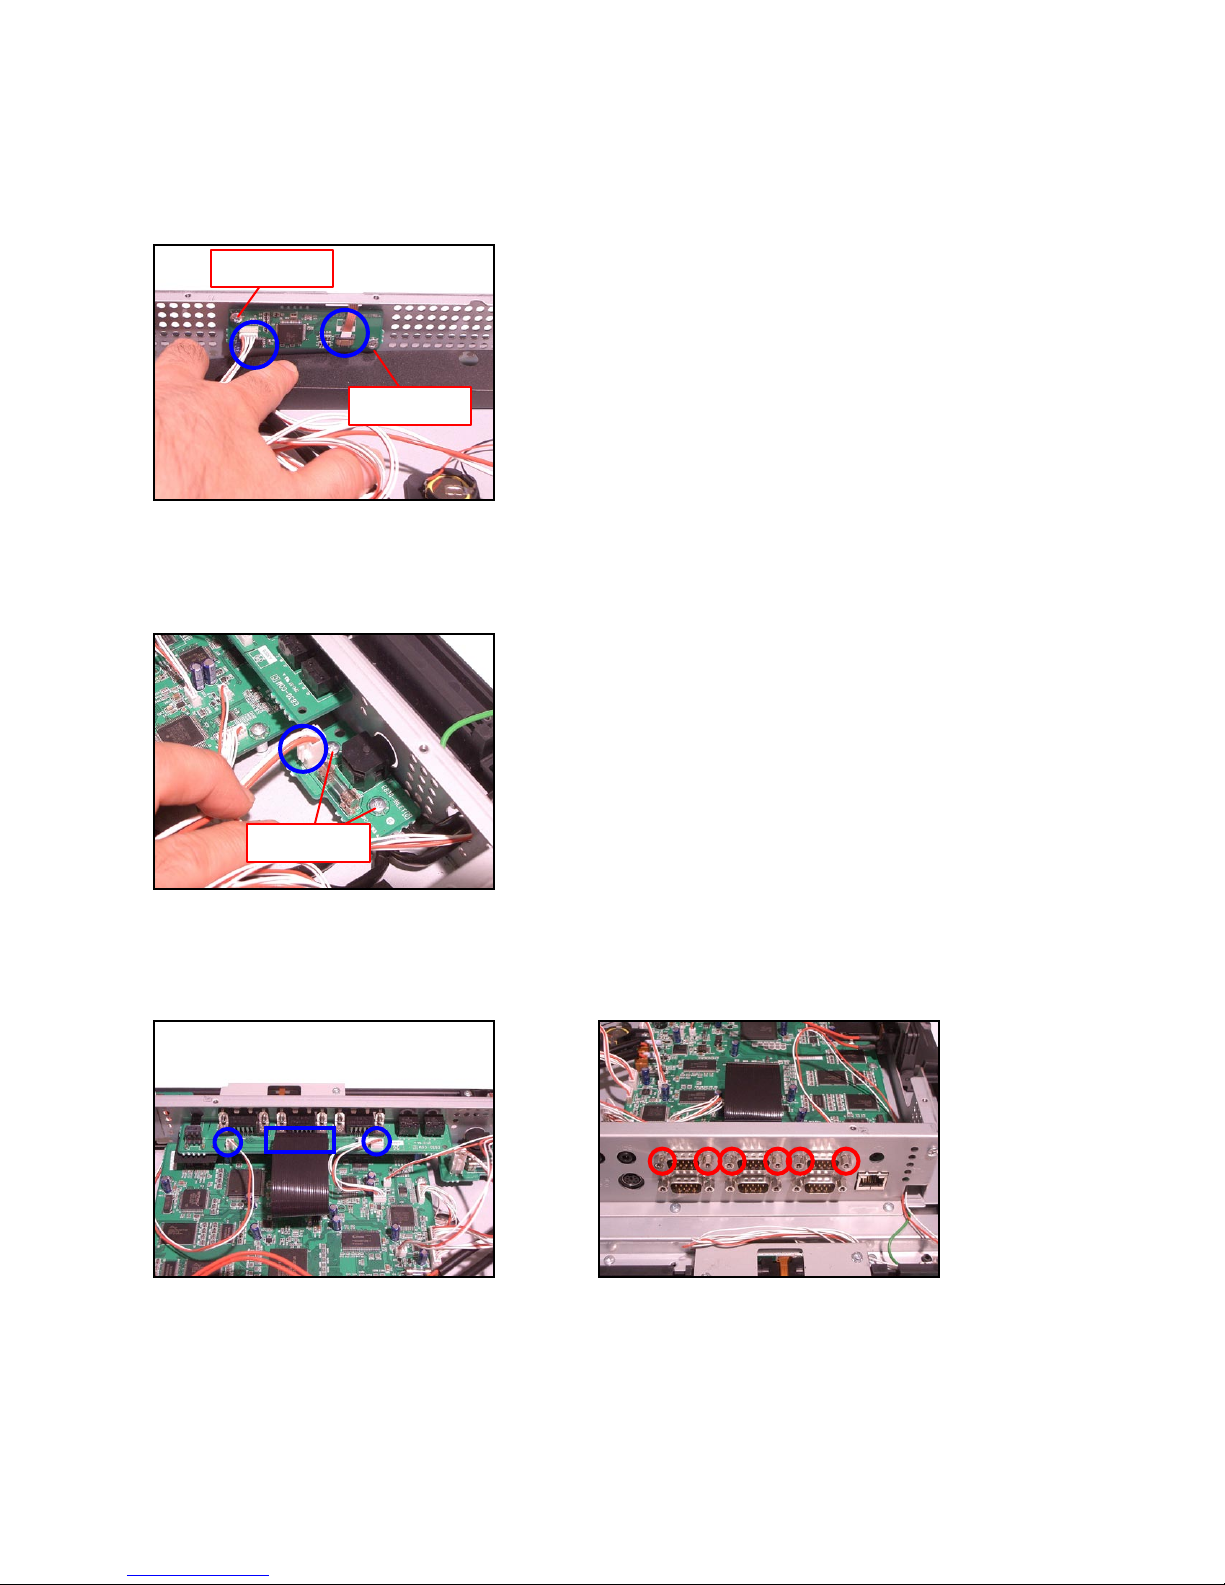
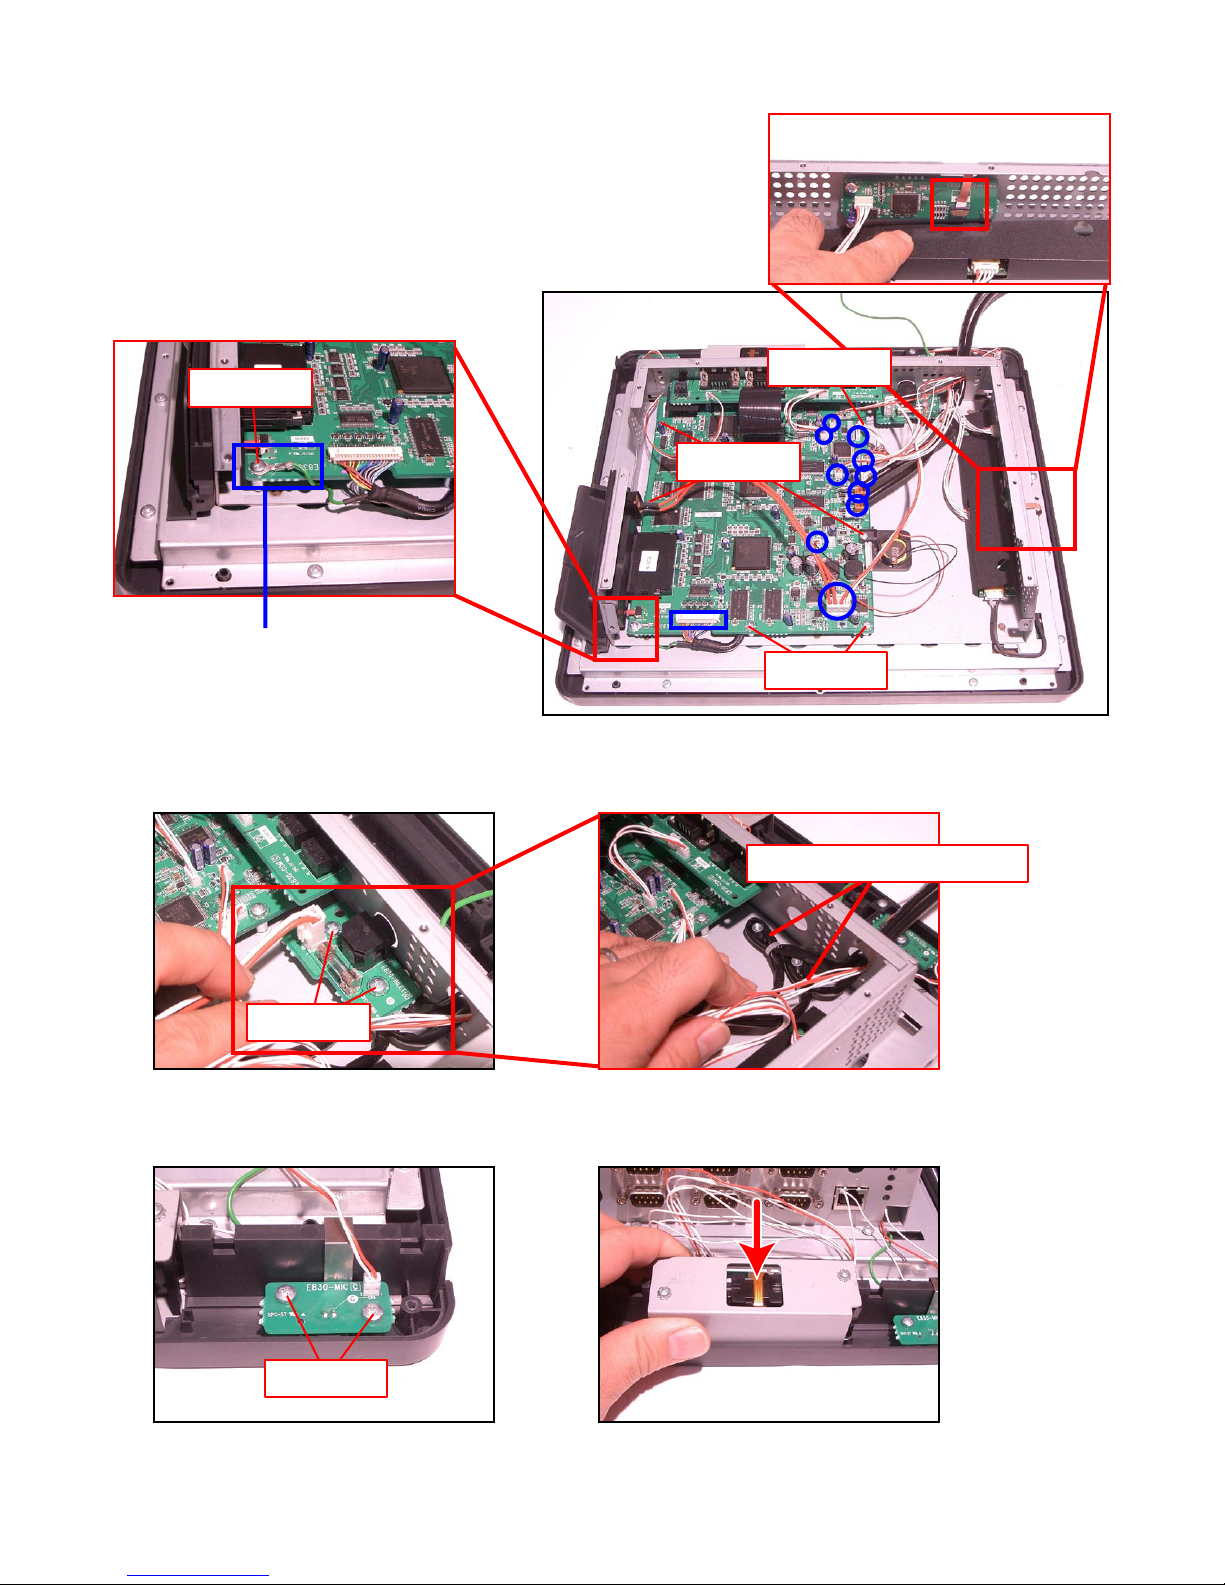
E. Removing the Mic PCB (E830-MIC)
E-1. Unplug the connector.
E-2. Remove two screws and remove the Mic PCB (E830-MIC).
Screws (S7)
F. Removing the LED PCB (E830-E6)
F-1. Unplug the connector.
F-2. Remove the screw and remove the LED PCB (E830-E6).
Screws (S7)
G. Removing the Inverter Unit
G-1. Unplug three connectors.
G-2. Remove two screws and remove the Inverter Unit.
Screws (S5)
— 17 —
Page 20
H. Removing the Touch Panel PCB (E830-TP)
H-1.Unplug the connector.
H-2. Release the connector lock and disconnect the FPC.
H-3. Remove two screws and remove the Touch Panel PCB (E830-TP).
Screws (S5)
Screws (S5)
I. Removing the Power Supply PCB (E830-INLET)
I-1. Unplug the connector.
I-2. Remove two screws and remove the Power Supply PCB (E830-INLET).
Screws (S5)
J. Removing COM PCB (E830-COM)
J-1. Unplug two connectors and 1 FPC.
J-2. Remove six nuts and remove the COM PCB (E830-COM).
— 18 —
Page 21
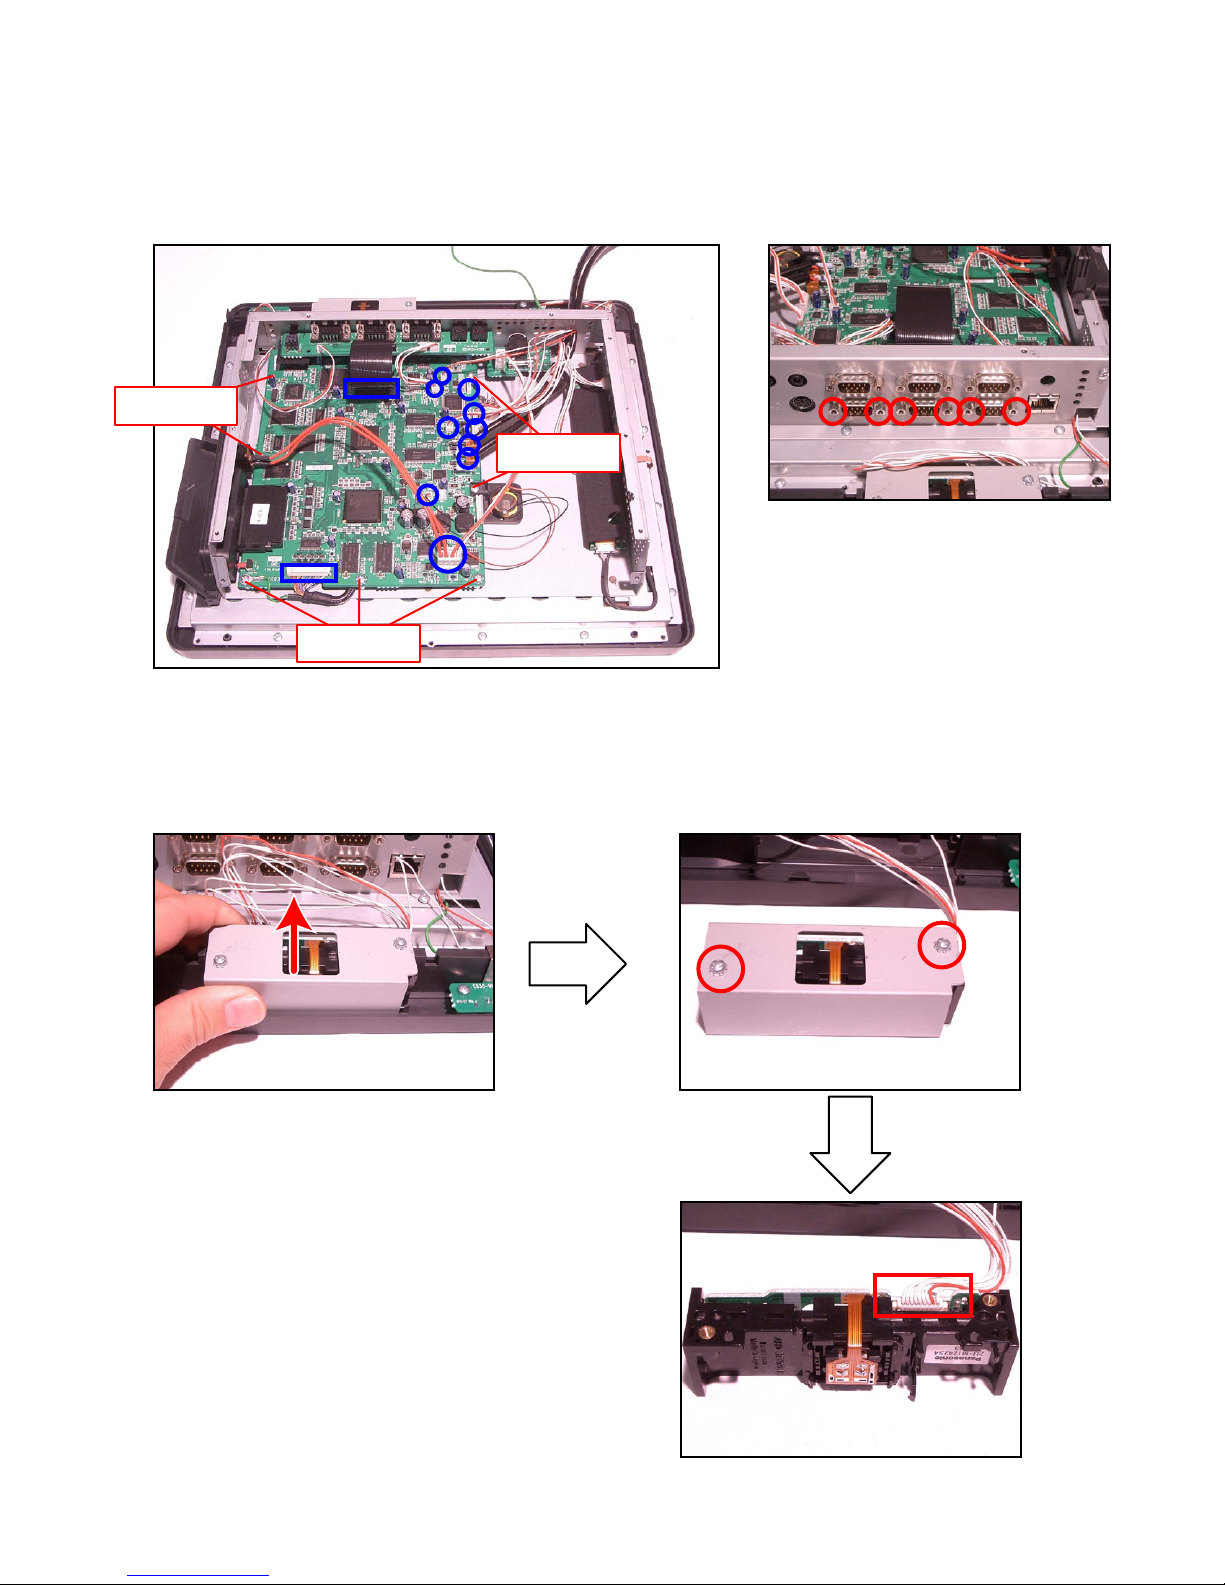
K. Removing the Main PCB (E830-1)
K-1. Unplug 10 connectors and 2 FPCs.
K-2. Remove six nuts.
K-3. Remove seven screws and remove the Main PCB (E830-1).
Screws (S9)
Screws (S9)
Screws (S9)
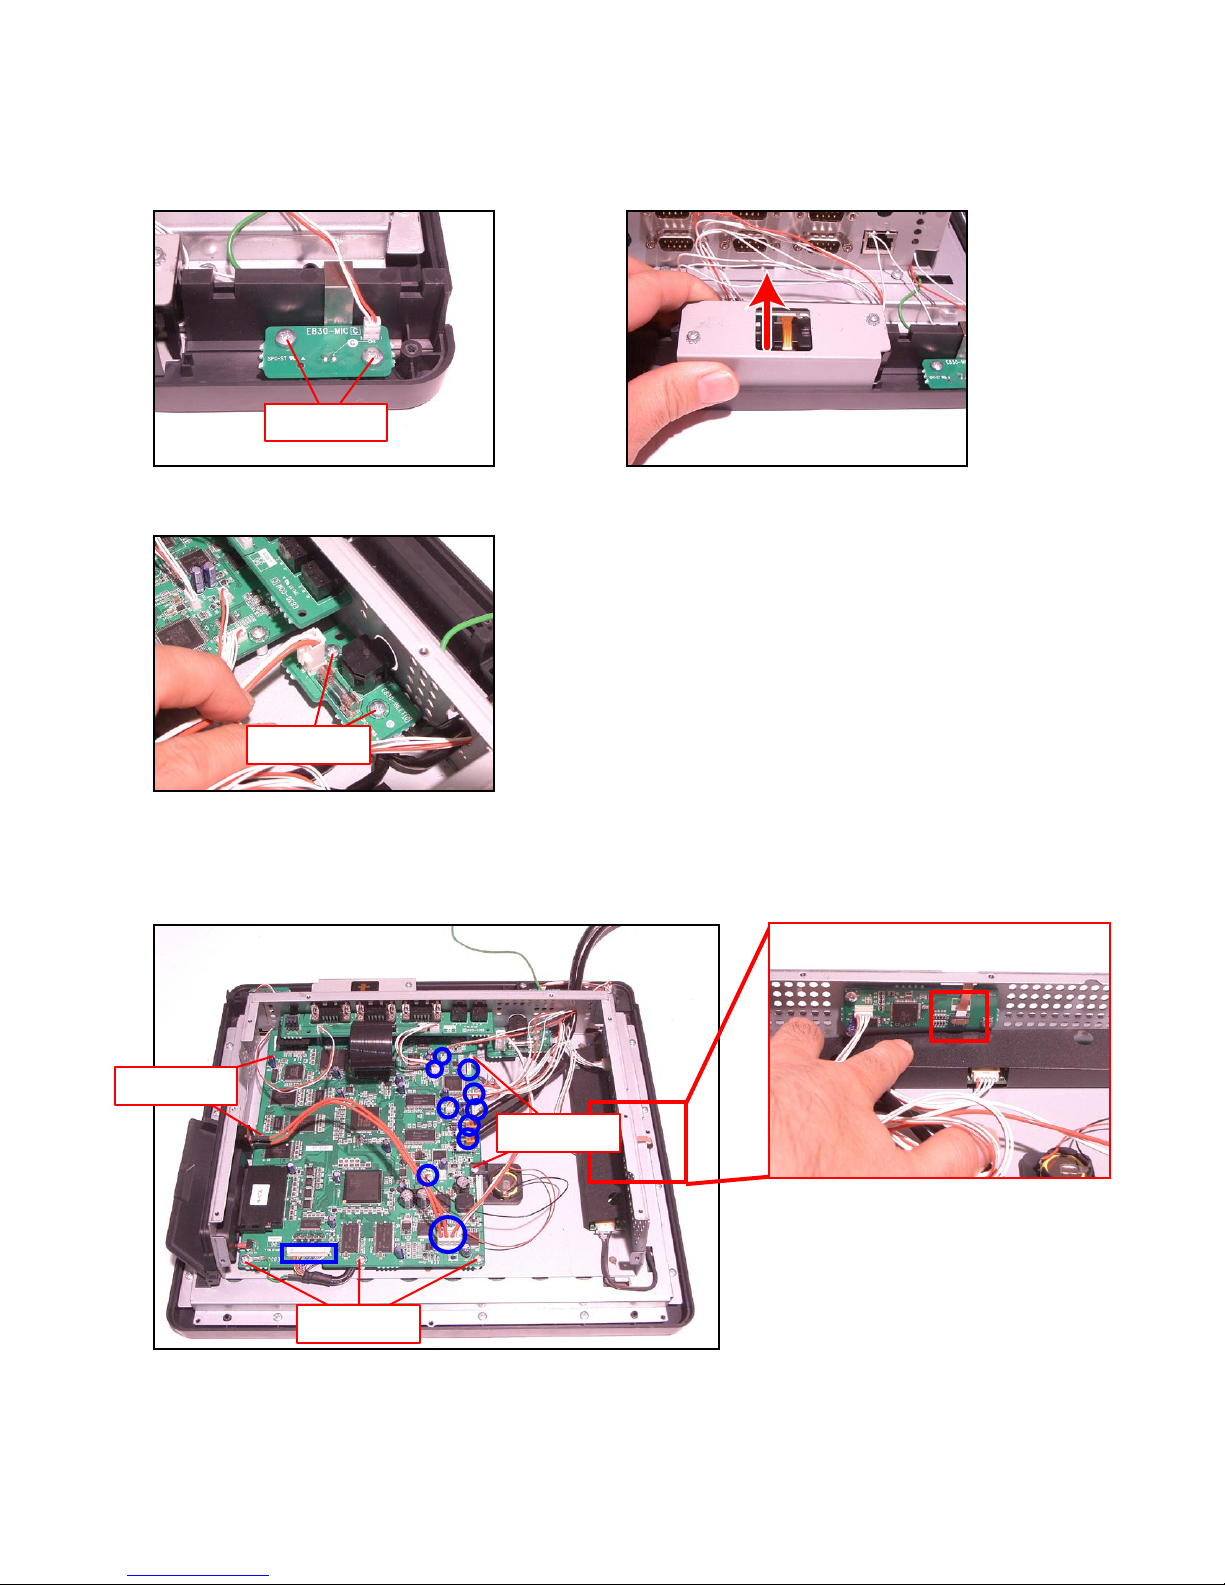
L. Removing the MCR
L-1. Disengage and remove the MCR Unit from the Main Unit.
L-2. Remove two screws and remove the MCR Unit.
L-3. Unplug the connector.
— 19 —
Page 22
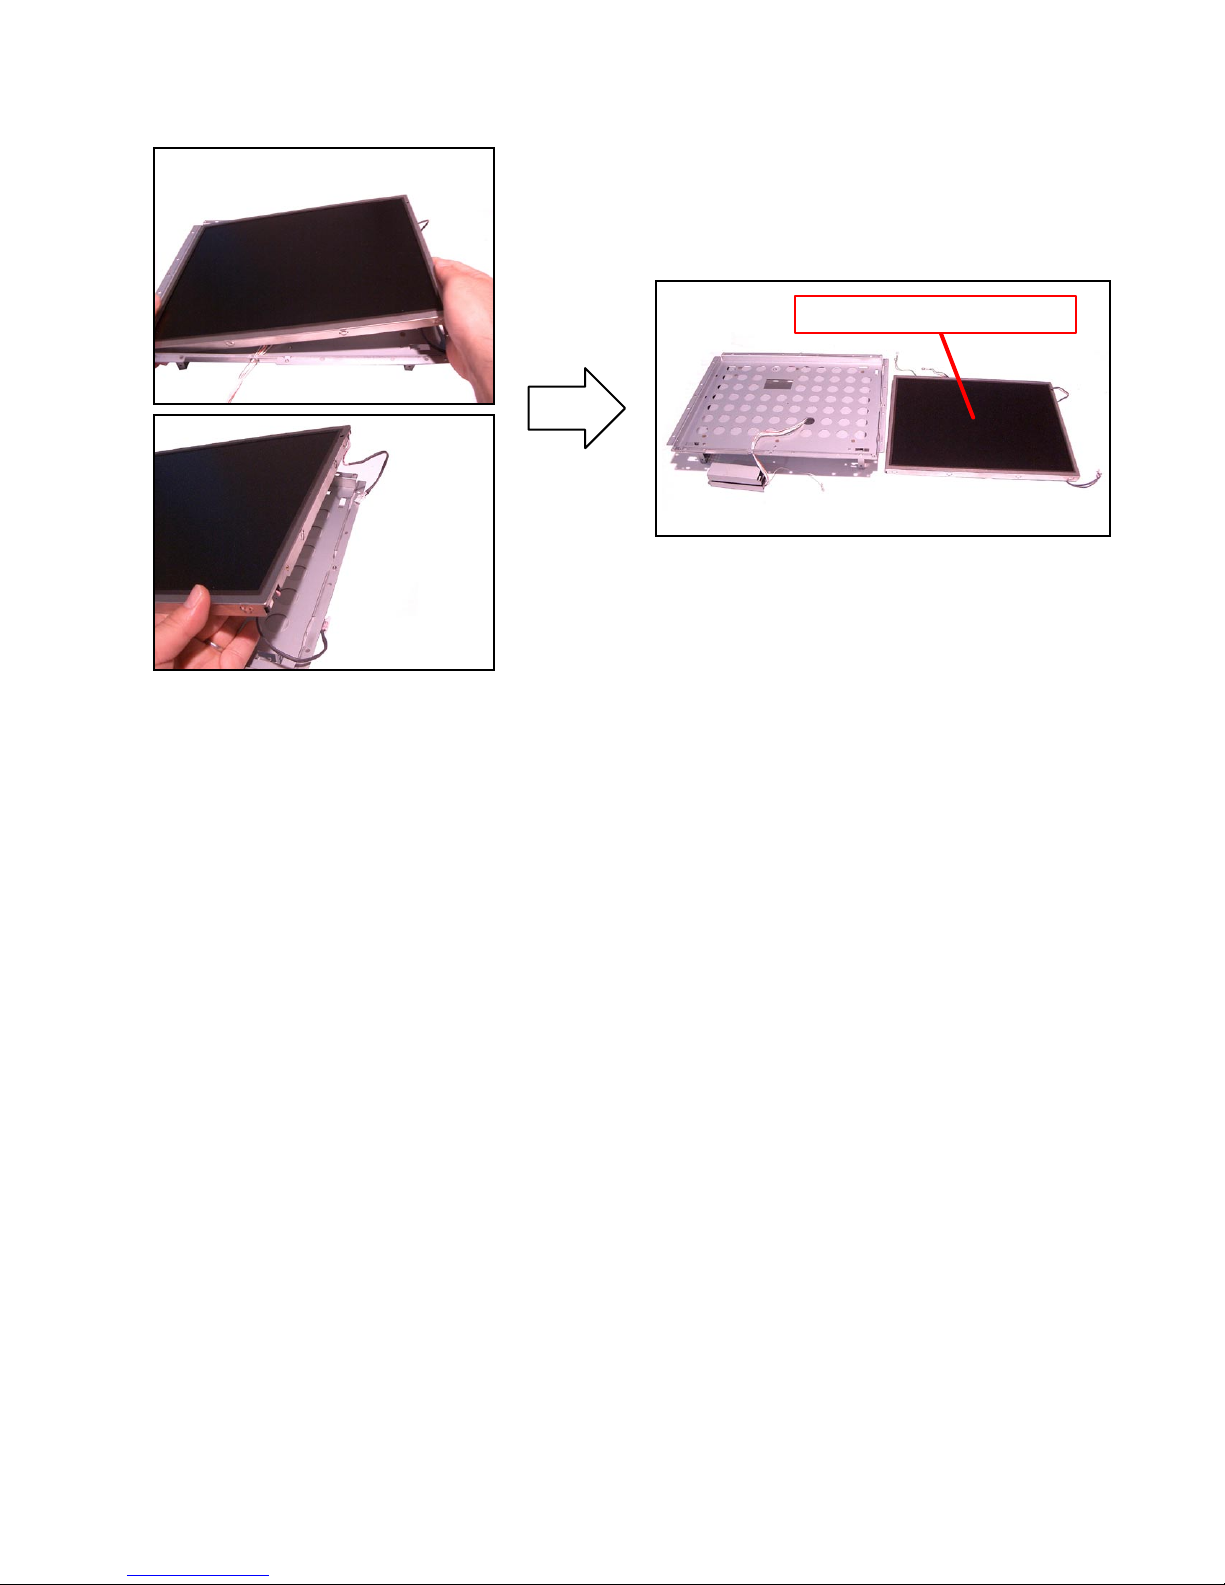
M. Removing the LCD/Touch Panel
M-1. Remove two screws and remove Mic PCB (E830-MIC).
M-2. Disengage and remove the MCR unit from the Main Unit.
Screws (S7)
M-3. Remove two screws and remove the Power Supply PCB (E830-INLET).
Screws (S5)
M-4. Unplug 10 connectors and disconnect 1 FPC.
M-5. Remove seven screws.
M-6. Release the Touch Panel PCB (E830-TP) connector lock and disconnect the FPC.
Screws (S9)
Screws (S9)
Screws (S9)
— 20 —
Page 23
M-7. Remove five screws and remove the COM Chassis and the Main PCB.
Screws (S5)
M-8. Remove 17 screws.
M-9. Disconnect the earth wire for the Mic.
Mic earth
— 21 —
Page 24
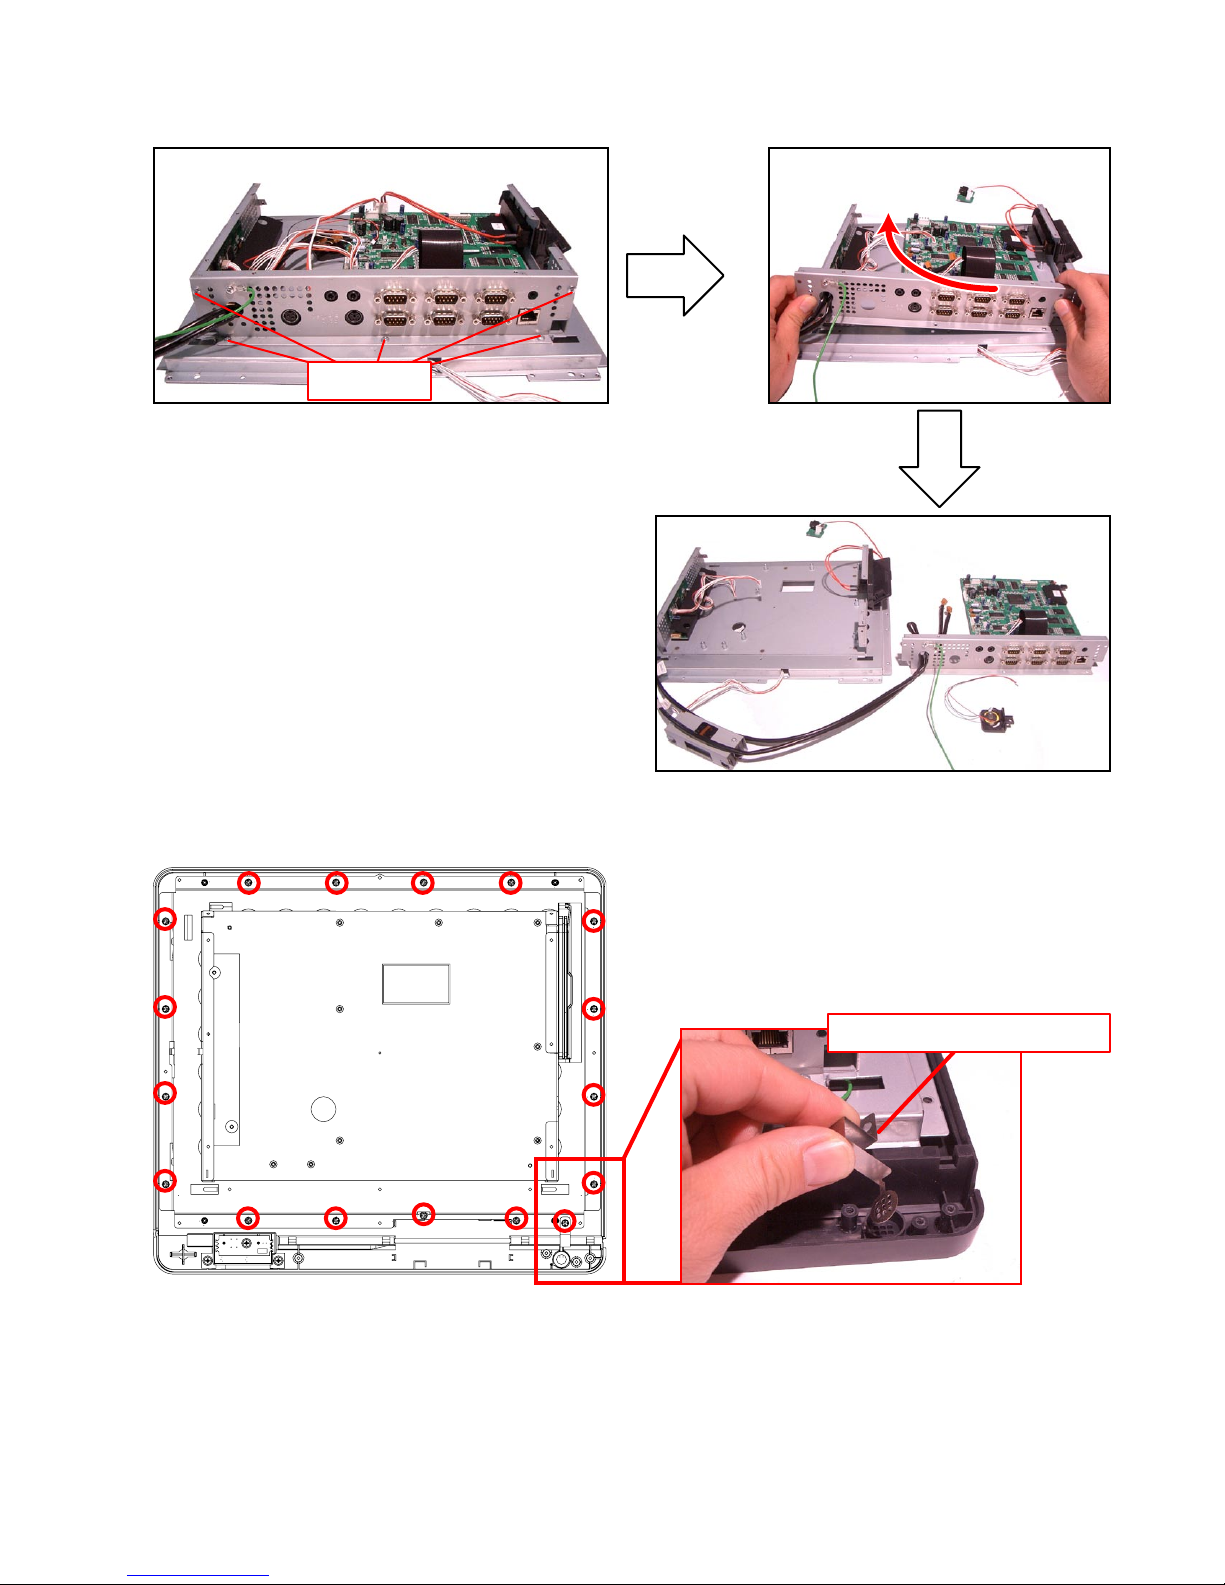
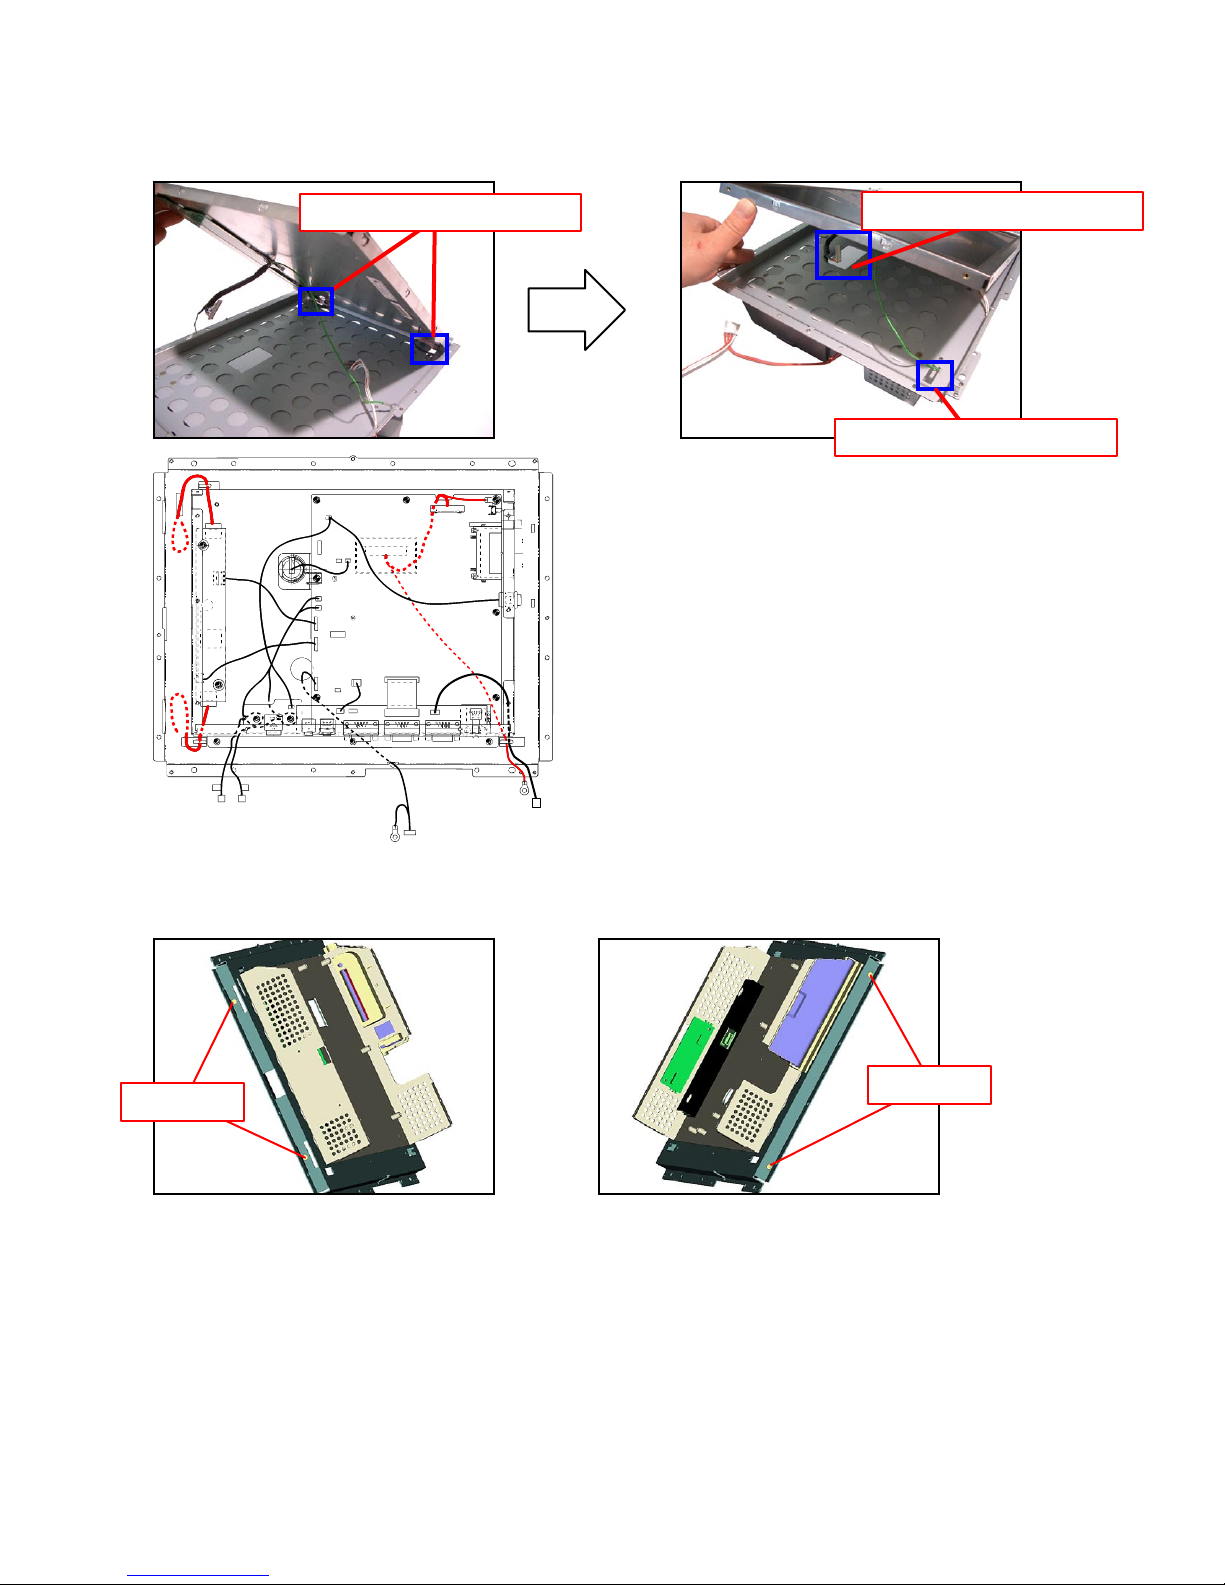
M-10. Remove the U-Case Assy Block.
U-CASE ASSY BLOCK
M-11. Remove the Touch Panel.
Touch panel
M-12. Remove four screws.
Screws (S10)
Screws (S10)
— 22 —
Page 25
M-13. Disengage and remove the LCD Unit.
LCD unit
— 23 —
Page 26
4. ASSEMBLY
M. Assembling the Stand
L. Assembling the B-case Assy Block
K. Assembling the Rear Display Block
I. Assembling the Mic PCB (E830-MIC)
H. Assembling the LED PCB (E830-E6)
G. Assembling the Inverter Unit
F. Assembling the Touch Panel PCB (E830-TP)
E. Assembling the Power Supply PCB (E830-INLET)
D. Assembling the COM PCB (E830-COM)
C. Assembling the Main PCB (E830-1)
B. Assembling the MCR
A. Assembling the LCD/Touch Panel
J. Assembling the Rear Display
Assembling
■
See the flowchart below for the order of re-assembling major units.
— 24 —
Page 27
A. Assembling the LCD/Touch Panel
A-1. Lay four cables in the appropriate groove.
Backlight cables
LCD cable
Earth cable
A-2. Engage the LCD Unit and secure it with four screws.
NOTE: Do not tighten the screws excessively. (Reference torque value: 0.34N•m or less)
Screws (S10)
Screws (S10)
— 25 —
Page 28

A-3. Engage the Touch Panel.
Guide Guide
Guide Guide
NOTE: Place the Touch Panel evenly inside the guides of the U-case.
Touch panel
A-4. Engage the U-Case Assy Block.
NOTE: Before engaging the U-case Assy Block, be sure that the LCD and the Touch Panel are clean and
free of dust, dirt, or any foreign matter.
NOTE: Pull out the FPC of the Touch Panel through the opening of the chassis.
A-5. Engage the Mic Earth.
U-CASE ASSY BLOCK
Mic earth
Touch panel FPC
— 26 —
Page 29
A-6. Secure it with 17 screws.
11 1 3 9
15
8
6
14
13
5
7
16
10 4
2
12
17
NOTE: Tighten the screws in the order of the numbers indicated in the illustration below.
A-7. Engage the COM Chassis and the Main PCB, and then secure them with five screws.
Screws (S5)
— 27 —
Page 30
A-8. Plug 10 connectors and 1 FPC.
NOTE: Do not tangle the wires.
A-9. Secure it with seven screws.
A-10. Connect the Touch Panel PCB (E830-TP) to the FPC.
Screws (S9)
NOTE: Position it so that the earth terminal
is in the correct orientation.
Screws (S9)
Screws (S9)
Screws (S9)
A-11. Engage the Power Supply PCB (E830-INLET) and secure it with two screws.
NOTE: Two Drawer Cables are arranged under the PCB.
Drawer cables
Screws (S5)
A-12. Engage the Mic PCB (E830-MIC) and secure it with two screws.
A-13. Engage the MCR Unit.
Screws (S7)
— 28 —
Page 31

B. Assembling the MCR
B-1. Connect the cables to the MCR Unit.
B-2. Engage the MCR Unit and secure it with two screws.
B-3. Engage the MCR Unit in the Main Unit.
C. Assembling the Main PCB (E830-1)
C-1. Engage the Main PCB and secure it with seven screws.
C-2. Install three COM Ports and secure them with two nuts each.
C-3. Plug 10 connectors and two FPCs.
Screws (S9)
Screws (S9)
Screws (S9)
NOTE: Position it so that the earth terminal is in the correct orientation.
— 29 —
Page 32

D. Assembling COM PCB (E830-COM)
D-1. Install three COM PCBs (E830-COM) and secure them with two nuts each.
D-2. Plug two connectors and the FPC.
E. Assembling the Power Supply PCB (E830-INLET)
E-1. Engage the Power Supply PCB (E830-INLET) and secure it with two screws.
NOTE: two Drawer Cables are arranged under the PCB.
E-2. Plug the connector.
Drawer cables
Screws (S5)
F. Assembling the Touch Panel PCB (E830-TP)
F-1. Engage the Touch Panel PCB (E830-TP) and secure it with two screws.
F-2. Plug the connector and 1 FPC.
NOTE: Engage the FPC securely until it locks in.
Screws (S5)
Screws (S5)
— 30 —
Page 33

G. Assembling the Inverter Unit
G-1. Engage the Inverter Unit and secure it with two screws.
G-2. Connect three connectors.
Screws (S5)
H. Assembling the LED PCB (E830-E6)
H-1. Engage the LEC PCB (E830-E6) and secure it with the screw.
H-2. Plug the connector.
Screws (S7)
I. Assembling the Mic PCB (E830-MIC)
I-1. Engage the Mic PCB (E830-MIC) and secure it with two screws.
I-2. Plug the connector.
Screws (S7)
— 31 —
Page 34

J. Assembling the Rear Display
J-1. Engage the Rear LCD PCD (E830-E22).
J-2. Use solder to connect six lead wires.
J-3. Connect the FPC.
NOTE: Engage the FPC securely until it locks in.
Black
White
Green
White
Black
J-4. Engage the LCD Frame and secure it with two screws.
Screws (S7)
J-5. Engage the Rear Display Unit and secure it with the screw.
NOTE: When assembling, use caution so that the wires are not caught in chassis.
Screws (S5)
— 32 —
Page 35

K. Assembling the Rear Display Block
NOTE:
Check that the cables for the i-Button key receiver and the LED PCB (E830-E6) are contained in the tube.
K-1. Plug the connector to the Rear Display and engage the Rear Display Block.
Connector (REAR DISPLAY)
K-2. Secure it with eight screws.
K-3. Plug the connector to the Battery.
Screws (S6)
Connector (Battery)
— 33 —
Page 36

L. Assembling the B-case Assy Block
L-1. Plug the connector to the Speaker and engage the B-case Assy Block.
NOTE: Insert the B-case in the groove of the Card Cover.
Card cover
Connector (Speaker)
L-2. Secure it with 12 screws.
Screws (S1)
Screws (S2)
Screws (S3)
— 34 —
Page 37

L-3. Engage two covers.
CONNECTOR COVER
HNG COVER
L-4. Secure them with three screws.
Screws (S4)
M. Engage the Main Unit to the Stand.
— 35 —
Page 38

5. OPTION INSTALLATION
210mm
Coil
Wind two turns of cable around the coil.
DISPLAY
SCANNER
PC/MODEM
COM3
COM6
COM2
COM5
COM1
COM4
SPK
PS/2
KEYBOARD
M
IC
LAN
COM6
COM3 COM2 COM1
COM5 COM4
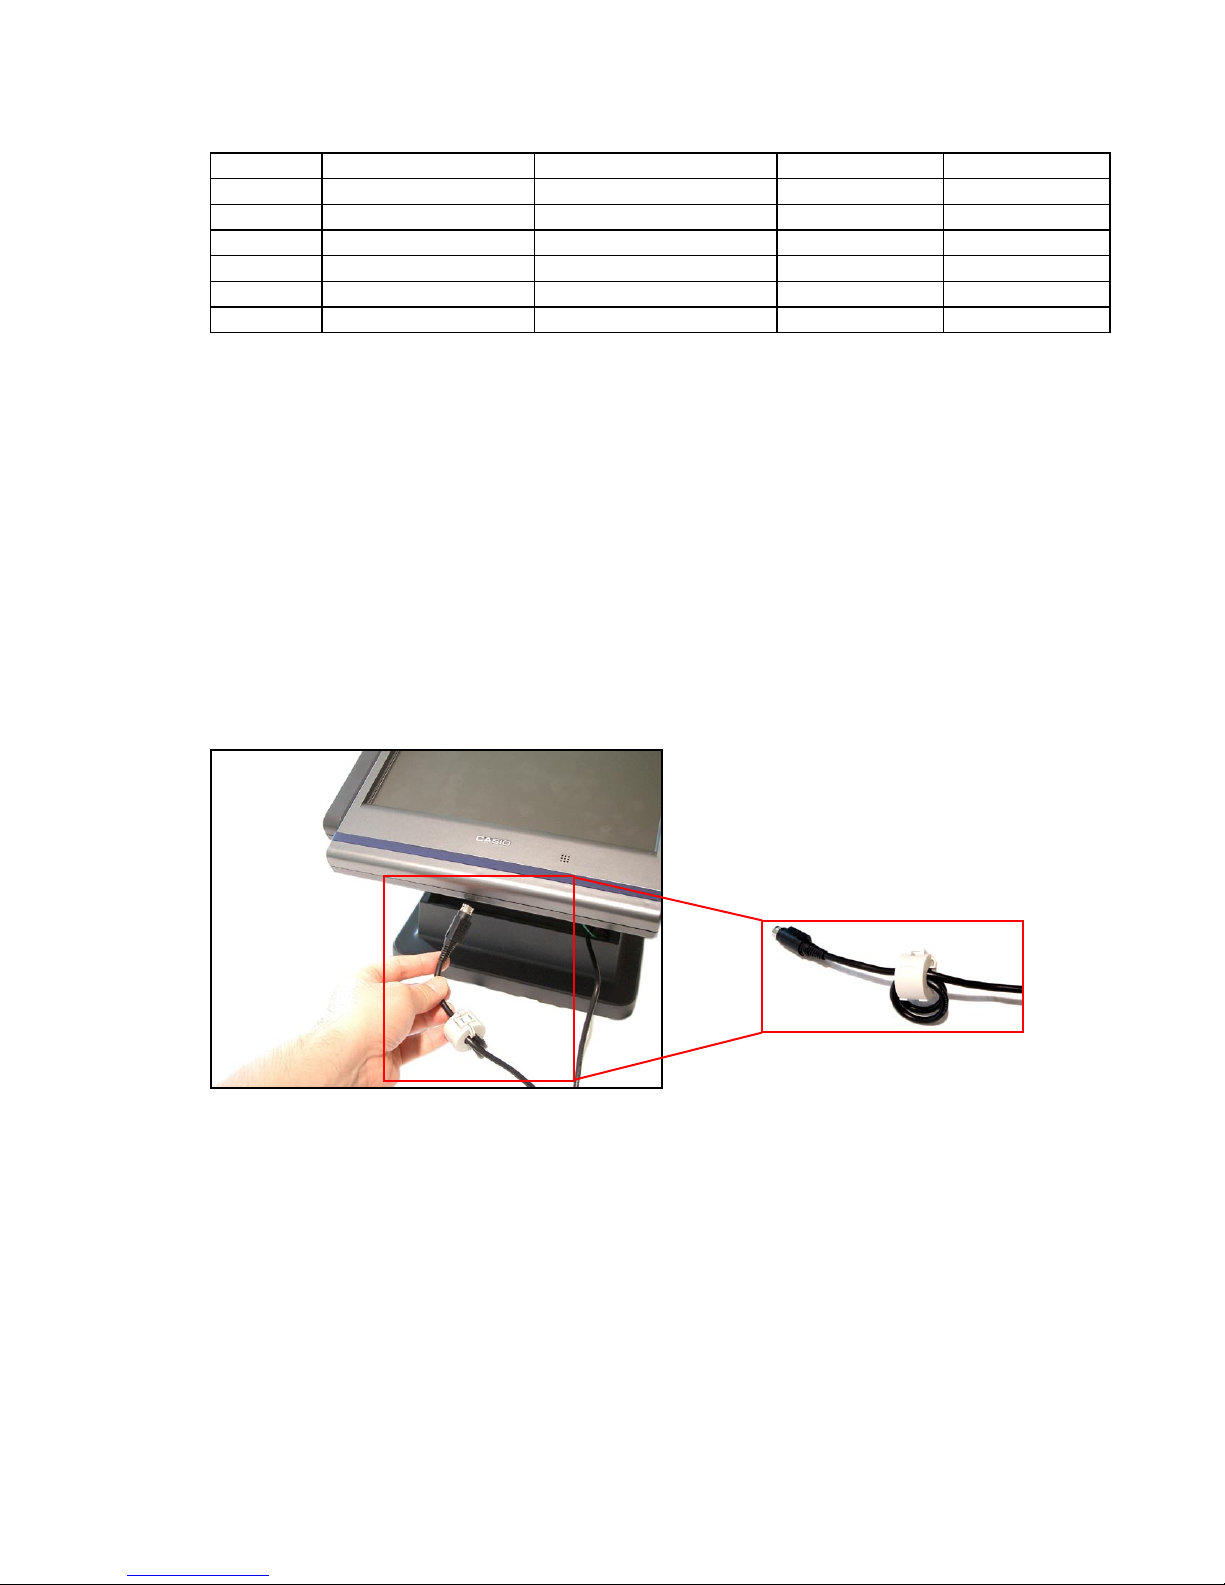
5-1. To install the I-Button
5-2. REMOTE PRINTER / SLIP PRINTER
Connect the following peripherals to the COM ports respectively.
REMOTE PRINTER: COM 4, 5 or 6
SLIP PRINTER: COM 2
— 36 —
Page 39

5-3. To install the DRAWER
In case of connecting drawer, follow the procedure below.
1. Connect drawer connector (three color lead on drawer) to the terminal.
2. Connect frame drawer connector (green lead on drawer) to the terminal.
Mount the cash register.
1. Screw in 2 fixing screws bottom side of the terminal.
2. Mount the terminal on the top of the drawer, ensuring that the feet on the bottom of the terminal
go into the holes on the drawer.
— 37 —
Page 40

6. IN LINE / ON LINE
PC
Via COM 1 port of the master terminal
or Inline (wire or wireless)
Maximum 32 terminals
PC
on-line (Public / Private Telephone line)
Maximum 32 terminals
6-1. Inline collection/consolidation system
• Inline collection/consolidation and auto-programming for up to 32 terminals.
6-2. Online collection / consolidation system
• Online collection / consolidation and auto-programming for up to 32 terminals.
— 38 —
Page 41

6-3. Online collection / consolidation system (use FTP feature)
PC
Maximum 32 terminals
ADSL/FTTH
MODEM
ADSL/FTTH
MODEM
VPN roote
r
VPN rooter
Internet
• Online collection / consolidation and auto-programming for up to 32 terminals.
— 39 —
Page 42

7. DIAGNOSTIC PROGRAM
DALLAS
DRW 1CLOSE 2CLOSE
MAC ADRS XX-XX-XX-XX-XX-XX
TEMP 0 VOLTAGE 0 CHARGE-MODE 359M
DISP ON/OFF OFF CF NON
Ioc Ver : xxxxxx xxxx
Boot Ver : xxxxxx xxxx
TOUCH START
221
Enter the Calibration mode
==>> Push Disp on/off ke
y
Skip the Calibration mode
==>> Touch the pane
l
0000 00000221
PANEL SIZE 15"
Copyright(C)2008
CASIO COMPUTER CO.,LT D.
All rights reserved.
ROM VER. xxxxxx xxxx
C
1
0
4
7
2
5
8
3
6
9
CREATE
xxxx-xx-xx xx:xx
QT-6600 Version x.xx
APL VER. xxxxxx xxxx
OK
Display on/off key
7-1. Starting the Program
Init switch
(1) Check that the power is turned OFF.
(2) While holding down the INIT switch, turn on the power.
Power switch
(3) Release the switch when the screen below appears.
* If the switch is released before this screen appears, either of the following modes is launched.
• Power-failure recovery reboot
• INIT boot-up
(4) Enter “99990000” and press [OK].
(5) When the program is launched, the software version information is printed out as shown below.
• BOOTER
• IOC
| IOC Ver : xxxx xxxxxx | IOC
| Boot Ver : xxxx xxxxxx | BOOTER
(6) After the version information is displayed and printed out, a
message appears prompting for an action to take as the next
step.
To proceed with the calibration settings, press the ON/OFF
key on the display. For detailed procedures, see “[15] LCD
CALIBRATION SETTING”. If you wish to skip the calibration
settings, press anywhere on the touch panel.
— 40 —
Page 43

7-2. General Notes on the Diagnostic Program
X X X X X X n a g d
XXXXXX : additional action
n : number of times
a : action
g : group
d : device number
• The test result is printed out through an external printer.
Baud rate :9600 bps
Connection : COM1
• A scanner must be connected to COM2.
• You may select “single test” or “repeat indefinitely” for the number of retries.To repeat the test
indefinitely, enter any number except for 0 in the command specifying the number of retries.
• When you press [ESC] while the test is repeated indefinitely, the following message is displayed
and printed out, then the test is terminated.
| ESC |
• Cut the receipt after the test result is printed out.
[Pass(OK)/fail(NG) Determination of Test Result by Operator]
• After the message below appears, the operator may decide pass(OK) or fail(NG) of the result by
pressing 1 or 9, respectively.
| Please Hit Key OK-> 1 NG-> 9 |
[Other]
• Hibernation memory
In this program, the automatic clear of the hibernation memory is executed or stopped in the following
situations:
<Execute>
• When INIT/FC is launched
• When a power-failure recovery is detected while idling (waiting for an input of a command)
<Stop>
• When the hibernation memory test is being executed
7-3. Command Input System
Follow the code below to enter a command.
— 41 —
Page 44

7-4. Status Information
DALLAS
DRW 1CLOSE 2CLOSE PANEL SIZE 15
"
MAC ADRS XX-XX-XX-XX-XX-XX
TEMP 20 VOLTAGE XX CHARGE-MODE 360M
DISP ON/OFF ON CF INSERT
Diag Ver : XXXXXX XXXX
0000 1234
Status information is displayed continuously
(in ordinary characters). However,
when performing a test, the status at
completion of a test is displayed
following completion of that test.
Counter display
Shows a screen as shown below on the LCD (XGA).
(In this chapter, the area for entries and the area for test results are illustrated separately.)
[Function]
Displays the status of each device.
DALLAS Indicates DALLAS key No. in a hexadecimal value
DRW 1/DRW 2 Indicates open/close status of the drawer.
CHARGE-MODE Indicates the remaining amount of the battery in minutes.
TEMP/VOLTAGE TEMP/VOLTAGE Indicates the A/D value of the battery.
PANEL SIZE PANEL SIZE: Indicates the panel size.
CF CF: Indicates whether a CF Card is inserted.
MAC ADRS MAC ADRS: MAC address written on FLASH ROM is indicated in a
DISP ON/OFF The default is set to ON.
Device Status information (description of messages)
OPEN: Drawer is open
CLOSE: Drawer is closed
nM: Remaining battery (minutes) n=0 ~ 360
DISP ON/OFF: The acquisition of TEMP status is prioritized when
the switch is ON.
Be sure to turn off DISP ON/OFF switch before opening other status
information or starting the Test Mode.
15”: Enhanced model (15-inch panel)
12”: Junior model (12-inch panel)
INSERT: CF Card is inserted
NON: CF Card is not yet inserted.
hexadecimal value.
To write in FLASH ROM, use the MAC Address Writing function of
this DIAG.
ON/OFF may be switched in the software setting.
— 42 —
Page 45

7-5. Memory Test Overview
Scope of the test in this range
• Sum check
BOOTER, Protected data area
0x0100000
0x1FFFFFF
0x0000000
FROM 32MByte (128KBytes × 256 blocks)
Program
FILE data
Free area
Scope of the test in this range
• CLEAR&WRITE/READ Test
• READ ONLY Test
• WRITE/READ Test
7-5-1.Types of memory tests
FLASH ROM
(for programming)
WRITE Test
READ ONLY Test
CLEAR Test
CLEAR & WRITE/READ Test
CHECK SUM Test
RAM
7-5-2. Scope of memory tests
[FROM Test]
This program does not back up programs or data. Be sure to perform IPL after performing CLEAR
and/or WRITE READ Test.
The data contained in the area used to perform CLEAR or WRITE Test is not protected.
In order to perform CLEAR or WRITE/READ Test, the program and data are copied as backup
temporarily in an available area of RAM.
Do not turn OFF the power during the test. Doing so may destroy the program and the proper
operation cannot be guaranteed. Should this occur, all operations, starting IPL, must be
performed.
FLASH ROM
(for hibernation)
CF
— 43 —
Page 46

[RAM Test]
The sizes vary according to
the program and system capacities.
Area for BOOTER
0x0030000
0x3FFFFFF
0x3FDFFEF
0x0000000
RAM 64MByte
Program/system area
USER area
Timer
Scope of READ ONLY Test
Scope of WRITE/READ Test
Scope of the test in this rang
e
CLEAR Test
READ ONLY Test
WRITE/READ Test
System area
0x0020000
0x3FFFFFF
0x0000000
FROM 64MByte (128KByte × 512 blocks)
Backup area
RAM Test uses, as the test area, all areas except for the program and system areas. USER area
is not guaranteed after performing the test.
[FROM Test for Hibernation]
FROM test for hibernation tests all areas.
Do not turn off the power during the test. If a power fails during the test, the hibernation function is
launched and this FROM is used.
Therefore the test which was being performed may be unsuccessful.
If the power is turned off without any backup battery, the hibernation function does not operate
— 44 —
Page 47

7-6. Test Items
This program performs the following tests.
No Device to be checked Operation Note Page
RAM, FROM (for programming),
1 Batch Test 1 1
2 Batch Test 2 2
3 RAM WRITE/READ Test n011 35
4 RAM READ ONLY Test n111 35
5 FLASH ROM CLEAR Test cn212 36
6 FLASH ROM WRITE/READ Test cn012 37
7 FLASH ROM CLEAR & WRITE/READ Test cn312 38
8 FLASH ROM CHECK SUM Test n512 39
9 CF-CARD CLEAR Test n213 39
10 CF-CARD WRITE/READ Test n013 40
11 CF-CARD READ ONLY Test n113 40
12 CF-CARD CLEAR & WRITE/READ Test n313 41
13 LCD Test n021 42
14 LCD Backlight OFF Test 121 42
15 LCD Calibration Setting 221 43
16 VRAM CHECK Test n721 44
17 REAR DISPLAY Test n322 45
18 REAR DISPLAY Backlight Test cn122 46
19 REAR DISPLAY Contrast Adjustment 422 47
20 REMOTE DISPLAY Test bn023 48
21 External Printer Output Test x1x2x3nm3d 49
22 Ethernet Printer Output Test x100nm37 51
23 COM(RS232C) Test xn04d 53
24 COM (RS232C) Batch Test 40 54
25 Printing COM (RS232C) Test Result 47 55
26 Ethernet Test: bm0a51 56
27 Setting MAC (Media Access Control Address) x0951 58
28 Date/Time Setting
hhmmss0070
yymmdd0170
29 Date/Time Display 070 60
30 Drawer Test xn091 61
31 Buzzer Test n092 62
32 MCR Test 96 63
33 Sound Test axn097 64
34 Microphone Test 98 64
35 Charge Mode Test 99 65
36 OBR Test 95 65
37 PS/2 Keyboard Test r1n094 66
FROM (for hibernation),
Date/Time, Buzzer, Drawer,
Receipt
LCD,LCD backlight, REAR
DISPLAY, REAR DISPLAY
backlight
33
34
60
— 45 —
Page 48

7-7. Test Procedures
[ 1 ] Batch Test 1
[Function]
Performs the following tests in sequence.
(1) RAM Test:
RAM WRITE/READ Test
(2) FROM (for program) Test
Check Sum test for the program code area.
(3) FROM (for hibernation) Test
Displays/prints out the sum of the FLASH headers for hibernation.
Calculates the sum of each byte and displays/prints out the lowest 8 bits.
(4) Date/Time Setting:
Sets the preset test data.
Test data: 01 year/ 12 month/ 31 day/ 23 hours/ 59 minutes /30 Seconds
(5) Buzzer Test:
Sounds single one-shot buzzer. There is no display/print-out for this test.
Select the test result "1" (OK) or "9" (NG) by touching the panel.
(6) Drawer Test:
Opens all drawers.
(7) Receipt Test:
Issues a receipt.
[Operation]
Operation : 1 ST
[LCD] [PRINT]
BATCH 1
RAM WR OK
FLASH CHK SUM OK
FLASH hib SUM XX
DATE 01/12/31
TIME 23:59-30
Please Hit Key OK−>1 NG−>9
FLASH CHK SUM OK
BATCH 1
RAM WR OK
FLASH CHK SUM OK
FLASH hib SUM XX
DATE 01/12/31
TIME 23:59-30
DRW OK
END 1
FLASH hib SUM XX
DATE 01/12/31
TIME 23:59-30
Please Hit Key OK−>1 NG−>9
DRW ALL OK
END 1
— 46 —
Page 49

[ 2 ] Batch Test 2
Green Blue
Reverse
check
RedWhiteBlack
Check (black
and white)
ABCDEFGHIJKLMNOPQRST
UVWXYZabcdefghijklm
n
ABCDEFGHIJKLMNOPQRST
UVWXYZabcdefghijklm
n
Back light
OFF
Back light OFF
White
Green
Emerald green
[Function]
Performs the following tests in sequence.
(1) LCD Test: Performs the LCD Display Test.
To change the screen, touch any part of the panel.
Select the test result "1" (OK) or "9" (NG) by touching the panel.
(2) LCD Backlight Test: Performs the OFF test of the LCD Backlight.
To change the screen, touch any part of the panel.
Select the test result "1" (OK) or "9" (NG) by touching the panel.
(3) REAR DISPLAY Test: Performs the REAR DISPLAY Test.
To change the screen, touch any part of the panel.
Select the test result "1" (OK) or "9" (NG) by touching the panel.
(4) REAR DISPLAY Backlight Test: Performs the OFF test of the Rear LCD Backlight.
To change the screen, touch any part of the panel.
Select the test result "1" (OK) or "9" (NG) by touching the panel.
[Operation]
Operation : 2 ST
[LCD] [PRINT]
BATCH 2
Please Hit Key OK−>1 NG−>9
LCD OK
Please Hit Key OK−>1 NG−>9
LCD BACKLIGHT OK
Please Hit Key OK−>1 NG−>9
BATCH 2
LCD OK
LCD BACKLIGHT OK
REAR DISP OK
REAR BACKLIGHT OK
END 2
REAR DISP OK
Please Hit Key OK−>1 NG−>9
REAR BACK LIGHT OK
END 2
— 47 —
Page 50

[ 3 ] RAM WRITE/READ Test
[Function]
Tests whether writing in/reading RAM is correctly performed.
Test data is written on the RAM, and tests are performed to check if the data has been written
properly.
The areas where performing this test affects the operation are excluded from the test.
[Operation]
Operation : n 0 1 1 ST
n: Number of times
0 or no value To perform a single test
A value other than 0 (1 ~ 9) Tests repeat infinitely (press ESC to terminate)
[LCD] [PRINT]
RAM 11
RAM WR OK
END 11
RAM 11
RAM WR OK
END 11
* If the test ends with errors, the line number
and the address are printed instead of OK
message.
[ 4 ] RAM READ ONLY Test
[Function]
Tests whether reading on RAM is correctly performed.
Be sure to perform “[3] RAM WRITE/READ Test” before this test.
[Operation]
Operation : n 1 1 1 ST
n: Number of times
0 or no value To perform a single test
A value other than 0 (1 ~ 9) Tests repeat infinitely (press ESC to terminate)
[LCD] [PRINT]
RAM 111
RAM RD OK
END 111
RAM 111
RAM RD OK
END 111
* If the test ends with errors, the line number
and the address are printed instead of OK
message.
— 48 —
Page 51

[ 5 ] FLASH ROM CLEAR Test
[Function]
Tests whether FLASH ROM Clear erases the memory correctly.
After this test, be sure to perform “[6] FLASH ROM WRITE/READ Test” before conducting other
tests. If other tests are performed without having conducted FLASH ROM WRITE/READ Test, the
program may be damaged and may not operate properly. Should this occur, perform all operations
starting from IPL.
[Operation]
Operation : c n 2 1 2 ST
c: Specifying FLASH ROM
0 FLASH ROM (for programming)
1 FLASH ROM (for hibernation)
n: Number of times
0 or no value To perform a single test
A value other than 0 (1 ~ 9) Tests repeat infinitely (press ESC to terminate)
[LCD] [PRINT]
FLASH ROM (for programming)
FLASH 0n212
FLASH CLR OK
END 0n212
FLASH 0n212
FLASH CLR OK
END 0n212
* If the test ends with errors, the line number
and the address are printed instead of OK
message.
FLASH ROM (for hibernation)
FLASH hib 1n212
FLASH hib CLR OK
END 1n212
FLASH hib 1n212
FLASH hib CLR OK
END 1n212
* If the test ends with errors, the line number
and the address are printed instead of OK
message.
— 49 —
Page 52

[ 6 ] FLASH ROM WRITE/READ Test
[Function]
Tests whether writing/reading to FLASH ROM is correctly performed.
This test targets all areas except for the data protection areas.
Be sure to perform “[5] FLASH ROM CLEAR Test” before this test. If other tests are performed
without having conducted FLASH ROM CLEAR test, this program may be damaged and may not
operate properly. Should this occur, perform all operations starting from IPL.
[Operation]
Operation : c n 0 1 2 ST
c: Specifying FLASH ROM
0 FLASH ROM (for programming)
1 FLASH ROM (for hibernation)
n: Number of times
0 or no value To perform a single test
A value other than 0 (1 ~ 9) Tests repeat infinitely (press ESC to terminate)
[LCD] [PRINT]
FLASH ROM (for programming)
FLASH 0n012
FLASH WR OK
END 0n012
FLASH ROM (for hibernation)
FLASH hib 1n012
FLASH hib WR OK
END 1n012
FLASH 0n012
FLASH WR OK
END 0n012
* If the test ends with errors, the line number
and the address are printed instead of OK
message.
FLASH hib 1n012
FLASH hib WR OK
END 1n012
* If the test ends with errors, the line number
and the address are printed instead of OK
message.
— 50 —
Page 53

[ 7 ] FLASH ROM CLEAR & WRITE/READ Test
[Function]
Clears FLASH ROM memory and tests whether writing/reading is correctly performed.
[Operation]
Operation : c n 3 1 2 ST
c: Specifying FLASH ROM
0 FLASH ROM (for programming)
1 FLASH ROM (for hibernation)
n: Number of times
0 or no value To perform a single test
A value other than 0 (1 ~ 9) Tests repeat infinitely (press ESC to terminate)
[LCD] [PRINT]
FLASH ROM (for programming)
FLASH 0n312
FLASH CLR&WR OK
END 0n312
FLASH ROM (for hibernation)
FLASH hib 1n312
FLASH hib CLR&WR OK
END 1n312
FLASH 0n312
FLASH CLR&WR OK
END 0n312
* If the test ends with errors, the line number
and the address are printed instead of OK
message.
FLASH hib 1n312
FLASH hib CLR&WR OK
END 1n312
* If the test ends with errors, the line number
and the address are printed instead of OK
message.
— 51 —
Page 54

[ 8 ] FLASH ROM CHECK SUM Test
[Function]
Performs CHECK SUM of FLASH ROM.
This test is exclusively for FLASH ROM for programming.
[Operation]
Operation : n 5 1 2 ST
n: Number of times
0 or no value To perform a single test
A value other than 0 (1 ~ 9) Tests repeat infinitely (press ESC to terminate)
[LCD] [PRINT]
FLASH n512
FLASH CHK SUM OK
END n512
FLASH n512
FLASH CHK SUM OK
END n512
* If the test ends with errors, the line number
and the address are printed instead of OK
message.
[ 9 ] CF-CARD CLEAR Test
[Function]
Tests whether CF card is clears properly.
The data contained and the operation of the CF card used for this test cannot be guaranteed.
[Operation]
Operation : n 2 1 3 ST
n: Number of times
0 or no value To perform a single test
A value other than 0 (1 ~ 9) Tests repeat infinitely (press ESC to terminate)
[LCD] [PRINT]
CF-CARD n213
CF CLR OK
END n213
CF-CARD n213
CF CLR OK
END n213
* If the test ends with errors, the line number
and the address are printed instead of OK
message.
— 52 —
Page 55

[ 10 ] CF-CARD WRITE/READ Test
[Function]
Tests whether writing in /reading CF Card is correctly performed.
Be sure to perform “[9] CF-CARD CLEAR Test” before this test.
After a CF Card is used for this test, the data contained in it and its operation cannot be
guaranteed.
[Operation]
Operation : n 0 1 3 ST
n: Number of times
0 or no value To perform a single test
A value other than 0 (1 ~ 9) Tests repeat infinitely (press ESC to terminate)
[LCD] [PRINT]
CF-CARD n013
CF WR OK
END n013
CF-CARD n013
CF WR OK
END n013
* If the test ends with errors, the line number
and the address are printed instead of OK
message.
[ 11 ] CF-CARD READ ONLY Test
[Function]
Tests whether reading on CF Card is correctly performed.
Be sure to perform “[10] CF-CARD WRITE/READ Test” before this test.
After a CF Card is used for this test, the data contained in it and its operation cannot be
guaranteed.
[Operation]
Operation : n 1 1 3 ST
n: Number of times
0 or no value To perform a single test
A value other than 0 (1 ~ 9) Tests repeat infinitely (press ESC to terminate)
[LCD] [PRINT]
CF-CARD 113
CF RD OK
END 113
CF-CARD 113
CF RD OK
END 113
* If the test ends with errors, the line number
and the address are printed instead of OK
message.
— 53 —
Page 56

[ 12 ] CF-CARD CLEAR&WRITE/READ Test
[Function]
Clears CF Card memory and tests whether writing/reading is correctly performed.
After a CF Card is used for this test, the data contained in it and its operation cannot be
guaranteed.
[Operation]
Operation : n 3 1 3 ST
n: Number of times
0 or no value To perform a single test
A value other than 0 (1 ~ 9) Tests repeat infinitely (press ESC to terminate)
[LCD] [PRINT]
CF-CARD n313
CF CLR&WR OK
END n313
CF-CARD n313
CF CLR&WR OK
END n313
* If the test ends with errors, the line number
and the address are printed instead of OK
message.
— 54 —
Page 57

[ 13 ] LCD Test
Green Blue
Reverse
check
RedWhiteBlack
Check (black
and white)
[Function]
Tests whether LCD operates correctly.
When performing a single test:
To change the screen, touch any part of the panel.
In order to complete the test, the operator must determine pass(OK)/fail(NG) of the result.
When performing test infinitely:
The screens change automatically.
Press ESC to end the test.
[Operation]
Operation : n 0 2 1 ST
n: Number of times
0 or no value To perform a single test
A value other than 0 (1 ~ 9) Tests repeat infinitely (press ESC to terminate)
[LCD] [PRINT]
LCD n021
Please Hit Key OK−>1 NG−>9
LCD OK
LCD n021
LCD OK
END n021
END n021
[ 14 ] LCD Backlight OFF Test
[Function]
Tests whether LCD Backlight turns OFF properly.
In order to complete the test, the operator must determine pass(OK)/fail(NG) of the result.
The backlight is set to OFF after the test. Touch any part of the Touch Panel and determine
pass(OK)/fail(NG) of the result.
(1) LCD Backlight turns OFF
(2) Touch any part of the panel
(3) LCD Backlight turns ON
(4) The operator determines pass(OK)/fail(NG) of the test result
[Operation]
Operation : 1 2 1 ST
[LCD] [PRINT]
LCD BACK LIGHT 121
Please Hit Key OK−>1 NG−>9
LCD BACK LIGHT OK
END 121
— 55 —
LCD BACK LIGHT 121
LCD BACK LIGHT OK
END 121
Page 58

[ 15 ] LCD Calibration Setting
Display on/off key
[Function]
Configures the calibration settings of the LCD (Touch Panel).
When touching the cross marks on the LCD, 10 coordinates shown below are indicated in
sequence.
(X,Y) =
[Operation]
Operation : 2 2 1 ST
<To skip the calibration setting]>
The screen below appears after entering a command and before the cross marks appear on
the screen.
You may skip the calibration mode by following the instruction on the screen.
Enter the Caribration mode
==>> Push Disp on/off key
Skip the Caribration mode
==>> Touch the panel
(25,19)
(999,19)
(487,19)
(25,749)
(999,749)
➉
(487,19)
(25,365)
(999,365)
(487,749)
(487,365)
Enter the Calibration mode: Press DISP ON/
OFF switch
Skip: Touch any part of the panel
<To enter the Calibration Mode>
Once the Calibration Mode is launched, cross marks appear on the LCD one by one.
When you touch the cross marks appear in sequence, the data of 9 coordinates on the LCD panel
and Touch Panel are obtained and any discrepancies are calculated. After the position of the 10th
coordinate is calculated and displayed, the offset value is to be confirmed. If the position of the
10th coordinate you touched differ that of the displayed coordinate only within a margin of errors,
it is determined as OK. If not, it is determined as NG. The offset values are written on EEPROM of
the panel controller when the operator touches the 9th coordinate.
<Calibration Test Results>
If the position data of the 10th coordinate falls within the values shown below after the
calibration offset, the precision is determined to be acceptable and OK is displayed and
printed out before ending the test. If the values exceed the range below, the result fails and
the test ends.
• X10: within 487±12
• Y10: within 365±12
— 56 —
Page 59

[LCD]
TOUCH START 221
Enter the Caribration mode
==>> Push Disp on/off key
Skip the Caribration mode
==>> Touch the panel
(X1,Y1) : (XXX,XXX)
(X2,Y2) : (XXX,XXX)
:
(X9,Y9) : (XXX,XXX)
(X10,Y10) : (XXX,XXX)
TOUCH OK
END 221
[PRINT]
TOUCH START 221
(X1,Y1) : (XXX,XXX)
(X2,Y2) : (XXX,XXX)
:
(X9,Y9) : (XXX,XXX)
(X10,Y10) : (XXX,XXX)
TOUCH OK
END 221
LCD display only
Displays data 1 for calibration
Displays data 2 for calibration
:
Displays data 9 for calibration (Performs offset)
Displays the position of the 10th coordinate (performs
calibration) (Checks offset errors)
Result of the offset value check
— 57 —
Page 60

[ 16 ] VRAM CHECK Test
VRAM
16MB
Display Area
(3Mbyte)
Te
stArea
LIME
Register Area * LIME : Internal Memory Area
00FFFFFFh
00300000h
00FFFFFFh
01FC0000h
01FFFFFFh
00000000h
[Function]
Checks VRAM of the LCD.
All areas except for the GDC system area are subjected to this test.
VRAM is not backed up by the battery. A power failure during the test results in an error.
This test uses the same test data as RAM Test to write on VRAM.
[Operation Overview]
(1) Write the test data from the beginning to the end of VRAM Test area.
(2) Verifies the written data from the beginning to the end of VRAM Test area.
(3) Displays and prints out the test result.
* If an error occurs, the test is immediately terminated and the result is displayed and printed out.
If the test is set to repeat indefinitely, the operation returns to Step (1) and continues the test.
* When the test is set to repeat indefinitely, Steps (1) through (3) repeat as a set until [ESC] is
pressed.
[Test area]
This test targets the free areas of VRAM (TestArea).
[Operation]
Operation : n 7 2 1 ST
n: Number of times
0 or no value To perform a single test
A value other than 0 (1 ~ 9) Tests repeat infinitely (press ESC to terminate)
[LCD] [PRINT]
LCD VRAM 721
LCD VRAM OK
LCD VRAM NG address
END 721
* If an NG occurs, the address of the error is displayed /printed out.
* The counter is displayed on the LCD during the test.
— 58 —
LCD VRAM 721
LCD VRAM OK
LCD VRAM NG address
END 721
Page 61

[ 17 ] REAR DISPLAY Test
ABCDEFGHIJKLMNOPQRST
UVWXYZabcdefghijklmn
Pattern 1
ABCDEFGHIJKLMNOPQRST
UVWXYZabcdefghijklmn
Pattern
2
Pattern 3Pattern 4
Command
input
END
[Function]
Tests whether REAR DISPLAY operates correctly.
The backlight turns emerald green (white and green) during the test and turns off when the test
ends.
When performing a single test:
To change the screen, touch any part of the panel.
In order to complete the test, the operator must determine pass(OK)/fail(NG) of the result.
When performing test infinitely:
The screens change automatically.
Press ESC to end the test.
[Operation]
Operation : n 3 2 2 ST
n: Number of times
0 or no value To perform a single test
A value other than 0 (1 ~ 9) Tests repeat infinitely (press ESC to terminate)
[LCD] [PRINT]
REAR DISP n322
Please Hit Key OK−>1 NG−>9
REAR DISP OK
REAR DISP n322
REAR DISP OK
END n322
END n322
— 59 —
Page 62

[ 18 ] REAR DISPLAY Backlight Test
Back light OFF
White
Green
Emerald green
[Function]
Tests whether REAR DISPLAY backlight operates correctly.
In order to complete the test, the operator must determine Pass(OK)/fail(NG) of the result. (When
performing a single test)
The specified backlight turns on while performing the test and turns off when the test ends.
[Operation]
Operation : c n 1 2 2 ST
c: Specifying the backlight color
0 Batch test (batch-test the specified colors 1 through 4)
1 OFF (green OFF/white OFF)
2 White (green OFF/white ON)
3 Green (green ON/white OFF)
4 Emerald green (green ON/ white OFF)
n: Number of times
0 or no value To perform a single test
A value other than 0 (1 ~ 9) Tests repeat infinitely (press ESC to terminate)
[Batch Test]
Touching any part of the panel changes the color in the following sequence.
[LCD] [PRINT]
REAR DISP 122
Please Hit Key OK−>1 NG−>9
REAR BACK LIGHT OK
REAR DISP 122
REAR BACK LIGHT OK
END 122
END 122
— 60 —
Page 63

[ 19 ] REAR DISPLAY Contrast Adjustment
ABCDEFGHIJKLMNOP
QRSTUVWXYZabcdef
[Function]
Adjusts the contrast of REAR DISPLAY and writes the adjustment values on FLASH.
FLASH may be written up to 16 times. Writing more than 16 times results in an error. When such
an error occurs, you may follow the procedure “Clearing the contrast area” to re-initialize FLASH.
The contrast setting at the restart is the value written in the previous adjustment (“128” when
no value has been written). You may write the adjustment values by entering [ST] after an
adjustment. The contrast may be set at 256 increments within the range of 0 – 255.
[Operation]
Operation : 4 2 2 ST
When you launch the mode by using the above command, use the following keys to operate.
• Numeric key [1]: DARK key Current contract +1
• Numeric key [9]: LIGHT key Current contract -1
• ST: Finalize the entry (writes on FLASH and complete the sequence)
• ESC: Cancel adjustment (ends the mode)
[REAR DISPLAY]
[LCD]
REAR DISP 422
CONTRAST XXX
LED display only. XXX indicates the contrast value.
REAR CONTRAST Set value
REAR CONTRAST NG
REAR CONTRAST OVER
REAR CONTRAST ESC
REAR CONTRAST ERASE
An error is printed
The maximum times of writing is exceeded
When leaving the sequence without setting the contrast
When the contrast area is cleared
END 422
[PRINT]
REAR DISP 422
REAR CONTRAST Set value
REAR CONTRAST NG
REAR CONTRAST OVER
REAR CONTRAST ESC
REAR CONTRAST ERASE
END 422
[Clearing the Contrast Area]
FLASH may be written up to 16 times. If you wish to write more than 16 times, execute the
following command to clear the area and initialize FLASH.
1 0 4 2 2 ST
— 61 —
Page 64

[ 20 ] REMOTE DISPLAY Test:
ABCDEFGHIJKLMNOP
QRSTUVWXYZabcdef
0,1,2,3,4,5,6,7,8,9,
[Function]
Tests whether the data is correctly displayed on REMOTE DISPLAY.
Be sure to connect REMOTE DISPLAY to COM3. When changing the baud rate, be sure to also
change the settings on REMOTE DISPLAY. The backlight turns on in pastel green (green + white)
when performing the test and turns off when the test ends.
When performing a single test:
In order to complete the test, the operator must determine pass(OK)/fail(NG) of the result.
After the operator determines pass(OK)/fail(NG), the display and the backlight turn off.
When repeating the test infinitely:
Repeats transmitting the same test text at a set interval.
Press [ESC] to terminate the test, clear the display, and turn off the backlight.
[Operation]
Operation : b n 0 2 3 ST
b:Specifying the baud rate
0 19.2 Kbps
1 9600 bps
n: Number of times
0 or no value To perform a single test
A value other than 0 (1 ~ 9) Tests repeat infinitely (press ESC to terminate)
[LCD]
REMOTE DISP bn023
Please Hit Key OK−>1 NG−>9
REMOTE DISP OK
END bn023
[PRINT] [REMOTE DISPLAY]
REMOTE DISP bn023
REMOTE DISP OK
END bn023
— 62 —
Page 65

[ 21 ] External Printer Output Test
[Function]
Connects a printer with a RS232C interface and tests whether the printer operates and prints
properly. The external printer must be connected to COM.
[Operation]
Operation : x1 x2 x3 n m 3 d ST
x1: Printout format
0 Pattern A
1 Pattern B
x2: Specify COM port
1 COM1
2 COM2
3 COM3
4 COM4
5 COM5
6 COM6
x3: Specify the baud rate
1 4800 bps
2 9600 bps
3 19.2 kbps
< Printer baud rate table >
When changing the baud rate, be sure to also change the baud rate of the printer.
19.2 kbps 9600 bps 4800 bps
SLIP SP1300
RJ UP360/UP400
n: Number of times
0 or no value To perform a single test
A value other than 0 (1 ~ 9) Tests repeat infinitely (press ESC to terminate)
m: Operation pattern
1 Print one line
2 Feed 5 lines + full cut
3 Print 10 lines + feed 5 lines + full cut
4 Feed 5 lines + partial cut
5 Print 10 lines + Insert 5 lines + partial cut
— 63 —
Page 66

d: Specifying a printer
1 External printer RJ
2 External printer SLIP
[LCD]
RJ is connected Error display (when a printer is disconnected)
PRT xxxn03d
NON PRINTER ERR
END xxxn03d
[PRINT]
There are two formats to print out to the external printer.
RJ is set at 40 lines and SLIP at 35 lines.
Pattern A Pattern B
BBBBBBBBBBBBBBBBBBBBBBBBBBBBBBBBBBBBBBBB
BBBBBBBBBBBBBBBBBBBBBBBB *8,888,88
— 64 —
Page 67

[ 22 ] Ethernet Printer Output Test
HUB
PRINTER
UP-400
QT-6600
[Function]
Tests whether the Ethernet printer operates and prints out properly.
The illustration below shows how QT-6600 and the printer are connected.
< Printer settings >
The printer settings are fixed. Please configure the printer to be used before the test.
IP address: 192.168.0.100
Subnet mask: 255.255.255.0
Default gateway: 192.168.0.200
TCP port number: 9100
Baud rate: AutoNegotiation
QT-6600 operates with IP address 192.168.0.1 at the fixed baud rate of 100M.
* Ethernet does not operate without setting a MAC address. Be sure to set a unique MAC address
before use.
* If Ethernet has already been tested, run all operations starting from INIT boot-up.
[Operation]
x1: Printout format
n: Number of times
0 or no value To perform a single test
A value other than 0 (1 ~ 9) Tests repeat infinitely (press ESC to terminate)
m: Operation pattern
Operation : x1 0 0 n m 3 7 ST
0 Pattern A
1 Pattern B
1 Print one line
2 Feed 5 lines + full cut
3 Print 10 lines + feed 5 lines + full cut
4 Feed 5 lines + partial cut
5 Print 10 lines + Insert 5 lines + partial cut
— 65 —
Page 68

[LCD]
PRT xxxn03d
EtherPrt OK
EtherPrt NG
When it is NG (communication error, etc.)
END xxxn03d
[PRINT]
There are two formats to print out to the external printer.
Pattern A Pattern B
BBBBBBBBBBBBBBBBBBBBBBBBBBBBBBBBBBBBBBBB
BBBBBBBBBBBBBBBBBBBBBBBB *8,888,88
— 66 —
Page 69

[ 23 ] COM (RS232C) Test
[Function]
Performs a loop back test on RS232C port.
This test does not generate a printout of the result.
To generate a printout, see “[25] Printing COM(RS232C) Test Result.”
Please refer to the illustration in "[24] COM(RS232C) Batch Test” for wiring.
[Operation]
Operation : x n 0 4 d ST
x: Specify the baud rate
0 2400 bps
1 4800 bps
2 9600 bps
3 19200 bps
4 38400 bps
5 57600 bps
6 115200 bps
n: Number of times
0 or no value To perform a single test
A value other than 0 (1 ~ 9) Tests repeat infinitely (press ESC to terminate)
d: Specify COM port
0 Batch
1 COM1
2 COM2
3 COM3
4 COM4
5 COM5
6 COM6
[LCD]
COM1 xn04d
RTSx=1 → CTSx=1 OK
DTRx=1 → DSRx=1 OK
DTRx=1 → CDx=1 OK
DTRx=1 → CIx=1 OK
RTSx=0 → CTSx=0 OK
DTRx=0 → DSRx=0 OK
DTRx=0 → CDx=0 OK
DTRx=0 → CIx=0 OK
TxD → RxD OK
END xn04d
Displays only COM1
Displays only COM1
Displays only COM1
Displays only COM1
x: COM number
— 67 —
Page 70

[ 24 ] COM (RS232C) Batch Test
T x D
R x D
C T S
R T
S
D T R
DS R
C D
C I
T x D
R x D
C T
S
R T
S
D T R
DS R
COM1 COM2~COM6
∗ ∗
∗
∗
: output “1” � “0” from the output terminal and checks the input terminal.
∗
Figure : RS232C port connection
[Function]
Performs a loop back batch test on RS232C port.
When performing this test, attach the loop back connecters to all COM ports.
Please see below for how to wire.
[Operation]
Operation : 4 0 ST
Baud rate: COM1: 115 kbps, COM2-6: 19.2 kbps
Number of test: once (fixed)
[LCD]
COM BATCH 40
.
.
.
END 40
Refer to the previous paragraph "COM Test."
— 68 —
Page 71

[ 25 ] Printing COM (RS232C) Test Result
[Function]
Prints out COM (RS232C) test results.
The printer must be connected to COM1 port at 9600 bps.
[Operation]
Operation : 4 7 ST
[PRINT]
COM1 47
RTSx=1 → CTSx=1 OK
DTRx=1 → DSRx=1 OK
DTRx=1 → CDx=1 OK
DTRx=1 → CIx=1 OK
RTSx=0 → CTSx=0 OK
DTRx=0 → DSRx=0 OK
DTRx=0 → CDx=0 OK
DTRx=0 → CIx=0 OK
TxD → RxD OK
END 47
x: COM number
Prints only COM1
Prints only COM1
Prints only COM1
Prints only COM1
When no test has been performed after IPL or INIT
COM* NO TEST
* In case of "NO TEST", the printout shows TxD RxD as failed (NG) and the rest as successful (OK).
— 69 —
Page 72

[ 26 ] Ethernet Test
CNT(2BYTE) DATA 00h~FFh,00h~FFh,00h~FFh,...(1444BYTE)
Lowest 8 bits of
the test counter
Highest 8 bits of
the test counter
[Function]
Tests the Ethernet counter communication.
QT-6600 in the reception mode becomes on standby and, then, QT-6600 in the transmitting mode
sends data.
Once the communication opens properly, the number of successful/failed communication to LCD
is displayed on the counter, which will be printed out when the test ends.
* Ethernet does not operate without setting a MAC address. Be sure to set a unique MAC address
before use.
* When testing the Ethernet counter communication without a HUB, the AutoNagotiation function
is disabled. Set the baud rate at 100base to run a test.
* If an Ethernet printer test has been performed beforehand, run all operations stating from INIT
boot-up.
< Transmitting/receiving data >
Test counter: counts up from 1 through INT Max. and returns to 1.
The test data length (CNT + DATA) is 1446 bytes in total, excluding the Ethernet header, the IP
header, the TP header, etc.
<TCP Mode>
A counter communication test by TCP protocol with an error control.
When the receiving end (command below a=2) receives the data properly, the data is checked
and returned (FBh – 01h, 00h, FFh-00h) to the transmitting end, which checks the data returned
(repeats the operations).
[Operation]
When an ID is set, perform the test with that ID. When you change the ID, run all operations
starting from INIT boot-up. The same applies to the baud rate.
Operation : b m 0 a 5 1 ST
b: Baud rate
0 Any number except for 1 (or not specified) → AutoNegotiation
1 100BASE
m: ID
<ID>
1 through 9 are valid numbers for the ID. If an invalid value is assigned, number 1 is automatically
set and IDs are converted as shown in the example below.
The upper values of the IP address are fixed at 192.168.0 and the lowest number corresponds to
the ID.
e.g. ID=1 → IP address = 192.168.0.1, ID=9 →IP address = 192.168.0.9
Note that the address is 192.168.0.10 in the receiving mode regardless of the ID. In the
transmitting mode, the data is sent to a fixed address of 192.168.0.10.
— 70 —
Page 73

a: Transmitting/receiving mode
0 TCP transmitting mode
1 TCP receiving mode
5 Ping transmission
Transmitting and receiving continue unless an error occurs.
Press ESC to terminate the test. (To terminate the test, operate at the transmitting end.)
<Ping transmission>
Ping is sent to 192.168.0.10. When a ping is transmitted, the counter adds a value. After
terminating it with ESC key, the number of successful/failed communication is displayed.
[LCD]
ETHERNET bm0a51
TCP MODE
OK xxxx NG xxxx
END bm0a51
[PRINT]
ETHERNET bm0a51
TCP MODE
OK xxxx NG xxxx
END bm0a51
Prints the number of successful and failed communicationupon the end of the test
— 71 —
Page 74

[ 27 ] Setting MAC (Media Access Control Address
[Function]
Configures MAC address
[Operation]
When an ID is set, perform the test with that ID. When you change the ID, run all operations
starting from INIT boot-up.
Operation : x 0 9 5 1 ST
x: Specifying how to write the address
Writes a continual address based on MAC address on CF Card.
<e.g.>
0
When ASCII data “080074FF0300” is on MACADR.TXT file in a CF Card,
080074FF0301, the value to which 1 is added to the aforementioned address, is to
be written on MAC address area. Then the same value is written in the CF Card.
Writes MAC address manually.
In the manual mode, MAC address will be on standby.
An address may be entered by 8 bits. Enter 3 decimal values + press [ST] to confirm
8 bits.
By repeating this step 6 times (48 bits), a 48-bit address is entered and, upon pressing [ST] for the 6th time, written. Each time an 8-bit value is entered, the address
1
entered is displayed in hexadecimal value.
Performing CLEAR resets the address. Or pressing ESC terminates the step without
writing an address.
<e.g.>
To write a MAC address 080074FF0300
After entering the manual writing mode, entering a numeric value 008 + [ST] → 000 + [ST]
→ 116 + [ST] → 255 + [ST] → 003 + [ST] → 000 + [ST] writes the address.
[LCD]
When configuring using a CF Card
MAC ADDRESS x0951
Write EEPROM : ******
END x0951
When configuring manually
MAC ADDRESS x0951
1 : 008
2 : 000
3 : 116
4 : 255
5 : 003
6 : 000
Write EEPROM : ******
END x0951
Written MAC address (in hexadecimal)
In the above example
Written MAC address (in hexadecimal)
— 72 —
Page 75

[PRINT]
When configuring using a CF Card
MAC ADDRESS x0951
Write EEPROM : ******
END x0951
When configuring manually
MAC ADDRESS x0951
1 : 008
2 : 000
3 : 116
4 : 255
5 : 003
6 : 000
Write EEPROM : ******
END x0951
— 73 —
Page 76

[ 28 ] Date/Time Setting [ 29 ] Date/Time Display
[Function]
Configures or displays the date and time.
If [ST] is pressed without an entry while Date/Time Setting, the Date/Time is displayed.
[Operation]
Date/Time Setting
Operation : h h m m s s 0 0 7 0 ST
hh: Hour, mm: minute, ss: second
Operation : y y m m d d 0 1 7 0 ST
yy: Year, mm: month, dd: day
Date/Time Display
Operation : 0 7 0 ST
Press ESC to terminate the mode.
[LCD]
When setting the date/time When displaying the date/time
DATE/TIME YYMMDD****
DATE/TIME YY/MM/DD
END YYMMDD****
****: Command
[PRINT]
When setting the date/time
DATE/TIME YYMMDD****
DATE/TIME YY/MM/DD
END YYMMDD****
When displaying the date/time
DATE/TIME 70
DATE/TIME YY/MM/DDHH:MM-SS
END 70
DATE/TIME 70
DATE/TIME YY/MM/DDHH:MM-SS
END 70
Each data will be printed only when setting the
date and time.
This line is not printed out
— 74 —
Page 77

[ 30 ] Drawer Test
[Function]
Tests whether drawers operate properly.
In order to complete the test, the operator must determine pass(OK)/fail(NG) of the result.
[Operation]
Operation : x n 0 9 1 ST
x: Drawer No.
0 Opens all drawers.
1 Opens Drawer 1
2 Opens Drawer 2
n: Number of times
0 or no value To perform a single test
A value other than 0 (1 ~ 9) Tests repeat infinitely (press ESC to terminate)
[LCD]
When all drawers are open When Drawer No. is specified
DRW 0n091
DRW ALL OK
END 0n091
DRW xn091
DRW n OK
END xn091
n: Drawer number
[PRINT]
When all drawers are open When Drawer No. is specified
DRW 0n091
DRW ALL OK
END 0n091
DRW xn091
DRW n OK
END xn091
— 75 —
Page 78

[ 31 ] Buzzer Test
[Function]
Tests whether the buzzer operates properly.
When performing a single test, one-shot buzzer sounds once.
When repeating a test infinitely, the buzzer sounds intermittently for 500 msec.
Press ESC key to terminate the buzzer.
[Operation]
Operation : n 0 9 2 ST
n: Number of times
0 or no value To perform a single test
A value other than 0 (1 ~ 9) Tests repeat infinitely (press ESC to terminate)
[LCD] [PRINT]
BUZZ n092
END n092
BUZZ n092
END n092
— 76 —
Page 79

[ 32 ] MCR Test
[Function]
Tests whether the card reader (MCR) operates properly.
The data read out is compared against the preset data to determine pass(OK)/fail(NG).
Track 1:
1234567890123456789012345678901234567890123456789012345678901234567890123456
Track 2:
1234567890123456789012345678901234567
[Operation]
Operation : 9 6 ST
[LCD]
MCR 96
MCR1 OK
MCR2 OK
MCR1 ******************
**************************************
MCR2 OK
MCR1 OK
MCR2 ******************
********************
END 96
When it is operating properly
When MCR1 data does not match the test data
When MCR2 data does not match the test data
[PRINT]
MCR 96
MCR1 OK
MCR2 OK
MCR1 ******************
**************************************
MCR2 OK
MCR1 OK
MCR2 ******************
********************
END 96
— 77 —
Page 80

[ 33 ] Sound Test
[Function]
Tests whether sound is replayed properly through the internal or external speaker.
In order to complete the test, the operator must determine pass(OK)/fail(NG) of the result. (when
performing a single test)
[Operation]
Operation : a x n 0 9 7 ST
a: Volume
0 Max. volume
The volume may be set at 7 increments (including 0)
1 ~ 7 When 8 or 9 is entered, the volume is set at level 7
The larger the value, the lower the volume.
x: Selecting sound data
0 Replay the data recorded in Command 98
1 ~ 9 Replay specific sound data
n: Number of times
0 or no value To perform a single test
A value other than 0 (1 ~ 9) Tests repeat infinitely (press ESC to terminate)
[LCD] [PRINT]
SOUND axn097
SOUND OK
SOUND axn097
SOUND axn097
SOUND OK
SOUND axn097
[ 34 ] Microphone Test
[Function]
Tests whether sound is replayed properly through the internal or external microphone.
Sound is recorded for 3 seconds and, then, replayed at the maximum volume.
In order to complete the test, the operator must determine pass(OK)/fail(NG) of the result.
[Operation]
Operation : 9 8 ST
[LCD] [PRINT]
MIKE 98
Please Hit Key OK−>1 NG−>9
MIKE OK
END 98
MIKE 98
MIKE OK
END 98
— 78 —
Page 81

[ 35 ] Charge Mode Test
[Function]
Turns OFF the Charge Mode
[Operation]
Operation : 9 9 ST
[LCD] [PRINT]
CAHRGE OFF 99
END 99
CAHRGE OFF 99
END 99
[ 36 ] OBR Test:
[Function]
Tests whether the scanner connected operates correctly.
The data read out is compared against the preset data to determine pass(OK)/fail(NG).
Be sure to connect OBR to COM2.
< Preset bar code >
[Operation]
Operation : 9 5 ST
[LCD]
OBR 95
OBR OK
OBR ERR xxxxxxxxx
END 95
[PRINT]
OBR 95
OBR OK
OBR ERR xxxxxxxxx
END 95
Display/printout when it is properly operating
Display/printout when there is an error
— 79 —
Page 82

[ 37 ] PS/2 Keyboard Test
[Function]
Tests whether the interface operates correctly.
An echo command is transmitted to PS/2 interface keyboard to see if there is a correct echo
response.
It must be a command-response communication, and one transmission is performed per test.
If there is an error in data reception or a transmission time-out, the test is repeated the specified
number of times. The results are displayed at each retry and, then, printed out when the test ends.
When retry is set to repeat indefinitely, the test is repeated indefinitely.
Executing the test turns on the power to PS/2 and ending the test turns the power OFF.
[Operation]
Operation : r 1 n 0 9 4 ST
r: Number of retries
0 3 times
1 5 times
2 7 times
3 10 times
n: Number of times
0 or no value To perform a single test
A value other than 0 (1 ~ 9) Tests repeat infinitely (press ESC to terminate)
[LCD]
PS/2 KB r1n094
OK **** NG ****
END r1n094
[PRINT]
PS/2 KB r1n094
OK **** NG ****
END r1n094
The number of successful/failed communication is
printed out as a result when the test ends.
[Power Recovery Error]
An error occurs during the power recovery (because the system deletes the power recovery
process during this time).
— 80 —
Page 83

8. CIRCUIT EXPLANATION
Scanner
(HHS-15)
Drawer
Drawer
Remote
display
QT-6060D
Slip
printer
SP-1300
MODEM
or
PC
CPU
RAMFlash
Memory
32MB 64MB
NOR
FROM
64MB
Note: Shadowed device and dot line indicate option devices.
QT-6061CB or QT-6062CB
PRT-CB-8A/-8B
PRT-CB-8C
PRL-CB-2
CAT5 UTP cable
Remote
printer
UP-400
Remote
printer
UP-400
Power
suppl
y
PRT-CB-8A/-8B
Power
Power
suppl
y
suppl
y
PRT-CB-8A/-8B
Power
suppl
y
Remote
printer
UP-360
Microphone
Speaker
i-Button
key i/f
CF card
Power switch cover
1024 x 768 dot co
lor LCD
Max. 126 key touch
screen
HUB
Other terminals
PC or LAN printer
MCR
QT-6046MCR
AC Adptor
Drawer 2 i/f
Drawer 1 i/f
Inline
RS-232C COM1
RS-232C COM2
RS-232C COM3
RS-232C COM4
RS-232C COM5
RS-232C COM6
Ext. microphone
Ext. speaker
QT-6011DLST
(except for
QT-6600-DLS)
Remote
printer
UP-400
Power
suppl
y
8-1. HARDWARE DIAGRAM
— 81 —
Page 84

8-2. BLOCK DIAGRAM
15inch-LCD
CCFL
CPU
IOC
PWB E830-1
CF card
socket
A1501
2pin
A1251
8pin
A2507
A2507
3pin
3pin
Drawer
Drawer
Optional
Optional
A2001
A1251
2pin
A3963 4pin
DC SW
NiMH Battery
Li Battery
DC+24V
PWB
E830-INLET
AC Adaptor
AC100V
~240V
2pin
Dallas Key
MCR
Optional
D/A Invertor
15inch Touch Panel
Rear LCD
160x32Full dots
PWB E830-E22
PWB E830-TP
PWB E830-MIC
A1501 2pin
PWB E830-COM
Ext SPK
Ext MIC
COM5
COM4
COM6
A2001
2pin
A1501
A1501 4pin
FFC 30pin
1mm pitch
INIT
SW
4pin
Brightness
volume
Speaker
PWB E830-E6
Power
LED
Disp
SW
MIC
Control
LSI
DDR
256Mb
DDR
256Mb
FROM
256Mb
FROM
256Mb
FROM
256Mb
SDRAM
64Mb
SDRAM
64Mb
LVDS
Graphic
control
LAN Sound
9pin
A2001
5pin
A1501
5pin
A2001
20pin
A1255
G.A.
PS/2 6pin
COM1
COM2
COM3
RJ45
— 82 —
Page 85

8-3. LSI BLOCK DIAGRAM
PWD HALT
RESET
INT PWD
IOC CTS
EtherNet
LIME
GA
OUND
EXTERNAL RTC
REAR LCD
DISPLAY
160x32dot
LCD BACKLIGHT
(GREEN&WHITE)
POWER LED
PORT
PORT x2
CPU
Renesas Technology Corp.
SH7763
COM1
PANEL TYPE (ENH/Jr.Judgment)
PORT
Power supply Control (Backup)
POWER SUPPLY/
PWD CIRCUIT
TouchPanel
TouchPanel
Controller
UART
TxD/RxD
KEY BOARD
EEPROM
PS/2
IOC
NEC Electronics Corp.
V850 KF2
20MHz
BACKUP POWER
SUPPLY
CONTROL UNI
T
CHARGING ON/OFF
OUTPUT×1
TEMP/VOLTAGE
A/D×2
KI
×
2
INT×1/DK OUTPUT×1
INT×2/INPUT×4
OUTPUT
×
2/INPUT×2
UART
INT×2
OUTPUT×1
TxD/RxD
RESET
FLMD0
SQUARE WAVE OUTPUT (BEEP)
DDR DRAM I/F
32bit
133MHz
DDR SDRA
M
64MB
SWITCH
×
2
Dallas KEY
×
1
MC
R
DRAWER
×
2
NTT+ABA
IATA+ABA
DISP ON/OFF SWITCH
INIT SWITC
H
SOUND IC
BUFFE
R
BUFFER
CF-CAR
D
AMPLIFIER
SPEAKER (EXTERNAL)
SPEAKER (INTERNAL)
MIC (EXTERNAL)
MIC (INTERNAL)
EtherNet IC
LAN9115
GA
RS232C
COM2 to 6
NOR FLASH RO
M
32MB
NOR FLASH RO
M
32MB x2
SH BUS 32/16bit
(32bit/66MHz: LIME,
FROM (Backup only
)
LCD CONTROLLE
R
(GC)
FUJITSU LIM
E
(MB86276)
RGB 24bit
Digital
LVDS
Conversion IC
LCD
XG
A
1024×768
SDRAM
16MB
SDRAM I/F
32bit 100MHz
INVERTO
R
UNIT
LCD BACKLIGH
T
LCD BACKLIGH
T
PORT
LVDS
DDR SDRAM BACKUP
PROGRAM
CLOCK SYNCHRONOUS
SERIAL
ASYNCHRONOUS
SERIAL
INTERNAL: 266MHz
BUS: 66MHz
INTERNAL RTC
(NOT BACKUP)
— 83 —
Page 86

9. ERROR CODE LIST
9-1. Error message
This section describes what to do when you have problems with operation.
When an error occurs
Errors are indicated by an error codes. When this happens, you can usually find out what the problem
is as illustrated below.
Press C and check the appropriate section of this manual for the operation you want to perform.
Prompt message Meaning Action
Operator mistake. Operation error Perform proper operation.
E001 Wrong mode. Check tracking (Open mode error) Return the mode to its original setting.
E003 Wrong operator. Error clerk/Error clerk in check tracking Input correct check number or assign the
proper clerk.
E005 Insufficient memory. Memory allocation over Reallocate memory.
E011 Close the drawer. Drawer compulsory Close cash drawer.
E012 Journal paper end. Journal paper end Replace journal paper.
E014 Receipt paper end. Receipt paper end Replace receipt paper.
E015 Check R/J printer. Internal R/J printer error Check the internal R/J printer.
E016 Change back to REG
mode.
E017 Enter Check/TBL number. Check number compulsory Input a check number.
E018 Enter Table number. Table number compulsory Input a table number.
E019 Enter Number of covers. Cover compulsory Enter the number of customers.
E020 Enter Seat number. Seat number compulsory Input a seat number.
E021 No dept link. Scanning PLU item w/o department link is
E023 Stock running short. Alarm when any item drops below its
E024 No stock is available. Error when actual stock value for a
E025 Scale Read Error Scale read error Retry weighing the item.
E028 Not found PLU or C/D is
mismatch.
E029 No registration is possible
while you are in the tender
operation.
E031 Press ST key before
Finalization.
E033 Enter tendered amount. Amount tender compulsory Enter tendered amount.
E035 Change amount exceeds
the limit.
E036 Remove money from the
drawer.
E037 Digit or Amount Limitation
Over.
E038 Perform Money
Declaration
E040 Issue Guest Receipt. Guest receipt compulsory Issue a guest receipt.
E041 Print Validation. Validation compulsory Perform validation operation.
E044 Print Cheque. Check print compulsory Perform check print operation.
E045 Print Check-Endorsement. Check endorsement compulsory Perform check endorsement operation.
E046 REG Buffer Full. Please
Finalize or NB.
E047 Print bill. Slip compulsory Perform slip printing operation.
Prohibit plural operation in REF/REG–
mode
registered.
programmed minimum stock quantity
during registration.
registration items is a negative value.
Scanning PLU is not found or OBR code
is mismatched.
Attempted registration whilst partial tender
operation is being done.
ST compulsory Press ST key.
Change amount exceeds the limit. Enter amount tendered again.
Contents of the drawer exceed the
programmed limit — Sentinel function.
H.D.L., H.A.L., L.D.L. error Enter correct unit price/amount.
Money declaration compulsory Perform money declaration.
Registration buffer full Finalize the transaction.Allocate sufficient
Switch to another mode and then back to
the REF/REG– mode again.
Link the item to a department.
Perform stock maintenance.
Perform stock maintenance.
Re-enter the PLU code.
Finalize the transaction.
Perform pickup operation.
buffer.
— 84 —
Page 87

Prompt message Meaning Action
E048 Insert Slip Paper and
retry.
Alarm when no paper is inserted in the
Slip.
Insert new slip paper.
E049 CHECK memory full. Check tracking index full/near end Finalize and close the check number
currently used.
E050 Detail memory full. Check tracking memory full/near end Finalize and close the check number
currently used.
E051 CHK/TBL No. is occupied. Attempt is made to use the <NEW
CHECK> key to open a new check using a
number that is already used for an existing
Finalize and close the check that is
currently under the number that you want
to use or use a different check number.
check tracking memory.
E052 CHK/TBL No. is Busy. Attempt to use the same check number
whilst the specified number is being used
Use another check number or close the
check at that terminal.
in the other terminal.
E053 CHK/TBL No. is not
opened.
Check number not found Use the correct check number (if you want
to reopen a check that already exists in
the check tracking memory) or use <NEW
CHECK> to open a new check.
E054 Out of CHK/TBL No.
Check number range over Enter correct number.
Range.
E056 Store range full. All check number are occupied in range. Recall the stored data.
E057 No item exists in detail. Round repeat cannot be found in detail.
E058 Enter post entry item. Post entry item has not been registered
Enter Post entry item.
yet.
E059 Press Eat-in or Take-out
Press eat-in or take-out key. Press Eat-in or Takeout key.
key.
**********
E060 Printer offline.
Printer offline.
“****” means ECR logical ID and printer
number.
**********
E061 Printer error.
Printer downed.
“****” means ECR logical ID and printer
The contents are printed on the backup
printer.
number.
**********
E061 Printer error.
YES : Retry to print.
Printer downed.
“****” means ECR logical ID and printer
number.
Follow the prompt message.
NO : Show on the screen.
ESC : Discard data.
**********
E062 Printer paper end.
Paper near-end/end “****” means ECR
logical ID and printer number.
Set new paper.
The contents are printed on the backup
printer.
**********
E062 Printer paper end.
Paper near-end/end “****” means ECR
logical ID and printer number.
Follow the prompt message.
YES : Retry to print.
NO : Show on the screen.
ESC : Discard data.
E064 Printer buffer full.
Print buffer full at sender side Follow the prompt message.
YES : Retry to print.
NO : Show on the screen.
ESC : Discard data.
**********
E070 Terminal out of action.
Cannot print.
**********
E071 Target terminal printer BF
full.
YES : Retry to print.
Down at target ECR which has printer
“****” means ECR logical ID and printer
number.
Printer buffer full at target ECR which has
printer
“****” means ECR logical ID and printer
number.
Follow the prompt message.
NO : Show on the screen.
ESC : Discard data.
— 85 —
Page 88

Prompt message Meaning Action
**********
E072 Target printer terminal is
busy.
**********
E073 Your receipt/order may
not be issued.
Busy at target ECR which has printer
“****” means ECR logical ID and printer
number.
Time out at ECR which has printer
“****” means ECR logical ID and printer
number.
Follow the prompt message.
YES : Retry to print.
NO : Show on the screen.
ESC : Discard data.
E075 Negative Balance, cannot
be finalized.
E080 Electronic Journal Full
Attempted finalization when balance is
less than zero.
Register item(s) until the balance becomes
positive amount.
Electronic journal full Reset the electronic journal memory.
Please clear E-Journal.
E082 ***** Illegal Data ***** Illegal Electronic journal data
E083 Cannot create E-Journal.
Electronic journal file cannot be created. Check flash memory.
Check Flash memory.
**********
E105 Check/TBL tracking
CHK master down
“****” means ECR logical ID.
Follow the prompt message.
Master down. Please call
Manager!!
YES : Retry for connection.
NO : Remove it from system.
**********
E106 Check/TBL tracking
CHK BM down
“****” means ECR logical ID.
Follow the prompt message.
Backup master down.
Please call Manager!!
YES : Retry for connection.
NO : Remove it from system.
**********
E107 Both Master&Backup
CHK M/BM down
“****” means ECR logical ID.
master down. CHK/TBL
tracking or Clerk interrupt
is not available.
**********
E108 CHK/TBL Master is
Master down then take it off from system
“****” means ECR logical ID.
removed from system.
**********
E109 CHK/TBL Backup master
is removed from system.
E110 CHK data mismatch
Backup master down then take it off from
system
“****” means ECR logical ID.
Data mismatch has occurred.
between Master and
Backup master.
E130 Middle of Pick up or Loan
During picking up Follow the prompt message.
Press Cancel Key.
E131 Middle of <Bill Copy>
During bill copy Follow the prompt message.
Press Cancel Key.
E133 Middle of <Media
During media change Follow the prompt message.
Change> Press Cancel
Key.
E134 Middle of Clerk Transfer
During clerk transfer Follow the prompt message.
Press ESC Key.
E136 Middle of Separate Check
During separate check Follow the prompt message.
Press ESC key.
E139 Not allowed to be negative
Credit balance error Enter proper minus/coupon amount.
by Minus/Coupon key.
E140 Wrong menu. This sheet holder is prohibited by program. Set correct sheet holder.
E141 Press <TRAY TTL> twice
before finalization.
<TRAY TOTAL> key is not pressed twice
before finalization.
Follow the prompt message.
E145 Arrangement syntax error. Arrangement syntax error Program the arrangement again.
— 86 —
Page 89

Prompt message Meaning Action
E150 Incorrect value entry. Incorrect entry for PGM Enter proper value again.
E151 Incorrect Key Pressed. Linking is incorrect. Enter proper key again.
E152 PGM File or Memory
No such file, no such record Enter file/record number again.
number does not Exist.
E164 Employee No. is not
Found in the Employee
Employee No. is not set in the Employee
File.
Enter employee number again.
File.
E165 Employee No. is not
Clocking-in.
E166 Employee No. is
Occupied.
Employee has not done CLOCK-IN
operation yet.
Employee who has done CLOCK-IN
operation attempts to operate CLOCK-IN
Perform CLOCK-IN operation.
Enter the proper employee number again.
again.
E167 Incorrect Job code. Employee attempts to operate CLOCK-IN
Enter proper job code.
with incorrect JOB code.
E168 Your Operation is out of
Schedule. Please Call
Employees operate CLOCK-IN/OUT in not
allowance time.
Follow the prompt message.
Manager.
E169 Work Hours Exceeded.
Overtime work. Follow the prompt message.
Please Call Manager.
E170 No Shift Remains in the
There is no available shift left.
Schedule. You cannot
Clock-in.
E171 Please Break-out and
Retry.
E172 Break Hours Exceeded.
Employee attempts to operate CLOCK-
Follow the prompt message.
OUT whilst he/she is in a break time.
Break hours are exceeded. Follow the prompt message.
Please Call Manager.
E173 This employee is at work
Employee is at work without break.
now.
E174 This employee is taking a
break now.
E175 Please Clock-in/Break-
Employee who has not done BREAK-OUT
operation attempts to operate BREAK-IN.
Sign on after you clock-in or break out. Follow the prompt message.
out before you sign on. or
Please Call Manager.
E176 You cannot Clock-in.
Employee Report has not been reset. Follow the prompt message.
Please reset Employee
Report.
E177 Time&Attendance Data
Communication Error.
Time & Attendance Data communication
error.
Follow the prompt message.
Please Call Manager.
E180 IDC FILE (1) memory full.
IDC FILE (1) memory is full of items. Follow the prompt message.
Please clear IDC data.
E181 IDC FILE (2) memory full.
IDC FILE (2) memory is full of items. Follow the prompt message.
Please clear IDC data.
E182 IDC FILE (3) memory full.
IDC FILE (3) memory is full of items. Follow the prompt message.
Please clear IDC data.
E184 OPEN CHK/TBL data
exist.
Open check/ table data exist while
resetting fixed total.
Close the opend check/ table data first.
E185 Item is not active. Registrer non active item. Register active item.
E200 Insert CF Card. CF card is not inserted to the slot. Insert CF card.
E201 Format error. CF card data or formats illegal. Check the CF card.
E203 Insufficient memory. Insufficient memory is remained in CF
Format or use a new CF card.
card.
E205 The file already exists. Do
File name duplication error Follow the prompt message.
you replace?
YES : Replace the file.
NO : Input new name.
E210 Mag Card Reader Error. Magnetic card read error. Swipe the card again.
E211 Wrong Card Prefix Code. Card prefix code error This card cannot be used.
— 87 —
Page 90

Prompt message Meaning Action
E212 Card Expired. Card is expired. This card cannot be used.
E213 Card Validation Failed. Card validation is failed. This card cannot be used.
E215 Card Format Error. Card format error This card cannot be used.
E240 Customer No. is occupied. Attempt is made to set a customer that
Enter proper customer No.
already exists in the customer file.
E241 Customer memory full. Customer file becomes full. Delete unnecessary customer No.
E242 Customer not found. This customer does not exist. Enter proper customer No.
E243 Illegal Site ID. The site No. of the file does not coincide
Swipe the proper magnetic card.
with the No. of the card.
E244 Credit limit over. Attempt to transfer when the balance is
over than the credit limit
Release credit limit by OPEN2
Make minus, void, or refund operation to
decrease the balance under the credit
limit. Perform finalization or cancellation.
E251 Magnetic card error. This card cannot be read.
This card format is illegal.
Swipe the magnetic card again.
Swipe the proper magnetic card.
E252 Enter customer name. Follow the prompt message.
E253 Enter address. Follow the prompt message.
E254 Enter phone number. Follow the prompt message.
MC#nn
E259 Terminal out of order
YES : Retry
Comminication error to the machine #nn
during
auto updating scanning PLU.
Follow the prompt message.
NO : Skip
— 88 —
Page 91

9-2. Operation prompt
All prompt messages, together with descriptors and symbol characters for displaying / printing are
contained in the list below. These messages cannot be added, modified or deleted.
Prompt message Meaning
Data cannot be printed out.
Backup to R/J printer?
Do you want to clear data? Confirmation to reset displayed report.
Cancel OK? Confirmation of all void operation.
Please wait. Please wait. ECR now processing.
Item Consolidation Mode In the item consolidation mode.
Non Consolidation Mode Not in the item consolidation mode.
REG Mode Mode change : REG mode
REFUND Mode Mode change : REF mode
REG- Mode Mode change : REG–mode
Training Signing on a training operator
REG2 Mode Mode change : REG2 mode
Please Sign on. The terminal is in signed off.
Enter Check/Table Number. CHK# compulsory
Enter Table Number. TBL# compulsory
Enter Number of covers. Covers compulsory
Enter Seat Number. Seat# compulsory
Perform Slip Printing. Slip compulsory
Issue Guest Receipt. GUEST RCT compulsory
Perform Validation Printing. VLD compulsory
Perform Check Printing. CHK-PRT compulsory
Perform Check Endorsement. CHK-END compulsory
Operation Code? Enter secret number for REG 2 mode.
Re_configuration... During system reconfiguration
Re_configuration end System reconfugiration ends
Clock-in OK? Time and attendance clock-in operation
Clock-out OK? Time and attendance clock-out operation
Break-in OK? Time and attendance break-in operation
Break-out OK? Time and attendance break-out operation
Enter cash tip amount and press
<YES> key.
Communication Error Communication error during clock-in
This procedure stops system maximum 60 sec.
OK ?
Enter # Registering Non-add after RC / PD.
Enter Alphacode! To search the appropriate item, enter goods name.
Items not found! Items cannot be found by item searching.
Request to check the X / Z report data which
cannot be printed out.
Time and attendance tip declaration compulsory
Alert before flash memory clear.
— 89 —
Page 92

9-3. System error code
All error codes are contained in the list below. These error codes are displayed or printed on error log report.
Error code Meaning
0010 Handler access error (software)
0011 Cannot execute handler (system configuration)
0012 Break by PC
0013 Break by ECR
0014 DSR off before receiving command packet
0015 Receive illegal command number of command packet
0016 Receive illegal character
0017 Send error (hardware)
0018 Receive error (hardware)
0019 Receive illegal data packet
0020 No response error
0021 Receive illegal command phase
0022 Received illegal packet
0023 CNET receive error
0024 Illegal termination by sender
0025 Received illegal packet during receiving data packets
0026 Not enough data packets received
0040 No “H”information
0041 No “I”information
0042 No “F”information
0044 Illegal packet format
0045 No file exists
0046 Illegal block
0047 Illegal command packet
0048 Illegal command No. (Not CMD)
0049 Illegal command No. (Not DATA)
0050 Sequence error
0051 Turn off DSR signal
0052 Received cancellation
0053 Retry over while waiting command
0054 Retry over while waiting EOT
0055 Retry over while waiting data
0056 Received EOT
0057 Retry over while waiting ACK
0058 Retry over while sending data
0059 Retry over while waiting “C”
0060 Retry over while sending response
0061 Retry over while excluding
0064 Break end
0065 Error during printing report header
0066 Error during printing report data
0067 Error during printing report data in work file
0068 Error during printing report data in consolidation file
0069 Work file clear error
0070 Consolidation file clear error
0071 Z lock error
0072 Z clear error
0073 Z lock release error
0074 Error during accumulating to consolidation file
0075 Error during copying report data from terminal memory to work
0076 Error during copying stock data to terminal memory
0077 Z lock error on satellite terminal
0078 No appropriate file is exist on satellite terminal during collection/consolidation
— 90 —
Page 93

Error code Meaning
0079 Z lock release error on satellite terminal
0081 Check tracking master is removed from system.
0082 Check tracking backup master is removed from system.
0128 Parameter error / Maximum length of send error
0130 Error drive
0134 Network parameter error
0138 Detect error in core system
0140 Parameter error (record length exceeds work buffer)
0141 EOF over
0144 Calculation overflow
0145 Undefined value of n_open () mode
0146 Mismatch of type when closing network
0147 Parameter error
0152 Defined NCB is not network resource
0153 Retry over by the target busy
0155 Sequence error
0156 No port exists
0158 Target port in use
0160 Error while getting priority
0161 Fail to change temporary priority
0162 Error semaphore operation to keep resource
0163 Fail to get new sled
0164 Error while getting semaphore
0165 Error to operate semaphore
0166 Error during delay
0167 Error during termination
0168 Error when resource return
0170 Error during getting task ID
0171 No code is found while search/pick up
0172 Cannot get work buffer
0173 File opened/fail to activate task
0174 No file exists
0175 ITRON service error
0176 Cannot create file
0177 Record number error
0178 Detect error while memory area opening
0179 Detect error while returning mail box / double create error
0180 Detect error while handling memory
0190 RCB is not mail box resource
0192 Error send message ID
0194 Send message length over
0197 Ending response
0198 Time out while waiting for ending response / no receive message
0202 No free FCB
0204 Memory capacity shortage
0205 Fail to create mail box
0209 Cannot find the coincide PCB resource
0210 Cannot find the coincide RCB resource
0232 ID collision when network starts
0233 Cannot find the target ID
0235 Protocol error
0247 Stop token
0248 FTP client can’t open data connection.
0249 FTP client requested file action not taken.
0250 FTP client local error in processing
0251 FTP client syntax error
— 91 —
Page 94

9-4. CPU Exceptional Error
The functions of the CPU (SH series) include exception handling. If an exception other than reset and
general interrupt (hereafter called “general exception”) occurs, the OS displays a message as shown
below and stops the operation of ECR, because the operation after that cannot be guaranteed.
The example shown below indicates the screen displayed when “reservation instruction code
exception” occurs.
The values of error no., error point and access adrs vary according to errors.
CPU Exceptional Error !!
error no. 180
error point ffffd47e
access adrs 0
error no.:
Indicates the exception code of the general exception.
From this code, the operation that causes the general exception is known.
error point:
Indicates the point on the memory where the operation instruction that causes the above general
exception is located (program counter).
However, an illegal address may be displayed depending on the exception code.
access adrs:
Indicates the address that is accessed according to the operation instruction that causes the above
general exception.
However, the address is 0 (zero) and has no meaning if the access is not the cause.
Error Code Correspondence Table
error no. error point access adrs Description of error
40 Location where error occurs Logical address of comparison source TLB address comparison
results in address mismatch
60 Location where error occurs Logical address of error source TLB entry is invalid
80 Location where error occurs Logical address of error source Initial page write exception
A0 Location where error occurs Logical address of error source TLB protection exception
(read)
C0 Location where error occurs Logical address of error source TLB protection exception
(write)
E0 Location where error occurs Address of read destination CPU address error (read)
100 Location where error occurs Address of write destination CPU address error (write)
180 Location where error occurs 0 Reservation instruction code
exception
1A0 Location where error occurs 0 Slot illegal instruction
exception
— 92 —
Page 95

Causes of error occurrence
(1) error no. 40: TLB address comparison results in address mismatch
(2) error no. 60: TLB entry is invalid
Description of phenomenon:
The CPU performs a conversion from logical address to physical address when
accessing the external memory.
TLB is what caches that information.
If an error occurs in the process of the caching, a general exception of the CPU occurs.
Possible causes:
A malfunction of the CPU, because this is an internal operation of the CPU.
(3) error no. 80: Initial page write exception
Description of phenomenon:
This exception occurs if the address conversion table of the above TLB is illegally
written.
Possible causes:
A malfunction of the CPU, because this is an internal operation of the CPU.
(4) error no. A0: TLB protection exception (read)
(5) error no. C0: TLB protection exception (write)
Description of phenomenon:
TLB is protected by setting access right. An access that violates the access right causes
one of these exceptions to occur.
Possible causes:
A malfunction of the CPU, because this is an internal operation of the CPU.
(6) error no. E0: CPU address error (read)
(7) error no. 100: CPU address error (write)
Description of phenomenon:
This exception occurs if an illegal address is accessed (read or written).
Possible causes:
• An illegal address is accessed by software (a software bug).
• The address to be accessed has changed due to insufficient charge of the backup
battery for RAM.
(8) error no. 180: Reservation instruction code exception
(9) error no. 1A0: Slot illegal instruction exception
Description of phenomenon:
These exceptions occur when an illegal instruction is performed.
Possible causes:
It is hard to think that this phenomenon is caused by software, because these errors
occur due to an internal operation of the CPU.
This phenomenon is apt to occur when backup of RAM is not performed normally and
the memory has been changed.
It is possible that the data in RAM has become illegal data.
— 93 —
Page 96

9-5. Booster Error
ERR for XXX nn
XXX: INIT…INIT error
IPL…IPL error
nn: Refer to the Error Code Correspondence Table below
Error Code Correspondence Table
Error No. Description of error
1 CF card is not inserted.
2 CF card is not formatted correctly
3 FROM erase error
4 FROM write error
5 RAM write error
6 RAM read error
9 Mismatching MAGIC code
10 Checksum error
99 Other
A mismatching MAGIC code error may occur;
(1) when BOOTER IPL is complete (ROM data)
(2) after APLI IPL IP data is downloaded to RAM (RAM data)
(3) after writing to APLI IPL FROM is complete (ROM data)
(4) during ROM-to-RAM copying at the time of boot-up (ROM data)
A Check Sum error may occur;
(1) when BOOTER IPL is complete (ROM data)
(2) when APLI IPL is complete (ROM data)
(3) during ROM-to-RAM copying at the time of boot-up (ROM data)
Notes:
Hibernation-realated errors are not displayed. When a Back-up error occurs, perform an INIT-boot up
to launch the APLI.
— 94 —
Page 97

10. PCB LAYOUT
MAIN PCB (E830-1 PCB)
(TOP VIEW)
— 95 —
Page 98

MAIN PCB (E830-1 PCB)
(BOTTOM VIEW)
— 96 —
Page 99

REAR LCD PCB (E830-E22 PCB)
(TOP VIEW) (BOTTOM VIEW)
TOUCH PANEL PCB (E830-TP PCB)
(TOP VIEW) (BOTTOM VIEW)
INTERFACE PCB (E830-COM PCB)
— 97 —
Page 100

LED PCB (E830-E6 PCB)
(TOP VIEW) (BOTTOM VIEW)
INLET PCB (E830-INLET PCB) MIC PCB (E830-MIC PCB)
— 98 —
 Loading...