

Page 1

ANACOM, INC.
®
AnaSat
SSPA Series
Operating Manual
Ku-Band
SEKu-Band
EC-Band
SEC-Band
Page 2

You have just received an AnaSat® SSPA (Solid-State Power Amplifier), a cost-effective
product with no compromise on quality and reliability. This product should provide tireless
performance in any reasonable operating environment. Note that this product is transmit only, and
does not include a Block Down-Converter, which will have to be obtained separately.
We, at ANACOM, have taken great care to provide a convenient, easy-to-use product in a
single package. Should a situation arise beyond the operator’s control, just give us a telephone call.
Many situations can be diagnosed and solved by ANACOM’s trained customer-service personnel
over the phone.
If you have any questions, require technical assistance or training please call ANACOM
directly at (408) 748-7800 or FAX to us at (408) 748-7801. You can also send e-mail to
techsupport@anacominc.com and one of our engineers will contact you.
ANACOM, INC.
3000 Tasman Drive
Santa Clara, CA 95054
Tel: (408) 748-7800
Fax: (408) 748-7801
©
2006 AnaCom, Inc. All rights reserved. The information furnished by AnaCom, Incorporated, in this
publication is believed to be accurate and reliable. However, no responsibility is assumed by AnaCom for its
use, nor any infringements of patents or other rights of third parties resulting from its use. No license is
granted by implication or otherwise under any patent or patent right of AnaCom, Inc. AnaCom reserves the
right to change circuitry and specifications at any time without prior notice.
The following terms are trademarks of their respective holders:
AnaSat, AnaCom, Inc.
Polyswitch
Teflon
Duroid
INTELSAT
A
NACOM AnaSat
®
SSPA
Page 3

3000 Tasman Drive, Santa Clara, CA 95054
Tel: (408) 748 7800 Fax: (408) 748 7801
3133501
Operating Manual
for the
AnaSat®-Series SSPA
Table of Contents
Table of Contents.................................................................................................................3
Introduction..........................................................................................................................6
Typical Operating Parameters – AnaSat SSPAs...................................................................... 7
Installation............................................................................................................................8
Unpacking................................................................................................................................8
Tools and Test Equipment.....................................................................................8
Safety Precautions.................................................................................................................... 8
General..................................................................................................................8
Power Supply.........................................................................................................8
Transmitter.............................................................................................................8
Power Amplifier......................................................................................................9
Site Considerations ..................................................................................................................9
Antenna ................................................................................................................. 9
Power Requirements.............................................................................................9
SSPA Mounting Considerations............................................................................................ 10
SSPA Mounting..................................................................................................................... 10
Grounding............................................................................................................10
Cable and Waveguide Connections...................................................................................14
Cabling Requirements .........................................................................................14
AC Power.............................................................................................................14
Transmitter Feed .................................................................................................15
Driver Feed..........................................................................................................15
Final Check..........................................................................................................16
Water Resistance Wrap.......................................................................................16
Operation............................................................................................................................17
Frequency Programming .....................................................................................17
Antenna Adjustment ............................................................................................17
Transmit Power Adjustment.................................................................................17
A
NACOM AnaSat
®
SSPA
Page 4

3133501
Maintenance.......................................................................................................................18
Fan Replacement.................................................................................................................... 18
Alarm Relay Closure..........................................................................................................19
Monitored Values.................................................................................................19
Data Terminal Connection.................................................................................................19
Terminal Display..................................................................................................19
RS232 Serial Port Weather-tight Connector......................................................................20
RS485/RS232 Selection......................................................................................21
Emissions and Immunity Regulation Conformance..........................................................22
Standards Met: ....................................................................................................22
LIMITED WARRANTY...................................................................................................23
ANACOM AnaSat
®
SSPA 4
Page 5
AnaAat® SSPA Quick Start Guide
1. Mount the SSPA on the antenna.
2. Connect the cables for RF input, and RF output (waveguide).
3. If needed, connect the M&C or PA MONITOR to the driver or Protection Switch.
4. Connect AC power, nominal 120 or 240 VAC.
There are no settings that need adjustment.
The SSPA is factory set for a gain equal to the P1dB value.
For monitoring the performance of the SSPA, there are two methods
1. Connect a computer to the RS232 port using the cable provided, and the Supervisor
software. Now you can see a status of the SSPA digital and analog monitored points. The
gain is fixed and cannot be changed. You can MUTE the SSPA with the command TX
OFF/ON.
2. Connect a cable (user provided) to the PA MONITOR connector. This will provide:
A. Pin 1 is used to MUTE the SSPA by grounding this pin.
B. Pin 2 is used to show a summary fault in the SSPA (0 volts). 5 volts is normal.
C. Pin 3 is used to show an analog voltage that changes as output power changes.
D. Pin 4 is used to show the SSPA internal temperature in analog form.
E. Pin 5 is not used.
F. Pin 6 is ground.
3133501
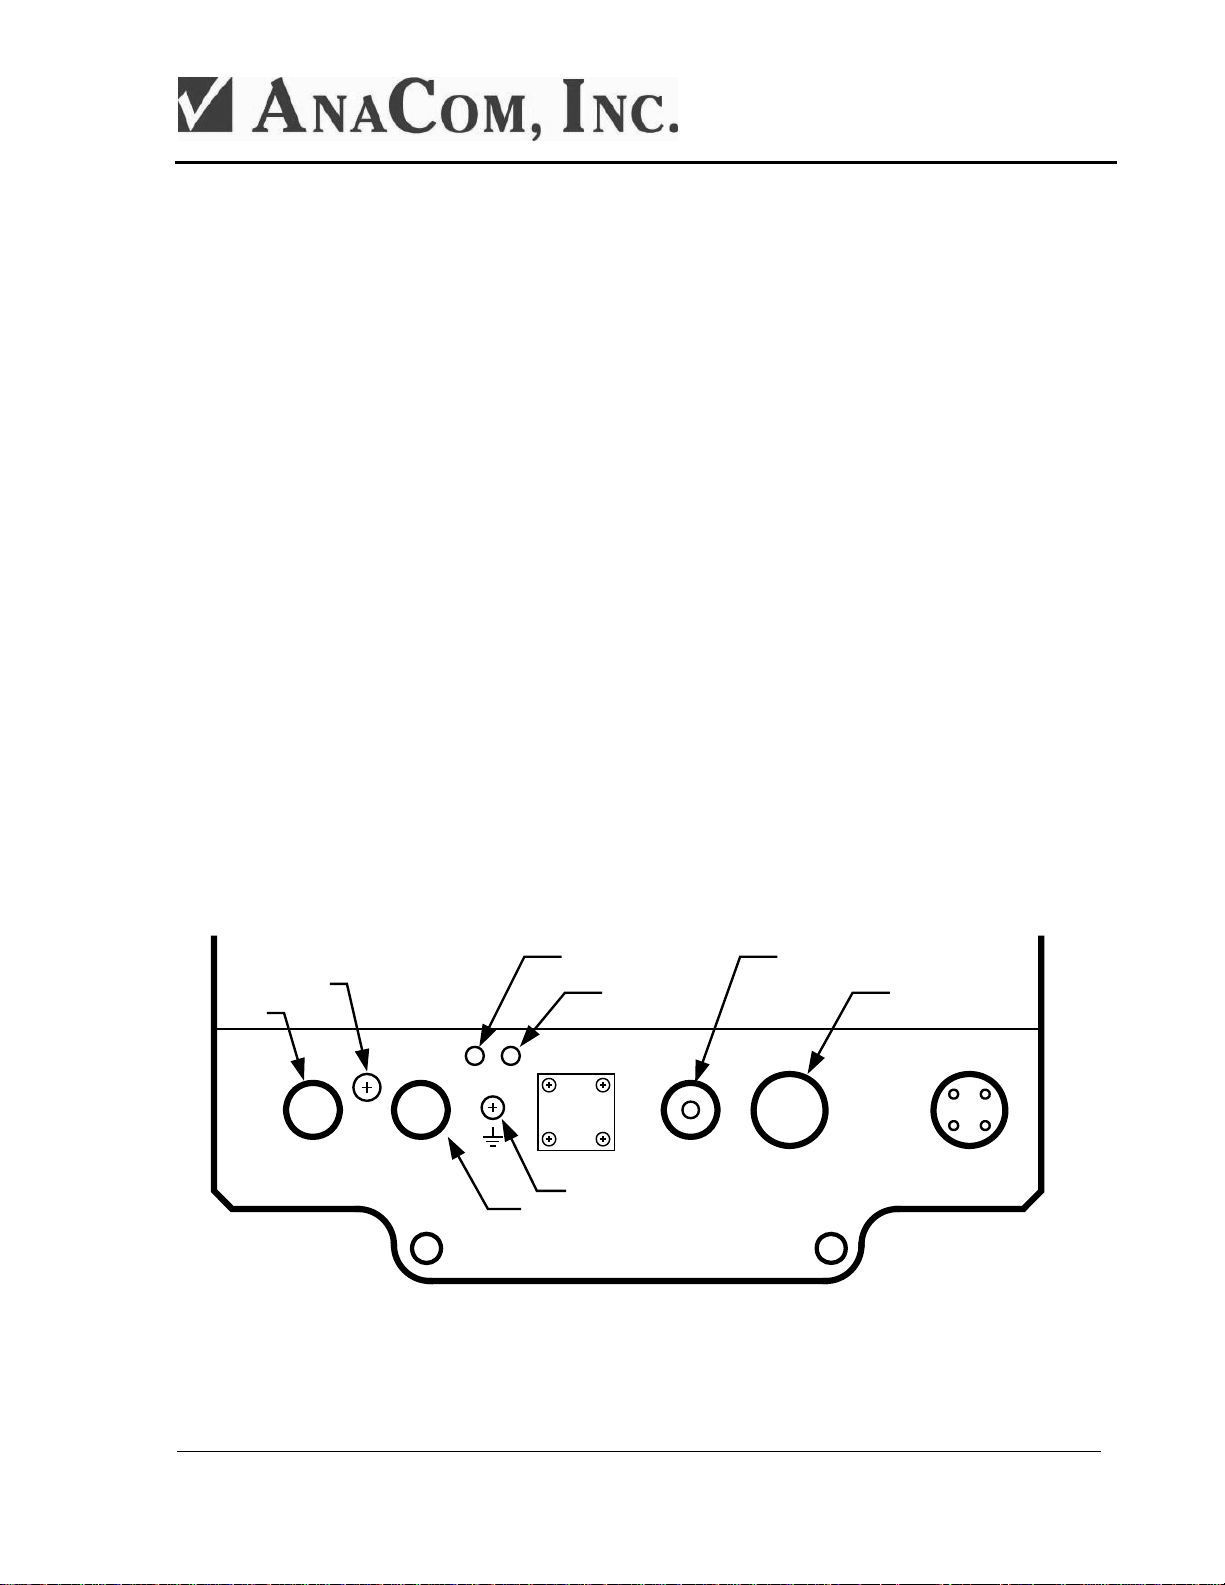
Drawing of required cable connections
Monitor
analog
points
6
PIN
PA MONITOR
DO NOT OPEN
Pressure Test port
ALARM POWER
6
PIN
RS232 TXIN
"Alarm" RED LED
"OK" Green LED
Ground Lug
Serial Port
RF INPUT
Serial ports & Alarm Relay
18
PIN
M & C
100~250VAC
ANACOM AnaSat
®
SSPA 5
Page 6
3133501
Introduction
The AnaSat® VSAT series of SSPAs are designed for continuous outdoor duty in all types of
environments. Ideally suited for SCPC, MCPC, DAMA, and VoIP applications. Designed to interface
with a 0 dBm driver, the AnaSat
networks.
The C-band members of the AnaSat
Ku-band members of the SSPA
The AnaSat
®
VSAT SSPAs incorporate a solid-state power amplifier, M&C function, and a
universal power supply, all in a small, highly integrated outdoor package. The only cabling required to
the indoor plant are the RF and AC power cables.
The Power Amplifier (PA) uses Internally-Matched Field-Effect Transistors (IMFET) to achieve
highly linear power and gain with minimal intermodulation distortion (IMD) products.
AnaSat
®
SSPAs use a wide input voltage (100 to 240VAC, 47 to 63Hz) switching power supply to
develop the +13V used as the internal power source for the Power amplifier. An internal circuit senses
the input voltage range being used and automatically switches to the appropriate mode. The AC input is
connected via a 4-pin circular connector.
®
VSAT SSPA may be used in a wide variety of communication
®
®
SSPA family transmit in the 14 GHz frequency.
SSPA family transmit in the 6 GHz frequency range. The
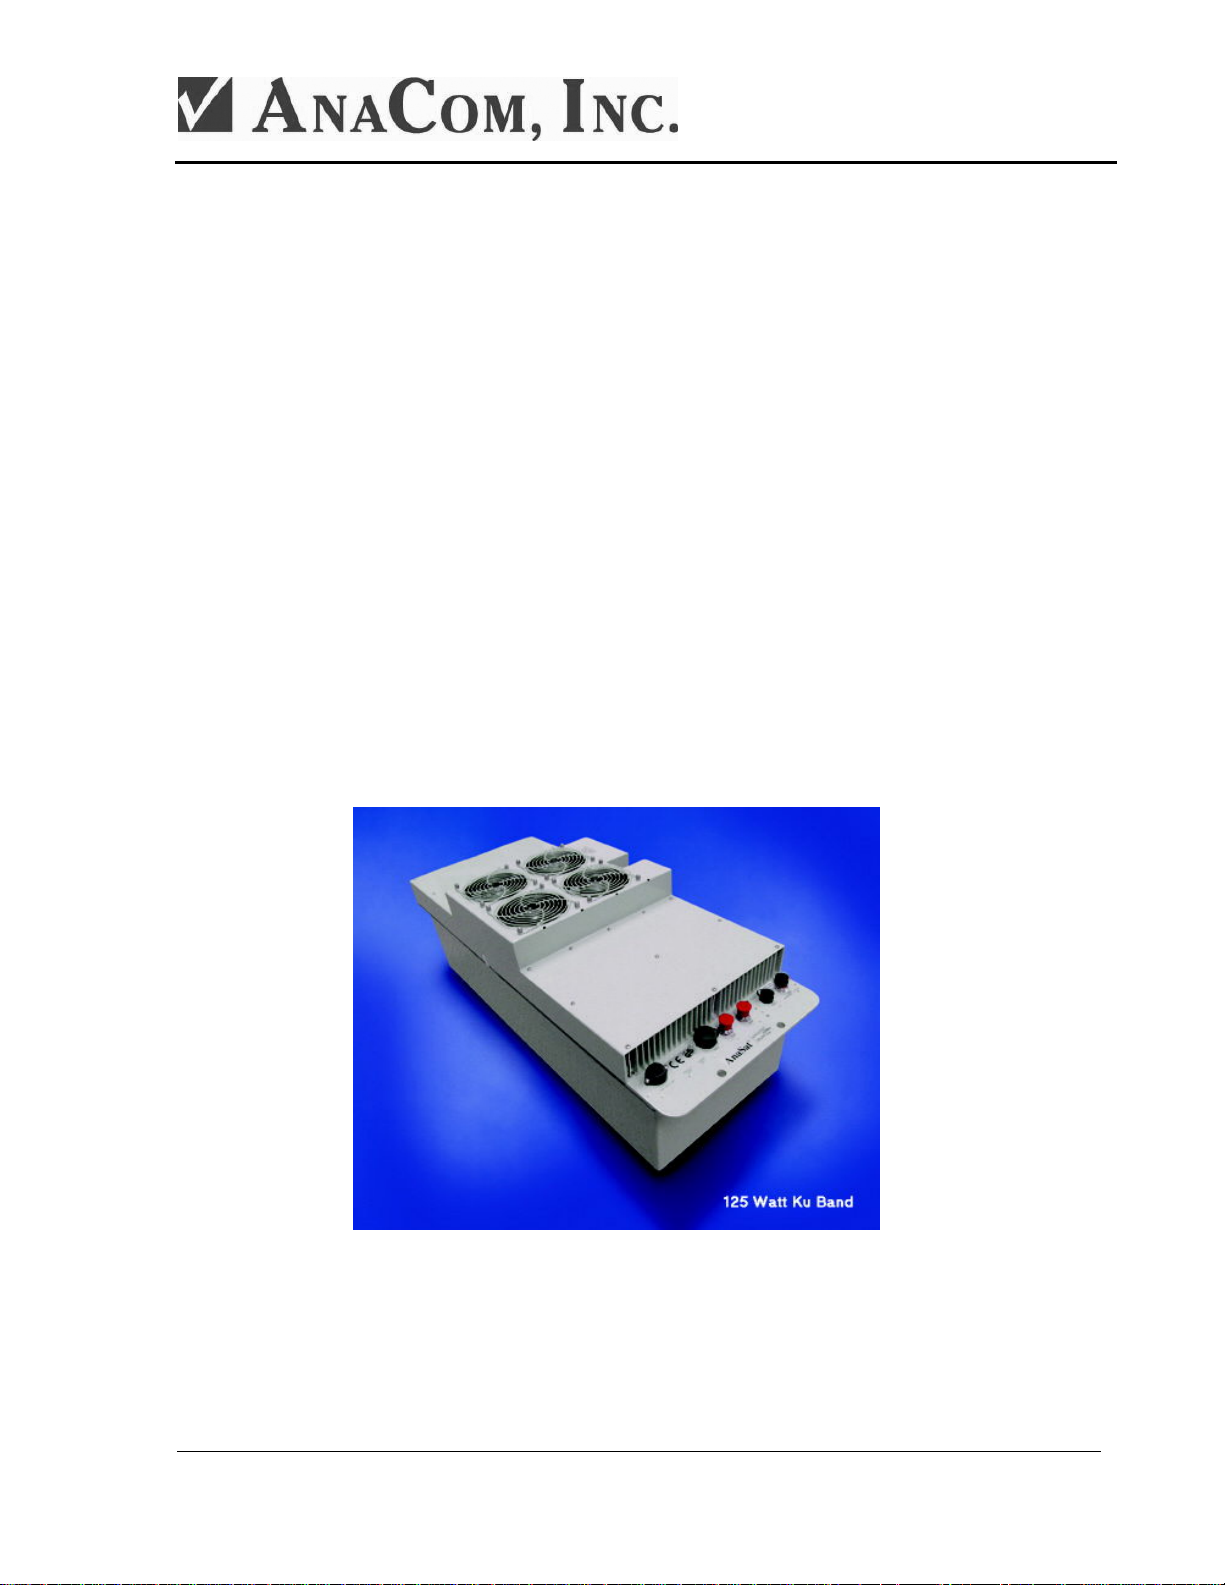
Shown in Figure 1 below is a 125W Ku-Band AnaSat
Figure 1 – AnaSat SSPA
Figure 1 - 125 Watt Ku-Band SSPA
®
SSPA.
ANACOM AnaSat
®
SSPA 6
Page 7
Typical Operating Parameters – AnaSat SSPAs
EC/SEC-Band Ku/SEKu-Band
1 dB Compression Point 10W: 40 dBm
20W: 43 dBm
30W: 44.8 dBm
40W: 46 dBm
50W: 47 dBm
60W: 47.8 dBm
70W: 48.5 dBm
80W: 49 dBm
100W: 50 dBm
125W: 51 dBm
150W: 51.8 dBm
180W: 52.6 dBm
200W: 53 dBm
TX Level Flatness 6dBp-p max / 500 MHz
TX Input N-Type Connector
TX Input RF Impedance 50 Ω (75 Ω is optional)
TX Input Level 0 dBm
Transmit RF EC - 5.850 to 6.425 GHz
SEC - 5.850 to 6.650 GHz
CPR-137 Flange (Threaded & Grooved): 30W, 50W and higher
N-Type Connector: 10W, 20W, 40W
Spurious -50 dBc max, + - 500 Hz: - 45 dBc
Alarm Relays FORM C for Summary Alarm; Isolated
Temperature Range -40C to +50C operational
-40C to +75C storage
Altitude 10,000 feet (3,048 meters) max
Rain 20 inches per hour
Wind 150 miles per hour
Vibration 1.0 g random operational,
2.5 g random survival
Shock 10 g operational, 40 g survival
Power 100 to 250 VAC; 47 to 63 Hz
Typical Power Consumption / Weight
10W: 125VA / 32 lb. (15kg) 70W: 570VA / 57 lb. (27kg)
20W: 230VA / 39 lb. (18kg) 80W: 570VA/ 60 lb. (28kg)
30W: 280VA / 57 lb. (26kg) 100W: 760VA / 75 lb. (34kg)
40W: 390VA / 45 lb. (21kg) 125W: 1070VA / 100 lb. (46kg)
50W: 390VA / 57 lb. (26kg) 150W: 1070VA / 100 lb. (46kg)
60W: 400VA / 57 lb. (26kg 180W: 1400VA / 134 lb. (61kg)
200W: 1400VA / 134 lb. (61kg)
SSPA Size
10W 21.6" x 9" x 11.6" (549 x 229 x 295 mm)
20W 21.6” x 9” x 13.5” (549 x 229 x 343 mm)
40W 21.6" x 9" x 14" (549 x 229 x 356 mm)
30, 50, 60, 70W 21.6" x 9" x 15" (549 x 229 x 381 mm)
80W 21.6" x 9" x 16" (549 x 229 x 407 mm)
100W 21.6" x 13" x 14" (549 x 330 x 356 mm)
125,150,180,200W 38" x 13" x 12.5" (965 x 330 x 381 mm)
40 dB
43 dB
44.8 dB
46 dB
47 dB
47.8 dB
48.5 dB
49 dB
50 dB
51 dB
51.8 dB
52.6 dB
53 dB
TX Gain
1 dB Compression Point 8W: 39 dBm
16W: 42 dBm
20W: 43 dBm
23W: 43.6 dBm
25W: 44 dBm
40W: 46 dBm
50W: 47 dBm
60W: 49 dBm
80W: 49.75 dBm
100W: 50 dBm
125W: 51 dBm
Transmit RF Ku - 14.0 to 14.5 GHz
SEKu – 13.75 to 14.5 GHz
WR-75 Flange (Threaded & Grooved) all power levels
Typical Power Consumption / Weight
8W: 160VA / 28 lb. (13kg) 40W: 770VA / 67 lb. (31kg)
16W: 270VA / 37 lb. (17kg) 50W: 800VA / 67 lb. (31kg)
20W: 290VA / 40 lb. (18kg) 60W: 850VA / 67 lb. (31kg)
23W: 300VA / 40 lb. (18kg) 80W: 1430VA / 125 lb. (57kg)
25W: 300VA / 40 lb. (18kg)) 100W: 1600VA / 125 lb. (57kg)
125W: 1640VA / 125 lb. (57kg)
SSPA Size
8W 21.6" x 9" x 11.6" (549 x 229 x 295 mm)
16W, 20W, 23W, 25W 21.6” x 9” x 13” (549 x 229 x 330 mm)
40W, 50W, 60W 21.6" x 13" x 13.6" (549 x 330 x 353 mm)
80W, 100W, 125W 38” x 13” x 12.5” (965 x 330 x 318 mm)
3133501
39 dB
42 dB
43 dB
43.6 dB
44 dB
46 dB
47 dB
49 dB
49.75 dB
50 dB
51 dB
TX Gain
ANACOM AnaSat
®
SSPA 7
Page 8

3133501
R
Installation
emoval of any cover may jeopardize the weather seal, which may cause problems
later.
!
Unpacking
Check to make sure that the SSPA has not suffered any damage in shipment. Compare contents of
the crate to ensure items received match those listed on the packing slip. Retain all shipping containers
for future use.
Tools and Test Equipment
Have on-hand a standard electrician’s tool kit and any tools listed in your antenna installation
instructions.
Safety Precautions
General
Observe normal safety precautions when operating this equipment.
!
Ensure the AnaSat
ground connection.
If the cover is removed from any ANACOM product, ensure that all:
• gaskets are intact and free of damage prior to reinstallation
• mounting screws are properly installed
Ensure all connectors are properly waterproofed.
®
SSPA is properly grounded. Do not rely on coaxial cable shields for the
Power Supply
We strongly recommend that this equipment not be opened in the field, and the warranty will be
void if the housing is opened without authorization, but should you choose to do so, confirm that AC
Power is disconnected before removing the SSPA cover.
Transmitter
Take adequate precautions to ensure the AnaSat® SSPA output does not transmit a signal
until it has been properly connected and set up for authorized frequencies and power levels.
Transmitter RF output power levels are adequate to cause blindness or other serious
!
injury to body tissues. Use caution when working around the SSPA or antenna when
the system is active.
ANACOM AnaSat
®
SSPA 8
Page 9

3133501
Power Amplifier
Be sure the SSPA TX OUT port is properly terminated prior to operation. Ensure all the correct
waveguide gaskets are used to prevent water damage.
TO ENSURE PROTECTION OF PERSONNEL AND EQUIPMENT, USE CARE DURING
ANTENNA INSTALLATION AND WHENEVER WORKING ON OR AROUND THE SYSTEM.
Site Considerations
The installation requirements of any particular site are the responsibility of the system operator.
AnaCom offers an optional installation mounting kit, that can be used at most sites. Contact AnaCom
for details.
Antenna
The SSPA must be attached to some form of mounting structure which is usually the antenna feed
boom or the antenna support structure. Specific mounting procedures will depend on the antenna used.
The AnaSat
according to the antenna manufacturer’s instructions. Choose an area that is free of extraneous
interference from motors and electronic equipment and has a clear line-of-sight from the antenna to the
satellite.
®
SSPA is designed to be mounted on most antennas. Locate and install the antenna
Lightning arrestors should be used at the site to protect personnel and equipment. Size 3/0 or 4/0
stranded copper wire should be used to bond the SSPA to the antenna frame and to the lightning
protection ground rod.
Power Requirements
The AnaSat® SSPA contains an internal universal AC power supply that supplies the Monitor &
Control functions, (M&C,) and PA internal subassemblies.
The AnaSat
size of the circuit breaker depends on model. To assure uninterrupted service, some method of back-up
AC power is recommended. Installing surge arrestors and AC power line filters will reduce voltage
surges from the AC power input. Provide an isolation filter to clean up power line interference and/or
voltage variations, as required.
NOTE: AC TRANSIENTS AND SURGES MAY CAUSE DATA TRANSMISSION ERRORS AND LOSS OF SYNCHRONIZATION IN THE 0
DBM SYNTHESIZERS AND/OR THE EXTERNAL MODEM EQUIPMENT.
®
SSPA requires 110 VAC or 220 VAC at 50 or 60 Hz, through a circuit breaker. The
ANACOM AnaSat
®
SSPA 9
Page 10

SSPA Mounting Considerations
The AnaSat® SSPA must be mounted such that:
1. Sufficient support is afforded the Block Up-Converter to minimize the effects of antenna sway
in strong winds.
2. Air movement is possible across the heat sink fins. Ideally, the fins should be aligned
vertically, but this is not required.
NOTE: The length (and associated RF losses) of the interconnecting cables must be considered
when determining the location of the AnaSat® SSPA.
SSPA Mounting
The AnaSat® SSPA is designed for mounting in any position.
Figure 2 shows a common
installation example where the SSPA is
mounted on the antenna feed support
arm.
3133501
When mounting the SSPA, allow
enough room to adjust the antenna’s
azimuth and elevation. Throughout
installation and during any polarization,
azimuth, or elevation adjustment, ensure
the cables and waveguide are not
crimped or pinched.
Figure 3 on the next page shows
the SSPA mounting for single thread.
Figure 2 - SSPA
Grounding
Electrical bonding (grounding) of
the SSPA is required to prevent possible
damage from lightning or other induced electrical surges.
The SSPA is provided with both an M3, and a #8 ground point. It is recommended that 000 AWG
minimum copper wire or copper braid be used to bond this unit to the earth ground (grounding rod)
using the most direct (shortest) route possible.
ANACOM AnaSat
®
SSPA 10
Page 11

BOOM ARM ASSEMBLY
A
A
NOTE: THIS MOUNTING KIT IS COMPATIBLE
WITH ALL ANASAT TRANSCEIVERS. USER
MUST MAKE SURE THE BOOM ARM OR STRUT
USED TO HOLD THE ODU IS STRONG ENOUGH
TO SUPPORT THE TOTAL WEIGHT OF ODU AND
CABLES.
NACOM
SSPA
2
VIEW A - A
3133501
NOTE: UPPER CHANNEL CAN BE INVERTED TO
ACCOMADATE LARGER BOOM SIZE IF NEEDED
1
4
5
6
1
VIEW A - A
Single Universal Mounting Kit Parts List _ 12104
ITEM Description QTY
1 Channel 4
3
4
2 Threaded 3/8 rod, SS, 12in long 4
3 Tube, 7in x 0.7in dia, steel 4
4 Washer, flat, 3/8 SS 16
5 Washer, split, 3/8 SS 12
6 Nut, 3/8 SS 12
4
5
6
BOOM ARM ASSEMBLY
SSPA
NACOM
4
5
6
ANACOM INC.
150 Knowles Dr. Los
Title
ASSEMBLY DRAWING, SINGLE MOUNTING KIT
Document
Size
B
3 FEB 2003
Date
31626
Sheet 1 of
Rev
1
1
4
5
6
4
5
6
1
4
4
5
6
ANACOM INC.
150 Knowles Dr. Los Gatos, CA
Title
ASSEMBLY DRAWING, SINGLE MOUNTING KIT
Document Number
Size
B
Date: Sheet 2 of 2
3 FEB 2003
31626
Rev
1
Figure 3a - Front and Side Views of Boom Mounted SSPA
ANACOM AnaSat
®
SSPA 11
Page 12

3133501
ANACOM AnaSat
Figure 3b – Single Mount for a Kingpost
®
SSPA 12
Page 13

3133501
ANACOM AnaSat
Figure 3c – 1+1 Mount for a Kingpost
®
SSPA 13
Page 14

3133501
Cable and Waveguide Connections
Cabling Requirements
Local regulations may require that cables in occupied buildings be installed in steel conduit. Local
government agencies may waive this requirement for the use of Plenum cables, which are standard
cables entirely encased in solid Teflon. Check the codes in your area.
NOTE: E
COVERED BY YOUR WARRANTY
QUIPMENT OUTAGES DUE TO FAULTY CABLE MATERIALS OR INSTALLATION ARE NOT
.
AC Power
Attach the AC input cable to the 4-pin connector on the SSPA, shown in Figure 4. Run the AC
cable to the power source but do not attach. The supplied power cable has a four-pin weathertight circular connector attached to one end. The other end is terminated with flying leads. Attach
the proper AC power connector for your location to the other end of this cable as shown in Figure
5 below.
Color code:
Brown..................AC Hot power lead
Blue......................AC Neutral power lead
Green/Yellow......Ground
ANACOM AnaSat
Figure 4 - AC Power Connection
®
SSPA 14
Page 15

3133501
Figure 5 - Diagram of AC power cable
Transmitter Feed
If using an SSPA with an N-type connector output, connect a section of coax between the OMT
transmit port and the SSPA’s transmit port.
If using a SSPA with a waveguide flange output port, connect a section of waveguide between the
OMT transmit port and the SSPA’s transmit output, TX OUT. A waveguide should be attached to the
antenna feed per manufacturer’s instructions. Ensure a gasket is fitted at each flange and that the
connections are weather-tight.
Driver Feed
Attach a coaxial cable with male N-connectors between the SSPA’s TX RF input and the 0
dBm driver’s RF OUTPUT. Make sure that the connections are weather-tight.
ANACOM AnaSat
®
SSPA 15
Page 16

3133501
Final Check
Recheck all bolts and cabling.
After all other connections have been made (TX RF input, TX RF output, and grounding), connect
the AC power cord to an active outlet.
Water Resistance Wrap
The application of moisture-resistant wrap (mastic tape) to all connectors is recommended to
prevent water entry and resultant water damage. See Figure 6. Apply the mastic tape as follows:
1. Ensure that all connectors are tight.
2. Pre-cut the mastic tape to the desired size and remove the protective wax liner from the tape.
3. Center the tape on the connector to be sealed and wrap the tape tightly around the connector.
Squeeze the tape tightly and ensure that both ends of the tape have formed around the connector
and the cable.
4. Apply the mastic tape to all connectors that may be exposed to moisture.
Figure 6 - Mastic Tape Application
ANACOM AnaSat
®
SSPA 16
Page 17

3133501
A
D
Operation
After the AnaSat® hardware is mounted and verified, the antenna must be aimed toward the
desired satellite. Follow the antenna/mount manufacturer’s instructions, using coordinates provided by
the satellite operator. Do not transmit until you have received authorization from the satellite network
operation center, and a transmit power level from its engineering staff.
naSat SSPA will produce RF output power the moment a modulator/driver is
!
Frequency Programming
Transmit operating frequency is set by the up-converter that is driving the SSPA as the SSPA is
amplifies an input signal and does not alter the frequency of the signal passing through. Please see the
instructions for the driver equipment for setting the frequency of operation.
connected and provides input.
Antenna Adjustment
o not transmit while adjusting the antenna position.
!
Follow the antenna manufacturer’s instructions for antenna position adjustment. For final alignment,
contact the satellite operator and get the correct polarization, azimuth, and elevation of the satellite and
also confirm the desired transponder is operational.
Transmit Power Adjustment
Maintaining proper output power is vital for maximizing signal-to-noise ratios over the radio path.
Low power levels produce noisy signals; excessive power robs downlink strength from other stations
sharing the transponder.
Adjust the modulator/driver output level to attain the desired output power level. Use a calibrated watt
meter on the output of the SSPA for this task.
When transmitting multiple carriers, run the output power with an output level back-off sufficient
to meet the spectral density mask requirements.
Caution: It is recommended that the SSPA not be driven into saturation for long periods of time.
ANACOM AnaSat
®
SSPA 17
Page 18

F
F
F
Maintenance
AnaSat® SSPAs are designed for a minimum of maintenance. Periodic scheduled maintenance is
not required. Replacement of the weatherized fan after 7 years is recommended however.
Fan Replacement
3133501
!
Some units come with a weatherized fan and ducted fan shroud assembly that is attached to the
PA heatsink, and is outside the SSPA enclosure. It is fairly easy to remove the shroud from the heatsink
in order to replace the fan.
heatsink, the old fan can be unplugged from the block up-converter heatsink and then removed from the
shroud. A replacement fan available from AnaCom, Inc., can then be mounted on the shroud and it’s
connector plugged into the receptacle on the heatsink. The shroud can then be re-attached to the
heatsink using the original screws.
igure 7 - Fan shroud removed from SSPA
The fan comes with a cable and three-prong connector. After the housing has been removed the
The ducted fan shroud should NEVER be removed from the ODU while AC power is
connected to the SSPA. Disconnect AC power before replacing fan.
igure 8 - Underside of fan shroud
ANACOM AnaSat
®
SSPA 18
igure 9 - Integrated fan and cable assembly
Page 19

3133501
Alarm Relay Closure
A mechanical relay is used in the AnaSat® SSPA for alarm indication. The red LED mounted on
the SSPA is illuminated whenever a problem exists and the relay has closed.
The alarm relay has normally closed contacts, so it defaults to the alarm state when power is off.
The alarm relay is accessible through the 18-pin connector mounted on the SSPA chassis. See Figure 10
for a diagram of the pins in this connector.
Monitored Values
The following analog inputs are monitored and can result in Alarm closure if out of range:
PA temperature
-5V DC supply (used as a bias voltage in the power amp stages)
+5V DC supply
PA Stage voltages
Main +13V DC supply
The following digital inputs are monitored:
Cooling fan failure
Data Terminal Connection
Using a serial cable with a connector on one end that matches y our terminal equipment (either a
“dumb” terminal or a computer running terminal emulator or modem software), connect the 6-pin or
18-pin weathertight circular connector to the other end, following figure 10 below.
Terminal Display
The ASCII terminal display gives an accounting of SSPA alarms and status, example:
100W EC-Band SSPA REV:04 S/N:012345
TXREQ on | TX ON AIR
ALARM:CLEAR
TXG 50.0 TXout 47
TXpk 48
TEMP: 13C FANERR:clear P12V:13.4 P11V:PA12 P5V: 5.0 N5V:-5.4
PA 1: 0.0 PA 2: 0.0 PA 3: 0.0 PA 4: 0.0 PA 5: 0.0 PA 6:13.0
• The top line shows the SSPA model and serial number.
• The second line gives the only changeable operating parameter: ON or OFF. This can be
set using the TX command: example TX ON, TX OFF.
ANACOM AnaSat
®
SSPA 19
Page 20

“ON” indicates the SSPA will transmit when all alarms are cleared. This is the normal
setting.
“OFF” indicates the SSPA will not turn on even if all alarms are clear.
This can be saved across a reboot using the SAVE command.
• SSPA status is either “TX ON AIR” or TX OFF AIR”.
• The third line gives a summary alarm indication. If there are no alarms, then “CLEAR”
will be indicated.
• The fourth line and fifth lines give the gain value, the TX output level, and the peak
output level seen in the last 10 seconds. TX Gain is given in dB.
• The sixth line shows the internal temperature in degrees Celcius, alarm status of the
cooling fan, and internal power supply voltages such as +12VDC, +5VDC, -5VDC.
• The remaining data gives the voltages for individual stages of the SSPA power amplifier.
3133501
RS232 Serial Port Weather-tight Connector
Cable End View
The Cable End View refers to looking into the end of the connecting cable; the Cable Wire View
refers to looking into the connector on the SSPA.
Pin Signal Description
4 RXD Receive Data (RS232)
5 TXD Transmit Data (RS232)
6 GND Ground
Note dimple next to Pin 1
Figure 10 – RS232 6 pin weather-tight connector
ANACOM AnaSat
®
SSPA 20
Page 21

3133501
F
18-Pin Circular Weathertight Connector
An 18-pin circular connector is used for monitoring the alarm C-Form relay. Only some of the
pins are used, but the same connector is used to maintain consistency with the protection switch used in
the AnaSat® product line.
10
9
17
16
8
7
1
11
12
2
13
18
14
15
6
3
4
5
Cable Wire View
Pin Signal Description
4 NO Alarm Normally Open
5 NC Alarm Normally Closed
6 C Alarm Common
7 P13V +13V CD Power (powers protection switch)
8 TX+ Differential Transmit Data (RS485)
9 TX- Differential Transmit Data (RS485)
10 RX+ Differential Transmit Data (RS485)
11 RX- Differential Transmit Data (RS485)
12 RS485 Grounded for RS485 operation
13 TXMUTE Grounded to mute transmit function
16 RXD Receive Data (RS232)
17 TXD Transmit Data (RS232)
18 GND Ground
Note dimple next to Pin 1
igure 11 - 18 pin weather-tight connector
The Cable End View refers to looking into the end of the connecting cable; the Cable Wire View
refers to looking into the connector on the SSPA.
1
13
14
12
11
10
17
18
6
15
9
16
8
7
2
3
4
5
RS485/RS232 Selection
Pin 12 on the 18-pin weathertight circular connector is the RS485/RS232 mode select jumper pin.
Connect pin 12 to ground (pin 18) for RS485 operation. Leave open for RS232 operation. This has no
effect on the other serial port (if installed.)
ANACOM AnaSat
®
SSPA 21
Page 22

3133501
Emissions and Immunity Regulation Conformance
AnaCom SSPA products conform to the following CE standards listed below:
Standards Met:
Emissions Regulations
1. Power Line Conducted Emissions per EN55022: 2003 Class A
2. Open Field Radiated Emissions per EN55022: 2003 Class A
3. EN 61000-3-2: 2001, Limits for harmonic current emissions
4. EN 61000-3-3: 2002, Limits for voltage fluctuations and flicker
Immunity Regulations
5. EN 61000-4-2: 2003, Electrostatic discharge immunity test.
6. EN 61000-4-3: 2004, Radiated, radio-frequency, electromagnetic field immunity test.
7. EN 61000-4-4: 2004, Electrical fast transient/burst immunity test.
8. EN 61000-4-5: 2004, Surge immunity test.
9. EN 61000-4-6: 2004, Immunity to conducted disturbances, induced by radio-frequency fields
10. EN 61000-4-11: 2004 Power line dips and brownouts
ANACOM AnaSat
®
SSPA 22
Page 23

3133501
LIMITED WARRANTY
If this product should fail due to defects in materials or workmanship, AnaCom, Inc., will, at its
sole option, repair or replace it with new or rebuilt parts free of charge for a period of two (2) years
from the date of shipment from the AnaCom factory. This warranty covers only failures due to defects
in materials and workmanship that occurs during the period of the warranty. It does not cover damage
that occurs during shipment, failure caused by operation of the product outside the published electrical
or environmental specifications, or malfunctions caused by misuse of the product. Expendable
components are not covered under this warranty.
In order for the customer to exercise their rights to repairs under the warranty, the customer must
first contact AnaCom to obtain a repair authorization number (RMA). If it is necessary to return the
product for repair, the customer is responsible for paying the cost of shipping it to AnaCom. AnaCom
will pay the cost of shipping the product back to the customer when the repairs are completed. All
import duties, customs fees, taxes of any kind, or any related fees are the sole responsibility of the
customer.
Spare parts, repairs, or replacements are warranted to be free from defects in material or
workmanship for ninety (90) days or the remainder of the limited warranty period, whichever is longer.
There are no express or implied warranties except as listed above. In no event shall AnaCom be
liable for special, incidental, or consequential damages arising from the use of this product, or arising
out of any breach of this warranty. All express and implied warranties, including the warranties of
merchantability and fitness for a particular purpose, are limited to the applicable warranty period set
forth above. No employee or representative of AnaCom is authorized to modify this warranty or
AnaCom’s standard warranty for any product.
Non-warranty repair service is available from AnaCom for a nominal charge. Non-warranty
repair service can be obtained by contacting AnaCom and requesting a return authorization number
(RMA), as described above. The customer is responsible for paying the cost of the shipping to and
from AnaCom for any non-warranty repairs. Non-warranty repair service will be available for any
AnaCom product for a minimum of five years from the date of its first shipment from AnaCom’s
factory.
ANACOM AnaSat
®
SSPA 23
 Loading...