

Page 1

Mobile Address Book (Version 2.0US)
User's Guide
Trademarks
Microsoft, Windows, and Windows NT are either registered trademarks or trademarks of
Microsoft Corporation in the United States and/or other countries.
All other product and company names mentioned herein may be the trademarks of their
respective owners.
l The contents of this document are subject to change without notice.
l In no event shall CASIO COMPUTER CO., LTD. be liable to anyone for special, collateral,
incidental, or consequential damages in connection with or arising out of the purchase or use
of these materials. Moreover, CASIO COMPUTER CO., LTD. shall not be liable for any claim
of any kind whatsoever against the use of these materials by any other party.
l This manual and the software it describes are owned by CASIO COMPUTER CO., LTD. The
structure, organization, and code of the software are the valuable trade secrets of CASIO.
l The operations described in this manual assume that you are already familiar with the basic
operation of Windows CE. See the documentation that comes with Windows CE for full
details on its operation.
l Sample displays shown in this manual may differ somewhat from the displays actually
produced by the product.
Copyright Notice
No part of this publication may be reproduced, transmitted, transcribed, stored in a retrieval
system, or translated into any human or computer language, in any form or by any means,
without the express written permission of CASIO COMPUTER CO., LTD.
Copyright 2000 CASIO COMPUTER CO., LTD. All rights reserved.
Mobile Address Book (Version 2.0US) User's Guide -Page 1 -
Page 2

Contents
Introduction ....................................................................................3
Features..................................................................................................................3
Starting Up Mobile Address Book......................................................................4
Inputting Data with Mobile Address Book.......................................5
Inputting New Data................................................................................................5
To input new data using Mobile Address Book.......................................................5
Editing Data with Mobile Address Book............................................................7
To edit a Contacts database record with Mobile Address Book.................................7
To delete a Contacts database record with the Mobile Address Book.......................8
To cut a record.....................................................................................................8
To copy a record...................................................................................................8
To paste a record from the clipboard......................................................................9
Mobile Address Book Screens .....................................................10
Company List Screen.........................................................................................10
Name List Screen................................................................................................11
Changing the Content of the Name List...............................................................12
Business Card Screen.......................................................................................13
Personal Screen..................................................................................................15
All Data Screen....................................................................................................16
About the Memo Screen....................................................................................17
Searching for Data..............................................................................................18
To search for text................................................................................................18
Command Bar Items (Menus and Buttons) ...................................20
Tools Menu...........................................................................................................20
Edit Menu..............................................................................................................20
Buttons...................................................................................................................20
Mobile Address Book (Version 2.0US) User's Guide -Page 2 -
Page 3
Introduction
Mobile Address Book is an application that gives you a digital address book on your
Pocket PC. Though it is similar to and uses the same data as your Pocket PC's built-in
Contacts application, it provides you with additional functions and more display
versatility than Contacts alone.
Features
Input and editing of Contacts data
l
Data Input Screens
Data layouts that are more practical and easier to use
l
->
Contacts Mobile Address Book
(Business Card Screen)
Mobile Address Book (Version 2.0US) User's Guide -Page 3 -
Page 4
Business Card Screen for Contacts Business data, and Personal Screen for
l
Contacts Personal data, plus an All Data screen that shows all the data stored in a
specific record.
Personal Screen All Data Screen
View attached memo text with the tap of a button.
l
Powerful search functions
l
Starting Up Mobile Address Book
Turn on your Pocket PC.
1.
Tap - Programs - Mobile Address Book.
2.
The Company List screen appears first.
l
Company List Screen
Mobile Address Book (Version 2.0US) User's Guide -Page 4 -
Page 5

Inputting Data with Mobile Address Book
This section describes how to use Mobile Address Book to input new data into the
Contacts database and how to edit existing records.
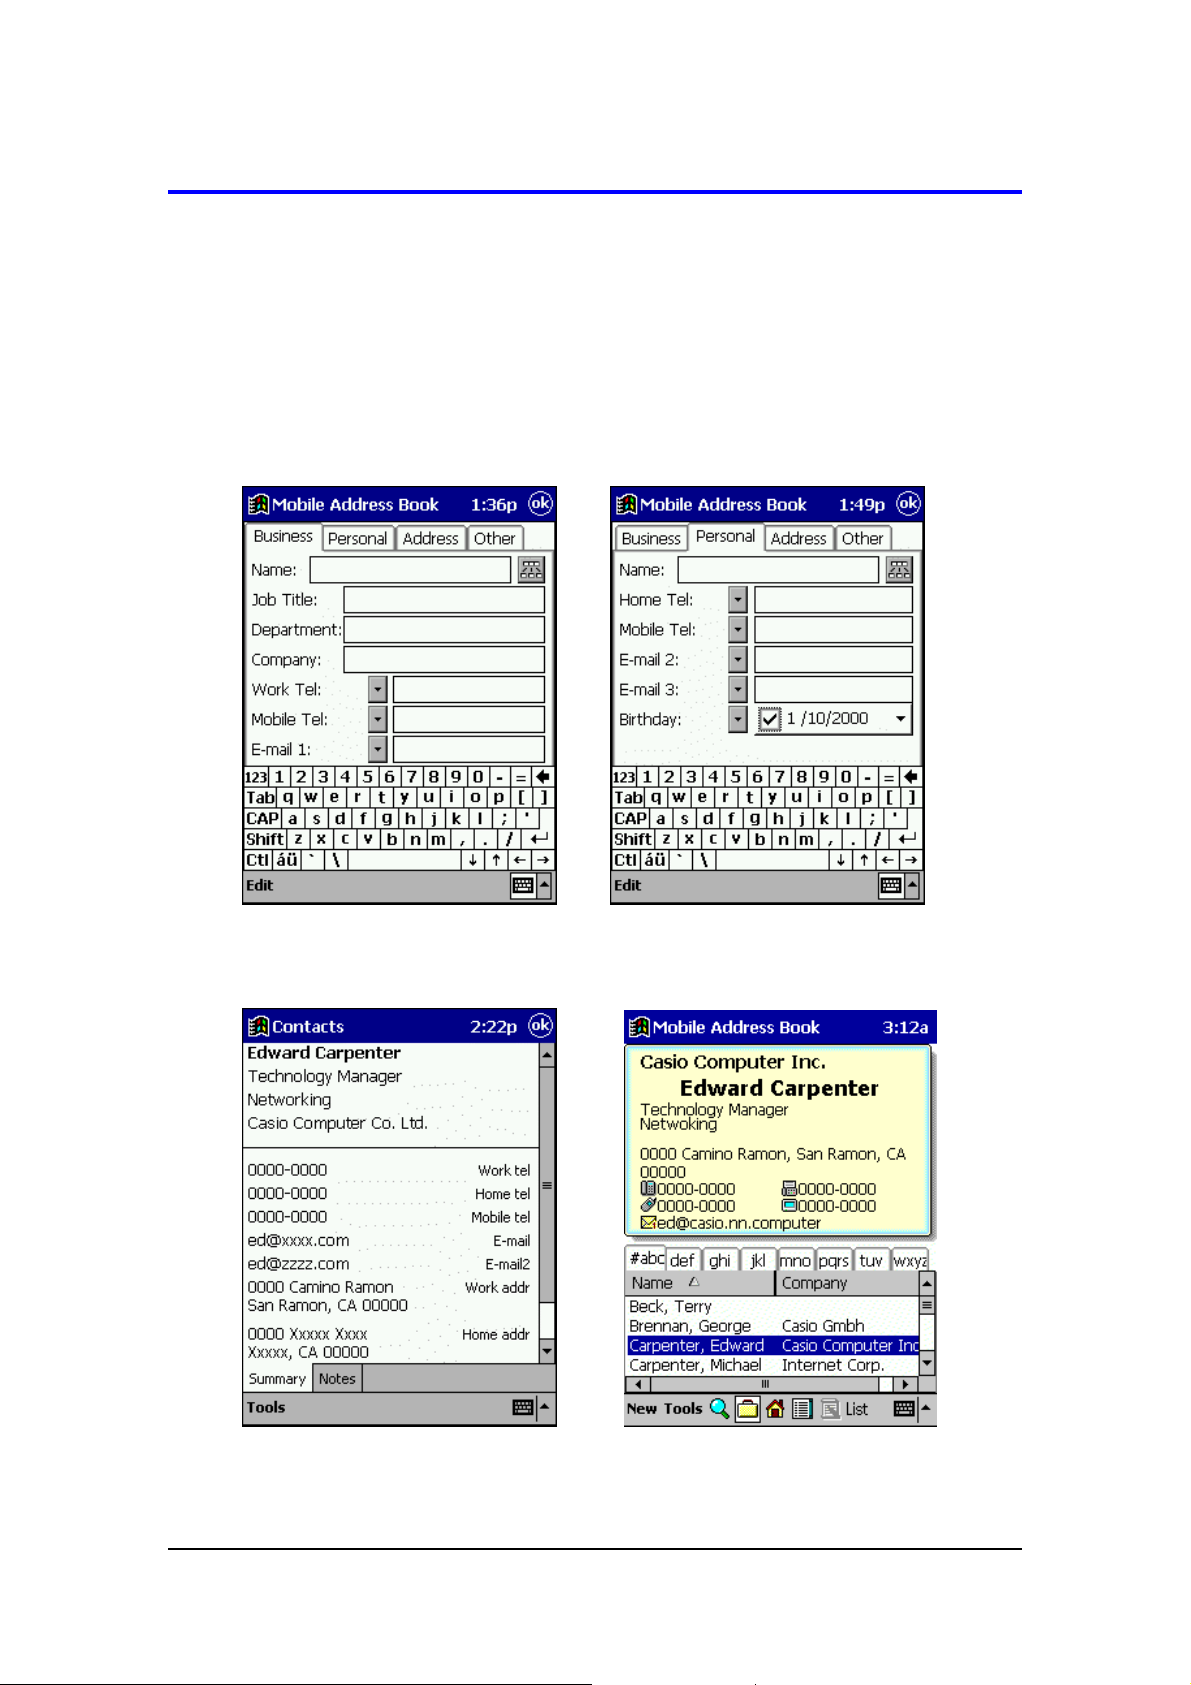
Inputting New Data
Mobile Address Book input using four tabs, named Business, Personal, Address, and
Other.
To input new data using Mobile Address Book
Start up Mobile Address Book.
1.
Tap New to display the Business tab of Mobile Address Book input screen.
2.
Input data into the boxes on the Business tab.
3.
In the Name box, input the first
name, middle name, and last name,
separating each with a space.
Tapping the button to the
right of this box displays a Confirm
Name dialog box, which you can
also use for name input.
Tapping the button next to a
box displays a list of input items.
Tap an item in the list to input it into
the box.
Tap the Personal tab and then input data into the boxes on the tab.
4.
The Name box contains the name data you input on the Business tab.
l
If a box has a button next to it, you can tap the button to display a list of
l
input items. Tap an item in the list to input it into the box.
The following describes how to input dates in the Birthday/Anniversary box.
l
Mobile Address Book (Version 2.0US) User's Guide -Page 5 -
Page 6
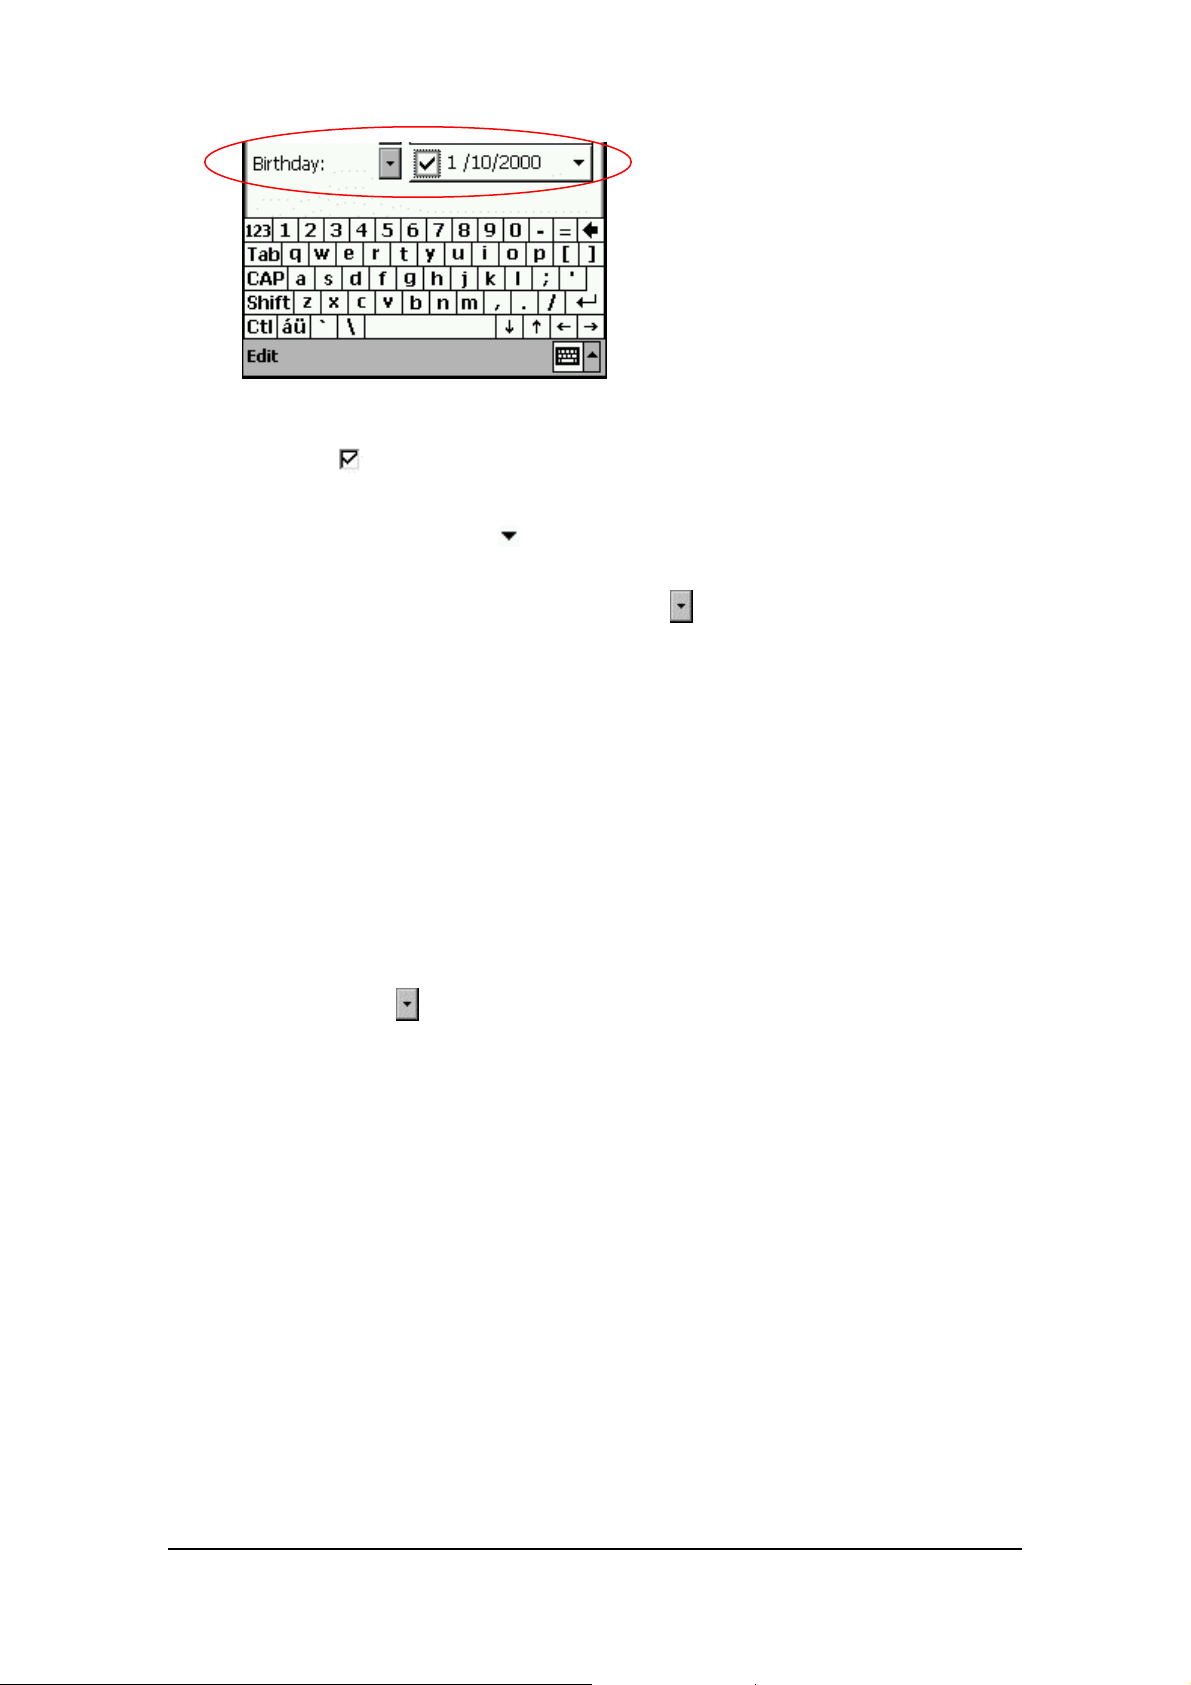
(1) To input a birth date, tap the check box in the Birthday box so it looks like
this: . This means that date input is enabled.
(2) Tap the year, month, or day digits, and then input a value using the
keyboard, or tap the button to the right of the box to display a calendar
that you can use to select a date.
(3) To input an anniversary date, tap the button to the left of the box, and
then tap Anniversary on the list of options that appears.
(4) Use the same procedure as described in step (2) to input an anniversary
date.
Tap the Address tab and then input data into the boxes on the tab.
5.
You can input up to three addresses: Work, Home, and Other. Tap the radio
l
button next to the type of address you want to input and then input the data you
want.
Tap the Other tab and then input data into the boxes on the tab.
6.
If a box has a button next to it, you can tap the button to display a list of
l
input items. Tap an item in the list to input it into the box.
If you want to add notes to a record while you are inputting it, tap the Tap here
l
to add notes box. This displays a memo input dialog box, which you can use
to input a text memo or voice memo.
Tapping the Categories button displays a list of categories. Check the
l
checkbox next to the category to which you want to assign the record.
After everything is the way you want, tap OK to save the record and close the
7.
Mobile Address input screen.
Mobile Address Book (Version 2.0US) User's Guide -Page 6 -
Page 7

Editing Data with Mobile Address Book
This section describes how to use Mobile Address Book to edit and delete existing
Contacts database records. It also explains how to cut, copy, and paste existing data.
To edit a Contacts database record with Mobile Address Book
Display the Business Card screen, Personal screen, or All Data screen.
1.
Data List
In the data list, tap the record you want to edit.
2.
This displays the Business tab of Mobile Address Book input screen.
You can also display the Business tab of Mobile Address Book input screen by
l
tapping the record you want to edit on the data list located at the bottom of the
window.
Use the same procedures as those described under "To input new data using
3.
Mobile Address Book" to edit the data.
After everything is the way you want, tap OK to save the record and close the
4.
Mobile Address input screen.
Mobile Address Book (Version 2.0US) User's Guide -Page 7 -
Page 8

To delete a Contacts database record with the Mobile Address
Book
Display the Business Card screen, Personal screen, or All Data screen.
1.
In the data list, tap and hold the record you want to delete, and then tap Delete in
2.
the shortcut menu that appears.
This displays a confirmation message asking whether you really want to delete
l
the record.
Tap OK to delete the record or Cancel to cancel the delete operation without
3.
deleting anything.
To cut a record
Display the Business Card screen, Personal screen, or All Data screen.
1.
In the data list, tap and hold the record you want to cut, and then tap Cut in the
2.
shortcut menu that appears.
This cuts the record and places it onto the clipboard. The record remains on the
l
clipboard until you perform the next cut or copy operation.
The record on the clipboard can be pasted to another location. See "To paste a
l
record from the clipboard" below for more information.
To copy a record
Display the Business Card screen, Personal screen, or All Data screen.
1.
In the data list, tap and hold the record you want to copy, and then tap Copy in the
2.
shortcut menu that appears.
This places a copy of the record onto the clipboard. The recordremains on the
l
clipboard until you perform the next cut or copy operation.
The record on the clipboard can be pasted to another location. See "To paste a
l
record from the clipboard" below for more information.
Mobile Address Book (Version 2.0US) User's Guide -Page 8 -
Page 9

To paste a record from the clipboard
Display the Business Card screen, Personal screen or All Data screen.
1.
Anywhere in the data list, tap and hold, and then tap Paste in the shortcut menu
2.
that appears.
This pastes the record currently on the clipboard into the screen that is on the
l
display.
You can place a record onto the clipboard using the cut and copy operations
l
described above.
After pasting a record you can use the procedures under "Editing Data with
l
Mobile Address Book" to edit it.
Mobile Address Book (Version 2.0US) User's Guide -Page 9 -
Page 10

Mobile Address Book Screens
There are five different screens that you can use to view Mobile Address Book data: a
Company List screen, Name List screen, Business Card Screen, Personal screen, and
All Data screen. This section describes each screen and explains the operations you
can perform for each one.
Company List Screen
The Company List screen always appears first whenever you start up Mobile Address
Book. It lists all of the company names currently in the Contacts database.
Index tabs
Company name list
The currently selected company
name is the one that is highlighted.
The following are the operations that can be performed while the Company List screen
is on the display.
Tapping an index tab displays all the company names that start with the letters
l
marked on the tab.
Tapping the name of a company in the list highlights the name to indicate that it is
l
selected. You can also move the highlighting up and down with the ACTION control.
Use (Business Card Screen), (Personal Screen), and (All Data
l
Screen) buttons to select the type of screen you want to appear when you tap a
company name in the Company List. Pressing a button selects the corresponding
screen (indicated by the button image appeared to be depressed on the display),
but does not change the appearance of the Company List.
Mobile Address Book (Version 2.0US) User's Guide -Page 10 -
Page 11

Tapping a company name in the Company List displays the corresponding
l
Business Card Screen, Personal Screen, or All Data Screen. The type of screen
that appears depends on whether the , , or button is currently
depressed.
The Business Card Screen, Personal Screen, or All Data Screen that appears when
l
you tap a company name contains data only for the company whose name you
tapped. Tapping "CASIO," for example displays data about CASIO employees
only.
Tapping launches the search function. See page 18 for more information.
l
Tapping New displays a new record input screen. See page 5 for more information.
l
Tapping the Name List button changes to the Name List screen.
l
Records that do not contain a company name entry are indicated by No Company
l
in the Company List.
Name List Screen
The Name List shows the all of the names and home phone numbers in the Contacts
database.
Index tabs
Field names
Record data
The currently selected record is the
one that is highlighted.
The following are the operations that can be performed while the Name List screen is on
the display.
Tapping an index tab displays data for all the names that start with the letters
l
marked on the tab.
Mobile Address Book (Version 2.0US) User's Guide -Page 11 -
Page 12

Tapping a field name toggles the sorting of the data under it between ascending
l
and descending. The symbol ( ) appears next to the field name when data is
sorted ascending, while ( ) appears to indicate descending.
Tapping data in the list highlights the data to indicate that it is selected. You can
l
also move the highlighting up and down with the ACTION control.
Use (Business Card Screen), (Personal Screen), and (All Data
l
Screen) buttons to select the type of screen you want to appear when you tap
data in the Name List. Pressing a button selects the corresponding screen
(indicated by the button image appeared to be depressed on the display), but
does not change the appearance of the Name List.
Tapping data in the Name List displays detailed data. The type of data that
l
appears depends on whether the , , or button is depressed.
Tapping launches the search function. See page 18 for more information.
l
Tapping New displays a new record input screen. See page 5 for more
l
information.
Tapping the Company List button changes to the Company List screen.
l
Records that do not contain a name entry are indicated by No Name in the Name
l
List.
Changing the Content of the Name List
The field on the left of the Name List is always Name. Initially, the field on the right is
[Home Tel], but you can use the following procedure to change to another field, if you
want.
Display the Name List screen.
1.
Tap and hold any one of the entries in the field on the right of the Name List. This
2.
opens a shortcut menu of available field names.
Tap the field name to which you want to change.
3.
Note
You cannot select the [Name] field for the field on the right side of the Name List.
Mobile Address Book (Version 2.0US) User's Guide -Page 12 -
Page 13

Business Card Screen
The Business Card screen shows the data fields in the Contacts database that belong
to the Business category.
The following shows the fields that appear on the Business Card screen.
Upper Window
Company name, name, Job title,
Department
Business address
Business postal code
Business phone
Business fax
Mobile phone
Pager
E-mail 1
(1)
(2)
Lower Window
(1) Index tabs
(2) Field names
(3) Data list (The currently selected
record is highlighted.)
Note
The data list shows personal names and company names.
l
If there is no data entered for a particular field in a record, that field is blank in the
l
upper window and in the data list.
The following are the operations that can be performed while the Business Card screen
is on the display.
Lower Window
Tapping data in the list highlights the data to indicate that it is selected. You can also
l
move the highlighting up and down with the ACTION control.
(3)
Tapping a field name ("Name" or "Company") toggles the sorting of the data under it
l
between ascending and descending. The symbol ( ) appears next to the field
name when data is sorted ascending, while ( ) appears to indicate descending.
Mobile Address Book (Version 2.0US) User's Guide -Page 13 -
Page 14

Moving the cursor in the data list to the Company field and tapping an index tab
l
displays all the Company data items that start with the letters marked on the tab.
When the data list cursor is in the Name field, tapping an index tab displays all the
Name data items that start with the letters marked on the tab.
You can change the relative width of the data fields by dragging the vertical
l
separator line between the field names.
Toolbar Buttons and Menu Commands
Tapping the button switches to the Personal screen. See page 15 for more
l
information.
Tapping the button displays the All Data screen. See page 16 for more
l
information.
Tapping the List button displays the last list (Company List or Name List) you
l
were viewing. See page 10 and 11 for more information about lists.
Tapping the button displays memo text attached to the currently displayed
l
record. Note that the button is disabled (indicated when the button is dimmed)
when there is no attached memo text. See page 17 for more information.
Tapping launches the search function. See page 18 for more information.
l
Tapping New displays a new record input screen. See page 5 for more information.
l
Mobile Address Book (Version 2.0US) User's Guide -Page 14 -
Page 15

Personal Screen
The Personal screen shows the data fields in the Contacts database that belong to the
Personal category.
The following shows the fields that appear on the Personal screen.
Upper Window
Name, Home address, home postal
code
Home phone
Mobile phone
Pager
E-mail 2
E-mail 3
Date of birth
Anniversary
(1)
(2)
Lower Window
(1) Index tabs
(2) Field names
(3) Data list (The currently selected
record is highlighted.)
Note
If there is no data entered for a particular field in a record, that field is blank in the
l
upper window and in the data list.
Personal screen operations are the same as Business Card screen operations (page
13), except for the following.
Tapping the button changes to the Business Card screen.
l
(3)
Mobile Address Book (Version 2.0US) User's Guide -Page 15 -
Page 16

All Data Screen
As its name suggests, the All Data screen shows all of the data stored in each Contacts
database record.
The operations you can perform for the data list in the lower window are the same
l
as those for the Business Card Screen as described on page 13.
Tapping the button displays the Business Card screen.
l
All other button and menu operations on the All Data screen are identical to those for
l
the Business Card screen as described on page 13.
Mobile Address Book (Version 2.0US) User's Guide -Page 16 -
Page 17

About the Memo Screen
Tapping the button when a memo is attached to Contacts data causes the memo
to appear on the display.
The following are the operations you can perform on the memo screen.
Select a screen zoom factor of 75%, 100%, 150%, 200%, or 300% from the Tools
l
menu.
Use the scroll bar to scroll the memo screen up and down.
l
To close the memo screen, tap OK.
Important!
When you tap the button and display a memo, various drawing tools also appear
on the display. You can use these tools to edit the memo on the screen, but you cannot
save your changes. To edit a memo and save your changes, use the procedure under
"Editing Data with Mobile Address Book" on page 7.
Mobile Address Book (Version 2.0US) User's Guide -Page 17 -
Page 18

Searching for Data
Use the procedure below to search for Contacts database records that match a string of
text you specify.
The search function checks all fields for the text you specify.
l
You can also input a date for the search text (such as 98/03/25) and find a specific
l
birth date, anniversary, or other date.
To search for text
On the Business Card screen, Personal screen, or All Data screen, Business Card
1.
Screen, tap the button to display the Find dialog box.
Input the text you want to find.
2.
Tapping displays a list of the last 10 text strings you recently searched for.
l
You can tap a text string in the list to input it again.
Tap the Find button to start the search.
3.
Mobile Address Book (Version 2.0US) User's Guide -Page 18 -
Page 19

This tab title
indicates that the
data list is the
result of a search.
Exit clear the search operation and return the screen to normal, tap .
4.
Note
The operations you can perform for the list of matching records in the bottom window
l
are identical to those for the lower windows of other screens. Note, however, that
the search results screen does not have index tabs.
You can change to the Business Card, Personal, or All Data screen while search
l
results are on the display. You can also display the memo screen.
Records that
contain text
matching the text
string you specify
are listed here.
The message "No matches were found for the text you specified." appears when
l
there are no matches your text string.
Mobile Address Book (Version 2.0US) User's Guide -Page 19 -
Page 20

Command Bar Items (Menus and Buttons)
Tools Menu
Command Description
Edit Item Displays the data editing screen for the record selected on the Business
Card, Personal, or All Data screen.
Delete Deletes the record selected on the Business Card, Personal, or All Data
screen.
Cut Cuts the record selected on the Business Card, Personal, or All Data
screen.
Copy Copies the record selected on the Business Card, Personal, or All Data
screen.
Paste Pastes cut or copied data.
About Displays version and copyright information.
Edit Menu
Command Description
Undo Undoes one operation.
Redo Redoes an undone operation.
Cut Cuts the currently selected text.
Copy Copies the currently selected text.
Paste Pastes cut or copied text at the current cursor location.
Clear Clears the currently selected text.
Select All Selects all the text in the field where the cursor is currently located.
Note
The Edit menu appears only when the data input or data editing screen is on the display.
Buttons
New............Displays a new data input screen.
............Displays the Business Card screen.
............Displays the Personal screen.
............Displays the All Data screen.
............Displays the memo screen.
............Displays the Find dialog box.
............Exits a search operation.
List.............Displays the Name List.
Mobile Address Book (Version 2.0US) User's Guide -Page 20 -
 Loading...