

Page 1

DERMOCAMERA
User’s Guide
EN
Thank you for purchasing this CASIO product.
• Be sure to keep all user documentation handy for future reference.
IMPORTANT!
• Note that this product is not a diagnostic device. It should only be used for observing skin lesions.
• This product is intended for photographing mucous membrane and the surface of the skin over the entire body.
Photography of the mucous membra ne is limited to the oral cavity, the eyeball and the genital area only. No
restrictions apply to the age or gender of the patient being photographed.
• This product is a digital camera for dermal obser vations and consists of components such as an imaging element,
lens and LED for illumination.
• The distance between this product and the operator should be no greater than 40 cm (15.7").
Page 2

Operating Principle
Image data captured from the lens is converted to electrical signals by a CMOS
imaging element inside the camera and displayed as an image on the camera’s LCD
monitor.
The operator composes the image to be photographed while viewing the image
shown on the LCD monitor and takes the photograph by pressing the shutter button.
The image captured by the CMOS imaging element is converted to electrical signals
and the photographed image is saved onto a memory card.
The special lens built into the camera allows the subject to be photographed at a
distance, in the same way as a conventional digital camera, and also allows subjects
such as skin lesions to be photographed by placing the lens directly onto the skin.
Such close-up shots are taken using illumination from an LED light inside the lens.
Because the LED light used for illumination is fitted with a polarizing filter, the
operator can switch between polarized and non-polarized lighting.
Purpose and Effects
This camera can be used to photograph the skin in close-up or at a distance. Closeup shots of the skin are taken using illumination from an LED light inside the lens.
Shots taken at a distance can also be illuminated using the ring light around the
outside of the lens. This camera allows you to use the same camera to record both
enlarged images of a skin lesion and overall images of the area containing the lesion.
The LED light in this camera can be switched between polarized and non-polarized,
allowing you to photograph images of both the dermis and the epidermis with a single
press of the shutter button.
Checking the Accessories
When you open the package, check that it contains all the accessories listed below.
DERMOCAMERA
(Model DZ-D100)
Lens cap
(Model DLC-100M)
Lithium-ion battery
(Model DNP-100M)
Lens removal tool
(Model DLR-100M)
2
AC adapter for camera charging
(Model AD-M50300A)
Quick Start Guide
(with Warranty) and enclosed
documents
Page 3

Important Information
• The contents of this manual are subject to change without notice.
• The contents of this manual have been checked at each step of the production
process. Feel free to contact us if you notice anything that is questionable,
erroneous, etc.
• Any copying of the contents of this manual, either in part or its entirety, is forbidden.
Except for your own personal use, any other use of the contents of this manual
without the permission of CASIO COMPUTER CO., LTD. is forbidden under
copyright laws.
• CASIO COMPUTER CO., LTD. shall not be held liable for any damages or lost
profits suffered by you or any third party due to the use or malfunction of this
product.
• CASIO COMPUTER CO., LTD. shall not be held liable for any damages or lost
profits caused by loss of memory contents due to malfunction, repair, or any other
reason.
• Note that the example screens and product illustrations shown in this manual may
differ somewhat from the screens and configuration of the actual camera.
LCD Panel
The liquid crystal panel of the monitor screen uses high-precision technology that
provides a pixel yield in excess of 99.99%. This means that some very small number
of pixels may not light or may remain lit at all times. This is due to the characteristics
of the liquid crystal panel, and does not indicate malfunction.
Take test shots
Before shooting your final image, shoot a test shot to ensure that the camera is
recording correctly.
3
Page 4

Contents
Operating Principle. . . . . . . . . . . . . . . . . . . . . . . . . . . . . . . . . . . . . . . . . . . . . . . 2
Purpose and Effects . . . . . . . . . . . . . . . . . . . . . . . . . . . . . . . . . . . . . . . . . . . . . . 2
Checking the Accessories . . . . . . . . . . . . . . . . . . . . . . . . . . . . . . . . . . . . . . . . . 2
Important Information . . . . . . . . . . . . . . . . . . . . . . . . . . . . . . . . . . . . . . . . . . . . . 3
Component Names . . . . . . . . . . . . . . . . . . . . . . . . . . . . . . . . . . . . . . . . . . . . . . 7
LCD Monitor Display Details and Switching Procedure . . . . . . . . . . . . . . . . . . . 8
❚❙ Introduction (Basic Operation) 11
After unpacking the product, charge the battery . . . . . . . . . . . . . . . . . . . . . . . 11
❚
Inserting the battery . . . . . . . . . . . . . . . . . . . . . . . . . . . . . . . . . . . . . . . . . . . . . . . 11
❚
Charging . . . . . . . . . . . . . . . . . . . . . . . . . . . . . . . . . . . . . . . . . . . . . . . . . . . . . . . . 12
Preparing Memory Cards . . . . . . . . . . . . . . . . . . . . . . . . . . . . . . . . . . . . . . . . . 16
❚
Inserting a memory card . . . . . . . . . . . . . . . . . . . . . . . . . . . . . . . . . . . . . . . . . . . . 16
Switching the Camera On/Off. . . . . . . . . . . . . . . . . . . . . . . . . . . . . . . . . . . . . . 18
Using the Touch Panel . . . . . . . . . . . . . . . . . . . . . . . . . . . . . . . . . . . . . . . . . . . 19
Setting the Date & Time When You First Use the Camera . . . . . . . . . . . . . . . 20
Opening and Closing the LCD Monitor. . . . . . . . . . . . . . . . . . . . . . . . . . . . . . . 21
Holding the Camera Correctly . . . . . . . . . . . . . . . . . . . . . . . . . . . . . . . . . . . . . 22
Photography . . . . . . . . . . . . . . . . . . . . . . . . . . . . . . . . . . . . . . . . . . . . . . . . . . . 23
❚
Setting the photography mode . . . . . . . . . . . . . . . . . . . . . . . . . . . . . . . . . . . . . . . 23
❚
Photography . . . . . . . . . . . . . . . . . . . . . . . . . . . . . . . . . . . . . . . . . . . . . . . . . . . . . 24
Viewing Photographed Still Images and Videos. . . . . . . . . . . . . . . . . . . . . . . . 25
Deleting Photographed Still Images and Videos . . . . . . . . . . . . . . . . . . . . . . . 26
Notes on Taking Pictures . . . . . . . . . . . . . . . . . . . . . . . . . . . . . . . . . . . . . . . . . 29
❚❙ Photography 30
Setting Photography Modes and Shooting Still Images and Videos . . . . . . . . 30
❚
Photography in NORMAL mode . . . . . . . . . . . . . . . . . . . . . . . . . (NORMAL). . . 31
❚
Photography in DERMO CONT mode . . . . . . . . . . . . . . . . (DERMO CONT) . . . 31
❚
Photography in DERMO mode . . . . . . . . . . . . . . . . . . . . . . . . . . . (DERMO). . . 32
❚
Photography in DERMO AIF mode . . . . . . . . . . . . . . . . . . . . .(DERMO AIF). . . 32
❚
Shooting video in NORMAL mode . . . . . . . . . . . . . . . . . . (NORMAL (video)). . . 33
❚
Shooting video in DERMO mode . . . . . . . . . . . . . . . . . . . . (DERMO (video)). . . 34
❚
Photography in MICROSCOPE mode . . . . . . . . . . . . . . . . (MICROSCOPE) . . . 34
Viewing Images Immediately After Shooting . . . . . . . . . . . . . . . . . . . . . . . . . . 36
Adjusting the Brightness . . . . . . . . . . . . . . . . . . (Exposure Compensation) . . 36
Using the Zoom . . . . . . . . . . . . . . . . . . . . . . . . . . . . . . . . . . . . . . . . . . . . . . . . 37
4
Contents
Page 5

❚❙ Getting Better Images 38
Photography Settings . . . . . . . . . . . . . . . . . . . . . . . . . . . . . . . . . . . . . . . . . . . . 38
❚
Viewing Image Information . . . . . . . . . . . . . . . . . . . . . . . . . . . . . . . . . . . . . . . . . . 38
❚
Displaying the scale on the LCD monitor when shooting . . . . . . . . . . . . . . . . . . . 38
❚
Changing the light brightness for shots. . . . . . . . . . . . . . . . . . . . . . . . . . . . . . . . . 39
❚
Changing the filter for shots . . . . . . . . . . . . . . . . . . . . . . . . . . . . . . . . . . . . . . . . . 39
❚
Using the self-timer. . . . . . . . . . . . . . . . . . . . . . . . . . . . . . . . . . . . . . . . . . . . . . . . 39
❚
Shooting with the small-diameter adapter. . . . . . . . . . . . . . . . . . . . . . . . . . . . . . . 40
❚
Adjusting the color tones . . . . . . . . . . . . . . . . . . . . . . . . . . . (White Balance). . . 42
❚❙ Viewing Still Images and Videos 43
Viewing Photographed Still Images and Videos. . . . . . . . . . . . . . . . . . . . . . . . 43
Zooming in on images . . . . . . . . . . . . . . . . . . . . . . . . . . . . . . . . . . . . . . . . . . . 43
Viewing the image list . . . . . . . . . . . . . . . . . . . . . . . . . (thumbnail display) . . 43
❚❙ Other Playback Functions 44
Using various playback functions and settings. . . . . . . . . . . . . . . . . . . . . . . . . 44
❚
Displaying a scale on playback images . . . . . . . . . . . . . . . . . . . . . . . . . . . . . . . . 44
❚
Resetting the Doctor ID or Patient ID . . . . . . . . . . . . . . . . . . . . . . . . . . . . . . . . . . 45
❚
Setting the video playback volume . . . . . . . . . . . . . . . . . . . . . . . . . . . . . . . . . . . . 45
Viewing images on an external monitor . . . . . . . . . . . . . . . . . . . . . . . . . . . . . . 46
❚❙ Connecting the Camera to a Computer
(Wi-Fi connection) 47
Wi-Fi Mode . . . . . . . . . . . . . . . . . . . . . . . . . . . . . . . . . . . . . . . . . . . . . . . . . . . . 48
Setting Up the Wi-Fi Connection the First Time . . . . . . . . . . . . . . . . . . . . . . . . 49
❚
Transferring images to a computer . . . . . . . . . . . . . . . . . . . .(Auto Transfer) . . . 51
❚
Changing the password for Wi-Fi connection . . . . . . . . . . . . . . . . . . . . . . . . . . . . 52
❚❙ Using a Computer 53
Functions available on a computer. . . . . . . . . . . . . . . . . . . . . . . . . . . . . . . . . . 53
Using a Windows PC . . . . . . . . . . . . . . . . . . . . . . . . . . . . . . . . . . . . . . . . . . . . 53
❚
Saving and viewing images on a PC . . . . . . . . . . . . . . . . . . . . . . . . . . . . . . . . . . 53
Using a Macintosh Computer . . . . . . . . . . . . . . . . . . . . . . . . . . . . . . . . . . . . . . 57
❚
Saving and viewing images on a Macintosh computer. . . . . . . . . . . . . . . . . . . . . 57
Files and Folders . . . . . . . . . . . . . . . . . . . . . . . . . . . . . . . . . . . . . . . . . . . . . . . 59
Data in memory . . . . . . . . . . . . . . . . . . . . . . . . . . . . . . . . . . . . . . . . . . . . . . . . 60
5
Contents
Page 6

❚❙ Other Settings 61
Modifying other settings . . . . . . . . . . . . . . . . . . . . . . . . . . . . . . . . . . . . . . . . . . 61
❚
Configuring Wi-Fi . . . . . . . . . . . . . . . . . . . . . . . . . . . . . . . . . . . . . . . . . . . . . . . . . 61
❚
Changing the LCD monitor brightness . . . . . . . . . . . . . . . . . . . . . . . . . . . . . . . . . 61
❚
Configuring the camera sounds . . . . . . . . . . . . . . . . . . . . . . . . . . . . . . . . . . . . . . 62
❚
Resetting the camera date and time. . . . . . . . . . . . . . . . . . . . . . . . . . . . . . . . . . . 62
❚
Changing the date style . . . . . . . . . . . . . . . . . . . . . . . . . . . . . . . . . . . . . . . . . . . . 62
❚
Changing the display language. . . . . . . . . . . . . . . . . . . . . . . . . . . . . . . . . . . . . . . 62
❚
Adjusting the white balance . . . . . . . . . . . . . . . . . . . . . . . . . . . . . . . . . . . . . . . . . 62
❚
Setting the Doctor ID. . . . . . . . . . . . . . . . . . . . . . . . . . . . . . . . . . . . . . . . . . . . . . . 63
❚
Setting the Patient ID . . . . . . . . . . . . . . . . . . . . . . . . . . . . . . . . . . . . . . . . . . . . . . 63
❚
UV ON/OFF setting. . . . . . . . . . . . . . . . . . . . . . . . . . . . . . . . . . . . . . . . . . . . . . . . 63
❚
Trash setting . . . . . . . . . . . . . . . . . . . . . . . . . . . . . . . . . . . . . . . . . . . . . . . . . . . . . 63
❚
Setting the date labels for thumbnail display . . . . . . . . . . . . . . . . . . . . . . . . . . . . 63
❚
PIN setting . . . . . . . . . . . . . . . . . . . . . . . . . . . . . . . . . . . . . . . . . . . . . . . . . . . . . . 63
❚
Formatting memory. . . . . . . . . . . . . . . . . . . . . . . . . . . . . . . . . . . . . . . . . . . . . . . . 64
❚
Resetting the camera to the factory defaults . . . . . . . . . . . . . . . . . . . . . . . . . . . . 64
❚
Checking the camera’s firmware version . . . . . . . . . . . . . . . . . . . . . . . . . . . . . . . 64
❚❙ Appendix 65
Notes on Using the Camera . . . . . . . . . . . . . . . . . . . . . . . . . . . . . . . . . . . . . . . 65
Power Supply . . . . . . . . . . . . . . . . . . . . . . . . . . . . . . . . . . . . . . . . . . . . . . . . . . 73
❚
Charging . . . . . . . . . . . . . . . . . . . . . . . . . . . . . . . . . . . . . . . . . . . . . . . . . . . . . . . . 73
❚
Notes on the battery . . . . . . . . . . . . . . . . . . . . . . . . . . . . . . . . . . . . . . . . . . . . . . . 73
Memory Cards . . . . . . . . . . . . . . . . . . . . . . . . . . . . . . . . . . . . . . . . . . . . . . . . . 74
Resetting and reset content . . . . . . . . . . . . . . . . . . . . . . . . . . . . . . . . . . . . . . . 75
Trouble shooting. . . . . . . . . . . . . . . . . . . . . . . . . . . . . . . . . . . . . . . . . . . . . . . . 76
❚
Symptoms and solutions. . . . . . . . . . . . . . . . . . . . . . . . . . . . . . . . . . . . . . . . . . . . 76
❚
Messages displayed on the screen. . . . . . . . . . . . . . . . . . . . . . . . . . . . . . . . . . . . 80
No. of Remaining Still Image Shots/Remaining Shooting Time . . . . . . . . . . . . 81
Main Specifications/Optional Products. . . . . . . . . . . . . . . . . . . . . . . . . . . . . . . 82
6
Contents
Page 7
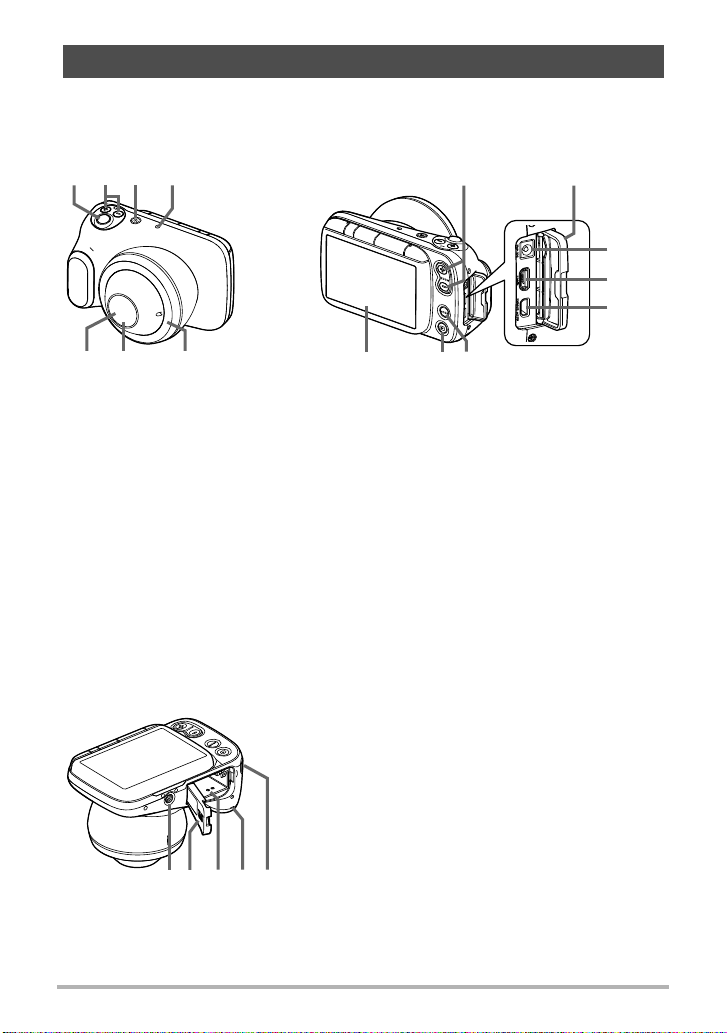
Component Names
(4(5(6
(1
(2
(3
Shutter button
EV button (exposure
compensation)
[p] (Power) button/
Operation check indicator
Microphone
LED light (lens surround)
Lens*
LED light (lens interior)
Front Rear
Zoom button (pages 24, 25, 37, 43)
Connector cover
[DC IN] jack
[USB] port (page 54)
[HDMI OUT] port
[MODE] button
[p] (Playback) button
(pages 18, 23, 25)
LCD monitor (pages 8, 10, 23)
(9 (8 (7(:)1
Strap mount
Speaker
Battery/Memory card slot (pages 11, 16)
Battery cover
Tripod mount
Use when mounting the camera on a tripod.
Numbers in parentheses ( ) indicate the main page on which the component is
described.
* Directly touches healthy skin or mucous membrane, and damaged skin or mucous
membrane. (Type B applied part)
Base
7
Page 8
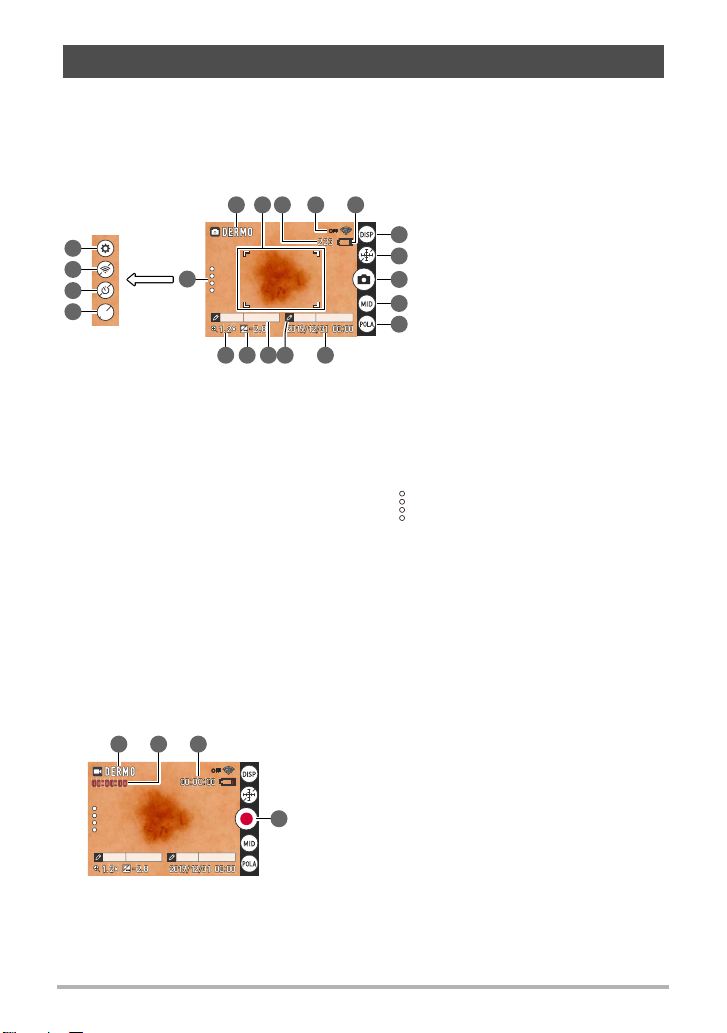
LCD Monitor Display Details and Switching Procedure
A123456789 A123456789
OFFOFF
Patient ID Doctor ID
mm
6
6
7
8
9
10
1112131415
16
17
18
19
20
Photography mode (page 30)
Focusing frame (page 24)
No. of remaining still image shots
(page 81)
Wi-Fi communication status
(page 48)
Battery level indicator (page 14)
Information display selector icon
(page 10)
Scale display icon (page 38)
Photography icon (page 24)
Light selector icon (page 39)
Filter selector icon (page 39)
Date/Time (pages 20, 62)
Doctor ID (page 63)
Patient ID (page 63)
Exposure compensation value
(page 36)
Digital zoom (page 37)
(recall) icon
(pages 40, 42, 49, 50, 61)
Settings icon
(pages 42, 49, 50, 52, 61)
Wi-Fi connection selector icon
(page 61)
Self-timer icon (page 39)
Adapter selector icon (page 40)
Patient ID Doctor ID
A123456789 A123456789
OFFOFF
1 2 3
4
The LCD monitor uses icons and numbers to display a wide range of information.
• The screen pictured below is to show where the different information is displayed.
The actual LCD monitor will not appear as shown here.
. When shooting still images
14352
. When shooting videos
Photography mode (page 30)
Video shooting time
Remaining video shooting time (page 81)
Recording start icon (pages 33, 34)
8
Page 9
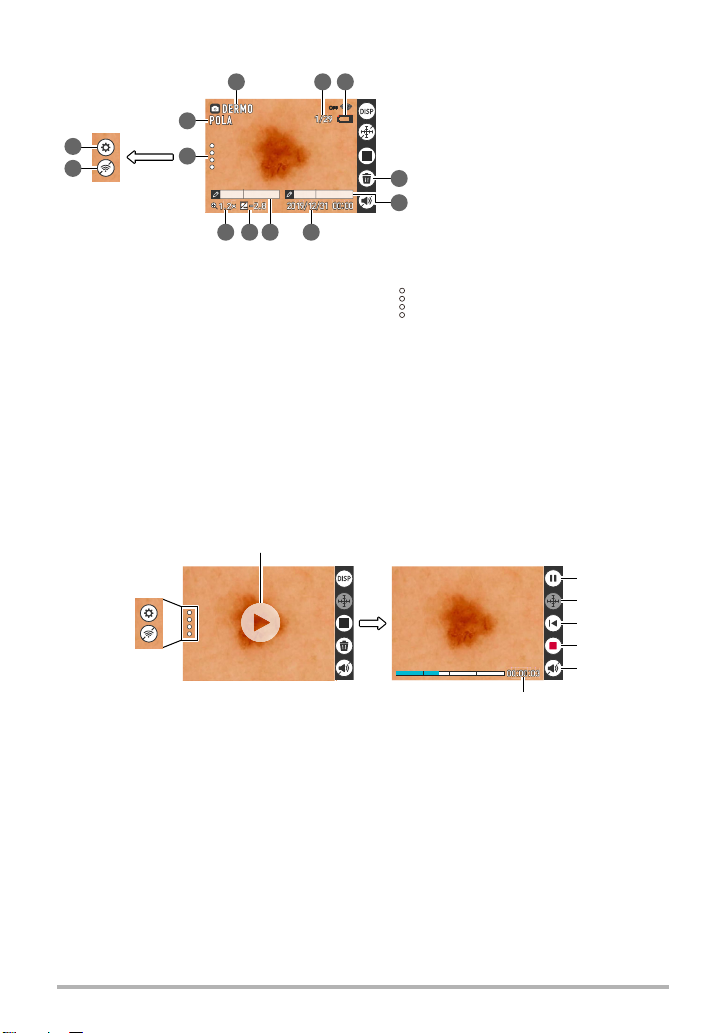
. When playing back still images
Patient ID Doctor ID
A123456789
OFFOFF
A123456789
1 2 3
4
5
6789
10
11
12
13
Photography mode (page 30)
No. of images (current/total images)
(page 81)
Battery level indicator (page 14)
Trash icon (pages 26, 63)
Doctor ID (page 63)
Shooting date/time (pages 20, 62)
Patient ID (page 63)
Exposure compensation value
(page 36)
Shooting scale (page 37)
(recall) icon
(pages 40, 42, 49, 50, 61)
Shooting filter (page 39)
Settings icon
(pages 42, 49, 50, 52, 61)
Wi-Fi connection selector icon
(page 61)
Playback start icon (page 25)
Pause icon
Scale display icon (page 44)
Rewind icon
Stop video playback icon
Video volume setting icon (page 45)
Video playback time (page 81)
. When playing back videos
9
Page 10

. Selecting the details displayed on the LCD monitor
Tapping (information display selector) allows you to toggle between showing and
hiding information on the screen. This can be selected in both photography mode and
playback mode.
Photography mode
Information display ON Information such as settings is displayed.
Information display OFF Settings and other information are not displayed.
Playback mode
Information display ON
Information display OFF
Photography settings, date, time and other information
are displayed.
The recorded information is not displayed during
playback.
10
Page 11
Introduction (Basic Operation)
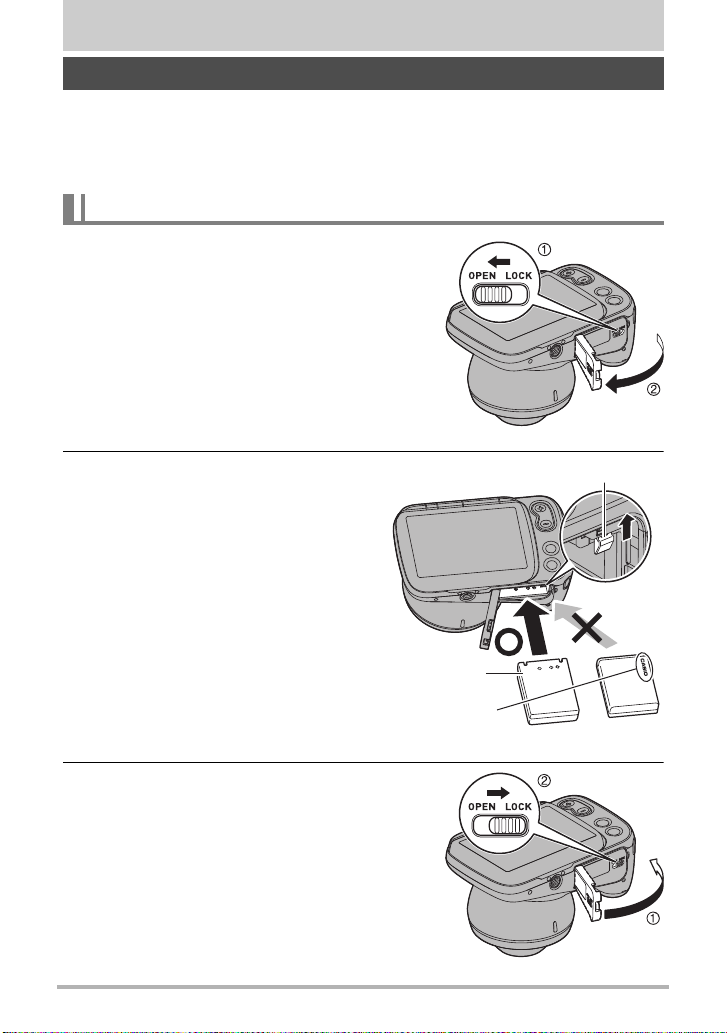
CASIO logo
Stopper
Battery
Back
Front
After unpacking the product, charge the battery
The battery is not fully charged at the time of purchase. Use the procedure below to
load the battery into the camera and charge it.
• This camera uses a CASIO dedicated lithium-ion rechargeable battery (DNP100M) as its power supply. (Batteries other than the DNP-100M cannot be used.)
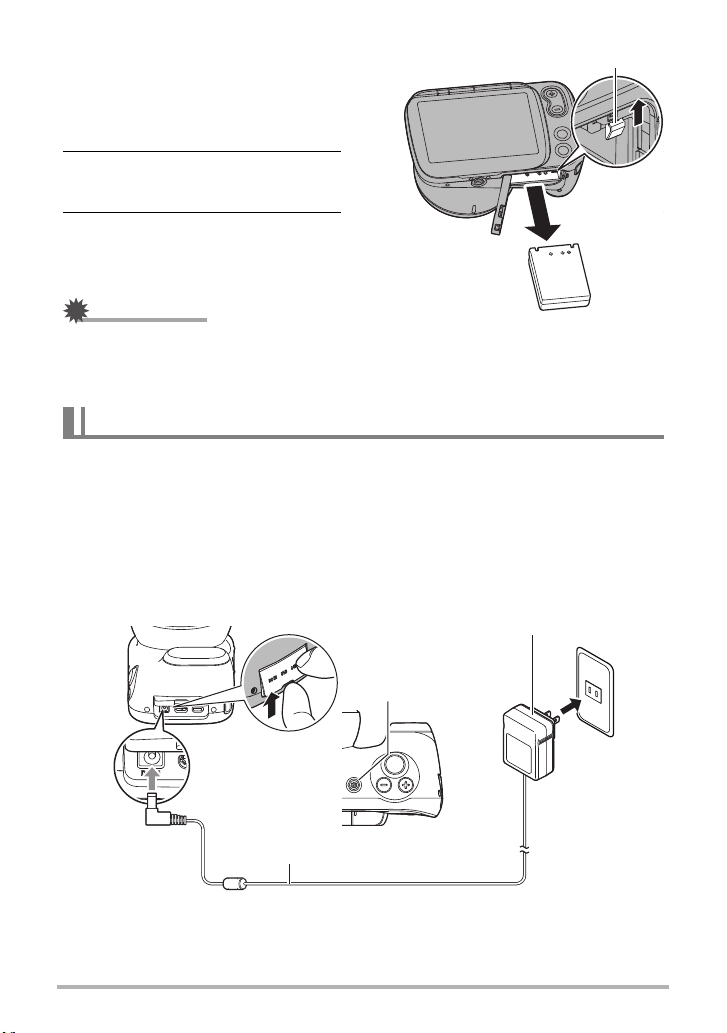
Inserting the battery
1. Open the battery cover.
2. Insert the battery.
Hold the battery so that the CASIO
logo faces down (towards the lens)
and insert the battery so that the
side of the battery shifts the
stopper in the direction of the
arrow. Push the battery in firmly
until the stopper engages with the
battery.
3. Close the battery cover.
11
Introduction (Basic Operation)
Page 12
Replacing the battery
IMPORTANT!
Stopper
DC IN USB HDMI OUT
Operation check indicator
Orange: Charging
Off: Charging completed
AC adapter
Cable
1. Press [p] (Power) to switch
the camera off and then open
the battery cover.
2. Remove the battery and insert
a new battery.
3. Close the battery cover.
• When you have pressed [p] (Power) to switch the camera off, do not remove the
battery while the operation check indicator (page 7) is flashing green. Doing so
may cause data to be deleted or corrupted.
Charging
There are two ways to charge the battery, as outlined below.
Charging using the AC adapter for camera charging (AD-M50300A)
Charging using the Battery Charger Set (DCS-100M (sold separately))
. Charging using the AC adapter for camera charging
This method charges the battery while it is in the camera.
With the camera switched off, connect the cable in the sequence shown as
Charging time: Approx. 4 hours 30 minutes
,
.
• When disconnecting the adapter from the camera, always disconnect the camera
end of the cable (
in the above diagram) first.
12
Introduction (Basic Operation)
Page 13
IMPORTANT!
Operation check
indicator
+
–
[CHARGE] lamp
Battery
Power cord
Lithium-ion battery charger
AC adapter for the lithium-ion battery charger
• If you press the [p] (Power) button when the AC adapter for camera charging is
connected to the camera, the camera starts up. At that point, charging stops.
• The AC adapter for camera charging heats up slightly during charging. This is
normal and does not indicate malfunction.
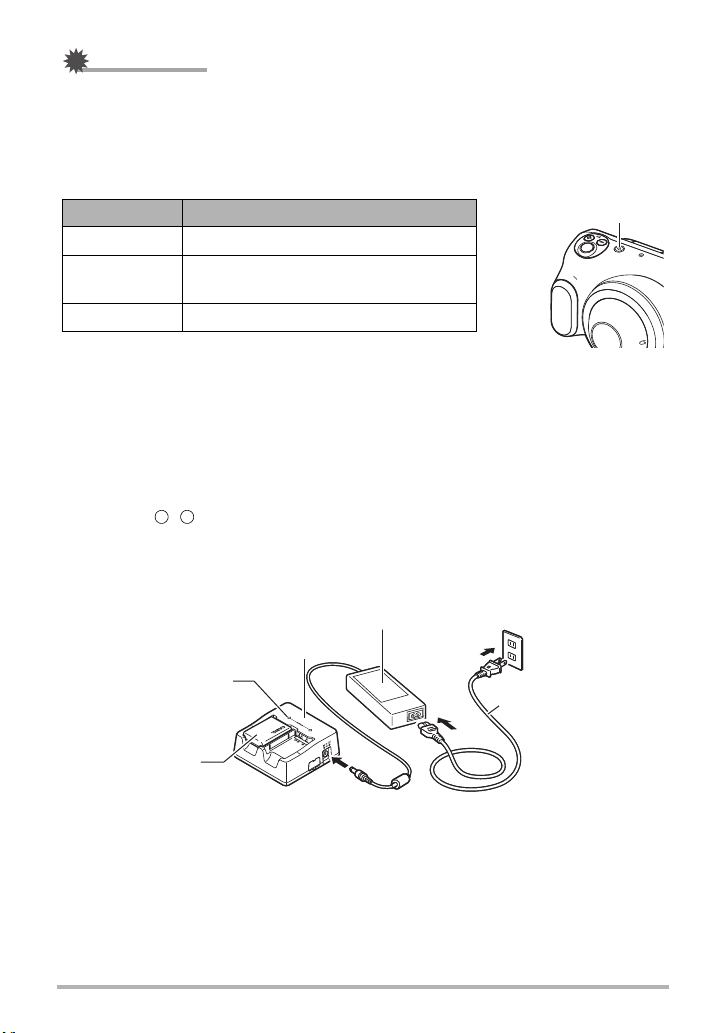
Operation check indicator operation
Action Details
Lights orange Charging
Flashes red
Off Charging completed
Abnormal ambient temperature, AC
adapter fault or battery fault (page 73)
. Charging using the Battery Charger Set (DCS-100M (sold
separately))
• The Battery Charger Set (DCS-100M) includes a lithium-ion battery charger, the
AC adapter for the lithium-ion battery charger and a power cord.
• This method charges the battery while it is removed from the camera.
• Load the battery into the battery charger, ensuring that battery and charger
polarities ( , ) are correctly matched and then connect the cables in the
sequence shown in
Charging time: Approx. 5 hours 30 minutes with 1 battery loaded
Approx. 10 hours with 2 batteries loaded
,
and .
13
Introduction (Basic Operation)
Page 14
Other Important Notes on Charging
• The lithium-ion battery (DNP-100M) should only be charged using the methods
specified in this manual.
• If the battery has become hot after being used, it may not be fully charged. Allow
the battery to cool down and then recharge it.
• The battery will self-discharge even when it is not being used. Always charge the
battery before use.
• Charging may produce interference with a TV or radio. In this event, use a mains
power socket that is as far away as possible from the TV or radio.
• Charging times will vary somewhat depending on the battery capacity, its
remaining charge and the operating environment.
• Do not use the Battery Charger Set (DCS-100M) with products other than this
camera.
• For charging, use the device specified in this manual. The use of any other device
could make it impossible to correctly charge the battery.
• To cut off power to this camera, unplug the AC adapter from the mains power
socket.
• Do not place this camera in a location that interferes with connecting or
disconnecting the AC adapter.
• Do not operate this product with wet hands when using the AC adapter.
• In environments where this product is used with patients, charge it using the AC
adapter for camera charging (AD-M50300A) .
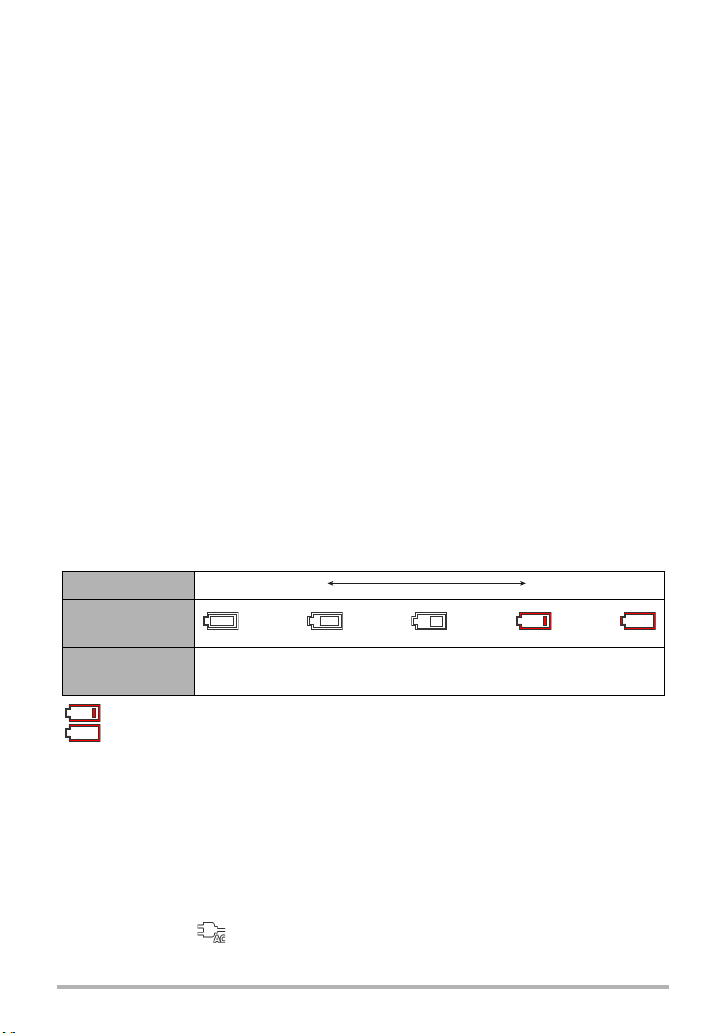
Checking the remaining battery charge
As the battery uses up charge, the battery level indicator shown on the LCD monitor
changes as shown below.
Battery level Full Low
Battery level
indicator
Level indicator
color
****
White * White * White * Red * Red
Indicates that the battery is low on charge. Recharge the battery soon.
Indicates that the camera cannot take photos. Recharge the battery
immediately.
• The battery level indicator status may change if you switch from photography mode to
playback mode or vice-versa.
• If the camera is left unused for roughly 20 days without the battery loaded or with a
depleted battery, the date/time setting will be reset. Reset the date in the date
setting notification screen that appears the next time you switch the camera on
(page 62).
• See page 83 for information on the battery life and the number of shots.
• If you switch the camera on during charging with the AC adapter, the battery level
indicator shows (Under power).
14
Introduction (Basic Operation)
Page 15

Making your battery last longer
This camera is equipped with Sleep and Auto Power Off functions to reduce its power
consumption.
• Sleep function
If the camera is not used for approximately 1 minute in photography mode, it
switches to Sleep mode and the LCD monitor and LED light switch off. Pressing
any button will wake the camera from Sleep mode.
• Auto Power Off function
If the camera is not operated in any way for approximately 5 minutes while in use, it
automatically shuts down.
15
Introduction (Basic Operation)
Page 16
Preparing Memory Cards
To store photographed images, use a third-party memory card. (No memory card is
provided with this camera.) This camera has built-in memory that allows you to shoot
a number of still images and short videos. If a memory card is inserted, the images
and videos you shoot are recorded on the memory card. If not, they are recorded in
built-in memory.
• See page 81 for information on the number of still images and videos you can
store.
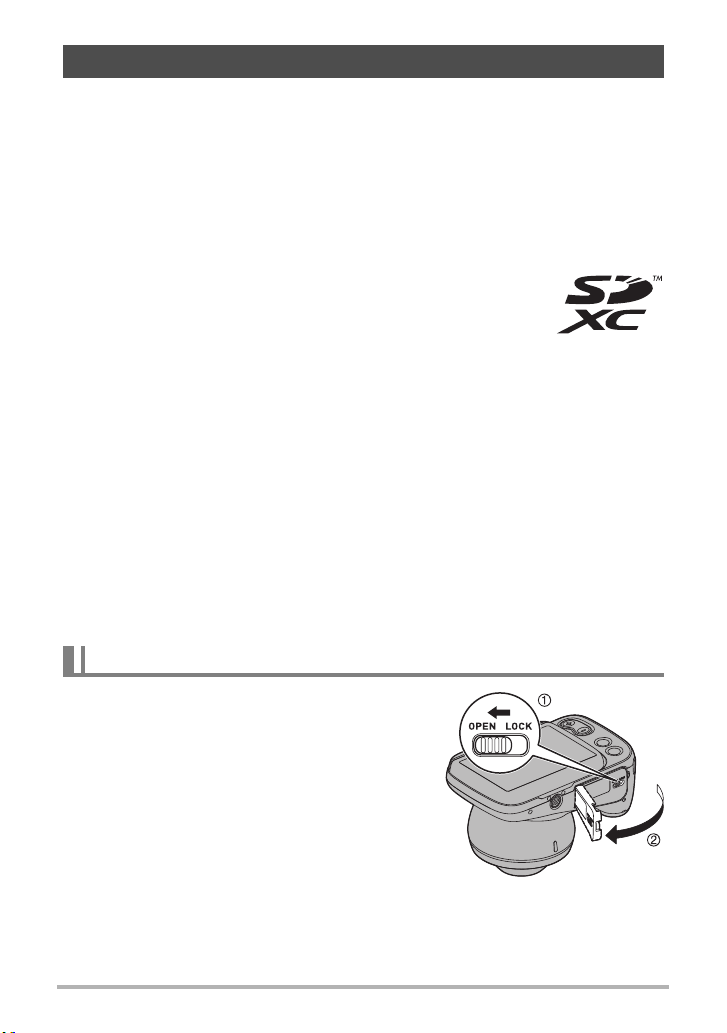
. Supported memory card types
– SD Memory Card
– SDHC Memory Card
– SDXC Memory Card
• The list of supported memory card types is valid as of March
2019.
• This product supports memory cards that comply with the SD standard. The
memory card capacities under that standard are up to 2 GB for SD memory cards,
2 to 32 GB for SDHC memory cards and 32 GB to 2 TB for SDXC memory cards.
Note that these capacities and card functioning are not guaranteed for all memory
cards, even those listed above.
It is recommended that you use only CASIO-approved memory cards.
Recommended: 16GB SDHC memory card (by SanDisk Corporation).
. Notes on Using Memory Cards
Processing speeds may be slower for some types of memory card. Depending on the
memory card used, recording may take some time, which could result in images or
sound being momentarily interrupted.
Inserting a memory card
1. Press [p] (Power) to switch the
camera off and then open the
battery cover.
16
Introduction (Basic Operation)
Page 17
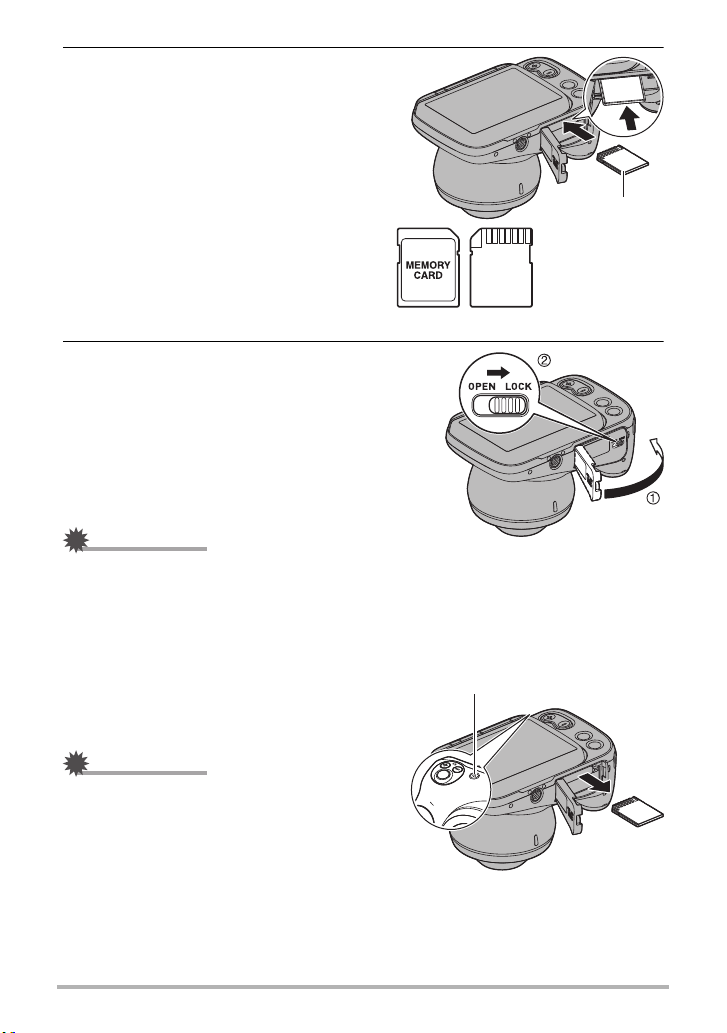
2. Insert the memory card.
Front Back
Back
Operation check indicator
Hold the memory card with the back
side uppermost (towards the LCD
monitor) and push it into the memory
card slot until you hear a click.
3. Close the battery cover.
IMPORTANT!
• Do not insert anything other than designated memory cards (page 16) into the
memory card slot.
• If any foreign body or moisture gets into the memory card slot, switch the camera
off and remove the battery.
Replacing the memory card
Pressing the memory card causes it to pop
out slightly. Pull it out and insert another
memory card.
IMPORTANT!
• Switch the camera off before replacing the
memory card.
• When you have pressed [p] (Power) to
switch the camera off, do not remove the
memory card while the operation check
indicator is flashing green. Doing so could
result in photographed images not being recorded or the memory card being
damaged.
17
Introduction (Basic Operation)
Page 18

NOTE
Switching the Camera On/Off
[p] (Power)
[p] (Playback)
Shutter button
. Switching the camera on
Pressing [p] (Power) switches the camera on in
photography mode so that it is ready to take
pictures.
Pressing [p] (Playback) again at this point
switches the camera to playback mode and you
can view still images or videos shot previously
(pages 25, 43).
•Pressing [p] (Playback) switches the camera
on in playback mode.
• In playback mode, press [p] (Playback) or
press the shutter button to return to photography
mode.
. Switching the camera off
Press [p] (Power).
• If the camera is not used for a set time, the LCD monitor and the camera are
automatically switched off by the Sleep function (page 15) and Auto Power Off
function (page 15) respectively.
• To switch them back on, simply open the LCD monitor.
18
Introduction (Basic Operation)
Page 19

Using the Touch Panel
LCD monitor
The LCD monitor on this camera is a touch panel.
This enables you to control various camera
operations by touching the panel.
Tap
Briefly touch the screen.
Used to select and specify icons and menu options.
Swipe
Touch the screen and then slide your fingertip up,
down, left or right on the screen.
Used for operations such as viewing the previous or
next image.
Pinch-out
Touch the screen with two fingers and then slide
them apart on the screen.
Zooms in on the displayed image.
Pinch-in
Touch the screen with two spread fingers and then
slide them closer together on the screen.
Zooms out from the displayed image or displays the
image list.
IMPORTANT!
• Do not press on the screen with pointed or hard objects. Doing so could damage
the LCD monitor.
• The touch panel has difficulty recognizing fingernails. Use the pad of your finger.
NOTE
• Applying a third-party LCD protective sheet to the panel will make it more difficult
for the panel to recognize gestures.
19
Introduction (Basic Operation)
Page 20
NOTE
Setting the Date & Time When You First Use the Camera
[p] (Power)
The first time you switch the camera on
after purchasing it
A screen for setting the time appears. If you do
not set the date & time, the correct date & time
will not be recorded on photographed images.
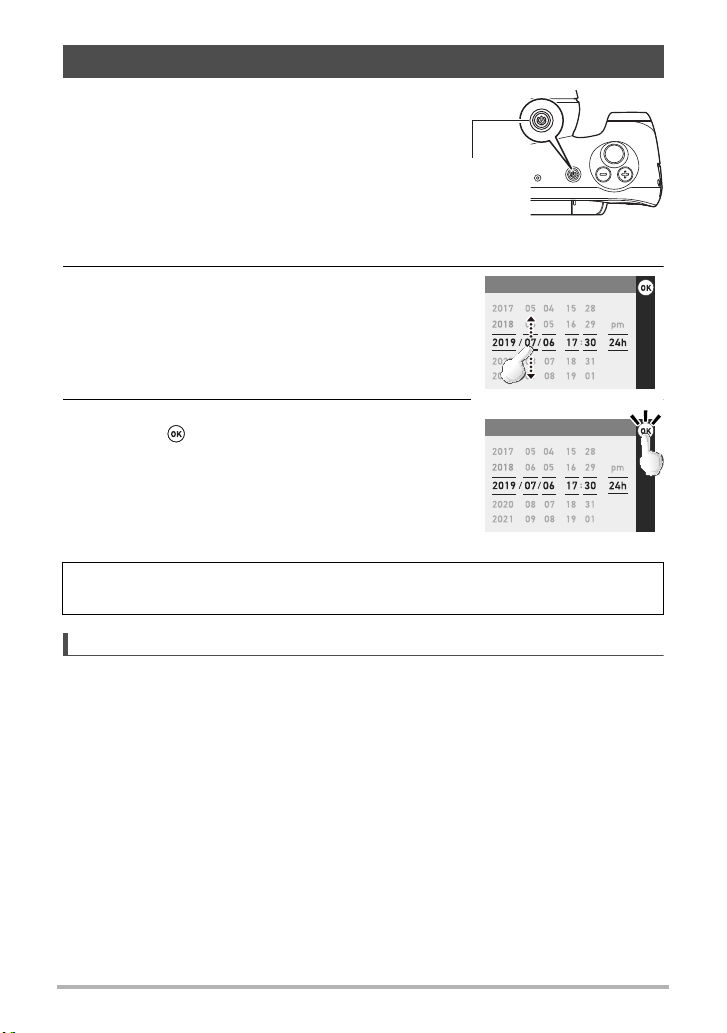
1. Press [p] (Power) to switch the
camera on.
2. Set the date & time.
Tap the year, month, day, hour, minute or am (or pm)/
24h and then swipe up or down to change the setting.
3. Once you have finished setting the date &
time, tap to complete the settings.
If you set the date or time incorrectly, you cannot correct it using the above
procedure. Refer to page 62 to correct the settings.
• If you set the time and then immediately remove the battery, the set time may be
reset. After setting the time, leave the battery in the camera for at least 24 hours.
Adjust
Adjust
20
Introduction (Basic Operation)
Page 21
Opening and Closing the LCD Monitor
180°
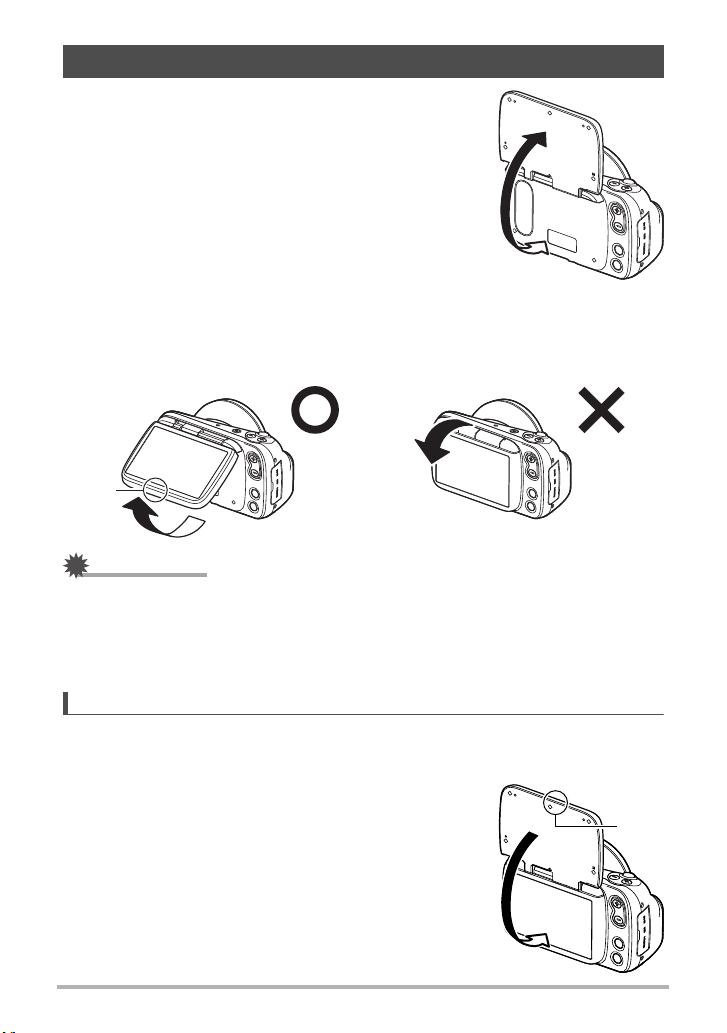
The LCD monitor on this camera is hinged at the
top so that it opens 180° upwards.
. Opening the LCD monitor
As shown in the illustration, place your fingertip at in the center of lower edge of
the LCD monitor and lift it upwards so that it rotates and opens.
• The LCD monitor does not open from the top. Always open it from the bottom, as
shown in the illustration.
IMPORTANT!
• Opening the LCD monitor switches the camera on.
• When closing the LCD monitor, take care not to trap your finger in the top or bottom
of the LCD monitor.
• Do not press on the LCD monitor with excessive force. Doing so could damage the
LCD monitor.
NOTE
• Close the LCD monitor when not using the camera.
. Closing the LCD monitor
As shown in the illustration, hold in the center of lower
edge of the LCD monitor and rotate it downwards so that
it closes.
21
Introduction (Basic Operation)
Page 22

Holding the Camera Correctly
Held level Held on end
If you move the camera as you are
pressing the shutter button, the
image shot will not be clear.
Hold the camera as shown in the
illustration at right and lock your arm
against your body. Press the shutter
button gently and hold the camera
steady as the shutter releases and
immediately afterwards.
. Photographing the area around the affected area
Point the camera at the area containing the lesion and
take a picture.
Hold the camera steady so that it does not move while
you tap (Shoot) or press the shutter button and
photograph the entire affected area.
. Taking close-up shots of the affected area
Wipe the lens clean.
Place the lens* directly onto the affected area and take
a picture. (A gel can also be used.)
Hold the camera steady so that it does not move while
you tap (Shoot) or press the shutter button to take an
enlarged image of the lesion.
* The lens directly touches healthy skin and mucous
membrane or damaged skin and mucous membrane.
NOTE
• Firmly support the camera while taking the picture and take care not to drop it, etc.
• To ensure that you do not drop the camera accidentally, attach a strap to the
camera and put the strap around your fingers or wrist while shooting.
• Do not dangle the camera by the strap.
22
Introduction (Basic Operation)
Page 23

Photography
Patient ID Doctor ID
A123456789 A123456789
OFFOFF
Shutter button
Photography mode
LCD monitor
[p] (Power)
[MODE]
[p] (Playback)
Setting the photography mode
This camera features 7 photography modes that can be selected according to the
purpose of the photography.
NORMAL, DERMO CONT, DERMO, DERMO AIF, NORMAL (video),
DERMO (video), MICROSCOPE
• For detailed information on the modes, see “Setting Photography Modes and
Shooting Still Images and Videos” (page 30).
1. Press [p] (Power) to switch the camera on.
The camera switches on in photography mode and is ready to take pictures.
• If the camera is in playback mode, press [p] (Playback) or the shutter button.
2. Press [MODE] and select the photography mode.
The mode changes in the sequence shown below each time you press [MODE].
NORMAL→ DERMO CONT→ DERMO→ DERMO AIF→
NORMAL (video)→ DERMO (video)→ MICROSCOPE
23
Introduction (Basic Operation)
Page 24
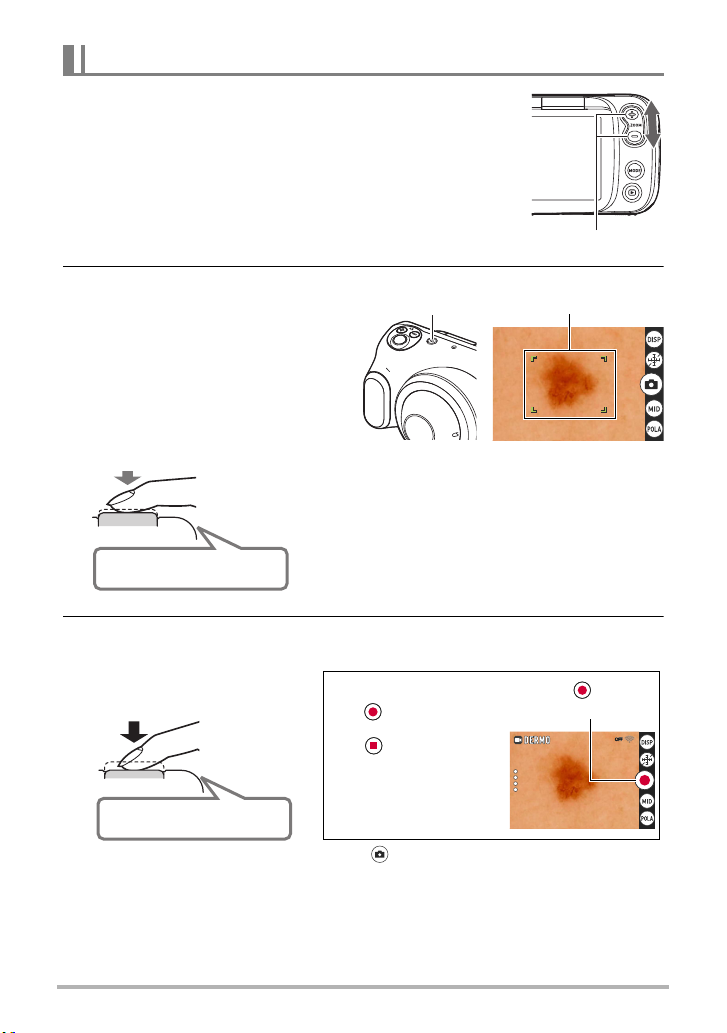
Photography
Zoom button
Focusing frame
Operation check
indicator
Press down
halfway
Press down gently
until it stops
“Bibip” (focused)
When you press the shutter button down halfway,
the camera automatically sets the exposure and
focus for the subject it is pointed at. Learning just
how much pressure will press the shutter button
down halfway is one of the secrets to shooting
crystal-clear still images.
Press down
fully
All the way
“Kashick!”
(An image is shot)
To shoot a video
Tap to start shooting
a video.
Tap to stop
shooting.
See pages 33 and 34
for detailed information
on shooting videos.
(Video shooting starts)
OFFOFF
1. Point the camera at the site to be photographed or
place the lens directly onto the affected area.
• You can change the zoom ratio.
2. Press the shutter button down
halfway to focus the image.
When the image is focused, the
camera gives two short beeps and
the operation check indicator and
focusing frame turn green.
3. With the camera fixed in place, press the shutter button down fully.
A still image is photographed.
• You can also take photos by tapping .
. If the image is out of focus
If the focusing frame is red, the image is not in focus. Point the camera at the subject
again or try focusing by placing the lens directly onto the affected area.
24
Introduction (Basic Operation)
Page 25
Viewing Photographed Still Images and Videos
[p] (Playback)
or or
[EV-] [EV+]
You can view photographed still images or videos on the LCD monitor.
1. Press [p] (Playback) to set the
camera to playback mode.
• One of the recorded still images or
videos appears on the LCD monitor.
• Information about the displayed still
image or video is also displayed
(page 9).
• You can also view just the still image
or video without the information
being displayed (page 10).
• Pinch-out on the image or press the zoom button (+) to zoom in on the
displayed image (page 43).
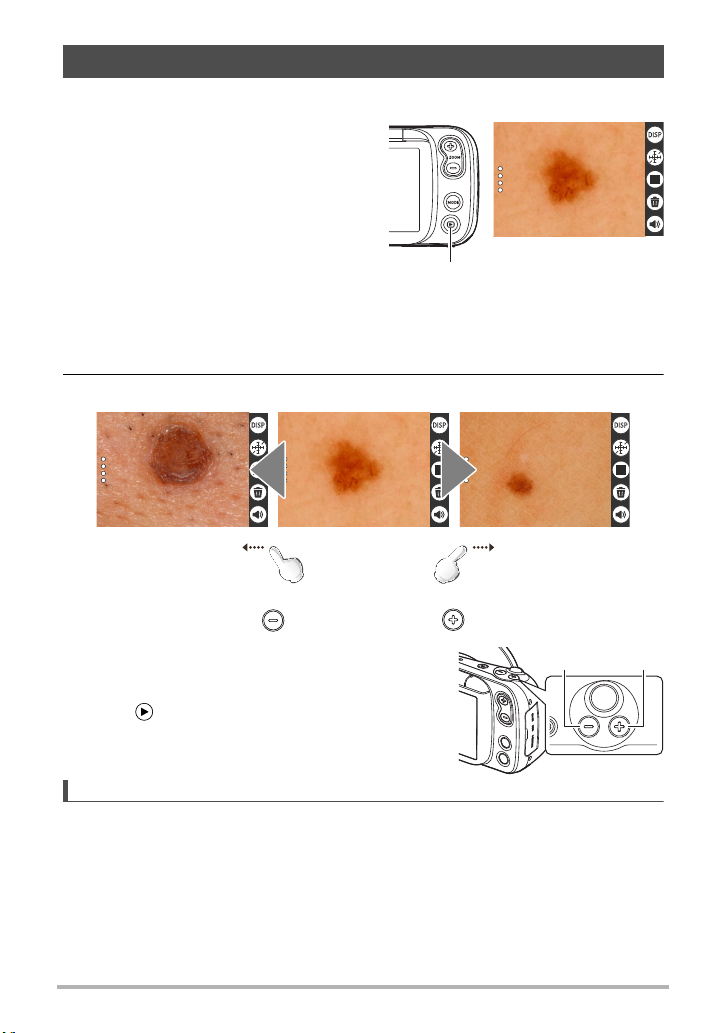
2. Swipe left or right to move back and forth between images.
• You can also move between images using
[EV+] and [EV-].
• To play back video, open the video file and
tap in the center of the screen.
NOTE
• Pressing the shutter button down halfway in playback mode switches immediately
to photography mode.
25
Introduction (Basic Operation)
Page 26

Deleting Photographed Still Images and Videos
When the camera’s memory is full, deleting still images and videos shot previously
will free up some memory capacity so that you can shoot new images.
• You can delete files simply by tapping (Trash).
. Deleting files 1 at a time
1. Swipe left or right to view the file to be deleted.
2. Tap (Trash).
3. Tap .
• To delete more files, simply repeat steps 1-3.
• To stop deleting, tap in the confirmation message.
. Deleting selected files
1. Tap (Switch to thumbnail display) to
display the image list.
2. Tap (Trash).
• The deletion menu appears.
3. Tap “Delete Files”.
4. Tap the files you want to delete to select them.
• A check mark appears next to the selected files.
5. Once you have selected all the files to be deleted, tap (Trash).
• The “Delete selected files.” confirmation message appears.
6. Tap .
• The selected files are deleted.
• To stop deleting, tap in the confirmation message.
26
Introduction (Basic Operation)
Page 27

. Deleting all files
1. Tap (Switch to thumbnail display) to display the image list.
2. Tap (Trash).
• The deletion menu appears.
3. Tap “Delete All Files”.
• The “Delete all files.” confirmation message appears.
4. Tap .
All the files are deleted and the “There are no files.” message appears.
. Deleting/restoring files in the Trash
When the Trash function is enabled (page 63), deleted images are temporarily moved
to the Trash. You can delete or restore files that are in the Trash.
Restoring selected files
1. Tap (Switch to thumbnail display) to display the image list.
2. Tap (Trash).
• The deletion menu appears.
3. Tap “Trash”.
• The files that have been moved to the Trash are displayed.
4. Tap the files you want to restore to select them.
• A check mark appears next to the selected files.
5. Tap .
• The selected files are moved back to the playback screen.
27
Introduction (Basic Operation)
Page 28

Deleting selected files
1. Tap (Switch to thumbnail display) to display the image list.
2. Tap (Trash).
• The deletion menu appears.
3. Tap “Trash”.
• The files that have been moved to the Trash are displayed.
4. Tap the files you want to delete from the Trash to select them.
• A check mark appears next to the selected files.
5. Tap .
• The “Delete selected files.” confirmation message appears.
6. Tap .
• The selected files are permanently deleted.
. Emptying the Trash
1. Tap (Switch to thumbnail display) to display the image list.
2. Tap (Trash).
• The deletion menu appears.
3. Tap “Empty Trash”.
• The “Delete all files in trash?” confirmation message appears.
4. Tap .
• All the files are permanently deleted.
28
Introduction (Basic Operation)
Page 29

Notes on Taking Pictures
Operation
• Do not open the battery cover while the operation check indicator is flashing green.
Doing so could cause problems such as photographed images not being saved
correctly, recorded images being corrupted and the camera not functioning
normally.
. Auto Focus Limitations
• The camera may not focus correctly for the following types of subject or in the
following situations.
– Subjects with low contrast
– Multiple subjects at different distances from the camera
– Subjects in dark locations
– When the camera is shaking
– Subjects outside the shooting range
– When the lens is dirty
29
Introduction (Basic Operation)
Page 30

Photography
Setting Photography Modes and Shooting Still Images and Videos
This camera features 7 photography modes that can be selected according to the
purpose of the photography.
Photography mode Details
NORMAL
DERMO CONT
DERMO Use this mode to take a close-up shot of the affected area.
DERMO AIF
NORMAL
DERMO Use this mode to take a close-up video of the affected area.
MICROSCOPE
Use this mode to take a normal photograph of the affected
area and its periphery.
Use this mode to use a single shutter release to take
polarized, non-polarized and UV* close-up shots with the
same angle of view.
* A safe light wavelength of 405 nm is used.
When UV is enabled, the shot is taken with UV light.
Use this mode to take a close-up shot of a raised affected
area so that the entire area is in focus.
A single shutter release takes multiple images with a shifting
focal point and the images are then merged into a single
shot.
Photography in this mode requires the optional 3D adapter
(DLA-100M (sold separately)).
Use this mode to shoot a video of the affected area and its
periphery.
Use this mode to photograph subjects such as pathological
tissue viewed through a microscope.
Photography in this mode requires the optional microscope
adapter (DMS-100M (sold separately)).
1. Press [p] (Power) to switch the camera on in photography mode.
• If the camera is in playback mode, press [p] (Playback) or the shutter button
to switch to photography mode.
2. Press [MODE] and select the photography mode.
The mode changes in the sequence shown below each time you press [MODE].
NORMAL→ DERMO CONT→ DERMO→ DERMO AIF→
NORMAL (video)→ DERMO (video)→ MICROSCOPE
30
Photography
Page 31

Photography in NORMAL mode (NORMAL)
OFFOFF
Non-polarized
image
UV image Polarized image
Shoots still images for clinical use. Suitable for normal still image photography.
1. Set the photography mode to “ NORMAL”.
2. Point the camera at the subject and press the shutter button down
halfway to focus the image.
3. With the camera fixed in place, press the shutter button down fully.
• A still image is photographed.
• You can also take photos by tapping .
Photography in DERMO CONT mode (DERMO CONT)
A single shutter release shoots 3 types of still image with the same angle of view.
• 3 types of image shot simultaneously
Polarized image
Non-polarized
image
UV image Image shot using UV light (405 nm)
NOTE
• To shoot UV images, the UV setting must be enabled (ON). For information on UV
settings, refer to ”UV ON/OFF setting” (page 63) in “Other Settings” (page 61).
Image where diffused light reflected from the photographed
surface is blocked
Normal photographed image
1. Set the photography mode to “ DERMO CONT”.
2. Place the camera lens directly on the affected area and press the
shutter button down halfway to focus the image.
3. With the camera fixed in place, press the shutter button down fully.
• 3 types of still image are photographed.
• You can also take photos by tapping .
31
Photography
Page 32

Photography in DERMO mode (DERMO)
Raised flange on 3D
adapter
Camera notch Protruding section
Mounting diagram
When mounting the 3D adapter
Shoots still images for close-up shots of the affected area.
1. Set the photography mode to “ DERMO”.
2. Place the camera lens directly on the affected area and press the
shutter button down halfway to focus the image.
3. With the camera fixed in place, press the shutter button down fully.
• A close-up still image is photographed.
• You can also take photos by tapping .
Photography in DERMO AIF mode (DERMO AIF)
With the 3D adapter (DLA-100M (sold separately)) fitted, this mode shoots multiple
images with differing focusing positions and merges them into a single image that is
in focus over a wide range.
This is ideal for photographing lesions that are normally difficult get in focus over the
entire lesion.
1. Mount the 3D adapter on the camera.
Ensure that the raised flange is securely fitted into the notch on the camera.
2. Set the photography mode to “ DERMO AIF”.
3. Place the end of the 3D adapter directly onto
the affected area and press the shutter button
down halfway to focus the image.
32
Photography
Page 33

4. With the camera fixed in place, press the shutter button down fully.
The screen shown at left appears while the still images
are being merged.
Once merging is completed, a thumbnail version of the
still image appears at the bottom right of the screen.
Busy...
Pleasewait…
OFFOFF
• A close-up still image is photographed.
• You can also take the shot by tapping .
5. Remove the 3D adapter.
Grip the protruding section of the 3D adapter and detach it from the camera.
NOTE
• The photography angle of view is different in DERMO mode.
• The recorded image size (pixel count) is 4368 x 3280.
• The camera may be unable to merge images effectively for the following types of
subject or in the following situations.
– If there is camera shake or subject movement
– Subjects with high contrast
– Subjects with undulations of 1 mm (0.04") or greater
Shooting video in NORMAL mode (NORMAL (video))
Records videos for clinical use.
1. Set the photography mode to “ NORMAL”.
2. Point the camera at the subject and tap .
• Video shooting starts.
3. Tap to end shooting.
33
Photography
Page 34

Shooting video in DERMO mode (DERMO (video))
Tripod mount Mounting screw
Shoots videos for close-up shots of the affected area.
1. Set the photography mode to “ DERMO”.
2. Place the camera lens directly on the affected area and tap .
• Video shooting starts.
3. Tap to end shooting.
NOTE
• You can also start and end recording by pressing the shutter button.
• The auto focus operates continually during video shooting.
Photography in MICROSCOPE mode (MICROSCOPE)
With the microscope adapter (DMS-100M (sold separately)) fitted, this mode allows
you to shoot still images by mounting it onto a microscope.
1. Mount the microscope adapter on the camera.
Mount the microscope adapter onto the camera and fasten it in place by screwing
the mounting screw for the adapter into the camera’s tripod mount.
34
Photography
Page 35

2. Mount the camera on the microscope.
NOTE
Stopper screw
End cover
Mounting diagram
When mounting the camera
on a microscope
The microscope adapter has two differently sized eyepieces (30 mm (1.2") dia.
and 23.2 mm (0.9") dia.).
When mounting the 30 mm (1.2") dia. eyepiece, leave the end cover fitted on the
adapter.
When mounting the 23.2 mm (0.9") dia. eyepiece, loosen the stopper screw and
remove the end cover.
3. Set the photography mode to “ MICROSCOPE”.
4. Adjust the microscope focus by looking at the camera’s LCD monitor.
5. Press the shutter button down halfway to focus the image.
6. Press the shutter button down fully.
• A still image is photographed.
• You can also take the shot by tapping .
7. Remove the microscope adapter.
Remove the microscope adapter from the microscope eyepiece.
Loosen the mounting screw on the microscope adapter and remove the
microscope adapter from the camera.
• The microscope adapter corresponds to roughly 10x eyepiece magnification.
• Use the adapter size that best suits your microscope eyepiece (30 mm (1.2") dia.
or 23.2 mm (0.9") dia.).
35
Photography
Page 36

Viewing Images Immediately After Shooting
OFFOFF
OFFOFF
Non-
polarized
UV Polarized
Modes other than
DERMO CONT
DERMO CONT mode
OFFOFF
After you take a picture, a thumbnail version of the photographed image appears at
the bottom right of the screen.
Tap the thumbnail to view the playback image.
Adjusting the Brightness (Exposure Compensation)
You can manually adjust the exposure compensation
value (EV value) according to the brightness when the
shot is taken.
– Exposure compensation value: -2.0 to +2.0 EV
– Adjustment increment: 0.1 EV
1. Press [EV+] or [EV-] to adjust the exposure value (EV value).
[EV+]: Increases the EV value in increments of 0.1. Press to brighten the image.
[EV-]: Decreases the EV value in increments of 0.1. Press to darken the image.
36
Photography
Page 37

Using the Zoom
OFFOFF
Zoom button
Pinch-in/Pinch-out
With the digital zoom (a method for digitally zooming in on the central part of an
image), you can zoom in on your shots up to 8x.
1. In photography mode,
pinch in to zoom out or
pinch out to zoom in.
• You can change the scale
using the zoom buttons.
2. Tap or press the shutter button to take the shot.
NOTE
• You can zoom the image while shooting video.
37
Photography
Page 38

Getting Better Images
OFFOFF
mm
6
Information display selector icon
Scale display icon
Light selector icon
Filter selector icon
Settings icon
Wi-Fi connection selector icon
Self-timer icon
Adapter selector icon
OFFOFF
5mm5mm
OFFOFF
5mm
OFFOFF
Scale displayed Scale + grid displayed Scale hidden
This camera features a range of settings that can be accessed via screen icons.
Photography Settings
Viewing Image Information
Tap to display the photography information. Tap the icon again to hide the
photography information.
Displaying the scale on the LCD monitor when shooting
Tap to display the scale. This is useful for measuring the affected area.
Tap the icon again to display the scale and the grid. The scale changes each time you
tap .
• These cannot be used in NORMAL, NORMAL (video) or MICROSCOPE modes.
NOTE
• The scale and grid displays shown on the LCD monitor are purely indicative and
are not accurate values.
38
Getting Better Images
Page 39

NOTE
Changing the light brightness for shots
Tap or to change the brightness of the light.
The available light settings vary depending on the photography mode.
• NORMAL, NORMAL (video): AUTO (default)→ LOW→ MIDDLE→
HIGH→ OFF
• DERMO CONT, DERMO, DERMO AIF, DERMO (video): MIDDLE (default)→
HIGH→ LOW
NOTE
• In MICROSCOPE mode, the setting cannot be changed. The icon is displayed.
Changing the filter for shots
Tap to switch between the polarizing, non-polarizing and UV photography filters.
The available filter settings vary depending on the photography mode.
• NORMAL, NORMAL (video): Non-polarized (default)→ Polarized
• DERMO CONT, DERMO, DERMO AIF, DERMO (video): Polarized (default)→
Non-polarized→ UV (if enabled)
• In MICROSCOPE mode, the setting cannot be changed.
Using the self-timer
Tap to enable the self-timer.
This allows you to shoot still images with a 2-second delay after you tap or press
the shutter button.
NOTE
• In NORMAL (video) and DERMO (video) mode, the setting cannot be changed.
39
Getting Better Images
Page 40

Shooting with the small-diameter adapter
Camera
Camera notch
mm
6
OFFOFF
mm
6
OFFOFF
When photographing lesions in difficult-to-focus locations, such as between fingers,
fit the small-diameter adapter (DPS-100M (sold separately)) to the camera to take the
shot.
1. Fit the small-diameter adapter on the camera.
Ensure that the raised flange on the small-diameter adapter is securely fitted into
the notch on the camera.
2. Tap (recall) on the left side of screen and
select .
The mode name at the top left of the screen
changes from white to green.
appears.
3. Place the small-diameter adapter lens directly
onto the affected area and press the shutter
button down halfway to focus the image.
4. With the camera fixed in place, press the shutter button down fully.
• A close-up still image is photographed.
• You can also take pictures by tapping .
• A thumbnail version of the photographed still image appears at the bottom right
of the screen.
40
Getting Better Images
Page 41

5. Remove the small-diameter adapter.
Release button
To remove the small-diameter adapter, press the release button on the rim of the
adapter as you remove it from the camera.
NOTE
• To maintain a consistent angle of view for shots taken with the small-diameter
adapter mounted, take care not to press too hard on or apply excessive force to the
small-diameter adapter.
• The small-diameter adapter cannot be used in NORMAL, NORMAL (video) or
MICROSCOPE mode.
• The default zoom magnification setting is 3x. You can zoom images up to a
maximum of 8x. If you zoom out from the default setting, the construction of the
camera is such that LED light reflections will be captured in the shot, but this will
not affect the photographed image.
• When cleaning the camera, wipe the front glass element of the adapter lens clean
with a soft cloth. If any dust gets inside the small-diameter adapter, use a blower or
similar tool to clean it off.
• Images shot with the small-diameter adapter mounted may appear different from
those shot without the adapter due to differences in the illumination.
41
Getting Better Images
Page 42

Adjusting the color tones (White Balance)
White paper
You can adjust the white balance of still images and videos shot in NORMAL mode.
The white balance of still images and videos shot in other modes cannot be adjusted.
1. Tap (recall) on the left side of screen.
2. Tap (Setting).
The Setting menu appears.
3. Tap “White Balance”.
The white balance settings are displayed.
Setting Details
Auto The white balance is adjusted automatically
Fluorescent N
Fluorescent D
Tungsten
Manual
Color tones for shots taken with the color cast under white or
neutral white fluorescent lighting suppressed
Color tones for shots taken with the color cast under daylight
fluorescent lighting suppressed
Color tones for shots taken with the effects of electric bulb
lighting removed
Manual adjustment to correct the colors for
various types of lighting
Take a photograph where a sheet of
white paper fills the entire screen.
Select “Manual”.
When the “Completed” message
appears, tap .
4. Tap a setting to select it.
5. Tap to finish the white balance settings.
42
Getting Better Images
Page 43

Viewing Still Images and Videos
Image periphery
Enlarged area
Zoom scale
2-column (4-image)
display
3-column (9-image)
display
4-column (16-image)
display
Viewing Photographed Still Images and Videos
Refer to page 25 for more information on the procedure.
Zooming in on images
1. Set the camera to playback mode and swipe left or right to show the
image you want to view.
2. Pinch-out on the image or press the zoom
button (+) to zoom in on the displayed image.
You can swipe to zoom in on a different area. Pinchin on the image or press the zoom button (-) to zoom
out from the displayed image.
• When information is displayed on the LCD
monitor, the enlarged area appears in the bottom
right of the image.
• Images can be enlarged up to a maximum of 8x,
but enlargement up to 8x may not be possible for
some image sizes.
Viewing the image list (thumbnail display)
1. Set the camera to playback mode and tap (Switch to thumbnail
display).
Tapping (Switch to thumbnail display) allows you to change the number of
columns used for thumbnail display (2, 3 or 4 columns).
To return to the normal view (single-image display), tap the image you want to
view.
43
Viewing Still Images and Videos
Page 44

Other Playback Functions
5mm
5
mm
This section describes functions that you can use and configure in playback mode.
Using various playback functions and settings
Displaying a scale on playback images
Displaying the scale enables you to measure the size of an affected area.
1. Set the camera to playback mode and tap (Scale display).
The scale appears in the center of the screen.
2. Touch the scale to rotate it.
You can rotate the scale to the direction you want to measure.
• The gradation label is not shown during rotation.
44
Other Playback Functions
Page 45

Resetting the Doctor ID or Patient ID
YES
NO
Reset Patient ID ?
Patient I
Patient ID
OFFOFF
Doctor ID
A123456789
î +
You can reset the Doctor ID and Patient ID registered in a photographed image.
1. Display the image with the Doctor ID or Patient ID you want to reset.
2. Tap to display the photography information.
3. Tap the Doctor ID or Patient ID.
The “Reset Doctor ID ?” or “Reset Patient ID ?”
message appears.
4. Tap .
The reset ID field is cleared.
Setting the video playback volume
1. Display the video.
2. Tap .
The volume setting appears.
3. Tap or on the screen to set the volume.
If you use to mute the video, changes to .
45
Other Playback Functions
Page 46

NOTE
Viewing images on an external monitor
HDMI
HDMI cable
(Less than 3.0 m (9.8'))
HDMI output (micro)
HDMI micro connector
HDMI
connector
HDMI input
External monitor
1. Switch off the camera and use a third-party HDMI cable to connect the
camera to the external monitor.
• Use only HDMI cables (third-party) that carry
the logo shown at right.
• Switch the camera off before connecting or
disconnecting the cable. Configure the
external monitor as described in the manual for the monitor before connecting
or disconnecting the cable.
2. Switch the camera on.
The image displayed on the LCD monitor appears on the external monitor.
• The HDMI cable used should be less than 3.0 m (9.8') long and should be shielded
and compatible with the HDMI high-speed specification (ver. 1.4).
• The external monitor used should be compliant with the IEC/UL/CSA/EN60950-1
or JIS C 6950-1, or with the VCCI-B, FCC-B or CE standard.
• The use of products that do not comply with the specified standards may result in
lowered resistance to external electromagnetic waves and/or an increase in
unwanted electromagnetic wave emissions.
• External monitors should be kept at least 1.5 m (4.9') away from the patient during
use.
• The touch panel cannot be used while an HDMI cable is connected.
46
Other Playback Functions
Page 47

Connecting the Camera to a Computer
NOTE
(Wi-Fi connection)
This camera is equipped with a Wi-Fi (wireless LAN) connection function.
Connecting this camera to a computer via Wi-Fi enables you to transfer
photographed images to the computer. To use the Wi-Fi connection, you must install
the D'z IMAGE Viewer image management software on your computer.
This product includes built-in designated wireless equipment that has received a
certificate of construction type (certificate no. 007-AH0009) under Japanese Radio
Law.
IMPORTANT!
• Depending on the version of the Windows OS installed on your computer and the
amount of available storage, you may not be able to save videos or still images on
your computer. Once images have been received on your computer, check that
they have been saved on the computer.
• You cannot transfer images shot on other cameras.
• Using a memory card equipped with a Wi-Fi function in this camera could cause
problems.
• When you use the Wi-Fi function, you will consume more power than usual. Only
use Wi-Fi when there is plenty of charge in the battery.
. Install the image management software on your computer.
Install the dedicated D’z IMAGE Viewer from the website below.
https://dz-image-store.casio.jp/dl/
. Software system requirements
To install the D'z IMAGE Viewer on your computer, the following operating
environment is recommended.
Be sure to check your computer system beforehand.
OS: Windows 10, 64-bit
• D’z IMAGE Viewer is dedicated Windows OS software. It will not run on MacOS.
• The above system requirements are the recommended environment only and do
not guarantee that the software will run.
IMPORTANT!
• The software functions and system requirements are subject to change without
notice.
Connecting the Camera to a Computer
47
(Wi-Fi connection)
Page 48

Wi-Fi Mode
Tap (Enable Wi-Fi) to enable or disable the Wi-Fi connection.
. Icons displayed on screen during Wi-Fi connection
When you enable the Wi-Fi connection between the camera and a computer (page
61), icons indicating the communication status appear on the camera screen.
Wi-Fi connection is disabled.
Wi-Fi connection is enabled and you are connected in AP mode.
Wi-Fi connection is enabled but is operating in STATION mode,
but you are not connected.
Wi-Fi connection is enabled and you are connected in STATION
XXXXXXXXXXXXXXXXXX
(Shown flashing)
XXXXXXXXXXXXXXXXXX
(Shown flashing)
mode.
The “XXXXXXXXX” section in the display at left indicates the
connected SSID.
Wi-Fi connection is enabled and image files are being
transferred in AP mode.
Wi-Fi connection is enabled and image files are being
transferred in STATION mode. The “XXXXXXXXX” section in
the display at left indicates the connected SSID.
48
Connecting the Camera to a Computer
(Wi-Fi connection)
Page 49

Setting Up the Wi-Fi Connection the First Time
A
To connect the camera to a computer via Wi-Fi, you must configure the Wi-Fi
connection. This procedure is only necessary the first time.
AP Connects the camera to a computer via Wi-Fi.
STATION Connects the camera to a wireless LAN router.
. Wi-Fi connection via AP mode
Procedure on the camera
1. Tap (recall) on the left side of screen.
2. Tap (Setting).
3. Tap “Wi-Fi”.
4. Set “Wi-Fi” to “ON”.
5. Set “Wi-Fi Mode” to “AP”.
Wi-Fi
Wi-Fi Mode
SSID
Wi-Fi
ONOFF
PSTATION
DZ-D100
Procedure on the computer
6. From the list of networks (SSIDs), select the camera’s SSID and click
“Connect”.
SSID: DZ-D100
Password: 00000000
Windows 10
1) In “ Start”, click “Settings ”.
2) In “Network & Internet”, click “Wi-Fi”.
Check that the Wi-Fi setting is enabled.
3) Click “Show available networks”.
The list of networks (SSIDs) appears.
49
Connecting the Camera to a Computer
(Wi-Fi connection)
Page 50

. Wi-Fi connection via STATION
A
Procedure on the camera
1. Tap (recall) on the left side of screen.
2. Tap (Setting).
3. Tap “Wi-Fi”.
4. Set “Wi-Fi” to “ON”.
5. In “Wi-Fi Mode”, select “STATION”.
6. Tap “SSID”.
7. In the STATION MODE screen, select the
SSID you want to connect to.
If the desired SSID is shown
1) Select the SSID for the router you want to
connect to and enter the password for the router.
2) Tap .
If the desired SSID is not shown
If the stealth settings are enabled, SSIDs are not shown. Check the router
settings and then use the procedure below to configure the settings.
1) Tap “+Add Network”.
2) Enter the SSID.
3) Select the router authentication method.
None If no password is set
WEP For the WEP method
WPA/WPA2 PSK For the WPA PSK/WPA2 PSK method
4) Select the router IP address setting.
DHCP To allocate IP addresses automatically
To enter the IP address manually
Static
Input details: Static IP address, gateway address,
network prefix length
Wi-Fi
Wi-Fi Mode
SSID
STATION MODE
abcdefghijk_A
abcdefghijk_G
+ Add Network
Wi-Fi
ONOFF
PSTATION
5) Tap .
The added SSID appears in the STATION MODE screen.
50
Connecting the Camera to a Computer
(Wi-Fi connection)
Page 51

Transferring images to a computer (Auto Transfer)
You can transfer photographed images to your computer using the camera's Wi-Fi
connection function and the D’z IMAGE Viewer image management software.
1. Double-click the icon for D’z IMAGE Viewer on the computer screen.
2. In the startup screen, click “自動転送OFF” (Auto Transfer OFF).
When “自動転送OFF” (Auto Transfer OFF) changes to “画像転送中” (Transferring
Images), image transfer begins.
When image transfer is completed, (Update) appears.
3. Click (Update).
The images are saved in D’z IMAGE Viewer.
51
Connecting the Camera to a Computer
(Wi-Fi connection)
Page 52

IMPORTANT!
Changing the password for Wi-Fi connection
You can change the password used when connecting the camera to a computer via
Wi-Fi (AP mode).
To protect personal information, it is recommended that you change the password.
• Terminate the Wi-Fi connection before changing your Wi-Fi connection password.
1. Tap (Setting).
2. Tap “Wi-Fi”.
3. Tap “SSID” to display the Password field.
4. Tap “Password” to open the password settings screen.
5. Once you have changed the password, tap .
NOTE
• Changing the password for the Wi-Fi connection terminates the connection to the
computer. Configure the Wi-Fi connection settings again.
• Either leave the password unset or enter 8 or more characters as a password.
52
Connecting the Camera to a Computer
(Wi-Fi connection)
Page 53

Using a Computer
Functions available on a computer
Connecting the camera to a computer enables the following.
Saving and
viewing images
on your
computer
Playing back
video
The procedure for this is different on Windows PCs and Macintosh computers.
• For Windows PCs, see ”Using a Windows PC” (page 53)
• For Macintosh computers, see ”Using a Macintosh Computer” (page 57)
Using a Windows PC
Depending on the performance of your PC, how it is set up and which software is
installed, you may not be able to successfully view or save still images and videos on
your PC.
• Manually saving and viewing images on the
computer (USB connection) (pages 53, 57).
• Automatically transferring images to the
computer for viewing via wireless LAN
(page 47). The D'z IMAGE Viewer image
management software must be installed.
• You can also play back videos
(pages 56, 58).
Saving and viewing images on a PC
Connecting the camera to a PC allows you to save images (files such as still images
and videos) to the PC and to view images on the PC.
Do not use a PC to manipulate images in built-in memory or on memory
cards, including modifying, deleting, moving or renaming the images.
Doing so causes inconsistencies with the image management data and may
prevent images being played back on the camera or radically alter the number of
images shot. Operations such as image modification, deletion, relocation and
renaming should be carried out on images saved on the PC.
IMPORTANT!
• Do not disconnect the cable or operate the camera while viewing or saving images.
Doing so could cause file corruption.
53
Using a Computer
Page 54

NOTE
USB
USB port
Micro USB cable
Windows 8.1 Windows 7
Desktop File Explorer
ComputerStart
Windows 10
Start
File Explorer
• You can also import images directly from a memory card using a third-party card
reader or the card slot on the PC. Refer to the manual for your device for details.
. Connecting the camera to a PC to save files
1. Switch off the camera and
connect it to a USB port on the
PC using a micro USB cable.
• The PC used should be compliant
with the IEC/UL/CSA/EN60950-1
or JIS C 6950-1, or with the
VCCI-B, FCC-B or CE standard.
The use of products that do not
comply with the specified
standards may result in lowered
resistance to external electromagnetic waves and/or an increase in unwanted
electromagnetic wave emissions.
• The PC should be kept at least 1.5 m (4.9') away from the patient during use.
A micro USB cable is not included with this camera.
2. Press [p] (Power) to switch the camera on.
When you switch the camera on, check that the camera’s operation check
indicator has changed to being lit green. Note that, at this point, the LCD monitor
is not switched on.
• The first time you connect the camera to a PC via a USB cable, an error
message may appear on the PC. In this event, briefly disconnect and then
reconnect the USB cable.
3. Windows 10: Click “Start” and then “File Explorer”, and then click
“This PC” in the sidebar.
Windows 8.1: Click “Desktop” and then “File Explorer”.
Windows 7: Click “Start” and then “Computer”.
54
Using a Computer
Page 55

4. Double-click “Removable Disk”
Removable Disk
Windows 7
Removable Disk
Windows 8.1Windows 10
Removable Disk
DCIM
Windows 7
DCIM
Windows 8.1
DCIM
Windows 10
• Memory cards and built-in memory are each recognized as a “Removable
Disk”.
5. Right-click the “DCIM” folder
6. Click “Copy” in the menu.
7. Windows 10/Windows 8.1: Click “Documents”.
Windows 7: Click “Start” and then “Documents”.
• If there is already a saved “DCIM” folder, it will be overwritten. Rename or move
the existing saved “DCIM” folder before copying the new folder.
8. Windows 10/Windows 8.1: In the “Documents” menu, click “Home”
and then “Paste”.
Windows 7: In the “Documents” menu, click “Organize” or “Edit” and
then “Paste”.
The “DCIM” folder (the folder containing the saved image files) is copied to the
“Documents” folder and the images are also saved on the PC.
• Once copying is completed, it is recommended that you right-click the “DCIM”
folder and rename the folder.
9. When copying is completed, disconnect the camera from the PC.
Disconnect the USB cable.
55
Using a Computer
Page 56

. Viewing images saved on a PC
DCIM
1. Double-click the copied “DCIM” folder to open
it.
2. Double-click to open the folder containing the
images you want to view.
3. Double-click the image file you want to view to
display the image.
• See “Folder structure in memory” (page 60) for
more information on file names.
. Notes on playing back video
• Once you have saved a video file to your PC, doubleclick that image file to play the video. Video files on a network or on a memory card
may not play back correctly.
• Depending on the performance of your PC, playback may not run correctly. In this
event, try the following:
– Close any other software that you have open. Also shut down any resident
software.
If a file will not play back correctly on your PC, you may still be able to play it back on
a TV with an HDMI port by using a third-party HDMI cable.
56
Using a Computer
Page 57

Using a Macintosh Computer
Depending on the performance of your Macintosh computer, you may not be able to
successfully view or save still images and videos on your computer.
Saving and viewing images on a Macintosh computer
Do not use a computer to manipulate images in built-in memory or on
memory cards, including modifying, deleting, moving or renaming the
images.
Doing so causes inconsistencies with the image management data and may
prevent images being played back on the camera or radically alter the number of
images shot. Operations such as image modification, deletion, relocation and
renaming should be carried out on images saved on the computer.
IMPORTANT!
• Do not disconnect the cable or operate the camera while viewing or saving images.
Doing so could cause file corruption.
NOTE
• You can also import images directly from a memory card using a third-party card
reader or the card slot on the computer. Refer to the manual for your device for
details.
. Connecting the camera to a computer to save files
1. Switch off the camera and connect it to a USB port on the computer
using a micro USB cable (page 54).
• The computer used should be compliant with the IEC/UL/CSA/EN60950-1 or
JIS C 6950-1, or with the VCCI-B, FCC-B or CE standard.
• The computer should be kept at least 1.5 m (4.9') away from the patient during
use.
A micro USB cable is not included with this camera.
2. Press [p] (Power) to switch the camera on.
When you switch the camera on, check that the camera’s operation check
indicator has changed to being lit green. Note that, at this point, the LCD monitor
is not switched on.
The computer recognizes built-in memory or memory cards in the camera as
drives. The icon displayed differs depending on the Mac OS version used.
• The first time you connect the camera to a computer via a USB cable, an error
message may appear on the computer. In this event, briefly disconnect and
then reconnect the USB cable.
57
Using a Computer
Page 58

3. Double-click the displayed drive.
4. Drag & drop the “DCIM” folder to the desktop to copy
the images to the computer.
5. Once copying is completed, eject the drive or drag &
drop it to the Trash (Bin).
6. Disconnect the camera from the computer.
Check that the operation check indicator is not flashing red and then disconnect
the USB cable.
. Viewing images saved on the computer
1. Double-click the displayed drive.
2. Double-click the “DCIM” folder to open it.
3. Double-click to open the folder containing the images you want to
view.
4. Double-click the image file you want to view to display the image.
• See “Folder structure in memory” (page 60) for more information on file names.
. Notes on playing back video
• Once you have saved a video file to your computer, double-click that image file to
play the video. Video files on a network or on a memory card may not play back
correctly.
• Depending on the performance of your Macintosh, playback may not run correctly.
In this event, try the following:
– Shut down any other software that is running.
If a file will not play back correctly on your Macintosh, you may still be able to play it
back on a TV with an HDMI port by using a third-party HDMI cable.
58
Using a Computer
Page 59

Files and Folders
CIMG0026.JPG
ExtensionSerial No.
(4-digit)
100CASIO
Serial No. (3-digit)
Individual photographed still images and other data are recorded on this camera as
discrete blocks of data. Each such discrete block of data is referred to as a “file”. Files
are grouped together into “folders”. Files and folders are automatically named so that
they can be identified.
• For detailed information on the folder structure, see “Folder structure in memory”
(page 60).
Name and maximum number created Sample
Files
Name of the 26th recorded
Up to 9,999 files, numbered “CIMG0001” to
“CIMG9999”, are created in a single folder. The file
extension used differs depending on the file
format.
Folders
Up to 900 folders, from “100CASIO” to
“999CASIO”, are created.
• The significance of the folder name and file name shown at the top right of the
screen during still image or video playback is as follows:
E.g.) 100-0023: The 23rd file in the “100CASIO” folder
• The folder names and file names can be viewed on a computer.
• The number of folders and files that can be saved varies depending on the capacity
of the memory card used.
file:
Name of the 100th folder:
59
Using a Computer
Page 60

Data in memory
DCIM
100CASIO
*
CIMG0001.JPG
CIMG0002.MOV
Images photographed with this camera are stored in the camera’s memory using a
method that complies with the DCF (Design rule for Camera File system) standard.
. DCF standard
• Images shot with this camera can be viewed on other DCF-compatible brands of
camera.
• Images shot with this camera can be printed on other DCF-compatible brands of
printer.
• Images shot with other DCF-compatible brands of camera can be viewed on this
camera.
Note that the above items are not all guaranteed to function.
. Folder structure in memory
Memory
(DCIM folder)
(Recording folder)
(Still image file)
(Video file)
. Image files supported by this camera
• Image files photographed with this camera
• Image files that comply with the DCF standard
Some functions may not be available for some DCF-compliant image files. Note also
that playing back images shot on other cameras may take some time.
. Notes on handling built-in memory and memory cards on a
computer
• When you store content from the camera’s memory on a computer, save it in
“DCIM” folders. Renaming DCIM folders using information such as the date can be
useful for organizing your images later. However, when copying files saved on your
computer back onto the camera, change the folder name back to “DCIM”
beforehand. Folders with names other than “DCIM” are not recognized by this
camera. This also applies to other folders inside the DCIM folder that you have
renamed.
• To ensure that folders and files are correctly recognized by the camera, the folder
structure in memory must match the structure shown on page 60.
60
Using a Computer
Page 61

Other Settings
Setting
Screen
î
+-2
Sounds
Wi-Fi
AP
Modifying other settings
This section describes menu options that can be configured in both photography
mode and playback mode.
1. Tap (recall) on the left side of screen.
2. Tap (Setting).
3. Choose the option you want to set and
select a setting.
Configuring Wi-Fi
Menu item: Wi-Fi
Wi-Fi Select ON or OFF.
Wi-Fi Mode
SSID DZ-D100
Password 00000000
AP: Connects the camera to a computer via Wi-Fi.
STATION: Connects the camera to a wireless LAN router.
Changing the LCD monitor brightness
Menu item: Screen
Settings: -2, -1, 0, +1, +2
Default: 0
61
Other Settings
Page 62

Configuring the camera sounds
Menu item: Sounds
Startup
Half Shutter
Shutter
Operation
Operation Vol
ON: The tone sounds.
OFF: No tone sounds.
Sets the volume for the operation tones.
Range of settings: 0-7 (default: 3)
Resetting the camera date and time
Menu item: Adjust
Tap the year, month, day, hour, minute or am (or pm)/24h option and then swipe up
or down to change the setting.
After changing the date or time, tap to confirm the change.
• You can enter any date between 1 January 2018 and 31 December 2099.
Changing the date style
Menu item: Date Style
You can choose from 3 styles for displaying the date on the screen.
E.g.) 10 July 2019
yyyy/mm/dd 19/7/10
dd/mm/yyyy 10/7/19
mm/dd/yyyy 7/10/19
Changing the display language
Menu item: Language
Sets the language used for on-screen messages.
You can switch between 日本語(Japanese) and English.
Adjusting the white balance
Menu item: White Balance
You can adjust the white balance of still images and videos shot in NORMAL mode.
See page 42 for details.
62
Other Settings
Page 63

Setting the Doctor ID
Menu item: Doctor ID
Enables/disables input of a Doctor ID when the camera starts up.
To change the Doctor ID, tap “Doctor ID” and register a new ID.
Setting the Patient ID
Menu item: Patient ID
Enables/disables input of a Patient ID when the camera starts up.
To change the Patient ID, tap “Patient ID” and register a new ID.
UV ON/OFF setting
Menu item: UV
Enables/disables the UV filter.
Trash setting
Menu item: Trash
Enables/disables the Trash function.
ON Selected files are moved to the Trash.
OFF Selected files are permanently deleted.
Setting the date labels for thumbnail display
Menu item: Date Label
Enables/disables display of the date label in the thumbnail display.
PIN setting
Menu item: PIN
Enables/disables input of a PIN when the camera starts up.
To change the PIN, tap “PIN” and register a new PIN.
63
Other Settings
Page 64

Formatting memory
Menu item: Format
If a memory card is inserted in the camera, you can format the memory card. If not,
you can format the built-in memory.
• Formatting deletes all the data in memory. Data deleted in this way cannot be
recovered. Check that you really want to format the memory before proceeding.
• When you format memory, images are deleted even when Trash (page 63) is
enabled.
• When formatting, ensure that you are using a battery with ample remaining charge.
Switching the camera off during formatting could prevent correct formatting and
cause the camera to malfunction.
• Never open the battery cover during formatting. Doing so cause the camera to
malfunction.
Resetting the camera to the factory defaults
Menu item: Reset
See page 75 for more information on the factory default settings.
The settings below are not reset.
– Adjust (date & time)
Checking the camera’s firmware version
Menu item: Version
This shows the camera’s model name, the firmware version installed in the camera
and its MAC address.
• The MAC address is a fixed number assigned to identify network devices.
• Check this screen after you upgrade the camera’s firmware.
64
Other Settings
Page 65

Appendix
Notes on Using the Camera
. Notes on Handling the Camera
This camera is a precision device. Applying undue force to the lens in particular can
cause damage or a fault. Take special note of the following:
Use the camera indoors (consulting/examination rooms, home health
care, etc.).
Do not leave the LED light switched on for extended periods.
Do not use this camera around people fitted with devices such as
pacemakers.
Do not operate with wet hands.
Do not subject the camera to sterilization using equipment such as an
autoclave.
Do not use lighting or communications equipment that emits
electromagnetic waves near this camera.
Doing so could cause a malfunction.
When taking photos, take care not to hit the lens against other objects,
drop the camera or otherwise subject the camera to strong impacts.
Do not use the camera in ways that subject the lens to excessive force,
such as holding the camera by the lens when taking photos.
When carrying the camera in a bag or other container, avoid subjecting
the camera to excessive force. Take particular care to protect the lens,
such as by fitting the lens cap provided.
Hold on to the strap when taking pictures to avoid dropping the camera.
Do not drop the camera or otherwise subject it to strong impacts.
Do not attempt any disassembly or modification.
Check that the rechargeable battery is fully charged and take care to
ensure that the battery does not run out of charge while you are using the
camera.
65
Appendix
Page 66

During observations and photography, hold the camera grip securely and
take care not to drop it.
Particularly when working above the patient, take care not to drop the
camera onto the patient.
Carefully check the photography mode (NORMAL or DERMO) when
taking pictures to ensure that the mode is correct for the site being
photographed.
Depending on the photography mode, the LED light may be on or off, or
may illuminate a different area. Take care shining the light at other
people. Take particular care not to shine the LED light into other people’s
eyes.
Both during normal use and when being replaced, the rechargeable
battery, AC adapter and cables used with the camera must always be the
specified products. The use of other products may lead to faults or
malfunctions.
It may also result in lowered resistance to external electromagnetic waves
and/or an increase in unwanted electromagnetic wave emissions.
Avoid using the camera close to or stacked on top of other equipment.
Doing so could cause a malfunction.
If you notice any unusual odors, overheating, discoloration, distortion or
any other abnormality when using, charging or storing this camera,
immediately stop using the camera. Continued use of the camera could
cause the battery to overheat, rupture or catch fire.
If the battery leaks fluid or emits unusual odors, immediately move it away
from any exposed flame. Otherwise, the leaked electrolyte could ignite
and explode or catch fire.
Even during the warranty period, charges will apply to any repairs for faults
caused by damage to camera components such as the lens, LCD monitor or
internal circuit boards where that damage arises from handling errors, such as
external pressure, impacts or being dropped.
. Notes on Storing the Camera
• Storage temperature: -20°C to 60°C (-4°F to 140°F)
• Storage humidity: 10% to 85% (condensation-free)
• Switch the camera off, wipe the lens and camera body clean and store the camera
in a clean location.
• Store the camera in a location that is not subject to high temperatures or humidity
or exposed to direct sunlight.
• Store the camera out of the reach of children.
• Do not store the camera in an elevated or other location from which it could fall and
be damaged and/or cause injury.
• If the camera will not be used for an extended period, store it with the rechargeable
battery removed from the camera body.
66
Appendix
Page 67

. Notes on Data Errors
This camera is made up of precision electronic components. Handling the camera in
any of the ways listed below could result in the corruption of data in the camera.
• Removing the battery or memory card during camera operation
• Removing the battery or memory card when you have switched the camera off and
the operation check indicator is flashing green
• Disconnecting the USB cable during communication
• Continuing to use a battery that immediately goes flat after being charged
– Continuing to use a battery that immediately goes flat after being charged could
damage the camera. Install a new replacement battery immediately.
• Other abnormal operations
In such cases, a message may appear on the screen (page 80). Respond as directed
by the message.
. Operating environment
• Operating temperature requirements: 10°C to 30°C (50°F to 86°F)
• Operating humidity: 10% to 85 % (condensation-free)
• Do not place this camera in the following locations:
– Very humid, dusty or gritty locations or in direct sunlight
– Locations subject to extreme variations in temperature or humidity, such as
close to heating or cooling units
– Inside a vehicle on a sunny day or in locations subject to frequent vibrations
– Locations accessible to children
– In an elevated or other location from which the camera could fall and be
damaged and/or cause injury
• The camera should be used in a dedicated medical treatment facility or home
health care situation.
. Condensation
If the camera is suddenly moved between locations with very different temperatures,
such as from outdoors on a cold, midwinters day to a heated room indoors, water
droplets (condensation) may form on the inside and outside of this camera and cause
a fault. To prevent condensation in such situations, place the camera is a sealed
plastic bag before moving it. Then wait until it has fully adjusted to the ambient
temperature before taking it out of the bag and leaving it for several hours with the
battery cover open.
. Lens
Do not forcefully rub the lens surface as this could scratch the surface or damage the
lens unit.
67
Appendix
Page 68

. Cleaning the inside of the lens
Lens removal tool
Camera
Lens top
If dirt or dust gets into the lens, use the procedure below to clean it.
1. Fit the lens removal tool (DLR-100M) and remove the lens top from the
camera body.
Align the lug on the lens removal tool with the notch in the lens top.
2. Use a blower or similar tool to blow out any dirt or dust that has got
into the lens.
3. Use the lens removal tool to re-attach the lens top to the camera body.
When attaching the lens top to the camera body, rotate the lens top until the
notch is back in its original position.
NOTE
• Note that you should only remove the lens when absolutely necessary, as doing so
can result in dirt getting into the lens.
. LED light
• Do not look directly at the LED light or look directly into the close-up lens at the
front of the camera when it is switched on. This could lead to the eye being
exposed to strong light which could cause impaired eyesight.
• When photographing close to the eye, take care not to shine light directly into the
the eye.
• Using the light at the HIGH brightness setting for long periods can cause the
temperature of the light at the tip of the close-up section to exceed 41°C (106°F),
reaching a maximum of 46°C (115°F). Be sure to switch the light off when not
taking pictures.
68
Appendix
Page 69

. Cleaning the camera
• Do not touch the lens surface or LED light.
• Check that there is no dirt or dust on the close-up lens at the front of the camera. If
any dirt or dust is found, use the tool provided to detach the close-up lens and then
remove any soiling.
• Before and after use, use clean gauze or soft cloth soaked in ethanol for
disinfection at the appropriate dilution to wipe any soiling off the close-up lens.
• To prevent possible infection, keep the close-up lens clean and hygienic before
and after using the camera.
• If using gel, use a non-toxic water-soluble gel. After using gel, take particular care
to wipe the area around the close-up lens at the front of the camera clean.
• Before and after use, check that there is no soiling, chipping or splitting in the
camera body and the close-up lens at the front of the camera.
• Do not use damaged equipment.
. Notes on handling this camera and the AC adapter
• Disposal and recycling should be carried out in accordance with the directions
given by your local government authority for environmental protection.
. Handling rechargeable batteries (notes on recycling)
To conserve valuable resources, batteries that are no longer needed
should not be discarded but taken to a store that offers a recycling
service for rechargeable batteries.
<Guide to stores with recycling services>
For detailed information, visit the JBRC website:
• Home page https://www.jbrc.com/
. Notes on handling used rechargeable batteries
• Insulate the positive and negative terminals with tape or a similar covering.
• Do not remove the outer covering.
• Do not disassemble.
. Notes on using Wi-Fi function (wireless LAN)
• Because this product uses wireless communication, it may affect or be affected by
nearby equipment.
• This product is subject to the Export Administration Regulations (EAR) of the
United States and cannot be taken or exported to countries that are embargoed
under those regulations.
Frequencies used
This camera uses frequencies in the 2.4 GHz band that may also be used by other
wireless device.
To prevent radio interference with other wireless device, note the following when
using this device.
69
Appendix
Page 70

This device includes built-in wireless devices for a low-power data communications
system.
Other equipment that operates in the frequency band being used includes industrial,
scientific and medical equipment such as microwave ovens, along with other wireless
stations of the same type, in-plant wireless stations for mobile object identification that
require a permit and are used in facilities such as factory production lines, specific lowpower wireless stations that do not require a permit, and amateur wireless stations
(hereinafter referred to collectively as “other wireless stations”).
• Check that there are no other wireless stations operating nearby before using the
camera.
• If any radio interference occurs between this camera and other wireless stations,
immediately move the camera to another location or stop using the camera.
• While this camera is compliant with the EMC standards, it may still malfunction if
there are devices that generate high-frequency emissions (mobile phones, etc.)
nearby. If a malfunction occurs, move the camera away from the device generating
high-frequency emissions.
Frequency labeling
This wireless device uses the 2.4 GHz band.
Wireless LAN
As its modulation method, this device uses DS-SS
with OFDM, and the interference range is 20 m
(65.6').
Radio transmission interception
Data transmitted via radio waves can be intercepted by a third party. Please bear this
in mind.
Unauthorized access
CASIO COMPUTER CO., LTD. accepts no liability whatsoever for any loss or
damages due to the use of this product or unauthorized access to contacts stored in
this product arising from its loss or theft.
Use of this camera as a wireless device
The Wi-Fi function in this product should be used within the limitations stated in this
User’s Guide. CASIO COMPUTER CO., LTD. accepts no liability whatsoever from
any damages arising from other uses of this product.
Magnetism, electrostatic charge and radio interference
Do not use this product in locations exposed to magnetism, electrostatic charge or
radio interference, such as close to a microwave oven. In some environments, it may
not be possible to receive radio waves.
Also, using this product close to a device that uses radio waves in the 2.4 GHz band
may result in lower processing speeds in both devices.
Connections to public LANs
This camera cannot make a wireless LAN connection via a public wireless LAN.
70
Appendix
Page 71

Intended region
The wireless LAN function in this camera is intended for use in Japan. Where this
product is used in a country outside Japan, there is a risk that the radio wave
regulations in that country might be violated and CASIO COMPUTER CO., LTD.
accepts no liability whatsoever for any such violation.
. Other notes
• This camera heats up slightly when being used. This is normal and does not
indicate a fault.
• Keep any portable wireless communications devices (including peripheral devices
such as antenna cables and external antennas) at least 30 cm (11.8") away from
this camera. Proximity to such equipment may impair device performance.
. Trademarks and registered trademarks
Where used in this document, the terms listed below are registered trademarks or
trademarks of their respective owners. Note that the ™ and
this document.
• The SDXC logo is a trademark of SD-3C, LLC.
• Windows, Windows Media, Windows 7, Windows 8.1 and Windows 10 are
registered trademarks or trademarks of Microsoft Corporation in the US and other
countries.
• Macintosh, Mac OS and QuickTime are trademarks of Apple Inc.
• HDMI, the HDMI logo and High-Definition Multimedia Interface are trademarks or
registered trademarks of HDMI Licensing, LLC.
• Wi-Fi is a registered trademark of Wi-Fi Alliance.
• All other company and product names are registered trademarks or trademarks of
the respective companies.
Unauthorized duplication (copying), distribution or transfer via a network of the
software provided by CASIO in this product for commercial purposes is prohibited.
®
symbols are not used in
71
Appendix
Page 72

. Open Source Software
BSD License
Copyright (c) 1987 Regents of the University of California. All rights reserved.
Redistribution and use in source and binary forms are permitted
provided that the above copyright notice and this paragraph are
duplicated in all such forms and that any documentation,
advertising materials, and other materials related to such
distribution and use acknowledge that the software was developed
by the University of California, Berkeley. The name of the
University may not be used to endorse or promote products derived
from this software without specific prior written permission.
THIS SOFTWARE IS PROVIDED ``AS IS'' AND WITHOUT ANY EXPRESS OR
IMPLIED WARRANTIES, INCLUDING, WITHOUT LIMITATION, THE IMPLIED
WARRANTIES OF MERCHANTIBILITY AND FITNESS FOR A PARTICULAR PURPOSE.
This product includes software that has been licensed in accordance with the terms of
the license as stated below.
72
Appendix
Page 73

Power Supply
Charging
. If the camera’s operation check indicator flashes red during
charging
• This indicates that charging cannot proceed because the ambient temperature or
the battery temperature is either too high or too low. Disconnect the cable and
leave the camera at room temperature for some time. Then resume charging within
the recommended operating temperature range.
• Check for soiling on the battery contacts. If the contacts are dirty, wipe them clean
with a dry cloth.
If you take the above steps and the operation check indicator is still flashing, the battery
may be defective.
Notes on the battery
. Notes on using the battery
• In cold locations, the characteristics of the battery are such that the time for which
battery can be used when fully charged may be shorter.
• Charge the battery within the recommended operating temperature range. At
temperatures outside the recommended rate, charging may take longer or it may
not be possible to charge the battery fully.
• Do not damage or peel off the outer seal on the battery.
• If the time for which the battery can be used reduces significantly even immediately
after charging, the battery may have reached the end of its service life. Purchase a
new battery. Do not continue to use an old battery. Rather, take old batteries to a
store that offers a recycling service for rechargeable batteries (page 69).
. Notes on storing batteries
• Storing a charged battery for long periods may adversely affect the battery’s
characteristics. If the battery will not be used for some time, drain the battery
charge fully before storing it.
• When the camera is not being used, remove the battery from the camera. When
the battery is left in the camera, small amounts of current continue to flow even
when the camera is switched off. This could drain the battery, lengthen the
charging time or cause camera damage.
• Store batteries in a dry, cool location (20°C (68°F) or less).
• To prevent over-discharging, at least once every 6 months you should fully charge
the battery and then fully use up the charge with the camera before storing the
battery.
73
Appendix
Page 74

Memory Cards
Unlocked
(write-enabled)
Locked
(write-protected)
See page 16 for information on the supported memory cards and how to insert a
memory card.
. Memory cards
• SD, SDHC and SDXC memory cards are all fitted
with write-protection (lock) switches. Use this switch if
you are concerned about accidentally deleting your
data. However, note that you cannot use a locked
card for photography, format the card or delete data
without first unlocking the card.
• Because recorded data can be deleted or corrupted
by factors such as electrostatic charge or electrical noise, you are advised to
always back up important files to another media (optical disk (Blu-ray, DVD, etc.),
hard disk, etc.).
. Notes on Using Memory Cards
• Processing speeds may be slower for some types of memory card. Always use
ultra high-speed memory cards whenever possible. Note that not all operations are
guaranteed, even for ultra high-speed memory cards.
• It is recommended that you use only CASIO-approved memory cards.
Recommended: 16GB SDHC memory card (by SanDisk Corporation).
. Notes on transferring or disposing of memory cards and the camera
body
The “Format” and “Delete” functions in this camera only change the file management
information on the memory card. The data itself is left unchanged. The management
of data on a memory card is the responsibility of the customer. Some recommended
methods are outlined below.
• When disposing of a memory card, physically destroy the memory card itself, or
use third-party dedicated data eraser software or a similar tool to completely delete
the data on the memory card.
• When transferring a memory card, use third-party dedicated data eraser software
or a similar tool to completely delete the data on the memory card.
It is also recommended that you use the “Format” function (page 64) to completely
delete the data in built-in memory before transferring or disposing of the camera
body.
74
Appendix
Page 75

Resetting and reset content
UV OFF
White Balance
Auto
Screen 0
Sounds
Startup: ON
Half Shutter: ON
Shutter: ON
Operation: ON
Operation Vol: 3
Wi-Fi
Wi-Fi: OFF
Wi-Fi Mode: AP
SSID: DZ-D100
Password: 00000000
Doctor ID
Doctor ID input at
startup: OFF
Patient ID
Patient ID input at
startup: OFF
PIN
PIN input at startup:
OFF
Trash OFF
Date Style yyyy/mm/dd
Date Label OFF
Language 日本語(Japanese)
The list below shows the settings in the photography mode and playback mode
menus that are reset (initialized) by the Reset procedure (page 64).
--: Indicates settings that are not affected by the Reset procedure.
IMPORTANT!
• Some menu options may not be available depending on the photography mode
used.
75
Appendix
Page 76

Trouble shooting
Symptoms and solutions
Symptoms Probable cause and solution
Power Supply
The camera won’t
switch on.
The camera
switched itself off
for no reason.
The camera won’t
switch off. Nothing
happens when I
press the buttons.
Charging
The operation
check indicator
does not light
orange and I can’t
charge the
camera battery.
Photography
Pressing the
shutter button
doesn’t take
pictures.
I’m using Auto
Focus but I still
can’t get the
image in focus.
The subjects in
photographed
images are
blurred.
1) The battery may be loaded the wrong way round (page 11).
2) The battery may be fully discharged. If so, recharge the battery
(page 12). If the battery immediately runs even so, the battery
has reached the end of its service life. Purchase a new CASIO
lithium-ion battery (DNP-100M) (sold separately).
1) The Auto Power Off function may have been triggered (page
15). Switch the camera back on.
2) The battery may be fully discharged. If so, recharge the battery
(page 12).
3) Protective action may have been triggered because the
camera exceeded a set temperature. Leave the camera
switched off for a while until it cools down before using it again.
Briefly remove the battery from the camera and then reload the
battery.
1) Connect or disconnect the cable for the AC adapter for camera
charging connected to the camera.
2) Briefly remove the battery from the camera and then reload the
battery (page 12).
3) If reconnecting the AC adapter for camera charging or
reloading the battery does not enable charging, the battery may
be damaged due to an electrostatic discharge or similar event.
Replace the battery.
1) If the camera is in playback mode, press [p] or the shutter
button to switch to photography mode.
2) If “Memory Full” is displayed, transfer some image to your
computer and then delete images you no longer need on the
camera. Otherwise, load another memory card.
1) If the lens is dirty, wipe it clean.
2) Align the center of the focusing frame with the subject.
The image may not be focused. Align the focusing frame over the
subject you want in focus and then take the shot.
76
Appendix
Page 77

Symptoms Probable cause and solution
The battery went
dead while I was
The battery may be fully discharged. If so, recharge the battery
(page 12).
shooting with the
self-timer.
Images displayed
on the LCD
The adapter selector setting may be wrong. Use the correct
setting for the photography mode (page 40).
monitor are
slightly out of
focus.
There is noise in
the image.
The camera automatically increases its sensitivity when the
subject is dark, which may generate noise. Use a light or similar
means to make the shot brighter.
Photographed
images are not
saved.
1) If the battery ran flat before recording was completed, the
image is not saved. If the battery level indicator is ,
immediately charge the battery (page 14).
2) If the memory card was removed before recording was
completed, the image is not saved. Do not remove the memory
card until recording is completed.
The image goes
out of focus during
video shooting.
I can’t stop the
camera shooting
video.
1) The adapter selector setting may be wrong. Use the correct
setting for the photography mode (page 40).
2) The lens may be dirty. If so, clean it (page 68).
An electrostatic discharge or similar event may be preventing the
monitor screen from changing and stopping you from ending
video shooting. Disconnect the AC adapter cable or reload the
battery to switch the camera off and then on again.
The camera
suddenly stops
shooting video for
Protective action may have been triggered because the camera
exceeded a set temperature. Let the camera cool down before
using it again.
no reason.
I can’t change the
function settings.
Some setting options are not available in some photography
modes.
The setting
options are not
displayed.
Playback
Images are not
displayed.
If you used a memory card containing images shot on another
camera that is not compliant with the DCF standard, the images
are in a different file management format and cannot be played
back.
77
Appendix
Page 78

Symptoms Probable cause and solution
Wi-Fi function
I can’t connect to
the wireless LAN.
The connection
drops out.
1) If the computer or wireless LAN router are too far from the
camera, it cannot maintain a connection.
2) The computer may be connected to another wireless device.
Check that this camera is selected in the Wi-Fi connection
settings on the computer (page 49).
3) The connection may drop out if there is a microwave oven,
cordless phone or other wireless device nearby. Keep the
camera well away from other devices when using it.
4) If none of the above problems apply and you still cannot
establish or maintain a connection, the camera may have been
damaged by an electrostatic discharge or similar event.
Other
The date and time
shown on the
The date and time settings are incorrect. Reset the date and time
(page 62).
screen and the
dates for recorded
files are incorrect.
The words shown
on the screen are
The display language settings are incorrect. Reset the language
(page 62).
in a foreign
language.
Images are not
imported when I
connect to the
computer via
USB.
1) The USB cable may not be securely connected. Check the
connectors and ensure that they are securely plugged in.
2) If the camera is not switched on, switch it on again.
3) If you connect the USB cable to the computer via a USB hub or
similar device, the camera may not be recognized correctly.
Connect the USB cable directly to a USB port on the computer.
4) You cannot communicate via USB when the battery level
indicator shows . Recharge the battery before connecting
to the computer.
When I switch the
camera on, the
time setting
screen appears.
1) The camera is not set to the factory defaults, or the camera has
been left with the battery fully discharged. Configure the
settings correctly (pages 14, 20).
2) The memory management area inside the camera may be
corrupted. If so, use the Reset procedure to restore the default
camera settings (page 64). Then configure the settings. If the
time setting screen did not appear when you switched the
camera back on, the memory management area in the camera
has been successfully restored.
Various icons and
numbers appear
on the screen.
Such displayed items include the screen displays needed for
photography and information on images you have shot. Tapping
allows you to toggle between showing and hiding information
on the screen (page 10).
78
Appendix
Page 79

Symptoms Probable cause and solution
If you set the time
after purchasing
the camera and
then immediately
remove the
Load the battery and reset the time (page 20). Then leave the
battery in the camera for at least 24 hours.
• If you have left the battery in the camera for at least 24 hours
and the time is still reset every time you remove the battery, the
function for retaining the camera settings may be corrupted.
battery, the set
time is reset.
The buttons do
not work
immediately after I
If you are using a high-capacity memory card, more time is
required between switching the camera on and being able to use
the buttons.
switch the camera
on.
79
Appendix
Page 80

Messages displayed on the screen
IMPORTANT!
LOCK switch
Displayed where there is an error on the memory card. Switch
the camera off and re-insert the memory card. If the same
message reappears when you switch the camera back on,
format the memory card (page 64).
Card ERROR
• Note that formatting the memory card will delete all the
content (files) on the card. Before formatting the memory
card, use a computer or other device to save any
uncorrupted files on the memory card.
This card is not
formatted.
The card is
locked.
Displayed where there is the memory card has not been
formatted. Format the memory card (page 64).
The LOCK switch provided on the SD, SDHC
or SDXC memory card is in the locked
position. You cannot record or delete files on
a locked memory card.
This file cannot
be played.
Battery is low. Appears when the battery has run flat.
There are no
files.
LENS ERROR
Send failed.
Communication
stopped.
Could not
connect to Wi-Fi
You are trying to play back a file that is corrupted or that
cannot be played on this camera.
You have not recorded any files, or all the recorded content
has been deleted and there are no files on this camera.
If the lens is operated unexpectedly, this message appears and
the camera shuts down.
Displayed when an attempt to send images to the D’z IMAGE
Viewer image management software failed.
Displayed when communication to the computer via a Wi-Fi
connection is interrupted.
Displayed when the Wi-Fi connection to the connected
computer drops out.
80
Appendix
Page 81

No. of Remaining Still Image Shots/Remaining Shooting Time
Still images
Image size (pixels) File size
20M
(5184×3888)
8.06MB 5 1967
No. of shots in
built-in memory*
Video
Image size/
pixels
(audio)
UXGA
1600×1200
(monaural)
*1
For built-in memory capacity after formatting (approx. 40.0MB).
Transfer rate
(frame rate)
18Mbps
(30 frames/sec.)
1 file
Max.
size
Up to
4GB
Recording
time in
built-in
memory*
18 sec.*
available
recording
time on SD
1
memory
card*
1 hour
4
55 min.
Max.
*2 For a 16GB SDHC memory card (by SanDisk Corporation). The number of available
shots/recording time may differ depending on memory card being used.
*3 If you use an SD memory card with a capacity that is smaller than the maximum size for
one file, the time may be shorter than that shown.
*4 The built-in memory cannot fully meet the video transfer rate. Use an ultra high-speed
memory card (page 16).
• The values given for the number of shots, shooting time and recording time are intended
purely as a guide. The actual performance may be lower depending on the image
content.
• The numbers provided for the file size and transfer rate are intended purely as a guide.
Actual performance may vary depending on the subject photographed.
• If you use memory cards with different capacities, the number of images you can shoot
should be roughly in proportion with the card capacity.
No. of shots on
1
SD memory card*
File size
1-minute
recording
2
140MB 25 min.
for
2
Available
continuous
shooting
time per
3
shot
*
81
Appendix
Page 82

Main Specifications/Optional Products
Image file
formats
Recording
media
Recorded
pixels
Valid
pixels
Imaging
element
Lens F3.3/f=7.67 mm
Zoom Digital zoom 8x
Focus Contrast detection AF
Shooting
range
Still images: JPEG (Exif Ver.
2.3/DCF2.0-compliant/DPOF
non-compliant)
Video: MOV format, H.264/
AVC-compliant, IMA-ADPCM
audio (monaural)
Built-in flash memory
(Image recording area:
Approx. 40.0MB*)
SD/SDHC/SDXC
* Built-in memory capacity
after formatting
Still image:
5184×3888 (NORMAL,
DERMO CONT, DERMO,
MICROSCOPE mode)
4368×3280 (DERMO AIF mode)
Video: UXGA (1600×1200)
Approx. 20.16 megapixels
Size: 1/2.3 inch CMOS (backside illuminated)
Total pixels: Approx. 21.14
megapixels
(Equivalent to 53.5 mm for 35mm
film)
Zoom resolution: 0.1x
NORMAL mode:
From lens (front glass
element):
approx. 1 cm to ∞ (0.4" to
)
∞
DERMO mode:
From lens (front glass
element): 0 to approx. 3 mm
(0.1")
• Using small-diameter
adapter:
From adapter (front glass
element): 0 to approx. 3 mm
(0.1")
Exposure
compensation
Shutter
type
Shutter
speed
Switchable
filters
White
Balance
ISO
sensitivity
(standard
output
sensitivity)
Communication
functions
Image
monitor
External
connection
ports
Microphone
Speaker Monaural
Power
supply
Service life
-2.0EV to +2.0EV
(0.1EV increments)
CMOS electronic shutter
2-1/8000 sec.
Polarizing, non-polarizing, UV
NORMAL mode:
Auto, Fluorescent N,
Fluorescent D, Tungsten,
Manual
Close-up (DERMO)
photography: Fixed
NORMAL mode: Auto
Close-up (DERMO)
photography: Fixed
Wi-Fi:
• Compliant standard: IEEE
802.11b/g/n
• Range of frequencies used:
1-13 ch, 2412-2472 MHz
• Encryption method: WPA2
• Radiant power: 8.51 mW
3.0 inch TFT color LCD
1,036,800 dots
Capacitive touch panel
Micro USB port (Hi-Speed
USB-compatible), HDMI™
output (Micro, type D),
DC jack (5V, 3A)
Monaural
Lithium-ion battery
(DNP-100M) (1)
5 years
82
Appendix
Page 83

Battery life
The battery life figures shown below are
an approximate guide to how long the
battery will last when used at a
temperature of 23°C (73°F). They
constitute no guarantee of shooting time
or number of shots. Battery life will be
shorter at lower temperatures.
No. of still image
1
shots*
Actual video
shooting time*
Approx. 175
Approx. 45 min.
1
• Temperature: 23°C (73°F)
• Battery used: DNP-100M (rated
capacity 1690 mAh)
• Recording media: 16GB SDHC
memory card (by SanDisk
Corporation)
*1 Compliant with CIPA (Camera &
Imaging Products Association)
standards
• The above figures are for a new, fully
charged battery. Battery life will
gradually shorten with repeated use.
• These figures are not guaranteed for
battery life in actual use.
Power
consumption
External
dimensions
Weight Approx. 395 g (13.9 oz)
3.7 V DC, approx. 6.1 W
127.5×76.0×86.1 mm
(5.0"×3.0"×3.4") (W x H x D)
(including battery and memory
card)
Approx. 350 g (12.3 oz)
(excluding battery and memory
card)
Applicable
standards
Applicable
emissions
class/
group
Immunity
test level
Medical
electrical
equipment
safety
standards
IEC60601-1
IEC60601-1-2
The monitor and computer used
should be compliant with the
IEC/UL/CSA/EN60950-1 or JIS
C 6950-1 standard or with the
VCCI-B, FCC-B or CE standard.
The use of non-compliant
products could result in failure to
meet the applicable standards.
CISPR11 group 1, class B
IEC61000-4-3
Radiated RF electromagnetic
field
Home health care situation
IEC61000-4-6
Conducted disturbance caused
by RF electromagnetic fields
Home health care situation
This product qualifies
as a type B applied
part.
Referencing the icon
at right Class II ME
equipment
• Refer to the “Component
Names” for information on
applied parts.
. Lithium-ion battery
(DNP-100M)
Rated
voltage
Rated
capacity
External
dimensions
Weight Approx. 46 g (1.6 oz)
3.7 V
1690 mAh
36.0×55.2×13.7 mm
(1.4"×2.2"×0.5") (W x H x D)
83
Appendix
Page 84

. AC adapter for camera
charging
(AD-M50300A)
Input power
supply
Output 5.0 V DC, 3 A
Frequency 50/60 Hz
External
dimensions
Weight Approx. 137 g (4.8 oz)
Method of
protection
against
electric
shock
100-240 V AC, 0.44-0.22 A
64×34.8×50 mm
(2.5"×1.4"×2.0") (W x H x D)
(excluding protrusions)
Class II ME equipment
(reinforced insulation)
. Optional Products
(As of May 2019)
• Lithium-ion battery DNP-100M
• AC adapter for camera charging
• Small-diameter adapter DPS-100M
• 3D adapter DLA-100M
• Microscope adapter DMS-100M
• Battery Charger Set DCS-100M
. Camera Applied Parts
Glass cover Aluminosilicate glass
Adhesive Acrylic UV/visible-light curing
Glass retainer Polybutylene terephthalate (PBT)
. Small-diameter adapter Front section
Glass cover Aluminosilicate glass
Adhesive Acrylic UV/visible-light curing
Glass retainer Polybutylene terephthalate (PBT)
AD-M50300A
. 3D adapter Front section
Body Thermoplastic polyurethane elastomer
84
Appendix
Page 85

Warning icons
B-shaped
mounting
Class II
equipment icon
Power (ON/OFF)
icon
ISO7010-W001
Indicates a general, non-specific warning
IEC60417-5840 type B applied part
Marking placed on devices (applied parts) that are only applied
to the surface of the body.
A mark given to ME equipment that is designed such that it has
functioning double insulation or reinforced insulation composed
of both basic insulation and supplementary insulation for
IEC60417-5172 Class II equipment.
IEC60417-5009
Power (standby)
85
Appendix
Page 86

5400-1 Higashine-ko, Higashine-city, Yamagata 999-3701
Manufacturing & Distribution: YAMAGATA CASIO CO., LTD.
Manufacturer: YAMAGATA CASIO CO., LTD.
MO1909-A
2019 YAMAGATA CASIO CO., LTD.
 Loading...