

Page 1
MA1012-EA
Operation Guide 3189/3252
About This Manual
• Depending on the model of your watch, display text
appears either as dark figures on a light background or
light figures on a dark background. All sample displays
in this manual are shown using dark figures on a light
background.
• Button operations are indicated using the letters shown
in the illustration.
• Each section of this manual provides you with the
information you need to perform operations in each
mode. Further details and technical information can be
found in the “Reference” section.
E
Procedure Lookup
The following is a handy reference list of all the operational procedures contained in
this manual.
To set the time and date .........................................................................................E-7
To input a new Data Bank record ........................................................................ E-12
To recall Data Bank records ................................................................................ E-15
To edit a Data Bank record .................................................................................. E-16
To delete a Data Bank record .............................................................................. E-16
To view the time in another city code ................................................................. E-17
To toggle a city code time between Standard Time and
Daylight Saving Time ........................................................................................ E-18
E-2
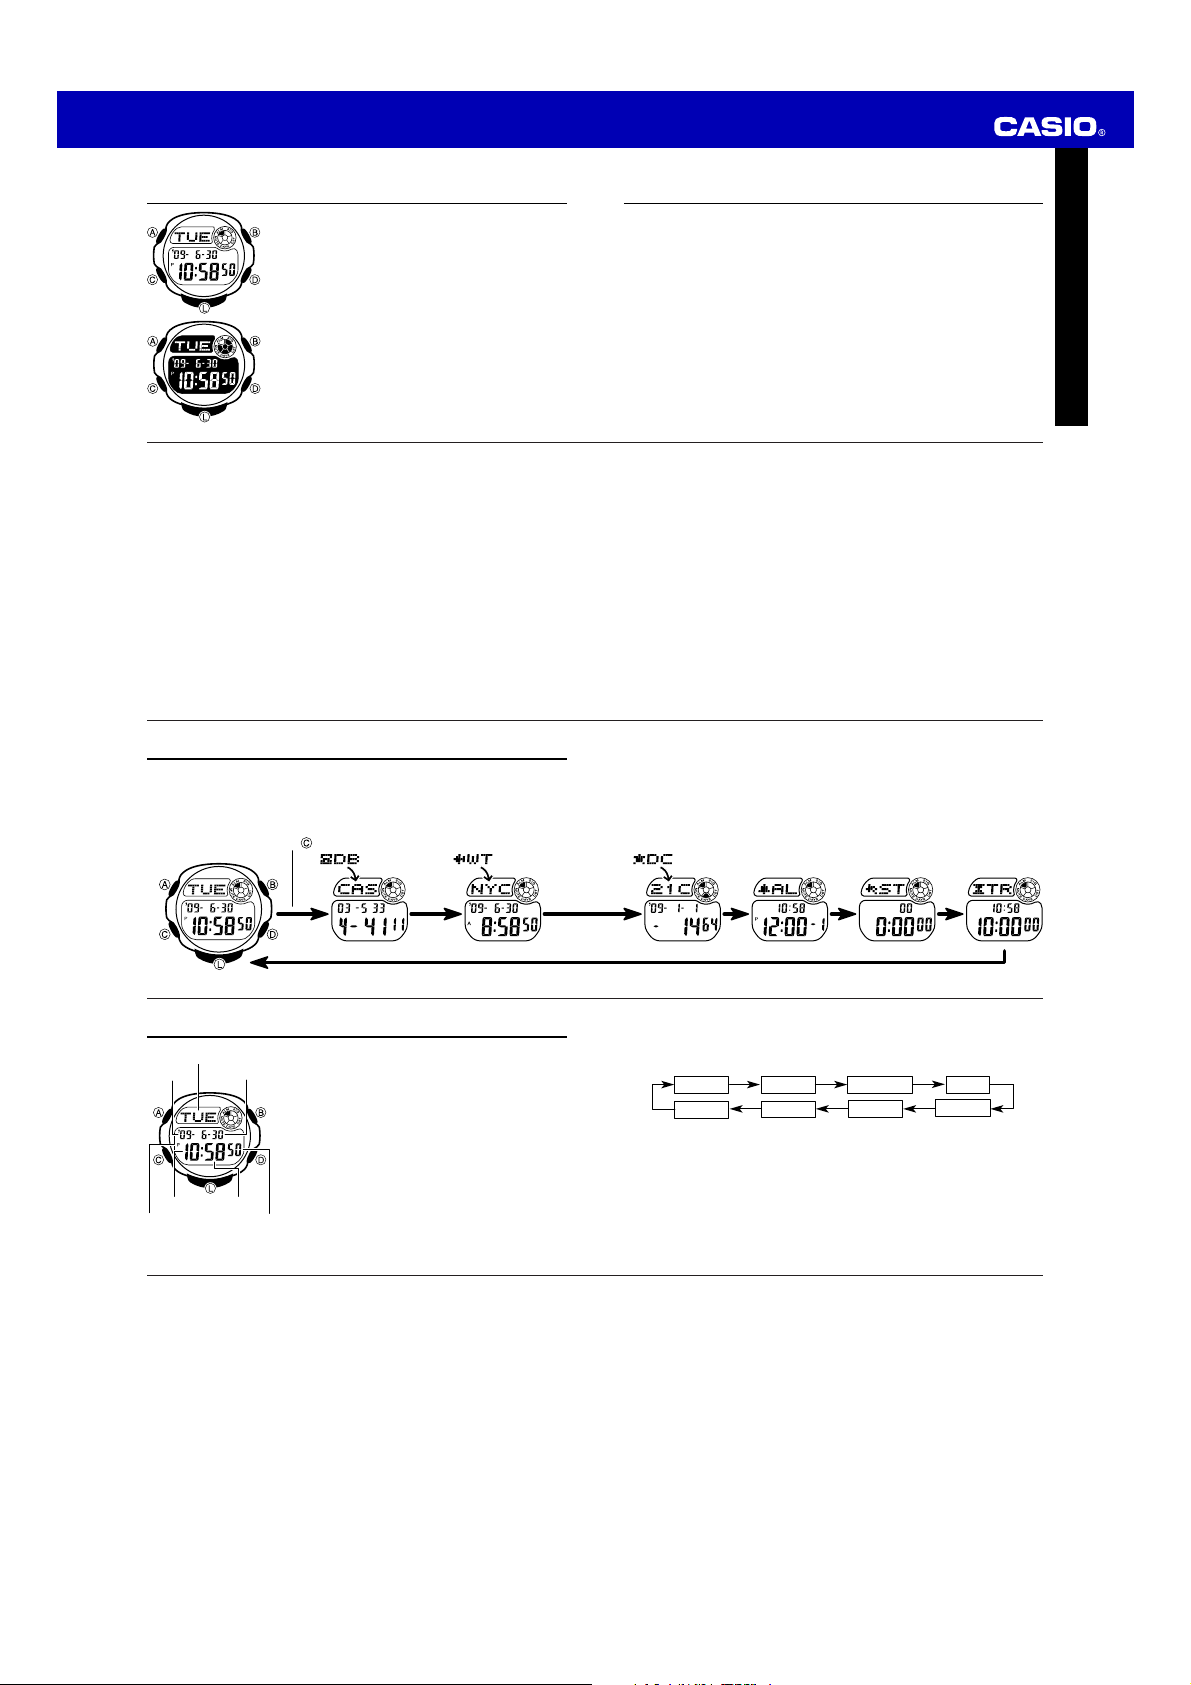
General Guide
• Press C to change from mode to mode.
• Pressing L in any mode illuminates the display.
Timekeeping Mode World Time ModeData Bank Mode
Press .
Contents
General Guide ......................................................................................................... E-4
Timekeeping ............................................................................................................ E-6
Data Bank .............................................................................................................. E-11
World Time ............................................................................................................ E-17
Day Counter .......................................................................................................... E-19
Alarms .................................................................................................................... E-23
Stopwatch .............................................................................................................. E-28
Countdown Timer ................................................................................................. E-30
Reference .............................................................................................................. E-32
Specifications ....................................................................................................... E-35
E-1
To set the target date ............................................................................................E-20
To set an alarm time ............................................................................................. E-24
To test the alarm ................................................................................................... E-25
To turn an alarm on and off ................................................................................. E-26
To turn the Hourly Time Signal on and off ......................................................... E-27
To use the countdown timer ................................................................................ E-30
To set the countdown start time .......................................................................... E-31
To turn the button operation tone on and off .....................................................E-32
E-3
• If you do not perform any operation for a few minutes while a setting screen (with
flashing digits) is on the display, the watch exits the setting screen automatically.
• If you do not perform any operation for a few minutes in the Alarm Mode, Day
Counter Mode, or Data Bank Mode, the watch reverts to the normal timekeeping
screen automatically.
Alarm Mode Stopwatch ModeDay Counter Mode
Countdown
Timer Mode
E-4
Timekeeping
Day of week
Year
Month – Day
Hour
PM indicator
E-6
3. While the seconds setting is selected (flashing), press D to reset it to 00. If you
press D while the seconds setting is in the range of 30 to 59, the seconds are
reset to 00 and 1 is added to the minutes. If the seconds setting is in the range of
00 to 29, the minutes count is unchanged.
• While the DST* setting is selected (DST on indicator is flashing), press D to
• The DST on/off setting you select for the Timekeeping Mode affects the World
• While the city code setting is selected, use D and B to scroll through the
• For full information on city codes, see the “City Code Table” at the back of this
4. While any other setting is selected (flashing), press D to increase it or press B to
decrease it. Holding down D or B scrolls at high speed.
5. Press A to exit the setting screen.
• The day of the week is set in accordance with the date automatically.
• The date can be set within the range of January 1, 2000 to December 31, 2099.
E-8
Minutes
toggle it on (On) and off (OF).
Time Mode.
available codes until the one you want to use as your home time city is displayed.
manual.
Use the Timekeeping Mode to set and view the current
time and date.
• Pressing A in the Timekeeping Mode will display the
currently selected Home City.
• Press D to toggle between 12-hour and 24-hour
formats.
• With 12-hour format, times between midnight and noon
are indicated by A (am), while times between noon and
midnight are indicated by P (pm).
• The A and P indicators do not appear when you are
using 24-hour format.
Seconds
To set the time and date
1. While in the Timekeeping Mode, hold down A until the second’s digits flash on the
display, which indicates the setting screen.
2. Press C to move the flashing in the sequence shown below.
Seconds
Day
• The watch’s built-in full automatic calendar makes allowances for different month
lengths and leap years automatically. Once you set the date, there should be no
reason to change it except after replacement of the watch’s battery.
* See “Daylight Saving Time (DST) Setting” (page E-18) for details about the DST
setting.
DST
Month
City code
Year
Hour
Minutes
E-5
E-7
E-9
Page 2
Operation Guide 3189/3252
g
Backlight Precautions
The backlight uses an EL (electro-luminescent) panel that causes the entire display to
glow for easy reading in the dark.
In any mode, press L to illuminate the display for about two seconds.
• The electro-luminescent panel that provides illumination loses power after very long
use.
• The illumination provided by the backlight may be hard to see when viewed under
direct sunlight.
• The watch may emit an audible sound whenever the display is illuminated. This is
due to vibration of the EL panel used for illumination, and does not indicate
malfunction.
• The backlight turns off automatically whenever an alarm sounds.
• Frequent use of the backlight shortens the battery life.
E-10
To input a new Data Bank record
1. In the Data Bank Mode, use D (+) and B (–) to scroll through the Data Bank
records and display the one you want to input data.
2. Hold down A until a cursor appears on the name area.
3. Use D and B to scroll through characters at the current cursor position.
Characters scroll in the sequence shown below.
Press .
(Space)
Press .
• Holding down D or B scrolls at high speed.
E-12
7. Use D and B to scroll through characters (hyphen, numbers, space) at the
current cursor position on the number area. Characters scroll in the sequence
shown below.
• Holding down D or B scrolls characters at high speed.
8. When the character you want is at the cursor position, press C to move the cursor
to the right.
9. Repeat steps 7 and 8 to input the rest of the numbers you want.
• You can input up to 12 digits for the number.
A to Z 0 to 9 . (Period) - (Hyphen)
Press .
0 to 9 - (Hyphen)
Press .
(Space)
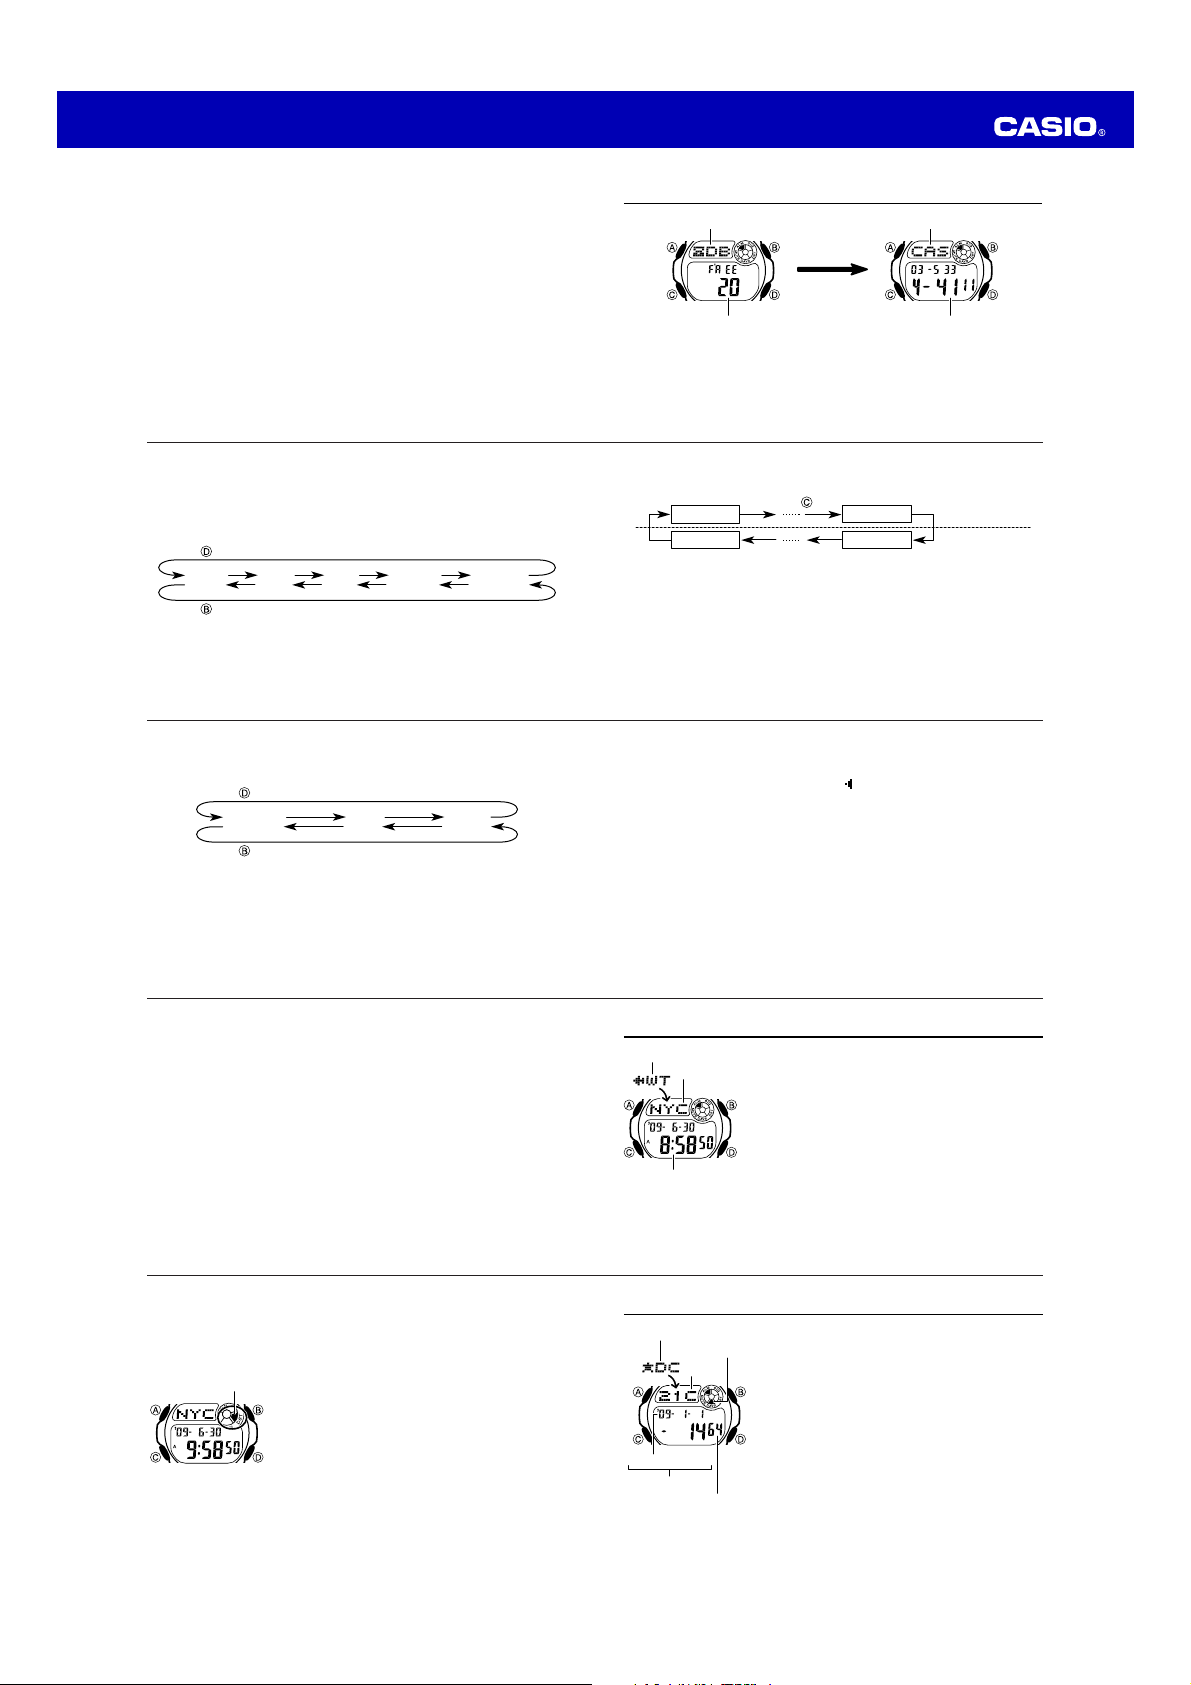
Data Bank
Mode indicator Name area
Remainin
The Data Bank Mode lets you store up to 25 records, each with a name (up to eight
characters) and a phone number (up to 12 digits). Entering the Data Bank Mode displays
a screen that shows the mode name (DB) and remaining memory capacity (number of
records) for a few moments. After that, the record you were viewing the last time you
exited the Data Bank Mode will appear. Anytime you input a new record, all records will
be sorted automatically into alphabetic sequence on the name.*
* A to Z, 0 to 9, symbols (, or -)
4. When the character you want is at the current cursor position, press C to move the
cursor to the right.
5. Repeat the steps 3 and 4 to input the rest of the characters.
• You can input up to eight characters for the name, though only three characters
are visible at a time.
• If the name you input has fewer than eight characters, use C to move the cursor
to the eighth space (which means you would press C three times after inputting
a five-character name).
6. After you input the name, use C to move the cursor to the number area.
• Pressing C while the cursor is located at the eighth character of the name area
advances to the number area. Pressing C while the cursor is located at the 12th
digit of the number area returns to the name area.
10. After inputting the name and number of the record, press A to store it and exit
the setting screen.
• The display can show only three name characters at a time. Longer names scrolls
continuously from right to left. The symbol “
left is the last, and the character to the right is the first.
To recall Data Bank records
In the Data Bank Mode, use D (+) and B (–) to scroll through Data Bank records on
the display.
• Holding down B or D scrolls at high speed.
free records Number area
1st digit
12th digit
Press .
Alternate at
the 1-second
interval.
8th digit
1st digit
” indicates that the character to the
E-11
Name area
Number area
E-13
E-14
To edit a Data Bank record
1.
In the
Data Bank
2. Hold down A until the cursor appears in the display.
3. Use C to move the cursor to the character you want to change.
4. Use D and B to change the character.
• See step 3 of “To input a new Data Bank record” for information on inputting name
characters, and step 7 for inputting number characters.
5. After making the changes that you want, press A to store them and exit the setting
screen.
To delete a Data Bank record
1. In the Data Bank Mode, scroll through the records and display the one you want to
delete.
2. Hold down A until the cursor appears in the display.
3. Press B and D at the same time. The message “CLR” appears in the display,
indicating that the record was deleted.
• After the record is deleted, the cursor appears in the name area, ready for input.
4. Input a new record or press A to exit the setting screen.
E-16
Daylight Saving Time (DST) Setting
Daylight Saving Time (summer time) advances the time setting by one hour from
Standard Time. Remember that not all countries or even local areas use Daylight
Saving Time.
To toggle a city code time between Standard Time and Daylight Saving Time
• The DST indicator will appear on the display whenever you display a city code for
which Daylight Saving Time is turned on.
• Note that the DST/Standard Time setting affects only the currently displayed city
code. Other city codes are not affected.
E-18
Mode, scroll through the records and display the one you want to edit.
DST indicator
1. In the World Time Mode, use B and D to display the
city code (time zone) whose Standard Time/Daylight
Saving Time setting you want to change.
2. Hold down A for about one second to toggle between
Daylight Saving Time (DST indicator displayed) and
Standard Time (DST indicator not displayed).
World Time
Mode indicator
City code
Current time in the zone
of the selected city code
Day Counter
Mode indicator
DAYS indicator
Text
Year – Month – Day
Target date
Numbers of days
E-15
World Time shows the current time in 30 cities (29 time
zones) around the world.
• All of the operations in this section are performed in the
World Time Mode, which you enter by pressing C
(page E-4).
To view the time in another city code
In the World Time Mode, press D to scroll through city
codes (time zones) to the east or B to scroll to the west.
• For full information about city codes, see the “City Code
Table” at the back of this manual.
• If the current time shown for a city is wrong, check your
Timekeeping Mode time and Home City code settings
and make the necessary changes.
E-17
The Day Counter Mode lets you count the number of days
from the Timekeeping Mode’s current date to a specific
target date.
This watch has five day counters. You can assign text
titles up to eight characters long to each of the five Day
Counters. Whenever the date specified by any one of the
day counters matches the date of the Timekeeping Mode
(regardless of the day counter’s year setting), the DAYS
indicator flashes on the Timekeeping Mode screen. In the
Day Counter Mode, the DAYS indicator flashes on the
screen of the particular day counter whose date matches
the date of the Timekeeping Mode.
• The day counter on the display when you exit the Day
Counter Mode appears first the next time you enter the
Day Counter Mode.
E-19
Page 3

Operation Guide 3189/3252
Recalling Day Counter Data
In the Day Counter Mode, use D (+) and B (–) to scroll through the day counters.
To set the target date
E-20
6. After you make the settings you want, press A to exit the input screen.
• The date can be set within the range of January 1, 1950 to December 31, 2049.
• The text area display can show only three characters at a time. Longer text scrolls
continuously from right to left. The symbol “
left is the last, and the character to the right is first.
E-22
To set an alarm time
1. In the Alarm Mode, use D to scroll through the alarm screens until the one whose
time you want to set is displayed.
Alarm 1
• To set a one-time alarm, display one of the screens indicated by an alarm number
x1
from
2. After you select an alarm, hold down A until the hour setting of the alarm time
3. Press C to move the flashing between the hour and minute settings.
through x5.
starts to flash, which indicates the setting screen.
• This operation turns on the alarm automatically.
1. In the Day Counter Mode, use D (+) and B (–) to
display the day counter you want to set.
2. Hold down A until the flashing cursor appears in the
text area. This indicates the input screen.
3. Press C to move the flashing in the sequence shown
below.
1st digit
Day
Alarm 2
:00 (Hourly Time Signal)
Press .
Month
” indicates that the character to the
Alarm 3
8th digit
Year
Alarm 4
Alarm 5
4. While the cursor is in the text area, use D and B to scroll through characters at
the current cursor position. Characters scroll in the sequence shown below. Holding
down D or B scrolls at high speed.
Press .
(Space)
Press .
5. While the cursor is in the date area, press D and B to scroll through digits at the
current cursor position. Holding down D or B scrolls at high speed.
• Press B and D at the same time, and the message “CLR” will appear in the
display. The characters in the text area are cleared and today’s date is set as the
target date. You then can make any changes in the date you want.
A to Z 0 to 9 . (Period) - (Hyphen)
E-21
Alarms
Mode indicator
Alarm time
(Hour : Minutes)
4. While a setting is flashing, use D (+) and B (–) to change it.
• When setting the alarm time using the 12-hour format, take care to set the time
5. Press A to exit the setting screen.
Alarm Operation
The alarm sounds at the preset time for about 10 seconds, regardless of the mode the
watch is in.
• To stop the alarm tone after it starts to sound, press any button.
To test the alarm
In the Alarm Mode, hold down D to sound the alarm.
Alarm on
indicator
Alarm number
correctly as a.m. (A indicator) or p.m. (P indicator).
You can set five independent Daily Alarms. When an
alarm is turned on, the alarm tone sounds when the alarm
time is reached.
You can turn on an Hourly Time Signal that causes the
watch to beep twice every hour on the hour.
• There are six screens in the Alarm Mode. Five are for
daily alarms (indicated by numbers from
x5
), and one is for the Hourly Time Signal (indicated by
).
• All of the operations in this section are performed in the
Alarm Mode, which you enter by pressing C (page
E-5).
x1
through
E-23
E-24
To turn an alarm on and off
Alarm on indicator
E-26
Stopwatch
Mode indicator
Hours : Minutes
Seconds
1/100 second
E-28
1. In the Alarm Mode, use D to select an alarm.
2. Press B to toggle it on (the alarm on indicator
displayed) and off (the alarm on indicator not
displayed).
• Turning on a daily alarm (
alarm on indicator on its Alarm Mode screen.
• In all modes, the alarm on indicator is shown for any
alarm that is currently turned on.
The stopwatch lets you measure elapsed time, split times,
and two finishes.
• The display range of the stopwatch is 23 hours,
59 minutes, 59.99 seconds.
• The stopwatch continues to run, restarting from zero
after it reaches its limit, until you stop it.
• The stopwatch measurement operation continues even
if you exit the Stopwatch Mode.
• Exiting the Stopwatch Mode while a split time is frozen
on the display clears the split time and returns to
elapsed time measurement.
• All of the operations in this section are performed in the
Stopwatch Mode, which you enter by pressing C (page
E-5).
x1
through x5) displays the
To turn the Hourly Time Signal on and off
Hourly time
signal on indicator
Elapsed time measurement
Start
Split time measurement
Start
Split time and 1st-2nd place times
Start
1. In the Alarm Mode, use D to select the Hourly Time
Signal (
).
2. Press B to toggle it on (the hourly time signal on
indicator displayed) and off (the hourly time signal on
indicator not displayed).
• The Hourly Time Signal on indicator is shown on the
display in all modes while the Hourly Time Signal is
turned on.
Stop
Split
(SPL displayed)
Split Stop Split release Clear
First runner
finishes.
Display time of
first runner.
Re-start Stop Clear
Split release Stop Clear
Second runner
finishes.
Display time of
second runner.
E-25
E-27
E-29
Page 4

Operation Guide 3189/3252
Countdown Timer
The countdown timer can be set within a range of
one minute to 24 hours. An alarm sounds when the
countdown reaches zero.
• The countdown operation continues even if you exit the
Countdown Timer Mode.
• All of the operations in this section are performed in the
Hours Seconds
Minutes
E-30
Countdown Timer Mode, which you enter by pressing
C (page E-5).
To use the countdown timer
Press D while in the Countdown Timer Mode to start the
countdown timer.
• When the end of the countdown is reached, the alarm
sounds for 10 seconds or until you stop it by pressing
any button. The countdown time is reset to its starting
value automatically after the alarm stops.
Reference
This section contains more detailed and technical information about watch operation.
It also contains important precautions and notes about the various features and
functions of this watch.
Button Operation Tone
Mute indicator
E-32
World Time
• The seconds count of the World Time is synchronized with the seconds count of the
Timekeeping Mode.
• All World Time Mode times are calculated from the current Home City time in the
Timekeeping Mode using UTC time offset values.
• The UTC offset is a value that indicates the time difference between a reference
point in Greenwich, England and the time zone where a city is located.
• The letters “UTC” is the abbreviation for “Coordinated Universal Time”, which is the
world-wide scientific standard of timekeeping. It is based upon carefully maintained
atomic (cesium) clocks that keep time accurately to within microseconds. Leap
seconds are added or subtracted as necessary to keep UTC in sync with the Earth’s
rotation.
E-34
The button operation tone sounds any time you press one
of the watch’s buttons. You can turn the button operation
tone on or off as desired.
• Even if you turn off the button operation tone, the alarm,
Hourly Time Signal, and Countdown Timer Mode alarm
all operate normally.
To turn the button operation tone on and off
In any mode (except when a setting screen is on the
display), hold down C for about three seconds to toggle
the button operation tone on (mute indicator not
displayed) and off (mute indicator displayed).
• Press D while a countdown operation is in progress to pause it. Press D again to
resume the countdown.
• To stop a countdown operation completely, first pause it (by pressing D), and then
press B. This returns the countdown time to its starting value.
To set the countdown start time
• Holding down C to turn the button operation tone on or off also causes the watch’s
current mode to change.
• The mute indicator is displayed in all modes when the button operation tone is
turned off.
Scrolling
The B and D buttons are used in various modes and setting screens to scroll
through data on the display. In most cases, holding down these buttons during a scroll
operation scrolls at high speed.
Initial Screens
When you enter the World Time or Alarm Mode, the data you were viewing when you
last exited the mode appears first.
1. In the Countdown Timer Mode, hold down A until the
hours of the countdown start time start to flash, which
indicates the setting screen.
2. Press C to move the flashing between the hours and
minutes.
3. While a setting is flashing, use D (+) or B (–) to
change it.
• To set the starting value of the countdown time to
24 hours, set
4. Press A to exit the setting screen.
0:00
.
E-31
E-33
Specifications
Accuracy at normal temperature: ±30 seconds a month
Timekeeping: Hour, minutes, seconds, a.m. (A)/p.m. (P), day, day of the week,
Time system: Switchable between 12-hour and 24-hour formats
Calendar system: Full auto-calendar pre-programmed from the year 2000 to 2099
Standard time/Daylight saving time
Other: Home City code (can be assigned one of 30 city codes); Daylight Saving
Data Bank: 25 records (8-character name, 12-digit number)
World Time: 30 cities (29 time zones)
Other: Daylight Saving Time/Standard Time
Day Counter
Number of days between current date and a target date
Memory capacity: 5 counters (8-character text, target date (year, month, day))
Target date setting range: January 1, 1950 to December 31, 2049
month, year
Time (summer time)/Standard Time
E-35
Other: Day counter alarm (DAYS indicator flashes on the display when a target date
is reached regardless of year.)
Alarm: 5 Daily Alarms, Hourly Time Signal
Stopwatch
Measuring unit: 1/100 of a second
Measuring capacity: 23 hours, 59 minutes, 59.99 seconds
Functions: Elapsed time, split time and two finishes
Countdown Timer
Measuring unit: 1 second
Input range: 1 minute to 24 hours (1-minute increments and 1-hour increments)
Other: EL backlight, Button operation tone on/off
Battery: One lithium battery (Type: CR1616)
Battery life
3 years under the following conditions
• 2 seconds of backlight operation per day
• 10 seconds of alarm operation per day
E-36
City Code Table
L-2
City
Code
PPG
HNL
ANC
LAX
DEN
CHI
NYC
CCS*
YYT
RIO
RAI
LON
PAR
CAI
JRS
City
PAGO PAGO
HONOLULU
ANCHORAGE
LOS ANGELES
DENVER
CHICAGO
NEW YORK
CARACAS
ST. JOHNS
RIO DE JANEIRO
PRAIA
LONDON
PARIS
CAIRO
JERUSALEM
UTC Offset/
GMT Differential
–11
–10
–9
–8
–7
–6
–5
–4
–3.5
–3
–1
0
+1
+2
City
Code
JED
THR
DXB
KBL
KHI
DEL
DAC
RGN
BKK
HKG
TYO
ADL
SYD
NOU
WLG
City
JEDDAH
TEHRAN
DUBAI
KABUL
KARACHI
DELHI
DHAKA
YANGON
BANGKOK
HONG KONG
TOKYO
ADELAIDE
SYDNEY
NOUMEA
WELLINGTON
UTC Offset/
GMT Differential
+3
+3.5
+4
+4.5
+5
+5.5
+6
+6.5
+7
+8
+9
+9.5
+10
+11
+12
City Code Table
• Based on data as of July 2010.
• The rules governing global times (UTC offset and GMT differential) and summer time are
determined by each individual country.
* In December 2007, Venezuela changed its offset from –4 to –4.5. Note, however, that
this watch displays an offset of –4 (the old offset) for the CCS (Caracas, Venezuela) city
code.
L-1
L-3
 Loading...