

Page 1

MA1509-EA
③①②
⑥
⑤
④
①②③ ④ ⑤
B
B
B
B
B
B
A
BABC
C
B
B
B
Receive Mode
World Time Mode
Alarm Mode
Timer ModeStopwatch Mode
Data Recall Mode
Thermometer Mode
Barometer Mode
Digital Compass ModeAltimeter Mode
Timekeeping Mode
© 2015 CASIO COMPUTER CO., LTD.
Operation Guide 5470
Basic Operations
This section provides an overview of the watch
and explains operations that are common to
all modes.
Important!
●
This watch is not a special-purpose
measuring instrument.
Measurement function readings are
intended for general reference only.
●
Whenever using the Digital
Compass of this watch for serious
trekking,
activities, be sure to always take
along another compass to confirm
readings. If the readings produced
by the Digital Compass of this watch
are different from those of the other
compass, perform bidirectional
calibration of the Digital Compass to
ensure better accuracy.
l
●
The watch’s Altimeter Mode
calculates and displays relative
altitude based on barometric
pressure readings produced by its
pressure sensor. Because of this,
altitude values displayed by the
watch may be different from your
actual elevation and/or sea level
elevation indicated for the area
where you are located. Regular
calibration in accordance with the
local altitude (elevation) indications
is recommended.
l
mountain climbing, or other
ー
Compass readings and
calibration will not be possible if
the watch is in the vicinity of a
permanent magnet (magnetic
accessory, etc.), metal objects,
high-voltage wires, aerial wires, or
electrical household appliances
(TV, computer, cellphone, etc.)
Digital Compass
Altitude Measurement
General Guide
Navigating Between Modes
Your watch has the modes shown below.
A
Hour hand
B
Second hand
C
Minute hand
D
Mode hand
E
LCD
F
Crown
Indicators
A
Appears when an alarm is turned on.
B
Appears
C
Appears when the indicated time is
summer time.
D
Appears when Barometric Pressure
Change Indications are on.
E
Shows the barometric pressure
measurement unit.
when the hourly time signal is on.
Note
●
In this manual, the expression “time
signal” refers to a time calibration
signal. Time signals include time
information.
●
Note that the watch illustrations in
this manual are intended for
reference only. The actual watch
may appear somewhat different
than depicted in the illustrations.
Use the buttons in the illustration above to
navigate between modes.
Important!
●
To return to the Timekeeping Mode
from
any other mode, hold down the
(B) button for about two seconds.
1
Page 2
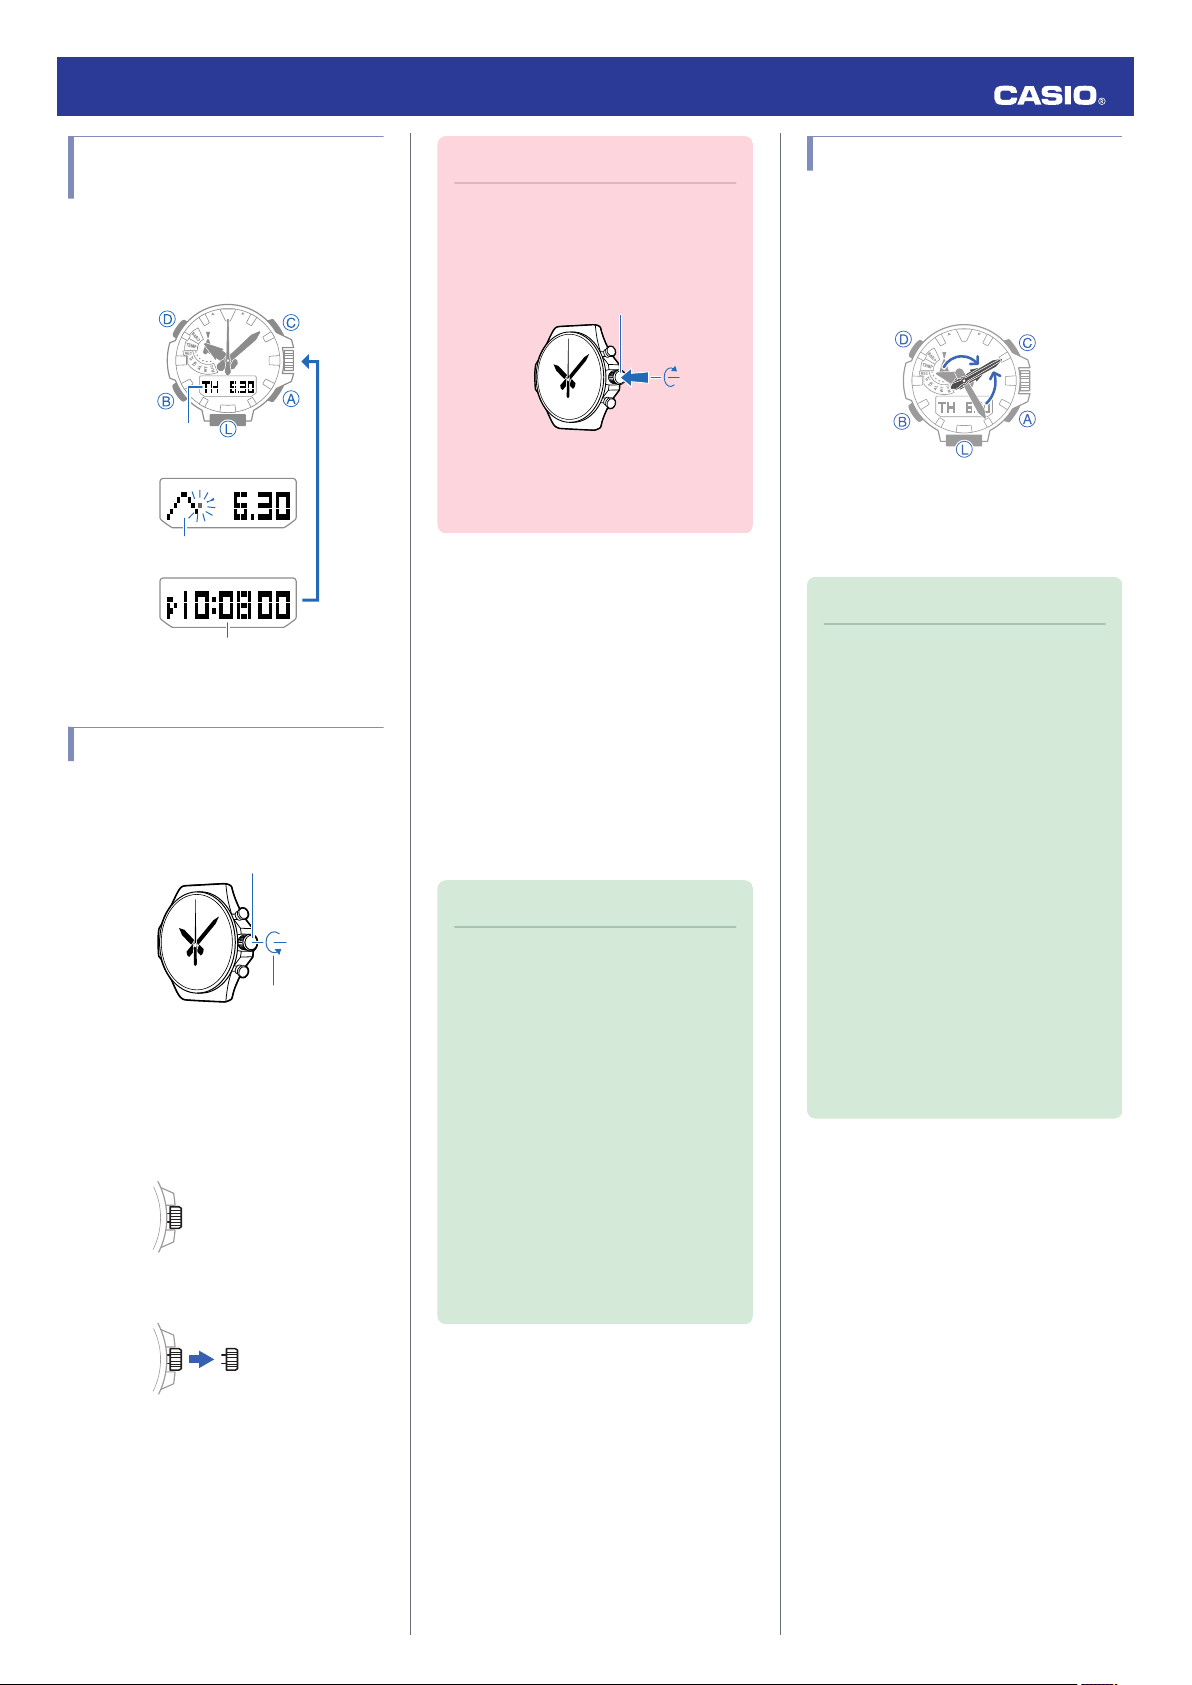
p
D
p
D
D
Day of the week,
month, day
Hour, minute, second
Barometric pressure
graph
Loosen
Crown
Screw in
Operation Guide 5470
Selecting a Timekeeping Mode Digital Display Format
In the Timekeeping Mode, you can use the
operation
below to change the contents of the
digital displays.
Using the Crown
The watch’s crown is a screw-in (screw lock)
type. To use the crown, you first need to rotate
it towards you (leftwards) to loosen it.
●
Pulling Out and Pushing In the Crown
Pull out the crown before performing crown
operations. Do not pull the crown with too
much force.
Normal timekeeping
Pull out
Important!
●
To prevent loss of water resistance
and/or damage due to impact, be
to screw the crown in by rotating
sure
it away from you as you push it in.
●
When pushing the crown back in,
take care not to apply too much
force.
●
Fast Forward/Fast Reverse
After pulling out the crown, rotating it quickly
succession in either direction will start a fast
in
forward or fast reverse operation. While a fast
forward operation is in progress, quickly
rotating the crown in succession again will
increase the speed even further.
●
The fast reverse operation speed is fixed
and cannot be changed.
●
Stopping Fast Forward/Fast Reverse
Rotate the crown in the direction opposite that
of the ongoing operation or press any button.
Note
●
If you do not perform any operation
for about two minutes after pulling
out the crown, crown operations will
automatically become disabled. If
that happens, push the crown back
in and then pull it out again.
●
The message [PUSH] will appear on
the display in the cases below. If that
happens, push the crown back in
and then pull it out again.
ー
When the crown is pulled out while
in a mode that does not support
crown operation
ー
When you do not perform any
operation for about two minutes
after pulling out the crown
Shifting the Hands
Hand shift moves the hands out of the way for
easy viewing of display info.
While holding down (L), press (B).
1.
●
All hands will move to 2 o’clock.
To return the hands to their normal
2.
timekeeping
or (D).
Note
●
This function can be used in any
mode.
ー
Hand shift cannot be used while
configuring the city code or the
summer time setting, or when
manually configuring time and
date settings.
●
Shifted hands will return to their
normal positions if no button
operation is performed within about
ten
●
In the modes below, hands that are
blocking a digital display will
automatically move to 4 o’clock or 8
o’clock.
normal positions after about three
seconds.
ー
Altimeter Mode
ー
Barometer Mode
ー
Thermometer Mode
positions, press (A), (B), (C),
seconds after hands are shifted.
The hands will return to their
2
Page 3

Crown
NOYES
One second later
Operation Guide 5470
Switching between 12-hour and 24-hour Timekeeping
Pull out the crown.
1.
The second hand will move to the
currently set city.
Press (B) five times so the current setting
2.
or [24H]) is flashing on the display.
([12H]
Rotate the crown to select [12H] (12-hour
3.
timekeeping) or [24H] (24-hour
timekeeping).
Push the crown back in to complete the
4.
setting operation.
Solar Charging
What is solar charging?
This watch runs on power supplied from a
rechargeable (secondary) battery that is
charged by a solar panel. The solar panel is
integrated into the face of the watch, and
power is generated whenever the face is
exposed to light.
Charging the Watch
When you are not wearing the watch, put it in
a location where it is exposed to bright light.
While you are wearing the watch, make sure
that its face (solar panel) is not blocked from
light by the sleeve of your clothing. Power
the
generation efficiency is reduced even when
the face of the watch is blocked only partially.
Checking the Charge Level
A display indicator shows the watch’s charge
level when you enter the Timekeeping Mode.
Navigating Between Modes
l
●
The
display will show charge levels 4 and 5,
even if the watch is not in the Timekeeping
Mode.
●
Charge Level 1: Good
All functions enabled.
●
Charge Level 2: Good
All functions enabled.
Note
●
While 12-hour timekeeping is
selected, the [A] indicator will be
displayed
be displayed for p.m. times.
for a.m. times, and [P] will
Important!
●
Depending on light intensity and
local conditions, the watch may
become hot to the touch when
exposed to light for charging. Take
care to avoid burn injury after
charging. Also, avoid charging the
watch under high-temperature
conditions like the ones described
below.
ー
On the dashboard of a vehicle
parked in the sun
ー
Near
an incandescent light bulb or
other source of heat
ー
Under direct sunlight or in other
hot areas for long periods
●
The display panel may become
black (or white, depending on the
LCD type) under very high
temperatures. This is temporary,
and the display will return to normal
at lower temperatures.
●
Charge Level 3: Low
The functions below are disabled. Also, the
second hand jumps at two-second intervals.
●
Time signal reception
●
Compass, altitude, barometric pressure,
temperature measurements
●
Face illumination
●
Sounds (alarms, etc.)
●
Charge Level 4: Low
Battery charge is lower than Level 3, and all
functions are disabled. Also, all hands are
stopped.
●
Charge Level 5: Dead
All hands are stopped and digital displays are
blank. Memory data is lost, and watch settings
are returned to their initial factory defaults.
3
Page 4

Operation Guide 5470
Important!
●
Should battery go low or go dead,
the face (solar panel) to light
expose
as soon as possible.
Note
●
If [RECOVER] is flashing on the
display, it means that all functions
are disabled due to momentary
battery power consumption.
Charging Times
The table below shows general guidelines for
charging times under various light sources.
Actual charging time depends on your local
environment.
●
Sunny day, outdoors (50,000 lux)
Charge Level
Level 1 Good 6 hours
Level 2 Good 23 hours
Level 3 Low Battery
Level 5 Dead Battery
●
Sunny day, near a window (10,000 lux)
Charge Level
Level 1 Good 23 hours
Level 2 Good 85 hours
Level 3 Low Battery
Level 5 Dead Battery
●
Overcast
day, near a window (5,000 lux)
Charge Level
Level 1 Good 37 hours
Level 2 Good 138 hours
Level 3 Low Battery
Level 5 Dead Battery
●
Indoor fluorescent lighting (500 lux)
Charge Level
Level 1 Good -
Level 2 Good -
Level 3 Low Battery
Level 5 Dead Battery
Approximate
Charging Time
3 hoursLevel 4 Low Battery
Approximate
Charging Time
7 hoursLevel 4 Low Battery
Approximate
Charging Time
11 hoursLevel 4 Low Battery
Approximate
Charging Time
121 hoursLevel 4 Low Battery
Power Saving Function
Leaving the watch in a dark location for about
one hour between the hours of 10 p.m. and 6
a.m. will cause the second hand to stop, and
the
watch to enter Level 1 power saving. If the
watch is left in this condition for six or seven
days, all hands will stop at 12 o’clock and the
watch will enter Level 2 power saving.
Power Saving Level 1:
Second hand stops and digital displays go
blank to save power.
Power Saving Level 2:
All hands stop and the digital display goes
blank to save power. Only timekeeping
functions remain operational.
●
Recovering from Power Saving
Operation
Use one of the operations below to exit power
saving.
●
Press any button.
●
Move the watch to a bright location.
●
Trigger auto light by angling the watch
towards your face.
Note
●
The watch will not enter the power
saving state in the cases below.
ー
While barometric pressure
indications are turned on
ー
While in the Stopwatch Mode
ー
While in the Timer Mode
●
You can enable or disable Power
Saving.
Configuring
l
Settings
●
Note that the watch also may enter
the power saving state if its face is
blocked from light by your sleeve
while you are wearing it.
Power Saving Function
Auto Time Adjustment
The watch’s time and day settings can be
configured
signal.
Important!
Receiving a Time Signal
Time Signal Cities
TOKYO (TYO) +9 Second 30
Receivable Time Signal: Japan Time Calibration
Signal (JJY)
HONG KONG
(HKG)
Receivable Time Signal: China Time
Calibration Signal (BPC)
NEW YORK (NYC) -5 Second 52
CHICAGO (CHI) -6 Second 50
DENVER (DEN) -7 Second 48
LOS ANGELES
(LAX)
ANCHORAGE (ANC) -9 Second 44
HONOLULU (HNL) -10 Second 42
Receivable Time Signal: U.S. Time
Calibration Signal (WWVB)
LONDON (LON) ±0 Second 2
PARIS (PAR) +1 Second 4
ATHENS (ATH) +2 Second 6
Receivable Time Signal: U.K. (MSF) and
German (DCF77) Time Calibration Signals
in accordance with a received time
●
To receive a time signal, one of the
cities shown under “Time Signal
Cities”
needs to be set as your Home
City.
●
Whenever you are in an area where
a time signal cannot be received or
if your Home City does not support
time signal reception, you will need
to configure time and date settings
manually.
City Offset
City Offset
Second Hand
Position
Second Hand
Position
+8 Second 28
City Offset
Second Hand
Position
-8 Second 46
City Offset
Second Hand
Position
4
Page 5

500 kilometers
500 kilometers
1,000 kilometers
1,000 kilometers
To k yo
Fukushima
Fukuoka/
Saga
500 kilometers
1,500 kilometers
Chengdu
Shangqiu
Hong Kong
Shanghai
Beijing
Changchun
600 miles
(1,000 kilometers)
2,000 miles (3,000 kilometers)
Los Angeles
Denver
Fort Collins
Chicago
New York
The Anthorn signal is receivable within this area.
500 kilometers
1,500 kilometers
Mainflingen
Anthorn
Crown
12 o'clock
Operation Guide 5470
Time Signal Reception Ranges
Time signal reception is supported in the
areas shown below.
●
Japan Time Calibration Signal (JJY)
●
Chinese Time Calibration Signal (BPC)
●
U.S. Time Calibration Signal (WWVB)
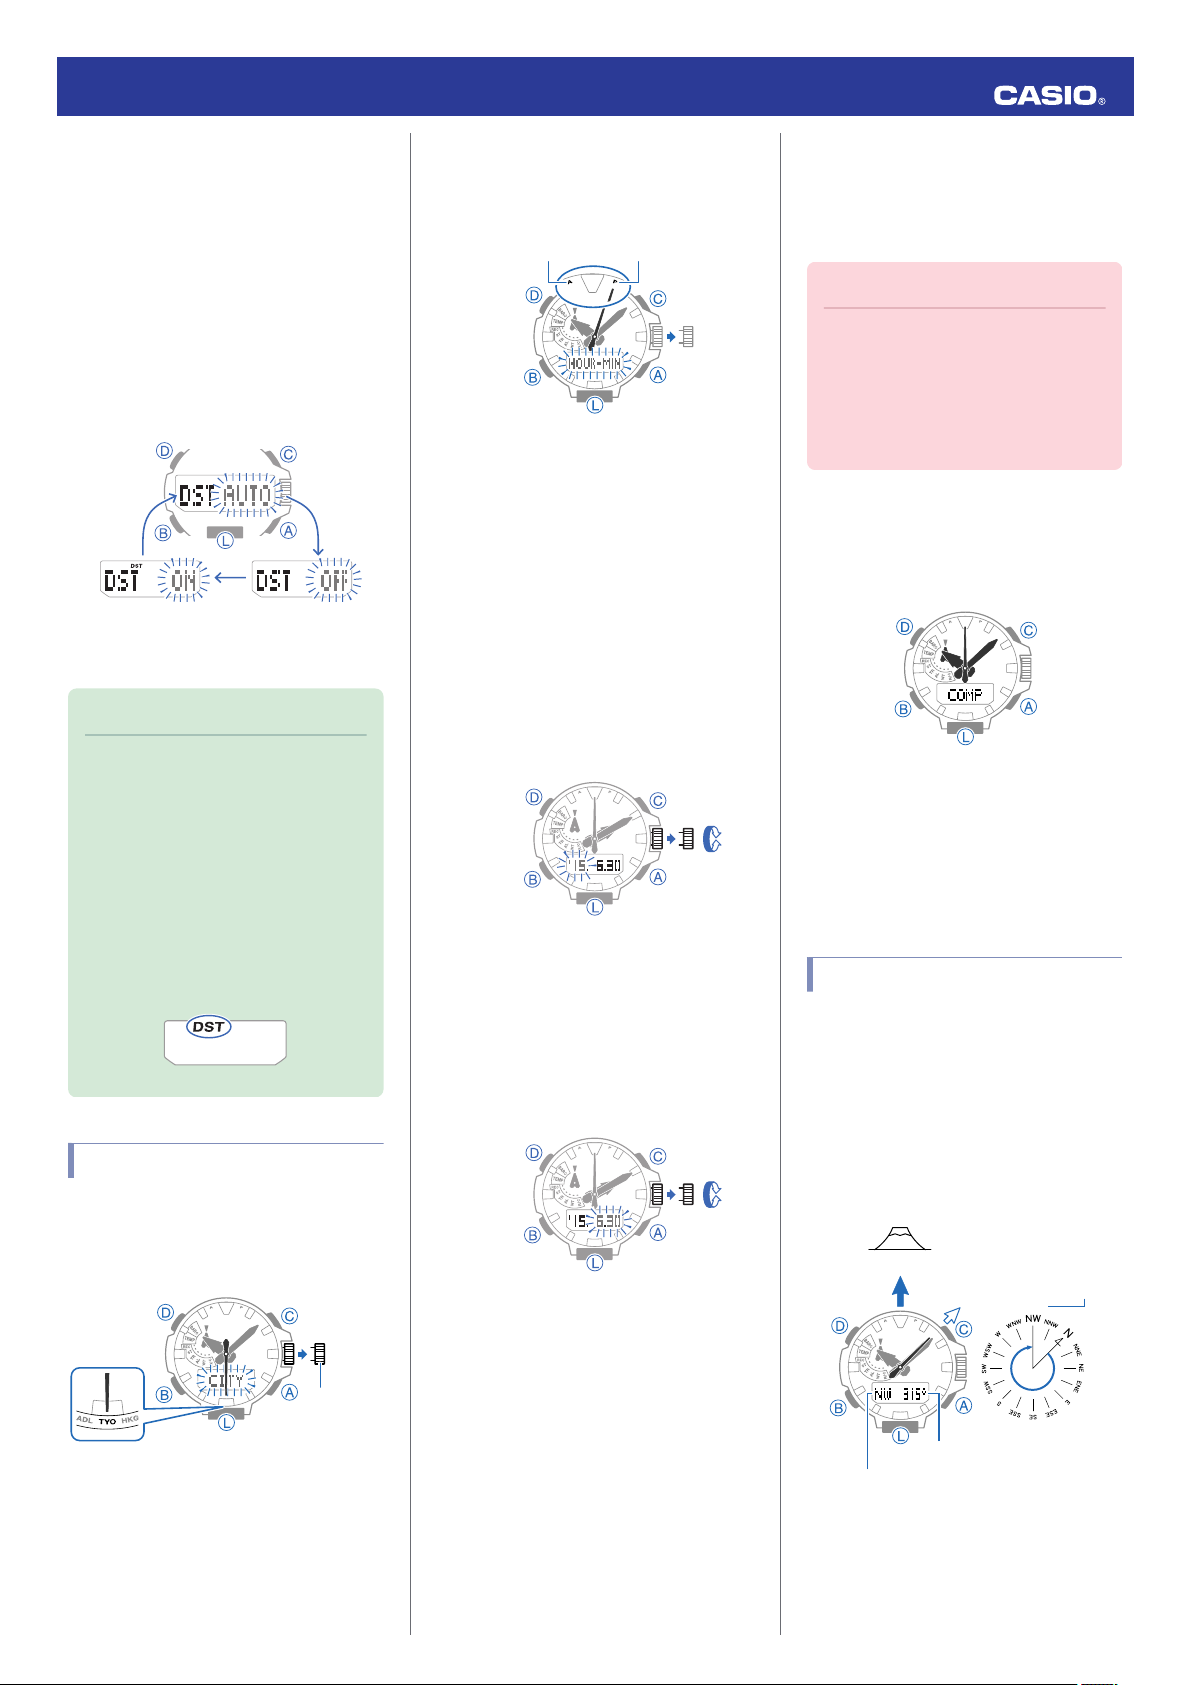
Setting a Home Time City
Use the procedure in this section to configure
Home City (the city that is in the same time
zone as your current location) and summer
time settings.
Time Signal Cities
l
Summer Time
l
Important!
●
Time signal reception will not be
possible if your Home City setting is
not correct.
Getting ready
Enter the Timekeeping Mode.
Navigating Between Modes
l
Pull out the crown.
1.
The second hand will move to the
currently set city.
Push the crown back in to complete the
5.
setting operation.
Note
●
If the currently indicated time is
summer time, [DST] will be shown
on the display.
●
cannot change the summer time
You
setting by rotating the crown towards
you.
Summer Time
Summer time, which is also known as Daylight
Saving
Time (DST), advances the time setting
one hour, 30 minutes, or some other amount
of time from standard time (STD) during the
summer months. Whether or not and how
summer time is used depends on your country
or local area. Summer time is not used in some
countries and local areas.
●
U.K. (MSF) and German (DCF77) Time
Calibration Signal
Note
●
Even if you are within the normal
reception range of a time signal,
reception may be made impossible
by the following factors: geographic
contours, weather, the season, the
time of day, wireless noise.
Rotate the crown to move the second
2.
hand to the city (one that supports time
signal reception) you want to set.
To
change the summer time setting, press
3.
(B).
●
you don’t want to change the summer
If
time setting, push the crown back in to
complete the setting operation.
Rotate
4.
the crown away from you to change
the summer time setting.
●
[AUTO]
The watch switches between standard
and summer time automatically. In
time
many cases, the [AUTO] setting lets you
use the watch without switching
manually between summer time and
standard time.
Summer Time Table
l
●
[OFF]
The watch always indicates standard
time.
●
[ON]
The watch always indicates summer
time.
Appropriate Signal Reception Location
A time calibration signal can be received while
the watch is near a window.
●
Keep metal objects away from the watch.
●
Do not move the watch.
●
not perform any operation on the watch.
Do
Note
●
You may experience time signal
reception problems in the areas
described below.
ー
Among or near buildings
ー
While riding in a vehicle
ー
Near household appliances,
office machines, mobile phones,
etc.
ー
On a construction site, in an
airport, or any other location
where radio wave interference
occurs
ー
Near high-voltage lines
ー
In mountainous areas or behind a
mountain
5
Page 6

Mode hand
2 seconds
UnsuccessfulSuccessful
Operation Guide 5470
Auto Time Signal Receive
An automatic time signal receive operation is
performed and the time and day settings are
adjusted between midnight and 5:00 a.m.
Once
a signal receive operation is successful,
no more auto receive operations are
performed that day.
The receive operation is performed only while
the watch is in the Timekeeping Mode.
Navigating Between Modes
l
Place the watch near a window or some other
location appropriate for signal reception.
●
When the receive operation is successful,
the time and day settings will be adjusted
automatically.
Note
Enabling/Disabling Auto Receive
Use the procedure below to enable or disable
Auto Receive.
Getting ready
Enter the Receive Mode.
Navigating Between Modes
l
Pull out the crown.
1.
Rotate the crown to select either [ON] or
2.
[OFF].
[ON]: Auto receive is on.
[OFF]: Auto receive is off.
Push the crown back in to complete the
3.
setting operation.
Press (B) to return to the Timekeeping
4.
Mode.
Hold down the (A) button for about two
2.
seconds until [RC!] appears on the dot
display.
This indicates that time signal reception
has started.
●
To cancel an ongoing time signal
receive operation, press any button.
After time signal receive ends, the result
of
the receive operation will appear on the
display.
●
Reception takes anywhere from
about two minutes to about 10
minutes. It can take as long as 20
minutes.
●
Using Auto Receive
Before going to bed at night, put the watch into
the Timekeeping Mode (whose settings
should be configured correctly), and leave it
near a window.
Manual Time Signal Receive
You can use a button operation to receive the
signal. When a receive is successful, the
time
time and date settings will be adjusted
automatically.
Getting ready
Enter the Receive Mode.
Navigating Between Modes
l
Place the watch near a window or some
1.
other location appropriate for time signal
reception.
Press (B) to return to the Timekeeping
3.
Mode.
●
reception fails for some reason, check
If
the surrounding reception environment
and then try again.
Note
●
Reception takes anywhere from
about two minutes to about 10
minutes. It can take as long as 20
minutes.
●
The watch will automatically return
to the Timekeeping Mode if you do
not perform any operation for about
or three minutes after time signal
two
receive ends.
6
Page 7

StableUnstable
Timekeeping Mode
Crown
Operation Guide 5470
Receive Levels
The current time signal receive level is
indicated on the display. Refer to the level
indicator to determine the best location for
time signal reception.
Note
●
It takes about 10 seconds for time
signal reception conditions to
stabilize.
●
Reception conditions are affected
by weather, the time of day, the
surrounding environment, etc.
Checking the Receive Operation Result
Use the procedure below to check the date
and time of the last successful time signal
receive operation.
the Timekeeping Mode, press (B) eight
In
1.
times.
This enters the Receive Mode and
displays the date and time of the last
successful time signal receive operation.
●
The display will show [-:--] for the time
and [-.--] for the date if no time signal
receive operation has been successful
yet.
Signal Reception Precautions
●
When the watch is unable to adjust its time
in accordance with a calibration signal for
some reason, average timekeeping
accuracy is within ±15 seconds per month.
●
Time signal reception is not possible when
any one of the conditions exists.
ー
While battery power is low
ー
Power Saving Level 2
ー
Timer countdown operation in progress
ー
barometric pressure indications turned
on
●
If an alarm starts to sound while time signal
reception
●
If the receive operation is successful, the
is in progress, reception will stop.
time and day settings will be adjusted
automatically in accordance with the Home
City and summer time settings. Summer
will not be applied correctly in the case
time
described below.
ー
When the summer time start date and
time, end date and time, or other rules are
changed by authorities
●
Note that an internal decoding process the
performs after it receives a signal may
watch
cause the time setting to be slightly off (by
less than one second).
●
As of July 2015, China does not observe
summer time. If China starts to observe
summer time in the future, the time
displayed
by the watch for China may not be
correct.
Manual Time
Adjustment
You can use the procedure below to adjust the
time and day settings using the watch in an
area where time signal reception is not
possible.
Setting a Home Time City
Use the procedure in this section to select a
city to use as your Home City. If you are in an
area
that observes summer time, you can also
enable or disable summer time.
Summer Time
l
Important!
●
World Time times will not be correct
if you select the wrong city as your
Home City.
Note
●
watch has 29 built-in cities that
Your
you can select as a Home Time City.
If you are using the watch in a
location that is not among the builtin cities, use the built-in city that is in
the same time zone as your location.
For available city settings, see “City
Code List”.
Pull out the crown.
1.
The second hand will move to the
currently set city.
Rotate the crown to move the second
2.
hand to the city you want to set.
To
change the summer time setting, press
3.
(B).
●
you don’t want to change the summer
If
time setting, push the crown back in to
complete the setting operation.
Press (B) to return to the Timekeeping
2.
Mode.
Getting ready
Enter the Timekeeping Mode.
Navigating Between Modes
l
7
Page 8
Crown
PMAM
Digital Compass Mode
315°
0°
Bearing
Bearing angle to objective
Bearing to objective
North
Objective
Operation Guide 5470
the crown away from you to change
Rotate
4.
the summer time setting.
●
[AUTO]
The watch switches between standard
time and summer time automatically.
Summer Time Table
l
●
[OFF]
The watch always indicates standard
time.
●
[ON]
The watch always indicates summer
time.
Push the crown back in to complete the
5.
setting operation.
Note
●
[AUTO] setting works only when
The
a Time Signal City is selected for
your Home City.
●
Select [OFF] or [ON] when your
City is not a Time Signal City.
Home
●
that summer time (DST) cannot
Note
be selected while “UTC” is selected
as the Home City.
●
If the currently indicated time is
summer time, [DST] will be shown
on the display.
Setting the Time and Date
Press (D).
2.
●
You can see if a time is a.m. or p.m. by
checking the second hand position.
Rotate the crown to change the minute
3.
setting.
●
hour hand will move in accordance
The
with minute hand movement.
Press (B).
4.
This causes [HOUR] to flash on the
display.
Rotate the crown to change the hour
5.
setting.
Press (B).
6.
Rotate the crown to change the year
7.
setting.
Press (B).
8.
Rotate
9.
the crown to change the month and
day setting.
●
you want to change the time and date
If
settings at this point, press (B). Next,
return to the minute setting in step 3 and
perform the above steps again.
Digital Compass
You can use the Digital Compass Mode to
determine the direction of north, and to check
your bearing to a destination.
Important!
●
Check the information below to find
out how to ensure correct readings.
Calibrating Compass Readings
l
(Bidirectional Calibration)
Digital Compass Reading
l
Precautions
Getting ready
Enter the Compass Mode.
Navigating Between Modes
l
●
Entering the Compass Mode starts
compass readings.
●
If you point 12 o’clock in the direction of an
objective and then enter the Compass
Mode, the bearing to the objective will
appear immediately.
Taking a Compass Reading
Keeping the watch level, point 12 o’clock in the
direction of your desired objective. The
second hand will indicate north. The bearing
and bearing angle to your objective will also
appear on the display.
●
To retrigger the compass operation, press
(C).
Pull out the crown.
1.
The second hand will move to the
currently set city.
Interpreting Bearing Readings
On a time signal at the top of a minute,
10.
push the crown back in to complete the
setting operation.
Directions: N (North), E (East), W (West), S
(South)
8
Page 9

Crown
Crown
Magnetic declination angle
Magnetic declination direction
Operation Guide 5470
Note
●
Normally the Compass Mode
indicates magnetic north. You can
also configure settings to indicate
true north.
Up for True North Readings
Setting
l
(Magnetic Declination Calibration)
Magnetic North and True North
l
●
After the initial reading is displayed,
the watch will continue to take
readings about every second for
about the next 60 seconds. The
will return to the Timekeeping
watch
Mode automatically about 60
seconds after you press (C).
●
Light will not illuminate the face
Auto
while a compass operation is in
progress.
●
If an alarm or other beeper sounds,
or if you turn on illumination by
pressing (L) while a compass
operation is in progress, the
compass operation will be
suspended momentarily. The
compass operation will resume
when the beeper stops or
illumination turns off.
●
Aligning a map with actual
surroundings (setting a map)
Setting a map means to align the map so the
directions indicated on it are aligned with the
actual directions of your location. Once you
a map, you can more easily get a grasp of
set
the relationship between map markings and
actual geographic contours. To set a map with
this watch, align north on the map with the
north indication of the watch. Once you set the
map, you can compare your bearing on the
map with your surroundings, which will help
you determine your current location and
destination.
●
that map reading skills and experience
Note
are required to determine your current
location and destination on a map.
Calibrating Compass Readings
Calibrating Compass Readings (Bidirectional Calibration)
Perform calibration whenever you notice the
watch’s compass readings are different from
those of another compass, or before setting
out on a climb or trek.
●
Note that accurate compass readings
and/or calibration will not be possible in an
area where strong magnetism is present.
Digital Compass Reading Precautions
l
Pull out the crown.
1.
keeping the watch horizontal, press
While
2.
(C).
This starts calibration of the first point,
which causes [o WAIT] to appear on the
display. If calibration is successful,
indicators
following sequence: [OK] n [Turn 180°]
n [p 2].
Rotate
3.
to be as exact as possible.
Press (C).
4.
This starts calibration of the second point,
which causes [p WAIT] to appear on the
display. [OK] will appear on the display if
calibration is successful.
will appear on the display in the
the watch 180 degrees, taking care
Setting Up for True North Readings (Magnetic Declination Calibration)
If you want the watch to indicate true north
instead
of magnetic north, you need to specify
the current magnetic declination direction
(east or west) and declination angle.
Magnetic North and True North
l
●
The magnetic declination angle value can
set in 1° (degree) units only. Use a value
be
that is closest to the angle you want to set.
Example: For an angle of 7.4°, set 7°.
Example: For an angle of 7°.4' (7 degrees,
40 minutes), set 8°.
Note
●
Magnetic
west) and angle degree values for
specific locations can be found on
geographic maps, mountain
climbing maps, and other maps that
include contour lines.
Pull out the crown.
1.
Press (B).
2.
Rotate the crown to change the magnetic
3.
declination
desired.
Setting range: 90° west to 90° east
[0° (OFF)]: Magnetic north
[E]: East declination (Magnetic north is
east of true north.)
[W]: West declination (Magnetic north is
west of true north.)
●
To
(A) and (C) at the same time.
declination angles (east or
direction and angle settings as
return the setting to [0° (OFF)], press
Push the crown back in to complete the
5.
setting operation.
Note
●
[ERR] will appear if calibration fails
for some reason. If this happens,
restart the above procedure from
step 1.
Push the crown back in to complete the
4.
setting operation.
9
Page 10

Earth
Magnetic north
True north
Altimeter Mode
50 m*
Current reading
6 readings ago
Operation Guide 5470
Magnetic North and True North
There are actually two types of north:
magnetic north and true north.
Magnetic north: North indicated by the needle
of a compass
True north: Direction to the North Pole
As shown in the illustration below, magnetic
north and true north are not the same.
Note
●
north indicated on commercially
The
available maps is normally true
north.
Digital Compass Reading Precautions
Location during Use
Taking readings near sources of strong
magnetism
watch away from the following types of items.
Permanent magnets (magnetic accessories,
etc.),
wires, electrical household appliances (TVs,
computers, cellphones, etc.)
●
Note that correct direction readings are not
possible indoors, especially inside of
reinforced concrete structures.
●
Accurate
in motor vehicles, on boats, on aircraft, etc.
Storage Location
Exposure of the watch to magnetism can
affect the accuracy of digital compass
readings. Keep the watch away from the
following types of items.
Permanent magnets (magnetic accessories,
etc.), metal objects, electrical household
appliances
can cause reading error. Keep the
metal objects, high-voltage wires, aerial
direction readings are not possible
(TVs, computers, cellphones, etc.)
Altitude Measurement
The watch takes altitude readings and
displays results based on air pressure
measurements taken by a built-in pressure
sensor.
Important!
●
The altitude readings displayed by
the
watch are relative values that are
calculated based on barometric
pressure measured by the watch’s
pressure sensor. This means that
barometric pressure changes due to
weather can cause altitude readings
taken at the same location to be
different. Also note that the value
displayed by the watch may be
different from the actual elevation
and/or sea level elevation indicated
for the area where you are located.
When using the watch’s altimeter
while mountain climbing, it is
recommended that you regularly
calibrate its readings in accordance
with local altitude (elevation)
indications.
Calibrating Altitude Readings
l
●
The altitude calibration value and
barometric pressure changes may
result in display of a negative value.
●
Check the information below to find
out about how to minimize
differences between readings
produced by the watch, and values
provided
indications.
Altitude Reading Precautions
l
Getting ready
Enter the Altitude Mode.
Navigating Between Modes
l
●
Entering the Altitude Mode starts altitude
readings.
by local altitude (elevation)
Note
●
When you enter the Altitude Mode,
the second hand will indicate either
timekeeping seconds, or the
differential between altitude
measurements (whichever was
indicated the last time you were in
the Altitude Mode). You can toggle
second hand indication between
the
seconds and the measured value
differential by pressing (D).
Taking a Relative Altitude Reading
l
from Some Reference Point
Checking the Current Altitude
Starting an altitude measurement operation
displays the altitude in your current location.
The watch takes altitude readings every
second for about the first three minutes. After
it takes readings according to the watch’s
that,
auto measurement interval setting.
●
the information below to find out how
Check
to configure the auto measurement interval.
Setting the Auto Measurement Interval
l
Note
●
To retrigger measurement, press
(A).
●
Measurement range: -700 m to
10,000 m (-2,300 to 32,800 feet)
(Measurement
Note that calibrating altitude
readings will cause a change in the
measurement range.
●
[- - -] will appear for the measured
value if it is outside the allowable
range.
●
Press (B) to return to the
Timekeeping Mode.
Interpreting Altitude Graph Contents
unit: 1 meter (5 feet))
*
1 square (v) is 10 m.
10
Page 11

Crown
Crown
Current location altitude
Altitude Differential Indicator
100 50
0
−50
−100
Altitude Differential
Indicator
Range: ±100 m (1000 m)
(±328 feet (3280 feet))
Unit: m
Operation Guide 5470
Calibrating Altitude Readings
To minimize the difference between locally
indicated and measured values, you should
update the reference altitude value before
setting off on and during treks or any other
activities where you take altitude readings.
You can find out the altitude at your current
location
from signs, maps, on the Internet, etc.
While mountain climbing, it is highly
recommended that you check a map, local
altitude indications, or some other source for
your current location’s altitude and regularly
calibrate watch readings with the latest
information.
●
Differences between actual altitude and
watch readings can be caused by the
factors below.
ー
Changes in barometric pressure
ー
Changes in temperature caused by
variations in barometric pressure and by
elevation
●
Though altitude readings can be taken
without calibration, doing so may produce
readings that are very different from
indications by altitude markers, etc.
Pull out the crown.
1.
Rotate the crown to calibrate the
2.
displayed value to that of a local altitude
(elevation) marker.
Calibration unit: 1 m (5 feet)
●
return the altitude setting to its initial
To
factory default, press (A) and (C) at the
same time.
Push the crown back in to complete the
3.
setting operation.
Taking a Relative Altitude Reading from Some Reference Point
After you set a reference altitude, the second
hand of the watch will indicate the difference
between your current altitude and the
reference altitude. This makes it easy to
measure the altitude different between two
points while climbing or trekking.
●
Setting the Altitude Differential
Measurement Range
Pull out the crown.
1.
Press (B) twice.
2.
Rotate
3.
4.
●
Measuring Altitude
1.
2.
the crown to select either [100m] or
[1000m].
[100m]: ±100 m (±328 feet) in 5 m (16 feet)
units
[1000m]: ±1000m (±3280 feet) in 50m
(164 feet) units
Push the crown back in to complete the
setting operation.
Use the contour lines on your map to
determine the difference in altitude
between your current location and your
destination.
Take an altitude reading of your current
location.
Checking the Current Altitude
l
Hold down the (D) button for about two
3.
seconds to set your current location’s
altitude as the reference altitude.
[DIFF RESET] and [RESET] will appear
on the display, followed by the current
altitude.
●
The second hand (Altitude Differential
Indicator) will indicate the difference
between the reference altitude and the
altitude reading. At this time the
current
second hand should indicate ±0 m (±0
feet).
While comparing the difference between
4.
the
altitude you found on the map and the
altitude differential indicated by the
watch’s second hand, advance towards
your destination.
●
the altitude differential you found
When
on the map is the same as that indicated
by the second hand, it means you are
close to your destination.
Example: Altitude differential of -30 m (-98
feet) (-300 m (-984 feet))
To exit the altitude differential indication,
5.
press (D).
The second hand indicates the current
time seconds.
●
To toggle the second hand between
altitude differential and current time
seconds indication, press (D).
11
Page 12

Crown
A
B
CD
F
E
End point
Start point
Crown
Operation Guide 5470
Note
●
The second hand will point to r
(over) if the current altitude
differential
is greater than the setting
value, or s (under) if it is lower than
the setting value.
If either of these is indicated while
using the ±100 m (328 feet)
measurement range, change the
range setting to ±1000 m (3280
feet).
●
The second hand will move to 9
o’clock if a reading is outside the
allowable altitude measurement
(-700 m to 10,000 m (-2,300 to
range
32,800 feet)), or if a reading error
occurs.
Setting the Auto Measurement Interval
You can select an auto measurement interval
of either five seconds or two minutes.
Pull out the crown.
1.
Press (B).
2.
Recording Altitude Readings
Use the procedure below to record altitude
measurements manually. Auto
measurements are also recorded
automatically.
●
Use the Altitude Record Recall Mode to
view or delete records.
Viewing Altitude Records
l
●
Recording Altitude Data Manually
Hold down the (A) button for about two
seconds, until [REC] stops flashing on the
display. This records the current altitude
reading, along with the recording date and
time.
●
There is enough memory to hold up to 30
altitude records.
●
Recording altitude data when there are
30 records in memory automatically
already
deletes the oldest record to make room for
the new one.
●
Auto Altitude Data Recording
The altitude data described below is recorded
automatically while the watch is in the Altitude
Mode. One record each is maintained in
memory for each of these items.
Note
●
Auto recording ends when you exit
Altimeter Mode. Re-entering the
the
Altimeter Mode restarts recording of
cumulative values from where it was
stopped when you last exited the
Altimeter Mode.
Specifying the Altitude Measurement Unit
You can select either meters (m) or feet (ft) as
the Altitude Mode display unit.
Important!
●
When Tokyo (TYO) is set as the
Home City, the altitude unit is fixed
as meters (m) and cannot be
changed.
Pull out the crown.
1.
Press (B) three times.
2.
Rotate the crown to select [0’05] or [2’00]
3.
as the auto measurement interval.
[0’05]: Readings taken every second for
first three minutes, and then every five
the
seconds for about the next one hour.
[2’00]: Readings taken every second for
first three minutes, and then every two
the
minutes for about the next 12 hours.
Push the crown back in to complete the
4.
setting operation.
Note
●
The watch will automatically return
to the Timekeeping Mode if you do
not perform any operation in the
Altimeter Mode for about one hour
while [0’05] is selected as the
measurement interval or about 12
hours while [2’00] is selected.
High Altitude (MAX): E
Low Altitude (MIN): F
Cumulative Ascent (ASC): A+C
Cumulative Descent (DSC): B+D
*
*
* Cumulative ascent and cumulative descent
values are updated whenever there is a
difference of at least ±15 m (±49 feet) from
one reading to the next.
Rotate the crown to select meters (m) or
3.
feet (ft) as the measurement unit.
Push the crown back in to complete the
4.
setting operation.
12
Page 13

Barometer Mode
Barometric pressure
Barometric pressure graph
Operation Guide 5470
Altitude Reading Precautions
Effects of Temperature
When taking altitude readings, take the steps
below to keep the watch at as stable a
temperature as possible. Changes in
temperature can affect temperature readings.
●
readings with the watch on your wrist.
Take
●
Take readings in an area where
temperature is stable.
Altitude Readings
●
not use this watch while skydiving, hang
Do
gliding, paragliding, gyrocopter flying, glider
flying, or engaged in other activities where
altitude changes suddenly.
●
Altitude readings produced by this watch
are not intended for special-purpose or
industrial level use.
●
In an aircraft, the watch measures the in-
pressurized air pressure, so readings
cabin
will not match altitudes announced by the
crew.
Altitude Readings (Relative Altitude)
This watch uses International Standard
Atmosphere (ISA) relative altitude data
defined by the International Civil Aviation
Organization (ICAO). Barometric pressure
generally becomes lower as altitude
increases.
Correct measurement may not be possible
under the conditions below.
●
During unstable atmospheric conditions
●
During sudden temperature changes
●
After the watch has been subjected to
strong impact
Barometric Pressure
Measurement
You can use the Barometer Mode to take a
reading of the barometric pressure at your
location, and to track reading changes
current
and trends.
Important!
●
Check the information below to find
out how to ensure correct readings.
Barometric Pressure Reading
l
Precautions
Getting ready
Enter the Barometer Mode.
Navigating Between Modes
l
●
Entering the Barometer Mode starts
barometric pressure readings.
Note
●
When you enter the Barometer
the second hand will indicate
Mode,
either timekeeping seconds, or the
differential between barometer
measurements (whichever was
indicated the last time you were in
the Barometer Mode). You can
toggle the second hand indication
between seconds and the measured
value differential by pressing (D).
Checking the Change in Barometric
l
Pressure between Two Readings
Checking the Current Barometric Pressure
Entering the Barometer Mode displays the
current
barometric pressure and a barometric
pressure graph. After you enter the Barometer
Mode, the watch takes readings about every
five seconds for three minutes. After that, a
measurement is taken about every two
minutes.
Note
●
To retrigger measurement, press
(A).
●
The watch will automatically return
to the Timekeeping Mode from the
Barometer mode if you do not
any operation for about one
perform
hour.
●
measurement range is 260 hPa
The
to 1,100 hPA (7.65 inHg to 32.45
inHg) (1 hPa (0.05 inHg) units). [- - -]
will appear for the measured value if
it is outside the allowable range.
●
return to the Timekeeping Mode,
To
hold down the (B) button for about
two seconds.
13
Page 14

Barometric
pressure
(1 hPa per division)
Time
(2 hours per division)
10 5
0
−5
−10
Pressure
Differential
Indicator
Range: ±10 hPa
(1 hPa units)
Unit: hPa
Operation Guide 5470
Checking Changes in Barometric Pressure Over Time
The watch displays a graph of 20 hours of
barometric
hours. The square (v) at the far right of the
graph indicates the latest barometric pressure
reading.
●
Predicting Upcoming Weather
A trend
like this:
pressure readings taken every two
Indicates this:
Rising barometric pressure,
which indicates that upcoming
weather probably will be fair.
Falling barometric pressure,
which indicates that upcoming
weather probably will be bad.
Checking the Change in Barometric Pressure between Two Readings
When you perform the procedure below in the
Barometer Mode, the second hand will
indicate the difference between the current
barometric pressure measurement and the
last auto measurement value (taken at twohour intervals).
Press (D).
1.
The second hand will indicate the
barometric pressure differential (Pressure
Differential Indicator).
Example: Barometric pressure differential
of -3 hPa (approximately -0.9 inHg)
Barometric Pressure Change Indications
Whenever the watch detects a significant
change in air pressure readings (due to
sudden ascent or descent, or to the passage
of
a low pressure or high pressure area), it will
beep to let you know. An arrow will also flash
on the display at this time if the watch is in the
Barometer Mode, or if it is in the Timekeeping
Mode with the barometric pressure graph
displayed. The arrow that appears shows the
direction of the pressure change. These alerts
are called “Barometric Pressure Change
Indications”.
This
indicator:
Sudden drop in barometric
pressure
Sudden rise in barometric
pressure
Sustained rise in pressure,
shifting to a fall
Sustained fall in pressure, shifting
to a rise
Important!
Means this:
Note
●
Large changes in barometric
pressure and/or temperature can
cause past data readings to be
plotted outside of the visible area of
the graph. Though plots are not
visible, the data is still maintained in
watch memory.
●
The barometric pressure graph is
not displayed while Barometric
Pressure Change Indications are
displayed.
Barometric Pressure Change
l
Indications
To exit barometric pressure differential
2.
indication, press (D).
●
Each press of (D) toggles the second
hand between barometric pressure
differential and current time seconds
indication.
Note
●
The second hand will point to r
(over) if the current barometric
pressure differential is greater than
hPa (0.3 inHg), or s (under) if it
+10
is less than -10 hPa (-0.3 inHg).
●
A reading that is outside the
allowable measurement range (260
to 1,100 hPa (7.65 inHg to 32.45
hPa
inHg)) or any measurement error will
cause the second hand to move to 9
o’clock.
●
To ensure correct barometric
pressure
indication operation, turn it
on in a location where the altitude is
constant (such as a lodge, camp
area, or on the ocean).
●
A change in altitude causes a
change in barometric pressure.
Because
of this, correct readings are
impossible. Do not take readings
while ascending or descending a
mountain, etc.
Hold down the (D) button for about two
1.
seconds.
[BARO] is displayed while Barometric
Pressure Change Indications are on.
Hold down the (D) button for about two
2.
seconds to turn off Barometric Pressure
Change Indications.
14
Page 15

Crown
Crown
Thermometer Mode
Operation Guide 5470
Note
●
If Barometric Pressure Change
Indications are on, barometric
pressure readings are taken every
two minutes even while the watch is
not in the Barometer Mode.
●
Barometric Pressure Change
Indications turn off automatically 24
hours after it is turned on.
●
Time signal reception is disabled
while Barometric Pressure Change
Indications are turned on. Power
saving is also disabled.
Power Saving Function
l
●
You will not be able to turn on
Barometric Pressure Change
Indications are while charge level of
the watch’s battery is low.
●
Low battery power will also cause
barometric pressure trend
information to turn off.
Calibrating Barometric Pressure Readings
The watch’s pressure sensor is adjusted at the
factory and normally does not require
calibration. However, you can calibrate the
displayed value if you notice major errors in
readings.
Important!
●
The
watch will not be able to produce
correct temperature readings if you
make a mistake during the
calibration procedure. Check to
make sure that the value you use for
calibration produces correct
pressure readings.
Specifying the Barometric Pressure Measurement Unit
You can specify either hectopascals (hPa) or
inches
of mercury (inHg) as the display unit for
barometric pressure values.
Important!
●
When Tokyo (TYO) is set as the
Home City, the barometric pressure
unit is fixed as hectopascals (hPa)
and cannot be changed.
Pull out the crown.
1.
Press (B).
2.
Rotate the crown to select hectopascals
3.
(hPa) or inches of mercury (inHg) as the
measurement unit.
Push the crown back in to complete the
4.
setting operation.
Barometric Pressure Reading Precautions
Temperature
Measurement
The watch can be used to take current air
temperature readings.
Important!
●
Check the information below to find
out how to ensure correct readings.
Temperature Reading Precautions
l
Getting ready
Enter the Temperature Mode.
Navigating Between Modes
l
●
Entering the Temperature Mode starts
temperature readings.
Checking the Current Temperature
Entering the Temperature Mode displays
temperature reading results. After you enter
the Temperature Mode, the watch takes
readings about every five seconds for three
minutes. After that, a measurement is taken
about every two minutes.
●
To retrigger measurement, press (A).
Pull out the crown.
1.
Rotate the crown to change the value.
2.
Calibration Unit: 1 hPa (0.05 inHg)
●
To return the barometric pressure
to its initial factory default, press
setting
(A) and (C) at the same time.
Push the crown back in to complete the
3.
setting operation.
●
The barometric pressure graph produced
this watch can be used to obtain an idea
by
of upcoming weather conditions. However,
this watch should not be used in place of
precision instruments required for official
weather prediction and reporting.
●
Pressure sensor readings can be affected
by sudden changes in temperature.
Because
of this, there may be some error in
the readings produced by the watch.
Note
●
The watch will automatically return
to the Timekeeping Mode if you do
not perform any operation in the
Temperature Mode for about one
hour.
●
The measuring range is -10.0 °C to
60.0 °C (14.0 °F to 140.0 °F) (0.1 °C
(0.2 °F) units). [- - .-] will appear for
the measured value if it is outside the
allowable range.
●
return to the Timekeeping Mode,
To
hold down the (B) button for about
two seconds.
15
Page 16

Crown
Crown
Data Recall Mode
ACCA
ACCA
A
C
C*
A*
Total Descent
Total Ascent Low Altitude
High Altitude
Auto Recorded Data
Manually Recorded Data
Operation Guide 5470
Calibrating Temperature Readings
The watch’s temperature sensor is adjusted at
the factory and normally does not require
calibration. However, you can calibrate the
displayed value if you notice major errors in
readings.
Important!
●
Check to make sure that the value
you use for calibration produces
correct temperature readings.
●
Before calibrating the temperature
reading,
wrist and leave it in the area where
you plan to measure temperature for
about 20 or 30 minutes to allow the
case temperature to become the
same as the air temperature.
Pull out the crown.
1.
remove the watch from your
Specifying the Temperature Measurement Unit
You can select either Celsius (°C) or
Fahrenheit (°F) as the temperature display
unit.
Important!
●
When Tokyo (TYO) is set as the
Home City, the temperature unit is
fixed as Celsius (°C) and cannot be
changed.
Pull out the crown.
1.
Press (B).
2.
Rotate
3.
the crown to select Celsius (°C) or
Fahrenheit (°F) as the measurement unit.
Viewing Altitude
Records
You can use the Altitude Record Recall Mode
to
view manually recorded and auto recorded
data.
Getting ready
Enter the Altitude Record Recall Mode.
Navigating Between Modes
l
Viewing Recorded Data
Entering the Altitude Record Recall Mode
displays the data type screen of an altitude
data record. Use the (A) and (C) buttons to
between the data top screens as shown
scroll
below.
●
Holding down (A) or (C) scrolls at high
speed.
Rotate the crown to calibrate the
2.
temperature value.
Calibration unit: 0.1 °C (0.2 °F)
●
To return the barometric pressure
to its initial factory default, press
setting
(A) and (C) at the same time.
Push the crown back in to complete the
3.
setting operation.
Push the crown back in to complete the
4.
setting operation.
Temperature Reading Precautions
Body temperature, direct sunlight, and
humidity all have an effect on temperature
readings. To help ensure more accurate
temperature
your wrist, wipe it dry of any moisture, and
place it in a well-ventilated location not
exposed to direct sunlight. You should be able
to take temperature readings after about 20 to
30 minutes.
readings, remove the watch from
* Each press of a button scrolls to the top
screen of the next manually recorded data
record. There can be up to 30 records in
memory, numbered from 1 ([-01-]) to 30
([-30-]).
16
Page 17

D
D
2 seconds
2 seconds
1 second
Altitude Time
Recording date
Record number
D
D
2 seconds
2 seconds
1 second
Altitude
Time
Recording dateData type
D
D
2 seconds
1 second
Cumulative altitude
Date when
accumulation started.Data type
Stopwatch Mode
Operation Guide 5470
Note
●
there is no data left in memory due
If
to a data delete operation, error, or
some other reason, [- - - -] or [0] will
appear on the display.
●
If the cumulative ascent (ASC) or
cumulative descent (DSC) value
exceeds 99,999 m (327,995 feet), it
will revert to 0 and continue from
there.
●
Pressing (D) returns to the top
screen (record number, DSC, ASC,
or MIN) of the data that you are
MAX,
viewing.
●
Manually Recorded Data
After displaying the top screen of a manually
recorded
navigate between the record’s data screens
as shown below.
Example: Manually recorded Record 01
data record (01 through 30), you can
Cumulative ascent and cumulative
descent
Example: Cumulative ascent
Deleting a Particular Record
Use the (A) and (C) buttons to scroll
1.
the top screens of the records and
through
display the one you want to delete .
●
Note that holding down the (D) button
for more than five seconds in step 2
below will delete all data.
Hold down the (D) button for
2.
approximately two seconds. Release the
button as soon as [CLEAR] changes from
flashing to not flashing.
This deletes the record you selected.
Stopwatch
The stopwatch can be used to perform 1/100
second elapsed time measurement up to 23
hours, 59 minutes, 59.99 seconds.
It can also measure split times.
Getting ready
Enter the Stopwatch Mode.
Navigating Between Modes
l
Note
●
Elapsed time returns to zero
automatically and timing continues
from there when the maximum limit
is reached.
●
Once started, elapsed time
measurement continues until you
press (C) to reset the stopwatch,
even if you change to a different
mode and even if the stopwatch
reaches the elapsed time
measurement limit.
●
Exiting the Stopwatch Mode while a
split time is frozen on the display
clears the split time and returns to
elapsed time measurement.
●
Auto Recorded Data
High altitude and low altitude
Example: High altitude
Deleting All Records
Hold down the (D) button for about five
seconds, until the message [CLEAR ALL]
changes from flashing to not flashing. This
deletes all the altitude record data.
17
Page 18

A
A
A
A
nnn
Stop
Resume
Stop
Start
Hours, minutes, seconds, 1/100 seconds
A
C
C
A
nnn
Stop
Split release
Split
Start
Hours, minutes, seconds, 1/100 seconds
A
C
A
C
nnn
Split release
(Time of 2nd finisher)
2nd Finisher
1st Finisher
(Time of 1st finisher)
Start
Hours, minutes, seconds, 1/100 seconds
Timer Mode
Minutes
Crown
Start/Stop
Reset
Minutes, seconds
Operation Guide 5470
Measuring Elapsed Time
Use the operations below to measure
1.
elapsed time.
Timing the First and Second Place Finishers
Use the operations below to measure
1.
elapsed time.
Setting the Timer Start Time
Pull out the crown.
1.
This will cause the timer minutes digits to
flash.
Rotate the crown to change the minutes
2.
value.
The start time can be set in 1-minute units
up to 60 minutes.
Push the crown back in to complete the
3.
setting operation.
Using the Timer
Press (C) to reset the elapsed time to all
2.
zeroes.
Measuring a Split Time
Use the operations below to measure
1.
elapsed time.
Press (C) to reset the elapsed time to all
2.
zeroes.
Timer
The timer counts down from a start time
specified by you. A beeper sounds when the
end of the countdown is reached.
Getting ready
Enter the Timer Mode.
Navigating Between Modes
l
Press (A) to start the countdown. A beeper
sounds when the end of the countdown is
reached.
●
Pressing (A) toggles the countdown
between pause and resume.
●
Pulling out the crown while a countdown is
progress will reset to the countdown start
in
time. You can then use the crown to change
the start time.
●
stop the timer and reset it to the start
To
time
While a countdown operation is in
1.
progress, press (A).
This stops the timer.
Press (C) to reset the elapsed time to all
2.
zeroes.
Press (C).
2.
This resets the timer to the start time.
Stopping the Timer
Pressing any button while the timer beeper is
sounding stops it.
18
Page 19

Alarm Mode
Alarm time
OFF
a.m. (A)
Alarm number
Crown
Alarm number
Hourly time signal
Alarm
Home City time
World Time Mode
World time
Crown
Home City time
Time in selected city
Operation Guide 5470
Alarms
The watch will beep when an alarm time is
reached. You can set up to five different
alarms. The hourly time signal causes the
watch to beep every hour on the hour.
Getting ready
Enter the Alarm Mode.
Navigating Between Modes
l
Configuring Alarm Settings
the (A) and (C) buttons to display the
Use
1.
alarm ([AL1] to [AL5]) you want to
configure.
Rotate the crown to change the hour
5.
setting.
●
If you are using 12-hour timekeeping,
[A] indicates a.m., while [P] indicates
p.m.
Push the crown back in to complete the
6.
setting operation.
Note
●
the Alarm Mode, hold down the (A)
In
button to sound the alarm.
Turning an Alarm On or Off
Use
the (A) and (C) buttons to display the
1.
alarm ([AL1] to [AL5] or [SIG]) you want to
turn on or off.
World Time
You can view the current time in 29 cities (29
time
zones), and UTC (Coordinated Universal
Time) time.
Getting ready
Enter the World Time Mode.
Navigating Between Modes
l
Checking the Time in Another Zone
Pull out the crown.
1.
The second hand will move to the
currently set World Time City.
Pull out the crown.
2.
This turns on the alarm.
Rotate the crown to change the minute
3.
setting.
●
The hour hand will move in accordance
with minute hand movement.
●
To set the hour hand separately, go to
step 4 of this procedure.
Press (B).
4.
Press (D) to toggle the displayed alarm
2.
between on and off.
Stopping an Alarm
Pressing any button while the beeper is
sounding stops it.
Finding Out an Alarm’s On/Off Status
Turning on an alarm or the hourly time signal
causes
the corresponding indicator to appear
on the display.
When any alarm is turned on:
[ALM] is displayed.
When the hourly time signal is enabled:
[SIG] is displayed.
Rotate the crown to move the second
2.
hand to the city you want to set.
The hour and minute hands will indicate
the current time in the selected World
Time City.
Push the crown back in to complete the
3.
setting operation.
This will cause the current time in the
selected Home City to appear on the
digital display.
19
Page 20

Crown
n
Current time
Current time
World Time
World Time
After swappingBefore swapping
Operation Guide 5470
Note
●
To look up the current time in a city
that is not among the built-in cities,
select a built-in city that is in the
time zone as the city you want
same
to look up. For information about
built-in cities, see the “City Code
List”.
●
Pressing
Mode will cause the second hand to
move to the city code of the currently
selected World Time City.
●
To check whether the currently
selected World Time City time is
a.m. or p.m., enter the World Time
Mode, and then press (A). The
second hand will move to “A” (a.m.)
or “P” (p.m.).
(D) while in the World Time
Configuring the Summer Time Setting
When summer time is used in a World Time
city, you can enable Summer Time for that city.
Summer Time
l
Pull out the crown.
1.
The second hand will move to the
currently set World Time City.
Swapping the World Time and Current Location Time
Holding down the (D) button for about three
seconds will swap your World Time with your
current location time (Home Time).
Note
●
This function comes in handy when
you need to move to another time
zone.
International Travel
l
Accessing the UTC (Coordinated Universal Time) Zone
To select UTC as the World Time City, hold
down the (A) button for about three seconds.
Display Illumination
The face of the watch can be illuminated for
reading in the dark. The watch also has an
auto light function that automatically
illuminates the display whenever the watch is
angled for reading in the dark.
Note
●
Illumination
if an alarm starts to sound or if you
perform a crown operation.
●
Display illumination is disabled
when any one of the conditions
below exists. Display illumination is
also
a sensor is in progress.
ー
While a time signal receive
operation is in progress
ー
While a hand movement
operation is in progress
Illuminating the Display Manually
Pressing (L) in any mode turns on face
illumination.
will turn off automatically
disabled while measurement by
2.
3.
4.
Press (B).
Rotate the crown to change the summer
time setting.
●
[OFF]
The watch always indicates standard
time.
●
[ON]
The watch always indicates summer
time.
Push the crown back in to complete the
setting operation.
20
Page 21

40
degrees
or more
Crown
Crown
Timekeeping Mode
Operation Guide 5470
Auto Light
If Auto Light is enabled, display illumination
will
turn on automatically whenever the watch
is positioned at an angle of 40 degrees or more
when it is dark.
Important!
●
Light may not operate properly
Auto
when the watch is at a horizontal
angle of 15 degrees or greater from
horizontal as shown in the illustration
below.
●
Auto Light may operate
unintentionally and run down the
battery if the watch is blocked from
light by your sleeve.
●
Electro-static charge or magnetism
can interfere with proper auto light
operation. If this happens, try
lowering your arm and then angle it
towards your face again.
●
When moving the watch you may
note a slight rattling sound. This is
due to operation of the auto light
which determines the current
switch,
orientation of the watch. It does not
indicate malfunction.
Configuring the Auto Light Setting
In the Timekeeping Mode, pull out the
1.
crown.
Press (B) three times so [AUTO] is
2.
displayed.
Rotate the crown to turn the setting on or
3.
off.
[ON]: Auto Light enabled.
[OFF]: Auto Light disabled.
Push the crown back in to complete the
4.
setting operation.
Specifying the Illumination Duration
You can select either 1.5 seconds or three
seconds as the illumination duration.
In the Timekeeping Mode, pull out the
1.
crown.
Rotate the crown to select an illumination
3.
duration.
[LIGHT1]: 1.5-second illumination
[LIGHT3]: 3-second illumination
Push the crown back in to complete the
4.
setting operation.
Hand Alignment
Adjustment
Strong magnetism or impact can cause the
time
indicated by the analog hands to become
different from the time on the digital display. If
this happens, correct the hand position.
●
The watch has a function to adjust hand
alignment automatically.
Important!
●
You do not need to perform the
operation below as long as the
analog
hands indicate the same time
as the digital display.
Getting ready
Enter the Timekeeping Mode.
Navigating Between Modes
l
Note
●
Auto
Light is disabled when any one
of the conditions below exists.
ー
Alarm, timer alert, or other beeper
sounding
ー
Watch in the Compass Mode
ー
Time signal receive operation in
progress
ー
Hand movement operation is
progress
●
If Auto Light is enabled, face
illumination may be delayed if you
angle the watch towards your face
while a compass, altitude,
barometric
reading operation is being
performed.
pressure, or temperature
(B) four times so the current setting
Press
2.
([LIGHT1] or [LIGHT3]) is displayed.
21
Page 22

Timekeeping Mode
Crown
Crown
Operation Guide 5470
Adjusting Hand Alignment
Pull out the crown.
1.
Hold down the (A) button for about five
2.
seconds until [HAND ADJ] flashes on the
display.
This indicates that hand alignment
adjustment has started.
●
[HAND SET] will flash first on the
display about 0.5 seconds after you
hold down the (A) button. Keep the
button depressed until [HAND ADJ]
flashes on the display.
●
All of the hands will move to 12 o’clock
when hand alignment adjustment is
complete.
Check to make sure that all of the hands
3.
are stopped at 12 o’clock.
●
Hand alignment will not be adjusted
correctly
while the hands are still moving.
Push the crown back in to complete the
4.
setting operation.
●
After hand alignment adjustment is
complete, check to make sure that the
proper time is being indicated in the
Timekeeping Mode by the hands and
on the digital display. If the time
indication is not correct, adjust hand
alignment again.
if you advance to the next step
Other Settings
Getting ready
Enter the Timekeeping Mode.
Navigating Between Modes
l
Enabling the Button Operation Tone
Use the procedure below to enable or disable
tone that sounds when you press a button.
the
Pull out the crown.
1.
The second hand will move to the
currently set city.
Press (B) twice so the current setting
2.
([KEY♪] or [MUTE]) is displayed.
Rotate the crown to select either [KEY♪]
3.
or [MUTE].
[KEY♪]: Operation tone is enabled.
[MUTE]: Operation tone is muted.
Configuring Power Saving Function Settings
Pull out the crown.
1.
The second hand will move to the
currently set city.
Press (B) six times so [P.SAVE] is
2.
displayed.
Rotate the crown to turn the setting on or
3.
off.
[ON]: Power Saving enabled.
[OFF]: Power Saving disabled.
Push the crown back in to complete the
4.
setting operation.
Note
●
details about Power Saving, see
For
“Power Saving Function”.
Push the crown back in to complete the
4.
setting operation.
22
Page 23

Destination time
Current time
n
DestinationOrigin
Operation Guide 5470
International Travel
Use the procedure below to easily change day
and time settings of the watch to a destination
location.
●
Before Boarding
Select a World Time City that corresponds to
your destination.
World Time
l
●
After Arriving
Swap the origin time zone time with the
destination time zone time.
Swapping the World Time and Current
l
Location Time
Other Information
City Code List
This list shows the 29 cities that are built in to
watch memory.
City Code City Name Offset
LON London +0
PAR Paris +1
ATH Athens +2
JED Jeddah +3
THR Tehran +3.5
DXB Dubai +4
KBL Kabul +4.5
KHI Karachi +5
DEL Delhi +5.5
KTM Kathmandu +5.75
DAC Dhaka +6
RGN Yangon +6.5
BKK Bangkok +7
HKG Hong Kong +8
TYO Tokyo +9
ADL Adelaide +9.5
SYD Sydney +10
NOU Noumea +11
WLG Wellington +12
PPG Pago Pago -11
HNL Honolulu -10
ANC Anchorage -9
LAX Los Angeles -8
DEN Denver -7
CHI Chicago -6
NYC New York -5
YHZ Halifax -4
RIO Rio de Janeiro -3
RAI Praia -1
●
The
information in the above table is current
as of July 2015.
Summer Time Table
This list shows the summer time periods of
Time Signal Cities. When the summer time
setting is “AT (AUTO)”, switching between
standard time and summer time is performed
automatically at the timing shown in the table
below.
City Name
London
Paris
Athens
Anchorage
Los
Angeles
Denver
Chicago
New York
●
The
Summer Time
Start
01:00, last
Sunday in March
02:00, last
Sunday in March
03:00, last
Sunday in March
02:00, second
Sunday in March
02:00, second
Sunday in March
02:00, second
Sunday in March
02:00, second
Sunday in March
02:00, second
Sunday in March
information in the above table is current
as of July 2015.
Summer Time
End
02:00, last
Sunday in
October
03:00, last
Sunday in
October
04:00, last
Sunday in
October
02:00, first
Sunday in
November
02:00, first
Sunday in
November
02:00, first
Sunday in
November
02:00, first
Sunday in
November
02:00, first
Sunday in
November
23
Page 24

Troubleshooting
Auto time setting is not
correct.
Q1
The watch cannot perform a receive
operation.
Is the watch’s battery charged?
Signal reception is not possible while
battery power is low. Keep the watch
exposed to light until it recharges
sufficiently.
Solar Charging
l
Is the watch in the Timekeeping Mode?
Time signal auto receive is performed only
while the watch is in the Timekeeping
Mode.
Press (B) to enter the Timekeeping
Mode.
●
To trigger a time signal receive
operation manually, enter the Receive
and then hold down the (A) button
Mode
for about two seconds.
Navigating Between Modes
l
Auto Time Adjustment
l
Is your Home City setting correct for your
location?
The watch will not indicate the correct time
the Home City setting is wrong. Change
if
your Home City setting so it correctly
reflects your location.
Setting a Home Time City
l
After checking the above, the watch still
cannot perform a receive operation.
Time signal reception is not possible
when any one of the conditions exists.
●
When watch is at Level 2 power saving
●
Barometric Pressure Change
Indications turned on
●
Timer countdown in progress
If successful reception is not possible for
reason, you can adjust the time and
some
day settings manually.
Operation Guide 5470
Q2
The signal receive operation always
fails.
Is the watch in a location that is appropriate
for signal reception?
Check your surroundings and move the
to a location where signal reception
watch
is better.
Appropriate Signal Reception Location
l
Did you avoid touching the watch while the
receive operation was in progress?
Minimize movement of the watch and do
not perform any watch operation while a
receive operation is in progress.
Is there an alarm configured to sound
during the same period that the signal
receive operation is performed?
Receive stops if an alarm operation starts
while it is being performed. Disable the
alarm.
Turning an Alarm On or Off
l
Is the signal transmitter in your area
transmitting a signal?
The transmitter of the time signal may not
be transmitting. Try again later.
Q3
Time setting is incorrect even when
time signal reception is successful.
Strong magnetism or impact may cause the
hands of the watch to go out of alignment.
Adjust hand alignment.
Adjusting Hand Alignment
l
Altitude Measurement
Q1
Relative altitude is calculated based on
changes
the watch’s pressure sensor. This means that
barometric pressure changes can cause
readings taken at the same location to be
different. Also note that the value displayed by
the watch may be different from the actual
elevation and/or sea level elevation indicated
for the area where you are located. When
using the watch’s altimeter while mountain
climbing, it is recommended that you regularly
calibrate its readings in accordance with local
altitude (elevation) indications.
l
Q2
The second hand will move to 9 o’clock if a
reading is outside the allowable altitude
measurement range (-700 m to 10,000 m
(-2,300
there may be a problem with the sensor.
l
Q3
There may be a problem with the sensor. Try
taking another measurement. If [ERR] keeps
appearing after multiple measurement
attempts, contact a CASIO service center.
Readings
the same location.
Watch readings are different from
altitude information available from
other sources.
Correct altitude readings are not
possible.
Calibrating Altitude Readings
Following a relative altitude reading,
the watch’s second hand points to 9
o’clock.
to 32,800 feet)). If [ERR] is displayed,
Taking a Relative Altitude Reading from
Some Reference Point
[ERR]
produce different results at
in barometric pressure measured by
appears during measurement.
24
Page 25

Timekeeping Mode
Operation Guide 5470
Digital Compass
Q1
The entire display is flashing.
Abnormal magnetism has been detected.
Move away from any potential source of
strong magnetism and try taking a reading
again.
●
If the display flashes again, it could mean
that the watch itself has become
magnetized. Move away from any potential
source of strong magnetism, perform
bidirectional calibration, and then try taking
a reading again.
Calibrating Compass Readings
l
(Bidirectional Calibration)
Digital Compass Reading Precautions
l
Q2
[ERR]
appears during measurement.
There is a problem with the sensor or there
may be a source strong magnetic force
nearby.
Move away from any potential source
of strong magnetism and try taking a reading
again. If [ERR] keeps appearing after multiple
measurement attempts, contact a CASIO
service center.
Digital Compass Reading Precautions
l
Q3
[ERR] appears following
bidirectional calibration.
If [- - -] is followed by [ERR] on the display, it
could
mean there is something wrong with the
sensor.
●
[ERR] disappears after about one second,
If
try performing bidirectional calibration
again.
●
If [ERR] continues to appear even after
multiple attempts, contact your original
retailer or CASIO service center.
Q4
Direction
watch is different from that indicated
by a backup compass.
Move away from any potential source of
strong magnetism, perform bidirectional
calibration, and then try taking a reading
again.
Calibrating Compass Readings
l
(Bidirectional Calibration)
Digital Compass Reading Precautions
l
Q5
Readings at the same location
produce different results.
Cannot take readings indoors.
Move away from any potential source of
strong magnetism and try taking a reading
again.
Digital Compass Reading Precautions
l
information indicated by the
Barometric Pressure
Measurement
Q1
Following a relative barometric
pressure reading, the watch’s
second hand points to 9 o’clock.
The second hand will move to 9 o’clock if a
reading is outside the allowable barometric
pressure measurement range (260 hPa to
1,100
hPa (7.65 inHg to 32.45 inHg)). If [ERR]
appears on the display, there may be a
problem with the sensor.
Checking the Change in Barometric
l
Pressure between Two Readings
Q2
There may be a problem with the sensor. Try
taking another measurement. If [ERR] keeps
appearing after multiple measurement
attempts, contact a CASIO service center.
appears during measurement.
[ERR]
Temperature Measurement
Q1
There may be a problem with the sensor. Try
taking another measurement. If [ERR] keeps
appearing after multiple measurement
attempts, contact a CASIO service center.
appears during measurement.
[ERR]
World Time
Q1
The time for a World Time City is not
correct.
The summer time setting (standard time/
summer time) is wrong.
Configuring the Summer Time Setting
l
Hand Movement and
Indications
Q1
I don’t know what mode the watch is
in.
You tell which mode the watch is currently in
by checking the position of the mode hand.
Navigating Between Modes
l
●
Hold down the (B) button for about two
seconds to enter the Timekeeping Mode.
Q2
The second hand is jumping at twosecond intervals.
Battery power is low. Keep the watch exposed
to light until it recharges sufficiently.
Checking the Charge Level
l
Q3
hands are stopped and buttons do
All
not work.
The battery is dead. Keep the watch exposed
to light until the battery recharges sufficiently.
Checking the Charge Level
l
Q4
The hands suddenly start moving at
high speed.
This is due to one of the reasons below, and
does not indicate malfunction. Simply wait
until normal hand movement resumes.
●
The watch is recovering from a power
saving state.
Power Saving Function
l
●
time signal is being received and the time
A
setting is being adjusted.
Auto Time Adjustment
l
Q5
Hands are stopped and buttons do
not work.
The watch is in the charge recovery mode.
Wait until the recovery process is complete
(for
about 15 minutes). The watch will recover
more quickly if you place it in a brightly lit
location.
Q6
The time indicated by the hands is
different from the digital time.
Strong magnetism or impact may cause the
hands of the watch to go out of alignment.
Correct hand position alignment.
Adjusting Hand Alignment
l
25
Page 26

Operation Guide 5470
Crown Operations
Q1
Nothing happens when I rotate the
crown.
Leaving the crown pulled out for more than two
minutes
without performing any operation will
automatically disable crown operation. Push
the crown back in to its normal position and
then pull it out again.
Using the Crown
l
Usage Restrictions
Q1
[RECOVER] is flashing on the
display.
A flashing [RECOVER] indicates that some
functions have been temporarily disabled to
protect against a drop in battery voltage.
Checking the Charge Level
l
Charging
Q1
The watch does not work even
though it is exposed to light.
The watch stops operating whenever the
battery goes dead. Keep the watch exposed
to light until it recharges sufficiently.
Checking the Charge Level
l
Q2
[CHARGE] is flashing on the digital
display.
The charge level of the watch is extremely low.
Immediately expose the watch to light to
charge it.
Checking the Charge Level
l
26
 Loading...