

Page 1
MA1308-EA
© 2013 CASIO COMPUTER CO., LTD.
ENGLISH
PORTUGUÊS
Para alterar a defi nição do
indicador do dia
Para ajustar a defi nição da hora
Puxe a Coroa para o cliqu e 1.
Empurre a Cor oa de volta.
Empurre a Cor oa de volta.
Gire a Coroa para alterar a
defi niçã o da h ora.
Quando o ponte iro do s segun dos
estiver na pos ição d as 12 h oras,
puxe a
Coroa para o clique 2.
Gire a Coroa para defi nir o dia.
Nota
Certifi que-se de defi nir a hora AM ou
PM corretamente.
Quando alterar a hora, mova o
ponteiro dos minutos quatro ou cinco
minutos além da defi nição desejada e,
em seguida, retorne-o de volta para a
defi nição desejada.
Nota
A defi nição do indicador do dia usa
um mês de 31 dias. Faça ajustes para
meses com menos dias.
Evite alterar a defi nição do indicador
do dia entre 9 PM e 1 AM. Caso
contrário, o indicador do dia pode
não mudar corretamente à meia-
noite.
Especifi cações
Precisã o: ±20 segundos por mês em média
Cronôme tro: Capacidade de medição: 59'59" (60 minutos)
Unidade de medida: 1 segundo
Medições: Tempo decorrido; tempo intermediário; tempos dos dois
primeiros colocados
Ilumina ção: LED (diodo emissor de luz)
Pilha: Uma pilha de óxido de prata (Tipo: SR920SW) e uma pilha de lítio (Tipo:CR1616)
Vida út il da p ilha: Aproximadamente 2 anos (60 minutos de funcionamento do
cronômetro e 16 segundos de iluminação por dia)
Sempre providencie a troca de ambas as pilhas ao mesmo tempo.
Funções do cronôm etro
Operações da coroa
Alguns modelos resistentes à água (100 metros, 200 metros)
possuem uma coroa aparafusada. Se você precisar
realizar uma operação com a coroa, gire-a para si para
desaparafusá-la. Em seguida, puxe a coroa. Evite aplicar
uma força excessiva ao puxar a coroa. O relógio perde a sua
resistência à água enquanto a coroa está desaparafusada.
Depois de realizar uma operação com a coroa, aparafuse a
coroa de volta completamente.
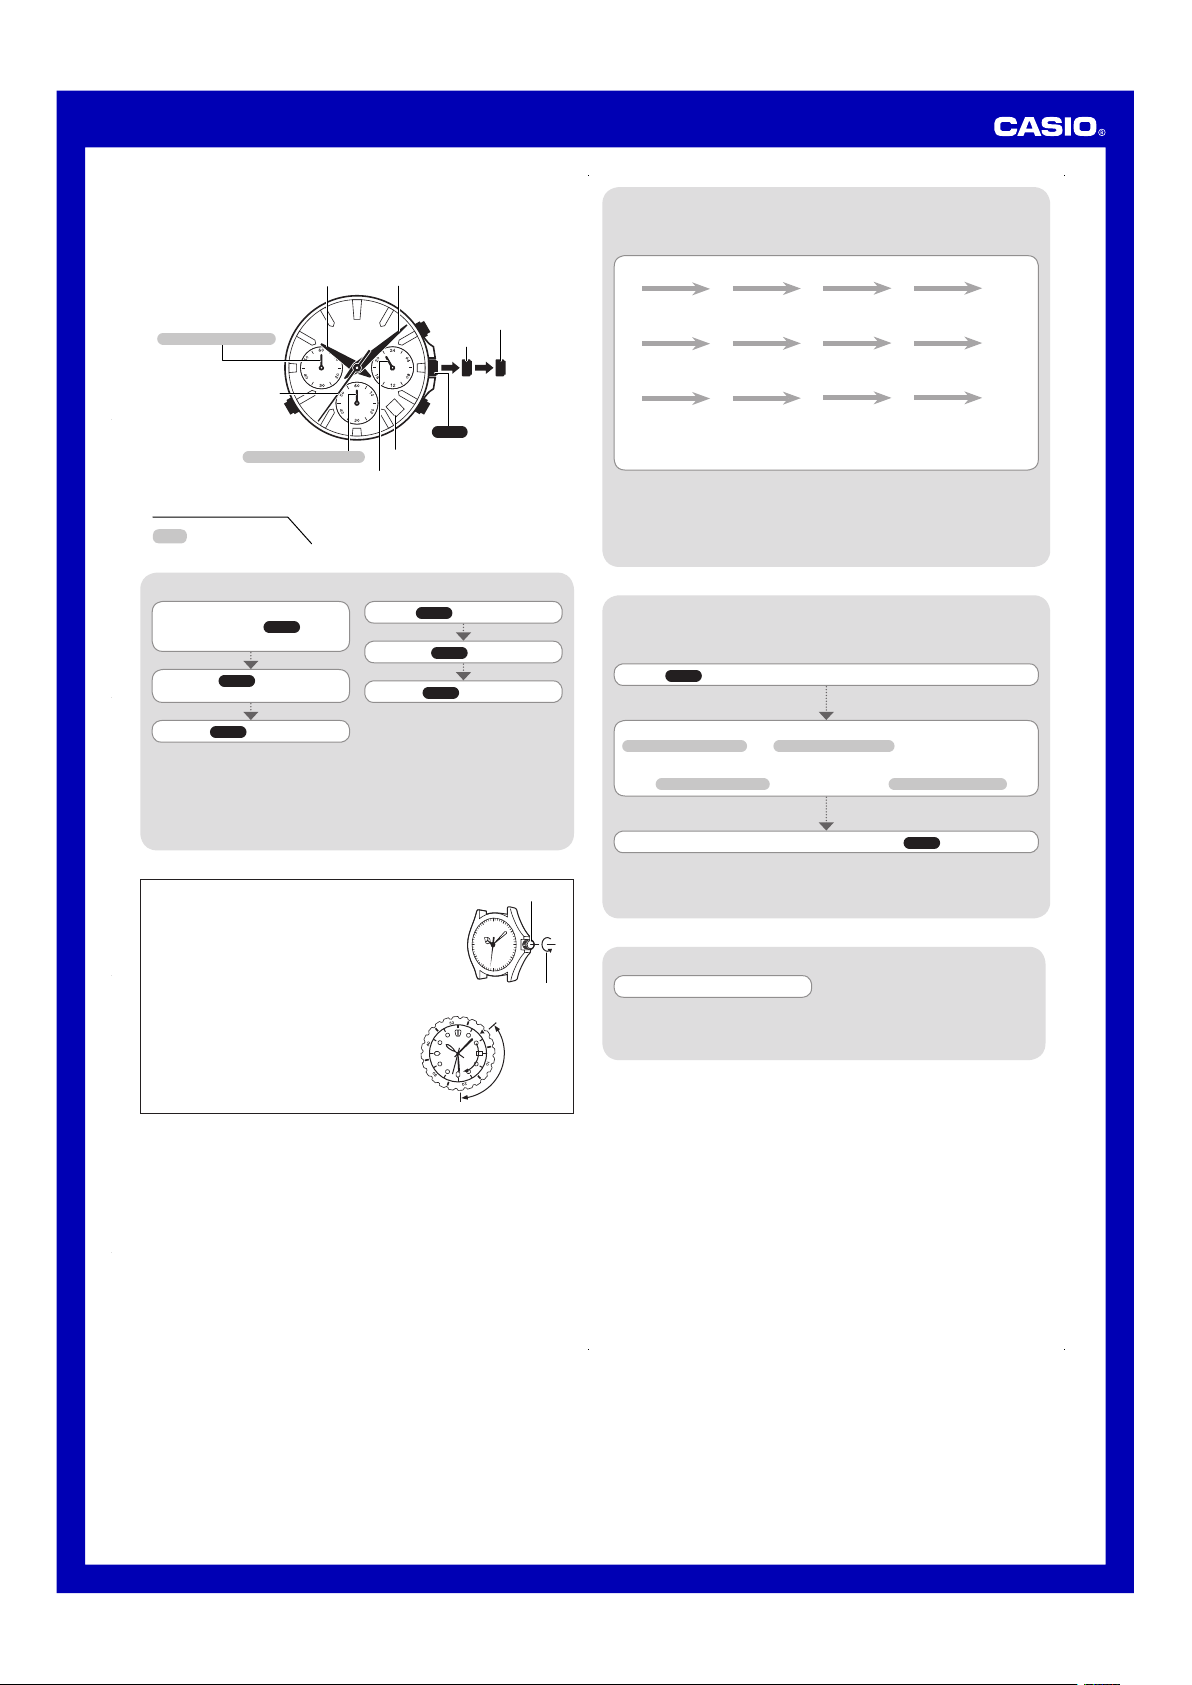
Coroa
Afrouxar
Se o seu relógio tiver um aro graduado
rotativo…
Você pode girar o aro graduado para alinhar sua
marca ▼ com o ponteiro dos minutos. Assim você
poderá saber quanto tempo passou a partir do
alinhamento da marca ▼.
Início
Tempo
decorrido
Atual
Certifi que-se de guardar toda a documentação do usuário à mão para futuras
referências.
Seu relógio pode diferir um pouco do mostrado na ilustração.
Alguns modelos podem usar uma combinação de ponteiros e discos giratórios
para indicar as informações. A palavra “ponteiro” nesta seção é usada para indicar
tanto os ponteiros analógicos como os discos giratórios.
Uso do cronômetro
Tempo d ecorrid o
A
A
A A
B
Início Parada R einício Parada Repos ição
Tempo i ntermed iário
A
B
B A
B
Início Tempo
intermed iário
Liberaçã o
do tempo
intermed iário
Parada R eposição
Dois pr imeiros coloc ados
A
B
A B
B
Início Tempo
intermed iário
Primeiro corredor
termina.
Exibição do
tempo do primeiro
corredor .
Parada
Segundo
corredor
termina.
Liberaçã o
do temp o
intermed iário
Exibição do tempo
do segun do
corredor .
Reposiçã o
Importante!
Não opere o cronômetro com a coroa puxada.
O cronômetro mede o tempo decorrido em incrementos de 1 segundo até 59 minutos
e 59 segundos.
Realize o seguinte procedimento se os ponteiros do cronômetro não retornarem às
suas posições 0 (zero) quando você reposicionar o cronômetro.
Correção das posições 0 dos ponteiros
Puxe a Coroa para o cliqu e 2.
Use B (sentid o horá rio) e A (se ntido a nti-ho rário) para mo ver o
ponteir o dos segundos do cro nômetro
e o
ponteir o dos minutos do cron ômetro
para a posição das 1 2 horas .
Manter um dos botões pressionado moverá o ponteiro dos segundos em alta
velocidade, até que solte o botão.
O
ponteiro dos m inutos do cronômetro
é sincronizado com o
ponteiro dos s egundos do cronômetro
.
Depois que tod os os ponteir os est iverem como q uiser, empurre a C oroa d e
volta.
Importante!
A indicação das horas para enquanto a coroa está puxada. Corrija a defi nição da
hora atual depois de realizar a operação acima.
Precauções relativas à operação
Resistência à água
O seguinte aplica-se aos relógio s com a indic ação “WATER RESIST” ou “WATER
RESISTANT” marcada na tampa posterior.
Resistên cia à
água no uso
diário
Resistên cia à água implementada no
uso diár io
5
atmosfer as
10
atmosfer as
20
atmosfer as
Marcação
Na frent e do relógio ou na
Sem
5BAR 10BAR 20BAR
Pulseiras de couro natural e pulseiras de couro sintético
Permitir que o relógio fi que em contato com outros itens ou guardá-lo junto com outros itens
durante longos períodos de tempo, enquanto o mesmo estiver molhado, pode transferir
a cor dos outros itens para a pulseira de couro natural ou de couro sintético do relógio.
Certifi que-se de secar o relógio completamente antes de guardá-lo e certifi que-se também
de que ele não fi que em contato com outros itens.
Deixar uma pulseira de couro onde ela fi que exposta à luz direta do sol (raios ultravioletas)
durante longos períodos de tempo ou deixar de limpar a sujeira da pulseira de couro durante
muito tempo pode provocar a sua descoloração.
Importante!
Sujeitar uma pulseira de couro natural ou de couro sintético à fricção ou sujeira pode causar
Nota
Uma medição de tempo decorrido parará automaticamente no fi nal de 60 minutos.
Precauções relativas à iluminação
A iluminação pode ser difícil de ver sob a luz direta do sol.
O uso frequente da iluminação descarrega a pilha.
Para acender a iluminação
Nota
A iluminação permanece acesa enquanto L continuar sendo pressionado.
A iluminação se apagará cerca de quatro segundos depois que L for solto.
Mantenh a L pr ession ado.
A
BL
Ponteiro dos segu ndos
Indicador do dia
Clique 2
Clique 1
Ponteiro das hora s
Ponteiro dos minu tos
Coroa
Ponteiro dos min utos do cronômetr o
Ponteiro de 24 ho ras
Ponteiro dos seg undos do cronômet ro
Precauciones de funcionamiento
Resistencia al agua
Lo siguiente correspon de a los relojes con las marcas WATER RESIST o W ATER
RESISTANT (resistente al agua) estampadas en la cubierta posterior.
Resisten cia
al agua en
condicio nes de
uso diar io
Resisten cia al agua mejorada en
condicio nes de uso diario
5
atmósfer as
10
atmósfer as
20
atmósfer as
En el fr ente del reloj o
Sin marc a
Correa de cuero natural o de cuero de imitación
Si deja el reloj en contacto con otros elementos, o lo guarda junto con otros elementos,
durante lapsos prolongados cuando está húmedo puede provocar que el color de dichos
elementos se transfi era a la correa de cuero natural o de cuero de imitación del reloj.
Asegúrese de secar completamente el reloj antes de guardarlo y compruebe, también,
que no quede en contacto con otros elementos.
Si deja la correa de cuero donde quede expuesta a la luz directa del sol (rayos ultravioletas),
o si no limpia la suciedad de la correa de cuero durante períodos prolongados puede
provocar que se decolore.
¡Importante!
Si somete una correa de cuero natural o de cuero de imitación al roce o la suciedad puede
ESPAÑOL
Para cambiar el ajuste del
indicador del día
Para ajustar la hora
Extraig a la corona hasta la
posició n 1.
Vuelva a intro ducir la cor ona .
Vuelva a intro ducir la cor ona .
Gire la coron a para cambi ar el
ajuste de la h ora.
Cuando la mane cilla de segu ndos
está en la pos ición de las
12 hora s, extr aiga l a
corona hasta
la posi ción 2.
Gire la coron a para ajust ar el d ía.
Nota
Tenga la precaución de ajustar
correctamente a AM o PM.
Para cambiar el tiempo, adelante la
manecilla de minutos cuatro o cinco
minutos desde la posición de ajuste
que desea y, a continuación, hágala
retroceder hasta el ajuste que desee.
Nota
El ajuste del indicador del día se basa
en un mes de 31 días. Realice los
ajustes para los meses cortos.
Evite cambiar el ajuste del indicador
del día entre las 9 p.m. y la 1 a.m.
De lo contrario, es posible que
el indicador del día o cambie
correctamente a la medianoche.
Especifi caciones
Precisi ón: Promedio de ±20 segundos por mes
Cronóme tro: Capacidad de medición: 59'59" (60 minutos)
Unidad de medición: 1 segundo
Mediciones: Tiempo transcurrido, tiempo fraccionado, dos llegadas a meta
Ilumina ción: LED (diodo emisor de luz)
Pila: Una pila de óxido de plata (tipo: SR920SW) y una pila de litio (Tipo:CR1616)
Autonom ía de l a pila : Aproximadamente 2 años (60 minutos de operación del
cronómetro y 16 segundos de iluminación por día)
Reemplace siempre ambas pilas al mismo tiempo.
Funciones del cro nómetro
Operaciones con la corona
Algunos modelos resistentes al agua (100 metros,
200 metros) vienen con una corona a rosca. Cuando deba
realizar una operación con la corona, primero gírela hacia
adentro para desbloquearla. A continuación extraiga la
corona. No tire de la corona con una fuerza excesiva. Tenga
en cuenta que el reloj no es resistente al agua mientras la
corona está desenroscada. No olvide de volver a enroscar
la corona por completo después de realizar una operación
con la corona.
Corona
Afl ojar
Si su reloj tiene un bisel rotatorio...
Puede girar el bisel hasta alinear la marca ▼ con
la manecilla de minutos. Esto le permitirá saber
cuánto tiempo ha transcurrido desde que se
alineó con la marca ▼.
Inicio
Tiempo
transcurrido
Tiempo actual
Asegúrese de tener a mano toda la documentación del usuario para futuras
consultas.
Su reloj puede diferir ligeramente del que se muestra en la ilustración.
Algunos modelos pueden indicar información mediante una combinación de
manecillas y discos de rotación. El término “manecilla” en esta sección se utiliza
para referirse tanto a las manecillas analógicas como a los discos de rotación.
Realice el siguiente procedimiento si las manecillas del cronómetro no regresan a sus
posiciones de 0 (cero) al reposicionar el cronómetro.
Corrección de las posiciones 0 de las manecillas
Extraig a la corona hasta la posi ción 2 .
Gire B (en se ntido horario ) y A (en se ntido antihor ario) p ara mo ver las
manecil la de segundos del cr onómetro
y
manecil la de minutos del cro nómetro
a la po sición de las 12.
Mantenga presionado uno u otro botón para mover la manecilla de segundos a
alta velocidad, hasta que usted suelte el botón.
La
manecilla de m inutos del cronómetro
está sincronizada con la
manecilla de s egundos del cronómetro
.
Una vez realiz ados l os ajus tes qu e corre spondan de to das las maneci llas,
vuelva a intro ducir la
corona .
¡Importante!
La marcación de la hora se detiene mientras la corona se encuentra extraída.
Corrija el ajuste de la hora actual después de realizar la operación anterior.
Uso del cronómetro
Tiempo transcu rrido
A
A
A A
B
Inicio Parada Reinicio Parada Reposició n
Tiempo fraccio nado
A
B
B A
B
Inicio Fracci ón Liberación
del tiem po
fraccion ado
Parada Reposición
Dos lle gadas a meta
A
B
A B
B
Inicio Fracci ón
Llegada del
primer c orredor.
Muestra el
tiempo d el
primer c orredor.
Parada
Llegada a meta
del segu ndo
corredor .
Liberaci ón
del tiem po
fraccion ado
Visualiz ación
del tiem po del
segundo corredor.
Reposici ón
¡Importante!
No haga funcionar el cronómetro con la corona extraída.
El cronómetro mide el tiempo transcurrido en incrementos de 1 segundo hasta
59minutos, 59 segundos.
Nota
La medición del tiempo transcurrido se detiene automáticamente al cabo de
60minutos.
Precauciones sobre la iluminación
La iluminación puede ser difícil de ver bajo la luz directa del sol.
El uso frecuente de la iluminación agotará la pila.
Para encender la iluminación
Nota
La iluminación permanece encendida mientras mantiene presionado L.
La iluminación se apaga cuatro segundos después de soltar L.
Manteng a presi onado L.
A
BL
Manecilla de segu ndos
Indicador del día
Posición 2
Posición 1
Manecilla de hora
Manecilla de minu tos
Corona
Manecilla de min utos del cronómet ro
Manecilla de 24 h oras
Manecilla de seg undos del cronóme tro
$)
5SERS'UIDE
'U¤ADELUSUARIO
'UIADO5SUÕRIO
Module No. 5378
Printed in China
MA1308-A
CASIO COMPUTER CO., LTD.
6-2, Hon-machi 1-chome
Shibuya-ku, Tokyo 151-8543, Japan
Ú
#!3)/#/-054%2#/,4$
Operation Guide 5378
Be sure to keep all user documentation handy for future reference.
Your watch may differ somewhat from the one shown in the illustration.
Some models may use a combination of hands and rotating disks to indicate
information. The word “hand” in this section is used to mean both analog hands
and rotating disks.
Stopwatch Minute Han d
Second Hand
Stopwatch functio ns
To adjust the time setting
When th e secon d hand is at
12 o’cl ock, pu ll the
Click 2 .
Rotate the Cro wn to change t he
time se tting.
Push th e Crown back i n.
Note
Take care that you set the correct AM
or PM time.
When changing the time, move the
minute hand four or fi ve minutes past
your fi nal setting, and then back it up
to the setting you want.
Crown Operations
Some water-resistant models (100 meters, 200 meters)
have a screw-in crown. When you need to perform a crown
operation, rotate it towards you to unscrew it. Then pull
the crown out. Avoid applying undue force when pulling.
The watch loses its water resistance while the crown is
unscrewed. After performing a crown operation, fully screw
the crown back in.
If your watch has a rotary bezel...
You can rotate the bezel to align its ▼ mark with the
minute hand. Then you will be able to tell how much
time has elapsed since aligning the ▼ mark.
Hour Hand
Stopwatch Second Han d
Crown ou t to
Minute Hand
Day Indicator
24 Hour Hand
To change the day indicator setting
Pull th e Crown out to Click 1.
Rotate the Cro wn to set the day.
Push th e Crown back i n.
Note
The day indicator setting uses a 31-
day month. Make adjustments for
months of shorter lengths.
Avoid changing the day indicator
setting between the hours of 9
p.m. and 1 a.m. Otherwise, the day
indicator may not change correctly at
midnight.
A
BL
Crown
Current
Click 2
Click 1
Crown
Start
Elapsed time
Using the Stopwatch
The stopwatch measures elapsed time in 1-second increments up to 59minutes,
59seconds.
Elapsed time
A
Start Stop Re- start Stop Res et
Split t ime
A
Start Split Split re lease Stop Re set
Two fi ni shes
A
Start Split
Important!
Do not operate the stopwatch with the crown pulled out.
Note
An elapsed time operation will stop automatically at the end of 60 minutes.
A
B
B
First runner
fi nishe s.
Display time of
fi rst r unner.
A A
B A
A B
Stop
Second runner
fi nishe s.
Correcting the 0 Positions of the Hands
Perform the following procedure if the stopwatch hands do not return to their 0 (zero)
positions when you reset the stopwatch.
Pull th e Crown out to Click 2.
Use B (clockw ise) a nd A (count erclock wise) t o move the
Stopwatc h Secon d Hand
Holding down either button will move the second hand at high speed, until you
release the button.
The
Stopwatc h Minute Hand
After a ll of t he han ds are the wa y you w ant, pu sh the Crown back i n.
Important!
Timekeeping stops while the crown is pulled out. Correct the current time setting
after performing the above operation.
and
Stopwatc h Minut e Hand
is syncronized with the
To turn on illumination
Loosen
Hold do wn L.
Note
Illumination remains turned on as long as L is depressed.
Illumination will turn off about four seconds after L is released.
Illumination Precautions
Illumination may be hard to see when viewed under direct sunlight.
Frequent use of illumination runs down the battery.
Specifi cations
Accurac y: ±20 seconds average per month
Stopwat ch: Measuring Capacity: 59'59" (60 minutes)
Illumin ation: LED (light-emitting diode)
Battery : One silver oxide battery (Type: SR920SW) and one lithium battery
Battery Life: Approximately 2 years (60 minutes stopwatch operation and 16 seconds
Measuring Unit: 1 second
Measurements: Elapsed time; split time; two fi nishes
(Type:CR1616)
illumination per day)
Always have both batteries replaced at the same time.
Split re lease
Display time of
second runner.
to 12 o'clock .
Stopwatc h Second Hand
B
B
B
Reset
.
1
 Loading...