

Page 1
MO1007-EC
Operation Guide 3172
Congratulations upon your selection of this CASIO watch.
Applications
The built-in sensors of this watch measure direction, barometric pressure, temperature and altitude.
Measured values are then shown on the display. Such features make this watch useful when hiking,
mountain climbing, or when engaging in other such outdoor activities.
• The measurement functions built into this watch are not intended for taking measurements that
require professional or industrial precision. Values produced by this watch should be considered
as reasonable representations only.
• When engaging in mountain climbing or other activities in which losing your way can create a
dangerous or life-threatening situation, always use a second compass to confi rm direction
readings.
• Note that CASIO COMPUTER CO., LTD. assumes no responsibility for any damage or loss
suffered by you or any third party arising through the use of this product or its malfunction.
Warning !
About This Manual
• Button operations are indicated using the letters shown in the
illustration.
• Note that the product illustrations in this manual are intended for
reference only, and so the actual product may appear somewhat
different than depicted by an illustration.
(Light)(Light)
Things to check before using the watch
1. Check the battery power level.
Is “H” or “M” displayed for the battery power indicator?
NO YES
Does any one of the following conditions exist?
• Battery power indicator shows “L” and “
upper left corner of the screen.
• “C” is displayed in the lower left corner of the screen.
• The face is blank.
Power is low.
where it is exposed to light. For details, see “Charging the
Watch”.
Charge the watch by placing it in a location
YES
LOW
” is displayed in the
Battery power
indicator
The watch is charged
sufficiently.
For details about
charging, see
“Charging the Watch”.
NEXT
Go to step 2.
2. Check the Home City and the daylight saving time (DST) setting.
Use the procedure under “To confi gure Home City settings” to confi gure your Home City and daylight
saving time settings.
Important!
Proper time calibration signal reception, and World Time Mode and Sunrise/Sunset Mode data depend
on correct Home City, time, and date settings in the Timekeeping Mode. Make sure you confi gure these
settings correctly.
3. Set the current time.
• To set the time using a time calibration signal
See “To get ready for a receive operation”.
• To set the time manually
See “Confi guring Current Time and Date Settings Manually”.
The watch is now ready for use.
• For details about the watch’s radio controlled timekeeping feature, see “Radio Controlled Atomic
Timekeeping”.
Charging the Watch
The face of the watch is a solar cell that generates power from light. The generated power charges a
built-in rechargeable battery, which powers watch operations. The watch charges whenever it is exposed
to light.
Charging Guide
Whenever you are not wearing the
watch, leave it in a location where it
is exposed to light.
• Best charging performance is
achieved by exposing the watch to
the strongest light available.
Warning!
Leaving the watch in bright light for charging can cause it to become quite hot.
Take care when handling the watch to avoid burn injury. The watch can become particularly hot
when exposed to the following conditions for long periods.
• On the dashboard of a car parked in direct sunlight
• Too close to an incandescent lamp
• Under direct sunlight
Important!
• Allowing the watch to become very hot can cause its liquid crystal display to black out. The
appearance of the LCD should become normal again when the watch returns to a lower temperature.
• Turn on the watch’s Power Saving function and keep it in an area normally exposed to bright light when
storing it for long periods. This helps to ensure that power does not run down.
• Storing the watch for long periods in an area where there is no light or wearing it in such a way that it is
blocked from exposure to light can cause power to run down. Expose the watch to bright light
whenever possible.
When wearing the watch, make sure
that its face is not blocked from light
by the sleeve of your clothing.
• The watch may enter a sleep state
if its face is blocked by your sleeve
even only partially.
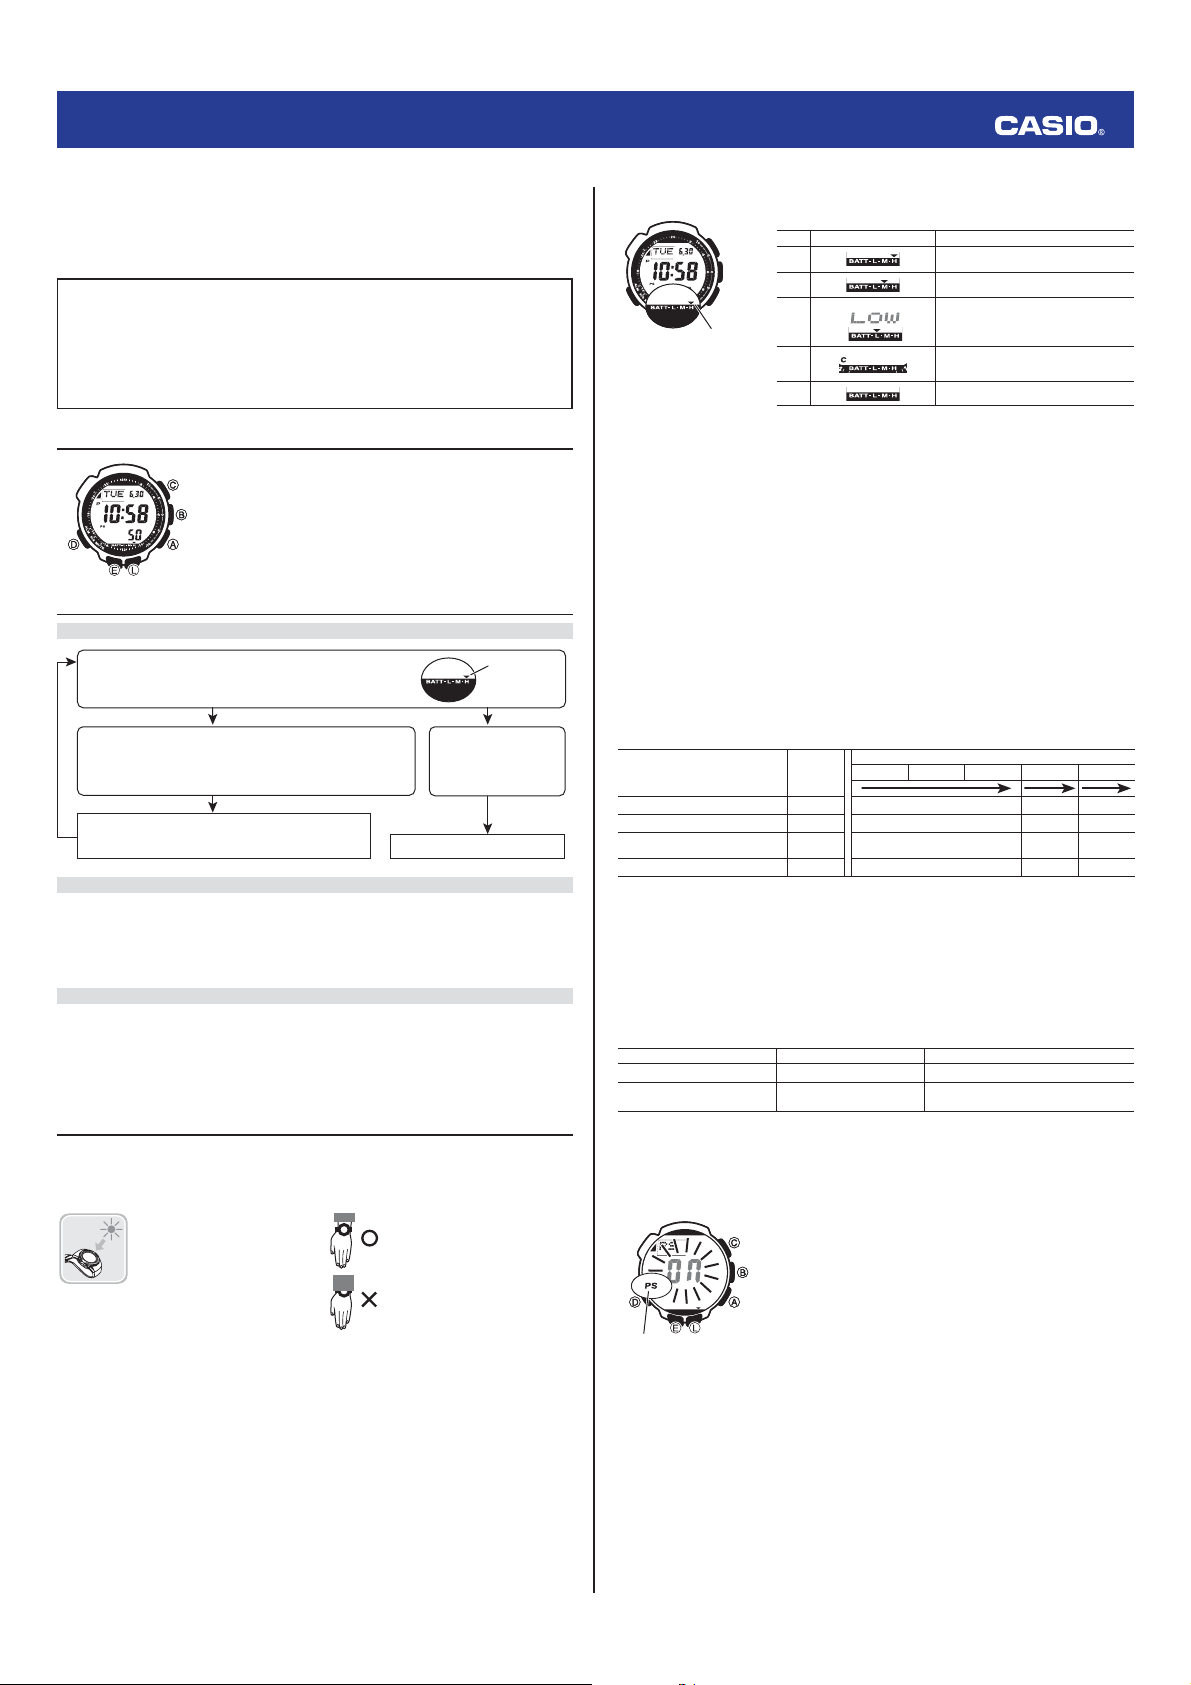
Power Levels
You can get an idea of the watch’s power level by observing the battery power indicator on the display.
Level Battery Power Indicator Function Status
1
(H)
2
(M)
3
Battery power
Battery power
indicator
indicator
• The fl ashing
bright light for charging is required as soon as possible.
• At Level 5, all functions are disabled and settings return to their initial factory defaults. Once the battery
reaches Level 2 (M) after falling to Level 5, reconfi gure the current time, date, and other settings.
• Display indicators reappear as soon as the battery is charged from Level 5 to Level 2 (M).
• Leaving the watch exposed to direct sunlight or some other very strong light source can cause the
battery power indicator to show a reading temporarily that is higher than the actual battery level. The
correct battery level should be indicated after a few minutes.
• All data stored in memory is deleted, and the current time and all other settings return to their initial
factory defaults whenever battery power drops to Level 5 and when you have the battery replaced.
Power Recovery Mode
• Performing multiple sensor, illumination, or beeper operations during a short period may cause all of
the battery power indicators (H,M, and L) to start fl ashing on the display. This indicates that the watch
is in the power recovery mode. Illumination, alarm, countdown timer alarm, hourly time signal, and
sensor operations will be disabled until battery power recovers.
• Battery power will recover in about 15 minutes. At this time, the battery power indicators (H,M,L) will
stop fl ashing. This indicates that the functions listed above are enabled again.
• If all of the battery power indicators (H,M,L) are fl ashing and the C (charge) indicator also is fl ashing,
it means the battery level is very low. Expose the watch to bright light as soon as possible.
• Even if battery power is at Level 1 (H) or Level 2 (M), the Digital Compass Mode, Barometer/
Thermometer Mode, or Altimeter Mode sensor may be disabled if there is not enough voltage available
to power it suffi ciently. This is indicated when all of the battery power indicators (H,M,L) are fl ashing.
• Frequent fl ashing of all of the battery power indicators (H,M,L) probably means that remaining battery
power is low. Leave the watch in bright light to allow it to charge.
LOW
indicator at Level 3 (L) tells you that battery power is very low, and that exposure to
(L)
4
(C)
5 All functions disabled.
l
l
l
l
l
l
l
l
l
l
All functions enabled.
All functions enabled.
l
l
l
l
l
Auto and manual receive, illumination,
l
l
l
beeper, and sensor operation disabled.
Except for timekeeping and the C (charge)
indicator, all functions and display
indicators disabled.
Charging Times
Daily
Exposure Level (Brightness)
Outdoor sunlight (50,000 lux) 5 min. 2 hours 11 hours 3 hours
Sunlight through a window (10,000 lux)
Daylight through a window on a
cloudy day (5,000 lux)
Indoor fl uorescent lighting (500 lux) 8 hours 87 hours – – – – – –
*1 Approximate amount of exposure time required each day to generate enough power for normal daily
operation.
*2 Approximate amount of exposure time (in hours) required to take power from one level to the next.
• The above exposure times all are for reference only. Actual exposure times depend on lighting
conditions.
• For details about the operating time and daily operating conditions, see the “Power Supply” section of
the Specifi cations.
Power Saving
When turned on, Power Saving enters a sleep state automatically whenever the watch is left for a certain
period in an area where it is dark. The table below shows how watch functions are affected by Power
Saving.
• There actually are two sleep state levels: “display sleep” and “function sleep”.
Elapsed Time in Dark Display Operation
60 to 70 minutes (display sleep) Blank, with PS fl ashing Display is off, but all functions are enabled.
6 or 7 days (function sleep) Blank, with PS not fl ashing
• The watch will not enter a sleep state between 6:00 AM and 9:59 PM. If the watch is already in a sleep
state when 6:00 AM arrives, however, it will remain in the sleep state.
• The watch will not enter a sleep state while it is in the Stopwatch Mode or Countdown Timer Mode.
To recover from the sleep state
Move the watch to a well-lit area, press any button, or angle the watch towards your face for reading.
To turn Power Saving on and off
Operation
24 min. 5 hours 54 hours 15 hours
48 min. 8 hours 110 hours 30 hours
1. In the Timekeeping Mode, hold down E until the currently selected
city code starts to fl ash. This is the city code setting screen.
• Before the cit y code starts to fl ash, the m essage SET Hold
will appear o n the display. Keep E depressed u ntil SET Hold
disappear s and the cit y code star ts to fl ash.
Level 5 Level 4 Level 3 Level 2 Level 1
*1
Level Change *2
All functions are disabled, but timekeeping is
maintained.
2. Use D to display the Power Saving On/Off screen shown nearby.
OFF
).
Power saving
Power saving
on indicator
on indicator
3. Press A to toggle Power Saving on (On) and off (
4. Press E twice to exit the setting screen.
• The Power Sav ing on indicato r (PS) is on the display in a ll modes
while Power S aving is turne d on.
1
Page 2
Operation Guide 3172
g
Radio Controlled Atomic Timekeeping
This watch receives a time calibration signal and updates its time setting accordingly. However, when
using the watch outside of areas covered by time calibration signals, you will have to adjust the settings
manually as required. See “Confi guring Current Time and Date Settings Manually” for more information.
This section explains how the watch updates its time settings when the city code selected as the Home
City is in Japan, North America, Europe, or China, and is one that supports time calibration signal
reception.
If your Home City Code setting is this:
LIS, LON, MAD, PAR, ROM, BER, STO, ATH, MOW Anthorn (England), Mainfl ingen (Germany)
HKG, BJS Shangqiu City (China)
TPE, SEL, TYO Fukushima (Japan), Fukuoka/Saga (Japan)
HNL, ANC, YVR, LAX, YEA, DEN, MEX, CHI, NYC, YHZ,
YYT
Important!
• The areas covered by
certain conditions may cause reception problems.
HKG
• When
time calibration signal. You need to switch manually between standard time and daylight saving time
(DST) if required. See “To confi gure Home City settings” for information about how to do this.
MOW,HNL
and
BJS
or
is selected as the Home City, only the time and date are adjusted according to the
Approximate Reception Ranges
UK and German Signals
Anthorn
500 kilometers
1,500 kilometers
The Anthorn signal is
receivable within this area
Japanese Signals Chinese Signal
500 kilometers
Fukuoka/Saga
• Even when the watch is within range of a transmitter, signal reception may be impossible due to the
effects of geographic contours, structures, weather, the time of year, the time of day, radio interference,
etc. The signal becomes weaker at distances of approximately 500 kilometers, which means that the
infl uence of the conditions listed above becomes even greater.
• Signal reception may not be possible at the distances noted below during certain times of the year or
day. Radio interference may also cause problems with reception.
Mainfl ingen (Germany) or Anthorn (England) transmitters: 500 kilometers (310 miles)
Fort Collins (United States) transmitter: 600 miles (1,000 kilometers)
Fukushima or Fukuoka/Saga (Japan) transmitters: 500 kilometers (310 miles)
Shangqiu (China) transmitter: 500 kilometers (310 miles)
• As of January 2009, China does not use Daylight Saving Time (DST). If China does go to the Daylight
Saving Time system in the future, some functions of this watch may no longer operate correctly.
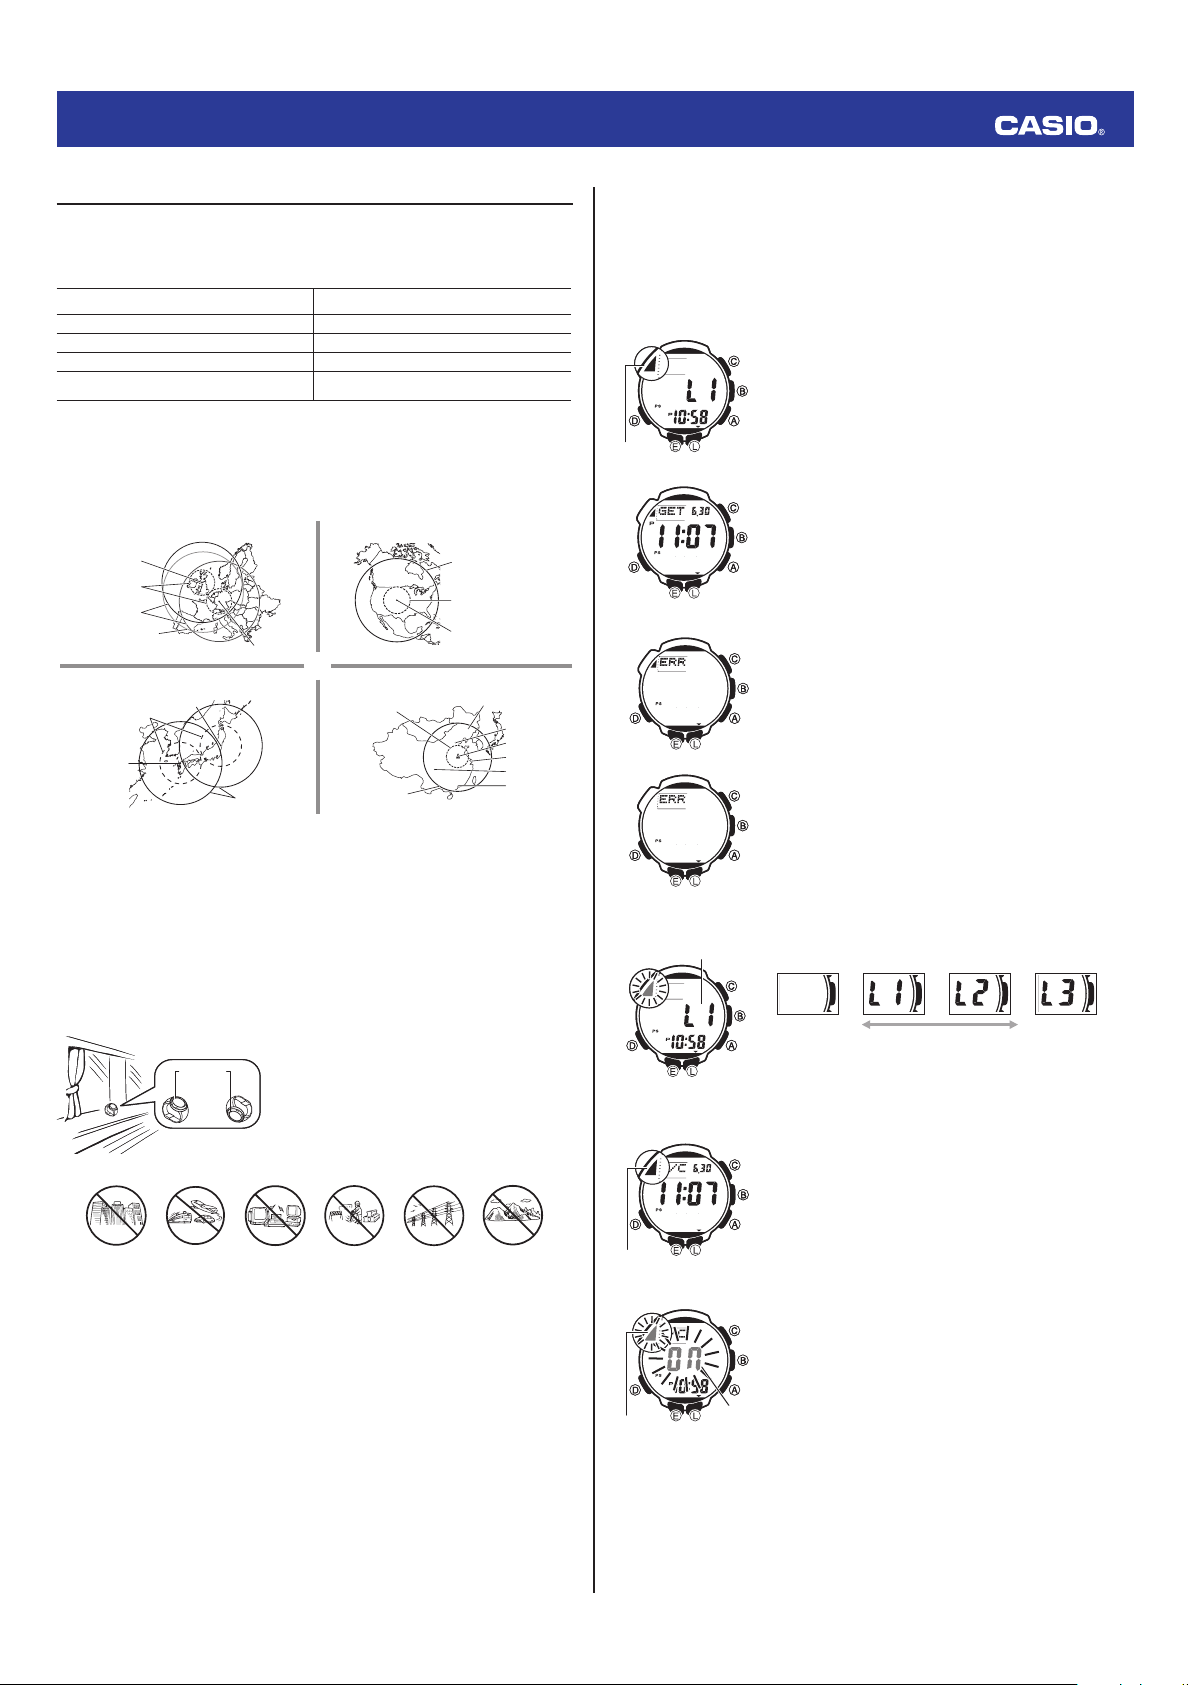
To get ready for a receive operation
1. Confi rm that the watch is in the Timekeeping Mode. If it isn’t, use D to enter the Timekeeping Mode.
2. The antenna of this watch is located on its 12 o’clock side. Position the watch with 12 o’clock facing
towards a window as shown in the nearby illustration. Make sure there are no metal objects nearby.
Fukushima
Signals are receivable in the Taiwan area
when reception conditions are
12 o’clock
12 o’clock
or
or
Mainflingen
1,000 kilometers
ood.
• Signal rece ption may be dif fi cult or even imp ossible und er the condit ions describ ed below.
Inside or
among
buildings
3. What you should do next depends on whether you are using Auto Receive or Manual Receive.
• Auto Receive: L eave the watch over nigh t in the locati on you selecte d in step 2. See “Auto
Receive” bel ow for details .
• Manual Re ceive: Perfo rm the operati on under “To per form manua l receive”.
Inside a
vehicle
Near
household
appliances,
offi ce
equipment,
or a mobile
phone
The watch can receive the signal from the transmitter
located here:
Fort Collins, Colorado (United States)
ANC
are quite far from the calibration signal transmitters, so
North American Signal
2,000 miles
(3,000 kilometers)
600 miles
(1,000 kilometers)
Fort Collins
500 kilometers
1,500 kilometers
• Signal rece ption norma lly is better at n ight.
• The receive o peration ta kes from two to s even minutes,
but in some c ases it can ta ke as long as 14 minutes . Take
care that you do n ot perfor m any button o peration or
move the watch duri ng this time.
Near a
construction
site, airport,
or other
sources of
electrical
noise
Near
high-tension
power lines
Changchun
Beijing
Shangqiu
Shanghai
Chengdu
Hong Kong
Among or
behind
mountains
Auto Receive
• With Auto Receive, the watch performs the receive operation each day automatically up to six times (up
to fi ve times for the Chinese calibration signal) between the hours of midnight and 5 a.m. (according to
the Timekeeping Mode time). When any receive operation is successful, none of the other receive
operations for that day are performed.
• When a calibration time is reached, the watch will perform the receive operation only if it is in the
Timekeeping Mode or World Time Mode. The receive operation is not performed if a calibration time is
reached while you are confi guring settings.
• You can use the procedure under “To turn auto receive on and off” to enable or disable auto receive.
To perform manual receive
Receiving
Receiving
Receiving
Receiving
indicator
indicator
Receive successful
Receive successful
Receive failed
Receive failed
If there was a previously
If there was a previously
successful reception
successful reception
If no reception was
If no reception was
successful
successful
Signal Level Indicator
Signal level indicatorSignal level indicator
To check the latest signal reception results
Receiving
Receiving
indicator
indicator
To turn auto receive on and off
On/Off
Receiving
Receiving
indicator
indicator
On/Off
status
status
1. Use D to select the Receive Mode (R/C) as shown in “Selecting a
Mode”.
2. Hold down A.
• Keep A depressed u ntil RC Hold appears on th e display and the
receiving i ndicator sta rts fl ashing.
• A signal level indi cator (L1, L2, or L3, see “S ignal Level Indi cator”)
appears on t he display afte r reception sta rts. Do no t move the
watch or perfo rm any butto n operation un til GET or ERR appears
in the upper le ft corne r of the screen.
• If the receive o peration is su ccessful, t he reception da te and time
appear on th e display, along wit h the GET indicator.
The watch will ret urn to the Time keeping Mod e if you press D or
if you do not pe rform any bu tton operat ion for abou t two or thre e
minutes.
• If the current re ception fails bu t a previous rece ption (within th e
last 24 hours) was suc cessful, th e display shows t he receiving
indicator and the ERR indicator. If the ERR indicator onl y is
displayed (with out the recei ving indicator), it m eans that all of t he
receive oper ations over the p ast 24 hours have fai led.
The watch will ret urn to the Time keeping Mod e without ch anging
the time set ting if you pre ss D or if you do not p erform any b utton
operation f or about tw o or three minu tes.
Note
T
o interrupt a receive operation and return to the Receive Mode, press
A
.
During manual receive, the signal level indicator displays the signal level
as shown below.
Weak (Unstable) Strong (Stable)
As you watch the indicator, keep the watch in a location that best
maintains stable reception.
• Even under optimum reception conditions, it can take about 10
seconds for reception to stabilize.
• Note that weather, the time of day, surroundings, and other factors all
can affect reception.
Enter the Receive Mode.
• When receive is successful, the display shows the time and date that
receive was successful.
operations were successful.
• To return to the Timekeeping Mode, press D.
Note
The receiving indicator will not be displayed if you have adjusted the
time or date setting manually since the last receive operation.
- : - -
indicates that none of the reception
1. Enter the Receive Mode.
2. In the Receive Mode, hold down E until the current auto receive
setting (On or
setting screen.
• Note that the s etting scre en will not appe ar if the curre ntly selected
Home Cit y is one that do es not suppo rt time cali bration recept ion.
3. Press A to toggle auto receive on (On) and off (
OFF
) and receiving indicator start to fl ash. This is the
OFF
).
4. Press E to exit the setting screen.
2
Page 3
Operation Guide 3172
Radio-controlled Atomic Timekeeping Precautions
• Strong electrostatic charge can result in the wrong time setting.
• Even if a receive operation is successful, certain conditions can cause the time setting to be off by up
to one second.
• The watch is designed to update the date and day of the week automatically for the period January 1,
2000 to December 31, 2099. Updating of the date by signal reception will no longer be performed
starting from January 1, 2100.
• If you are in an area where signal reception is not possible, the watch keeps time with the precision
noted in “Specifi cations”.
• The receive operation is disabled under any of the following conditions.
– While power is at Level 3 (L) or lower
– While the watch is in the power recovery mode
– While a sensor operation is being performed
– When the watch is in the function sleep state (“Power Saving”)
– While a countdown timer operation is in progress
• A receive operation is cancelled if an alarm sounds while it is being performed.
• The Home City setting reverts to the initial default of
drops to Level 5 or when you have the rechargeable battery replaced. If this happens, change the
Home City to the setting you want.
Selecting a Mode
• The illustration below shows which buttons you need to press to navigate between modes.
• For about one second after you enter a mode by pressing D, a pointer will appear on the display
pointing the applicable mode name on the watch's bezel.
• In any mode, press L to illuminate the display.
World Time
World Time
Mode
Mode
Data Recall
Data Recall
Mode
Mode
TYO
(Tokyo) whenever the battery power level
Timekeeping Mode
Timekeeping Mode
Sunrise/Sunset
Sunrise/Sunset
Mode
Mode
Mode Reference Guide
Your watch has 11 “modes”. The mode you should select depends on what you want to do.
To do this: Enter this mode:
• View the current date in the Home City
• Confi gure Home City and daylight saving time (DST) settings
• Confi gure time and date settings manually
View the sunrise and sunset times for a specifi c date Sunrise/Sunset Mode
• Determine your current bearing or the direction from your current
location to a destination as a direction indicator and angle value
• Determine your current location using the watch and a map
• View the barometric pressure and temperature at your current location
• View a graph of barometric pressure readings
• View the altitude at your current location
• Determine the altitude differential between two locations (reference
point and current location)
• Record an altitude reading with the measurement time and date
Recall records created in the Altimeter Mode Data Recall Mode
View the current time in one of 48 cities (31 time zones) around the globe World Time Mode
Use the stopwatch to measure elapsed time Stopwatch Mode
Use the countdown timer Countdown Timer Mode
Set an alarm time Alarm Mode
• Perform a time calibration receive operation
• Check whether the last receive operation was successful
• You can use buttons A,B, and C to enter a sensor mode directly from the Timekeeping Mode or
from another sensor mode. To enter a sensor mode from the Sunrise/Sunset Mode, Data Recall, World
Time, Stopwatch, Countdown Timer, Alarm, or Receive Mode, fi rst enter the Timekeeping Mode and
then press the applicable button.
Sensor Modes
Sensor Modes
Timekeeping Mode
Digital Compass Mode
Barometer/Thermometer Mode
Altimeter Mode
Receive Mode
Countdown
Stopwatch Mode
Stopwatch Mode
General Functions (All Modes)
The functions and operations described in this section can be used in all of the modes.
Auto Return Features
• The watch returns to the Timekeeping Mode automatically if you do not perform any button operation
for two or three minutes in the Sunrise/Sunset, Data Recall, Alarm, Receive, or Digital Compass Mode.
• If you leave a screen with fl ashing digits on the display for two or three minutes without performing any
operation, the watch exits the setting screen automatically.
Initial Screens
When you enter the World Time, Alarm, or Digital Compass Mode, the data you were viewing when you
last exited the mode appears fi rst.
Scrolling
TheA and C buttons are used on the setting screen to scroll through data on the display. In most
cases, holding down these buttons during a scroll operation scrolls through the data at high speed.
Countdown
Timer Mode
Timer Mode
Alarm Mode Receive Mode
Alarm Mode Receive Mode
Timekeeping
Use the Timekeeping Mode to set and view the current time and date.
• Pressing E while in the Timekeeping Mode will cycle through the Timekeeping Mode display formats
as shown below.
Day of the Week Screen Year Screen Barometric Pressure
PM
Day of
week
Month
Day
Year
indicator
Graph Screen
Barometric
pressure graph
Digital Compass Mode
Digital Compass Mode
Barometer/
Thermometer Mode
Thermometer Mode
Altimeter Mode
Altimeter Mode
Barometer/
Confi guring Home City Settings
There are two Home City settings: actually selecting the Home City and selecting either standard time or
daylight saving time (DST).
PM
City
City
code
code
Month
Month
Day
Day
SecondsHour : Minutes
SecondsHour : Minutes
To confi gure Home City settings
1. In the Timekeeping Mode, hold down E until the currently selected
city code starts to fl ash. This is the city code setting screen.
• Before the cit y code starts to fl ash, the m essage SET Hold
will appear o n the display. Keep E depressed u ntil SET Hold
disappear s and the cit y code star ts to fl ash.
• The watch will exi t the settin g mode automat ically if you d o not
perform a ny operation f or about tw o or three minu tes.
• For details about city codes, see the “City Code Table”.
2. Press A (East) and C (West) to select the city code you want to use
as your Home City.
• Keep pressin g A or C until the cit y code you wan t to select as
your Home C ity appea rs on the display.
3. Press D to display the DST setting screen.
4.
UseA to cycle through the DST settings in the sequence shown below.
Auto DST (AUTO) DST off (OFF)
DST on (On)
PM
indicator
indicator
DST indicator
DST indicator
• The Auto DS T (AUTO) setti ng will be availabl e only when a ci ty code that s upports t ime calibrati on
signal recept ion is selecte d as the Home C ity. While Auto D ST is selected t he DST set ting will be
changed aut omatically i n accordanc e with time cal ibration sig nal data.
• Note that you c annot switch b etween sta ndard time an d daylight saving t ime (DST ) while UTC is
selected as yo ur Home Cit y.
5. After all the settings are the way you want, press E twice to return to the Timekeeping Mode.
SecondsHour : Minutes
• The DST indicator a ppears to indi cate that Dayligh t Saving Tim e is turned on.
Note
• After you sp ecify a cit y code, the watch w ill use UTC* of fsets in the Wo rld Time Mod e to calculate
the current ti me for other ti me zones base d on the current t ime in your Ho me City.
* Coordinated Universal Time, the world-wide scientifi c standard of timekeeping.
The reference point for UTC is Greenwich, England.
• Selectin g some cit y codes autom atically ma kes it possibl e for the watch to rece ive the time
calibratio n signal for the c orrespon ding area. Se e “Radio Co ntrolled Atom ic Timekee ping” for
details.
3
Page 4
Operation Guide 3172
l
l
l
l
l
l
l
l
l
l
l
l
l
l
l
l
l
l
l
l
l
l
l
l
l
l
l
l
l
l
l
l
To change the Daylight Saving Time (summer time) setting
DST indicatorDST indicator
1. In the Timekeeping Mode, hold down E until the currently selected
city code starts to fl ash. This is the city code setting screen.
• Before the cit y code starts to fl ash, the m essage SET Hold
will appear on the display. Keep E depressed u ntil SET Hold
disappear s and the cit y code star ts to fl ash.
2. Press D to display the DST setting screen.
3. Use A to cycle through the DST settings in the sequence shown
below.
Auto DST (AUTO)
• The Auto DST ( AUTO) settin g will be available o nly when a cit y
code that supports time calibration signal reception is selected as
the Home City. While Auto DST is selected the DST setting will be
changed automatically in accordance with time calibration signal
data.
4. After all the settings are the way you want, press E twice to return to
the Timekeeping Mode.
• The DST indicator appears to indicate that Daylight Saving Time is
turned on.
DST off (
OFF
DST on (On)
)
Confi guring Current Time and Date Settings Manually
You can confi gure current time and date settings manually when the watch is unable to receive a time
calibration signal.
To change the current time and date settings manually
PM
City
City
code
code
Month
Month
Day
Day
SecondsHour : Minutes
SecondsHour : Minutes
PM
indicator
indicator
1. In the Timekeeping Mode, hold down E until the currently selected
city code starts to fl ash. This is the city code setting screen.
• Before the cit y code starts to fl ash, the m essage SET Hold
will appear on the display. Keep E depressed u ntil SET Hold
disappear s and the cit y code star ts to fl ash.
2. Use A and C to select the city code you want.
• Select your Home City code before changing any other setting.
• For full info rmation on c ity codes , see the “Cit y Code Table”.
3. Press D to move the fl ashing in the sequence shown below to select the other settings.
City Code
Thermometer/Barometer/
Altitude unit
DST
12/24-Hour
Format
Power
Saving
Seconds Hour Minutes Year
Illumination
Duration
Button Operation
Tone On/Off
Day Month
• The follow ing steps expla in how to confi gure timekee ping settin gs only.
4. When the timekeeping setting you want to change is fl ashing, use A and/or C to change it as
described below.
Screen To do this: Do this:
50
Change the city code Use A (East) and C (West).
Cycle between Auto DST (
Time (On) and Standard Time (
Toggle between 12-hour (
timekeeping.
Reset the seconds to
Change the hour or minutes
Change the year, month, or day
00
AUTO
), Daylight Saving
OFF
12H
) and 24-hour (
24H
)
PressA.
PressA.
PressA.
UseA (+) and C (–).
).
5. Press E twice to exit the setting screen.
Note
• For information about selecting a Home City and confi guring the DST setting, see “Confi guring
Home City Settings”.
• While 12-ho ur format is s elected for ti mekeeping, a P (P M) indicator w ill appear fo r times from
noon to 11:59 p.m. No indic ator appear s for times fro m midnight to 11:59 a.m. Wit h 24-hou r format,
time is displaye d from 0:0 0 to 23:59, wit hout any P (PM) indicator.
• The watch’s built- in full automa tic calendar m akes allowanc es for diffe rent month len gths and leap
years. Once y ou set the date, th ere should be no re ason to chang e it except after yo u have the
watch’s rechargeabl e battery rep laced or afte r power drops to Level 5 .
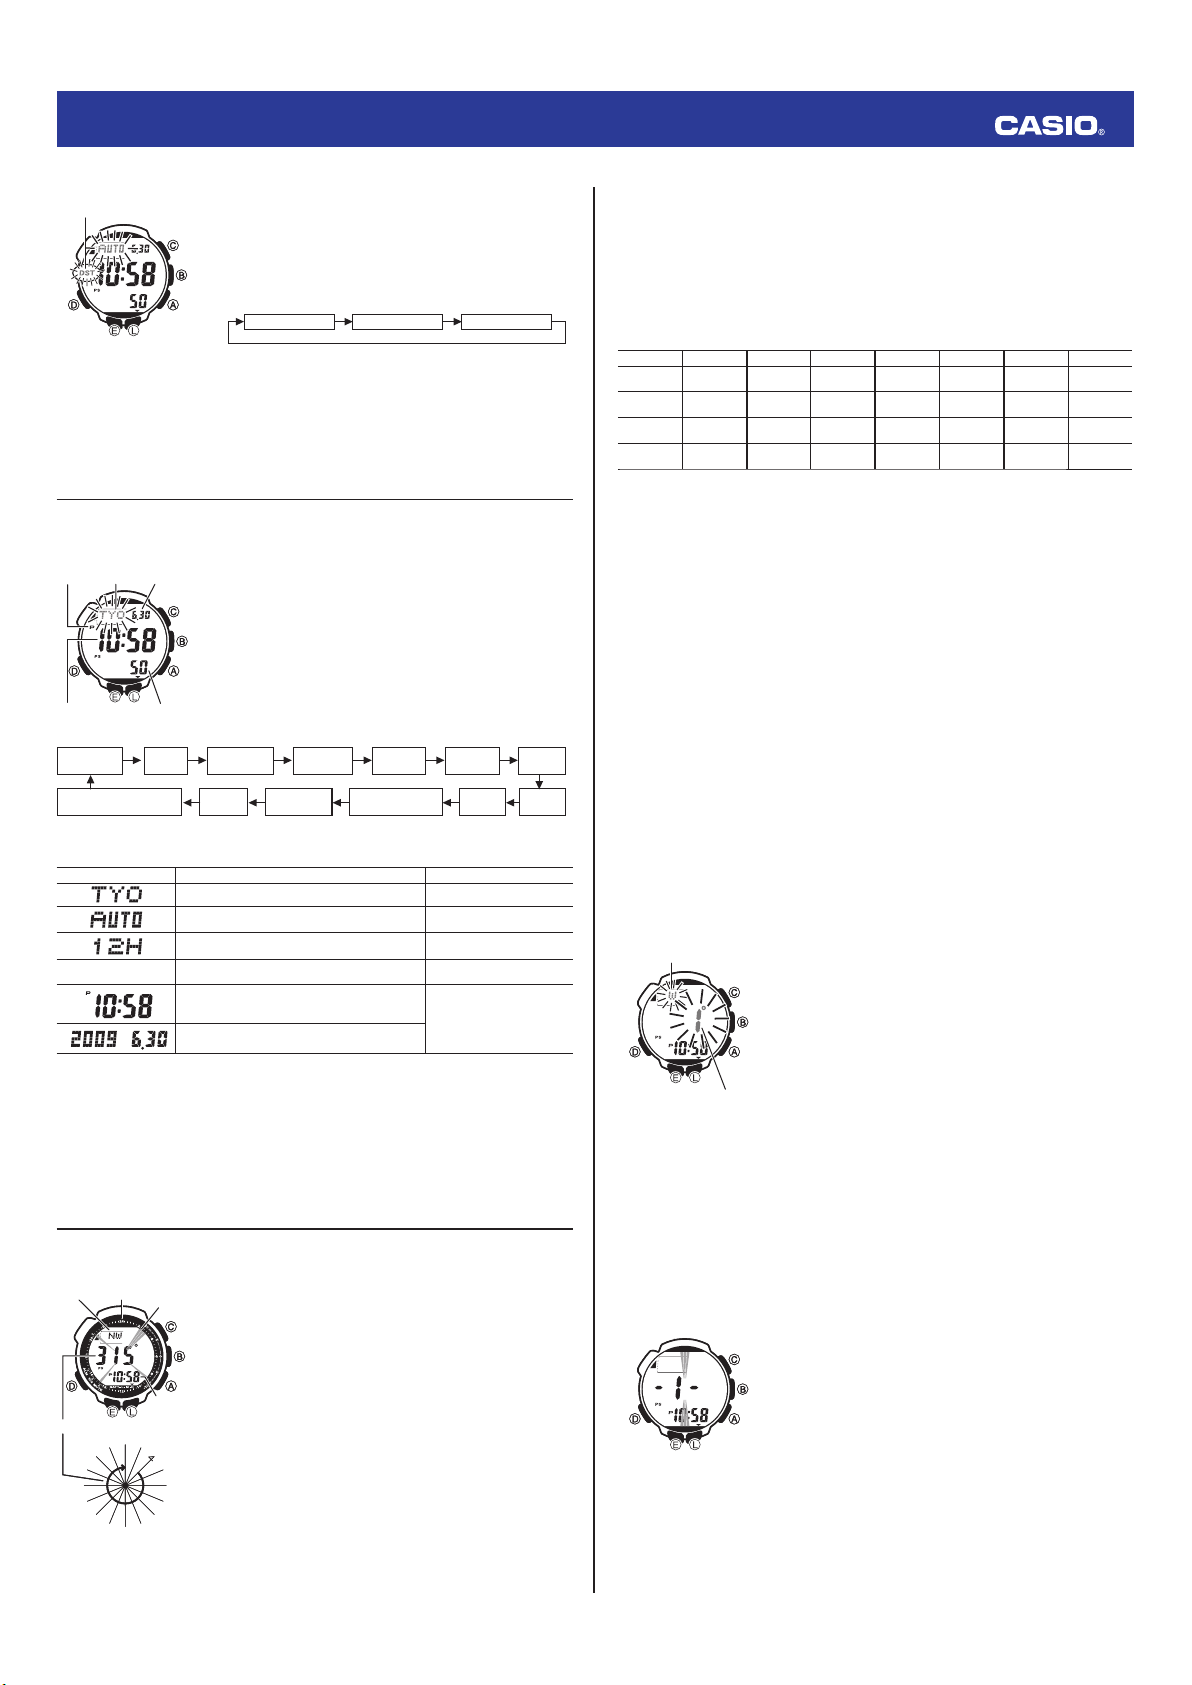
Digital Compass
In the Digital Compass Mode, a built-in bearing sensor detects magnetic north at regular intervals and
indicates one of 16 directions on the display.
12 o’clock
Direction
12 o’clock
Direction
position
indicator
position
indicator
Angle value (in degrees)
Angle value (in degrees)
NW
NW
WNW
WNW
270
270
W
W
WSW
WSW
SW
SW
SSW
SSW
S
S
180
180
SSE
SSE
Current
Current
time
time
NNW
NNW
ESE
ESE
SE
SE
To take a digital compass reading
North
North
1. Make sure the watch is in the Timekeeping Mode or any one of the
pointer
pointer
0
0
N
N
NNE
NNE
E
E
90
90
sensor modes.
• The senso r modes are: Digit al Compas s Mode, Barom eter/
Thermo meter Mode, an d Altimeter M ode.
2. Place the watch on a fl at surface. If you are wearing the watch, make
sure that your wrist is horizontal (in relation to the horizon).
3. Point the 12 o’clock position of the watch in the direction you want to
measure.
4. Press C to start digital compass measurement.
• COMP will appear on th e display to indic ate that a digital c ompass
operation is in progress.
• See “Dig ital Compa ss Readings” fo r informati on about wh at
appears on the display.
Note
NE
NE
• If a value appea rs to the right of the d irection indic ator, it means
ENE
ENE
that the bear ing memor y screen is disp layed. If this happ ens, press
E
to exit the bea ring memor y screen.
5. After you are fi nished using the digital compass, press D to return to
the Timekeeping Mode.
Digital Compass Readings
• When you press Cto start digital compass measurement,
indicate that a digital compass operation is in progress.
• About two seconds after you start a digital compass measurement operation, letters on the display will
indicate the direction that the 12 o’clock position of the watch is pointing. Four pointers that indicate
magnetic north, south, east, and west also will appear.
• After the fi rst reading is obtained, the watch will continue to take digital compass readings automatically
each second for up to 20 seconds. After that, measurement will stop automatically.
• The direction indicator and angle value will show
complete.
• The auto light switch is disabled during the 20 seconds that digital compass readings are being taken.
• The following table shows the meanings of each of the direction abbreviations that appear on the
display.
Direction Meaning Direction Meaning Direction Meaning Direction Meaning
N
North
E
East
S
South
W
West
• The margin of error for the angle value and the direction indicator is ±11 degrees while the watch is
horizontal (in relation to the horizon). If the indicated direction is northwest (NW) and 315 degrees, for
example, the actual direction can be anywhere from 304 to 326 degrees.
• Note that taking a measurement while the watch is not horizontal (in relation to the horizon) can result in
large measurement error.
•
You can calibrate the bearing sensor if you suspect the direction reading is incorrect.
• Any ongoing direction measurement operation is paused temporarily while the watch is performing an
alert operation (daily alarm, Hourly Time Signal, countdown timer alarm) or while illumination is turned
on (by pressing L). The measurement operation resumes for its remaining duration after the operation
that caused it to pause is fi nished.
• See “Digital Compass Precautions” for important information about taking direction readings.
Calibrating the Bearing Sensor
You should calibrate the bearing sensor whenever you feel that the direction readings being produced by
the watch are off. There are three different calibration methods available: magnetic declination correction,
bidirectional calibration, and northerly calibration.
Magnetic Declination Correction
•
With magnetic declination correction, you input a magnetic declination angle (difference between
magnetic north and true north), which allows the watch to indicate true north. You can perform this
procedure when the magnetic declination angle is indicated on the map you are using. Note that you can
input the declination angle in whole degree units only, so you may need to round off the value specifi ed
on the map. If your map indicates the declination angle as 7.4°, you should input 7°. In the case of 7.6°
input 8°, for 7.5° you can input 7° or 8°.
Bidirectional Calibration and Northerly Calibration
•
Bidirectional calibration and northerly calibration calibrate the accuracy of the bearing sensor in relation
to magnetic north. Use bidirectional calibration when you want to take readings within an area exposed
to magnetic force. This type of calibration should be used if the watch becomes magnetized for any
reason. With northerly calibration, you “teach” the watch which way is north (which you have to determine
with another compass or some other means).
Important!
The more correctly you perform bidirectional calibration, the better the accuracy of the bearing sensor
readouts. You should perform bidirectional calibration whenever you change environments where you
use the bearing sensor, and whenever you feel that the bearing sensor is producing incorrect readings.
NNE
ESE
SSW
WNW
To perform magnetic declination correction
Magnetic declination
Magnetic declination
angle direction value
angle direction value
(E, W, or OFF)
(E, W, or OFF)
Magnetic declination
Magnetic declination
angle value
angle value
Precautions about bidirectional calibration
• You can use any two opposing directions for bidirectional calibration. You must, however, make sure
that they are 180 degrees opposite each other. Remember that if you perform the procedure
incorrectly, you will get wrong bearing sensor readings.
• Do not move the watch while calibration of either direction is in progress.
• You should perform bidirectional calibration in an environment that is the same as that where you plan
to be taking direction readings. If you plan to take direction readings in an open fi eld, for example,
calibrate in an open fi eld.
To perform bidirectional calibration
l
l
l
l
l
l
l
l
l
l
l
l
l
l
l
l
l
l
l
l
l
l
l
l
l
l
l
l
l
l
l
l
l
3. Place the watch on a level surface facing any direction you want, and press C to calibrate the fi rst
direction.
• - - - is shown on th e display while c alibration is b eing perfo rmed. Whe n calibration i s successfu l,
the display wil l show OK and -2-, and the n orth pointe r fl ashing at the 6 o’clo ck positio n. This
means that t he watch is ready for ca libration of t he second dire ction.
North-
northeast
East-
southeast
South-
southwest
West-
northwest
1. In the Digital Compass Mode, hold down E until the current magnetic
declination settings start to fl ash on the display. This is the setting screen.
•
Before the magnetic declination settings start to fl ash, the message
SET Hold will appear on the display. Keep E depressed u ntil
SET Hold disappears and the magnetic declination settings start to
fl a s h .
2. Use A (East) and C (West) to change the settings.
•
The following explains magnetic declination angle direction
settings.
OFF
: No magnetic declination correction performed. The magnetic
declination angle with this setting is 0°.
E
: When magnetic north is to the east (east declination)
W
: When magnetic north is to the west (west declination)
• You can select a valu e within the ran ge of W 90° to E 9 0° with
these settings.
• You can turn off (OFF) magnetic declination correction by pressing
A
and C at the same ti me.
• The illustration, for example, shows the value you should input
and the direction setting you should select when the map shows a
magnetic declination of 1° West.
3. When the setting is the way you want, press E to exit the setting
screen.
1. In the Digital Compass Mode, hold down E until the current magnetic
declination settings start to fl ash on the display. This is the setting
screen.
• Before the magnetic declination settings start to fl ash, the
message SET Hold will appear on the display. Keep E depressed
until SET Hold disappears and the magnetic declination settings
start to fl ash.
2. Press D to display the bidirectional calibration screen.
• At this time, t he north po inter fl ashes at th e 12 o’clock positio n
and the displ ay will show -1- to i ndicate that the watc h is ready to
calibrate the fi rst direction.
COMP
will appear on the display initially to
- - -
to indicate that digital compass readings are
NE
SW
NW
Northeast
SE
Southeast
Southwest
Northwest
ENE
SSE
WSW
NNW
East-
northeast
South-
southeast
West-
southwest
North-
northwest
4. Rotate the watch 180 degrees.
5. Press C again to calibrate the second direction.
• - - - is shown on th e display while c alibration is b eing perfo rmed. Whe n calibration i s successfu l,
the display wil l show OK and then ch ange to the Digi tal Compas s Mode scree n (- - -).
4
Page 5

Operation Guide 3172
l
l
l
l
l
l
l
l
l
l
l
l
l
l
l
l
l
l
l
l
l
l
l
l
l
l
l
l
l
l
l
l
To perform northerly calibration
Important!
If you want to perform both northerly and bidirectional calibration, perform bidirectional calibration fi rst,
and then perform northerly calibration. This is necessary because bidirectional calibration cancels any
existing northerly calibration setting.
l
l
l
l
l
l
l
l
l
l
l
l
l
l
l
l
l
l
l
l
l
l
l
l
l
l
l
l
l
l
l
l
l
Bearing Memory
12 o’clock
12 o’clock
position
position
Direction angle of
Direction angle of
current reading
current reading
2. During the 20 seconds that digital compass measurement is in progress, press E to store the current
Using the Digital Compass While Mountain Climbing or Hiking
This section provides three practical applications for using the watch’s built-in digital compass.
• Setting a map and fi nding your current location
Having an idea of your current location is important when mountain climbing or hiking. To do this, you
need to “set the map”, which means to align the map so the directions indicated on it are aligned with
the actual directions of your location. Basically what you are doing is aligning north on the map with
north as indicated by the watch.
• Finding the bearing to an objective
• Determining the direction angle to an objective on a map and heading in that direction
To set a map and fi nd your current location
1. With the watch on your wrist, position it so the face is horizontal.
2. While in the Timekeeping Mode or in any of the sensor modes, press C to take a compass reading.
North indicated
North indicated
on the map
on the map
N
N
To fi nd the bearing to an objective
N
N
Bearing memory
Bearing memory
direction angle
direction angle
Bearing Memory
Bearing Memory
Screen
Screen
direction angle reading in Bearing Memory.
• The Beari ng Memor y direction a ngle fl ashes for a bout one se cond as it is sto red in Bearing
Memor y. After that, th e Bearing Me mory scre en (which shows t he bearing me mory dire ction
angle) will appea r, and a 20- second direc tion reading o peration wil l start.
• While the B earing Mem ory screen i s displayed, you ca n press C to start a new 2 0-se cond
direction rea ding operatio n, which displ ays the directi on angle for th e direction th at the 12 o’clock
position o f the watch is pointe d. The directio n angle of the cu rrent readings w ill disappear f rom the
display afte r the directio n reading operati on is compl ete.
• During the fi rst 20 seco nds after you d isplay the Bea ring Memor y screen or during the 20 -second
direction re ading operati on while the B earing Mem ory scree n is on the display, the di rection
stored in mem ory is indic ated by a Bearing M emory p ointer.
• Pressing E while the Be aring Mem ory screen i s displayed will cle ar the directi on angle curre ntly
in Bearing M emory a nd start a 2 0-se cond directi on reading ope ration.
• The reading wi ll appear on th e display afte r about two s econds.
Current
Current
location
location
N
N
North indicated by
North indicated by
north pointer
north pointer
Current
Current
location
location
12 o’clock
12 o’clock
N
N
position
position
1. In the Digital Compass Mode, hold down E until the current magnetic
declination settings start to fl ash on the display. This is the setting
screen.
• Before the magnetic declination settings start to fl ash, the
message SET Hold will appear on the display. Keep E depressed
until SET Hold disappears and the magnetic declination settings
start to fl ash.
2. Press D twice to display the northerly calibration screen.
• At this time, -N- (nort h) appears on the di splay.
3. Place the watch on a level surface, and position it so that its 12 o’clock
position points north (as measured with another compass).
4. Press C to start the calibration operation.
• - - - is shown on th e display while c alibration is b eing perfo rmed.
When calib ration is succ essful, the d isplay will show OK and then
change to the Di gital Comp ass Mode (- - -).
Bearing Memory lets you store a direction reading and display that
reading as you take subsequent digital compass measurements. The
Bearing Memory screen displays the direction angle for the stored
North
North
direction, along with an indicator on the display that also indicates the
pointer
pointer
stored direction.
When you take digital compass measurements while the Bearing Memory
screen is on the display, the direction angle of the current digital compass
measurement (as read from the 12 o’clock position of the watch) and the
currently stored Bearing Memory direction information will both be
displayed.
To store a direction angle reading in Bearing Memory
Bearing
Bearing
1. Press C to start a digital compass measurement operation.
memory
memory
pointer
pointer
Objective
Objective
• If a bearing me mory dire ction angle va lue is already dis played,
it means tha t the bearing m emory scre en is displayed. I f this
happens, press E to clear the valu e currently in B earing Mem ory
and exit the be aring mem ory screen .
3. Rotate the map without moving the watch so the northerly direction
indicated on the map matches north as indicated by the watch.
• If the watch is con fi gured to indicate m agnetic nor th, align the
map’s magnetic n orth with t he watch indicati on. If the watch has
been confi gu red with a declin ation to correct to t rue nort h, align
the map’s true n orth with t he watch indicati on. For deta ils, see
“Calibrating t he Bearing S ensor”.
• This will position the map in accordance with your current location.
4. Determine your location as you check the geographic contours around
you.
1. Set the map so its northerly indication is aligned with north as indicated
by the watch, and determine your current location.
• See “To set a map an d fi nd your current l ocation” for i nformatio n
about how to pe rform the a bove step.
2. Set the map so the direction you want to travel on the map is pointed
straight in front of you.
3. With the watch on your wrist, position it so the face is horizontal.
4. While in the Timekeeping Mode or in any of the sensor modes, press
C
to take a compass reading.
• The reading wi ll appear on th e display after a bout two se conds.
5. Still holding the map in front of you, turn your body until north as
indicated by the watch and the northerly direction on the map are
aligned.
• This will position the map in accordance with your current location,
so the bearin g to your objecti ve is straight ahe ad of you.
To determine the direction angle to an objective on a map and head in that direction
N
N
Objective
Objective
Current
Current
location
location
12 o’clock
12 o’clock
N
N
position
position
12 o’clock
12 o’clock
position
position
North
North
pointer
pointer
Direction angle of
Direction angle of
current reading
current reading
Digital Compass Precautions
This watch features a built-in magnetic bearing sensor that detects terrestrial magnetism. This means that
north indicated by this watch is magnetic north, which is somewhat different from true polar north. The
magnetic north pole is located in northern Canada, while the magnetic south pole is in southern Australia.
Note that the difference between magnetic north and true north as measured with all magnetic compasses
tends to be greater as one gets closer to either of the magnetic poles. You should also remember that
some maps indicate true north (instead of magnetic north), and so you should make allowances when
using such maps with this watch.
Location
• Taking a direction reading when you are near a source of strong magnetism can cause large errors in
• Accurate direction readings are impossible while in a train, boat, air plane, etc.
• Accurate readings are also impossible indoors, especially inside ferroconcrete structures. This is
Storage
• The precision of the bearing sensor may deteriorate if the watch becomes magnetized. Because of
• Whenever you suspect that the watch may have become magnetized, perform the procedure under “To
Bearing memory
Bearing memory
direction angle
direction angle
value
value
readings. Because of this, you should avoid taking direction readings while in the vicinity of the
following types of objects: permanent magnets (magnetic necklaces, etc.), concentrations of metal
(metal doors, lockers, etc.), high tension wires, aerial wires, household appliances (TVs, personal
computers, washing machines, freezers, etc.).
because the metal framework of such structures picks up magnetism from appliances, etc.
this, you should store the watch away from magnets or any other sources of strong magnetism,
including: permanent magnets (magnetic necklaces, etc.) and household appliances (TVs, personal
computers, washing machines, freezers, etc.).
perform bidirectional calibration”.
1. Set the map so its northerly indication is aligned with north as indicated
by the watch, and determine your current location.
• See “To set a map an d fi nd your current l ocation” for i nformatio n
about how to pe rform the a bove step.
2. As shown in the illustration to the left, change your position so you (and
the 12 o’clock position of the watch) are pointed in the direction of
objective, while keeping the northerly direction indicated on the map
aligned with north as indicated by the watch.
• If you fi nd it dif fi cult to per form the above s tep while keepi ng
everyth ing aligned, fi rs t move into the cor rect positio n (12 o’clock
position o f the watch pointed at t he objective) with out worry ing
about the o rientatio n of the map. Nex t, perfor m step 1 again to set
the map.
3. While in the Timekeeping Mode or in any of the sensor modes, press
Bearing
Bearing
memory
memory
pointer
pointer
C
to take a compass reading.
4. While direction angle readings are in progress, press E to record the
currently displayed direction in Bearing Memory.
• The directi on angle value a nd pointer store d in Bearing M emory
will remain o n the display for ab out 20 sec onds.
• See “Be aring Memo ry” for mo re informati on.
5. Now you can advance while monitoring the Bearing Memory pointer to
ensure that it remains in the 12 o’clock position.
• To re-display th e Bearing Me mory dire ction angle va lue and
Bearing Memory pointer, press C.
• Pressing E while the Be aring Mem ory directi on angle value a nd
Bearing M emory po inter are on the di splay will clear t he Bearing
Memor y data you saved in s tep 3 and save the cur rent direction
reading in Bearing Memory.
Note
• When mountain climbing or hiking, conditions or geographic
contours may make it impossible for you to advance in a straight
line. If this ha ppens, retur n to step 1 and save a new dire ction to
the objective.
Barometer/Thermometer
This watch uses a pressure sensor to measure air pressure (barometric pressure) and a temperature
sensor to measure temperature.
Barometric
Barometric
pressure graph
pressure graph
Barometric
Barometric
pressure
pressure
To take barometric pressure and temperature readings
While in the Timekeeping Mode or in any of the sensor modes, press B.
• This starts barometric pressure and temperature measurements automatically.
• You also can perform a barometric pressure and temperature measurement at any time by pressing
in the Barometer/Thermometer Mode.
• It can take up to four or fi ve seconds for the barometric pressure reading to appear after you enter the
Barometer/Thermometer Mode .
Temperature
Temperature
Pressure differential
Pressure differential
pointer
pointer
Temperature
Temperature
Barometric
Barometric
pressure
pressure
To enter and exit the Barometer/Thermometer Mode
1. While in the Timekeeping Mode or in any of the sensor modes, press
B
to enter the Barometer/Thermometer Mode.
• BARO will appear on the display, indicating that barometric
pressure and te mperature mea surements a re in progress. T he
measureme nt results will a ppear on the d isplay after ab out fi ve
seconds.
• After you pre ss B, the watch will take re adings every fi ve seconds
for the fi rst fi ve min utes, and then eve ry two min utes after that .
2. Press D to return to the Timekeeping Mode.
• The watch will retu rn to the Timeke eping Mode au tomaticall y if you
do not perf orm any operat ion for abou t one hour af ter entering th e
Barometer/Thermometer Mode.
Barometric Pressure
• Barometric pressure is displayed in units of 1 hPa (or 0.05 inHg).
•
The displayed barometric pressure value changes to
barometric pressure falls outside the range of 260 hPa to 1,100 hPa (7.65
inHg to 32.45 inHg). The barometric pressure value will reappear as
soon as the measured barometric pressure is within the allowable range.
Temperature
• Temperature is displayed in units of 0.1°C (or 0.2°F).
• The displayed temperature value changes to
measured temperature falls outside the range of –10.0°C to 60.0°C
(14.0°F to 140.0°F). The temperature value will reappear as soon as
the measured temperature is within the allowable range.
- - -
- - -
°C (or °F) if a
if a measured
B
5
Page 6

Operation Guide 3172
l
l
l
l
l
l
l
l
l
l
l
l
l
l
l
l
l
l
l
l
l
l
l
l
l
l
l
l
l
l
l
l
l
l
l
l
l
l
l
l
l
l
l
l
l
l
l
l
l
l
l
l
l
l
l
l
l
l
l
l
l
l
l
l
l
l
l
l
l
l
l
l
l
l
l
l
l
l
l
l
l
l
l
l
l
l
l
l
l
l
l
l
l
l
l
l
l
l
l
l
l
l
l
l
Display Units
You can select either hectopascals (hPa) or inchesHg (inHg) as the display unit for the measured
barometric pressure, and Celsius (°C) or Fahrenheit (°F) as the display unit for the measured temperature
value. See “To specify temperature, barometric pressure, and altitude units”.
Barometric Pressure Graph
Barometric
Barometric
pressure graph
pressure graph
Reading the Barometric Pressure Graph
The barometric pressure graph shows readings of previous measurements for up to 24 hours.
Barometric
Barometric
pressure
pressure
Time
Time
The following shows how to interpret the data that appears on the barometric pressure graph.
Note
• If there are sudden changes in weather or temperature, the graph line of past
measurements may run off the top or bottom of the display. The entire graph will
become visible once barometric conditions stabilize.
• The following conditions cause the barometric pressure measurement to be
skipped, with the corresponding point on the barometric pressure graph being
left blank.
– Barometric reading that is out of range (260 hPa to 1,100 hPa or 7.65 inHg to
32.45 inHg)
– Sensor malfunction
Barometric Pressure Differential Pointer
Barometric
Barometric
pressure
pressure
differential
differential
pointer
pointer
Reading Barometric Pressure Differential Pointer
Pressure differential is indicated in the range of
±10 hPa, in 1-hPa units.
• The nearby screen shot, for example, shows
what the pointer would indicate when the
calculated pressure differential is
approximately – 5 hPa (approximately – 0.15
inHg).
• Barometric pressure is calculated and
displayed using hPa as the standard. The
barometric pressure differential also can be
read in inHg units as shown in the illustration
=
(1 hPa
0.03 inHg).
Pressure Sensor and Temperature Sensor Calibration
The pressure sensor and temperature sensor built into the watch are calibrated at the factory and normally
require no further adjustment. If you notice serious errors in the pressure readings and temperature
readings produced by the watch, you can calibrate the sensor to correct the errors.
Important!
• Incorrectly calibrating the barometric pressure sensor can result in incorrect readings. Before
performing the calibration procedure, compare the readings produced by the watch with those of
another reliable and accurate barometer.
• Incorrectly calibrating the temperature sensor can result in incorrect readings.
Carefully read the following before doing anything.
Compare the readings produced by the watch with those of another reliable and accurate thermometer.
–
– If adjustment is required, remove the watch from your wrist and wait for 20 or 30 minutes to give the
temperature of the watch time to stabilize.
To calibrate the pressure sensor and the temperature sensor
l
l
l
l
l
l
l
l
l
l
l
l
l
l
l
l
l
l
l
l
l
l
l
l
l
l
l
l
l
l
l
l
l
l
l
l
l
l
l
l
l
l
l
l
l
l
l
l
l
l
l
l
l
l
l
l
l
l
l
Barometric pressure indicates changes in the atmosphere. By monitoring
these changes you can predict the weather with reasonable accuracy.
This watch takes barometric pressure measurements automatically every
two hours (at the 30th minute of every even numbered hour).
Measurement results are used to produce barometric pressure graph and
barometric pressure differential pointer readings.
• The horizontal axis of the graph represents time, with each dot
standing for two hours. The rightmost dot represents the most recent
reading.
• The vertical axis of the graph represents barometric pressure, with
each dot standing for the relative difference between its reading and
that of the dots next to it. Each dot represents 1 hPa.
A rising graph generally means improving weather.
A falling graph generally means deteriorating weather.
This pointer indicates the relative difference between the most recent
barometric pressure reading indicated on the barometric pressure graph,
and the current barometric pressure value displayed in the Barometer/
Thermometer Mode.
inHg values
inHg values
hPa values
hPa values
−5
−5
−10
−10
−0.3
Barometric pressure
Barometric pressure
differential pointer
differential pointer
1. While in the Timekeeping Mode or in any of the sensor modes, press
to enter the Barometer/Thermometer Mode.
2. Hold down E until the current temperature value starts to fl ash on the
display. This is the setting screen.
• Before the tem perature value s tarts to fl ash, t he message SET
Hold will appear on t he display. Keep E depressed u ntil SET Hold
disappears.
3. Press D to move the fl ashing between the temperature value and
barometric pressure value, to select the one you want to calibrate.
UseA (+) and C (–) to set the calibration value in the units shown below.
4.
Temperature 0.1°C (0.2°F)
Barometric Pressure 1 hPa (0.05 inHg)
• To return the currentl y fl ashing value to it s initial facto ry default set ting,
l
l
l
l
press A and C at the same ti me. OFF will appear at t he fl ashing
l
l
location f or about one s econd, foll owed by the initi al default value .
l
l
5. Press E to return to the Barometer/Thermometer Mode screen.
−0.3
Not visible on
Not visible on
the display.
the display.
Current pressure
Current pressure
greater than most
greater than most
recent measured
recent measured
pressure
pressure
−0.15
−0.15
Current pressure
Current pressure
less than most
less than most
recent measured
recent measured
pressure
pressure
Barometer and Thermometer Precautions
• The pressure sensor built into this watch measures changes in air pressure, which you can then apply
to your own weather predictions. It is not intended for use as a precision instrument in offi cial weather
prediction or reporting applications.
• Sudden temperature changes can affect pressure sensor readings.
• Temperature measurements are affected by your body temperature (while you are wearing the watch),
direct sunlight, and moisture. To achieve a more accurate temperature measurement, remove the
watch from your wrist, place it in a well ventilated location out of direct sunlight, and wipe all moisture
from the case. It takes approximately 20 to 30 minutes for the case of the watch to reach the actual
surrounding temperature.
Altimeter
The watch displays altitude values based on air pressure readings taken by a built-in pressure sensor.
How the Altimeter Measures Altitude
The altimeter can measure altitude based on its own preset values (initial default method) or using a
reference altitude specifi ed by you.
When you measure altitude based on preset values
Data produced by the watch’s barometric pressure sensor is converted to approximate altitude based on
ISA (International Standard Atmosphere) conversion values stored in watch memory.
When you measure altitude using a reference altitude specifi ed by you
After you specify a reference altitude, the watch uses that value to convert
barometric pressure readings to altitude.
• When mountain climbing, you can specify a reference altitude value in
accordance with a marker along the way or altitude information from a
map. After that, the altitude readings produced by the watch will be more
accurate than they would without a reference altitude value.
To take an altimeter reading
Altitude
Altitude
Altitude
Altitude
graph
graph
differential
differential
Current
Current
altitude
altitude
Reading the Altitude Graph
The altitude graph shows Altimeter Mode auto measurement readings over time.
Latest
Latest
reading
reading
Note
• The measurement range for altitude is –700 to 10,000 meters (–2,300 to 32,800 feet).
• The displayed altitude value changes to
An altitude value will reappear as soon as the altitude reading is within the allowable range.
•
Normally, displayed altitude values are based on the watch’s preset conversion values. You also can
specify a reference altitude value, if you want. See “Specifying a Reference Altitude Value”.
• You can change the unit for displayed altitude values to either meters (m) or feet (ft).
See “To specify temperature, barometric pressure, and altitude units”.
Selecting an Altitude Auto Measurement Method
You can select either of the following two altitude auto measurement methods.
0’05
2’00
Note
B
If you do not perform any button operation while in the Altimeter Mode, the watch will return to the
Timekeeping Mode automatically after 24 hours (altitude auto measurement method:
hour (altitude auto measurement method:
To select the altitude auto measurement method
Current time
Current time
Time
Time
: Readings at fi ve-second intervals for one hour
: Readings at fi ve-second intervals for the fi rst three minutes followed by two-minute intervals for
approximately 24 hours
l
l
l
l
l
l
l
l
l
l
l
l
l
l
l
l
l
l
l
l
l
l
l
l
l
l
l
l
l
l
l
1. Make sure the watch is in the Timekeeping Mode or any one of the
sensor modes.
• The senso r modes are: Digit al Compas s Mode, Barom eter/
Thermo meter Mode, an d Altimeter M ode.
A
to start Altimeter measurement.
2. Press
• ALTI will appear on the disp lay, indicating that A ltimeter
measurem ent is in progres s. The fi rst readi ng will appear o n the
display after a bout four or fi ve seconds.
• The current al titude value i s displayed in unit s of 5 meters (20 feet).
• After the fi rs t reading is obtai ned, the watch co ntinues to take
altimeter read ings automati cally every fi ve se conds for th e fi rst
three minute s, and then ever y two minute s after that (unde r initial
default settings).
• If you leave the watc h in the Altime ter Mode, it wil l update the
displayed altit ude value regula rly and indica te reading-to -reading
changes in gra ph form.
• You can use the proc edure under “ Selectin g an Altitud e Auto
Measurem ent Method ” to specify t he altitude a uto measurem ent
method you want to use.
3. After you are fi nished using the Altimeter, press
Timekeeping Mode and stop auto measurement.
• The watch will retu rn to the Time keeping Mode a utomaticall y if you
do not perf orm any operat ion for abou t 24 hours afte r entering the
Altimeter M ode (under init ial default set tings).
• The vertical axis of the graph represents altitude, and each dot stands
for 10 meters (40 feet).
• The horizontal axis represents time. For the altitude readings taken
Altitude
Altitude
l
l
l
l
l
l
l
l
during the fi rst three minutes after you start an altimeter measurement
operation, each dot represents fi ve seconds. After that, each dot
represents two minutes (under initial default settings).
• An out of range reading or a measurement error will cause the column
of dots for that reading to be blank (skipped).
- - -
if an altitude reading falls outside the measurement range.
0’05
).
1. In the Altimeter Mode, hold down E until the current reference altitude
value starts to fl ash. This is the setting screen.
• Before the refe rence altitud e starts to fl as h, the messag e SET
Hold will appear on t he display. Keep E depressed u ntil SET
Hold disappears.
2. Press D to display the current altitude auto measurement method
setting.
• This will cause either 0’05 or 2’00 to fl ash on th e display.
3. Press A to toggle the altitude auto measurement method setting
0’05
between
4. Press E to exit the setting screen.
and
2’00
.
A
A
400
400
D
to return to the
2’00
B
B
) or after one
6
Page 7

Operation Guide 3172
l
l
l
l
l
l
l
l
l
l
l
l
l
l
l
l
l
l
l
l
l
l
l
l
l
l
l
l
l
l
l
l
l
l
l
l
l
l
l
l
l
l
q
w
Using the Altitude Differential Value
Altitude
Altitude
differential
differential
To specify the altitude differential start point
Altitude differentialAltitude differential
Using the Altitude Differential Value While Mountain Climbing or Hiking
After you specify the altitude differential start point while mountain climbing or hiking, you easily can
measure the change in the altitude between that point and other points along the way.
To use the altitude differential value
Destination
Destination
altitude
altitude
Current
Current
location
location
Altitude differential
Altitude differential
Altitude
Altitude
Specifying a Reference Altitude Value
The altitude readings produced by this watch are subject to error caused by changes in air pressure.
Because of this, we recommend that you update the reference altitude value whenever one is available
during your climb. After you specify a reference altitude value, the watch adjusts its air-pressure-to-altitude
conversion calculation accordingly.
To specify a reference altitude value
l
l
l
l
l
l
l
l
l
l
l
l
l
l
l
l
l
l
l
l
l
l
l
l
l
l
l
l
l
l
l
l
l
l
l
l
l
Types of Altitude Data
The watch can maintain two types of altitude data in its memory: manual measurement records, and auto
save values (minimum, maximum, vertical ascent, vertical descent).
• Use the Data Recall Mode to view data stored in memory. See “Viewing Altitude Records” for details.
Manual Measurement Records
Any time you perform the procedure below in the Altimeter Mode, the watch will create and store a record
with the currently displayed altitude reading, along with the date and time the reading was taken. There is
enough memory to store up to 25 manual measurement records, which are numbered from
REC25
through
To save a manual measurement
.
The Altimeter Mode screen includes an altitude differential value that
shows the change in altitude from a reference point you specify. The
altitude differential value is updated each time the watch takes an altitude
reading.
• The range of the altitude differential value is –3,000 meters (–9,980
feet) to 3,000 meters (9,980 feet).
- - -
•
is displayed in place of the altitude differential value whenever the
measured value is outside the allowable range.
• See “Using the Altitude Differential Value While Mountain Climbing or
Hiking” for some real-life examples of how to use this feature.
In the Altimeter Mode, press E.
• The watch will take an altitude reading and register the result as the
altitude differential value start point. The altitude differential value will
be reset to zero at this time.
1. In the Altimeter Mode, check to make sure that an altitude reading is
on the display.
• If an altitud e reading is not dis played, press A to take one. Se e “To
take an altim eter reading” for d etails.
2. Use the contour lines on your map to determine the difference in
altitude between your current location and your destination.
3. In the Altimeter Mode, press E to specify your current location as the
altitude differential start point.
• The watch will ta ke an altitude rea ding and register t he result as
the altitud e different ial value star t point. Th e altitude dif ferential
value will be res et to zero at this time.
4. While comparing the altitude difference you determined on the map
and the watch’s altitude differential value, advance towards your
destination.
• If the map show s that the dif ference in alt itude betwe en your
locatio n and your desti nation is +8 0 meters for exa mple, you know
you will be nea ring your dest ination whe n the displayed al titude
different ial value shows + 80 meters.
1. In the Altimeter Mode, hold down E until the current reference altitude
value starts to fl ash. This is the setting screen.
• Before the referen ce altitude va lue starts to fl ash, the messa ge
l
l
l
l
l
l
SET Hold wil l appear on th e display. Keep E depressed u ntil
SET Hold disappears.
2. Press A (+) or C (–) to change the current reference altitude value
by 5 meters (or 20 feet).
• Specify a re ference altit ude value based o n accurate altitu de
informati on about you r current loca tion from a map, etc.
• You can set the reference altitude value within the range of –10,000
to 10,000 meters (–32,800 to 32,800 feet).
• Pressing A and C at the same ti me returns to OFF (no referenc e
altitude valu e), so the watch perfo rms air pressu re to altitude
conversio ns based on pres et data only.
3. Press E to exit the setting screen.
1. In the Altimeter Mode, check to make sure that an altitude reading is
on the display.
• If an altitud e reading is not dis played, press A to take one. Se e “To
take an altim eter reading” for d etails.
2. Hold down A until
disappears. Release A after
• This will save th e currently dis played altitud e reading in a manu al
measureme nt record, alo ng with the me asurement ti me and date.
• The watch will retu rn to the Altim eter Mode scree n automatica lly
after the save operation is complete.
• There is eno ugh memor y to store up to 25 ma nual measu rement
records. If th ere are already 2 5 manual meas urement rec ords in
memor y, the above operatio n will cause th e oldest reco rd to be
deleted autom atically to make ro om for the new o ne.
REC Hold
appears on the display and then
Hold
disappears.
REC01
Auto Save Values
Two sets of auto save values (Set 1 and Set 2) are maintained in watch memory.
• These values are checked and updated automatically by the watch as altitude auto measurements are
taken.
How Maximum and Minimum Values Are Updated
While the watch is in the Altimeter Mode, altitude readings are taken automatically at the interval specifi ed
by the altitude auto measurement method. With each reading, the watch compares the current reading
MAX (MAX-1
against the
the current reading is greater than
How Vertical Ascent/Descent Values Are Updated
Session start point
20 m
The total Vertical Ascent and Vertical Descent values produced by an Altimeter Mode measurement
session during the example climb illustrated above are calculated as follows.
Vertical Ascent:
Vertical Descent:
• Entering the Altimeter Mode starts a new altitude auto measurement session, but it does not reset the
ASC (ASC-1
current
This means that the starting
are the values that currently are in memory. Each time you complete an Altimeter Mode auto
measurement session by returning to the Timekeeping Mode, the vertical ascent value of the current
session (920 meters in the above example) is added to the session’s starting
vertical descent value of the current auto measurement session (–820 meters in the above example) is
added to the session’s starting
• Note that any change in elevation when ascending that is less than 15 meters (49 feet) is not added to
the vertical ascent value for the current Altimeter Mode auto measurement session. Also, any change in
elevation when descending that is less than –15 meters (–49 feet) is not added to the vertical descent
value for the current Altimeter Mode auto measurement session.
Note
• The maximum altitude, minimum altitude, vertical ascent, and vertical descent values are retained in
memory when you exit the Altimeter Mode. To clear values, perform the procedure under “To clear the
contents of a specifi c memory area”.
Using Auto Save Values
The watch maintains two independent sets of auto save values as shown below.
The values in Set 1 and Set 2 can be cleared independently of each other. This means you can use them
to keep track of daily and cumulative data as described in the example below.
Example:
Keeping track of data on a three-day climb
Day 1
Clear both Set 1 and Set 2, and start your Day 1 climb.
At the end of the day, both sets of auto save values contain the same data (
MIN-2
, etc.).
Day 2
Clear only Set 1, and start your Day 2 climb. At the end of the day, the values in Set 1 (
ASC-1,DSC-1
and minimum altitudes reached over the two-day span.
two days (Day 1 + Day 2) and
Day 3
Clear only Set 1, and start your Day 3 climb. At the end of the day, the values in Set 1 will show the
results of Day 3 only. In Set 2,
reached over the three-day span.
Day 2 + Day 3) and
• For details about clearing altitude data, see “To clear the contents of a specifi c memory area”.
How does the altimeter work?
Generally, air pressure and temperature decrease as altitude increases. This watch bases its altitude
measurements on International Standard Atmosphere (ISA) values stipulated by the International Civil
Aviation Organization (ICAO). These values defi ne relationships between altitude, air pressure, and
temperature.
• Note that the following conditions will prevent you from obtaining accurate readings:
When air pressure changes because of changes in the weather
Extreme temperature changes
When the watch itself is subjected to strong impact
) will show the results of Day 2 only. In Set 2,
Set 1 Set 2
Maximum Altitude (
Minimum Altitude (
Vertical Ascent (
Vertical Descent (
and
(300 m) + e (620 m) = 920 m
(320 m) + r (500 m) = 820 m
and
Maximum Altitude (
Minimum Altitude (
Vertical Ascent (
Vertical Descent (
DSC-2
Altitude Air Pressure Temperature
4000 m
3500 m
3000 m
2500 m
2000 m
1500 m
1000 m
0 m
14000 ft.
12000 ft.
10000 ft.
8000 ft.
4000 ft.
0 ft.
Source: International Civil Aviation Organization
MAX-1
)
MIN-1
)
ASC-1
)
DSC-1
)
MAX-2
ASC-2
ASC
Set 1 Set 2
will show the total vertical descent for the three days.
500 m
6000 ft.
2000 ft.
MIN (MIN-1
) and
MAX
) and
DSC
DSC-2
MAX-2
MIN
, or the
DSC (DSC-1
DSC
and
values for a new Altimeter Mode auto measurement session
value.
MAX-1
)
MIN-1
)
ASC-1
)
DSC-1
)
will show the total vertical descent for the two days.
MIN-2
and
ASC-2
will show the total vertical ascent for the three days (Day 1 +
616 hPa
About 8 hPa per 100 m
701 hPa
About 9 hPa per 100 m
795 hPa
About 10 hPa per 100 m
About 11 hPa per 100 m
899 hPa
About 12 hPa per 100 m
19.03 inHg
About 0.15 inHg per 200 ft.
22.23 inHg
About 0.17 inHg per 200 ft.
About 0.192 inHg per 200 ft.
25.84 inHg
About 0.21 inHg per 200 ft.
Maximum Altitude (
Minimum Altitude (
Vertical Ascent (
Vertical Descent (
MIN-2
and
value if the current reading is less than
and
will show the maximum and minimum altitudes
) values. It will replace the
620 m
DSC-2
) values or change them in any way.
Maximum Altitude (
Minimum Altitude (
Vertical Ascent (
Vertical Descent (
MAX-2
and
ASC-2
will show the total vertical ascent for the
–11°C
–4.5°C
2°C
8.5°C
15°C1013 hPa
16.2°F
30.5°F
44.7°F
59.0°F29.92 inHg
MIN-2
MAX-2
)
MIN-2
)
ASC-2
)
DSC-2
)
MAX
MIN
Session end point
320 m
120 m
0 m
ASC
value. Also, the
MAX-2
)
MIN-2
)
ASC-2
)
DSC-2
)
MAX-1
MAX-2,MIN-1
=
MAX-1,MIN-1
will show the maximum
About 6.5°C
per 1000 m
About 3.6°F
per 1000 ft.
value if
.
=
,
7
Page 8

Operation Guide 3172
l
l
l
l
l
l
l
l
l
l
l
l
l
l
l
l
l
l
l
l
l
l
l
l
l
l
l
l
l
l
l
l
l
l
l
l
l
l
l
l
l
l
l
l
l
l
l
l
l
l
There are two standard methods of expressing altitude: Absolute altitude and relative altitude. Absolute
altitude expresses an absolute height above sea level. Relative altitude expresses the difference between
the height of two different places.
Height of building 130 m
(relative altitude)
Altimeter Precautions
• This watch estimates altitude based on air pressure. This means that altitude readings for the same
location may vary if air pressure changes.
• The semiconductor pressure sensor used by the watch for altitude measurements is also affected by
temperature. When taking altitude measurements, do not subject the watch to temperature changes.
• Do not rely upon this watch for altitude measurements or perform button operations while sky diving,
hang gliding, or paragliding, while riding a gyrocopter, glider, or any other aircraft, or while engaging in
any other activity where there is the chance of sudden altitude changes.
• Do not use this watch for measuring altitude in applications that demand professional or industrial level
precision.
• Remember that the air inside of a commercial aircraft is pressurized. Because of this, the readings
produced by this watch will not match the altitude readings announced or indicated the fl ight crew.
Rooftop at an altitude of
230 m above sea level
(absolute altitude)
Sea Level
Specifying Temperature, Barometric Pressure, and Altitude Units
Use the procedure below to specify the temperature, barometric pressure, and altitude units to be used in
the Barometer/Thermometer Mode and the Altimeter Mode.
Important!
TYO
When
l
l
l
l
l
l
l
l
l
l
l
l
l
l
l
l
l
l
l
l
l
l
l
l
l
l
l
l
l
l
l
l
l
l
l
l
l
l
l
l
l
l
l
l
l
l
l
l
l
l
l
l
l
l
l
l
l
l
l
l
l
3. Perform the operations below to specify the units you want.
To specify this unit: Press this key: To toggle between these settings:
Altitude
Barometric Pressure
Temperature
4. After the settings are the way you want, press E twice to exit the setting screen.
(Tokyo) is selected as the Home City, the altitude unit is set
automatically to meters (m), the barometric pressure unit to hectopascals
hPa
(
), and the temperature unit to Celsius (°C). These settings cannot
be changed.
To specify temperature, barometric pressure, and altitude units
1. In the Timekeeping Mode, hold down E until the currently selected
city code starts to fl ash. This is the city code setting screen.
• Before the cit y code star ts to fl ash, the mes sage SET Hold
will appear o n the display. Keep E depressed u ntil SET Hold
disappear s and the cit y code star ts to fl ash.
2. Keep pressing D until
screen.
• See step 3 und er “To change the cur rent time and da te settings
manually” f or informati on about how to s croll through se tting
screens.
A
B
C
UNIT
appears in the upper left corner of the
m
(meters) and ft (feet)
hPa
(hectopascals) and
°C
(Celsius) and °F (Fahrenheit)
inHg
(inches of mercury)
Precautions Concerning Simultaneous Measurement of Altitude and Temperature
Though you can perform altitude and temperature measurements at the same time, you should remember
that each of these measurements requires different conditions for best results. With temperature
measurement, it is best to remove the watch from your wrist in order to eliminate the effects of body heat.
In the case of altitude measurement, on the other hand, it is better to leave the watch on your wrist,
because doing so keeps the watch at a constant temperature, which contributes to more accurate altitude
measurements.
• To give altitude measurement priority, leave the watch on your wrist or in any other location where the
temperature of the watch is kept constant.
• To give temperature measurement priority, remove the watch from your wrist and allow it to hang freely
from your bag or in another location where it is not exposed to direct sunlight. Note that removing the
watch from your wrist can affect pressure sensor readings momentarily.
Viewing Altitude Records
Use the Data Recall Mode to view manually saved altitude readings and automatically saved high altitude,
low altitude, total ascent, and total descent values. Altitude data records are created and saved in the
Altimeter Mode.
Record name
Record name
Altitude
Altitude
Alternates between
Alternates between
measurement time
measurement time
(Hour : Minutes) and
(Hour : Minutes) and
measurement date
measurement date
(Month Day)
(Month Day)
To view altitude records
1. Use D to select the Data Recall Mode (
Mode”.
• About one s econd afte r REC appears on the d isplay, the display
will change to s how the fi rst rec ord of the memo ry area you we re
viewing wh en you last exited t he Data Rec all Mode.
2. Use B to select the memory area you want.
REC 01
(Manually Saved
Record Area)
MAX-1
(Auto Save
Value Area 1)
REC
) as shown in “Selecting a
MAX-2
(Auto Save
Value Area 2)
3. Use A and C to scroll through the screens for an area and display the one you want.
AltitudeAltitude
AltitudeAltitude
REC
01
REC
02
Manually saved records
REC
25
MAX MIN ASC DSC
Auto saved values
• While a manu ally saved reco rd (REC 01 through REC 25) is displayed, the bot tom of the scre en
will alternate b etween the d ate (month, day) and time (h our, minute) the record was c reated.
• While MAX or MIN au to saved values are di splayed, the bot tom of the scre en will alternate
between th e date (month, day) and ti me (hour, minute) the value wa s recorded.
• While ASC or DSC a uto saved values are di splayed, the bot tom of the scre en will alterna te
between t he date (month, day) and ye ar that the ASC or DSC record was fi rst c reated.
• For detail ed informatio n about auto s aved values, see “Auto S ave Values”.
4. After you are fi nished viewing data, use D to exit the Data Recall Mode.
• ---- will be displayed if data ha s been deleted o r if there is no co rrespondin g data due to error, etc.
In such case s, total ascen t (ASC) and total desc ent (DSC) values will sho w zero.
• When the tot al ascent (ASC) or tot al descent (DSC) excee ds 99,9 95 meters (or 32 7,980 feet), the
applicable value will restart from zero.
Ten thousand digitTen thousand digit
To clear the contents of a specifi c memory area
• If the total as cent (ASC) or total de scent (DSC) value beco mes
fi ve digits, the l eftmost (te n thousand) di git will appea r in the upper
right of the dis play. The nearby illu stration sho ws the display wh en
the ASC-1 value is 999 95 meters.
1. Use D to enter the Data Recall Mode.
2. Use B to select the memory area you want to clear.
• Note that the contents of the memory area you select will be
deleted as so on as you per form step 3 belo w. The clear oper ation
cannot be un done, so doub le check to make s ure you really want
to delete the co ntents of the me mory area yo u select here.
3. Hold down E until
disappears. Release E after
• This will clea r the memor y area you sel ected in step 2 and t hen
return to the dat a display scree n, which now sh ows ----. This
indicates th ere is nothing sto red in the curren tly displayed me mory
area.
CLR Hold
appears on the display and then
CLR
disappears.
Looking up Sunrise and Sunset Times
You can use the Sunrise/Sunset Mode to look up the sunrise and sunset times for a particular date (year,
month, day) and location.
Pointer 3
Pointer 3
Current
Current
date
date
Pointer 1
Pointer 1
To view the sunrise/sunset time for a particular date
Sunset time Sunrise time
Sunset time Sunrise time
Sunset
Sunset
time
time
Date
Date
Pointer 2
Pointer 2
Sunrise
Sunrise
time
time
To enter the Sunrise/Sunset Mode
While in the Timekeeping Mode, press D to enter the Sunrise/Sunset
Mode.
• This will display the sunrise and sunset times for the current date
based the currently specifi ed city code, latitude, and longitude.
• The three Daylight Pointers described below are on the display in the
Sunrise/Sunset Mode.
Pointer 1: Sunset time in 24-hour format
Pointer 2: Sunrise time in 24-hour format
Pointer 3: This fl ashing pointer appears only when Pointer 1 and
Pointer 2 are indicating the sunrise and sunset times for the current
Timekeeping Mode date. It indicates the current Timekeeping Mode
time in 24-hour format.
• Before trying to use the Sunrise/Sunset Mode, you need to confi gure
settings for the city code, longitude, and latitude for the location whose
sunrise and sunset times you want to view.
• The factory default confi guration of the location is: City Code:
(Tokyo); Latitude: North 36 degrees; Longitude: East 140 degrees.
• You can fi nd latitude and longitude for various cities around the globe
in the “Site Data List”.
1. Enter the Sunrise/Sunset Mode.
• This will displ ay the sunrise a nd sunset tim es for the curre nt
date at t he locatio n specifi ed by the c ity code, la titude, and
longitude.
2. While the sunrise/sunset time are on the display, use A (+) and C (–)
to scroll through the dates.
• The sunris e and sunset ti mes for the sel ected date will be
indicated by valu es and pointers .
• You can select any date b etween Ja nuary 1, 20 00 and De cember
31, 209 9.
Note
• Sunrise/s unset time is d isplayed in 5- minute units.
•
If you think th at the sunrise a nd/or suns et times are not c orrect for
some reaso n, check the watch’s ci ty code, lon gitude and lat itude
settings.
• The sunris e and sunset tim es displayed by thi s watch are times at
sea level. Sun rise and suns et times are dif ferent at alti tudes other
than sea level.
TYO
8
Page 9

Operation Guide 3172
To look up the sunrise and sunset times for a specifi c city code
Important!
• You do not need to per form this pro cedure to look u p the sunrise an d sunset time s in your current ly
selected Home City.
• If you select a d ifferent cit y code to loo k up the sunris e and sunset ti mes there, retur n to the city
code of your H ome City ( your current lo cation) when yo u are fi nished. O therwis e, the time show n
in the Time keeping Mod e will not be co rrect.
• For inform ation abou t the Home Ci ty settin g, see “Con fi guring Hom e City Set tings”.
1. In the Timekeeping Mode, hold down E until the currently selected city code starts to fl ash. This is the
city code setting screen.
• Before the cit y code starts to fl ash, the m essage SET Hold will appear o n the display. Keep
depressed until SET Hold disappears and the cit y code star ts to fl ash.
2. Use A (East) and C (West) to select the city code whose sunrise and sunset times you want to view.
• For detail s about cit y codes, see t he “City C ode Table”.
E
3. Press E twice to exit the setting screen.
To confi gure longitude and latitude settings
Press D.
Press D.
1. In the Timekeeping Mode, hold down E until the currently selected
Latitude
Latitude
Longitude
Longitude
city code starts to fl ash. This is the city code setting screen.
• Before the cit y code star ts to fl ash, the mes sage SET Hold
will appear o n the display. Keep E depressed u ntil SET Hold
disappear s and the cit y code star ts to fl ash.
2. Press E to display the longitude/latitude setting screen, with the
latitude setting fl ashing.
3. Use D to move the fl ashing between the latitude and the longitude
setting.
4. Use A (+) and C (–) to change the fl ashing setting.
• You can con figure the lon gitude and lati tude sett ing within
following ranges.
Latitude Range: 65°S (South 65 degrees) to 0°N – 65°N (North 65
degrees)
Longitude Range: 179°W (West 179 degrees) to 0°E – 180°E (East
180 degrees)
• Latitu de and longitu de values are roun ded off to the n earest
degree.
• You can fi nd lati tude and long itude for vari ous cities aro und the
globe in the “ Site Data Li st”.
5. Press E to return to the Timekeeping Mode.
Checking the Current Time in a Different Time Zone
You can use the World Time Mode to view the current time in one of 31 time zones (48 cities) around the
globe. The city that is currently selected in the World Time Mode is called the “World Time City”.
Currently selected
Currently selected
World Time City
World Time City
Pointer 1
Pointer 1
Pointer 2
Pointer 2
Current
Current
Timekeeping
Timekeeping
Mode time
Mode time
Current time in the
Current time in the
currently selected
currently selected
World Time City
World Time City
To view the time in another time zone
In the World Time Mode, use A (East) and C (West) to scroll through city codes.
To specify standard time or daylight saving time (DST) for a city
DST indicatorDST indicator
To enter the World Time Mode
UseD to select the World Time Mode (WT) as shown in “Selecting a
Mode”.
•
About one second after WT appears on the display, the display will
change to show the city code of the currently selected World Time City.
• The two pointers described below are on the display in the World Time
Mode.
Pointer 1 (not fl ashing): Indicates the current time in the currently
selected World Time City in 24-hour format.
Pointer 2 (fl ashing): Indicates the current Timekeeping Mode time in
24-hour format.
1. In the World Time Mode, use A (East) and C (West) to display the
city code (time zone) whose Standard Time/Daylight Saving Time
setting you want to change.
2. Hold down E until
disappears. Release E after
• This toggle s the city co de you selecte d in step 1 betwe en Daylight
Saving Time (DST indic ator displayed) an d standard time ( DST
indicator not d isplayed).
• Using the Worl d Time Mode to c hange the DS T setting of t he
city code t hat is selecte d as your Home C ity also wil l change the
Timekee ping Mode ti me DST set ting.
• Note that you can not switch bet ween stan dard time/dayl ight
saving time (D ST) whil e UTC is selected as the Wo rld Time Cit y.
• Note that the st andard time /daylight saving t ime (DST ) setting
affects on ly the current ly selected ti me zone. Othe r time zones a re
not affected.
DST Hold
appears on the display and then
DST Hold
disappears.
Using the Stopwatch
The stopwatch measures elapsed time, split times, and two fi nishes.
Hours
Hours
1/100 second
1/100 second
To enter the Stopwatch Mode
UseD to select the Stopwatch Mode (
Mode”.
• About one second after
change to show the stopwatch hours.
STW
appears on the display, the display will
STW
) as shown in “Selecting a
To perform an elapsed time operation
A A
C A
Split release Stop Reset
displayed)
C
C
Minutes
Minutes
Current
Current
time
time
Seconds
Seconds
A
Start Stop (Restart) (Stop) Reset
A
To pause at a split time
A
Start Split
C
SPL
(
To measure two fi nishes
A
Start Split
Note
• The Stopwatch Mode can indicate elapsed time up to 23 hours, 59 minutes, 59.99 seconds.
• Once started, stopwatch timing continues until you press C to stop it, even if you exit the Stopwatch
Mode to another mode and even if timing reaches the stopwatch limit defi ned above.
• Exiting the Stopwatch Mode while a split time is frozen on the display clears the split time and returns
to elapsed time measurement.
C
First runner fi nishes.
Display time of fi rst
runner
A C
Stop
Second runner
fi nishes.
Split release
Display time of
second runner
C
Reset
Using the Countdown Timer
The countdown timer can be confi gured to start at a preset time, and sound an alarm when the end of the
countdown is reached.
Countdown time
Countdown time
(Hour, minutes,
(Hour, minutes,
seconds)
seconds)
Current time
Current time
To enter the Countdown Timer Mode
UseD to select the Countdown Timer Mode (
Mode”.
• About one second after
change to show the countdown time hours.
To specify the countdown start time
1. Enter the Countdown Timer Mode.
• If a countdow n is in progress (i ndicated by the se conds cou nting
down), press A to stop it and the n press C to reset to the cur rent
countdow n start tim e.
• If a countdow n is paused, pres s C to reset to the cur rent
countdow n start tim e.
2. Hold down E until the hour setting of the current countdown start time
starts to fl ash. This is the setting screen.
• Before the ho ur setting s tarts to fl ash , the messag e SET Hold
will appear o n the display. Keep E depressed u ntil SET Hold
disappear s and the hour s etting sta rts to fl ash.
TMR
appears on the display, the display will
TMR
) as shown in “Selecting a
3. Press D to move the fl ashing between the hour and minute settings.
4. Use A (+) and C (–) to change the fl ashing item.
• To set the starti ng value of the co untdown tim e to 24 hours, set 0H 00’00.
5. Press E to exit the setting screen.
To perform a countdown timer operation
A
Start Stop (Restart) (Stop) Reset
• Before starting a countdown timer operation, check to make sure that a countdown operation is not in
progress (indicated by the seconds counting down). If it is, press A to stop it and then C to reset to
the countdown start time.
• An alarm sounds for fi ve seconds when the end of the countdown is reached. This alarm will sound in
all modes. The countdown time is reset to its starting value automatically when the alarm sounds.
To stop the alarm
Press any button.
A
A A
C
Using the Alarm
Alarm
Alarm
number or
number or
SIG
SIG
Alarm time
Alarm time
(Hour : Minutes)
(Hour : Minutes)
Current time
Current time
You can set fi ve independent daily alarms. When an alarm is turned on,
an alarm will sound for about 10 seconds each day when the time in the
Timekeeping Mode reaches the preset alarm time. This is true even if the
watch is not in the Timekeeping Mode.
You can also turn on an Hourly Time Signal, which will cause the watch
to beep twice every hour on the hour.
To enter the Alarm Mode
D
to select the Alarm Mode (
Use
• About one second after
change to show an alarm number (
indicator. The alarm number indicates an alarm screen.
when the Hourly Time Signal screen is on the display.
• When you enter the Alarm Mode, the data you were viewing when you
last exited the mode appears fi rst.
ALM
ALM
) as shown in “Selecting a Mode”.
appears on the display, the display will
AL1
through
AL5
) or the
SIG
SIG
is shown
9
Page 10

Operation Guide 3172
l
l
l
l
l
l
l
l
l
l
l
l
l
l
l
l
l
l
l
l
l
l
l
l
l
l
l
l
To set an alarm time
Alarm ON/OFF
Alarm ON/OFF
indicator
indicator
1. In the Alarm Mode, use A and C to scroll through the alarm screens
until the one whose time you want to set is displayed.
AL1 AL2 AL3
SIG AL5
2. Hold down E until the alarm time starts to fl ash. This is the setting
screen.
• Before the ala rm time star ts to fl ash, the me ssage SET Hold
will appear o n the display. Keep E depressed u ntil SET Hold
3. Press D to move the fl ashing between the hour and minute settings.
4. While a setting is fl ashing, use A (+) and C (–) to change it.
• When set ting the alarm t ime using the 12- hour form at, take care to set t he time corre ctly as a.m. (no
indicator) or p. m. (P indicator).
5. Press E to exit the setting screen.
To test the alarm
In the Alarm Mode, hold down A to sound the alarm.
To turn an alarm and the Hourly Time Signal on and off
1. In the Alarm Mode, use A and C to select an alarm or the Hourly Time Signal.
2. When the alarm or the Hourly Time Signal you want is selected, press B to turn it on and off.
Hourly time signal
Hourly time signal
on indicator
on indicator
Alarm on indicator
Alarm on indicator
To stop the alarm
Press any button.
disappear s and the alar m time star ts to fl ash.
•
The alarm o n indicator and t he Hourly Ti me Signal on in dicator are
shown on th e display in all mo des while the se function s are turned on .
• If any alarm is o n, the alarm on i ndicator is sh own on the disp lay in
all modes.
AL4
Illumination
The display of the watch is illuminated for easy reading in the dark.
The watch’s auto light switch turns on illumination automatically when
you angle the watch towards your face.
• The auto light switch must be turned on for it to operate.
To turn on illumination manually
PressL in any mode to illuminate the display.
• You can use the procedure below to select either one second or three
seconds as the illumination duration. When you press L, the display
will remain illuminated for about one second or three seconds,
depending on the current illumination duration setting.
• The above operation turns on illumination regardless of the current
auto light switch setting.
• Illumination is disabled during time calibration signal reception, while
confi guring sensor measurement mode settings, and during bearing
sensor calibration.
To change the illumination duration
1. In the Timekeeping Mode, hold down E until the currently selected city code starts to fl ash. This is the
city code setting screen.
• Before the cit y code starts to fl ash, the m essage SET Hold will appear o n the display. Keep
depressed until SET Hold disappears and the cit y code star ts to fl ash.
2. Keep pressing D until
• See step 3 unde r “To change the curre nt time and date s ettings ma nually” for inform ation about
how to scroll thro ugh setting s creens.
3. Press A to toggle the illumination duration between three seconds (
LT1
(
displayed).
4. After the settings are the way you want, press E twice to exit the setting screen.
About the Auto Light Switch
Turning on the auto light switch causes illumination to turn on,
whenever you position your wrist as described below in any mode.
Moving the watch to a position that is parallel to the ground and
then tilting it towards you more than 40 degrees causes
illumination to turn on.
Warning!
Always make sure you are in a safe place whenever you are
•
reading the display of the watch using the auto light switch. Be especially careful when running
or engaged in any other activity that can result in accident or injury. Also take care that sudden
illumination by the auto light switch does not startle or distract others around you.
When you are wearing the watch, make sure that its auto light switch is turned off before riding
•
on a bicycle or operating a motorcycle or any other motor vehicle. Sudden and unintended
operation of the auto light switch can create a distraction, which can result in a traffi c accident
and serious personal injury.
Note
• This watch features a “Full Auto EL Light”, so the auto light switch operates only when available light is
below a certain level. It does not illuminate the display under bright light.
• The auto light switch is always disabled, regardless of its on/off setting, when any one of the following
conditions exists.
While an alarm is sounding
During sensor measurement
While a bearing sensor calibration operation is being performed in the Digital Compass Mode
While a receive operation is in progress in the Receive Mode
While a sunrise or sunset time is being calculated
LT1
LT3
or
is displayed in the upper left corner of the display.
LT3
displayed) and one second
Wear the watch on the
Wear the watch on the
outside of your wrist
outside of your wrist
E
More than
More than
40°
40°
To turn the auto light switch on and off
Auto light switch on
Auto light switch on
indicator
indicator
Illumination Precautions
• Frequent display illumination can run down the battery quickly and require charging.
The following guidelines give an idea of the charging time required to recover from a single illumination
operation.
Approximately fi ve minutes exposure to bright sunlight coming in through a window
Approximately 50 minutes exposure to indoor fl uorescent lighting
• The electro-luminescent panel that provides illumination loses power after very long use.
• Illumination may be hard to see when viewed under direct sunlight.
• Illumination turns off automatically whenever an alarm sounds.
• Frequent use of illumination runs down the battery.
Auto light switch precautions
• Wearing the watch on the inside of your wrist, movement of your arm, or vibration of your arm can
cause frequent activation of the auto light switch and illumination of the display. To avoid running down
the battery, turn off the auto light switch whenever engaging in activities that might cause frequent
illumination of the display.
• Note that wearing the watch under your sleeve while the auto light switch is turned on can cause
frequent illumination of the display and can run down the battery.
• Illumination may not turn on if the face of the watch is more than 15 degrees above
• Illumination turns off after the preset illumination duration, even if you keep the
• Static electricity or magnetic force can interfere with proper operation of the auto
• You may notice a very faint clicking sound coming from the watch when it is shaken
In the Timekeeping Mode, hold down L for about three seconds to toggle
the auto light switch on (
• The auto light switch on indicator (A.EL) is on the display in all modes
while the auto light switch is turned on.
• The auto light switch turns off automatically whenever battery power
drops to Level 4.
or below parallel. Make sure that the back of your hand is parallel to the ground.
watch pointed towards your face.
light switch. If illumination does not turn on, try moving the watch back to the
starting position (parallel with the ground) and then tilt it back towards your face
again. If this does not work, drop your arm all the way down so it hangs at your
side, and then bring it back up again.
back and forth. This sound is caused by mechanical operation of the auto light
switch, and does not indicate a problem with the watch.
A.EL
displayed) and off (A.EL not displayed).
Button Operation Tone
The button operation tone sounds any time you press one of the watch’s buttons. You can turn the button
operation tone on or off as desired.
• Even if you turn off the button operation tone, the alarm, Hourly Time Signal, and Countdown Timer
Mode alarm all operate normally.
To turn the button operation tone on and off
l
l
l
l
l
l
l
l
l
l
l
l
l
l
l
l
l
l
l
l
l
l
l
l
l
l
l
l
l
Mute indicatorMute indicator
1. In the Timekeeping Mode, hold down E until the currently selected
city code starts to fl ash. This is the city code setting screen.
• Before the cit y code sta rts to fl ash, the me ssage SET Hold
will appear o n the display. Keep E depressed u ntil SET Hold
disappear s and the cit y code star ts to fl ash.
2. Keep pressing D until
corner of the display.
• See step 3 und er “To change the cur rent time and da te settings
manually” f or informati on about how to s croll through se tting
screens.
3.
PressA to toggle the button operation tone on (
4. After the settings are the way you want, press E twice to exit the
setting screen.
Note
• The mute indi cator is displayed i n all modes whe n the button
operation tone is turned off.
MUTE
KEY
or
is displayed in the upper left
KEY
) and off (
MUTE
Troubleshooting
Time Setting
See “Radio Controlled Atomic Timekeeping” for information about adjusting the time setting according to a
time calibration signal.
The current time setting is off by hours.
■
Your Home City setting may be wrong. Check your Home City setting and correct it, if necessary.
The current time setting is off by one hour.
■
If you are using the watch in an area where time calibration signal reception is possible, see “To confi gure
Home City settings”.
If you are using in the watch in an area where time calibration signal reception is not possible, you may
need to change your Home City’s standard time/daylight saving time (DST) setting manually. Use the
procedure under “To change the current time and date settings manually” to change the standard time/
daylight saving time (DST) setting.
Sensor modes
I can’t change the temperature, barometric pressure, and altitude units.
■
TYO
When
(Tokyo) is selected as the Home City, the altitude unit is set automatically to meters (m), the
barometric pressure unit to hectopascals (hPa), and the temperature unit to Celsius (°C). These settings
cannot be changed.
“ERR” appears on the display while I am using a sensor .
■
Subjecting the watch to strong impact can cause sensor malfunction or improper contact of internal
circuitry. When this happens,
Compass
Measurement
Digital
ERR
(error) will appear on the display and sensor operations will be disabled.
Barometric
Pressure/Temperature
Measurement
Altitude
Measurement
).
ERR
•
If
appears while a measurement operation is being performed in a sensor mode, restart the measurement.
ERR
If
appears on the display again, it can mean there is something wrong with the sensor.
10
Page 11

Operation Guide 3172
•
Even if battery power is at Level 1 (H) or Level 2 (M), the Digital Compass Mode, Barometer/
Thermometer Mode, or Altimeter Mode sensor may be disabled if there is not enough voltage available
to power it suffi ciently. In this case,
and sensor operation should resume once battery voltage returns to its normal level.
ERR
• If
keeps appearing during measurement, it could mean there is a problem with the applicable
sensor.
ERR appears on the display after I perform bidirectional calibration or northerly calibration.
■
- - -
If
appears and then changes to
wrong with the sensor.
ERR
• If
disappears after about one second, try performing the calibration again.
ERR
• If
keeps appearing, contact your original dealer or nearest authorized CASIO distributor to have
the watch checked.
ERR appears on the display after I perform northerly calibration.
■
ERR
The
message indicates there may be some problem with the sensor. The
be due to movement of the watch while the calibration procedure is being performed. Try performing
calibration again, taking care to ensure that the watch is not moved.
If this does not solve the problem, the problem may be due to some nearby source of terrestrial
magnetism. Try performing the calibration procedure again from the beginning.
Whenever you have a sensor malfunction, take the watch to your original dealer or nearest authorized
CASIO distributor as soon as possible.
What causes incorrect direction readings?
■
• Incorrect bidirectional calibration. Perform bidirectional calibration.
• Nearby source of strong magnetism, such as a household appliance, a large steel bridge, a steel
beam, overhead wires, etc., or an attempt to perform direction measurement on a train, boat, etc. Move
away from large metal objects and try again. Note that digital compass operation cannot be performed
inside a train, boat, etc.
What causes different direction readings to produce different results at the same location?
■
Magnetism generated by nearby high-tension wires is interfering with detection of terrestrial magnetism.
Move away from the high-tension wires and try again.
Why am I having problems taking direction readings indoors?
■
A TV, personal computer, speakers, or some other object is interfering with terrestrial magnetism
readings. Move away from the object causing the interference or take the direction reading outdoors.
Indoor direction readings are particularly diffi cult inside ferro-concrete structures. Remember that you will
not be able to take direction readings inside of trains, airplanes, etc.
The barometric pressure differential pointer does not appear on the display when I enter the
■
Barometer/Thermometer Mode.
• This could indicate sensor error. Try pressing B again.
• The barometric pressure differential pointer is not displayed when the displayed current barometric
value is outside of the allowable measurement range (260 to 1,100 hPa).
World Time Mode
The time for my World Time City is off in the World Time Mode.
■
This could be due to incorrect switching between standard time and daylight saving time. See “To specify
standard time or daylight saving time (DST) for a city” for more information.
Charging
The watch does not resume operation after I expose it to light.
■
This can happen after the power level drops to Level 5. Continue exposing the watch to light until the
battery power indicator shows “H” or “M”.
Time Calibration Signal
The information in this section applies only when
HKG,BJS,HNL,ANC,YVR,LAX,YEA,DEN,MEX,CHI,NYC,YHZ,YYT,SEL
Home City. You need to adjust the current time manually when any other city is selected as the Home City.
The display shows the ERR indicator when I check the result of the latest receive operation.
■
Possible Cause Remedy
• You are wearing or moving the
watch, or performing a button
operation during the signal
receive operation.
• The watch is in an area with
poor reception conditions.
You are in an area where signal
reception is not possible for
some reason.
The calibration signal is not
being transmitted for some
reason.
The current time setting changes after I set it manually.
■
You may have the watch confi gured for Auto Receive of the time calibration signal, which will cause the
time to be adjusted automatically according to your currently selected Home City. If this results in the
wrong time setting, check your Home City setting and correct it, if necessary.
The current time setting is off by one hour.
■
Possible Cause Remedy
Signal reception on a day for
switching between standard
time/daylight saving time (DST)
may have failed for some reason.
Auto Receive is not performed or you cannot perform Manual Receive.
■
Possible Cause Remedy
The watch is not in the
Timekeeping Mode or World
Time Mode.
Your Home City setting is wrong. Check your Home City setting and correct it, if necessary.
There is not enough power for
signal reception.
Signal reception is being performed successfully, but the time and/or day is wrong.
■
Possible Cause Remedy
Your Home City setting is wrong. Check your Home City setting and correct it, if necessary.
The DST setting may be
incorrect.
ERR
will appear on the display. This does not indicate malfunction,
ERR
(error) on the calibration screen, it means that there is something
ERR
message also may
LIS,LON,MAD,PAR,ROM,BER,STO,ATH,MOW
Keep the watch in an area where reception conditions are good while the signal
receive operation is performed.
See “Approximate Reception Ranges”.
• Check the website of the organization that maintains the time calibration signal
in your area for information about its down times.
• Try again later.
Perform the operation under “To get ready for a receive operation”. The time
setting will be adjusted automatically as soon as signal reception is successful.
If you are unable to receive the time calibration signal, change the standard
time/daylight saving time (DST) setting manually.
Auto receive is performed only while the watch is in the Timekeeping Mode or
World Time Mode. Switch to either of these two modes.
Expose the watch to light to charge it.
Change the DST setting to Auto DST.
, or
TYO
is selected at the
,
Specifi cations
Accuracy at normal temperature:
Timekeeping:
Time Calibration Signal Reception:
Digital Compass:
Barometer:
Thermometer:
Altimeter:
Bearing Sensor Precision:
Pressure Sensor Precision:
Fixed
temperature
Effect of
variable
temperature
• Values are guaranteed for a temperature range of –10°C to 40°C (14°F to 104°F).
• Precision is lessened by strong impact to either the watch or the sensor, and by temperature extremes.
Temperature Sensor Precision:
Sunrise/Sunset:
World Time:
Stopwatch:
Countdown Timer:
Alarms:
Illumination:
Other:
Power Supply:
Hour, minutes, seconds, p.m. (P), year, month, day, day of the week
Time format: 12-hour and 24-hour
Calendar system: Full Auto-calendar pre-programmed from the year 2000 to 2099
Other: 3 display formats (Day of the week, Year, Barometric pressure graph); Home City code (can be
assigned one of 48 city codes); Standard Time / Daylight Saving Time (summer time)
signal) ; Remaining auto receives cancelled as soon as one is successful; Manual receive;
Receive Mode
Receivable Time Calibration Signals: Mainfl ingen, Germany (Call Sign: DCF77, Frequency: 77.5
kHz); Anthorn, England (Call Sign: MSF, Frequency: 60.0 kHz); Fort Collins, Colorado, the
United States (Call Sign: WWVB, Frequency: 60.0 kHz); Fukushima, Japan (Call Sign: JJY,
Frequency: 40.0 kHz); Fukuoka/Saga, Japan (Call Sign: JJY, Frequency: 60.0 kHz) ; Shangqiu
City, Henan Province, China (Call Sign: BPC, Frequency: 68.5 kHz)
20 seconds continuous measurement; 16 directions; Angle value 0° to 359°; Four
direction pointers; Calibration (bidirectional, northerly); Magnetic declination correction; Bearing
Memory
Measurement and display range:
260 to 1,100 hPa (or 7.65 to 32.45 inHg)
Display unit: 1 hPa (or 0.05 inHg)
Measurement timing: Daily from midnight, at two hour intervals (12 times per day); Every fi ve seconds
in the Barometer/Thermometer Mode
Other: Calibration; Manual measurement (button operation); Barometric pressure graph; Barometric
pressure differential pointer
Measurement and display range: –10.0 to 60.0°C (or 14.0 to 140.0°F)
Display unit: 0.1°C (or 0.2°F)
Measurement timing: Every fi ve seconds in the Barometer/Thermometer Mode
Other: Calibration; Manual measurement (button operation)
Measurement range: –700 to 10,000 m (or –2,300 to 32,800 ft.) without reference altitude
Display range: –10,000 to 10,000 m (or –32,800 to 32,800 ft.)
Negative values can be caused by readings produced based on a reference altitude or due to
atmospheric conditions.
Display unit: 5 m (or 20 ft.)
Current Altitude Data: 5-second intervals for 1 hour (
followed by 2-minute interval for next 24 hours (
Altitude Memory Data:
Manually saved records: 25 (altitude, date, time)
Auto saved values: Two sets (memory areas) each of high altitude and its measurement date and
time, low altitude and its measurement date and time, total ascent and its save start date and
time, total descent and its save start date and time
Other: Reference altitude setting; Altitude graph; Altitude differential; Altitude auto measurement
Direction: Within ±10°
Values are guaranteed for a temperature range of –10°C to 40°C (14°F to 104°F).
North pointer: Within ±2 digital segments
±2°C (±3.6°F) in range of –10°C to 60°C (14.0°F to 140.0°F)
Other: Daylight Saving Time/Standard Time
Measuring unit: 1/100 second
Measuring capacity: 23:59' 59.99"
Measuring modes: Elapsed time, split time, two fi nishes
Measuring unit: 1 second
Countdown start time setting range: 1 minute to 24 hours (1-hour increments and 1-minute
Approximate battery operating time: 5 months (from full charge to Level 4) under the following
• Watch not exposed to light
• Internal timekeeping
• Display on 18 hours per day, sleep state 6 hours per day
• 1 illumination operation (1.5 seconds) per day
• 10 seconds of alarm operation per day
• 10 digital compass operations per week
• 1 hour of altimeter measurement at 5-second interval, once per month
• 2 hours of barometric pressure measurement per day
• 6 minutes of signal reception per day
Frequent use of illumination runs down the battery. Particular care is required when using the auto
light switch.
0’05
method (
increments)
5 Daily alarms; Hourly time signal
second or 3 seconds); Auto Light Switch (Full Auto EL Light operates only in the dark)
Battery power indicator; Power Saving; Low-temperature resistance (–10°C/14°F); Button
operation tone on/off
or
Conditions (Altitude) Altimeter Barometer
0 to 6000 m
0 to 19680 ft.
6000 to 10000 m
19680 to 32800 ft.
0 to 6000 m
0 to 19680 ft.
6000 to 10000 m
19680 to 32800 ft.
Sunrise time and sunset time for specifi c date, Daylight pointers
48 cities (31 time zones)
EL Backlight (electro-luminescent panel); Selectable illumination duration (approximately 1
Solar cell and one rechargeable battery
conditions:
±15 seconds a month (with no signal calibration)
Auto receive 6 times a day (5 times a day for the Chinese calibration
0’05
), or 5-second interval for fi rst 3 minutes
2’00
)
2’00
)
± (altitude differential × 2%
+ 15 m) m
± (altitude differential × 2%
+ 50 ft.) ft.
± (altitude differential × 2%
+ 25 m) m
± (altitude differential × 2%
+ 90 ft.) ft.
± 50 m every 10°C
± 170 ft. every 50°F
± 70 m every 10°C
± 230 ft. every 50°F
± (pressure differential × 2%
+ 2 hPa) hPa
± (pressure differential × 2%
+ 0.059 inHg) inHg
± 5 hPa every 10°C
± 0.148 inHg every 50°F
11
Page 12

Site Data List
Site
Abu Dhabi 54°E 24°N
Addis Ababa 39°E 9°N
Adelaide 139°E 35°S
Amsterdam 5°E 52°N
Anchorage 150°W 61°N
Athens 24°E 38°N
Bangkok 100°E 14°N
Beirut 35°E 34°N
Boston 71°W 42°N
Brasilia 48°W 16°S
Buenos Aires 58°W 35°S
Cairo 31°E 30°N
Chicago 88°W 42°N
Christchurch 173°E 43°S
Dakar 17°W 15°N
Damascus 36°E 33°N
Delhi 77°E 29°N
Denver 105°W 40°N
Detroit 83°W 42°N
Dhaka 90°E 24°N
Dubai 55°E 25°N
Dublin 6°W 53°N
Edmonton 114°W 54°N
El Paso 106°W 32°N
Fernando de Noronha 32°W 4°S
Frankfurt 9°E 50°N
Guam 145°E 13°N
Hamburg 10°E 54°N
Hanoi 106°E 21°N
Helsinki 25°E 60°N
Hong Kong 114°E 22°N
Honolulu 158°W 21°N
Houston 95°W 30°N
Istanbul 29°E 41°N
Jakarta 107°E 6°S
Jeddah 39°E 21°N
Kabul 69°E 35°N
Karachi 67°E 25°N
Kathmandu 85°E 28°N
Kuala Lumpur 102°E 3°N
Kuwait 48°E 29°N
Las Vegas 115°W 36°N
Lima 77°W 12°S
Longitude
Latitude
City Code Table
City Code City
PPG Pago Pago –11
HNL Honolulu –10
ANC Anchorage –9
YVR Vancouver
LAX Los Angeles
YEA Edmonton
DEN Denver
MEX Mexico City
CHI Chicago
NYC New York –5
SCL Santiago
YHZ Halifax
YYT St. Johns –3.5
RIO Rio De Janeiro –3
FEN
RAI Praia –1
UTC
LON London
MAD Madrid
PAR Paris
ROM Rome
BER Berlin
STO Stockholm
ATH Athens
JRS Jerusalem
Fernando de
Noronha
UTC Offset/
GMT Differential
–8
–7
–6
–4
–2
0LIS Lisbon
+1
+2CAI Cairo
Operation Guide 3172
Site
Lisbon 9°W 39°N
London 0°E 51°N
Los Angeles 118°W 34°N
Madrid 4°W 40°N
Manila 121°E 15°N
Melbourne 145°E 38°S
Mexico City 99°W 19°N
Miami 80°W 26°N
Milan 9°E 45°N
Montreal 74°W 45°N
Nairobi 37°E 1°S
Nauru 167°E 1°S
New Orleans 90°W 30°N
New York 74°W 41°N
Noumea 166°E 22°S
Pago Pago 171°W 14°S
Panama City 80°W 9°N
Papeete 150°W 18°S
Paris 2°E 49°N
Perth 116°E 32°S
Phnom Penh 105°E 12°N
Port Vila 168°E 18°S
Praia 24°W 15°N
Pyongyang 126°E 39°N
Rio De Janeiro 43°E 23°S
Rome 12°E 42°N
San Francisco 122°W 38°N
Santiago 71°W 33°S
Sao Paulo 47°W 24°S
Seattle 122°W 48°N
Seoul 127°E 38°N
Singapore 104°E 1°N
St. Johns 53°W 48°N
Stockholm 18°E 59°N
Sydney 151°E 34°S
Taipei 122°E 25°N
Tehran 51°E 36°N
Tokyo 140°E 36°N
Vancouver 123°W 49°N
Vienna 16°E 48°N
Wellington 175°E 41°S
Longitude
• Based on data as of December 2008.
City Code City
MOW Moscow
JED Jeddah
THR Tehran +3.5
DXB Dubai +4
KBL Kabul +4.5
KHI Karachi +5
DEL Delhi +5.5
KTM Kathmandu +5.75
DAC Dhaka +6
RGN Yangon +6.5
BKK Bangkok +7
SIN Singapore
HKG Hong Kong
BJS Beijing
TPE Taipei
SEL Seoul
TYO Tokyo
ADL Adelaide +9.5
GUM Guam
SYD Sydney
NOU Noumea +11
WLG Wellington +12
• Based on data as of December 2008.
• The rules governing global times (GMT differential
and UTC offset) and summer time are determined
by each individual country.
Latitude
UTC Offset/
GMT Differential
+3
+8
+9
+10
12
 Loading...