

Page 1
MO0403-B
Module No. 2172
GETTING ACQUAINTED
Congratulations upon your selection of this CASIO watch. To get the most out
of your purchase, be sure to carefully read this manual and keep it on hand
for later reference when necessary.
About this manual
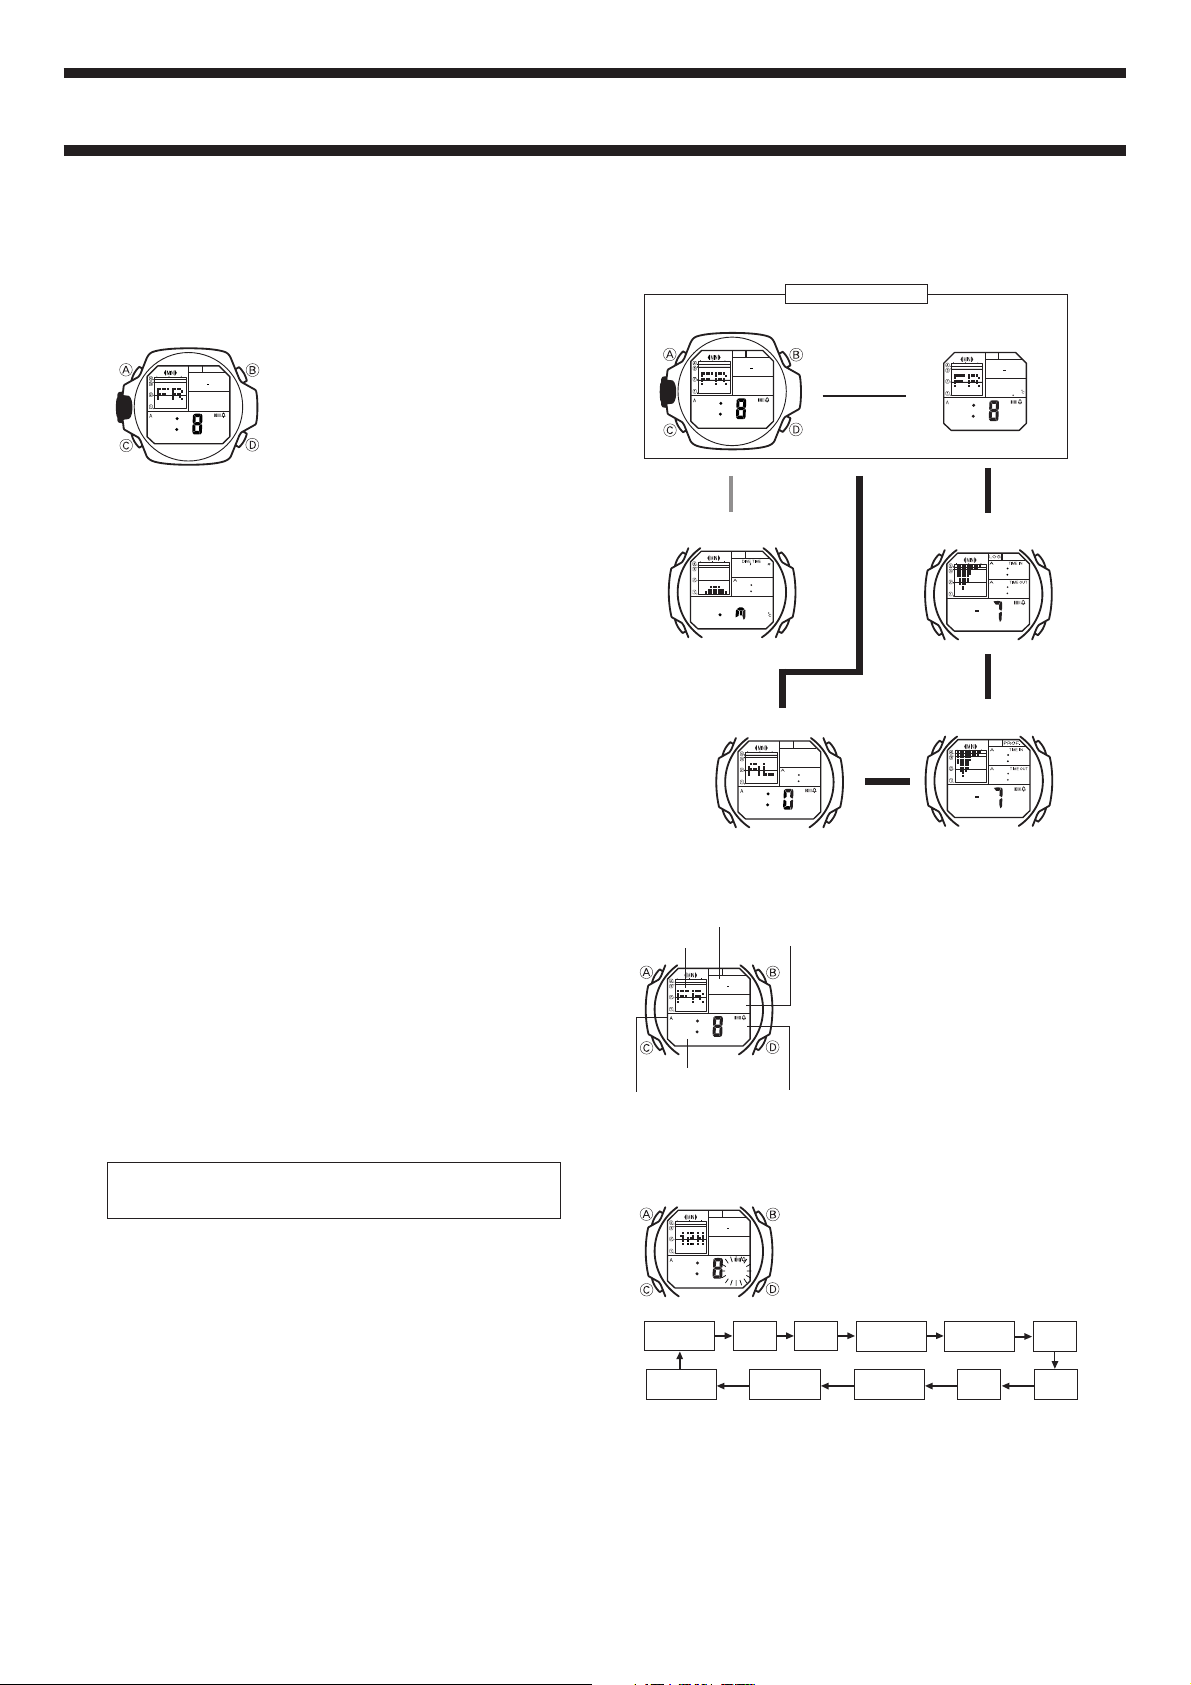
• Button operations are indicated using the
letters shown in the illustration.
630
20 00
05
1
5
0
Snorkeling/Scuba Diving Precautions
• Make sure that you have received proper diving training before using
this watch underwater.
• Always use the “buddy system” when diving. Never dive alone.
• Note that this watch is NOT a diving computer, and is not capable of
making decompression calculations.
• The depth meter function built into this watch should only be used as
a “back-up” to your standard depth gauge.
• Note that this watch cannot be used in helium atmospheres.
• Though the function of this watch is not affected by magnetism, long
use near a source of magnetism can case the watch itself to become
magnetized. A magnetized watch can interfere with the precision of
readings produced by an underwater compass. To avoid such
problems, keep the watch away from your compass when taking
readings.
Before Diving
• Before beginning each dive, check to make sure that the BATT (and/
or RECOVER) message (which indicates that battery power is weak)
and/or ERR message (which indicates sensor malfunction) are not on
the display. If either message is on the display, contact an authorized
CASIO Dealer/Distributor or authorized CASIO Service Point to have
the battery replaced or to have the watch repaired.
• Make sure that the current time setting of the watch is correct.
• Check the glass, case, and band for cracks or chips.
• Make sure that the band is fastened securely around your wrist.
While Diving
• Check to make sure that the timer and depth gauge are operating
properly.
• Warning indicators flashing on the display indicate the possibility of
a data error. For details, see “Warning Indicators”.
• Take care when diving near rocks or coral to avoid scratching or
damaging the watch.
After Diving
• To avoid corrosion, rinse your watch thoroughly with fresh water to
remove salt water, dirt, etc. When possible, soak the watch in fresh
water overnight to make sure that all salt is removed.
• When using a metal band, occasionally clean the gaps in the band
using a soft toothbrush and soapy water. Failure to keep a metal
band clean can result in corrosion of the watch, soiling of clothing, or
irritation of sensitive skin.
CASIO COMPUTER CO., LTD. assumes no responsibility for any
loss, or any claims by third parties that may arise through the use of
this watch.
• Each section of this manual provides you
with the information you need to perform
operations in each mode. Further details
and technical information can be found in
the “REFERENCE” section.
2172-1
GENERAL GUIDE
For information on how to read the display, refer to the separate instructions
on each function.
Timekeeping Mode
Time/Date
630
20 00
05
1
5
0
▲
Hold down C
for two seconds.
▲
Diving Mode
000
10 58
00
2
4
Alarm Mode
10 58
20
1
Day of week
05
1
Hour : Minutes
AM indicator
Month – Day
630
20 00
5
Year
0
Seconds
To set the time and date
630
20 00
05
1
5
0
Seconds
DST Hour
Press D.
▲
▲
TIMEKEEPING
Use the Timekeeping Mode to set the current
time and date, and to view the current time.
You also can adjust the display contrast while
in the Timekeeping Mode.
To reset the seconds count to zero
1. In the Timekeeping Mode, hold down A
until the seconds digits start to flash, which
indicates the setting screen.
2. Press D to reset the seconds count to
• Pressing D while the seconds count is in
the range of 30 to 59 resets the seconds to
00 and adds 1 to the minutes. In the range
of 00 to 29, the minutes count is
unchanged.
3. Press A twice to exit the setting screen.
1. In the Timekeeping Mode, hold down A
until the seconds digits start to flash, which
indicates the setting screen.
• While the seconds digits are flashing, press
D to set the seconds count to
2. Press C to move the flashing in the
sequence shown below to select other
settings.
Minutes
Temperature
▲
05
1
Recall Mode
82
Dive Profile Mode
82
12/24-Hour
format
500
500
630
300
▲
10 58
11 58
▲
10 58
11 58
5
0
Press C.
x
3
x
3
00.
Year
00.
°C/°F M/F
• See “Daylight Saving Time (DST)” for details on the DST setting and
“Adjusting Display Contrast” for information about contrast.
3. Use C to move the flashing to the hour, minutes, year, month, and day,
and make the settings you want for each.
• While the hour, minutes, year, month, or day setting is flashing, use D (+)
and B (–) to change it.
• When the 12/24-hour setting is selected, press D to toggle between
1CL) and 24-hour (CZL) timekeeping.
12-hour (
Contrast
Day
Month
Page 2
2172-2
4. Press A twice to exit the setting screen.
• The day of the week is automatically displayed in accordance with the date
(year, month, and day) settings.
• The year can be set in the range of 2000 to 2039.
• The watch’s built-in full automatic calendar automatically makes allowances
for different month lengths and leap years. Once you set the date, there
should be no reason to change it except after you have the watch’s battery
replaced.
Daylight Saving Time (DST)
Daylight Saving Time (DST) automatically advances the time setting by one
hour from Standard Time. Whether you should use Daylight Saving Time
depends on the geographic area where you are currently located.
To toggle between DST and Standard Time
1. In the Timekeeping Mode, hold down A
until the seconds digits start to flash, which
indicates the setting screen.
2. Press C to move the flashing to the DST
setting.
3. Press D to toggle between Daylight
Saving Time (
OFF).
(
4. Press A twice to exit the setting screen.
• The DST indicator appears on the display to
indicate that daylight saving time is turned
on.
ON) and standard time
15
1
630
20 00
5
0
Adjusting Display Contrast
Use the following procedure to adjust the relative darkness of the display
figures.
To adjust display contrast
1. In the Timekeeping Mode, hold down A
until the seconds digits start to flash, which
indicates the setting screen.
2. Press C eight times to move the flashing
to the contrast setting.
3. Use D (+) and B (–) to change the
contrast setting.
• You can set a value from
(darkest).
4. Press A twice to exit the setting screen.
0 (lightest) to 10
THERMOMETER
A built-in temperature sensor measures air temperature and water
temperature and the measurement result is shown on the display. You can
calibrate the temperature sensor if you suspect the temperature reading is
incorrect.
• See “DIVING FUNCTIONS” for information about the temperature display
in the Diving Mode.
• You can select either Celsius (°C) or Fahrenheit (°F) as the unit of
temperature measurement. See “To change the unit of temperature
measurement”.
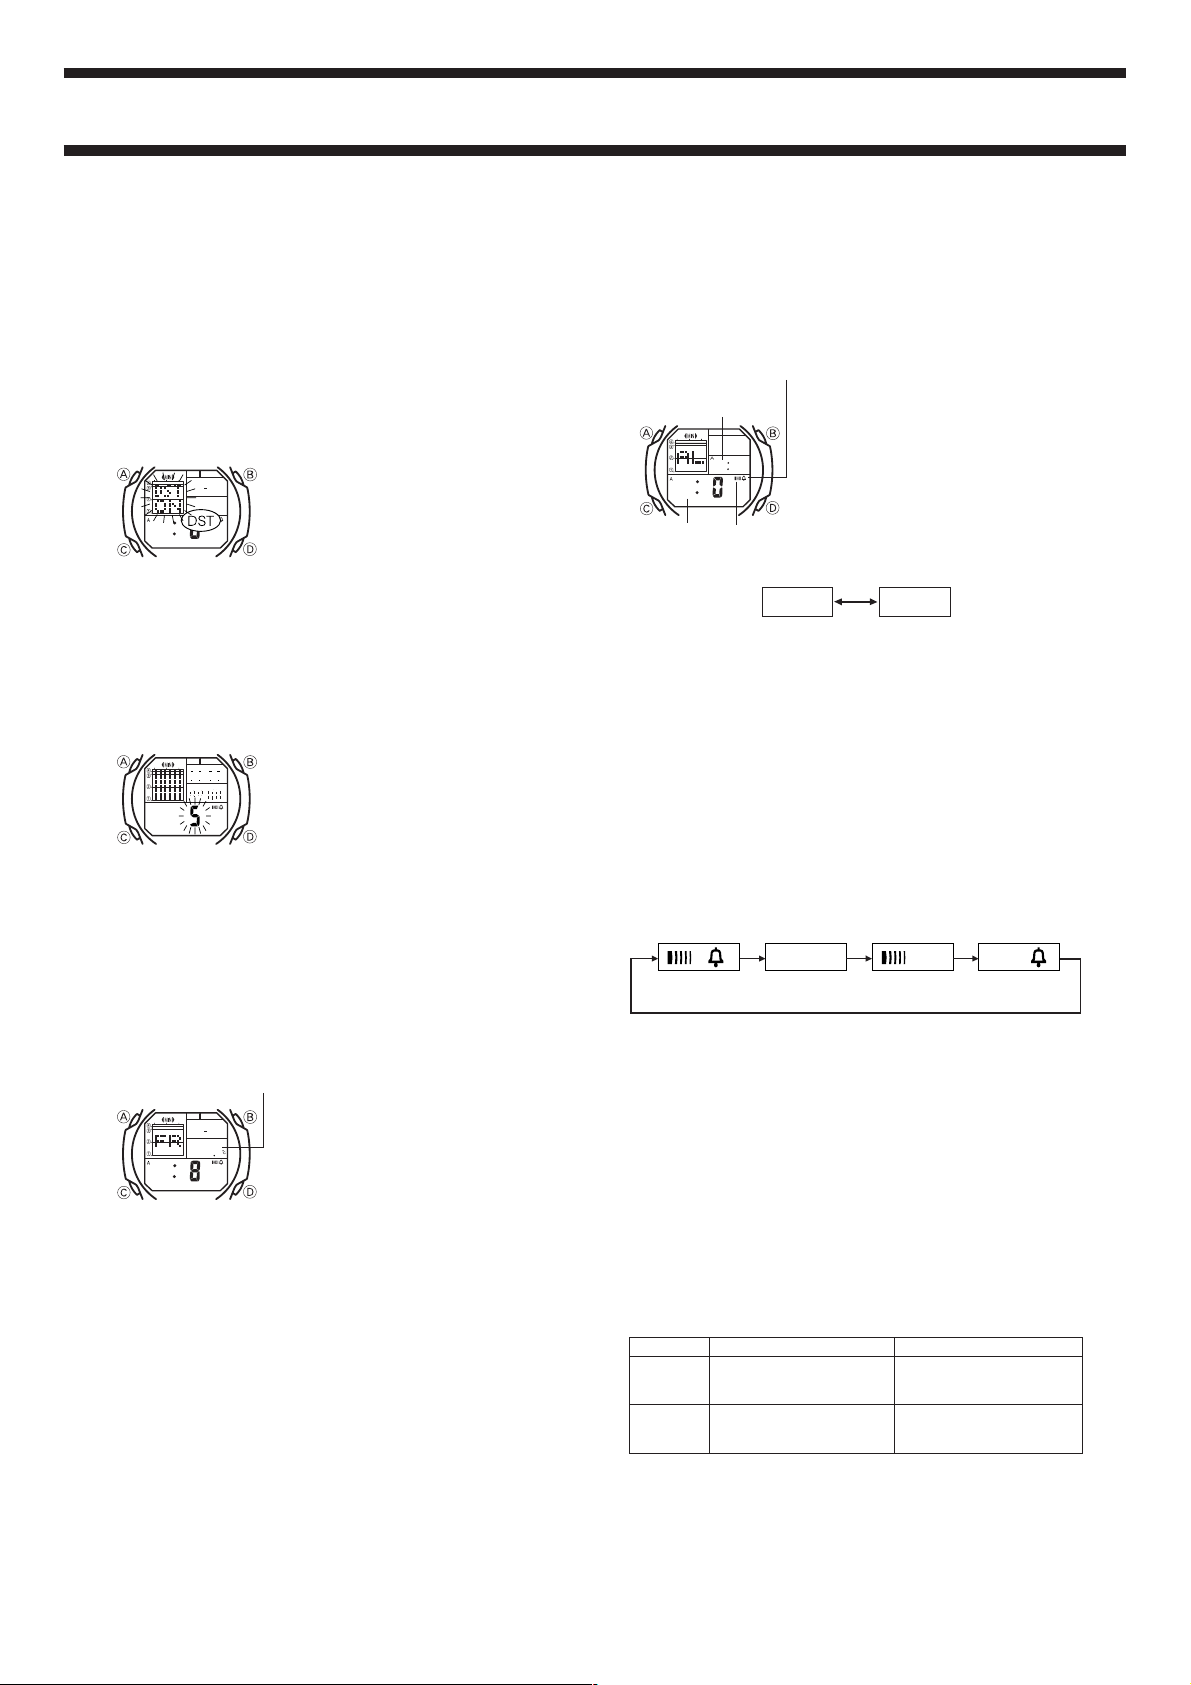
ALARM
Hourly time signal
on indicator
Current time
10 58
20
1
Alarm time
3. Press C to move the flashing between the settings shown below.
4. While the hour or minutes setting is flashing, use D (+) and B (–) to
change it.
• When setting the alarm time using the 12-hour format, take care to set the
time correctly as am (A indicator) or pm (P indicator).
5. Press A to exit the setting screen.
Alarm on
indicator
Daily Alarm Operation
The alarm sounds at the preset time each day for about 20 seconds or until
you stop it by pressing any button.
• The alarm does not sound while the watch is in the Diving Mode.
To test the alarm
In the Alarm Mode, hold down D to sound the alarm.
To turn the Daily Alarm and Hourly Time Signal on and off
In the Alarm Mode, press D to cycle through the on and off settings as
shown below.
[Alarm ON Indicator / Hourly Time Signal ON Indicator]
Alarm On
Signal On
You can set a Daily Alarm that sounds at the
same time each day, while the alarm is turned
on. You can also turn on an Hourly Time
Signal that causes the watch to beep twice
every hour on the hour.
To set the alarm time
1. Use C to enter the Alarm Mode.
2. Hold down A until the hour digits of the
alarm time start to flash, which indicates
the setting screen.
• Displaying the alarm time setting screen
automatically turns on the Daily Alarm.
MinutesHour
Alarm Off
Signal Off
Alarm On
Signal Off
Alarm Off
Signal On
Interpreting the Temperature Screen
Temperature
630
300
05
1
5
0
• The displayed temperature value changes to
temperature falls outside the range of –10.0°C to 60.0°C (14.0°F to 140.0°F).
The normal temperature value reappears as soon as the measured
temperature is within the allowable range.
Use C to enter the Timekeeping Mode and
then press D to display the Temperature
screen.
• While a surface interval measurement is in
progress, pressing D initially displays the
Surface Interval screen. Press D again to
advance to the Temperature screen.
• After about six seconds, the watch returns
to the Timekeeping screen from the
Temperature screen. You can return to the
Timekeeping screen manually by pressing
D.
xxx.x°C (or °F) if a measured
About Temperature Measurements
• Whenever you display the Temperature screen or enter the Diving Mode,
the watch performs a temperature measurement and displays the result on
the screen. The watch continues to take temperature measurements every
30 seconds in the Diving Mode.
• Air temperature measurements are affected by your body temperature
while you are wearing the watch, direct sunlight, and moisture. To achieve
a more accurate temperature measurement, remove the watch from your
wrist, place it in a well-ventilated location out of direct sunlight, and wipe all
moisture from the case. It takes approximately 20 to 30 minutes for the
case of the watch to reach the actual surrounding temperature.
• Wearing the watch on your wrist has almost no effect on water temperature
measurements. In the case of sudden extreme changes in water
temperature, however, it takes about five minutes for the temperature of
the watch to match the water temperature.
DIVING FUNCTIONS
The pressure and temperature sensors of this watch provide a wealth of
useful diving data. Besides automatically measuring depths in the Diving
Mode, the watch also stores depth and temperature data into a Log Memory
for later recall.
• You can change the unit of measurement for displayed depth values
between meters (
measurement”.
Important!
• The trigger depth for automatically starting and stopping depth and dive
time measurements in the Dive Mode is 1 meter (4 feet). Because of this,
the explanations in this manual use the term “submerged” to mean at a
depth deeper than 1 meter and the term “surface” to mean at a depth
shallower than 1 meter.
• Note that this watch also discriminates between “valid dives” and “invalid
dives” as described below.
Dive Type
Valid Dive
Invalid Dive
l) and feet (F). See “To change the unit of depth
Definition
• Submerged for at least two
or three consecutive minutes
• Submerged for less than two
or three consecutive minutes
• Insufficient depth
Description
• Starts measurement of the
surface interval when finished.
• Records log data for the dive.
• No surface interval measure-
ment when finished.
• No log data recorded
Page 3
2172-3
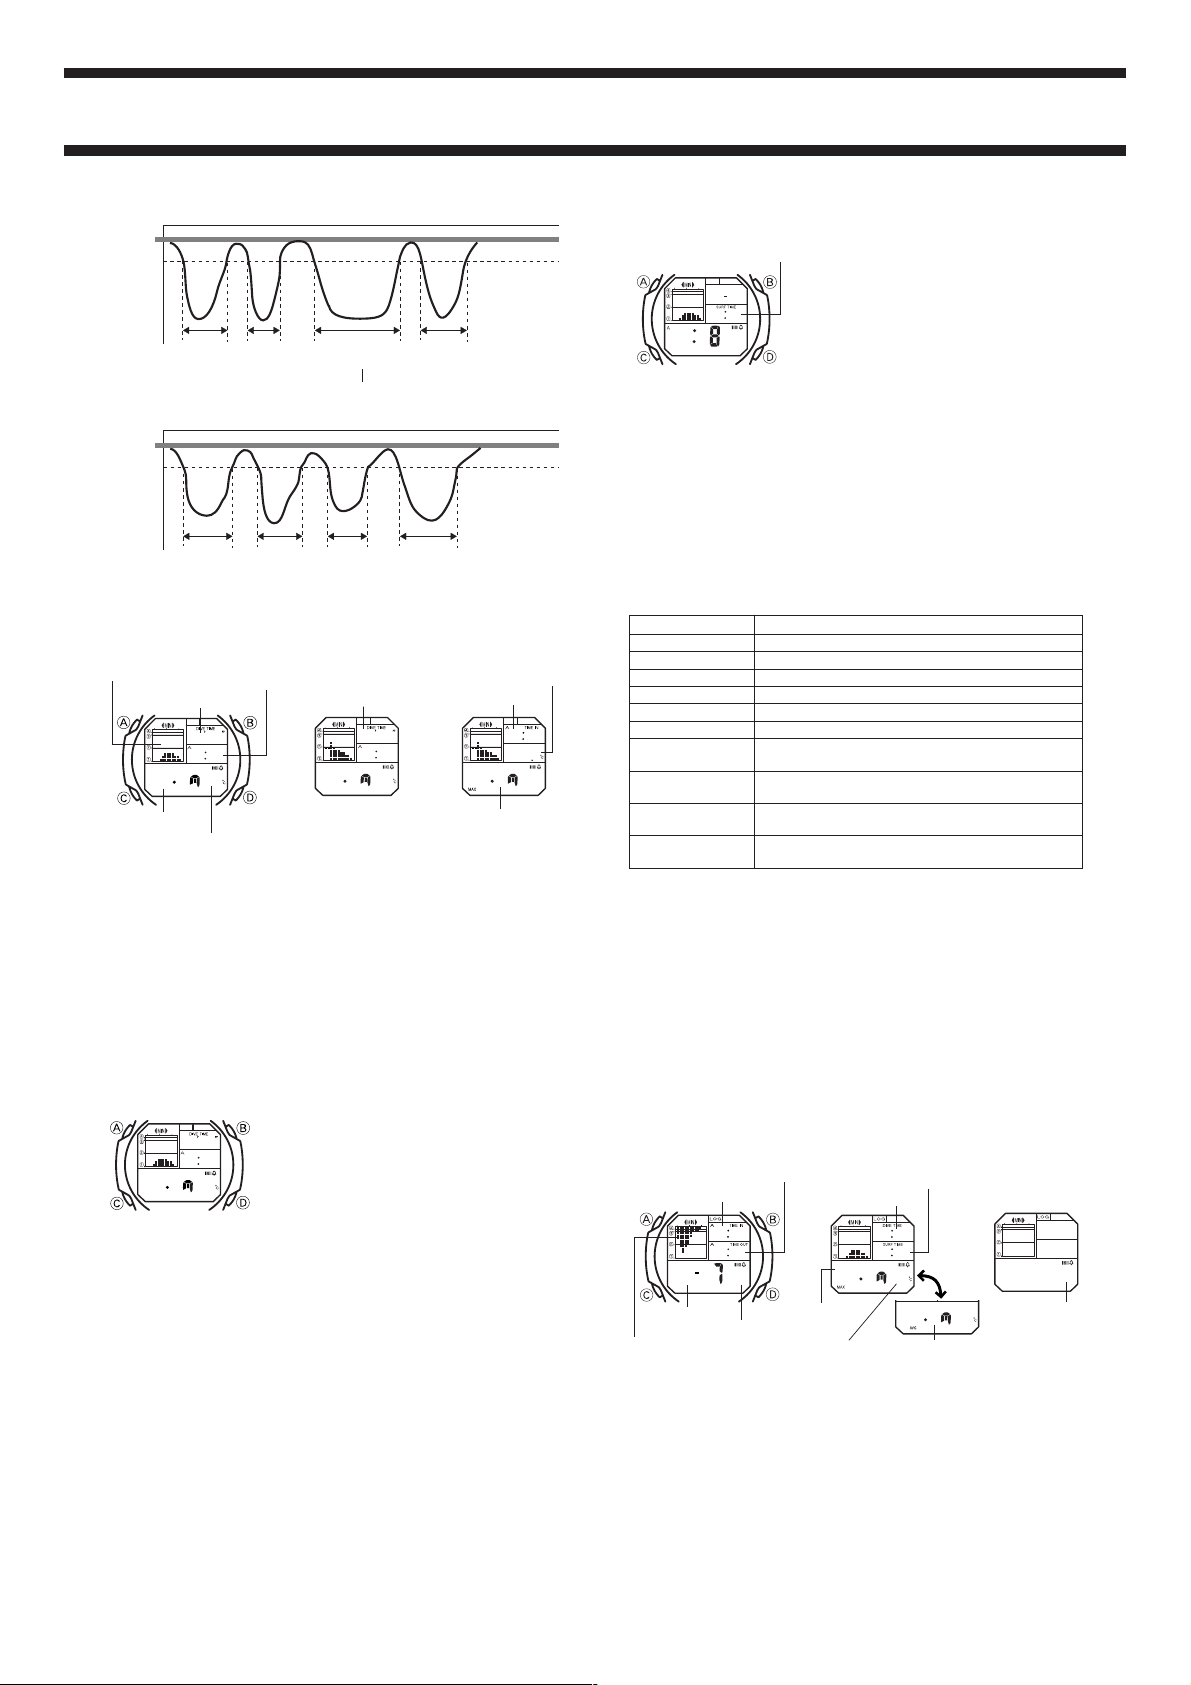
Valid Dive
Surface
Depth =
1.0m/4ft.
Invalid Dive
Surface
Depth =
1.0m/4ft.
1 minute
30 seconds
1 minute
30 seconds
1 minute
5 seconds
1 minute
25 seconds
2 minutes
50 seconds
Valid Dive
1 minute
20 seconds
1 minute
50 seconds
1 minute
30 seconds
On the Surface
Submerged
On the Surface
Submerged
Understanding the Diving Mode Screen
Surface Screen
Compartment Nitrogen
Loading Graph
Current depth
• The Surface screen appears while you are on the surface, while the
Submerged screen appears while you are submerged.
• The dive time value shows the elapsed time you spend submerged.
• Pressing C while the Surface screen or Submerged screen is on the
display changes to the Maximum Depth screen for about three seconds.
• The dive start time shows when your dive first reached submerged depth
after you entered the Diving Mode.
• The maximum depth value shows the maximum depth you reached during
your dive, as measured by the watch.
• See “COMPARTMENT NITROGEN LOADING GRAPH”.
Current time
Dive time
000
10 58
00
2
4
Current temperature
Submerged Screen Maximum
Dive time
30 52
1128
82
2
4
Depth Screen
Current temperature
Dive start time
10 58
243
80
2
Maximum depth
Using the Diving Mode
Make sure you are out of the water whenever performing button operations
before or after diving.
To enter the Diving Mode before diving
000
10 58
00
2
4
To exit the Diving Mode after diving
After finishing your diving, hold down C for about two seconds to exit the
Diving Mode and enter the Timekeeping Mode.
• Note that you cannot exit the Diving Mode while you are submerged.
Note
• If you switch to the Timekeeping Mode after surfacing, be sure to switch
back to the Diving Mode before starting your next dive. If you stay in the
Diving Mode after surfacing, your next dive will be considered a
continuation of the previous dive, with data being added on accordingly.
• Exiting the Diving Mode after a valid dive causes information about the
dive to be recorded in the watch’s Log Memory.
• If you leave the watch with the Diving Mode Surface Screen on the display
without performing a button operation for about one hour after surfacing, it
automatically exits the Diving Mode and enters the Timekeeping Mode.
Always check to make sure the watch is actually in the Diving Mode before
actually starting a dive.
• Dive times can be measured up to 11 hours 59 minutes and 59 seconds.
When the dive time reaches 12 hours, the watch automatically stores log
data up to that point and exits the Diving Mode and enters the Timekeeping
Mode. The watch also starts measuring the surface interval at this time.
In any other mode, hold down C for about two
seconds to enter the Diving Mode.
• While the watch is in the Diving Mode, it will
automatically start measurements whenever
you are submerged and stop measurements
whenever you are on the surface.
Surface Interval
Surface interval
(hours : minutes)
630
030
15
1
5
0
Whenever you surface after a valid dive, the
watch’s surface timer starts to count the
amount of time you spend on the surface. The
surface interval is counted up to 48 hours or
until you begin your next dive.
To display the Surface Interval screen
In the Timekeeping Mode (after exiting the
Diving Mode following a valid dive), press D
to display the Surface Interval screen.
• To return to the Timekeeping screen, press
D twice.
Using the Watch while Skin Diving
You can use this watch while skin diving without affecting dive data or surface
interval timing. Log data is not stored in memory and surface interval timing
continues as long as you do not start a valid dive.
Log Memory
After finishing a dive, log data for the dive is stored into the watch’s Log
Memory when you exit the Diving Mode and enter the Timekeeping Mode.
The watch has enough memory to store up to 20 log data records. The
following are the items stored for each log data record.
Surface interval
Dive time
50
2
Description
100
147
2
4
28
1
Average depth
Unused Record
Screen
24
17
Number
of unused
records
Item
Dive Date
Dive Number
Dive Start Time
Dive End Time
Dive Time
Maximum Depth
Average Depth
Maximum Depth
Temperature
Surface Interval
Compartment Nitrogen
Loading Graph
• When the Surface Interval time reaches 48 hours, the displayed time
changes automatically of
• Up to 20 log data records can be stored in memory. Once memory is full,
memory is updated by storing the newest record and deleting the oldest
record.
• In addition to the log data listed above, the watch also stores depth data in
memory. See “DIVE PROFILE” for more information.
Month and day of the dive
Dive number for the day
Hour and minutes, seconds rounded down
Hour and minutes, seconds rounded up
Hours and minutes, seconds rounded up
Maximum measured depth reached
Total of depth measurements divided by the number of
depth readings
Water temperature at the maximum depth of the dive
Time elapsed from the end of the last valid dive to the
start of the next valid dive, seconds rounded down
Compartment Nitrogen Loading Graph at the end of the
dive
xx:xx.
To recall log data
1. Use C to enter the Recall Mode.
• The initial screen that appears is the data screen for the last (newest)
record stored in memory.
2. Use D (new ➞ old) and B (old ➞ new) to scroll through the log data.
• Each press of A toggles between the date screen and maximum depth
screen.
• Pressing B and D at the same time displays the date screen for the last
recorded log data.
Date Screen Maximum Depth Screen
Dive end time
Dive start time
500
1058
1158
82
x
3
Dive date
Compartment Nitrogen
Loading Graph
Note
• The watch comes with sample data for a single dive in its Log Memory for
demonstration purposes.
• The Maximum Depth screen alternates every five seconds between display
of the maximum depth and average depth.
• The Unused Record screen shows the number of records in memory that
do not contain any data. It is located after the oldest record currently stored
in memory.
Dive number
Maximum
depth
Maximum depth
temperature
Page 4
2172-4
To delete log data
Holding down A for about two seconds in the Recall Mode or Dive Profile
Mode deletes all the log data and dive profile data for the currently displayed
record.
• Deleting log data while a surface interval timing operation is in progress
stops the surface interval timing operation.
Using Log Data with Dive Tables
■ Make sure you have a clear understanding of dive tables and their use.
Before using this watch, make sure you have undergone a thorough diving
training program.
■ Make sure you have a clear understanding of the special characteristics of
all the log data provided by this watch (dive time, maximum depth, dive
start time, dive end time, average depth, maximum depth temperature).
■ Always remember that depth readings provided by this watch are not
guaranteed for 100% accuracy.
■ Any log data accompanied by a warning indicator should not be used. For
details, see “Warning Indicators”.
■ Always obey the basic rules of safe diving.
• It is recommended to dive within the limits of the non-decompression
limit. Be sure to take “safety stops” every 3 to 6 meters (10 to 20 feet).
• It is dangerous to dive near the non-decompression limit. Dive 1 to 2
ranks inside of your own personal limitations.
• No dive table is 100% accurate. You should always take into account
individual physical differences, your physical condition, water
temperature, etc.
• Note that high altitude and fresh water diving requires the use of special
dive tables and calculations. Be sure to receive appropriate training
before attempting high altitude or fresh water diving.
Calculation of Average Air Consumption Using Average Depth
Average depth is calculated by adding all depth readings greater than 1
meter (4 feet) and dividing the total by the number of readings taken. Since
readings at depths less than 1 meter (4 feet) are ignored, you will not be able
to use average depth log data to calculate average air consumption if tank air
is consumed while on the surface.
You should also note here that time you spend on the surface is not included
as part of the dive time.
Date Screen Maximum Depth Screen Dive Profile
Dive end time
Dive start time
500
10 58
11 58
82
Dive date
Note
• When there are profiles for fewer than 20 dives in Dive Profile memory, the
Remaining Record screen, which shows the current number of unused
records, appears after the oldest record.
• Pressing B and D at the same time while the Date screen is on the
display jumps to the Date screen for the newest log data. The Date screen
remains on the display for about three seconds. After that, the display
switches to the Maximum Depth screen for that log data.
• Pressing B and D at the same time while the Dive Provide Data screen
is on the display returns to the Maximum Depth screen.
3 seconds
x
➞
3
Dive
Profile Graph
Dive time
500
100
50
2
Maximum depth
of selected dive
Data Screen
Elapsed time
100
Dive
Profile Graph
25
Maximum depth during
minute indicated by
elapsed time
001
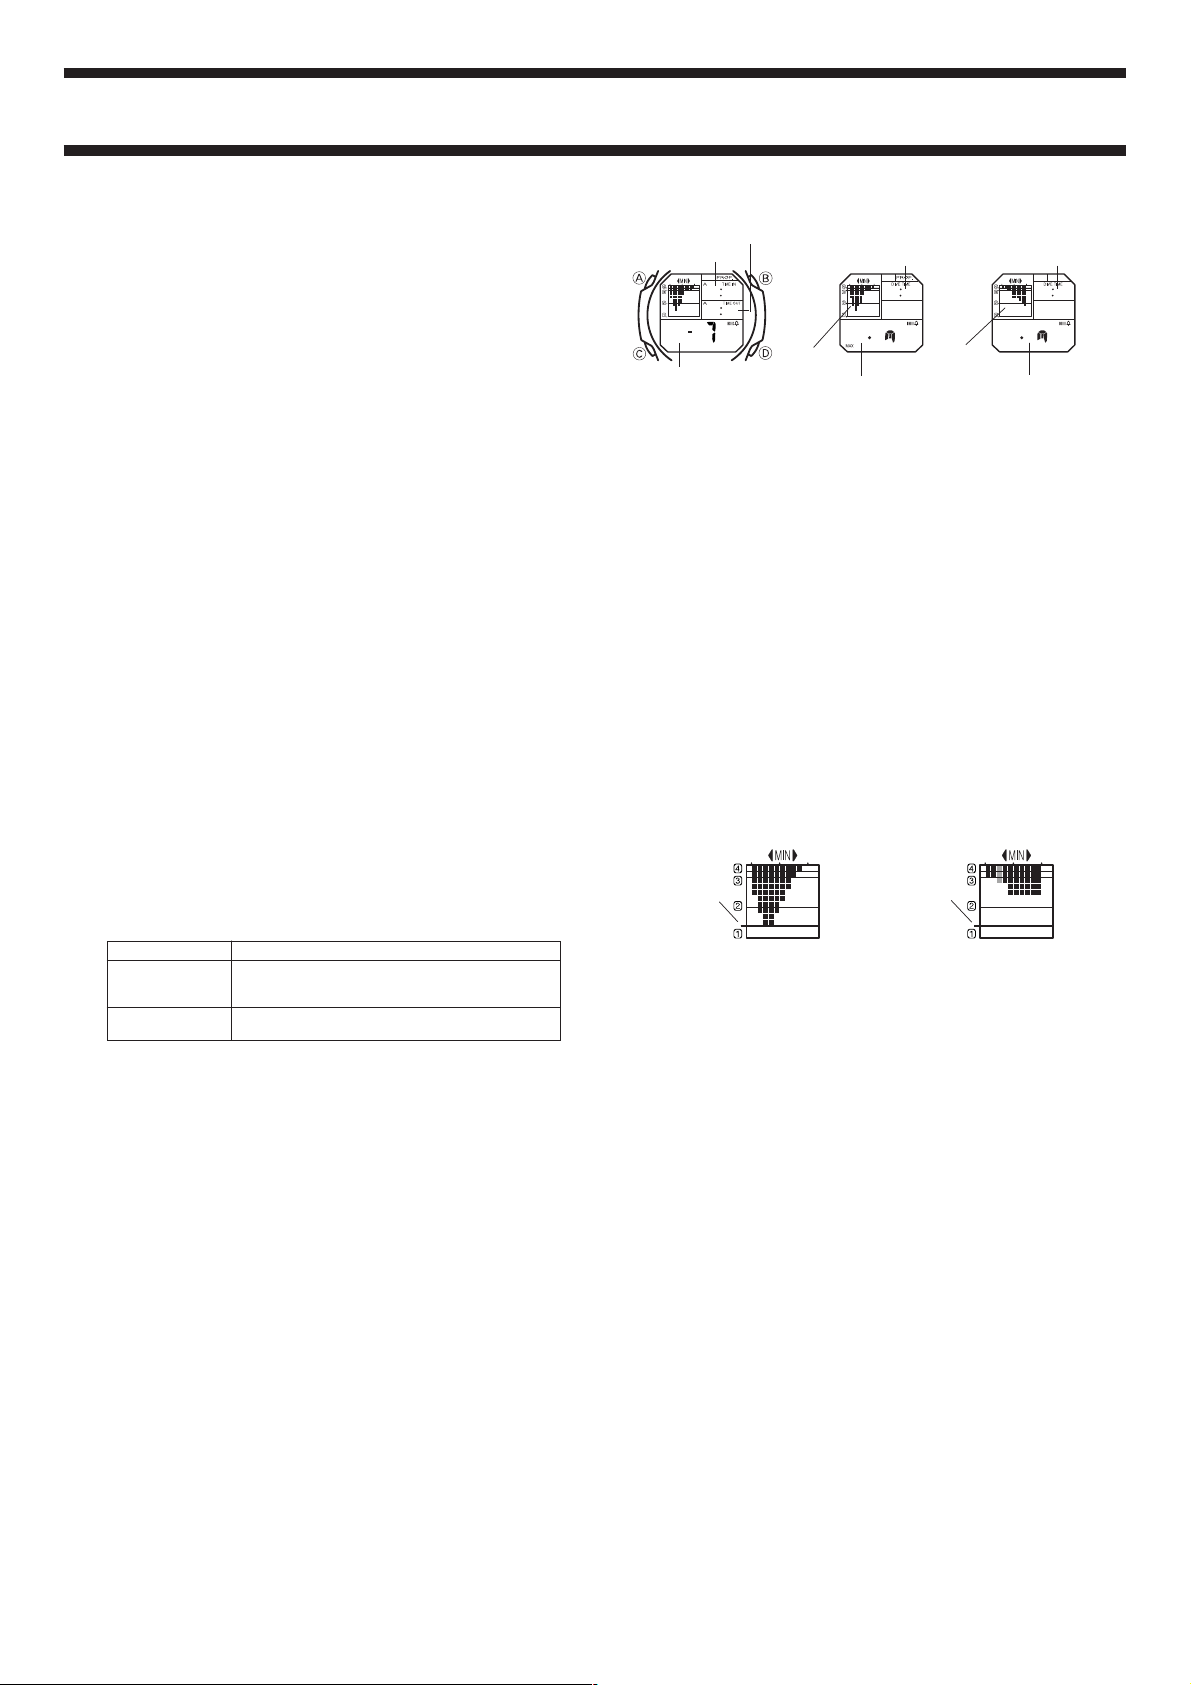
Interpreting the Dive Profile Graph
The Dive Profile Graph assigns a value of 10 to the maximum depth value of
the currently selected log data, and then plots all other depths relative to the
maximum. The appearance of the Dive Profile Graph depends on whether
you are viewing it on the Maximum Depth screen or the Dive Profile Data
screen.
• On the Date screen and Maximum Depth screen, the Dive Profile Graph
shows data from the beginning of the dive up to the 50th minute of the
dive, in five-minute intervals. The maximum depth reached during each
five-minute interval is used for graphing.
• On the Dive Profile Data screen, the Dive Profile Graph shows data from
the beginning of the dive up to the 100th minute of the dive, in one-minute
intervals. The bar in the graph that represents the currently displayed
elapsed time minute flashes.
DIVE PROFILE
When you exit the Diving Mode after a valid dive, the watch stores the
following Dive Profile data in memory, in addition to the log data.
As its name suggests, Dive Profile data provides a record of the maximum
depth reached during each minute of a valid dive.
Item
Elapsed Time
Depth Readings
• The depth readings of the Dive Profile are used to generate a Dive Profile
Graph.
• Dive Profile data memory allows up to 100 minutes duration for a single
dive, and can store data for up to 20 dives.
• No more profile data is stored in memory after the RECOVER or BATT
indicator (which indicates that battery power is weak) appears on the
display during a dive.
• This time indicates the minute from the start of the dive
for whose depth reading is on the display.
• Elapsed time is recorded as hours and minutes.
• Maximum depth reached during the minute indicated by
the elapsed time reading.
To recall Dive Profile data
1. Use C to enter the Dive Profile Mode.
• At this time, the Date screen for the log data that was displayed the last
time you exited the Recall Mode appears on the display for about three
seconds. After that, the display switches to the Maximum Depth screen for
that log data.
• Pressing A while the Maximum Depth screen is on the display changes to
the Date screen for about three seconds.
2. Use D (new ➞ old) and B (old ➞ new) to display the Date screen of the
Dive Profile data you want to view.
3. While the Maximum Depth screen is on the display, use D (+) and B (–)
to change to the Dive Profile Data screen and scroll through the Dive
Profile data (depth readings) minute-by-minute.
Description
Dive Profile screenDate/Maximum depth screen
500 100
Maximum depth
boundary line
• Dive Profile data past the 50th minute of the dive is not shown on the Dive
Profile Graph of the Date screen and Maximum Depth screen.
• If the maximum depth of a dive exceeds 80 meters (263 feet), graph data
will go past the maximum depth boundary line.
• Dive Profile data (including the Dive Profile graph) is deleted whenever you
use the procedure under “To delete log data” to delete the corresponding
log data.
Maximum depth
boundary line
COMPARTMENT NITROGEN LOADING GRAPH
Important!
• Be sure to read this section carefully before using the Compartment
Nitrogen Loading Graph.
During a dive, the diver breathes air (or some mixture of gasses) that is
pressurized in accordance with the dive depth. Breathing air or other gas
while the body is under pressure causes gas to be dissolved into the body’s
blood and tissues. The deeper the dive (and the greater the pressure) and
the longer the dive, the greater the uptake of gas into the body’s tissue. In
dives that use air or nitrox (a mixture of nitrogen and oxygen), tissue nitrogen
uptake can cause a painful condition called “decompression sickness
syndrome” (DCS). To protect against DCS the prudent diver must formulate
and follow a diving plan that takes tissue nitrogen uptake and elimination into
consideration. This watch displays a graph of reference data that shows the
tissue nitrogen uptake based on compression theory.
Halftime Model
The term “halftime” refers to half the time it takes for gas (such as nitrogen)
dissolved tissue to equilibrate to a new pressure, or to reach full saturation at
a new pressure. Theoretical tissue half times are used in designing dive
tables and algorithms for dive computers.
Nitrogen dissolves into tissue very quickly at first, with the rate gradually
slowing as the uptake amount increases, until is become extremely slow at
the point of full saturation. The actual full saturation point depends on the
ambient water pressure. Full saturation half time is half the time it takes to
reach full saturation.
Figure 1 shows the saturation of tissue with nitrogen in graphic form. Figure 2
shows the inverse as nitrogen is eliminated a low pressure.
Page 5

2172-5
4.0 PN2 (i)
3.0 PN2 (i)<4.0
2.8 PN2 (i)<3.0
2.6 PN2 (i)<2.8
2.4 PN2 (i)<2.6
2.2 PN2 (i)<2.4
2.0 PN2 (i)<2.2
1.8 PN2 (i)<2.0
1.6 PN2 (i)<1.8
1.4 PN2 (i)<1.6
1.2 PN2 (i)<1.4
1.05 PN2 (i)<1.2
Not shown – PN2 (i)<1.05
Halftime Compartments
5-minute
10-minute
20-minute
40-minute
60-minute
80-minute
120-minute
240-minute
320-minute
Sea level nitrogen
level × 4
Sea level nitrogen
level × 3
Sea level nitrogen
level × 2
Sea level nitrogen
level
Pressure at current depth
Figure 1: Tissue Nitrogen Uptake Graph
Nitrogen level
Saturation Value
Saturation
half value
Time
Halftime (Saturation)
Half the time it takes to achieve maximum saturation.
Figure 2: Tissue Nitrogen Elimination Graph
Nitrogen level
Saturation Value
Saturation
half value
Time
Halftime (Saturation)
Half the time it takes to achieve elimination of nitrogen.
Note
The solubility of blood and other bodily fluids is directly proportional to
ambient pressure. When diving, the nitrogen uptake of the body’s tissues is
also directly proportional to ambient pressure.
Normally, tissue nitrogen uptake is expressed in terms of the pressure of
nitrogen, or nitrogen component pressure. The atmospheric pressures of
nitrogen and oxygen are proportional at a ratio of 8-to-2 as shown below.
Depth
Sea level (1 atm)
10 meters (2 atm)
atm = atmospheres
This nitrogen component pressure corresponds to the nitrogen component
pressure in the air we breathe, and nitrogen is dissolved into body tissue in
accordance with the graph in Figure 1, until it ultimately reaches the
saturation level for the nitrogen component pressure value of the air being
breathed.
How nitrogen is dissolved into and eliminated from human tissue is very
different depending on the type of the tissue in question. Highly vascular
tissue (tissue that contains many blood vessels) tends to absorb nitrogen at a
faster rate while submersing and to eliminate it more quickly when the diver
surfaces, and so it is called “fast tissue.” Fast tissue also has a relatively high
tolerance for excess nitrogen.
As can be expected from the above, tissue that is less vascular is “slow
tissue,” because it is slower to absorb nitrogen under high pressure and to
eliminate it at lower pressure, and it has a relatively low tolerance for excess
nitrogen.
All of this means that fast tissue has a short halftime and slow tissue has a
long halftime.
Of course, the human body is composed of various types of tissues, ranging
from the fastest to the slowest, with variations in between. That is why the
body is divided into a number of theoretical “compartments” that are assigned
halftimes for nitrogen uptake and elimination values for the purposes of
calculating decompression.
This watch uses nine compartments with halftimes of 5, 10, 20, 40, 60, 80,
120, 240, and 320 minutes.
Figures 3 and 4 below illustrate nitrogen uptake and elimination for each of
these nine times.
Nitrogen Component
Pressure
0.8 atm
1.6 atm
Oxygen Component
Pressure
0.2 atm
0.4 atm
Figure 3: Nitrogen Uptake
Tissue Nitrogen Pressure
5-minute
compartment
10-minute
compartment
20-minute compartment
40-minute compartment
60-minute compartment
80-minute compartment
120-minute compartment
240-minute compartment
320-minute compartment
Time
Figure 4: Nitrogen Elimination
Tissue Nitrogen Pressure
320-minute compartment
240-minute compartment
120-minute compartment
80-minute compartment
60-minute compartment
40-minute compartment
20-minute compartment
5-minute
compartment
• This watch incorporates the latest thinking on decompression theory that
uses a safety factor to adjusts nitrogen elimination halftimes so they are
relatively longer than uptake halftimes.
Important!
• It should be noted there that tissue compartments are theoretical divisions
for calculating estimated nitrogen uptake and elimination. They do not refer
to any specific organs within the human body.
Caution!
• The Compartment Nitrogen Graph of this watch does not show nondecompression pressure limits.
• Compartment Nitrogen Graph data is based on numeric calculations
performed using depth, dive time, and halftime. Always keep in mind that it
shows theoretical representations of the levels of nitrogen contained in the
body of the diver.
10-minute
compartment
Time
Compartment Nitrogen Loading Graph
This section explains the information that appears on the Compartment
Nitrogen Loading Graph and how to interpret it.
Horizontal Axis: Compartments
Vertical Axis: Nitrogen level (relative pressure when sea level = 1)
In the Diving Mode, the two dot segments on the left indicate pressure at the
current depth.
PN2 (i): Tissue compartment nitrogen level (pressure)
(Relative pressure when sea level = 1)
Page 6

2172-6
Nitrogen uptake continues in the direction of the
nitrogen component pressure for normal air.
Depth
30m
15m
5m
Dive time
A short ascent causes elimination
at the 5-minute compartment only.
Gradually
approaches
saturation.
Nitrogen component
pressure corresponding to current depth.
Dive has not started yet, so there
is almost new nitrogen uptake.
Rapid nitrogen
uptake
Nitrogen
component
pressure at
current depth
Details
The tissue nitrogen uptake level
rises and falls to equilibrate with
nitrogen component pressure
at the current depth.
The speed of change is faster on
the left side of the graph and
slower on the right side.
Nitrogen level rises
Nitrogen level drops
Nitrogen uptake continues in
the direction of the nitrogen
component pressure for
normal air.
Nitrogen is slowly
eliminated in the
direction of the
nitrogen component
pressure for
5 meters.
Depth
Dive time
Rapid nitrogen uptake
Dive has not
started yet, so
there is almost
new nitrogen
uptake.
Uptake continues very gradually.
Gradually approaches saturation.
Nitrogen uptake continues
in the direction of the nitrogen
component pressure for normal air.
Nitrogen is slowly
eliminated in the direction
of the nitrogen component
pressure for 5 meters.
20m
5m
Depth
Time
Dive ends
Surface interval
Immediately
prior to dive end
One hour later
Three hours later
Dive
Nitrogen is eliminated from fast
tissue (with short halftime) quickly.
Nitrogen is eliminated from slow
tissue (with long halftime) slowly.
As can be expected according to the nitrogen uptake characteristics
illustrated in Figure 1, the left side of the graph climbs steeply when
submersing, with the upward slope flattening out as you move to the right.
Conversely, the left side of the graph when surfacing drops steeply and
flattens out as you move to the right, as indicated by the nitrogen elimination
characteristics illustrated in Figure 2.
The markers change position as
the depth of the dive changes.
This side rises steeply
when submersing.
This side drops steeply
when surfacing.
The slope on this side
both while submersing
and surfacing is very
gentle.
Super Saturation and Non-decompression Diving
Nitrogen dissolved in blood and tissue remains in
the body of the diver after the dive is complete, as
indicated by the dark segments on the graph. When
the pressure of the dissolved nitrogen is higher than
the pressure of the gas at one atmosphere (ambient
pressure), it creates an unstable situation known as
“super saturation.”
The human body is able to withstand a certain
degree of super saturation. Fast tissue (short
halftime) is able to withstand super saturation best,
while slow tissue less able to withstand super
saturation.
Any dive in which the super saturation limit of the
human body is not exceeded is called a “non-
decompression” dive.
Fast tissue is able to
withstand super
saturation best.
Slow tissue is less able
to withstand super
saturation.
Display Examples
Example 1: Relatively Deep Dive
Example 2: Relatively Long Dive
Important Precautions about Non-decompression
Diving and the Compartment Nitrogen Loading Graph
Super saturation nitrogen levels for each
halftime tissue compartment, as well as
the boundary between non-decompression diving and decompression diving are
all greatly influenced by individual
physical condition, environmental
conditions, etc. Consequently, this watch
does not define the boundary between
non-decompression diving and decompression diving.
Standard diving computers and dive
tables normally set the boundary from a
point around three to four times sea level,
to a point around 1.5 to 1.8 times sea
level for slow tissue. Applying this to the
Compartment Nitrogen Loading Graph of
this watch produces a graph like the one
nearby.
It is important to note that the above graph does not guarantee that you can
dive safely within the area marked non-decompression diving without
decompression. The boundary between non-decompression diving and
decompression diving are all greatly influenced by individual physical
condition, environmental conditions, etc. In addition, the data produced on the
graph of this watch does not take factors such as rate of ascent into
consideration. Ascending too quickly from a dive creates a dangerous
situation regardless of nitrogen levels.
Nitrox Diving
• In the case of nitrox diving, the boundary between non-decompression
diving and decompression diving must be shifted upwards because the
nitrox gas mixture has a higher oxygen percentage than found in ordinary
air.
• The Compartment Nitrogen Loading Graph assumes that you are breathing
normal air both underwater and on the surface. With nitrox diving, you are
breathing nitrox underwater and normal air on the surface, to the accuracy of
simulations tends to deteriorate as the number of repeat dives increases.
With nitrox diving, the actual nitrogen uptake level is less than that indicated
by the simulation.
• Never attempt to perform nitrox diving without going through the required
special safety training first.
Non-decompression dive
Decompression dive
The boundary shown
here is one example
intended for reference
purposes only.
Example 3: Surface Interval Time
Safety Stops and the Nitrogen Graph
Note
The boundary shown here is an example intended for reference purposes
only.
Approaching too close
to the boundary does
not allow a margin of
safety.
Nitrogen uptake volume close to
boundary value (surfacing without
safety stops)
Diving to relatively deep depths causes a large volume of nitrogen to be
dissolved quickly into fast tissue, which means that the non-decompression
limit is reached relatively quickly. Surfacing too quickly even when diving at
non-decompression depths, for example, does not provide a margin of error
(above graph on the left). Normally, a safety stop of about five minutes should
be taken even for non-decompression diving at relatively shallow depths of
around five meters. A safety stop of only five minutes provides a margin of
safety that allows even slow tissue to eliminate nitrogen.
All of this means that surfacing too quickly without allowing nitrogen to be
dissipated properly is dangerous, and staged decompression is required
when performing decompression diving.
Nitrogen uptake volume that allows
a margin of safety (surfacing with
safety stops)
Allows a margin
of safety.
Page 7

2172-7
Repeat Diving and the Nitrogen Graph
• The boundary shown here is an example intended for reference purposes
only.
Example: At the end of repeat diving
Repeat diving over a long period causes
nitrogen to build up in slow tissue.
Repeat diving causes nitrogen to build up in slow tissue. Even if each dive is
relatively shallow, repeat diving over a number of days can cause safety
problems due to build up of nitrogen in the body.
Slow tissue in particular has a very narrow margin for nitrogen saturation.
Because of this riding in an aircraft after repeat diving can cause a drop in
pressure and create a dangerous situation.
Example: After a 12-hour surface interval
(On land)
Boundary value
Margin
Very narrow margin for
nitrogen saturation
• Low pressure in an aircraft can cause a relative drop in the boundary,
which results in values exceeding the limit.
Example: After 12-hour interval time
Slow tissue eliminates nitrogen slowly,
even during a long surface interval.
(In an aircraft: 0.8 atmospheres)
Boundary value
Margin
0.8 atm
IMPORTANT POINTS TO REMEMBER
Note the following important points that define the conditions under which the
watch can be used when diving.
• Do not use the watch in temperatures outside the specified operating
temperature range (0
Never use this watch for applications such as “cold water diving” where the
water temperature is extremely low, as resulting readings will be incorrect.
• You cannot exit the Diving Mode while submerged (while 1.0m (4F) or
more is shown as the current depth).
• Avoid using this watch for dives deeper than 80 meters (263 feet).
This watch is designed to measure depths between 0.0 and 80 meters
(263 feet). When a depth of 80 meters (263 feet) is exceeded, the
dEEP appears on the display. Note also that for recreational
message
diving, it is recommended to dive no deeper than approximately 30 meters
(99 feet).
• Calculation is impossible whenever the dive time exceeds 12 hours.
The maximum dive time that can be measured by this watch is 12 hours.
When the dive time reaches 12 hours, the watch automatically stores log
data up to that point and exits the Diving Mode and enters the Timekeeping
Mode. When recreational diving, you should keep your dives to less than
one hour, no matter what the depth.
• This watch cannot be used in helium atmospheres.
Use of this watch in helium atmospheres may result in malfunction or even
damage to your watch.
• This watch does not replace pressure gauges.
This divers watch is designed only as a backup to your standard diving
(skin diving and scuba diving) equipment.
• This watch is not a diving computer.
This watch is not a diving computer for performing decompression
calculations. The data produced by this watch is intended as general back
up for more formal data obtained from other means.
°C to 40°C/32°F to 104°F).
MEASUREMENT ERRORS AND WARNING
INDICATORS
Depth Reading Errors
Operational errors or abnormal environmental conditions can cause incorrect
depth readings, such as –1.0 meter (–4 feet), etc.
These readings may occur when the following conditions exist.
• When the watch is exposed to sudden temperature changes (such as
when it is suddenly submerged after being exposed to direct sunlight for an
extended period) or air pressure
• When the depth reading is mistakenly set to
100
1058
xx
x
2
4
100
10 58
00
2
Since depth reading errors are not caused by malfunction of the watch, depth
measurements and log memory storage continue to be performed after you
reset the depth to
on the display after you reset the depth. Whenever a depth reading error
occurs, exit the Diving Mode to the Timekeeping Mode and then re-enter the
Diving Mode before diving again.
0.0 l (0 F). Note, however, that the “ ” indicator remains
In such cases, a depth measurement
error occurs and the message err
appears on the display for three seconds,
followed by a flashing double warning
indicator (
errors occur on the surface, so the
reading is automatically reset to
after the error display.
Note that appearance of the double
warning indicator indicates a major error
4
in the displayed data, so the data should
be disregarded.
Sensor Errors
Subjecting the watch to very strong impact can
cause the sensor to malfunction in the Diving
100
10 58
xxx
• The “ ” indicator and the z$t err message appear in the Diving Mode
when battery power is too low to power sensor operation.
• If a depth reading error occurs while the temperature where you are using
the watch is outside its specified operating temperature range (0°C to
40°C/32°F to 104°F) causes a sensor error, so only dive time is performed.
• Do not use your watch for diving after a sensor error occurs. Consult
your authorized CASIO dealer or distributor as soon as possible to
arrange for servicing by an authorized CASIO Service Point listed on
the Warranty Card.
Mode. When this happens, an
appears on the display along with the “
indicator, which indicates incorrect data.
• Appearance of an
dive time measurement. Holding down C
for about two seconds to exit the Diving
Mode and enter the Timekeeping Mode
stops the dive time measurement.
Warning Indicators
A warning indicator appears on the display when some abnormality is
detected during Diving Mode measurements. The same warning indicator
also appears when the data is recalled from Log Memory. Note that warning
indicators indicate major data errors, and such data should not be used for
dive planning, etc.
The following table describes the meaning of each warning indicator.
Warning
Indicator
• All applicable indicators appear when more than one error condition occurs
at the same time.
• If the Default Zero Depth Pressure and Depth Error conditions occur at the
same time, the warning indicators show “
appears on the display.
• Frequent appearance of warning indicators can mean that your watch
requires repair. Contact your authorized CASIO Dealer or Distributor to
arrange for repair by an Authorized CASIO Service Point.
Meaning
Default Zero
Depth Pressure
(1.033 kg/cm2)
Depth Error
Sensor Error
Low Battery
Low Battery
• Diving Mode entered while submersed.
• Measured water temperature lower than
–0.1°C/32°F or greater than 40°C/104°F
• Extreme sudden temperature or
pressure change
• Incorrect 0.0 l reset
• Sensor malfunction
• Battery power is low (measurement
functions disabled)
• Battery power is very low (measurement
functions, storage of dive end time and
dive in memory disabled)
0.0 l (0 F) while submerged
). Most of the time, depth
0.0 l
err message
err message starts a
Possible Cause
” and the err message
”
Page 8

2172-8
BACKLIGHT
The backlight uses an EL (electroluminescent) panel that causes the entire
630
20 00
05
1
5
0
Auto light switch on indicator
Turning on the Backlight Manually
In the Timekeeping, Alarm, or Diving Mode, press B to illuminate the display.
• The above operation turns on the backlight regardless of the current auto
light switch setting.
About the Auto Light Switch
Turning on the auto light switch causes the backlight to turn on whenever you
position your wrist as described below in any mode.
• Be sure to wear the watch on the outside of your left wrist while using the
auto light switch.
Moving the watch to a position that is parallel to the ground and then
tilting it towards you more than 40 degrees causes the backlight to turn
on.
Warning!
• Frequent use of the backlight while submerged can run down battery
power to the point that dive data measurement is disabled and proper
dive data storage becomes impossible. Take care that you do not
over use the backlight and that you turn off the auto light switch
whenever you are not using it.
• Always make sure you are in a safe place whenever you are reading
the display of the watch using the auto light switch. Be especially
careful when running, riding a bicycle or motor cycle, driving a car, or
engaged in any other activity that can result in accident or injury.
Also take care that sudden illumination by the auto light switch does
not surprise or distract others around you.
To turn the auto light switch on and off
In the Timekeeping or Diving Mode, hold down D for one second to turn the
auto light switch on (
• The auto light switch on indicator (
while the auto light switch is turned on.
• In order to protect against running down the battery, the auto light switch is
automatically turned off approximately six hours after you turn it on.
display to glow for easy reading in the dark.
The watch’s auto light switch automatically
turns on the backlight when you angle the
watch towards your face.
• The auto light switch must be turned on
(indicated by the auto light switch on
indicator) for it to operate.
• See “Backlight Precautions” for other
important information about using the
backlight.
Parallel to
ground
displayed) and off ( not displayed).
) is on the display in all modes
More
than
40°
WEAK BATTERY POWER
This watch is equipped with flash memory (EEPROM) that is designed to
retain its contents even when the battery goes dead. However, any of the
following conditions can cause corruption or even loss of memory contents.
• Taking the watch apart
• Malfunction or repair of the watch
• Subjecting the watch strong electrostatic charge or impact
• Exposing the watch to temperature extremes (especially extreme cold)
• Improper battery replacement
Low Battery Warning
When battery power drops below a certain
level, a BATT indicator appears on the display
630
20 00
05
1
5
0
Even when battery power is not low, keeping the backlight on too long or
recalling log data for an extended period can cause the RECOVER indicator
to flash on the display. This message appears to let you know that the
operation you are performing is overloading the battery. If you continue with
the high-load operation, the RECOVER indicator will remain on the display
(without flashing) and the following functions will become temporarily
disabled.
• Alarm and Hourly Time Signal
• Backlight
• Sensor operation
• Log data recall
• Diving Mode
The RECOVER indicator will disappear from the display and the above
operations will be re-enabled after the battery recovers to normal levels.
Important!
• In order to avoid possible problems due to a weak battery, we
suggest that you have it replaced (regardless of the low battery
message status) whenever you plan to engage in intensive diving.
• Extensive use of the backlight (more than 50 operations per hour) in the
Diving Mode will cause the RECOVER indicator to flash. Continued
extensive backlight use (more than 20 operations) will cause the
RECOVER indicator to remain on the display without flashing. Memory
data is lost, and dive measurements and backlight operation are disabled
at this time. Because of this, you should stop using the backlight and
terminate your dive as soon as possible after the RECOVER indicator
starts to flash while you are diving.
• Extensive backlight use also runs down the battery. About 50 operations in
one hour in the Diving Mode reduce battery life by about one week.
• Operating the backlight at low temperatures (around 0°C/32°F) can cause
the low battery message to appear, but the message will disappear when
normal temperature is attained. Avoid using the backlight as much as
possible at temperatures outside the guaranteed operating temperature
range (0°C/32°F to 40°C/104°F).
• Be sure to have the battery replaced at least once every two years.
Frequent use of the backlight can cause backlight operation to become
disabled. Have the battery replaced as soon as possible when this
happens.
• If you dive extensively (more than 100 dives per year), you should have
your watch serviced every 100 dives.
• The original battery installed in the watch at the factory loses some
capacity during the time it spends in shipment and on the shelf. Because of
this, the original battery may no provide the normal service life indicated by
the specifications.
Battery replacement should be performed by an authorized CASIO
Service Point only. When replacing battery, the Authorized CASIO
Service Point will also perform a full overhaul, replacing the sealing
material that is vital to the water resistance of your watch. Be sure to
request such servicing through an Authorized CASIO Dealer/Distributor.
and the following functions become disabled.
• Alarm and Hourly Time Signal
• Backlight
• Sensor operation
• Log data recall
• Diving Mode
In addition, timekeeping may become
inaccurate and the watch’s display may fail
entirely.
Page 9

2172-9
REFERENCE
This section contains more detailed and technical information about watch
operation. It also contains important precautions and notes about the various
features and functions of this watch.
Auto Return Features
• If you leave a setting screen (one with flashing digits or other settings) on
the display for two or three minutes without performing any operation, the
watch automatically saves anything you have input up to that point and
exits the setting screen.
• If you leave the watch in the Alarm, Recall or Dive Profile Mode for about
one hour without performing any operation, it automatically changes to the
Timekeeping Mode. The watch also reverts to the Timekeeping Mode if
you leave it with the Diving Mode Surface Screen on the display without
performing a button operation for about one hour after surfacing.
Data and Setting Scrolling
The B and D buttons are used in various modes and screens to scroll
through data on the display. In most cases, holding down these buttons
during a scroll operation scrolls through the data at high speed.
12-hour/24-hour Timekeeping Formats
The 12-hour/24-hour timekeeping format you select in the Timekeeping Mode
is also applied in all modes.
• With the 12-hour format, the P (PM) indicator appears to the left of the hour
digits for times in the range of noon to 11:59 p.m. and the A (AM) indicator
appears to the left of the hour digits for times in the range of midnight to
11:59 a.m.
• With the 24-hour format, times are displayed in the range of 0:00 to 23:59,
without any indicator.
How the Diving Function Works
About depth and water pressure
Water pressure increases with depth. In the case of seawater (specific gravity
= 1.025), water pressure increases by 1 ATM (1.03kg/cm
meters (33 feet) of depth.
This watch makes uses a pressure sensor to measure water pressure and
then converts the pressure measurements to depth readings.
Operation of the pressure sensor and
The watch automatically initializes the depth reading to 0.0 l (0 F) and
starts to take readings whenever you enter the Diving Mode. When you begin
a dive, the sensor automatically takes depth readings and starts the dive
timer, which measures the elapsed dive time. Normally, you should enter the
Diving Mode just before you start your dive.
00
0.
00
Current depth reading (Diving Mode)
The current depth reading displays your dive depth in real time, with the
displayed reading being updated every three seconds. When using the
current depth reading to monitor your ascent, we recommend that you ascend
at a rate of approximately 10 meters (33 feet) per minute (0.5m/2 feet every
three seconds).
Maximum depth reading (Diving, Recall, and Dive Profile
Modes)
In the Diving Mode, the maximum depth reading shows the maximum depth
reached since the start of the dive. In the Recall and Dive Profile Modes it
shows the maximum depth of each log data record.
Average depth reading (Recall Mode)
This reading shows the average depth during each dive. It is calculated by
dividing the total of all the depth readings by the number of readings.
• Since readings at depths less than 1 meter (4 feet) are ignored, you will not
be able to use average depth log data to calculate average air
consumption if tank air is consumed while on the surface.
• If there are any depth reading errors during a dive, the average depth
reading also shows an error, which is indicated by
Valid Dives and Invalid Dives
A single “dive” often consists of several short dives or “legs,” between which
the diver frequently returns to the surface for certain “intervals” between legs.
For a leg to be counted as part of the dive, it must be at least 1 meter (4 feet)
in depth, and last for a duration of more than about two or three consecutive
minutes. Such a leg is called a “valid dive,” while a leg that does not satisfy
these conditions is called an “invalid dive.”
Dive Type Definition Description
Valid Dive
Invalid Dive
• Submerged to a depth of at least
1 meter (4 feet) for a duration of
at least two or three consecutive
minutes
• Submerged depth less than 1
meter (4 feet) and/or for a
duration of less than two or three
consecutive minutes
2
) with each 10
00
ll
00
FF
0
l (
0
F) reset
00
ll
00
FF
xx.xl (xx F).
• Starts measurement of
the surface interval.
• Records log data for the
dive.
• No surface interval
measurement
• No log data recorded
• Note that Invalid Dives made during the surface interval do not affect the
surface interval.
• You can use this watch while skin diving without affecting dive data or
surface interval timing.
• Performing a Valid Dive while Log Memory is full causes the oldest Log
Memory record to be deleted.
Dive Time Calculation
Enter Diving Mode Enter Timekeeping Mode
Current Time
Surface
Depth = 1.0m
Depth
Dive start
When the watch is in the Diving Mode, the diving timer starts automatically
whenever a depth of 1 meter (4 feet) is reached.
Dive end
When the watch is in the Diving Mode, the diving timer stops automatically
when you surface to a depth of less than 1 meter (4 feet).
Dive time
The dive time the total time elapsed at depths of 1 meter (4 feet) or more.
Surface Interval
The timer begins counting the surface interval immediately after you ascend
to a depth less than 1 meter (4 feet). The surface interval is not counted
following an Invalid Dive, and Invalid Dives made during a surface interval do
not affect the surface interval.
Note
• If you switch to the Timekeeping Mode after surfacing, be sure to switch
back to the Diving Mode before starting your next dive. If you stay in the
Diving Mode after surfacing, your next dive will be considered a
continuation of the previous dive, with data being added on accordingly.
• Note that the dive time does not necessarily equal the difference between
the dive start time and the dive end time. This is because dive timer stops
when you surface to a depth above 1 meter (4 feet) (for rests, etc.) The
dive time shows only the time spent submerged at depths greater than 1
meter (4 feet).
00
00
ll
0.
0
l (
00
00
ll
Automatic
The watch automatically resets the current depth reading to 0.0 l (0 F)
whenever you enter the Diving Mode, even if you are submerged at a
different pressure. Because of this, you should avoid entering the Diving
Mode while submerged.
Manual
A10:00 A10:20 A10:30 A10:45
(4ft)
Dive
start
time
20 minutes
Dive time = 35 minutes
00
FF
0
F) Reset
00
FF
00
00
ll
00
0
00
ll
00
l (
0
ll
00
000
10 58
2
FF
l (
0
F) reset
ll
00
FF
FF
F) reset
FF
4
Holding down A for at least two seconds in
the Diving Mode resets the current depth to
0.0 l (0 F). You should manually reset the
current depth whenever the depth reading
shows a value greater than 1 meter (4 feet)
even while you are on the surface. This can
happen when the sensor is subjected to
sudden and extreme temperature changes.
0.
00
00
00
0.
0
00
00
20
Valid
Dive
15 minutes
On the Surface
Submerged
Dive end
time
00
Zero Depth Pressure
• Normally, the watch sets the current pressure reading being produced by
its sensor as zero depth pressure whenever you enter the Dive Mode or
perform a manual reset (as long as the current pressure reading is less
than 1.24kg/cm
interpreted as an increase in depth, relative to the zero depth pressure.
• If the current pressure reading being produced by the sensor is greater
than 1.24kg/cm
is performed, the watch disregards the sensor reading and sets a default
value of 1.033kg/cm
• A warning indicator (
default zero depth pressure is being used to produce depth readings. This
is because depth readings produced using the default zero depth pressure
are not as accurate as depth readings based on actual current pressure as
measured by the sensor.
• Use of the default zero depth pressure occurs in cases when you enter
the Dive Mode (which performs an automatic reset) or perform a manual
0.0 l (0 F) reset operation while submerged.
2
). Any increase in pressure above zero depth pressure is
2
when an automatic or manual 0.0 l (0 F) reset operation
2
as zero depth pressure.
) is shown on the display to let you know when the
Time
Page 10

2172-10
Warning!
• The settings made by a proper automatic or manual
based on the actual temperature and other conditions under which you are
diving at that time, and so they are more accurate.
• The default zero depth pressure values is based on standard diving
conditions that do not take into account actual diving conditions, and so
they are less accurate than readings produced using data obtained by a
0.0 l (0 F) reset.
proper
0.0 l (0 F) reset are
Pressure Measurement Precautions
Temperature extremes
Correct pressure measurement may become impossible when the watch is
exposed temperature extremes, under conditions like the following.
• When the watch is exposed to direct sunlight for long periods
• When the watch is left in a car parked in to direct sunlight for a long time
If the watch is exposed to high temperature, place it into the water for 2 to 3
minutes before using it.
Subjecting the watch to sudden temperature changes can case depth
measurement errors (such as display of a depth of
sea level).
1.0 l (4 F) or greater at
Sudden Depth Changes
Depth readings are taken every three seconds, so the depth reading may
differ from actual depth in cases where sudden changes in depth are
occurring. When using the current depth reading to monitor your ascent, we
recommend that you ascend at a rate of approximately 10 meters (33 feet)
per minute (0.5m/2 feet every three seconds).
High-altitude Diving/Fresh-water Diving
The depth reading is automatically reset to 0.0 l (0 F) whenever you enter
the Diving Mode, so you can use this watch for diving at altitudes. Note,
however, that malfunctions occur when diving at altitudes greater than
approximately 4,000 meters (13,000 feet). Also remember that this watch
bases its calculations on seawater, with a specific gravity of 1.025, so
readings are incorrect for fresh-water diving. When fresh-water diving, you
must assume that you are approximately 2.5% deeper than the depth shown
by this watch.
Example: When the displayed depth is 20 meters, the actual depth is 20 × 1.025
= 20.5 meters.
In all cases, be sure to receive appropriate training before attempting high
altitude or fresh water diving.
Log Memory Precautions
• Log Memory data accompanied by a warning indicator is incorrect and
should not be utilized for dive planning, etc.
• Incorrect battery replacement procedures and servicing of the watch
causes all Log Memory data to be deleted. Be sure to make separate
written copies of all Log Memory data before having your watch serviced.
Helpful Information
About warning indicators
Appearance of a warning indicator ( ) indicates that the applicable data is
incorrect for some reason. When you recall this data in the Recall Mode, the
warning indicator appears along with the problem data.
Abnormal data can be caused by any of the following.
• Operational error (such as entering the Diving Mode while submerged,
resulting in incorrect
• Abnormal temperatures, caused by suddenly submerged the watch after
exposing it to direct sunlight for a long time.
• Low battery warning while diving.
• Sensor error (indicated by
What to do if a low battery warning appears during a dive
The low battery warning message (BATT) protects against a sudden
unexpected loss of battery power. After the low battery warning appears,
however, depth and temperature readings are disabled and only dive time
timing continues. Low battery power can also result in loss of some Log
Memory data.
Registering the correct dive start time
When initially entering the water, especially when jumping in from a relatively
high position, the pressure produced by impact with the surface of the water
can cause the pressure sensor to generate incorrect data. To make sure that
the data for your dive is correct, exit and then re-enter the Diving Mode to
0.0 l (0 F) reset while on the surface.
perform
Preset Log Memory data
The watch comes with sample data for a single dive in Log Memory for
demonstration purposes. To clear this data, hold down A for about two
seconds while in the Recall Mode or Dive Profile Mode.
0.0 l (0 F) reset, etc.).
err message).
Maximum measurable depth
This watch is designed to measure depths between 0.0 and 80.0 meters (0
and 263 feet). Exceeding a depth of 80.0 meters (263 feet) stores the
following data into memory.
Maximum Depth: dEEP
Average Depth: xx.x l (xx F)
The above readings also appear when the applicable Log Memory is recalled.
For recreational diving, you should normally dive no deeper than approximately
30 meters (99 feet).
Temperature Measurement Range
If a temperature measurement falls outside the range of –10.0°C (14.0°F) to
60.0°C (140.0°F), the display shows
xx.x.
Rest times
Note that a dive does not end until you exit the Diving Mode and enter the
Timekeeping Mode while on the surface (depth =
that diving, surfacing, and diving again is regarded as the same dive.
To end a dive and start a new one, return to the surface, exit the Diving Mode
and enter the Timekeeping Mode, and then re-enter the Diving Mode. Your
next dive will be treated as a new dive.
0.0 l (0 F)). This means
Operating buttons underwater
The buttons on your watch can be operated underwater without harming the
watch. However, we recommend that you refrain from doing so for safety’s
sake.
If you forget to enter the Diving Mode before starting a dive
Entering the Diving Mode while submerged sets a preset default value for the
zero depth pressure. Note that resulting data is accompanied by a warning
indicator (
) in the Log Memory, indicating that the data may not be accurate.
What happens to log data and surface interval if you change
the time and date
Log data and surface interval are not affected when you change the time and
date setting after completing a dive.
To extend battery life
Your watch uses most battery power when its pressure sensor is in operation.
Because of this, it is best to enter the Timekeeping Mode immediately after
completing a dive in order to preserve battery power. The number of dives
you make is directly related to the life of the battery, as shown below. Also,
note that battery life is affected by how much you use the backlight.
Number of dives per year Approximate battery life
50 2 years
100 21 months
200 18 months
300 14 month
Based on 50 minutes per dive.
Note
Be sure to have the battery replaced at least once every two years,
regardless of how much you dive. When replacing the battery, your
authorized CASIO Service Point will also perform a full overhaul,
replacing the sealing material that is vital to the water resistance of your
watch.
When taking your watch on an airplane
Although there are no problems with taking your watch on an airplane, you
should note that if you enter the Diving Mode while in the airplane, it will be
impossible to revert to the Timekeeping Mode by holding down C. In this
case, first hold down A for at least two seconds to reset the depth reading to
0.0 l (0 F), and then hold down C for at least two seconds to re-enter the
Timekeeping Mode.
Chambers and other High-pressure Environments
Though this watch is designed for use in underwater and atmospheric
environments up to 20 atmospheres, decompression after exposure to a helium
environment runs the risk of damage to the watch. Because of this, you should
never expose the watch to chamber test or other very high-pressure conditions.
If you enter the Diving Mode while under high pressure, you will not be able to
exit to the Timekeeping Mode by holding down C.
To change the unit of depth measurement
1. Use C to enter the Timekeeping Mode.
2. Hold down A until the seconds digits start
to flash, which indicates the setting screen.
3. Press C 9 times to move the flashing to
the depth unit setting (
4. Press D toggle between the two settings.
5. Press A twice to exit the setting screen.
l or F).
Page 11

2172-11
Backlight Precautions
• The electro-luminescent panel that provides illumination loses power after
very long use.
• The illumination provided by the backlight may be hard to see when viewed
under direct sunlight.
• The watch will emit an audible sound whenever the display is illuminated. It
does not indicate malfunction of the watch.
• The backlight automatically turns off whenever an alarm sounds.
• The backlight illuminates the display for about three seconds in the Diving
Mode, and for about two seconds in other modes.
• The backlight may not turn on immediately after a sensor measurement in
the Diving Mode.
Auto light switch precautions
• Avoid wearing the watch on the inside of your wrist or on your diving
equipment. Doing so causes the auto light switch to operate when it is not
needed, which shortens battery life. If you want to wear the watch on the
inside of your wrist, turn off the auto light switch feature.
More than 15 degrees
too above
• Static electricity or magnetic force can interfere with proper operation of the
auto light switch. If the backlight does not light, try moving the watch back
to the starting position (parallel with the ground) and then tilt it back toward
you again. If this does not work, drop your arm all the way down so it
hangs at your side, and then bring it back up again.
• Under certain conditions, the backlight may not light until about one second
after you turn the face of the watch towards you. This does not necessarily
indicate malfunction of the backlight.
• The backlight may not light if the face of the
watch is more than 15 degrees above or
below parallel. Make sure that the back of
your hand is parallel to the ground.
• The backlight turns off in about two seconds
(three seconds in the Diving Mode), even if
you keep the watch pointed towards your
face.
Calibrating the Temperature Sensor
The temperature sensor of this watch is calibrated at the factory before
shipment and further adjustment is normally not required. If you notice
serious errors in the temperature readings produced by the watch, you can
calibrate the sensor.
Important!
Incorrectly calibrating the temperature sensor can result in incorrect readings.
Carefully read the following before doing anything.
• Compare the readings produced by the watch with those of another
reliable and accurate thermometer.
• If adjustment is required, remove the watch from your wrist and wait for 20
or 30 minutes to give the temperature of the watch time to stabilize.
• Performing temperature calibration while in water of stable temperature
produces more accurate calibration.
To calibrate the temperature
300
• You can calibrate the temperature displayed in step 3 within a range of
±10.0°C (18.0°F).
• Pressing B and D at the same time returns to the factory calibration.
5. Press A to exit the setting screen.
To change the unit of temperature measurement
1. Use C to enter the Timekeeping Mode.
2. Hold down A until the seconds digits start
to flash, which indicates the setting screen.
3. Press A again to move the flashing to the
temperature setting.
4. Each press of D increases the displayed
temperature by 0.1°C (or 0.2°F) while
pressing B decreases it.
1. Use C to enter the Timekeeping Mode.
2. Hold down A until the seconds digits start
to flash, which indicates the setting screen.
3. Press C 10 times to move the flashing to
the temperature unit setting (°C or °F).
4. Press D toggle between the two settings.
5. Press A twice to exit the setting screen.
❑ Are you diving in fresh water?
This watch bases its calculations on seawater, so fresh water diving
produces incorrect depth readings. (See “High-altitude Diving/Fresh-water
Diving”)
Problem: Inaccurate temperature measurements
❑ The temperature value displayed by the watch represents the temperature
of the watch itself. (See “About Temperature Measurements”)
Problem: Log data is not stored in Log Memory
❑ Have your dives been unusually short?
Make sure your dives are Valid Dives. (See “Valid Dives and Invalid
Dives”)
❑ Did the RECOVER or BATT message or a sensor error occur while
you were diving?
Low battery (See “Low Battery Warning”) and sensor error (See “Sensor
Errors”) conditions can cause data to be lost or can disable the recall
function.
When you exit the Diving Mode to the Timekeeping Mode (which stores dive
data in memory) while RECOVER or BATT is on the display, the dive end
time and dive time are shown as x:xx. Also, the Compartment Nitrogen
Loading Graph and Dive Profile Graph are not displayed in this case.
00
11
ll
44
FF
0.
1
l (
4
Problem: Display shows a depth greater than
❑ Correctly perform the
❑ Temperature extremes, especially cold, can cause depth measurement
Problem: Dive time shown in the Log Memory data in the Recall Mode
❑ The dive start and end trigger depth is 1 meter (4 feet), so time you spend
Problem: The alarm and Hourly Time Signal do not sound.
❑ The alarm and Hourly Time Signal are disabled in the Diving Mode and
Problem: Backlight does not operate.
❑ Have you over-used the backlight?
❑ Did you drop the watch or subject it to strong impact?
❑ Does this happen while you are diving?
Problem: Cannot display Log Memory data or Dive Profile data
❑ Display of Log Memory and Dive Profile data is disabled while the
you are on the surface.
Reset”)
error. (See “Depth Reading Errors”)
does not match the difference between the dive start time and
end time.
above that depth is not counted as part of the dive. (See “Dive Time
Calculation”)
when battery power is low.
Frequent use of the backlight can cause it to become temporarily disabled.
(See “Low Battery Warning”)
If so, contact an authorized CASIO Dealer/Distributor as soon as possible
to arrange for repair by an authorized CASIO Service Point.
The backlight temporarily goes off in the Diving Mode if a depth
measurement starts taken during the three seconds that the light is lit.
RECOVER or BATT indicator is on the display. (See “Low Battery
Warning”)
0.0 l (0 F) reset procedure. (See “0.0 l (0 F)
00
11
F) even though
ll
44
FF
Troubleshooting Guide
Problem: Inaccurate depth readings
❑ Make sure you enter the Diving Mode just before starting your dive.
If you change to another mode while submerged, reset the depth again
when you surface. (See “
❑ Was the watch exposed to temperature extremes?
Be especially careful about exposing the watch to direct sunlight during the
summertime. (See “Pressure Measurement Precautions”)
❑ Did you drop the watch or subject it to strong impact?
Subjecting the watch to abnormally strong impact can cause it to
malfunction or fail to operate entirely. When this happens, contact an
authorized CASIO Dealer/Distributor to arrange for repair by an authorized
CASIO Service Point.
0.0 l (0 F) Reset”)
 Loading...