

Page 1
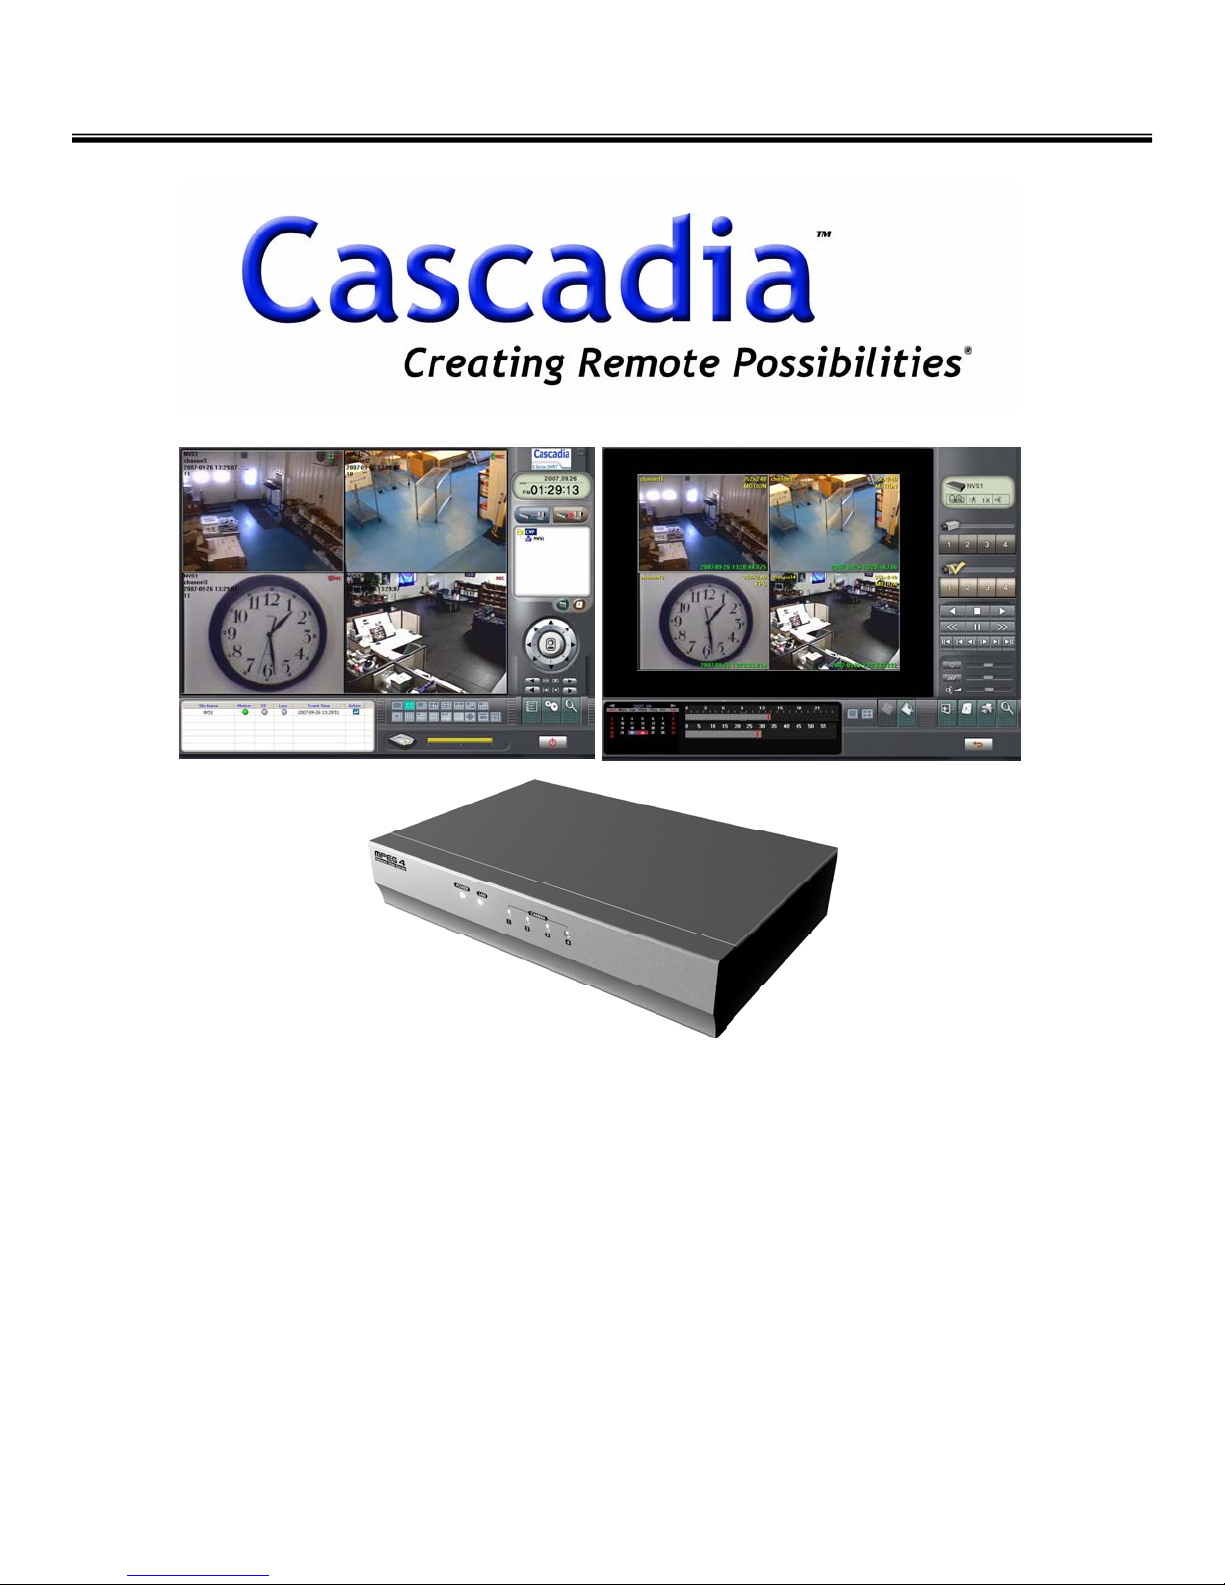
Network Video Server-NVS2004
USER MANUAL
USER MANUAL
Cascadia Video Products
(888) 421-0050
NVS2004
NVS2004
1
Version 1.0.1 Rev 9.27.07
Page 2

Table of Contents
Network Video Server-NVS2004
Introduction
1.1 What Is a Network Video Server (NVS2004)? ------------ 3
1.2 Specifications ------------ 4
Physical Connections
2.1 Front / Rear Panels ------------ 5
2.2 Connection Diagram ------------ 6
Installation
3.1 Identifying Components ------------ 7
3.2 General Network Connection Procedures 8
3.2.1 Connecting NVS To a Local Area Network ------------ 9
3.2.2 Connecting NVS Directly To a PC ------------ 11
3.2.3 Connecting NVS Directly To a xDSL Modem ------------ 12
3.2.4 Connecting NVS Through NAT Router ------------ 14
3.3 Dynamic DNS ------------ 16
Configuring NVS2004
4.1 Configuring NVS2004 ------------ 19
4.2 Basic Setting ------------ 20
4.3 Network Setting ------------ 21
4.4 Motion / Color Setting ------------ 23
4.5 Pan / Tilt Setting ------------ 24
4.6 DI / DO Setting ------------ 25
4.7 User Setting ------------ 26
4.8 System Setting ------------ 27
Viewing Through Web Browser
5.1 Starting Web Viewing Through Web Browser ------------ 28
5.2 Web Viewer Functions ------------ 29
Remote Client Software
6.1 Installing Remote Client Program ------------ 30
6.2 Functions of Live Mode GUI ------------ 31
6.3 Viewing Live Images ------------ 32
6.4 Recording Images ------------ 34
6.5 Searching and Playing Back Images ------------ 35
Cascadia Video Products
(888) 421-0050
2
Version 1.0.1 Rev 9.27.07
Page 3
Network Video Server-NVS2004
INTRODUCTION
1.1 WHAT IS NETWORK VIDEO SERVER (NVS2004)?
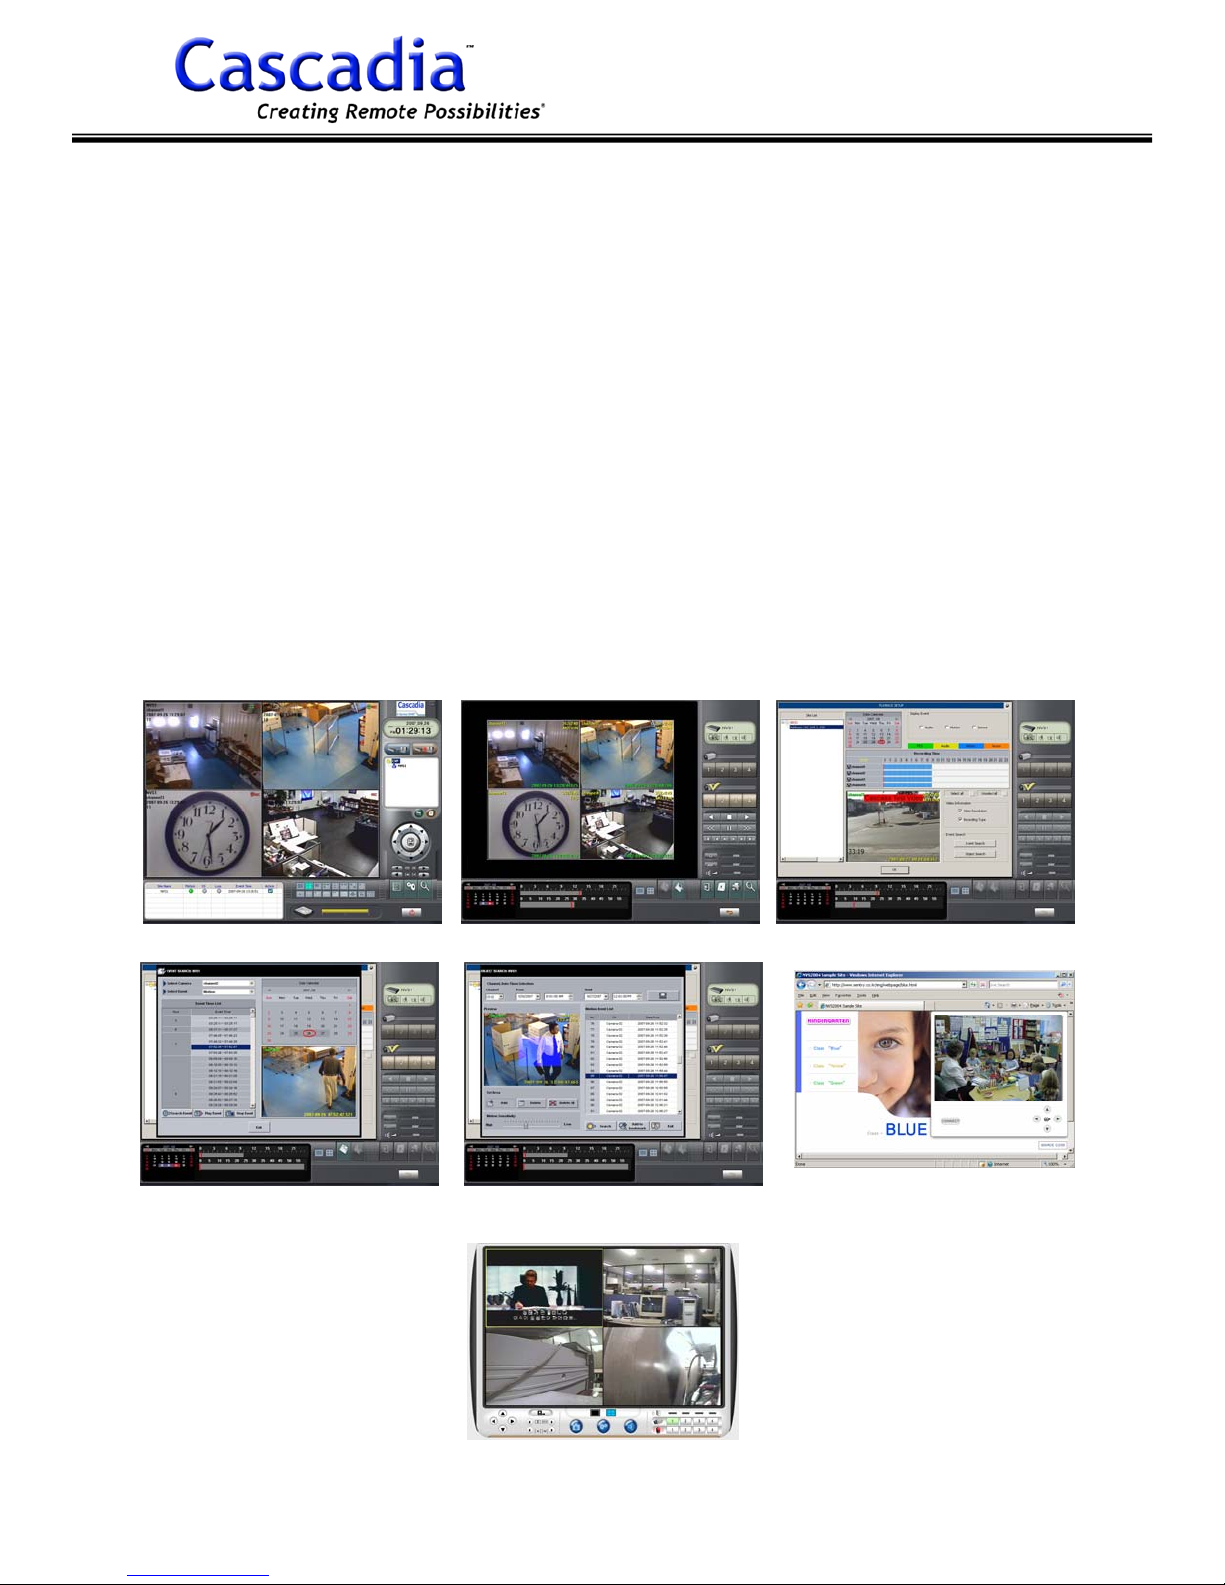
The S-Series NVS2004 is an IP-based surveillance system equipped with built-in web
server, embedded operating system and H/W image compression chip. Users simply
plug in analog cameras and an Ethernet cable to the Network Video Server (NVS2004)
unit to transmit video images over TCP/IP network.
The S-Series NVS2004 is the 4 channel standalone type Network Video Server which
transforms the video signals from analog cameras into digitalized video images. It can
be directly connected to TCP/IP network for delivering converted video images through
high speed network transmission.
Remote users can conveniently access, view and record transmitted video images from
the NVS2004 by utilizing a variety of user-friendly video management tools provided.
Users also can access NVS2004 from standard web browser anywhere using Active-X
based web viewer.
Event Search
Cascadia Video Products
(888) 421-0050
Search Live
Object Search
3
Data Search
Viewer In Web Page
Web Viewer
Version 1.0.1 Rev 9.27.07
Page 4

Network Video Server-NVS2004
Specifications
Hardware
CPU Intel Xscale Processor
Operating System Embedded Linux
Image Compression H/W Mpeg4
Video Input 4 Channel
Audio Input 4 Channel
Video Resolution NTSC ; 352x240/720x240/720x480
PAL ; 352x288/720x288/720x576
Frame Rate NTSC ; 120fps (@352x240)
60fps (@720x240)
30fps (@720x480)
Loop Out 4 Channel
TV Out 1 Port (Quad Mode Display)
Sensor / Alarm 4 Input / 4 Output
PTZ Interface RS485
Data Port RS232
Ethernet Interface RJ-45
Ethernet Protocol TCP/IP, HTTP, SMTP, DHCP, PPPoE
Weight / Dimension 1.6Kg(3.53lbs) 280x196x57mm(11.0"x7.7"x2.2")
Power DC 12V / 3.5A
Operating Conditions Temperature: Humidity:
5°C ~50°C (40°F ~ 125°F) 20%~80% RHG
Management
Installation IP allocation using IP Master
Video Server
Configuration
Event Management Triggered by: Action:
Firmware Upgrade Update download available through website
Web Viewing Supports access through standard web browser
Video Management
Software
Security ID/PW protection for video server access
Uses web-based admin menu
- Motion detection - Store video to FTP
- Sensor input - E-mail notification
- Alarm output
- Access to multiple video servers
- Live view, recording and search for
transmitted video images
PTZ Control - A wide range of PTZ protocols supported
Dynamic DNS Domain name provided for dynamic IP users
Cascadia Video Products
(888) 421-0050
- Load additional PTZ driver from admin menu
4
Version 1.0.1 Rev 9.27.07
Page 5
Network Video Server-NVS2004
PHYSICAL CONNECTIONS
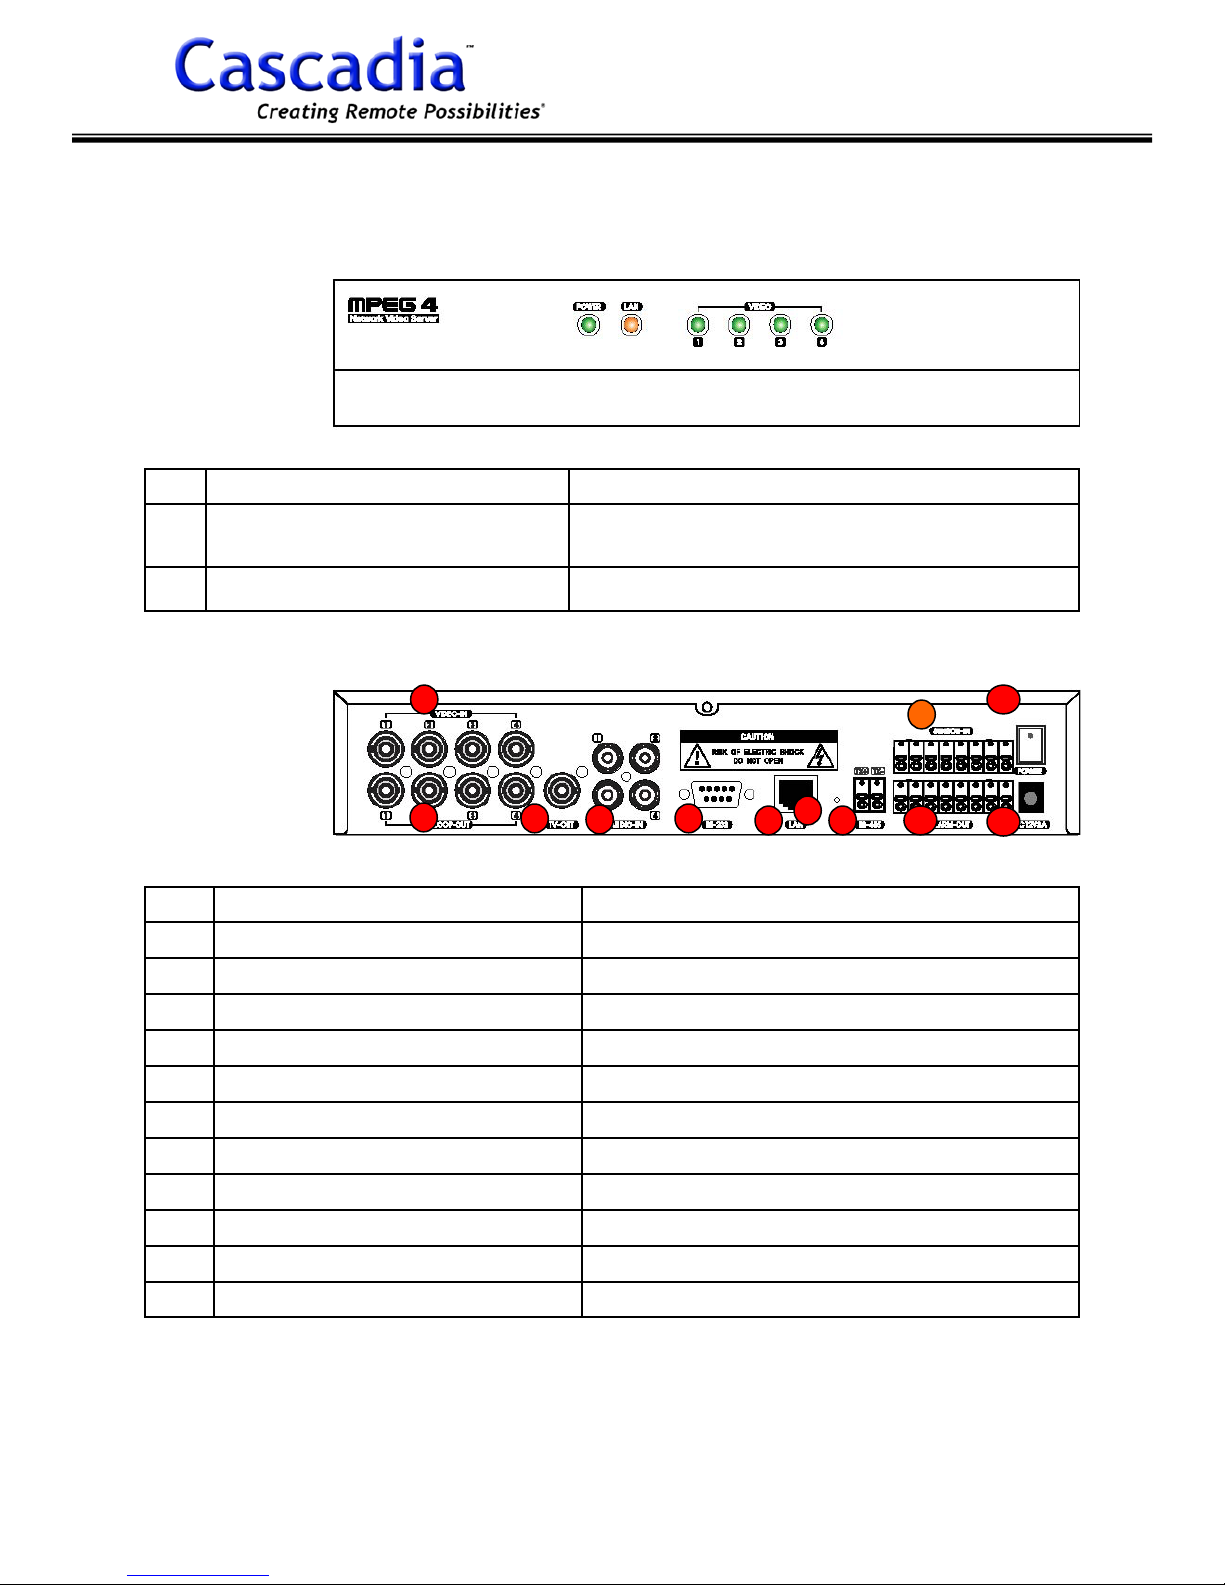
2.1 FRONT / REAR PANELS
Front Panel
1
2
3
Power On (LED) Constantly green when powered on
LAN (LED)
Video Input (LED) Constantly green when video signals are received
Rear Panel
1
2
3
4
5
6
7
8
9
10
11
12
Video-In 4 Channel Analog Camera Input
Loop-Out 4 Channel
TV-Out 1 Port (Quad Mode Display)
Audio-In 4 Channel (Microphone Input)
RS-232 Serial Data Port
LAN RJ-45 Network Jack
Reset Returns Settings to Factory Default
RS-485 PTZ Interface
Sensor-In 4 Channel Digital Input
Alarm-Out 4 Channel Digital Output
DC 12V/3A Power Input
Power Switch Power On / Off
1
2
Network connected : constantly red
Data sending : blinks red
3
4
5
6
7
8
9
10
12
11
Cascadia Video Products
(888) 421-0050
5
Version 1.0.1 Rev 9.27.07
Page 6
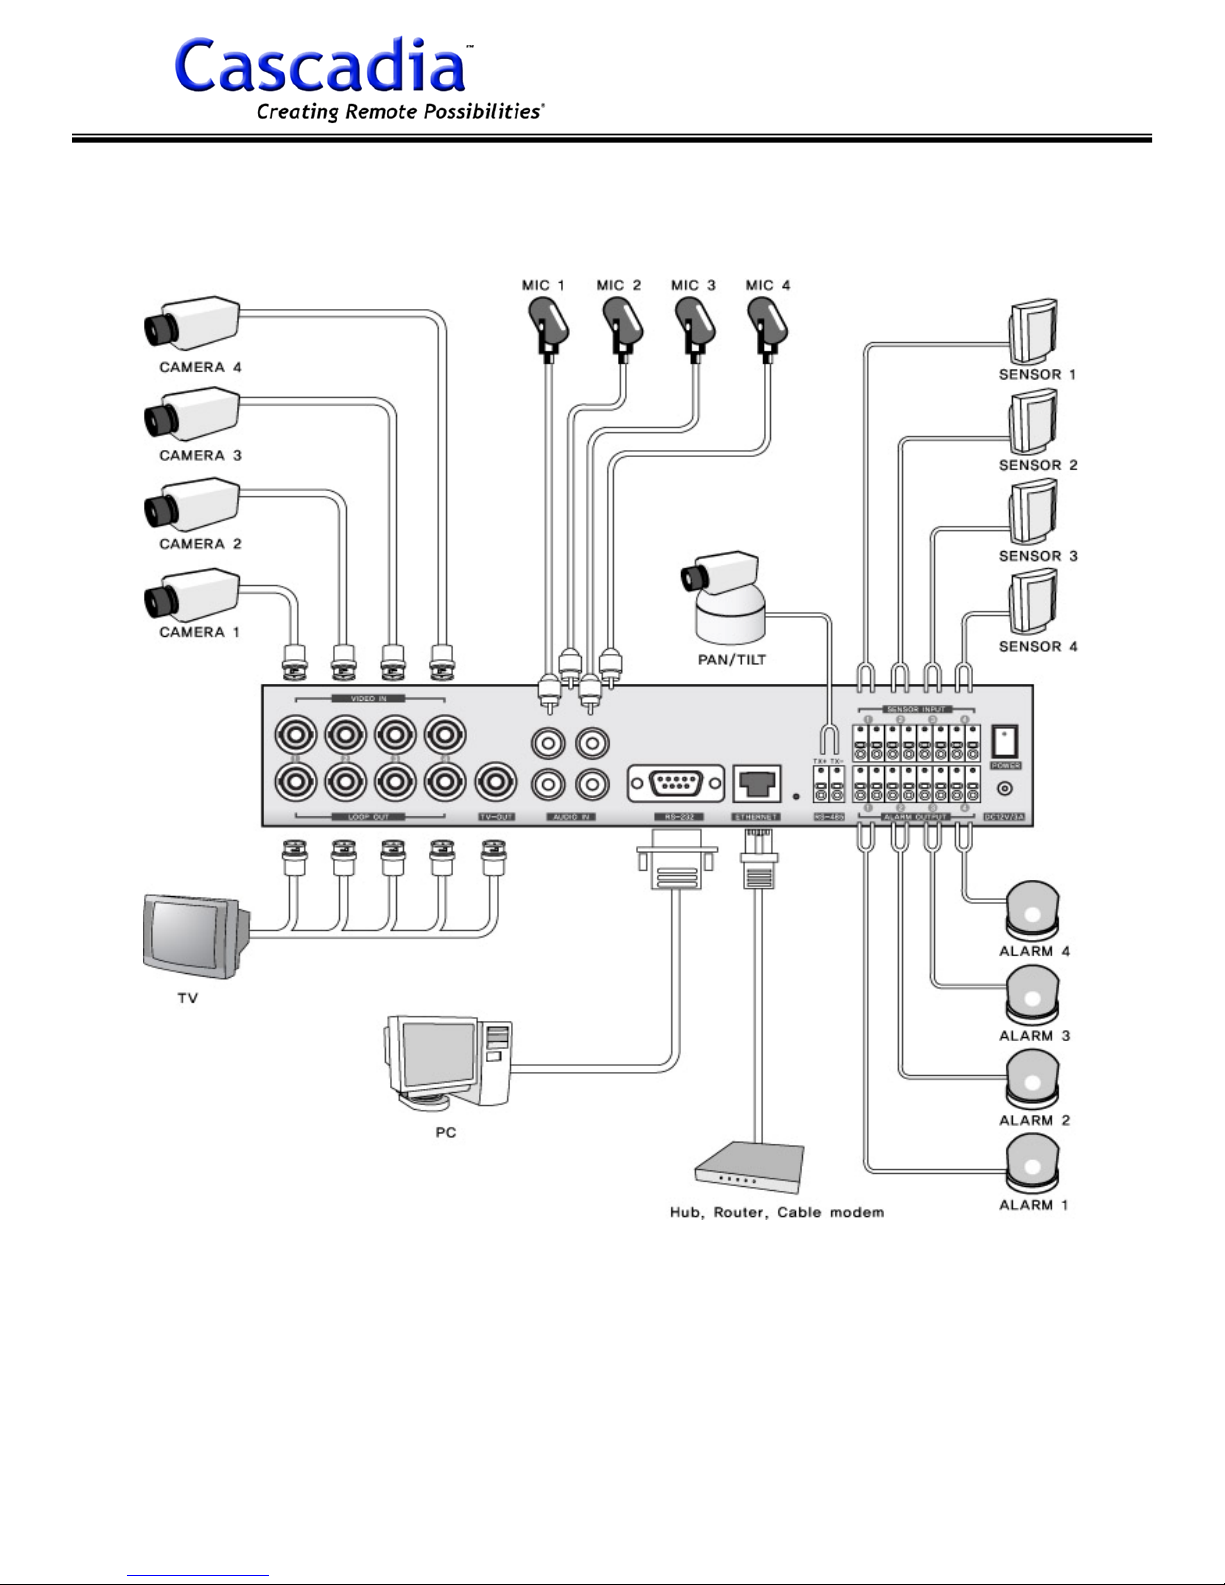
2.2 CONNECTION DIAGRAM
Network Video Server-NVS2004
Cascadia Video Products
(888) 421-0050
6
Version 1.0.1 Rev 9.27.07
Page 7

Network Video Server-NVS2004
INSTALLATION
3.1 IDENTFYING COMPNENTS
The S-Series NVS2004 comes with the items listed below. Identify the following components to make sure everything has been properly included with the product package
provided. If any of the following items are missing, please contact your local distributor.
NVS2004
Crossover Cable
Program CD
Power Adapter
User Manual
Cascadia Video Products
(888) 421-0050
7
Version 1.0.1 Rev 9.27.07
Page 8
Network Video Server-NVS2004
3.2 GENERAL NETWORK CONNECTION PROCEDURES
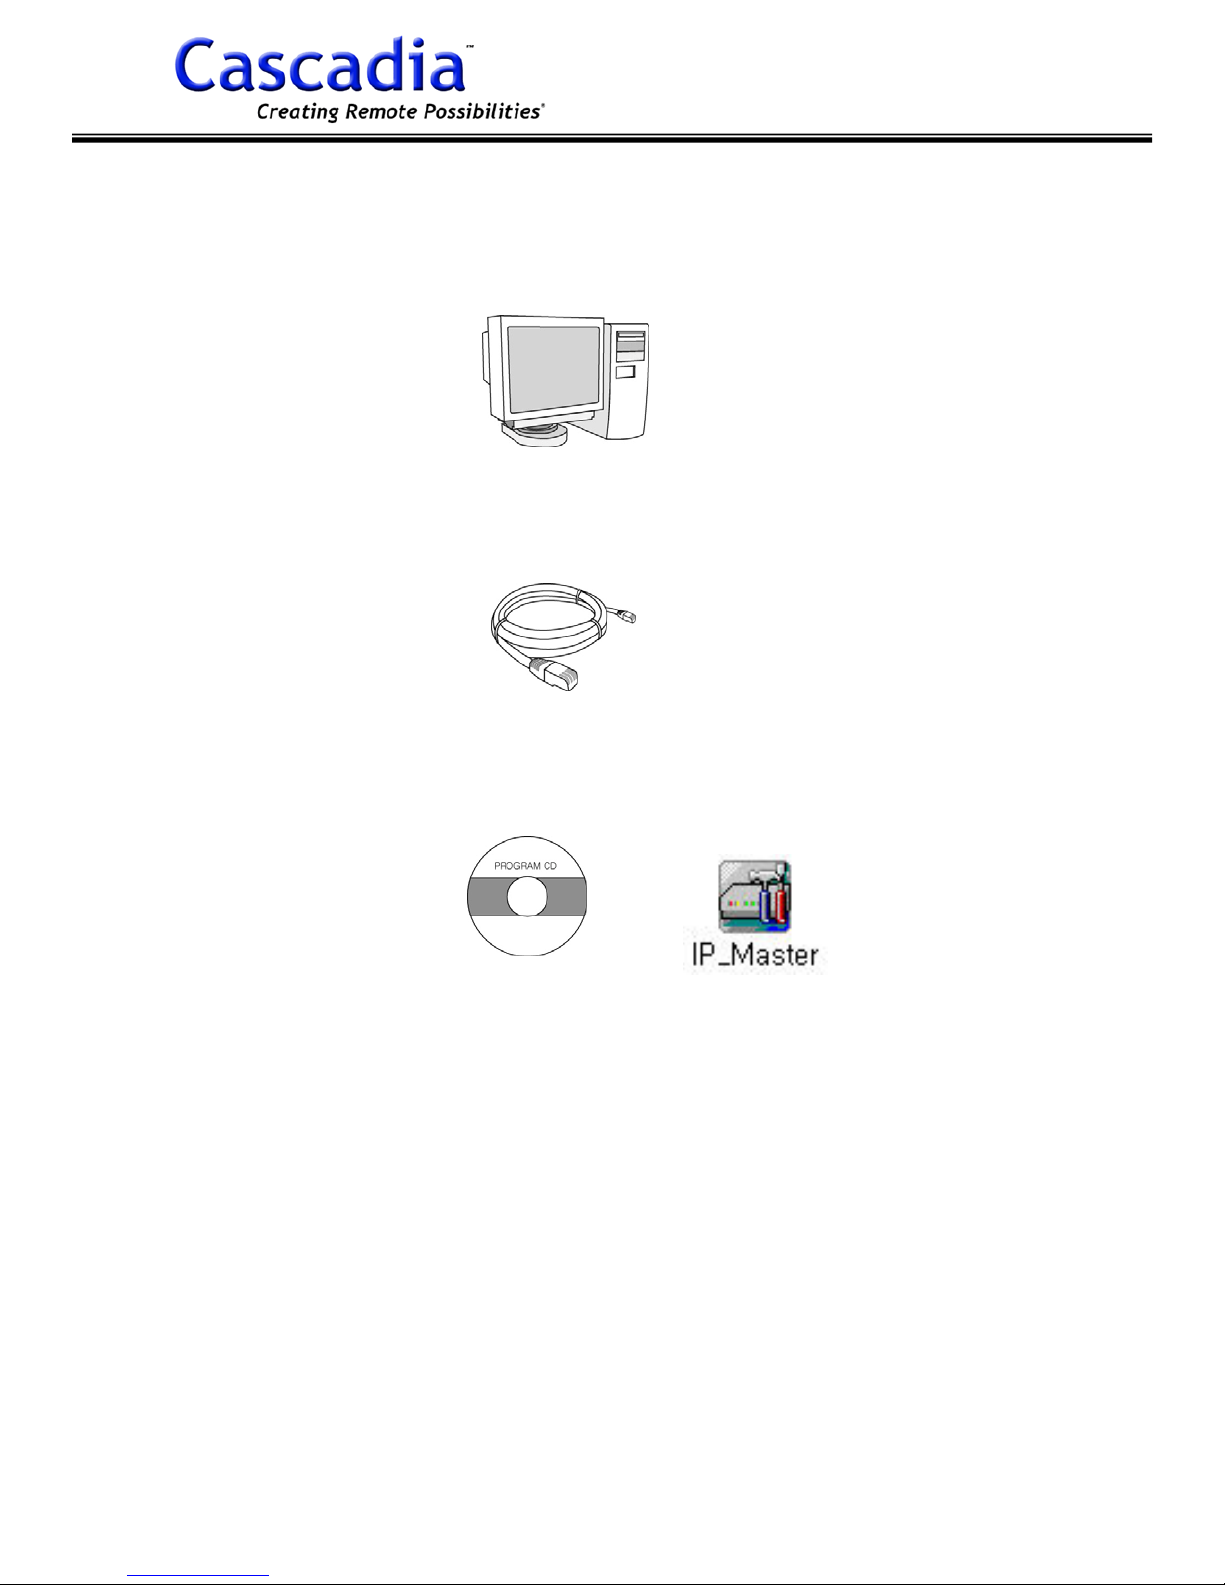
1) Prepare a PC with Ethernet connection.
Installation PC
2) Connect NVS2004 to your network using a Standard CAT5 Cable or to your PC di-
rectly using the cross-over cable provided.
Crossover Cable
3) Run the IP Master program (from the CD provided) on the PC and assign an IP
Address to the NVS2004.
IP Master Program
Note: Different types of network environments require different procedures for
setting up NVS2004’s. Please refer the following four procedures for more
details.
Cascadia Video Products
(888) 421-0050
8
Version 1.0.1 Rev 9.27.07
Page 9
Network Video Server-NVS2004
3.2.1 CONNECTING THE NVS2004 TO A LOCAL AREA NETWORK
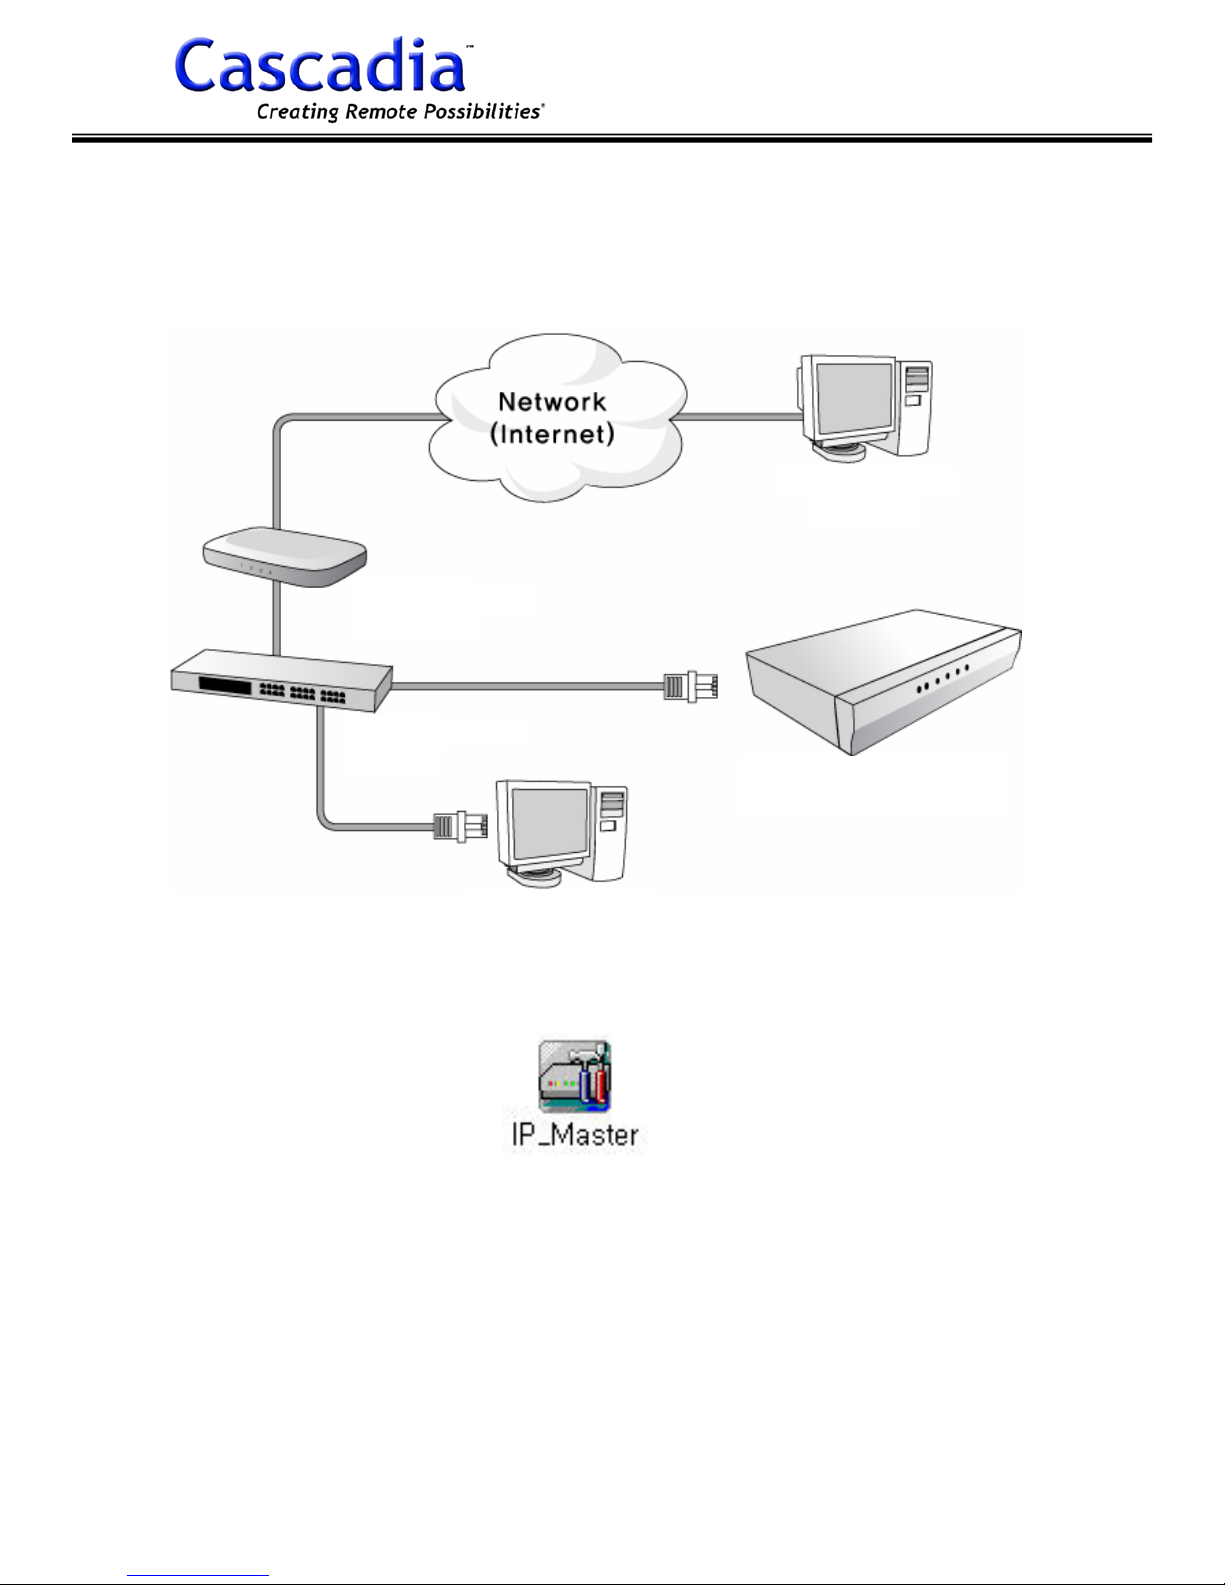
The following procedure describes how to set up the S-Series NVS2004 when
connecting to a local area network.
Remote Client
Router
Network Hub
NVS2004
PC
1) Connect NVS2004 to your network hub with a standard CAT5 cable.
2) Connect the PC to network hub for IP assignment.
3) Run IP Master program from the CD provided on the PC.
Cascadia Video Products
(888) 421-0050
9
Version 1.0.1 Rev 9.27.07
Page 10
Network Video Server-NVS2004
3.2.1 CONNECTING NVS2004 TO A LOCAL AREA NETWORK (cont.)
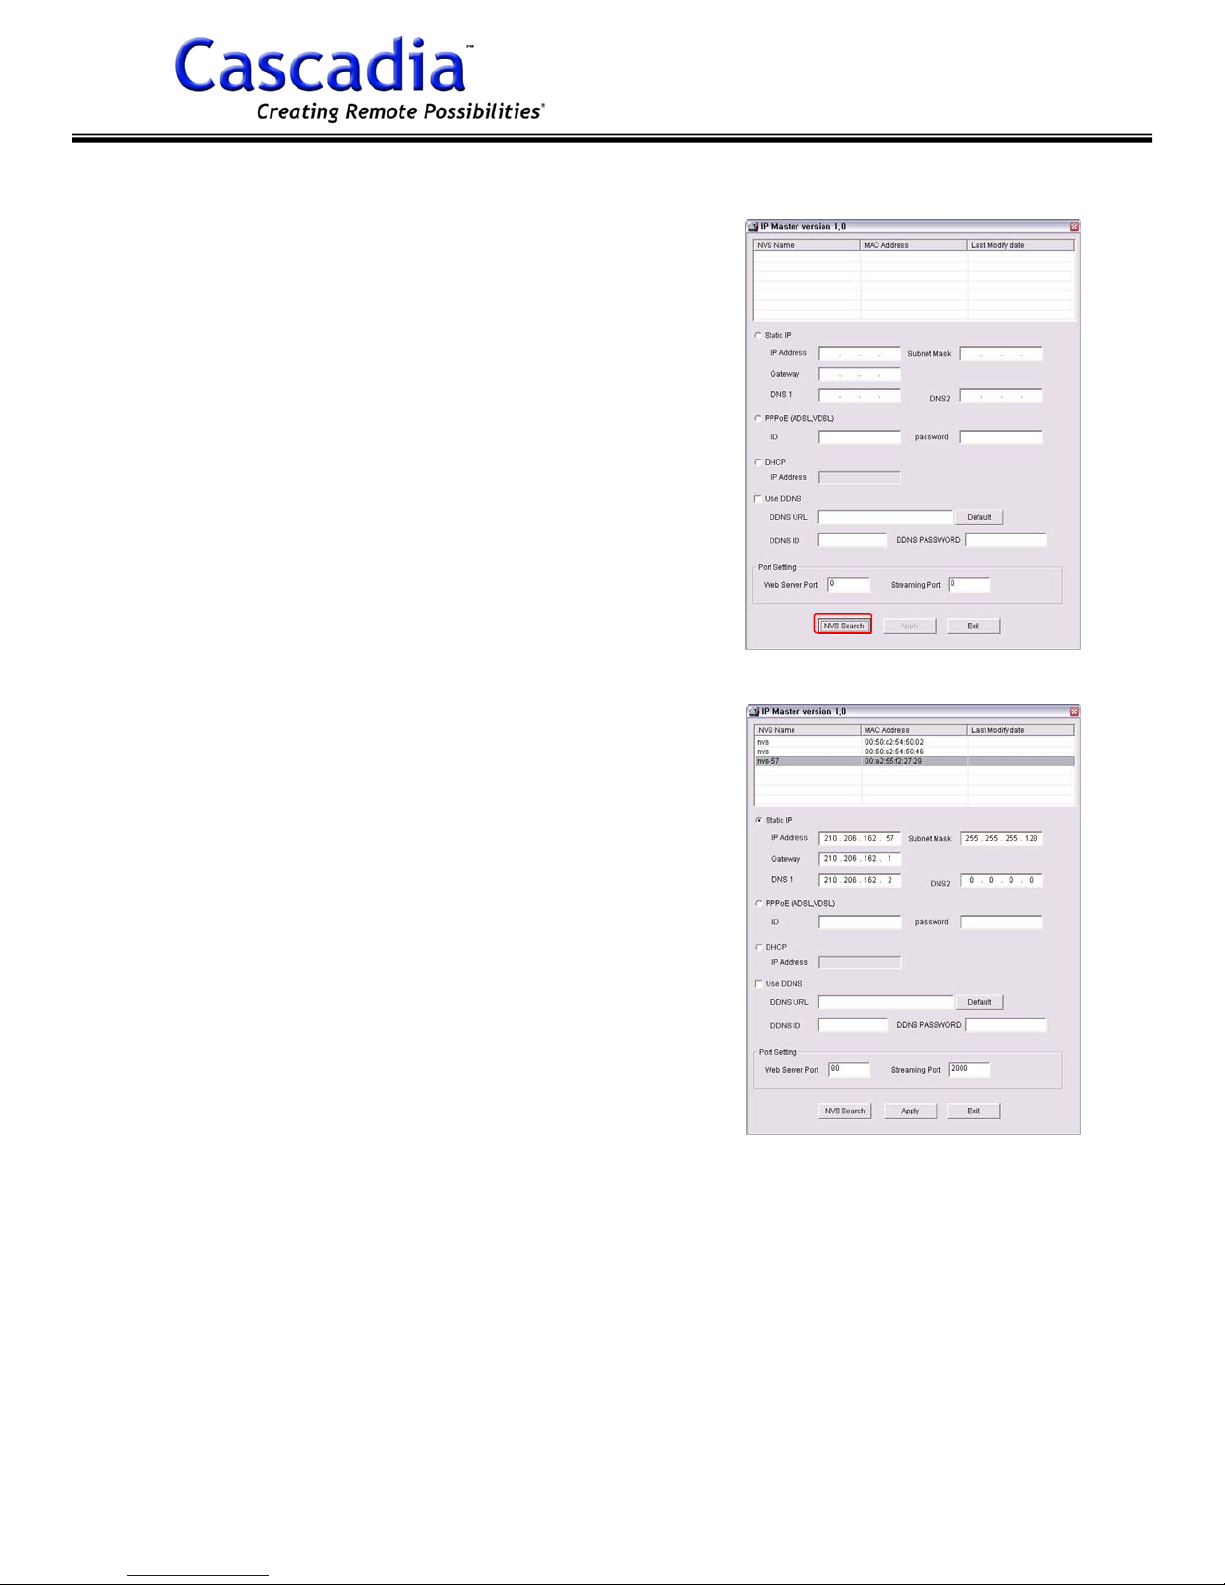
4) Left click “NVS Search” to search the Network
Video Servers in the LAN. Then all Network Video
Servers in the LAN are listed.
5) Select the MAC Address of the NVS2004 you
desire to set from the list.
6) Check on “Static IP” and enter IP Address,
Subnet Mask, Gateway and DNS.
Note: Factory default IP Address is 192.168.10.3.
7) Left click “Apply”. Enter Administrator IP/
Password
and left click “OK”. The NVS2004 will reboot
automatically.
Note: Factory default:
Administrator ID: root
8) Connect the video cables from the cameras to the NVS2004 and use the Web
Viewer to verify the images are transmitting properly.
Note: Open your web browser and enter the URL (ex ; http://192.168.10.3) in the
Address field.
Cascadia Video Products
(888) 421-0050
10
Version 1.0.1 Rev 9.27.07
Page 11
Network Video Server-NVS2004
3.2.2 CONNECTING THE NVS2004 DIRECTLY TO A PC
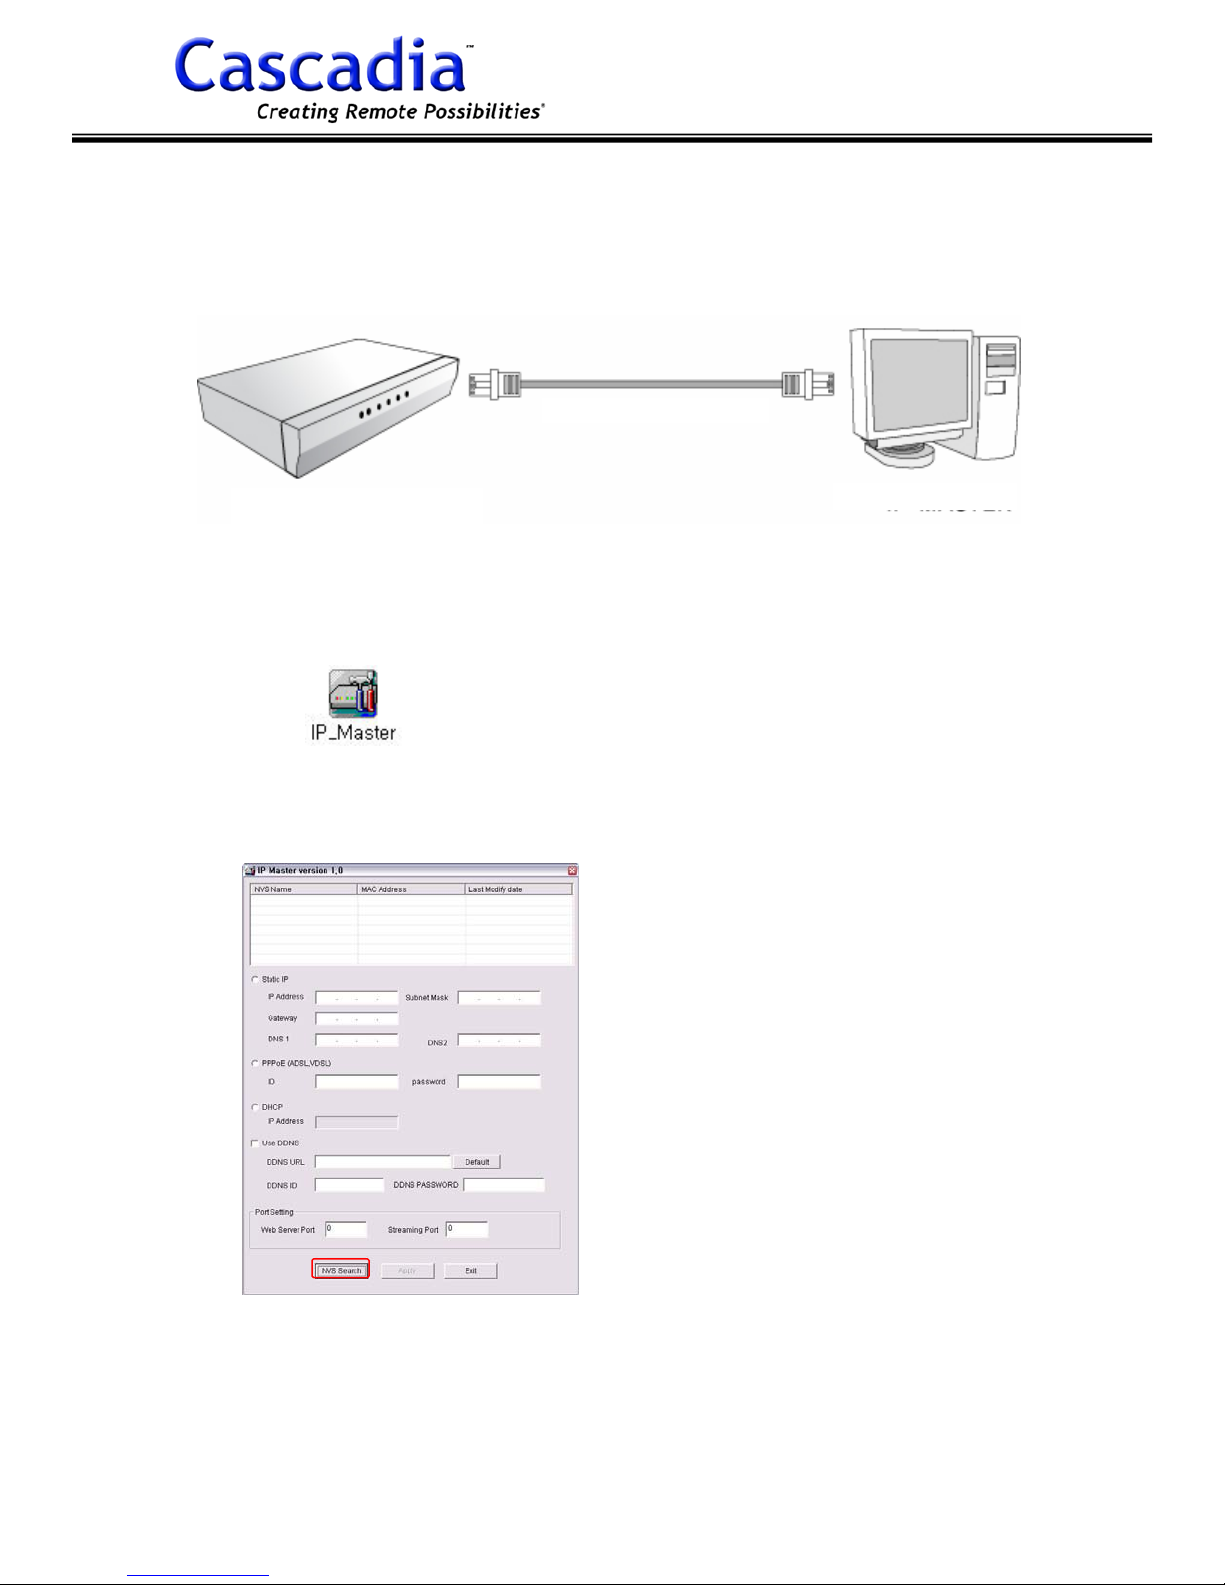
The following procedure describes how to set up the S-Series NVS2004 when connecting it directly to a PC.
Cross-over Cable
NVS2004
1) Connect NVS2004 to the PC prepared by connect cross-over cable.
2) Run IP Master program from the PC.
3) Left click “NVS Search” to search and list the
NVS2004s on the LAN.
PC
4) Select the NVS2004 from the list.
Cascadia Video Products
(888) 421-0050
11
Version 1.0.1 Rev 9.27.07
Page 12
Network Video Server-NVS2004
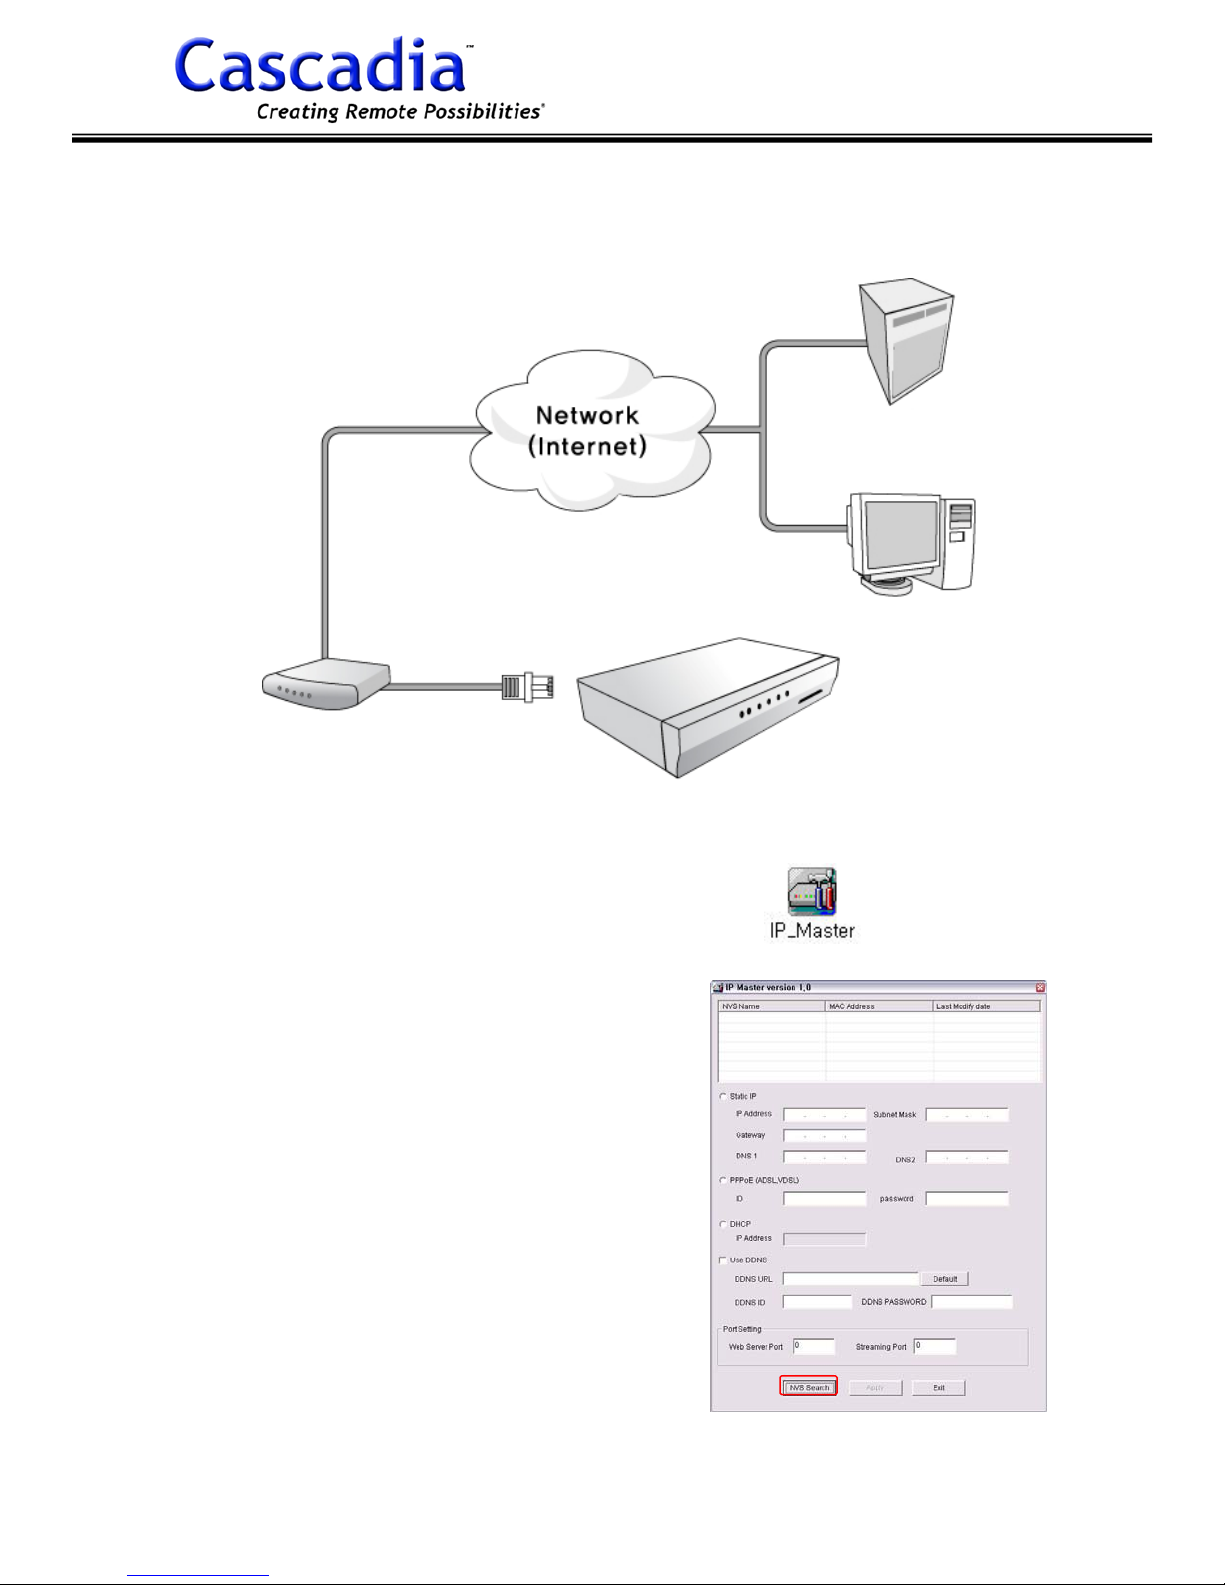
3.2.3 CONNECTING NVSDIRECTLY TO A xDSL Modem
The following procedure describes how to set up the S-Series NVS2004 when connecting to an xDSL Modem.
DDNS Server
Remote Client
XDSL Modem
1) Connect NVS2004 to the xDSL
Modem using a Network Cable.
2) Run IP Master program from the PC.
3) Left click “NVS Search” to search and list the
NVS2004s on the LAN.
4) Select the NVS2004 from the list.
NVS2004
Cascadia Video Products
(888) 421-0050
12
Version 1.0.1 Rev 9.27.07
Page 13
Network Video Server-NVS2004
3.2.1 CONNECTING NVS TO A LOCAL AREA NETWORK (cont.)
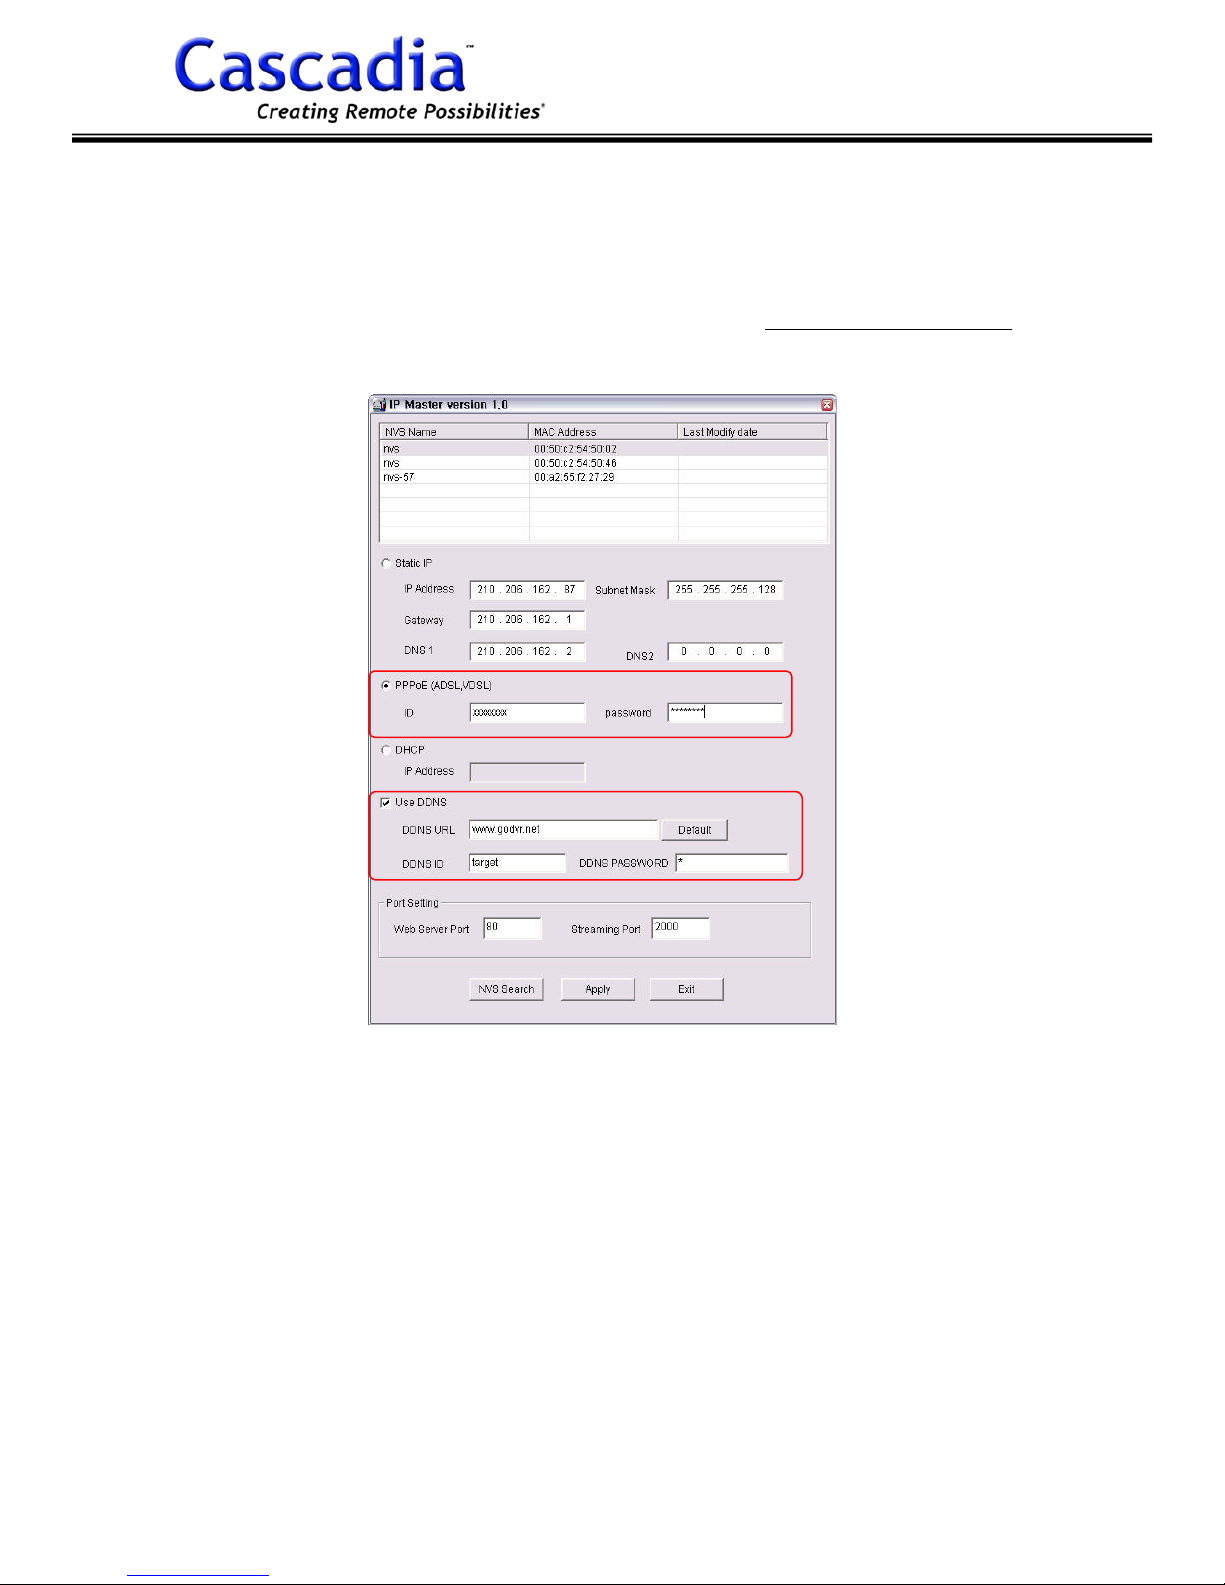
5) Check on “PPPoE” and enter User ID/Password for logging in xDSL service. If auto
log-in modem or cable modem is connected, check on “DHCP”
6) Check on “DDNS” and enter DDNS URL, DDNS ID and password.
Note: You should register DDNS ID and password from http://www.makeid.net prior
to this procedure. Please refer 3.3 Dynamic DNS for its detailed procedure.
7) Left click “Apply”. Enter Administrator IP/Password and left click “OK”. The
NVS2004 will
reboot automatically.
Note: Factory default: Administrator ID: root, Password: root.
8) Remove the cross-over cable from NVS2004 and connect it directly to xDSL modem
with standard CAT5 cable. And reboot the NVS2004.
9) Connect the video cables from the cameras to the NVS2004 and use the Web
Viewer to verify the images are transmitting properly.
Note: Open web browser. And enter the URL (ex ; http://192.168.10.3) in the
Address field.
Cascadia Video Products
(888) 421-0050
13
Version 1.0.1 Rev 9.27.07
Page 14
Network Video Server-NVS2004
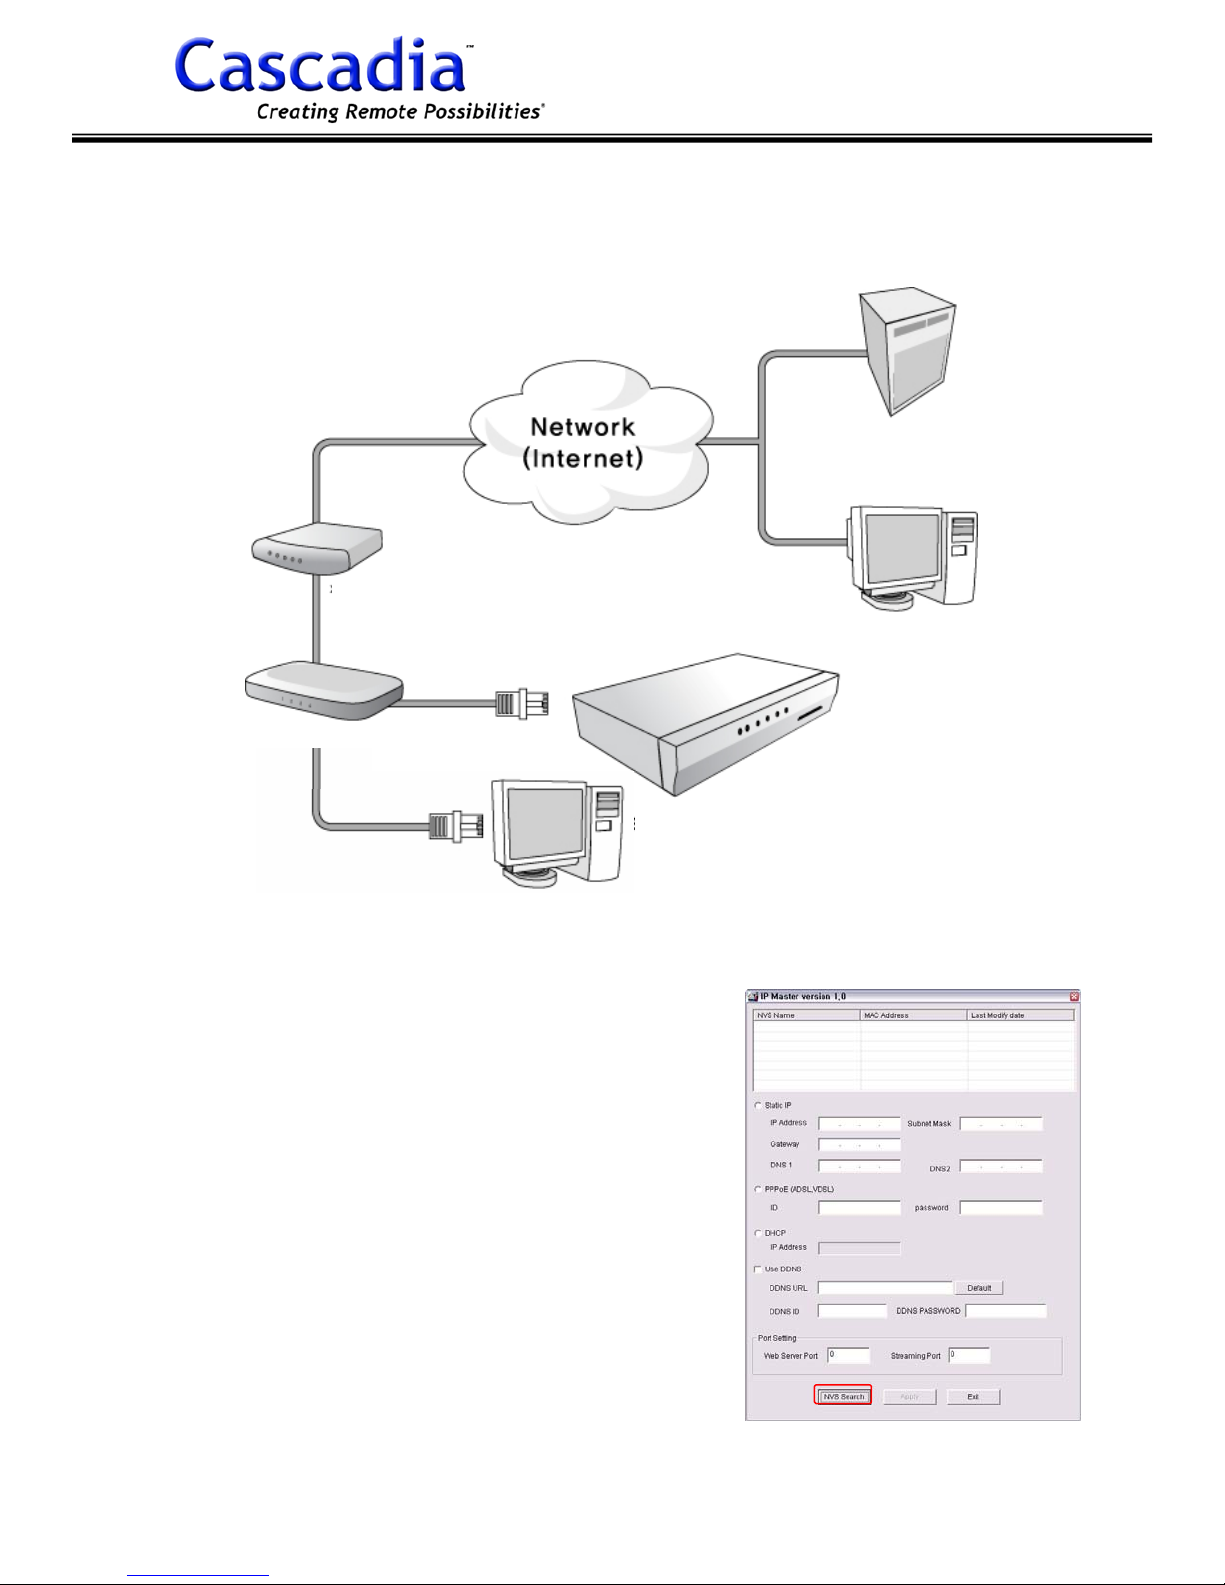
3.2.4 CONNECTING NVS2004 THROUGH A NAT ROUTER
The following procedure describes how to set up the NVS2004 when connecting to a
NAT Router.
DDNS Server
xDSL Modem
Remote Client
NAT Router
NVS2004
PC
1) Connect xDSL modem to WAN port of NAT router.
2) Connect NVS2004 to the NAT router.
3) Connect the PC prepared to the NAT router.
4) Run IP Master program from the PC.
5) Left click “NVS Search” to search the NVS2004s
on the LAN. Then all NVS2004’s on the LAN are
listed.
Cascadia Video Products
(888) 421-0050
14
Version 1.0.1 Rev 9.27.07
Page 15
Network Video Server-NVS2004
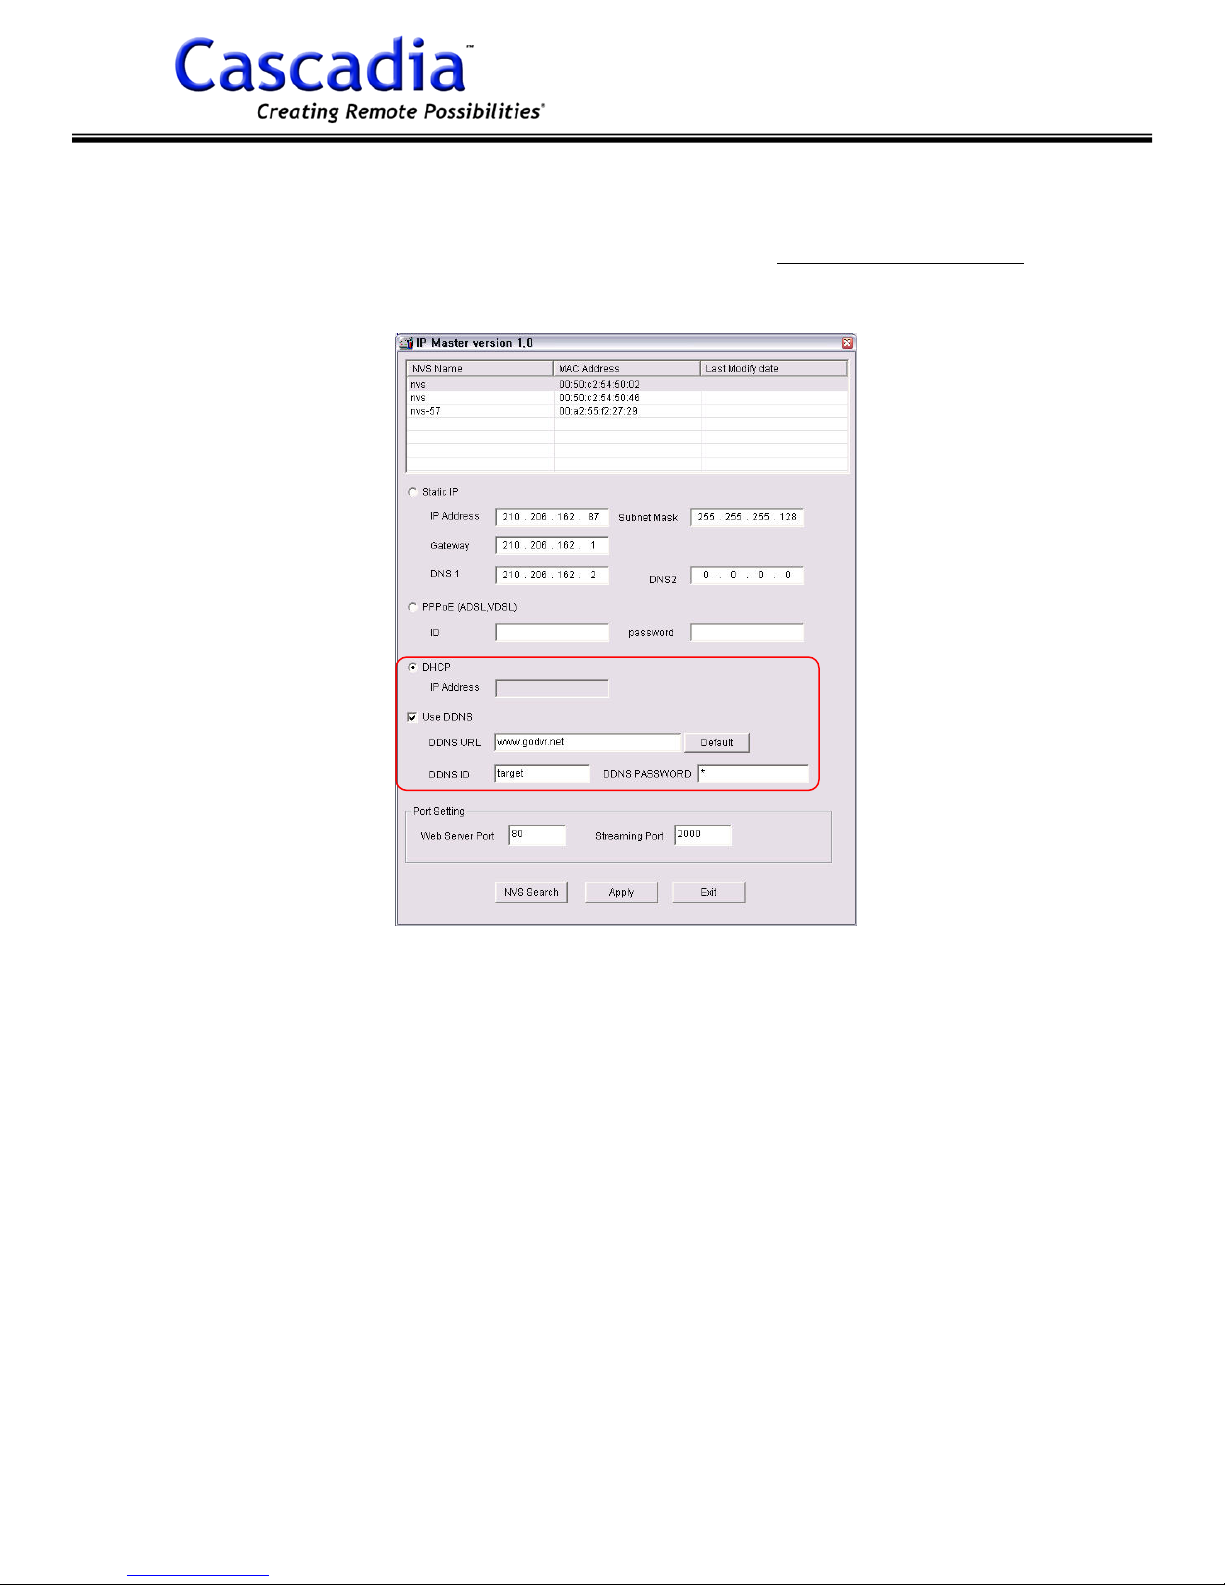
6) Check on “DHCP”.
7) Check on “DDNS” and enter DDNS URL, DDNS ID and password.
Note: You should register DDNS ID and password from http://www.makeid.net
prior to this procedure. Please refer 3.3 Dynamic DNS for its detailed procedure.
8) Left click “Apply”. Enter Administrator IP/Password and left click “OK”. The
NVS2004 will reboot automatically.
Note: Factory default Administrator ID: root, Password: root.
9) Run IP Master program again and left click “NVS Search”.
10) When selecting the NVS2004, IP address assigned by NAT router will be displayed.
11) Forward web and video streaming port from NAT router.
Note: Factory default web port: 80, video streaming port: 2000.
12) Connect the video cables from the cameras to the NVS2004 and use the Web
Viewer to verify the images are transmitting properly..
Note: Open web browser and enter the URL (ex ; http://192.168.10.3) in the Address
field.
Cascadia Video Products
(888) 421-0050
15
Version 1.0.1 Rev 9.27.07
Page 16
Network Video Server-NVS2004
3.3 DYNAMIC DNS
The Dynamic Domain Name Server (DDNS) will translate your dynamic IP address to
a static domain name. This allows a NVS2004 with a Dynamic IP Address to be
accessed using a static domain name If you connect the NVS2004 through dynamic IP
or through a NAT router, you’ll need to use DDNS to track the IP Address of the
NVS2004 as the Dynamic IP Address changes.
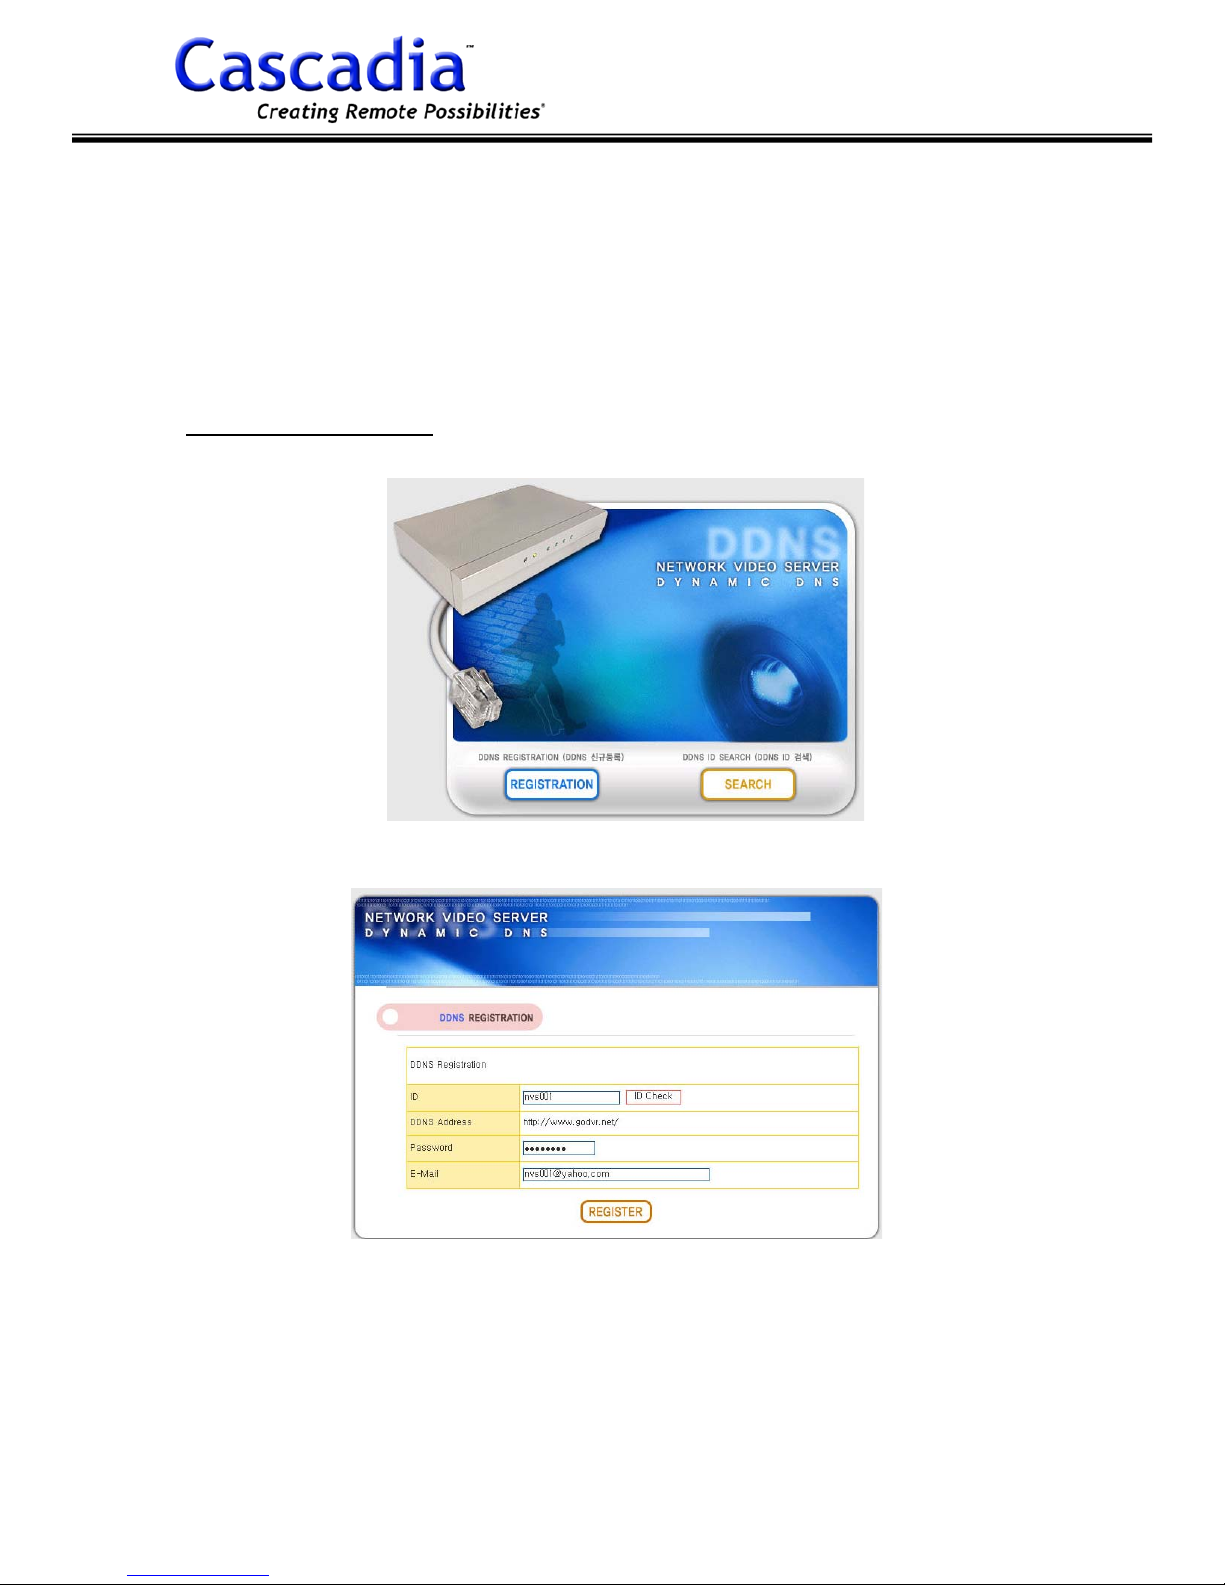
1) To register the NVS2004 with a DDNS Service, open web browser and type
http://www.makeid.net from Address field. Then the below menu appears.
2) To register your DDNS ID, left click “Registration”. Then the below menu appears.
Enter ID that you desire to have. Left click “ID Check”. If the ID is available, enter
password.
Then enter your e-mail address. And left click “Register”.
Note: E-mail address is used to reregister if the DDNS ID is forgotten.
Cascadia Video Products
(888) 421-0050
16
Version 1.0.1 Rev 9.27.07
Page 17
Network Video Server-NVS2004
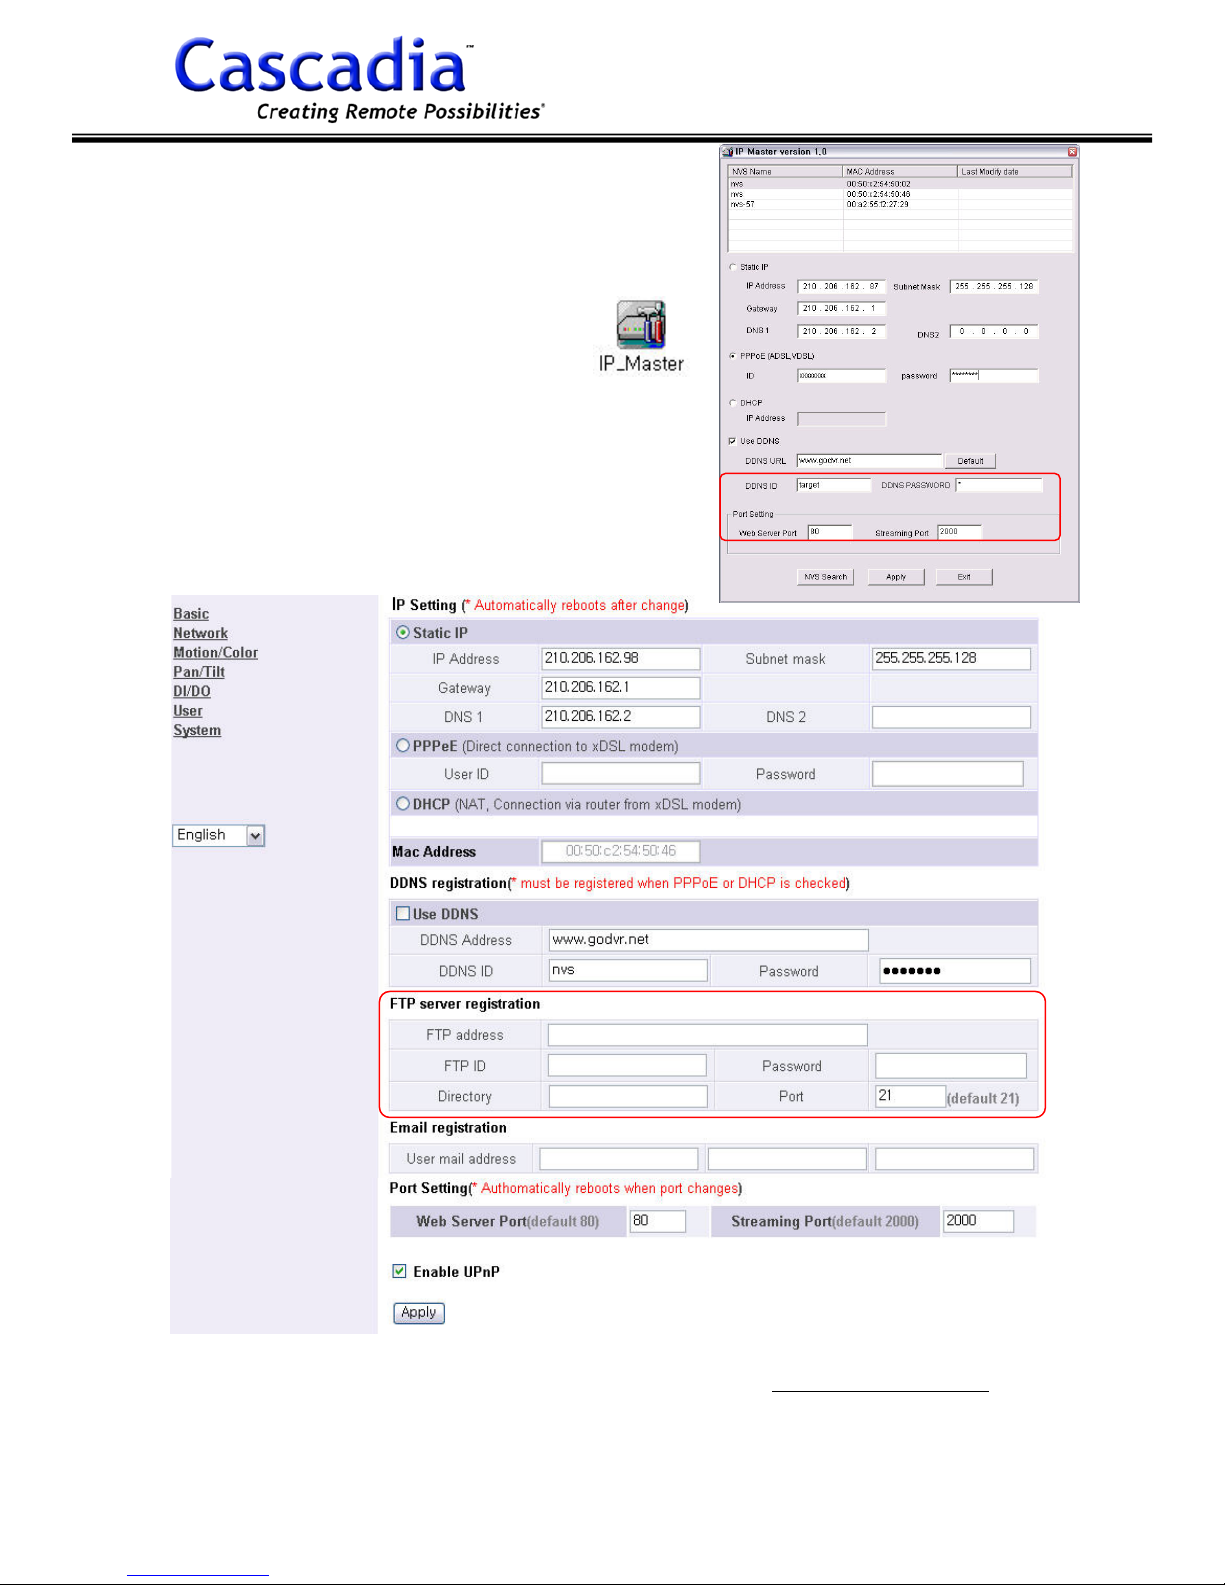
3) Run IP Master. Or open Admin page from web
browser. And input registered DDNS ID/
Password to your NVS2004.
Note: If you have DDNS ID “abc” for example, the URL is http://godvr.net/abc.
Note: E-mail address is used to reregister if the DDNS ID is forgotten.
Cascadia Video Products
(888) 421-0050
17
Version 1.0.1 Rev 9.27.07
Page 18
Network Video Server-NVS2004
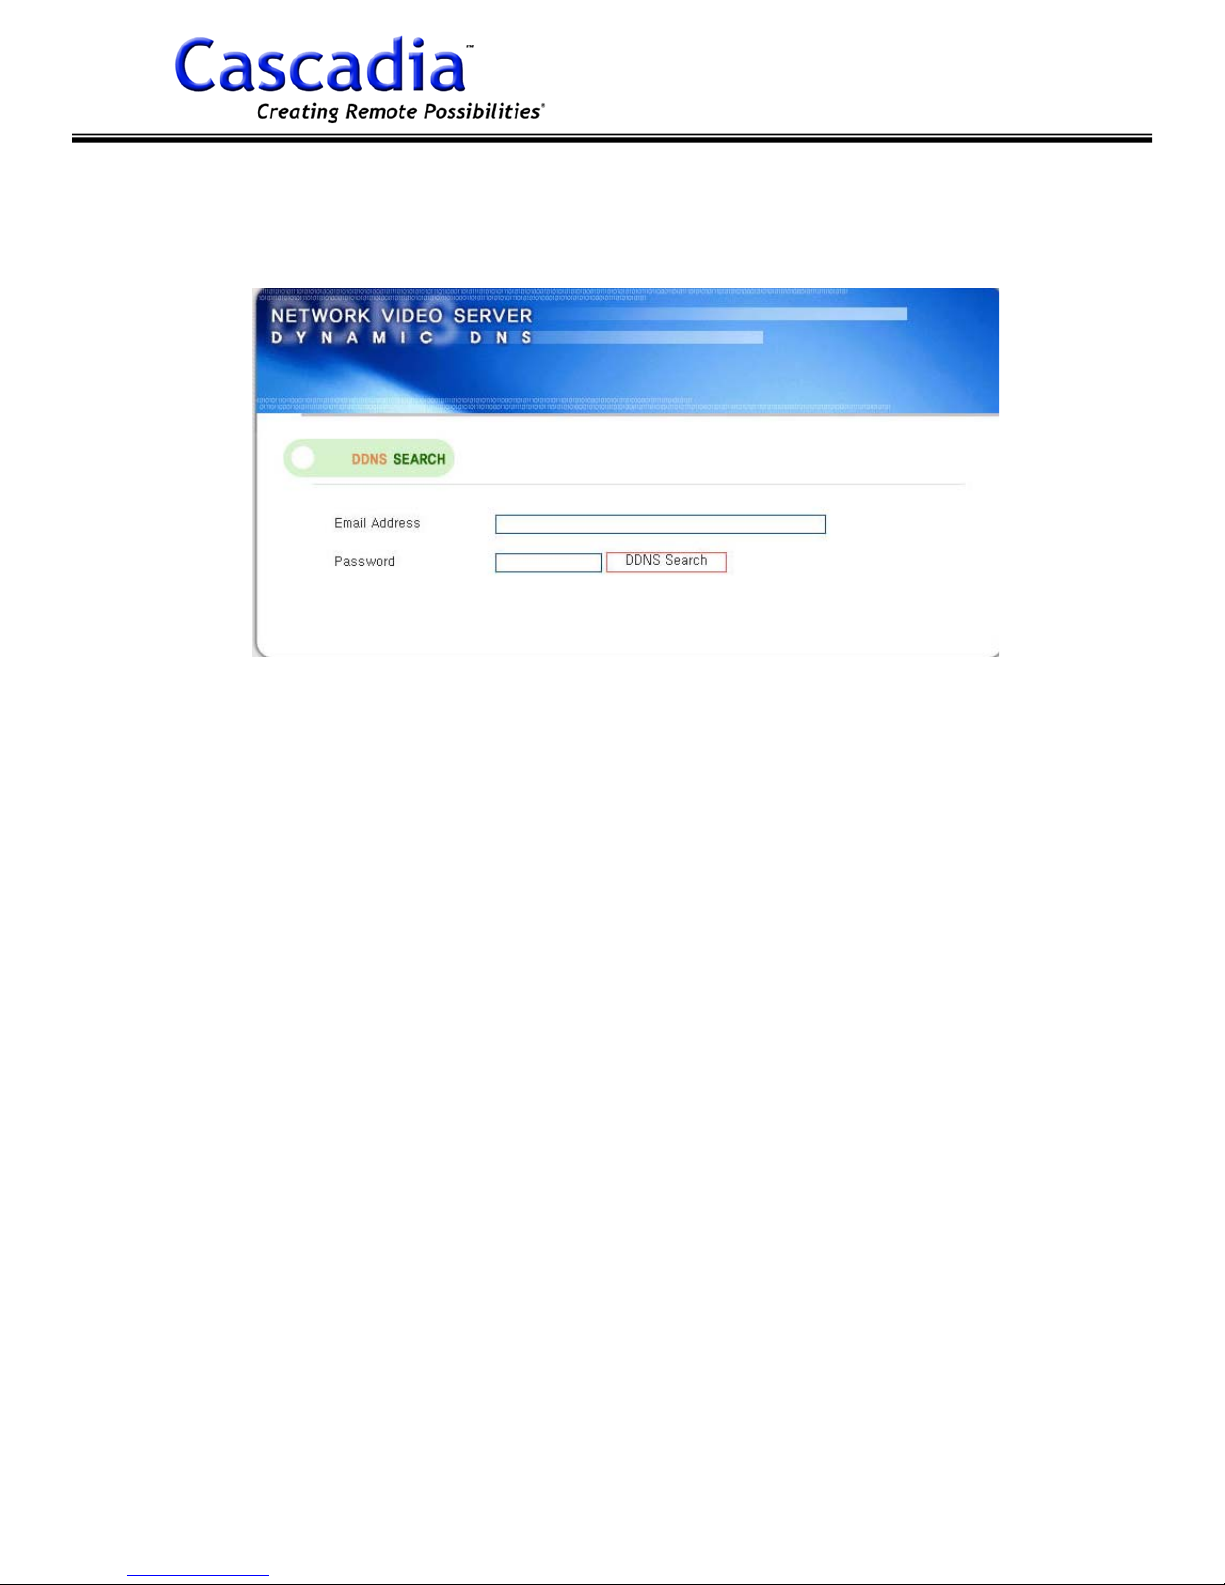
Note: If you forget your DDNS ID, left click “Search” from main page. Enter the e-
mail address and DDNS password. And left click “DDNS Search”. Then your DDNS ID
will be displayed on the same page.
Cascadia Video Products
(888) 421-0050
18
Version 1.0.1 Rev 9.27.07
Page 19
Network Video Server-NVS2004
CONFIGURING THE NVS2004
4.1 CONFIGURING THE NVS2004
You can configure the NVS2004 from web-based admin menu after installing NVS2004
on an IP Network. ID and Password with Administrator authority is required to access
the admin menu.
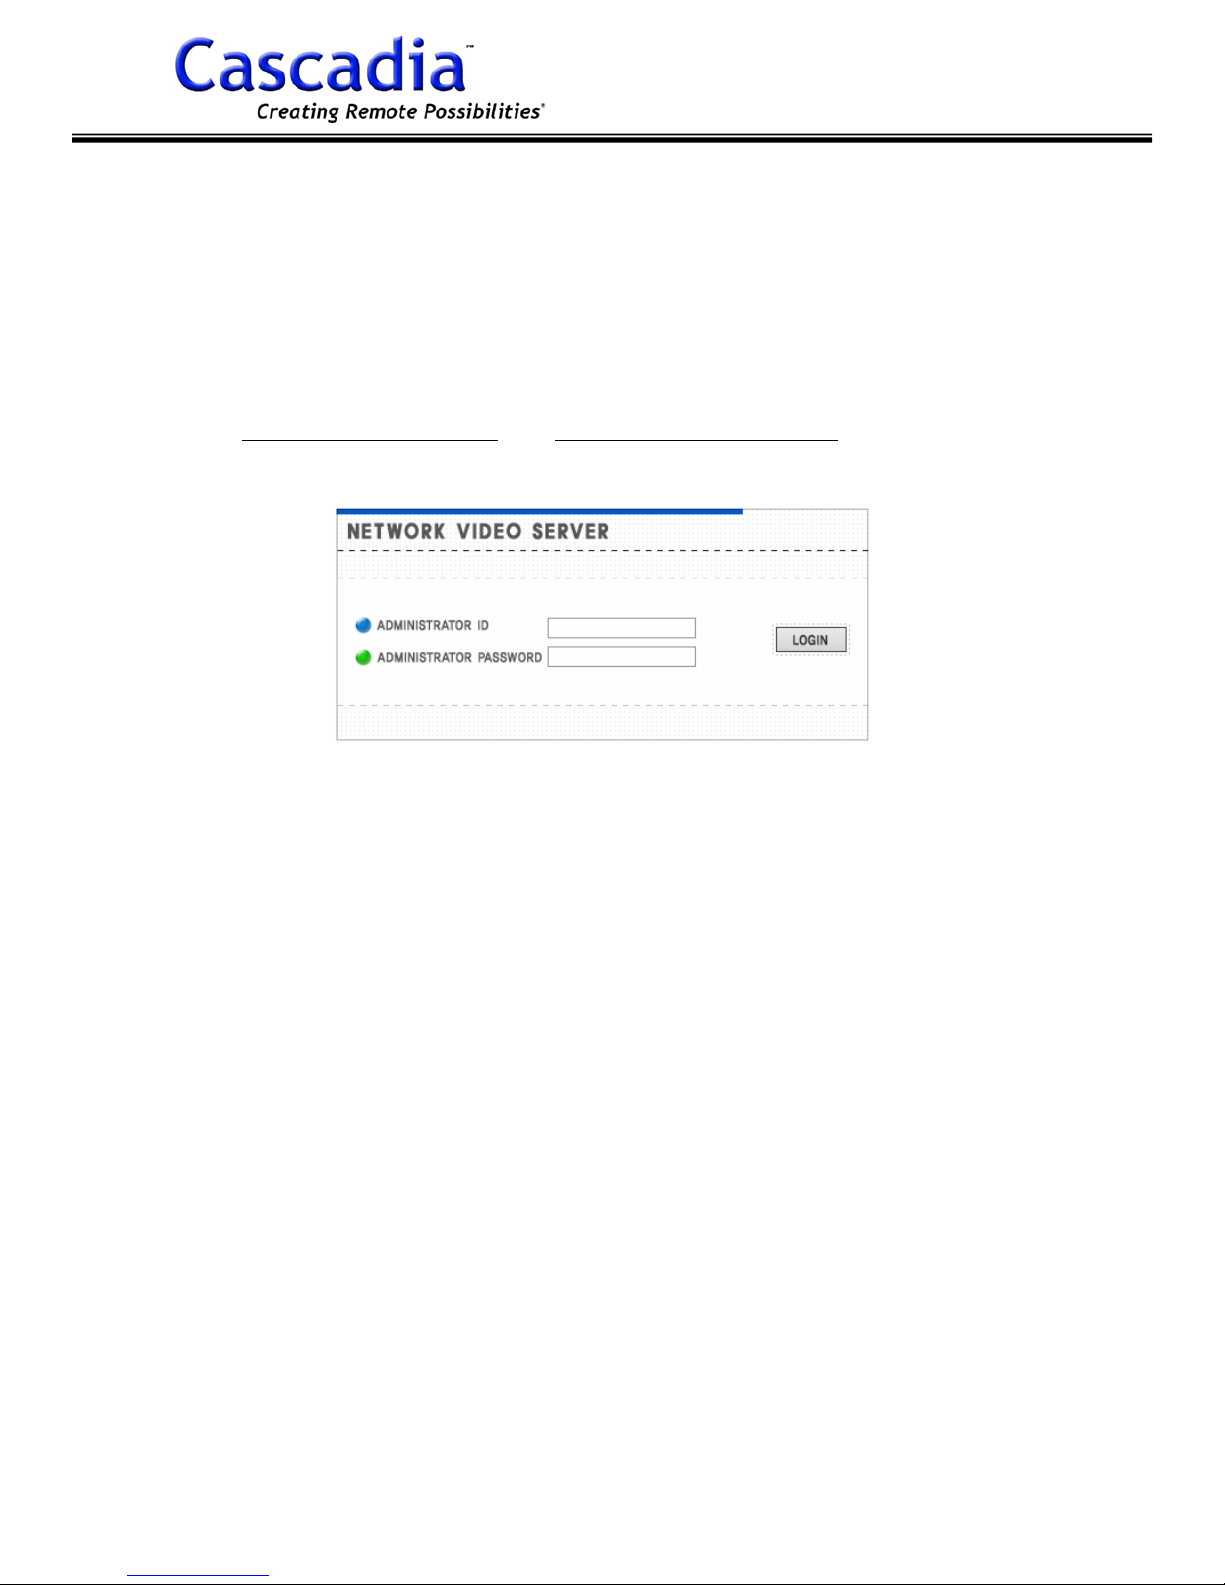
1) Open web browser.
2) Type http://IP address/admin (ex; http://192.168.10.3/admin) in the Address field.
3) Enter Administrator ID and password: Default are ID: root, PASSWORD: root (case-
sensitive).
Cascadia Video Products
(888) 421-0050
19
Version 1.0.1 Rev 9.27.07
Page 20
Network Video Server-NVS2004
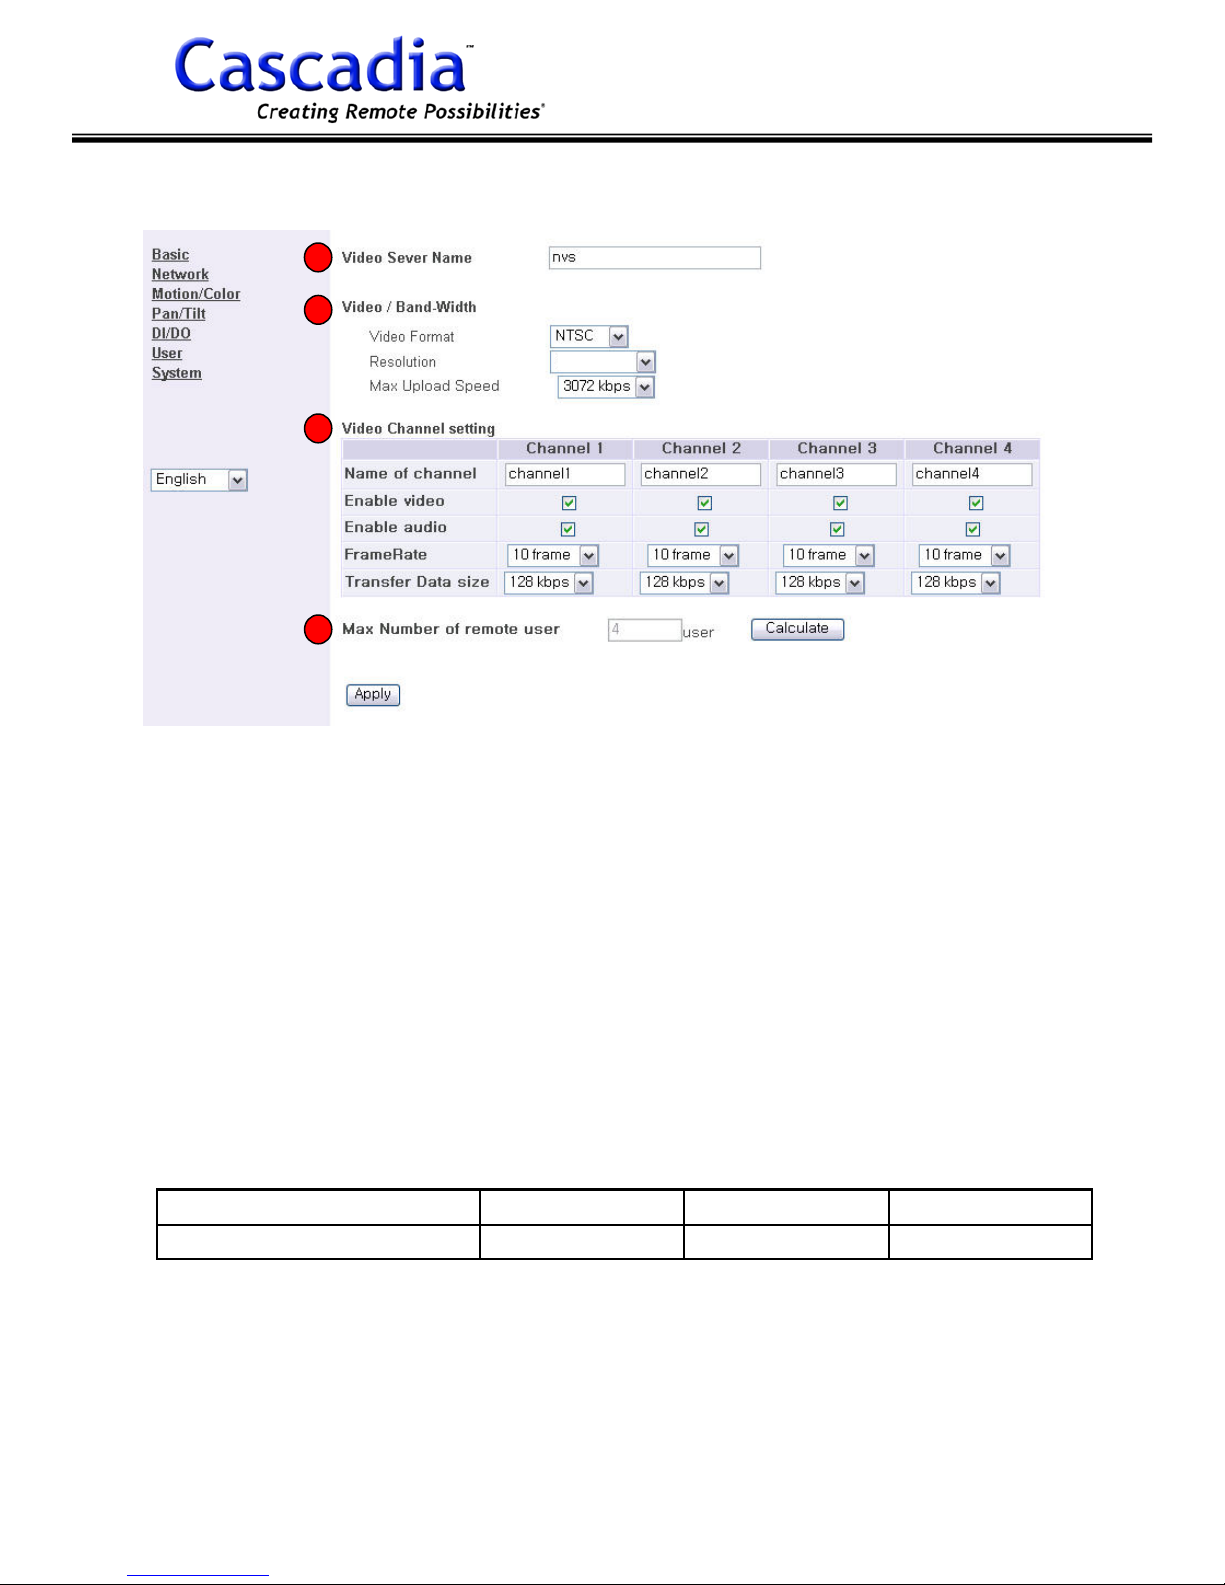
4.2 BASIC SETTING
Basic Settings are used to configure each cameras properties.
1
2
352x240
3
4
1) Video Server Name: enter any name that you desire to have.
2) Video / Bandwidth:
a) Video Format: select NTSC or PAL.
b) Resolution: select the video resolution.
c) NTSC: 352x240 / 720x240 / 720x480
d) PAL: 352x288 / 720x288 / 720x576
Note: Max. Upload Speed: should be set to the maximum upload speed provided
by the internet service or if it is not on the internet to the amount allowable on the
LAN.
3) Video Channel Setting:
a) Name of channel: enter the video channel name desired to be displayed from
camera view.
a) Enable video: enable the video channel to be viewed.
b) Enable audio: enable the audio channel to be turned on.
c) Frame Rate: set the frame rate per each video channel.
Resolution (NTSC/PAL) 352x240/352x288 720x240/720x288 720x480/720x756
Max. frame rate per each camera
30fps/25fps 15fps/12fps 7.5fps/6fps
d) Transfer data size: set the max. data size per second transferred by each video
channel. For example, if you set to “128kbps”, total video data size every second
cannot exceed 128Kbit.
4) Max. number of remote users: left click “Calculate” shows max. number of re-
mote users automatically.
Cascadia Video Products
(888) 421-0050
20
Version 1.0.1 Rev 9.27.07
Page 21
4.3 NETWORK SETTING
1
2
3
Network Video Server-NVS2004
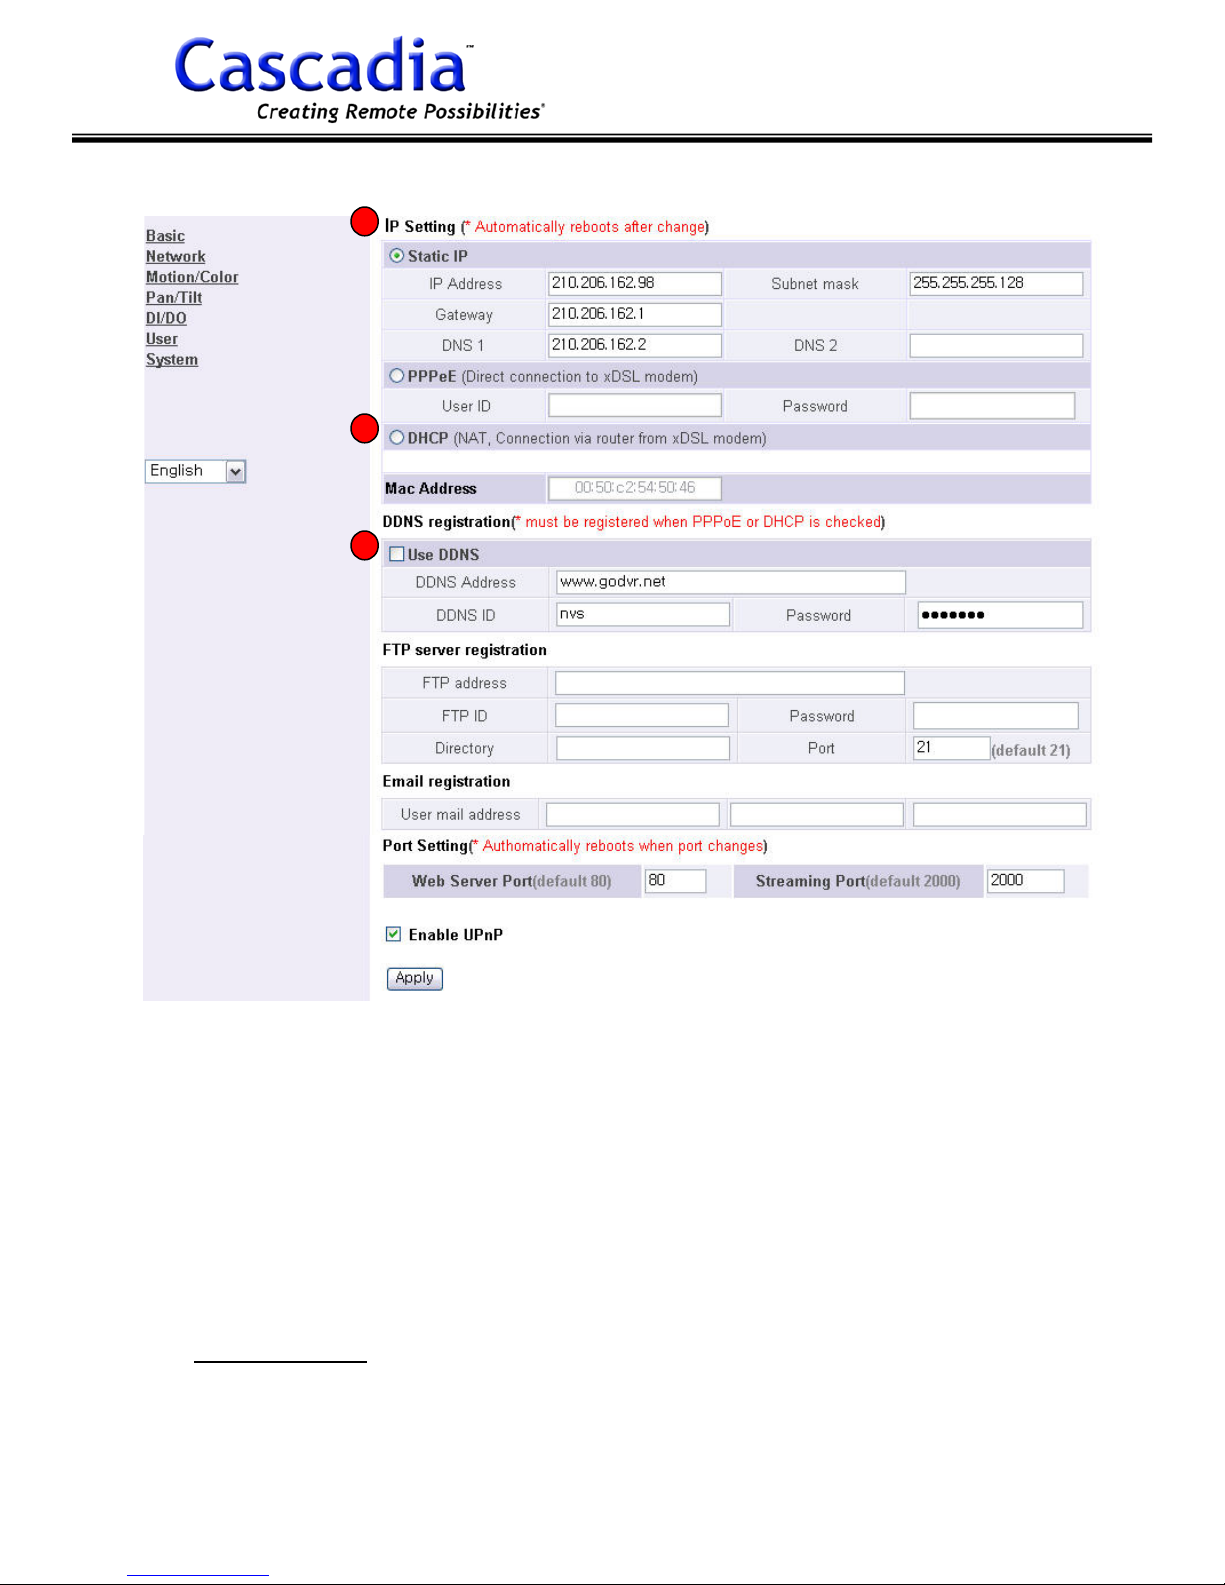
1) IP Setting: basically IP setting can be done from IP master program. You can
change configuration whenever your network environment changes.
a) Static IP: can checked when NVS2004 connects to local area network
b) PPPoE: can be checked when NVS2004 connects to xDSL modem
c) DHCP: can be checked when NVS2004 Connects to xDSL modem through NAT
router, or when connects directly to auto log-in xDSL modem or cable
modem
2) Mac Address: every NVS2004 unit has unique Mac address. Its Mac address is
displayed automatically in the field.
3) DDNS registration: when you use dynamic IP address or NVS2004 is behind NAT
router, you should get DDNS ID and password after registration from
www.gonvs.net.
Then you can enter the URL, ID and password in IP Master
program or in this Network Setting menu.
Cascadia Video Products
(888) 421-0050
21
Version 1.0.1 Rev 9.27.07
Page 22
4.3 NETWORK SETTING (cont.)
4
Network Video Server-NVS2004
5
6
7
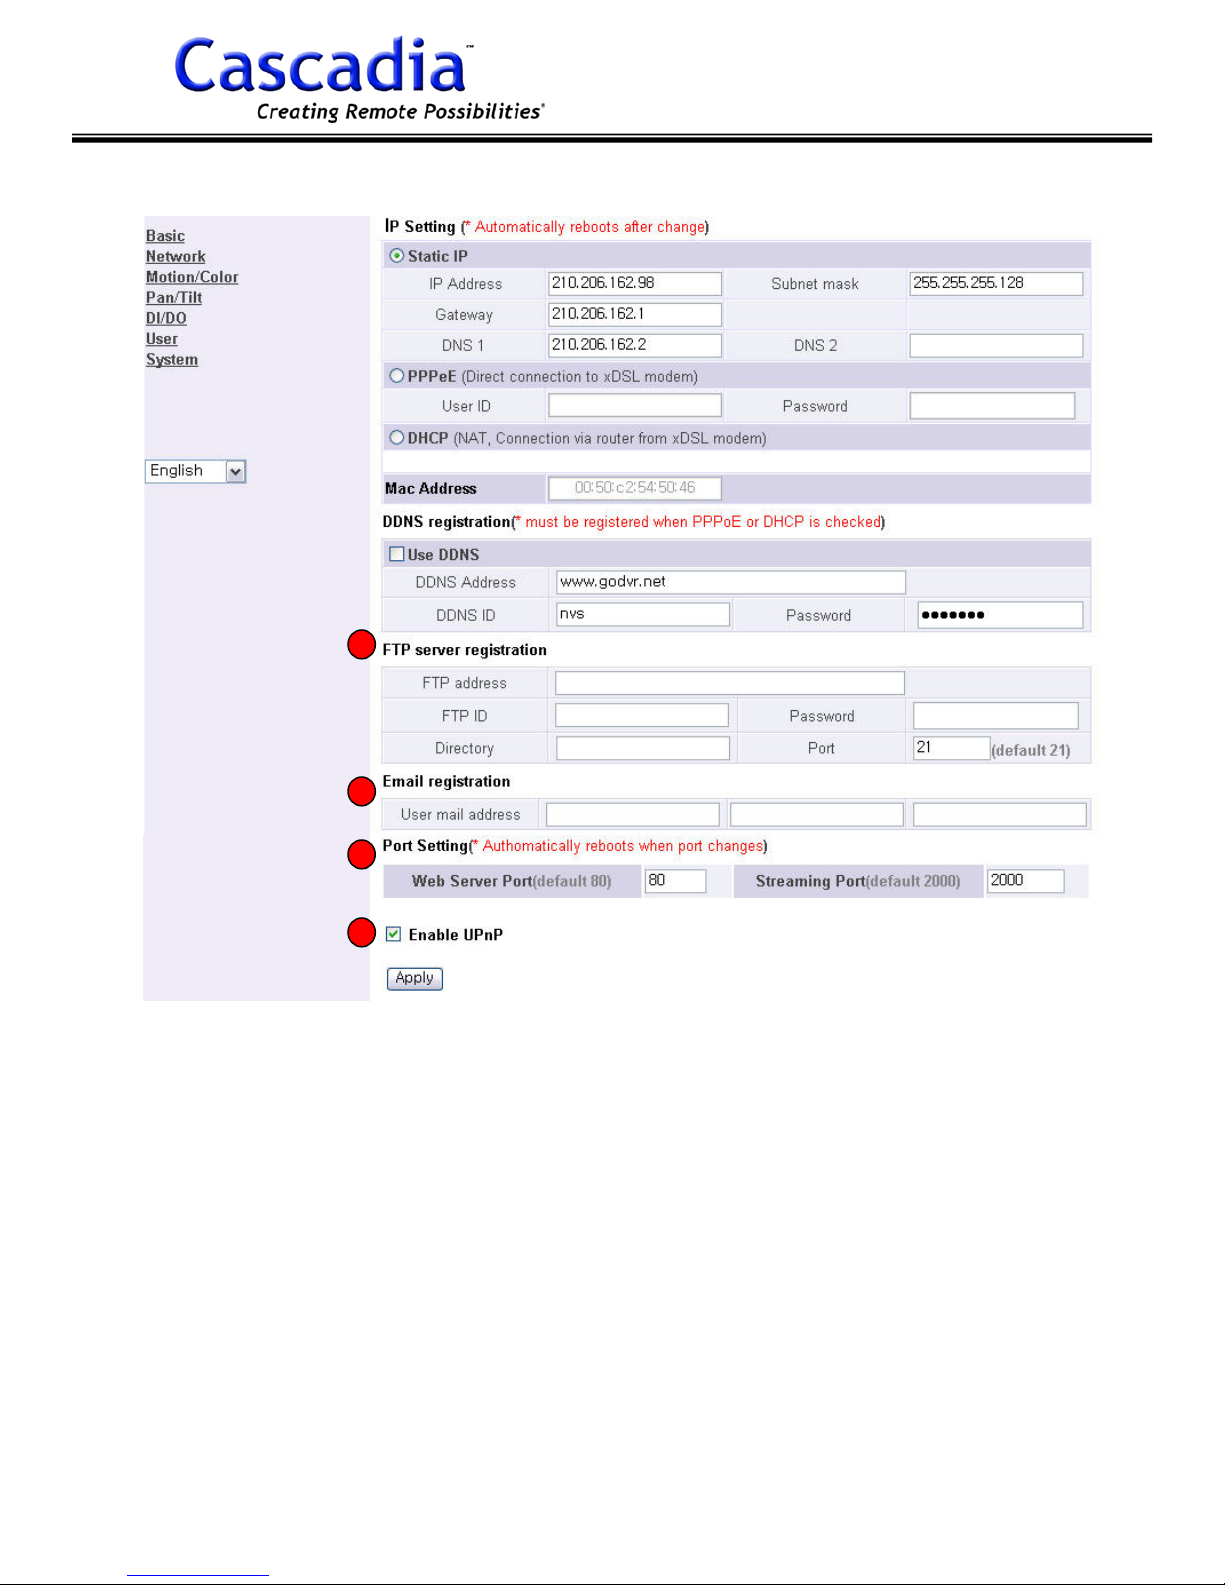
4) FTP server registration: you can register you ftp address when log files can be
stored when event occurs from NVS2004. Enter your IP, password, directory and
port no. accordingly.
5) E-mail registration: you can register max. 3 e-mail recipients who can receive
event report by e-mail from NVS2004.
6) Port Setting: you can set ports for web and video streaming in this menu or IP
Master program.
Note: Factory default web port: 80, video streaming port: 2000.
Note: You should forward these two ports from NAT router when NVS2004 is be-
hind the router.
7) Enable UPnP: check on “Enable UPnP” to use UPnP (Universal Plug and Play)
function provided from Windows XP.
Cascadia Video Products
(888) 421-0050
22
Version 1.0.1 Rev 9.27.07
Page 23
4.4 MOTION/COLOR SETTING
1
2
Network Video Server-NVS2004
3
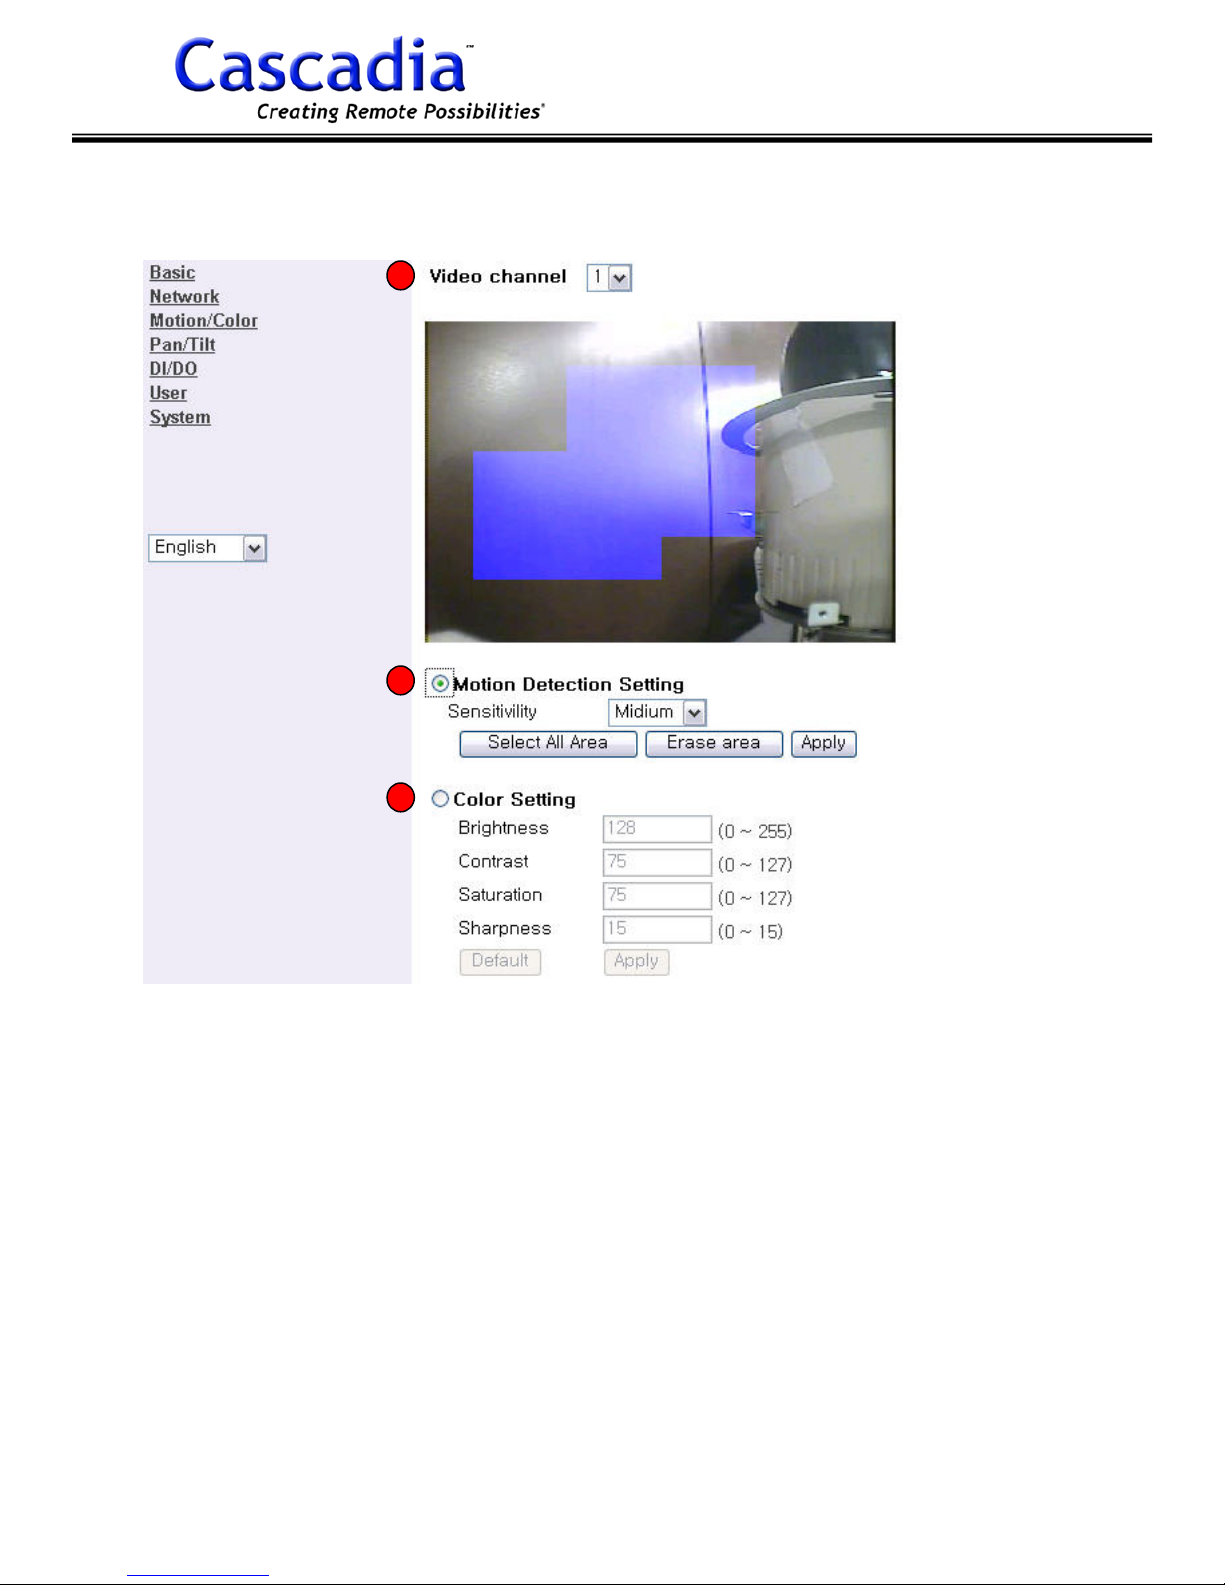
1) Video Channel: Select video channel to set motion properties and image color.
2) Motion Detection Setting: Draw multiple motion detection areas by drag & drop
mouse.
a) Sensitivity: Set motion sensitivity.
5 types of sensitivity can be selected (Lowest – Low – Medium – High – Highest)
b) Select All Area: Sets whole area to motion detection. All area in the preview
window is displayed in blue color.
c) Erase Area: Deletes all motion detection areas.
3) Color Setting: Seta video image color properties for Brightness, Contrast,
Saturation and Sharpness.
Cascadia Video Products
(888) 421-0050
23
Version 1.0.1 Rev 9.27.07
Page 24
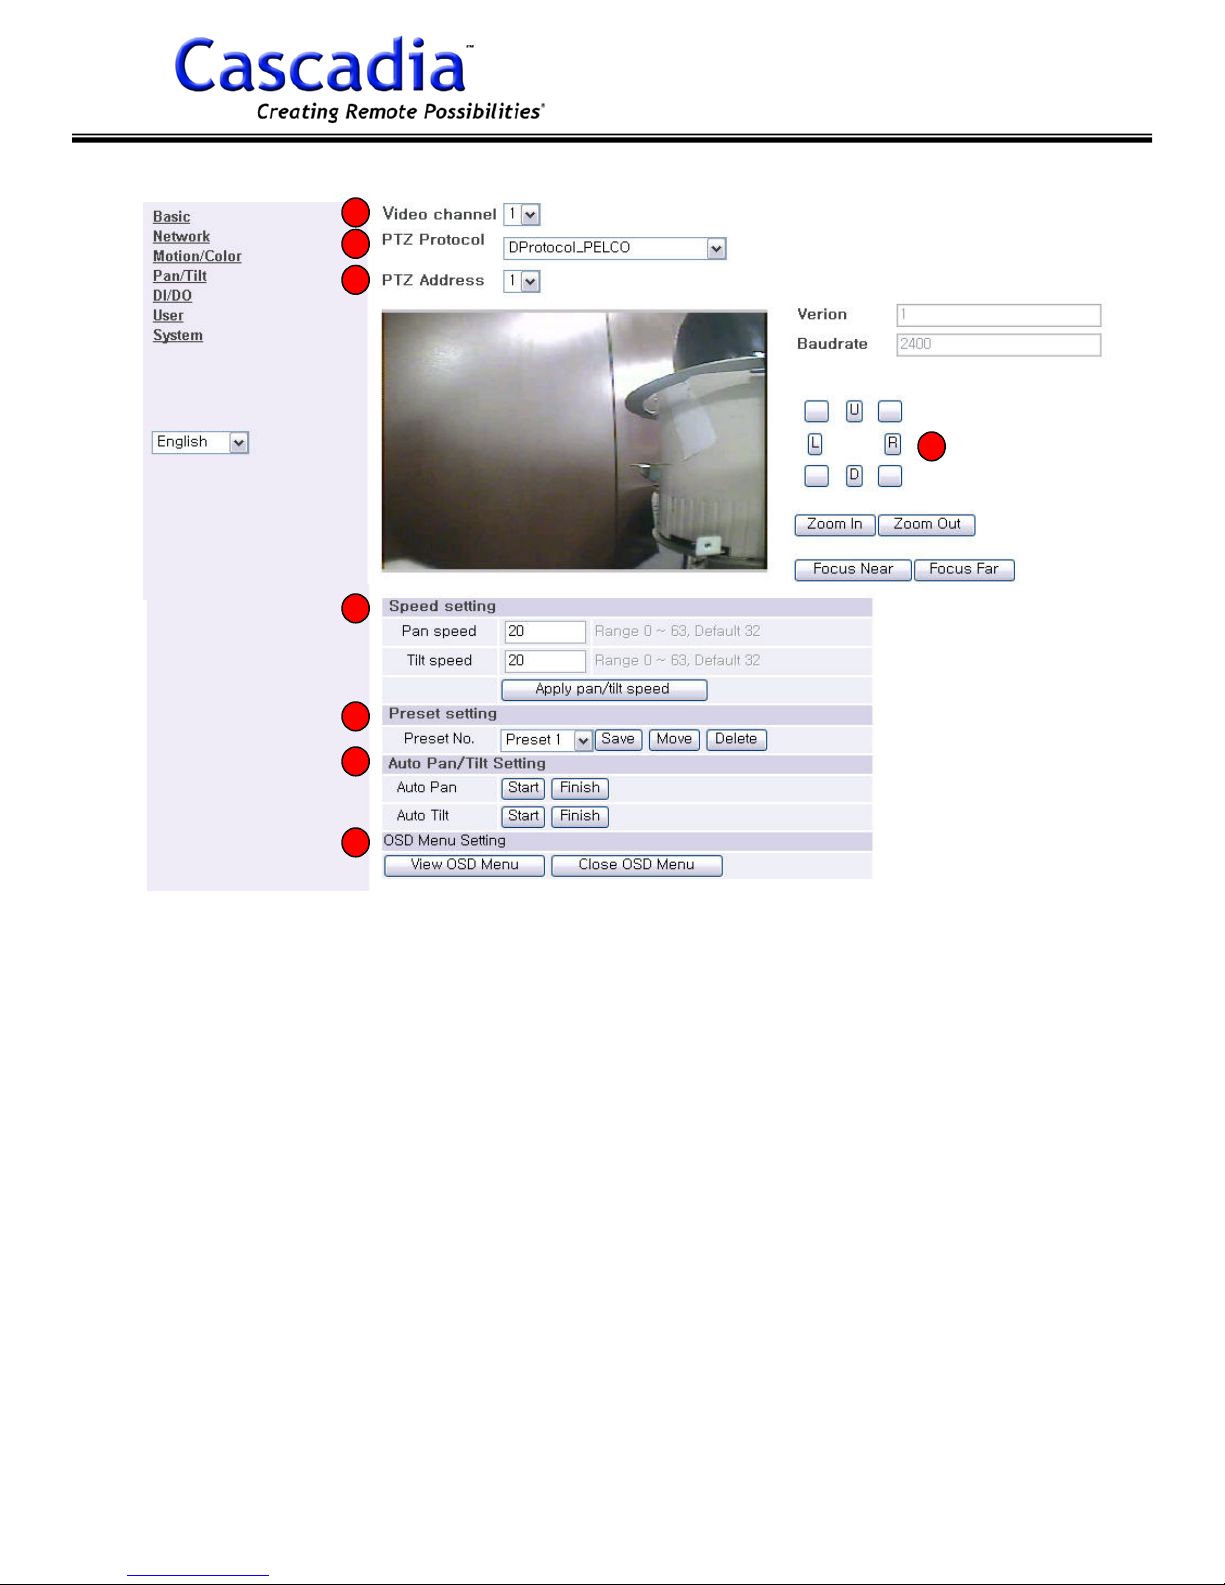
4.5 PAN/TILT SETTING
1
2
3
5
Network Video Server-NVS2004
4
6
7
8
1) Video channel: select video channel to set PTZ properties.
2) PTZ Protocol: select the protocol type used with your PTZ unit.
3) PTZ Address: select the address identically to setting on each PTZ camera unit.
4) PTZ Test Menu: you can run PTZ test using test menu after setting up PTZ
properties.
5) Speed setting: set Pan and Tilt movement speed.
6) Preset setting: select Preset No. and move the camera using PTZ buttons from
PTZ Test Menu. Left click “Save” to save the preset to memory. To delete, select
Preset No. and left click “Delete”.
7) Auto Pan/Tilt Setting: left click “Start”/”Finish” to start and finish auto pan/tilt
function
8) OSD Menu Setting: to view OSD menu of camera, left click “View OSD Menu”. To
close, left click “Close OSD Menu”.
Cascadia Video Products
(888) 421-0050
24
Version 1.0.1 Rev 9.27.07
Page 25
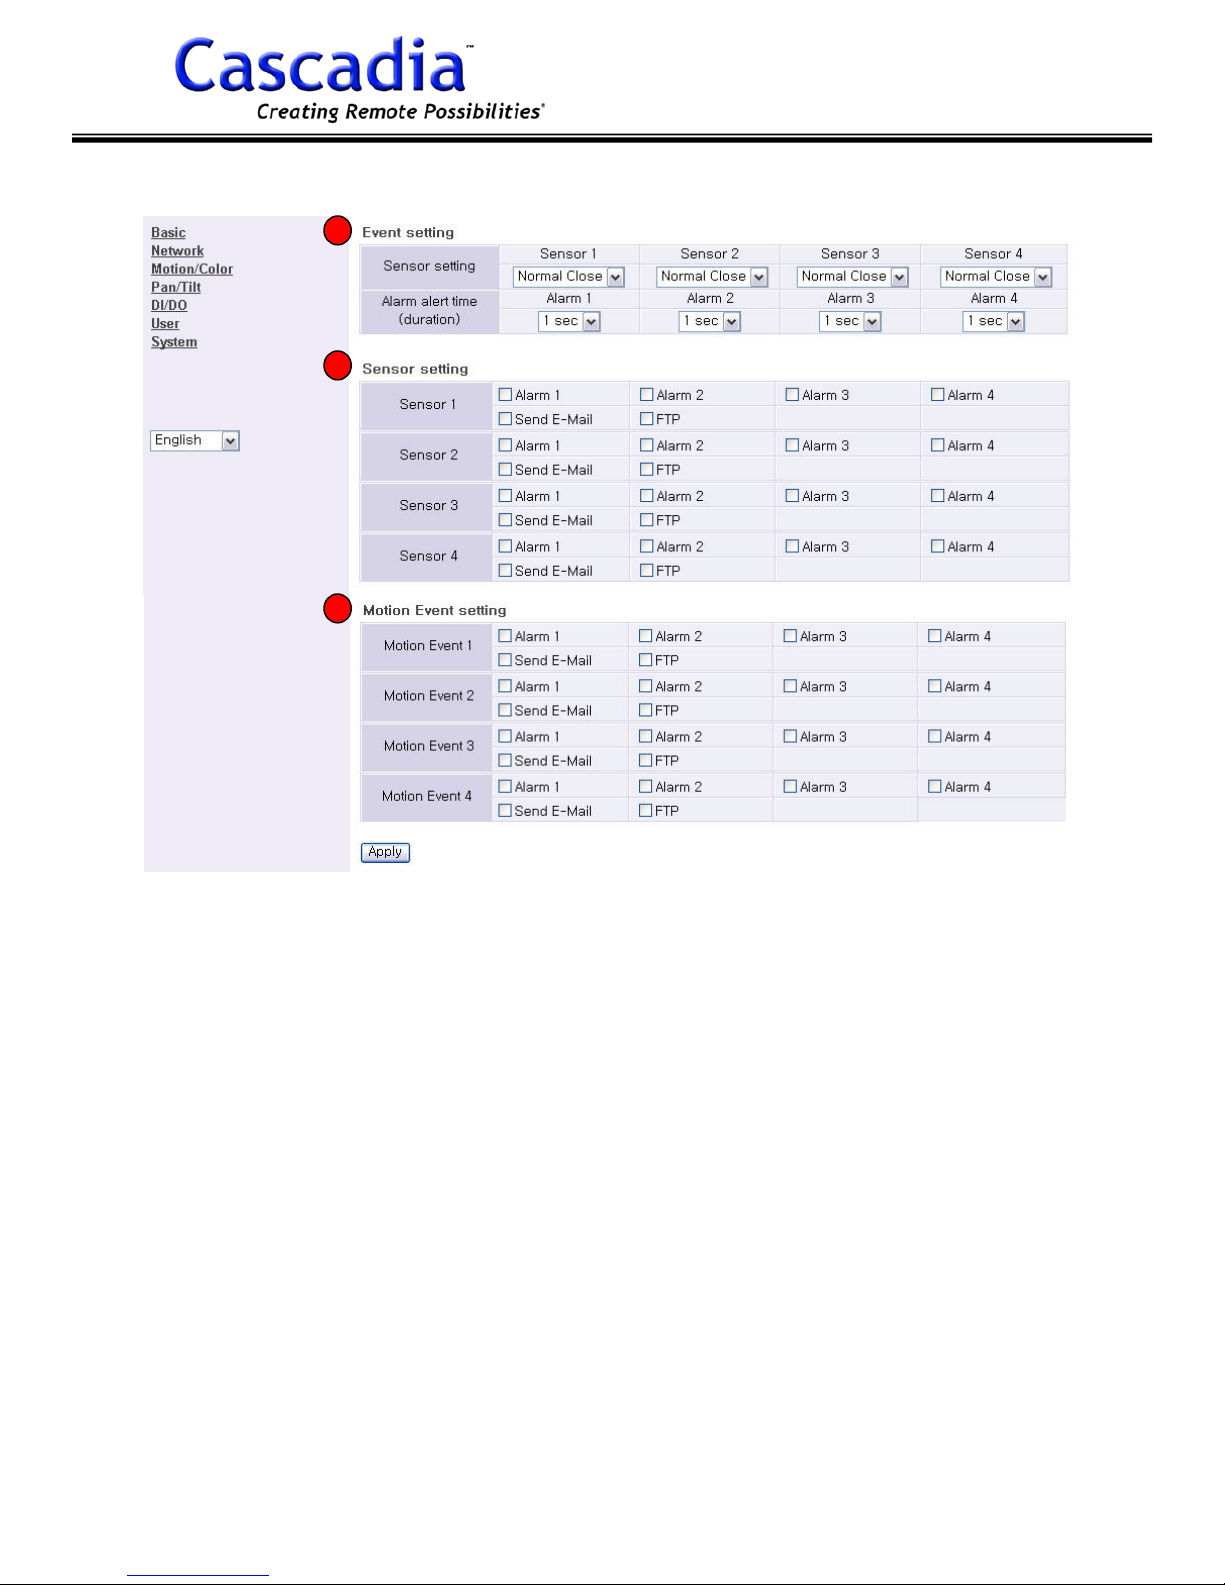
4.6 DI/DO SETTING
1
2
3
Network Video Server-NVS2004
1) Event setting:
a) Sensor setting: select Sensor type “Normal Close” or “Normal Open”
depending on the type used.
b) Alarm alert time: select alarm device activation time (1 ~ 5 seconds) after
event occur.
2) Sensor setting: Check on event alert method after sensor event occur.
a) Alarm 1 ~ 4: selected alarm is activated after event occur
b) Send E-mail: sends e-mail alert after event occur (refer to 3.3 Network
setting: E-mail registration)
c) FTP: stores event log to FTP address (refer to 3.3 Network setting : FTP server
registration)
3) Motion Event setting: Check on motion event alert method after sensor event
occur.
a) Alarm 1 ~ 4: selected alarm is activated after event occur
b) Send E-mail: sends e-mail alert after event occur (refer to 3.3 Network set-
ting : E-mail registration)
c) FTP: stores event log to FTP address (refer to 3.3 Network setting : FTP server
registration)
Cascadia Video Products
(888) 421-0050
25
Version 1.0.1 Rev 9.27.07
Page 26
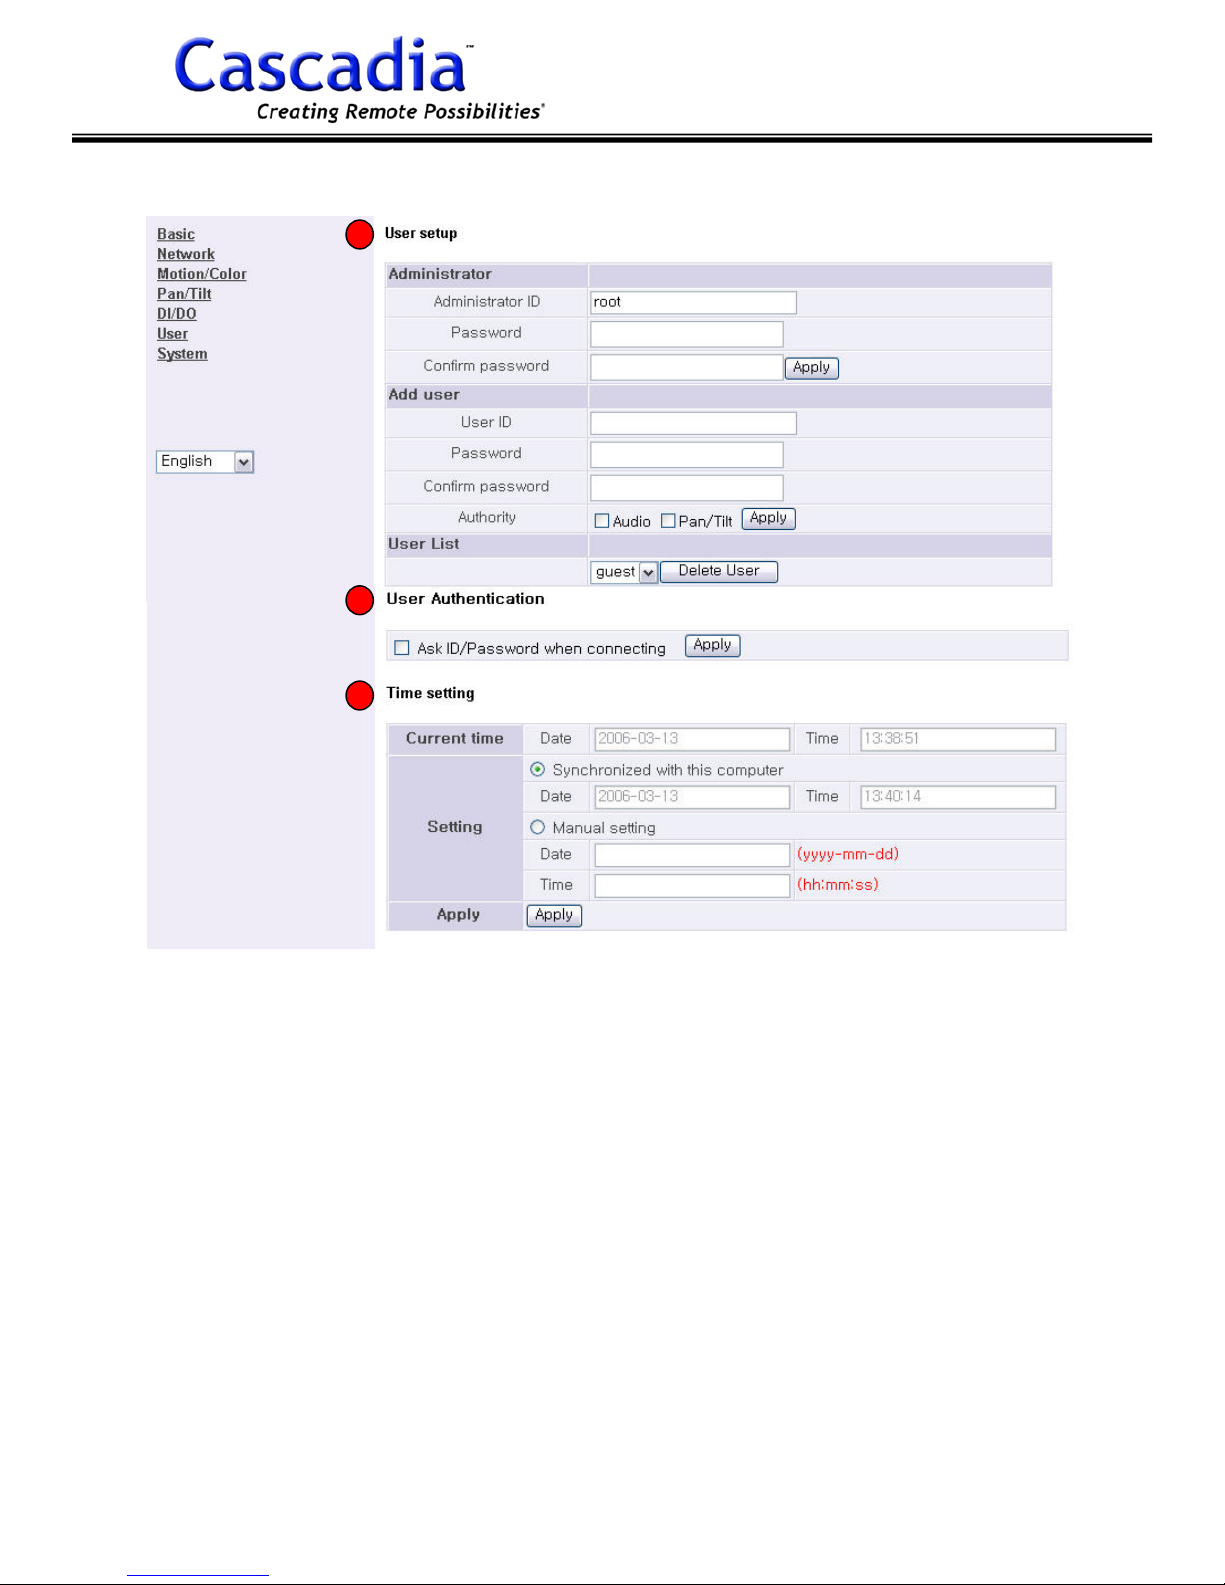
4.7 USER SETTING
1
2
Network Video Server-NVS2004
3
1) User setup:
a) Administrator: you can change Administrator ID and Password from the default provided.
b) Add user: to add new user for viewing remotely, enter new User IP and Pass-
word. And check “Audio” or
“Pan/Tilt” to give the rights to the remote user.
c) User List: registered users are listed. To delete, select the user ID and left click
“Delete User”.
2) User Authentication:
a) Check on “Ask ID/Password when connecting” to ask ID/Password when remote
users access the NVS2004.
3) Time setting:
a) Check on “Synchronized with this computer” to set the time of NVS2004 identi-
cally with the computer connected.
b) Check on “Manual setting” to enter the time manually.
Cascadia Video Products
(888) 421-0050
26
Version 1.0.1 Rev 9.27.07
Page 27
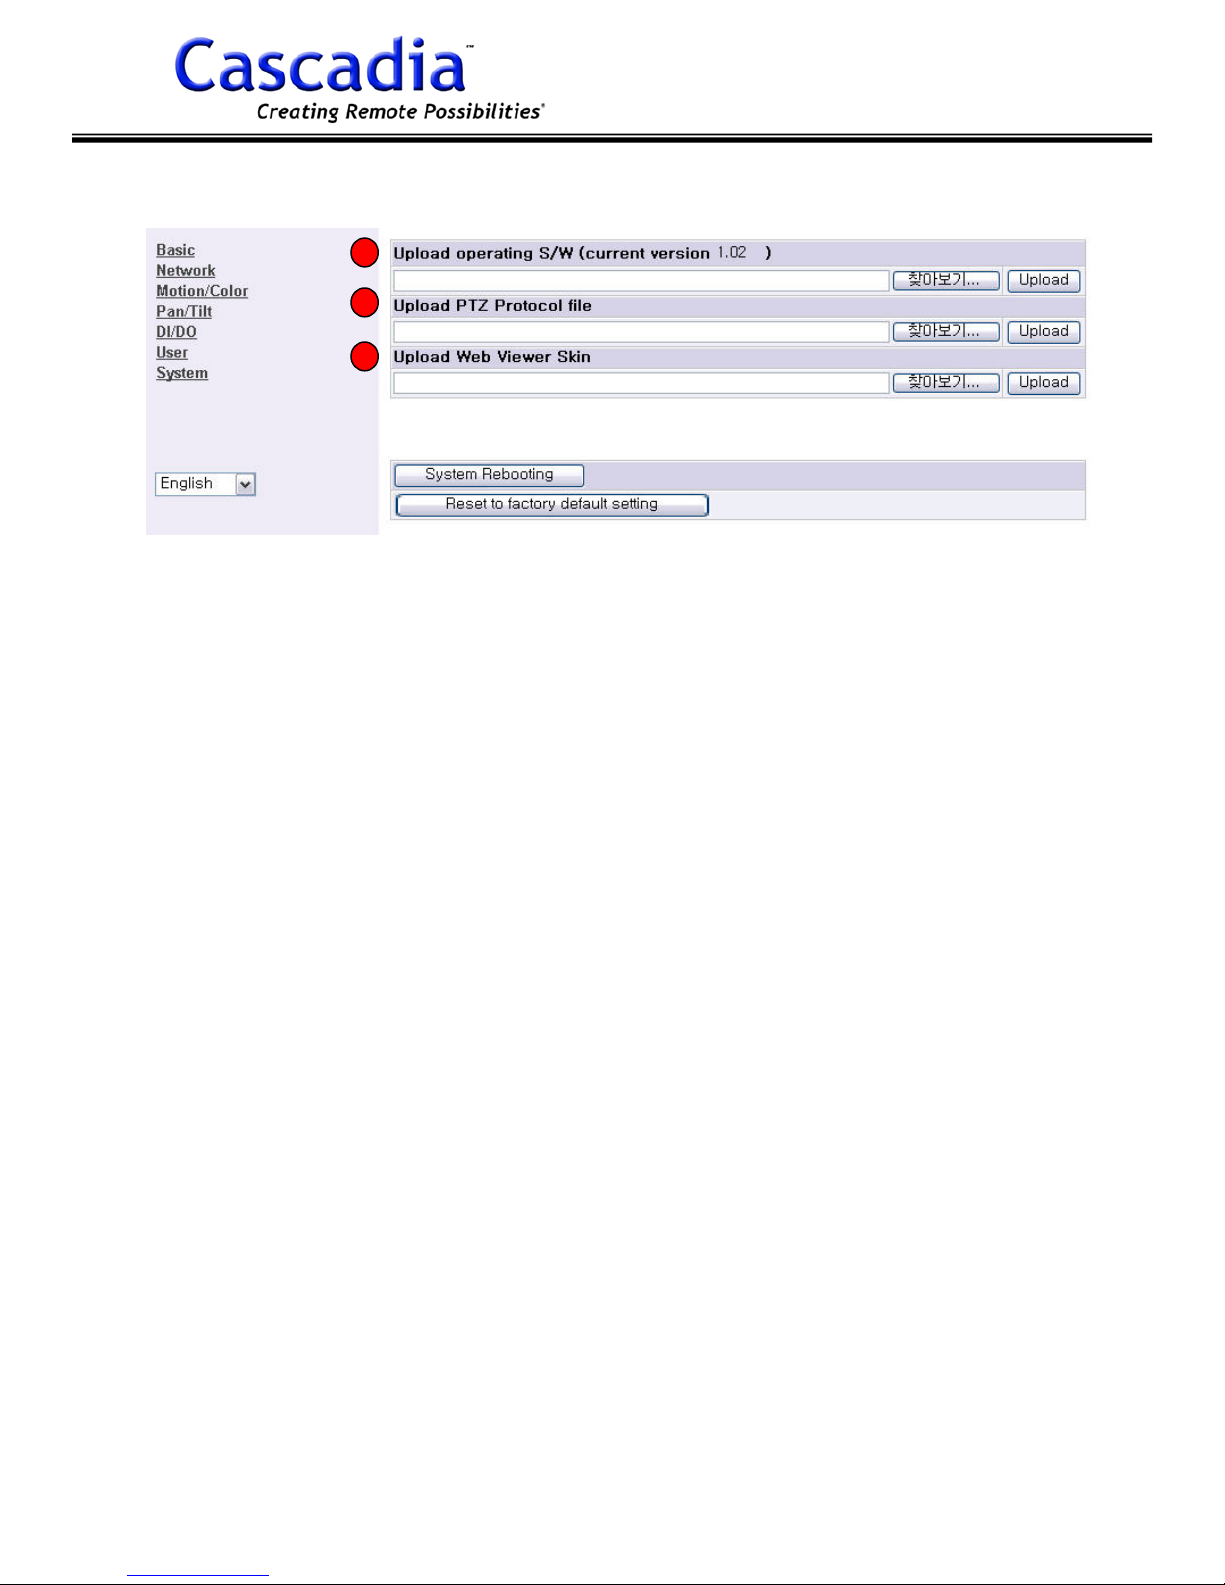
Network Video Server-NVS2004
4.8 SYSTEM SETTING
1
2
3
1) Upload operating S/W: you can upgrade the operating system of NVS2004 by
firmware upgrade. Download firmware upgrade file and load from this menu.
2) Upload PTZ Protocol file: you can load additional PTZ driver file from this
menu.
Note: You can contact your local distributor to get firmware upgrade or PTZ driver
file.
3) Upload Web Viewer Skin: you can load additional web viewer design file from
this menu.
Note: This function is available to development company.
Cascadia Video Products
(888) 421-0050
27
Version 1.0.1 Rev 9.27.07
Page 28
Network Video Server-NVS2004
VIEWING THROUGH THE WEB BROWSER
5.1 STARTING WEB VIEWING THROUGH WEB BROWSER
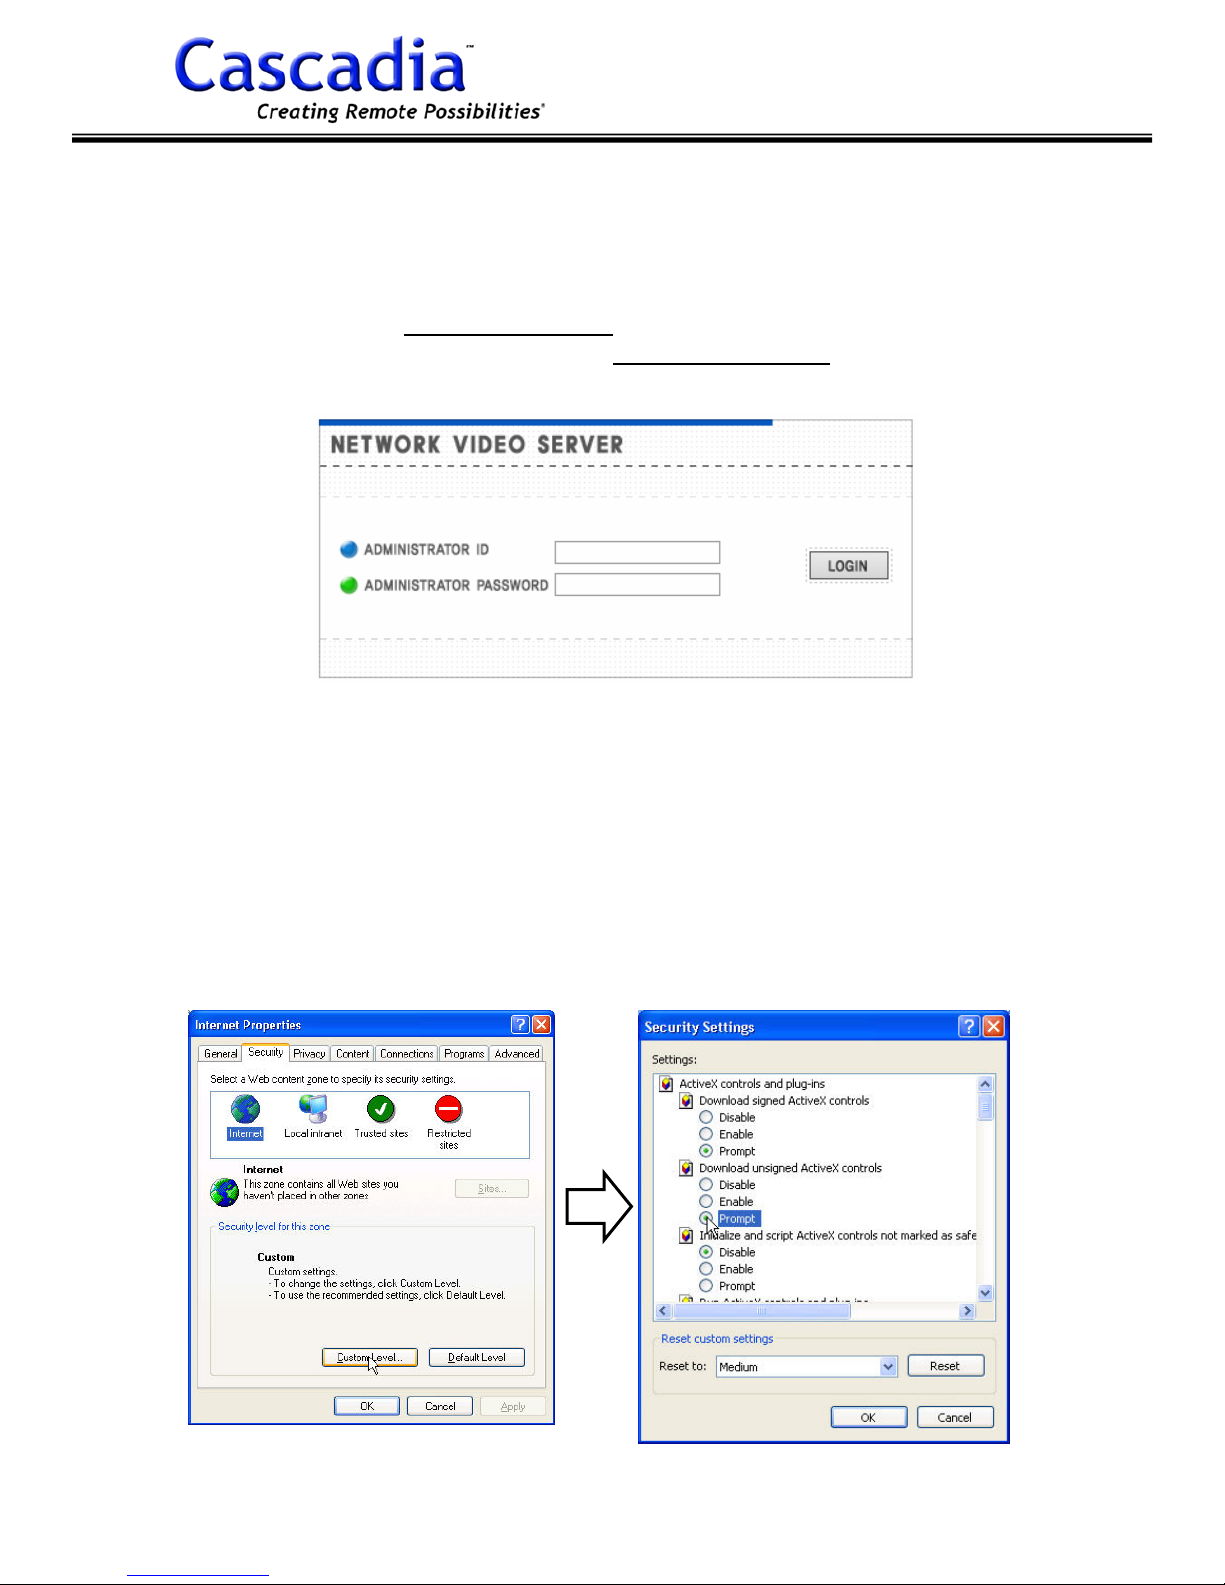
1) Open web browser.
2) Type the URL (ex ; http://192.168.10.3) in the Address field. If you have DDNS
ID, type http://godvr.net/DDNS ID (ex ; http://godvr.net/nvs) in the Address field.
3) Enter ID/Password and left click “Log-in”.
Note: If you don’t want log-in for web connection, uncheck on “Ask ID/Password
when connecting” from User setting of Admin menu.
Note: In case of Windows XP Service Pack 2, active-X control download may be
blocked. Please follow the below steps.
1) Open Internet Properties. And left click "Custom Level" from "Security" tab.
2) Check on "Prompt" under "Download unsigned ActiveX controls". Left click OK.
And left click OK from Internet Properties.
3) Then prompt window will be shown to ask if users wants to download ActiveX
controls for running web viewer.
Cascadia Video Products
(888) 421-0050
28
Version 1.0.1 Rev 9.27.07
Page 29
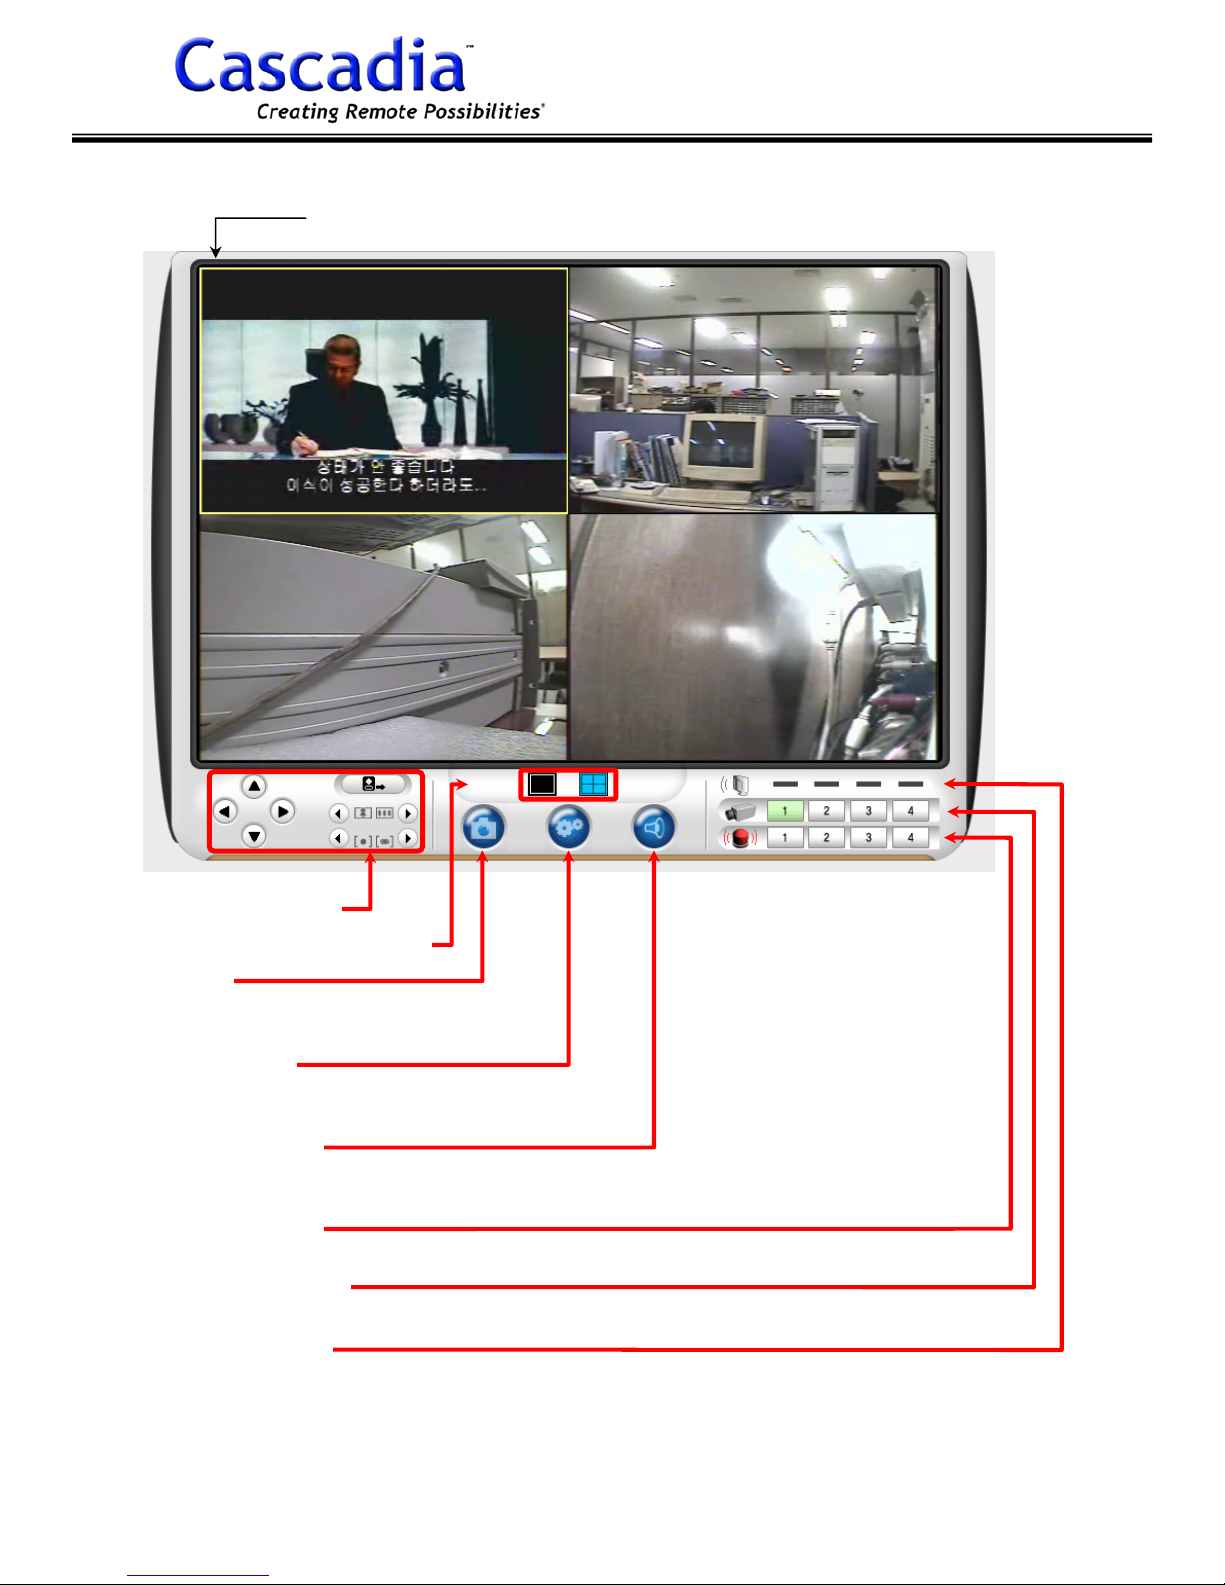
5.2 WEB VIEWER FUNCTIONS
Image Viewing Window
Network Video Server-NVS2004
PTZ Control Button
Screen Division Selection
Snapshot
Save snapshot of the camera selected
(BMP)
Admin Menu
Access admin menu to configure Network
Video
Sound On/Off
Alarm Activation
Left click the No. to activate the alarm
Camera Selection
Left click the No. to view the video channel from
Sensor Indication
Red light turns on when the sensor event occurs
Cascadia Video Products
(888) 421-0050
29
Version 1.0.1 Rev 9.27.07
Page 30
Network Video Server-NVS2004
REMOTE CLIENT SOFTWARE
6.1 INSTALLING REMOTE CLIENT SOFTWARE
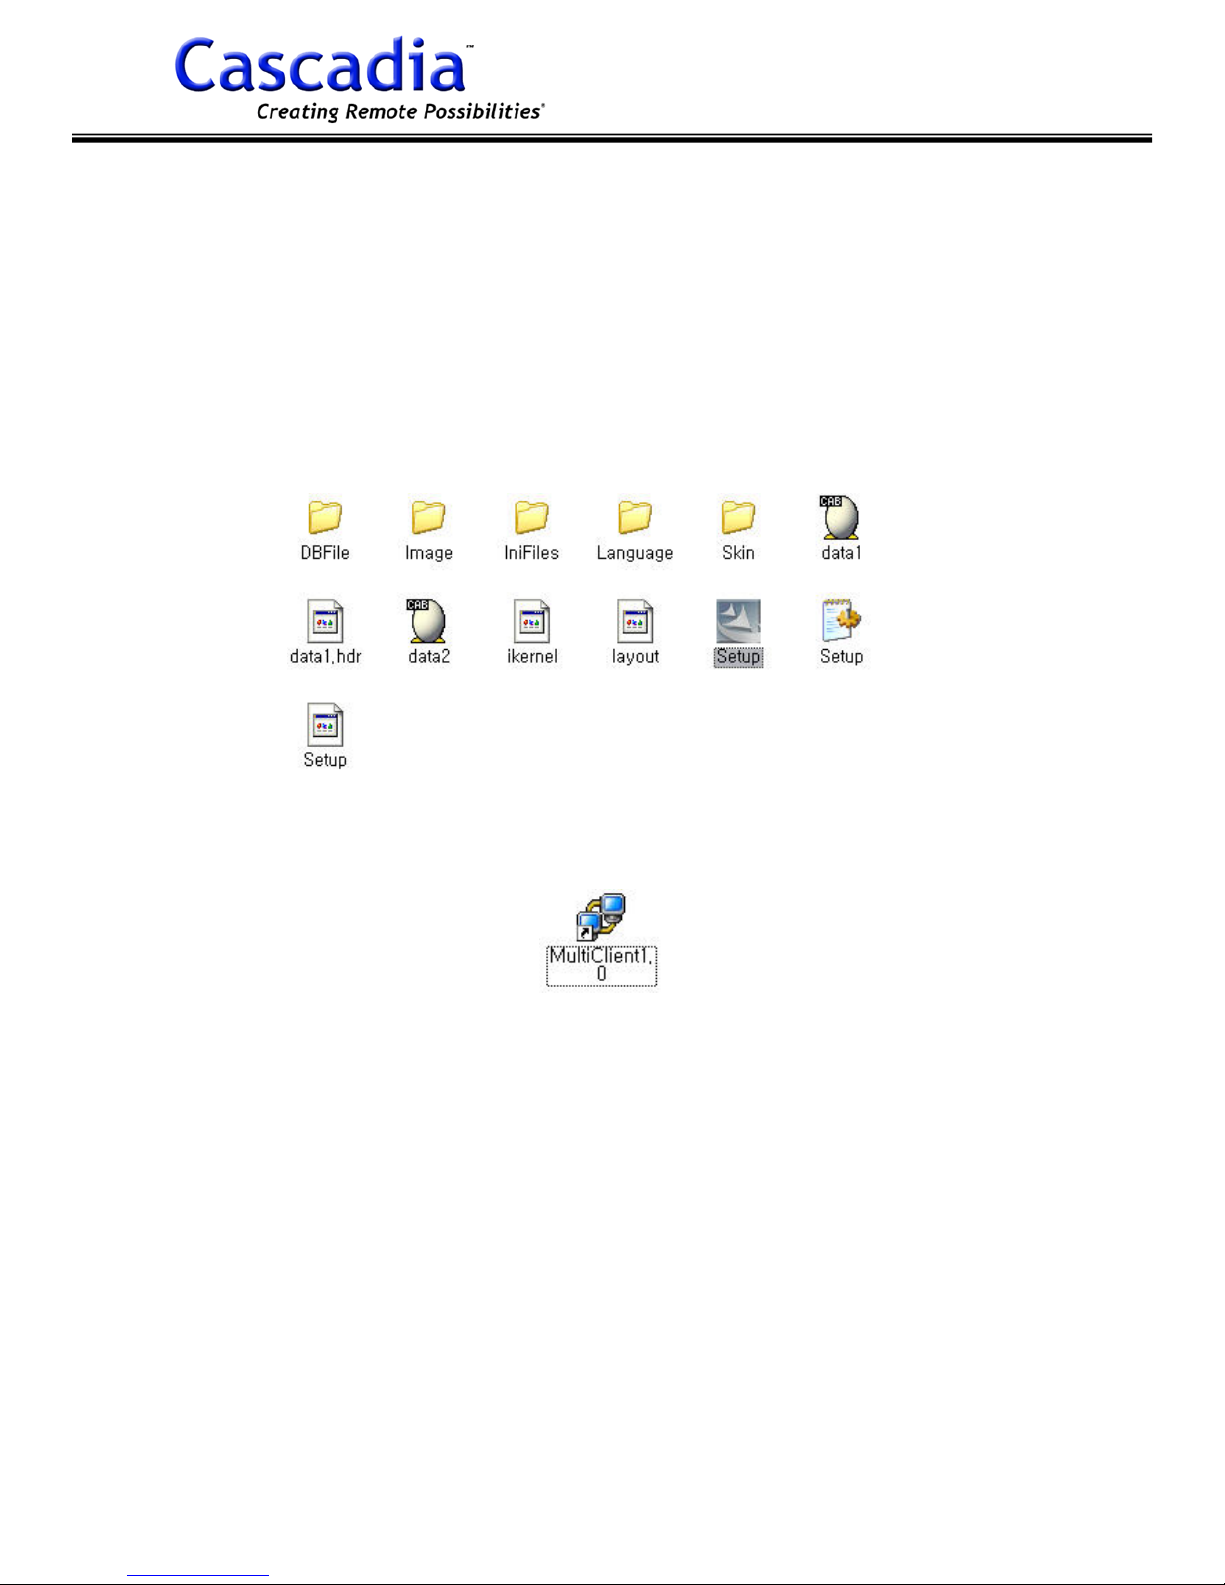
You can view, record and search video images from multiple NVS2004s (up to 9) by
the Multi-Client software provided.
You can install using program CD coming with NVS2004. Simply run Setup.exe from
installation program folder (ex ; MultiClient-2006-00-00).
After installation, the below program shortcut will be created in Windows desktop.
Cascadia Video Products
(888) 421-0050
30
Version 1.0.1 Rev 9.27.07
Page 31
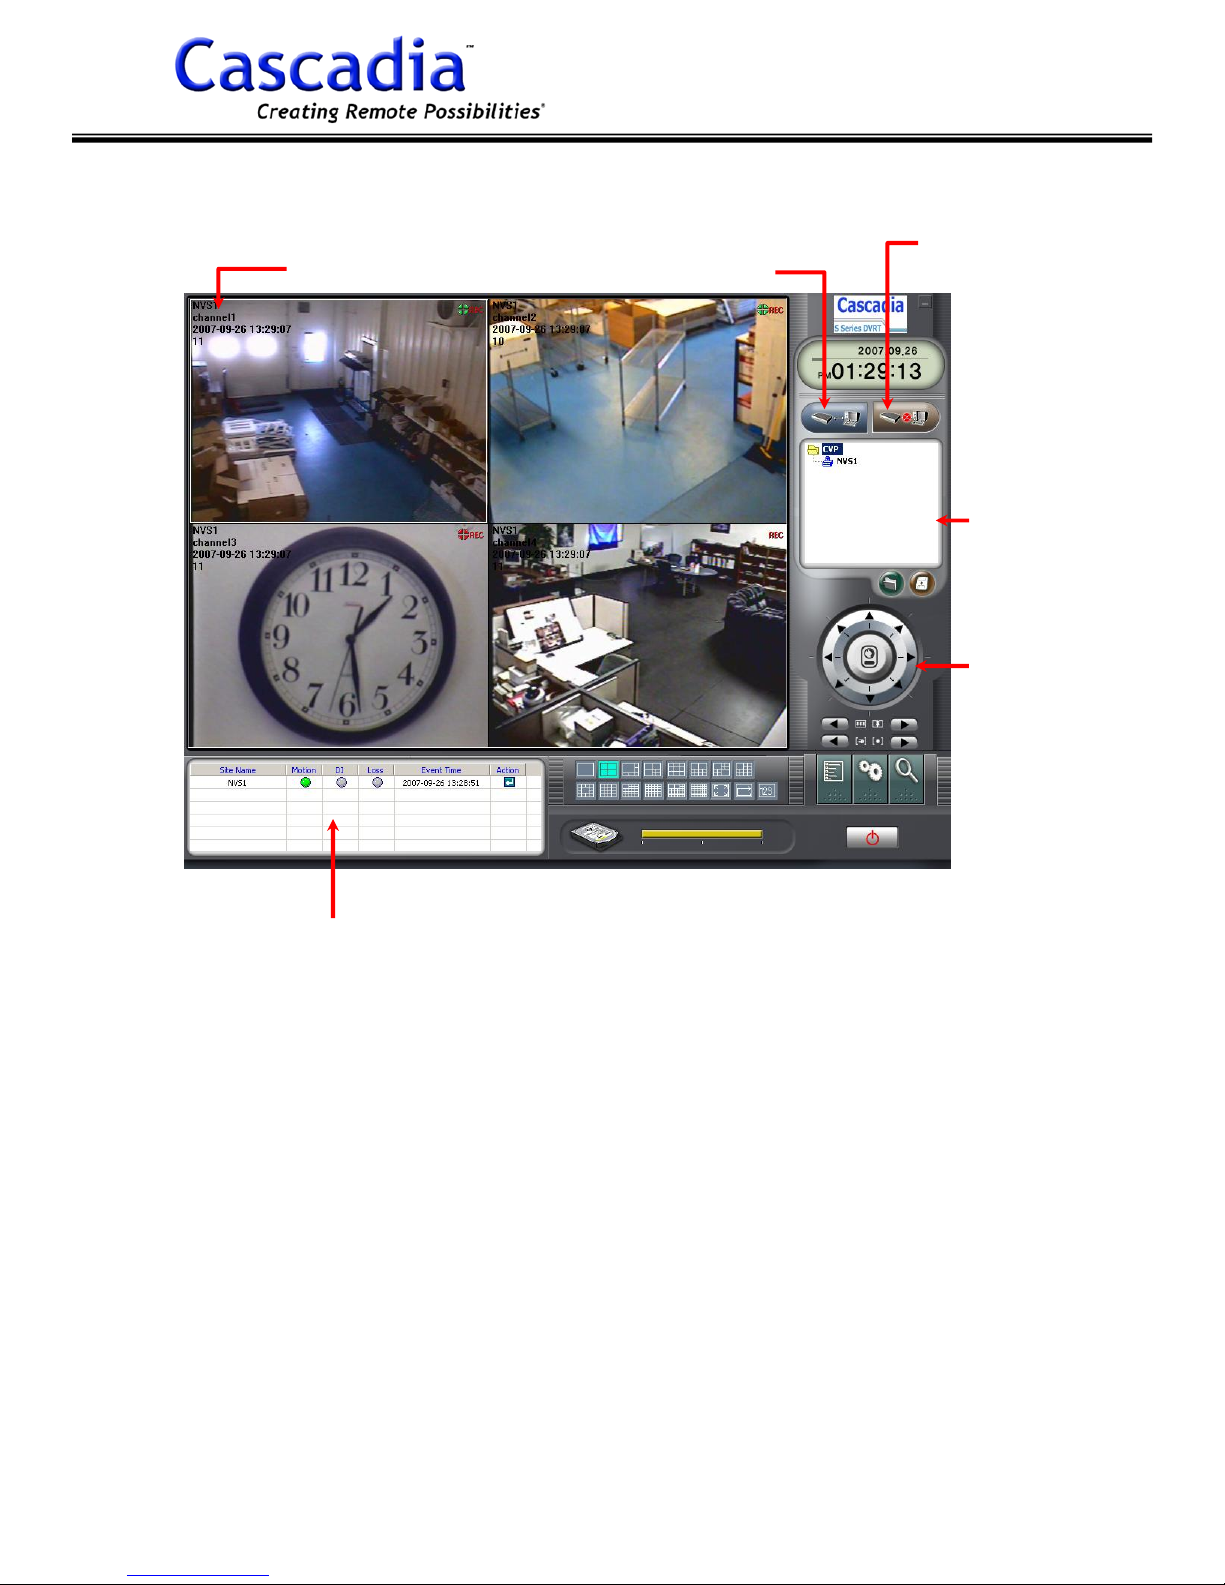
6.2 FUNCTIONS ON LIVE MODE GUI
Network Video Server-NVS2004
Image Viewing
Window
Connect
all servers
Disconnect
all servers
Server List
PTZ Control
Button
Event Manager
Cascadia Video Products
(888) 421-0050
31
Version 1.0.1 Rev 9.27.07
Page 32
Network Video Server-NVS2004
6.3 VIEWING LIVE IMAGES
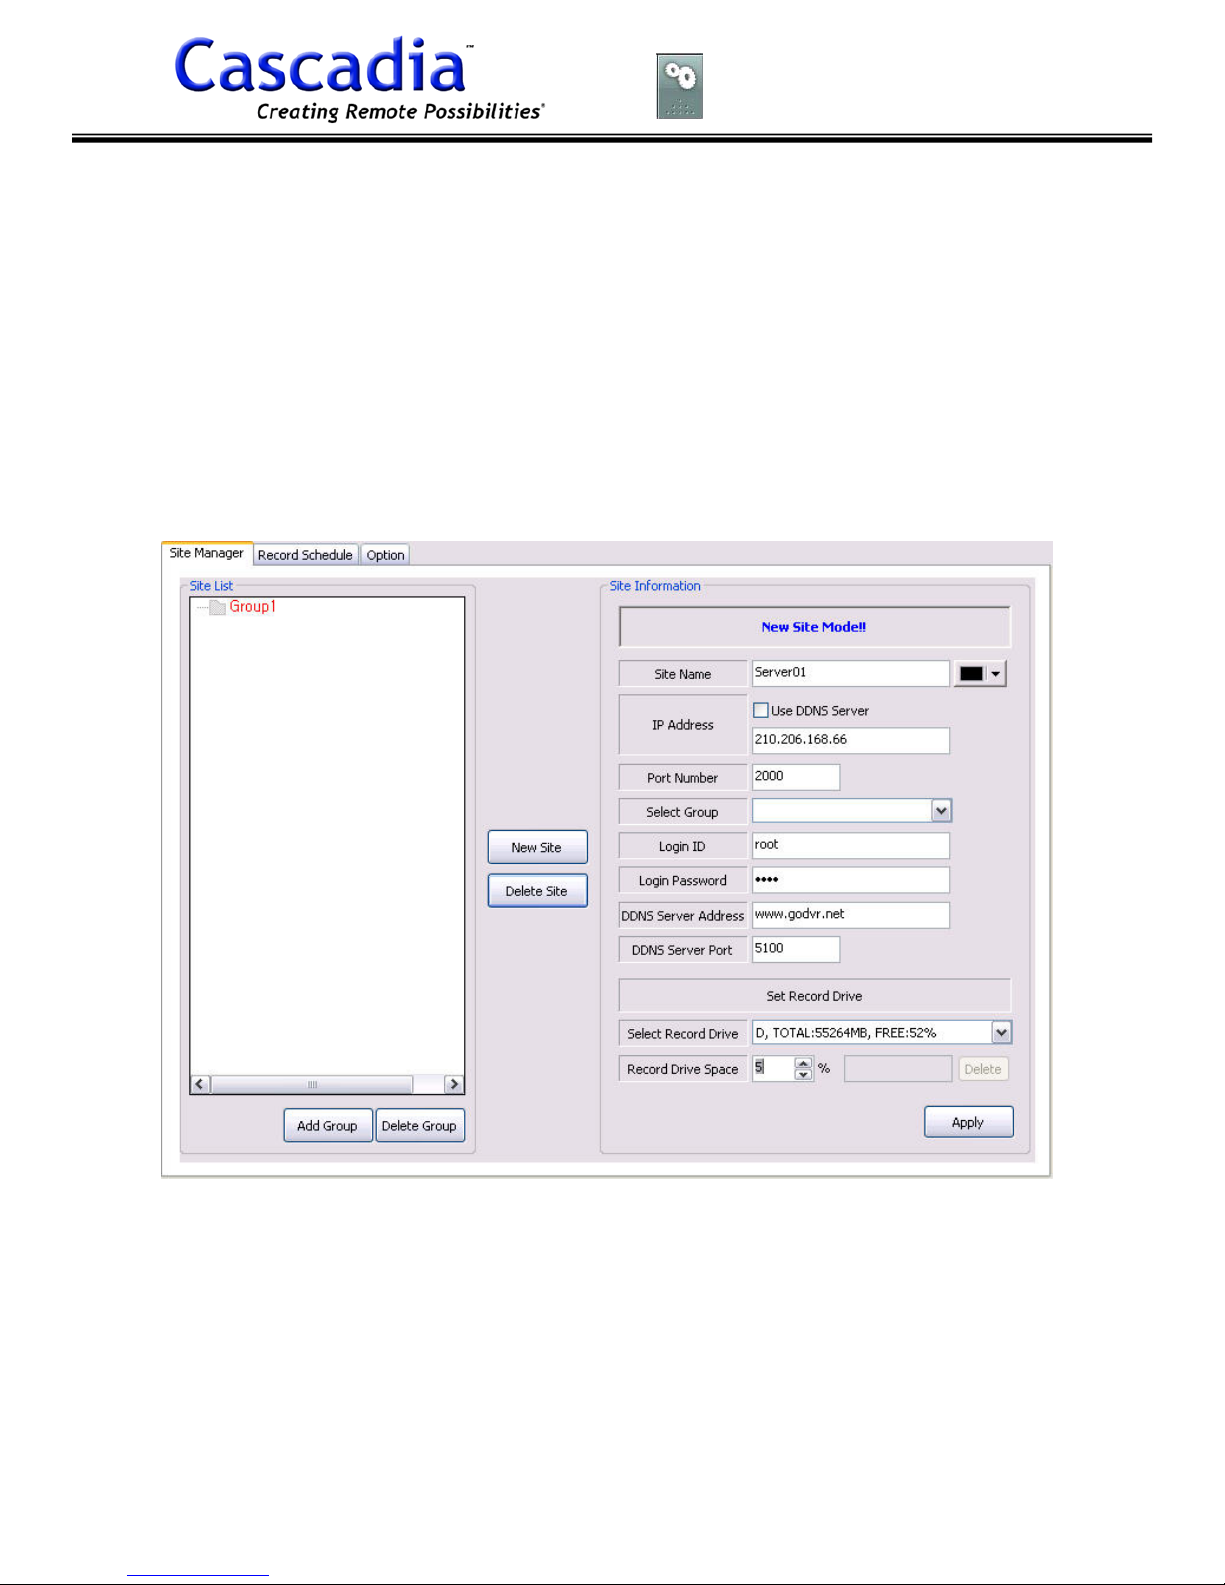
1) Left click “Client Setup Menu Button”.
2) Select “Site Manager Tab”.
3) Left click a group using “Add Group” button.
4) Left click “New Site” button. Enter required information in “Site Information field.
Note: If you use DDNS, check on “Use DDNS Server” and enter DDNS ID instead
of IP address.
5) Enter the video streaming port no. as set in Network setting of Admin menu
(factory default :2000). The port should be forwarded if NVS2004 is behind router or
firewall.
6) Enter Login ID/Password as in User setting of Admin menu.
7) Select one partition of local HDD to record live video images of the registered site.
If you set to D:, the recording will be written on D: drive.
Set the usage rate in the selected partition. If you set to 5%, 5% space of the se-
lected drive will be written. After the space is full, the data will be overwritten from
older data.
8) Then left click “Apply”. Exit from Client Setup Menu.
Cascadia Video Products
(888) 421-0050
32
Version 1.0.1 Rev 9.27.07
Page 33
Network Video Server-NVS2004
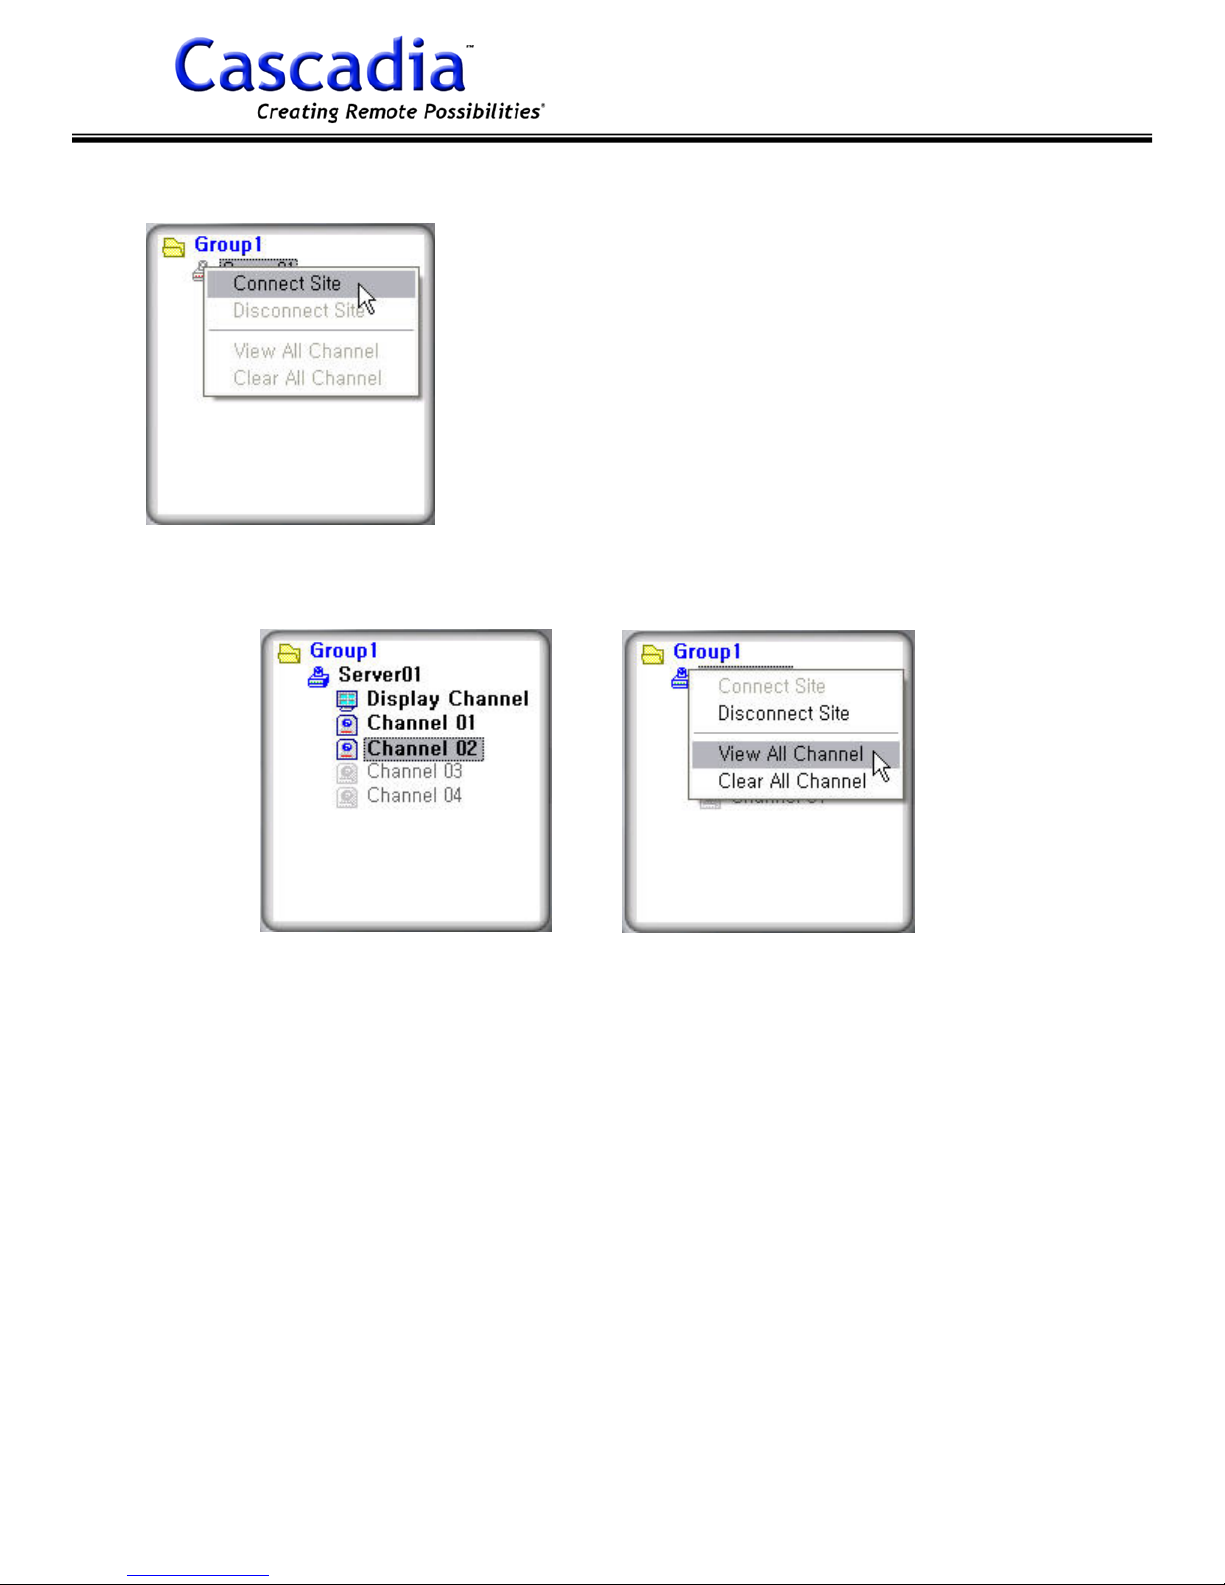
9) Right-mouse click on site name on server list and select “Connect”. Then the site
will be connected.
10) Click each channel no. to view video. Or right-mouse click on site name and select “View All Channel”.
Cascadia Video Products
(888) 421-0050
33
Version 1.0.1 Rev 9.27.07
Page 34
Network Video Server-NVS2004
6.4 RECORDING IMAGES
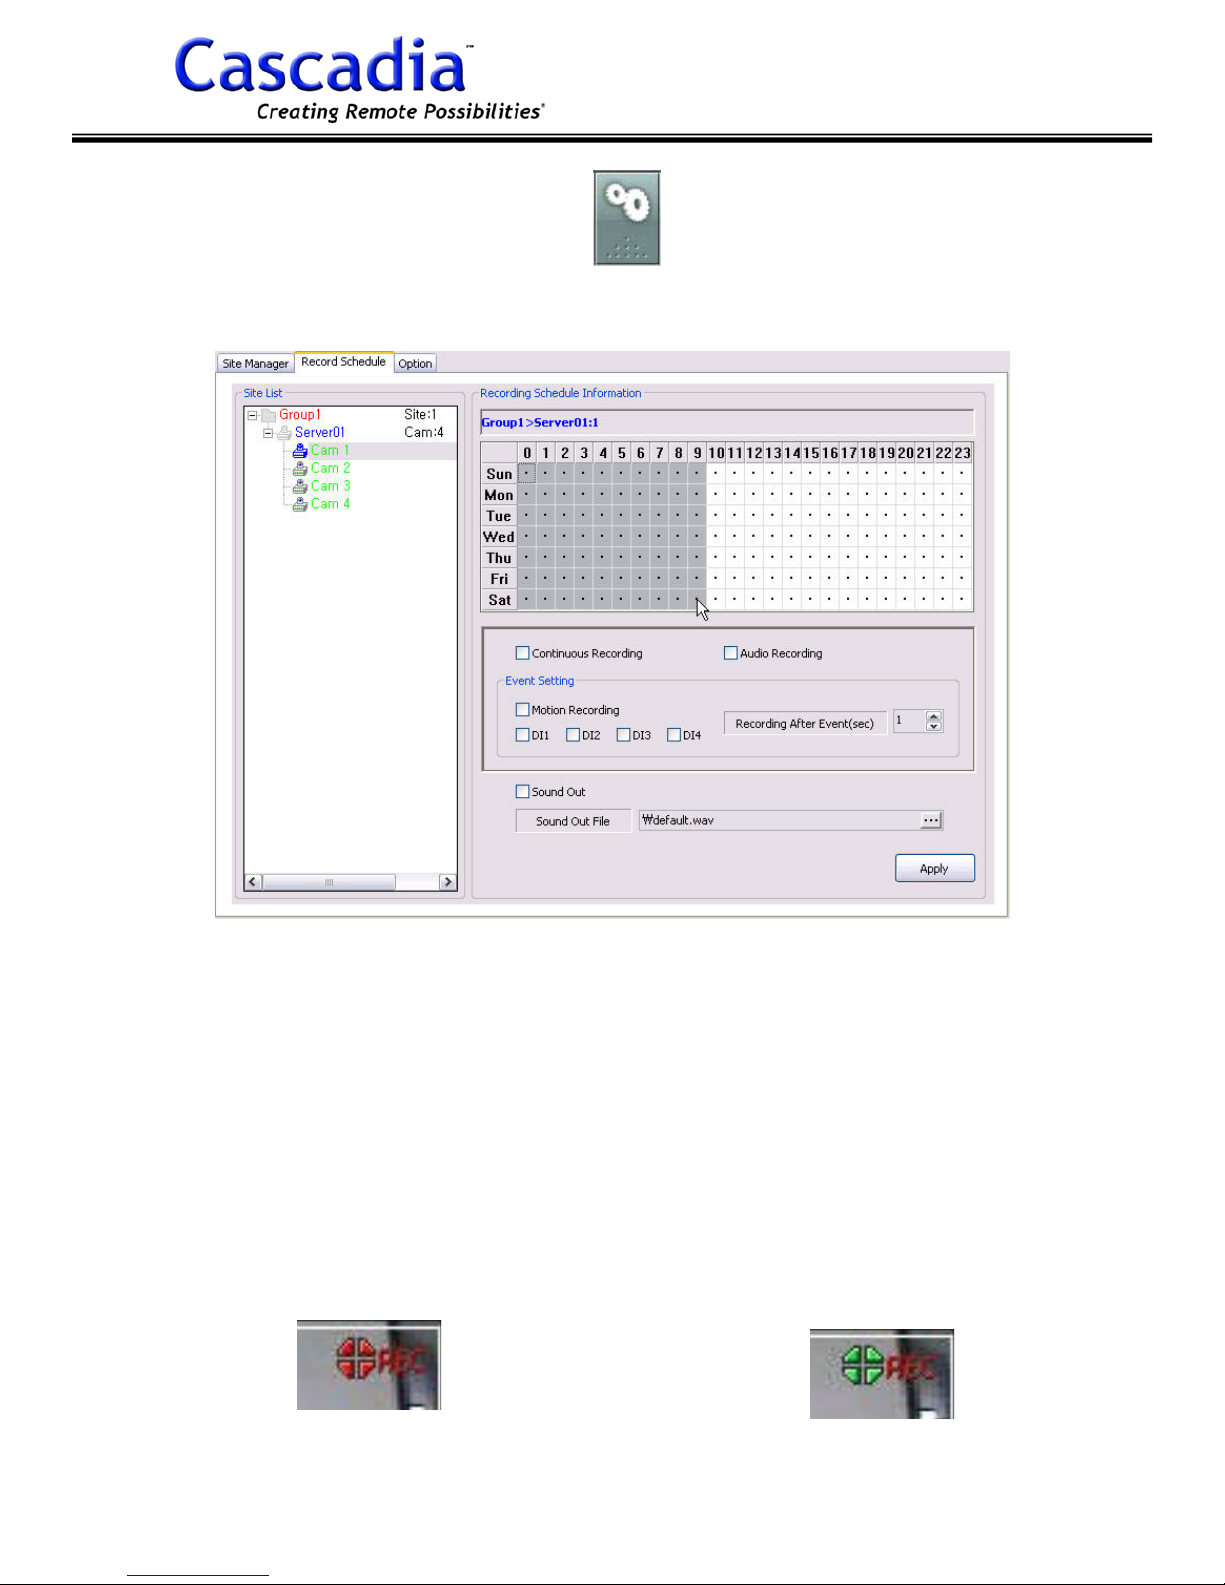
1) Left click “Client Setup Menu But- ton”.
2) Select “Record Schedule Tab”.
3) And select the channel no. under each site. Select day/time to set recording by drag
& drop on the time table.
4) Check on each recording option ;
- Continuous Recording : record video full time without intermittence
- Audio Recording : record audio
- Motion Recording : record video when motion event occurs
- DI1 ~ DI4 : record video when sensor event occurs
- Recording After Event : record video prior to event for the time set
5) Left click “Apply”. And exit from client setup menu.
6) Then recording will be done by recording schedule.
7) While recording is done, the indication is displayed on the camera view.
Cascadia Video Products
(888) 421-0050
34
- Motion Recording: Green - Continuous Recording: Red
Version 1.0.1 Rev 9.27.07
Page 35
Network Video Server-NVS2004
6.5 SEARCHING THE IMAGES
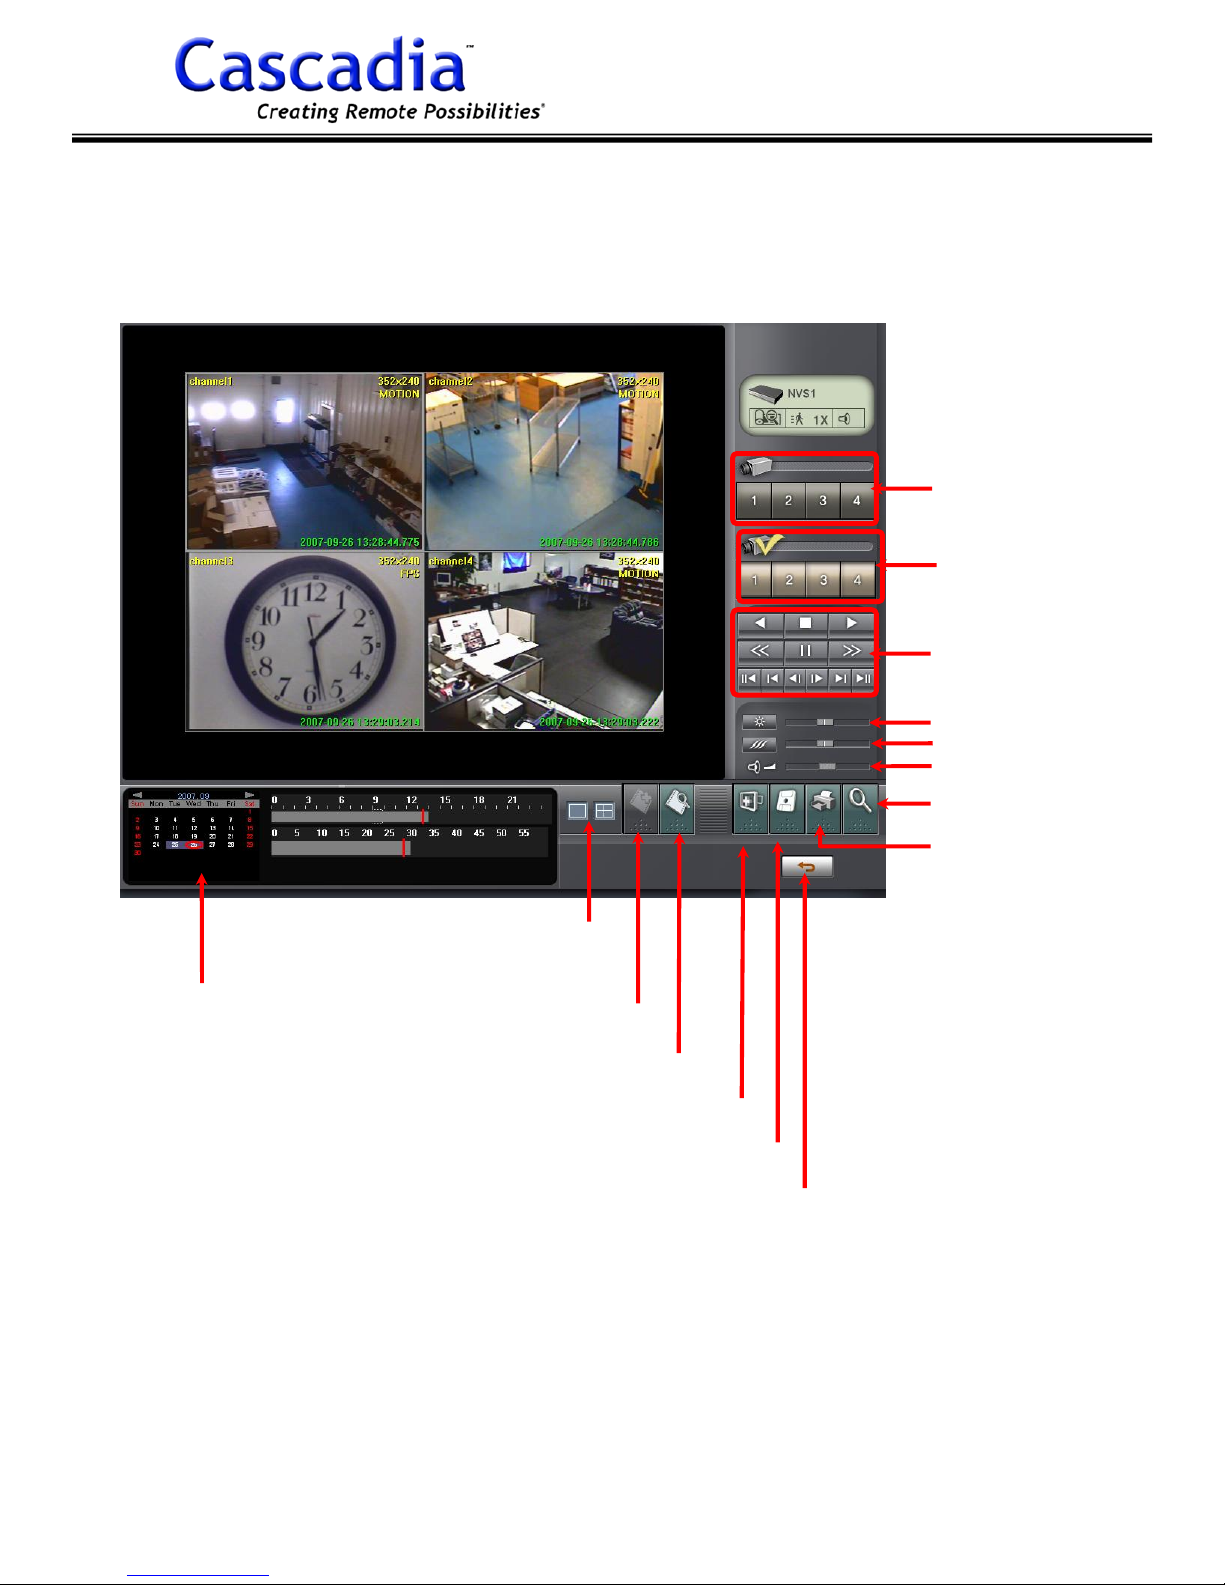
Left click “Search Button” to enter search menu.
Then the below search menu shows up.
Playback Channel
Selection
Playback Channel
On/Off
Playback Control
Search by Date/
Brightness
Sharpness
Volume
Search Mode
Print Image
Screen Division Selection
Add To Bookmark
View Bookmark List
Digital Zoom
Snapshot
Return To Live Mode
Cascadia Video Products
(888) 421-0050
35
Version 1.0.1 Rev 9.27.07
Page 36

Network Video Server-NVS2004
Cascadia Video Products
(888) 421-0050
36
Version 1.0.1 Rev 9.27.07
 Loading...