

Page 1
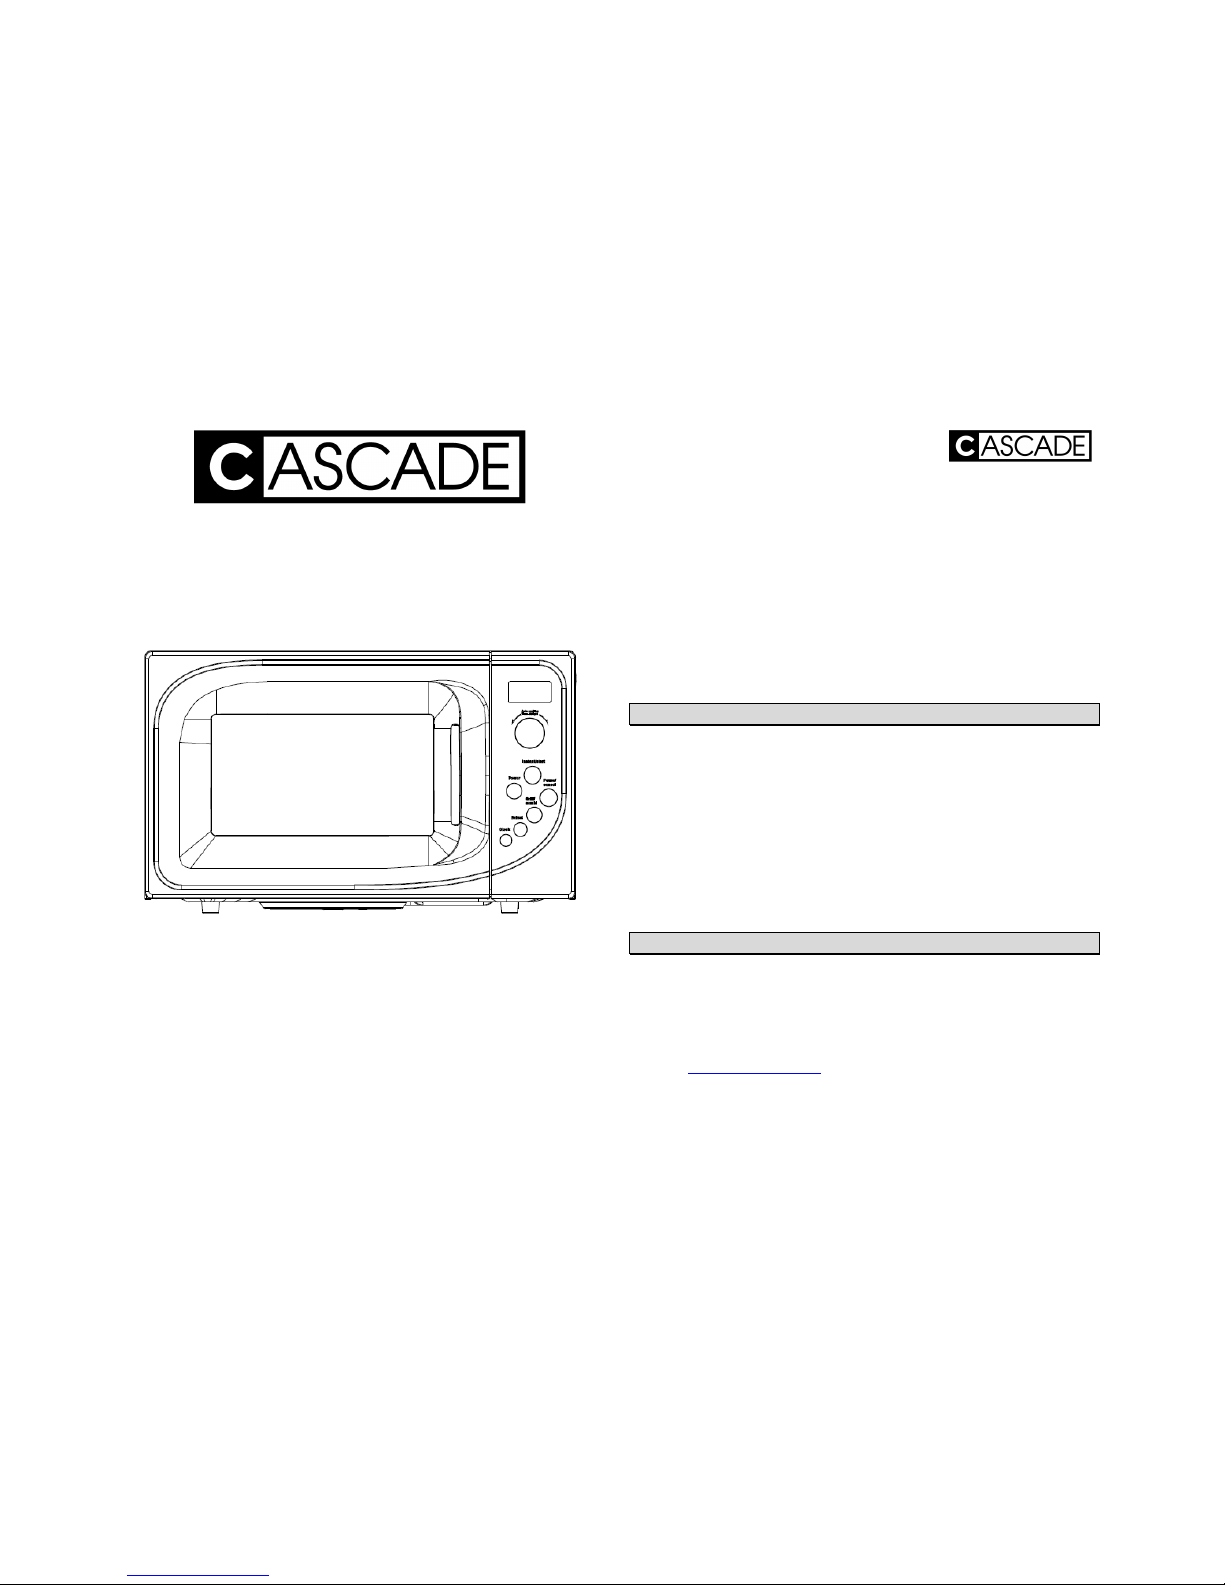
Microwave Oven
Model CE2139MO
INSTRUCTION MANUAL
PLEASE SAVE THESE INSTRUCTIONS
Dear Valued Customer
Thank you for purchasing a CASCADE appliance.
We understand the importance of your purchasing decision,
and appreciate your final choice to introduce this CASCADE
product into your home.
Your CASCADE appliance is recognised as a quality product at
an affordable price, and is proudly supported by our after sales
service team. We encourage you and your friends to choose
from the range of CASCADE appliances available exclusively to
The Warehouse.
TECHNICAL INFORMATION
Please make sure that your house installation voltage
corresponds to the voltage marked on the unit.
Mains supply: 230-240V ~ 50 Hz – AC only
Rated Power: Input 1280 watts
Output 800 watts
Operating Frequency: 2450 MHz
Outside Dimensions: 47.5cm x 37cm x 28cm (WxDxH)
Oven Capacity: 22 liter
Turntable: 245mm
SERVICE HELPLINE
In the unlikely event of failure or for product information
please contact the below help lines during normal working
hours.
New Zealand call 0800-898580
Email: [email protected]
Australia call Toll Free 1-800-858011
1
Page 2
CONTENTS
Page 1 Welcome.
Technical specifications.
Service.
Page 2 Contents
Page 3 Before first use.
Safety and installation
Page 4 Safety and installation.
Page 5 Safety and installation.
Microwave cooking principles.
Page 6 Microwave cooking principles.
Page 7 Parts and Turntable guide.
Page 8 Control panel guide.
Page 9 Using the oven.
Clock setting.
Manual time and power setting.
Page 10 Setting Power level.
Oven Delay Timer.
Page 11 Multi Level Cooking.
Express Cooking.
Page 12 Auto Defrosting.
Auto Cooking.
Page 13 Weight conversion.
Child lock.
Cooking tips.
Page 14 Cooking Tips.
Utensils guide.
Page 15 Utensils Guide.
Page 16 Important safety instructions.
Page 17 Important safety instructions.
Maintenance and cleaning.
Page 18 Maintenance and Cleaning.
Page 19 Warranty
2
BEFORE FIRST USE
Your CASCADE appliance has been packaged carefully to
ensure the product reaches you in good condition. If the
product has been damaged, dropped, has a malfunction in any
way, or if the supply cord is damaged, immediately contact
your retailer for replacement or repair.
Carefully unpack your CASCADE appliance. Make sure you do
not discard any packaging material until all parts of the
appliance have been found.
Carefully wipe the exterior of the appliance to remove any dust
that may have accumulated. Dry with a dry towel. Do not use
harsh abrasive cleaners. Remove any label or sticker.
WARNING! Do not immerse in water or any other liquids.
SAFETY AND INSTALLATION
Microwave Exposure Safety
The following safety precautions must be taken to avoid
possible exposure to excessive microwave energy
before using this appliance.
Do not attempt to operate this oven with the door open. Do
not tamper with the door safety interlocks.
Do not place any object between the oven face and the oven
door or allow any build up of food or dirt between the sealing
surfaces.
WARNING: If the door or door seals are damaged, the oven
must not be operated until it has been repaired by a trained
person.
3
Page 3
WARNING: It is hazardous for anyone other than a trained
person to carry out any service or repair operation that
involves the removal of any cover that gives protection against
exposure to microwave energy. Do not attempt to service this
appliance yourself. Return to a suitably qualified service
personnel for repair.
Before Use
Read all safety instructions carefully before using this
microwave.
Installation
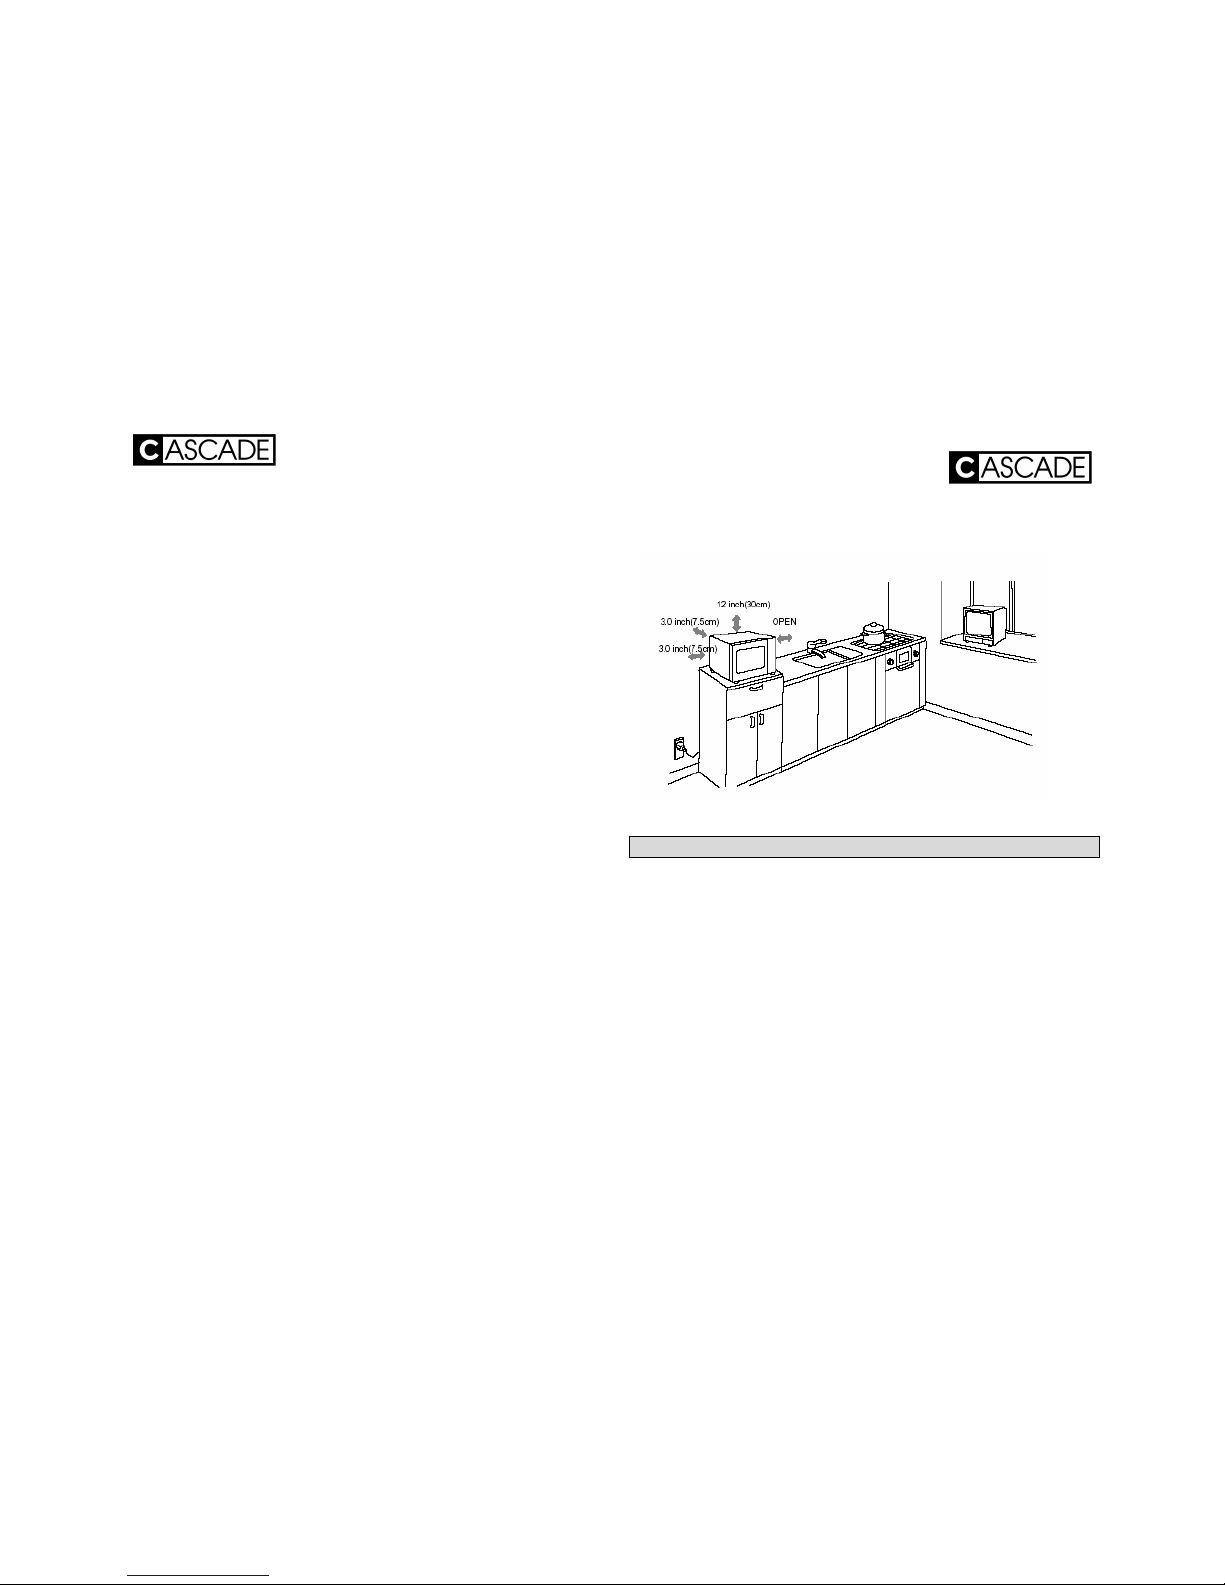
This oven must have sufficient airflow. Allow a space of 30cm
above the oven, 7.5cm at the rear of the oven and 7.5cm at
each side of the oven as a minimum.
Place oven on a flat level surface with sufficient strength to
hold its expected weight when in use, taking into account any
food or dish used. Do not pace any object on top of this
appliance.
Do not operate the oven near any other heat source, near
moisture or high humidity or combustible materials.
This appliance is for indoor household use only. It should not
be used outdoors or for commercial or industrial use.
CAUTION! This appliance must be connected to a suitable
230-240 V AC earthed supply socket. It is recommended that
you do not use any other appliances on the same power
circuit.
4
WARNING! Do not operate the microwave oven without the
turntable and guide roller in place.
MICROWAVE COOKING AND SAFETY PRINCIPLES
Always arrange the food carefully and evenly. Place the
thickest areas of the food towards the outside of the oven if
possible.
Always cook for a shorter time if you are unsure and then add
more if required. Severely overcooked food may smoke or
ignite.
Always cover the food to ensure even cooking and to avoid
splattering.
5
Page 4
Turn foods over once when cooking such items as chicken,
roasts or large food quantities. Rearrange foods during the
cooking process, placing items from the centre to the outside,
reversing from the outside to the centre to improve cooking
time and evenness.
Remove twist-ties from any bag.
Pierce foods with heavy skins such as potatoes. Eggs in their
shell and whole hard-boiled eggs shall not be heated in
microwave ovens since they may explode, even after
microwave heating has finished.
Utensils should be checked to ensure that they are suitable for
use in microwave ovens. Utensils may become hot because of
the heat transferred from the heated food. Use an oven cloth
to remove.
When heating food in plastic or paper containers, check the
oven frequently due to the possibility of ignition.
Microwave heating of beverages can result in delayed eruptive
boiling. Therefore care has to be taken when handling the
container.
The contents of feeding bottles and baby food jars are to be
stirred or shaken and the temperature is to be checked before
consumption, in order to avoid burns.
WARNING: Liquids or other foods must not be heated in
sealed containers since they are liable to explode.
Do not use any metal utensils, trays or cooking dishes. Do not
use recycled paper. Round or oval dishes are better than
square or oblong dishes.
WARNING: DO NOT OPERATE THE OVEN WHEN EMPTY.
6
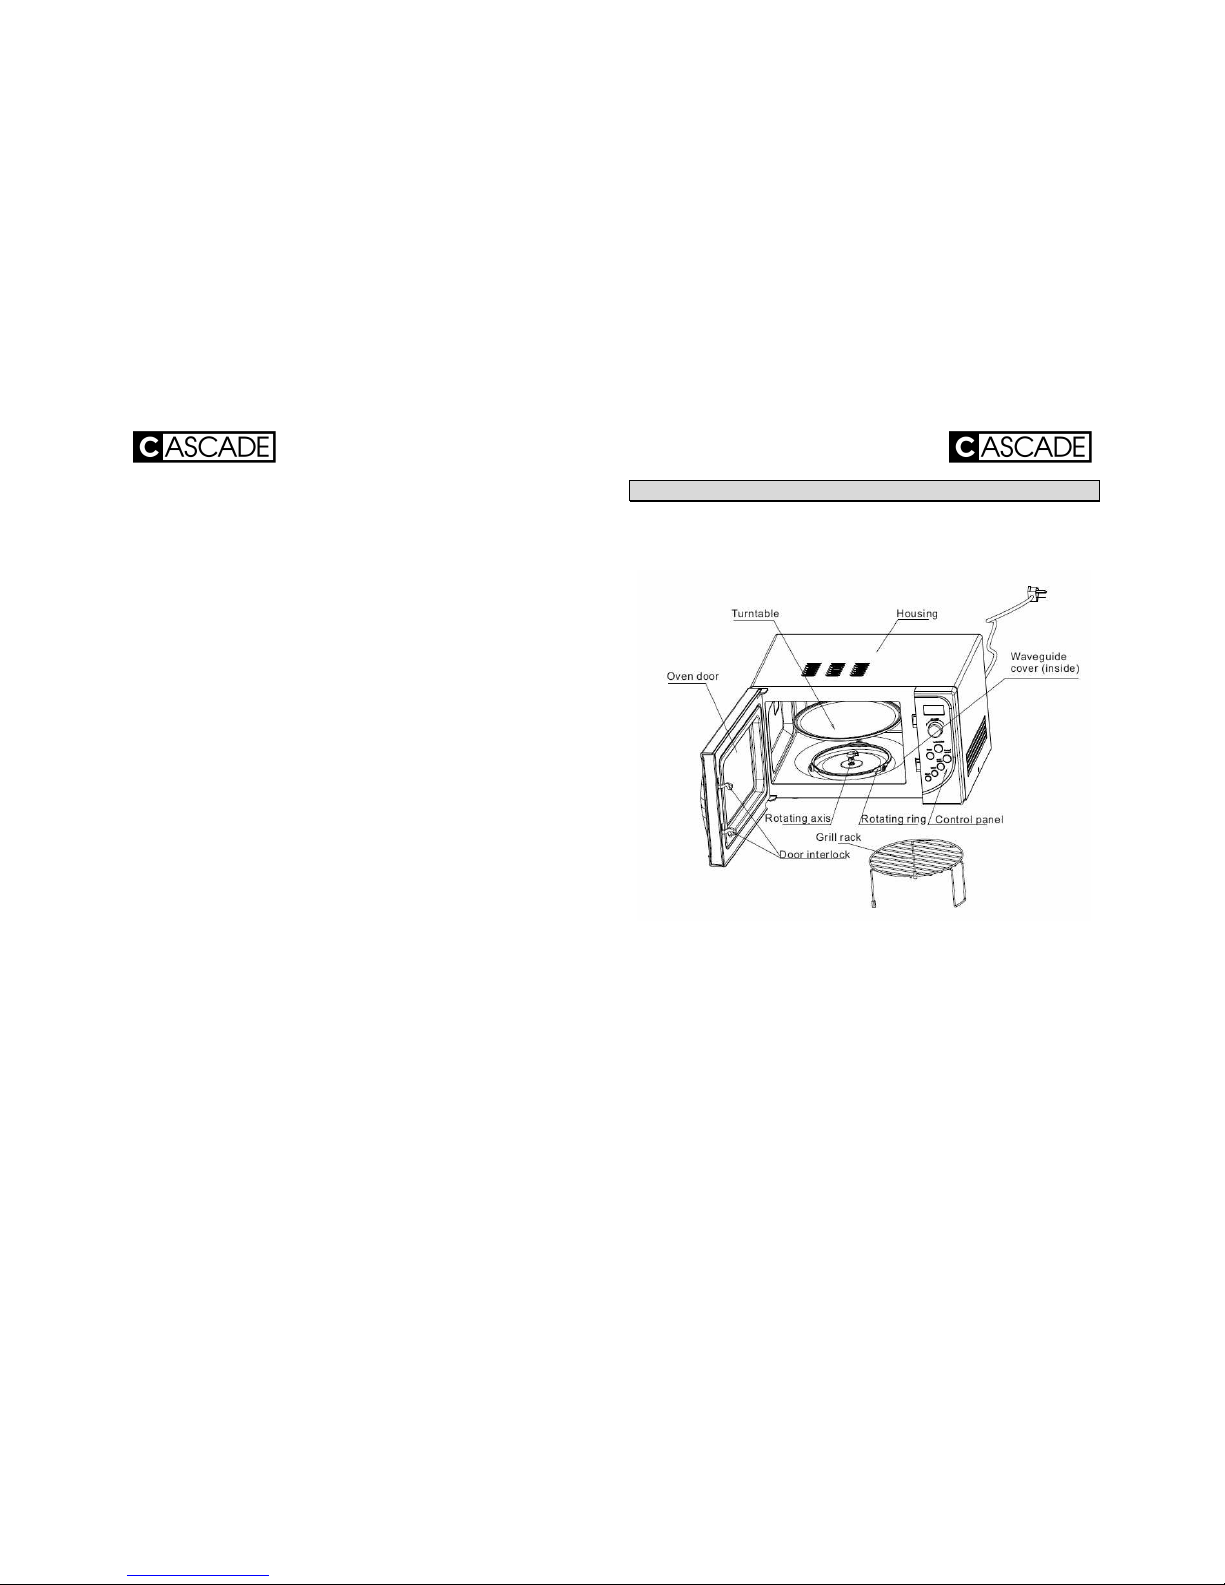
PARTS AND TURNTABLE GUIDE
Do not throw away any packaging until all parts of the
appliance are found.
7
Page 5
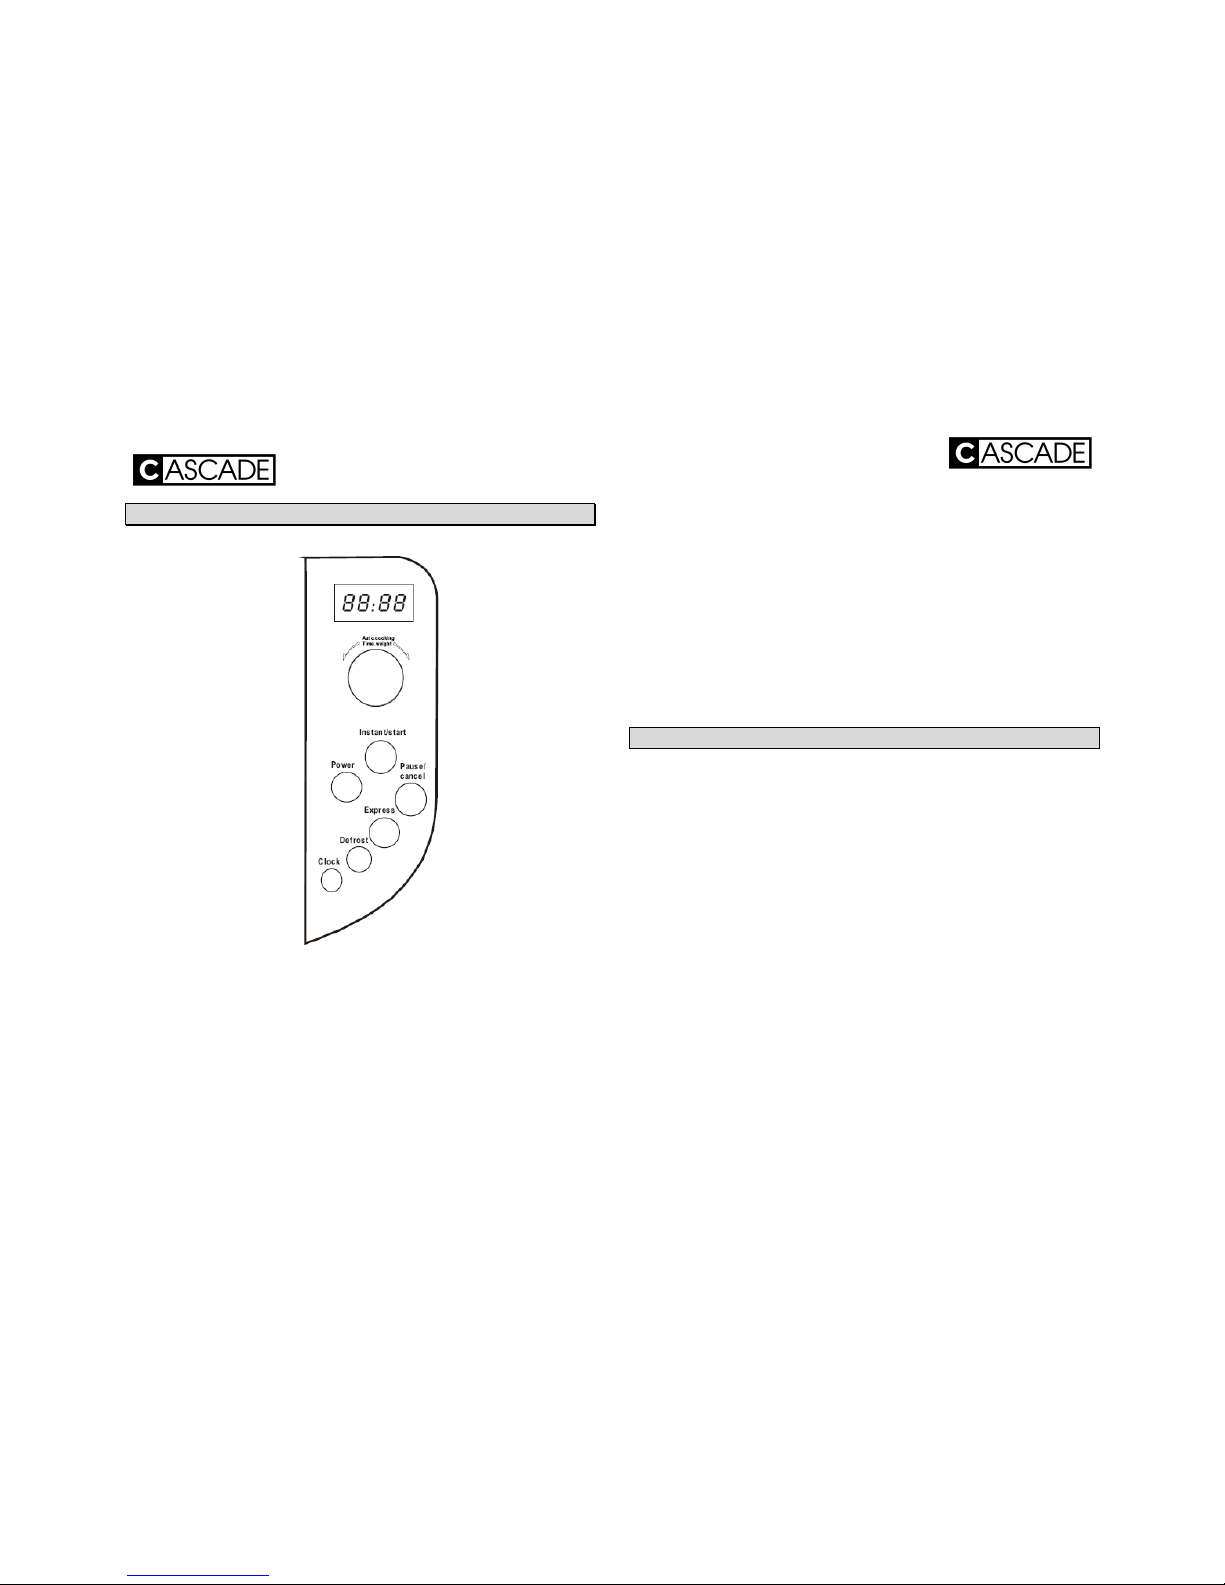
CONTROL PANEL GUIDE
8
Control Panel Description
Refer full instructions for detailed information.
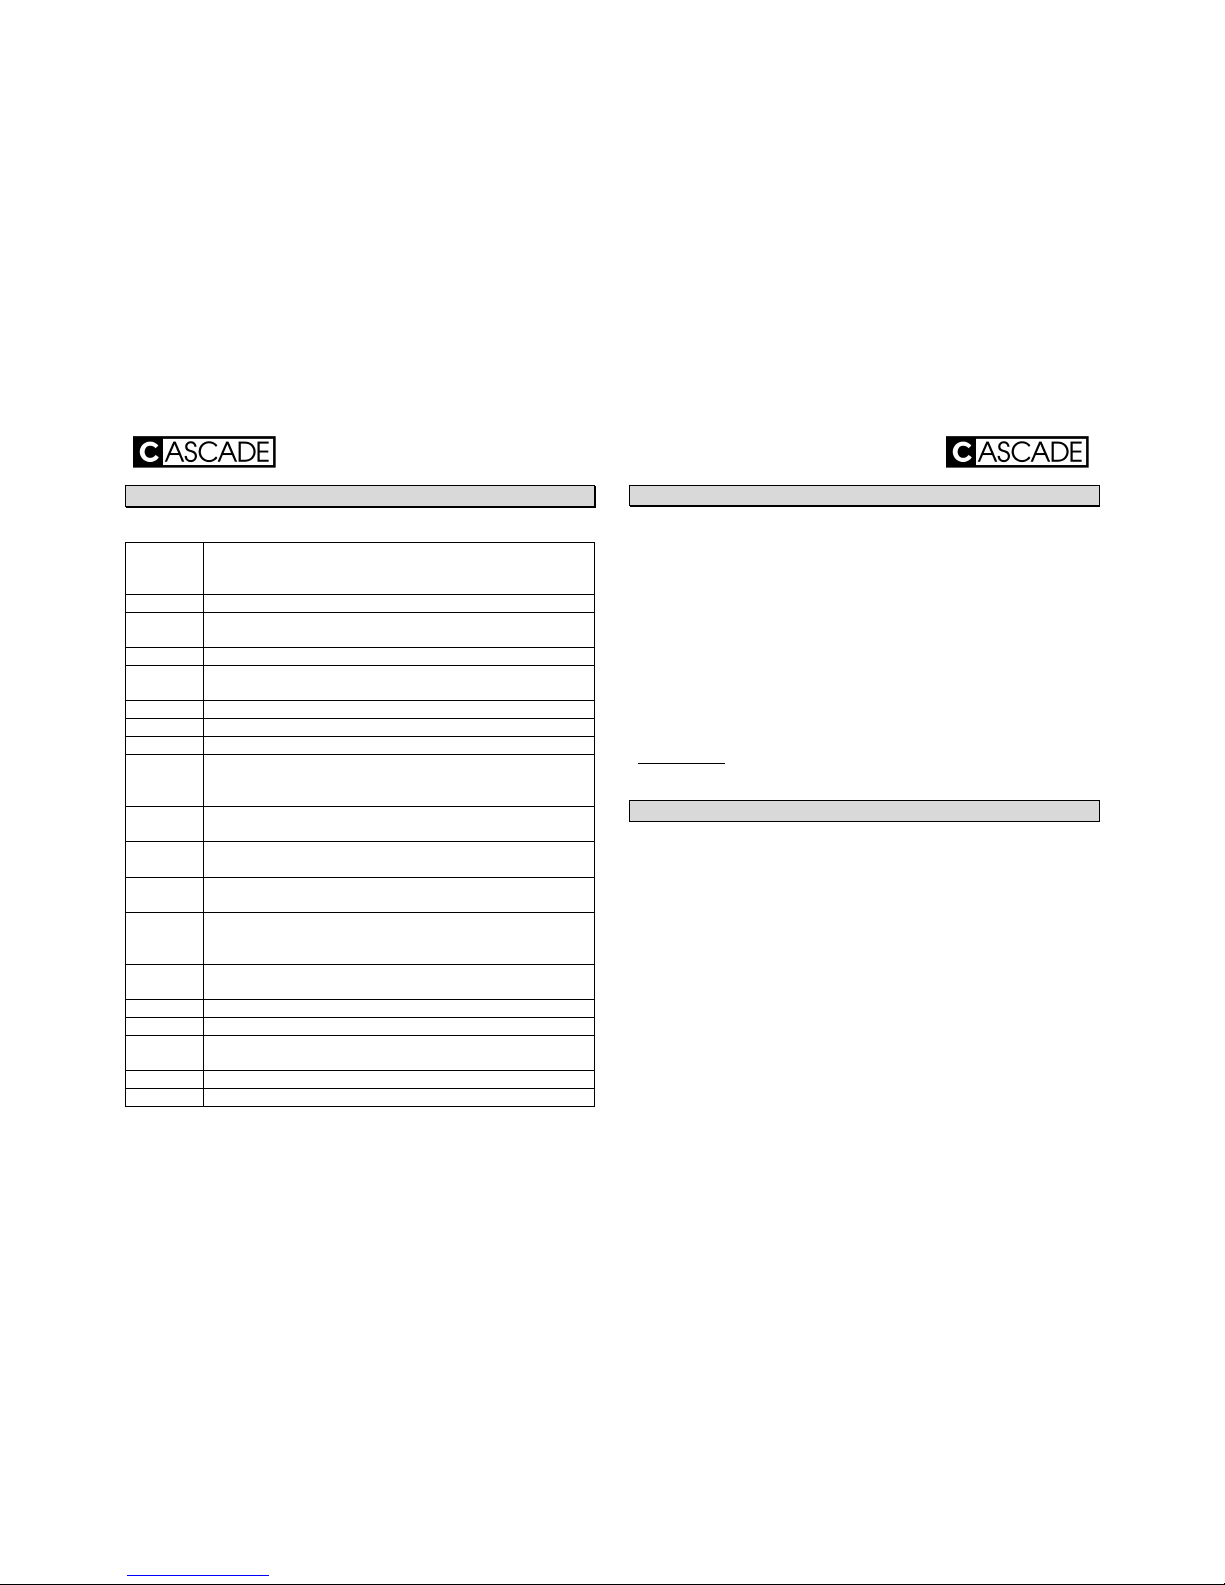
Power. Used to set the ‘Power’ cooking level.
Express. Used to quickly heat any item to 3 pre-set levels.
Defrost. Pre-set to defrost at 3 levels by weight.
Clock. Use to set the time and or cooking time.
Pause/Cancel. Use to pause or stop any program.
Instant Start. Start button. Use also to quick start on high at
1 minute on high.
Auto Cooking/Time/Weight. Use to set auto cooking, adjust
time or alter weight settings.
USING THE OVEN
Clock Setting
When first connected to the power supply, the display will flash
“:”. The current time must be set. To set time:
• Touch CLOCK pad. The hour display will flash.
• Turn the ‘Auto cooking’ knob to set the hour.
• Touch CLOCK pad.
• Turn the ‘Auto cooking’ knob to set the minutes.
• Touch the CLOCK button to confirm time. Note. This clock is
a 24hour clock.
Manually setting the Time and Power Settings
To set the time and power level manually:
• Press the POWER button to select power level and then turn
the ‘Auto cooking’ knob to the desired time setting. Press
INSTANT START to commence cooking.
At completion microwave will emit six short ‘Beep’ sounds and
‘END’ will show. To finish press PAUSE/CANCEL button to
return to the current time.
9
Page 6

Setting the Power Level
To alter power level, press the
POWER
pad once or more times
as detailed below. This oven has 5 pre-set power level
settings. The following guide indicates the power levels
available in this oven.
• Press once for HIGH - 100% power level.
• Press twice for MED HIGH - 80% power level.
• Press 3 times for MED - 60 %power level.
• Press 4 times for MED LOW - 40% power level
• Press 5 times for LOW - 20% power level.
Setting the Oven Delay Timer
The oven can be timed to commence cooking at a later time.
To set the oven delay firstly you must set the normal time as
indicated previously under ‘Clock Setting’. Then you must set
the delayed power level and cooking time.
For example to set cooking delay
• Set the current time first.
• Press POWER button to select the desired power level.
• Turn the AUTO COOK knob to select the cooking time.
• Press CLOCK button and hold for 3 seconds.
• Set the desired delayed start time as if you were setting the
clock time normally.
• Press the CLOCK button to confirm delay cooking. Oven
display will return to normal clock setting. At the preset time
cooking will commence.
• Press PAUSE/CANCEL when completed.
Note. Delayed cooking is not programmable for DEFROST or
EXPRESS cooking settings.
10
Multi Level Cooking
You can program the microwave to cook at different stages
with different power and settings. For example to cook on
HIGH for three minutes then LOW for one minute follow
these steps.
• Press POWER button once to show ‘H’
• Adjust AUTO COOK knob to set 3:00 minutes.
• Press POWER button again and select ‘L’
• Adjust AUTO COOK knob to set 1:00 minutes.
• Press INSTANT START button to commence.
Microwave oven will cook for 3 minutes on high before
automatically cooking for 1 minute on low. At the end of
cooking cycle END will display. Press PAUSE/CANCEL to end
program.
Express Cooking
To quickly heat commonly used ingredients or liquids use the
preset EXPRESS button. Simply press EXPRESS button once,
twice or three times and then INSTANT START to commence.
The microwave is set to operate for 30seconds, 1 minute or 1
minute and 30 seconds intervals on high depending the
number of times EXPRESS button is pressed.
For example to cook for 1 minute on HIGH;
• Press EXPRESS button twice.
• Press INSTANT START button to commence.
11
Page 7
Auto Defrosting
The microwave has 3 preset defrost levels as indicated below.
Press the defrost button once, twice or three times to select
and then set the weight using the AUTO COOKING knob.
d1
For defrosting meat. Weight range 0.1kg to 2.0kg.
d2
For defrosting poultry. Weight range 0.2kg to 3kg.
D3
For defrosting seafood. Weight range 0.1kg to 0.9kg.
For example to defrost 1kg of meat;
• Press DEFROST button once.
• Turn AUTO COOK knob to 1.0kg.
• Press INSTANT START button to commence.
Microwave will operate on DEFROST power level for 26 minutes
and 27 seconds.
Note. It is necessary to turn food over during DEFROST
program
Auto Cooking
The microwave memory has 8 preset AUTO COOKING time
settings on HIGH. To operate simply rotate the AUTO
COOKING knob to the desired setting and press INSTANT
START. Below are the preset cooking times.
A1: 2 minutes 30 seconds.
A2: 2 minutes 40 seconds.
A3: 1 minute.
A4: 2 minutes 20 seconds.
A5: 4 minutes 40 seconds.
A6: 7 minutes 12 seconds.
A7: 10 minutes 12 seconds.
A8: 6 minutes 30 seconds.
12
Weight Conversion Guide
1 kilogram = 2.20lbs
1 kilogram = 1000 grams
1 ounce = 28 grams
1 lb = 16 ounces
Setting SAFETY LOCK
The safety lock prevents unsupervised operation by young
children. To set, press and hold PAUSE CANCEL pad for 3
seconds. LOCK indicator lights and microwave cannot be used.
To cancel, press and hold PAUSE CANCEL pad for 3 seconds.
To Stop Oven at any Time
To pause the cooking process at any time simply touch STOP
pad once. To cancel program and return to the current time
press STOP pad a second time.
COOKING TIPS
Listed here are some simple cooking guides to making
microwave cooking simpler.
Stirring
Stir foods such as casseroles occasionally during the cooking
process. Food at the outside of the dish will cook quicker than
that in the center.
Arrangement
Arrange foods with the thickest parts to the outside of the
center point. Place delicate portions toward the center of the
oven.
13
Page 8
Shielding
Shield delicate portions such as chicken wing tips by placing a
small amount of aluminum foil. Do not use in excessive
amounts as this may damage the oven.
Standing
Food cooked in the microwave can build up internal heat when
removed from the oven. Always allow a period of 1 –2 minutes
before eating.
WARNING! NEVER OPERATE THE OVEN EMPTY.
UTENSILS GUIDE
Recommended
Microwave Browning Dish.
Used for browning the exterior of meats. Follow individual
instructions of the browning dish.
Microwavable Plastic Wrap
Use to retain steam and stop foods from splattering throughout
the oven. Leave a small hole in wrapping.
Paper Towels
Short term cooking. Use to absorb splattering and excess
liquids. Do not use recycled paper towels that may contain
metal and ignite.
Glass and Glass Ceramic Bowls and Dishes
For all general cooking use.
Paper Plates and Cups
Use for only short term cooking at low temperatures.
14
Limited Use
Aluminum Foil
Use narrow strips only to prevent overcooking of exposed
areas (I.E Chicken Wings). WARNING. Use only in limited
amounts. Keep away from the outer walls of the oven.
Ceramic, Porcelain and Stoneware.
Use only if labeled ‘Microwave Safe’.
Plastic.
Use only if labeled ‘Microwave Safe’. Other plastics may melt.
Do Not Use
Glass jars and bottles - regular glass is too thin and may
shatter causing damage or injury.
Paper Bags – they can create a fire hazard and may ignite.
Polystyrene type cups and plates – they may melt.
Metal objects or utensils - these will damage the oven. The
warranty will become void if used in this microwave.
Utensil Test
To test a dish to confirm its suitability, follow these simple
steps.
Place the empty dish in the microwave and microwave on
HIGH for 30 seconds. A dish that becomes very hot should not
be used.
WARNING! IF IN DOUBT DO NOT USE THE DISH
15
Page 9
IMPORTANT SAFETY INSTRUCTIONS
When using electric appliances always observe safety
regulations where applicable to reduce the risk of fire, electric
shock and personal injury. Always check that the power supply
corresponds to the voltage on the rating plate.
Supply
This appliance must be connected to a suitable 230-240V ~
50Hz power supply. If using an extension cord, ensure that the
extension cord is of a suitable 10amp power rating. Fully
unwind the supply cord when in use as a coiled cord may
overheat. It is not recommended to use other appliances on
the same circuit as that supplying this oven.
Supply cord and plug
Do not abuse or damage the power cord. Fully uncoil before
use. If the supply cord is damaged, it must be replaced by the
manufacturer or its service agent or a similarly qualified
person in order to avoid a hazard.
Children
Caution. Keep out of reach of children. This appliance is not
intended for use by young children or infirm persons. Young
children must be supervised to ensure that they do not play
with the appliance. WARNING: Only allow children to use the
oven without supervision when adequate instructions have
been given so that the child is able to use the oven in a safe
way and understands the hazards of improper use.
Use and environment
Do not use outdoors. Do not leave in direct sunlight as this
may damage the plastic. This appliance is for household use
only, not commercial or industrial use. The power socket must
be readily accessible so that the oven can be unplugged in an
emergency.
16
Fire risk
If smoke is observed, switch off the appliance and keep the
door closed in order to stifle any flames.
Damaged or dropped
Always inspect your appliance before use. Do not use this
appliance if it has been damaged, dropped, left outdoors or
dropped in water. Do not use if the door seals or door are
damaged in any way. Return it to an authorised service dealer
for examination and repair.
Water
Do not immerse in water or other liquids or use near
washbasins or sinks. Ensure that the appliance does not get
wet (water splashes etc.) and do not use it with wet hands.
Danger to children
Safely dispose of plastic bags and other components of the
packaging. They may be potentially dangerous to children.
MAINTENANCE AND CLEANING
Regular maintenance of your appliance will keep it safe and in
proper operational order.
When not in use or before cleaning, always disconnect the
appliance from the mains supply.
Cleaning
Regularly clean the outside of the appliance with a soft damp
cloth and dry it with a dry towel. Do not immerse in water. Do
not use harsh solvents to clean the plastic. Wash the turntable
and roller ring in hot soapy water regularly. Remove any food
deposits from the oven. Wipe the door and seal areas to
remove any soil build up. WARNING: Ensure the air vents are
free from obstruction at all times.
17
Page 10
Failure to maintain the oven in a clean state could lead
to deterioration of the surface that could adversely
affect the life of the appliance and possibly result in a
hazardous situation.
Odor removal
Combine a cup of water with the juice and skin from one
lemon in a deep microwavable bowl, microwave on high for 5
minutes. Wipe the inside thoroughly with a dry towel.
Damage check
Always check that the appliance is in good working order.
Check the power supply cord and plug regularly for cuts or
damage. Do not use if the door seals are damaged in any way.
Service
Do not attempt to service this appliance. If it is faulty in any
way, contact the help line or return it to the retailer
immediately.
18
Warranty Card
This product is guaranteed against faulty materials and workmanship for a
period of two years from the date of purchase with proof of purchase. The
obligation to the purchaser under this warranty is limited to servicing the unit
and replacing defective parts or refund when the product is returned freight
prepaid to the r etailer with proof of purchase. This warranty becomes void if
the product has been t ampered with, damaged by accident, damaged in any
other way by improper use or has been purchased second hand. All production
orders have quality inspections. In the unlikely event of a deficiency, please
contact the retailer from which this product was purchased.
WARRANTY FOR APPLIANCES USED COMMERCIALLY LIMITED TO 90
DAYS
Type of Appliance: __________________________________________
Model No.: _______________________ Purchase Date: _________________
Product Purchased From: __________________________________________
______________________________________________________________
Your Name: ____________________________________________________
Address: _______________________________________________________
_______________________________ Phone Number: __________________
IMPORTANT!
Please retain this warranty card along with your purchase receipt. Please do
not post to the retailer. If service or a warranty claim is required, both of these
documents are to be returned with the appliance to your retailer, otherwise a
fee may be charged or warranty declined. For technical help contact the
helpline.
Technical Assistance Helpline
New Zealand call Toll Free 0800-898580
Australia call Toll Free 1-800-858011
Email [email protected]
 Loading...