


WARRANTY
WARRANTY
2000W Lawn Mower
COMPLIES WITH
INTERNATIONAL
IEC60335
SAFETY SPECIFICATIONS
2000W
PLEASE READ ALL INSTRUCTIONS BEFORE USE
Model:
LM2000E
IMPORTANT:
Thank you for purchasing a Casals Electric
Lawn mower (hereinafter referred to as the
“Power tool”). This manual will assist you in
operating and maintaining your power tool.
This manual is the latest version. With the
continuous improvement and upgrading of
this product, the manufacturer reserves the
right to modify this manual without notice.
The manufacturer shall assume no liability
for incorrect information contained in this
manual. This manual is an integral part
of the power tool. When the power tool is
transferred to others, this manual should
be handed over to the new owner. The
users should pay special attention to these
instructions.
on your mower before attempting to operate
it, but above all, be sure you know how to
stop your mower in an emergency. Retain
this user manual and all other literature with
your mower for future reference.
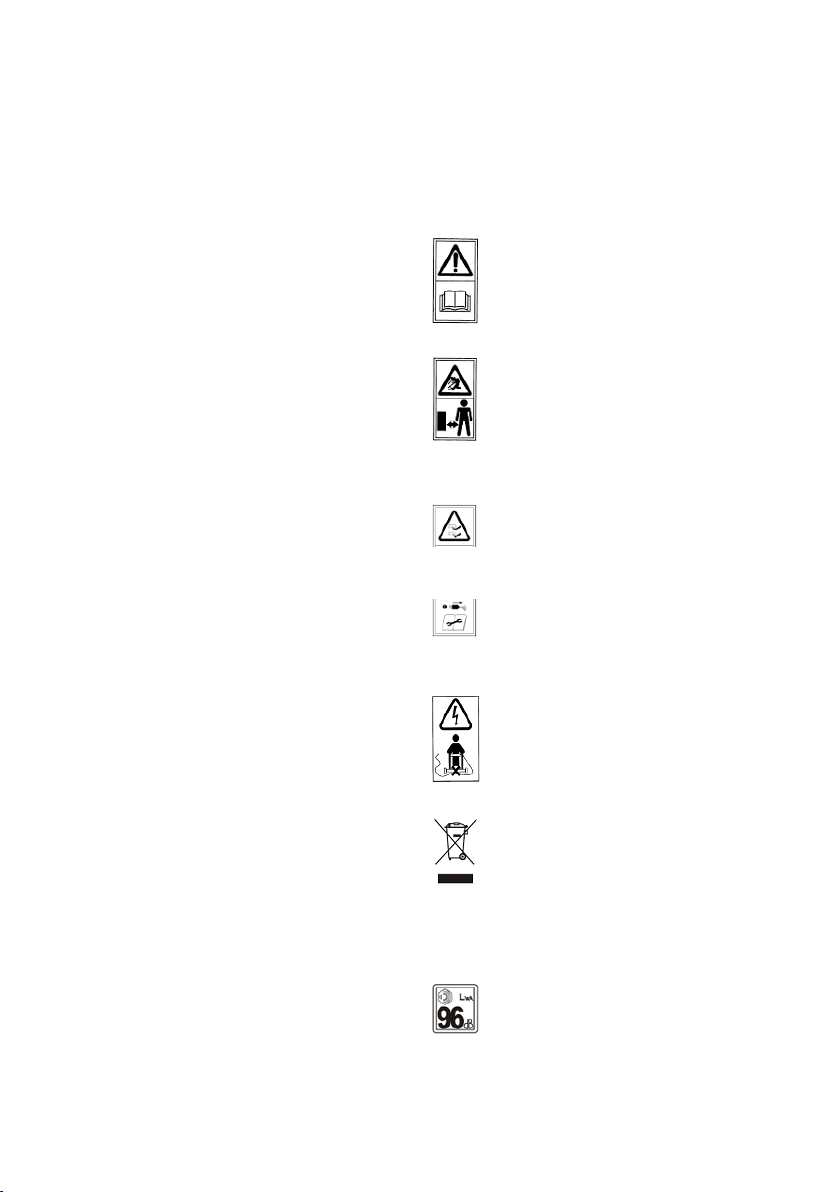
SYMBOLS MARKED ON THE PRODUCT
Read this instruction book
carefully before using the
lawn mower and keep it in a safe
place for future reference.
Keep bystanders away.
IMPORTANT:
The range of CASALS Outdoor Power tools
is safe and reliable, but incorrect use of
these products may cause personal injury
and or damage to your machine. Please
read this manual thoroughly before attempting to operate or assemble as this product
is required to operate strictly in accordance
with this manual.
WARNING
Read and understand all instructions. Save
these instructions. Failure to follow all instructions listed below may result in electric
shock, fire and or serious injury. The term
‘power tool’ in all of the warnings below
refers to your mains-operated (corded)
power tool.
KNOW YOUR LAWN MOWER
Read this manual carefully, observing the
recommended safety instructions before,
during and after using your lawn mower.
Following these simple instructions will also
maintain your lawn mower in good working
order. Familiarize yourself with the controls
Beware of sharp blades. Blades
continue to rotate after the motor
is switched off.
Remove the plug from the machine
before maintenance or if cord
damaged.
Keep the supply flexible cord away
from the cutting blades.
CAUTION! Unusable power tools
do not belong with domestic
waste. They must be taken to a
communal collecting point for
environmentally friendly disposal in
accordance with local regulations.
Noise level marking
Your tool noise is not more than
96dB.

DOUBLE INSULATED
Your mower is double insulated.
This means that all external parts
are electrically isolated from the
power supply. This is achieved by
placing an extra insulation barrier
between the electrical and m
chanical parts.
Parts Description
1. Upper handle
2. Safety push-button
3. Switch box
4. Locking knob
5.Plug
6. Grass catcher
7. Lower deck
8. Upper deck
9. Motor cover
10. Height adjusting lever
11. Lower handle
12. Cable clamp
13. Switch handle
14. Wheel
Fig.1A

2. GENERAL SAFETY RULES
The purpose of the safety rules is to attract
your attention to possible dangers. The
safety symbols and the explanations with
them, require your careful attention and
understanding. The safety warnings do not
by themselves eliminate any danger. The
instruction or warnings they give are not
substitutes for proper accident prevention
measures.
WARNING: Failure to obey a safety warning
can result in serious injury to yourself or to
others. Always follow the safety precautions
to reduce the risk of fire, electric shock and
personal injury. Save owner’s manual and
review frequently for continuing safe operation and instructing others who may use this
tool.
WARNING: This machine produces an electromagnetic field during operation. This field
may under some circumstances interfere
with active or passive medical implants. To
reduce the risk of serious or fatal injury, we
recommend persons with medical implants
to consult their physician and the medical
implant manufacturer before operating this
machine.
WARNING: The operation of any tool can
result in foreign objects being thrown into
your eyes, which can result in eyes severely
damaged. Before beginning power tool
operation, always wears safety goggles
or safety glasses with side shields and a
full face shield when needed. We recommend Wide Vision Safety Mask for use over
eyeglasses or standard safety glasses with
side shield.
IMPORTANT
READ CAREFULLY BEFORE USE.
KEEP FOR FUTURE REFERENCE.
1) Read the instructions carefully. Be familiar with the controls and the proper use of
the equipment;
2) Never allow children or people unfamiliar
with these instructions to use the lawnmower. Local regulations can restrict the age of
the operator
3) Never mow while people, especially
children, or pets are nearby;
4) Keep in mind that the operator or user is
responsible for accidents or hazards occurring to other people or their property.
5) While mowing, always wear substantial
footwear and long trousers. Do not operate
the equipment when barefoot or wearing
open sandals; Avoid wearing clothing that is
loose fitting or that has hanging cords
or ties.
6) Thoroughly inspect the area where the
equipment is to be used and remove all objects which can be thrown by the machine.
7) Before using, always visually inspect to
see that the blades, blade bolts and cutter
assembly are not worn or damaged. Replace worn or damaged blades and bolts in
sets to preserve balance. Replace damaged
or unreadable labels.
8) Before use check the supply and extension cord for signs of damage or worn.
If the cord becomes damaged during
use, disconnect the cord from the supply
immediately. DO NOT TOUCH THE CORD
BEFORE DISCONNECTING THE SUPPLY. Do
not use the appliance if the cord is damaged
or worn.
9) Mow only in daylight or in good artificial
light.
10) Avoid operating the equipment in wet
grass.
11) Always be sure of your footing on
slopes.
12) Walk, never run.
13) For wheeled rotary machines; mow across
the face of slopes, never up and down.

14) Exercise extreme caution when changing direction on slopes.
15) Do not mow excessively steep slopes.
16) Use extreme caution when reversing or
pulling the lawnmower towards you.
17) Stop the blades if the lawnmower has
to be tilted for transportation when crossing surfaces other than grass, and when
transporting the lawnmower to and from the
area to be mowed.
18) Never operate the lawnmower with defective guards, or without safety devices, for
example deflectors and/or grass catchers,
in place.
19) Start or switch on the motor carefully
according to instructions and with feet well
away from the blades.
20) Do not tilt the lawnmower when switching on the motor.
21) Do not start the motor when standing in
front of the discharge chute.
22) Do not put hands or feet near or under
rotating parts, Keep clear of the discharge
opening at all times.
23) Never pick up or carry a lawnmower
while the motor is running.
24) Stop the motor and disconnect the plug.
Make sure that all moving parts have come
to a complete stop.
- Whenever you leave the machine;
- Before clearing blockages or unclogging chute.
- Before checking, cleaning or working
on the lawnmower.
- After striking a foreign abject. Inspect
the lawnmower for damage and make
repairs before restarting and operating
the lawnmower.
If the lawnmower starts to vibrate abnormally (check immediately).
- Inspect for damage.
- Replace or repair any damage parts.
- Check for and tighten any loose parts.
25) Stop the mower:
- Whenever you leave the lawnmower.
26) keep all nuts, bolts and screws tight to
be sure the equipment is in safe working
condition.
27) Check the grass catcher frequently for
wear or deterioration.
28) Replace worn or damaged parts for
safety.
29) Do not use the lawnmower if the cords
are damaged or worn
30) Do not connect a damaged cord to the
supply or touch a damaged cord before it is
disconnected from the supply. A damaged
cord can lead to contact with live parts.
31) Do not touch the blade before the machine is disconnected form the supply and
the blade have come to a complete stop.
32) Keep extension cords away from the
blade. The blade can cause damage to the
cords and lead to contact with live parts.
33) Disconnect the supply (i.e. pulling the
plug from the socket)
- whenever leaving the machine una
tended
- before clearing a blockage
- before checking, cleaning or working
on the machine
- after striking a foreign object
- whenever the machine starts vibrating
abnormally
34) Children are not allowed to use the
machine.
35) This appliance is not intended for use
by persons with reduced physical, sensory
or mental capabilities, or lack of experience
and knowledge, unless they have been given
supervision or instruction concerning use
of the appliance by a person responsible for
their safety.
36) If the external flexible cable or cord is
damaged, it shall be exclusively replaced by
the manufacturer or his service agent or a
similar qualified person in order to avoid a
hazard (not light than H05VV-F 2x1.0mm2)

37) Instructions for the safe operation of the
appliance, including a recommendation that
the appliance should be supplied via a
Residual Current Device (RCD) with a
tripping current of not more than 30 mA.
38) Always allow the machine to cool before
storing.
39) When servicing the blades be aware
that, even though the power source is
switched off, the blades can still be moved.
40) Replace worn or damaged parts for
safety. Use only genuine replacement par ts
and accessories.
4. TECHNICAL DATA
Model: LM2000E
Rated Voltage: 230-240V~
Rated Frequency: 50Hz
Rated Power: 2000W
No Load Speed: 3500/min
Grass catcher capacity 45L
Cutting Width: 420mm
Net weight: 13.8kg
Degree of protection
against liquid:
Height adjustment : 20-70mm,
IP24
6 adjustment
LM2000E
Sound pressure level at
the operator’s position
Measured sound power
level
Measured sound power
level
Guaranteed Sound
Power level
Vibration max.2.88m/s² K=1.5 m/s²
83dB(A) K=3 dB(A)
93.4dB(A) K=2.13dB(A)
93.4dB(A) K=2.13dB(A)
96dB(A)

5. ASSEMBLY
5-1 ASSEMBLY THE FOLDING HANDLE
A) Fix the lower handlebars into the unit
body with locking knobs as Fig. 2A,/Fig.2B/
Fig.2C shown.
B) Connect the upper handle and the lower
handle with the locking knob.
(Fig.2D/Fig.2E/Fig.2F)
C).Attach the cable clamp to the position
shown and then attach the cable (Fig.2G)
- The level indicator inflates if the catcher
is not full during the moving. (Fig. 3E)
- If the catcher is full, the indicator co
lapses; once this happens, stop moving
immediately and empty the catcher,
make sure it is clean and ensure its
meshwork is ventilated. (Fig. 3D)
IMPORTANT:
If the position of indicator opening is very
dirty, the indicator will not inflate-in this
case, clean the position of indicator opening
immediately.
Fig. 2A
Fig. 2D
Fig. 2G
5-2 ASSEMBLY THE GRASS CATCHER
1. To fit: Raise the rear cover and hitch the
grass catcher on rear of mower. (Fig.3A/
Fig.3B/Fig.3C)
2. To remove: grasp and lift the rear cover,
remove grass catcher.
Fig. 2B
Fig. 2E
Fig. 2C
Fig. 2F
Fig. 3A
Fig. 3D
6. ADJUSTMENT OF CUTTING HEIGHT
Apply outward pressure to disengage lever
from rack. Move lever forward or back to
adjust height.
The height (the blade to the ground) can be
adjusted from 20mm (position 1) to 70mm
(position 6), 6 height positions. All wheels
will be in the same height of cut.
Fig. 3B
Fig. 3E
Fig. 3C
There is a level indicator on the top of the
grass catcher that shows whether the
catcher is empty or full :
Fig. 3D
Fig. 3E

WARNING: Make this adjustment only when
the blade is stopped.
WARNING: Disconnect the electric cord
from the power supply.
7. SAFETY PRECAUTIONS
a) Always operate with the deflector or grass
catcher in the correct position.
b) Always stop the motor before removing
the grass catcher or adjusting the height of
cutting position.
1. Before mowing, remove all foreign
objects from the lawn which may be thrown
by the machine.
While mowing, stay alert for any foreign
objects which may have been missed.
(Fig.5A)
2. Never lift the rear of the mower while
starting the motor or during normal
operation. (Fig.5B)
3. Never place your hands or feel
underneath the underpan or into the rear
discharge chute while the motor is running.
(Fig.5C)
8. STARTING
8.1 STARTING
Before connecting up the lawn mower to the
electric power supply, make sure that the
mains supply voltage is 230-240V~ 50Hz.
Before start the lawn mower, fix the extension cord with the machine as the Fig.6A /
Fig.6B shown.
Fig. 6A
Start the motor as follows (Fig.6C)
a) Press the safety push-button (1).
b) and at the same time, pull the switch
handle
(2), to keep motor running, keep holding the
switch handle.
Fig. 6C
If you release the switch handle, the motor
will stop.
CAUTION! The blade starts turning as soon
as the motor is started.
WARNING! The blade will continue to rotate
after the motor is switch off.
8.2 FOR THE BEST RESULTS WHEN
MOWING
Clear lawn of debris. Be sure that the lawn is
clear of stones, sticks, wire or other foreign
objects which could be accidentally thrown
out by the mower in any direction and cause
serious personal injury to the operator and
others as well as damage to property and
surrounding objects. Do not cut wet grass.
For effective mowing do not cut wet grass
because it tends to stick to the underside of
the deck preventing proper mowing of the
grass clippings. Cut no more than 1/3 the
length of the grass. The recommended cut
for mowing is 1/3 the length of the grass.
Fig. 6B

WARNING: if you strike a foreign object,
stop the motor. Pull out the mains plug, thoroughly inspect the mower for any damage
and repair the damage before restarting and
operating the mower. Extensive vibration of
the mower during operation is an indication
of damage. The unit should be promptly
inspected and repaired.
9. BLADE
The blade is made of pressed steel. It is allowed to resharpen the blade with a grinding
wheel when necessary.
Ensure that it is always balanced (an unbalanced blade will cause dangerous vibrations). To check for balance, insert a round
rod through the central hole and support
the blade horizontally. A balance blade will
remain horizontal. If the blade is not balanced the heavy end will rotate downwards.
Resharpen the heavy end until the blade is
evenly balanced. To remove the blade (1),
unscrew the blade screw (2).
and replace any parts, which are damaged.
When reassembling, make sure that the cutting edges face in the direction of the motor
rotation. The blade screw (2) must be torque
to 20N.m.
Fig. 7
WARNING: Disconnect the electric cord
from the power supply.
WARNING: Protect hands by using heavy
gloves or a rag to grasp the cutting blades
when replace the blade.
10. EXTENSION CORDS
You should only use extension cords for
outdoor use, PVC ordinary duty with a cross
sectional area not less than 1.0mm²(not
lighter than H05VV-F 2x1.0mm2)
Before using, check the supply and extension cords for signs of damaged during use,
disconnect the cord for signs of damage or
aging. If the cord becomes damaged during
use, disconnect the cord from the supply
immediately. DO NOT TOUCH THE CORD
BEFORE DISCONNECTING THE SUPPLY. Do
not use the appliance if the cord is damaged
or worn. Keep extension cord away from
cutting elements.
Warning: Always ensure that the ventilation
openings are kept clear of debris.
11. MAINTENANCE AND CARE
Warning: Before performing any Mainte-
nance or cleaning work, Always pull out the
mains plug!
Do not spray the unit with water. Water may
destroy the Switch-plug combination unit
and the electric motor. Clean the unit with a
cloth, hand brush, etc.
Expert inspection is required, do not make
any adjustment by yourself, must contact to
customer Service centre:
a) if the lawn mower strikes an object.
b) if the motor stops suddenly.
c) if the blade is bent (do not align!)
d) if the motor shaft is bent (do not align!)
e) if a short-circuit occurs when the cable is
connected.
f) If the gears are damaged.
g) Use only manufacturer’s recommended
replacement parts and accessories.
12. TROUBLESHOOTING
Warning: Before performing any maintenance
or cleaning work, always pull out the mains
plug and wait until the cutter has come to a
standstill.
CAUTION! Faults which cannot be rectified with
the aid of this table may be rectified by a specialist company only (customer service centre).

Fault Remedial action
Motor does not run Check mains connection cable
Start on short grass or on an area which has already been
mown.
Clean discharge channel/housing –the mowing blade must
rotate freely.
Correct the cutting height.
Check if motor carbon brush are worn.
Motor power drops Correct the cutting height.
Clean discharge channel/housing
Have mowing blade resharpened /replaced customer
Service centre.
Grass catcher is not filled Correct the cutting height
Allow the lawn to dry
Have mowing blade resharpened /replaced customer Service
centre.
Clean the grille on the grass catcher
Clean the discharge channel /housing

2 YEAR GUARANTEE
Casals guarantees that this product has been thoroughly inspected and tested before being dispatched and is
free from mechanical and electrical defects and complies with the applicable safety standards. However, should
defects due to faulty material or workmanship develop, under normal domestic use, within 6 months from the date
of purchase please return the product to the store from where it was purchased for a full refund or replacement.
The following conditions apply:
1. Please ensure you retain your receipt as this must be presented when making a claim under the terms of the
guarantee. It is impossible to determine the guarantee period without proof of purchase, so please keep this
in a safe place.
2. If a refund or exchange is required the product must be complete with all accessories, parts and packaging.
3. Missing parts will render the guarantee void.
4. Upon receipt of your appliance check it for any transport damage to ensure it is safe for use. Return it to the
store as soon as possible for exchange if damaged. The guarantee is void if products are damaged after use,
so please do not use the damaged product.
5. Your product is designed for normal domestic household use. Failure to read and comply with the instructions
for use, cleaning and maintenance will render your guarantee void, so please read these instructions carefully
to ensure your safety, and get the most effective use from the product.
6. Any abuse, negligent, improper use will render the guarantee void and Creative Housewares (Pty) Ltd
will not be liable for any loss or damage.
7. This Guarantee will not apply if this tool is damaged by accident or from normal wear and tear.
8. Any attempted repair, or replacement of unauthorised parts will render the guarantee void, so please contact
an authorised service centre or agent for any service or repair requirements.
9. Accessories such as bits, blades, sanding disc, cutting lines, etc are excluded from this guarantee.
10. Normal consumables parts, such as carbon brushes, bearings, chucks, cord assembly’s, spark plugs,
recoil pulleys and bump head assembly’s are specifically excluded from this guarantee.
Extended 24 Month Limited Guarantee
• Casals takes pride in their product quality and therefore offer an extended 24 month limited guarantee from the
original date of purchase to offer the consumer peace of mind on their purchase.
• Should defects due to faulty material or workmanship develop, under normal domestic use, within 24 months
from the original date of purchase, please return the product to the store from where it was purchased for repair
free of charge.
• Casals will however replace a product, if the cost of the repair is not commercially viable or if their ability to
conduct repair effectively cannot be guaranteed.
• NB: The guarantee on replaced products will be from the original date of purchase.
• All repairs carry a 3 month guarantee even if this falls outside of the 2 year guarantee period. Casals will at-
tempt to conduct repairs within reasonable industry standards but cannot be held responsible or liable for any
circumstances not under their control.
Before returning your product, check for the following:
1. Your household mains supply socket is working and switched on.
2. The mains supply circuit is not overloaded (White trip switch on your DB board is off).
3. You have read the trouble shooting guide in your Instructions for Use.
4. All accessories and parts are present.
If service or repair becomes necessary outside the guarantee period, this service is still available however all
transport/postage, spares and labour costs will be paid by the consumer. All chargeable repairs will require the
consumers’ approval in writing once the quote is accepted. Once the go-ahead has been received Casals will
undertake to conduct the repair within a reasonable time and maintain the condition of the product as received.
For any assistance, service, queries and complaints please contact our Customer Care on 086 111 5006 or e-mail help@
creativehousewares.co.za.

Be on the look-out for these Casals
products at your local outlet:
CD4800RE
MFS180 BS76-710 OS150 PL82-650 HAF2000A
AG115-500 AG115-710 AG230-710 SP1200 JS55A
CS1200RE IDR500REA ID710REA RHD1050
DBS900 MFS400 1200EA CS184L
Durban
35 Adrain Road, Windermere,
Durban, South Africa, 4001
Tell: +27 31 303 3465
Fax: +27 31 303 8259
Johannesburg
Unit 25 & 26 San Croy Office Park
Die Agora Road, Croydon, 1619
Tell: +27 11 392 5652
Fax: +27 11 392 1694
 Loading...