

Page 1

WARRANTY
WARRANTY
Brush Cutter 52cc
COMPLIES WITH
INTERNATIONAL
IEC60745
SAFETY SPECIFICATIONS
52cc
PLEASE READ ALL INSTRUCTIONS BEFORE USE
Model:
BC52P
Page 2

IMPORTANT:
Thank you for purchasing a Casals Petrol Brushcutter
(hereinafter referred to as the “Brushcutter”).
This manual will assist you in operating and maintaining your Brushcutter. This manual is the latest version.
With the continuous improvement and upgrading of
this product, the manufacturer reserves the right to
modify this manual without notice. The manufacturer
shall assume no liability for incorrect information
contained in this manual.
This manual is an integral part of the Brushcutter.
When the Brushcutter is transferred to others, this
manual should be handed over to the new owner.
Some important information in this manual will be
indicated in the following way (please see below). The
users should pay special attention to these instructions.
The range of CASALS Outdoor Power tools is safe
and reliable, but incorrect use of these products
may cause personal injury and or damage to your
machine. Please read this manual thoroughly before
operation as this product is required to operate
strictly in accordance with this manual.
IMPORTANT NOTICES:
WARNING: When using the Brushcutter, basic safety
precautions including the following safety instructions should always be followed to reduce the risk of
fire, electric shock and personal injury. Read all these
instructions before operating this product and retain
these instructions for future reference.
a rotating part of the Brushcutter will result in personal
injury.
1.8. Do not over reach. Keep proper footing and balance at all times. This enables better control of the
Brushcutter in unexpected situations.
1.9. Dress properly. Do not wear loose clothing or jewellery; Keep your hair, clothing and gloves away from
moving parts. Loose clothes, jewellery or long hair can
be caught in moving parts.
1.10. Do not force the Brushcutter. Use the correct the
Brushcutter for your application, The correct garden
power tools will do the job better and safer at the rate
for which it was designed.
1.11. Do not use the Brushcutter if the switch does not
turn it on and off. Any part of the Brushcutter that cannot be controlled with the switch is dangerous and must
be repaired.
1.12. Ensure the Brushcutter is off before making any
adjustments.
1.13. Store out of the reach of children and do not allow persons unfamiliar with the Brushcutter or these instructions to operate the Brushcutter. Brushcutters are
dangerous in the hands of untrained users.
1.14. Use the Brushcutter, in accordance with these
instructions and in the manner intended, taking into account the working conditions and the work to be performed.
1.15. Use of the Brushcutter or operations different from
the intended use, could result in a hazardous situation.
1.16. Have your Brushcutter serviced by a qualified
repair person using only identical replacement parts.
This will ensure that the safety of the Brushcutter is
maintained.
1. GENERAL SAFETY PRECAUTIONS:
1.1. Do not operate this product in an explosive atmosphere, such as in the presence of flammable liquids,
gases or dust.
1.2. Keep children and bystanders away while operating the Brushcutter. Distractions can cause you to lose
control.
1.3. Do not expose the Brushcutter to rain or wet conditions.
1.4. Stay alert. Watch what you are doing and use common sense when operating the Brushcutter.
1.5. Do not operate the Brushcutter when you are tired
or under the influence of drugs, alcohol or medication.
1.6. Use safety equipment. Always wear eye protection.
Safety equipment such as dust mask, non-skid safety
shoes, hard hat and hearing protection used for appropriate conditions will reduce personal injuries.
1.7. Remove any adjusting key or wrench before starting the Brushcutter. A wrench or a key left attached to
Page 3

2.1. SAFETY WARNINGS AND EXPLANATIONS:
Read owner’s manual before operating this machine.
Wear head, eye and ear protection.
Use the Brushcutter with two hands.
The exhaust and other parts of the engine will get very
hot during use, do not touch.
Petrol is very flammable. Avoid smoking or bringing
any flame or sparks near fuel.
Beware of thrown objects hit by cutting attachments.
Never use without properly mounted blade guard.
Warning! Kickback is dangerous.
Warning/Attention
Keep children, bystanders and helpers at least 15
meters away from the brush cutter.
Beware of foot injury by cutting attachment
Page 4
4. USE AND CARE:
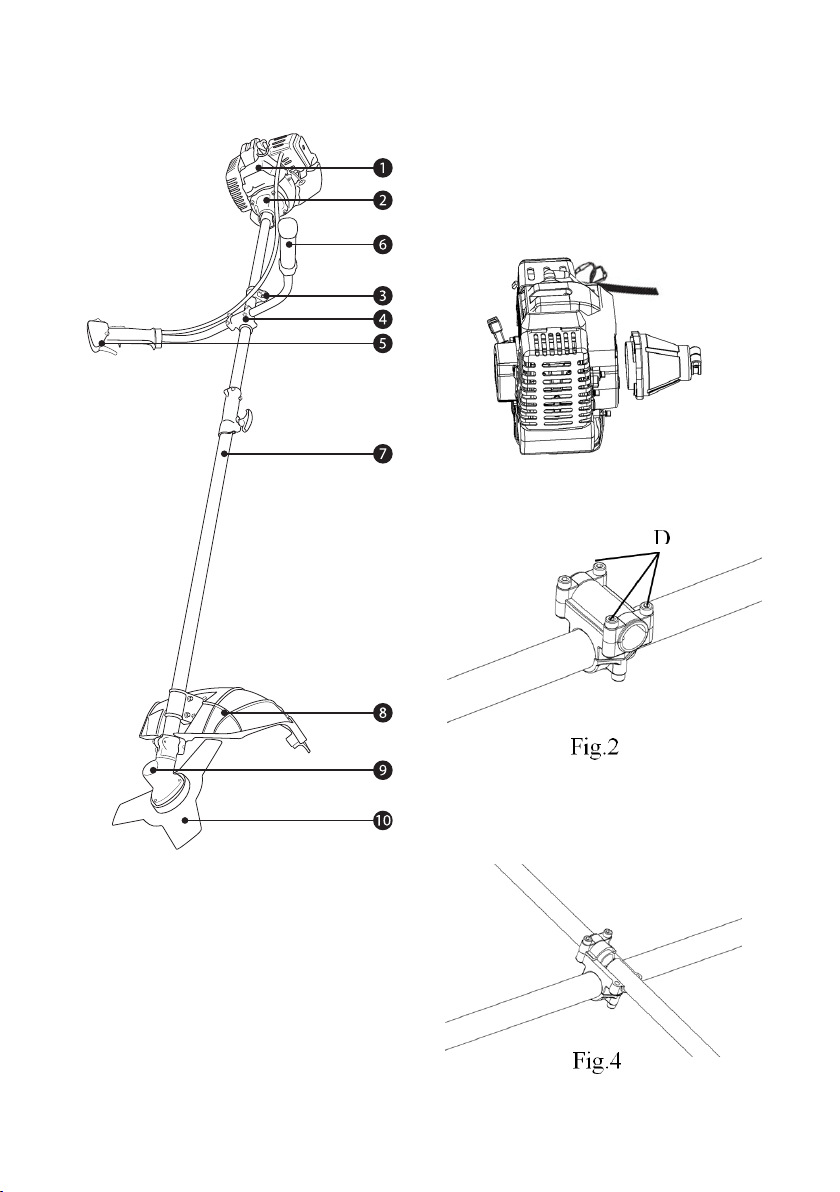
3. COMPONENTS:
4.1. Assembly:
Engine Assembly:
Remove the four bolts installed on the engine. The four
bolt holes of the clutch case should screwed to the
threaded holes at the base of the engine.
1. Engine
2. Clutch Assembly
3. Shoulder Tach
4. Throttle Lever Assembly
5. Handle Assembly
6. Operation Handle
7. Drive Shaft Assembly
8. Blade Guard
9. Gear Case Assembly
10. Blade
Page 5
Shaft Assembly:
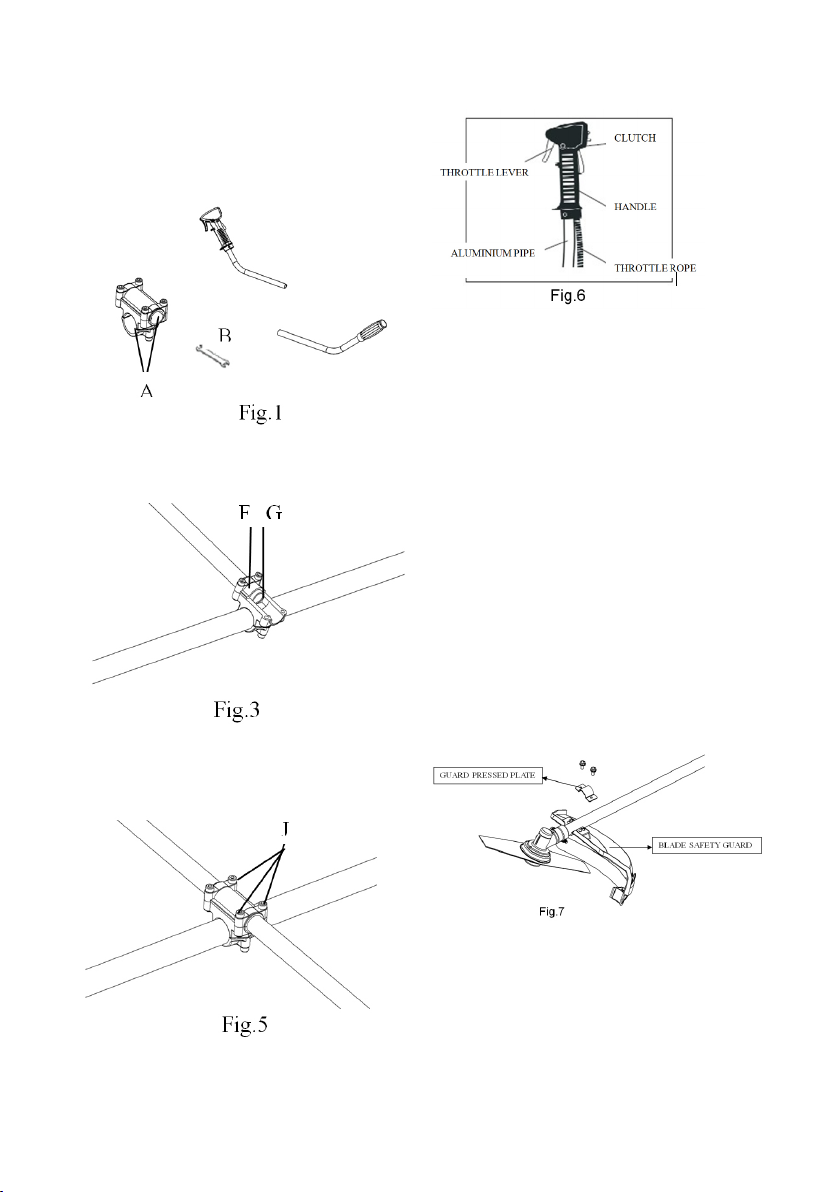
Handle assembly is to be installed and adjusted to a
suitable position according to your convenience and
comfort. The four bolts and nuts should be adjusted
so that the handle is secured tightly in the bracket.
(Fig.1~Fig.5)
Throttle lever and clutch diagram: (Fig.6)
A
B
G
F
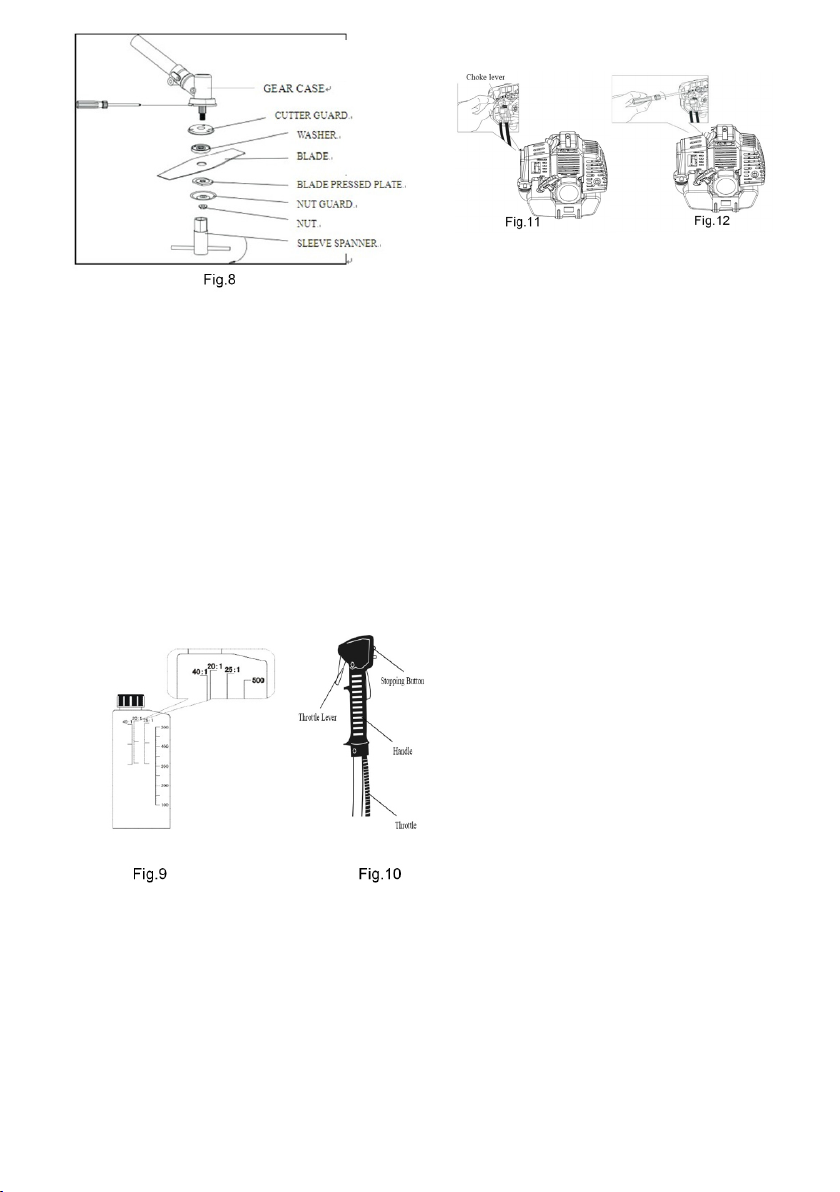
Blade safety guard Installation: (Fig.7)
Slide the blade gaurd bracket onto the shaft. There
after attach the gear case assembly to the shaft. Attach
connecting metal bracket betweeen the gear case and
gaurd bracket, ensuring the holes for the screws line
up. Place the blade gaurd underneath the bracket,
alligning the holes in the blade gaurd bracket, the connecting bracket and the blade gaurd itself. Use the four
nuts and bolts provided to secure them all together. It
should be assembled with the nut, the tensioner, the
washer and then placed through the brackets from the
top with the bolt securing the screw from the bottom of
the blad gaurd.
There are six holes on the blade gaurd allowing the
blade gaurd to be secured in one of two positions, either
closer or further away from the shaft. Once the gaurd
and the gear case assembly are at the correct angle
on the shaft with regards to the handles, secure annd
tighten the tensioning screws.
Gear Case Part
Remove the blade fixing bolt, assemble the blade by
this sequence: cutter holder blade, cutter holder cap,
cutter fixing nut. To align the slot of gear case body
with the hole of cutter holder, insert the Allen wrench.
Then tighten the blade fixing bolt anti-clockwise with
the box wrench. (Fig.8)
Page 6
4.2.Use:
Adjust shoulder belt length and the position of the handle assembly to your comfort position before star ting
engine. Make sure all the bolts are tightly secured.
4. Pull the recoil starter briskly. When you hear the
engine fires, move the choke lever back to open
position. Then pull the recoil starter briskly until the
engine starts and runs.
5. After starting the engine, allow it about 2~3 minutes to warm up at an idle speed 2800~3200rpm
before subjecting it to any load.
CAUTION: Blade may run and flexible shaft may
swing as starting the engine. Don’t let the blade
touch anything when starting the engine.
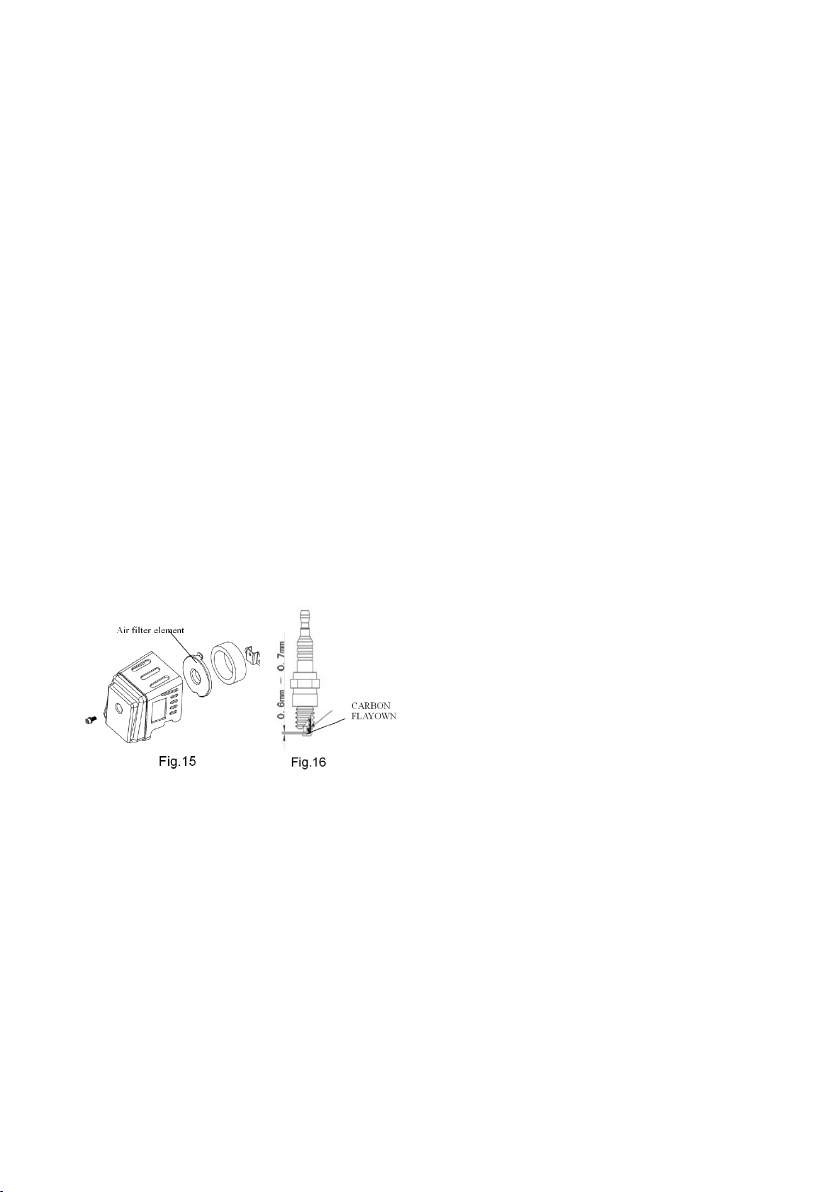
1. Filling the fuel.
(Mixing ratio 20:1: Fill petrol to the scale 500 mark
on the container, and then fill oil to the scale 20:1
mark on the container. Method of mixing ratio 25:1:
Fill petrol to the scale 500 mark the container, and
then fill oil to the scale 25:1 mark on the container.)
(Fig.9)
2. The throttle lever to be pressed on 1/4 position.
(Fig.10)
CAUTION: Do not move the throttle lever to max
throttle. It will suddenly spin the blade at high
speed.
3. Set the choke lever to closed position.(Fig.11)
6. Idle speed adjustment
When the idle speed is too high or too low, adjust
it with the idle speed adjusting screw. If the idle
speed is too high, turn the adjusting screw counterclockwise. If the idle speed is too low, turn the
screw clockwise.(Fig.12)
4.3. Installing the blade:
1. Before installing a blade, you must check if there
are signs of damage to the blade. Replace the
blade that is cracked, bent or chipped.
2. After installing the blade, be sure to align the hole
in the blade with the shoulder on cutter holder.
Turn the blade briskly to check if the blade turns
deflective.
3. Make sure you install the blade with cutting edges
and the arrow on the blade in the direction of rotation. Never install it reversed.
4. Make sure the blade has been properly installed by
running the blade with no load for a minute before
cutting. Do not operate the engine over 6000rpm.
5. The type of blade must be matched to the type and
size of cut.
6. Never thrust the blade into the objects when cutting. You must cut the objects at a moderate speed.
7. Do not stop the machine while cutting. It may
cause danger and blade damage.
5. Maintenance
Maintenance Mode
Page 7
Maintenance will help your machine work in a good
condition.
1. Daily inspect: (daily maintenance)
•Inspect all the bolts and screws to make sure they
are sufficiently tightened.
•Check if the fuel tank has any leaks or trapped air.
2. Every 20 hours inspect: (base on daily maintenance)
•Clean the air filter element. (Fig.15)
•Clean the fuel filter.
3. Every 50 hours inspect: (base on daily maintenance)
•Retighten the bolts of cylinder.
•Clean the excess carbon from cylinder firebox and
cylinder exhaust port.
•Clean the excess carbon from spark plug, and
re-adjust the electrode gap to
0.6mm-0.7mm.(Fig.16)
•Clean the excess carbon from exhaust port of
muffler.
•Flexible shaft should be removed and lubricated
with a good quality lithium grease.
•Gear case should be lubricated with the grease.
•Make sure that all the bolts, screws and nuts are
sufficiently tightened. Inspect carefully for any fuel
leak on the fuel tube.
c. Clean the external surfaces of the machine with a
clean rag. Then store the machine in a clean and dry
place.
Storage
If the machine is not used for a long period of time
the following steps of brush cutter storage will help
you start the engine easier when you use the machine
again.
a. Completely drain the fuel out of the fuel tank and
carburetor.
Close the choke and pull the recoil starter handle 3-5
times.
b. Remove the spark plug and pour the correct amount
of engine oil into the cylinder through the spark plug
hole. Pull the recoil starter handle gently 2-3 times.
Make the piston stop at the top of its travel. Then install
the spark plug.
Page 8

6. Troubleshooting
Problem Possible Causes Solution
Engine doesn’t
start.
Engine runs
but does not
accelerate
properly.
Engine runs
but the power
is low.
d. Engine
doesn’t crank
when running.
No fuel in carburetor. Please press the priming bulb
Fuel mixed with water. Please drain fuel tank and
Spark plug covered by carbon or plug defective.
Spark plug gap incorrect. Regap to 0.6 - 0.7mm
Fuel mixture too rich. Please adjust the carburettor.
The choke wasn’t opened fully. Open the choke.
Fuel mixed at an incorrect ratio. Please adjust the carburettor
Fuel mixed with water. Please drain fuel tank and
Air filter is dirty. Clean out filter.
Piston, piston ring and cylinder were badly
abraded.
The cylinder exhaust port and muffler were
clogged by excess
carbon.
Fuel used up. Refill fuel.
Plug wire broke off. Replace with a new plug wire.
Spark plug covered by excess carbon or
spark gap incorrect.
to fill carburetor.
carburetor, refill with fresh
fuel.
Replace spark plug.
fuel mixture.
carburetor, refill with fresh
fuel.
Engine needs to be overhauled.
Clean or regap spark plug.
Fuel filter was clogged by dirt. Clean / replace fuel filter
Fuel mixed with water. Please drain fuel tank and
Fuel vent is clogged.
carburetor, refill with fresh
fuel.
Page 9

2 YEAR GUARANTEE
Casals guarantees that this product has been thoroughly inspected and tested before being dispatched and is
free from mechanical and electrical defects and complies with the applicable safety standards. However, should
defects due to faulty material or workmanship develop, under normal domestic use, within 6 months from the date
of purchase please return the product to the store from where it was purchased for a full refund or replacement.
The following conditions apply:
1. Please ensure you retain your receipt as this must be presented when making a claim under the terms of the
guarantee. It is impossible to determine the guarantee period without proof of purchase, so please keep this
in a safe place.
2. If a refund or exchange is required the product must be complete with all accessories, parts and packaging.
3. Missing parts will render the guarantee void.
4. Upon receipt of your appliance check it for any transport damage to ensure it is safe for use. Return it to the
store as soon as possible for exchange if damaged. The guarantee is void if products are damaged after use,
so please do not use the damaged product.
5. Your product is designed for normal domestic household use. Failure to read and comply with the instructions
for use, cleaning and maintenance will render your guarantee void, so please read these instructions carefully
to ensure your safety, and get the most effective use from the product.
6. Any abuse, negligent, improper use will render the guarantee void and Creative Housewares (Pty) Ltd
will not be liable for any loss or damage.
7. This Guarantee will not apply if this tool is damaged by accident or from normal wear and tear.
8. Any attempted repair, or replacement of unauthorised parts will render the guarantee void, so please contact
an authorised service centre or agent for any service or repair requirements.
9. Accessories such as bits, blades, sanding disc, cutting lines, etc are excluded from this guarantee.
10. Normal consumables parts, such as carbon brushes, bearings, chucks, cord assembly’s, spark plugs,
recoil pulleys and bump head assembly’s are specifically excluded from this guarantee.
Extended 24 Month Limited Guarantee
• Casals takes pride in their product quality and therefore offer an extended 24 month limited guarantee from the
original date of purchase to offer the consumer peace of mind on their purchase.
• Should defects due to faulty material or workmanship develop, under normal domestic use, within 24 months
from the original date of purchase, please return the product to the store from where it was purchased for repair
free of charge.
• Casals will however replace a product, if the cost of the repair is not commercially viable or if their ability to
conduct repair effectively cannot be guaranteed.
• NB: The guarantee on replaced products will be from the original date of purchase.
• All repairs carry a 3 month guarantee even if this falls outside of the 2 year guarantee period. Casals will at-
tempt to conduct repairs within reasonable industry standards but cannot be held responsible or liable for any
circumstances not under their control.
Before returning your product, check for the following:
1. Your household mains supply socket is working and switched on.
2. The mains supply circuit is not overloaded (White trip switch on your DB board is off).
3. You have read the trouble shooting guide in your Instructions for Use.
4. All accessories and parts are present.
If service or repair becomes necessary outside the guarantee period, this service is still available however all
transport/postage, spares and labour costs will be paid by the consumer. All chargeable repairs will require the
consumers’ approval in writing once the quote is accepted. Once the go-ahead has been received Casals will
undertake to conduct the repair within a reasonable time and maintain the condition of the product as received.
For any assistance, service, queries and complaints please contact our Customer Care on 086 111 5006 or e-mail help@
creativehousewares.co.za.
Page 10
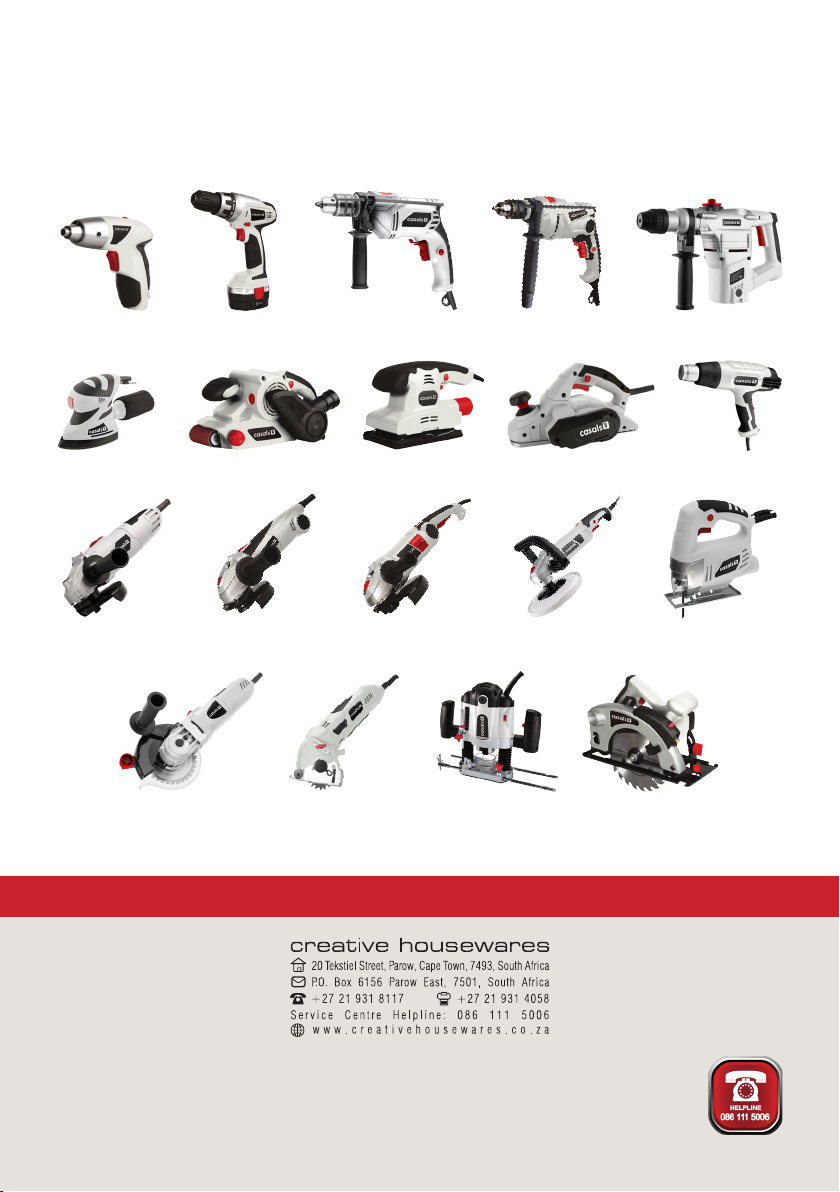
Be on the look-out for these Casals
products at your local outlet:
CD4800RE
MFS180 BS76-710 OS150 PL82-650 HAF2000A
AG115-500 AG115-710 AG230-710 SP1200 JS55A
CS1200RE IDR500REA ID710REA RHD1050
DBS900 MFS400 1200EA CS184L
Durban
35 Adrain Road, Windermere,
Durban, South Africa, 4001
Tell: +27 31 303 3465
Fax: +27 31 303 8259
Johannesburg
Unit 25 & 26 San Croy Office Park
Die Agora Road, Croydon, 1619
Tell: +27 11 392 5652
Fax: +27 11 392 1694
 Loading...