

CasaFan ECO AVIATOS 132, ECO AVIATOS 162 User guide [ml]
Montage- und Bedienungs-
D
Instructions de montage et
FR
Instrucciones de instalación
ES
anleitung
de service
y funcionamiento
VENTILATEUR DE PLAFOND
VENTILATORE DA SOFFITTO
12 - 14 GB
18 - 20 IT
24 - 26 CZ
Mounting and operating
manual
Istruzioni per il mon-
taggio e l´uso
Návod v češtině
DECKENVENTILATOR
CEILING FAN
VENTILADOR DE TECHO
15 - 17
21 - 23
27 - 29
STROPNÍ VENTILÁTOR
ECO AVIATOS 132
ECO AVIATOS 162
2017v7.1 24V

2
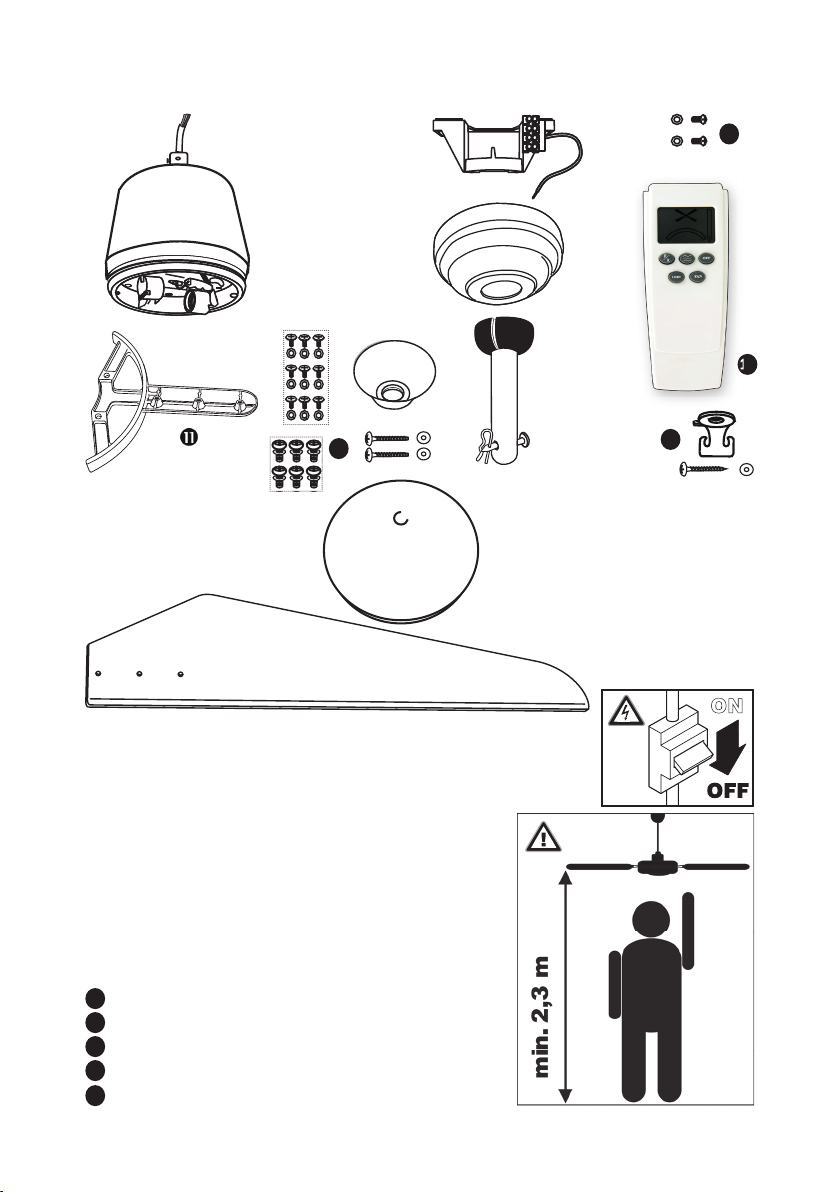
Übersicht der Einzelteile
13
12
Motor mit Gehäuse
Deckenstange
Montagehalter
Halbkugel
Baldachin
Leuchtenglas
Untere Abdeckung
Schraube für Flügel (9 x)
Flügelblatt (3 x)
Schraube CLS 4x50 (2 x)
11
Flügelhalter (3 x)
12
Schraube m. Schei be f. Flügelhalter (6 x)
13
Schraube für Baldachin (2 x)
14
Fernbedienung (Handsender)
15
Halterung Sicherungsseil mit Schraube
14
15
3
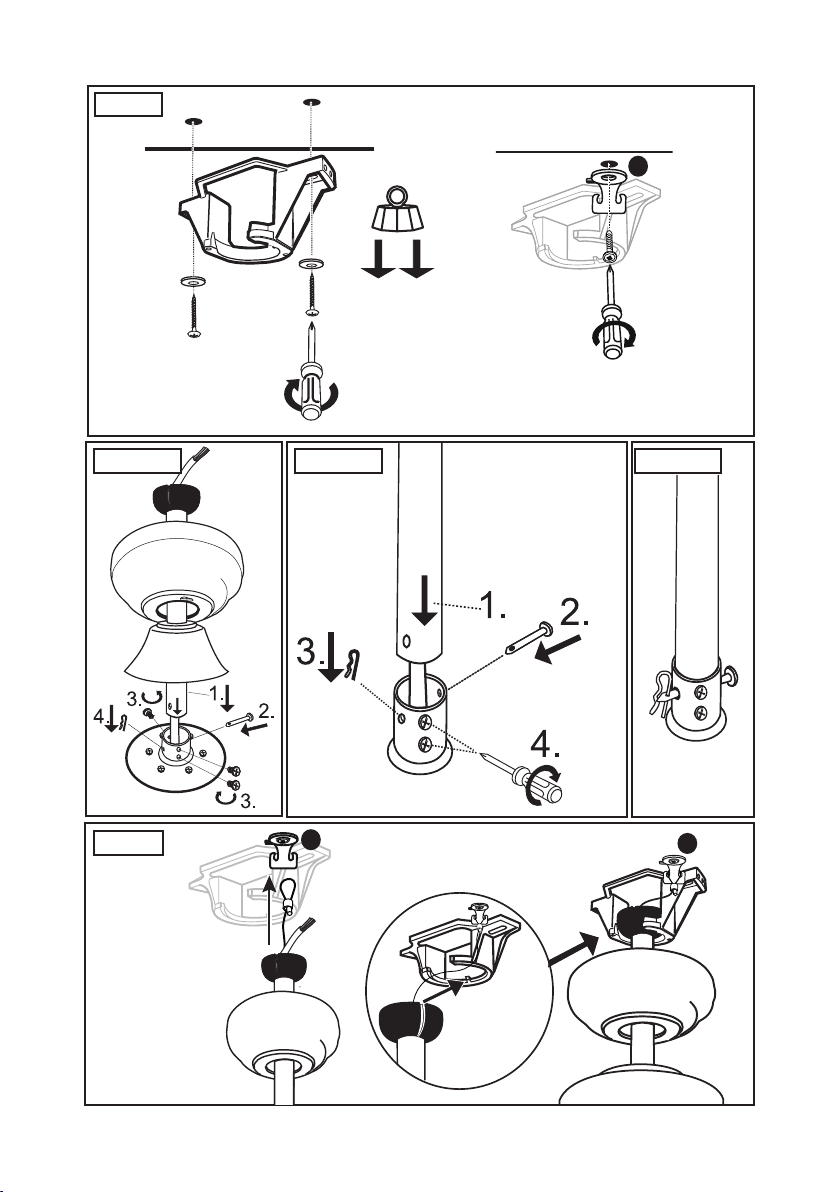
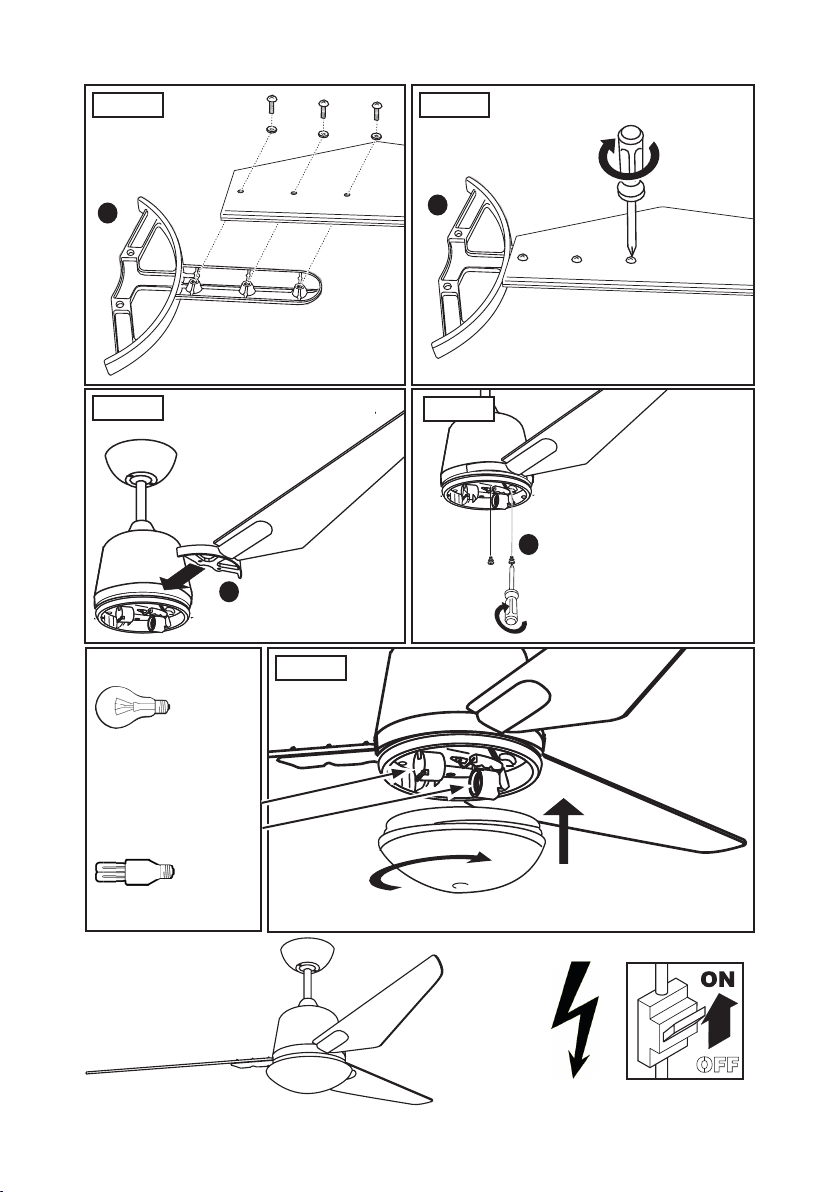
fig. 1
fig. 2
2 x
fig. 3
15
min. 25 kg !
fig. 4
fig. 5
4
15
15
D
GB
IT
CZ
FR
ES
Elektr. Hausnetz
Mains electrical
Résau électr.
Rete elettrico
Red eléttrica
Hlavní přívod napětí
220 - 240 V~50 Hz
ES
CZ
marrón
hnědý
ES
CZ
azul
modrý
ES
CZ
verde/amarillo
zelenážlutý
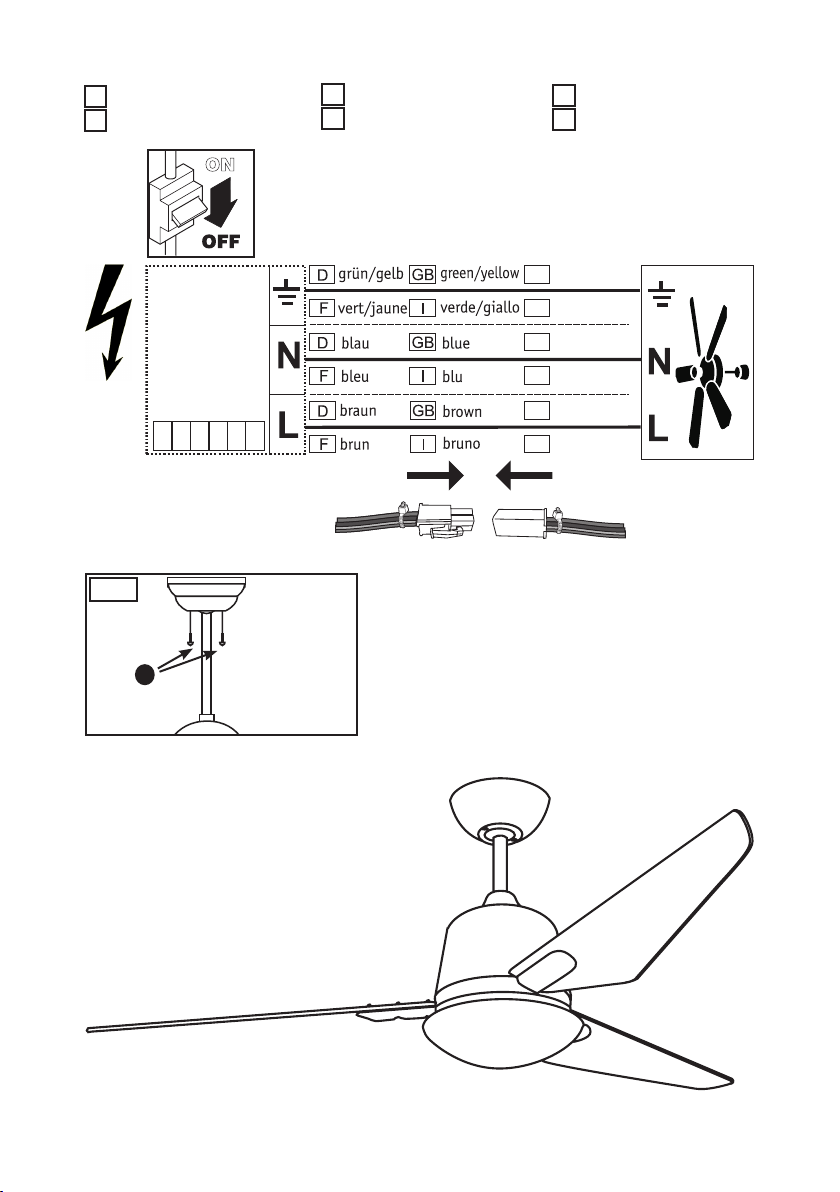
D
Elektr. Anschluss Hausnetz
Electric wiring diagramm
GB
fig. 9
Raccord réseau électrique
FR
Allacciamento elettrico
IT
Conexión a la red doméstica
ES
CZ
Připojení k domácí síti
14
5
fi g. 10
11
3 x 3 x
fi g. 11
3 x
11
fi g. 12
max.
2 x 40 W
E 27
fi g. 13
11
3 x
fi g. 14
12
3 x 2 x
max.
2 x 23 W
6
DE
Erst-/Neucodierung/Verbindung herstellen
FR
Faire initiale / ré-encodage / Connexion
ES
Configuracion inicial / Re-codificación
DE
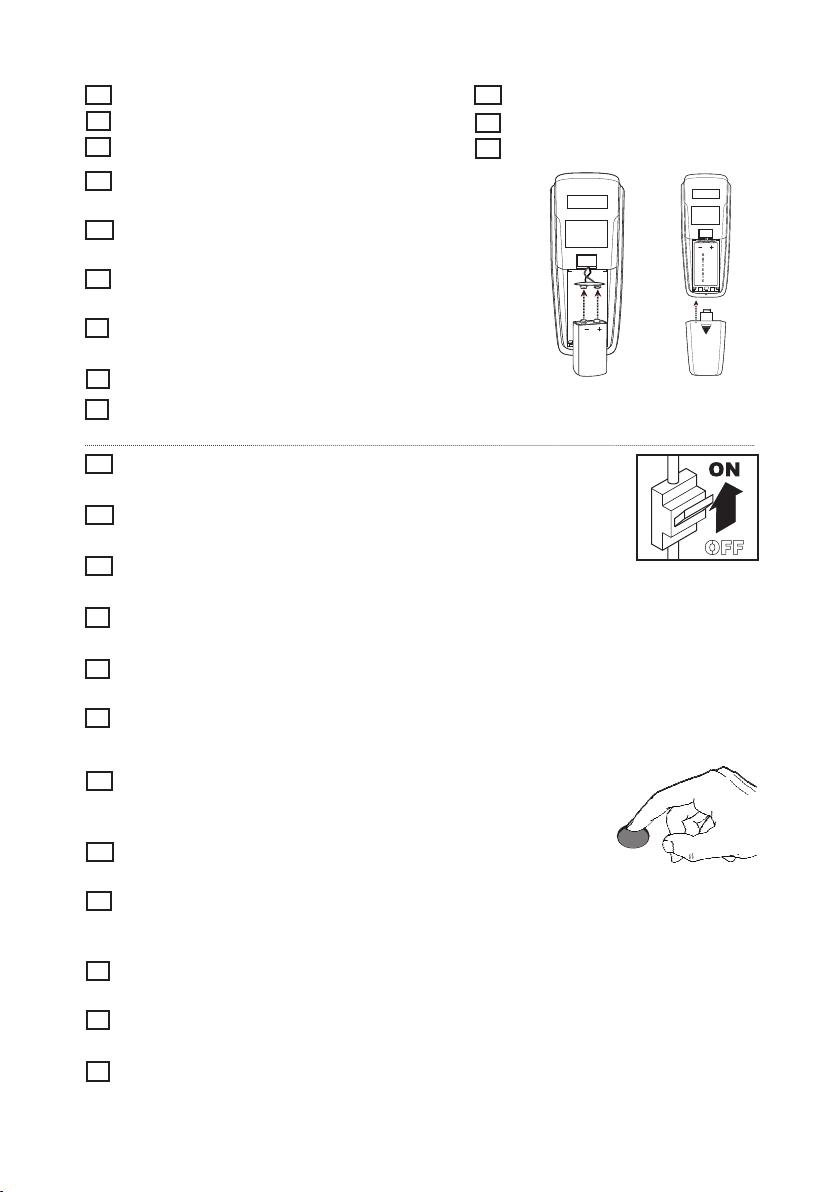
Setzen Sie 1 Batterie vom 9V / 6F22 in den Handsender
GB
Re-/first coding/Connect
IT
Rendendo iniziale / ri-codifica
CZ
Počáteční / nové kódování / připojení
der Fernbedienung ein. Drücken Sie noch keine Taste!
GB
Insert 1 9V / 6F22 batteries into the transmitter of
the remote control. Do not press any button yet!
FR
Insérer 1 pile de type 9V / 6F22 dans la télécommande.
N’appuyez sur aucune touche !
IT
Inserire 1 batterie 9V / 6F22 come il trasmettitore
del telecomando. Premere nessun tasto!
ES
Inserte 1 pila 9V / 6F22 en el mando a distancia. ¡No presione ningún botón todavía!
CZ
První kódování nebo rekódování / Zapojení Vložte 1 9V/6F22 baterii do vysílače dálkového ovládání. Zatím
nemačkejte žádné tlačítko!
DE
Schalten Sie die Spannung aller zu programmierenden Ventilatoren
in Reichweite der Fernbedienung mit der Raumsicherung ein.
GB
Switch the voltage of all fans within the radio range to be programmed
with the room fuse.
FR
Allumez la puissance de tous à programmer des ventilateurs
à portée de la télécommande avec la sauvegarde de l‘espace.
IT
Accendere l‘alimentazione di tutti da programmare ventilatori alla portata del telecomandocon il
backup spazio.
ES
Cambie la tensión de todos los ventiladores dentro del rango de radio que se va a programar con el
fusible de la habitación.
IT
První kódování nebo rekódování / Zapojení Vložte 1 9V/6F22 baterii do vysílače dálkového ovládání. Zatím
nemačkejte žádné tlačítko!
BATTERIE
DE
Innerhalb der ersten 180 Sekunden nach Einschalten der Spannung:
Drücken Sie die Taste „OFF“ für mindestens 5 Sekunden. Der Ventilator
läuft zur Bestätigung einer erfolgreichen Codierung für ca. 5 Sekunden an.
GB
Within first 180 seconds after power on: Press the „OFF“ button for
OFF
at least 5 seconds. The fan runs as confirmation of successful coding for about 5 seconds.
FR
Au cours des 180 premières secondes après la mise sous tension: Appuyez sur le bouton « ARRET »
pendant au moins 5 secondes. Le ventilateur fonctionne pendant environ 5 secondes pour confirmer un
codage de coupe réussie.
IT
Entro i primi 180 secondi dopo l'accensione della potenza: premere il tasto "OFF" per almeno 5 secondi.
La ventola gira su per circa 5 secondi per confermare una codifica rastrello successo.
ES
Dentro de los primeros 180 segundos después del encendido: Presione el botón "OFF" durante al menos 5 se-
gundos. El ventilador funciona como confirmación de la codificación exitosa durante aproximadamente 5 segundos.
CZ
Během prvních 180s poté, co byl přiveden elektrický proud: stiskněte a podržte tlačítko „OFF“ po dobu alespoň 5s.
Ventilátor potvrdí nastavení tím, že se roztočí na dobu přibližně 5s.
7

DE
Bedienung
FR
Foncionnement
DE
Drücken Sie die Taste „FAN“, um den Ventilator auf niedriger
GB
Operation
IT
Funzionamento
Stufe einzuschalten.
GB
Press the „FAN“ button to start the fan on low speed.
FR
Appuyez sur le bouton „FAN“ pour allumer le ventilateur en
première vitesse.
IT
Premere il tasto „FAN“ per accendere il ventilatore a bassa velocità.
ES
Presione el botón FAN para encender el ventilador a velocidad lenta.
CZ
Stiskněte tlačítko „FAN“ pro spuštění ventilátoru na nejnižší rychlost.
DE
Mit jedem weiteren Betätigen der Taste „FAN“ schalten Sie den Venti-
lator eine Stufe schneller.
GB
Pressing the „FAN“ button again will switch the fan motor one step
faster.
FR
Chaque pression sur le bouton FAN enclenche la vitesse supérieure.
IT
Ogni volta che si preme il pulsante „FAN“ girare la ventola
di un passo più veloce.
ES
Chaque pression sur le bouton FAN enclenche la vitesse supérieure.
CZ
Opětovné stisknutí tlačítka „FAN“ přepne rychlost ventilátoru o
jeden vyšší stupeň.
ES
Funcionamiento
CZ
Ovládání
FAN
FAN
DE
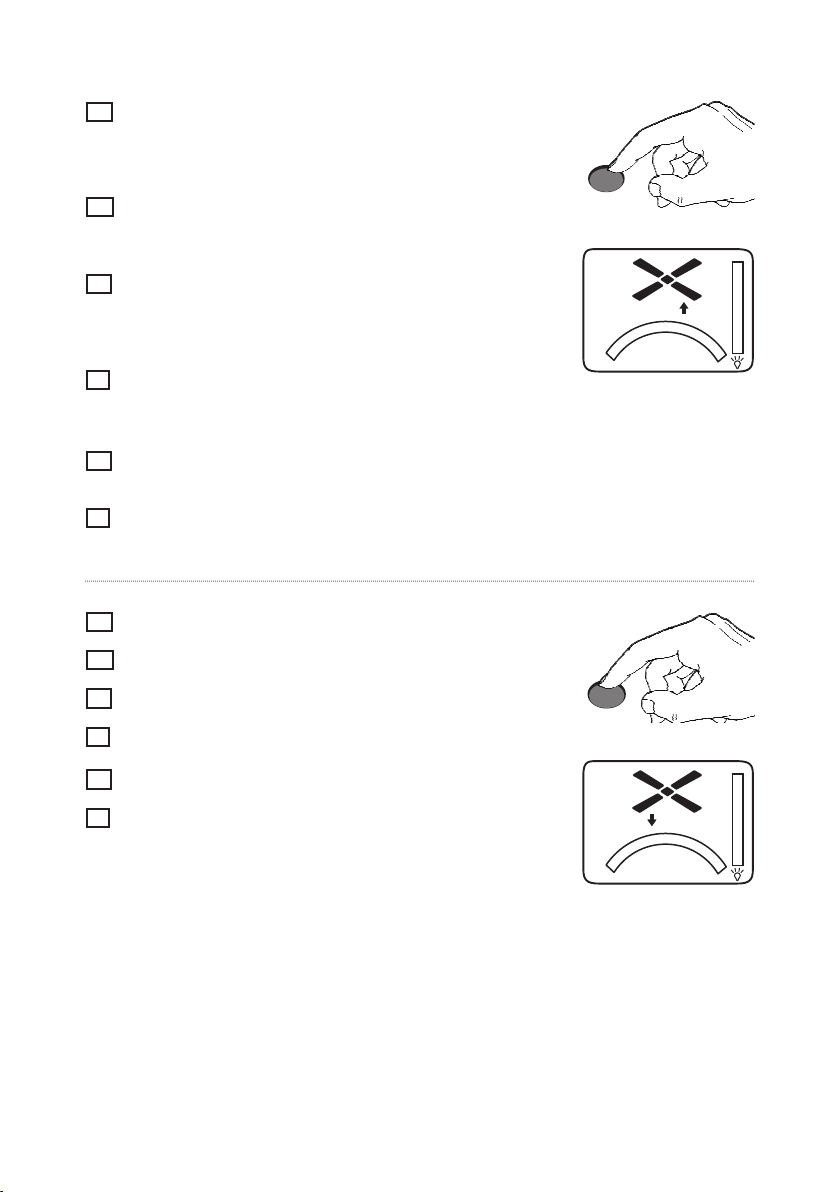
Drücken Sie die Taste „F/R“, um die Drehrichtung zu ändern.
GB
Press the „F/R“ button to change the direction of rotation.
FR
Appuyez sur „F/R“ pour changer le sens de rotation.
IT
Premere „F/R“ per cambiare la direzione di rotazione.
ES
Presione el botón F/R para cambiar el sentido de la rotación.
CZ
Stisknutím tlačítka „F/R“ změníte směr chodu ventilátoru.
8
FAN
F/R

DE
2
9
Drücken Sie bei laufendem Motor die Taste , um den Abschalttimer
einzustellen. Nach Ablauf der eingestellten Zeit schaltet sich der Ventilator ab.
GB
While the motor is running, press the button to set the shutdown
timer. When the set time has elapsed, the fan switches off.
FR
La fonction minuterie est activée en appuyant sur le bouton
pendant que le ventilateur fonctionne. Le ventilateur s’arrêtera après écoulement de la durée programmée.
IT
Premete con il motore acceso il tasto per impostare il timer di
spegnimento. Dopo il tempo impostato, la ventola si arresta.
ES
Cuando el motor esté en funcionamiento, pulse el botón para con-
figurar el temporizador de apagado. Una vez pasado el tiempo seleccionado,
el ventilador se apaga.
CZ
Během chodu ventilátoru stiskněte tlačítko pro nastavení
času.
DE
Jedes weitere Betätigen der Taste erhöht die Zeit, nach der sich
der Ventilator abschaltet, um eine Stunde.
GB
Each press on the button increases the time of the shutdown timer
by an hour.
FR
Chaque pression supplémentaire sur ce bouton augmente la durée
de fonctionnement d’une heure.
IT
Ogni ulteriore premere questo pulsante per aumentare il tempo
dopo il quale la ventola si spegne di un‘ora.
ES
Cada vez que presionamos este botón se incrementa una hora el tiempo
del temporizador de apagado.
CZ
Během chodu ventilátoru stiskněte tlačítko pro nastavení
času.
DE
Drücken Sie die Taste „LIGHT“, um die optionale Beleuchtung einzu-
schalten.
GB
Press the „LIGHT“ button to turn on the optional light kit.
FR
Appuyez sur le bouton „LIGHT“ pour allumer l‘éclairage optionnel.
IT
Premere il tasto „LIGHT“ per accendere l‘illuminazione opzionale.
ES
Presiona el botón “LIGHT” para encender el kit opcional de luz.
CZ
Stiskněte tlačítko „LIGHT“ pro zapnutí volitelného světelného
nástavce.
LIGHT
9
DE
Drücken Sie die Taste „LIGHT“ erneut, um die optionale
Beleuchtung auszuschalten.
HINWEIS: Die Leuchte ist optional und gehört nicht zum
Lieferumfang Ihres Deckenventilators.
GB
Press the „LIGHT“ button again to turn off the optional
light kit. NOTE: The luminaire is optional and is not
supplied with your ceiling fan.
FR
Appuyez à nouveau sur le bouton «LIGHT» pour éteindre
l‘éclairage en option.
REMARQUE: L’éclairage est en option et non inclus avec
votre ventilateur de plafond.
IT
Premere nuovamente il tasto „LIGHT“ per accendere l‘illuminazione
opzionale.
NOTA: La lampada è facoltativo e non incluso con il ventilatore a soffitto.
ES
Presiona el botón “LIGHT” de nuevo para apagar el kit opcional de luz.
NOTA: la luz es opcional y no viene incluida en el ventilador.
CZ
Stiskněte tlačítko „LIGHT“ ještě jednou pro vypnutí světelného
nástavce.
Pozn.: Svítidlo lze dokoupit a není součástí balení vašeho stropního
ventilátoru.
DE
Drücken Sie die Taste „OFF“, um den Deckenventilator auszuschalten.
GB
Press the „OFF“ button to turn off the ceiling fan.
FR
Appuyez sur le „OFF“ pour éteindre le ventilateur de plafond.
IT
Premere il tasto „OFF“ per spegnere il ventilatore a soffitto.
LIGHT
OFF
ES
Presiona el botón “OFF” para apagar el ventilador.
CZ
Stiskněte tlačítko „OFF“ pro vypnutí stropního ventilátoru.

D
Über diese Bedienungsanweisung
Bevor Sie den CasaFan-Ventilator benutzen, lesen Sie bitte die Bedienungsanweisung aufmerksam durch. Bewahren Sie die Bedienungsanweisung griffbereit auf. Geben Sie den CasaFanVentilator nie ohne Bedienungsanweisung an andere Personen weiter.
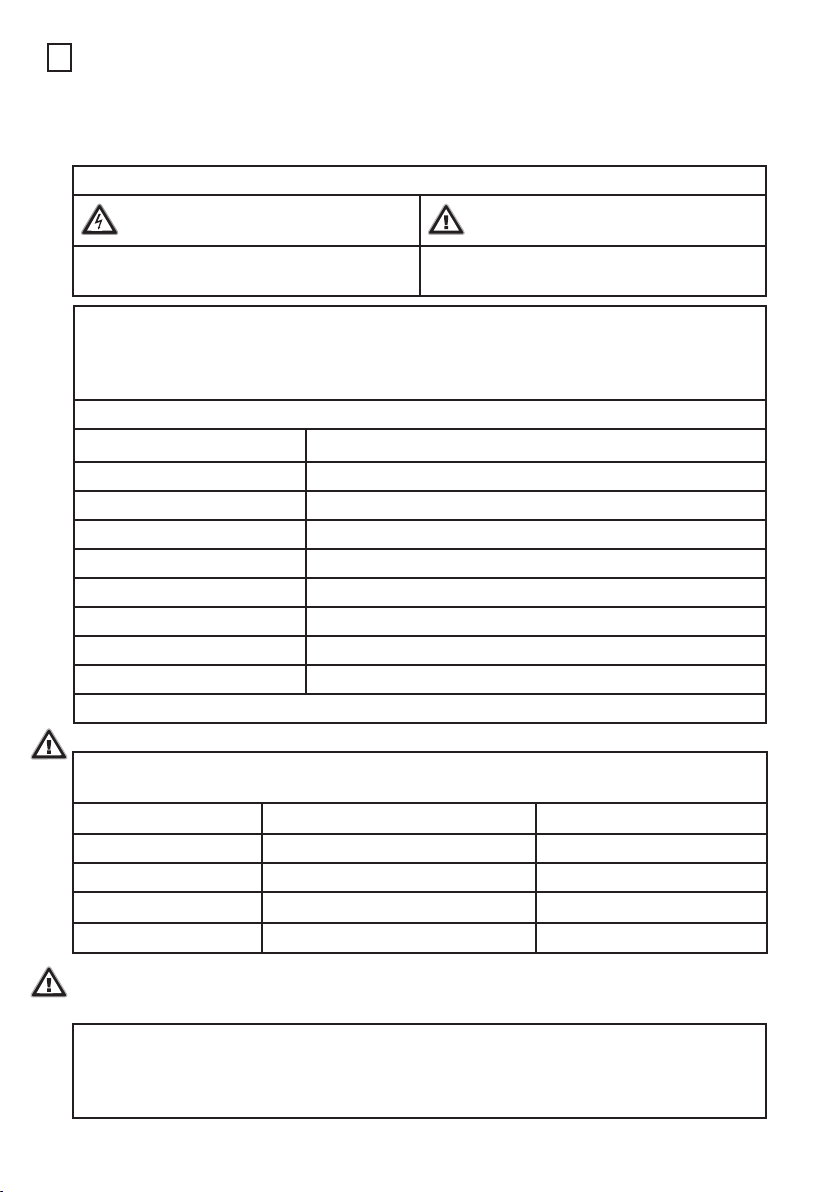
Zeichenerklärung:
Gefährliche elektrische Spannung
Warnt den Benutzer vor Schäden, die durch
elektrische Spannung verursacht werden.
Beschreibung ECO AVIATOS-Ventilator
Der ECO AVIATOS Ventilator dient zur Luftumwälzung der Raumluft. Der Einsatz in Maschinen,
im Freien, in Garagen, sowie in feuchten, nassen, feuer- und explosionsgefährdeten Räumen
ist nicht gestattet.
Technische Daten:
Typ ECO AVIATOS 132/162
Nennspannung (V) 110 - 240
Frequenz (Hz) 50/60
Leistung Motor (W max.) 29/32
Schutzklasse/Schutzart I/IP20
Stufen 6
Maße Ø x H (mm) ca. 1320/1620 x 440
Abstand Decke-Flügel (mm) ca. 350 mm, kürzbar auf ca. 260 mm
Gewicht (kg) ca. 7,9
Technische Änderungen vorbehalten.
Achtung! Gerät darf nur vollständig montiert betrieben werden!
- Den CasaFan-Ventilator auspacken, auf Vollständigkeit (siehe Abbildung Seite 3) und sichtbare Beschädigungen prüfen.
1. Motor
2. Deckenstange 7. Untere Abdeckung 12. Schraube f. Flügelhalter (9x)
3. Montagehalter 8. Schraube für Flügel (9x) 13. Schraube f. Baldachin (2x)
4. Halbkugel 9. Flügelblatt (3 x)
5. Baldachin 10. Schraube (2x)
- Verpackungsmaterial umweltbewusst und für Kinder unzugänglich entsorgen.
Montage
Gehen Sie nach den Abbildungen fig. 1 - fig. 14 auf den Seiten 4 - 7 vor.
Alle hier genannten Sicherheitsmaßnahmen im Umgang mit elektrischem Strom ersetzen ein vernünftiges und umsichtiges Handeln nicht. Es können nicht alle vorstellbaren
potentiellen Gefahren beschrieben werden, die bei der Montage und Inbetriebnahme
Ihres Ventilators entstehen können.
6.
Leuchtenglas
Achtung
Besonderer Hinweis für den Benutzer.
11. Flügelhalter (3 x)
14.
Fernbedienung (Send.)
15.
Halterung Sicherungsseil
12
 Loading...