

Page 1
1
표지
Page 2

`
2
CONTENTS
PRECAUTIONS........................................................3
PREFACE, OVERALL VIEW ...............................5
DISPLAY AND KEY BOARD ................................6
REMOVE THE SCREW.........................................9
COLUMN INSTALLATION ..................................9
OPERATION
Chapter 1. Basic Operation................................10
Chapter 2. PLU Saving & Calling-up ..............13
Chapter 3. User' s Set-up Mode ........................15
Chapter 4. Sales transaction ..............................17
TECHNICAL PARAMETER ...............................19
ERROR MESSAGE................................................19
Page 3
3
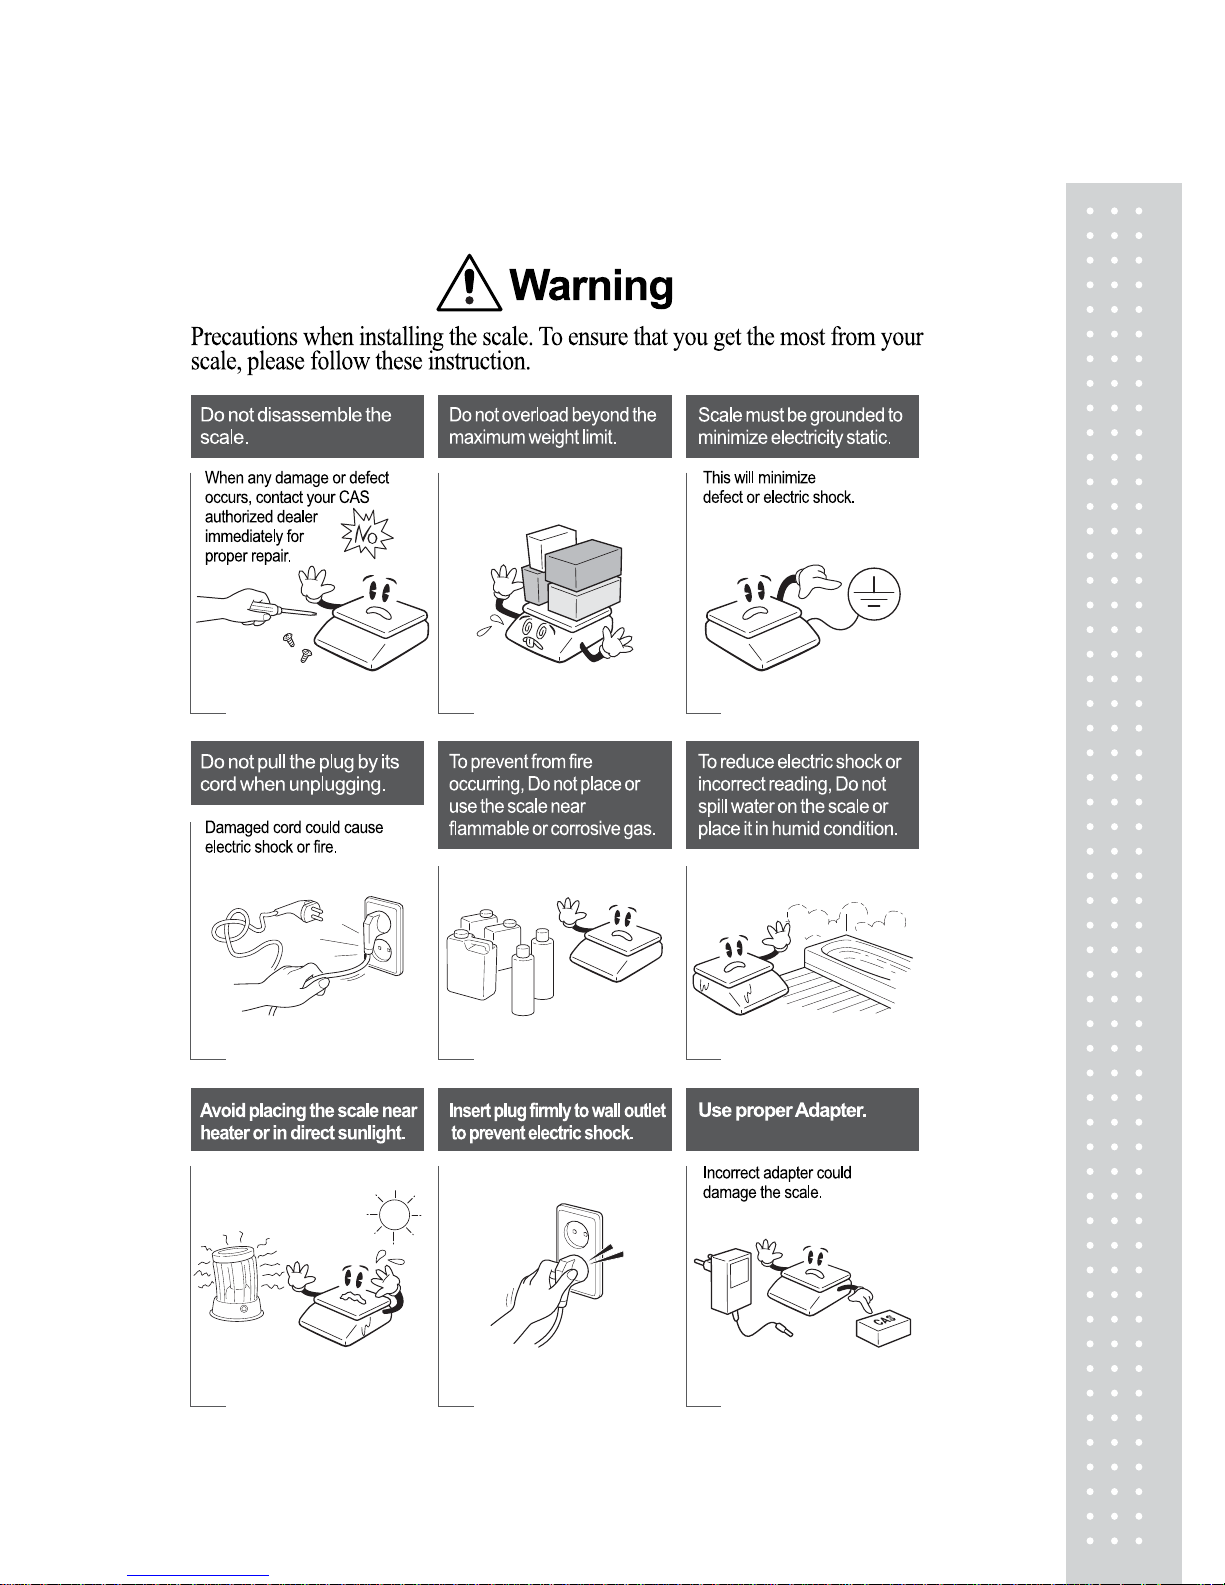
PRECAUTIONS
Page 4
`
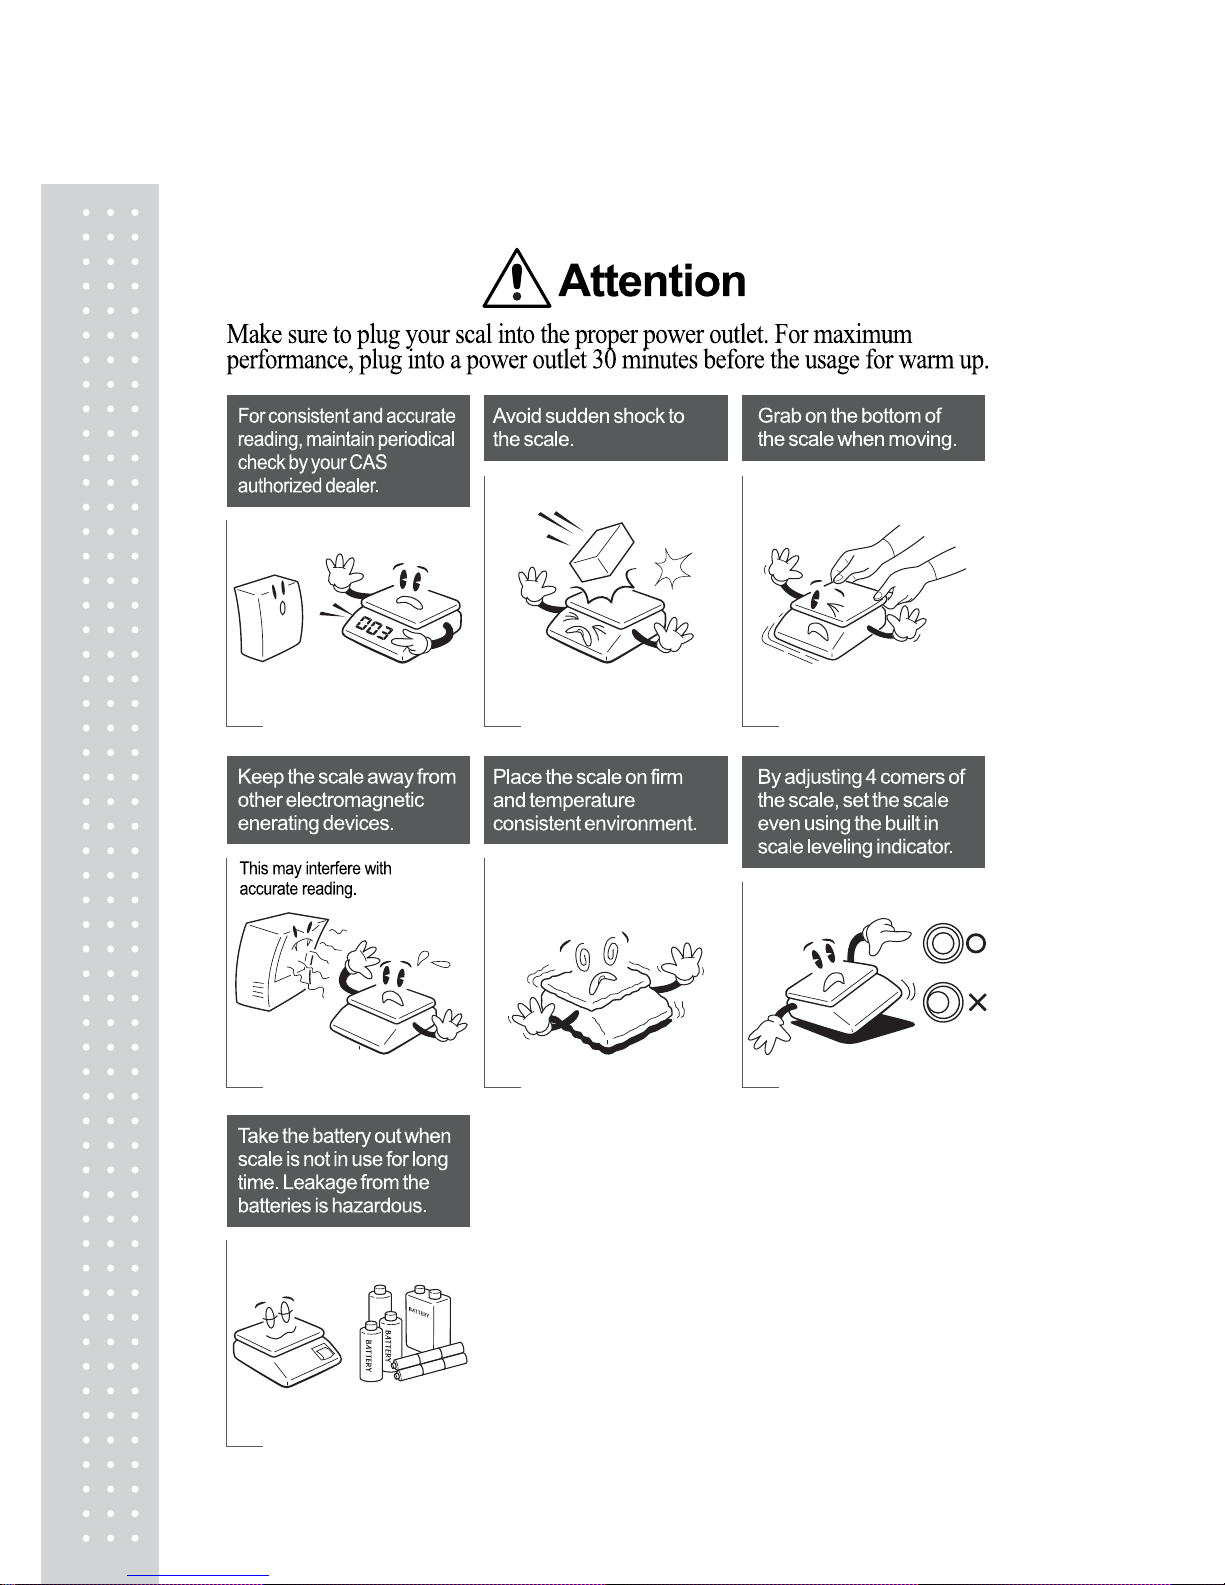
PRECAUTIONS
4
Page 5
5
PREFACE
Thank you for purchasing CAS PR
PLUS
These series have been designed with CAS reliability, under rigid quality control and with
outstanding performance. Your special departments can enjoy these high quality reliable
CAS products.
We believe that your needs will be satisfied and you will have proper reliability.
This manual will help you with proper operation and care of the PR
PLUS
Please keep it handy for future reference.
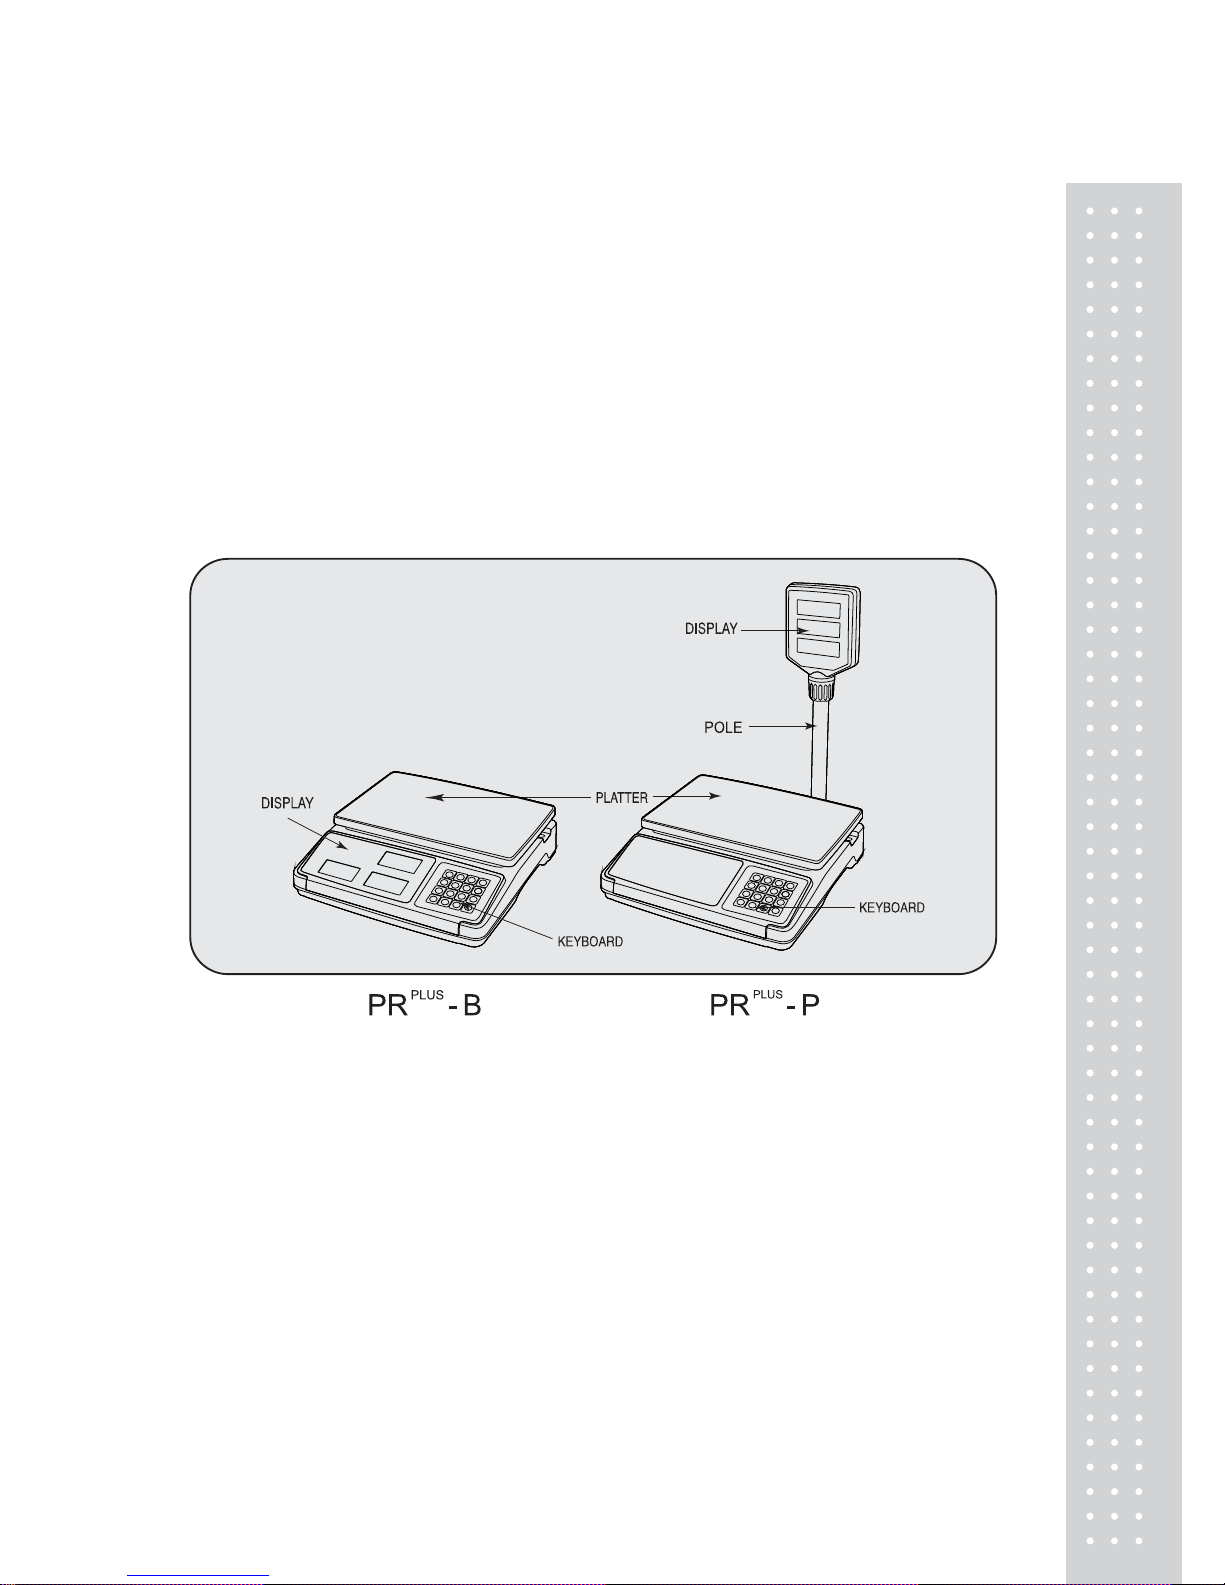
OVERALL VIEW
Page 6
`
6
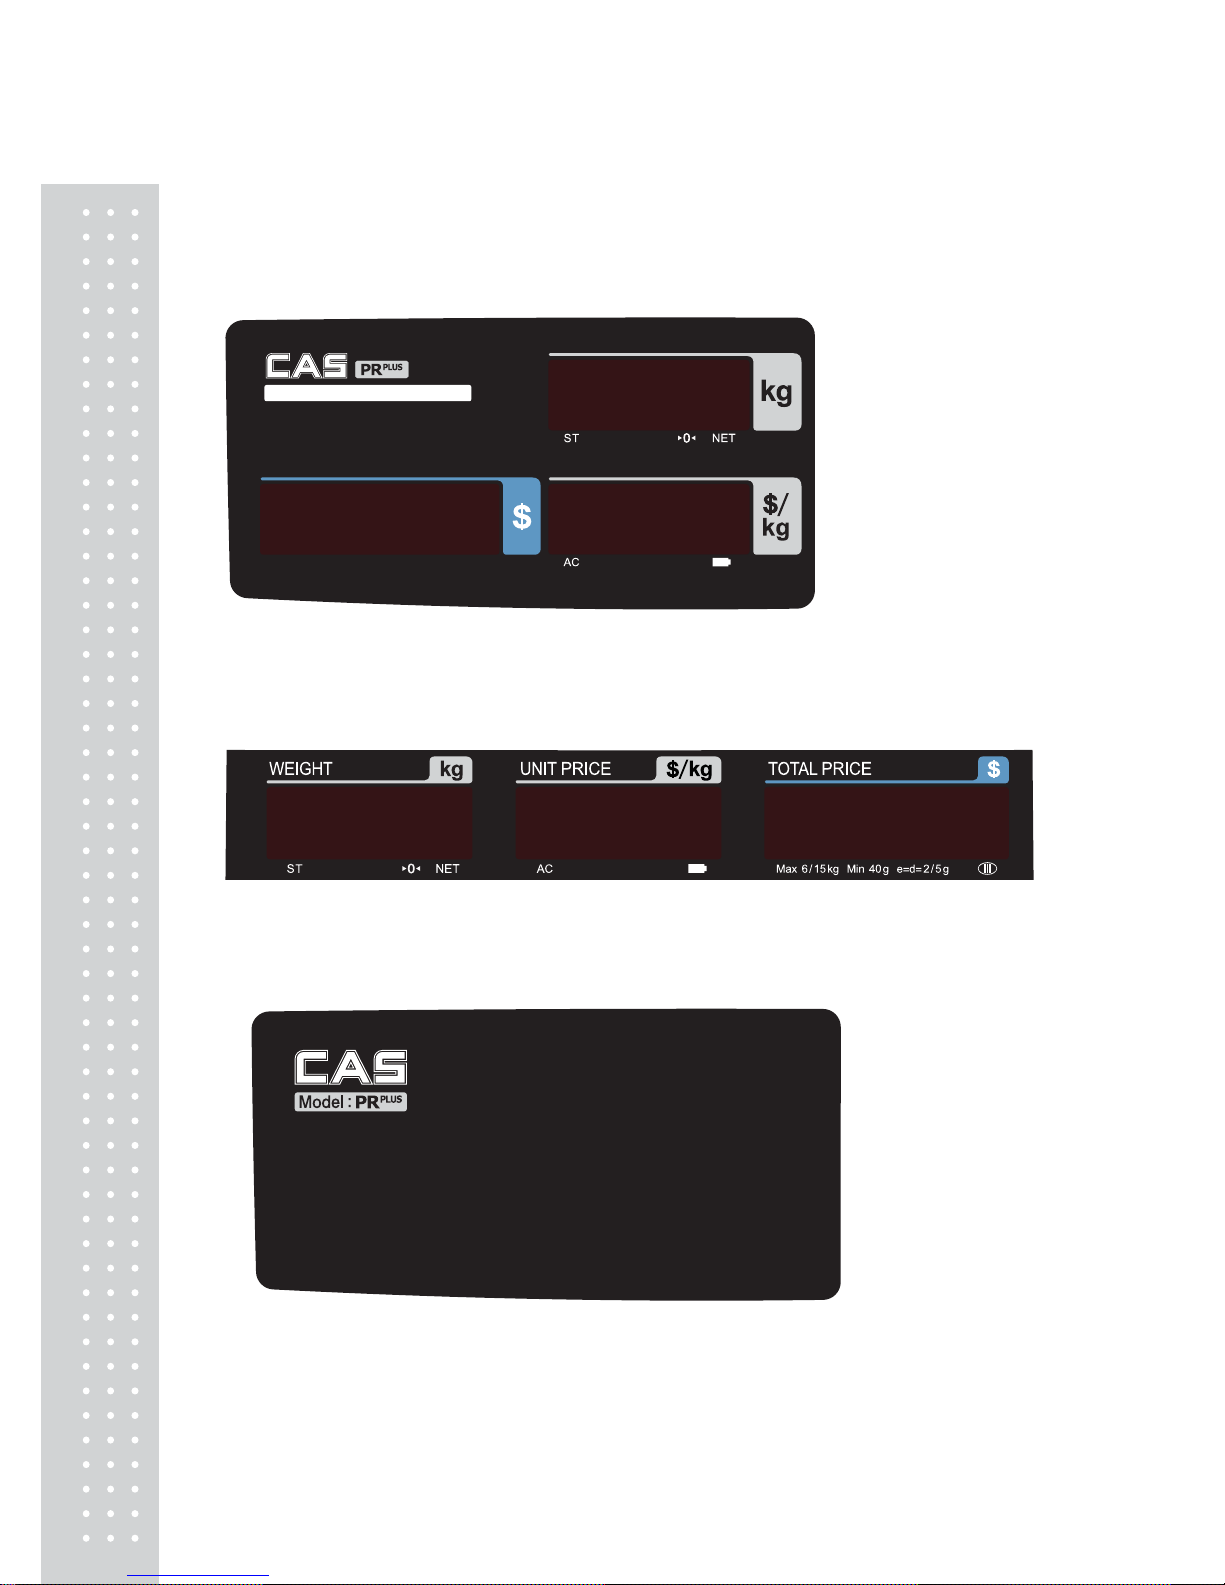
DISPLAY AND KEY BOARD
■
PR
PLUS
-B Front display
■
PR
PLUS
-B Rear display
■
PR
PLUS
-P Front cover
Page 7
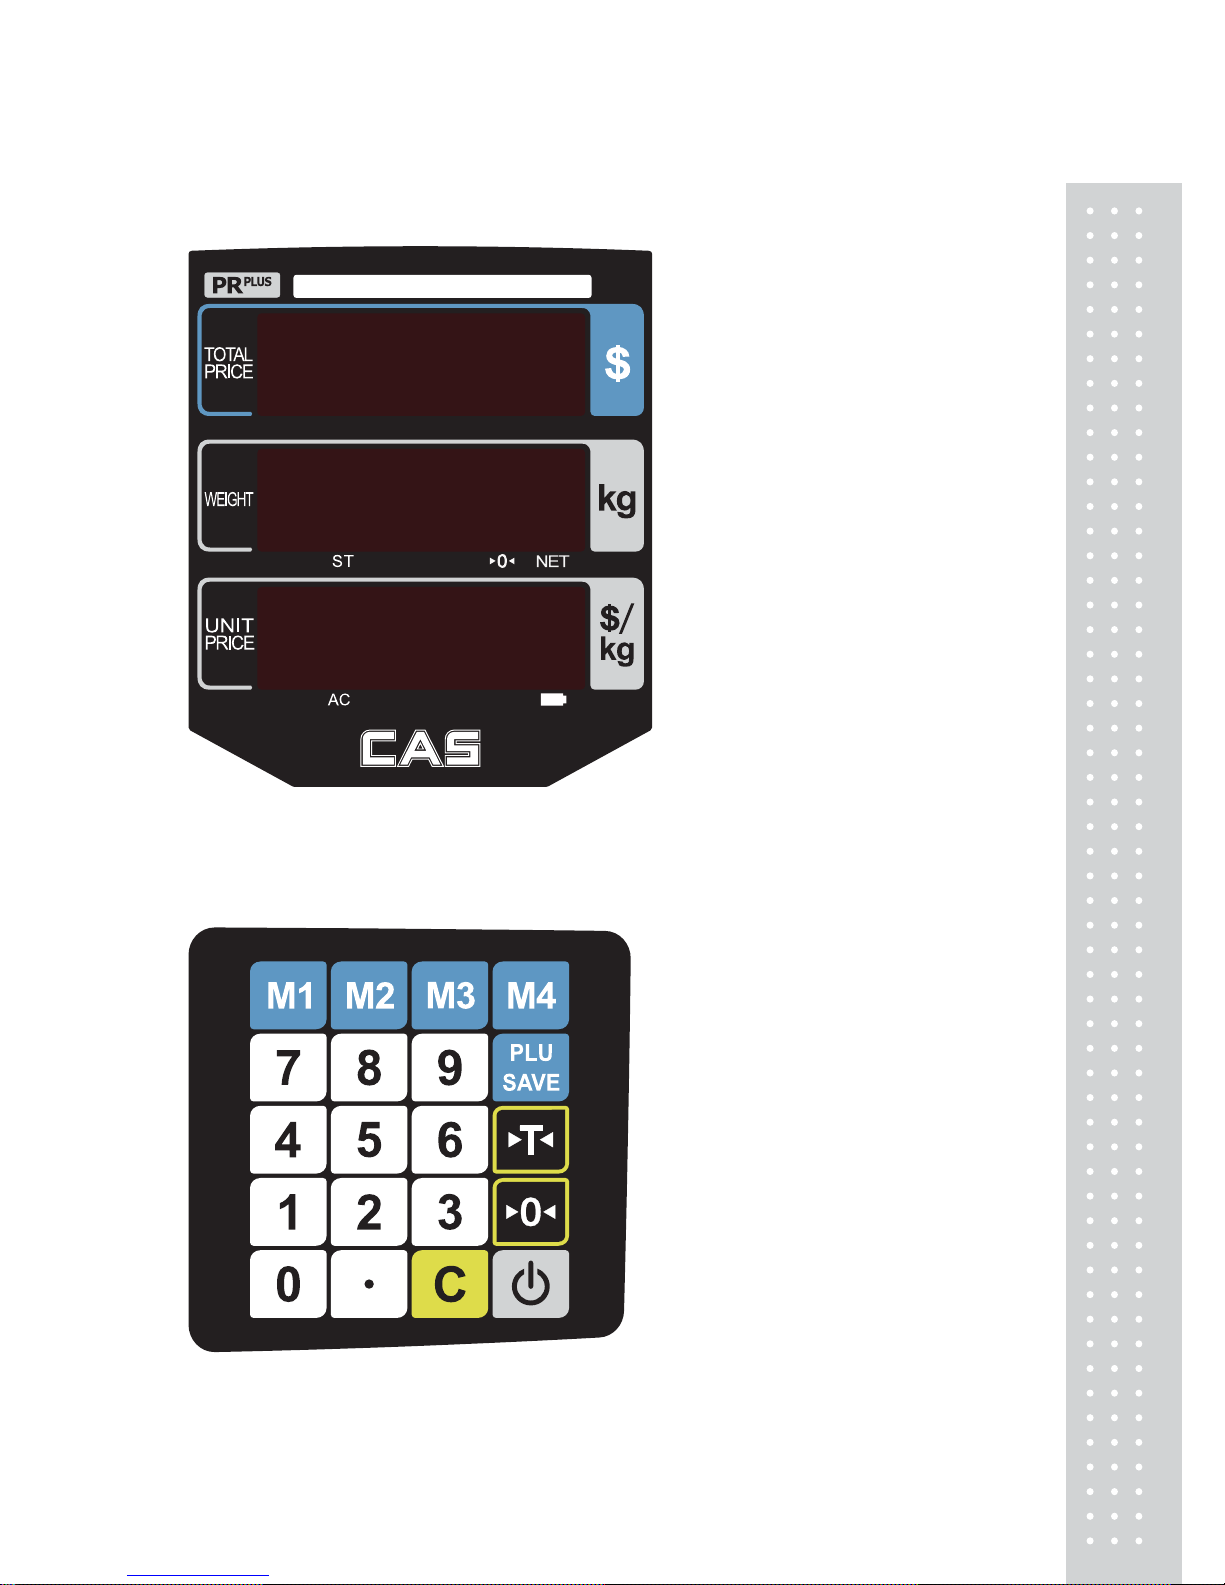
■ PR
PLUS
-P display
■ key
7
Page 8
`
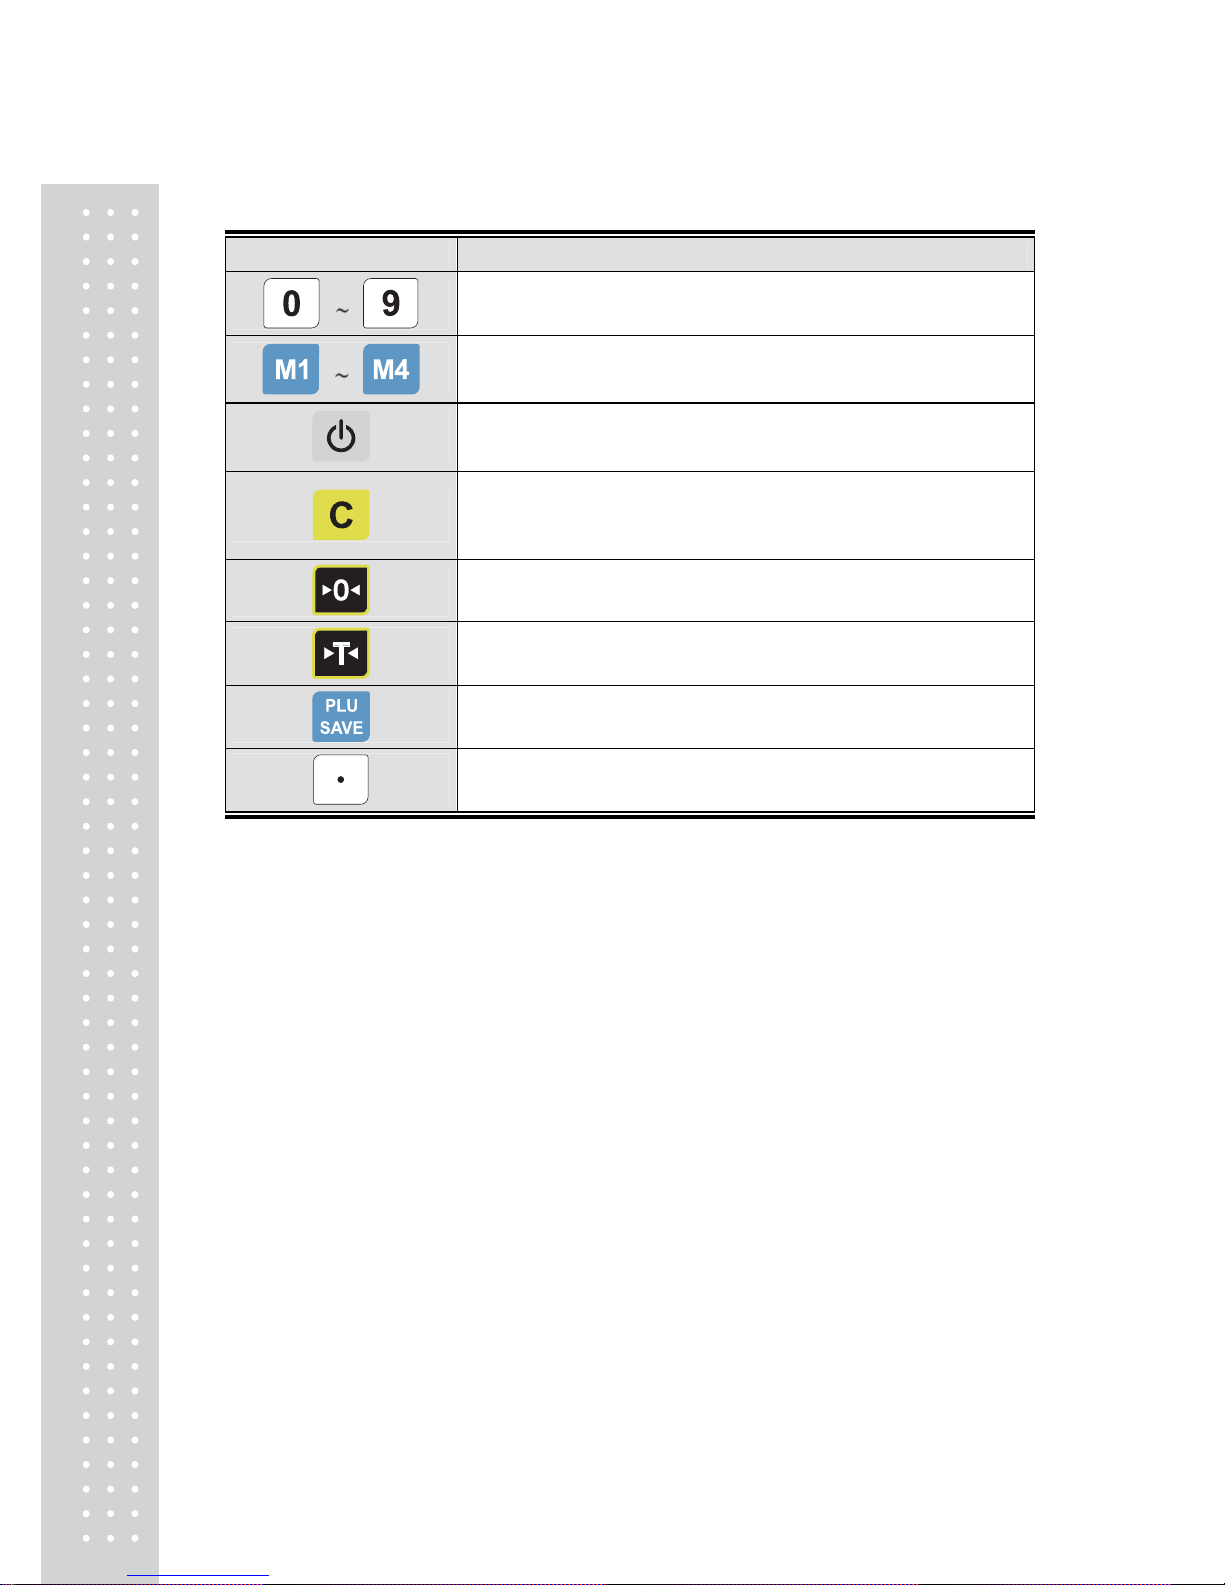
■ Function keys
KEYS FUNCTIONS
Used to enter all the numeric data.
PLU key.
Used to power on& off the scale.
Used to clear all the numeric price display.
Used to clear sum total price.
Used to clear all the daily total prices.
Used to correct the zero point.
To set or clear tare value.
PLU save key.
Display battery voltage %(push more than 2second)
Used to enter the decimal point when price is entered.
8
Page 9
9
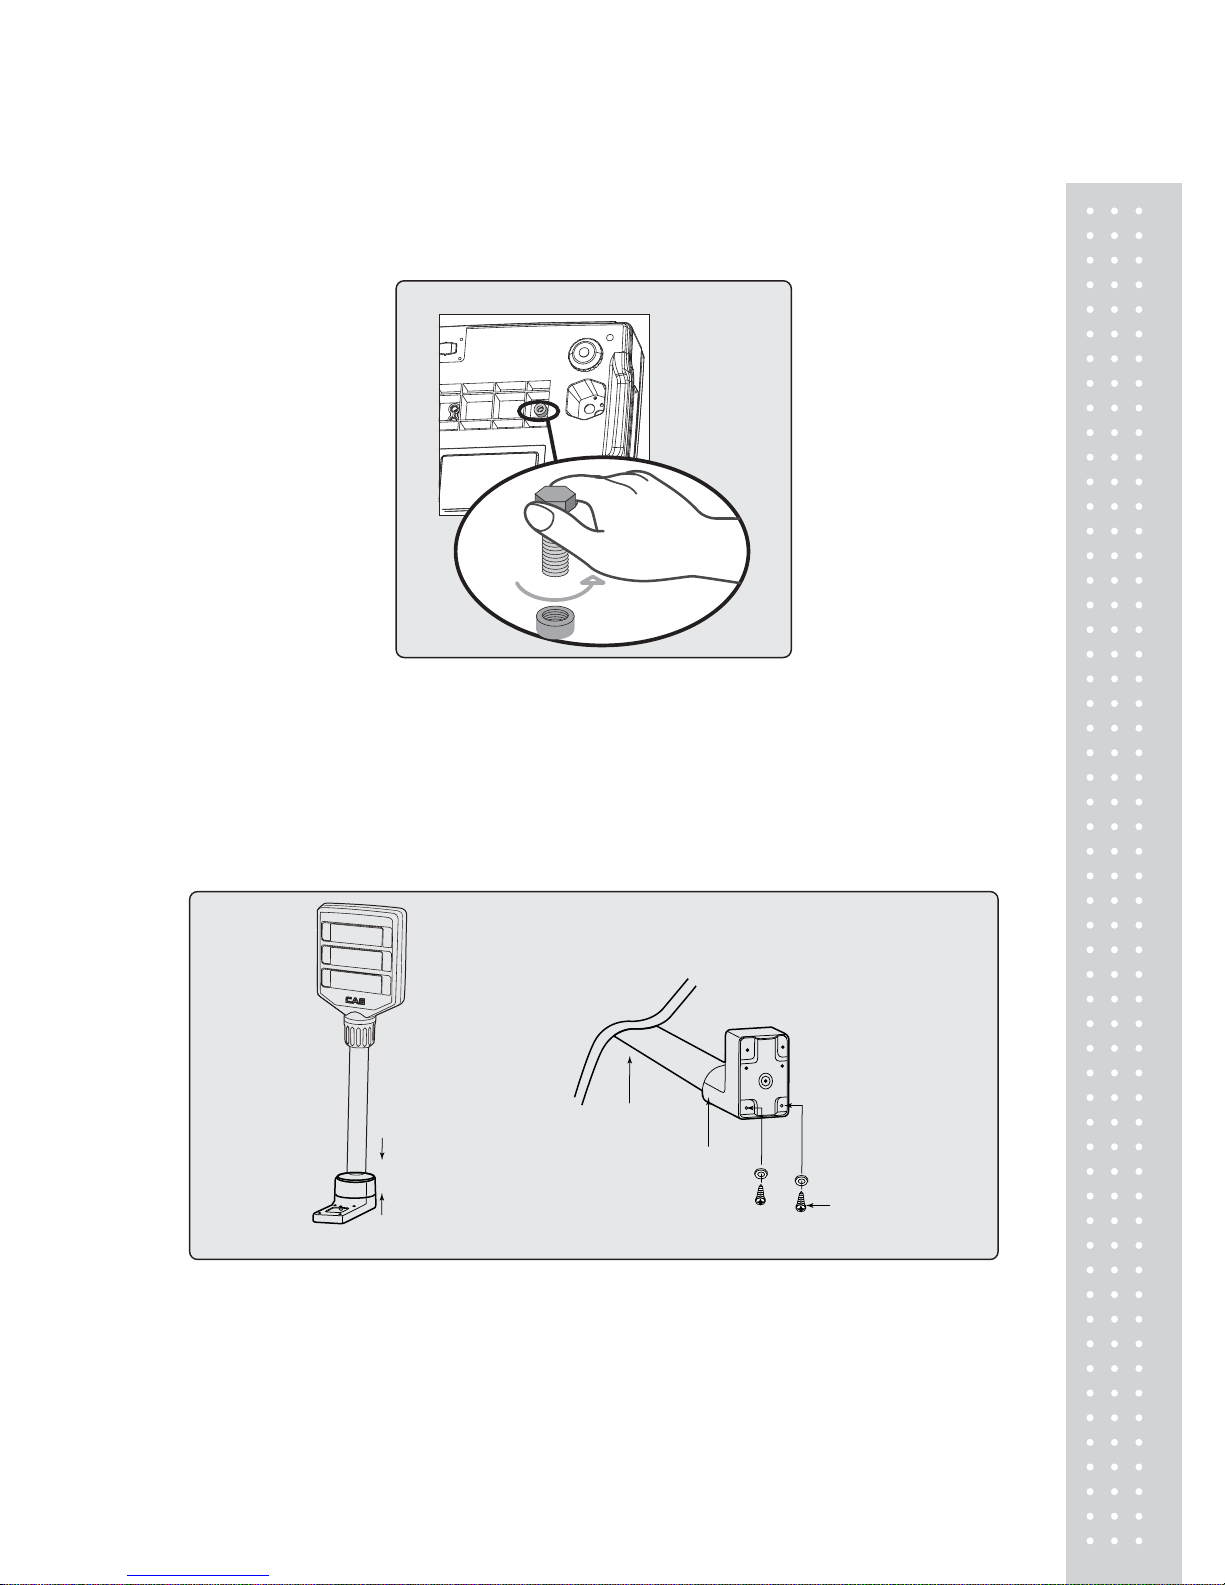
REMOVE THE SCREW
Remove the crew
NOTICE:Make sure to remove the screw before use at the first time.
COLUMN INSTALLATION
Column
Column Support
Screw
Figure one
Figure two
Column Installation
Page 10
`
10
OPERATION
Chapter 1. Basic Operation
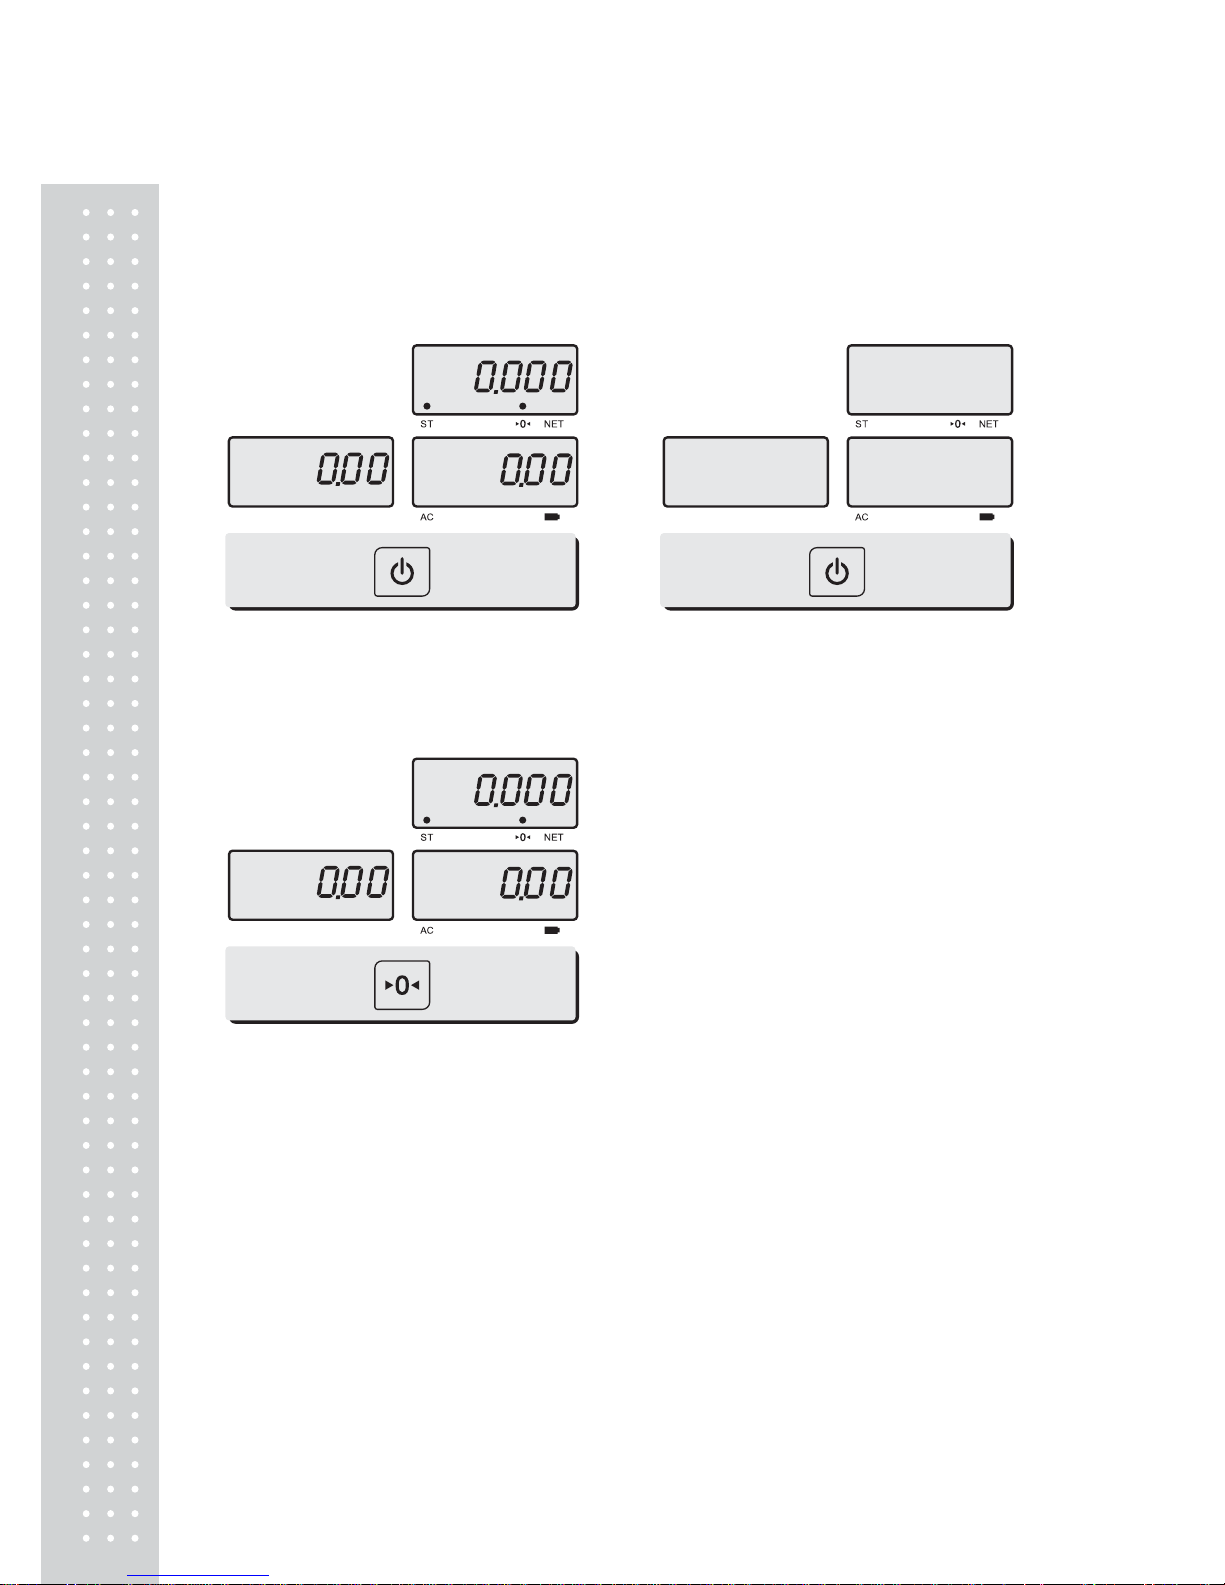
a. To turn on/off the scale
① Press the ON/OFF key to turn on. ② Press the ON/OFF key for a few
seconds to turn off.
b. Zero function
① Press ZERO key to set Zero
Page 11
11
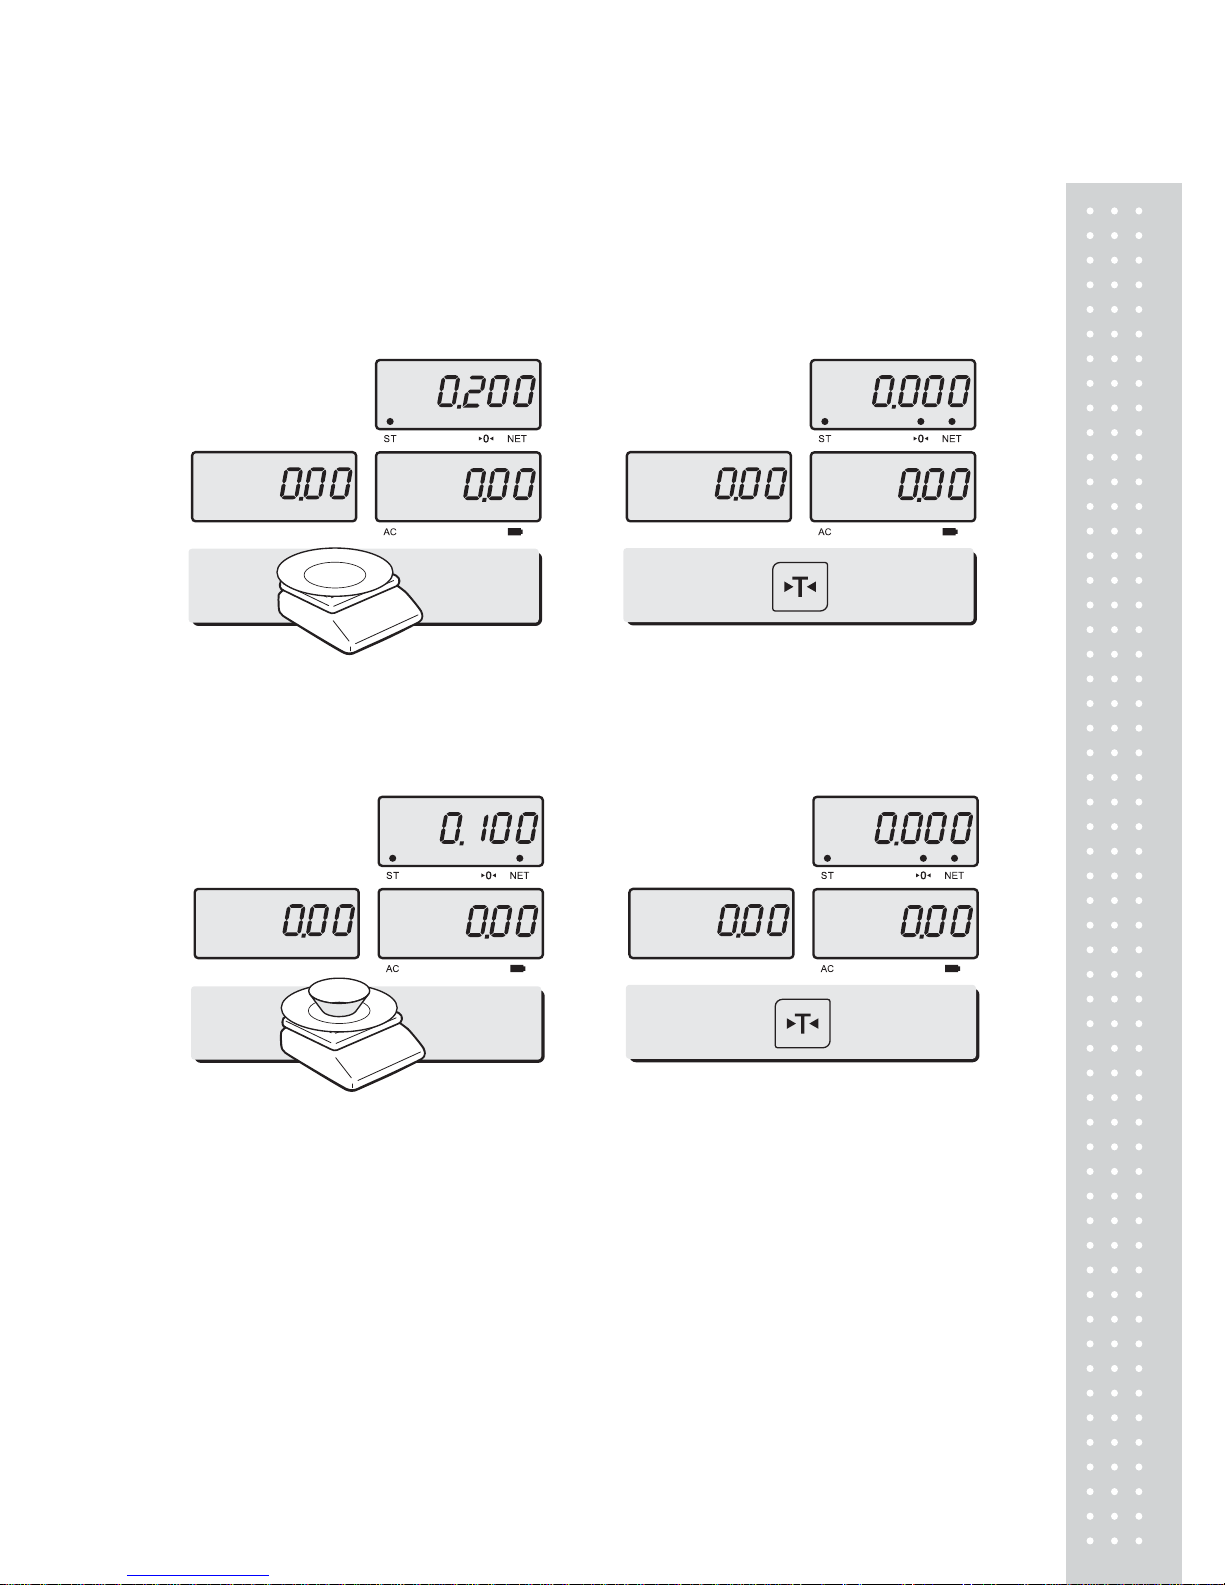
c. Tare function
Tare means the weight of container. You may use tare function when you weigh
an item with container and measure only the weight of item.
■
One time tare
① Place a container on the platter.
EX) 200g of tare.
② Press TARE key to set zero point.
EX) 200g of tare.
■
Successive tare
③ Place another container on the
platter. EX) 100g of tare.
④ Press TARE key to set zero point.
Page 12
`
12
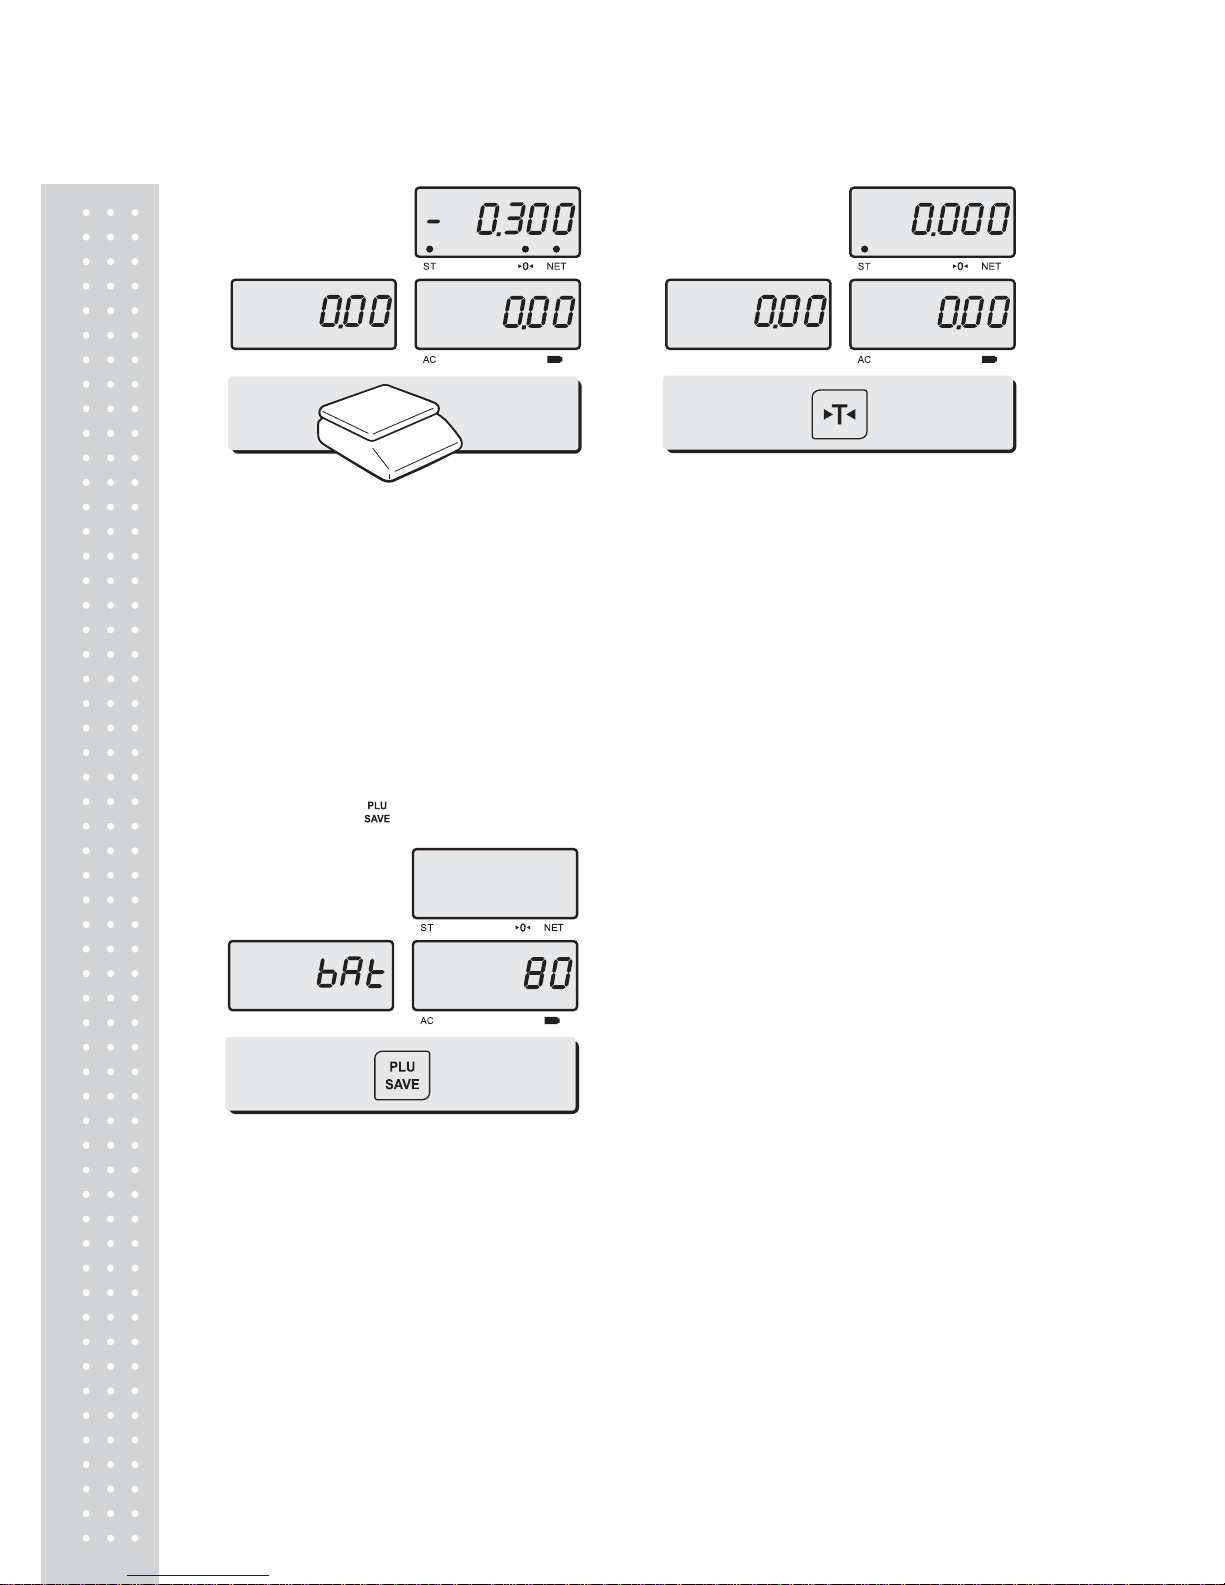
⑤ After weighing item remove all of the
container from the platter.
⑥ Press TARE key again to set zero.
NOTE
:To remove TARE funtion press“TAR E”Key again after removing
the container from the paltter. Automatic tare clearing function may
not be applied to all of PR series.
d. Display battery voltage
1) Press Press “ ” key to check battery voltage left. (push more than 2second)
● It shows percentage of full voltage.
● Please recharge under the 10%.
Page 13
13
Chapter 2. PLU Saving & Calling-up
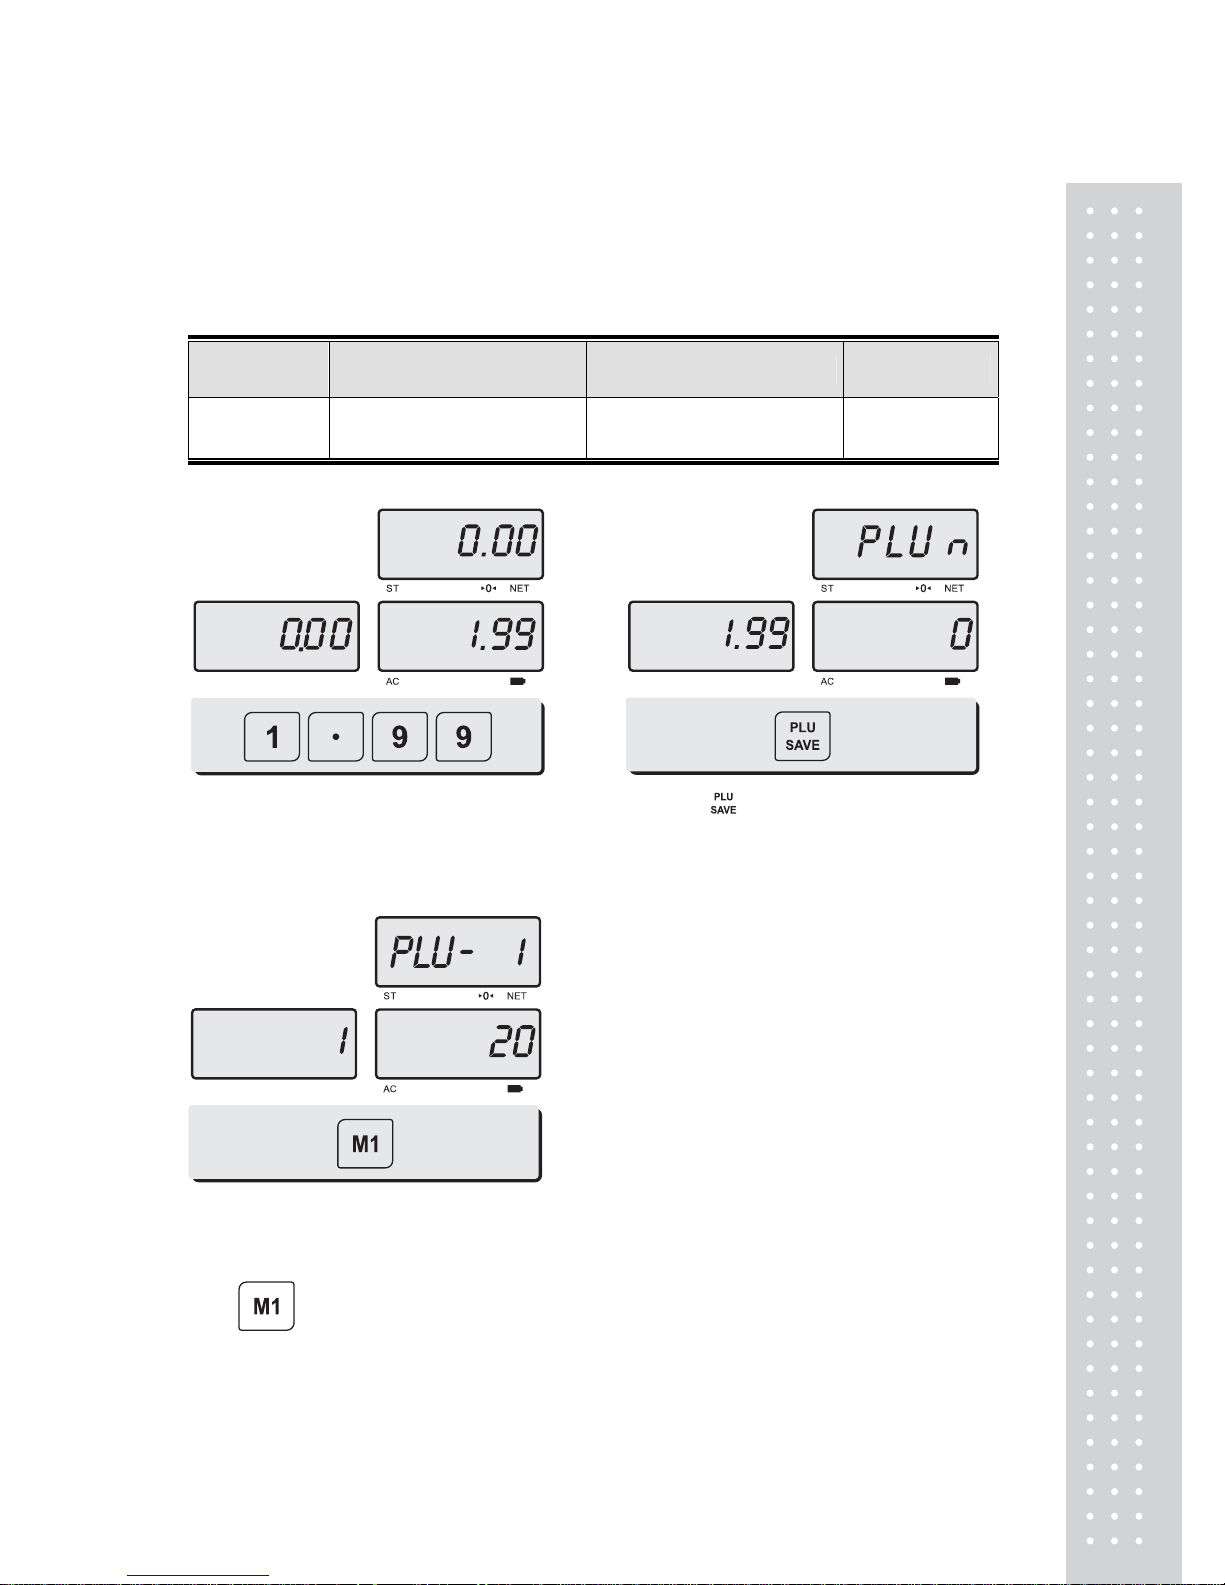
a. Saving unit price on PLU
This section explains how to save unit price in PLU.
Number of PLU Range Remarks
PLU
NAME
4 1~4
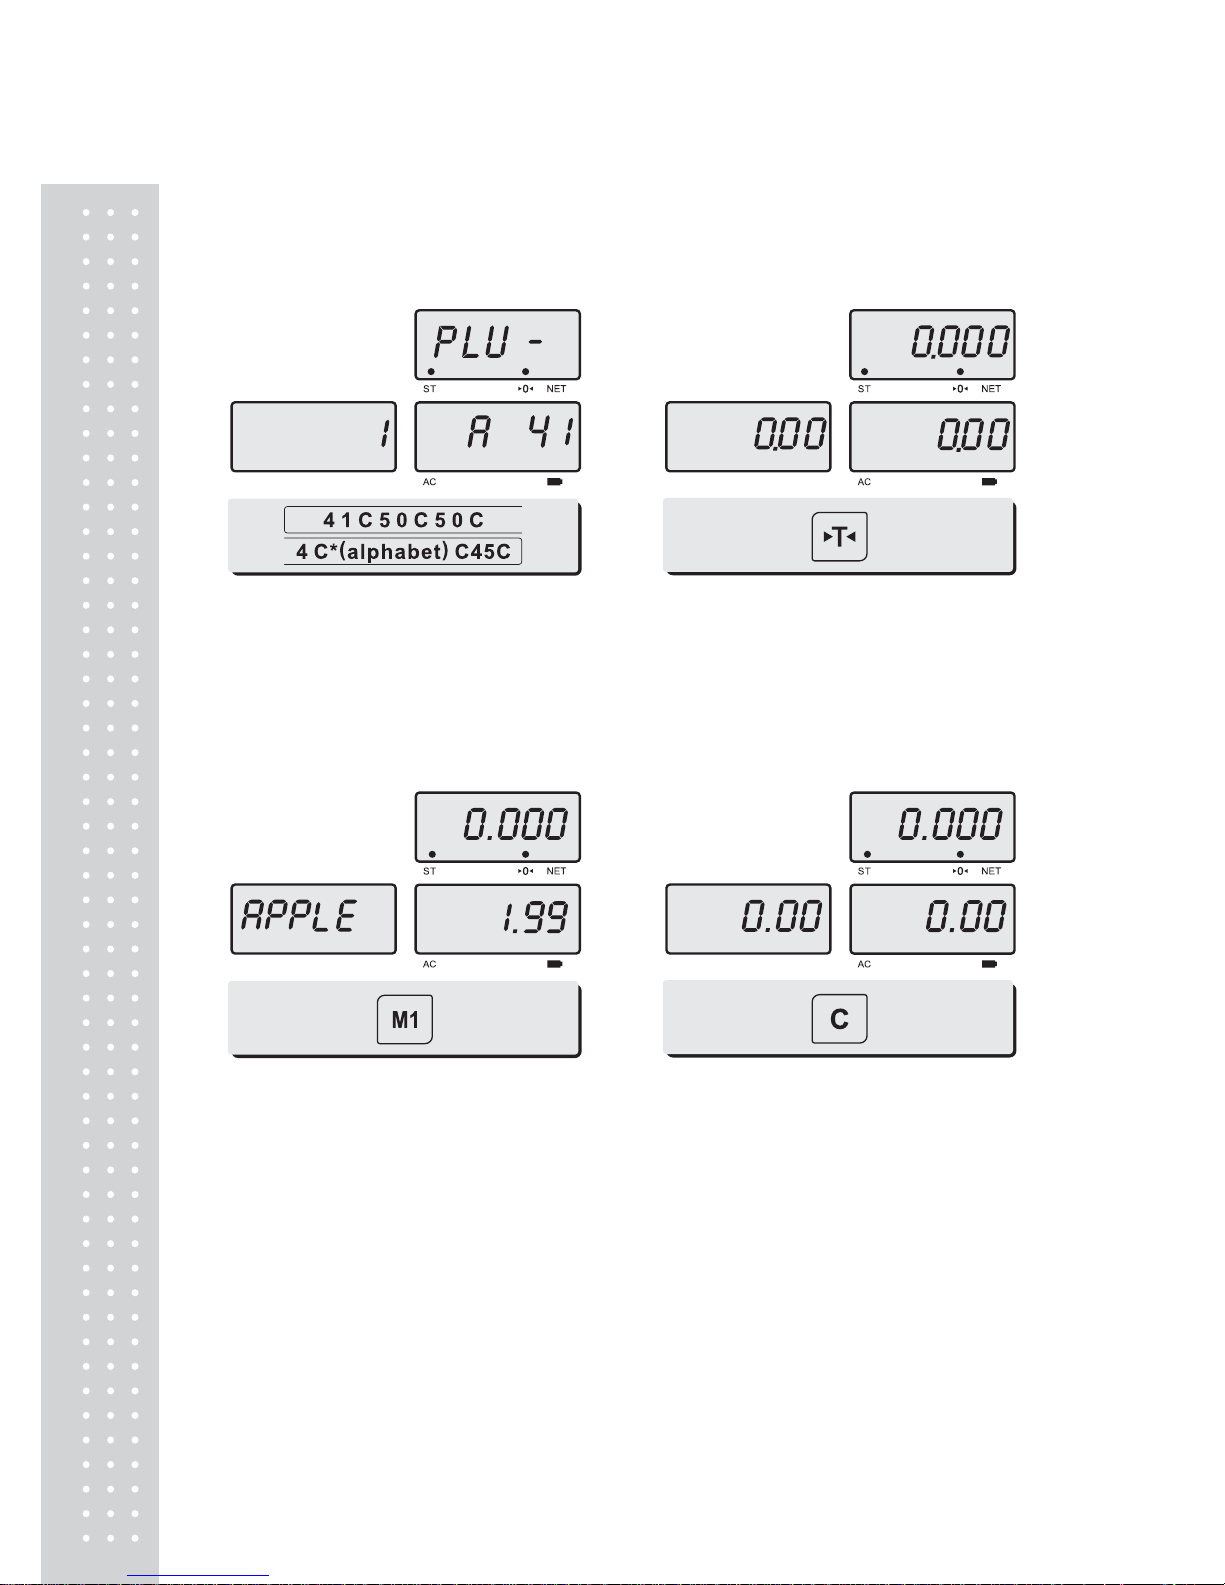
① Press number key to input unit price
you wish to have. EX)1.99
② Press “ ” key for a few seconds to
enter the PLU 's state can be pre-establish
③ Press PLU key (M1 ~M4) to input a
direct PLU address.
Ex)
Page 14
`
1
b. Saving PLU name (Option)
C key is to input, save a character, and move to next character (or byte).
TARE key is to move next programming menu.
Input appropriate ASCII codes to ①
save the PLU name.
Ex) “APPLE” is “4, 1, C, 5, 0, C, 5, 0,
C, 4, C(alphabet), C, 4, 5, C”.
② Press TARE key to exit to normal
weighing mode or C key up to maximum
8th byte. Then automatically exit to
normal weighing mode.
c. Calling up PLU
① Press M1 ~ M4 key to call up
PLU. e,g, Press M1 key.
② Press C key to clear and return to the
normal weighing mode.
4
Page 15
15
Chapter 3. User’s Set-up Mode
This section explains how to set up the following functions.
Functions Options Remarks
a. Auto power-off NO / 10 / 30 / 60
b. Suspend Mode OFF / 20 / 40 / 60
①
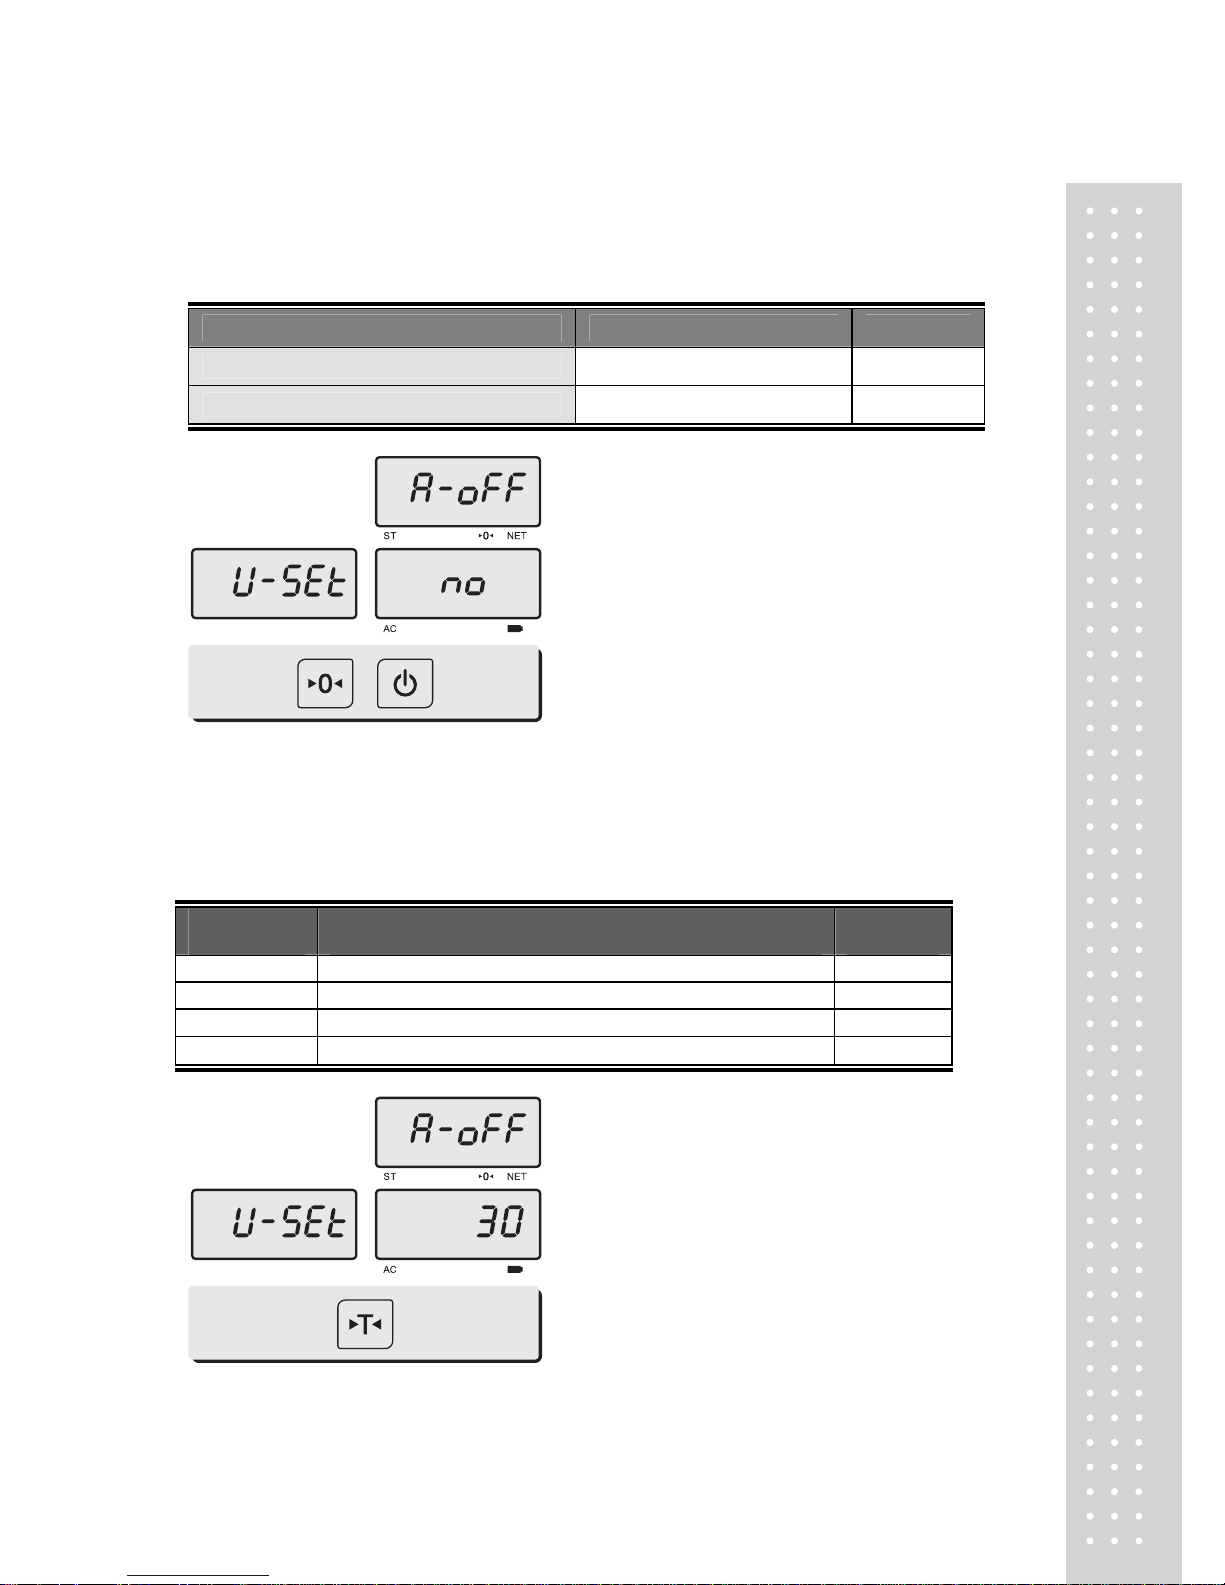
To get into “User’s Set-up
Mode”, hold ZERO key and press
ON/OFF key, while the scale is
Pr
ess ZERO key to save current option and move to next function setting mode.
Press TARE key to move to other next option.
a. Auto power-off
This section explains how to set backlight on & off function and automatic off function.
Options Description Remarks
NO
No auto power-off.
10 (minutes)
Auto power-off in 10 minutes when no use.
30 (minutes)
Auto power-off in 30 minutes when no use.
60 (minutes)
Auto power-off in 60 minutes when no use.
①
Select an option you wish to have
by using TAR E key. Ex) 30
(minutes).
Page 16
`
16
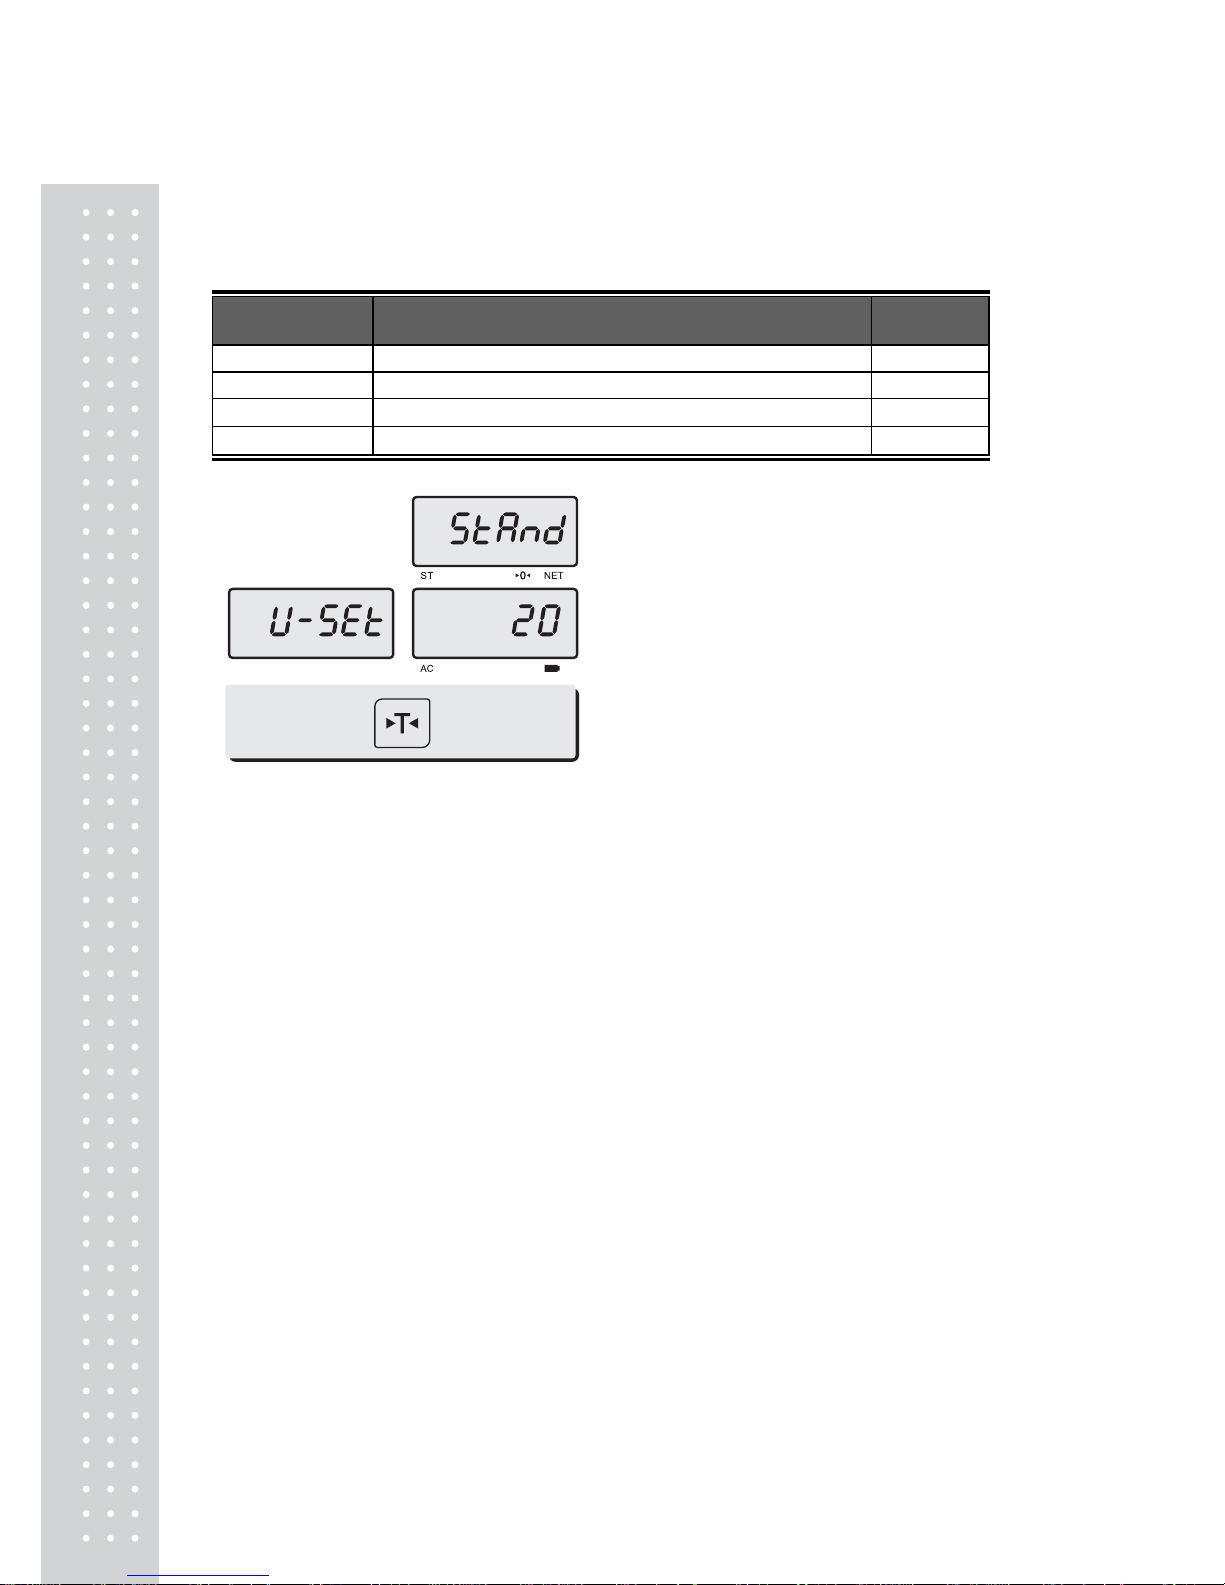
b. Suspend mode function
T
his section explains how to set a time to suspend mode.
Options Description Remarks
OFF
No suspend mode.
20 (seconds)
Suspend mode in 20 seconds when no use.
40 (seconds)
Suspend mode in 40 seconds when no use.
60 (seconds)
Suspend mode in 60 seconds when no use.
① Pr
ess ZERO key to move next function
setting, suspend mode.
② Press TARE key to select a time to suspend
mode.
Page 17
1
Chapter 4. Sales transaction
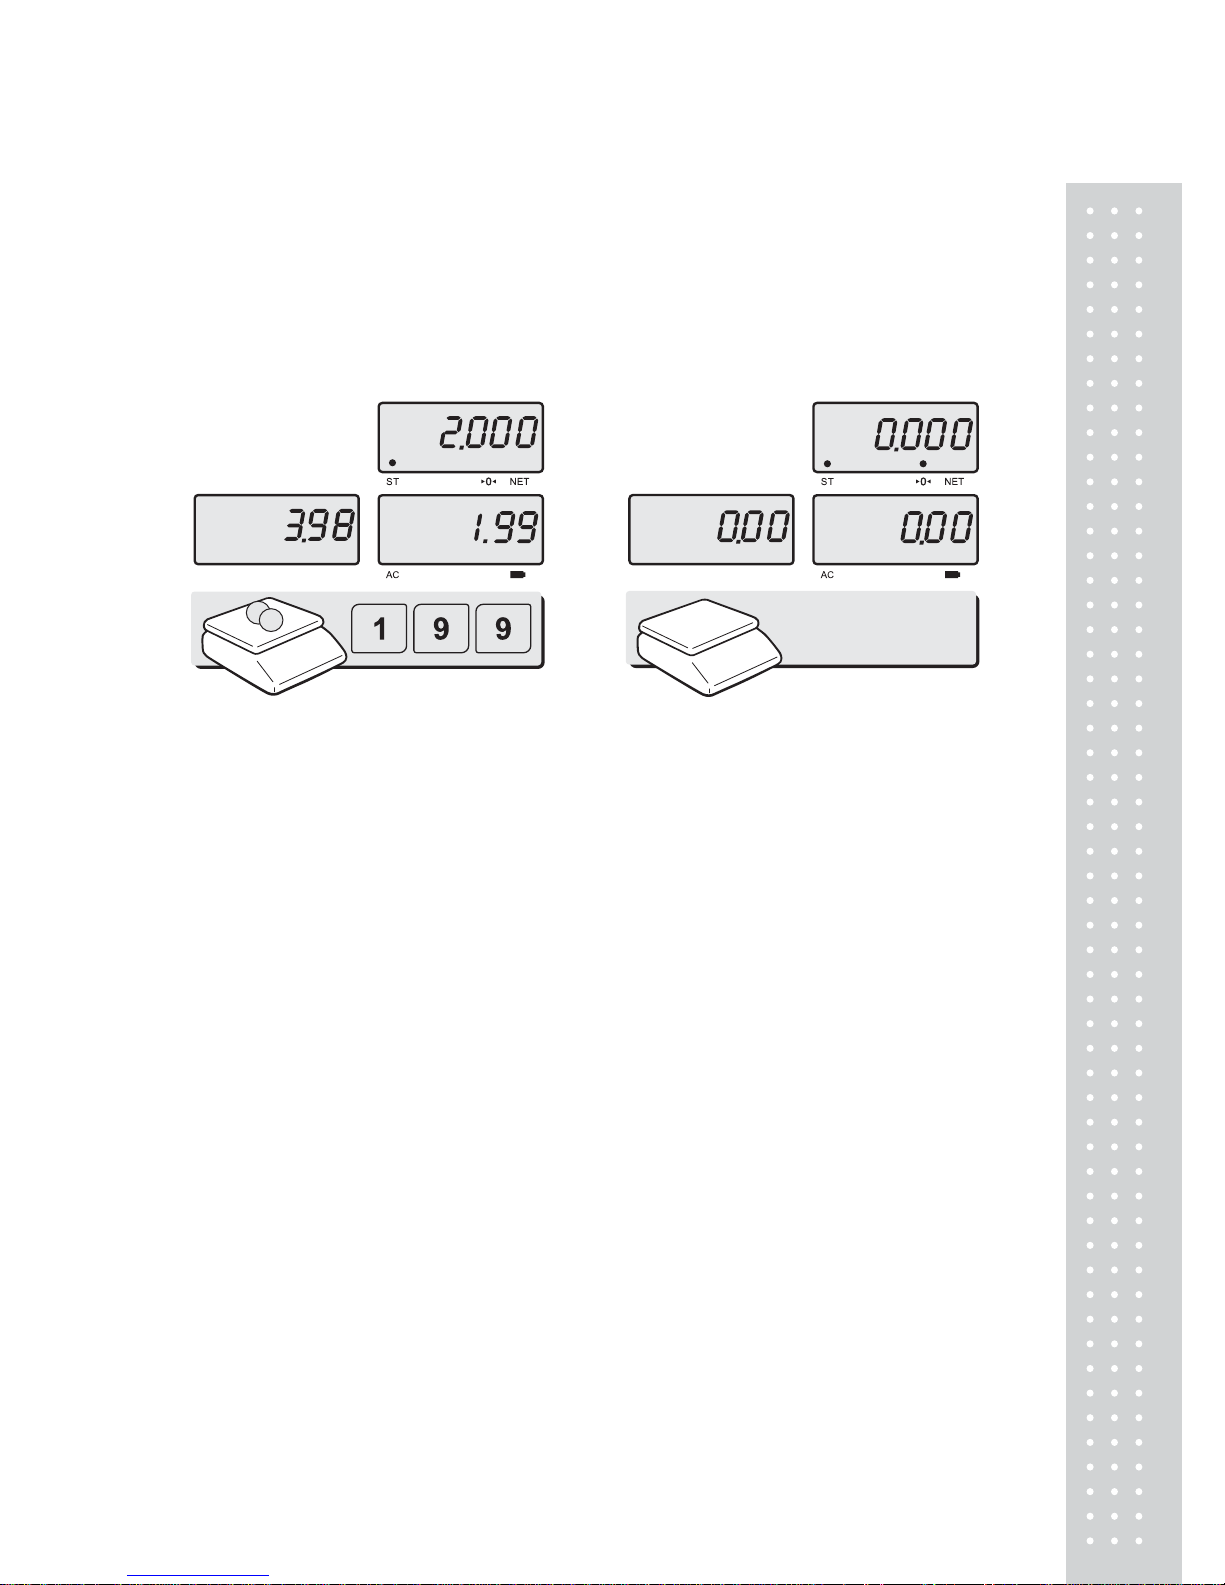
PR can provide inputting the unit price through the numeric key and calling up PLU.
a. Input the unit price through the numeric key
This section explains how to input the unit price through the numeric key
and complete the sales transaction.
① Place an item on the platter and
press appropriate numeric keys to input
unit price. EX) 1.99 for unit price.
② Remove the item from the platter.
7
Page 18
`
1
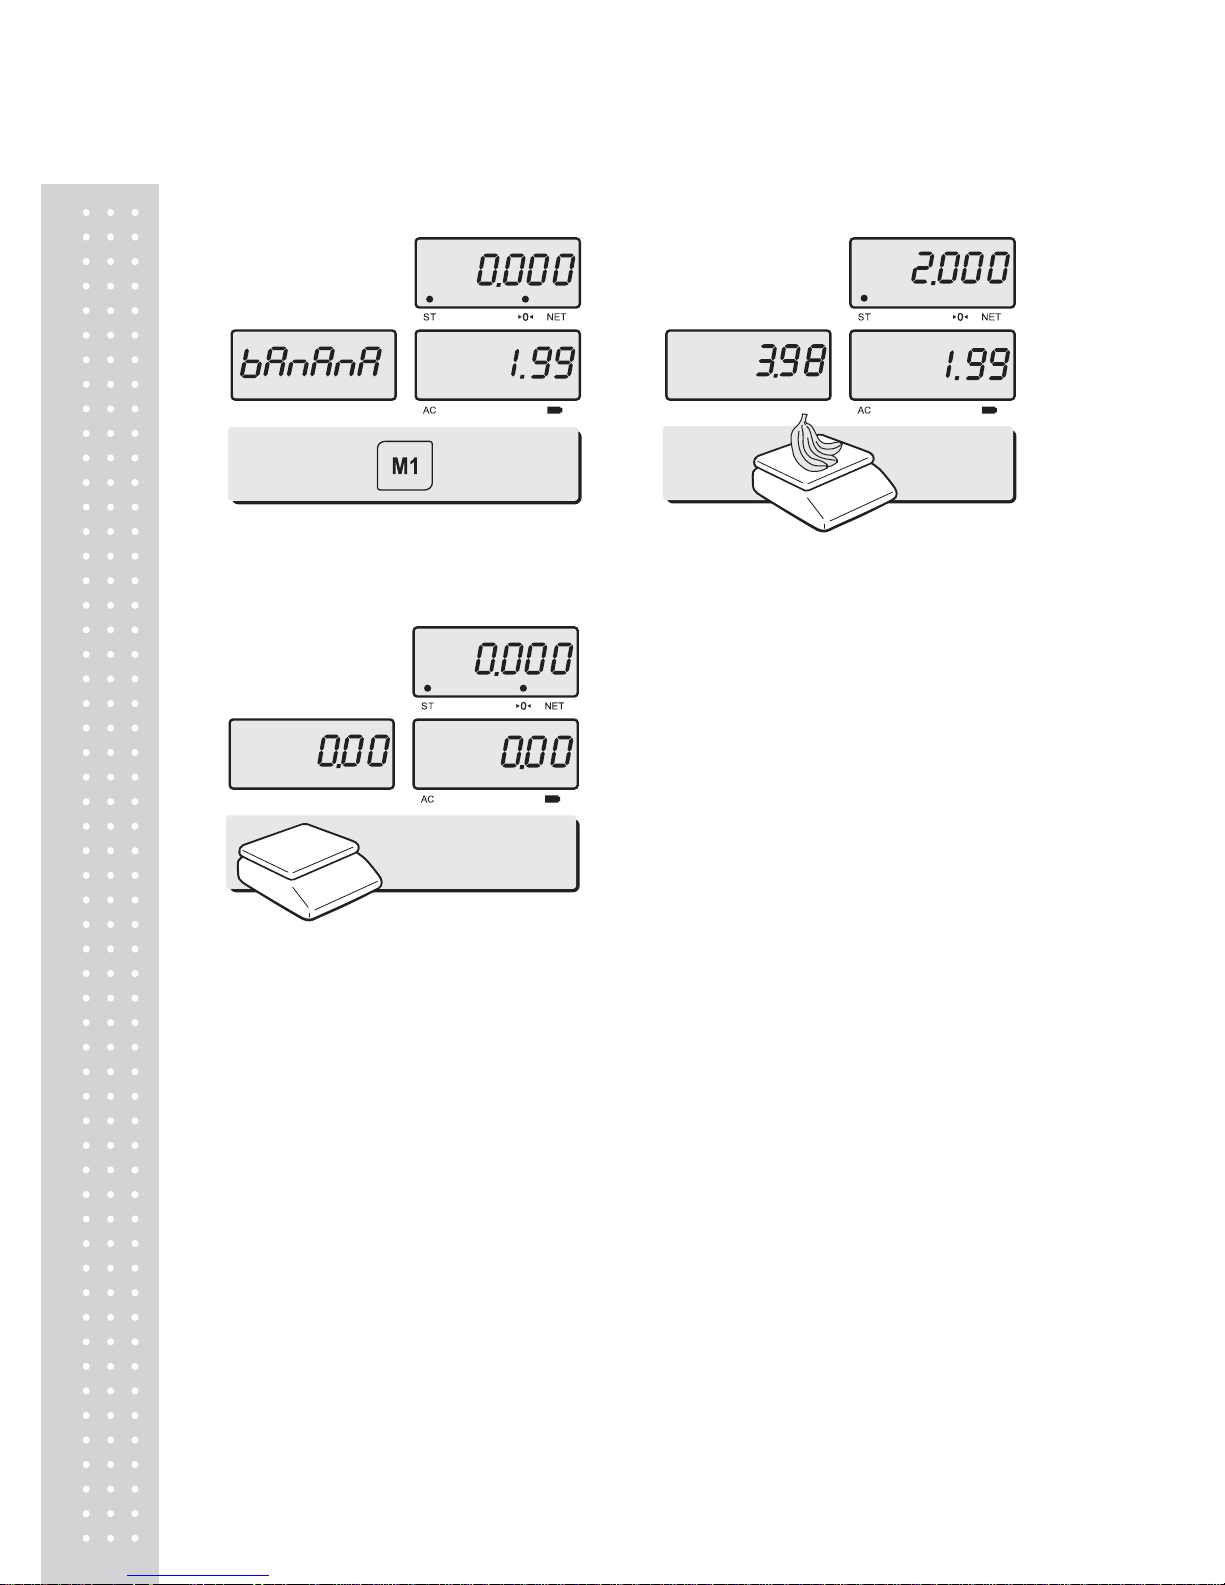
b. Input the unit price through calling up PLU
① Press M1~M4 key can call up
the PLU. EX) M1
② Place an item on the platter.
③ Remove an item on the platter.
8
Page 19
19
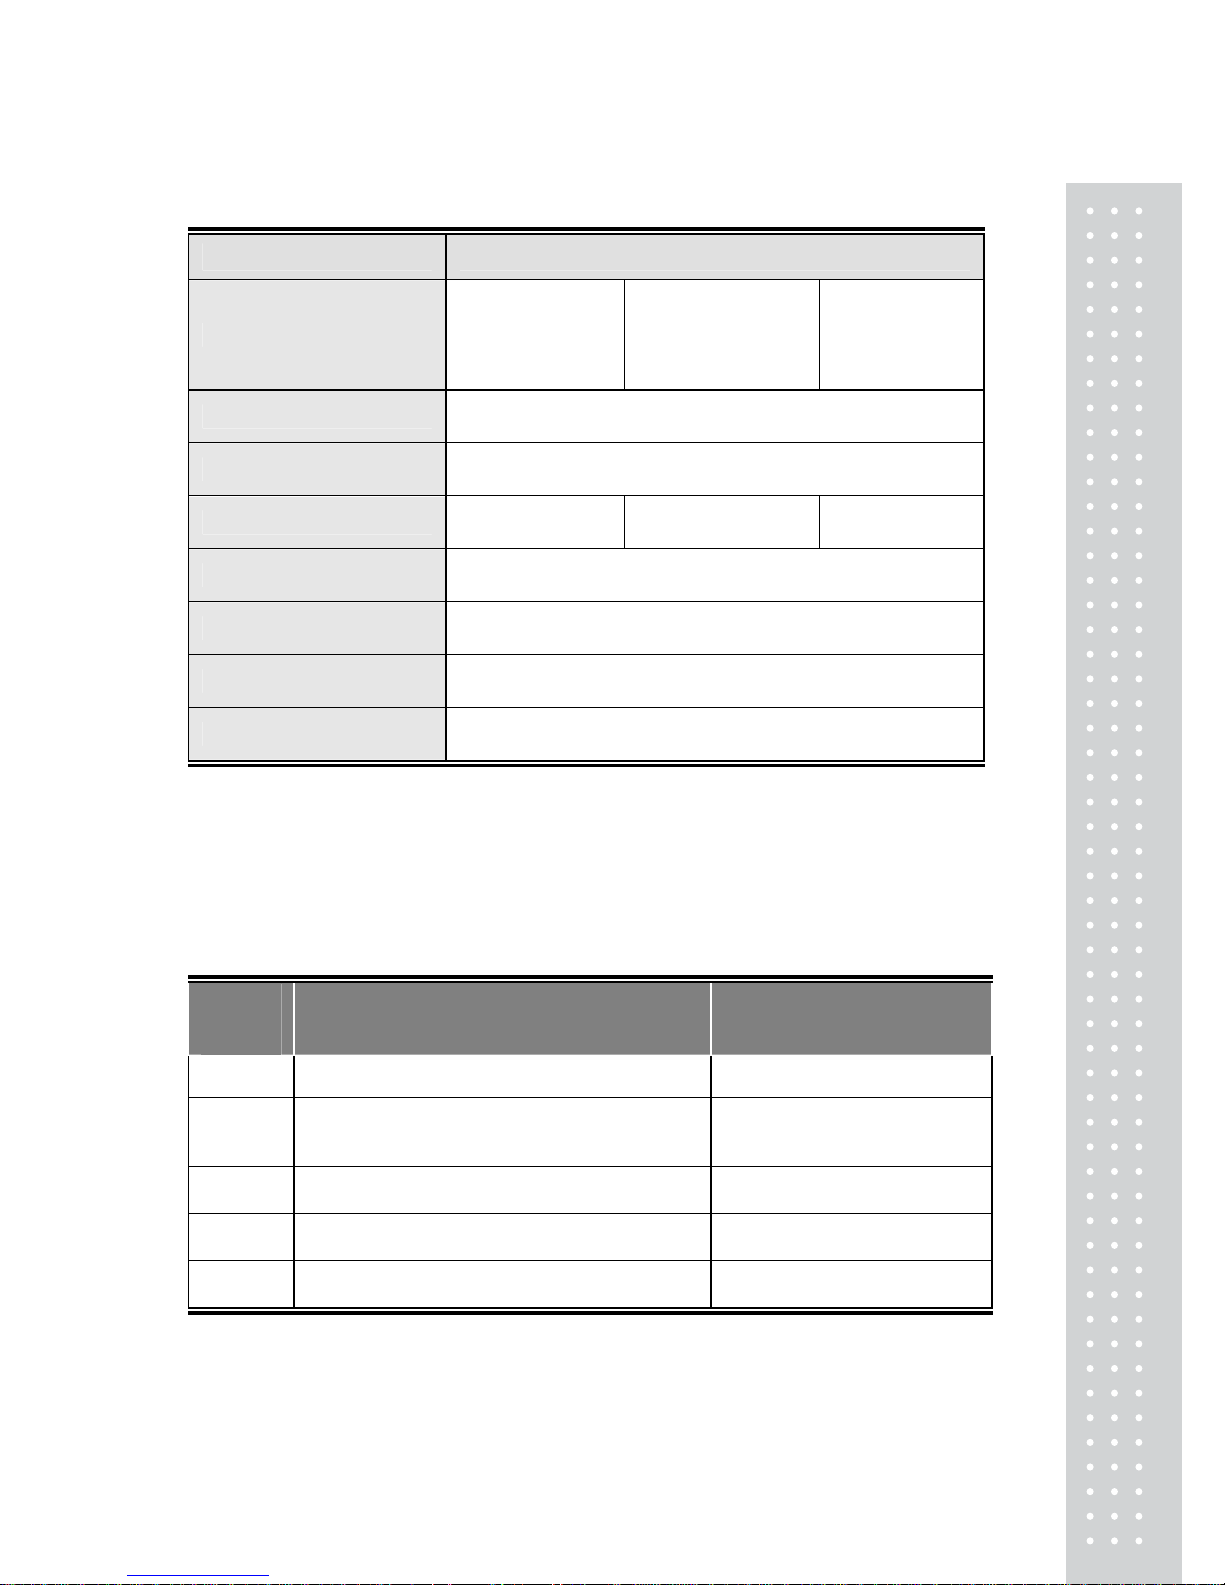
TECHNICAL PARAMETER
MODEL PR
PLUS
CAPACITY(Dual)
Max 3/6kg
e=d=1/2g
Max 6/15kg
e=d=2/5g
Max 15/30kg
e=d=5/10g
DISPLAYS: 6/5/5(Total price / Weight / Unit price)
DISPLAY DESIGNATORS ZERO, TARE, STABLE, AC POWER, BATTERY
MAXIMUM TARE - 2.999kg - 5.998kg - 9.995kg
TEMPERATURE -10 ~ +40℃℃
POWER SOURCE AC 220 - 240V,50 - 60Hz, PB 4V 4Ah
POWER CONSUMPTION APPROX. 4W
PLATTER SIZE(mm) 322W)x212(D)
ERROR MESSAGES
■ Table : Error Message
Error
Message
on Display
Description Solution
"Err 0" The "Err 0" occurs when scale is not stable. Remove unstable facts.
"Err 1"
The "Err 1" occurs when a current zero point has
shifted from the last span calibration.
Please call your CAS dealer.
"Err 3" The "Err 3" is an overload error. Please remove the weight.
"Err 4" The "Err 4" is leakage of payment. Scale needs more payment.
"Err 5" The "Err 5" means there is already tare. Remove the tare.
Page 20

`
20
MEMO
Page 21

21
MEMO
Page 22
`
22
 Loading...