

Page 1
3
Page 2

3
CONTENTS
Precautions................................................................. 4
Display and Keyboard.............................................. 7
Enter to features........................................................ 8
Normal turn off process........................................... 9
1. Switch off..............................................................................9
2. Display of switch off.............................................................9
Operations.................................................................. 9
1. Zero..........................................................................................9
2. Tare..........................................................................................9
3. Number 0~9 and digit unit...................................................9
4. Delete.....................................................................................10
5. SMPL sampling...................................................................10
6. UWS sin gle weight enterin g...............................................10
7. Weight/Quantity accumulation.........................................10
8. Accumulative display..........................................................11
9. Accumulative clear..............................................................11
10. Print.....................................................................................11
1 1. Set up Hi limit....................................................................1 1
12. Set up L ow limit.................................................................12
13. Check fu nction...................................................................12
14. Featur es Se tting.................................................................13
15. RS232 Setting.....................................................................14
16. Check w eighing warning settin g.....................................15
Internal count value display.................................. 16
Error message..........................................................16
Specifications............................................................ 17
Page 3
`
4
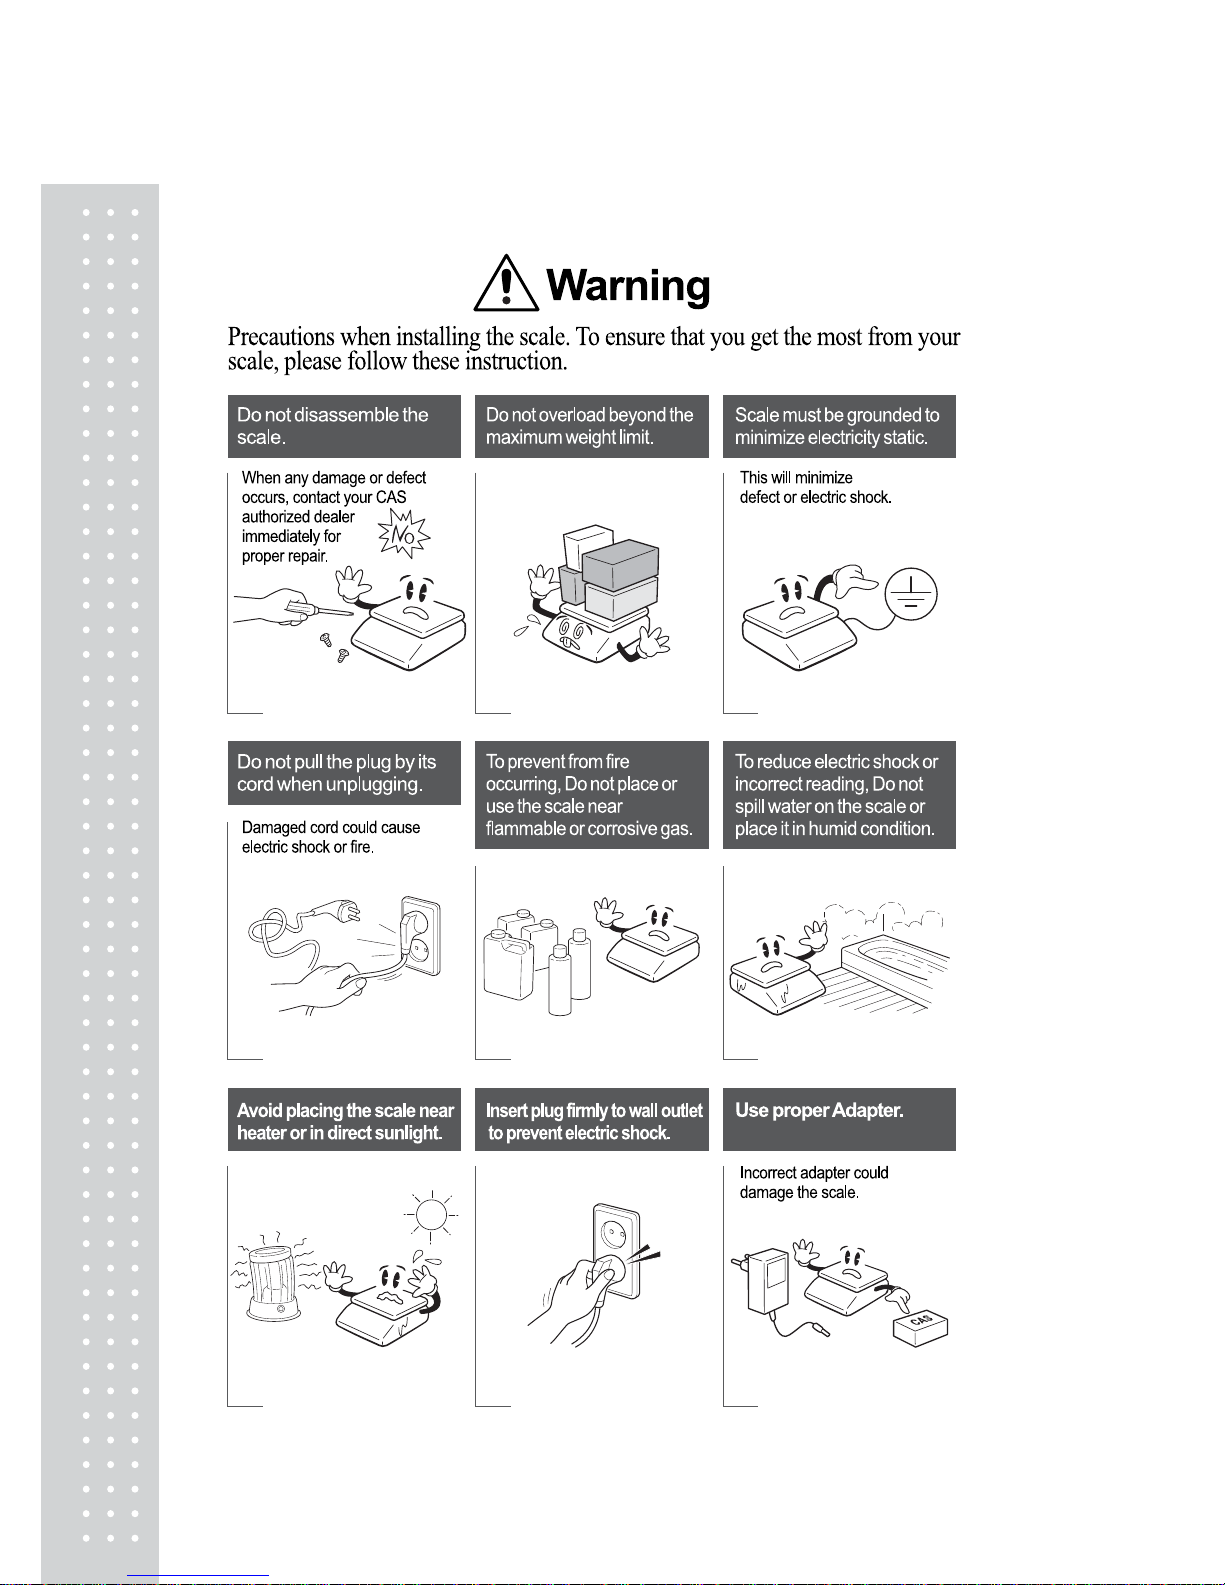
Precautions
Page 4
5
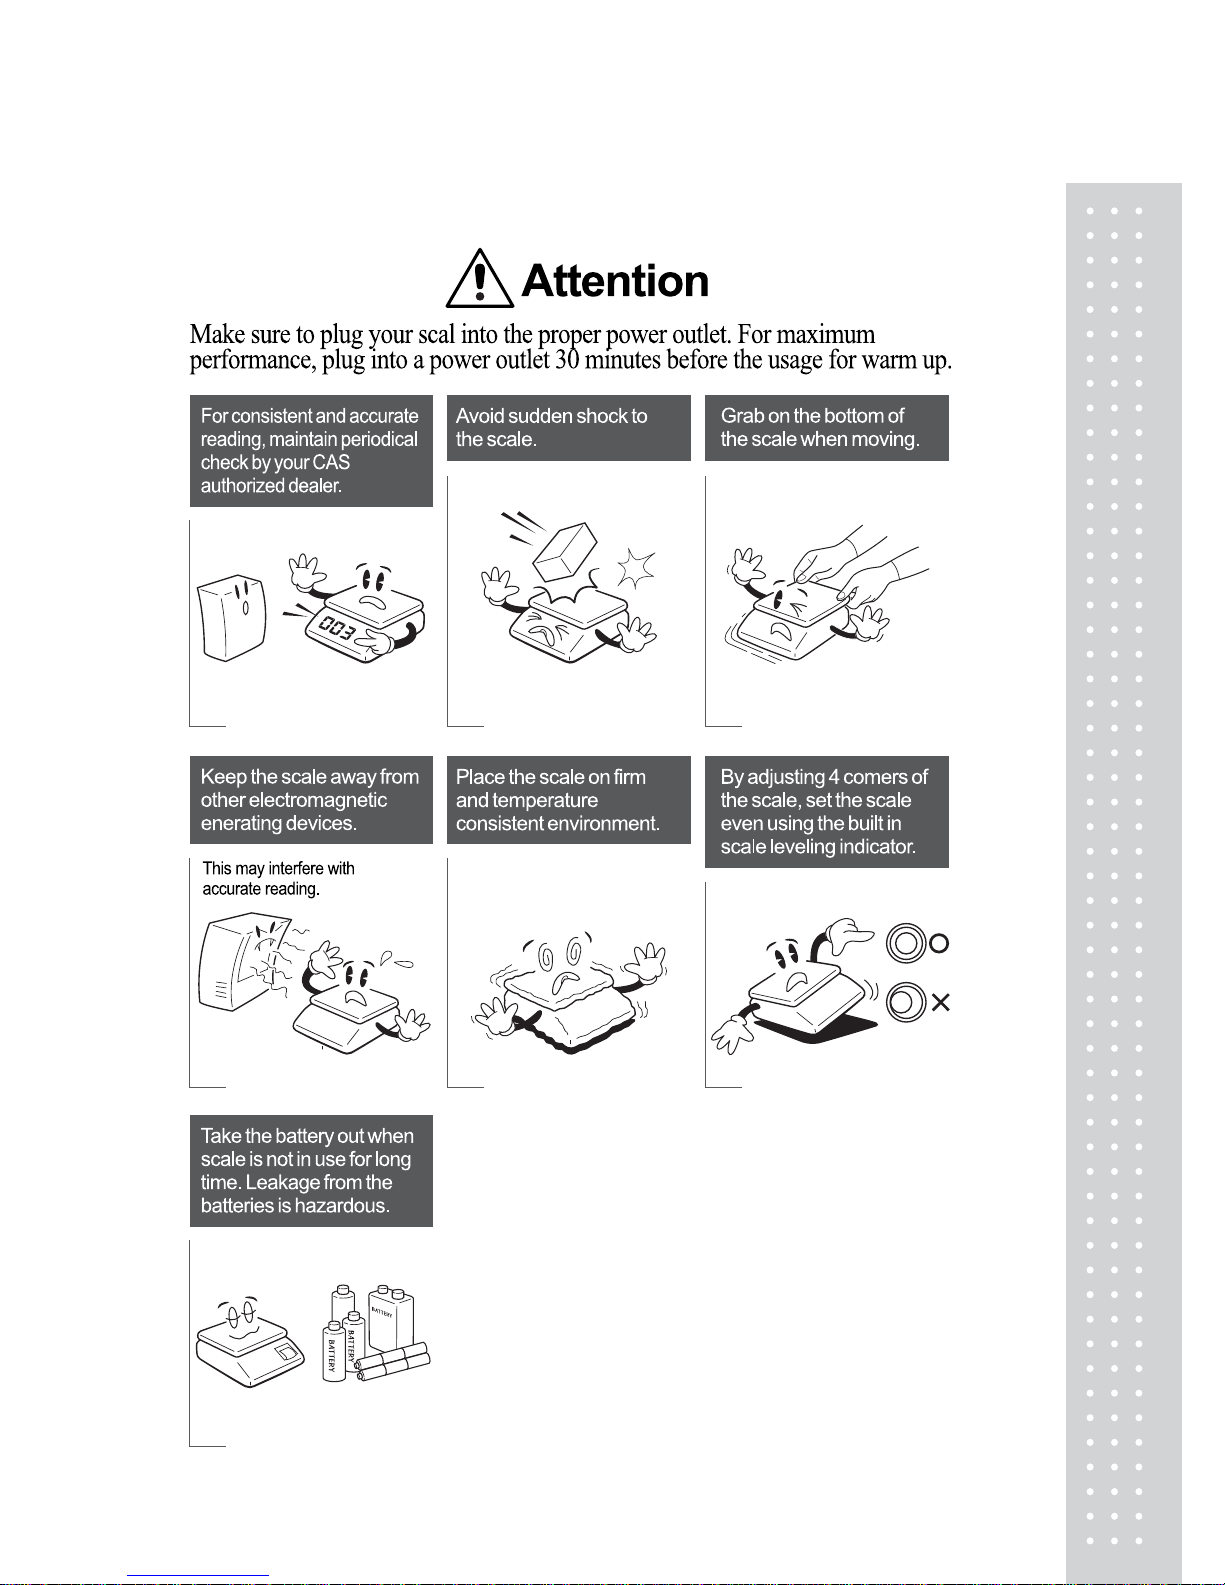
Precautions
Page 5
`
6
Precautions
- Please do not install the product at a plac e with drastic t emperature changes such as on th e
side of a window or a door .
- Avoid a place adjacent to an operating air conditioner or heater.
- Avoid a place with occurrence of vibration, rotation or excessive electromagnetic waves.
- Avoid a top of unstable surfaces.
- Avoid a dusty place.
- Do not use the product at a place with an exposure to direct sun light.
- Do not install in a region with magnetism or adjacent to machines.
1) Level adjustment for the balance
For balance, a level instrument is mounted on the rear of right side along with four level
adjusting screws. Please make the adjustment of the level adjusting screws so that an air
bubble of the level instrument is positioned inside a circle at the center.
2) How to operate a power supply for the balance
When a power supply for the balance is turned on and of f, a “Power supply” key shall be used,
and nothing shall be allowed to be placed on a platter.
This balance has a chargeable battery built in. When the “power supply” key is clicked after
supplying power to the balance, it will become a weighing cond ition af t er undergoing its own
test from 9 to 0. Particularly, make sure to sufficiently charge the battery for more than two
hours before use.
A battery service time after complete charging is about 100 hours. When the service time is
short even after complete charging of the purchased balance, use repeated charging and
discharging for several times to recover a service time performance.
Please use the product correctly b y reading the presen t manual careful ly prior to use to
sufficiently utilize the features of the PR-C series .
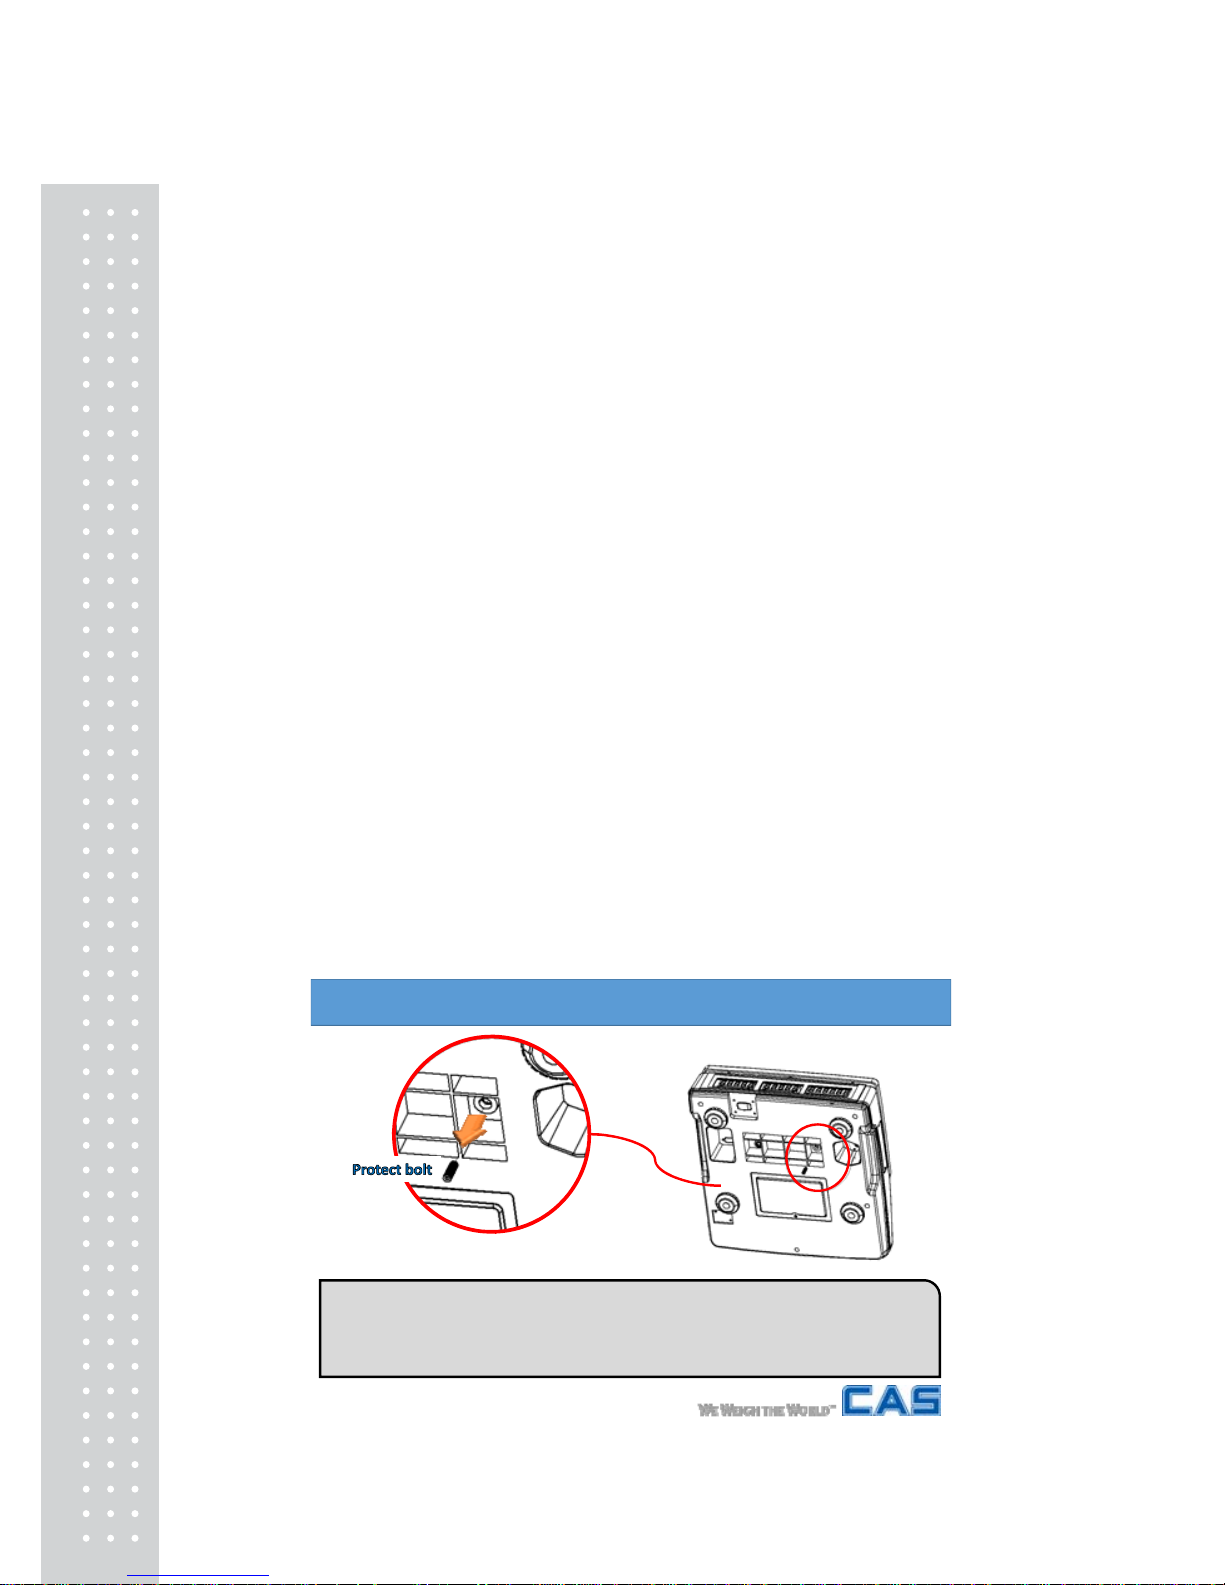
PR-C series precautions
※ Protect bolt (1ea) fixed to Product from the beginning.
※ please remove the Protect bolt before use.
Page 6
7
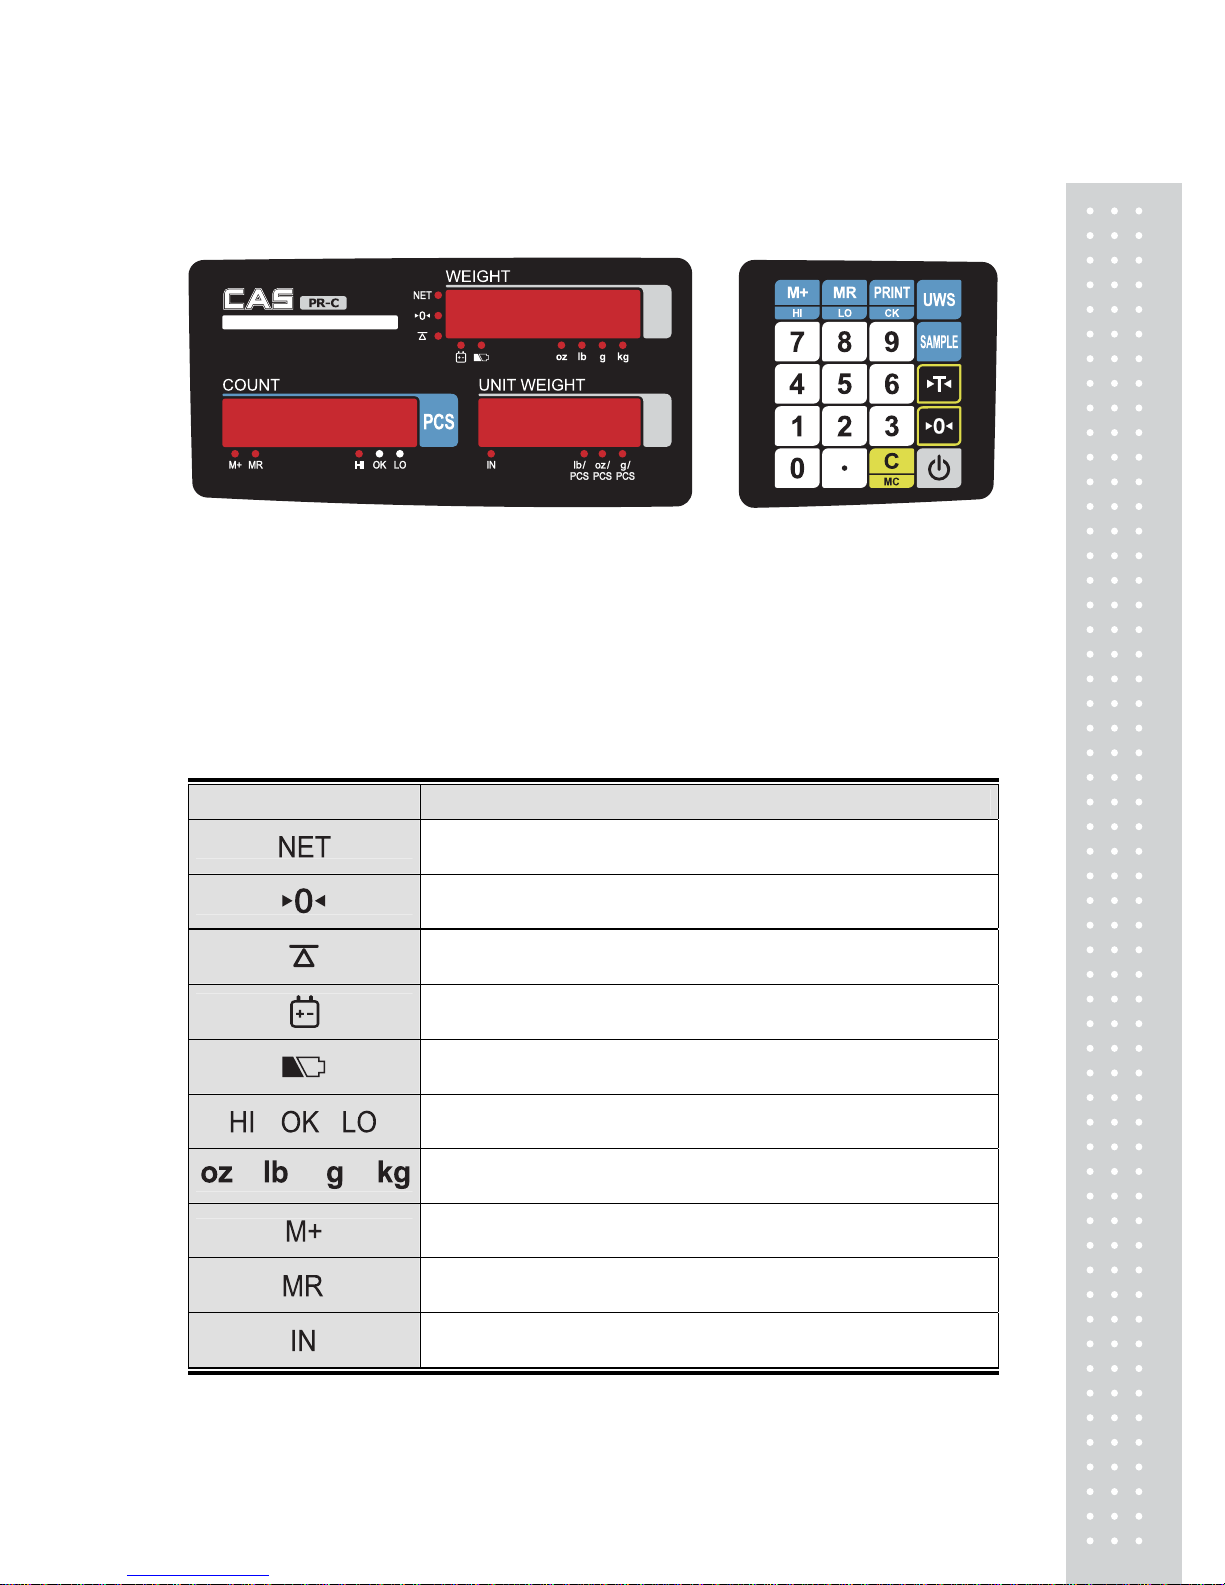
DISPLA Y AND KEYBOARD
1) Display window
- Weight window: It shows an added weight or a measured weight, with a weight displayed
up to 6 digits.
- Unit weight window: It displays a unit weight and a number of accumulated weight up to 5 digits.
- Quantity window: It displays an a ccumulated quantit y or a measured q uantity up to 6 digits.
2) Display symbols
Symbol Detailed content
Net weight mode
Zero-point display
Being in a stable condition
Battery being in a charged condition
Power supply cord being in a connected condition
Battery charging required
Alarm function display
Current weight unit
Summation display
Display upon recalling a summation value
Lack of Unit Weight, Lack of Sample Weight
Page 7
`
8
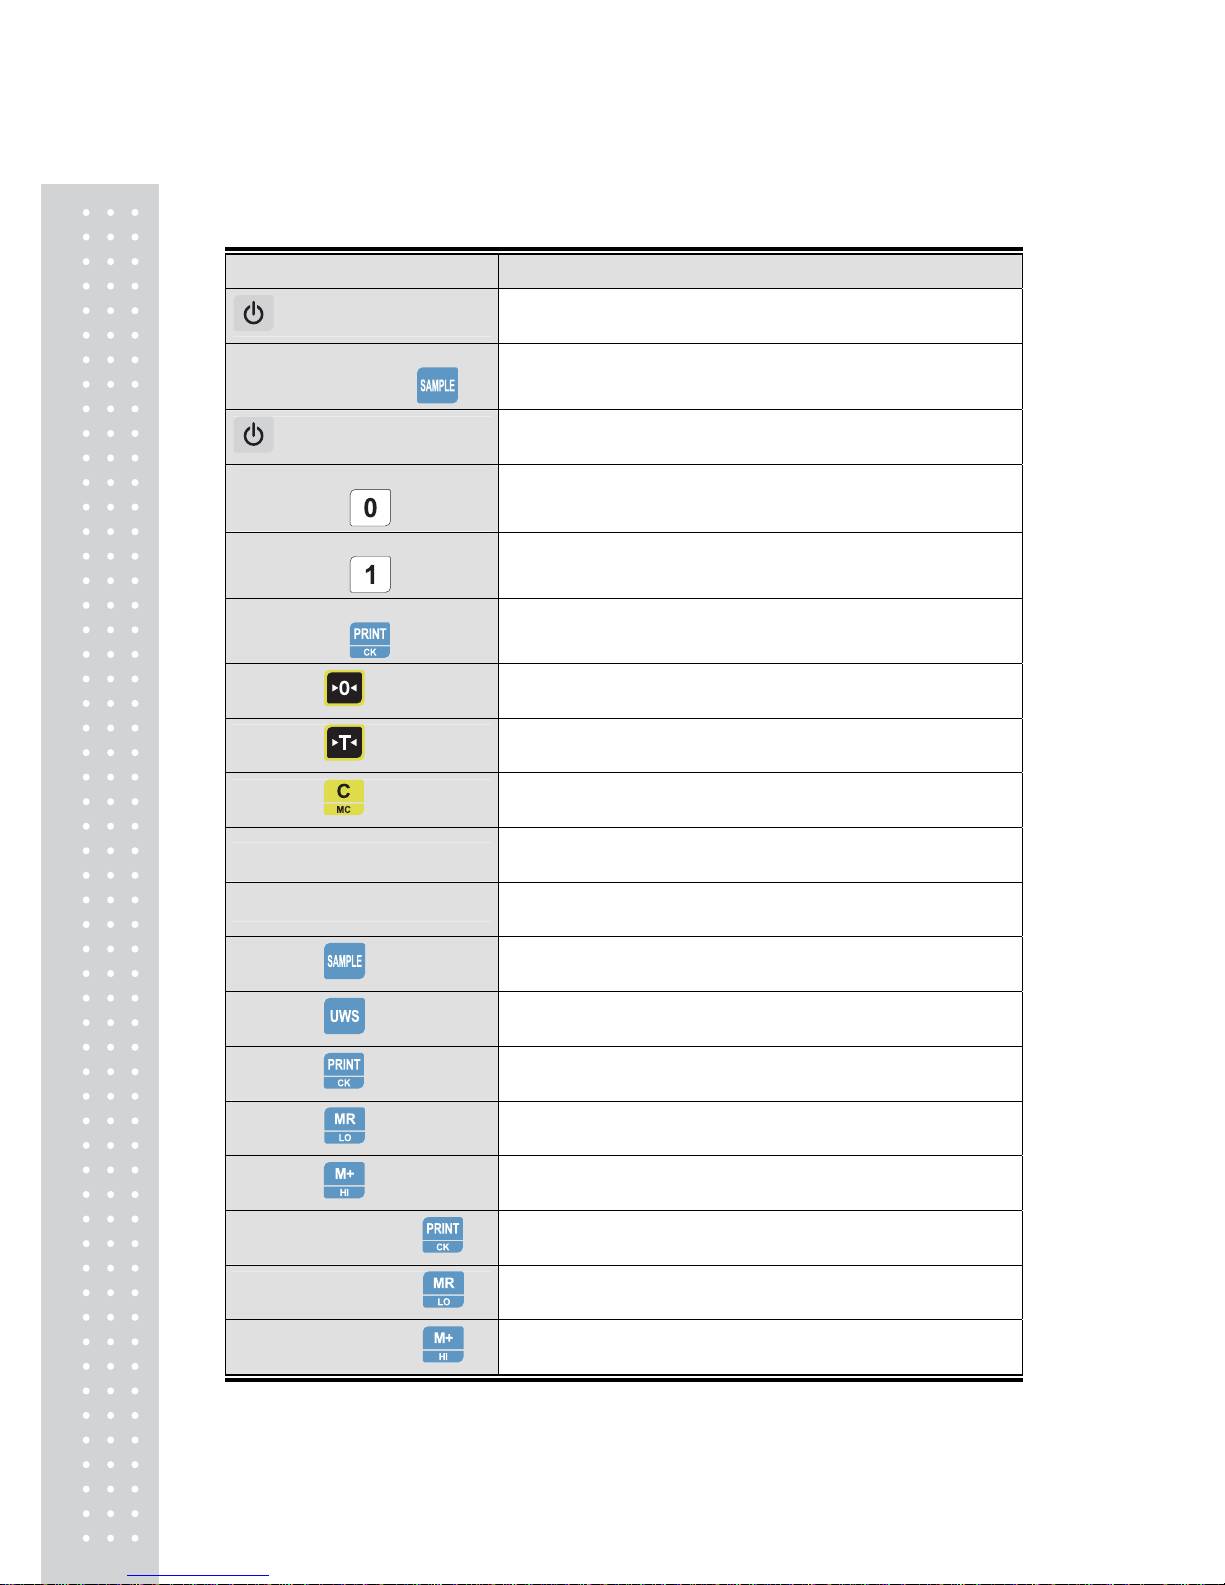
Enter to features
Key Features
+ PCB-SW1
Go to factory internal setting (Specification setting)
Go to factory
internal setting press
Go to specification setting
+ Unit weight
Go to user setting
(RS232 setting, print setting, check setting)
Under internal setting internal
setting press
Go to features setting
Under internal setting internal
setting press
Go to RS232 setting
Under internal setting internal
setting press
Go to checking setting
Turn on +
Zero
Turn on +
Tare
Turn on +
Enter delete/Accumulative delete
Turn on + Number Enter quantity
Turn on + Number + UWS Enter Unit weight
Turn on +
Sample function
Turn on +
Count Weight input function
Turn on +
Print
Turn on +
Accumulate weight display
Turn on +
Accumulate
Turn on + keep press
Start/cancel checking function
Turn on + keep press
Set up low limit
Turn on + keep press
Set up Hi limit
Page 8
9
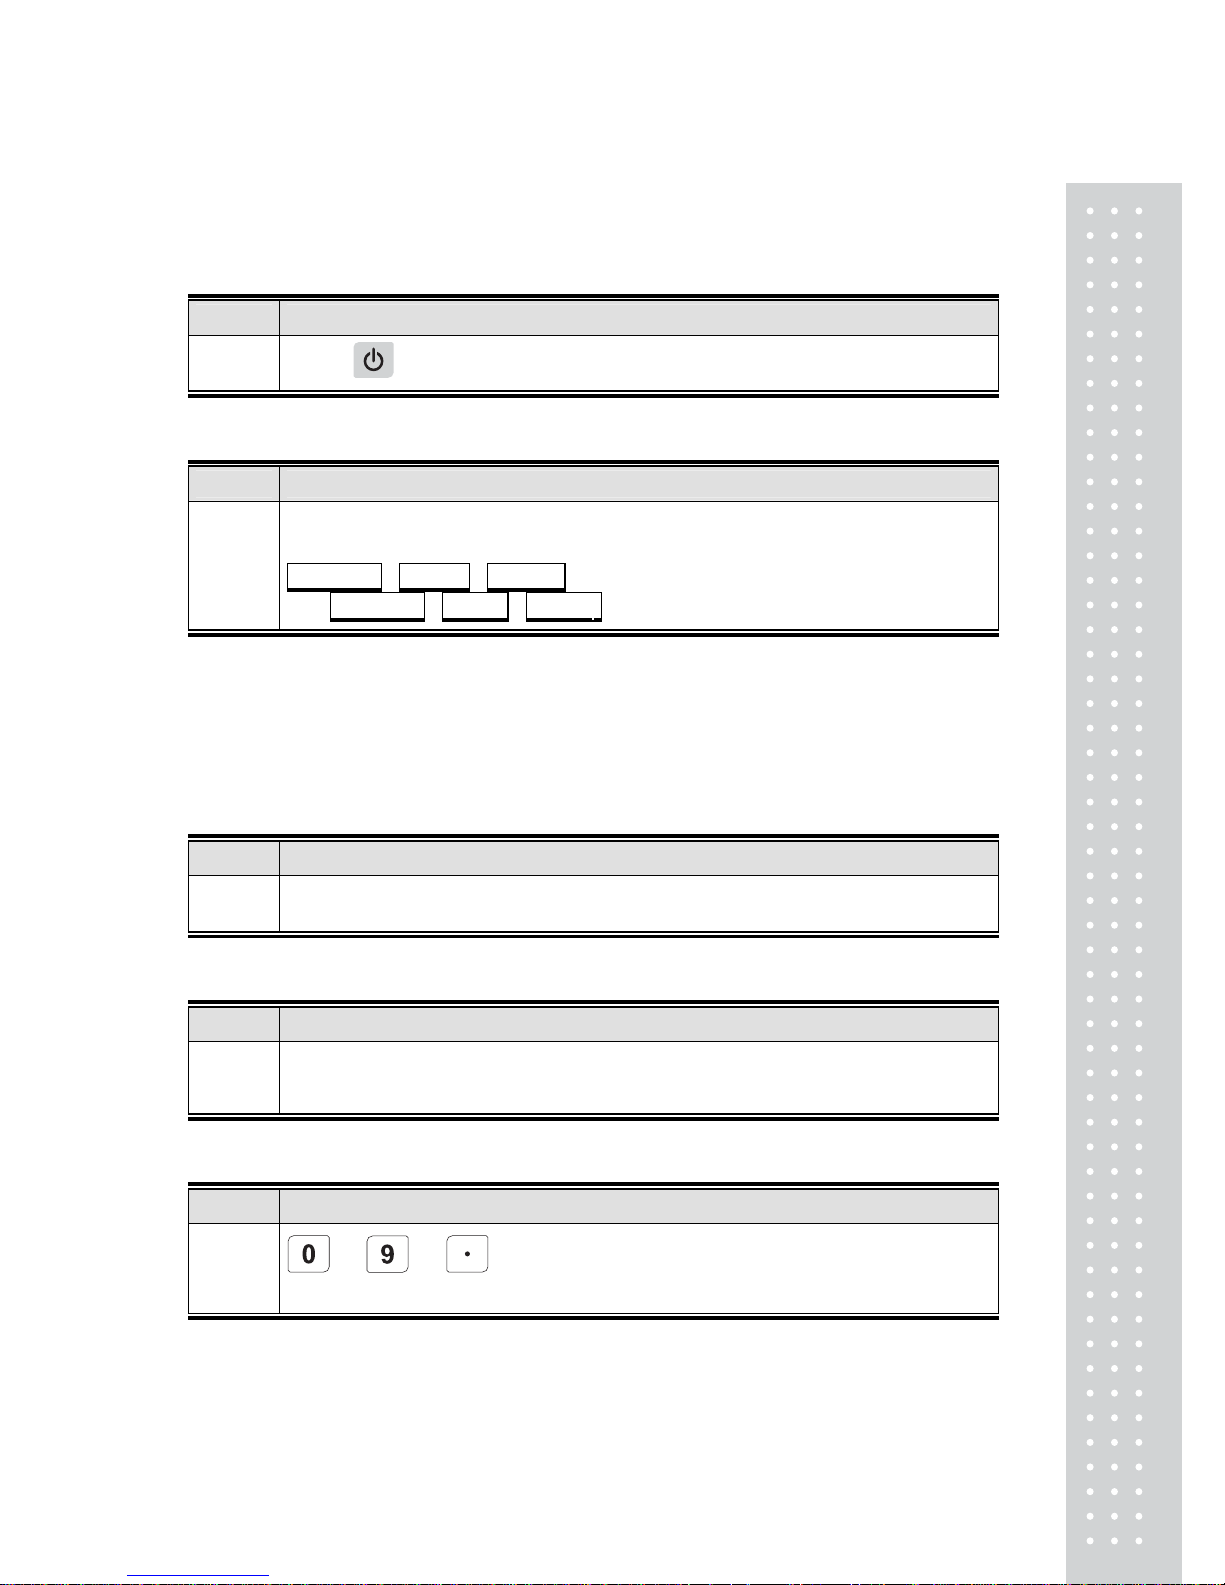
Normal turn off process
1. Switch off
Step Operation
1
Press
, 1.5 seconds is required to turn on and off the power supply .
2. Switch off display
Step Operation
1
In the screen, numbers are calculated backward from 9 to 0,
being changed from ON 600ms to OFF 400ms during each hour.
COUNT
- - - - - Ver X are shown continuously.
Ex : COUNT 30kg Ver 0
Operating functions explanation
1. Zero
Step Operation
1 Click zero point: At a zero point, the total weight is displayed as O.
2. T are
Step Operation
1
Click container: When a container button is clicked after placing a
container, the tot al weight will be displayed as 0.
3. Number 0 ~ 9 and digit unit button
Step Operation
1
~ & Unit weight, Inputting of a weight in decimal points
is allowed.
Page 9
`
10
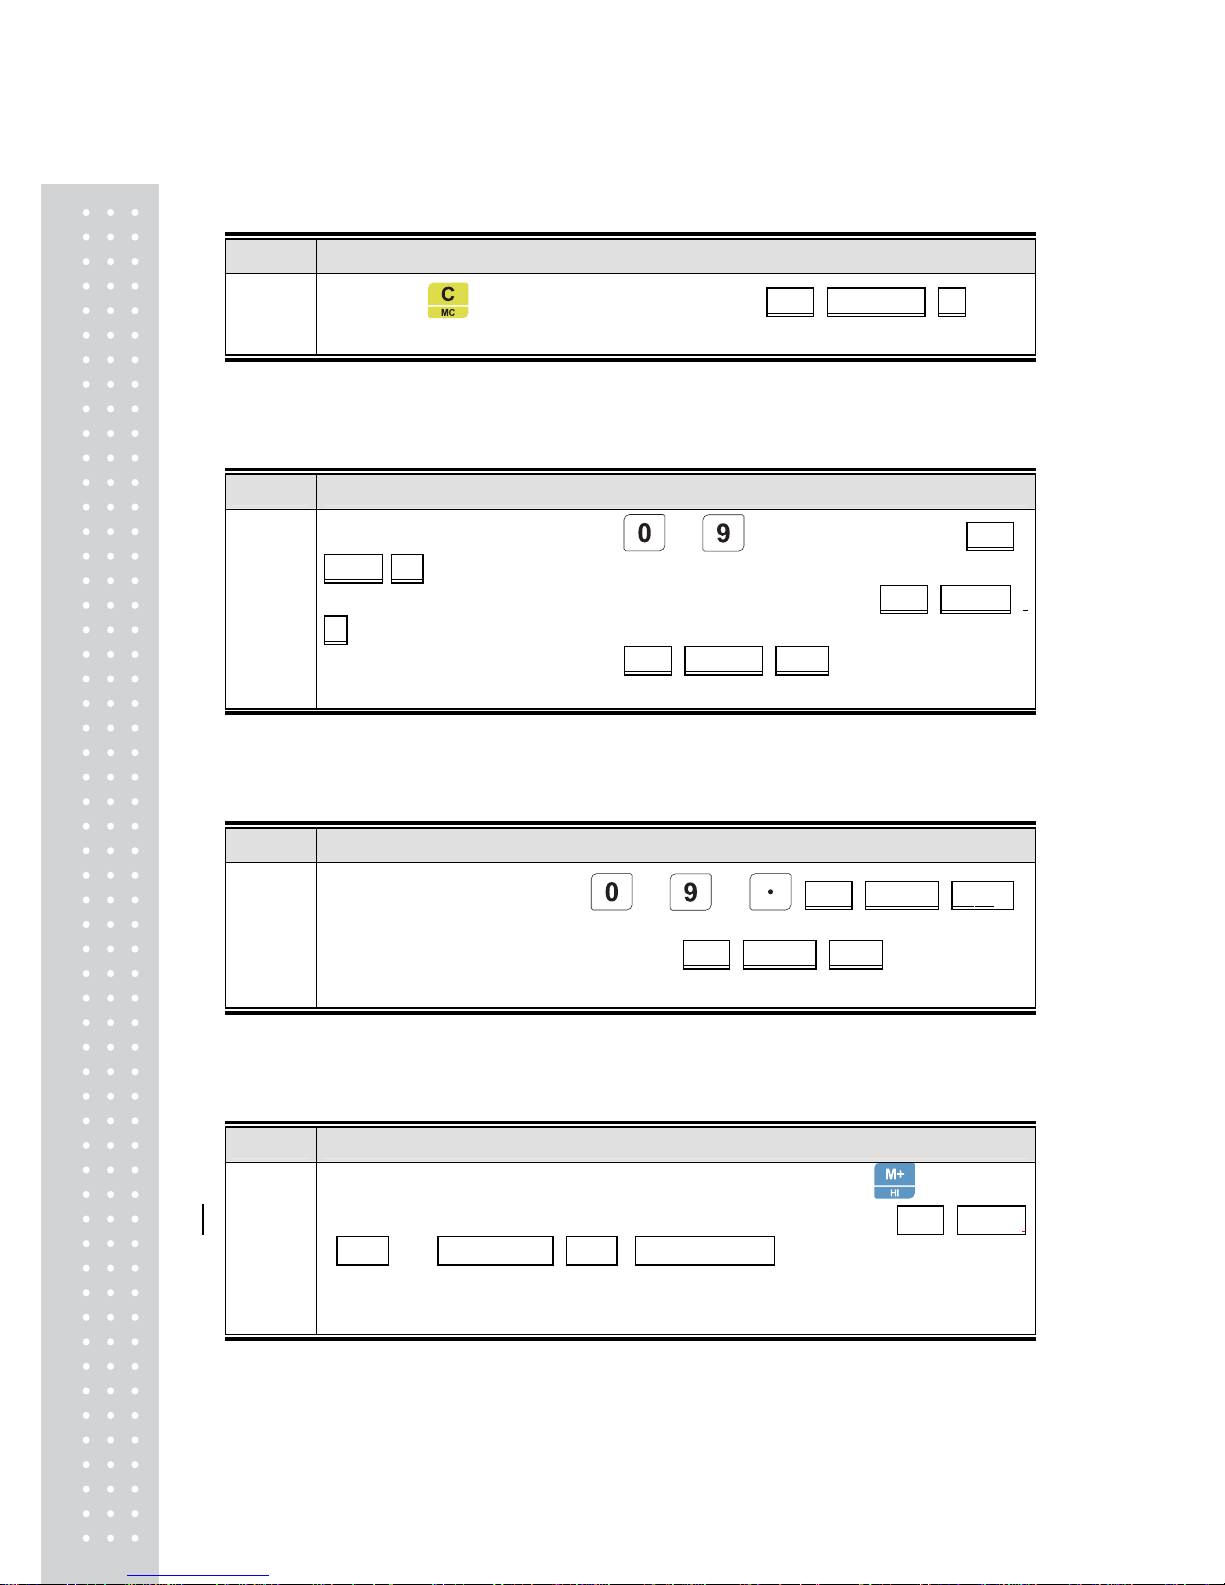
4. Delete
Step Operation
1
When the
key is clicked in any situation, weight 、 sample number 、 0 will
be displayed continuously.
5. SMPL sampling
Step Operation
1
a. Upon inputting numbers of ~ after placing a weight weight ,
SAMPLE , 0 will be displayed continuously .
b. When a quantity is inputted, stabilization will occur after weight 、 SAMPLE 、
0 will be continuously displayed.
C. When a quantity is inputted, weight 、 unit weight 、 quantity will be continuously
displayed in the display window .
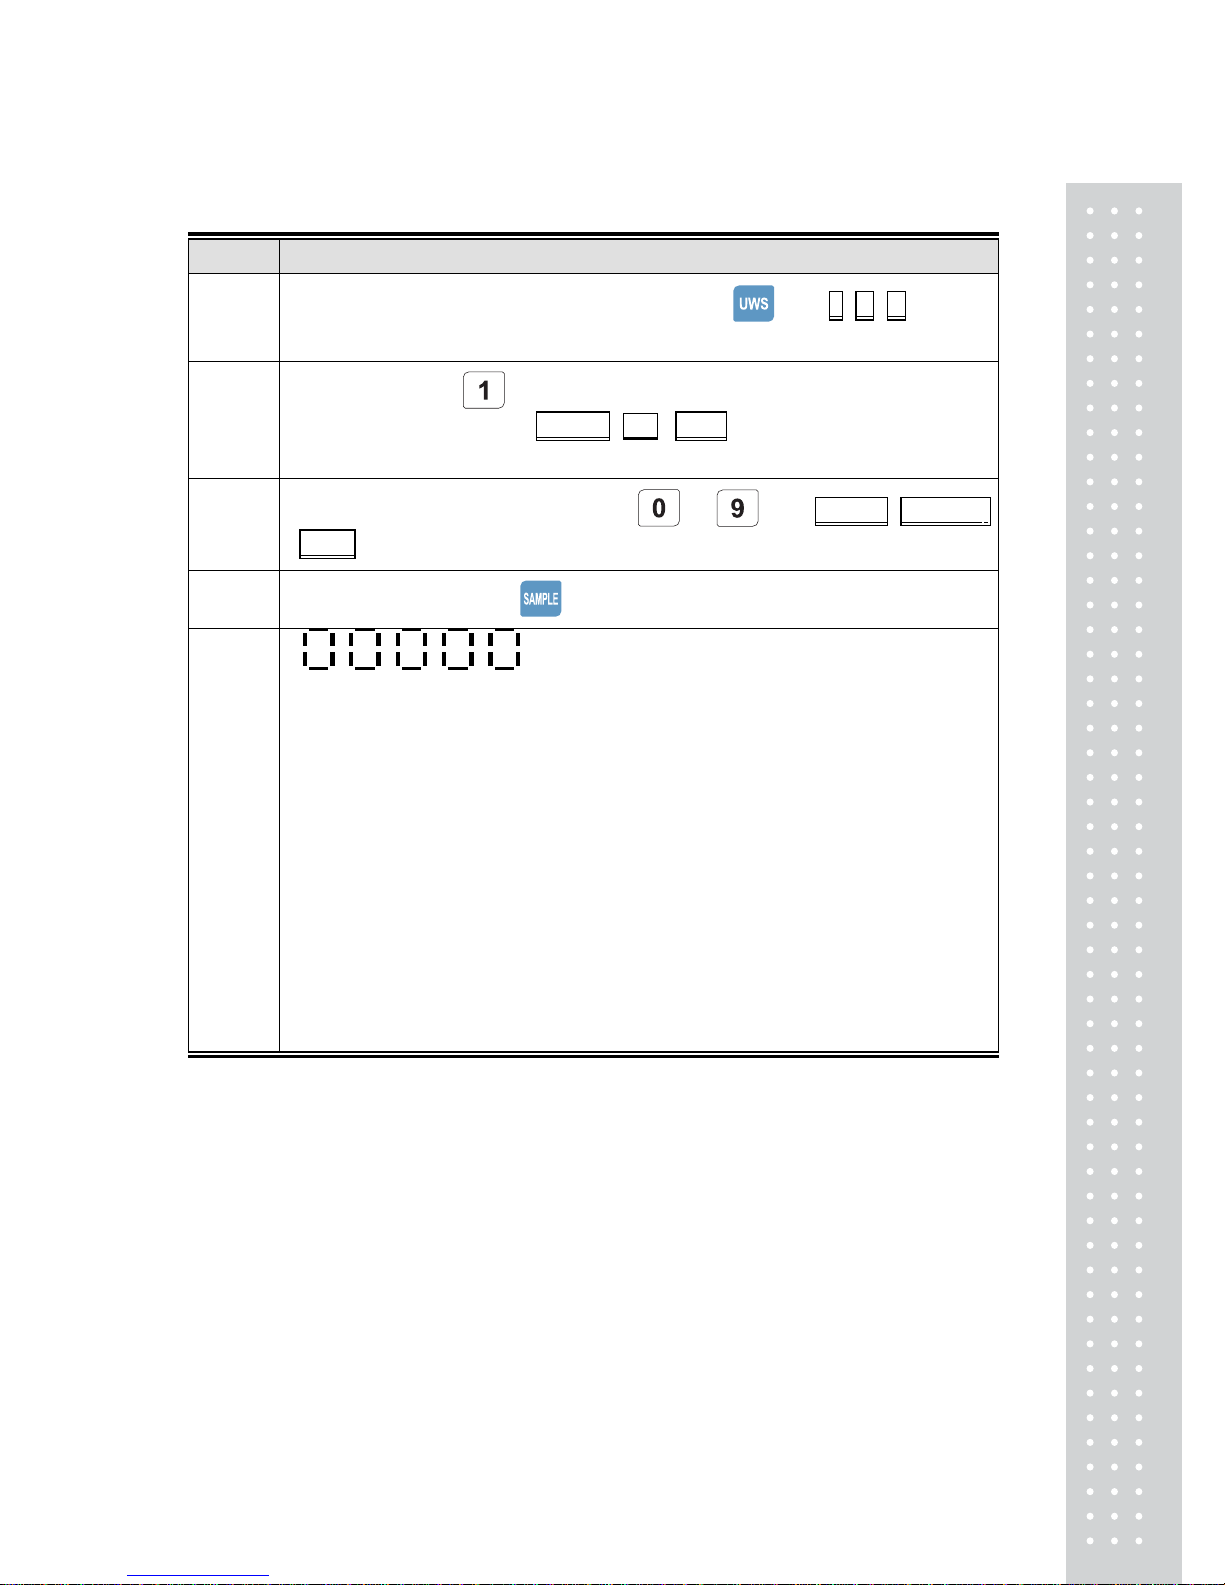
6. UWS single weight entering
Step Operation
1
a. Upon inputting values of
~ & , weight 、 unit weight 、 0
will be continuously displayed in the display window .
b. Upon inputting weight, unit weight, weight 、 unit weight 、 quantity will be
continuously displayed in the display window.
7. Weight / Quantity accumulation
Step Operation
1
Place item to be weighed/counted on the pan. When the
key is
clicked, it will return to the weight setting a minute later after weight 、 unit weight
、 Quantity and accumulated score 、 XXXXX 、 Total cumulated amount are displayed in the
display window.
* Accumulation effective only when stays at zero
Page 10
11
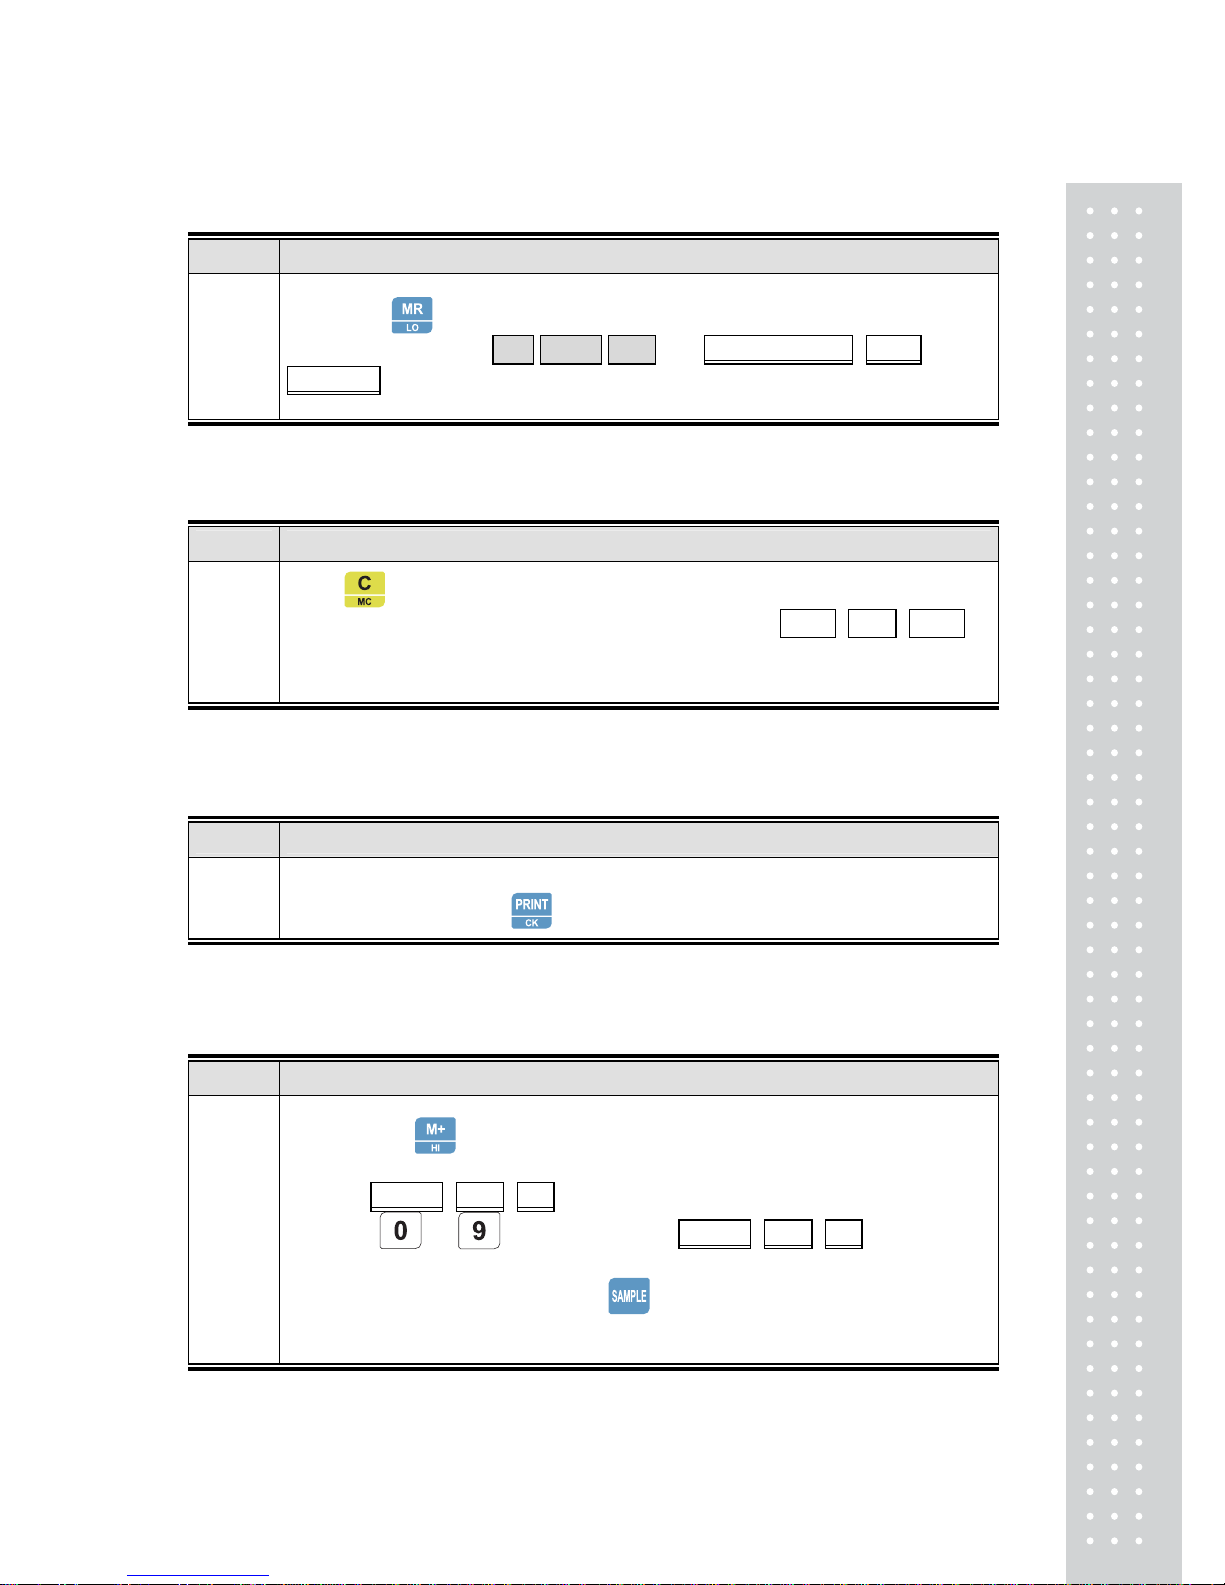
8. Accumulative display
Step Operation
1
When the
key is clicked, it will return to the weight setting by
clicking any key after Weight , Unit weight, Quantity and Total accumulated amount 、 XXXXX 、
cumulated score are continuously displayed in the display window.
9. Accumulative clear
Step Operation
1
If the key is clicked in an Accumulative function, then it means
deletion of accumulated Accumulative values. After
XXXXXX、 Clr AC 、XXXXXX is
continuously displayed in the display window , it will return to the weight
setting a second later.
10. Print
Step Operation
1
Upon outputting using RS232, printing will be executed by RE232
method by clicking the key.
1 1. Set up Hi limit
Step Operation
1
a. When the
key is clicked for a long time, it will enter into setting of
an upper limit value when the power supply is turned on. In the display
window,
original value、 SEtHi 、 0 will be continuously displayed.
b. When ~ keys are clicked, original value、 SEtHi 、 0 will be
continuously displayed in the display window.
c. Af ter inputting values, click the
key, it will return to the weight
setting.
Page 11
`
12
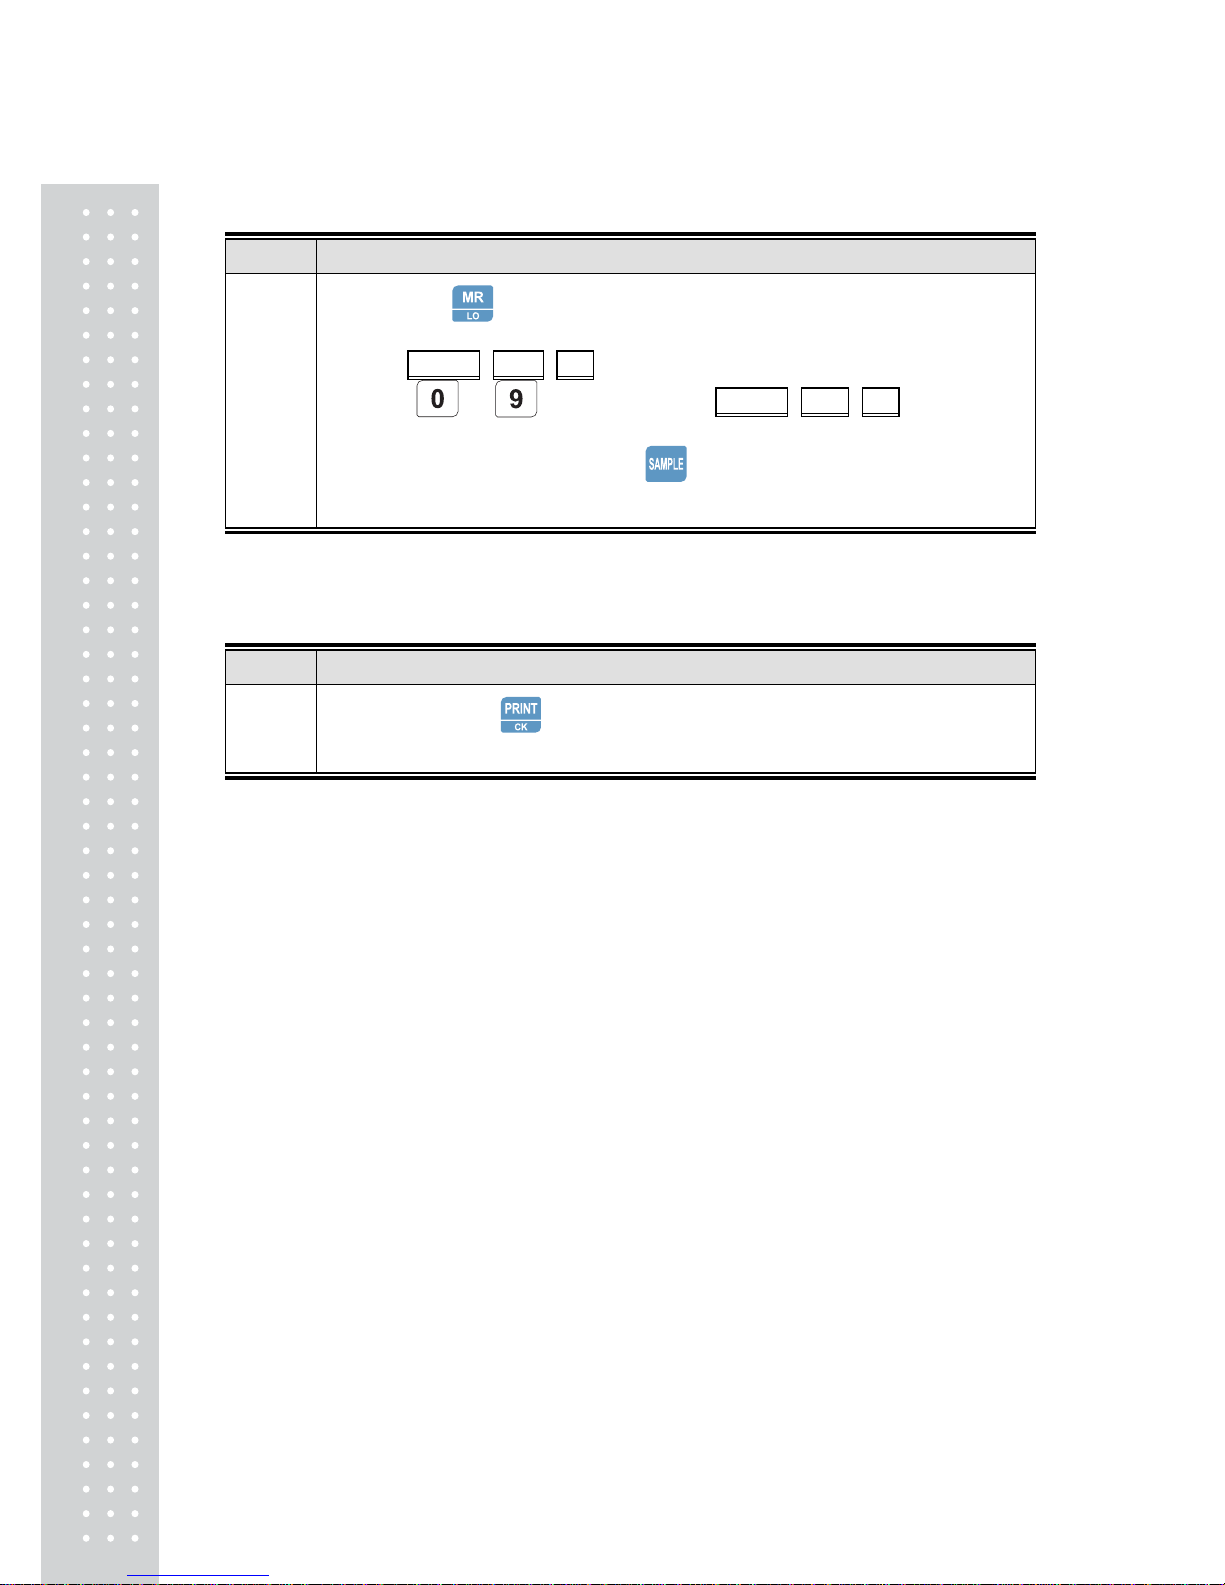
12. Set up Low limit
Step Operation
1
a. When the key is clicked for a long time, it will enter into setting of
an upper limit value when the power supply is turned on, In the display
window, original value 、 SEtLo 、 0 will be continuously displayed.
b. When ~ keys are clicked, original value、 SEtHi 、 0 will be
continuously displayed in the screen.
c. Af ter inputting values, click the key , it will return to the weight
setting.
13. Check function
Step Operation
1
While clicking the
, either “CK ON”or “CK OFF”Will be displayed in
the UNIT WEIGHT screen.
Page 12
13
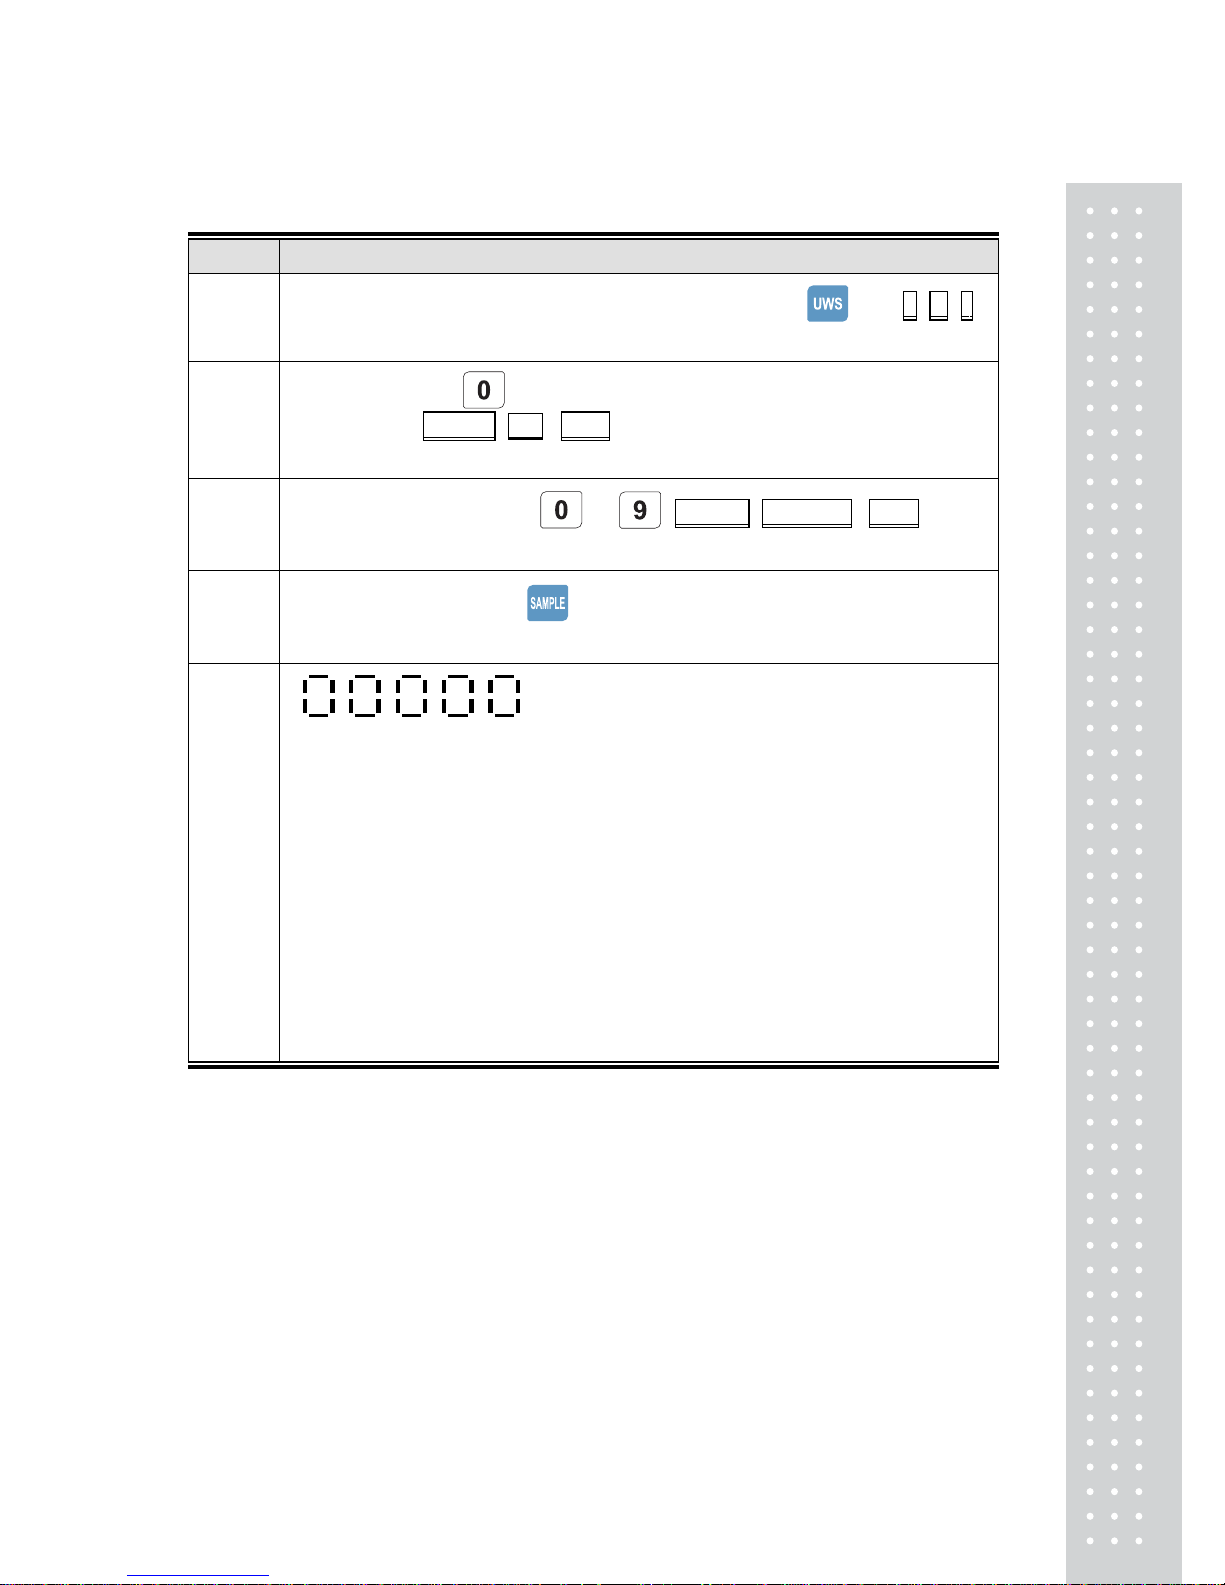
14. Features setting
Step Operation
1
When you turn on the power supply while clicking the key, 0 、 0 、0
will be continuously displayed in the display screen.
2
Upon clicking the key , the screen will be shifted to the Features
setting mode,
original value、 、 U SET will be continuously displayed in the
display window.
3
Upon inputting values of ~ , original value、 entering value 、 U SET will be
continuously displayed in the display window.
4
Check while clicking the
key, and return to the weight
measurement.
Example
1
(a) (b) (c) (d) (e) 02210
(a) Backlight setting (Function available only in LCD)
0 =Automatic backlight 1 =Backlight 2 = No backlight
(b) Vibration filtering
The larger the number among values of 0 ~5, the greater filtering
(c) Setting a range capable of taking a zero point
0 =over +/- 0d display value 1 = over+/- 1d display 2 = over +/- 2d display
3 = over +/- 3d display
(d) Automatic zero point setting
0 =+/- 0d auto zero 1 = l ower +/- 1d auto zero 2 =lower +/- 2d auto zero
(e) Weight display unit
0= g 1= kg 2= lb 3= oz
Page 13
`
1
4
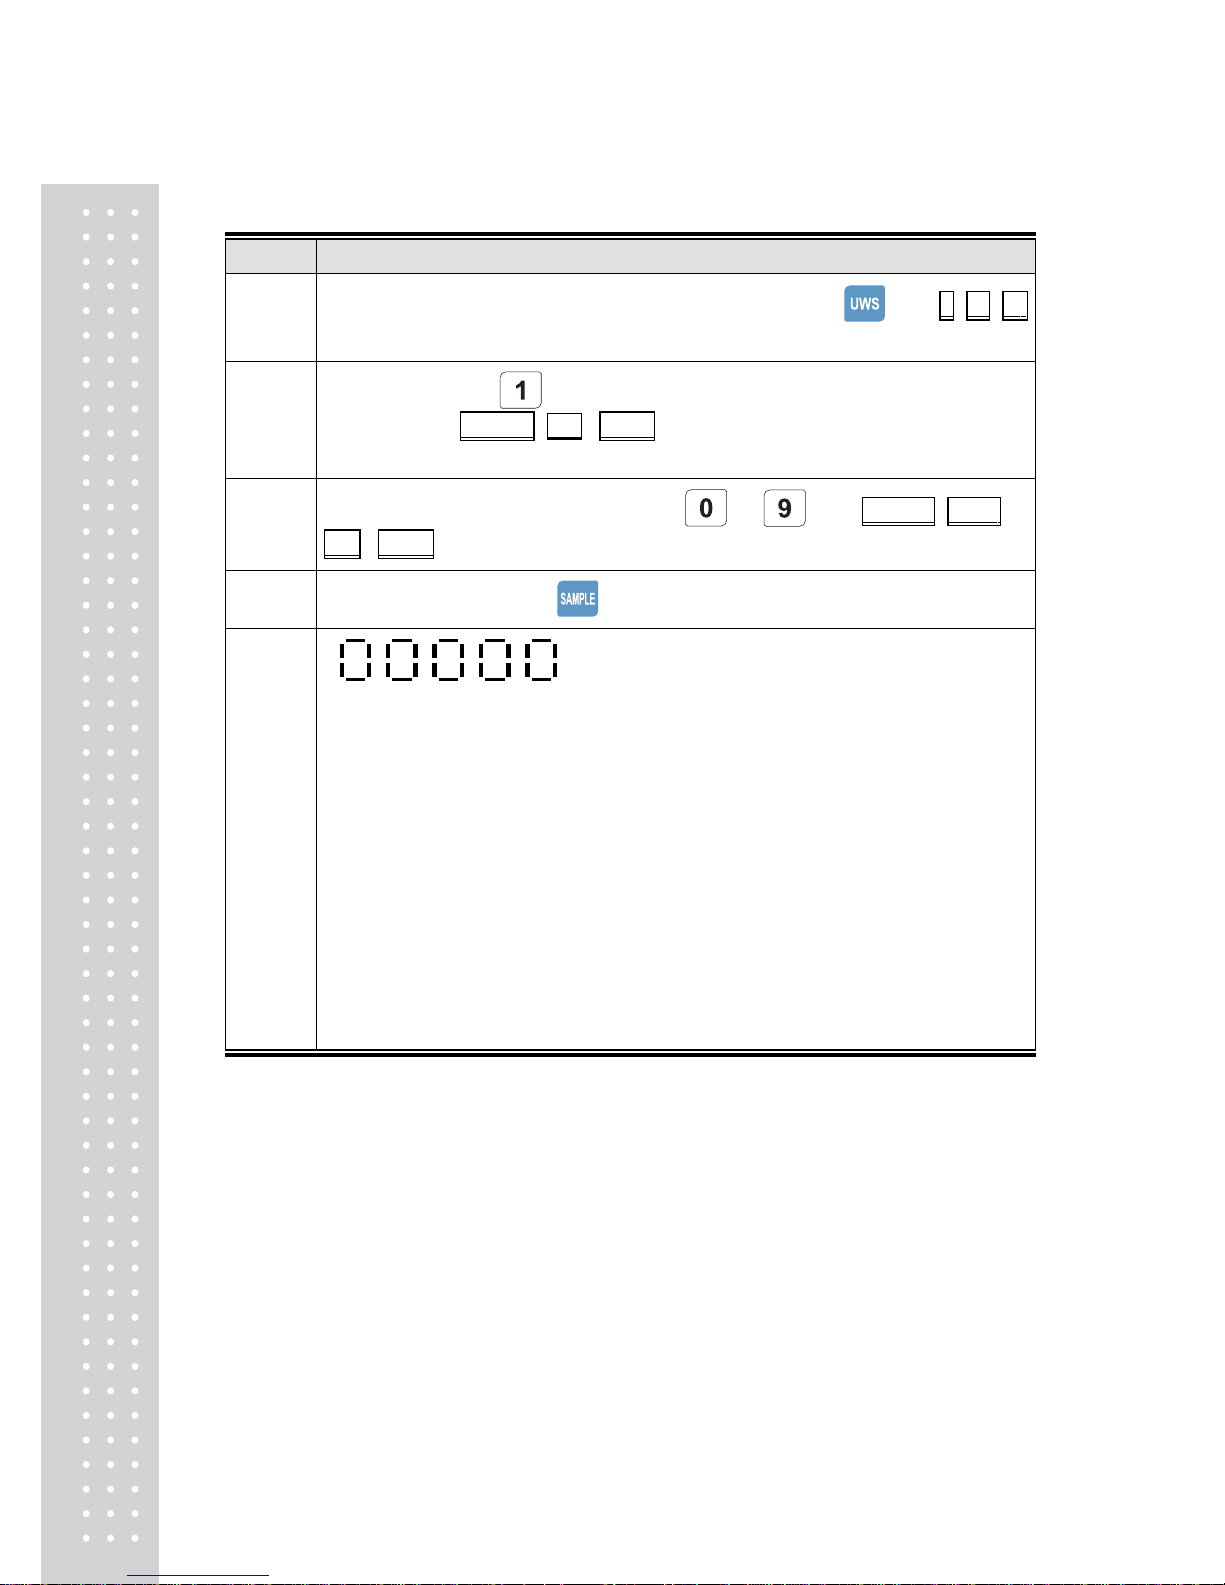
15. RS-232 setting
Step Operation
1
When you turn on the power supply while clicking the key, 0 、 0 、 0
will be continuously display ed in the di splay wind ow.
2
Upon clicking the key , the screen will be shifted to the RS232
setting mode,
original value、 、 RSSET will be continuously displayed in the
display window.
3
Upon inputting values while clicking ~
key,
original value、 ent ering
value 、 RSSET will be continuously displayed in the display window.
4
Check after clicking the
key, and return to the weight measurement.
Example
1
( a ) ( b ) ( c) ( d ) ( e ) 11111
(a) Baud rate setting
0 = 4800 1 =9600 2 =19200
(b) Weight printing status
0 =No printing 1 =Printing
(c) Unit weight printing status
0 =No printing 1 =Printing
(d) Quantity printing status
0 =No printing 1 =Printing
(e) Remove method
0=Continuous 1=Stable 2=Key 3=Ticket printer(Weight, unit weight, quantity)
4=Label printer(Weight, unit weight, quantity)
5=Label printer(Weight printing) 6= Label printer(Quantity printing)
Page 14
15
16. Check weighing warning setting
Step Operation
1
When operating the product while clicking the key, 0 、 0 、 0 will be
continuously displayed in the display window.
2
Upon clicking the key , the screen will enter into the check
weighing warning setting,
original value、 、 CKSET w ill be continuously
displayed in the display window .
3
Upon inputting values while clicking ~ key, original value、 entering value
、 CKSET w ill be continuously displayed in the display window.
4
Check after clicking the
key, and return to the weight setting.
Example
1
(a) (b) (c) (d) (e) 00010
(a) Set up check alarm type
0 = Weight 1 = Quantity
(b) Set up stable/unst able
0 = Check function operates when the w eight is st able
1 = Check function also operates when the weight is unsta ble
(c) Set up alarm type
0 =Alarm functions when the value is Hi-lim it
1 = Alarm functions w hen the value is Low-limit
2 = Alarm function s when the value is between Hi and Low-limit
3 = Alarm functions w hen the value exceeds the H i-limit
or is below the Low-limit
(d) Buzzer ON/OFF
0 = OFF 1 = ON
Page 15
`
16
Internal count value display
Step Operation
1
When operating the product while clicking the , AD value 、 、 key value
will be continuously display ed in the di splay wind ow.
2
Upon clicking Others including number, etc. keys, AD Values will be
displayed.
3
Upon clicking the
, the screen will return to the weight setting again.
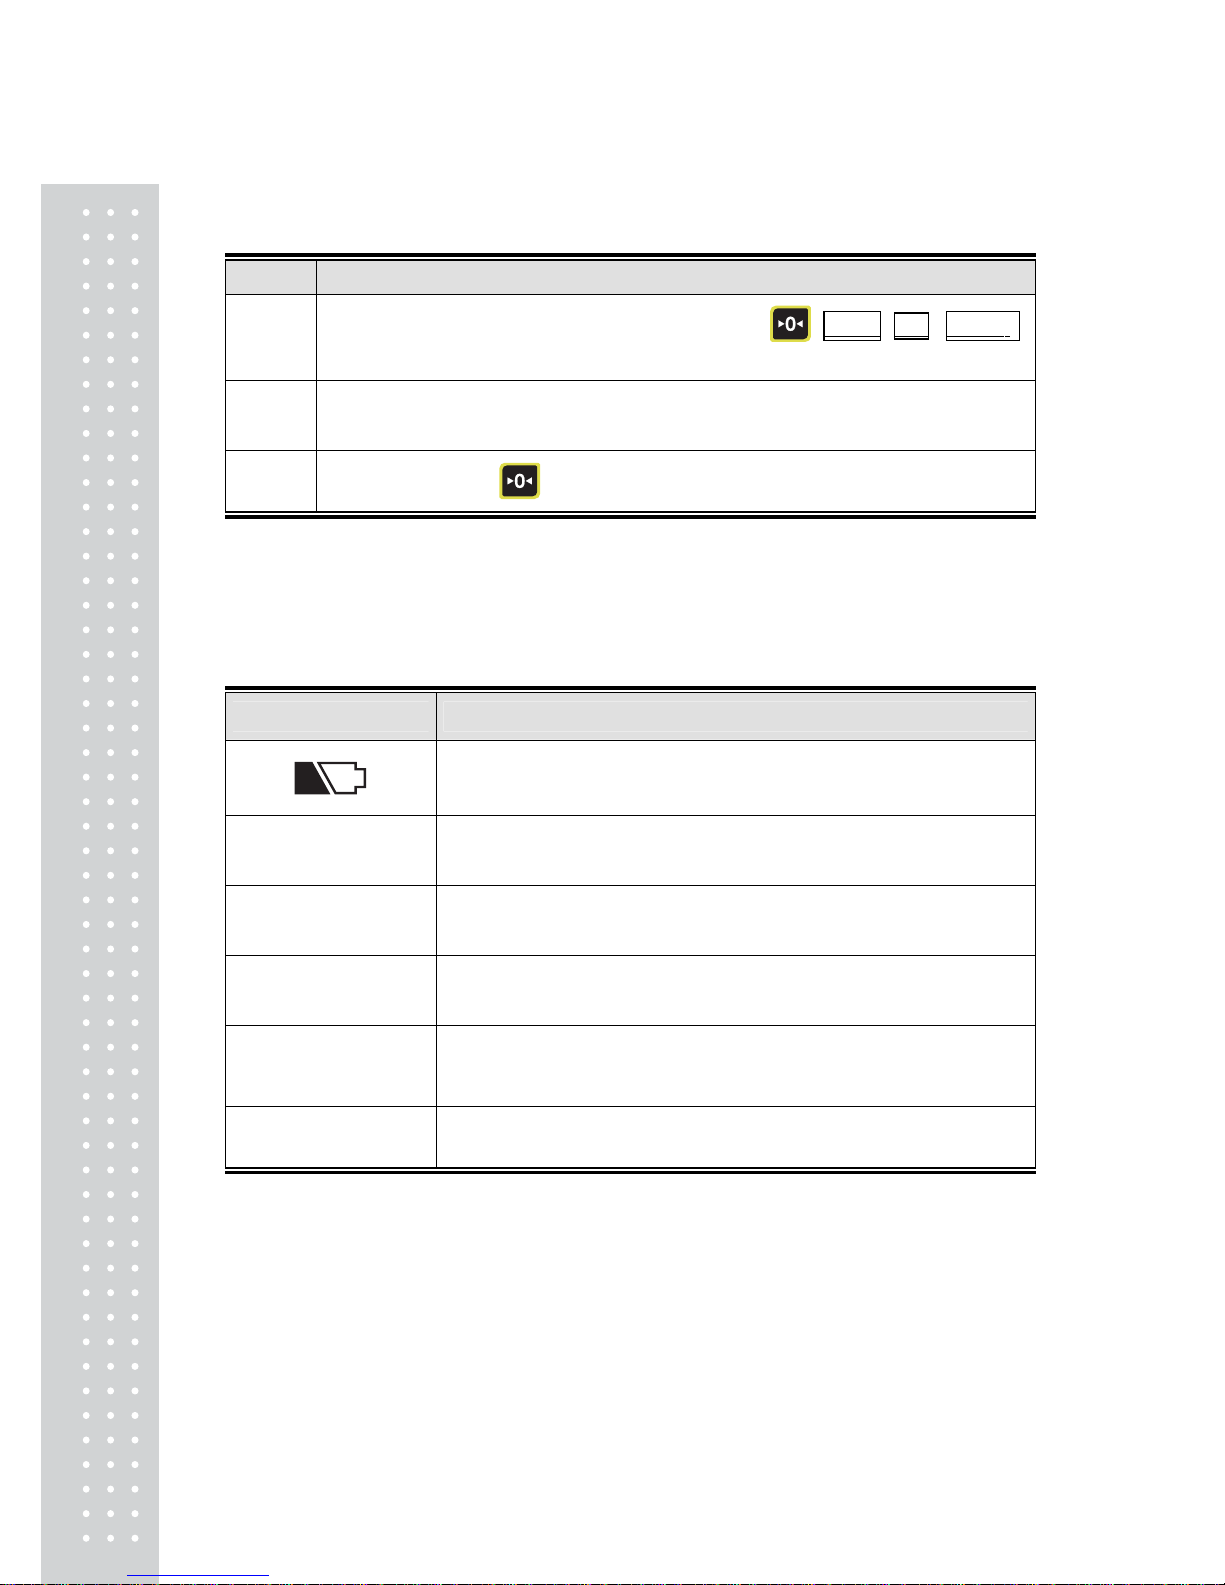
Error message
Error code Cause
Battery charging required.
B Err
Emergency battery charging required
oL
Checking required to see if weight is exceeded+9e
Err
Displayed when weight was not removed after summation
P-Err
Displayed when a number of digits in COUNT window and
a number of digits in UNIT Weight window are exceeded
ClrAC
Displayed when a summation value is erased
Page 16
1
7
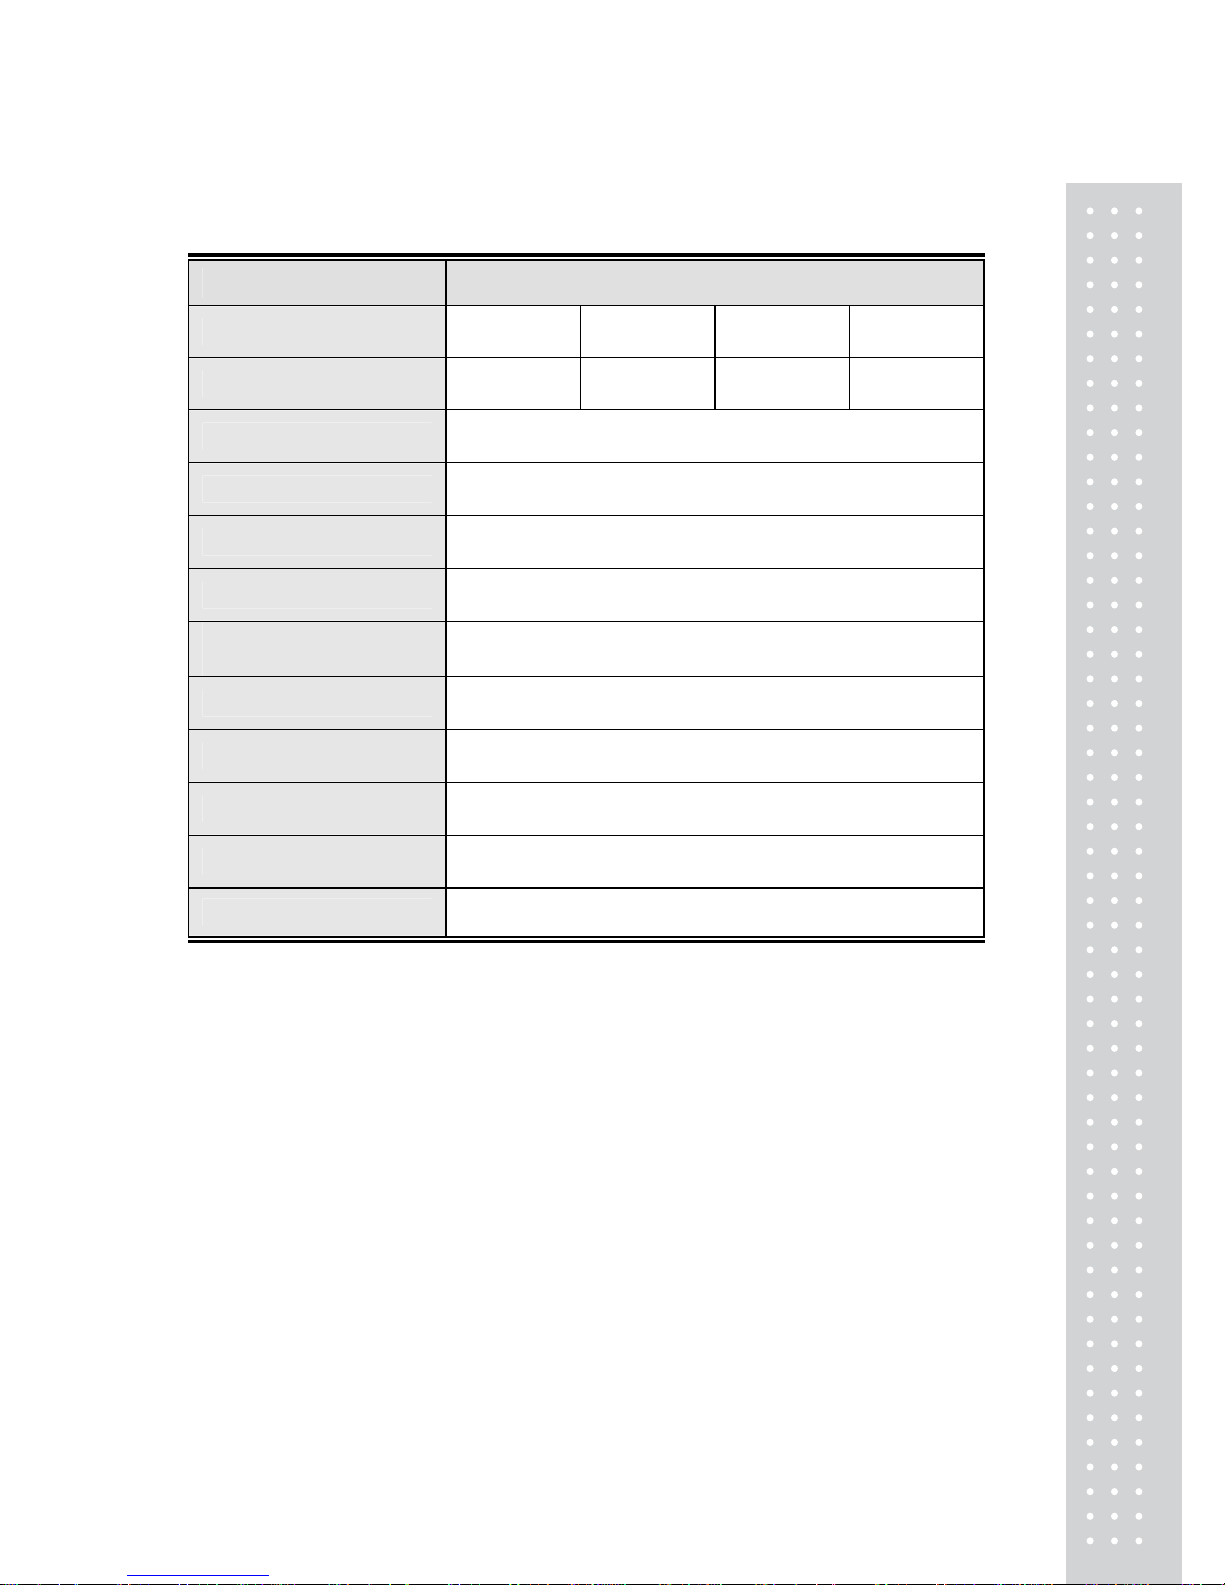
Specifications
MODEL PR-C
Max.Capacity
3kg 6kg 15kg 30kg
Readability (g)
0.1g 0.2g 0.5g 1g
External Resolution
1/30,000
Internal Resolution
1/600,000
Display Type
LED
Weight Units
Kg, g, lb, oz
Operating
temperature
0 ~ +40℃℃
Power
AC 220~240, 50/60Hz, Pb Battery 6V/4Ah
Battery life
100hrs
Dimensions(mm)
335(W) x 336.1(D) x 103(H)
Platter size(mm)
322(W) x 212(D)
Product Weight(kg)
3.5
Page 17

`
1
8
MEMO
Page 18
19
표4
 Loading...