

Page 1
2
Page 2

3
PRECAUTIONS................................................................................................ 4
PREFACE............................................................................................................... 6
CHANGING THE PRINTER ROLL ................................................. 6
NAME AND FUNCTIONS .........................................................................7
OPERATIONS.................................................................................................. 12
I. SAELS MODE.............................................................................................. 12
Chapter 1 Basic Operation....................................................................................... 14
Chapter 2 Sales for W eighed item........................................................................... 21
Chapter 3 Sales for non-weighed item................................................................... 22
Chapter 4 Clerk Operation........................................................................................26
Chapter 5 Discount & Payment.............................................................................. 37
Chapter 6 Sales Transactions Simulation............................................................. 46
II. PROGRAM MODE ............................................................................... 52
Chapter 7 PLU Programming................................................................................. 56
Chapter 8 Report........................................................................................................ 61
Chapter 9 SET 1 (Discount, Barcode & HW Setting)......................................... 68
Chapter 10 SET 2 (Date, T ime & Default Setting).............................................. 79
Chapter 1 1 Options (Receipt Formatting)............................................................. 83
Chapter 12 Clerk........................................................................................................ 92
Chapter 13 Logo........................................................................................................ 96
Chapter 14 Tax Rate Group..................................................................................... 99
Chapter 15 Test......................................................................................................... 102
CODE [MS 1250 Windows Central Europe]....................... 105
CODE [MS 1251 Window Cyrillic(Slavic)].................................. 106
CODE [MS 1252 Window Latin-1]..................................................107
CODE [MS 1253 Windows Greek]................................................... 108
CODE [MS 1254 Windows Turkish]............................................... 109
CODE [MS 1257 Windows Baltic].................................................... 110
CODE [FARSI FONT(IRAN)]............................................................. 111
ERROR MESSAGES................................................................................. 112
SPECIFICATION......................................................................................... 113
TABLE LIST .................................................................................................... 114
CASH DRAWER INTERFACE DRAWING ............................ 115
RS232C Interface Drawing ..................................................................... 115
PROGRAM MENU MAP ...................................................................... 116
CONTENTS
Page 3
4
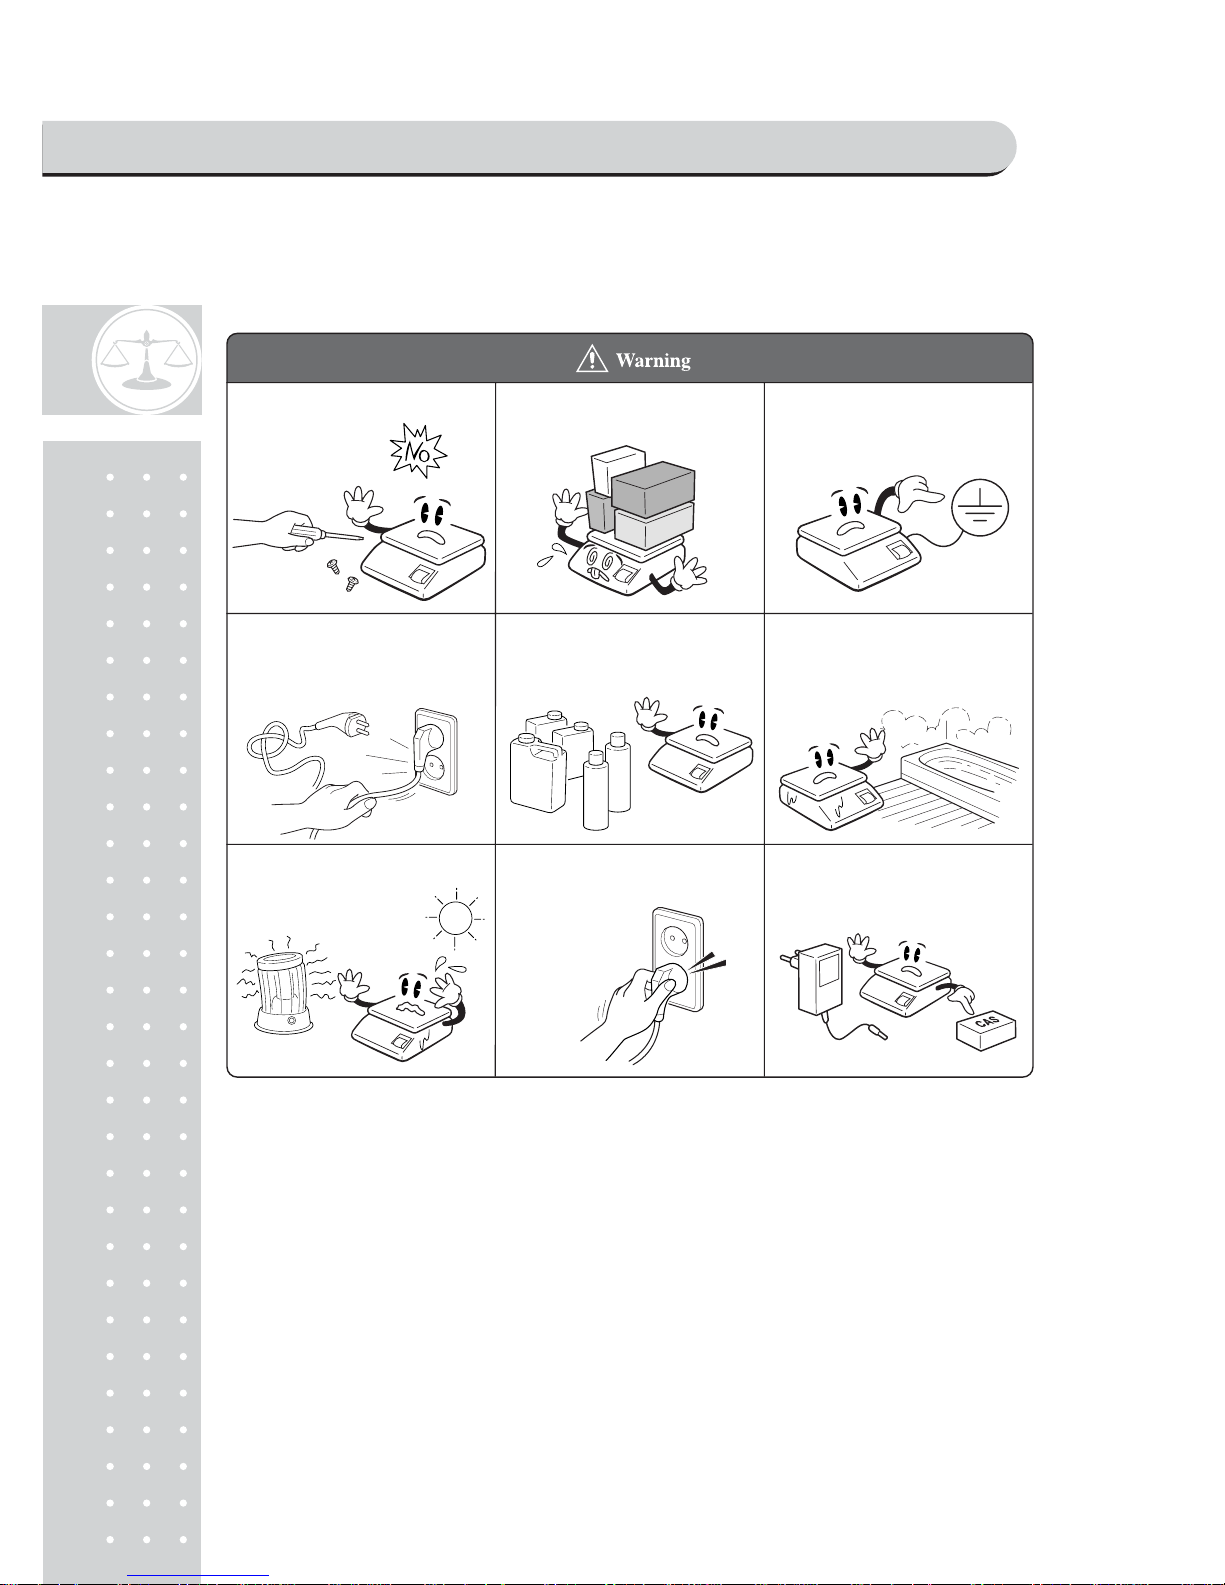
Precautions when installing the scale. T o ensure that y ou get the
most from your scale, please follow these instruction
Do not disassemble the scale.
When any damage or defect occurs,
contact your CAS
authorized dealer
immediately for
proper repair.
Do not overload beyond the maximum
weight.
Do not pull the plug by its cord when
unplugging. Damaged cord could cause
electric shock or fire.
To prevent from fire occurring, Do not
place or use the scale near flammable or
corrosive gas.
Avoid placing the scale near heater
or in direct sunlight.
Scale must be grounded to minimize
static electricity. This will minimize
defect or electric shock.
Use proper Adapter. Incorrect adapter
could damage the scale.
Insert plug firmly to wall outlet to
prevent electric shock.
To reduce electric shock or incorrect
reading, Do not spill water on the scale
or place it in humid environment.
PRECAUTIONS
Page 4
5
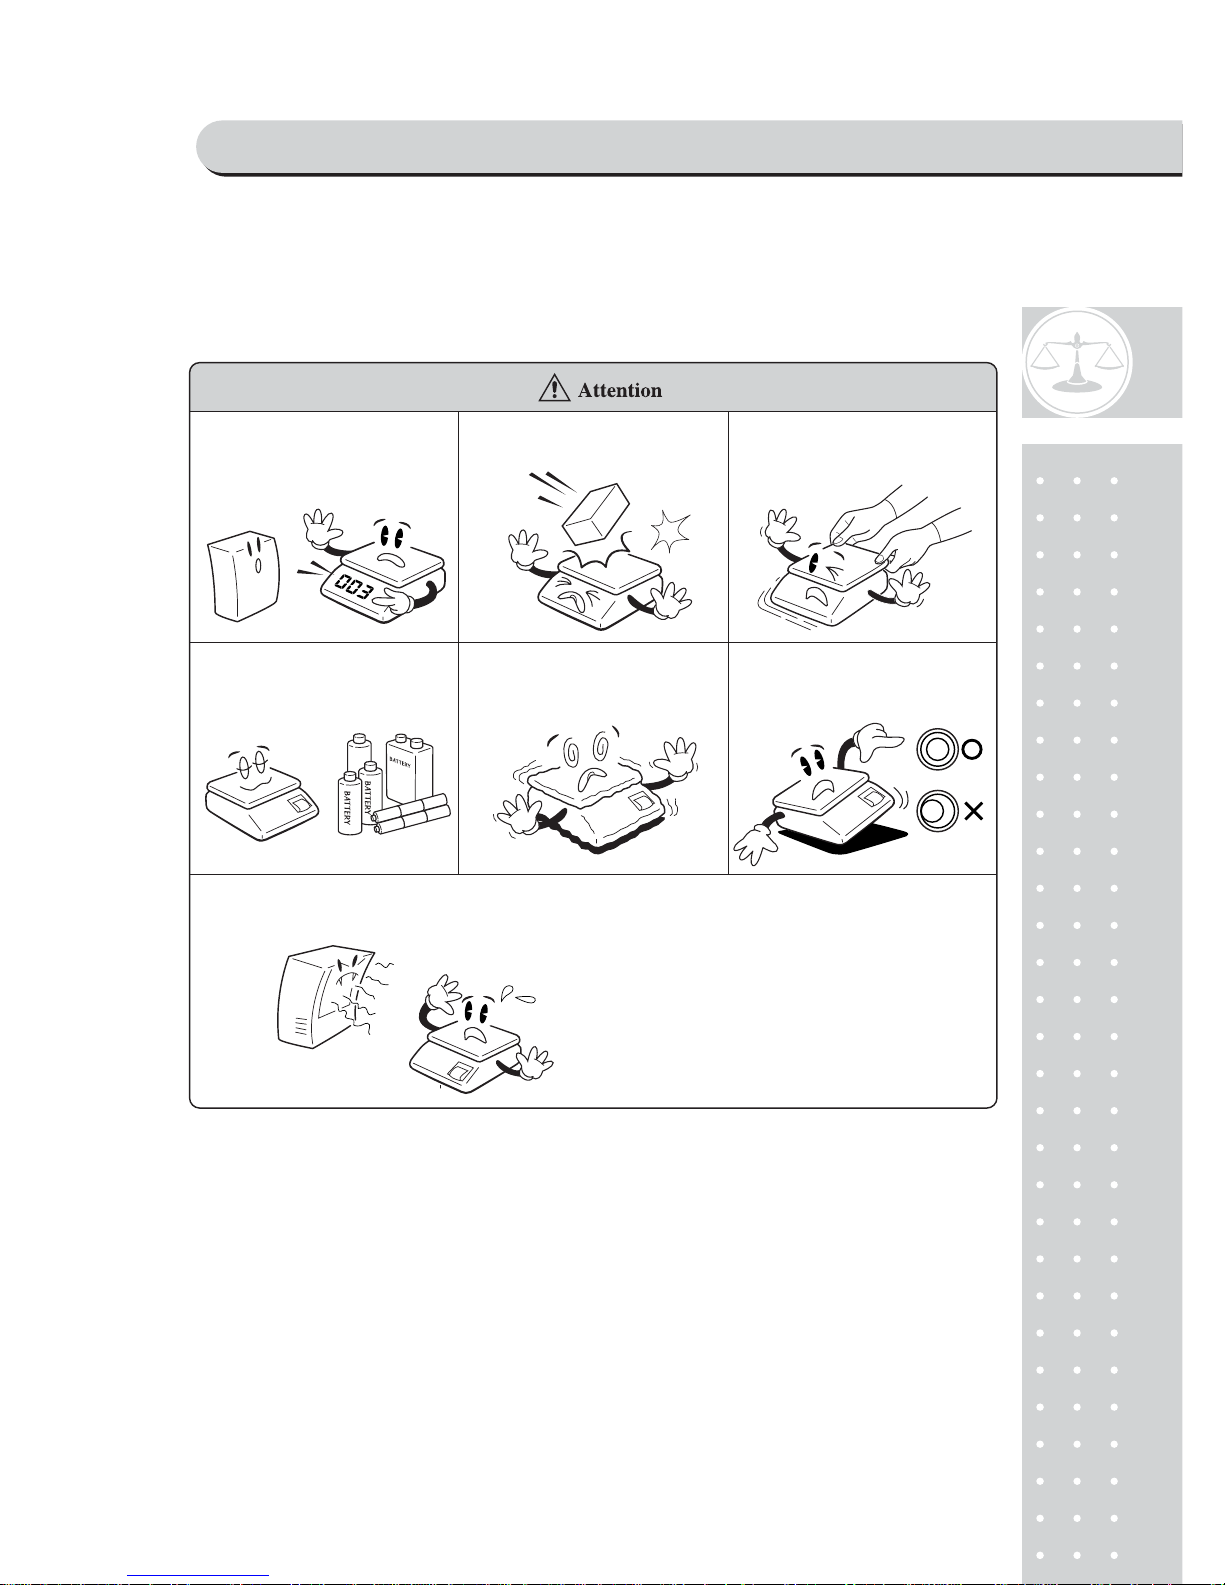
Make sure to plug your scale into the proper po wer outlet. For maximum
performance, plug into a power outlet 30 minutes before the usage
for Warm up
For consistent and accurate reading,
maintain periodical check by your
CAS authorized dealer.
Avoid sudden shock to the scale.
Internal mechanism could be damaged.
Take the battery out when scale is not in
use for long time. Leakage from the
batteries is hazardous.
Place the scale on firm and temperature
consistent environment.
Keep the scale away from other electromagnetic generating devices.
This may interfere with accurate reading.
Grab on the bottom of the scale when
moving. Do not hold by the platter.
By adjusting 4 corners of the scale, set
the scale even using the built in scale
leveling indicator.
PRECAUTIONS
Page 5
6
PREFACE
Thank you for purchasing your CAS POSCALE.
CAS scales are designed and produced under rigid quality control to deliver
outstanding performance, reliability and long life.
This manual will help you with the proper operation and care of your new
CAS POSCALE.
Please review the POSCALE manual before you use the scale and keep it handy
for future reference.
■ The Li-ion battery of product may not be fully charged. It is recommended to
charge Li-ion battery using AC power before initial usage.
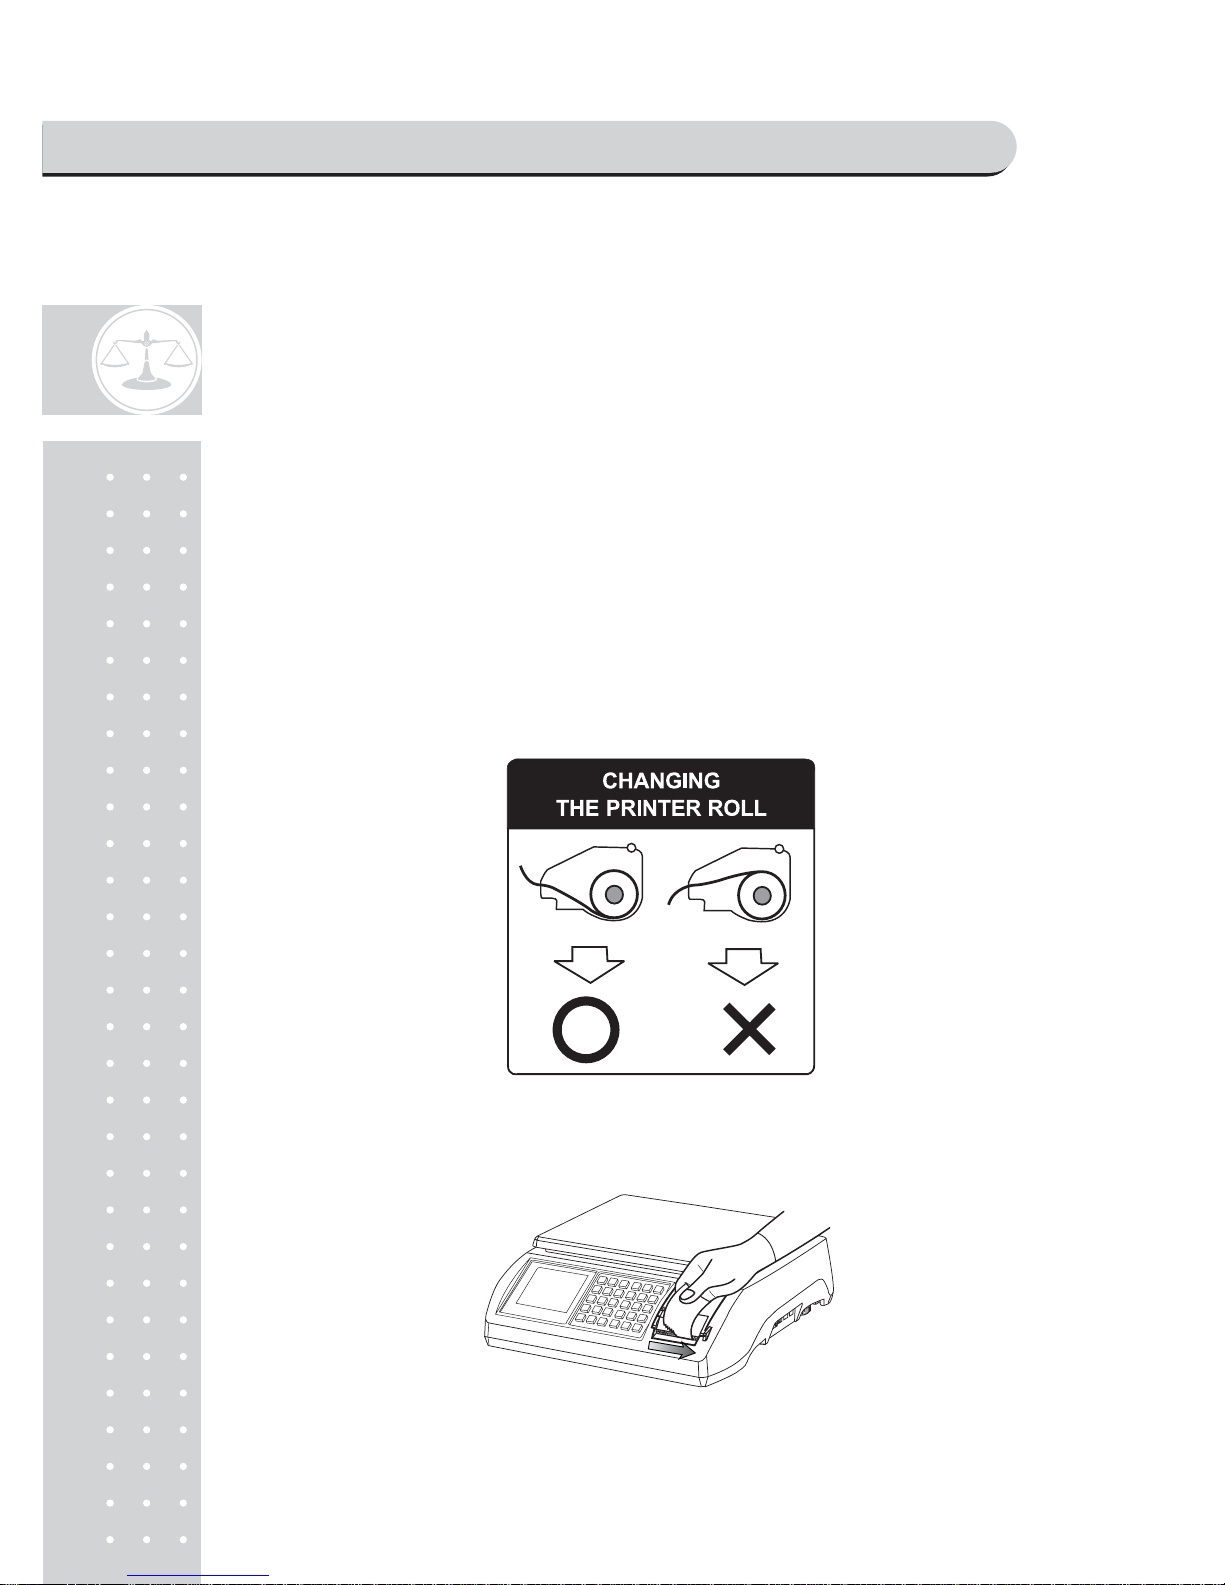
CHANGING THE PRINTER ROLL
■ Recommended size for thermal paper;
58mm (Width) / 65 m(Thickness) / 60mm (Maximum Diameter)
■ It is recommended to tear off the ticket left to right.
PREFACE & CHANGING THE PRINTER ROLL
Page 6
7
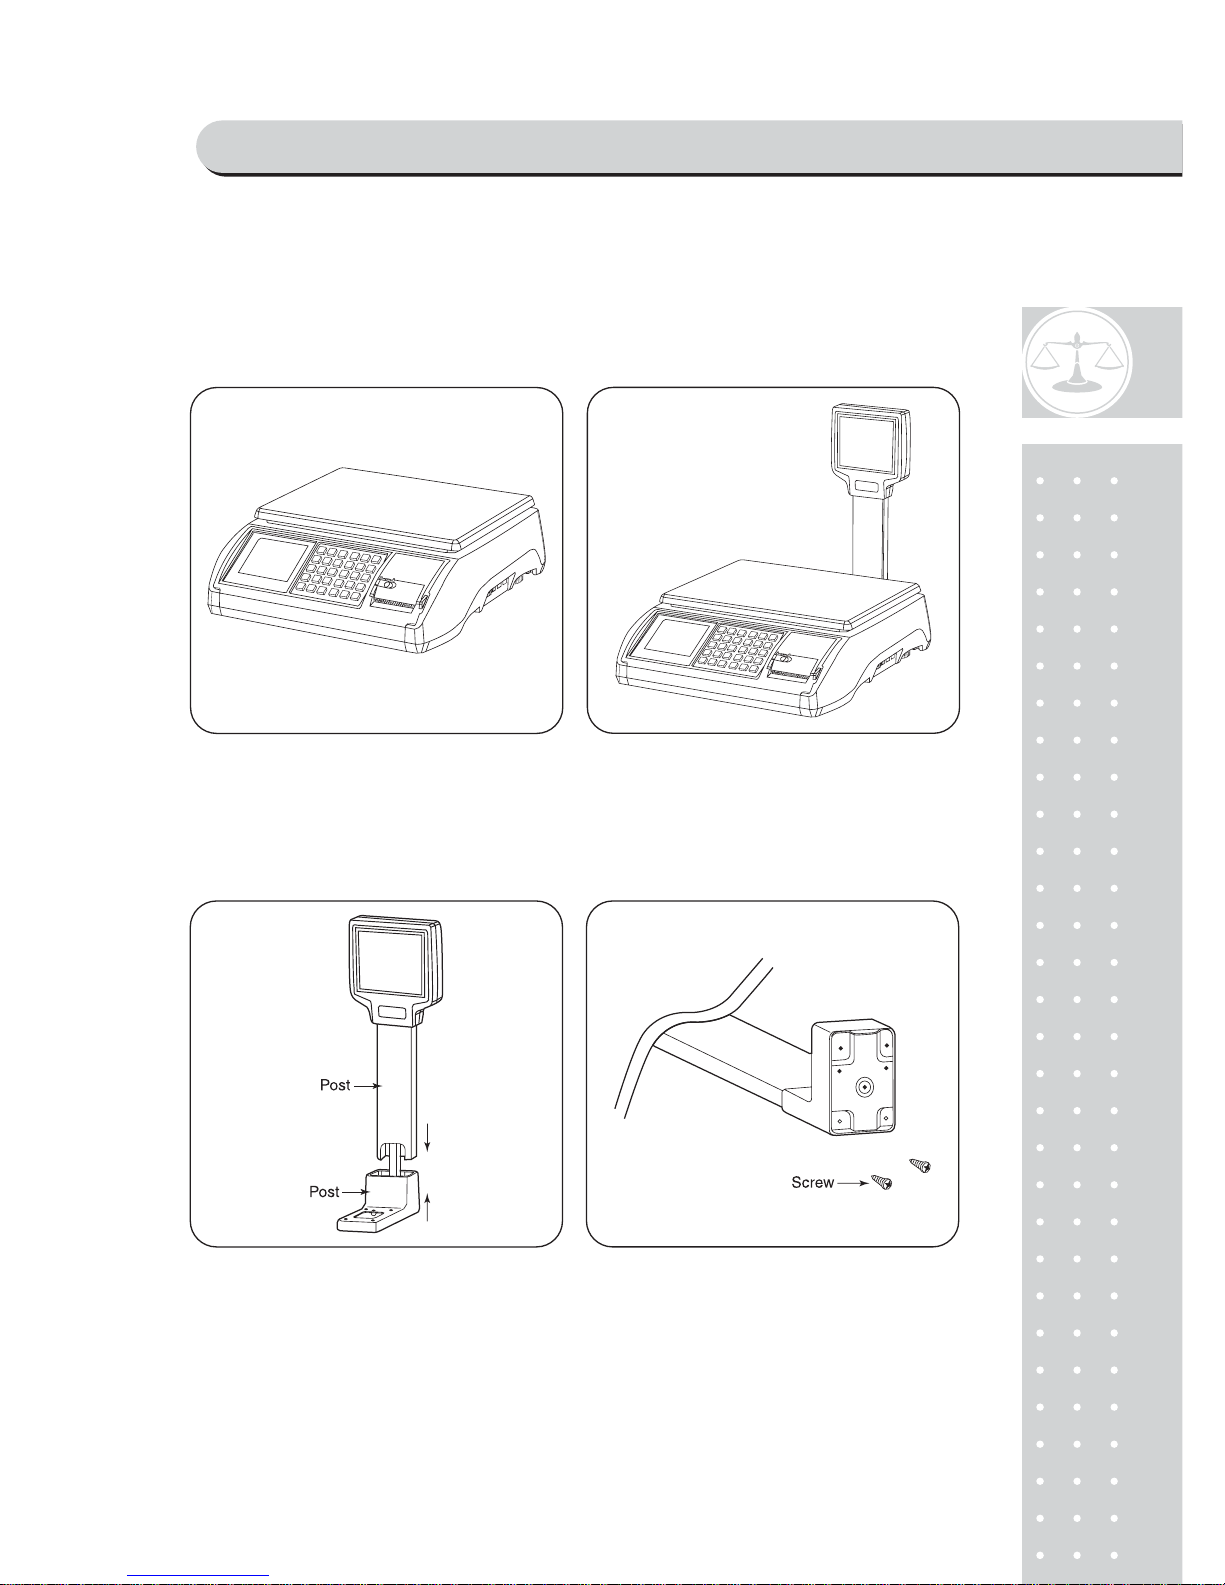
OVERALL VIEW
■ STANDARD TYPE ■ POLE TYPE
■ POLE TYPE INSTALLATIONS
- Insert the post pipe into a post bracket.
- Insert and fasten the display assembly screws.
NAME AND FUNCTIONS
Page 7
8
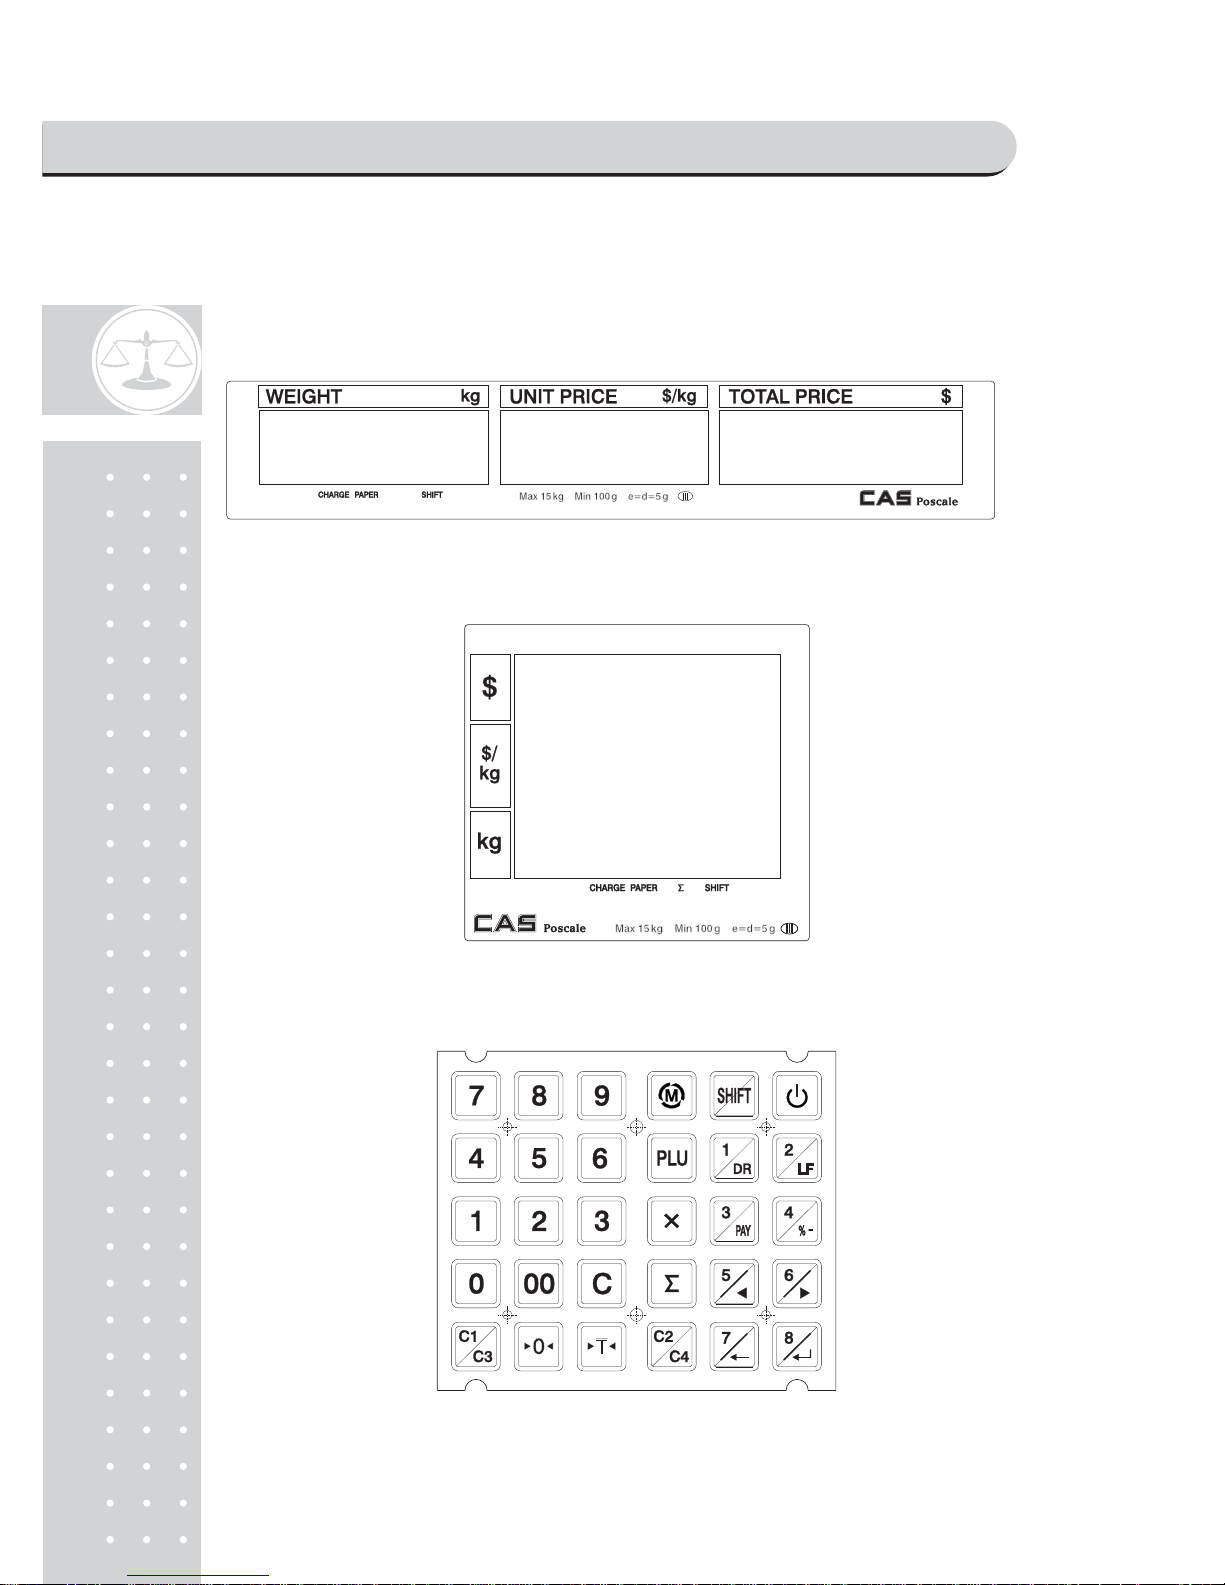
DISPLAY
■ Rear Display(Customer-side display) ex) 15kg Version
■ Front(Clerk-side display)& Pole Display ex) 15kg Version
■ KEYBOARD
NAME AND FUNCTIONS
Page 8
9
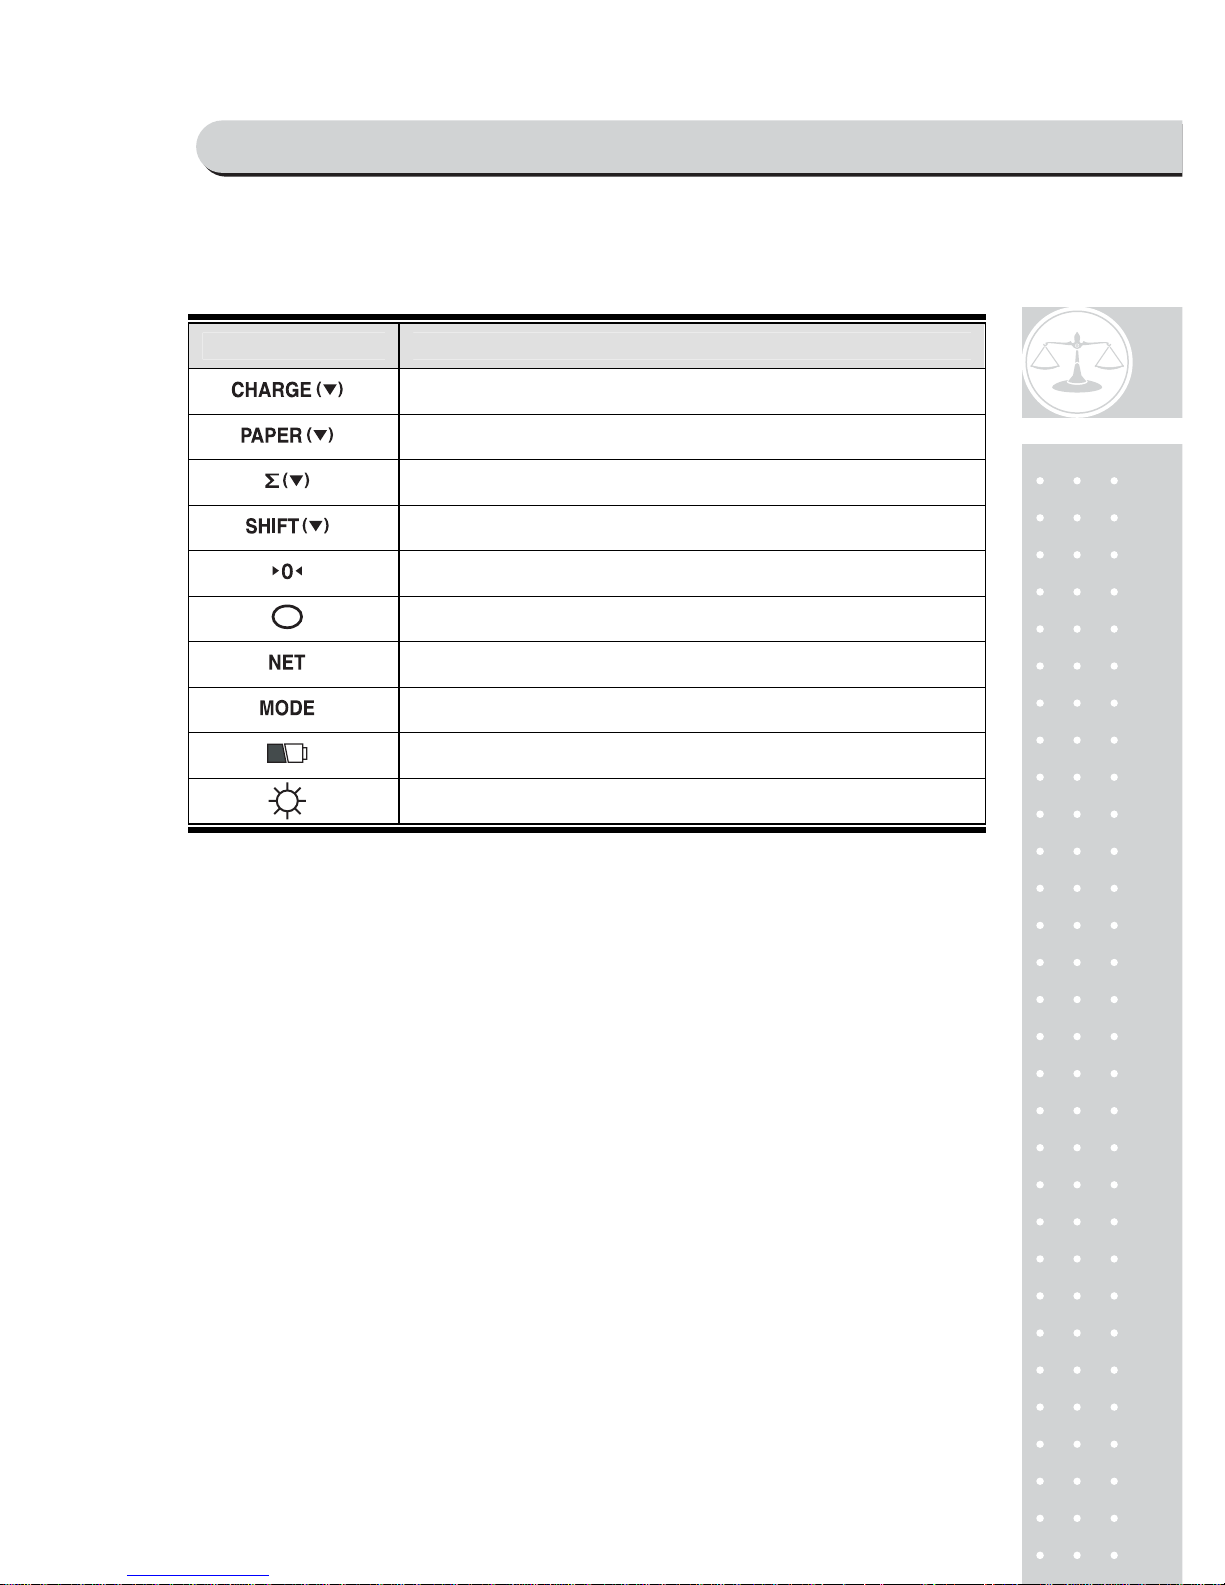
Table 1 : Symbols on Display
SYMBOLS DESCRIPTION
The battery is being charged.
When blinks there is some problem with paper roll in the printer.
In the subtotal mode
SHIFT key pressed
To adjust the weight to zero.
Stable
Tare on
Program mode
Low battery warning when it is below 7.3 voltage
Back Light on
NAME AND FUNCTIONS
Page 9
10
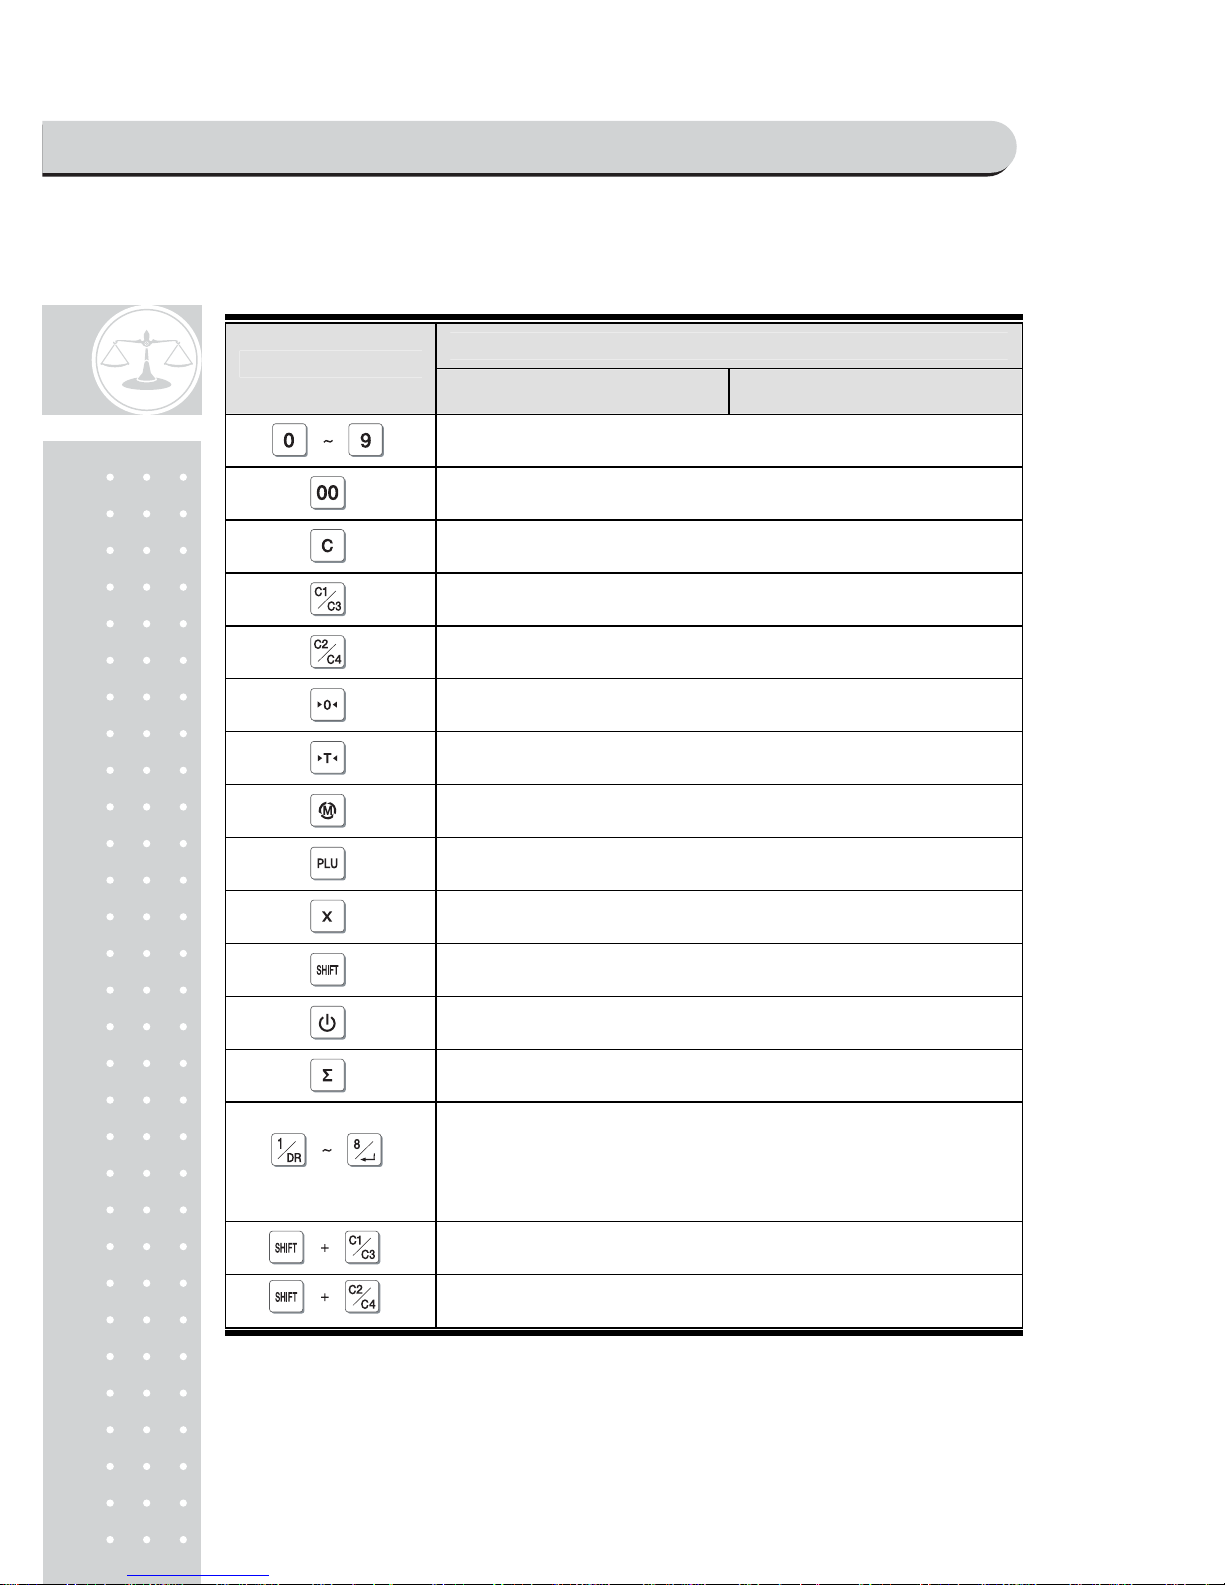
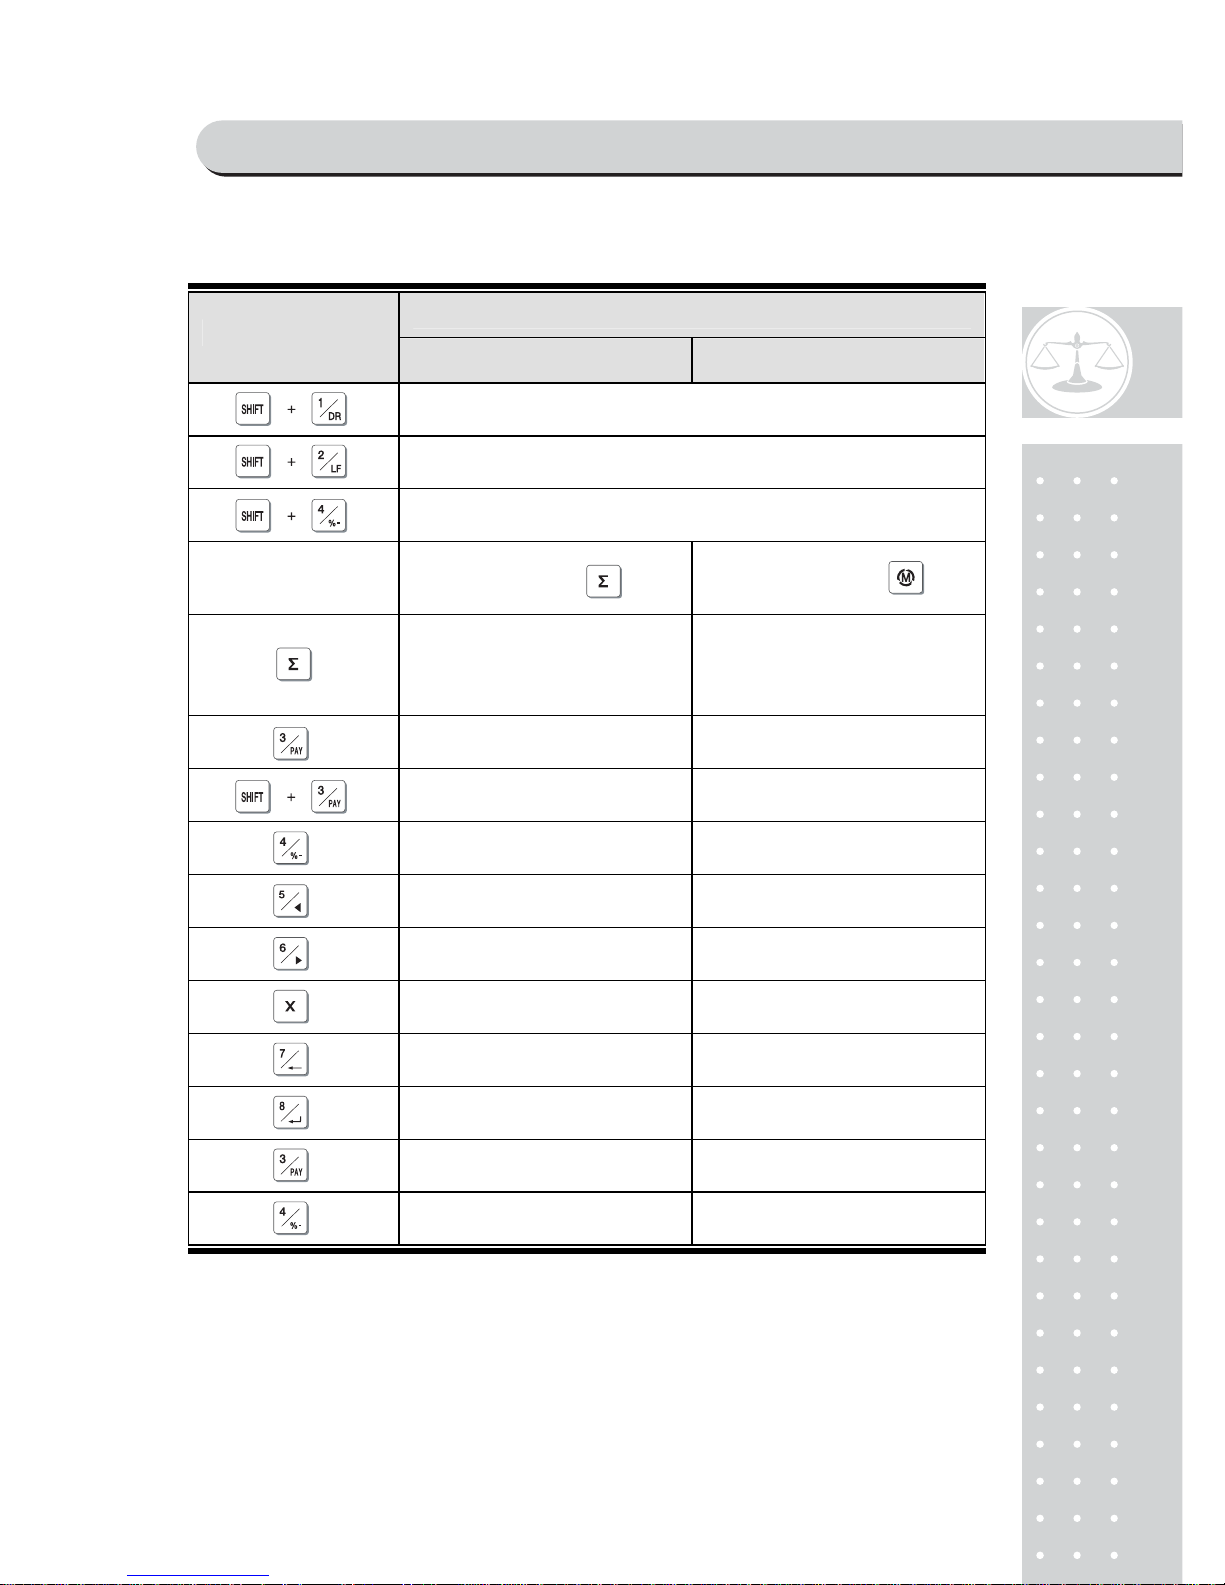
Table 2 : Key Functions
FUNCTIONS
KEYS
SALES M ODE PROGRAM MODE
To input all numerical data
To input double zero
To clear all of numbers input on the display
To select clerk 1
To select clerk 2
To set zero
To set or clear tare value
To go to program mode
To call up a PLU with numeric key
To input non-weighed item
To select alternate key functions
To turn on or off the power / backlight
To show subtotal / total / payment sum
Direct PLU keys
* PLUs # 1~8 may be used for both the direct and indirect PLUs.
Most commonly used 8 items are recommended to be used for
direct PLUs for users' convenience.
To select clerk 3
To select clerk 4
NAME AND FUNCTIONS
Page 10
11
FUNCTIONS
KEYS
SALES M ODE PROGRAM MODE
To open cash drawer
*The cash drawer is opened no matter how the "opening time"is set.
To feed the paper
To make discount
After pressing
After pressing
* To finalize the payment
in cash
* To print receipt
To print current data
To pa y i n c ash
To pa y i n c redit
To make discount for subtotal
Sales list - To go to the previous menu
Sales list + To go to the next menu
To delete a specific sale in
sales list
To go back to the
higher level of menu
To go into the lower
level of menu
Fast selection of PLU (-)
in the PLU mode
Fast selection of PLU (+)
in the PLU mode
NAME AND FUNCTIONS
Page 11

12
I. Sales Mode
Chapter 1. Basic Operation
a. Turning the scale or backlight on / off
b. Feeding the paper
c. Opening cash drawer
d. Self-test on printing
e. Zero function
f. Tare function
Chapter 2. Sales for weighed item
a. Sales with free price (hand pricing)
b. PLU sales
Chapter 3. Sales for non-weighed item
a. Sales with free price (hand pricing)
b. PLU sales
Chapter 4. Clerk Operation
a. CLERK MODE 0 (All clerk operation)
b. CLERK MODE 1 (Only one clerk operation)
c. CLERK MODE 2 (Supermarket mode)
d. CLERK MODE 3 (Label-1 mode)
e. CLERK MODE 4 (Label-2 mode)
Chapter 5. Discount & Payment
a. Discount for a single transaction
b. Discount for subtotal
c. Payment
d. Duplicate receipt
Chapter 6. Sales Transaction Simulation
* Sales with free price
* Void
* Programmed discount
* PLU sales
* Non-weighed sales
* Subtotal
* Discount for subtotal
* Sales list viewing
* Deleting a specific sale transaction
* Payment in credit
* Payment in cash
OPERA TIONS & SAELS MODE
Page 12

13
Chapter 1.
Basic Operation
SAELS MODE
Page 13
1
4
Chapter 1. Basic Operation
This chapter explains how to turn the scale or backlight on/off, feed the paper,
open cash drawer, and do self-test on printer.
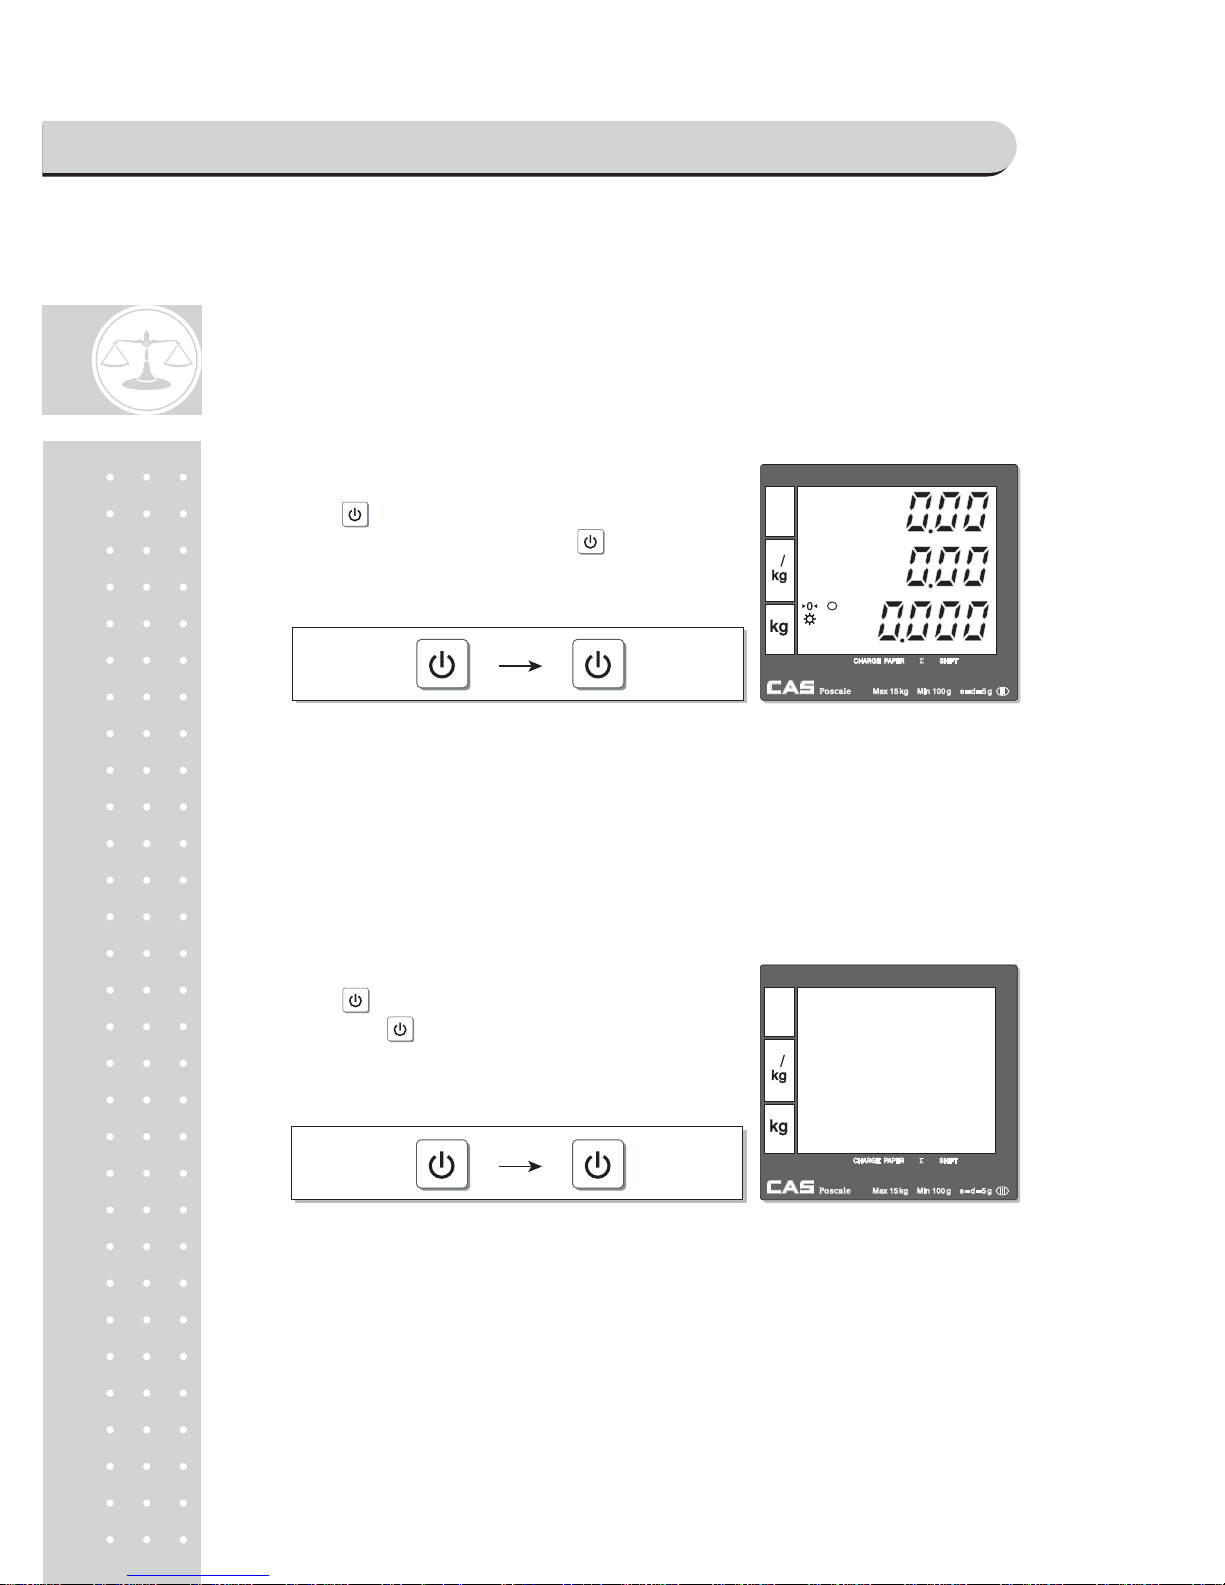
a. Turning the scale or backlight on/off
■ Only when user is in battery use the backlight lasts 1 minute and
automatically is turned off. Then, if the scale senses more than minimum
weight the backlight is automatically turned on.
Minimum weight : refer to SPECIFICATION Table on page 113.
② Press for a second to turn backlight off.
And press and hold it for more than a
second to turn the scale off.
Press wh① en the scale is turned off, then it
starts counting 0~9. And press again for
a second to turn on backlight of scale.
SAELS MODE
Page 14
15
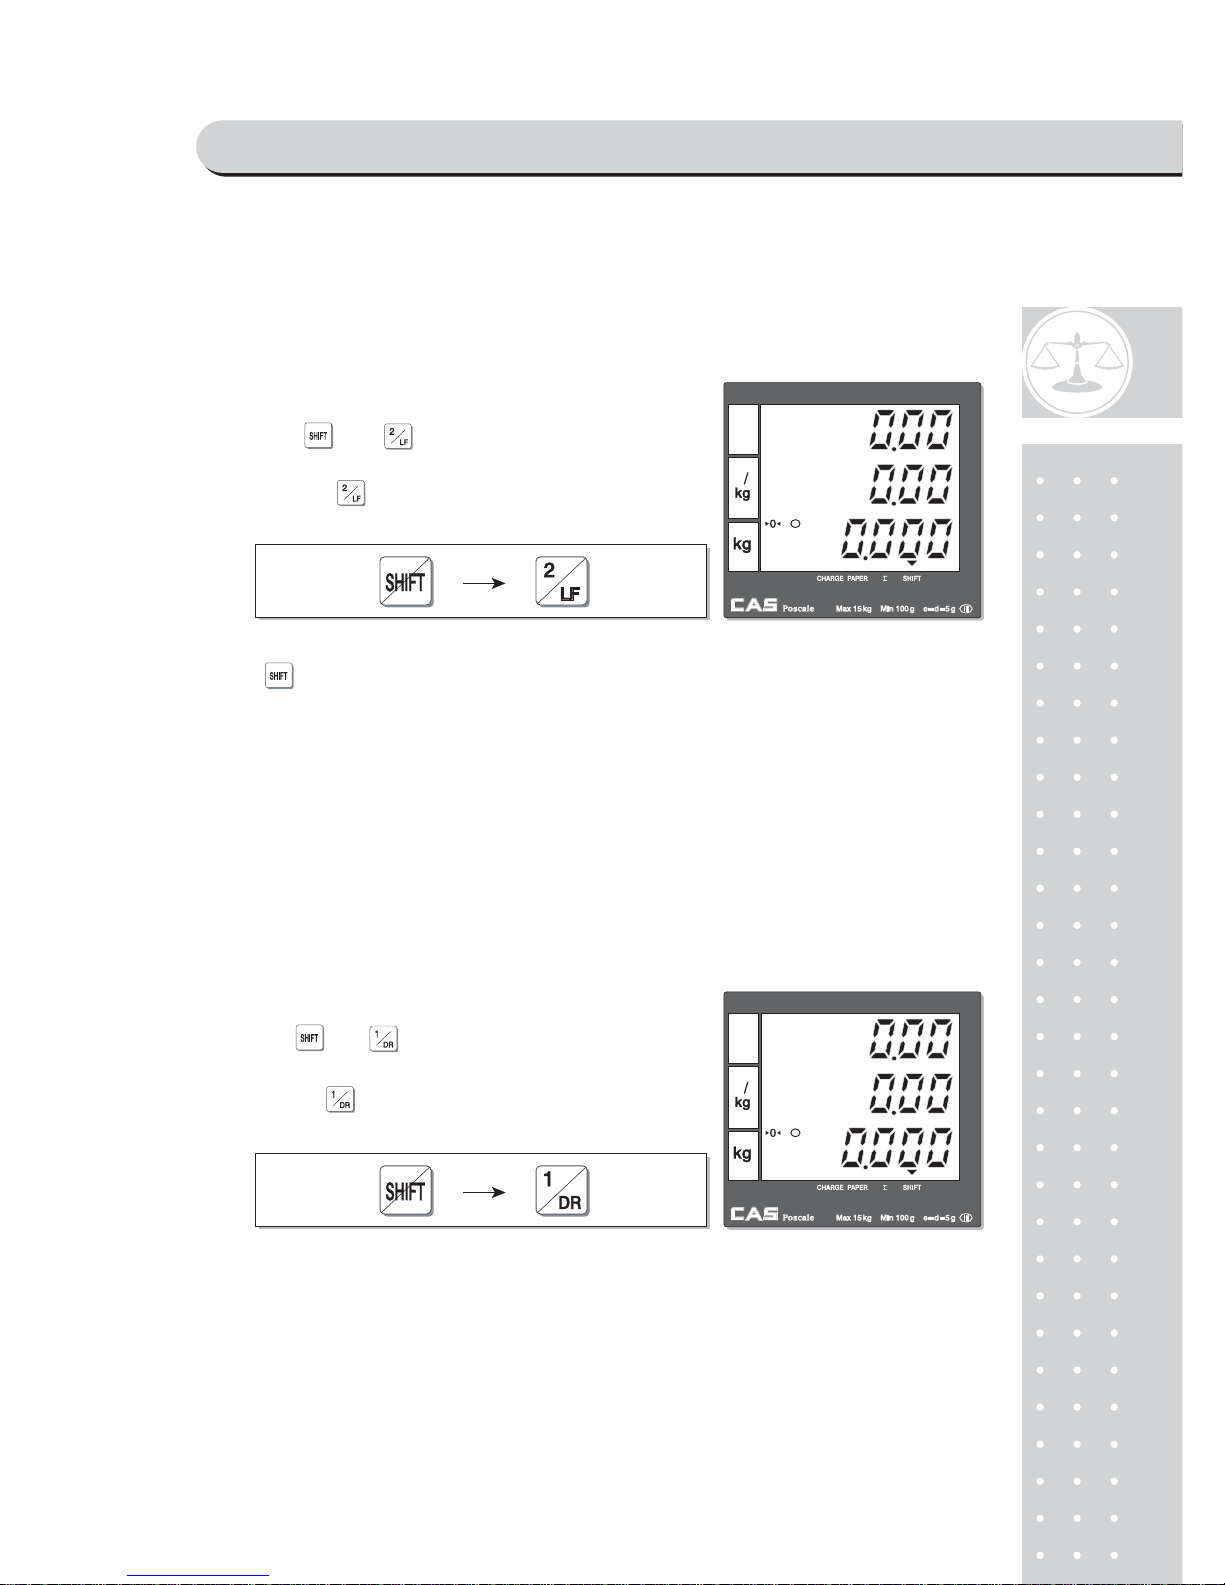
b. Feeding the paper
■ Feeding the paper is to make sure that printer paper is properly set and operated.
■ Press key again to turn off "SHIFT" function.
c. Opening cash drawer
■ This operation is to use the scale with cash drawer. The cash drawer is
opened only when the scale is connected to AC power.
■ Cash drawer will be opened whenever printing a receipt.
■ Please set "Cash Drawer Open Time"to "1"if user doesn't wants printing each
time and use "SHIFT"+"DR"key. Refer to page 76 "f. Setting Pulse length
to open cash drawer".
① Press and when user needs to feed
the paper. Paper will feed for as long as key is
pressed .
▼ (Shift) mark will be shown on the bottom of display.
① Press and to open cash drawer in time set.
▼ (Shift) mark will be disappeared after
pressing key.
SAELS MODE
Page 15
16
d. Self-test on printing
■ The printing self-test function may be also executed on test mode in
"II. Programming mode".
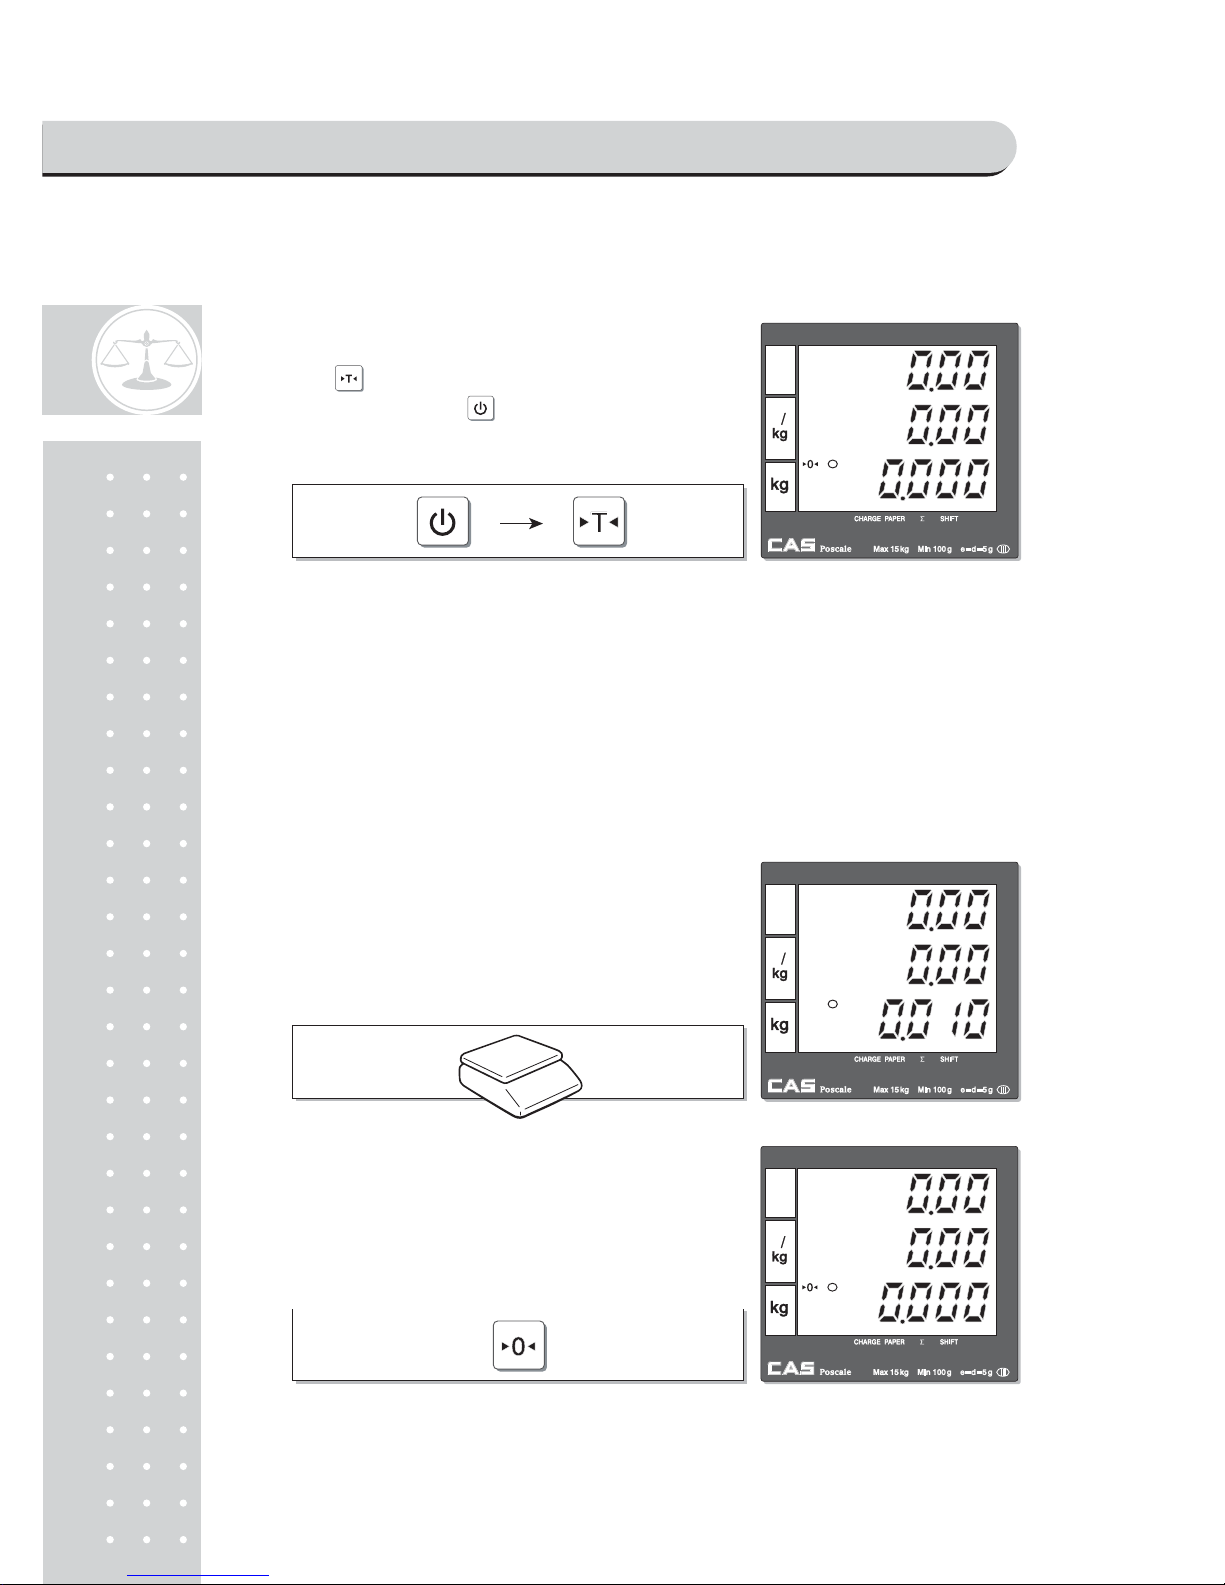
e. Zero function
■ The scale is not in initial zero point when there is(are) any item(s) on the
platter user may need to set zero using "zero" key.
① Press while counting 0~9 after turning on
the scale by pressing . Then, it automatically
prints out the test report. Please refer to the
sample report on page 104.
① The scale is not in initial zero point.
② Set zero point. User can set zero only within
±2% of capacity. For example, the 6kg
POScale model is ±120g.
SAELS MODE
Page 16
1
7
f. Tare function
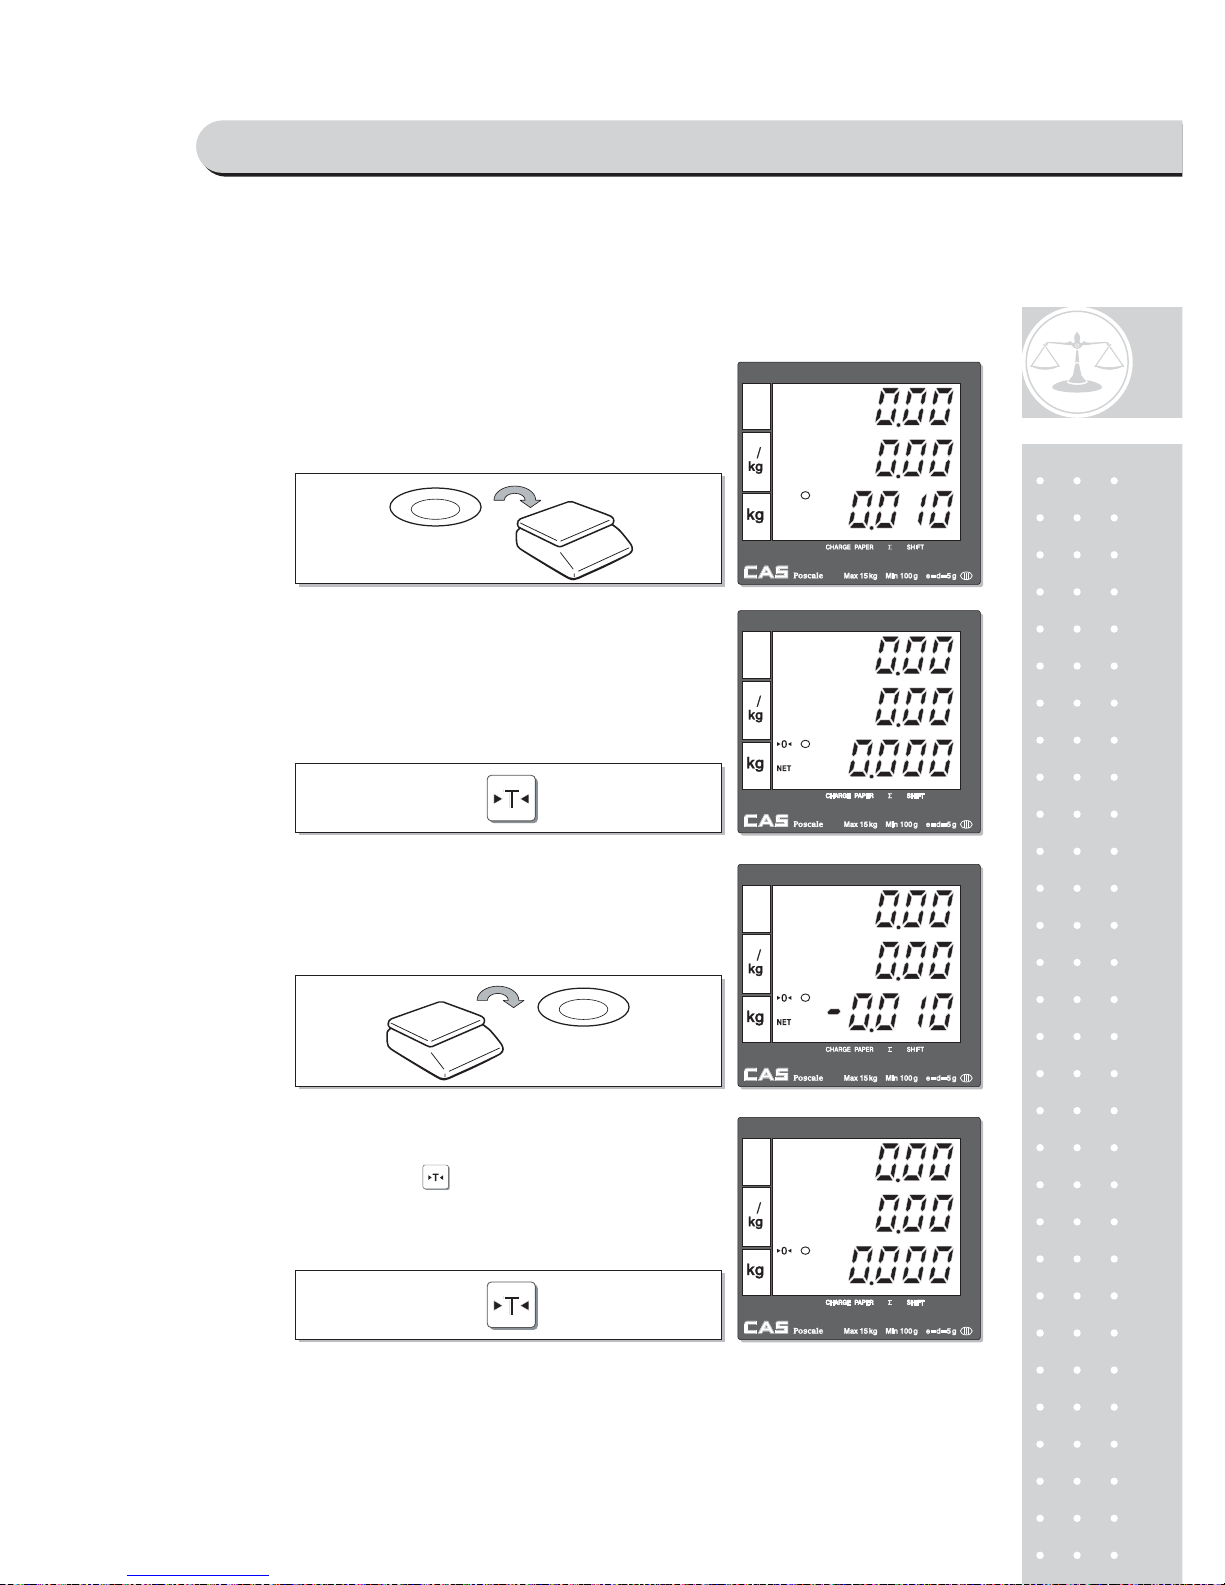
■ One Time Tare
This function is to subtract the weight of actual tare.
① Place a tare on the platter. For example, 10g.
② Subtract the tare weight. After setting the tare
user may place item on the platter, and the
scale reads only the weight of item.
③ Remove tare from the platter if user does not
need tare function. At this time the weight shows
negative value of tare.
④ To clear up the tare value, and go back to set
zero point, press the key again.
SAELS MODE
Page 17
1
8
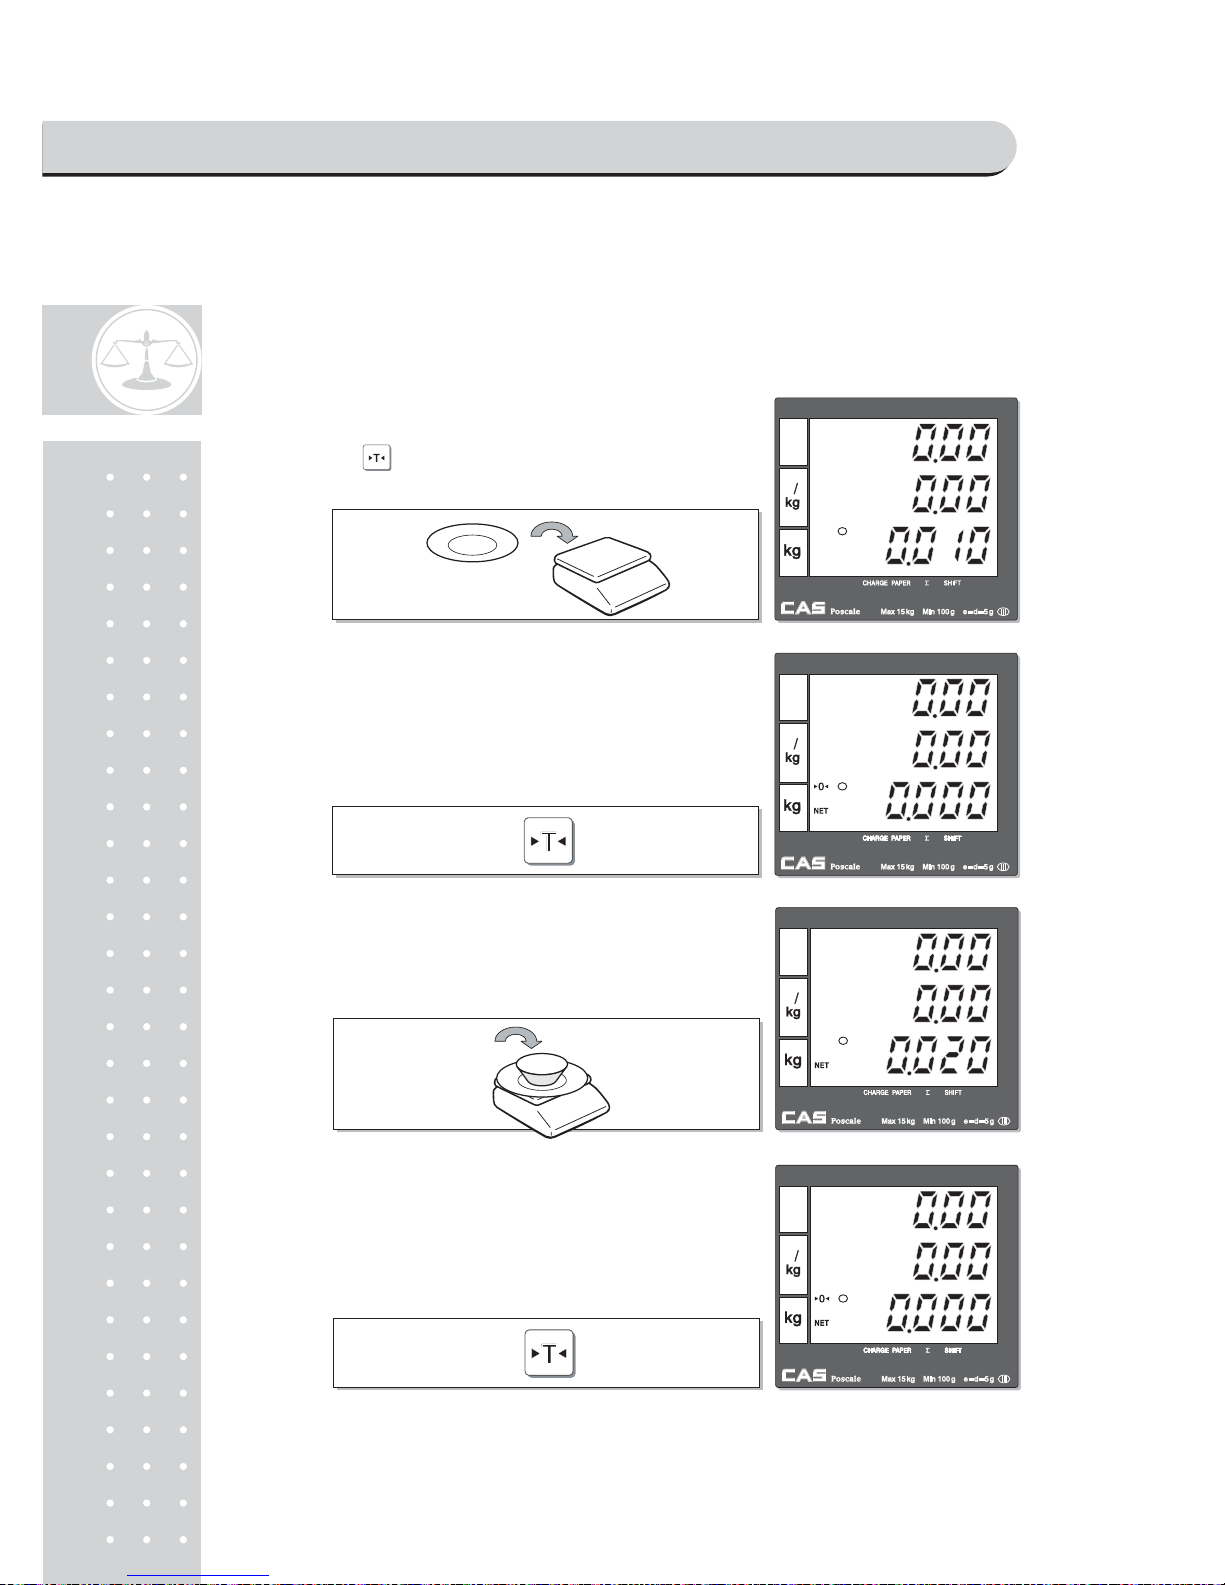
■ Successive Tare
This function is to subtract two successive tares.
The successive tare can be set in the calibration mode. Please contact your
dealer if you want to use "Successive Tare".
① Place a tare on the platter. For example, 10 g.
Press the key.
② The scale will subtract the tare weight.
③Place another tare on the platter.
For example, 20g.
④ The scale will add up the weight of tares. After
setting the successive tares user may place item
on the platter, and the scale reads only the
weight of item.
SAELS MODE
Page 18
19
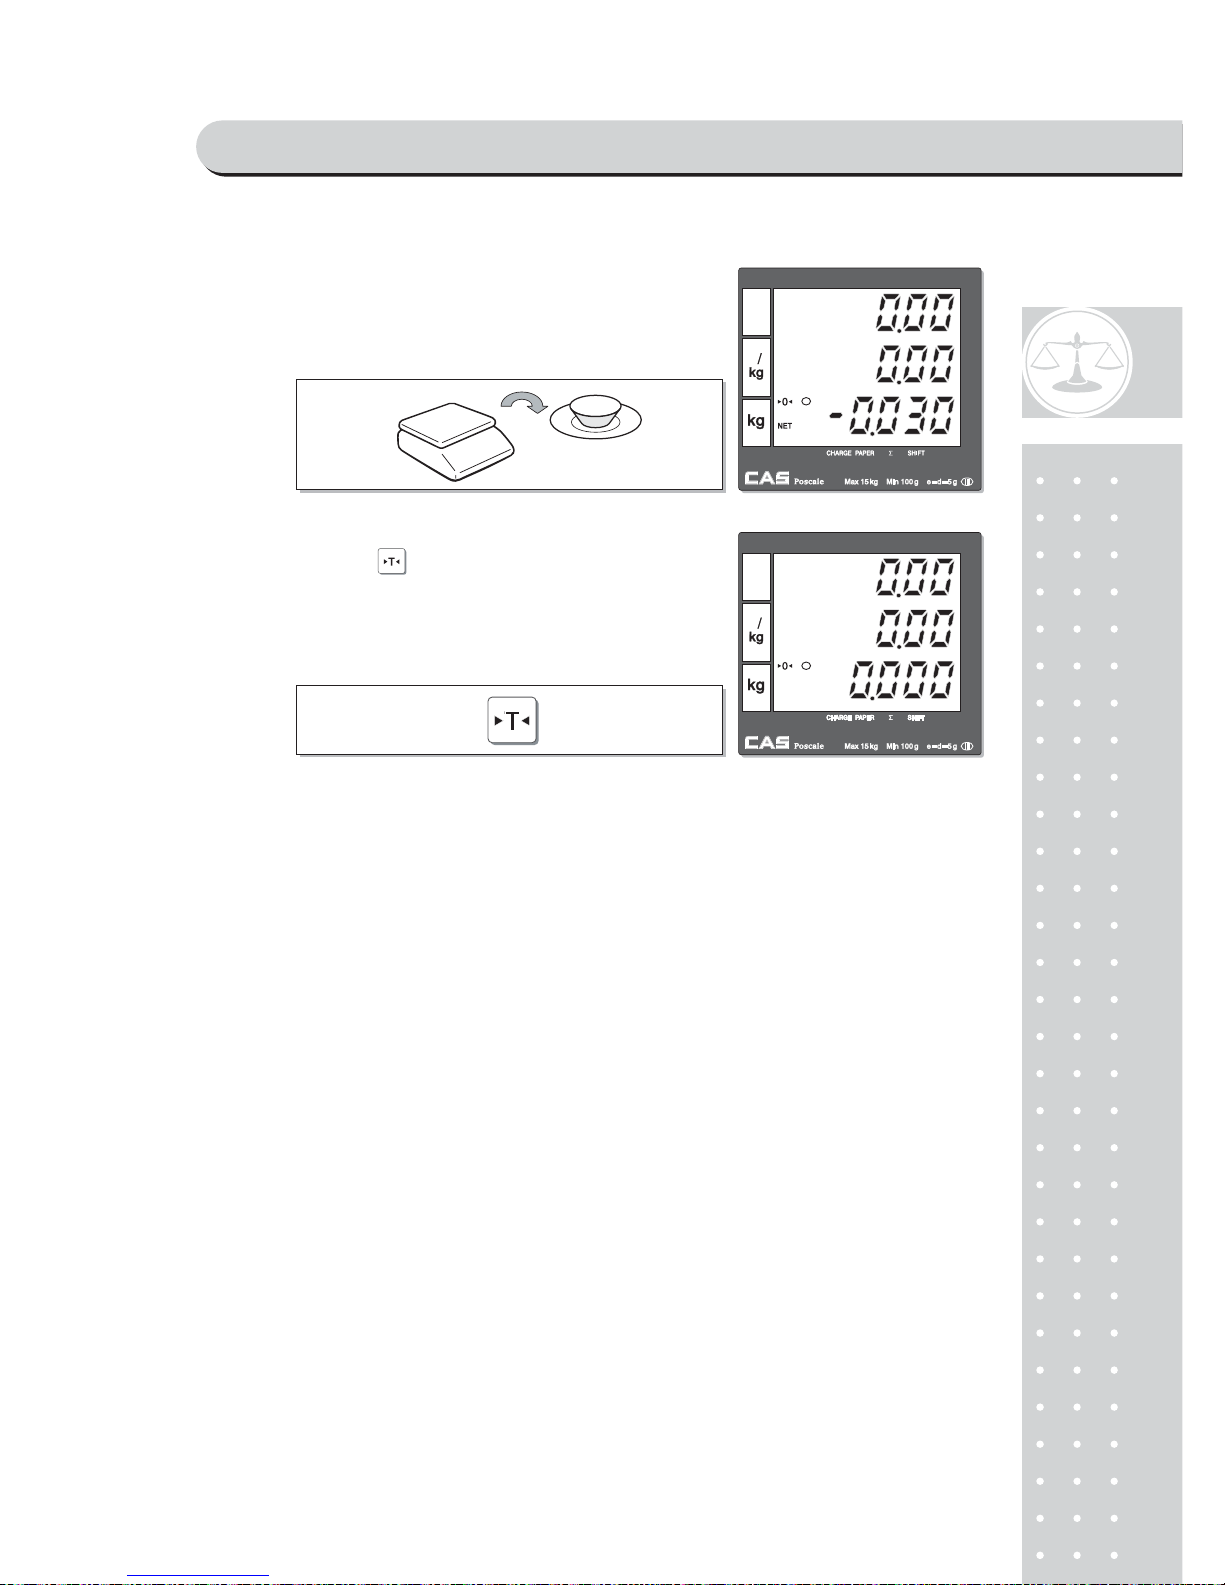
⑤Remove all weights from platter if user does
not need tare function. At this time the weight
shows negative value of tare.
⑥To clear up the tare value, and go back to set zero
point, press the key again.
SAELS MODE
Page 19

20
Next two chapters, chapter 2 & 3, explain how to make sales transactions for
weighed item and for non-weighed item respectively. User may use or not use PLU
(Price Look-Up), which can be pre-programmed into the scales. Let’s look at how
to operate the sales function of CAS POScale.
Chapter 2.
SALES FOR WEIGHED ITEM
Chapter 3.
SALES FOR NON-WEIGHED ITEM
SAELS MODE
Page 20
21
Chapter 2. Sales for weighed item
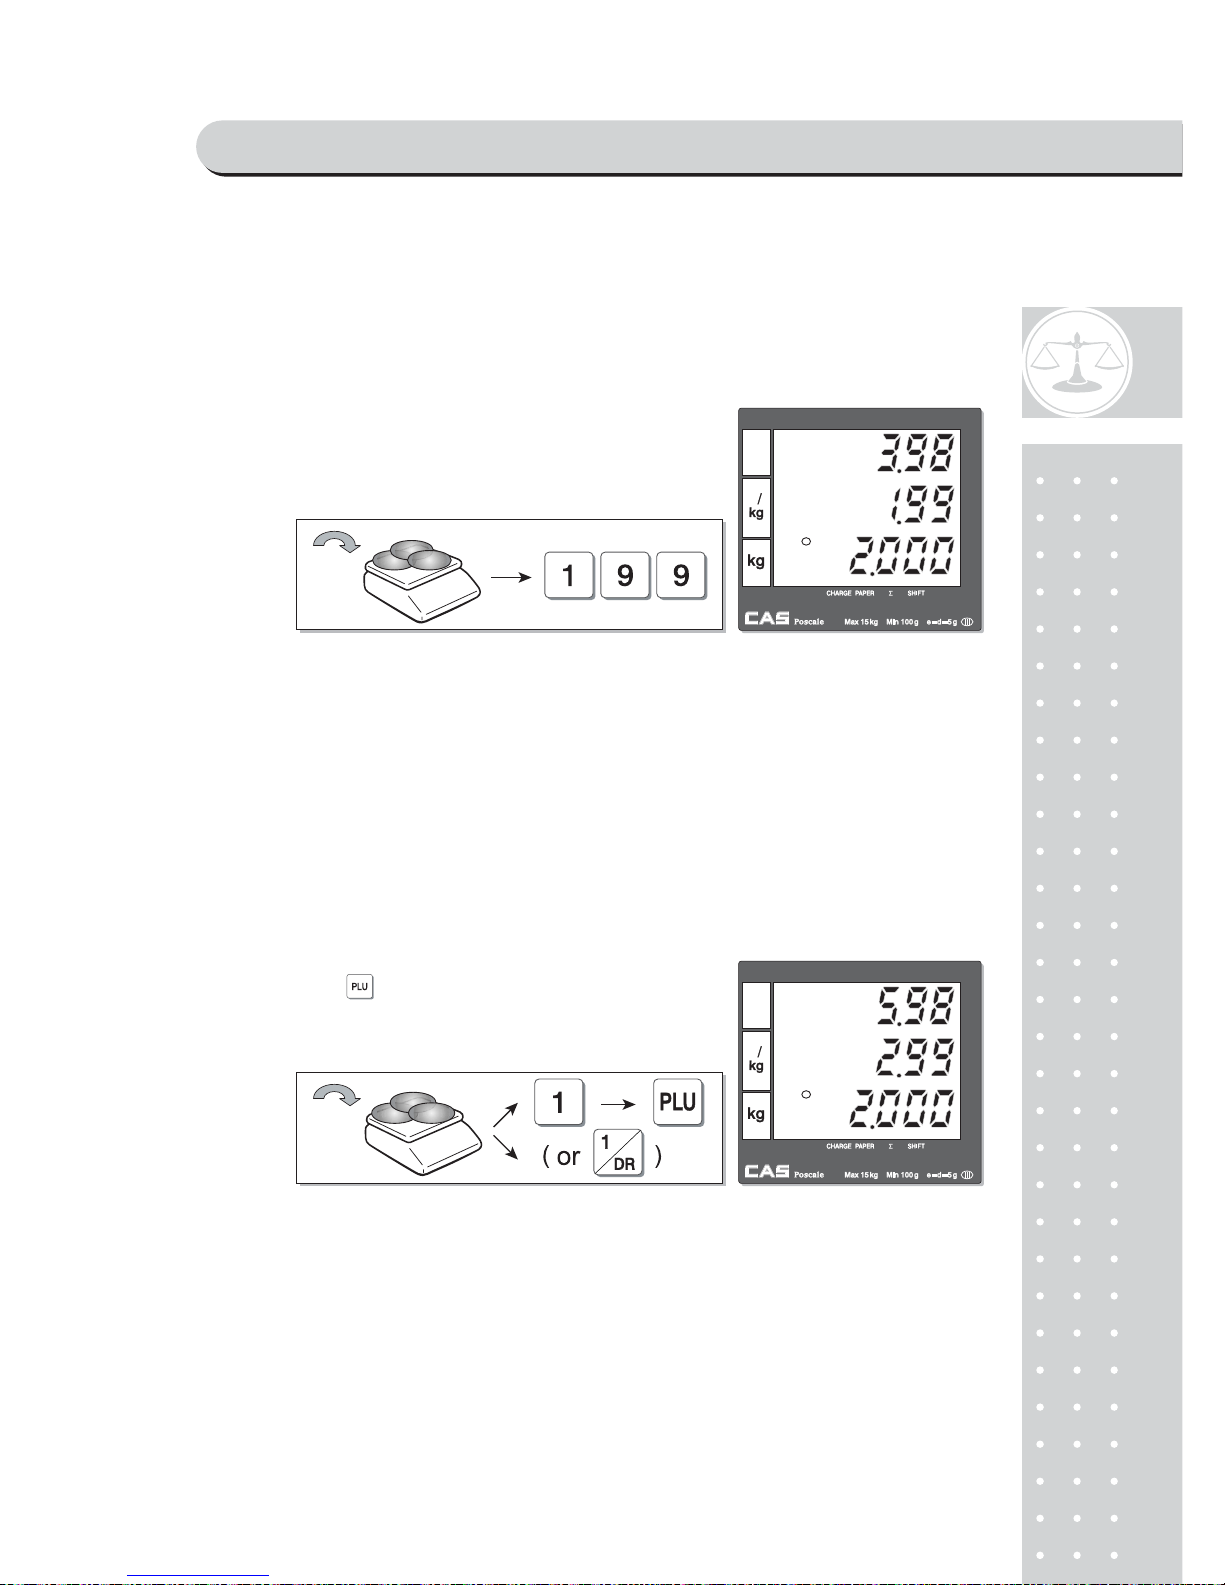
a. Sales with free price (hand pricing)
b. PLU Sales
PLU means Price Look-Up, which is pre-programmed into the scale for commonly
used unit price and item. It may store such information as unit price, item code,
department, item name, tax rate group, weighed or non-weighed, fixed or non-fixed
item, and printing or non-printing barcode for a PLU.
CAS POScale can store up to 1,799 PLUs in its memory. Let’s look at how to make a
sales transaction using a PLU.
* Direct PLU s: user may save one touch direct PLUs for most commonly-used 8 items.
* If user saves indirect PLUs of #1~8 he/she does not need to save direct PLUs
of # 1~8 because the indirect PLUs of #1~8 are automatically saved in the
direct PLU keys of #1~8. Most commonly used 8 items are recommended to
be saved in the direct PLU keys for users' convenience.
①
Put appropriate item of, for example, 2kg on the platter
and press numeric keys for its unit price in weighing mode.
* All of sales transactions with free price are
stored and accumulated on "PLU 0" for report.
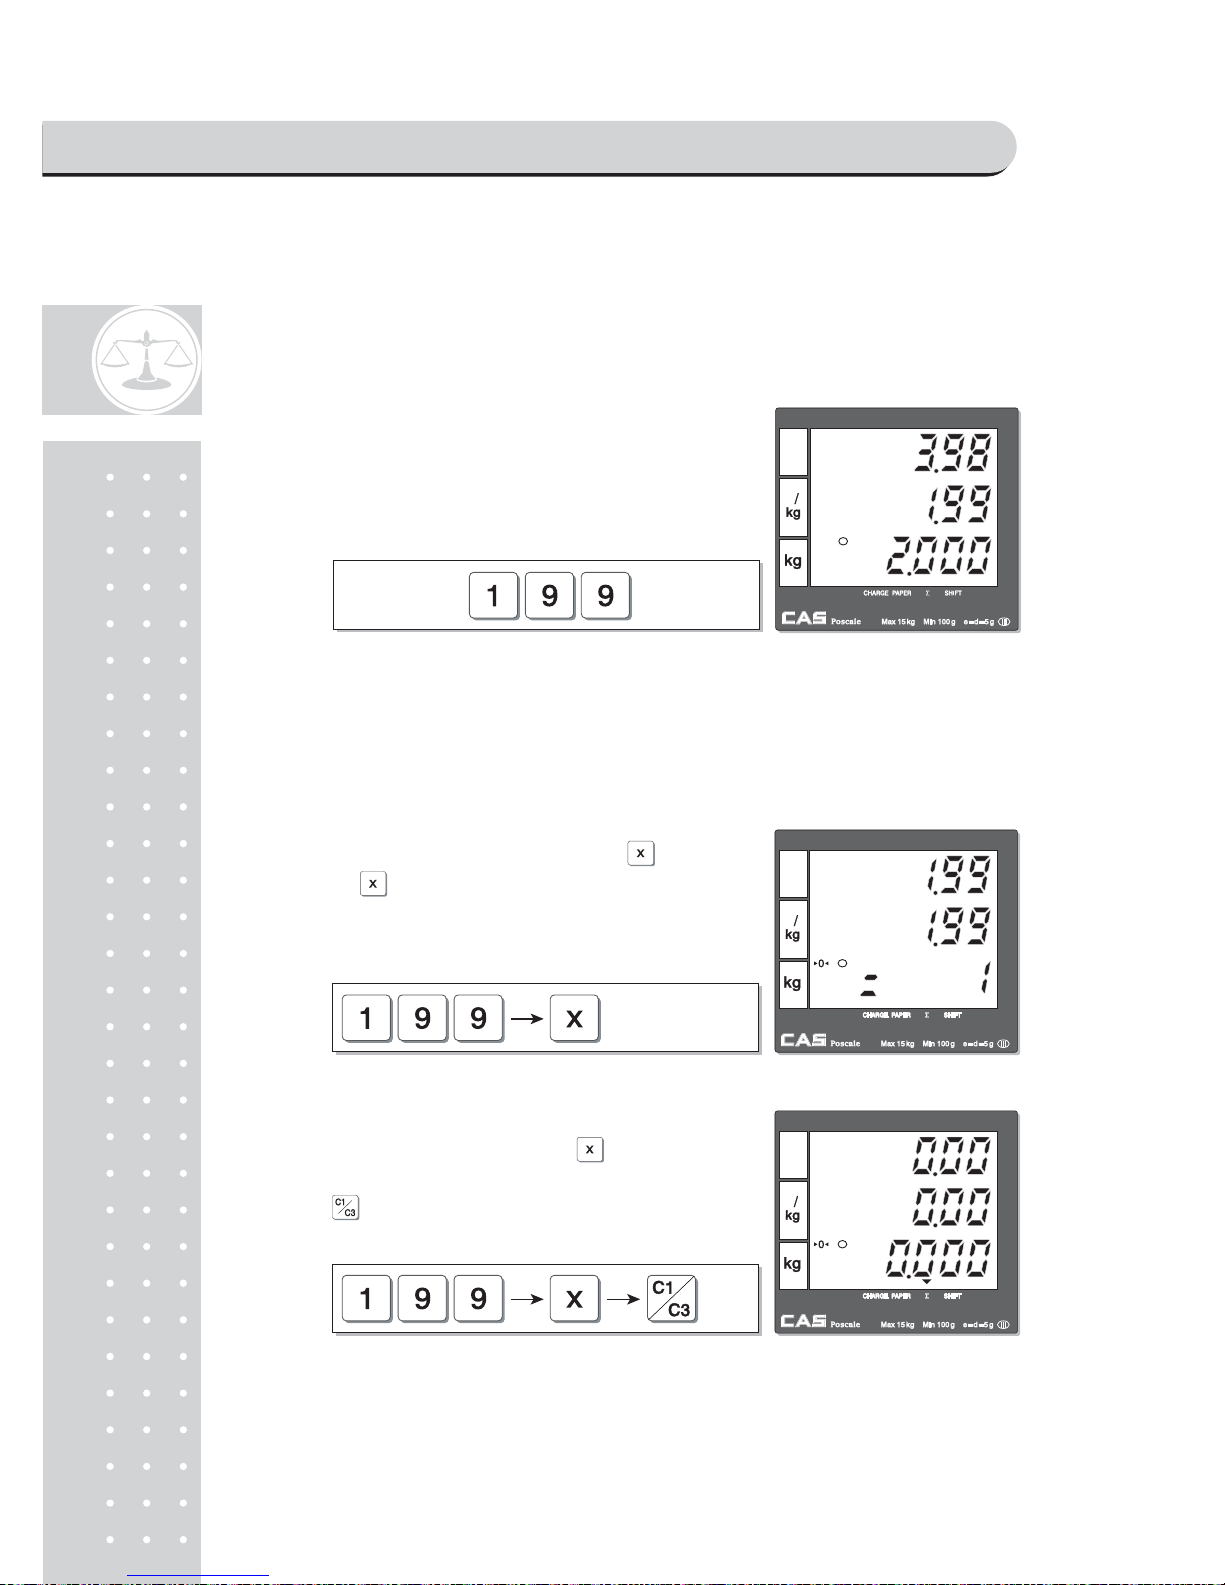
①Put appropriate item on the platter. And press either PLU
number and (or direct PLU key between 1~8 which
are preset in the programming mode). For example, lets
put in "PLU 1(non-fixed PLU)", which unit price is 2.99.
SAELS MODE
Page 21
22
* If current PLU, 1 has fixed price attribute, which is set in the program mode
user cannot change the unit price for PLU called up. However, if current PLU
has non-fixed price attribute user may change (override) the unit price as
his/her sales transaction requires.
Chapter 3. Sales for non-weighed item
a. Sales with free price(hand pricing)
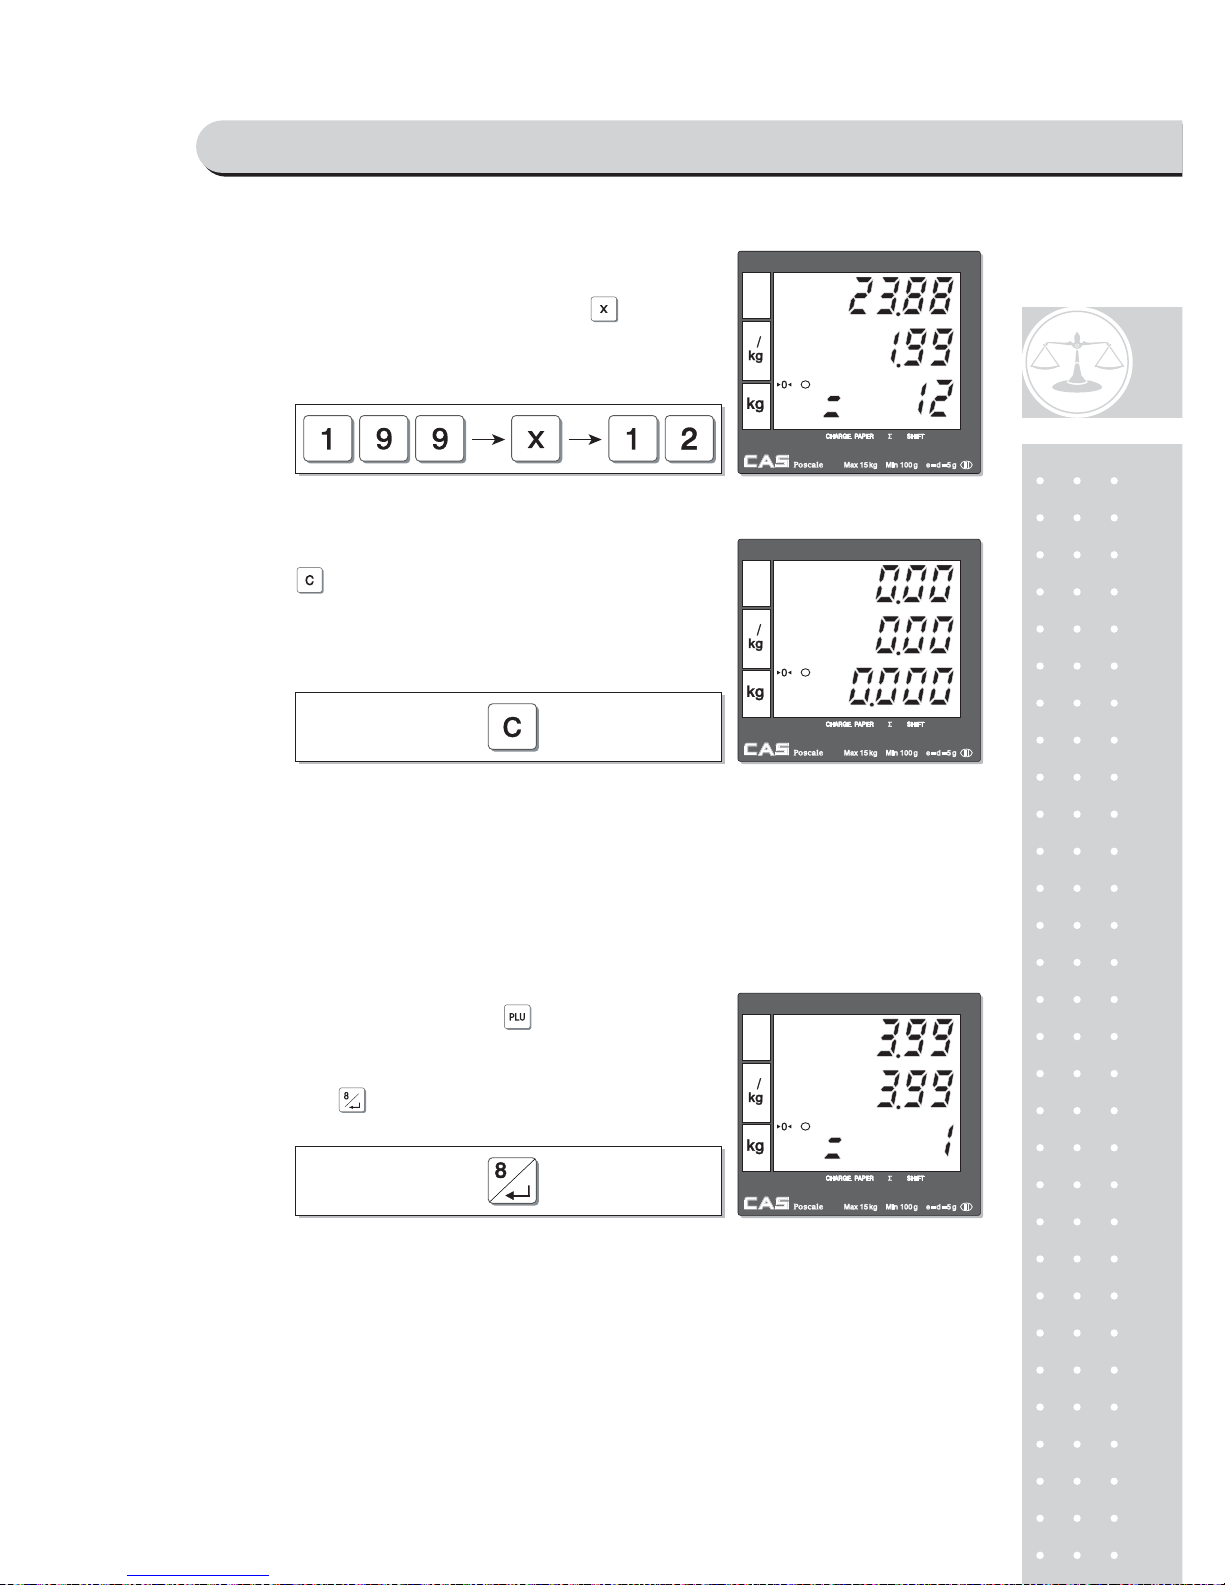
① In case of non-fixed priced PLU user may put in
(override) new price for current PLU at sales condition,
for example, "last minute sales" or "10 minutes
sales" etc. Lets try last minute sales of PLU 1; 1 kg for 1.99.
①Simply input item's unit price and press key.
Pressing displays initial "1".
②For sales of only 1 item just press becausezero
the quantity is already set to initial "1". Then,
press to select the clerk 1.
SAELS MODE
Page 22
23
b. PLU Sales
■ Please make sure current PLU is set with non-fixed price in the PLU program
mode. Otherwise, user cannot change unit price for the PLU called up.
■ User cannot change the unit price of "Fixed Price Item" after calling up the PLU.
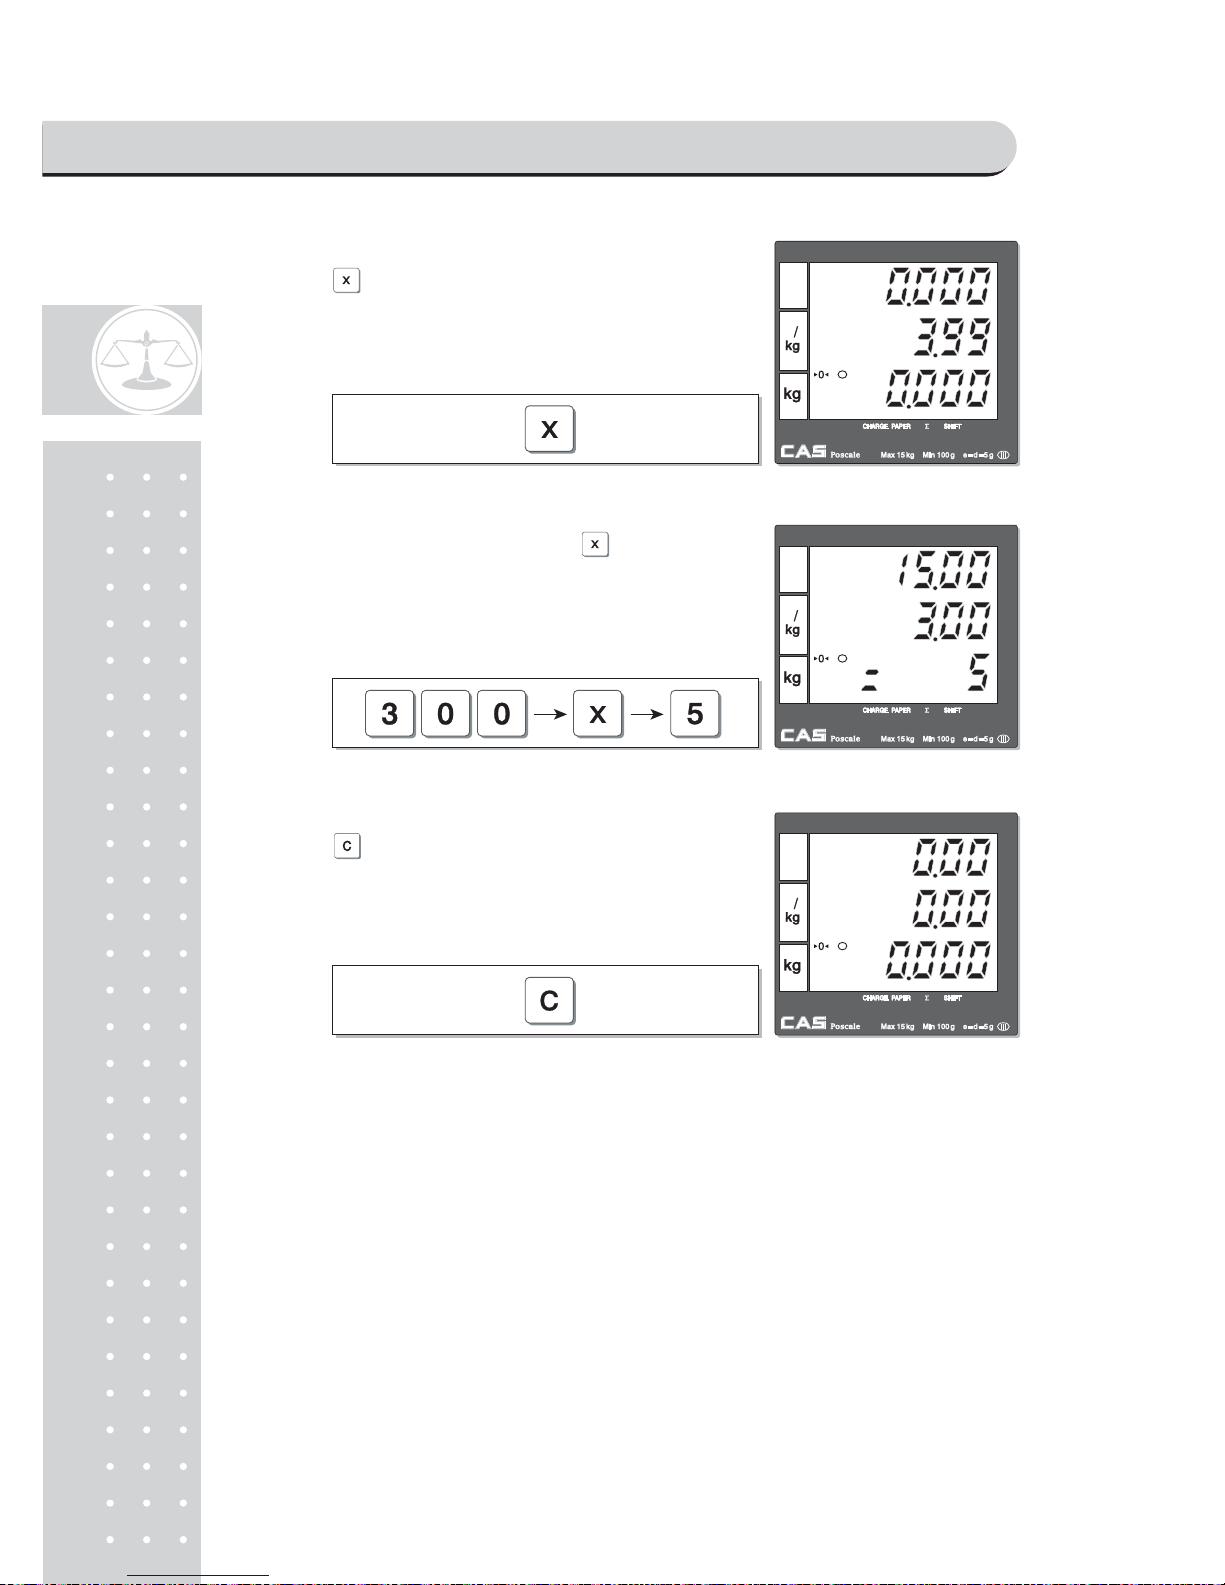
③For more than single item sales,
Simply input item's unit price and press
and quantity. Then display will show total price.
* User may make sales up to 1,999 items per transaction.
④Press to clear previous transaction and
go back to initial weighing mode.
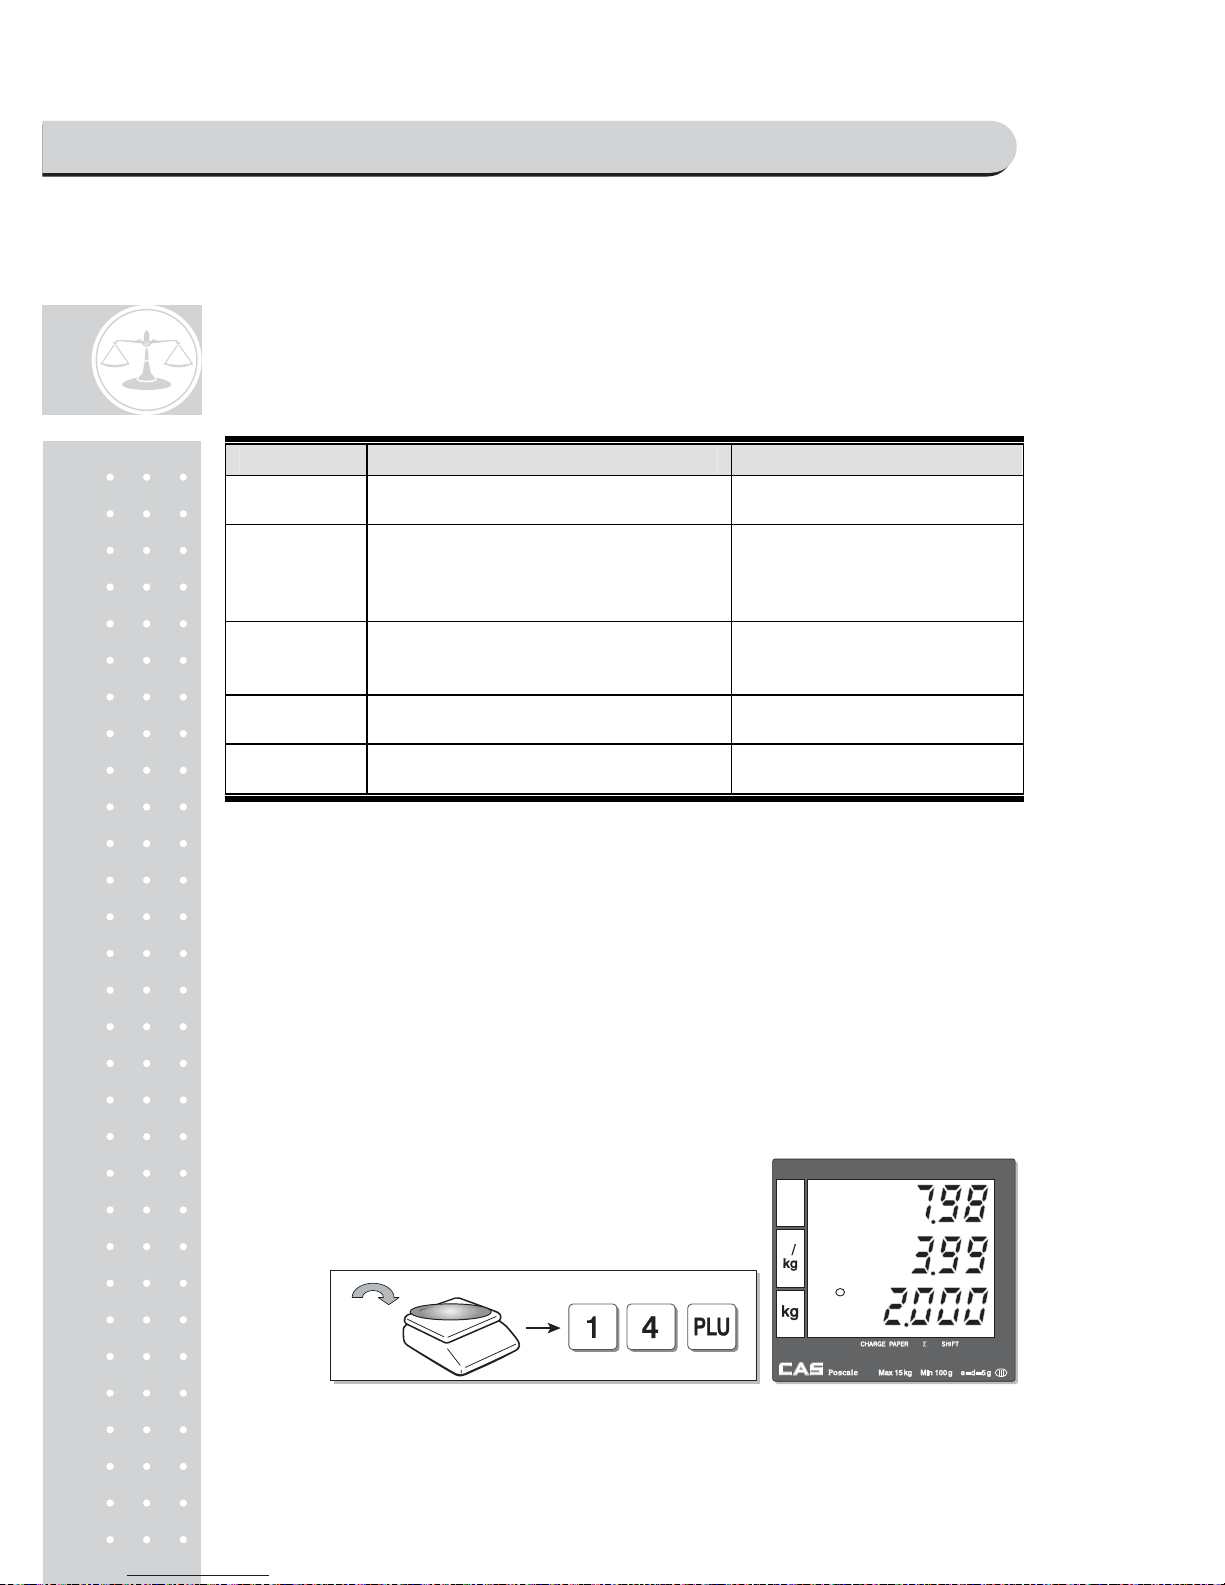
①Press either PLU number and (or appropriate
direct PLU key between 1~8). For example,
direct "PLU 8", which unit price is 3.99.
First press .
SAELS MODE
Page 23
2
4
② Press key to change unit price.
③ Input new price, 3.00. Then, press and
the number of non-weighed item unit, for
example, 5 units.
④ Press to clear previous transaction and go
back to initial weighing mode.
SAELS MODE
Page 24

25
Chapter 4.
CLERK OPERATION
SAELS MODE
Page 25
26
Chapter 4. Clerk Operation
There are three different type of clerk modes.
max number of sales per CLERK : 99
Table 3: Clerk Mode (refer to clerk mode setting on page 94)
Modes DESCRIPTION Receipt Printing
0
All clerks can use the scale for a
seriesof sales activity.
It prints ticket (receipt) including
each item and total information.
1
Only one clerk can use the scale for
a series of sales activity.
However, other clerk can use the scale for
other series of sales activities in this mode.
It prints only part of ticket (receipt),
which a transaction is made, and
prints total amount after a series of
transactions are completed.
2
(Supermarket
mode)
Only one transaction per clerk at a
moment.
It prints ticket (receipt) only for one
transaction per clerk.
3(Label-1
Mode)
Only one transaction per clerk at a
moment
It prints Label (receipt) only for one
transaction per clerk.
4(Label-2
Mode)
Only one transaction per clerk at a
moment
It prints Label (receipt) only for one
transaction per clerk.
a. CLERK MODE 0 (All clerk operation)
• All clerks can use the scale for a series of sales activity.
• It prints ticket (receipt) including each item total information.
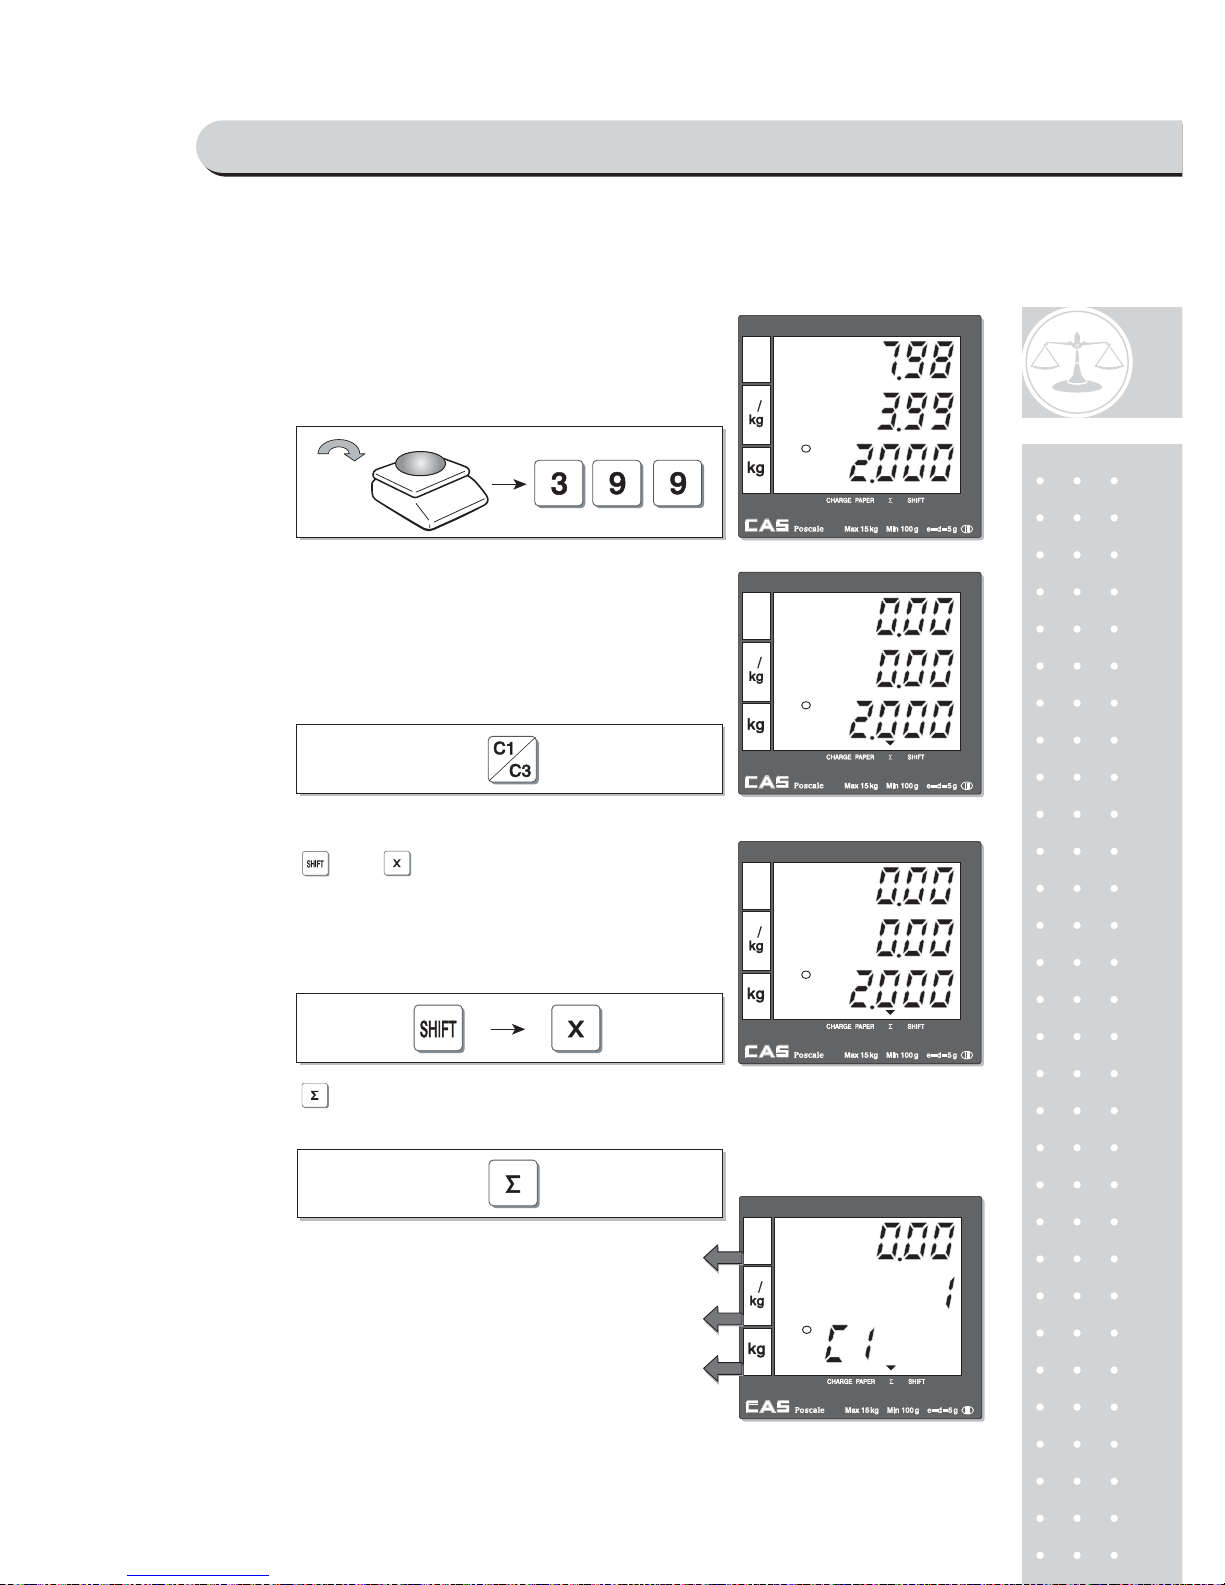
Assumption : (These are consecutive, separate, transactions.)
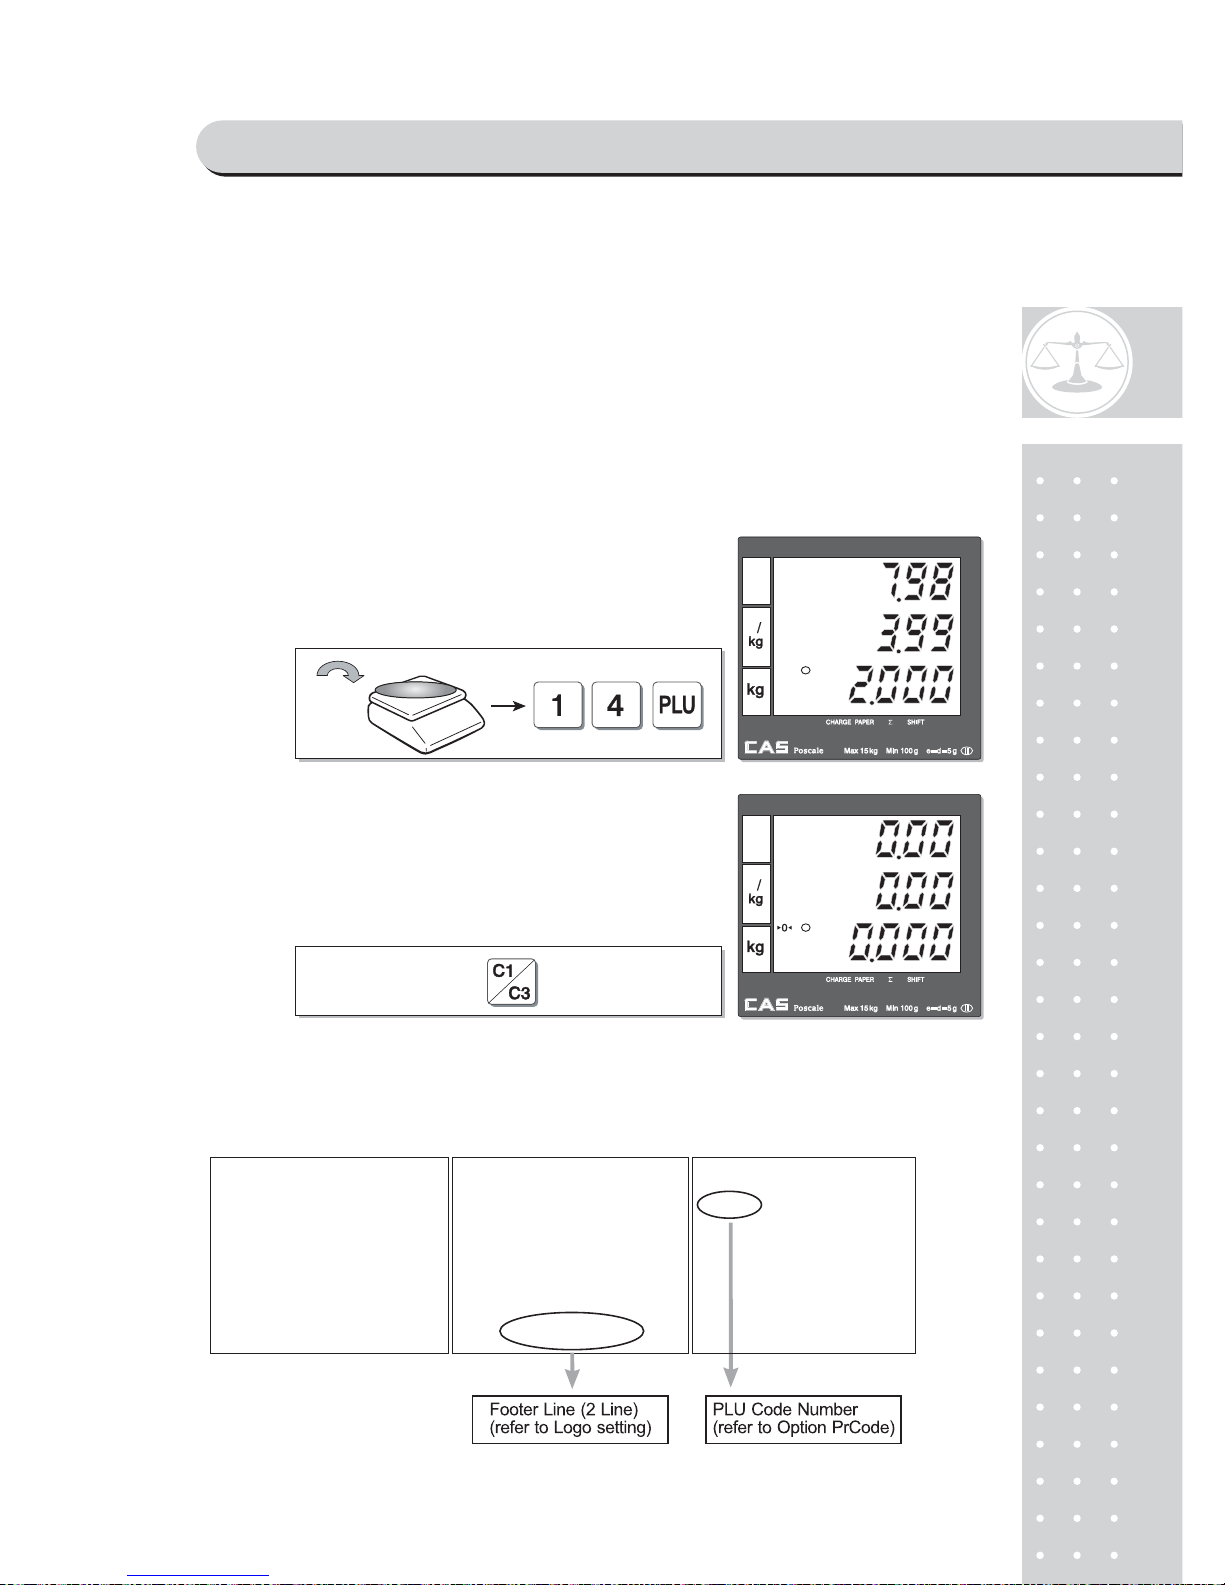
a) 2kg of Beef Sirloin (PLU setting # 14, €3.99/kg, No weight; No) for clerk C1.
b) 3kg of Turkey (PLU setting # 15, €4.99/kg, No weight; No) for clerk C2.
c) 3kg of Rib Eye (PLU setting # 17, €5.99/kg, No weight; No) for clerk C3.
d) 3 packs of Potato (PLU setting # 1, €1.99/pack, No weight; Yes) for clerk C1.
e) All of above-mentioned PLUs should have other code number than "code 0".
① Call up PLU of Beef Sirloin, #14 for clerk C1.
SAELS MODE
Page 26
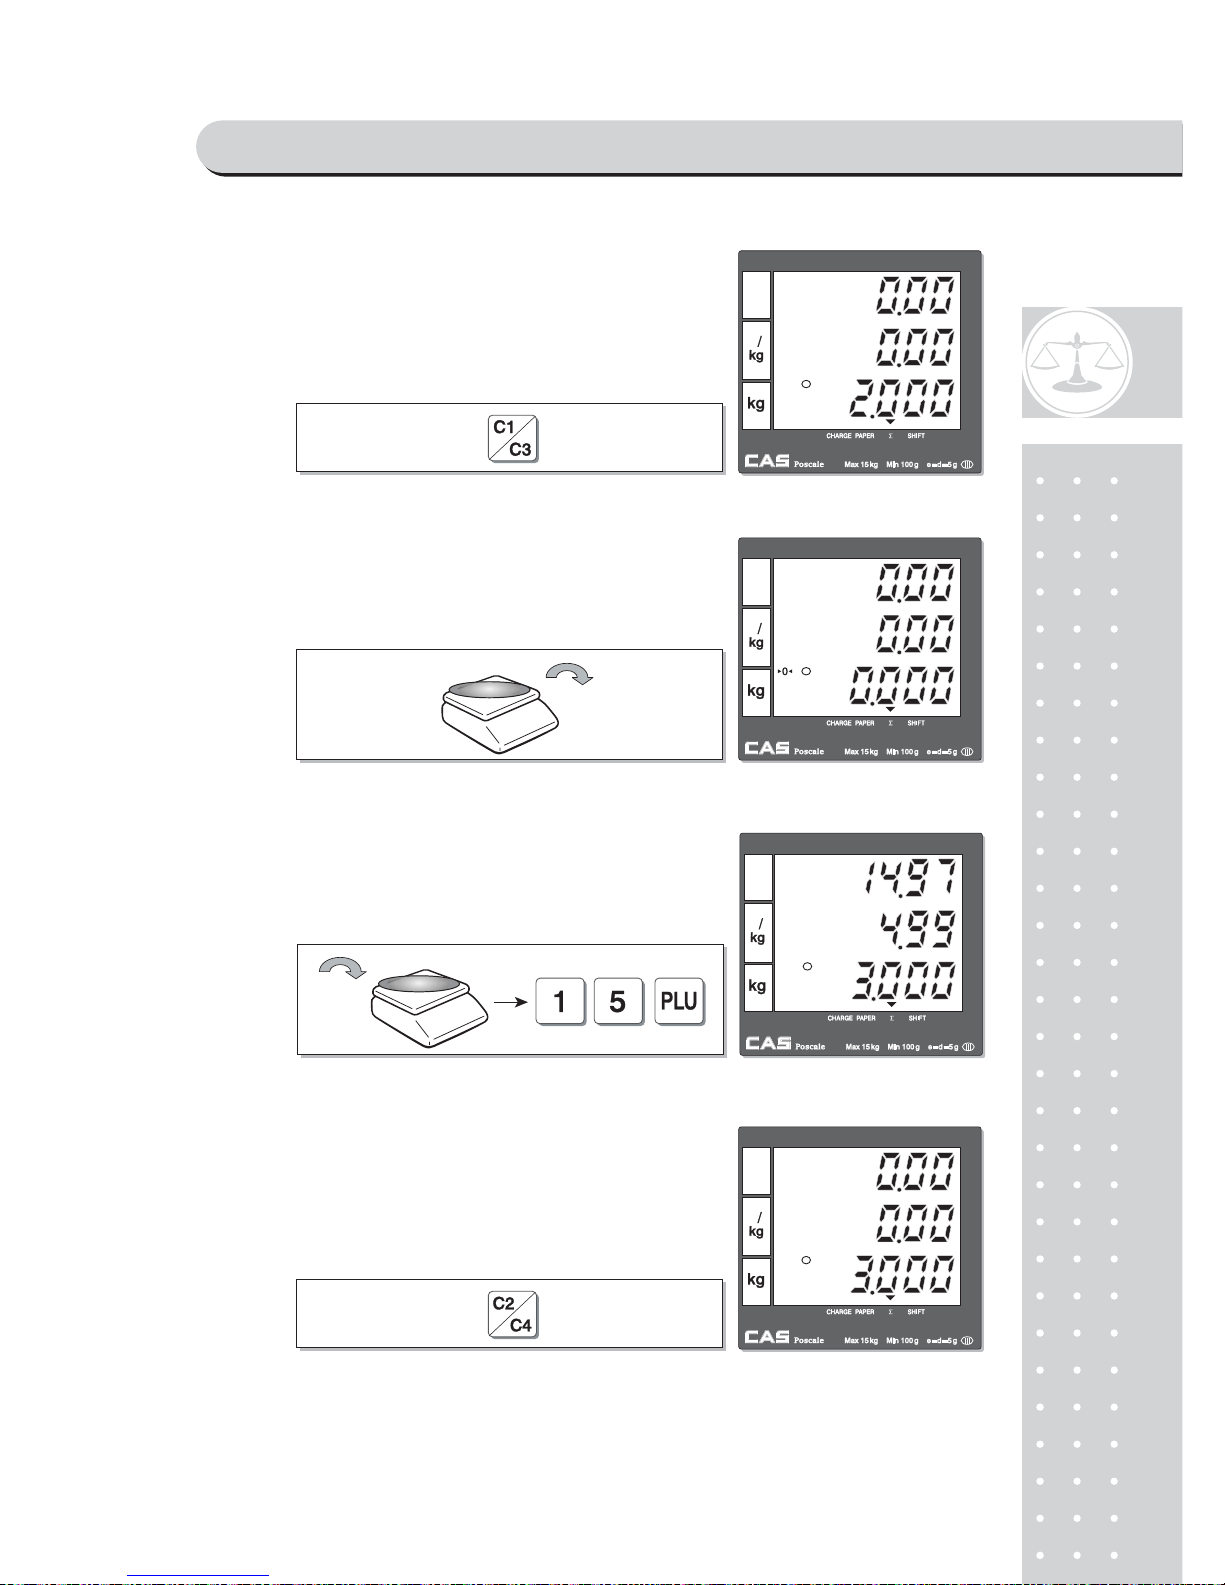
2
7
② Call up PLU of Beef Sirloin, #14 for clerk C1.
③ Select the clerk 1.
④ Remove Beef Sirloin from the platter.
⑤Select the clerk 2.
SAELS MODE
Page 27
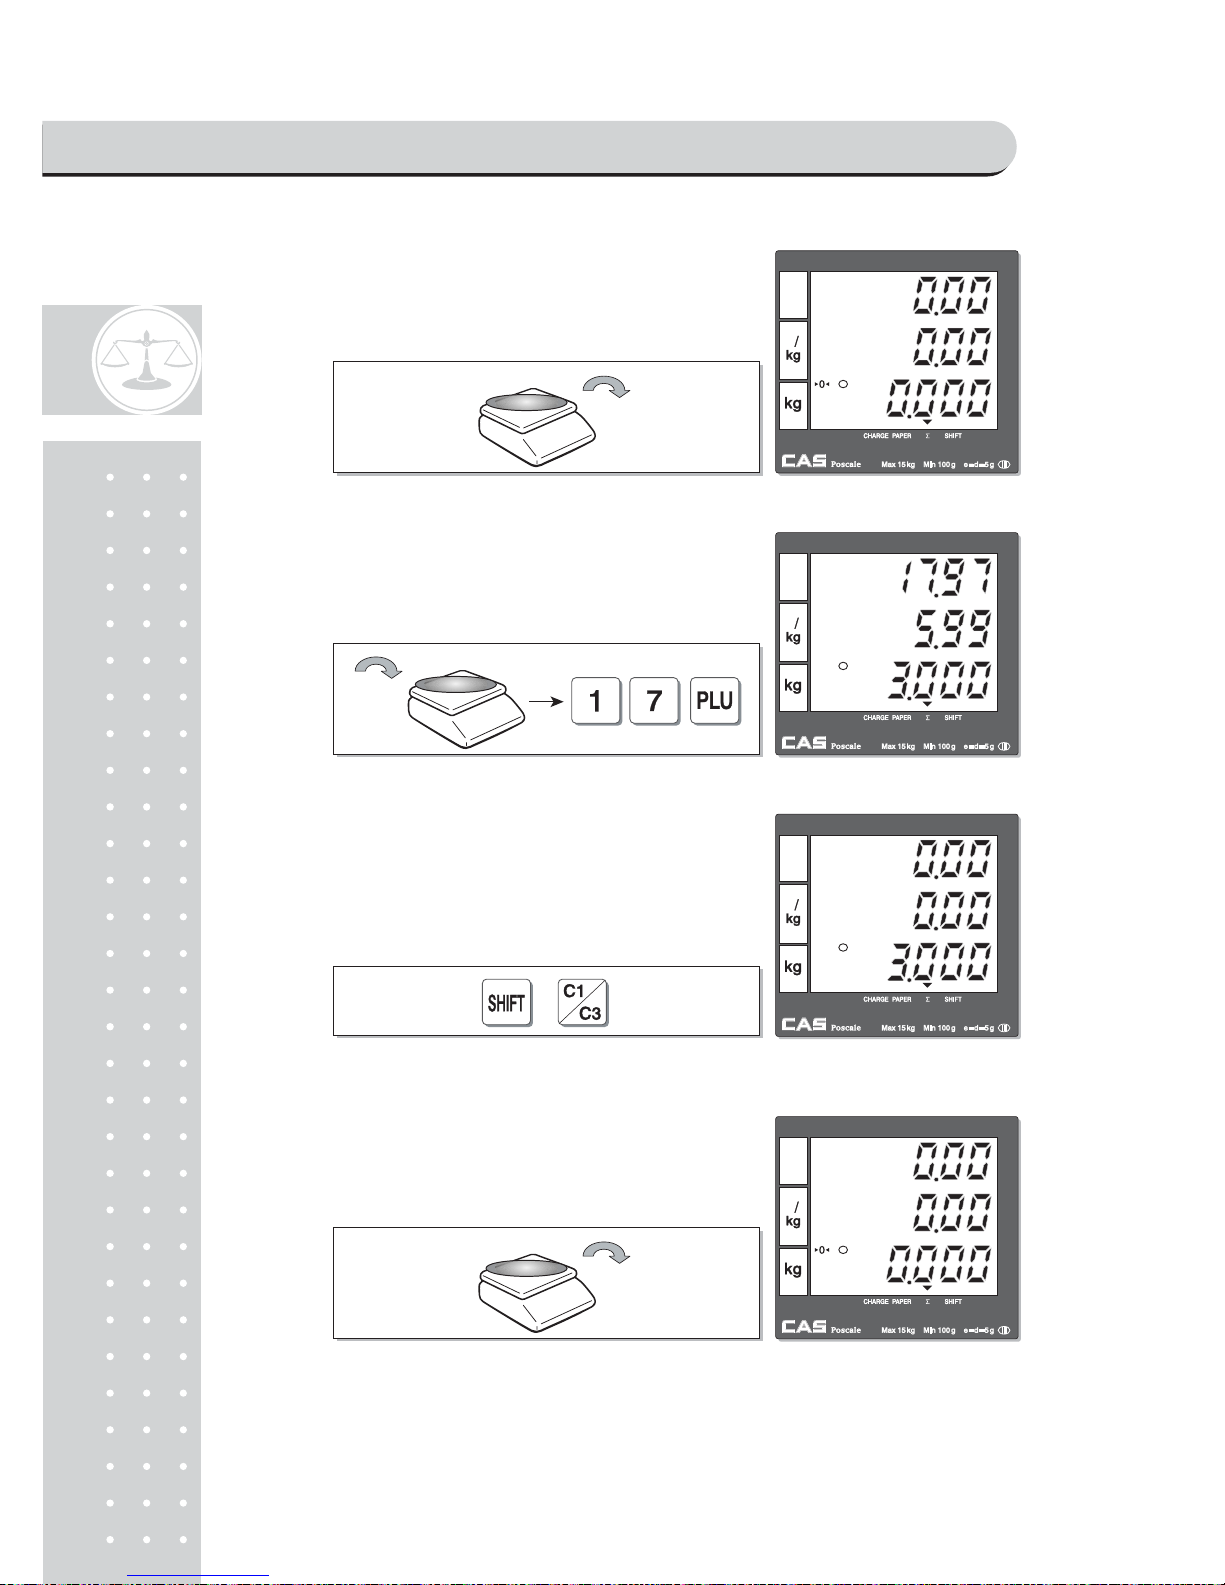
2
8
⑥Remove Turkey from the platter.
⑦Call up PLU of Rib Eye, #17 for clerk C3.
Select the clerk 3.⑧
⑨Remove Rib Eye from the platter.
SAELS MODE
Page 28
29
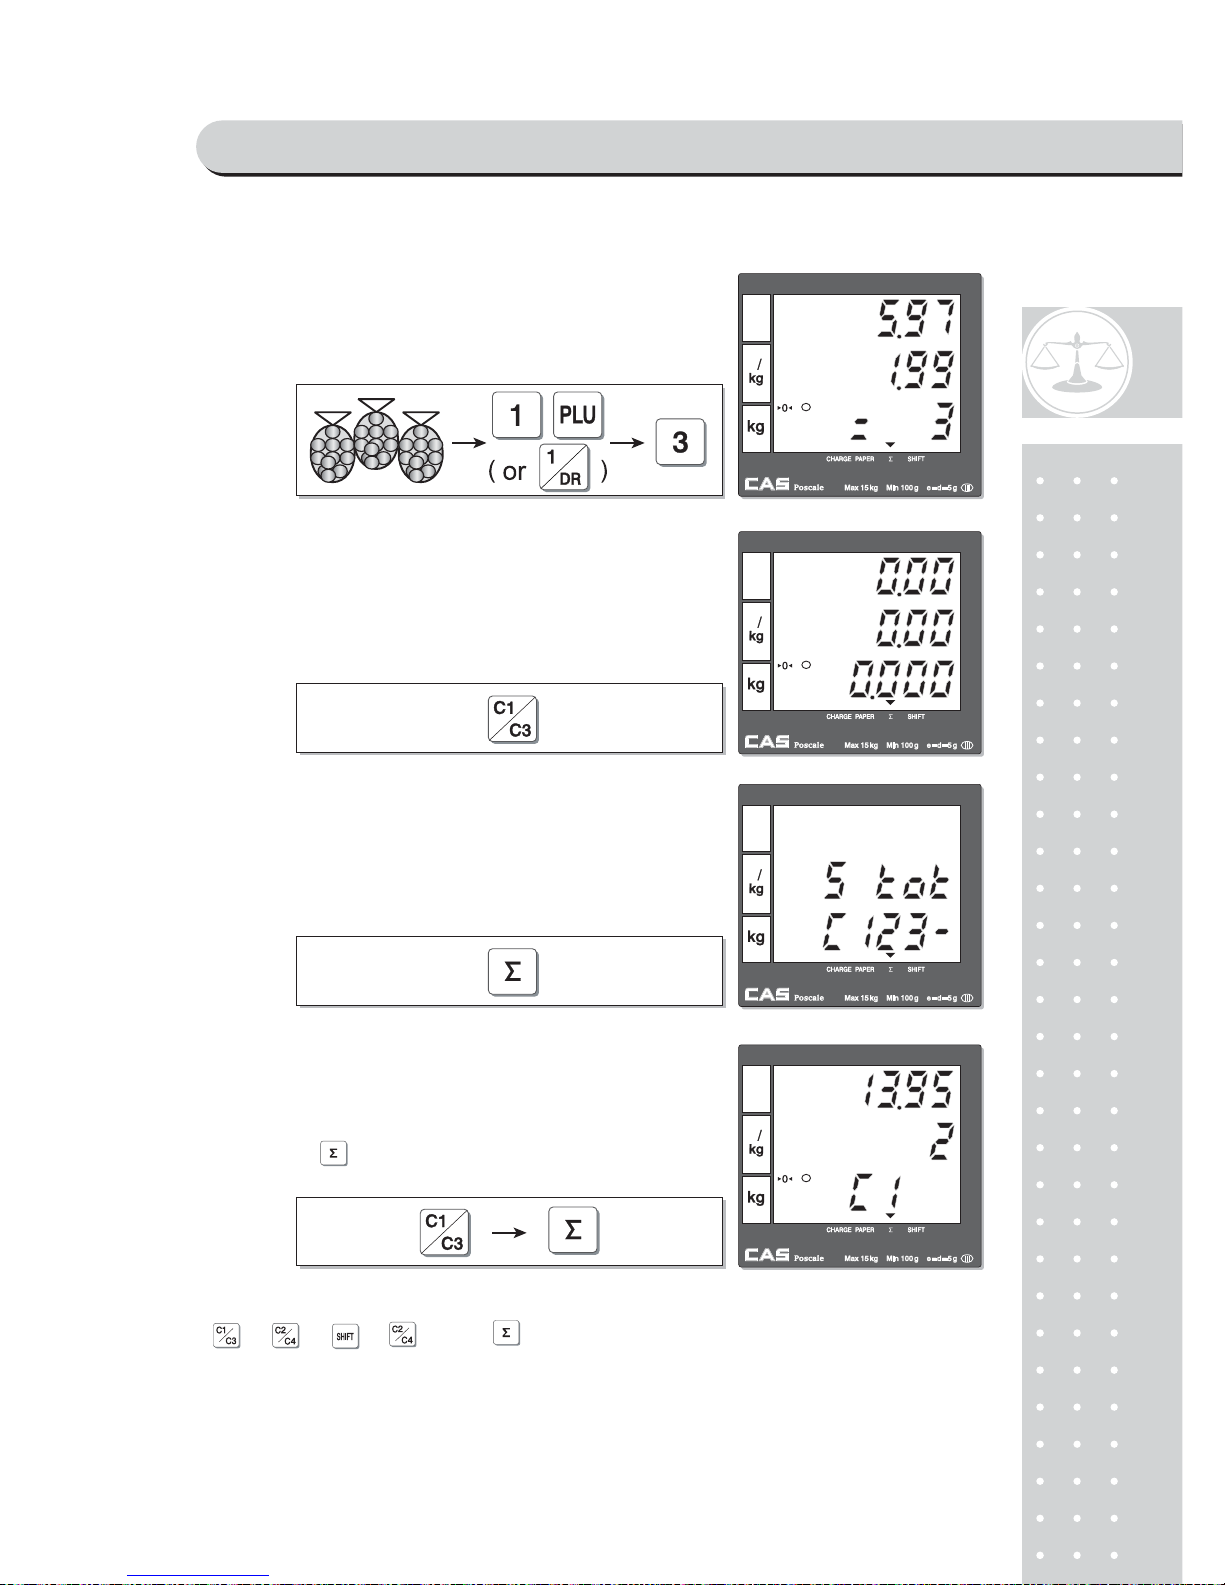
※User may print out individual clerk's receipt by pressing individual clerk key(using
, , & ) then key.
C⑩ all up PLU of Potato(No weight Item),
#1 for clerk C1. Customer purchase 3 packs
of Potato.
S⑪ elect the clerk 1.
S⑫ ubtotal Mode.
Get subtotal amount.
⑬ Select appropriate clerk (C1, C2, C3, C4)
Selecting C1 in the SUBTOTAL mode and
pressing key prints out a ticket (receipt)
for Clerk1 transaction(s).
SAELS MODE
Page 29
30
- Receipt Samples (Euro Version)
SAELS MODE
Page 30
31
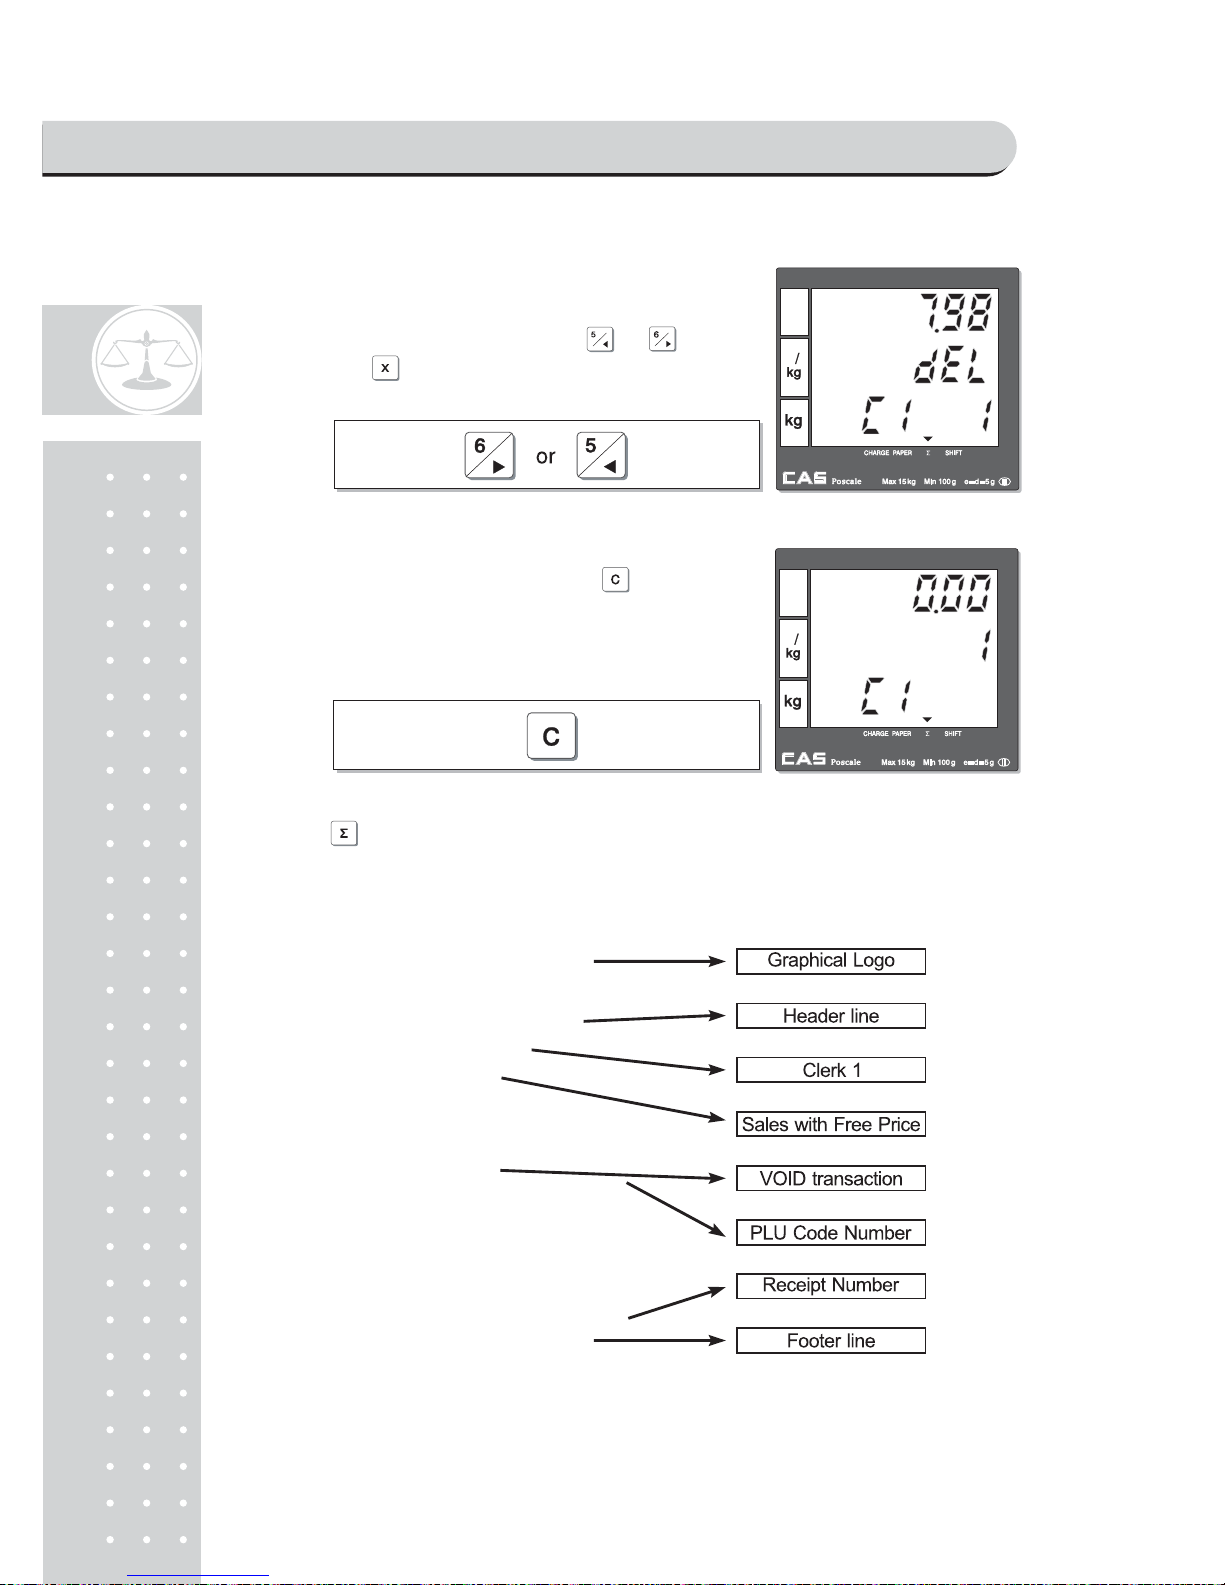
b. CLERK MODE 1 (Only one clerk operation)
x Total price through previous transactions.
x The number of transactions.
x Current clerk number in current transactions.
①For example, put 2kg of item whose unit price
is 3.99 and clerk 1 is making current transaction.
②Press to select the clerk 1. It automatically
prints out ticket (receipt) for current transaction.
③VOID
Press and to void (delete) latest transaction.
Clerk 1 to make sure the lastest transaction is voided
(deleted).
For Clerk Mode "0" user should press appropriate
clerk
deleted after pressing "Shift" +"X"key.
④ Press to have subtotal amount and
transaction after previous void transaction.
SAELS MODE
Page 31
32
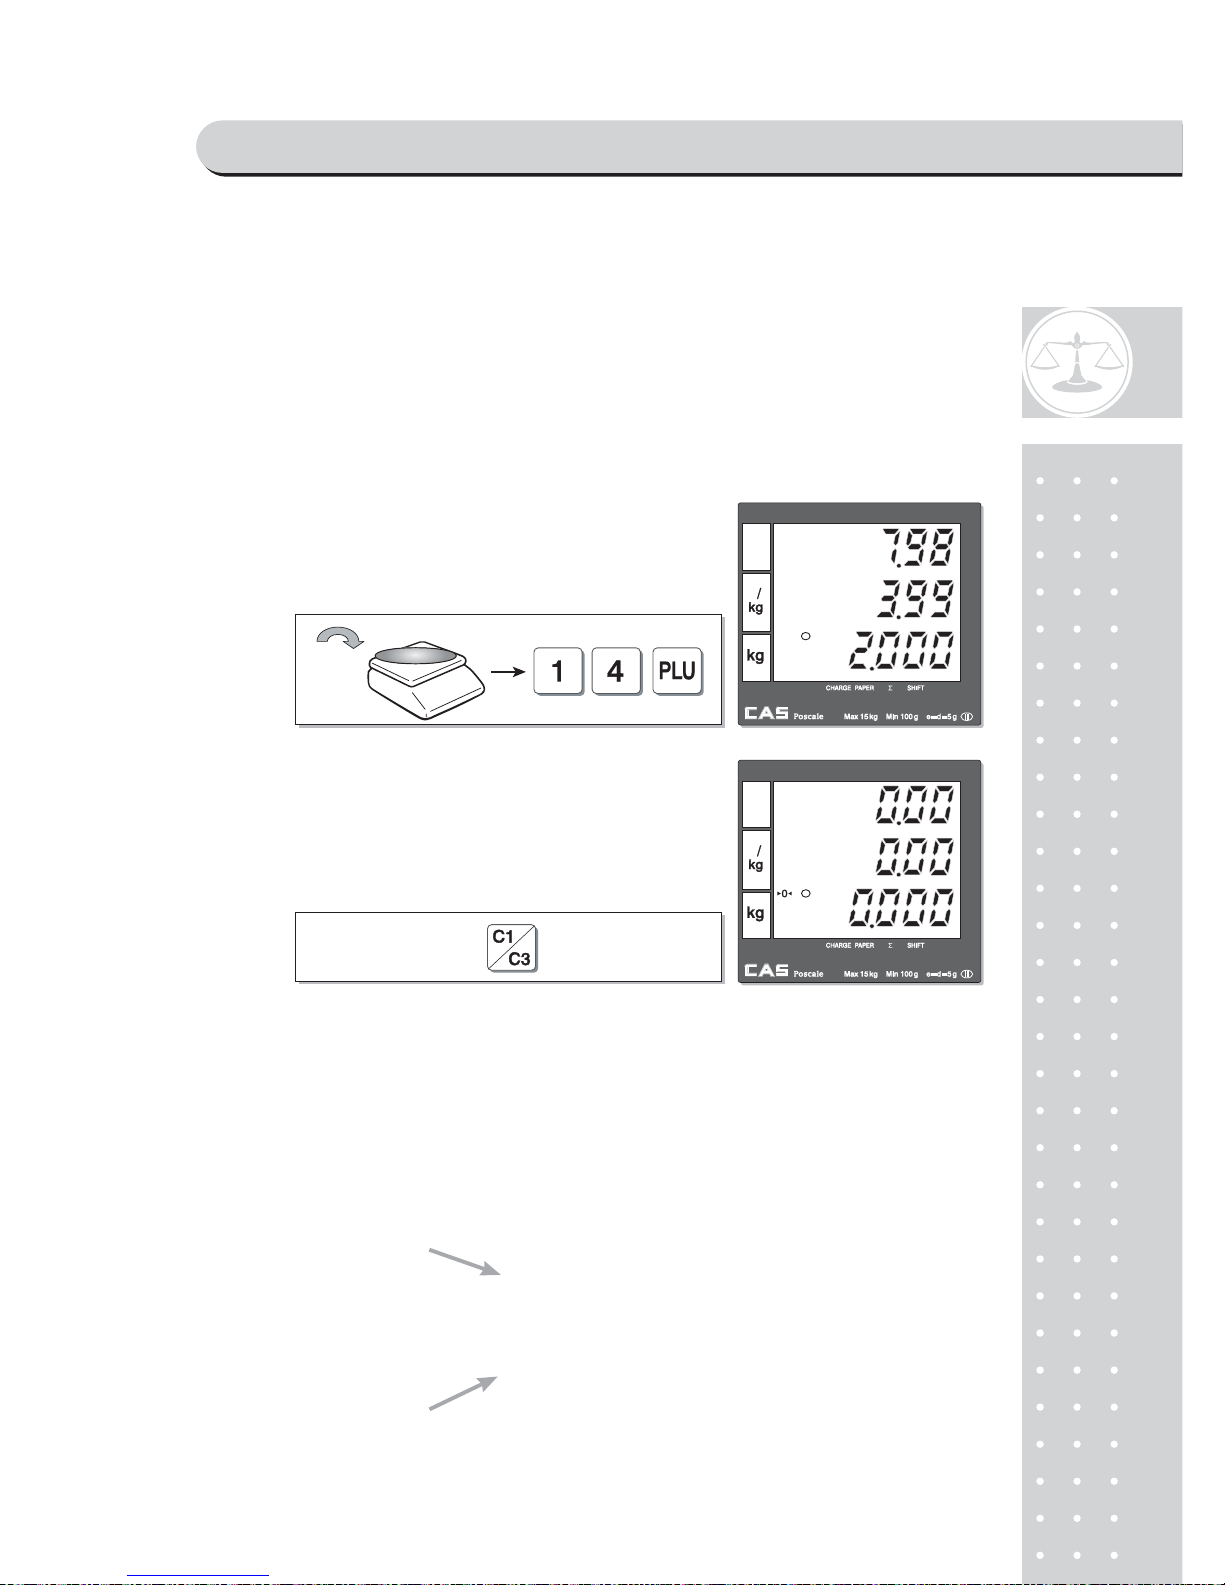
⑤Sales List
User may check through previous ① ~ ④ transactions
(lists) before printing receipt, using or .
• Pressing will delete current transaction made
in the sales list mode.
⑥User may exit from current by using once
for current clerk's sales and twice for another
transaction.
Press⑦ to print the receipt for ①~ ⑥steps, and the receipt looks like the following one.
SAELS MODE
Page 32
33
c. CLERK MODE 2 (Supermarket mode)
• Only one transaction per clerk at a moment.
• It prints ticket (receipt) only for one transaction per clerk.
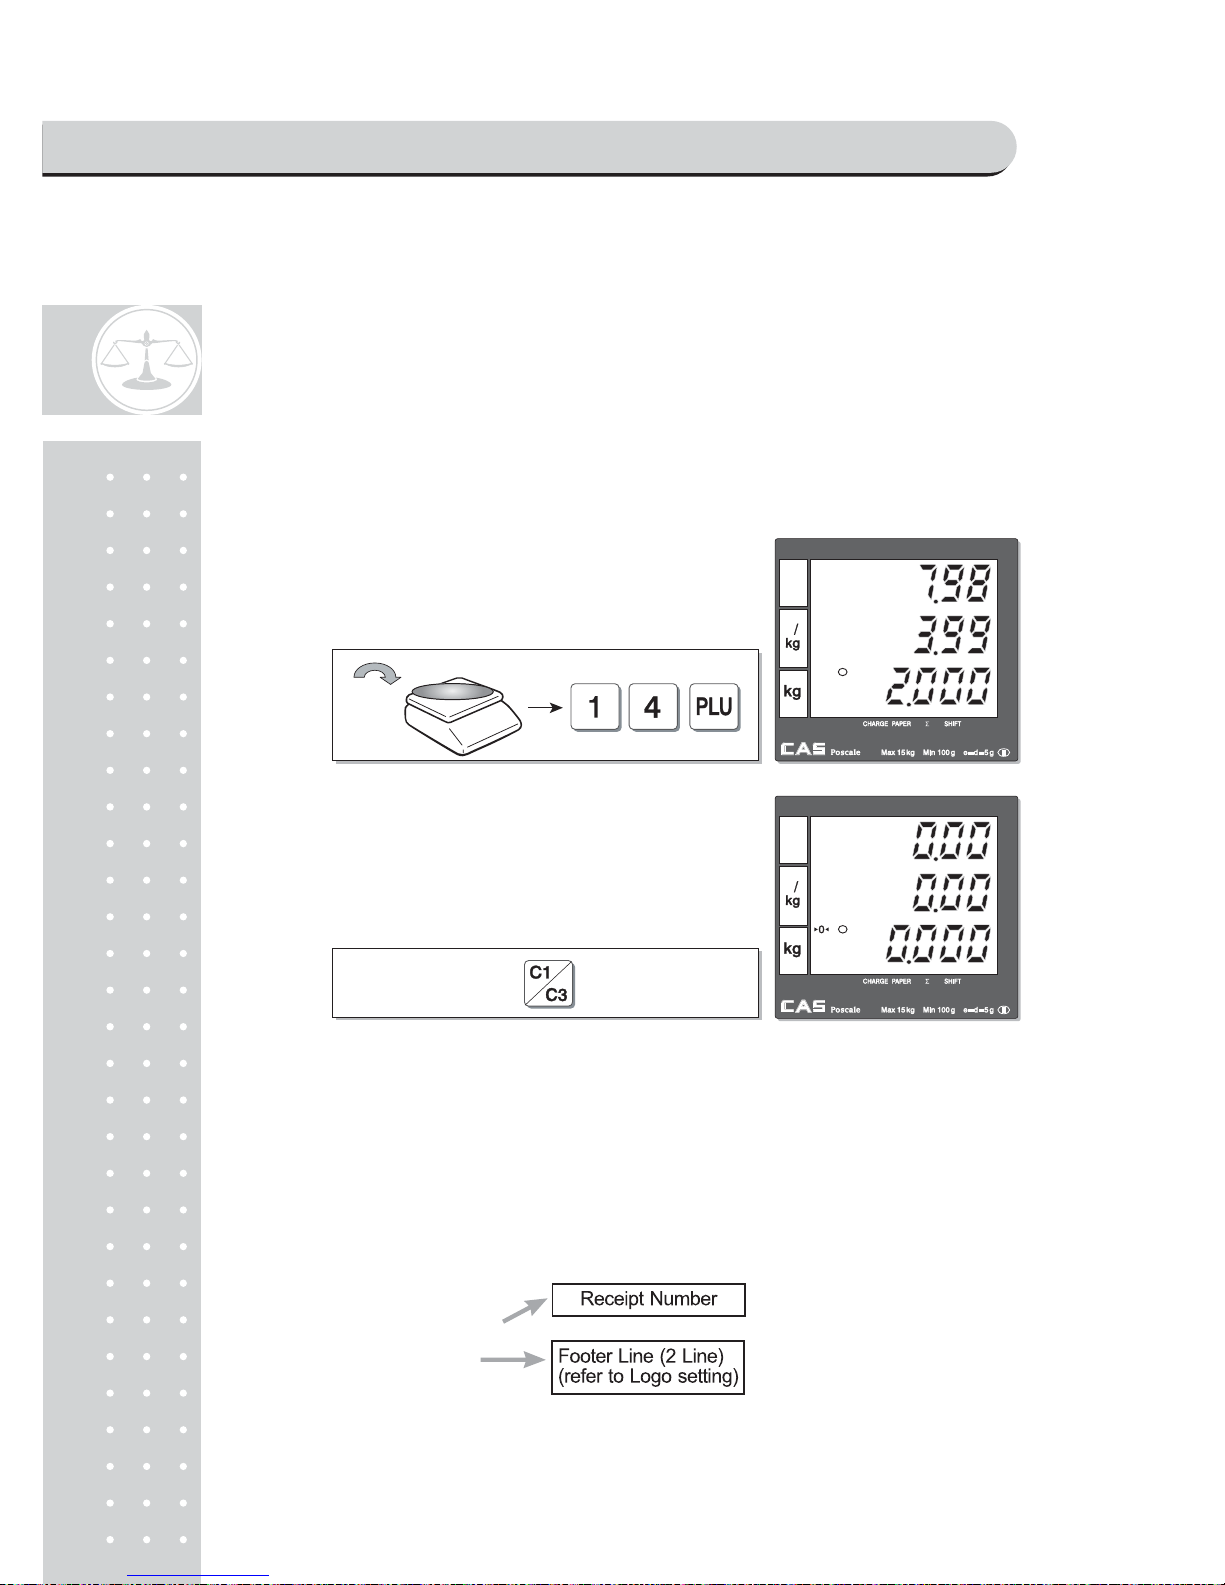
Assumption :
a) Please go to clerk mode and set clerk mode as "2 (supermarket mode)".
b) 2kg of Beef Sirloin (PLU setting # 14, €3.99/kg, No weight; No) for clerk C1.
c) All of above-mentioned PLUs should have other code number than "code 0".
① Call up PLU of Beef Sirloin, #14 for clerk C1.
② Then, it automatically prints out ticket (receipt)
for "a)" transaction when user selects the clerk.
※ The scale prints out ticket (receipt) for each
transaction in the supermarket mode (set"2")
whenever each transaction is made by a clerk.
※ For further information please refer to
"chapter 1 1. Bar code Printing" on page 85.
※ For further information please refer to
"chapter 1 1. Bar code Printing" on page 85.
SAELS MODE
Page 33
3
4
d. CLERK MODE 3 (Label-1 mode)
• Only one transaction per clerk at a moment.
• It prints Label format receipt only for one transaction per clerk.
Assumption :
a) Please go to clerk mode and set clerk mode as "3 (Label-1 mode)".
b) 2kg of Beef Sirloin (PLU setting # 14, €3.99/kg, No weight; No, Valid=30)
for clerk C1.
c) All of above-mentioned PLUs should have other code number than "code 0".
① Call up PLU of Beef Sirloin, #14 for clerk C1.
② Then, it automatically prints out ticket (Label
format receipt) for "a)" transaction when user
selects the clerk.
※ The scale prints out ticket (Label format receipt)
for each transaction in the Label-1 mode (set"3")
whenever each transaction is made by a clerk.
SAELS MODE
Page 34
35
e. CLERK MODE 4 (Label-2 mode)
• Only one transaction per clerk at a moment.
• It prints Label format receipt only for one transaction per clerk.
Assumption :
a) Please go to clerk mode and set clerk mode as "4 (Label-2 mode)".
b) 2kg of Beef Sirloin (PLU setting # 14, €3.99/kg, No weight; No, Valid=30)
for clerk C1.
c) All of above-mentioned PLUs should have other code number than "code 0".
① Call up PLU of Beef Sirloin, #14 for clerk C1.
② Then, it automatically prints out ticket (Label
format receipt) for "a)" transaction when user
selects the clerk.
※ The scale prints out ticket (Label format receipt)
for each transaction in the Label-2 mode (set"4")
whenever each transaction is made by a clerk.
SAELS MODE
Page 35

36
Chapter 5.
DISCOUNT & PAYMENT
SAELS MODE
Page 36
3
7
Chapter 5. Discount & Payment
a. Discount for a single of transaction
■ Instant
Assumption :
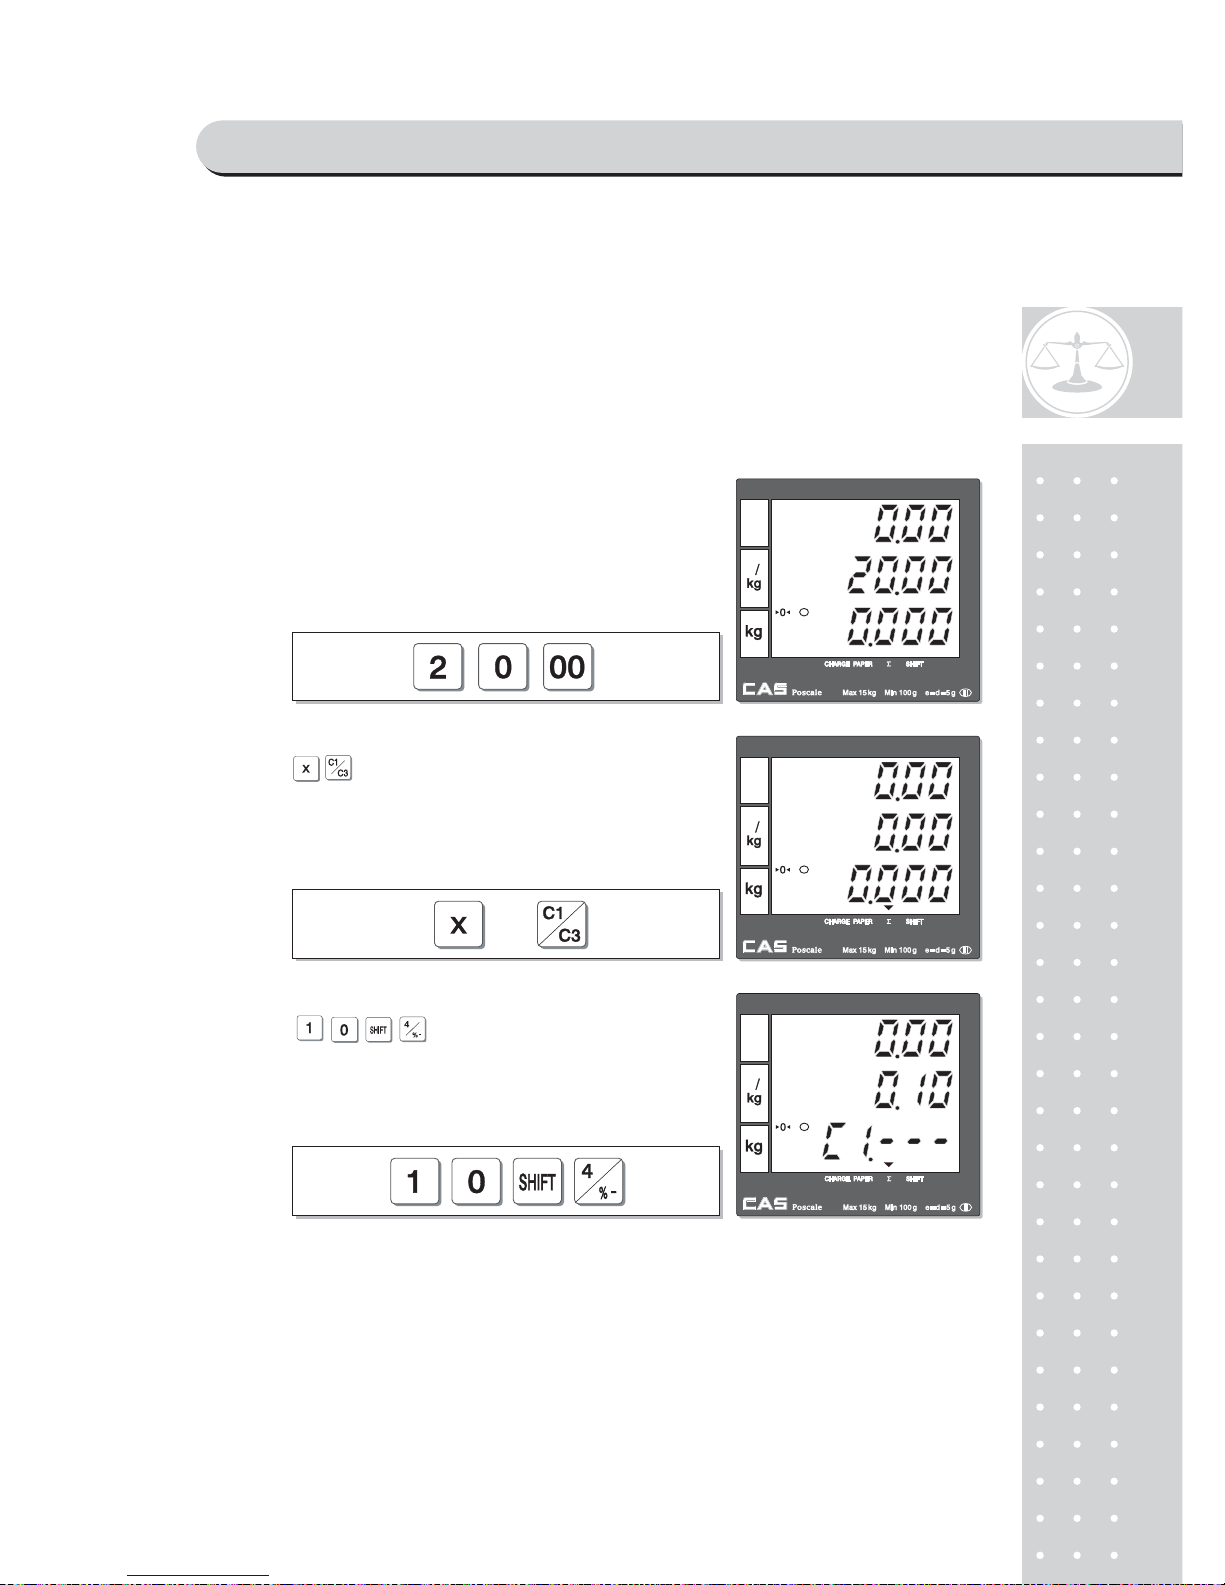
• Instant discount rate: 10%
• Unit price of a commodity: €20
① A customer purchased €20.00 for a commodity.
② Press to make €20.00 valued sales
transaction for clerk 1.
③ Press to provide 10% discount for
current single transaction.
SAELS MODE
Page 37
3
8
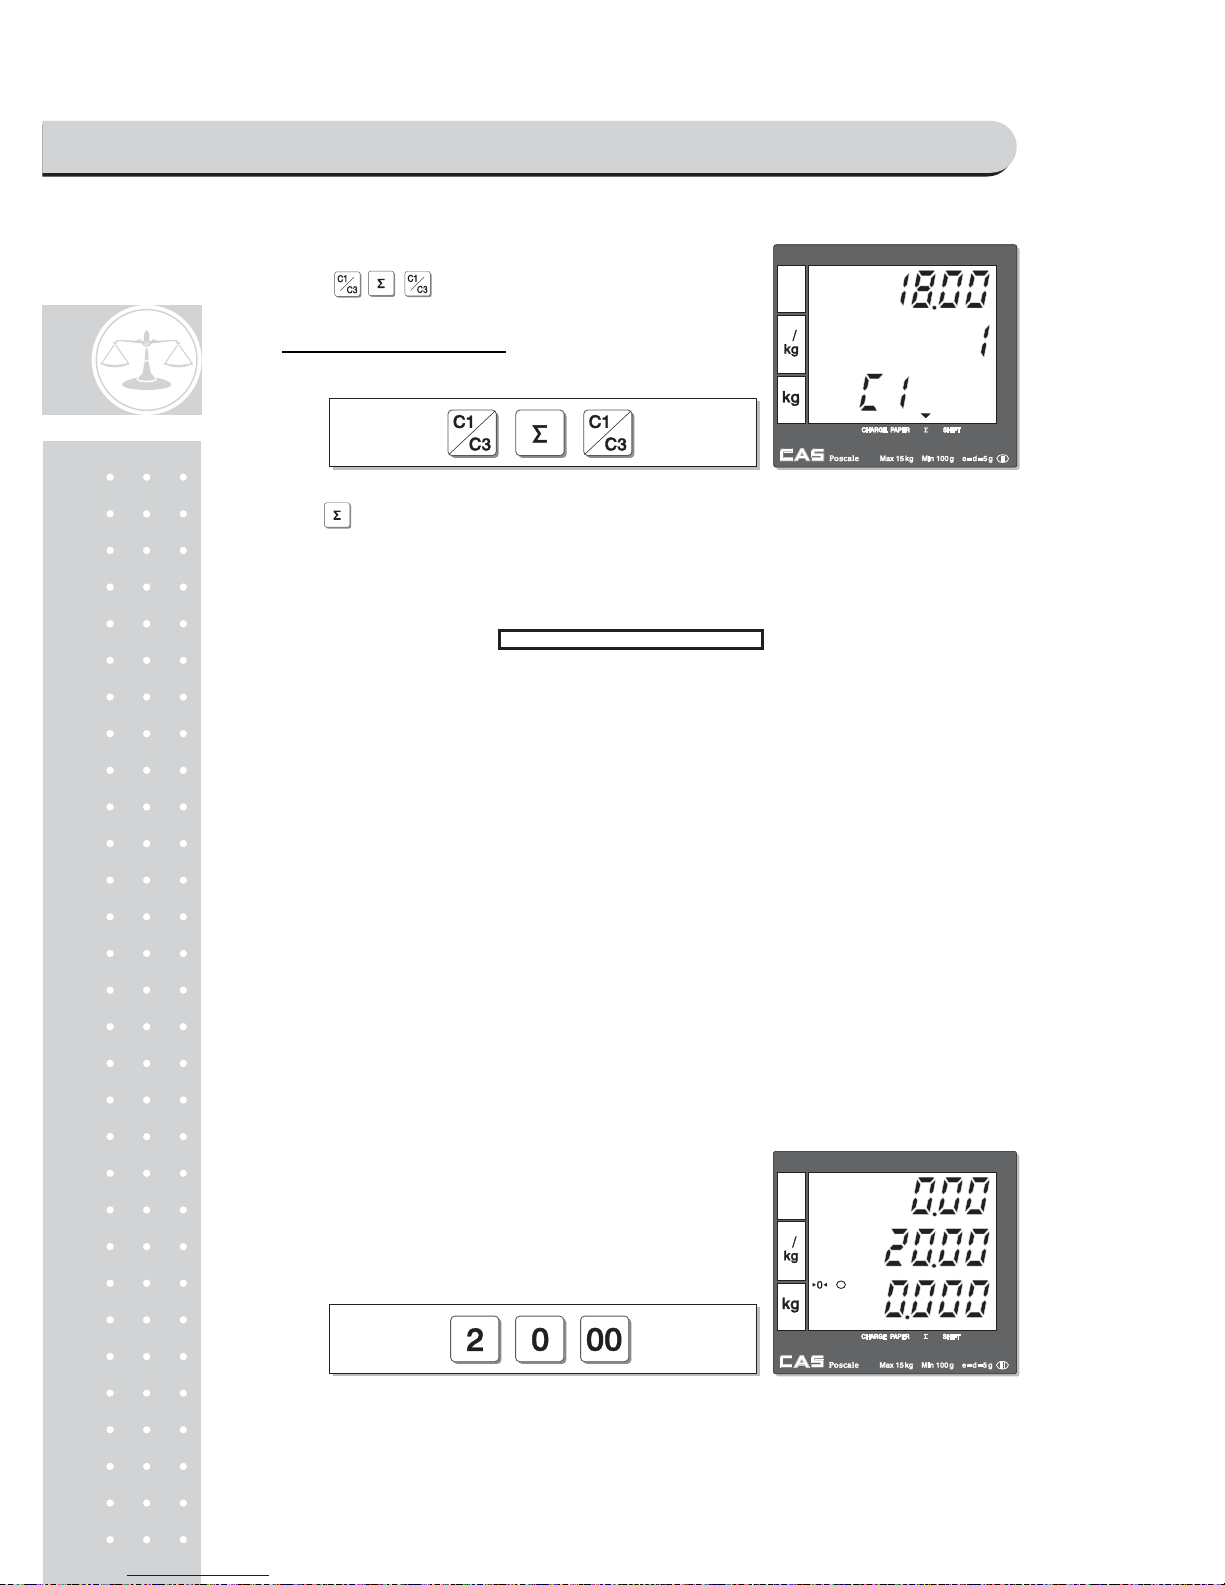
■ Pressing is to finalize the discount for a single transaction and print out the receipt.
■ Programmed discount
Assumption :
• Programmed discount rate: 5%
(Refer to "program mode"¼"SET1"¼"Pr-" for discount rate setting)
• Unit price of a commodity: €20
Press④ to have the amount of subtotal
after instant 10% of discount for a single transaction.
CLERK"1"MODE ※ :
User doesn't need to select a "Clerk", .
A customer purchased €20.00 for a commodity.①
SAELS MODE
Page 38
39
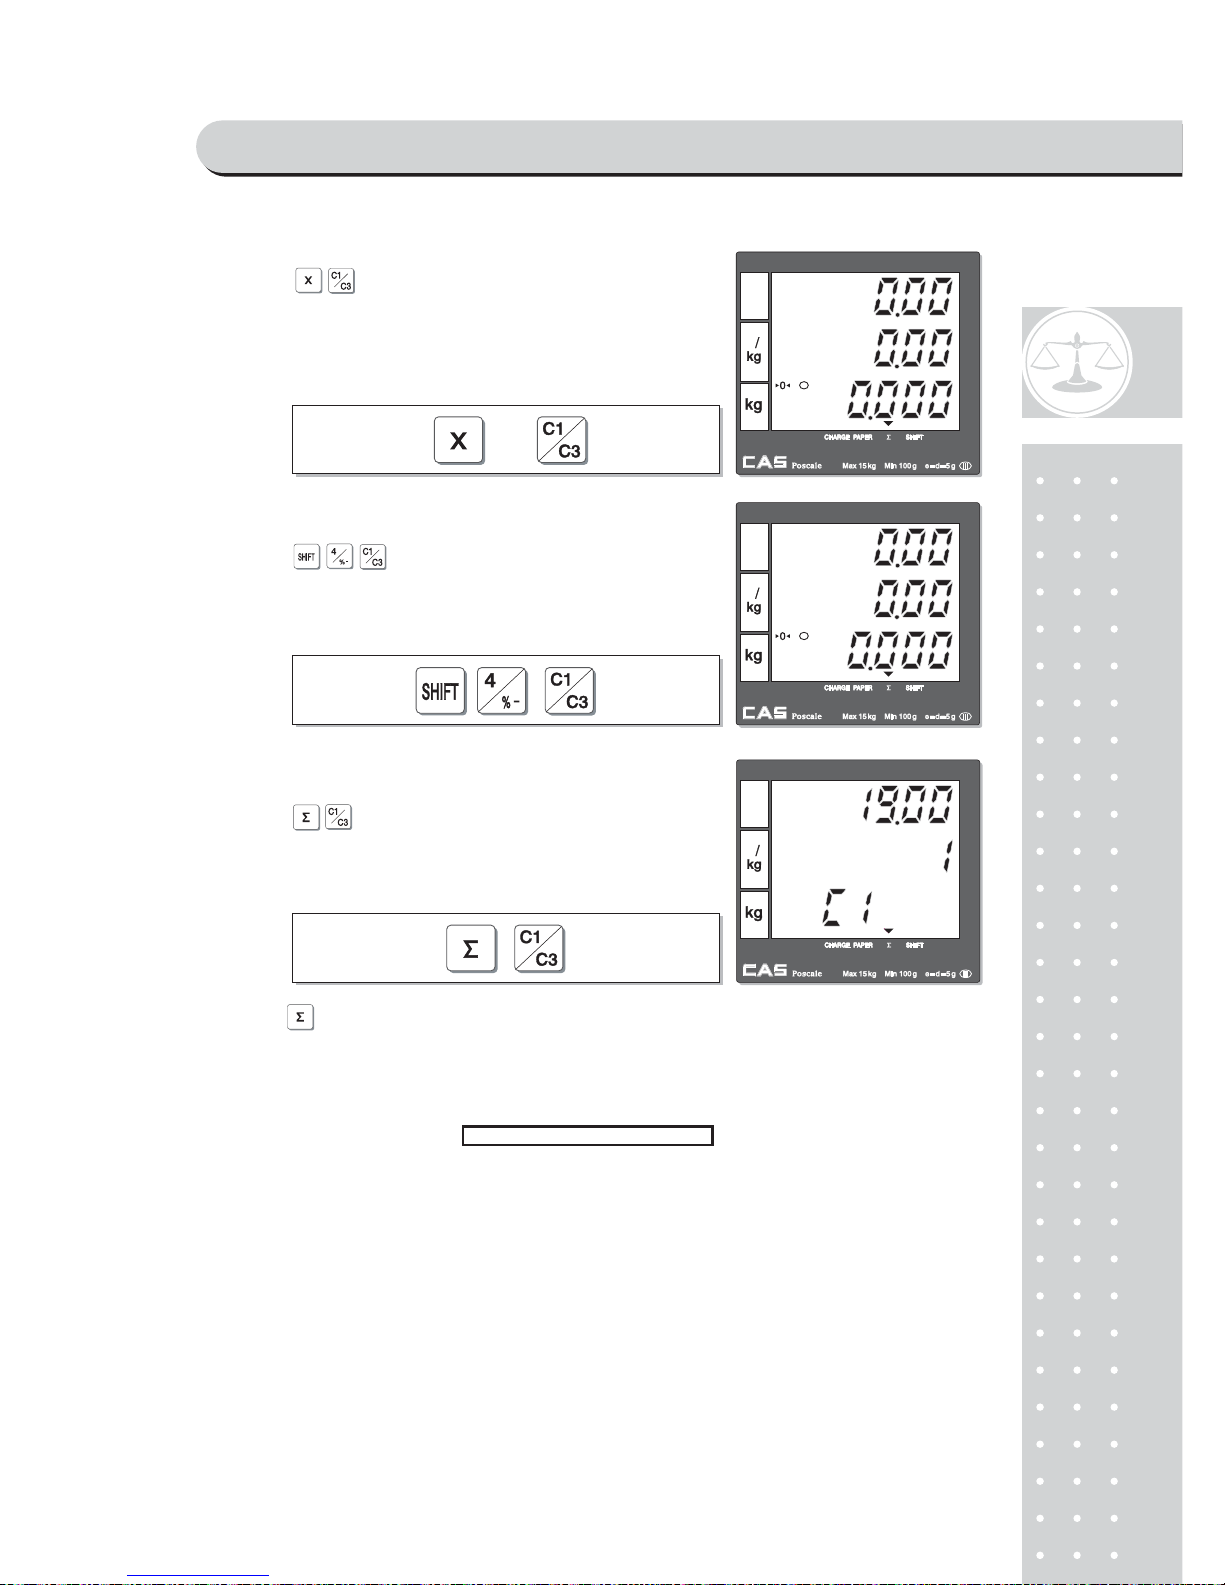
■ Pressing is to finalize the discount for a single transaction and print out the receipt.
Press to make €20.00 sales transaction②
for clerk 1.
Press to provide 5% programmed③
discount for current single transaction.
Press to have the amount of subtotal④
after instant 5% of discount for a single
transaction.
SAELS MODE
Page 39
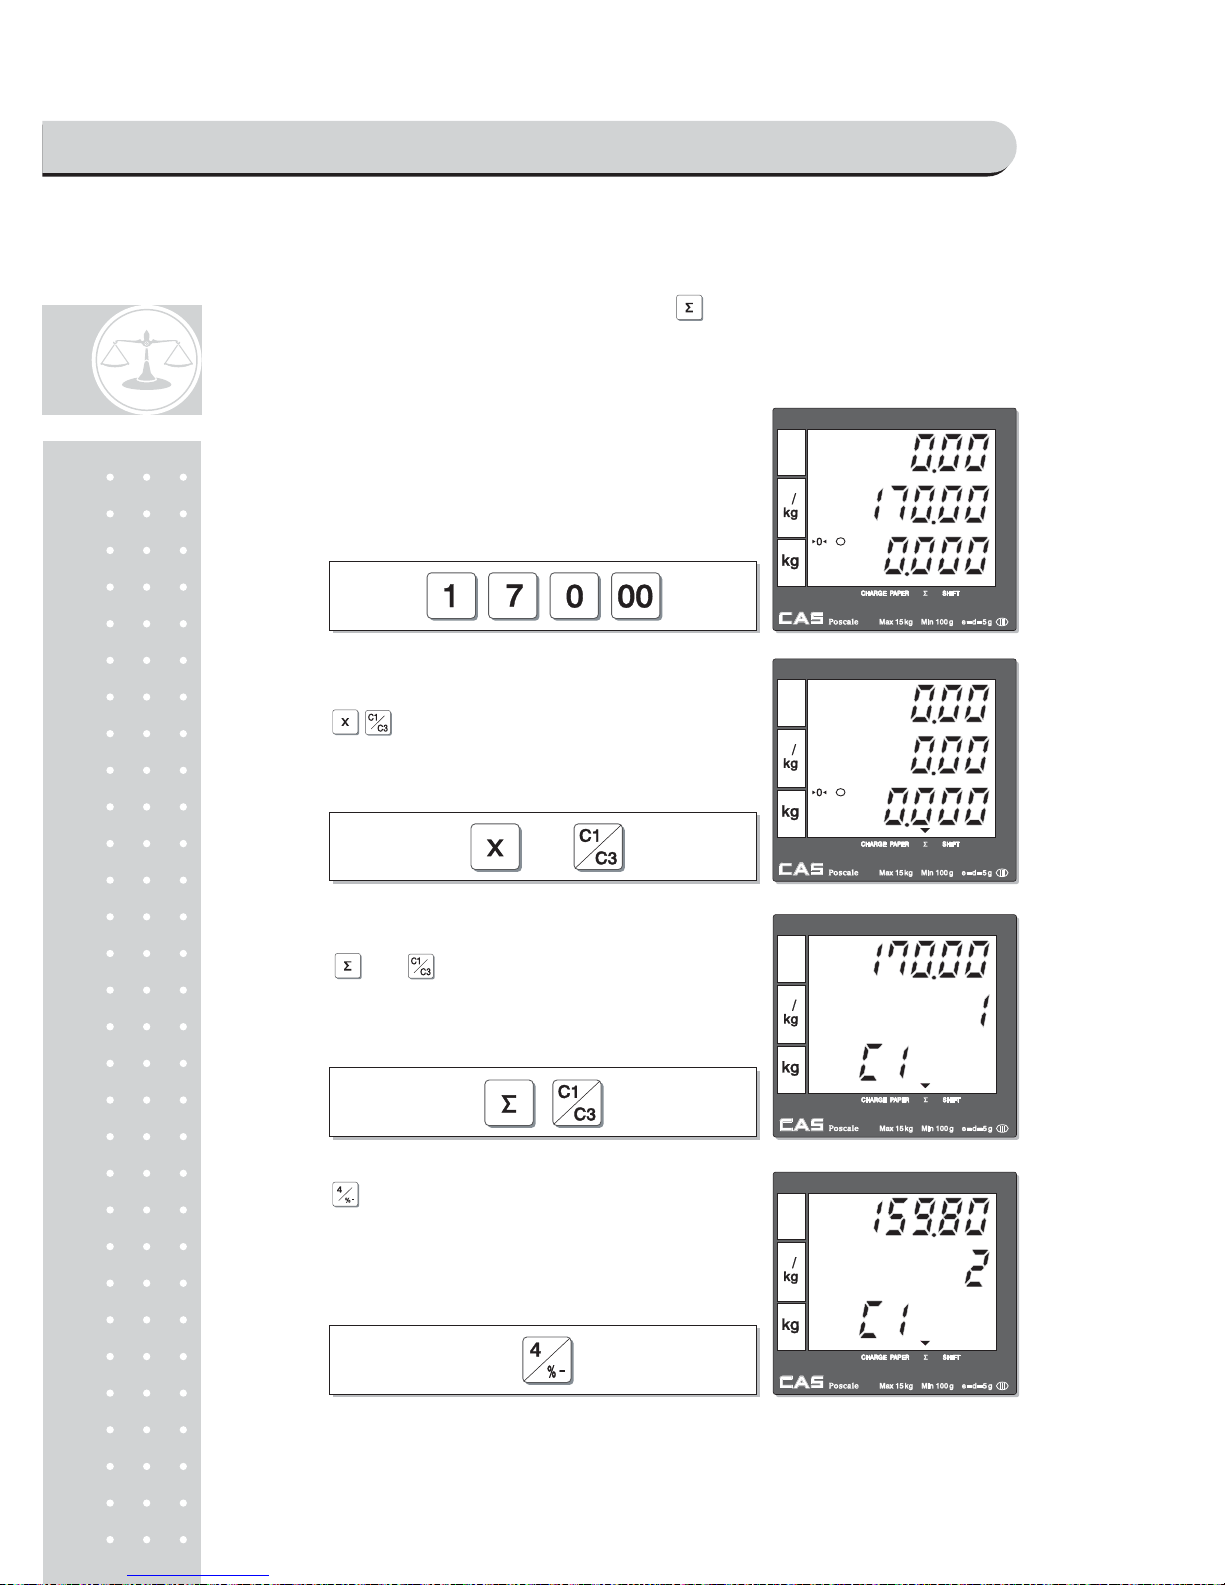
40
b. Discount for subtotal
Once the user gets the total amount by pressing he/she may apply
some percentage of discount to the subtotal. Let's assume we apply a 6%
discount (refer to II. program mode, SET 1) on a purchase of €170
valued commodity, for example.
A customer pays €170.00 for a commodity.①
Press to make €170.00 sales transaction②
for clerk 1.
③Press and to have the amount of
subtotal which clerk 1 made.
④ Press to show the subtotal after programmed
6% discount.
You may apply "Instant discount" function to※
subtotal amount.
SAELS MODE
Page 40
41
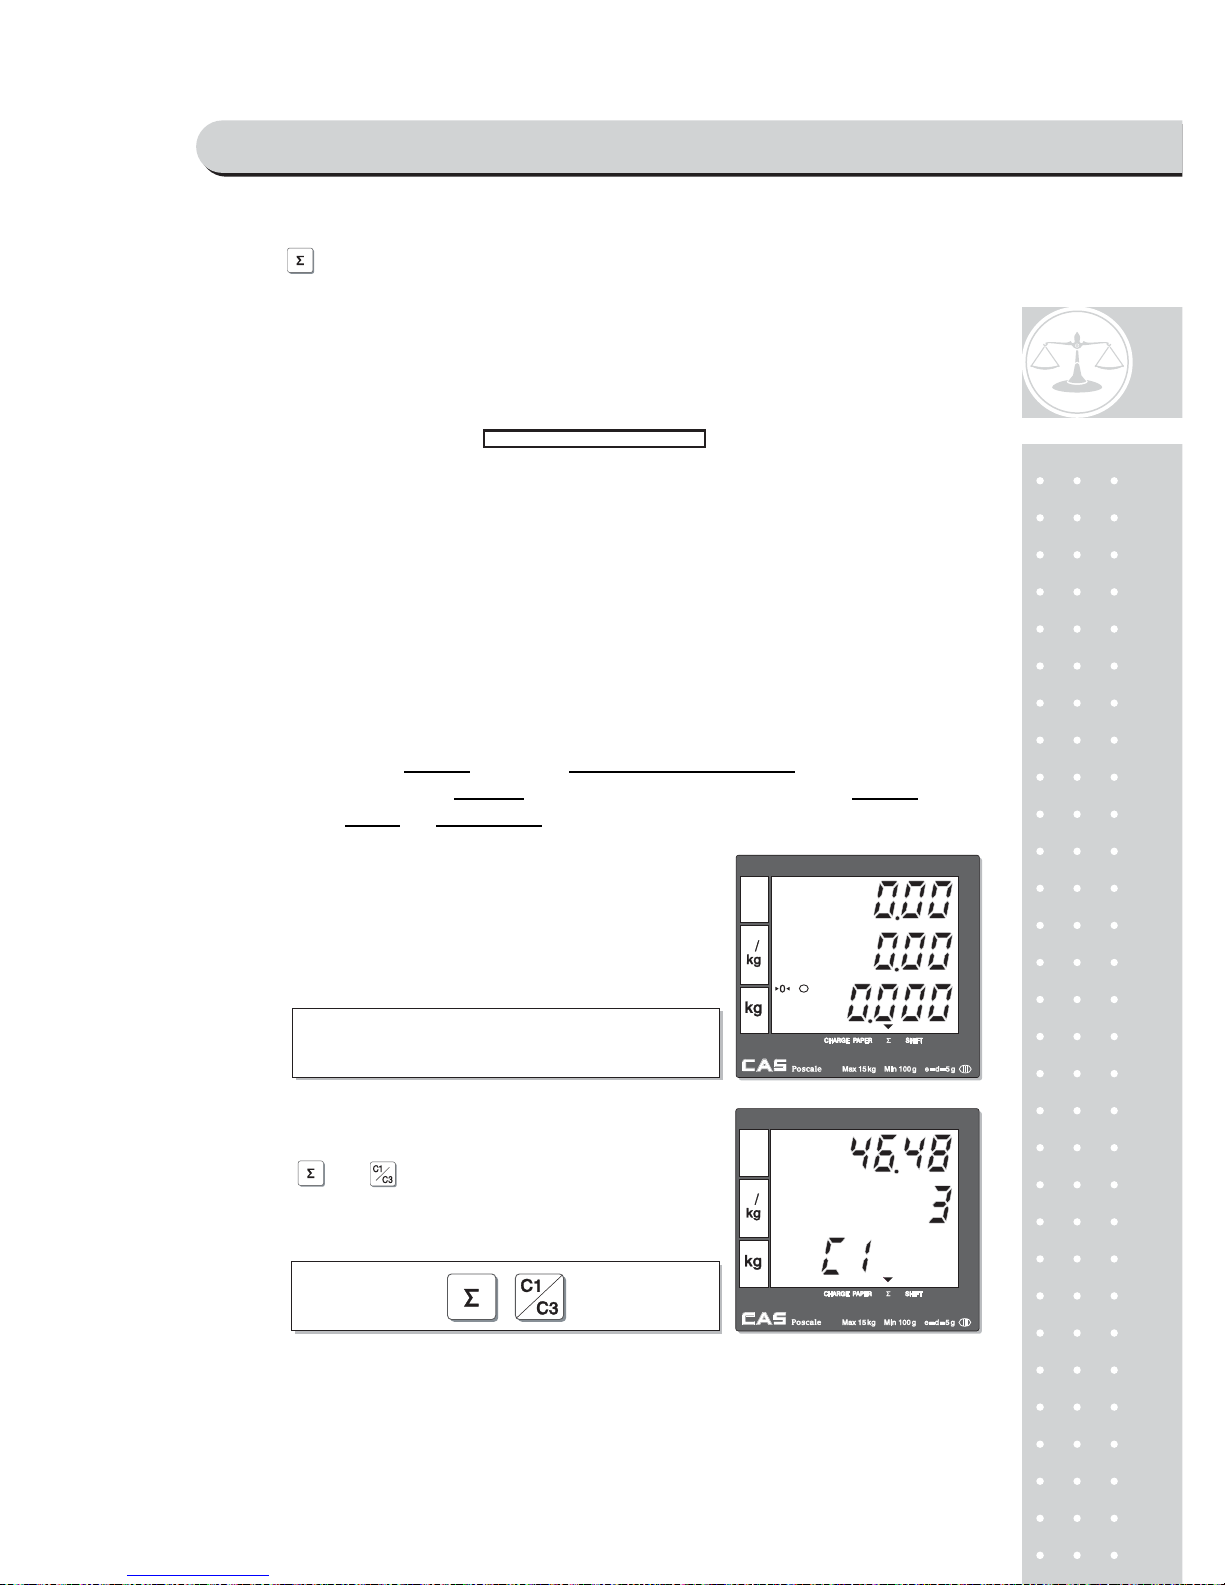
■ Pressing will to finalize the discount transaction and print out the receipt.
c. Payment
■ Payment function works only in the subtotal mode.
Assumption : After clerk 1 has made three sales transactions the subtotal
amount of € 46.48
comes up. Customer wants to pay € 20 in
credit
and rest in cash.
① ▼indicates that current display is in subtotal
mode as above assumption.
② Press and to have the amount of
subtotal for clerk 1 as an example.
SAELS MODE
Page 41
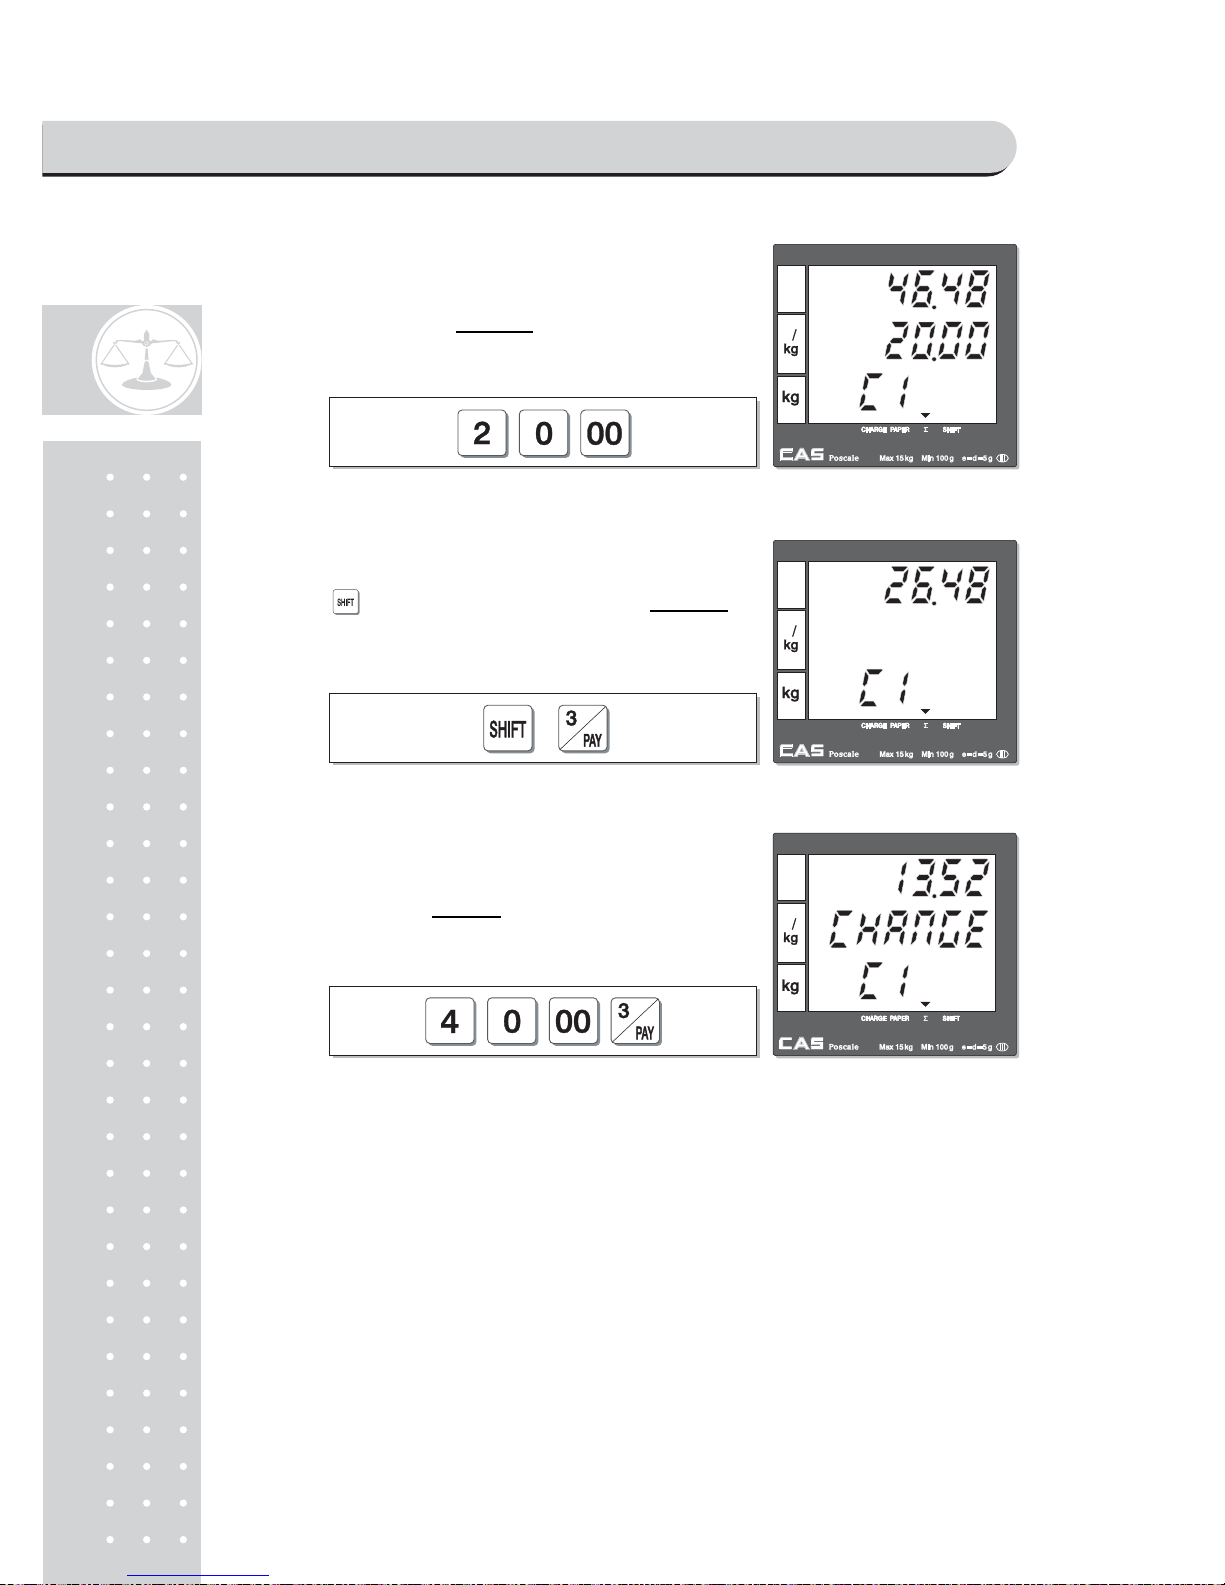
42
③ Press appropriate numeric keys to input the
amount of payment in credit.
④ Press and "pay" key to make payment in cr edit.
⑤ Press approproate numeric keys to make rest of
payment, €40.00 in cash.
SAELS MODE
Page 42
43
x If user is using the scale with cash drawer connected the cash drawer is also
automatically opened as the pulse length of cash drawer set when printing the
receipt. Default
for pulse length of cash drawer is 50 m/s (50/1,000 second).
Please refer to page 76 for further detail of "pulse length setting"
⑥Then, the scale automatically prints out receipt.
SAELS MODE
Page 43
4
4
d. Duplicate receipt
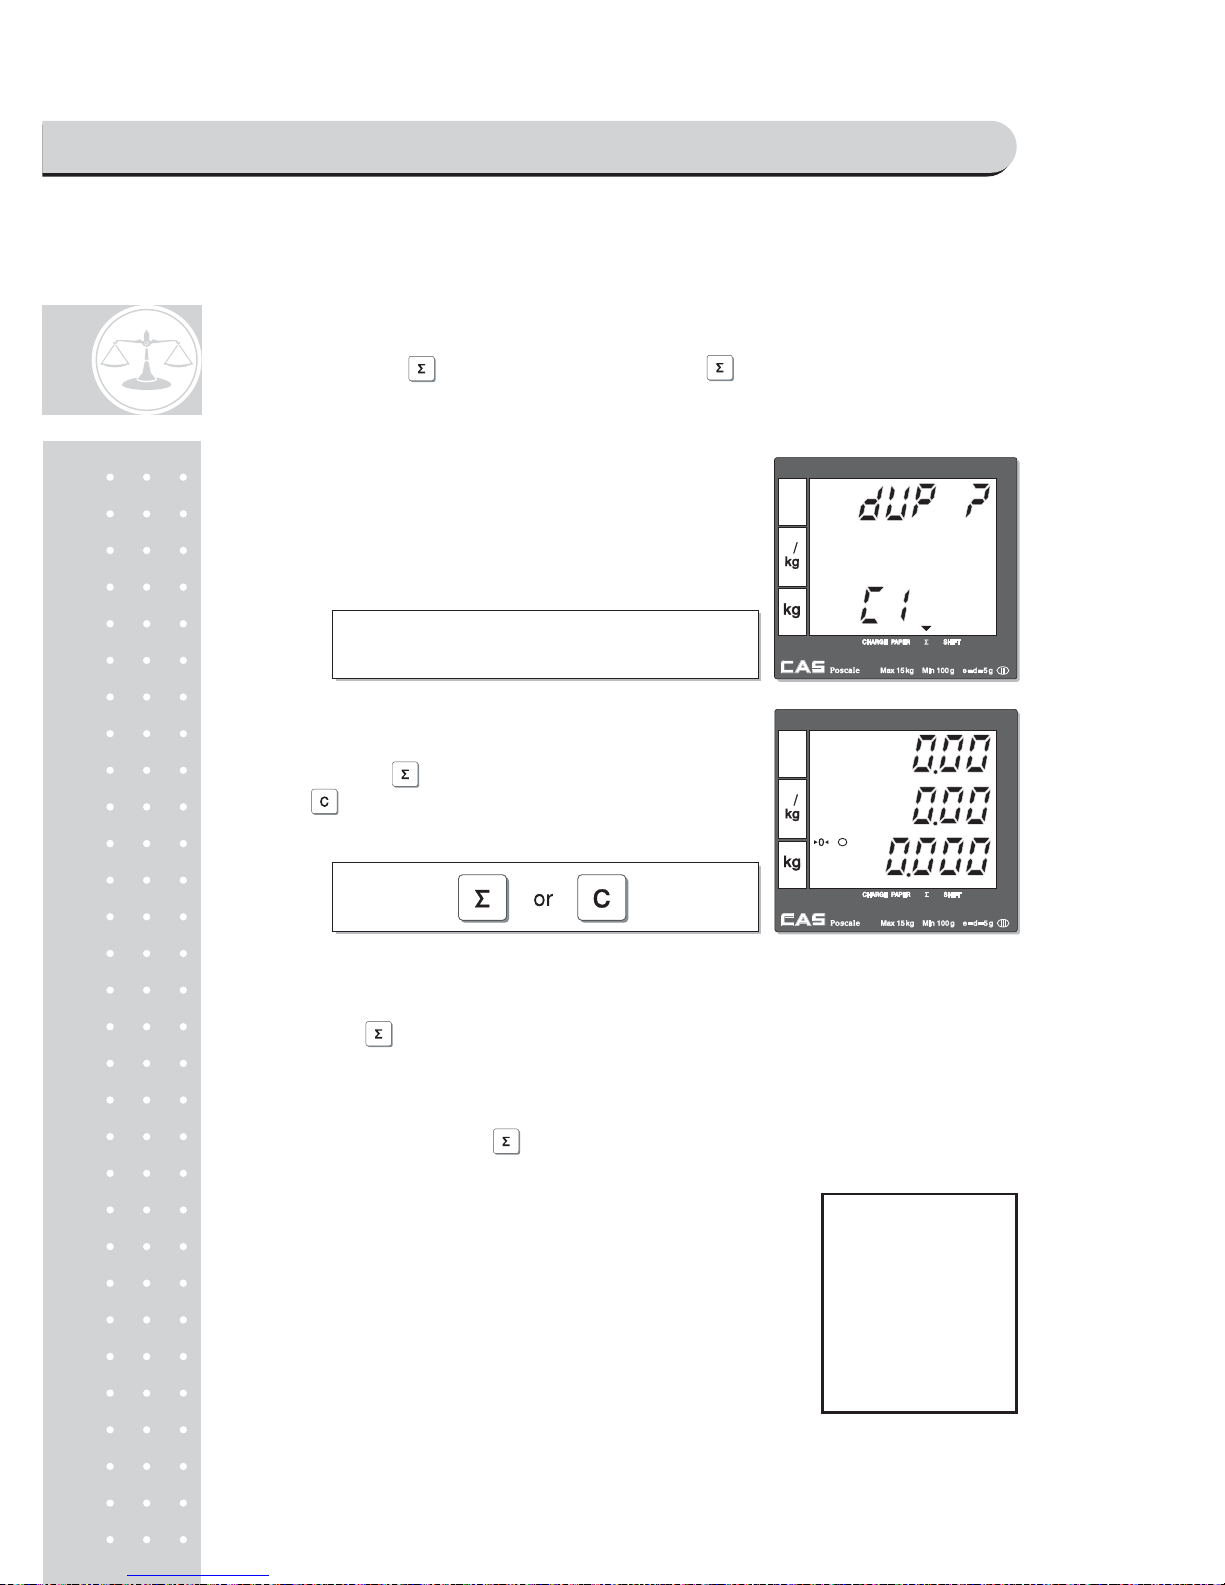
■ If user sets duplicate receipt ("dbL") as "YES" in the OPTION setting (refer
to page on 83) of program mode the scale asks "DUP?" whenever printing
receipt by using or PAY key. If user presses it prints the additional
copy of receipt, and if press "C" key it does not print copy of receipt.
he scale asks user "dUP?", when he/she has①
already printed out a receipt for current transaction.
② Press either to print an additional copy of receipt
or not to print the copy.
■ Printing receipt works only in the subtotal mode.
■ Usually, user can automatically have receipt
by using .
■ However, if "Obligatory Pay" function setting
(refer to page on 87) is already set in the OPTION
setting the scale does not automatically print out
the receipt by pressing . In this case user must
input the amount of payment more than current
total amount and then he/she can make a payment
in cash or credit.
SAELS MODE
Page 44

45
Chapter 6.
SALES TRANSACTIONS SIMULATION
SAELS MODE
Page 45
46
Chapter 6. Sales Transactions Simulation
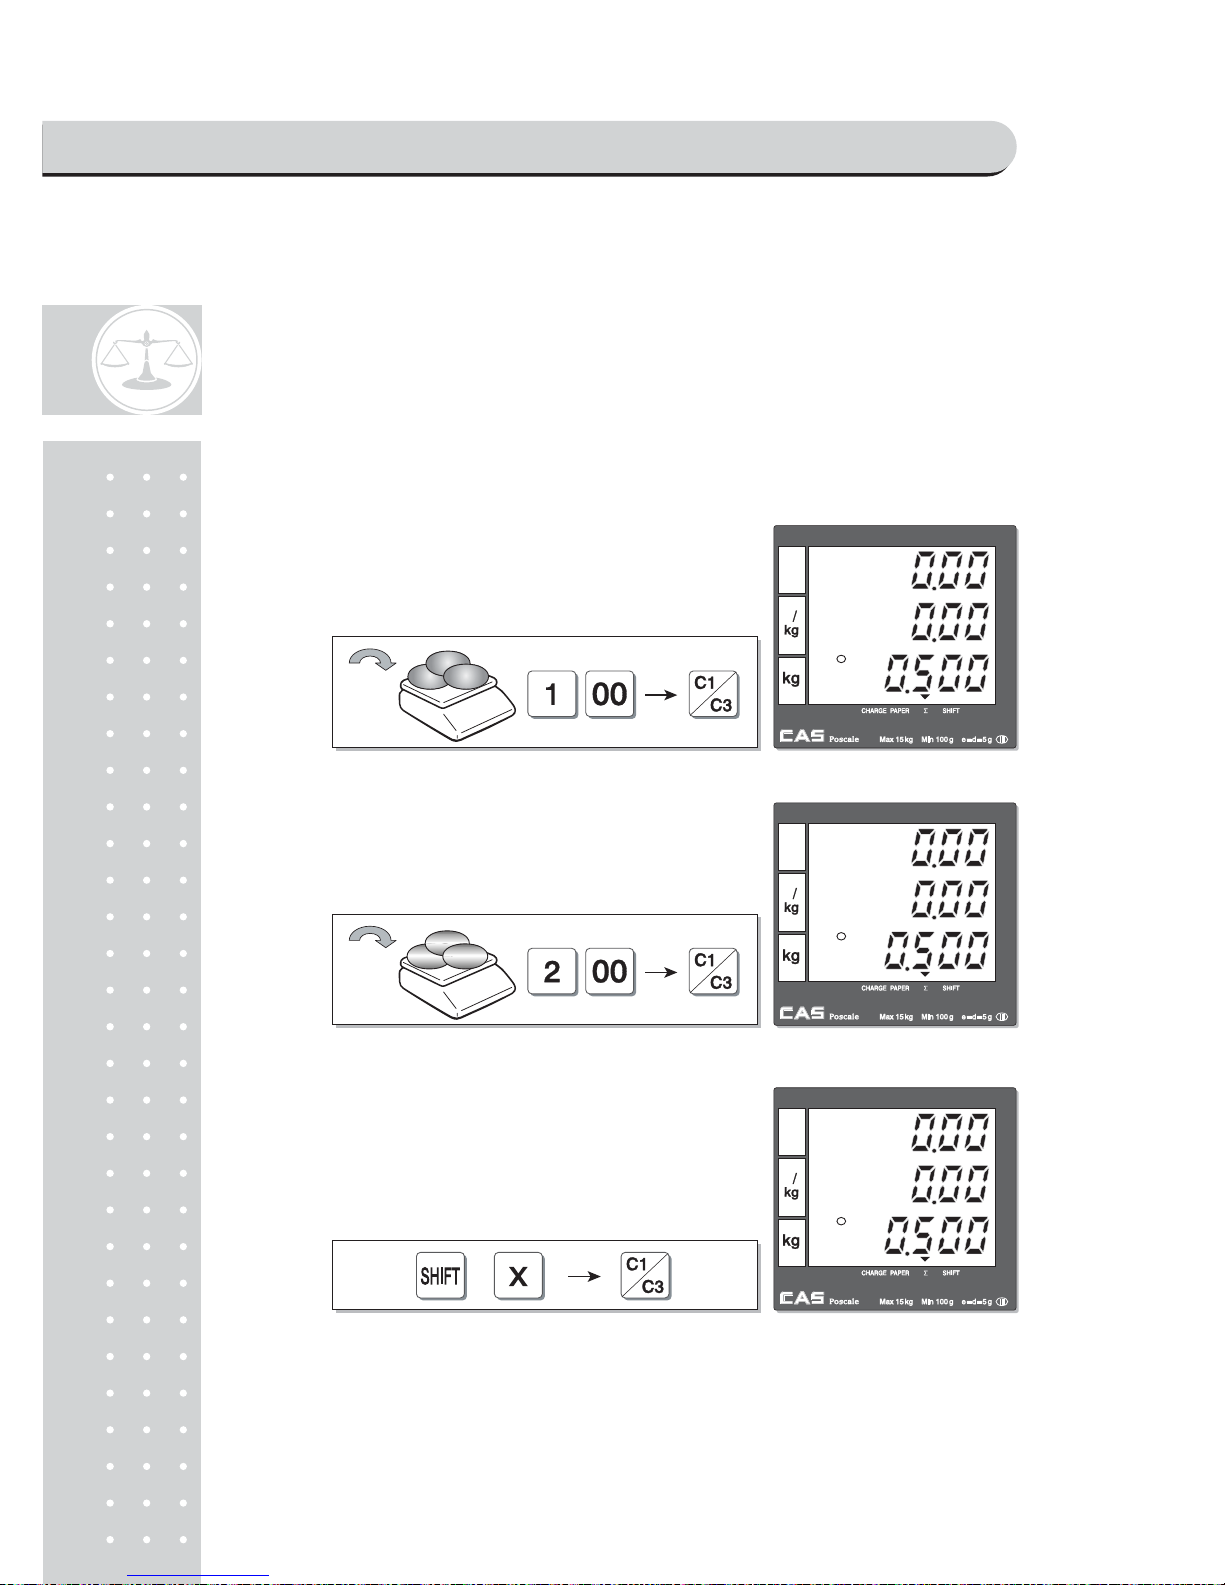
Assumption :
• Clerk sales mode: "0"- All clerks sales mode (Clerk mode on page 92)
• Programmed discount: 5% (Discount percentage mode on page 69)
• Obligatory payment function: "0"-disabled (Obligatory payment setting on page 87)
• Duplicate receipt function: "0"-disabled (Duplicate receipt setting on page 83)
• Weight of commodity: 0.500 kg, and 1.000 kg
C① ommodity (Kiwi) with free price, €1.00,
Weight=0.500 kg, clerk 1 sales.
②Commodity (Melon) with free price, €2.00,
Weight=0.500 kg, clerk 1 sales.
③Void function
SAELS MODE
Page 46
4
7
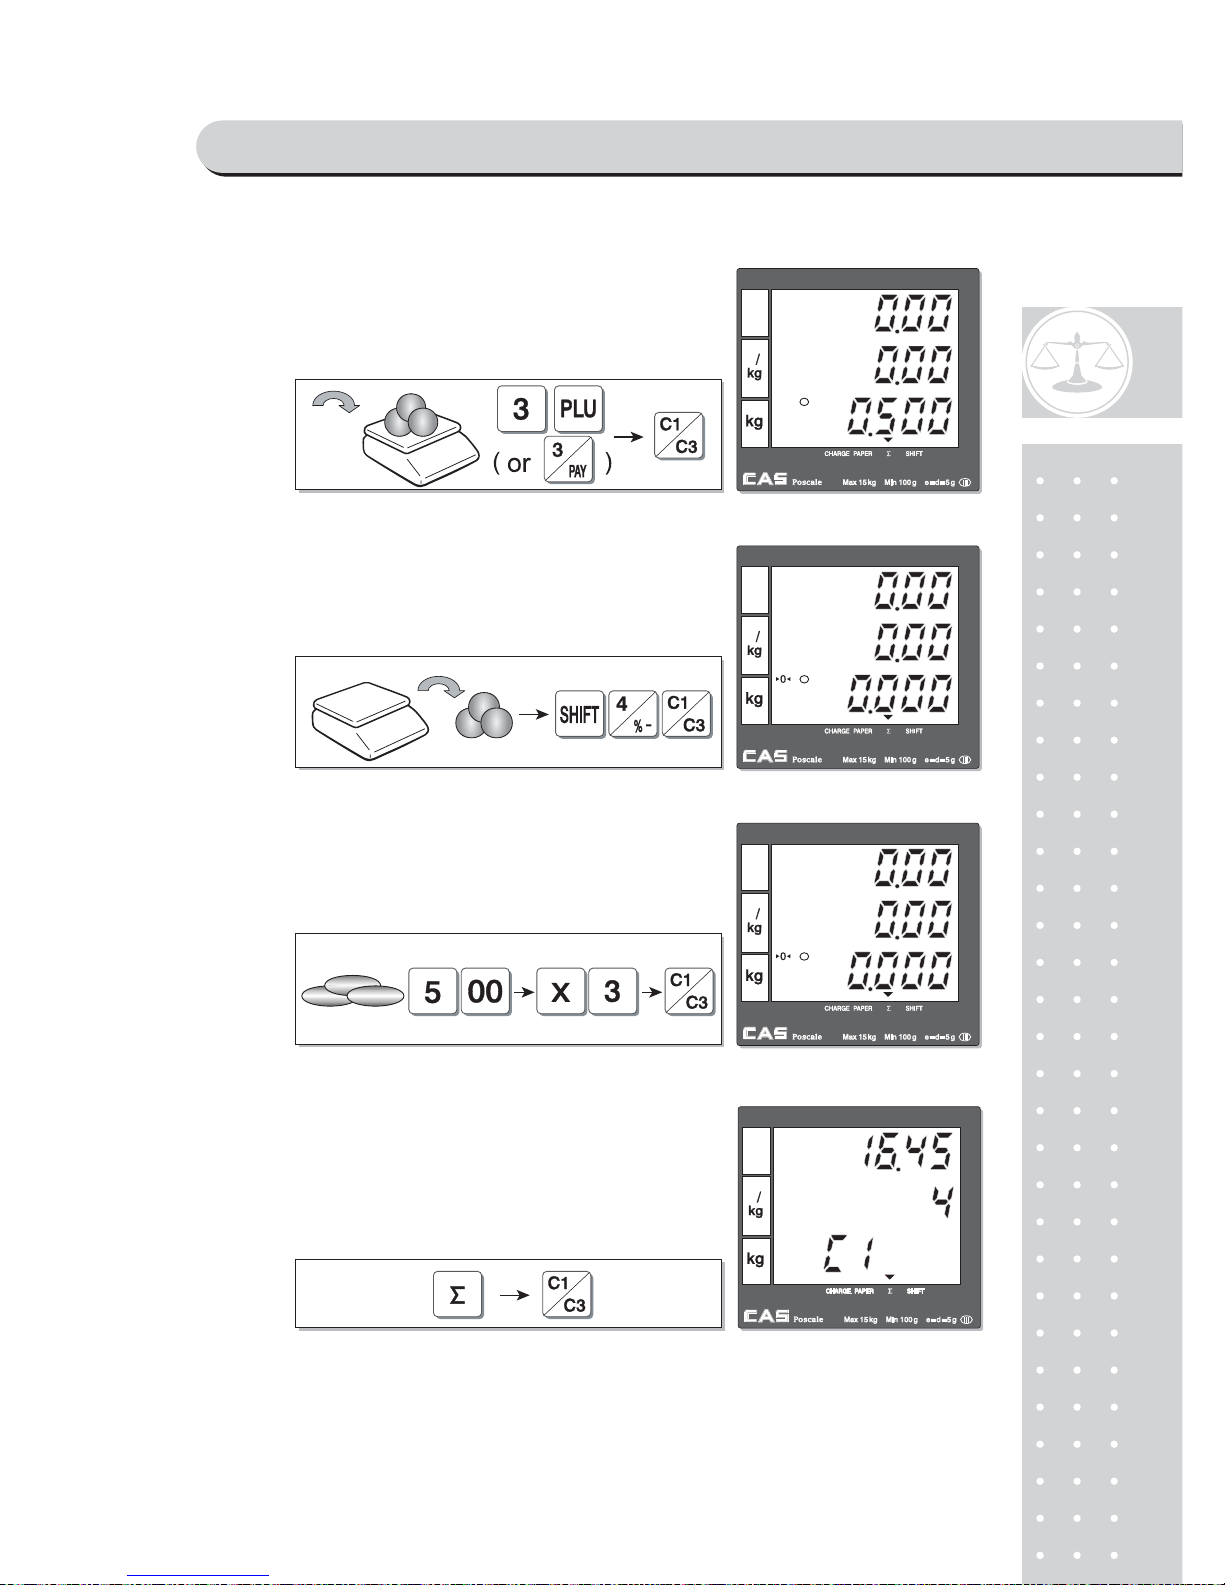
④PLU 3 commodity (Tomato: €1.99/kg),
Weight=0.500 kg, clerk 1 sales.
⑤Programmed discount (5%) for PLU 3
commodity (Tomato), Weight=0.500kg, clerk 1 sales.
⑥€5.00 of Non-weighed Free Price commodity
(Garlic bread) x3, clerk 1 sales.
⑦Subtotal, for example, €16.45. Total 4 transactions,
and clerk 1 sales activities are shown on the display.
SAELS MODE
Page 47
4
8
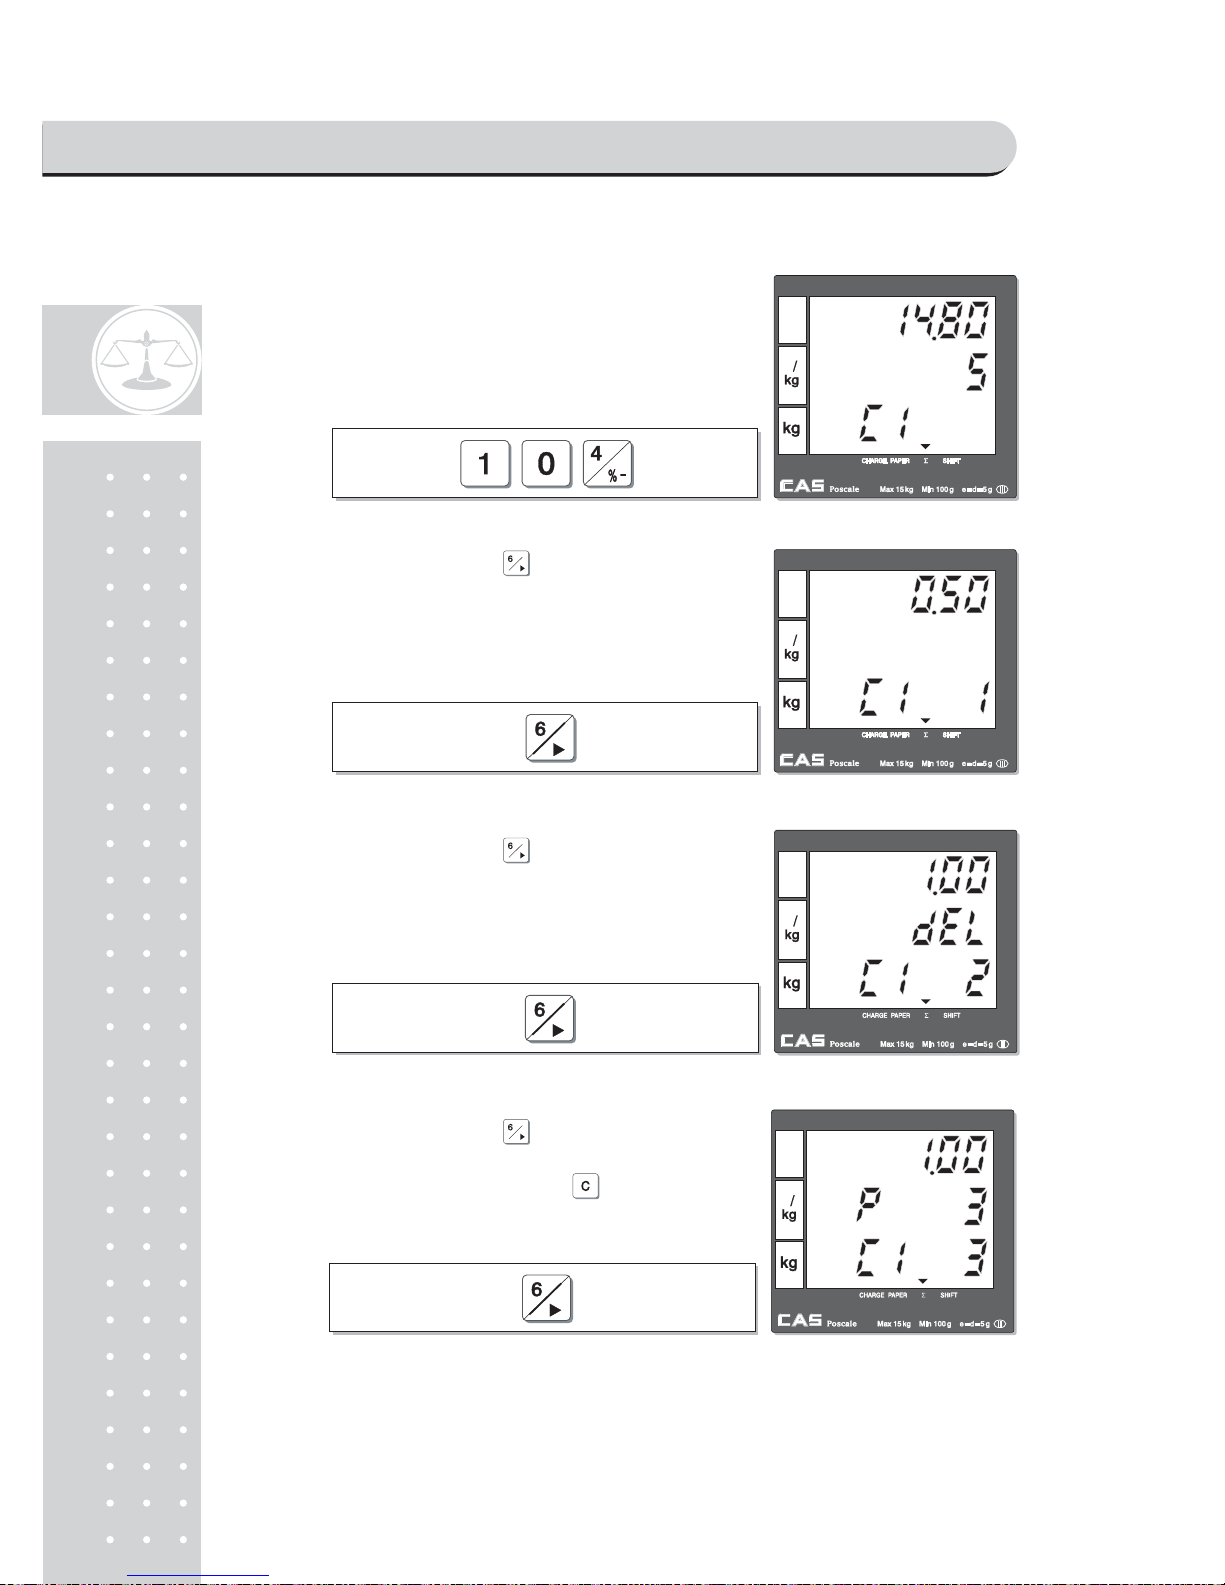
⑧Discount 10% for subtotal, €16.45.
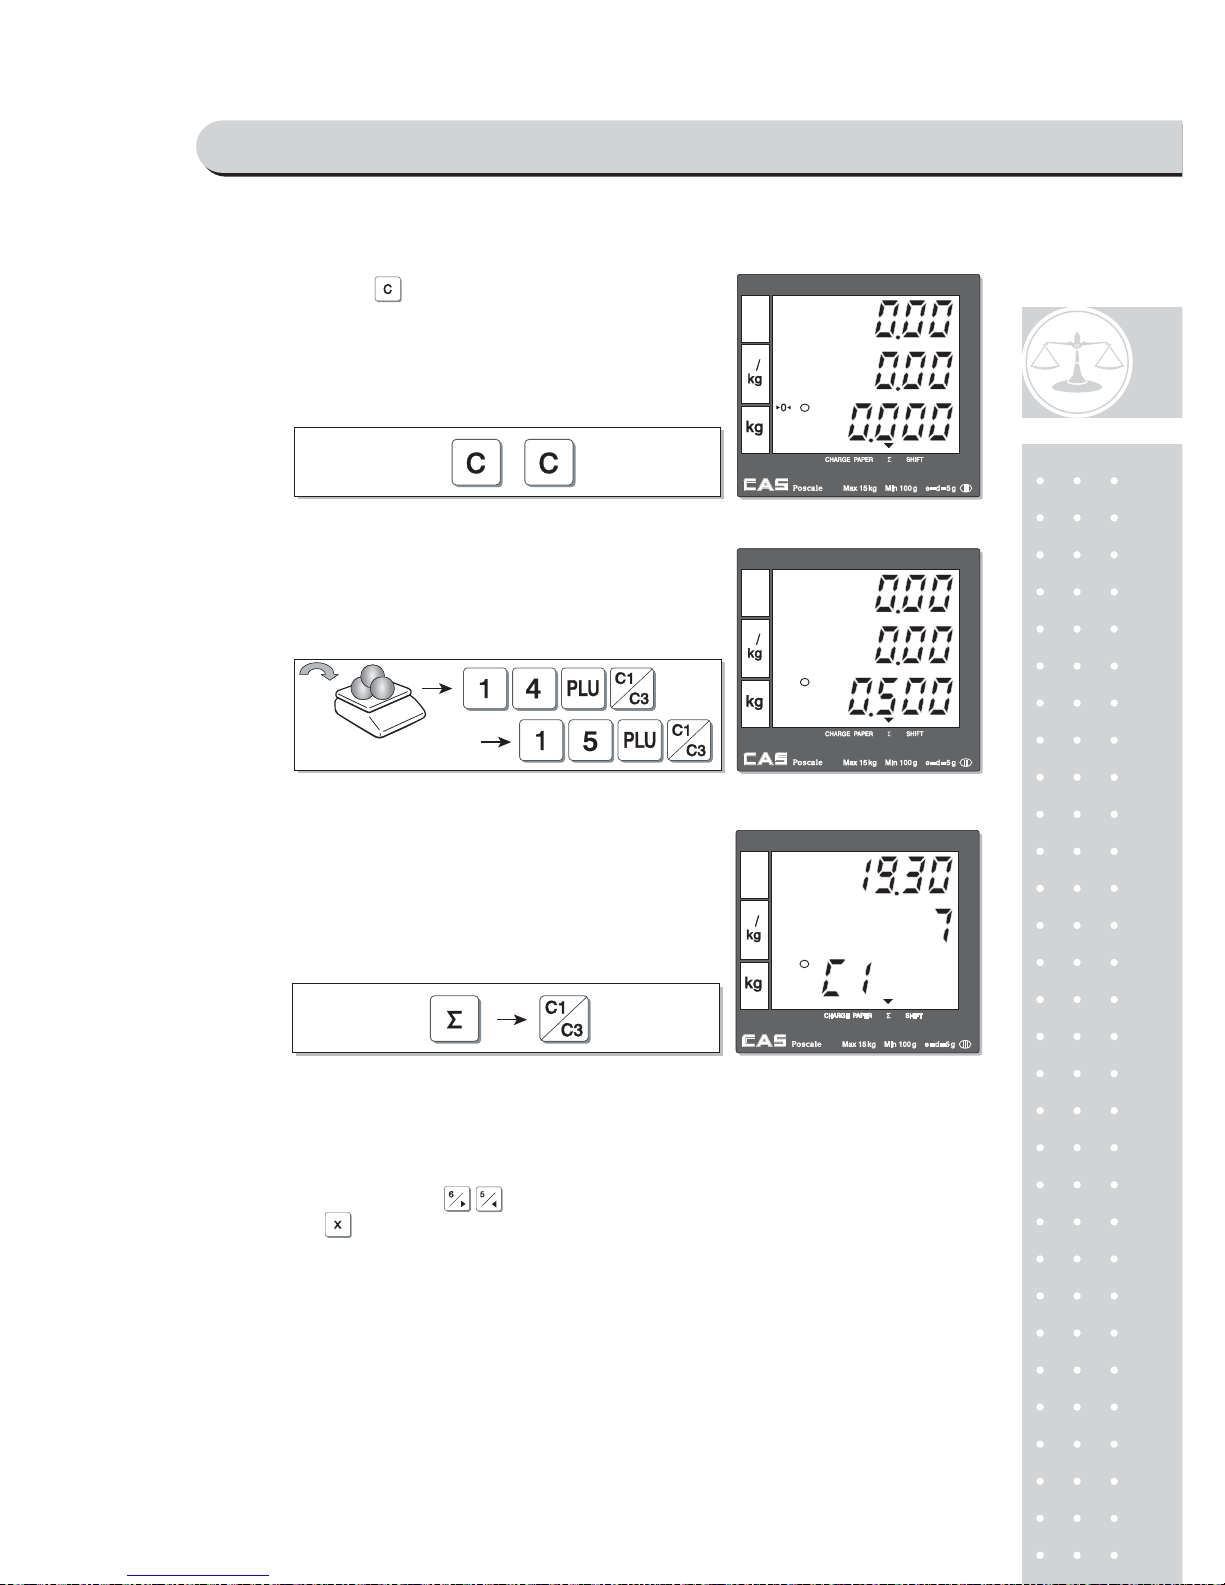
⑨To review sales list press .
⑩To review sales list press . "dEL" means
VOID function has deleted the second transaction.
⑪To review sales list press . "p 3" means
that PLU 3 transaction has been completed. If user
wants to exit from sales list press .
SAELS MODE
Page 48
49
Deleting sales transaction in subtotal
■ To delete a specific sales transaction user should go to the sales transaction
on the sales list by using key.
■ Then, press to delete it.
■ If any discount transaction is done for subtotal the sales included in the
subtotal can not be deleted.
■ User can not execute Void function of a sales transaction if any discount for
the subtotal is already made.
If ⑫ user presses to go back to sales mode the
display is shown as right.
⑬Two sales transactions for PLU 14 (€3.99/kg)
and PLU 15 (€4.99/kg) with weight=0.500kg,
clerk 1 sales activities.
⑭Subtotal mode. Subtotal is €19.30, for example.
SAELS MODE
Page 49
50
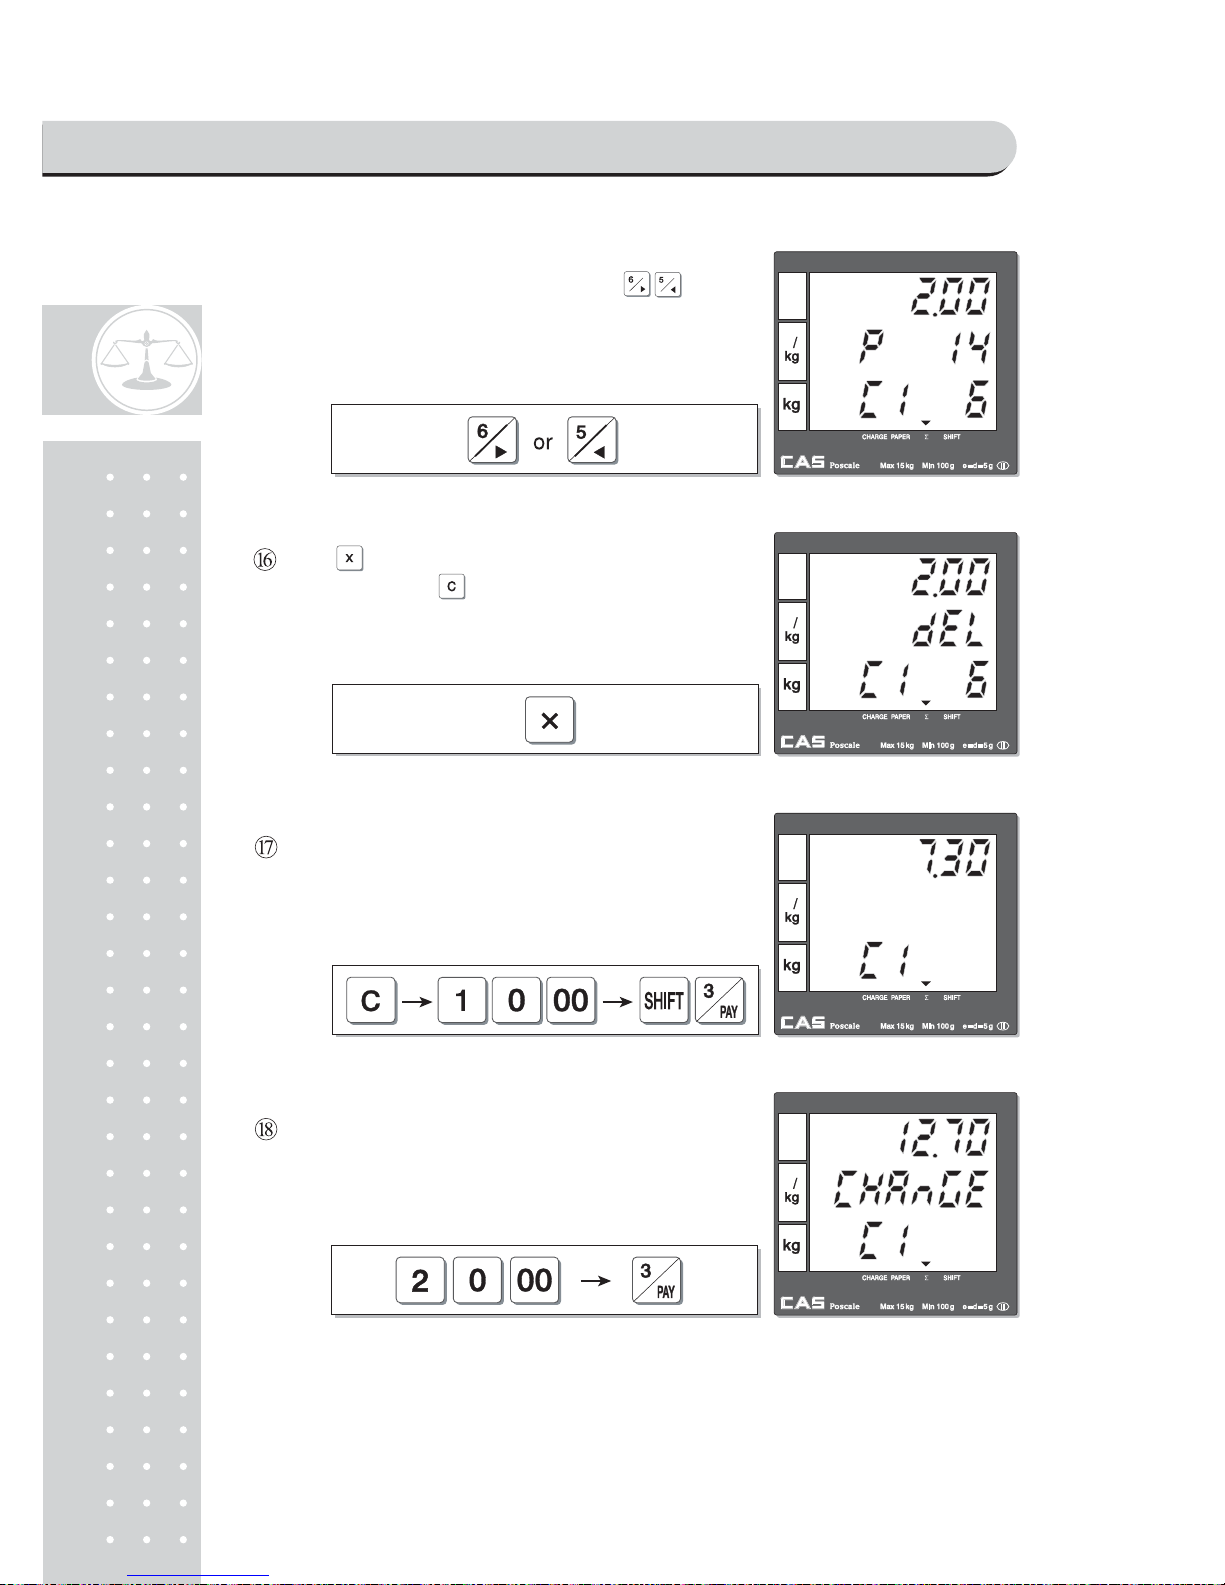
■ The receipt will be automatically printed and the scale is ready to exit to sales
mode.
⑮Go to the 6
th
sales transaction by using
to delete it.
Press to delete it. User may exit from this
mode by pressing .
Payment of €10.00 in credit and rest in cash for
total €17.30 for example.
Input €10.00 of payment in credit.
Input €20.00 to pay for remaining balance in cash.
SAELS MODE
Page 50
51
SAELS MODE
Page 51

52
II. Program Mode
Chapter 7. PLU Programming
a. Validity
Price
Code
Department
Name
b. Tax, Non Weighed, fixed PLU price & barcode printing
c. One touch PLU data Erasing
Chapter 8. Report
a. PLU data list
b.PLU report
c. Clerk report
d.Department report
e. Tax report and hourly sales report
f. Closing report
Chapter 9. SET 1 (Discount, Barcode formatting & HW setting)
a. Baud rate (bps)
b.Auto power-off
c. Discount rate(%)
d.Barcode format setting for a single transactions
e. Barcode format setting for total
f. Setting pulse to open cash drawer
g.Printing darkness setting
h.Currency symbol or name
Chapter 10. SET 2 (Date, Time & Default setting)
a. Date & Time
b. One touch PLU data erasing & default setting
PROGRAM MODE
Page 52

53
Chapter 11. OPTIONS (Receipt Formatting)
a. Duplicate receipt
b. Image (graphic logo)
c. Printing barcode for a single transaction
d. Printing barcode for total transaction
e. Obligatory payment
f. Discount
g. Printing PLU code
h. Printing all reports
i. Printing Tax
j. Use back light
k. saving PLU
Chapter 12. Clerk
a. Clerk mode
b. Clerk name input : 1~4
Chapter 13. Logo
a. Header & Footer setting
Chapter 14. Tax rate group
Chapter 15. Test
ADC.
SPAN
Display
Keyboard
RAM
Printer
Battery voltage
Chapter 14. Tax rate group
Chapter 15. Test
ADC.※
SPAN※
Display※
Keyboard※
RAM※
Printer※
Battery voltage※
PROGRAM MODE
Page 53
5
4
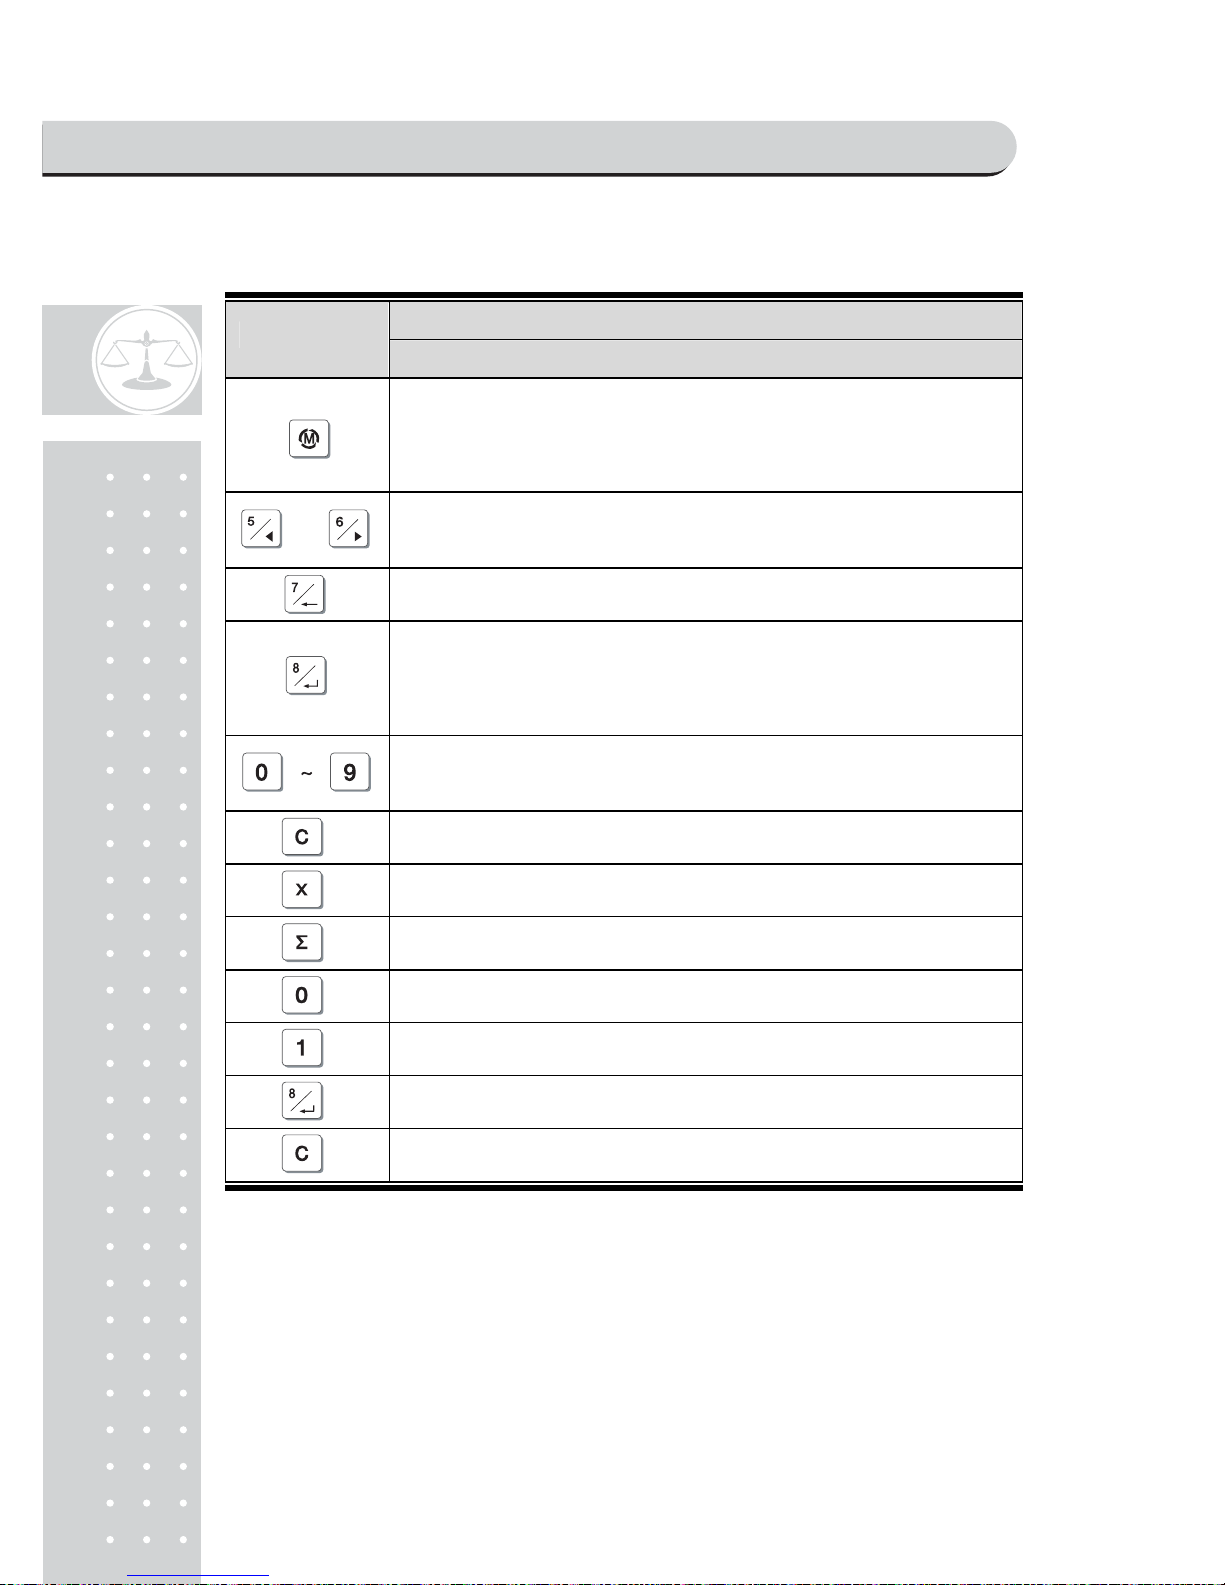
Table 4 : Most commonly used keys in program mode
FUNCTIONS
KEYS
PROGRAM MODE
To get into program mode
User can not get into program mode when ∑ (▼) is on,
that is, previous transaction(s) is not completed.
To choose menu
To move to previous or next character
To go to the higher level of menu
To go to the lower level of menu
To save number
To get into edit mode
To input number
To input number from an ASCII code
To clear all text
To delete characters like backspace key
To input and save character in accordance to ASCII code
To disable
To enable
To save
To clear
PROGRAM MODE
Page 54

55
Chapter 7.
PLU PROGRAMMING
PROGRAM MODE
Page 55
56
Chapter 7. PLU Programming
This chapter explains how to input all PLU-related data into the scale. User can
store such information as price, code, department, name, tax rate group, weighed
or non-weighed, fixed or not-fixed unit price, barcode printing etc. Lets look at
how to input price information on the scale.
* PLU MEMORY CAPACITY : 1,799 Indirect PLUs
8 Direct PLUs
2 Special PLUs
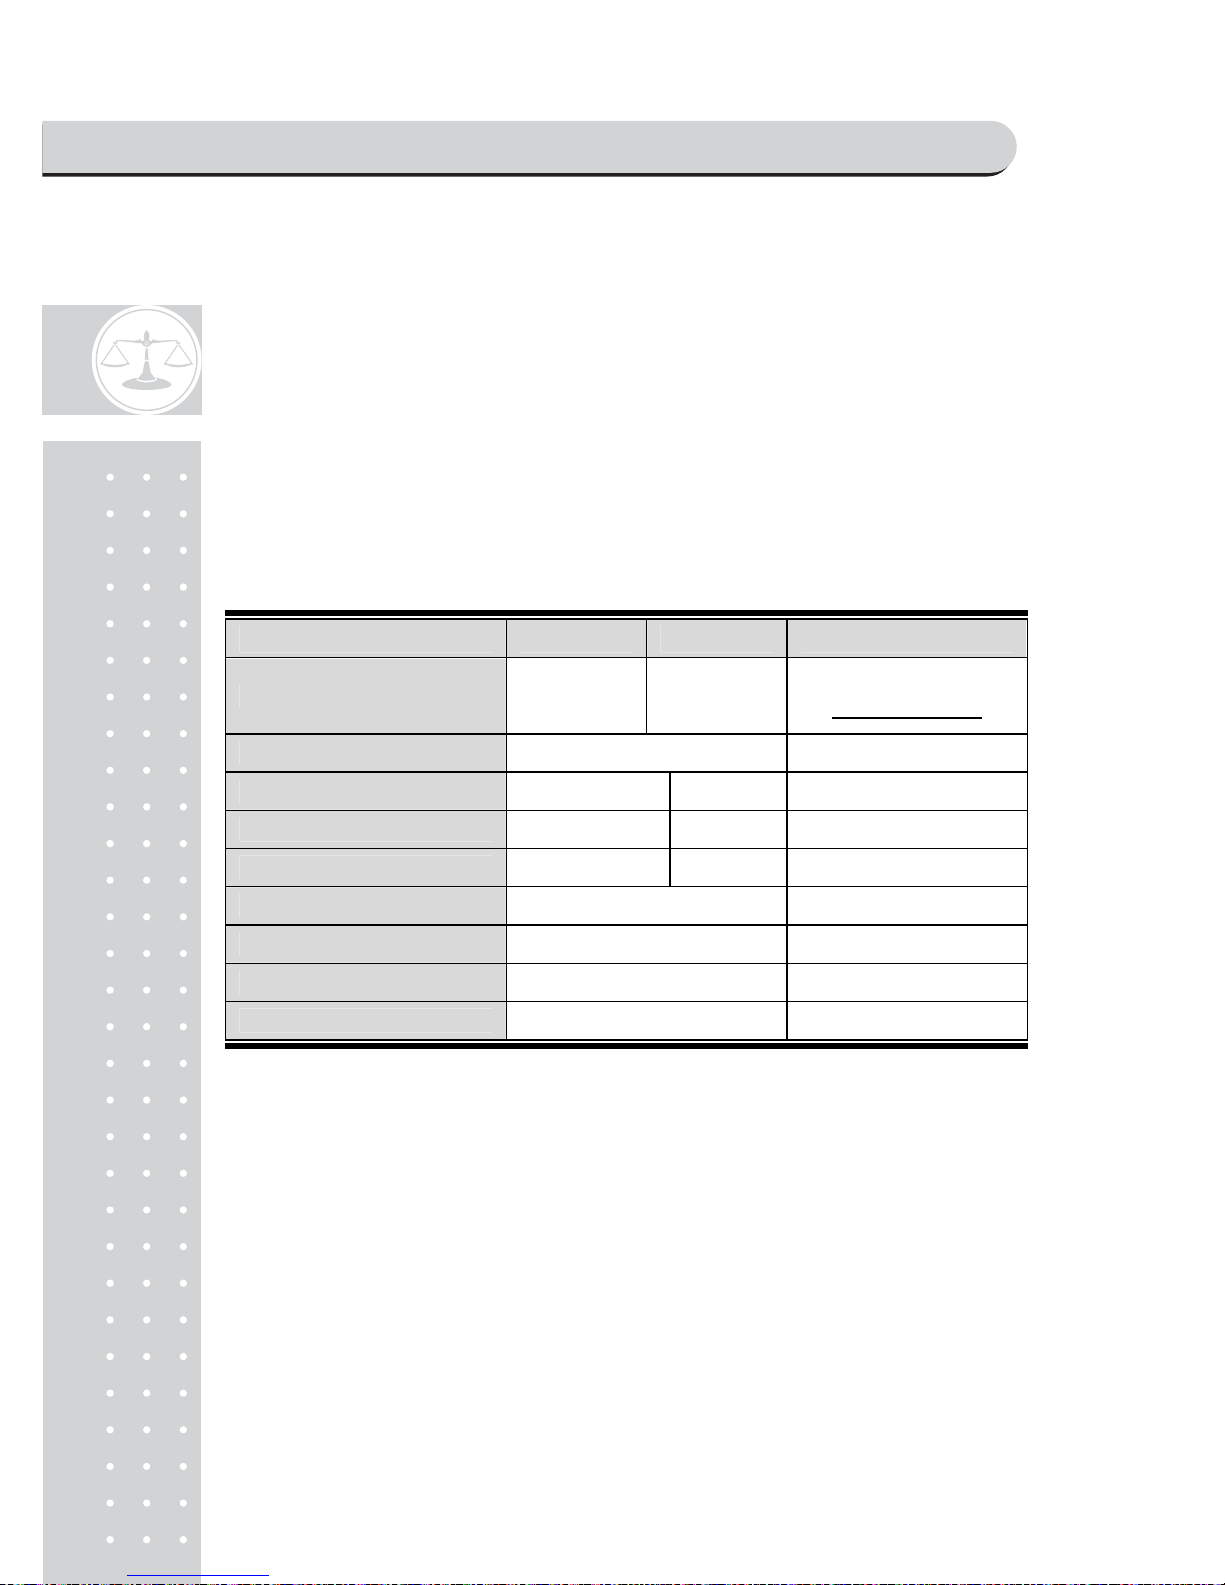
Table 5 : PLU programming
PLU Programming Minimum Maximum Remark
Validity Date Remark 999
CLERK MODE 3, 4
"Label mode" only
Digits for Price 0 ~ 9999.99
PLU Code 0(disabled) 999999
Department number 0 39
PLU Name (character) 0 30 Iran Version Max = 24
Tax group A ~ H
Weighed or non-weighed item Yes or No
Fixed or non-fixed item Yes or No
Barcode printing or not Yes or No
PROGRAM MODE
Page 56
5
7
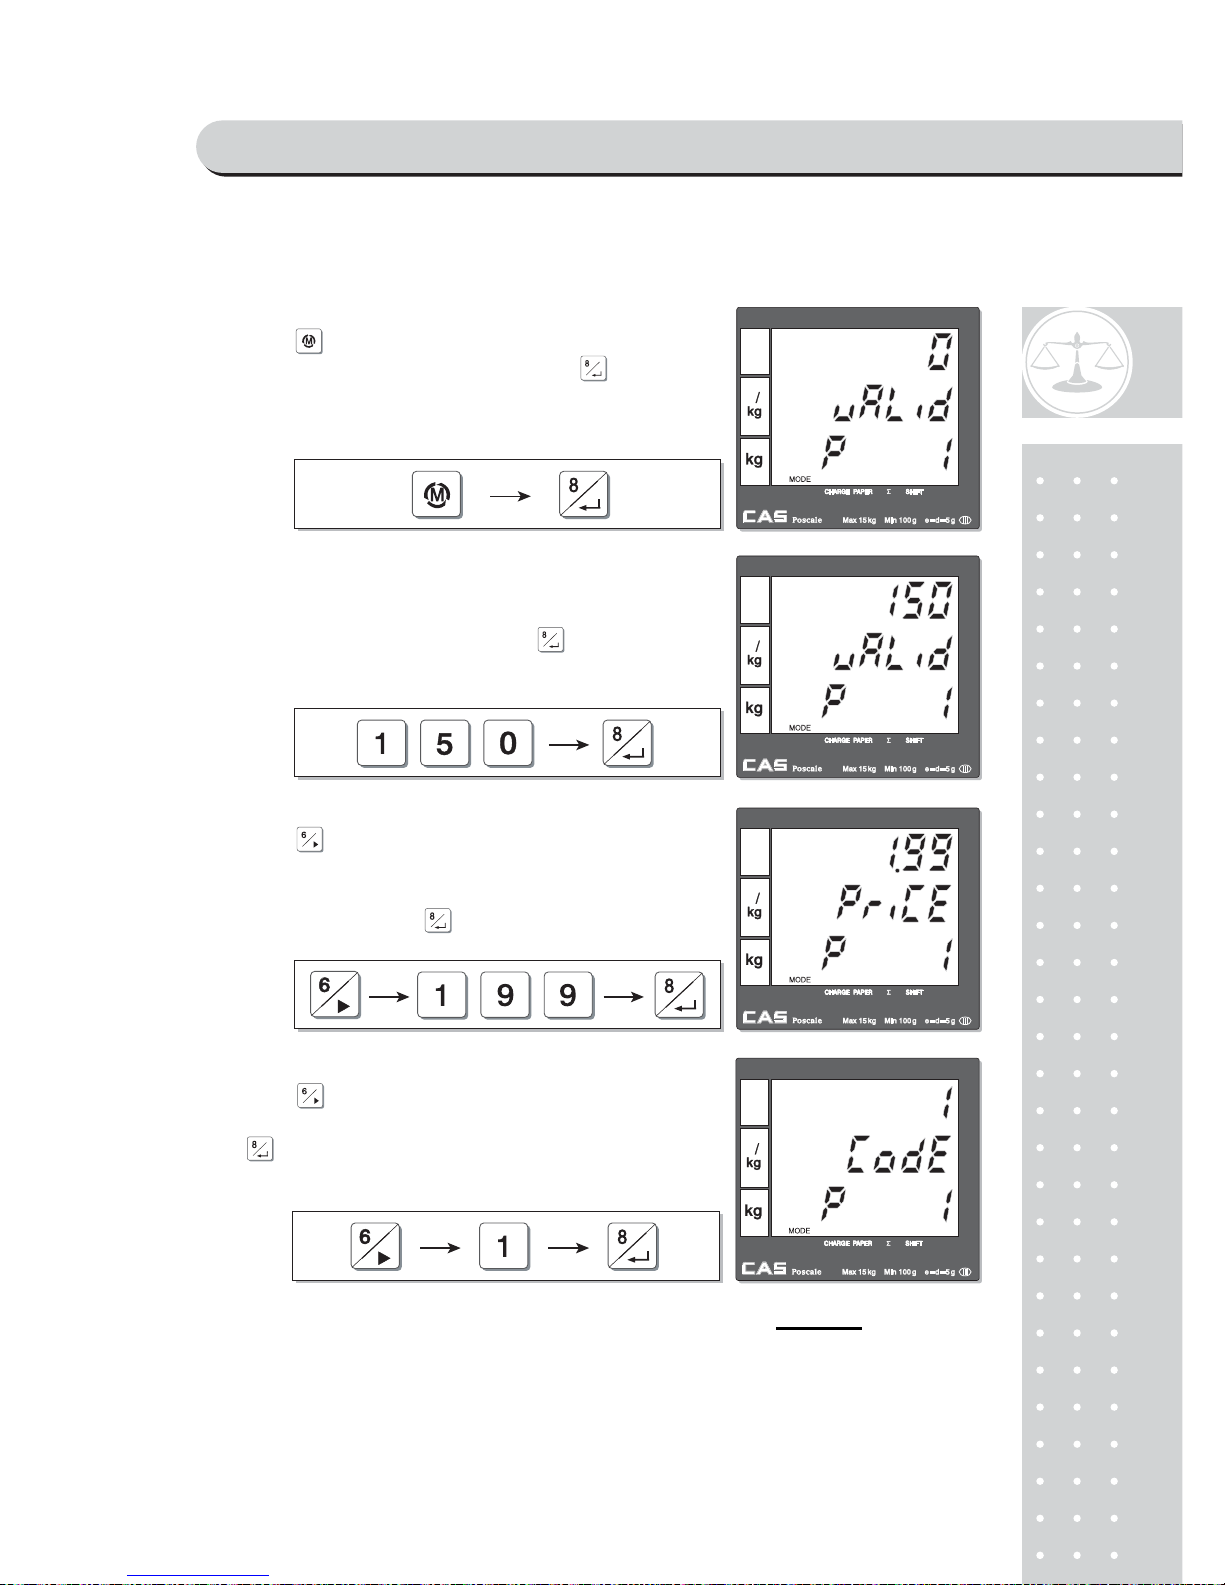
a. Validity, Price, Code, Department, and Name
■ If user inputs "0" in the code for a specific PLU the PLU is disabled.
①Press key to get into PLU programming
mode from main menu, and then press key.
②To input PLU's validity press numeric keys
you wish. For example, if you input 150 for
PLU 1 press 1, 5, and 0 and press to store.
③ Press to go to input unit price. To input
PLU's unit price press numeric keys you wish.
For example, if you input €1.99 for PLU 1
press 1, 9, and 9 and to store.
④Press to go to input code, and you can
input any number of 0~999, 999. Then, press
. For example, input 1 for this PLU.
PROGRAM MODE
Page 57
5
8
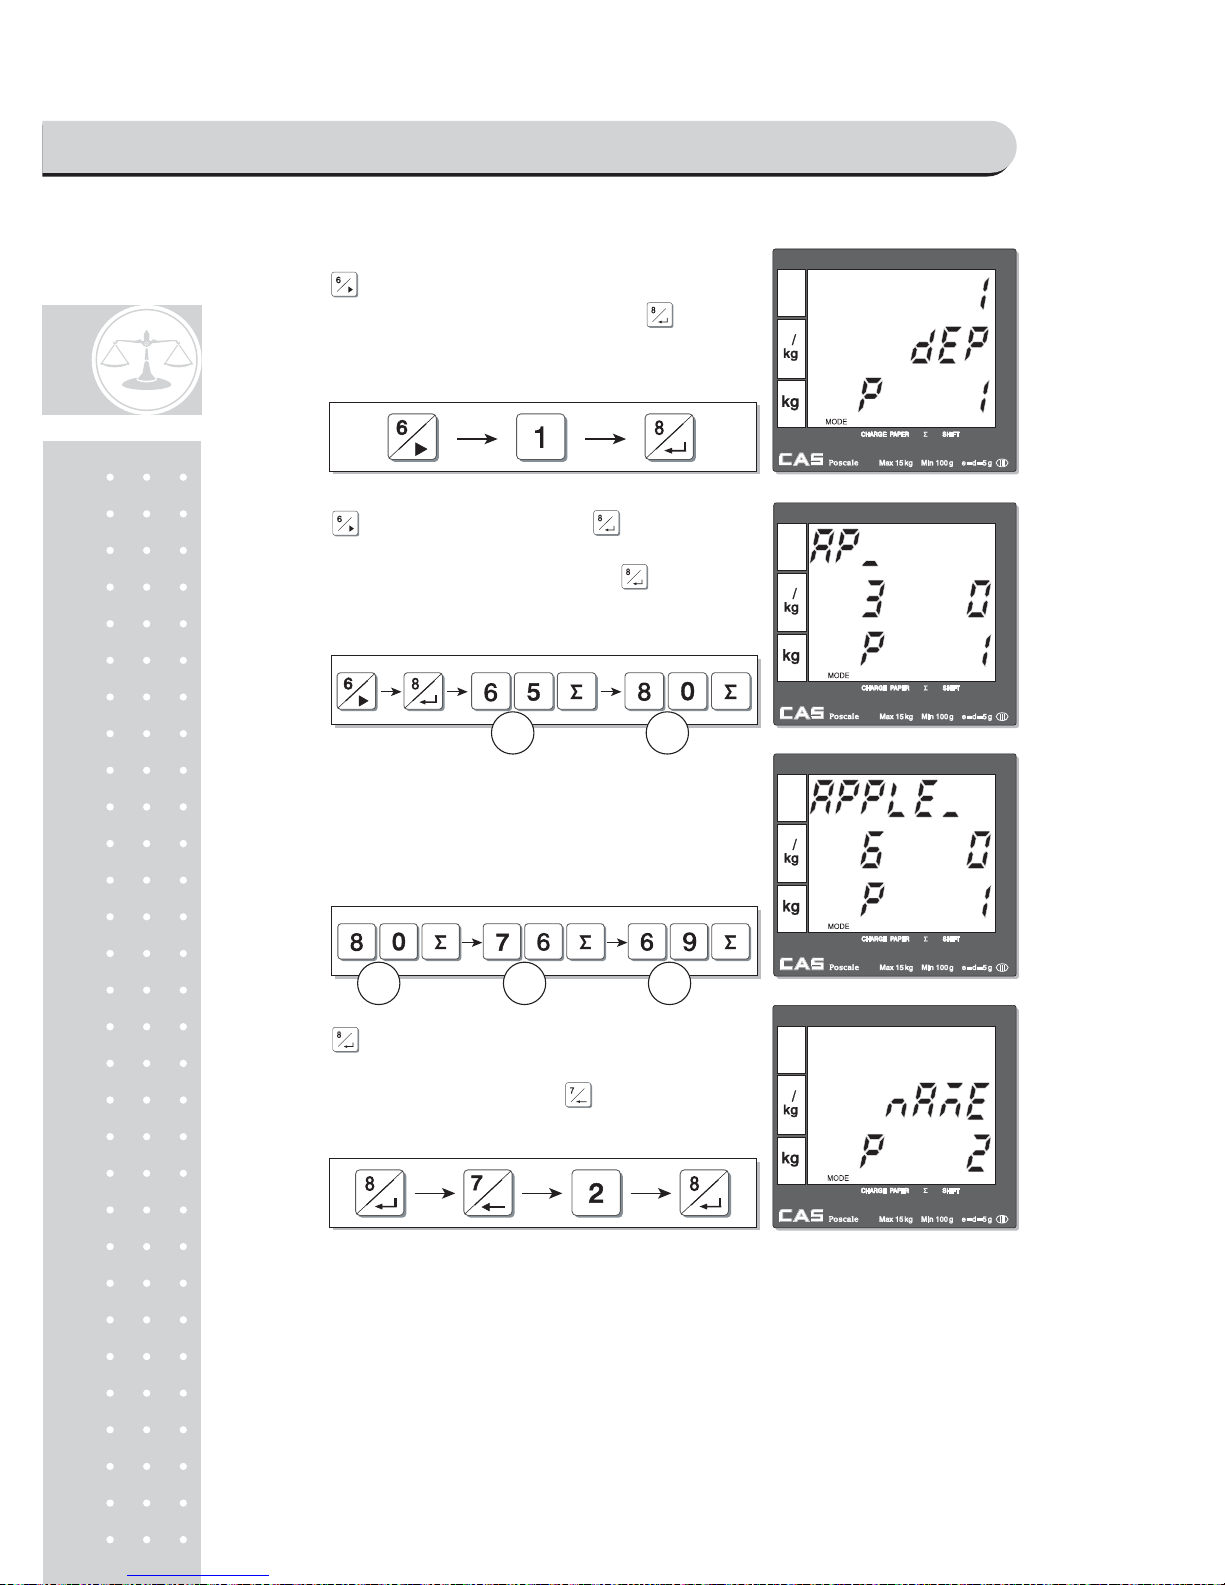
"A" "P"
"P" "L" "E"
* If Maximum number of PLU is up to 1,799.
⑤ Press to go to input department number, and you
can input any number of 0~39, then, press .
For example, input "1" for the department number.
⑥Press to go to input PLU name, . You
can input up to 30 characters in accordance to
Table 8: code on page 105. Then, press to
save the name. For example, input "APPLE" for
PLU 1. Press numerical keys as followed.
⑦ Press numerical keys as followed.
⑧ Press to save the name input. If user wants to
continue to input other PLU name he/she needs
to exit to PLU mode by pressing and
appropriate numeric keys.
PROGRAM MODE
Page 58
59
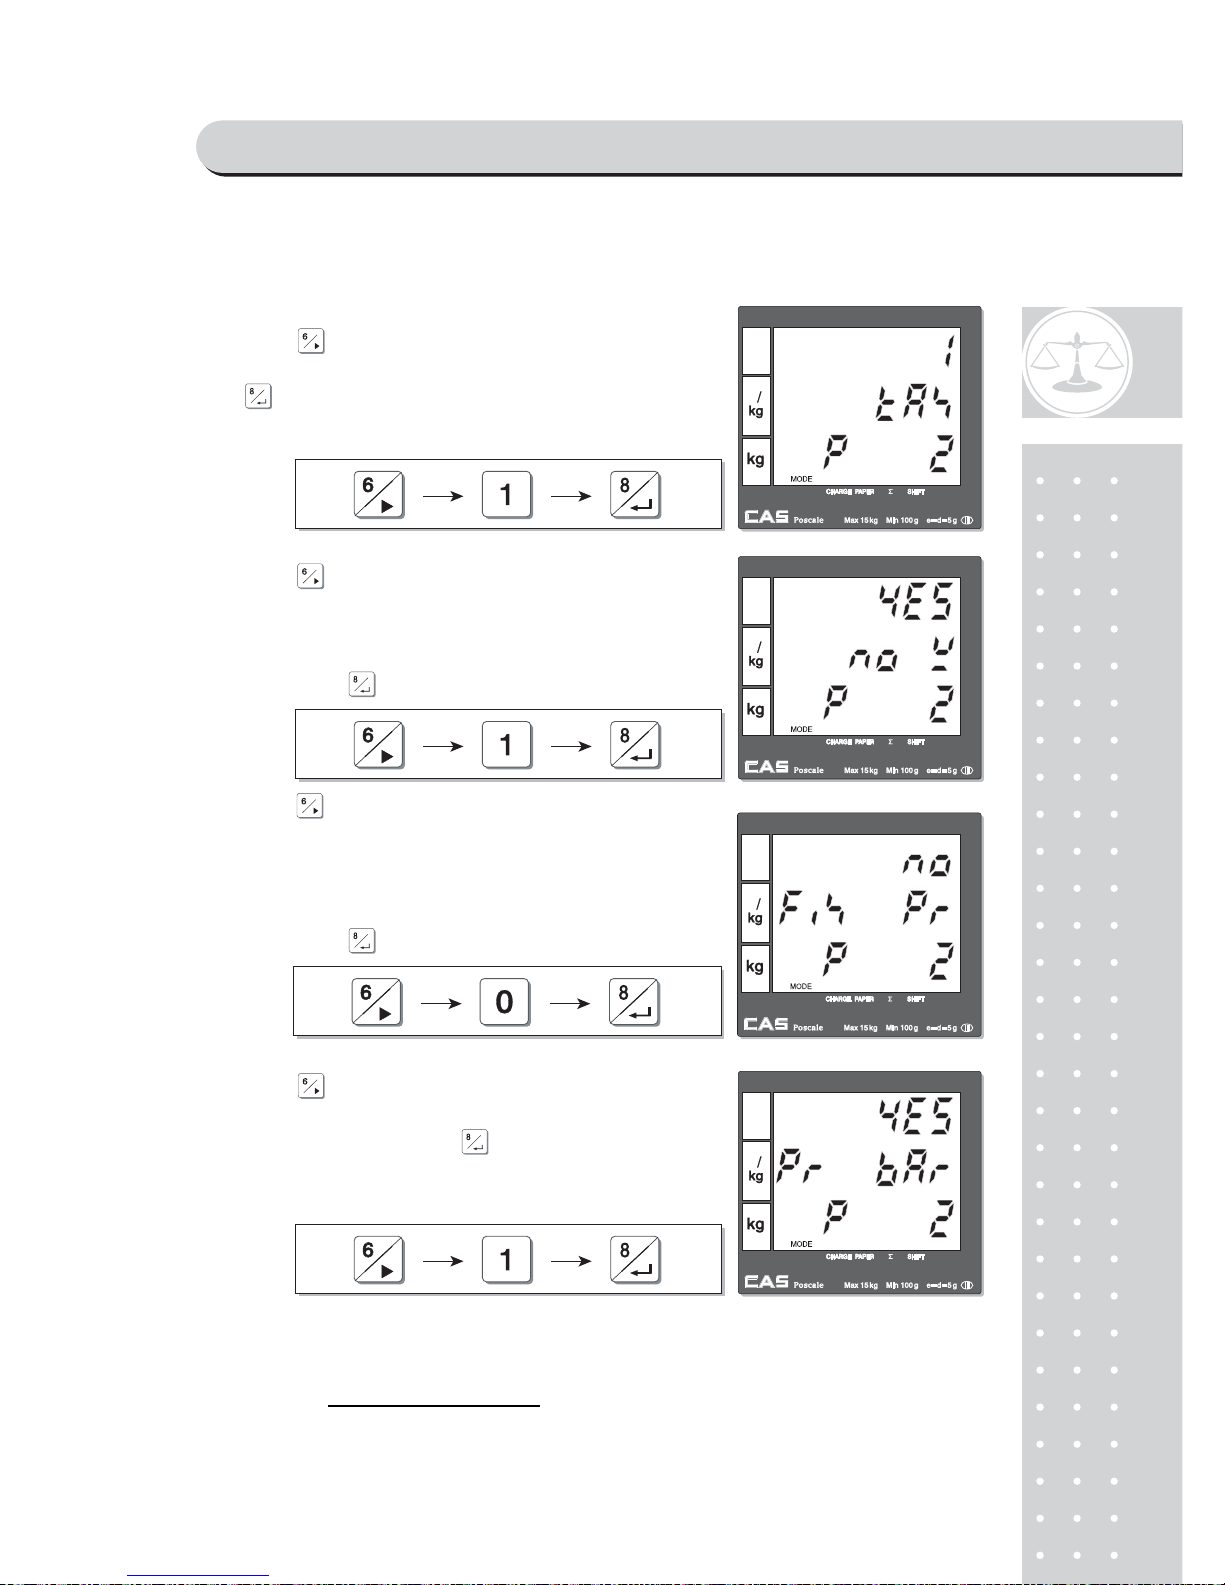
b. Tax, Non-weighed, fixed PLU price & barcode printing
c. One touch PLU data Erasing
Please refer to Chapter 10. SET 2. C. for more detail.
⑨Press to go to tax group setting mode, and you
can input any one of tax rate groups, A~H, then press
. For example, input tax group 1 for this PLU
(please refer to tax rate setting on page 99).
⑩Press to go to "non-weighed" setting mode.
This setting is to select non-weighed or weighed
commodity for current PLU selected. User can
select YES or no by pressing "1" or "0" respectively.
Then, press to save it.
⑪ Press to go to fixed PLU price set ting mode.
This setting is to select either fixed or non-fixed PLU
price. If user select fixed PLU price he/she can not
change unit price when called up the PLU. User can
select YES or no by pressing "1" or "0" respectively.
Then, press to save it.
⑫ Press to go to barcode printing mode. User
can select YES or no by pressing "1" or "0"
respectively. Then, press to save it.
PROGRAM MODE
Page 59

60
Chapter 8.
REPORT
PROGRAM MODE
Page 60
61
Chapter 8. Report
This chapter explains how to print out all kind of reports in POScale.
POScale provides such reports as PLU data list, PLU, clerk, department, tax, hourly, sales
reports. All of report always includes two special PLUs, PLU 0 and 1,800 on top of report.
a. PLU data list
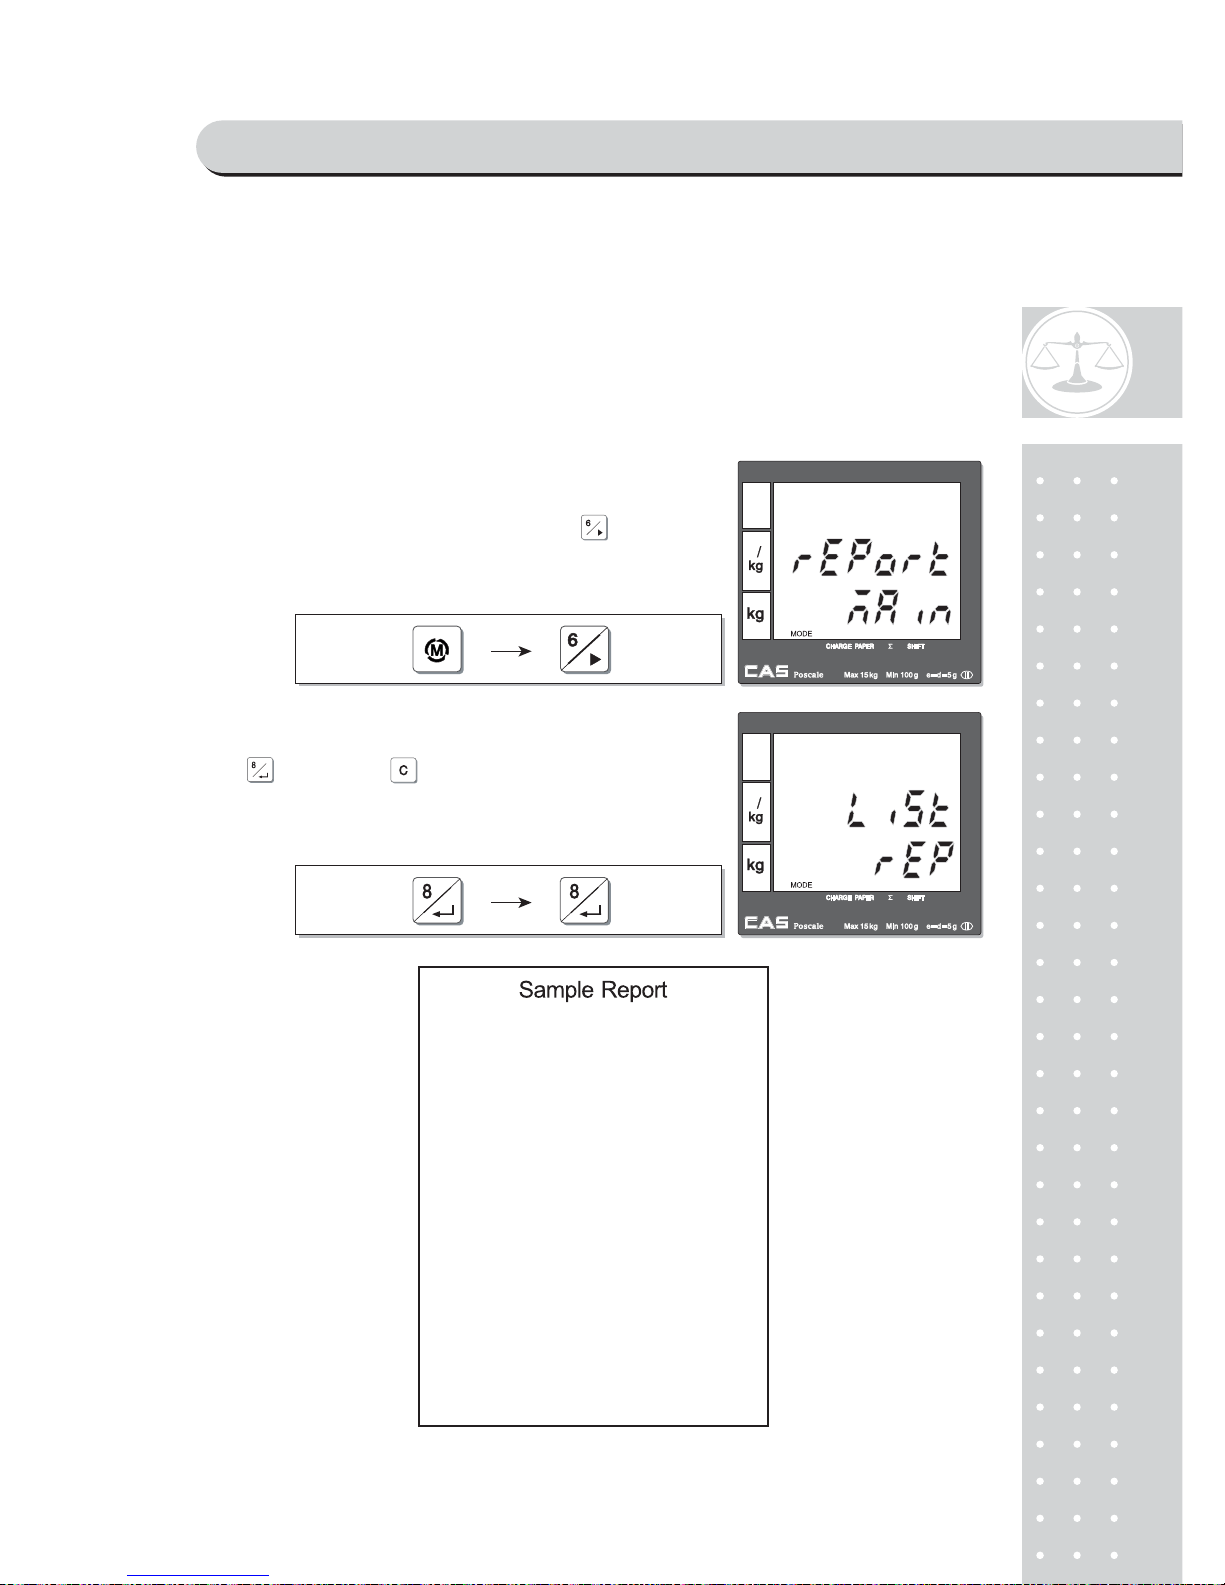
①Press -M- key to go to PLU programming
mode from main menu, and then press key.
②To print out list of all PLU data press
twice. Press to stop printing of list if
user wants.
PROGRAM MODE
Page 61
62
Table 6 : "C" key operation while printing
Does "C"(cancel) key work while printing report?
Report YES NO
PLU data list
X
PLU
X
Clerk
X
Department
X
Tax
X
Hourly sales
X
Closing
X
b. PLU report
■ PLU report always includes two special PLUs, PLU 0 and PLU 1,800.
■ PLU 0 is the sum of non-PLU transactions and weighed item sales.
■ PLU 1800 is the sum of non-PLU and non-weighed item sales.
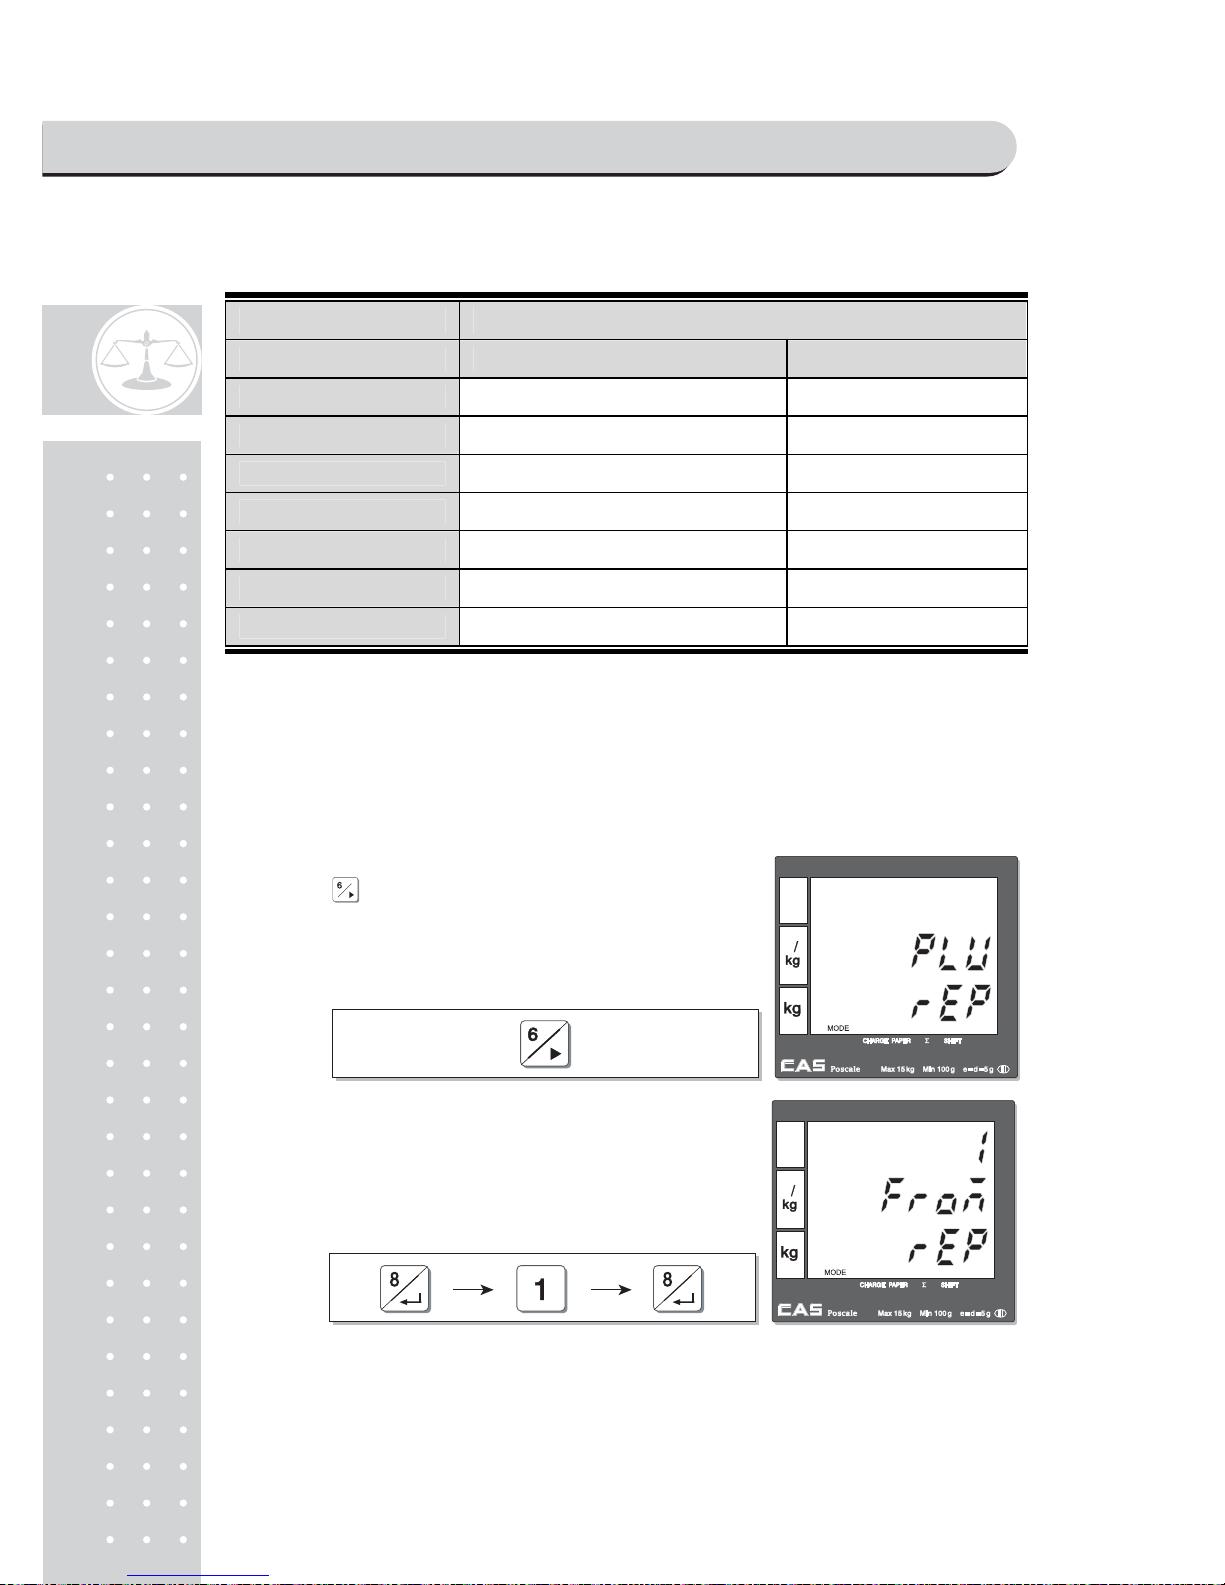
③ Press to go to PLU report mode. This
mode shows only PLU items sold and two
special PLU items sold on the report.
④Users can select any between PLU 1 and
1,799 for setting report range. For example,
select 1~20 for PLU report.
PROGRAM MODE
Page 62
63
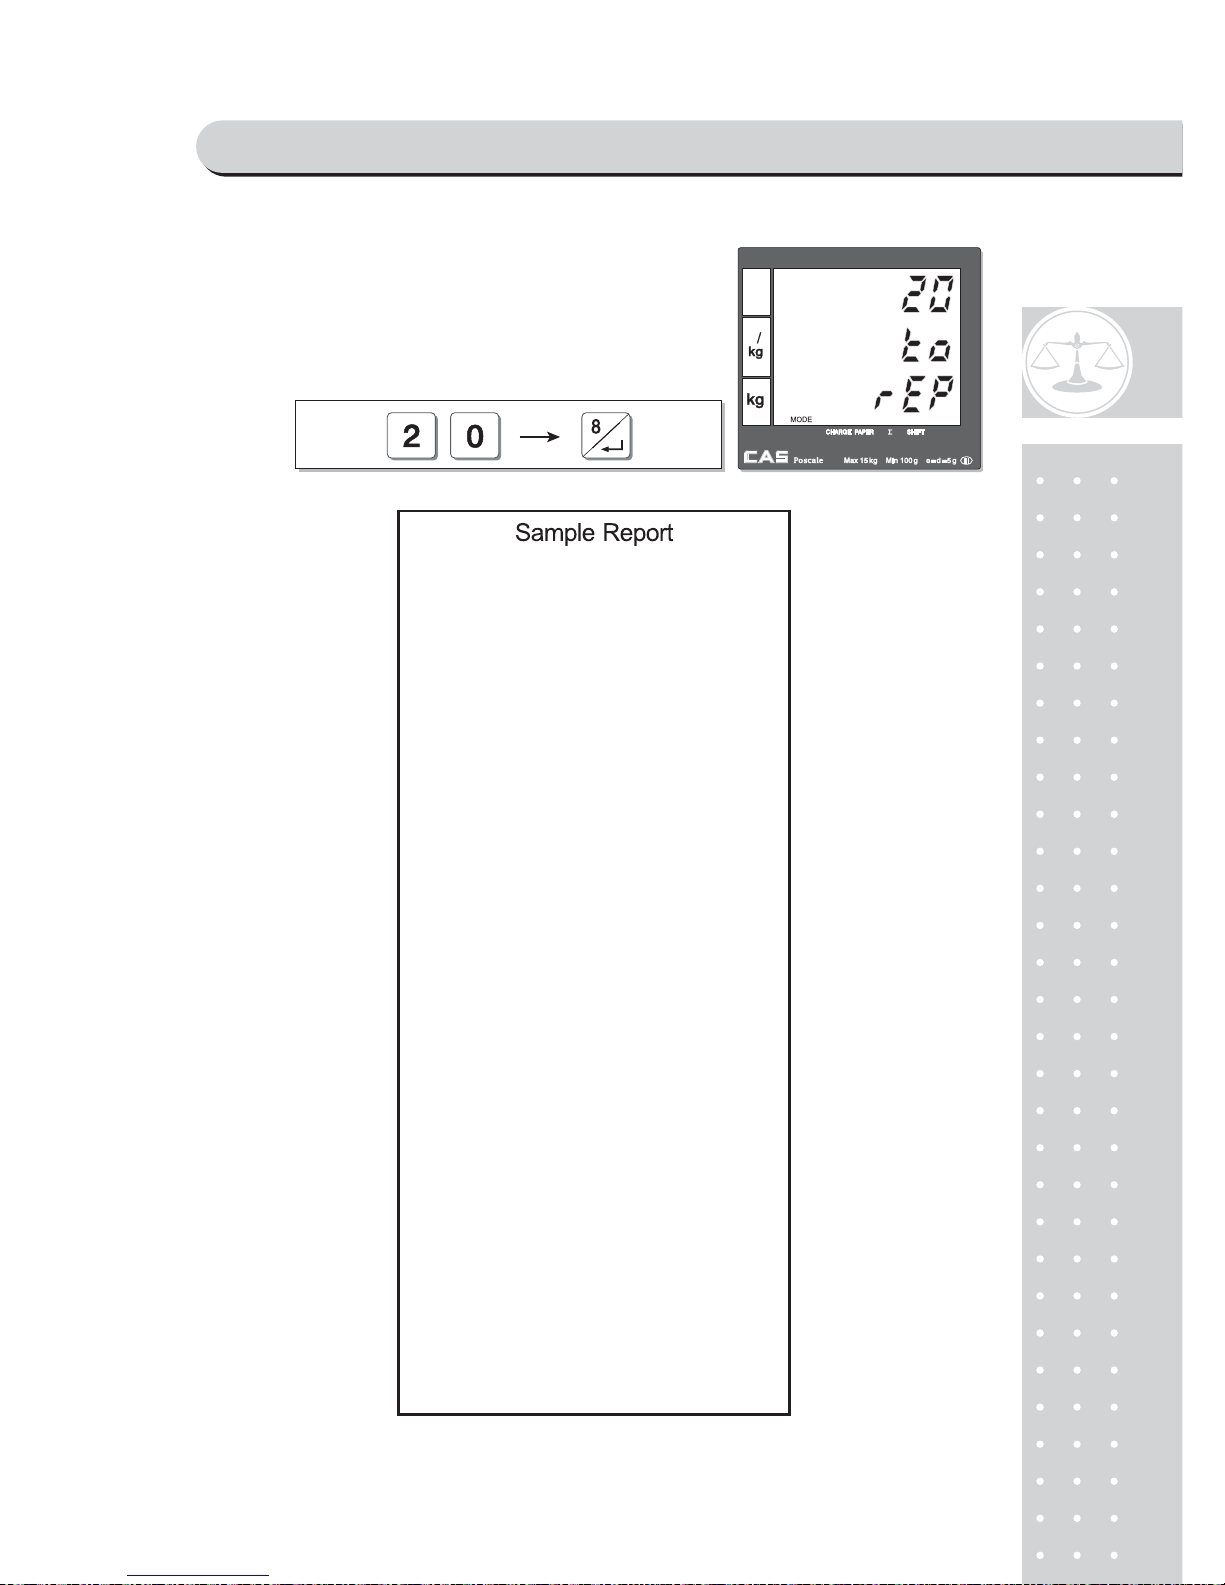
⑤ Automatically print out the PLU report
ranging from 1 to 20, and two special PLUs.
PROGRAM MODE
Page 63
6
4
c. Clerk report
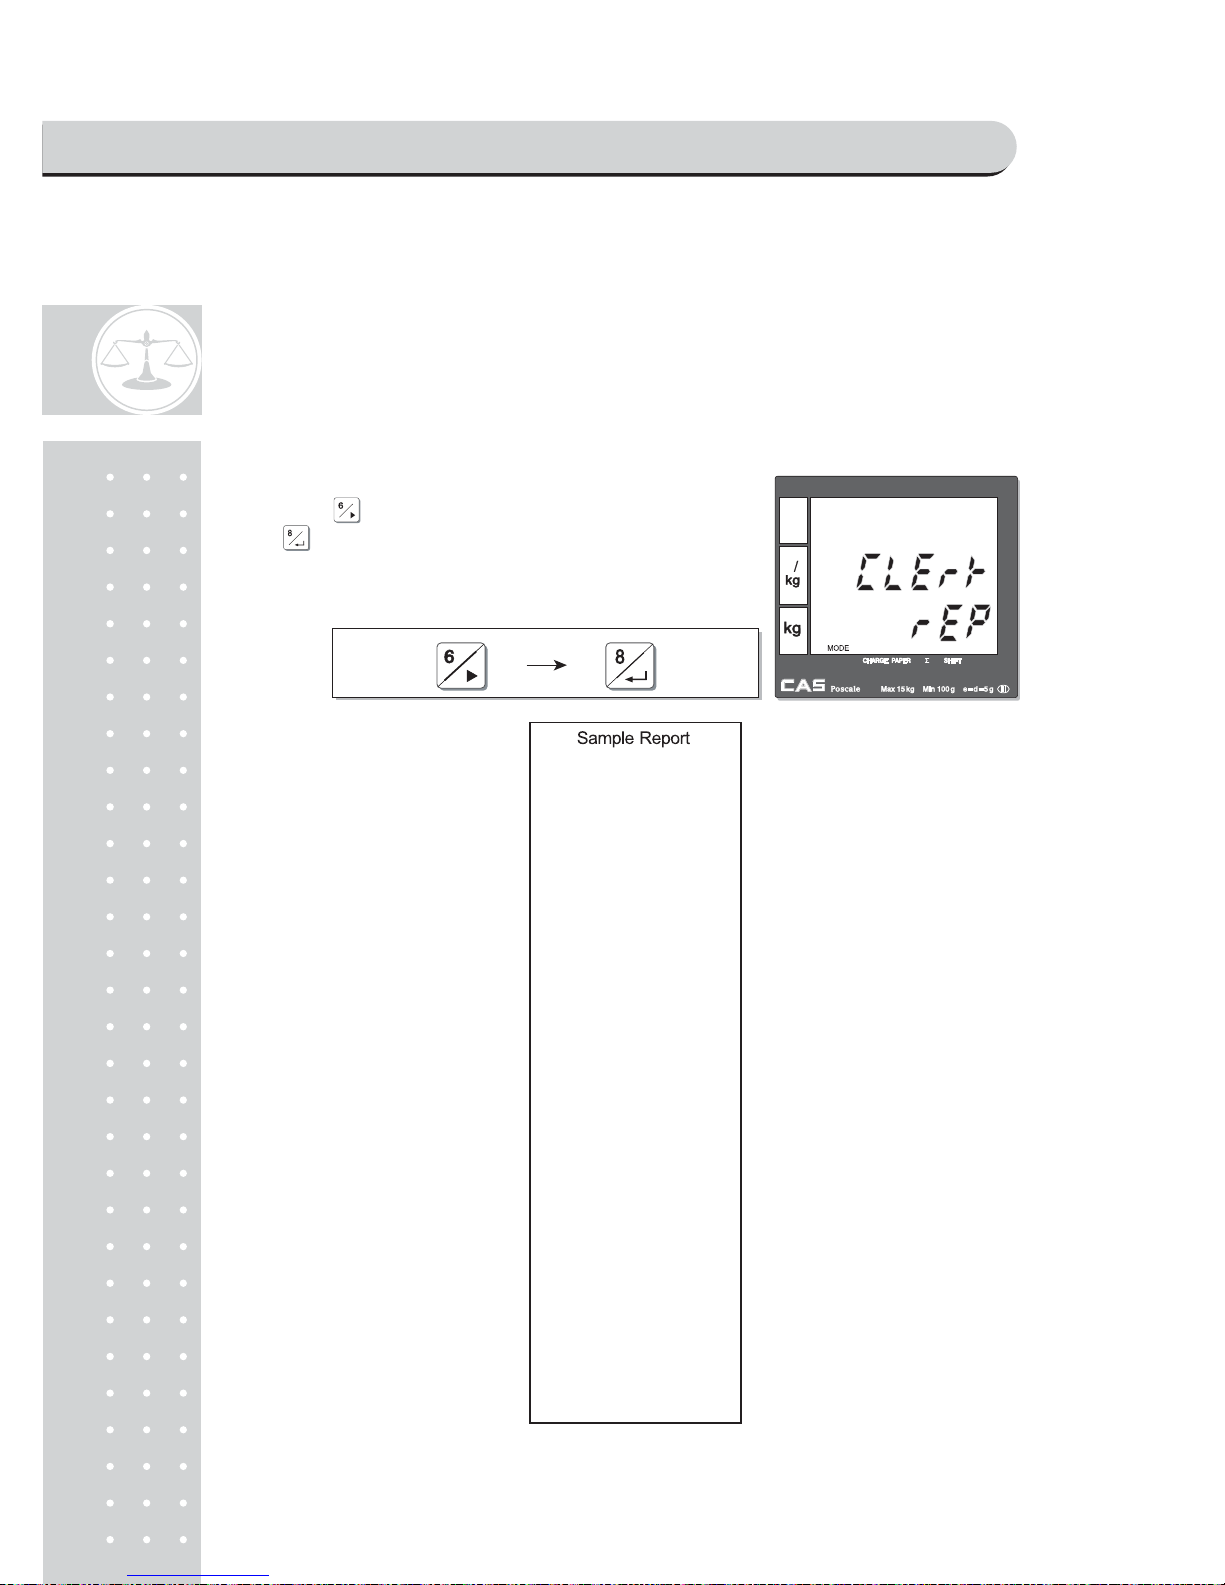
■ This reports all sales-related activities for four clerks.
■ This report includes such information as the number of clients (customers),
clerks total sales amount, proportional percent of total sales amount, the
amount and number of canceled transaction, the amount and number of
discount, transactions and the amount of sales in cash and credit respectively.
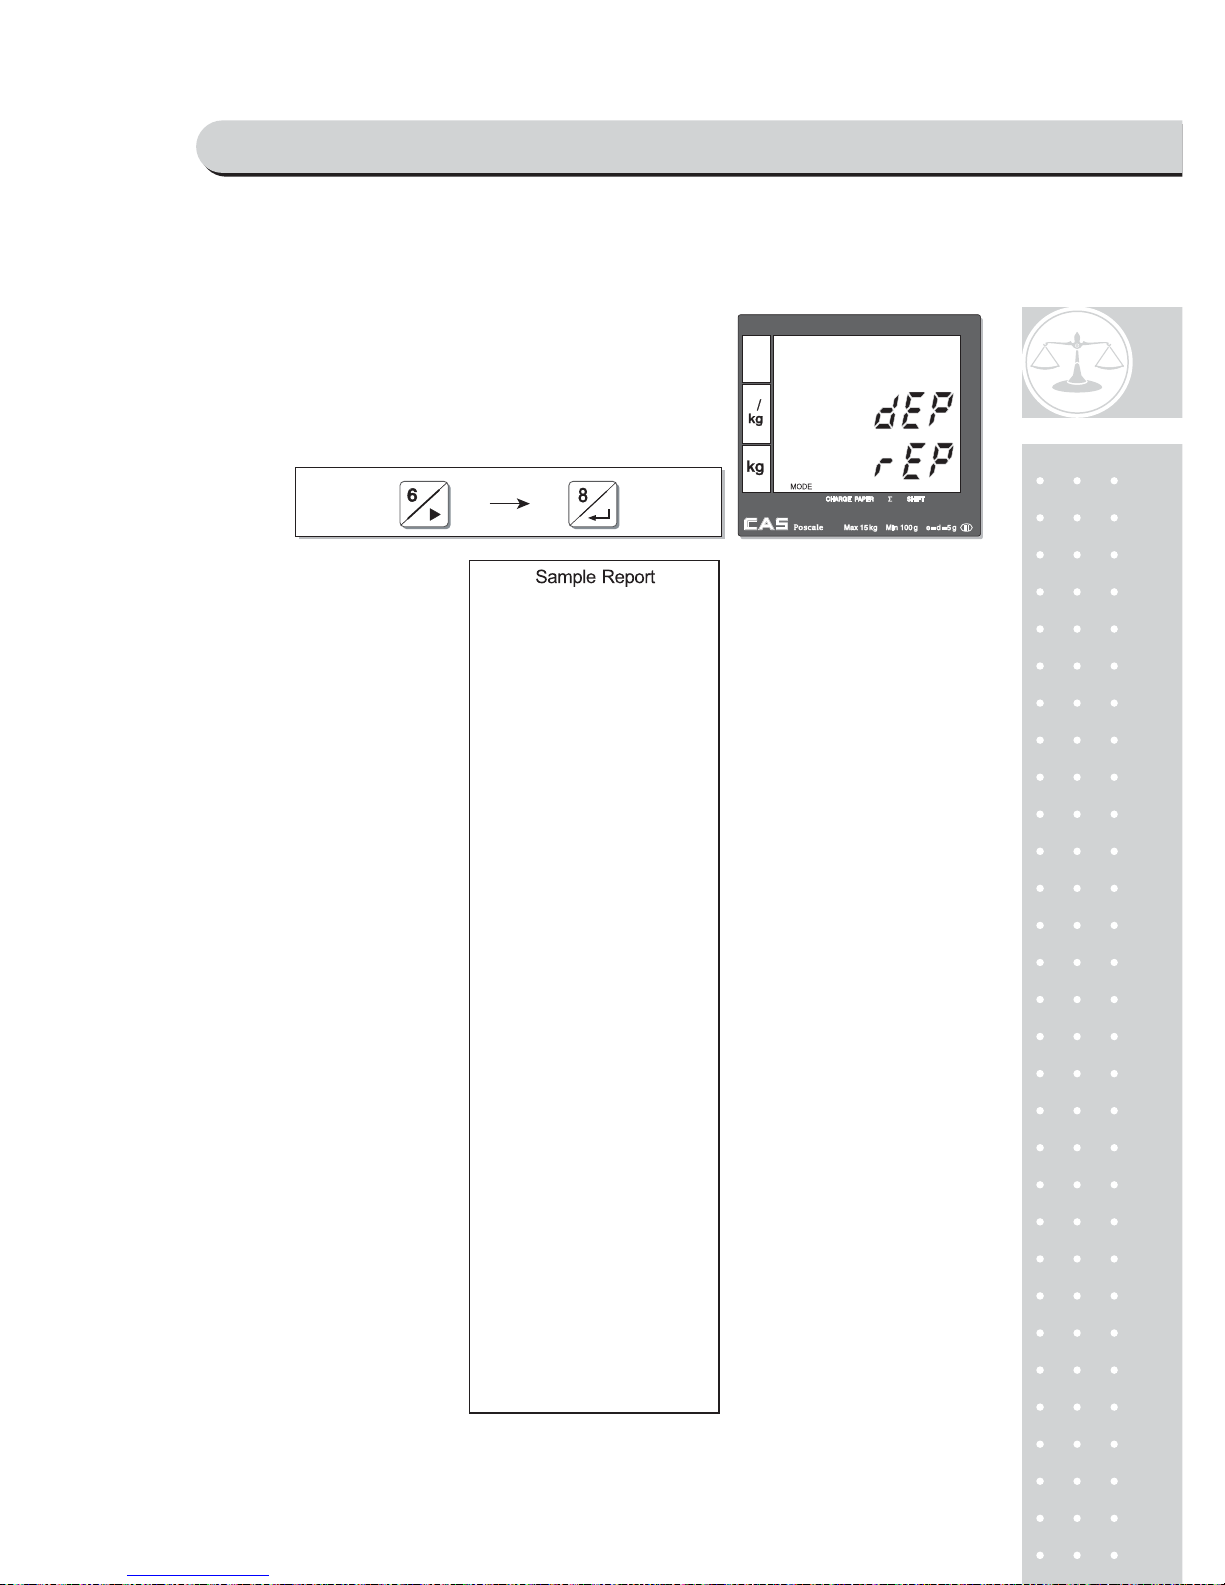
Press⑥ to go to clerk report mode, and
press to print out the report.
PROGRAM MODE
Page 64
65
d. Department report
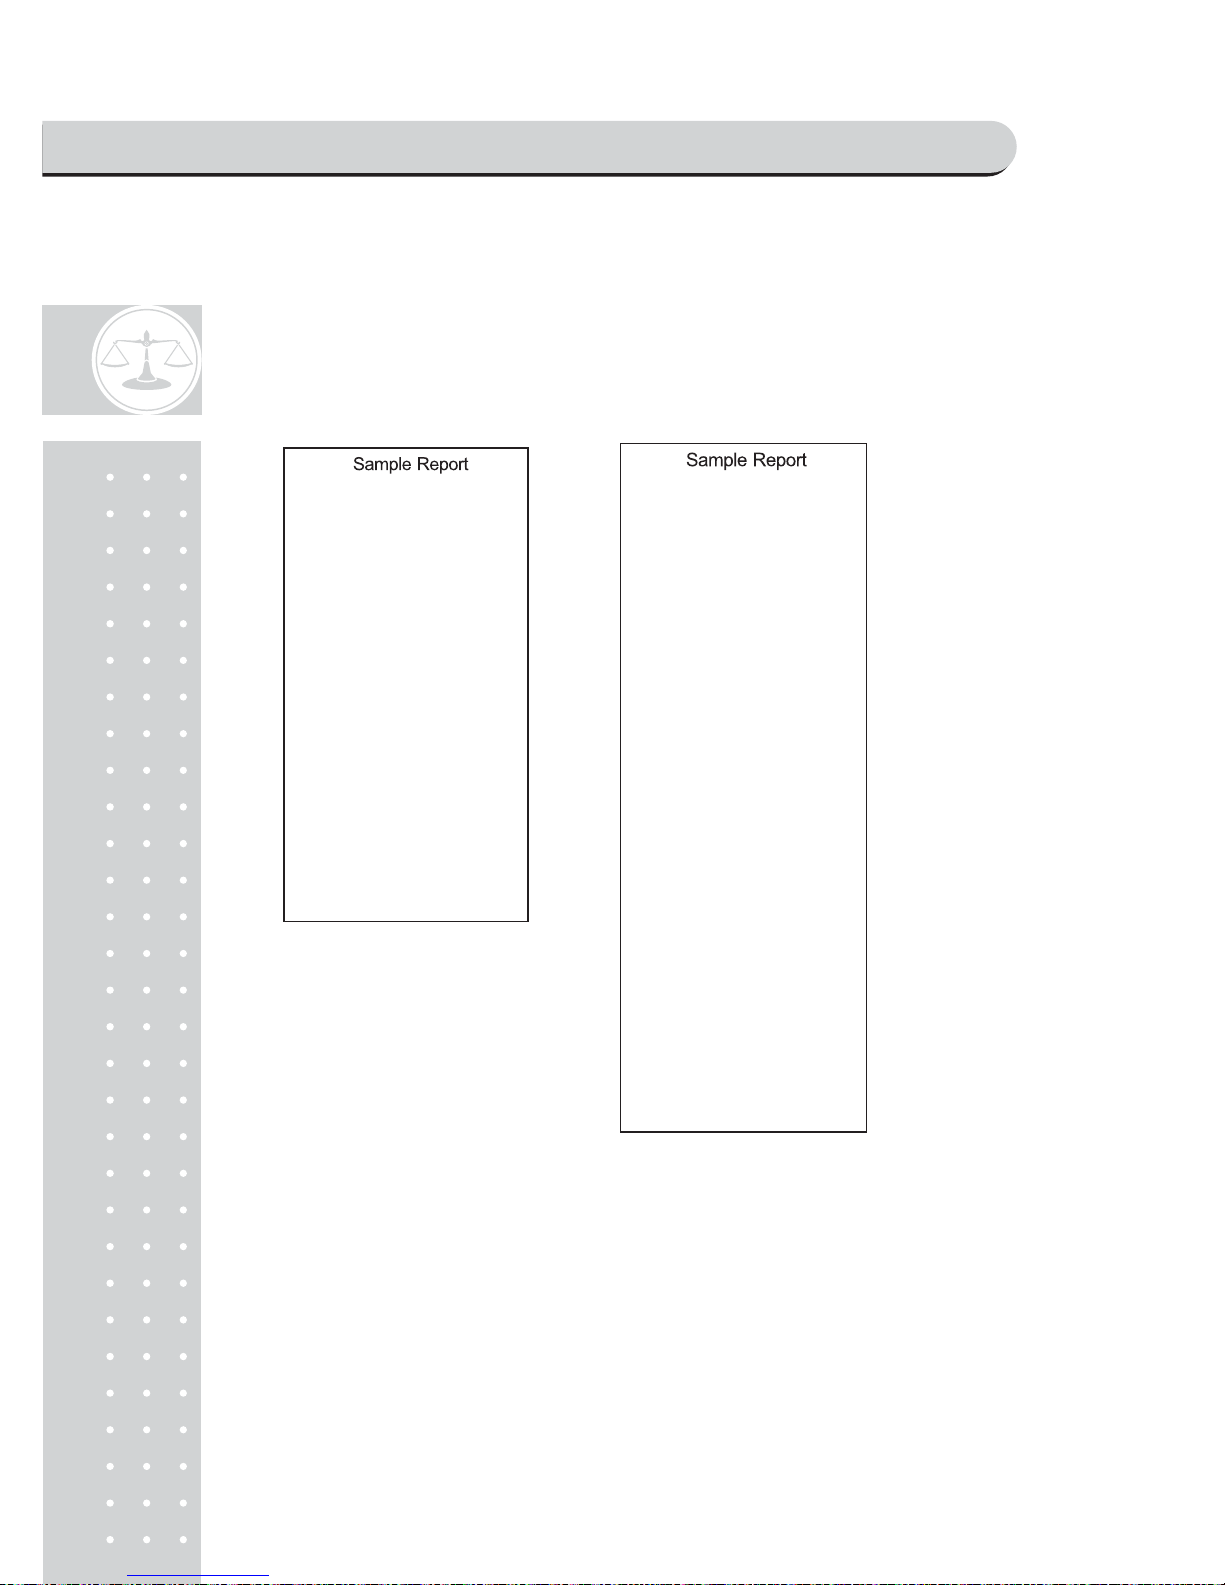
⑦
Go to the department report mode.
PROGRAM MODE
Page 65
66
e. Tax report and hourly sales report
The same process as department report.
■ Tax report: total tax amount and sales amount for each 8 tax groups.
■ Hourly sales report: hourly sales total amount, count, and percent for a day.
f. Closing report
This will set all of accumulated sums to zero and close all of daily sales activities
by printing report.
■ If user already sets "report all" function "YES" in OPTIONS setting of
program mode the scale will automatically print all the reports included such
as PLU data list, PLU report, clerk report, department report, tax report,
and hourly sales report by executing.
PROGRAM MODE
Page 66

6
7
Chapter 9.
SET 1
(Discount, Barcode formatting & HW setting)
PROGRAM MODE
Page 67
6
8
Chapter 9. SET 1 (Discount, Barcode formatting & HW setting )
This chapter explains how to set BAUD rate, auto power-off, LAN number, discount rate,
barcode format for a single or total, and pulse length for opening cash drawer. In addition
to these, it also describes how to set printing darkness and input currency symbol or name.
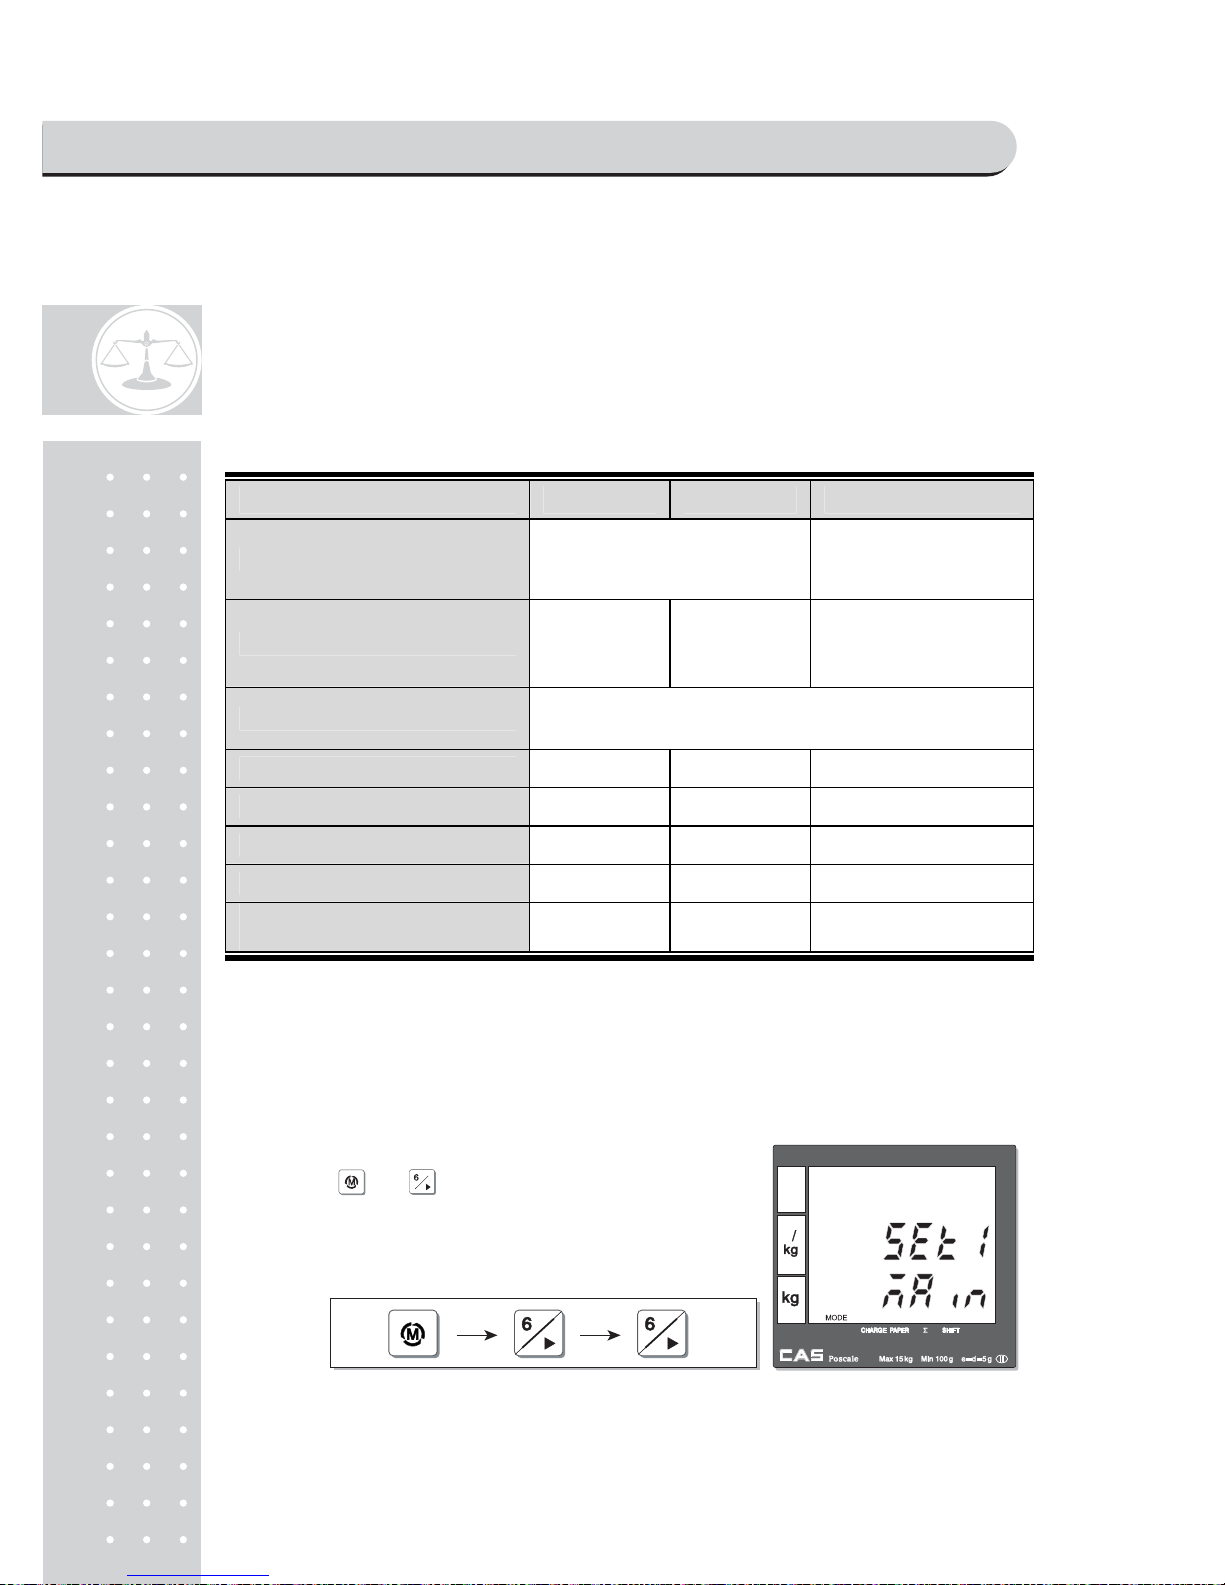
Table 7 : SET 1
SET 1 Minimum Maximum Remark
BAUD Rate (bps; bit per sec.)
1200, 2400, 4800, 9600,
14400, 19200, 28800, 38400,
57600, 115200
User should turn off
and on the scale after
setting new "BaudRate".
Auto Power-off timing setting(min.) 1 240
0: No Auto Power-off
Auto power-off works
only in battery usage.
LAN number (#)
This version of POScale does not support network
function. It will be provided in the future.
Discount Rate (%) 0 99
Barcode Format
Cash Drawer-Opening Pulse (ms.) 1 99
Printing Darkness 1 5 Default : 3
Currency Symbol or Name
(characters)
0 3 IRAN Version Max = 4
a. BAUD rate (bps)
BAUD rate is the data-downloading or uploading speed between the scale and PC.
User may set appropriate one of 10 speed options depending on his/her usage environment.
This rate must match the baud rate of the com port(com1, com2, etc) in the PC.
① Press and to go to SET 1 mode.
PROGRAM MODE
Page 68
69
b. Auto power-off time (min)
c. Discount rate(%)
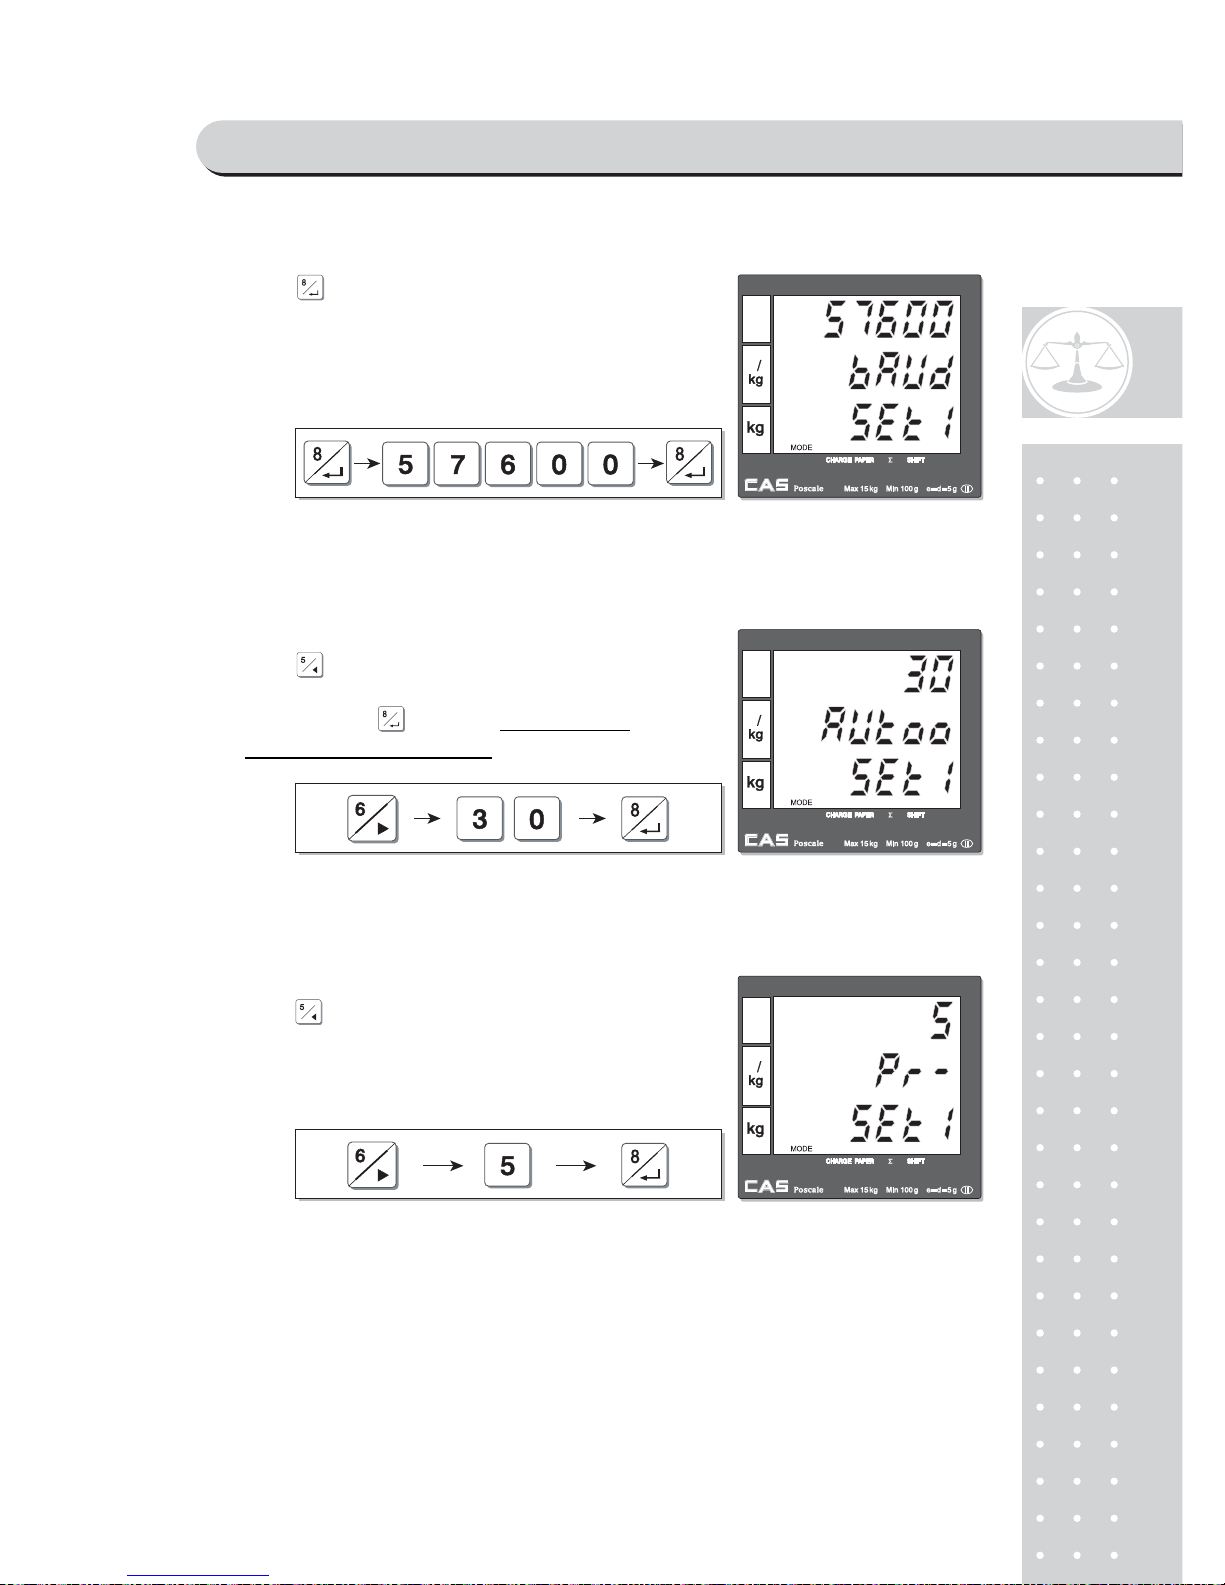
Press② to go to BAUD rate setting mode. User
may input any one of options 1200~115200 to
meet best usage environment. Please refer to
"Table 7: SET 1" on page 68 for speed options.
For example, select 57600.
Press① to go to Auto Power-Off setting mode.
User may input any minute 0~240 to set power-off,
and then, press to save it. Auto power-off
works only in battery usage.
① Press to go to Discount rate setting mode.
This is to set programmed discount rate between
0~99%. For example, lets set 5 % of programmed
discount rate.
PROGRAM MODE
Page 69
70
d. Barcode format setting for a single transactions
The barcodes are entered like string with specific format.
Barcode string: tMXNXNMXN...XN
t : type of barcode(If the 'type pf barcode' is not specified then EAN13 is printed.)▶
x a : EAN13
x b : UPCA
x c : EAN8
x d : CODE128 type
▶ X : The following information can inserted at "X" location.
x W : weight
x U : init price
x P : total sum
x N : code of PLU
x B : number of receipt
x D : department
x C : vendor (1..4)
x V : price control sum(using only EAN13 type)
("V" can be inserted only before "up to 5 digits for U (unit price)"
or "up to 5 digits for P (total sum)
" to make sure price- related information.)
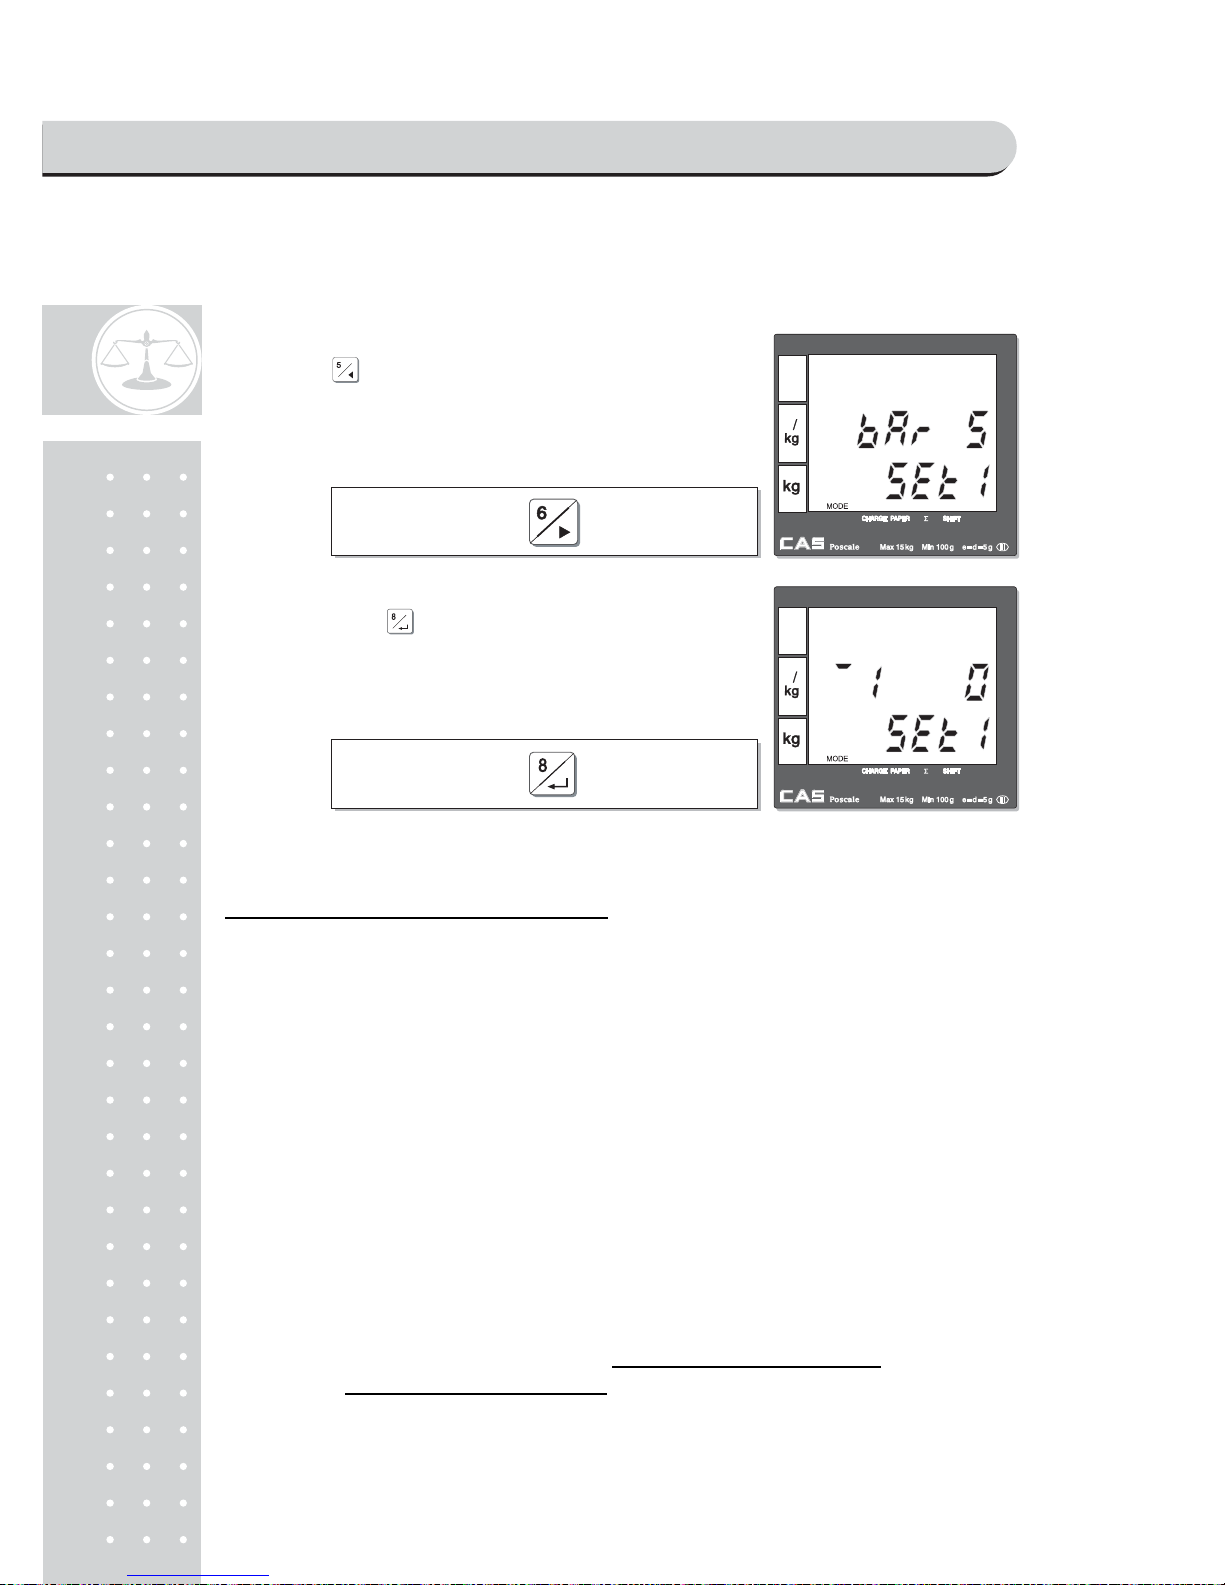
Press① to go to
Barcode format setting
for a single transaction mode.
② Then, press again to get into input barcode
string, using code table on page 104. Now you
can input appropriate barcode string.
PROGRAM MODE
Page 70
71
x M : number of sales in receipt
▶ N : number of digit(s)
▶ M : constant digit(s)
The parameter X specifies what will be printed. You can choose between several
parameters and can set how many digits will be printed.
The parameter N after parameter X is a obligatory! It give the number of digits which
will be printed from value specified with parameter X.
The constant digits M is not obligatory, they can be insert anywhere in the string
between group XN and will be print unconditionally.
The total number of digits in the barcode after interpretation must be stay exactly :
x 12 digits for EAN13 (1 digits by itself),
x 11 digits for UPCA (1 digits by itself),
x 7 digits for EAN8 (1 digits by itself),
x CODE128 have variable number of digits max 26. (For this barcode are
accepted only even number of digits. →Max Constant digits = 12digits)
If is set U, N or D type to total barcode then these values will be take from last sale!
If is set M for barcode for a single sale then value will be number of current sale.
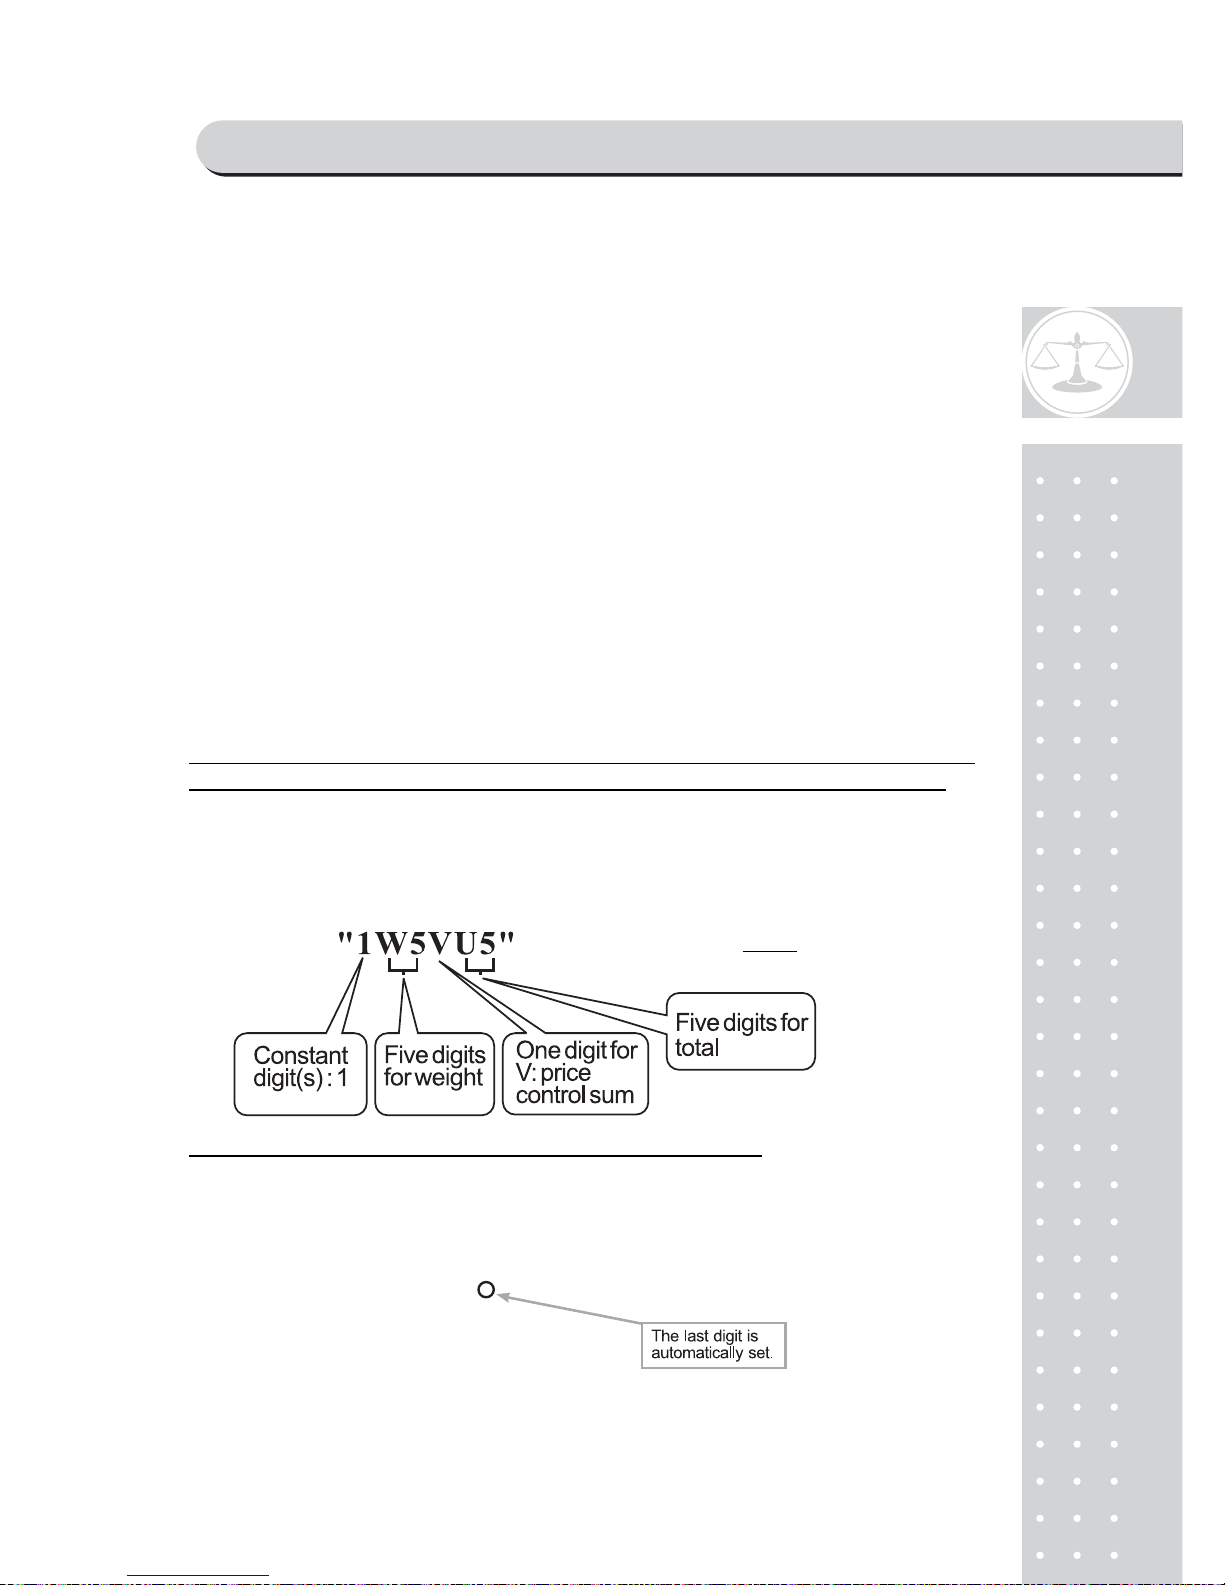
☞ Case 1 (EAN13 type) :
Assumption:
x Weight -1.025
x Unit price - 2.28
x String- (total is 12 digits input)Then,
Barcode -> 1 01025 1 00228 (total is 12 digits input)
PROGRAM MODE
Page 71
72
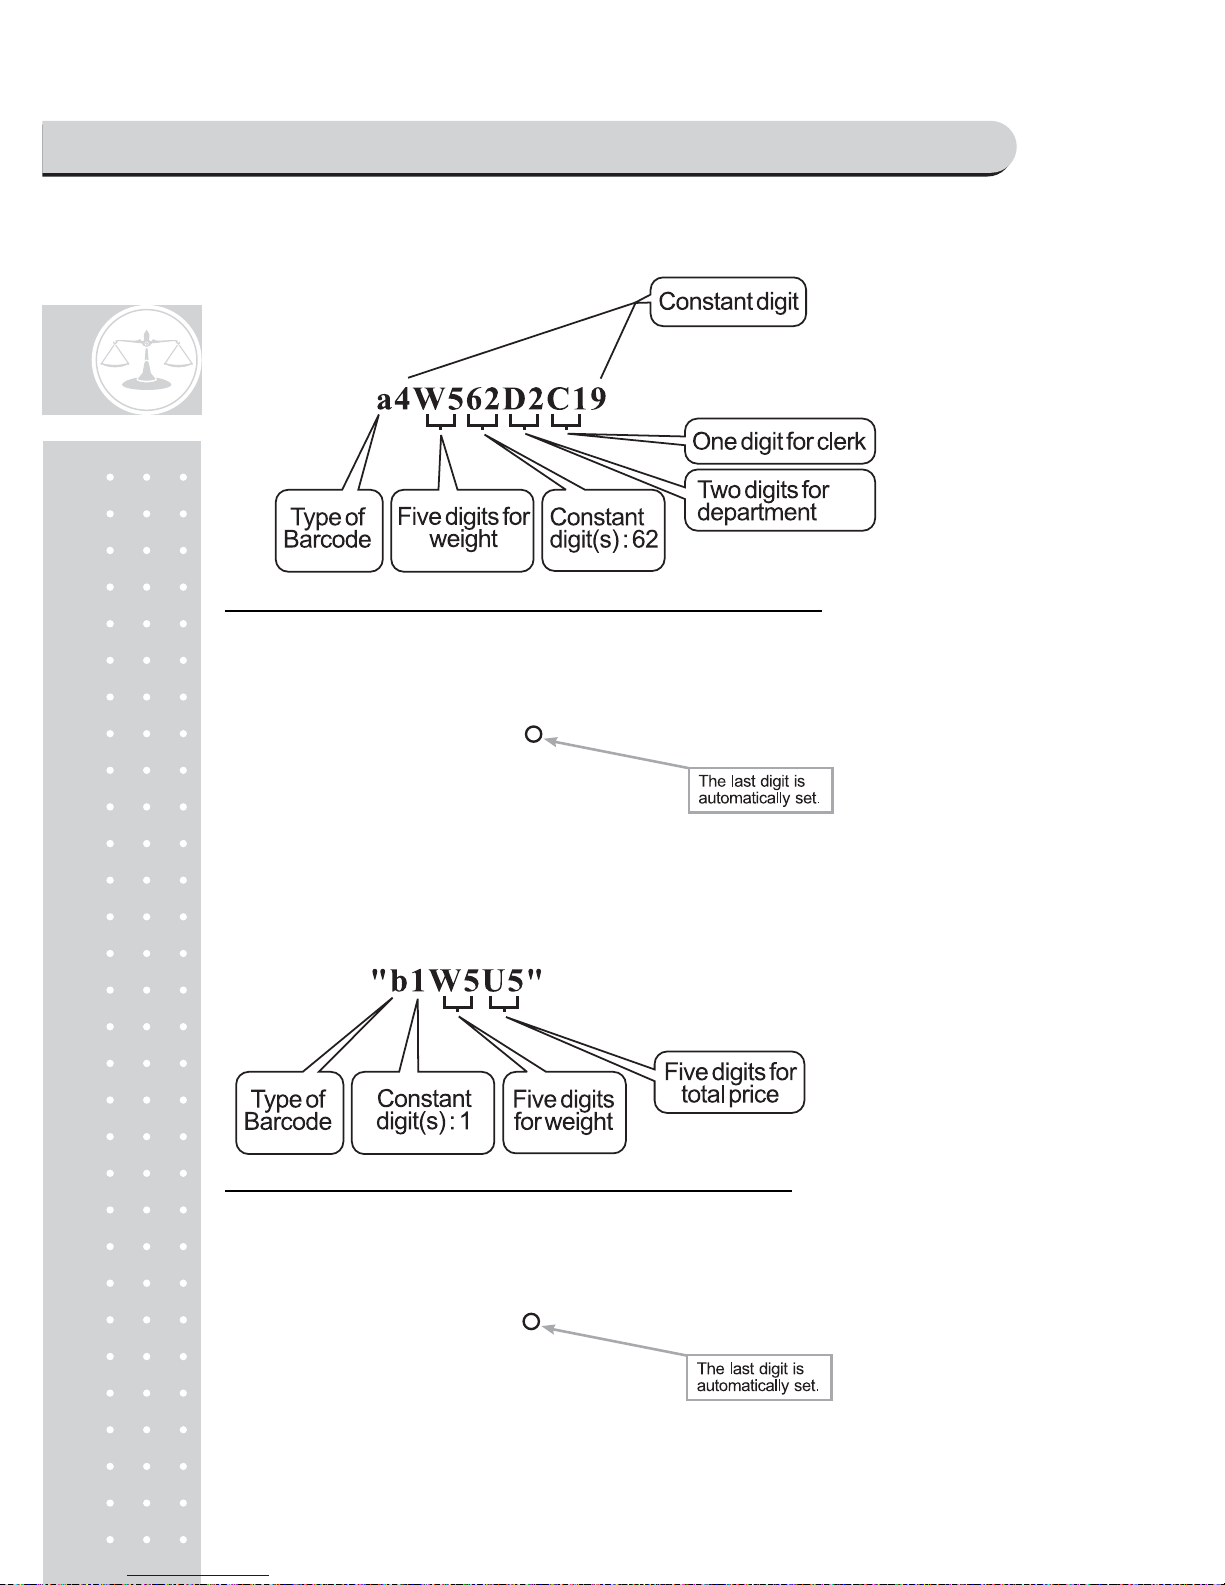
☞ Case 2 (EAN13 type) :
Assumption:
x Weight -1.550
x Department – 15
x Clerk - 1
x String- (total is 12 digits input)Then,
Barcode -> 4 01550 62 15 1 9 (total is 12 digits input)
☞ Case 3 (UPCA type) :
Assumption:
x Weight -1.025
x Unit price - 2.28
x String- (total is 11 digits input)Then,
Barcode -> 1 01025 00228 (total is 11 digits input)
PROGRAM MODE
Page 72
73
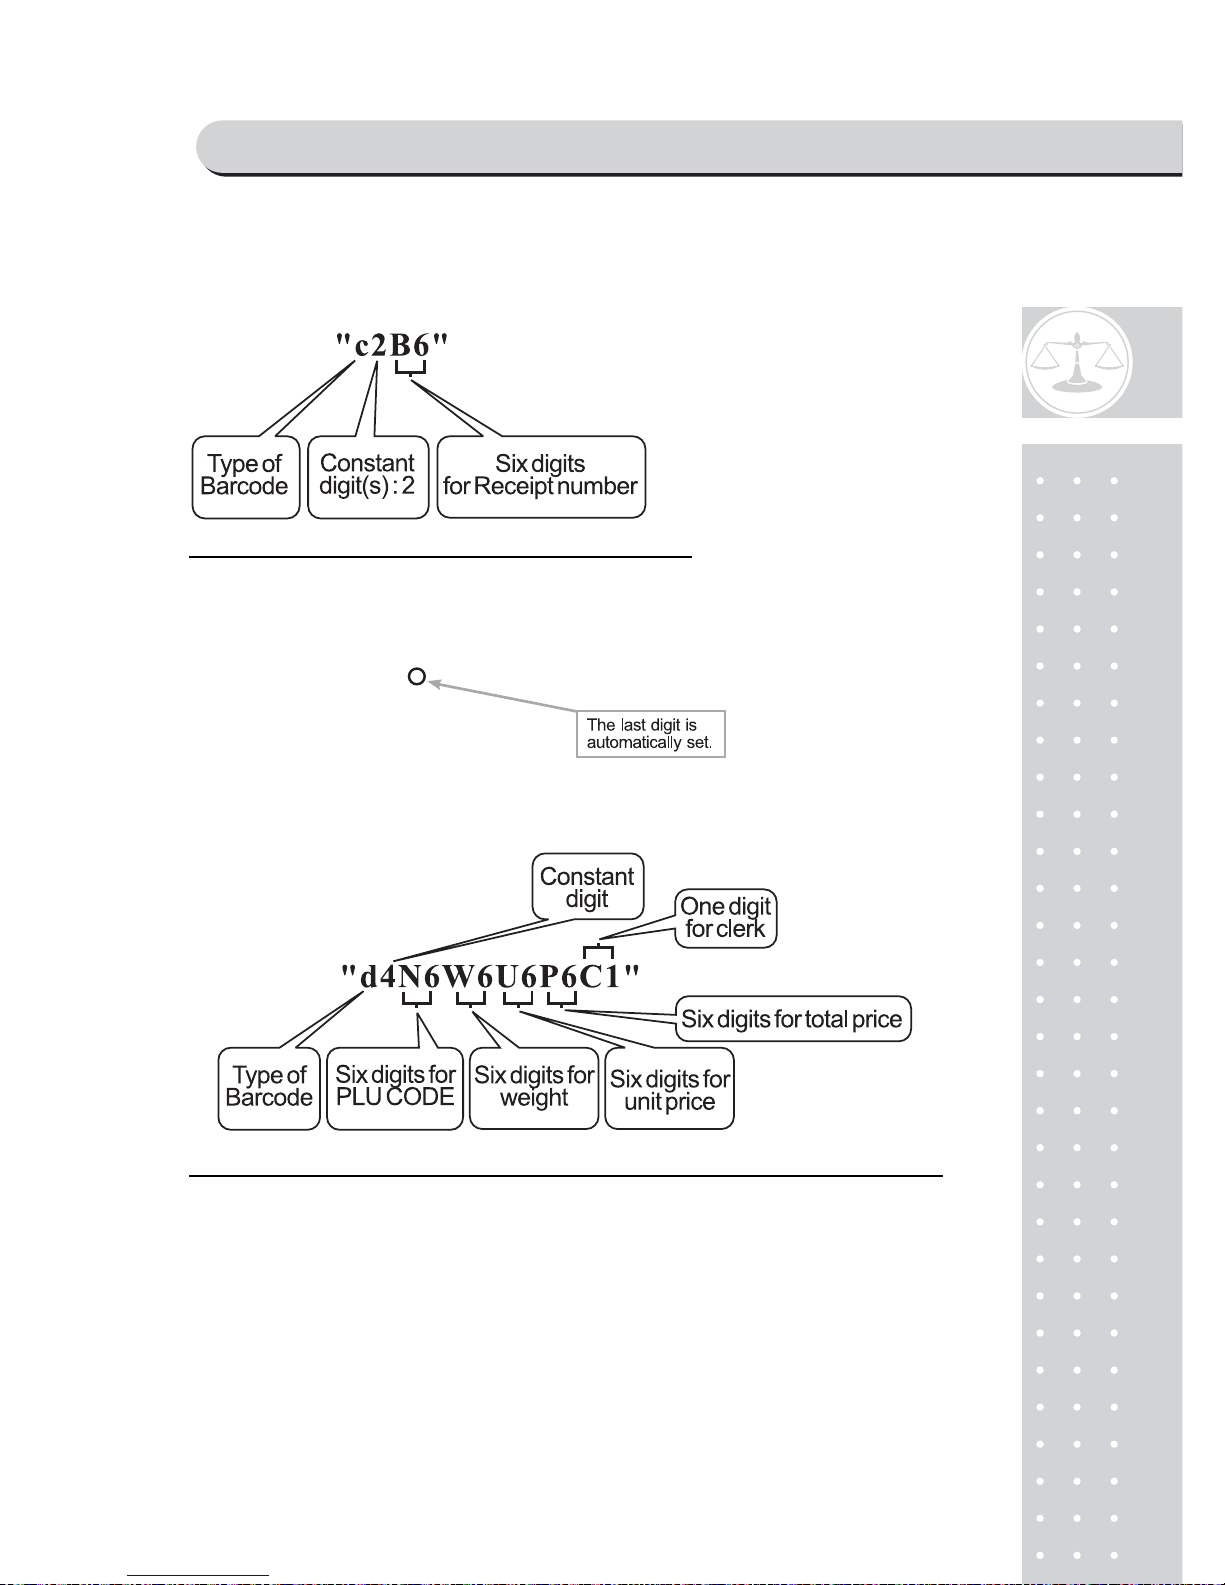
☞ Case 4 (EAN8 type) :
Assumption:
x Number of receipt - 000579
x String- (total is 7 digits input)
Then,
Barcode -> 2 000038 (total is 7 digits input)
☞ Case 5 (CODE128 type) :
Assumption:
x CODE of PLU - 551256
x Weigh - 1.545
x Unit price - 20.00
x Total price - 30.90
x Clerk - 2
x String- (total is 26(max) digits input)
Barcode -> 4 551256001545 002000 003090 2 (total is 26 digits input)
PROGRAM MODE
Page 73
7
4
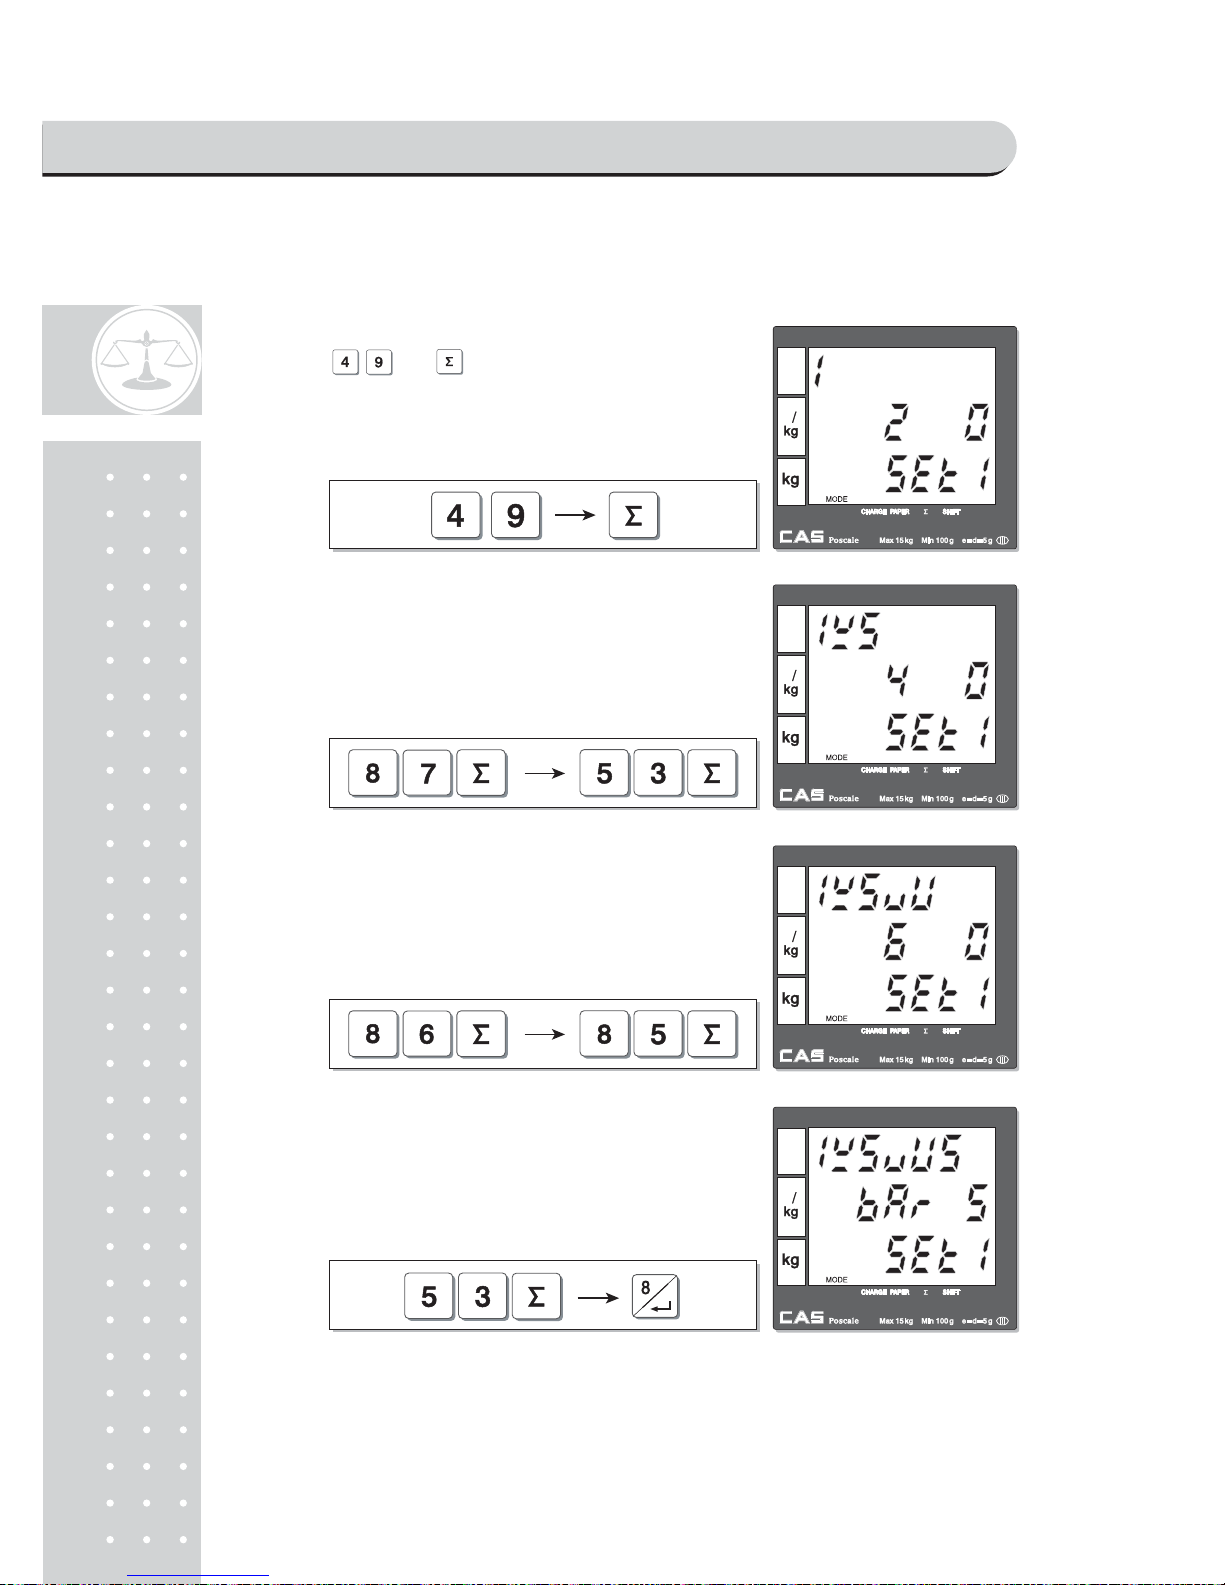
Lets try to set barcode for above case 1. User should input codes- 49, 87,53, 86,
80, 53- for barcode string, 1W5VU5.
③Press and to input "1", the first digit
of string in barcode for a single sale setting mode.
④ Press the following keys to continue to input
barcode string.
⑤ Press the following keys to continue to input barcode
string.
Press the following keys to continue to input barcode⑥
string.
PROGRAM MODE
Page 74
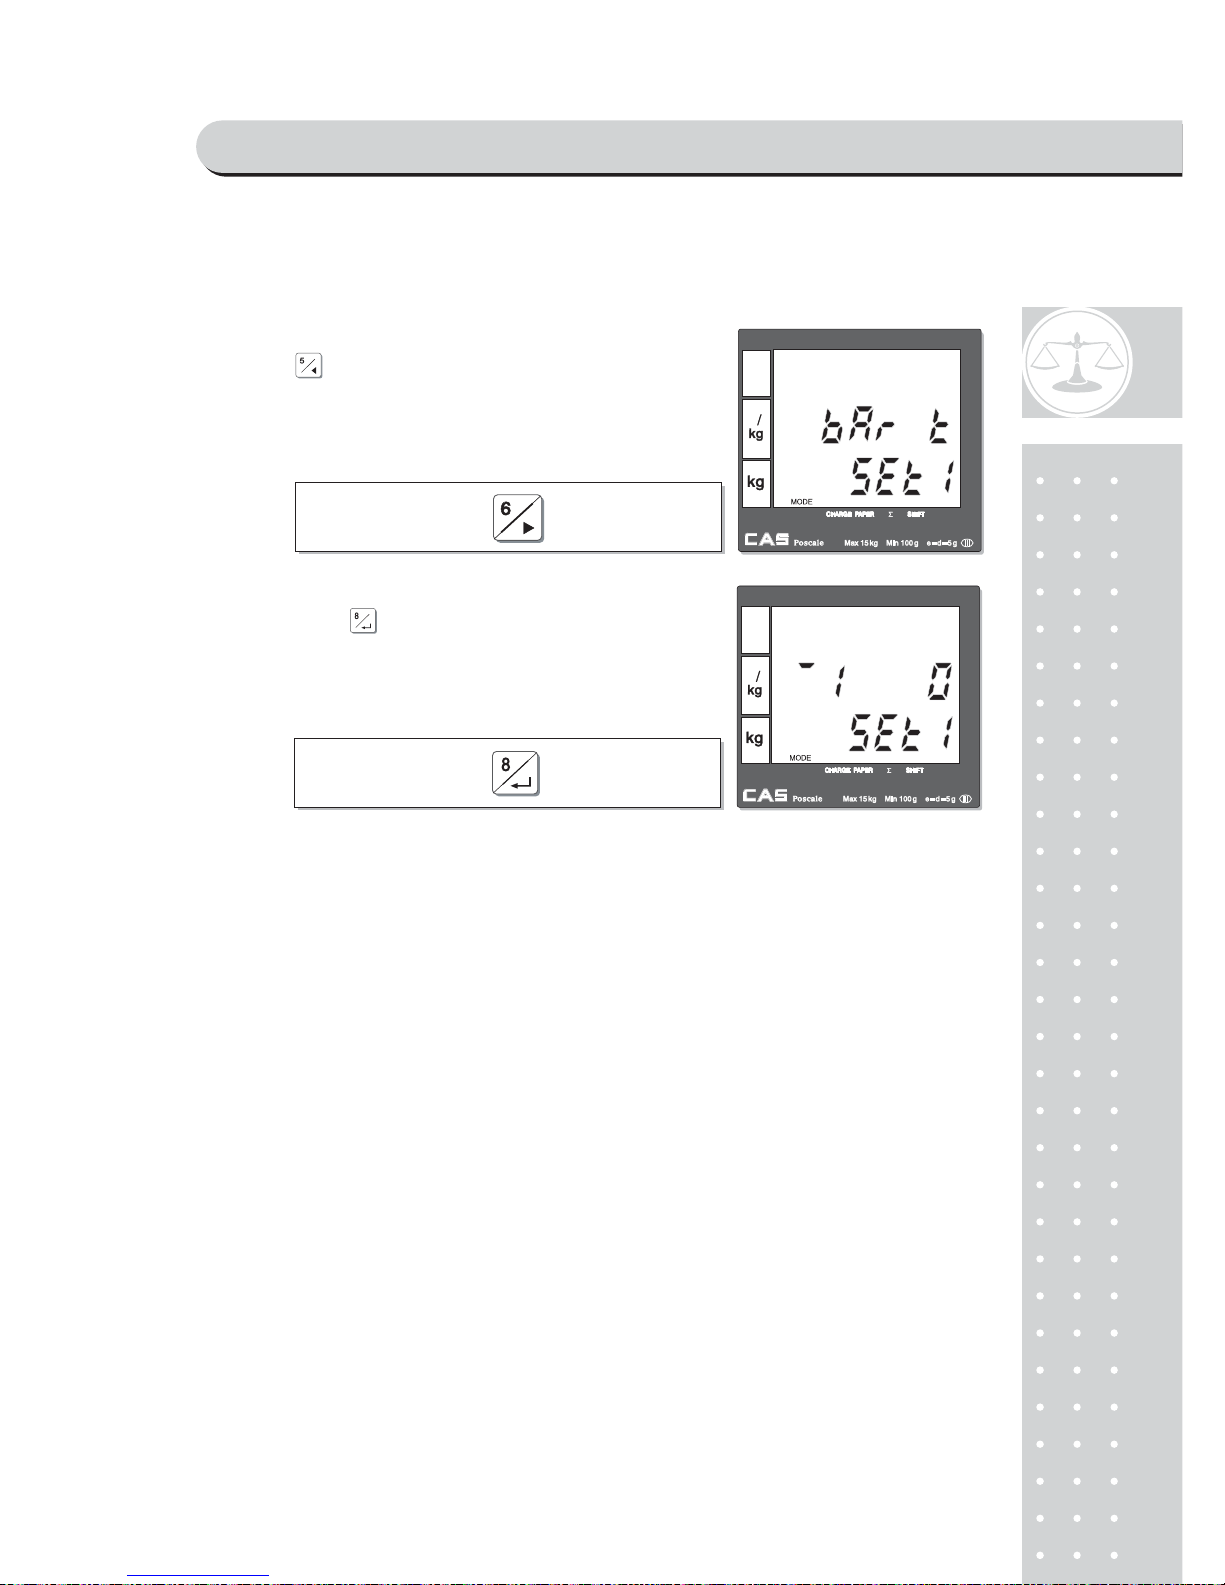
75
e. Barcode format setting for total
■ Same method as "d. barcode format setting for a single transaction."
Example : Single Barcode Format = 1W5VU5 (EAN13)
Total Barcode Format = 1W5VP5 (EAN13)
x Weigh - 1.545
x Unit price - 2.28
x Total price - 2.34
① Press to go to Barcode format setting
for a
total transaction mode.
② Then, press again to get into input barcode
string using code table on page 105. Now you can
to input appropriate barcode string.
PROGRAM MODE
Page 75
76
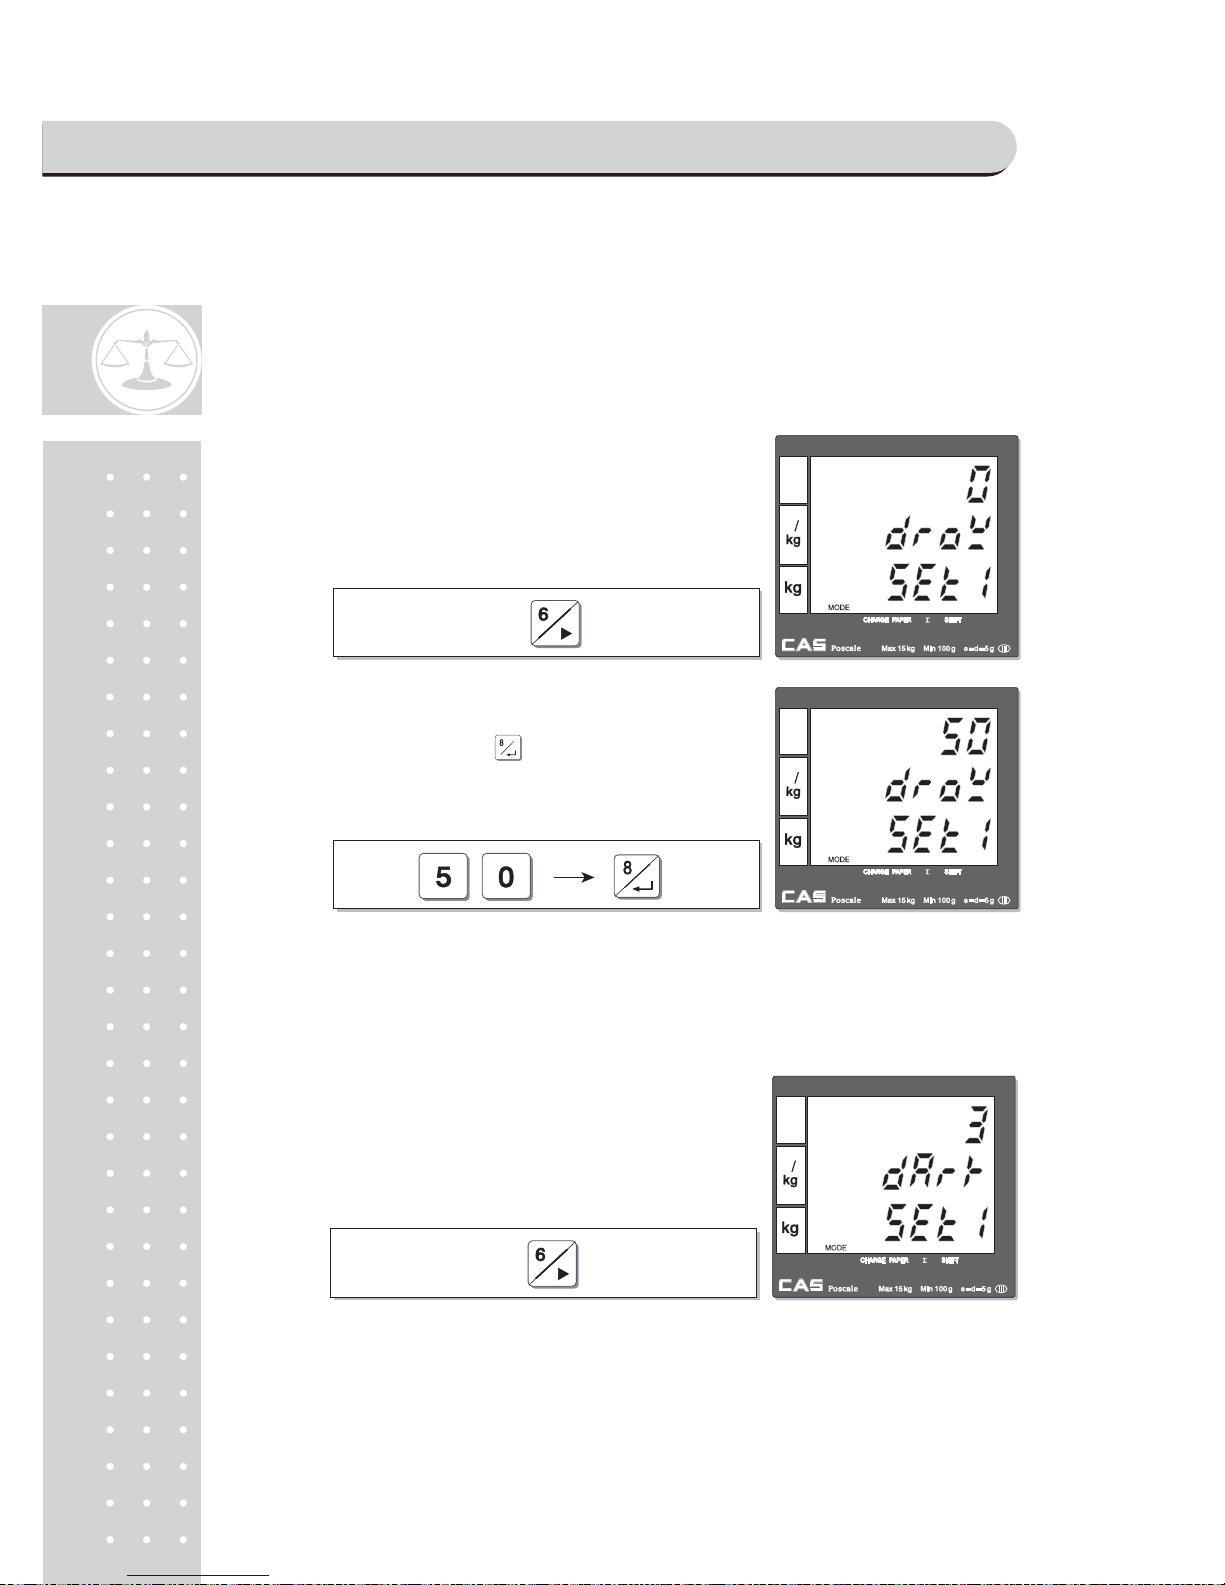
f. Setting pulse length to open cash drawer
■ CAS Poscale may be used with cash drawer 12 volts DC.
■ Default for pulse length of cash drawer is 50 m/s (50/1000 second). However,
user can select any of 1~99 ms, which is best fit for user's own cash drawer.
g. Printing darkness setting
Pulse length setting mode.①
② Press appropriate numeric key to set pulse
length of 1~99 (ms) and to save it.
For example, set 50 ms.
Printing darkness setting mode. User may set①
the darkness 1~5 and the default setting is 3.
PROGRAM MODE
Page 76
7
7
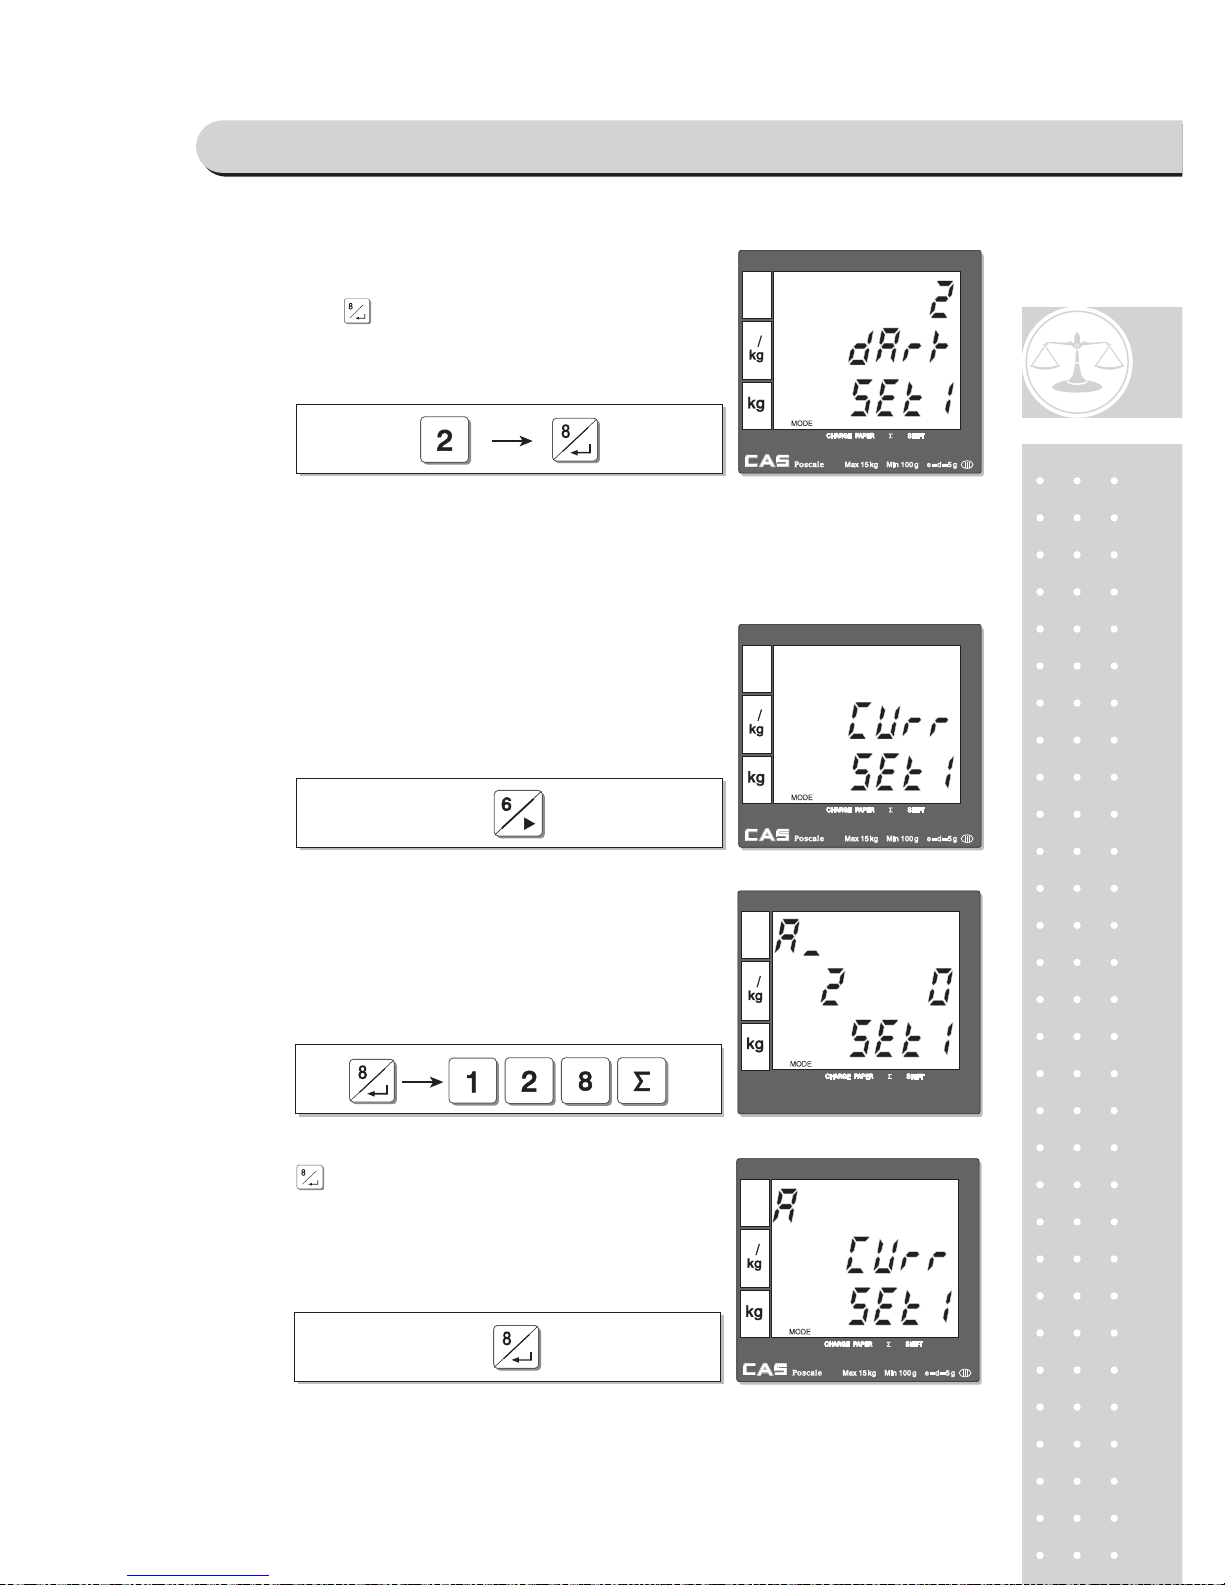
h. Currency symbol or name
② Press appropriate numeric key to set printing darkness
of 1~5 and to save it. For example, set 2.
"5" is the most dark set.
Currency symbol or name setting mode. User①
can input appropriate characters for currency,
using code table on page 104. Maximum
number of character is 3.
Let’s try to input "€ " for Euro.
② Input "128" for € symbol.
Press③ to save it.
PROGRAM MODE
Page 77

7
8
Chapter 10.
SET 2
(Date, Time & Default setting)
PROGRAM MODE
Page 78
79
Chapter 10. SET 2 (Date, Time & Default setting)
This chapter explains how to set date and time, erase all of PLU data. In addition
to these functions it also shows how to do one-touch default setting.
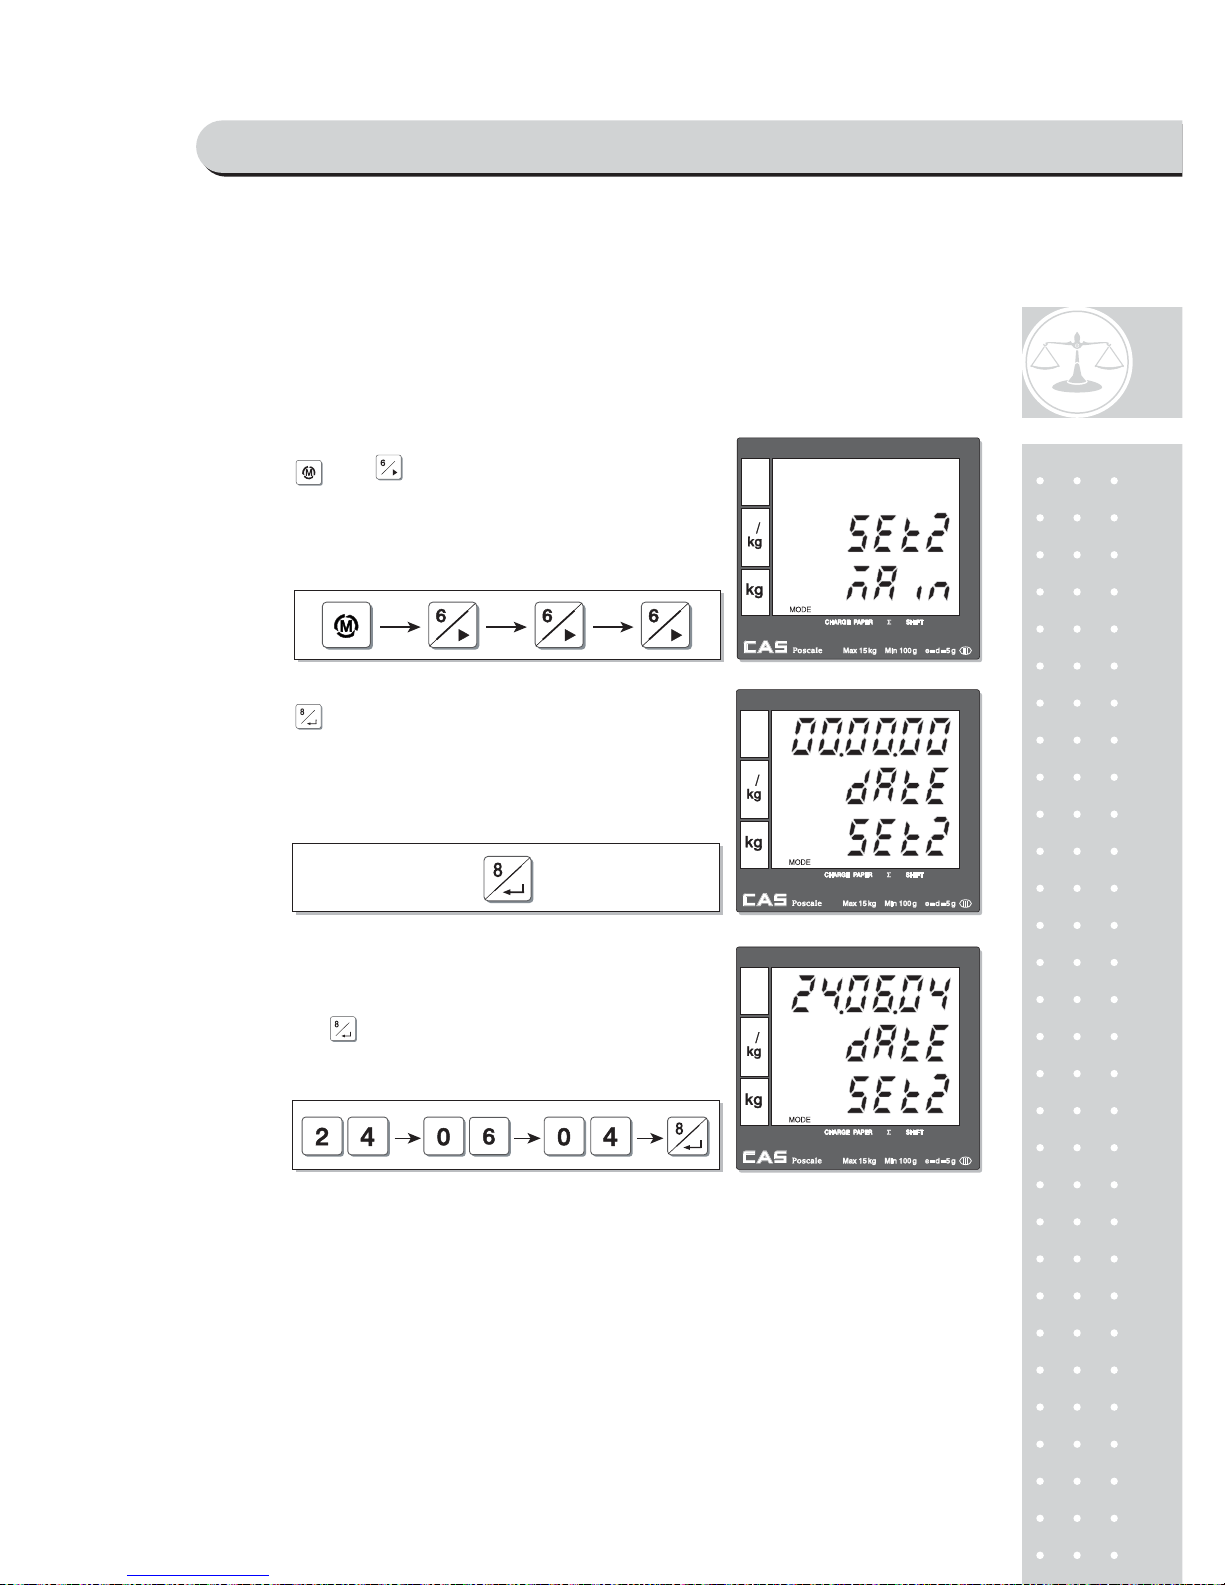
a. Date & time
①Press and to go to SET 2 mode.
②Press to go to date setting mode.
③Press any numerical keys you wish to input.
For example, let's input "24/06/2004" as date,
and press to save date.
PROGRAM MODE
Page 79
80
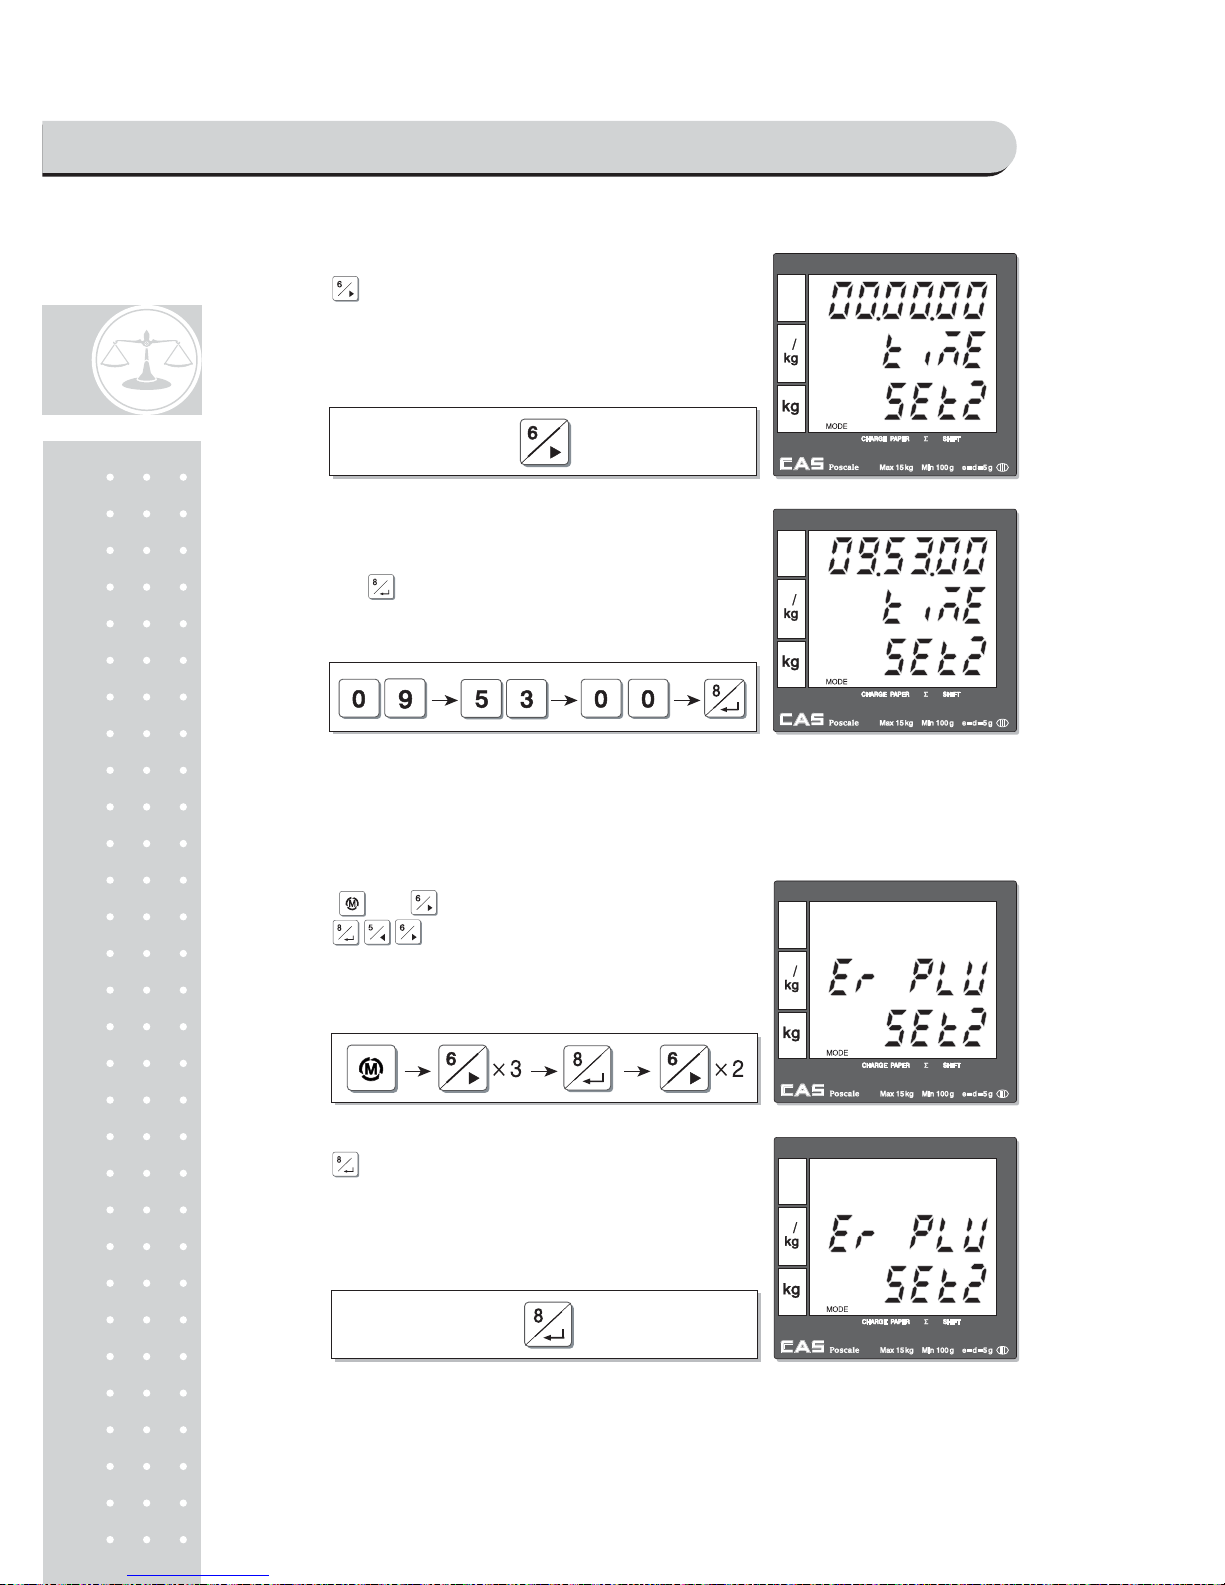
b. One touch PLU data erasing & default setting
④Press to go to T ime Setting mode.
⑤Press any numeric keys you wish to input.
For example, lets input "09:53:00" as time,
and press to save time.
①Using and go to SET 2 mode. Then,
press to get PLU Erasing mode.
②Press to erase all PLU data.
PROGRAM MODE
Page 80
81
Default
<SET1>
■ BAUD Rate (bps) = 115200
■ Auto Power-off time = 00
■ Discount Rate = 0%
■ Cash Drawer-Opening Pulse = 50ms
■ Printing Darkness = 3
<OPTION>
■ Duplicate receipt = No
■ Image (graphic logo) = No
■ Printing barcode for a single of transaction = Yes
■ Printing barcode for total transaction = Yes
■ Obligatory Payment = No
■ Discount = Yes
■ PLU code printing = No
■ Printing all reports = No
■ Printing tax = Yes
■ Use Back Light = No
■ PLU SAVE = No
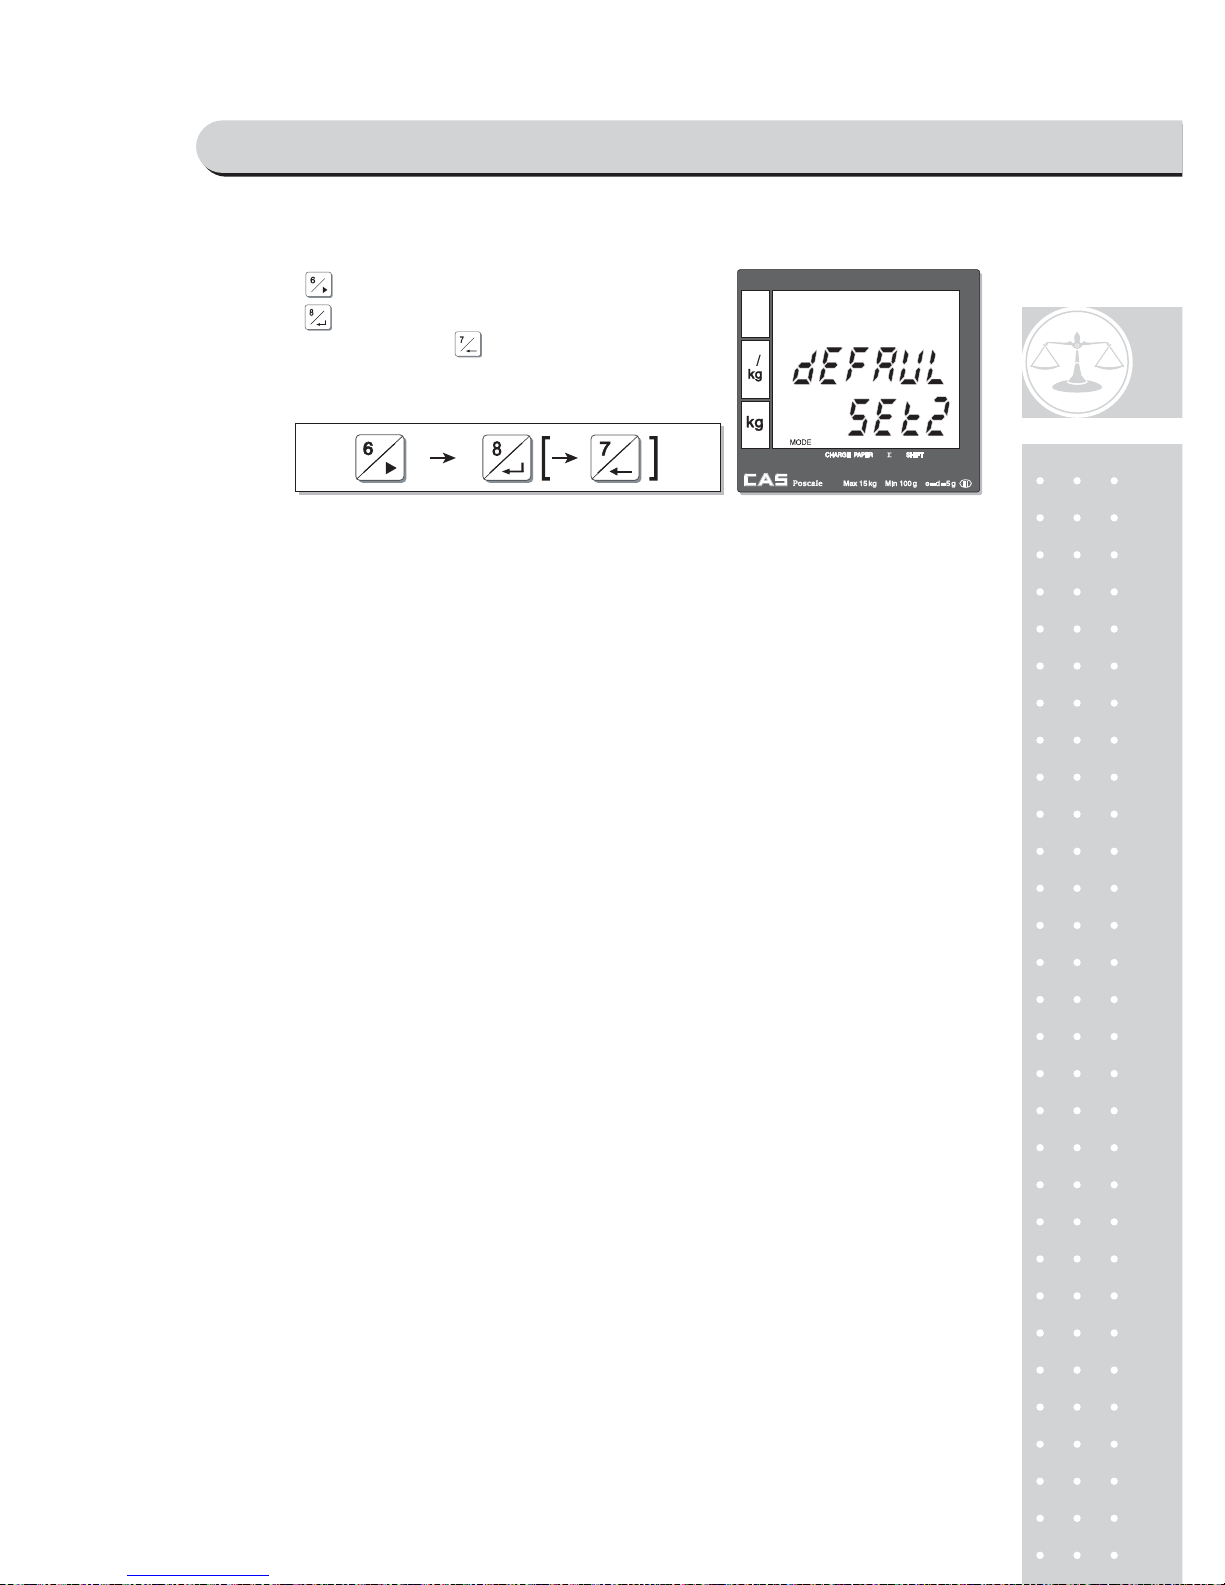
③ Press to go to default setting mode. Then,
press to set default.(you can exit to normal
weighing mode using ).
PROGRAM MODE
Page 81

82
Chapter 11.
OPTION(Receipt Formatting)
PROGRAM MODE
Page 82
83
Chapter 11. OPTIONS (Receipt Formatting)
This chapter explains how to enable/disable back light and save PLU after transaction.
duplicate receipt, printing barcode for a single transaction or total. It also explains how to
enable/disable printing graphic logo on receipt, code of PLU and all of reports in
the closing report. Furthermore, this chapter explains how to you to set obligatory
payment function and discount function.
The option setting is receipt-forma tting functions except obligatory payment and
discount functions.
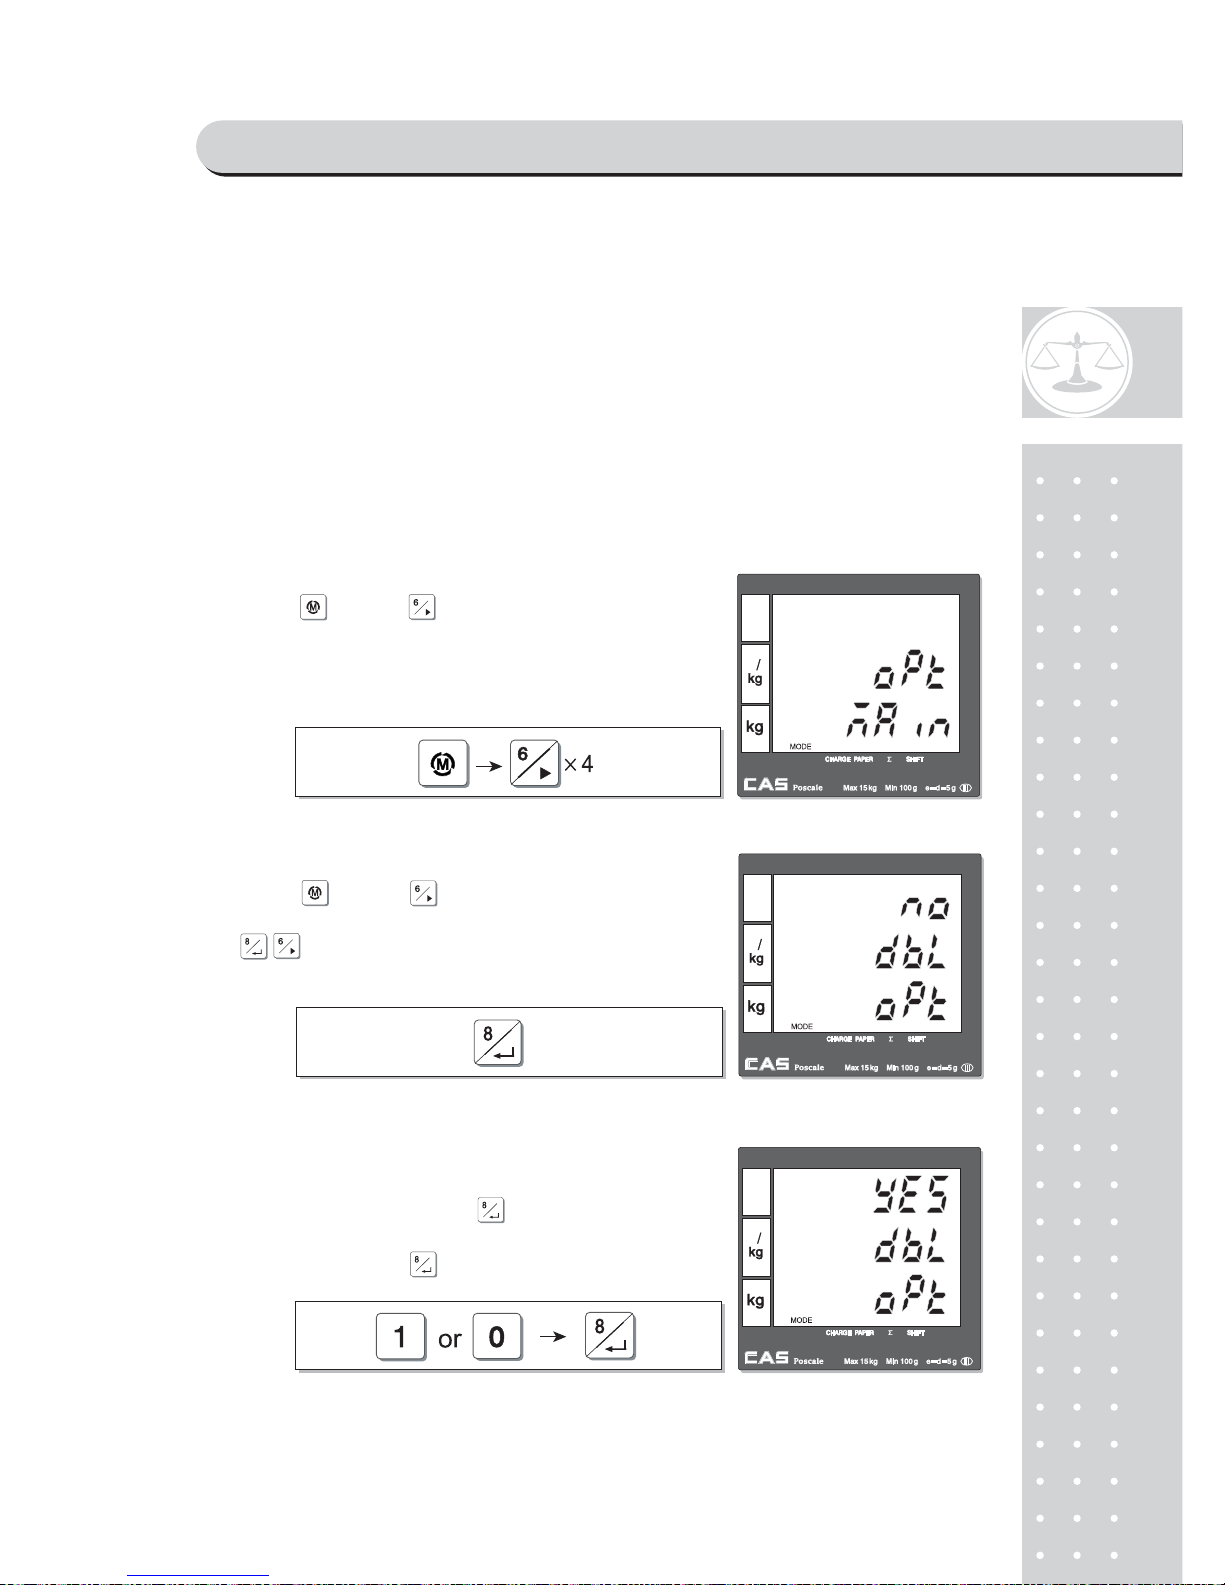
a. Duplicate receipt
①
Using key and to get into option
setting mode from main menu.
②Using key and go to option setting
mode from main menu. And then press
to get into duplicate ticket printing
setting mode.
③User may select YES or NO by pressing "1" or
"0" respectively, and press to save it. Use
"C" key to change "1" or "0" input before
saving by pressing .
PROGRAM MODE
Page 83
8
4
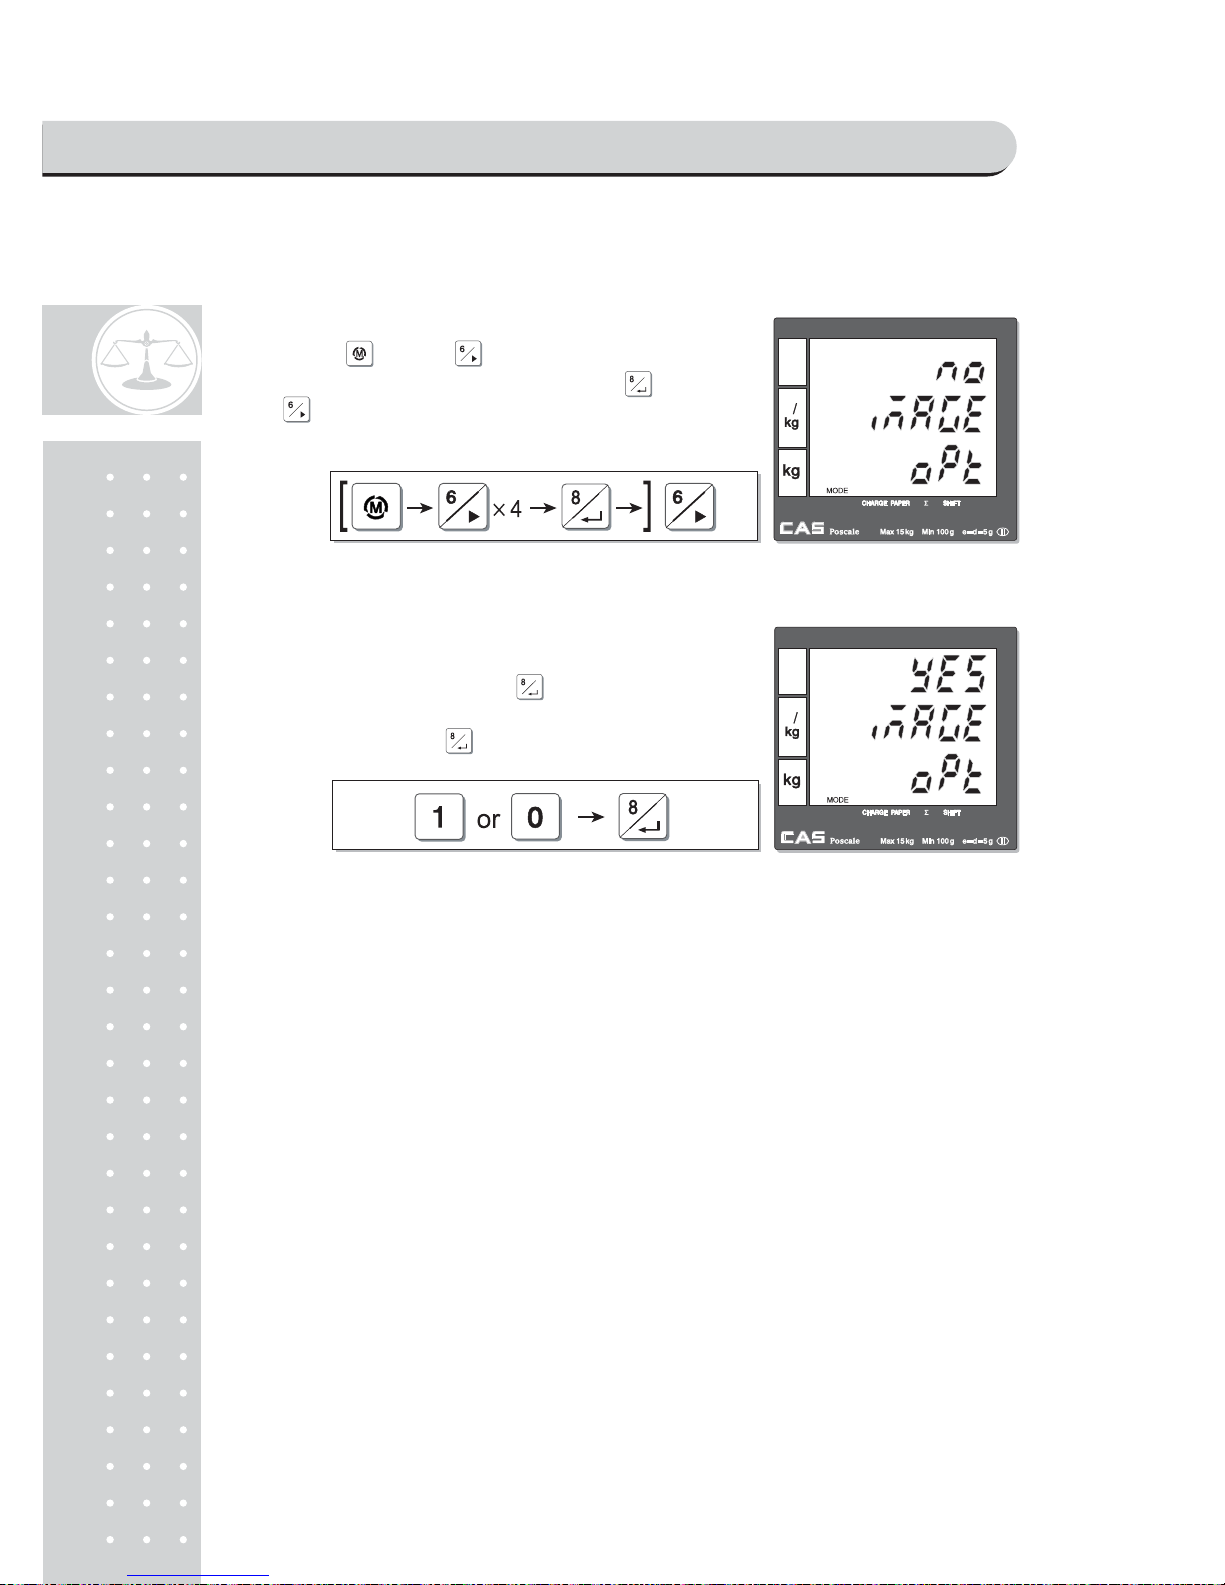
b. Image (graphic logo)
* Image : Yes = printing graphic logo on receipt
①(Using key and go to option setting
mode from main menu. And then press )
to get into image setting mode.
②User may select YES or NO by pressing "1" or
"0" respectively, and press to save it. Use
"C" key to change "1" or "0" input before
saving by pressing .
PROGRAM MODE
Page 84
85
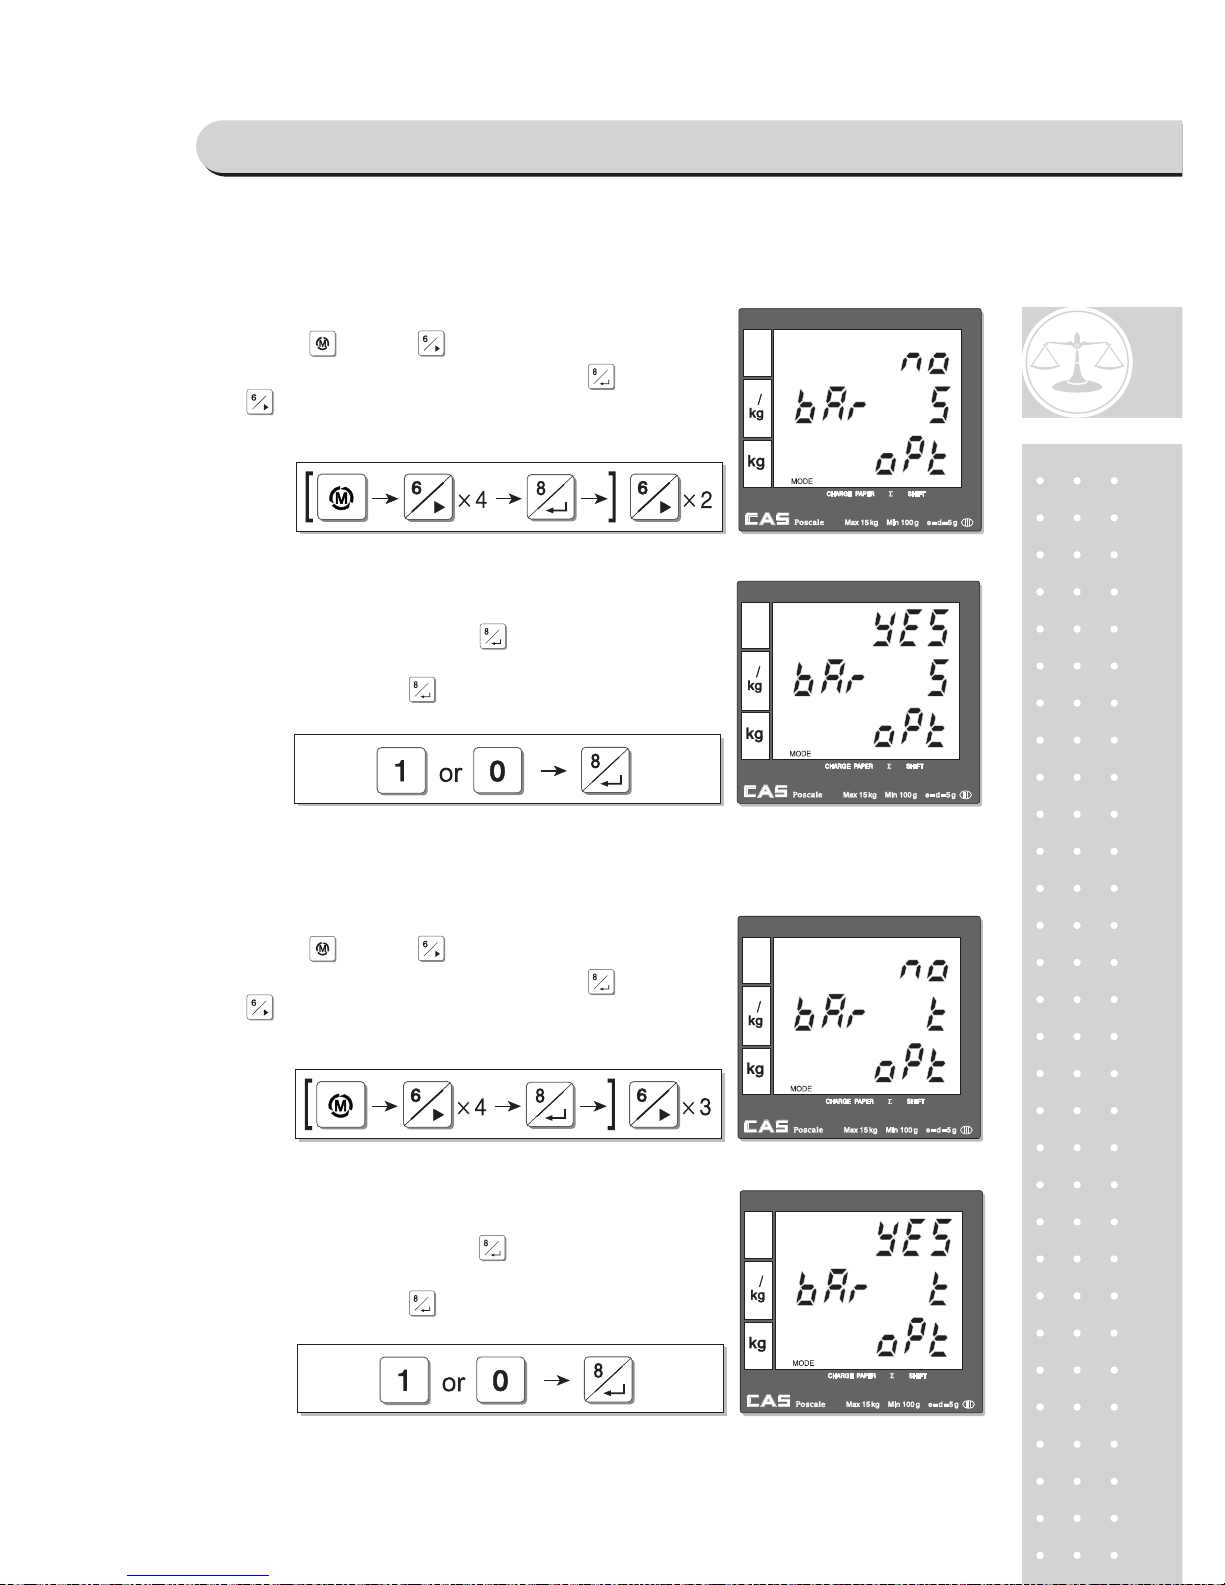
c. Printing barcode for a single of transaction
d. Printing barcode for total transaction
①(Using key and go to option setting
mode from main menu. And then press )
to get into
barcode printing for a single
of transaction setting mode.
②User may select YES or NO by pressing "1" or
"0" respectively, and press to save it. Use
"C" key to change "1" or "0" input before
saving by pressing .
①(Using key and go to option setting
mode from main menu. And then press )
to get into barcode printing for tota l
transaction setting mode.
② User may select YES or NO by pressing "1" or
"0" respectively, and press to save it. Use
"C" key to change "1" or "0" input before
saving by pressing .
PROGRAM MODE
Page 85
86
PROGRAM MODE
Page 86
8
7
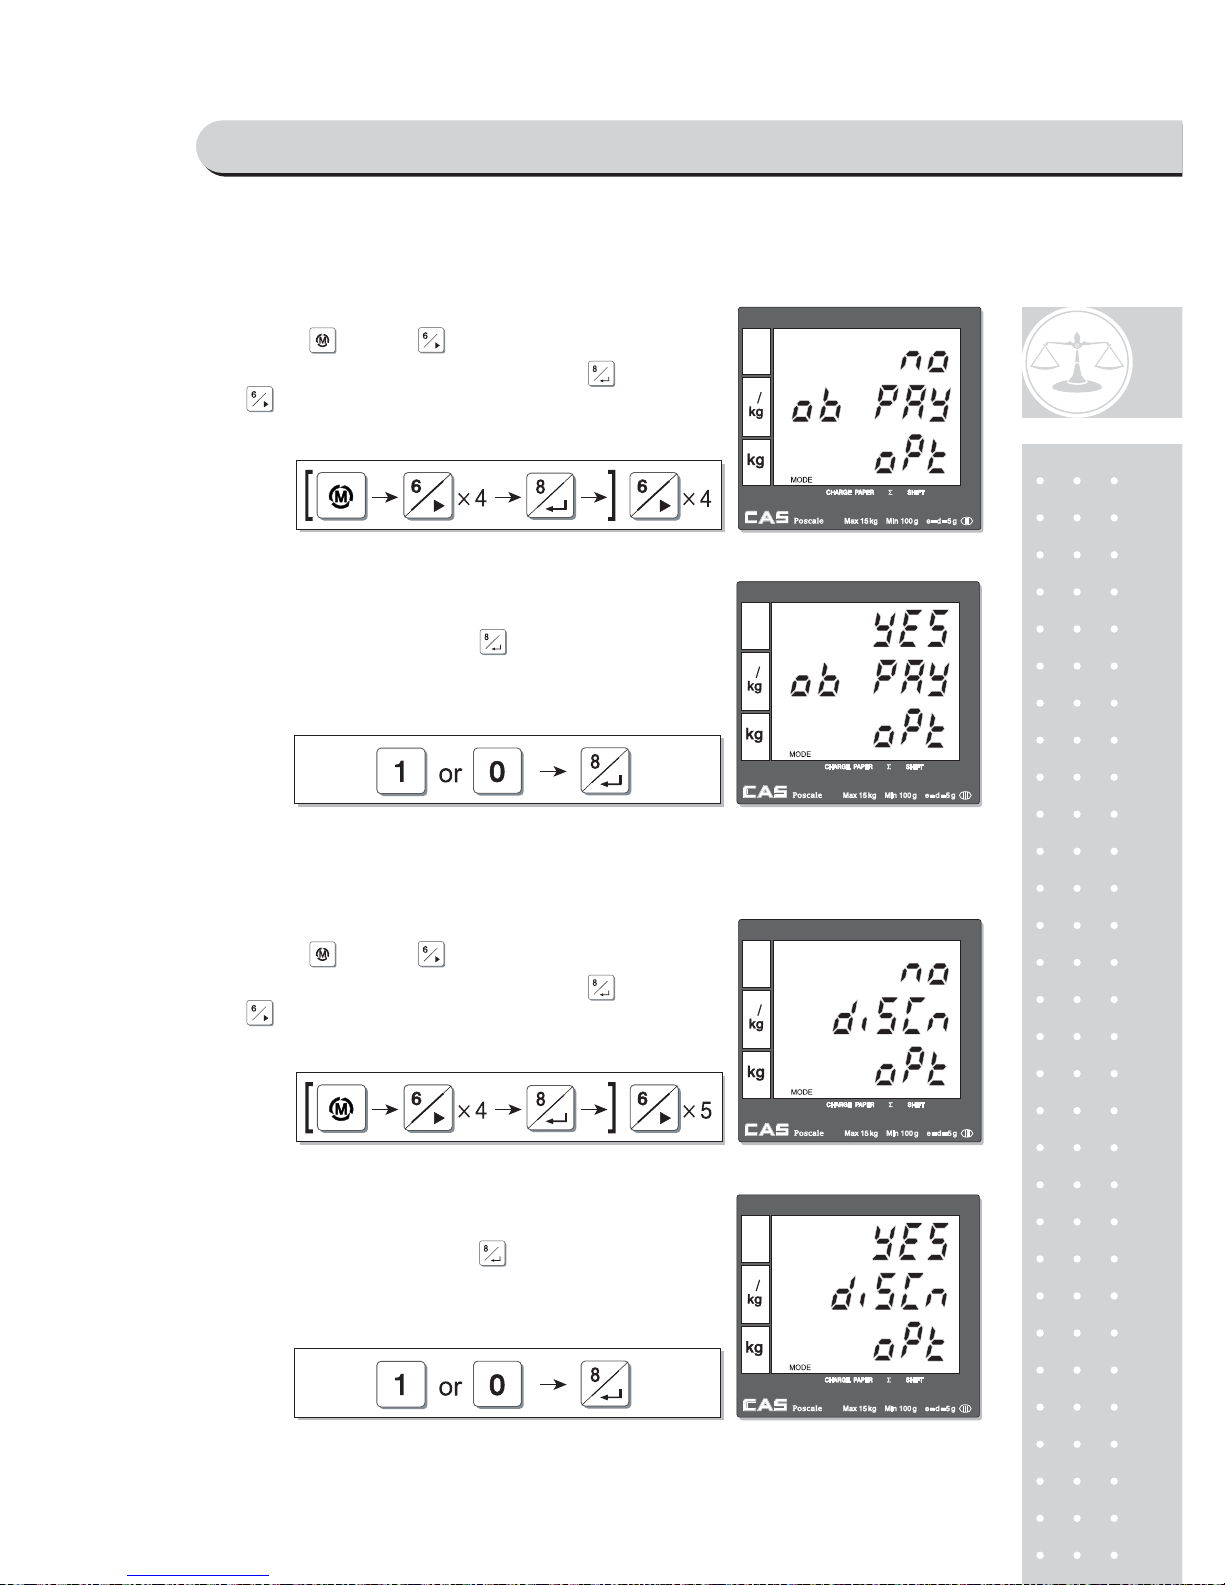
e. Obligatory payment
f. Discount
①(Using key and go to option setting
mode from main menu. And then press )
to get into obligatory payment option
mode.
②User may select YES or NO by pressing "1" or
"0" respectively, and press to save it.
①(Using key and go to option setting
mode from main menu. And then press )
to get into discount option mode.
② User may select YES or NO by pressing "1" or
"0" respectively, and press to save it.
PROGRAM MODE
Page 87
8
8
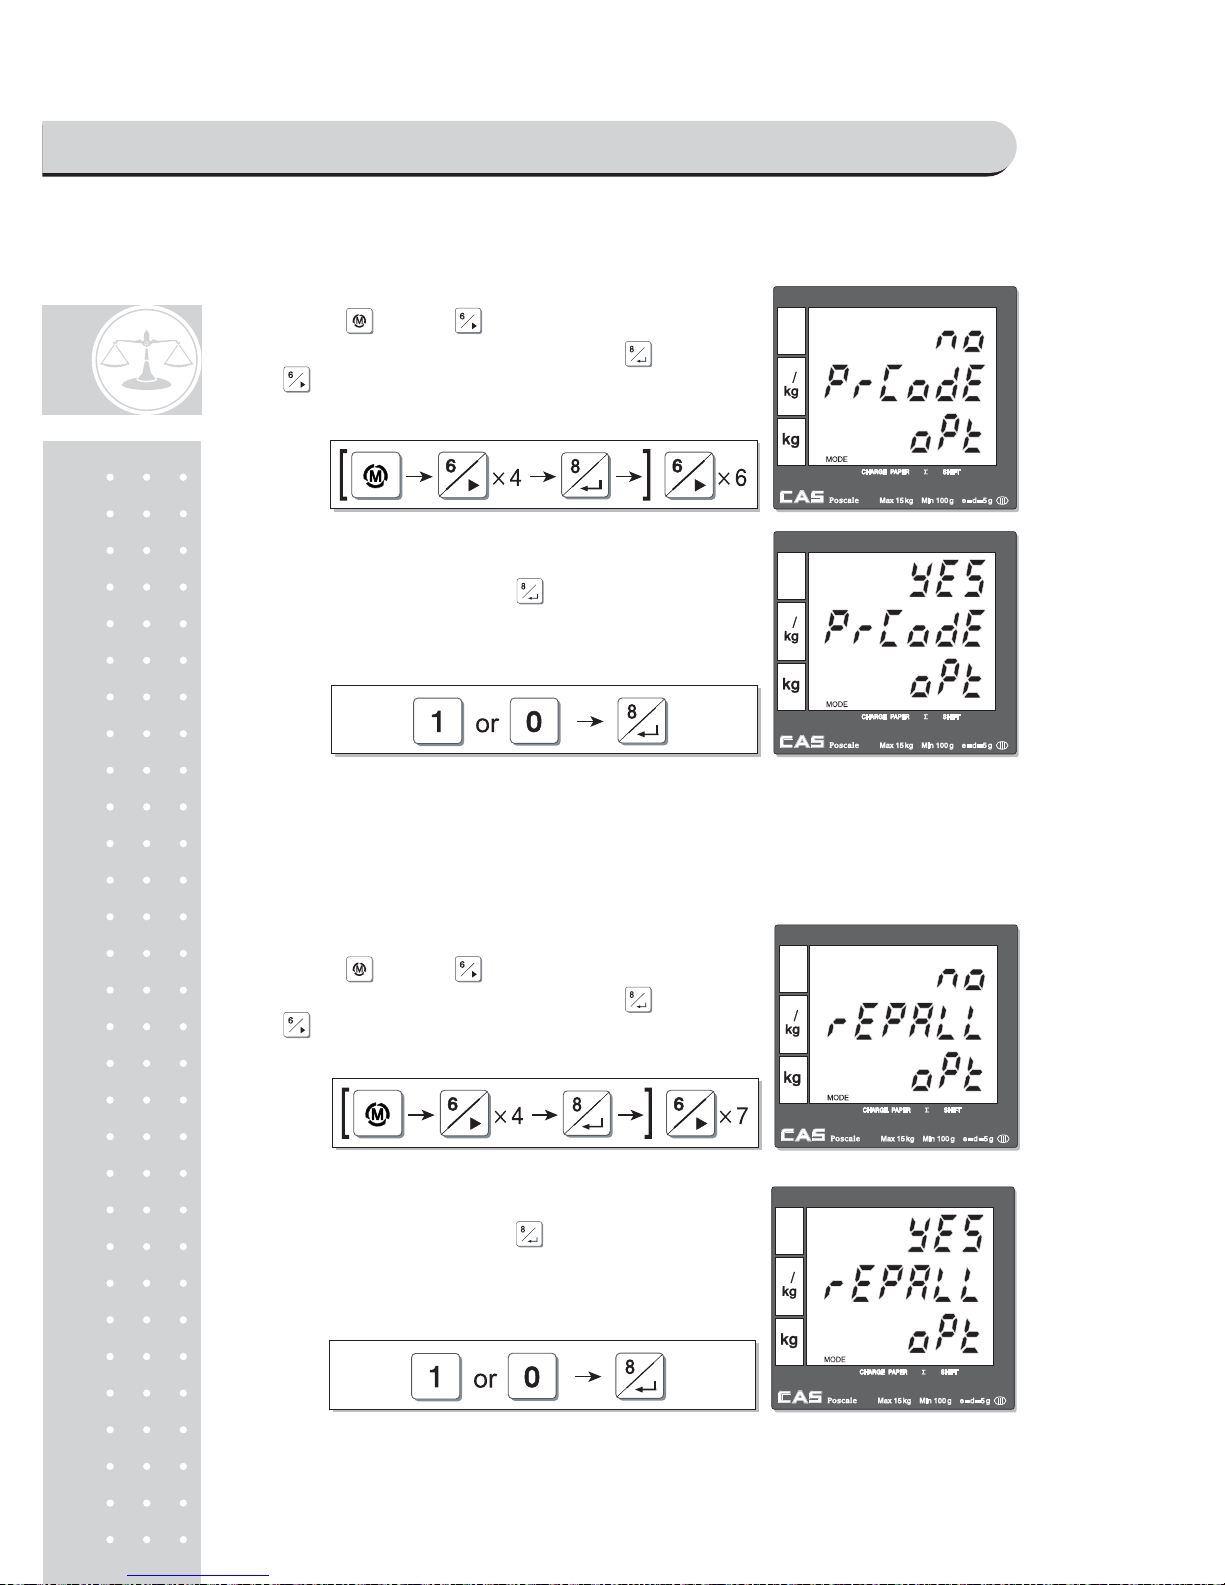
g. Printing PLU code
h. Printing all reports
■ Select "YES" for all reports printed or "No" for only
closing without other reports when executing "close".
①(Using key and go to option setting
mode from main menu. And then press )
to get into PLU code printing mode.
②User may select YES or NO by pressing "1" or
"0" respectively, and press to save it.
①(Using key and go to option setting
mode from main menu. And then press )
to get into all report printing mod e.
②User may select YES or NO by pressing "1" or
"0" respectively, and press to save it.
PROGRAM MODE
Page 88
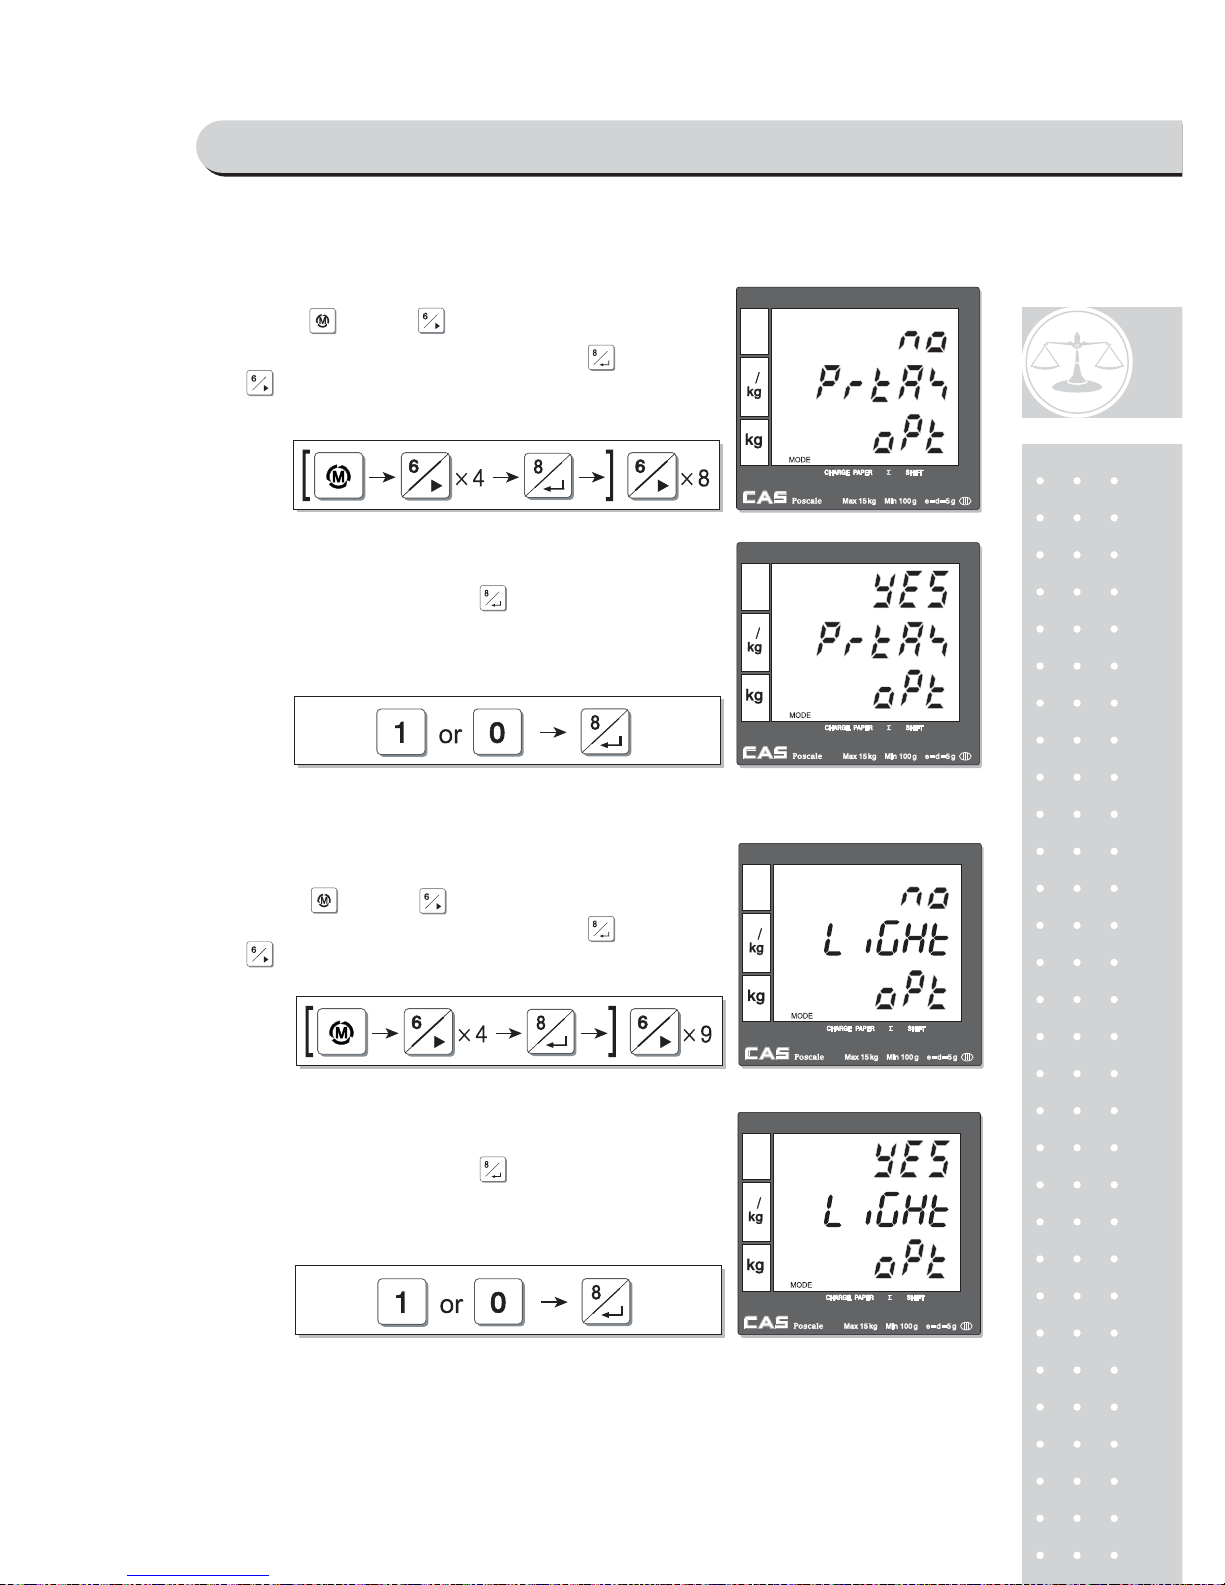
89
i. Printing tax
j. Use back light
① (Using key and go to option setting
mode from main menu. And then press )
to get into
tax printing mode.
② User may select YES or NO by pressing "1" or
"0" respectively, and press to save it.
① (Using key and go to option setting
mode from main menu. And then press )
to get into
back light setting mode.
② User may select YES or NO by pressing "1" or
"0" respectively, and press to save it.
PROGRAM MODE
Page 89
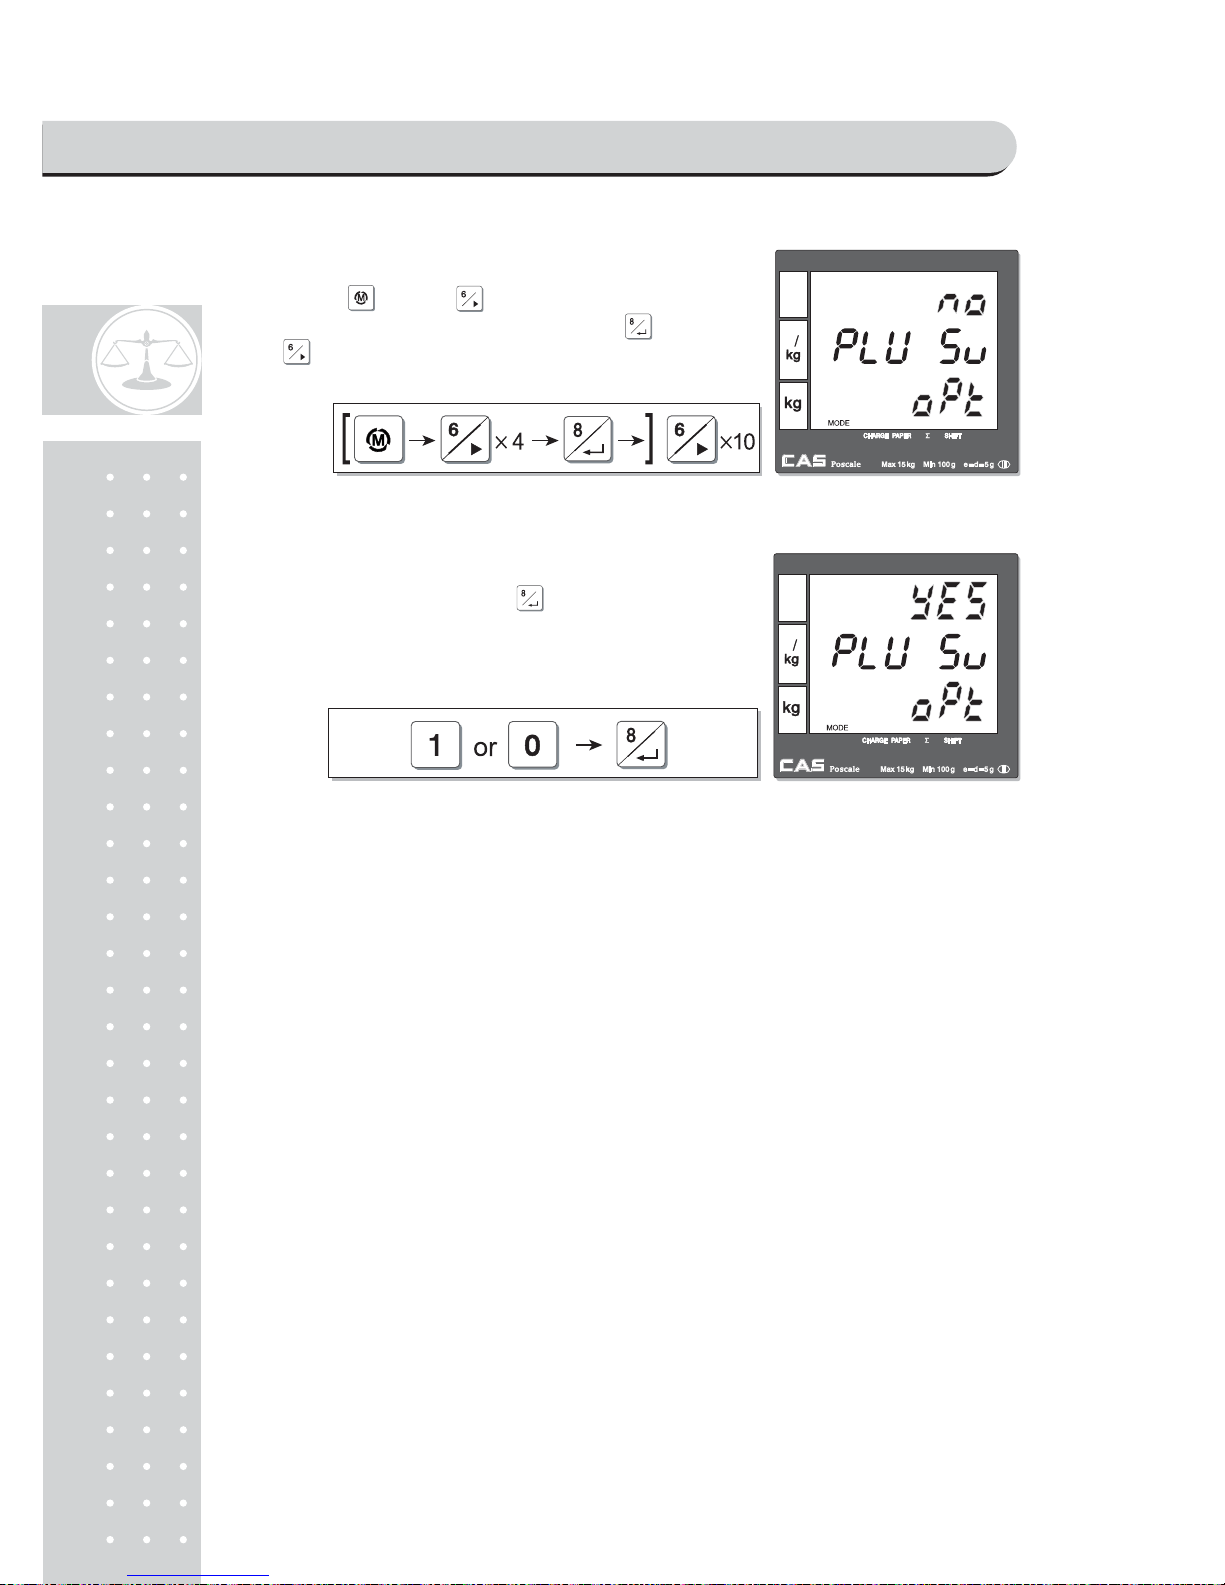
90
k. Saving PLU
① (Using key and go to option setting
mode from main menu. And then press )
to get into
PLU saving mode.
② User may select YES or NO by pressing "1" or
"0" respectively, and press to save it.
PROGRAM MODE
Page 90

91
Chapter 12.
CLERK
PROGRAM MODE
Page 91
92
Chapter 12. CLERK
This chapter explains what kind of clerk modes there are and how different they
are. In addition, it shows how to input name of clerk 1~4.
a. Clerk mode
There are three different type of clerk modes. max number of sales per CLERK : 99
Table 3 : Clerk Mode
Modes Description Receipt Printing
0
All clerks can use the scale for a
series of sales activity.
It prints ticket (receipt) including
each item and total information.
1
Only one clerk can use the scale for a
series of sales activity. However, other
clerk can use the scale for other series of
sales activities in this mode.
It prints only part of ticket (receipt),
which a transaction is made, and
prints total amount after a series of
transactions are completed.
2
(Supermarket
mode)
Only one transaction per clerk at a
moment.
It prints Label (receipt) only for one
transaction per clerk.
3
(Label-1 Mode)
Only one transaction per clerk at a
moment.
It prints Label (receipt) only for one
transaction per clerk.
4
(Label-2 Mode)
Only one transaction per clerk at a
moment.
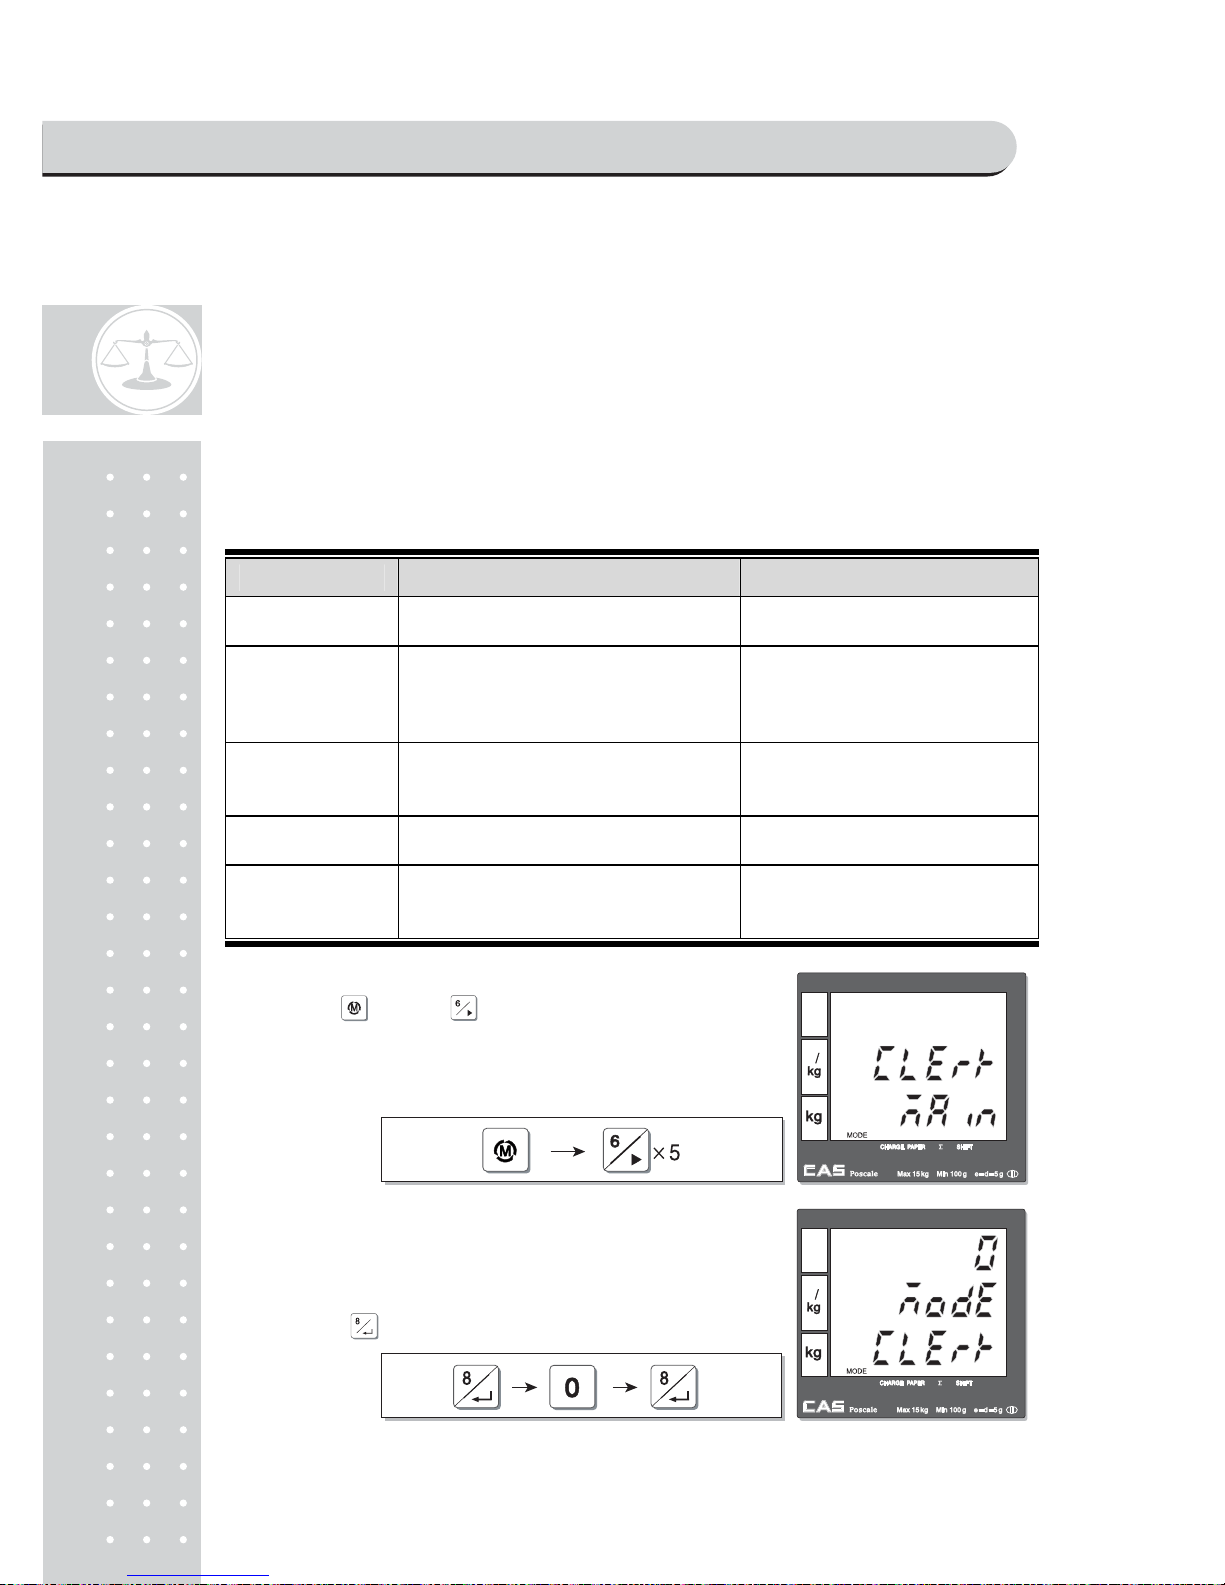
Using key and go to clerk setting
mode
from main menu.
①Using key and go to clerk setting
mode from main menu.
②User may select one of three clerk modes, "0",
"1", or "2" by inputting appropriate numeric
key. For example, "0" here. Then, save it by
pressig .
PROGRAM MODE
Page 92
93
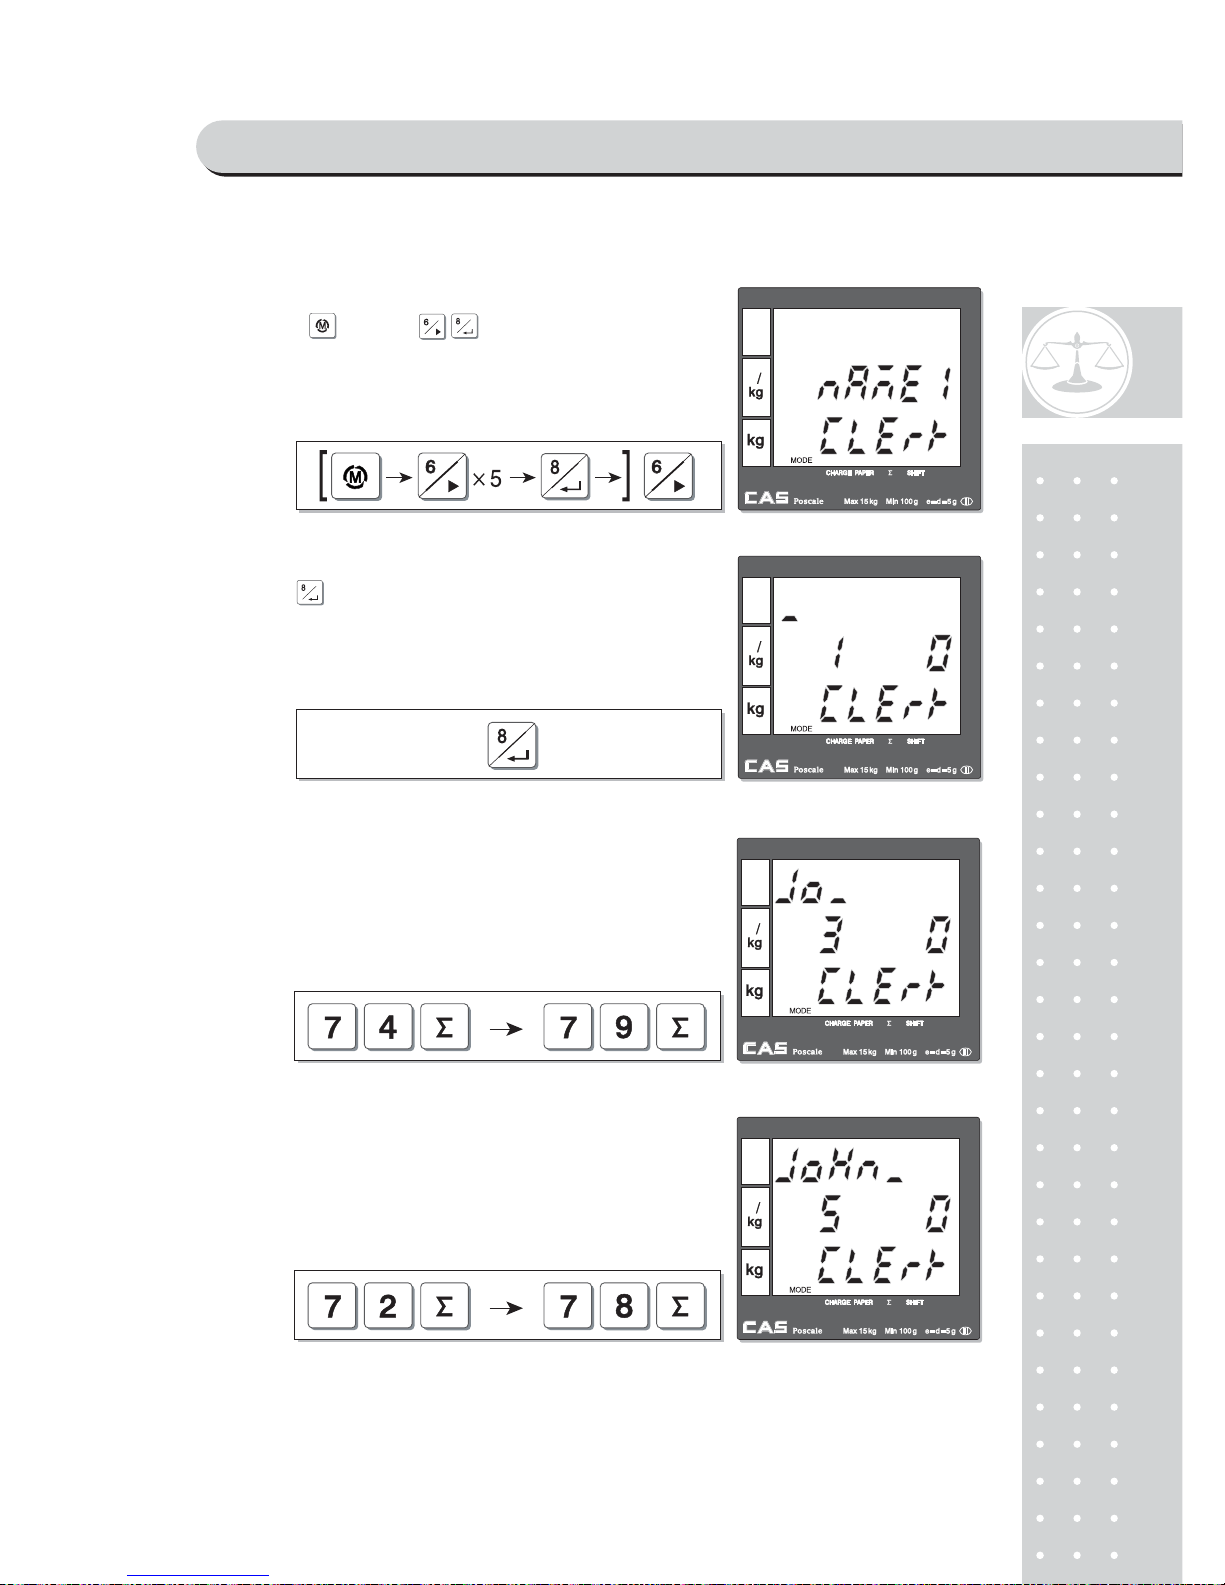
b. Clerk name input: 1~4
①(Using key and , go to clerk name
setting mode from main menu.
②Press to get into clerk name 1 setting
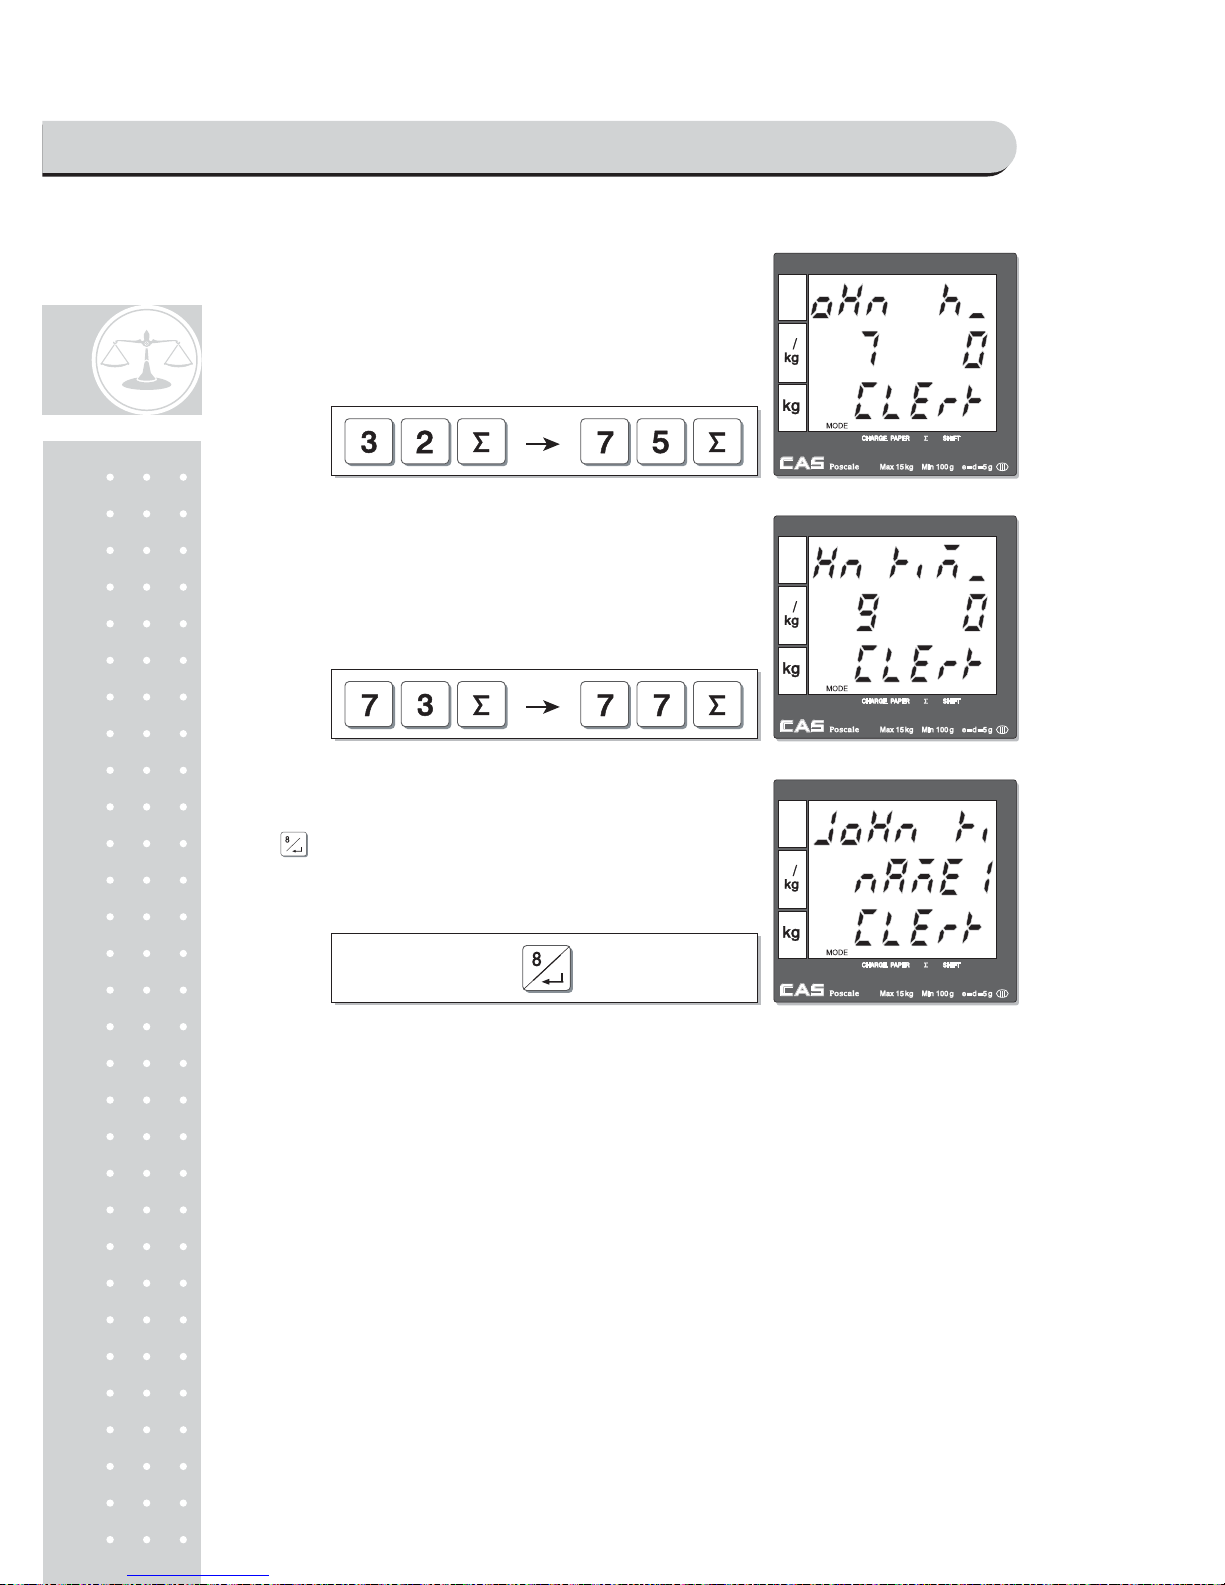
mode. User may input up to 16 characters in
accordance to "code table" on page 105. For
example, lets input "John Kim" as clerk name 1.
③Input clerk' name using appropriate numeric
keys in accordance to "code table" on page 105.
④Input clerk' name using appropriate numeric keys
in accordance to "code table" on page 105.
PROGRAM MODE
Page 93
9
4
* Whenever user wants to go back to main menu use .
* User may input other clerk names as above up to 4 names.
⑤Input clerk' name using appropriate numeric
keys in accordance to "code table" on page 105.
⑥Input clerk' name using appropriate numeric
keys in accordance to "code table" on page 105.
⑦After finishing clerk name input save it by pressing
.
PROGRAM MODE
Page 94

95
Chapter 13.
LOGO
PROGRAM MODE
Page 95
96
Chapter 13. LOGO
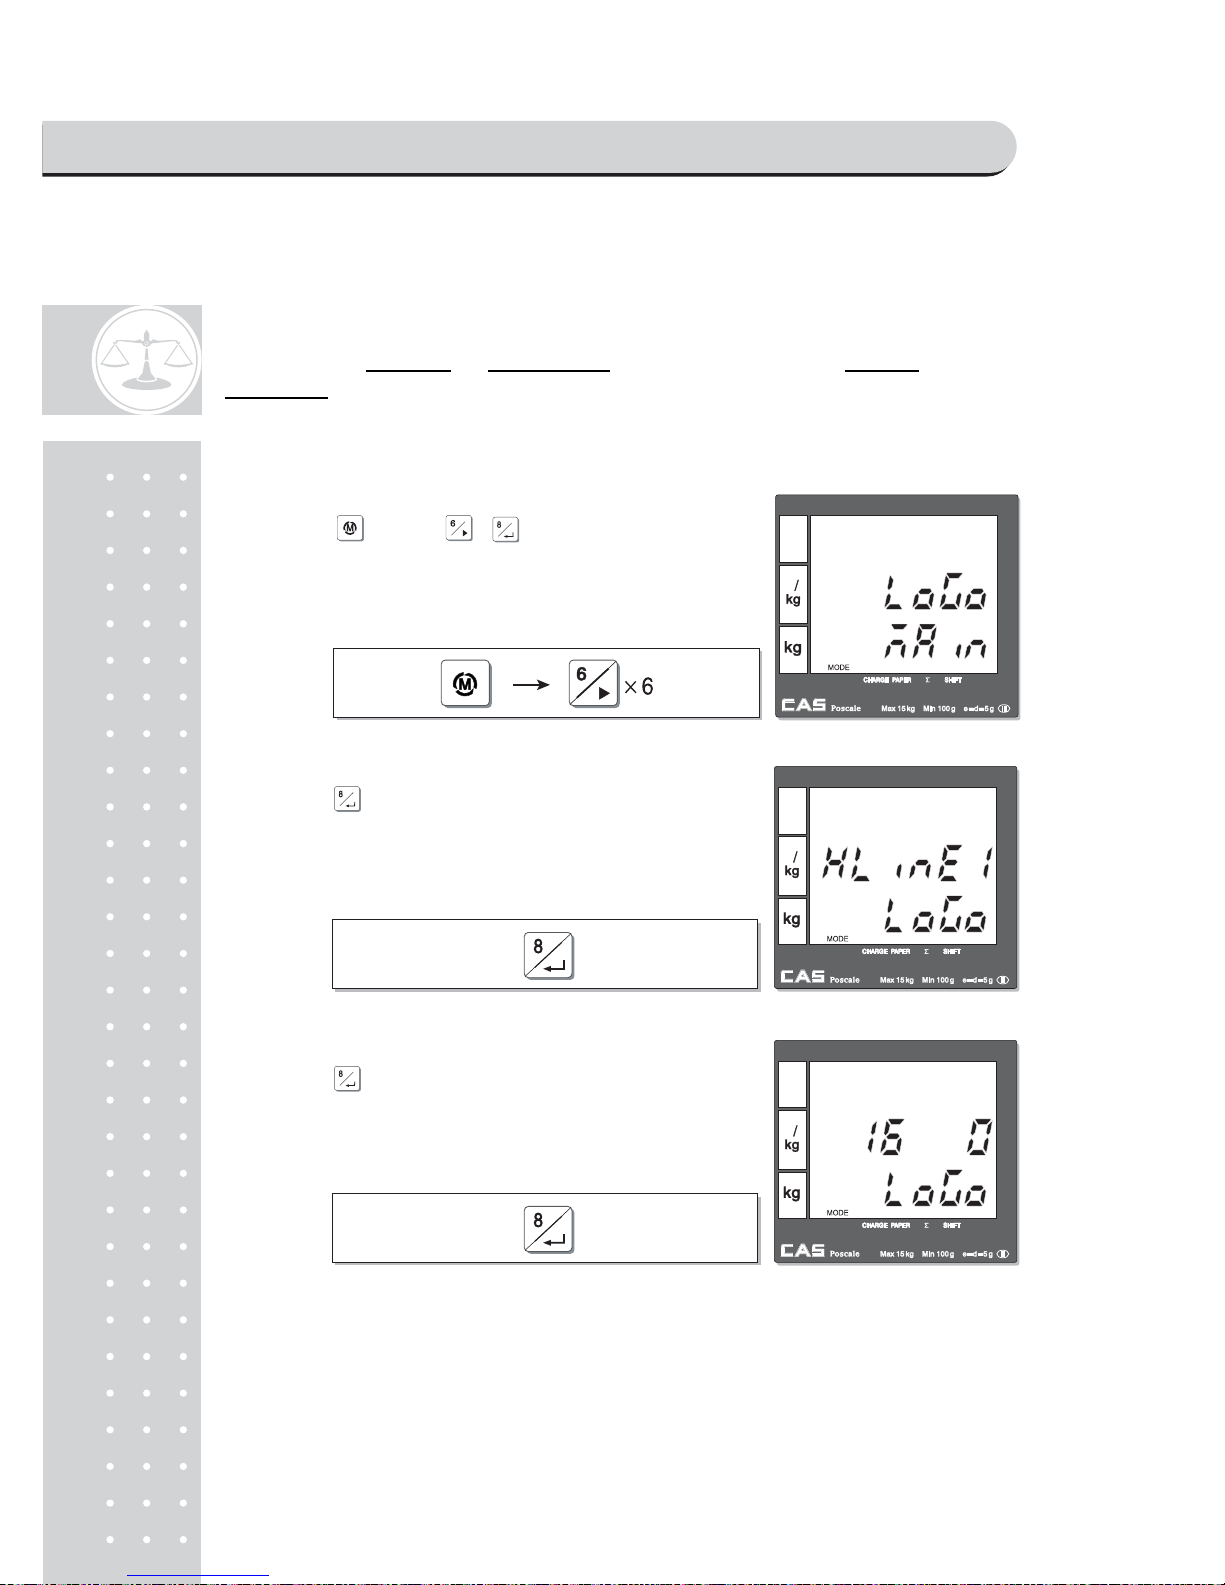
This chapter explains how to input header and footer on the ticket (receipt). Users
may input up to 6 header
and 2 footer lines, which each line may have up to 32
characters,
using "code table" on 105 page.
a. Header & Footer setting
①Using key and , go to Logo setting
mode from main menu.
② Press to get into Headline 1 setting mode.
③Press and input appropriate numeric keys
to input codes in the headline 1 (refer to page
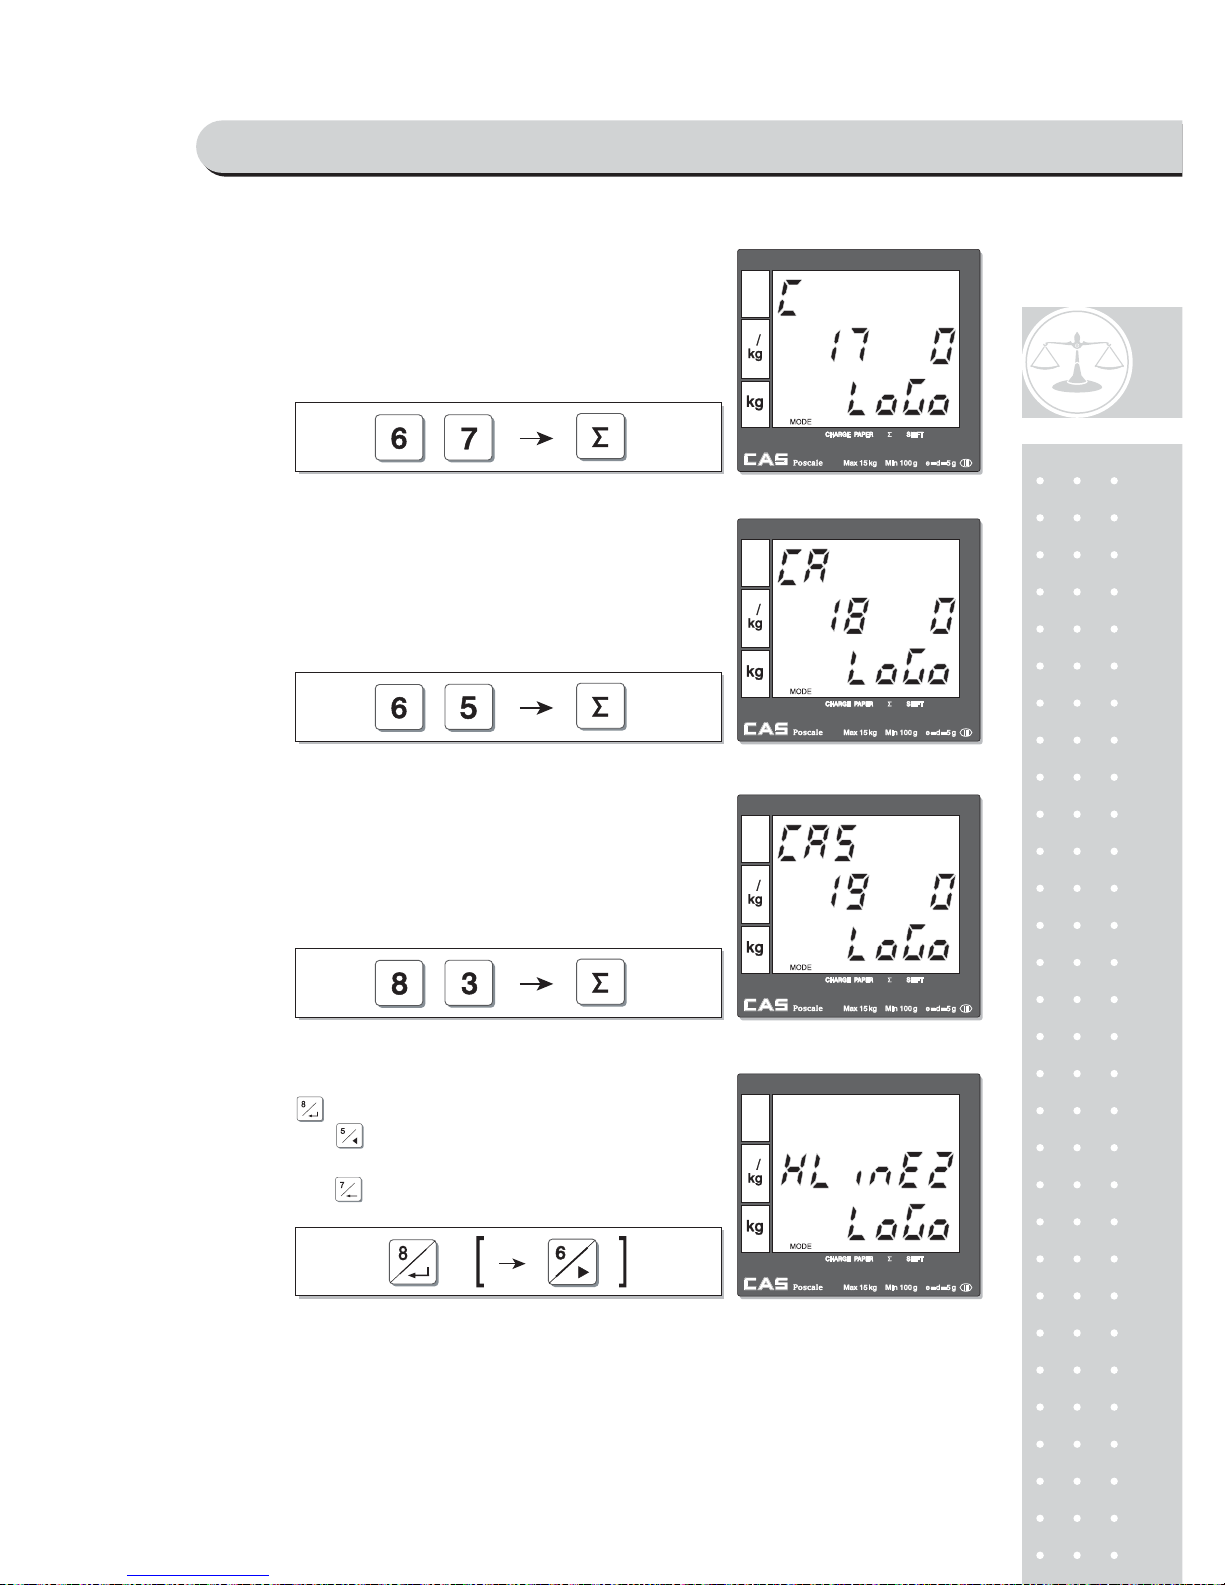
105). For example, lets input "CAS" at 16th
space in the first headline.
PROGRAM MODE
Page 96
9
7
④Press appropriate numeric keys.
⑤Press appropriate numeric keys.
⑥Press appropriate numeric keys.
⑦Press to save the first headline. And user
may press to go to input next headline
(storable up to 6 header & 2 footer lines), and
exit using .
PROGRAM MODE
Page 97

9
8
Chapter 14.
TAX RATE GROUP
PROGRAM MODE
Page 98
99
Chapter 14. TAX RATE GROUP
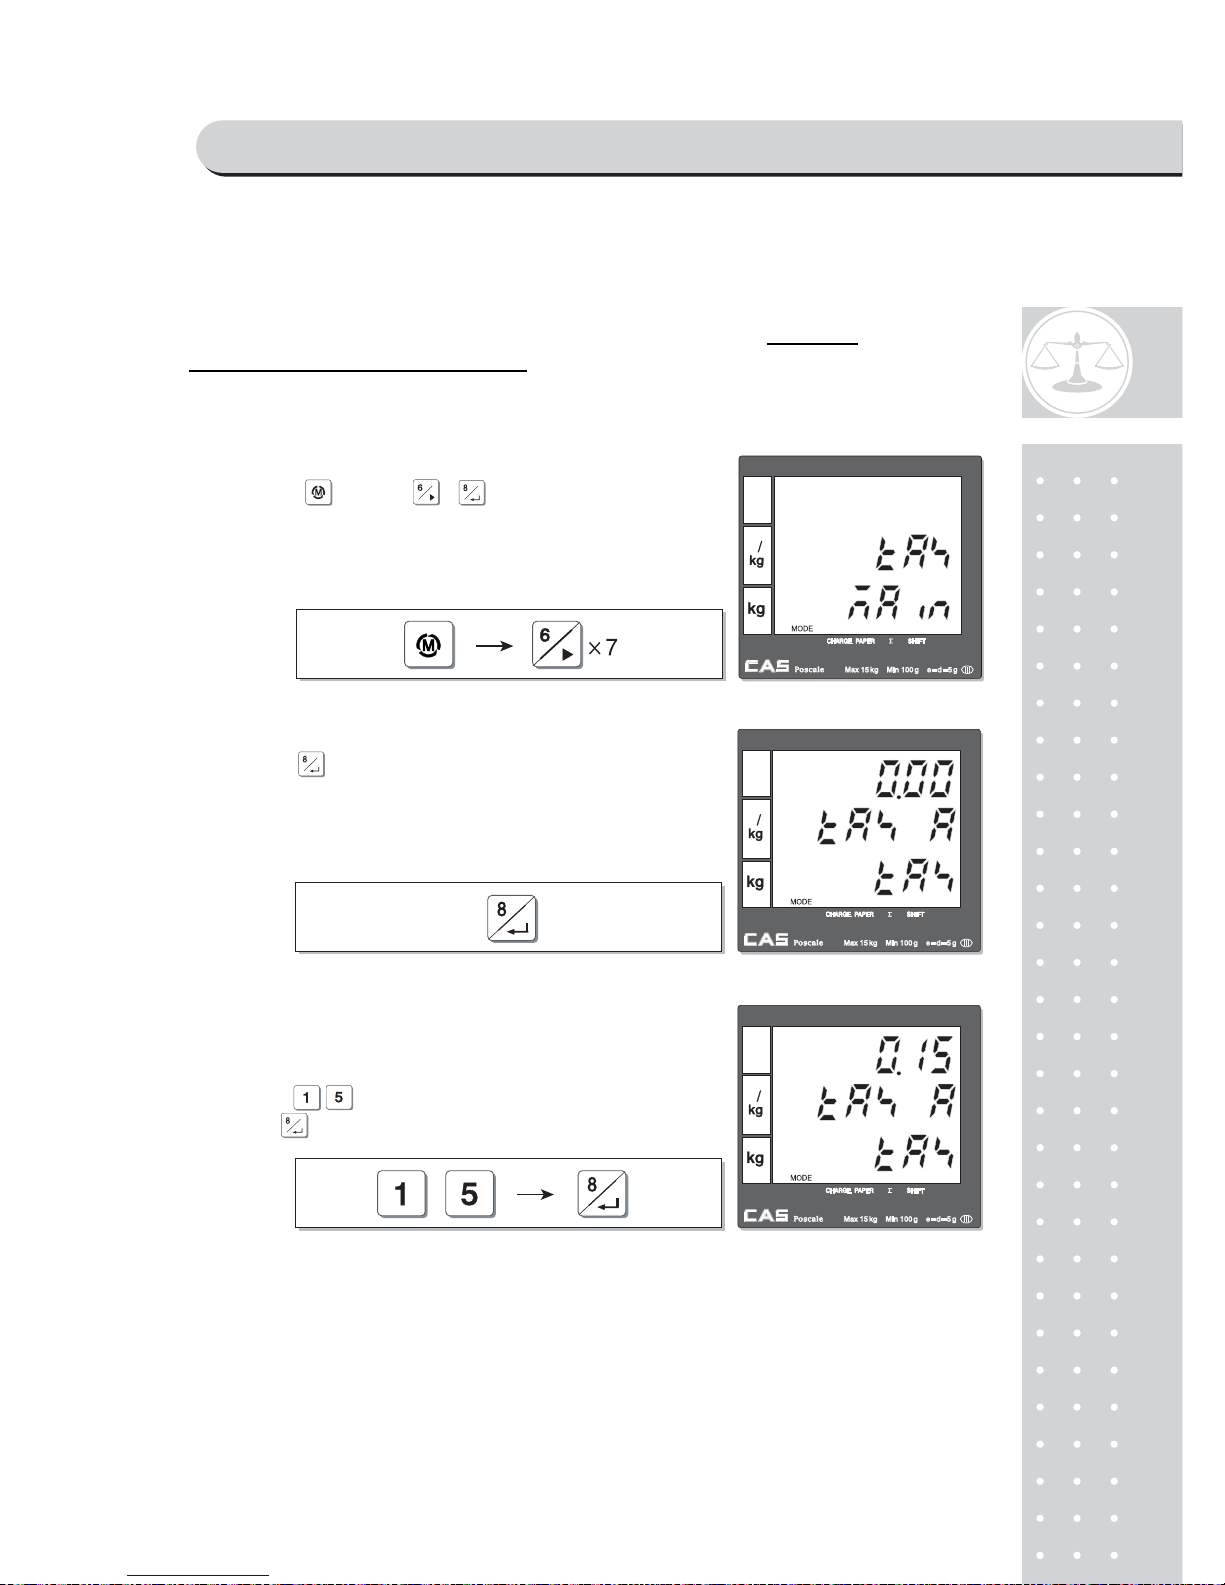
This chapter explains how to set tax rate group. User may set up to 8 different
tax rate groups; A, B, C, D, E, F, G, H,
and then store a specific tax group when
he/she inputs PLU data.
①Using key and , go to
tax rate
group setting mode from main menu.
②Press to get into tax rate group A setting mode.
③Press appropriate numeric keys (0.00~99.99%)
to input tax rate for group A. For example,
press input "0.15%" for tax rate group A,
and to save it.
PROGRAM MODE
Page 99
10
0
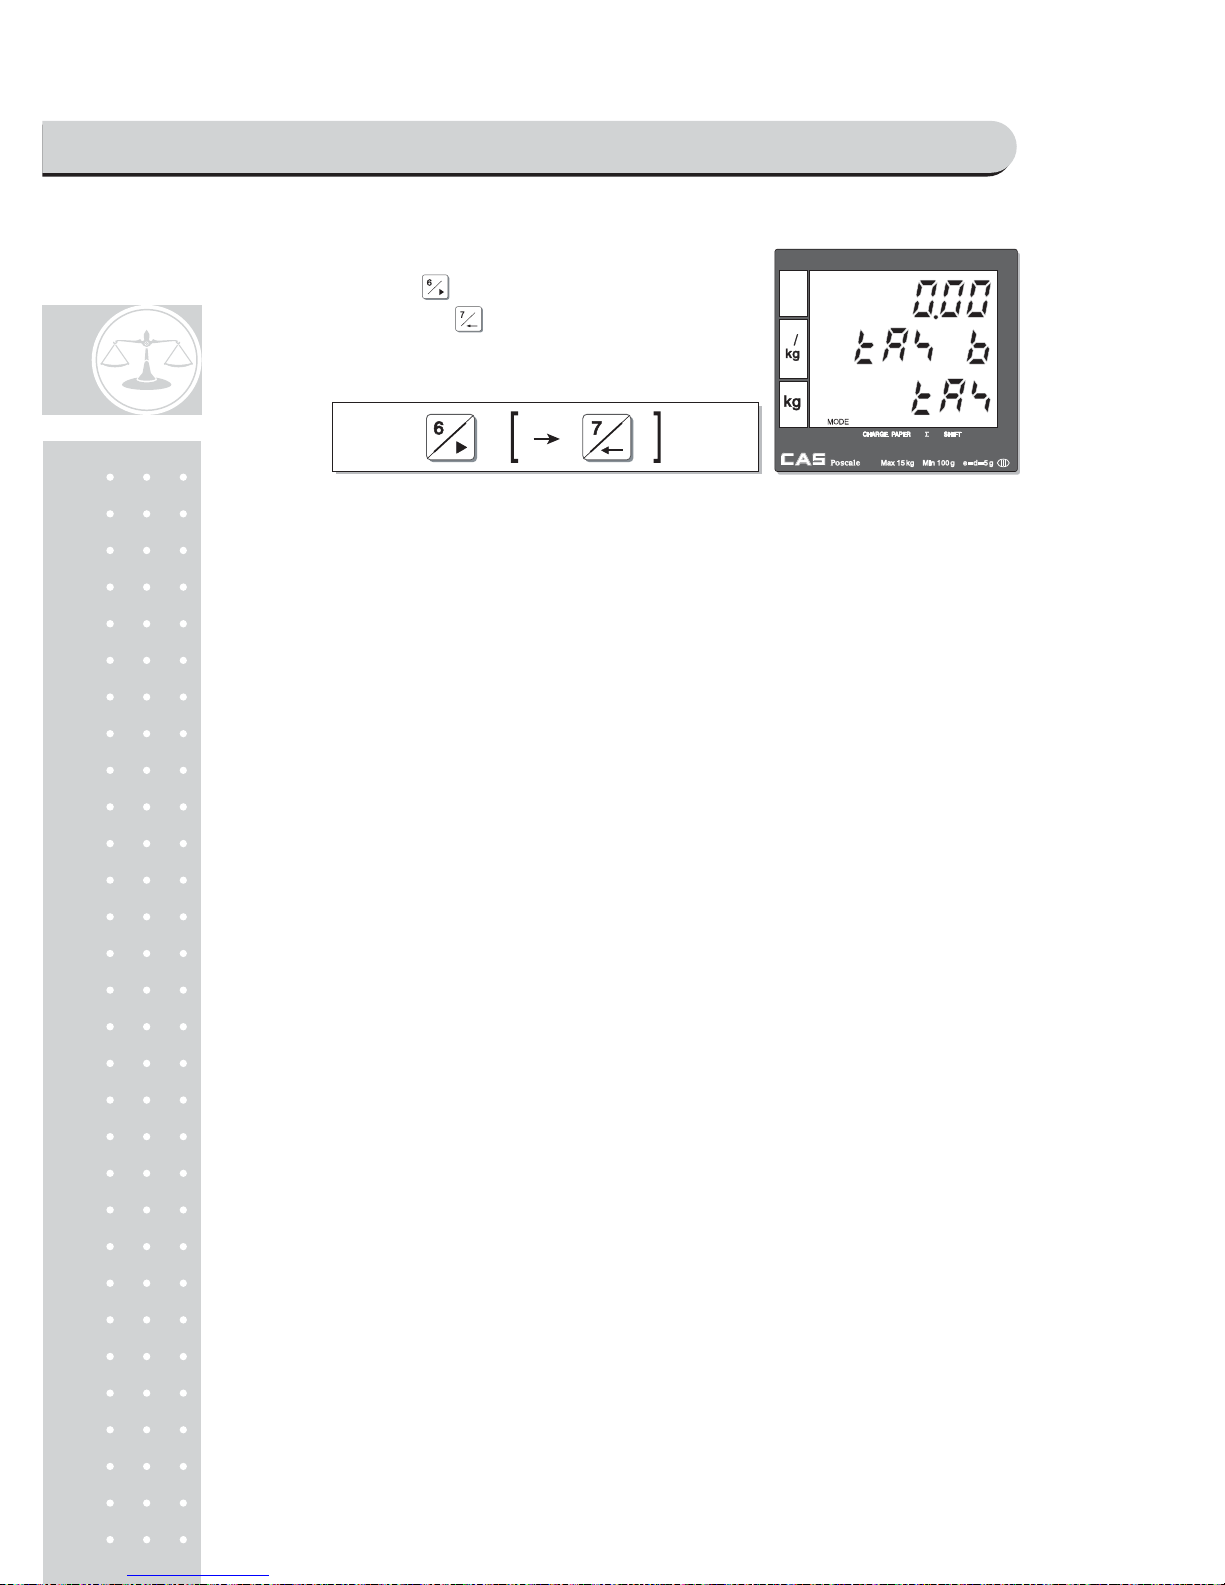
④User may press to go to input next tax
rate group, B. Press .
PROGRAM MODE
Page 100

101
Chapter 15.
TEST
PROGRAM MODE
 Loading...