

Page 1

2
Page 2

CONTENTS
1. PRECAUTIONS....................................................... 6
2. OVERALL VIEW.................................................... 7
3. DISPLAY & KEY FUNCTIONS......................... 10
4. BATTERY USAGE................................................ 12
5. FUNCTIONS & DESCRIPTIONS..................... 15
6. SET Mode Description........................................... 17
(1) AP MODE .................................................................................17
(2) SB MODE.................................................................................17
(3) BA MODE ................................................................................18
(4) CO MODE ................................................................................18
(5) ID MODE..................................................................................19
(6) BR MODE ................................................................................19
(7) HL MODE ........................................................................20
7. Communication Protocol & Command.............. 21
8. REMOTE CONTROL.......................................... 23
9. TWN (OPTION)..................................................... 24
10. PRODUCT SIZE(CASTON-II)......................... 25
11. ERROR MESSAGE ............................................ 30
3
Page 3
4
Page 4

5
Page 5

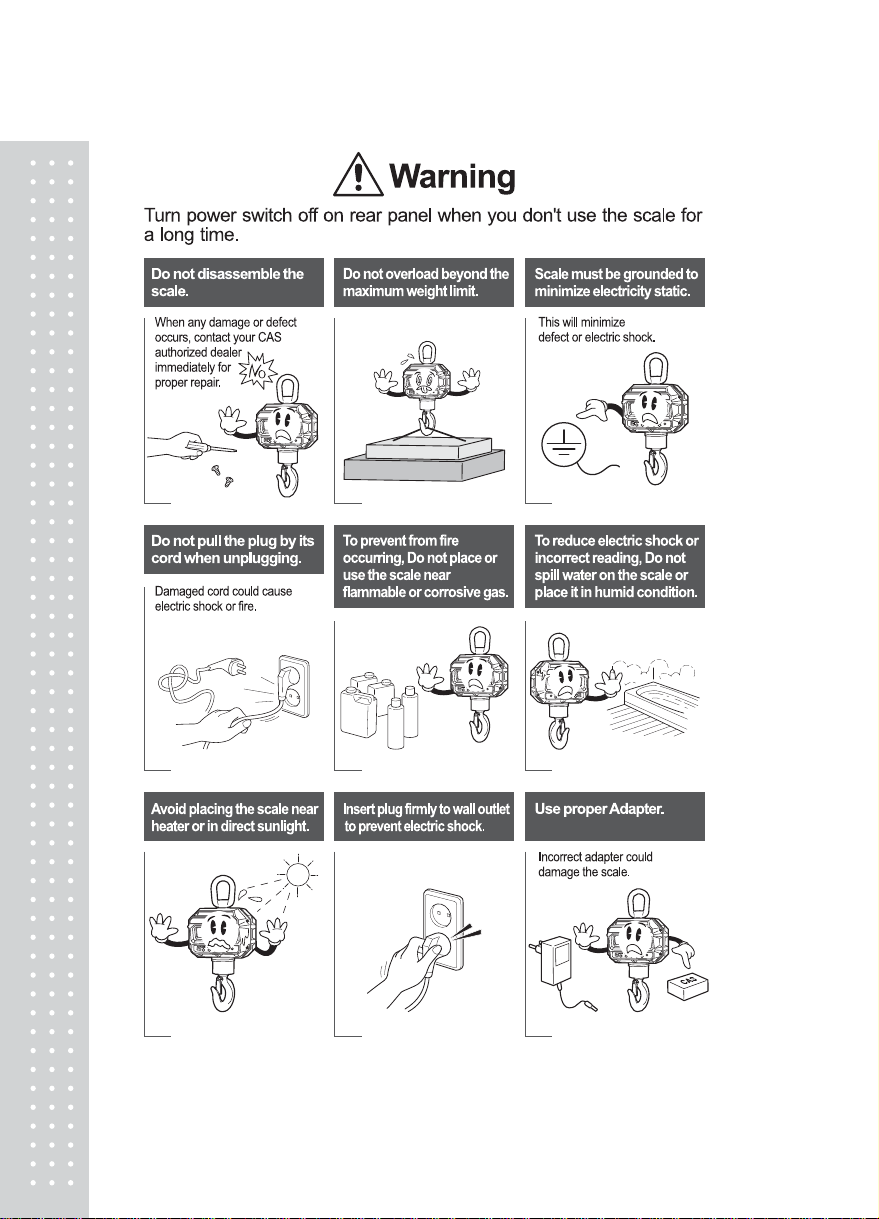
1. PRECAUTIONS
6
Page 6
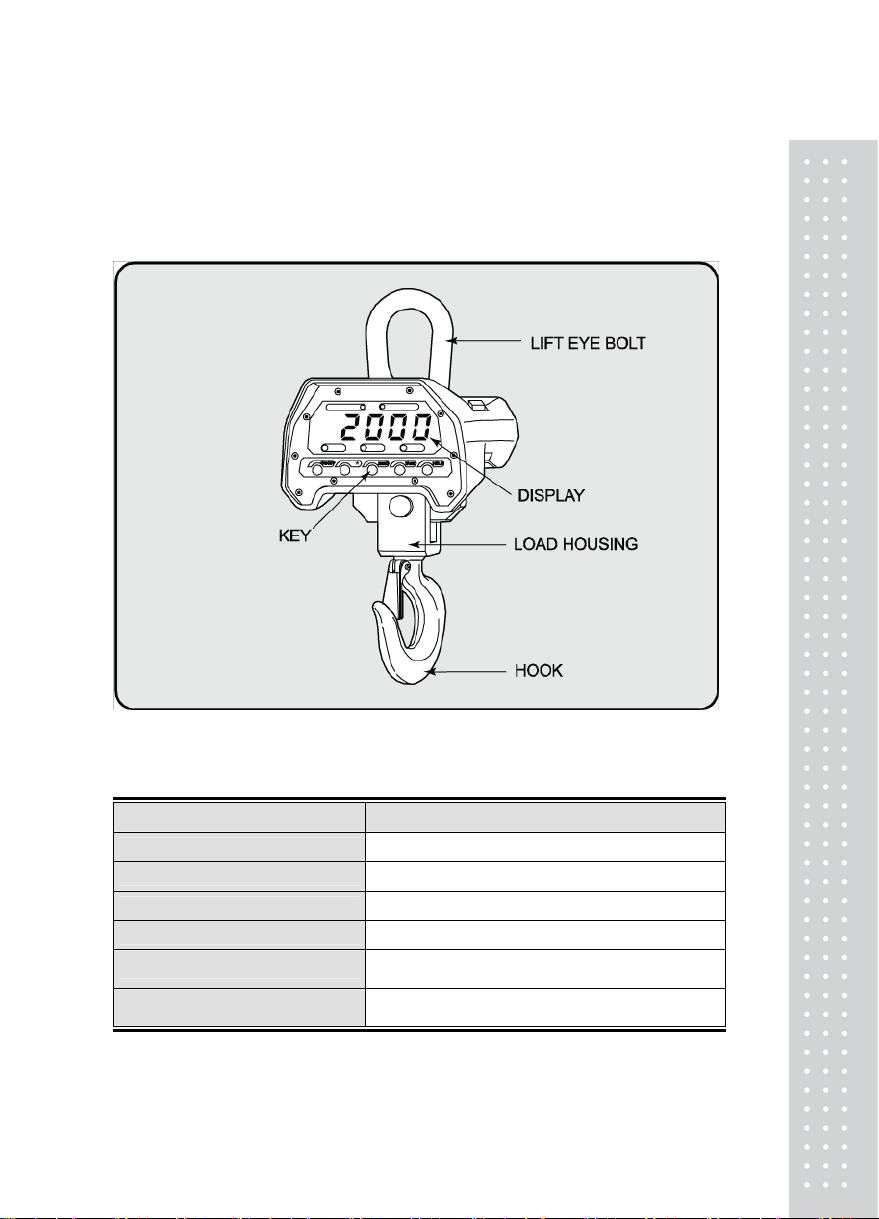
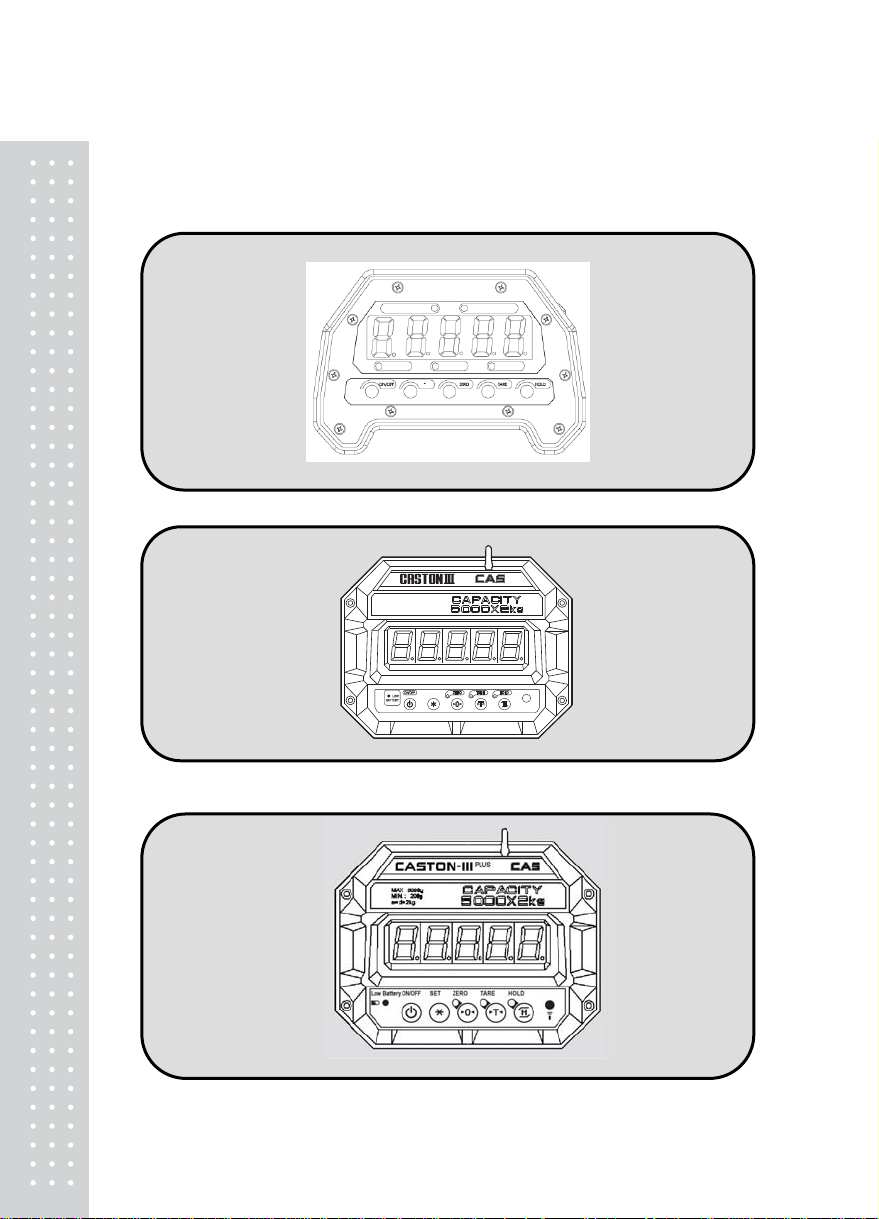
2. OVERALL VIEW
(1) CASTON-II
SPECIFICATIONS
MAX. TA RE WEIGHT FULL T A RE
DISPLAY L.E.D(1.2 inch)
OPERATION TEMPERATURE - 10 ~ +40℃℃
POWER SOURCE DC 6 V Rechargable Battery / AC Adaptor
POWER CONSUMPTION 0.6 ~ 1W
DISPLAY LAMP ZERO, T ARE, HOLD, LOW BA TTERY LAMP
CONTINUOUS USING TIME 60 HOURS
7
Page 7
8
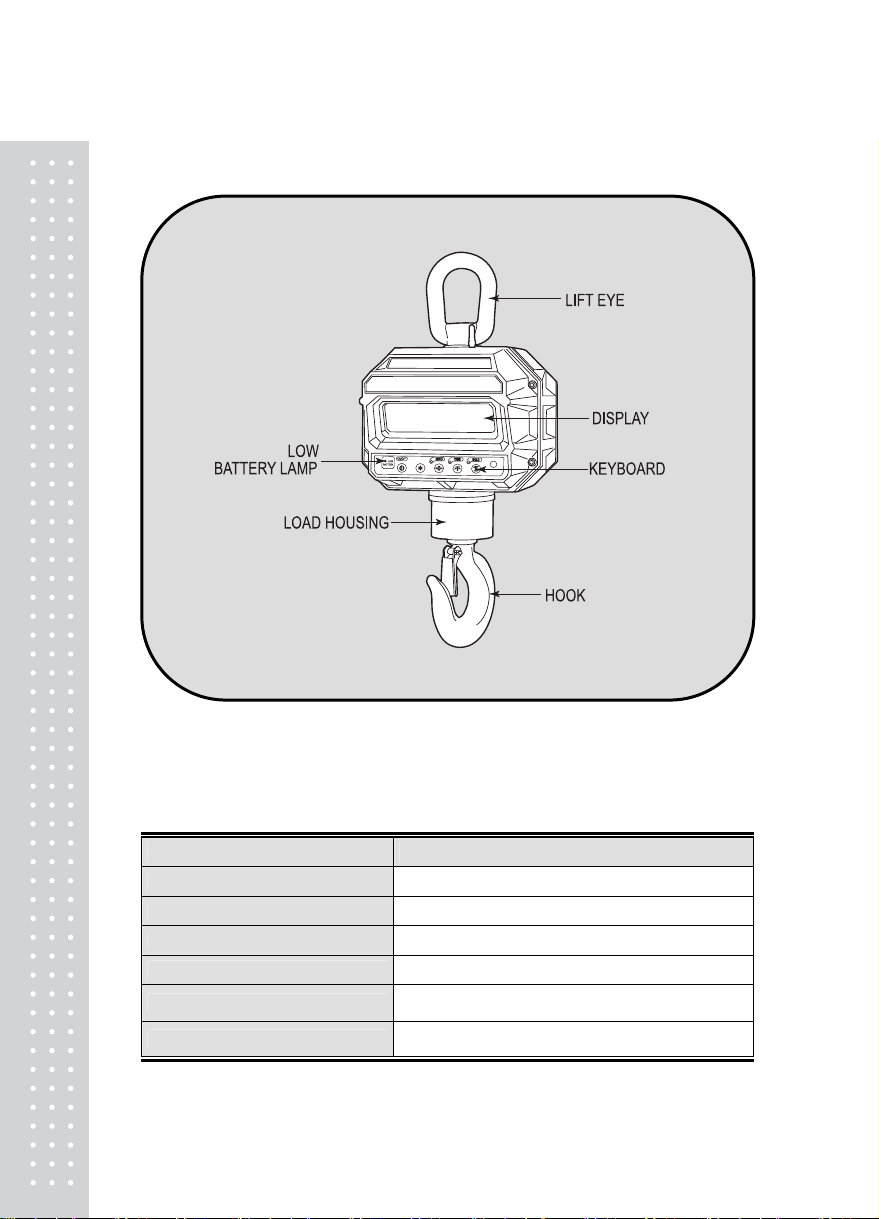
(2) CASTON-III
SPECIFICATIONS
MAX. TA RE WEIGHT FULL T A RE
DISPLAY L.E.D(1.5 inch)
OPERATION TEMPERATURE - 10 ~ +40℃℃
POWER SOURCE DC 12 V Rechargeble Battery / AC Adaptor
POWER CONSUMPTION 1.2 ~ 2.4W
DISPLAY LAMP ZERO, T ARE, HOLD, LOW BA TTERY LAMP
CONTINUOUS USING TIME 40 HOURS
Page 8
P
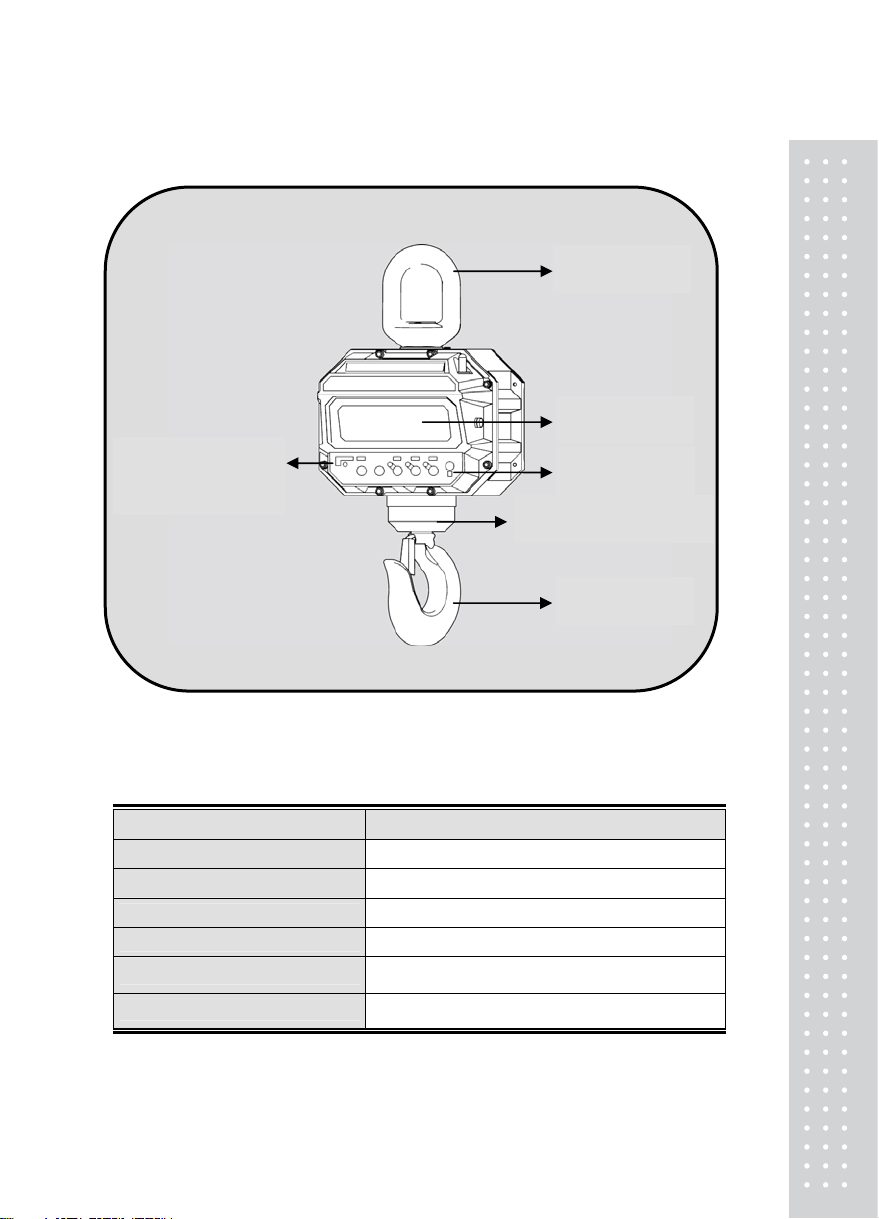
(3) CASTON-III PLUS
EYE BOLT
LOW BATTERY
LA
M
DISPLAY
KEYBOARD
LOAD HOUSING
HOOK
PECIFICATIONS
S
MAX. TA RE WEIGHT FULL T A RE
DISPLAY L.E.D(1.5 inch)
OPERATION TEMPERATURE - 10 ~ +40℃℃
POWER SOURCE DC 12 V Rechargeble Battery / AC Adaptor
POWER CONSUMPTION 1.2 ~ 2.4W
DISPLAY LAMP ZERO, T ARE, HOLD, LOW BA TTERY LAMP
CONTINUOUS USING TIME 40 HOURS
9
Page 9
3. DISPLAY & KEY FUNCTIONS
*CASTON-II
*CAST
ON-III
*CASTON-III PLUS
MAX 5000 kg
MIN. : 200 kg
e = d = 2 kg
10
Page 10
■ DISPLAY
WEIGHT DISPLAY:Displays weight or messages (5 Digit).
ZERO LAMP:Indicates that scale is stable and at zero.
NET LAMP:Indicates that scale is currently using a tare.
HOLD LAMP:Indicates that the HOLD function is activated.
LOW BATTERY LAMP:Indicates that voltage of battery low and should be changed soon.
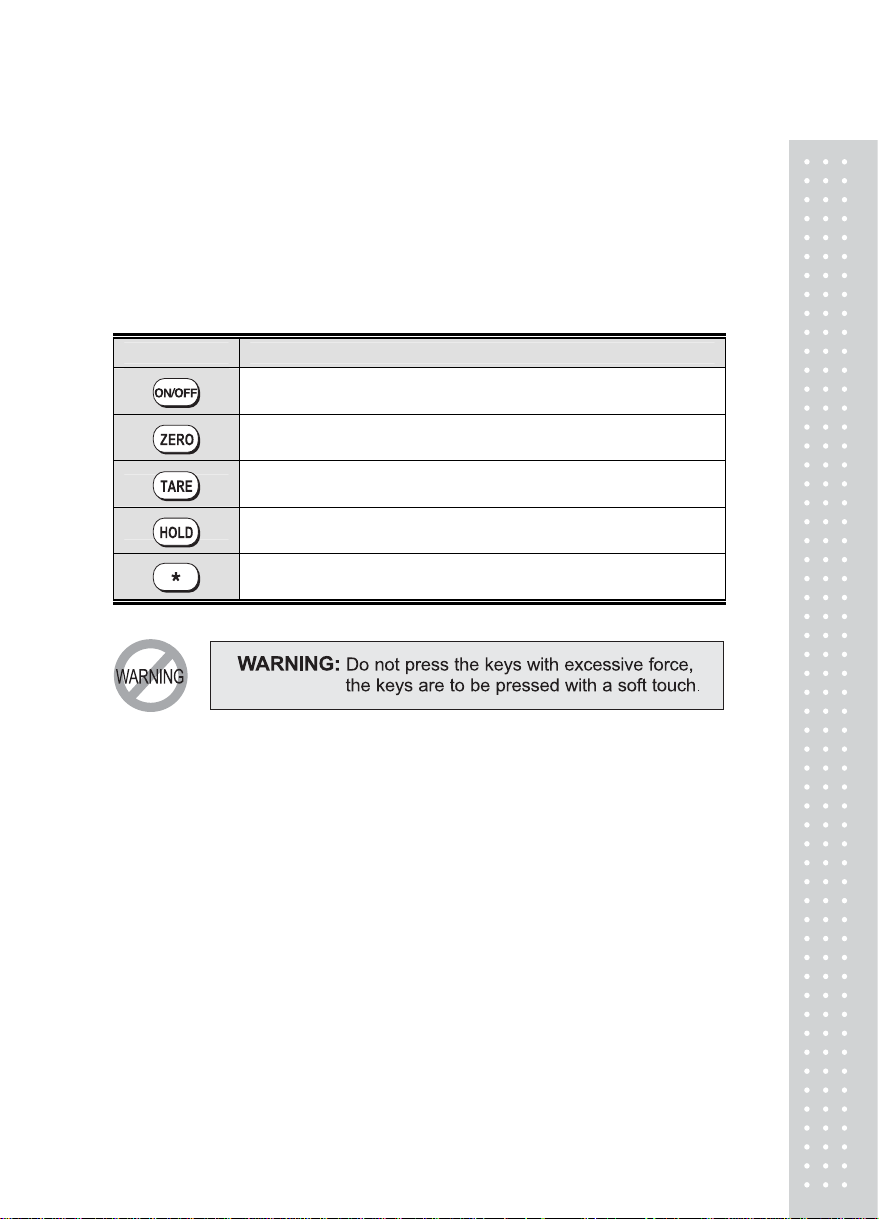
■ KEY FUNCTIONS
KEYS FUNCTIONS
Used to reset the scale zero or enter the AP mode
Used to activate tare function and to clear tare entry
Used to turn the scale ON / OFF or used to released from
AP/HL mode
Used to weigh unstable things (livestock, liquid, etc.) or used to
store the set value in ‘AP/HL’ mode
Used to increase the set value in ‘AP/HL’ mode
11
Page 11
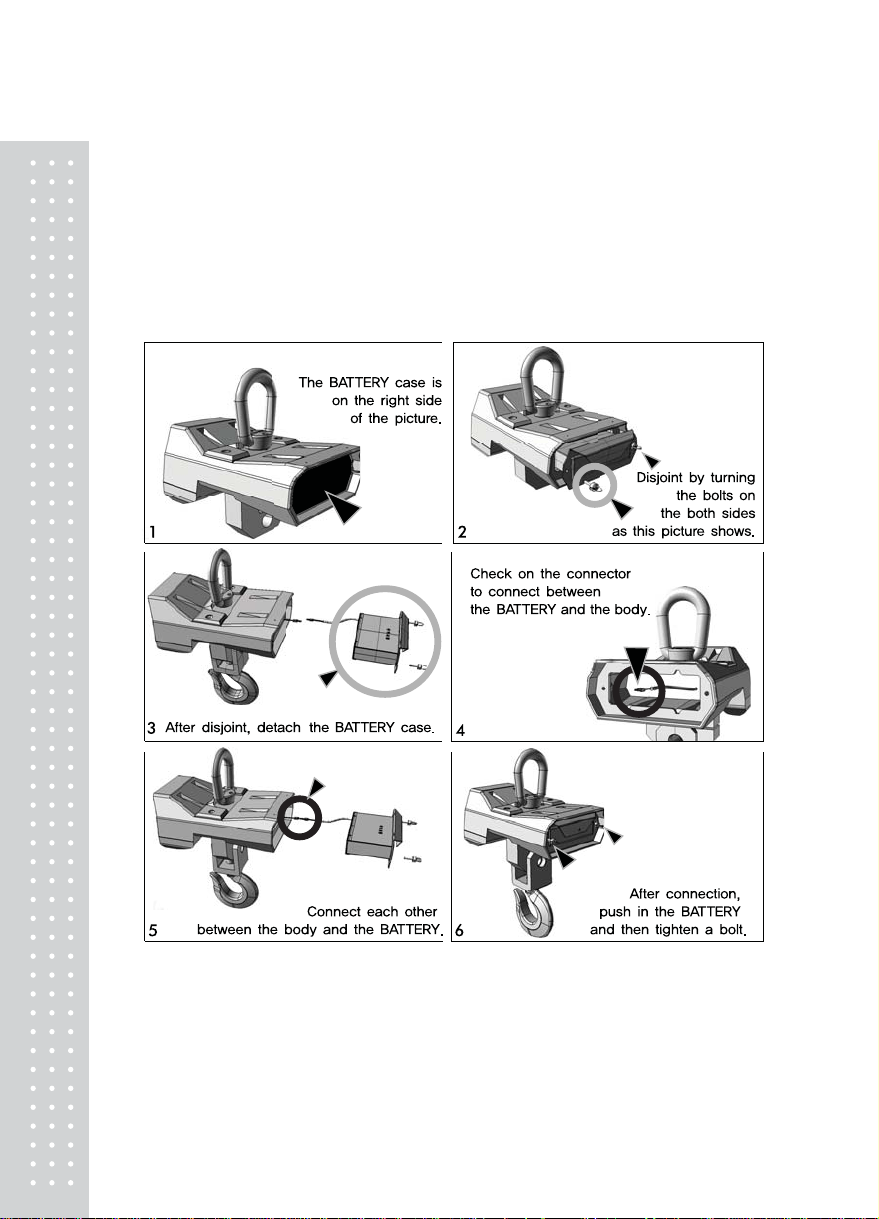
4. BATTERY USAGE
(1). CASTON-II
■ Couple connector in main body with connector in battery portion.
■ Insert battery portion to the main body and turn fixing bolt to the right to fix.
■ If the battery is neglected for a long time or not use without charging,
it may effect on battery life. (recommended charging period : once a month)
■ To prevent battery discharge, CASTON-II is disconnected with the battery.
■ Please connect the battery to use after opening the product as shown above.
12
Page 12

(2). CASTON-III
■ Open the battery lid located in back of the scale and turn main switch off.
■ Separate the battery connector and take out the discharged battery.
■ Put a charged battery in rear and connect the battery connector.
Turn main power switch on and cover the battery lid.
■ The drop of battery voltage can affect the brightness of display.
To prevent this, the regular battery recharging is recommended.
■ In case the battery will be left without recharging for a long time, it is desirable
the main power switch is set off. Otherwise, it also can affect the battery life.
13
Page 13

4
(3). CASTON-III PLUS
■The drop of battery voltage can affect the brightness of display.
To prevent this, the regular battery recharging is recommended.
■In case the battery will be left without recharging for a long time, it is
desirable the main power switch is set off. Otherwise, it also can affect
the battery life.
1
Page 14

5. FUNCTION & DESCRIPTIONS
1. POWER ON
■ Press the ON key located in real panel of the scale.
(While the power is off, the ON/OFF key on the remote control wouldn't
operate.)
■ Press ON/ OFF key.
■ LED display will be on and then, it will show from 00000 to 99999 continuously
2. POWER OFF
■ Press ON/OFF key
■ LED display will show off message and then power turns off
3. ZERO FUNCTION
■ Used to correct drifted zero value when the scale is unloaded motion is not
detected
You can adjust the zero up to ±2% of the maximum capacity
■ The function does not work when weight is fluctuated ort unstable.
4. T ARE FUNCTION
■ Use tare function after removing the weighing material from container being used.
■ The function does not work when weight is fluctuated ort unstable.
■ The weight including TARE weight can't exceed the maximum capacity.
15
Page 15

5. HOLD FUNCTION
There are three HOLD functions : Average / Manual / Peak Hold function
To use this function , must be check Hold-type of ‘HL’ mode.
■ Do Not Use Hold (HL -> 0)
- Do Not Use Hold.
■ Auto Hold (HL -> 1)
- Press the HOLD key before weighing an unstable item
- “AHold” will display and then, HOLD lamp is on.
- The averaged value of the weight fluctuation will be displayed after few seconds.
■ Peak Hold (HL -> 2)
- Press the HOLD key while checking peak value.
- “PHold” will display and then, peak value of the weight will be updated continuously
until HOLD function is released
■ Average Hold (HL ->3)
- Press the HOLD key while weighing an unstable item
- “Hold” will display and then the averaged value of the weight fluctuation will be
displayed after few seconds.
■ Release of Hold Functions
- Press the HOLD key while HOLD functions are activated
- Remove item on the hook.
- hdoFF will display and then, the scale return to normal weighing mode.
16
Page 16

6. SET Mode Description.
(1) AP MODE
Press ON key while ZERO key is pressed, then you can enter into ‘AP’ mode.
(‘AP’ means ‘Auto Power off’)
■ Key Usage
STA R KEY
HOLD KEY
ZERO KEY
■ Setting Menu
DISPLA Y FUNCTION
AP-00 Not use
AP-10 Power off after keeping ‘0’kg 10 minute
AP-20 Power off after keeping ‘0’kg 20 minute
AP-30 Power off after keeping ‘0’kg 30 minute
(2) SLEEP MODE
Press ON key while ZERO key is pressed and Press ZERO Again, then you
can enter into ‘SLEEP’ mode.
(‘Sb’ means ‘SLEEP’.)
■ Key Usage
STA R KEY
HOLD KEY
ZERO KEY
■ Setting Menu.
DISPLA Y FUNCTION
Sb-00 Sleep mode is deactivated.
Sb-20 Sleep mode is activated after 20 seconds.
Sb-40 Sleep mode is activated after 40 seconds.
Sb-60 Sleep mode is activated after 1 minute.
Used to increase the input value
Used to save the input value and Return to Normal Mode.
Go to Next Mode.
Used to increase the input value
Used to save the input value and Return to Normal Mode
Go to Next Mode.
17
Page 17

8
(3)BA MODE
Press ON key while ZERO key is pressed and Press ZERO Twice, then you
can enter into ‘bA’ mode.
(‘BA’ means ‘Weight BAck up’.)
■ Key Usage
STA R KEY
HOLD KEY
■ Setting Menu
Used to change the input value
Used to save the input value and Return to Normal Mode
DISPLA Y FUNCTION
bA-oF Weight Back Up OFF
bA-oN Weight Back Up ON
(4) CO MODE
Press ON key while ZERO key is pressed and Press ZERO Three times, then
you can enter into ‘CO’ mode.
(‘CO’ means ‘Communication’.)
■ Key Usage
STA R KEY
HOLD KEY
■ Setting Menu
DISPLA Y FUNCTION
CO-CO Use RS-232 Command Communication
CO-tU Use Blue Tooth Communication with TW-100
CO-St Use RS-232 stream.
Used to change the input value
Used to save the input value and Return to Normal Mode
1
Page 18
(5) ID MODE
Press ON key while ZERO key is pressed and Press ZERO Four times, then
you can enter into ‘ID’ mode.
(‘ID’ means ‘Device ID’.)
■ Key Usage
STA R KEY
HOLD KEY
■ Setting Menu
DISPLA Y
(from 0 to 9)
id- 0 Device ID 0
id- 9 Device ID 9
Used to change the input value
Used to save the input value and Return to Normal Mode
FUNCTION
(6) BR MODE
Press ON key while ZERO key is pressed, and Press ZERO Five times, then
you can enter into ‘BR’ mode.
(‘BR’ means ‘Display Brightness’.)
■ Key Usage
STA R KEY
HOLD KEY
■ Setting Menu
DISPLA Y FUNCTION
BR-00 The brightness is set to ‘0’ (Dark)
BR-05 The brightness is set to ‘5’ (Bright)
Used to increase the input value
Used to save the input value
19
Page 19

(7) HL MODE
Press ON key while HOLD key is pressed, then you can enter into ‘HL’ mode.
(‘HL’ means ‘Hold type’.)
■ Key Usage
STA R KEY
HOLD KEY
Used to increase the input value
Used to save the input value
■ Setting Menu
DISPLA Y FUNCTION
HL-00 Do Not USE Hold
HL-01 Auto Hold / Manual Hold
HL-02 Peak Hold use
HL-03 Average Hold use
Notice :
While using the HOLD function, the weight displayed may be not exact.
※How to set Bluetoth.(With TWN)
(1) Turn on the ‘POWER’ ( ) Key while pressing ‘ZERO’( ) Key
Display : AP – 00
(2)
Press ‘ZERO’( ) Key three times, enter CO Mode.
Display : CO - CO
(
3) Press ‘STAR’( ) Key , Set CO – Tu. ( Reset Bluetooth Moduel )
(4) Press HOLD ( ) Key. ( If Display ‘Err’ , Press HOLD ( ) key again.
(5) Turn off the power, Repeat step (1)~(2) process.
(6) Select CO – CO , Press ZERO ( ) Key. (To connect with TWN )
(7) Select id – 0 , Press HOLD Key ( ). ( To connect with TWN )
20
Page 20

7. Communication Protocol & Command
CAS Protocol (22 by ode tes) – ASCII C
ⓐ ⓑ
,
ⓒ ⓓ
,
ⓔ ⓕ
,
W ta eight Da
(8byte)
ⓖ ⓗ ⓘ ⓙ ⓚ
ⓐ ⓑ ST (Stable), US (Unstable), OL (O Loadver )
ⓒ ⓓ
ⓕ
ⓘ
N
ote. 1 Device No. is the successive value of ASCII code.
) Device No. 01 : 0x31, Device No. 09 : 0x39, Device No. 13 : 0x3d
Ex
Comman ode) d (ASCII c Description State
KT Key T are Va lue Re ite ad / Wr
WT Current Weight Read
ZE Operating like the ZERO key Read
GS (Gross NT (Net), ) ⓔ Dev ID ice
Blank ⓖ
g
Com de Prot
ⓙ
mand Mo ocol
CR
ⓗ
ⓚ
k Blank
LF
TR Operating like the TARE key Read
HD Operating like the ENTER key Read
PR Operating like the PRINT key Read
21
Page 21

Read
1 2 3 4 5
Device ID Command CR LF
Note. 1 Device ID is hex and Command is ASCII
[Ex] Devi c e I D i s 3 w h e n u s e r w ant to know the current weight.
->
write 03 57 54 0d 0a
Write
1 2 3 4 5 6 7 8 9 10
Device ID Command KEY T ARE CR LF
Note. 1 Device ID is hex and DATA is ASCII
[Ex] When user want to input Key Tare Value (to 200).
->
[Ex] When user want to read Key T are Value.
->
write 03 4B 54 30 30 32 30 30 0D 0A
write 03 4B 54 0D 0A
22
Page 22
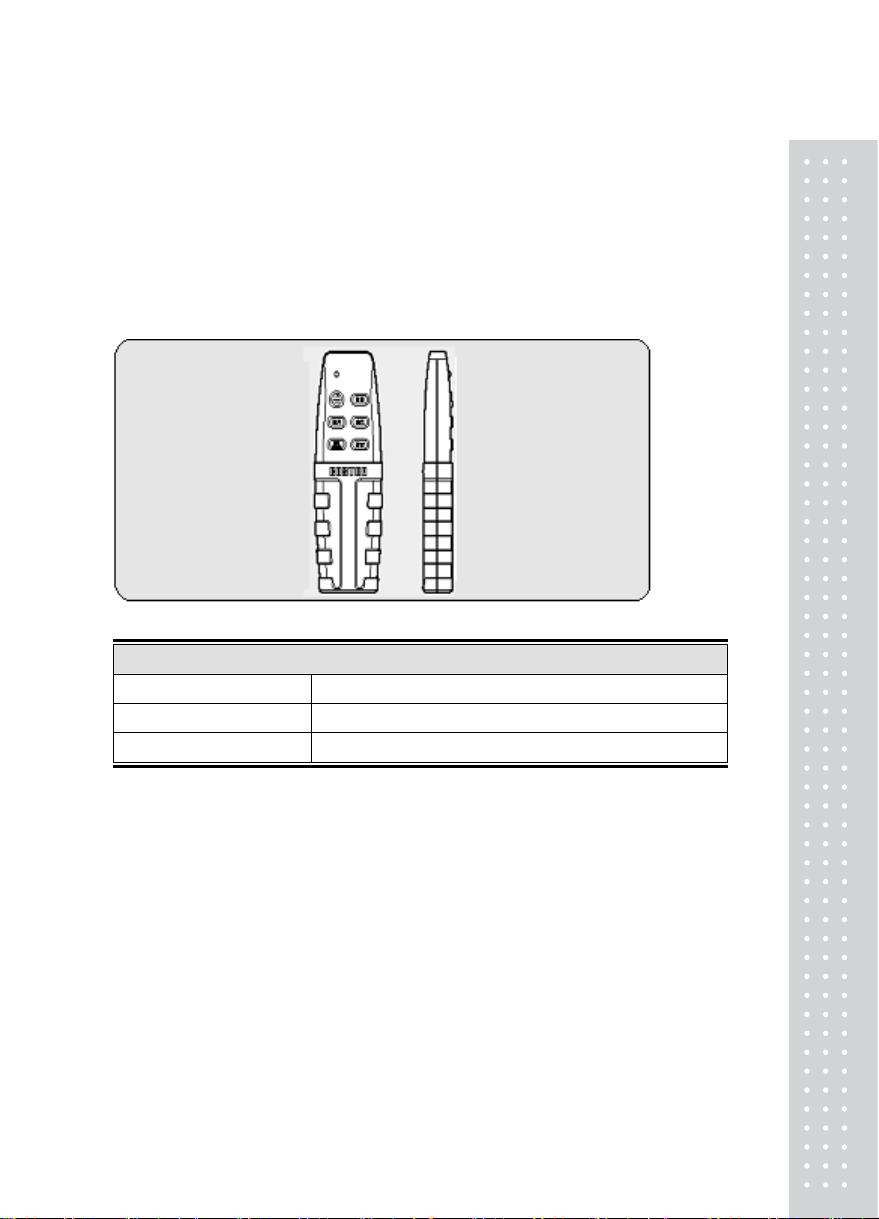
8. Remote Control
■ ON/OFF: Button to operate power on/off.
■ ZERO: Button to correct zero value.
■ TARE: Used to tare value memorizing.
■ HOLD: Used to weigh moving thing.
■ CLEAR : Used to clear summing weight.
■ SUM : Used to sum item
REMOTE CONTROL
AVAILABLE DISTANCE 6m ~ 9m
AV AILABLE ANGLE 60°
POWER 3V(1.5V AMM x 2)
23
Page 23

4
9. TWN (OPTION)
Please refer to handy terminal TWN manual of CASTON-Series
1. TWN Specification
Frequency 2.4GHz
Communication methods ZIGBEE (BLUETOOTH)
Baud Rate 9600
Effective distance for
communications
Display 320*240 TFT LCD
Display below zero “-” minus signal
Battery life time Approx. 24hours
Battery changing time Approx. 5 ~ 6 hours
Power
Temperature range
Function
Maximum about 50 ~ 100M
TWN : Rechargeable DC Battery 3.7V
Charger: adapter for charging (4.2V 4400mA)
-10℃ ~ 55℃
Printer interface, zero, tare, hold, print
ID setting, weight sum.
2
Page 24
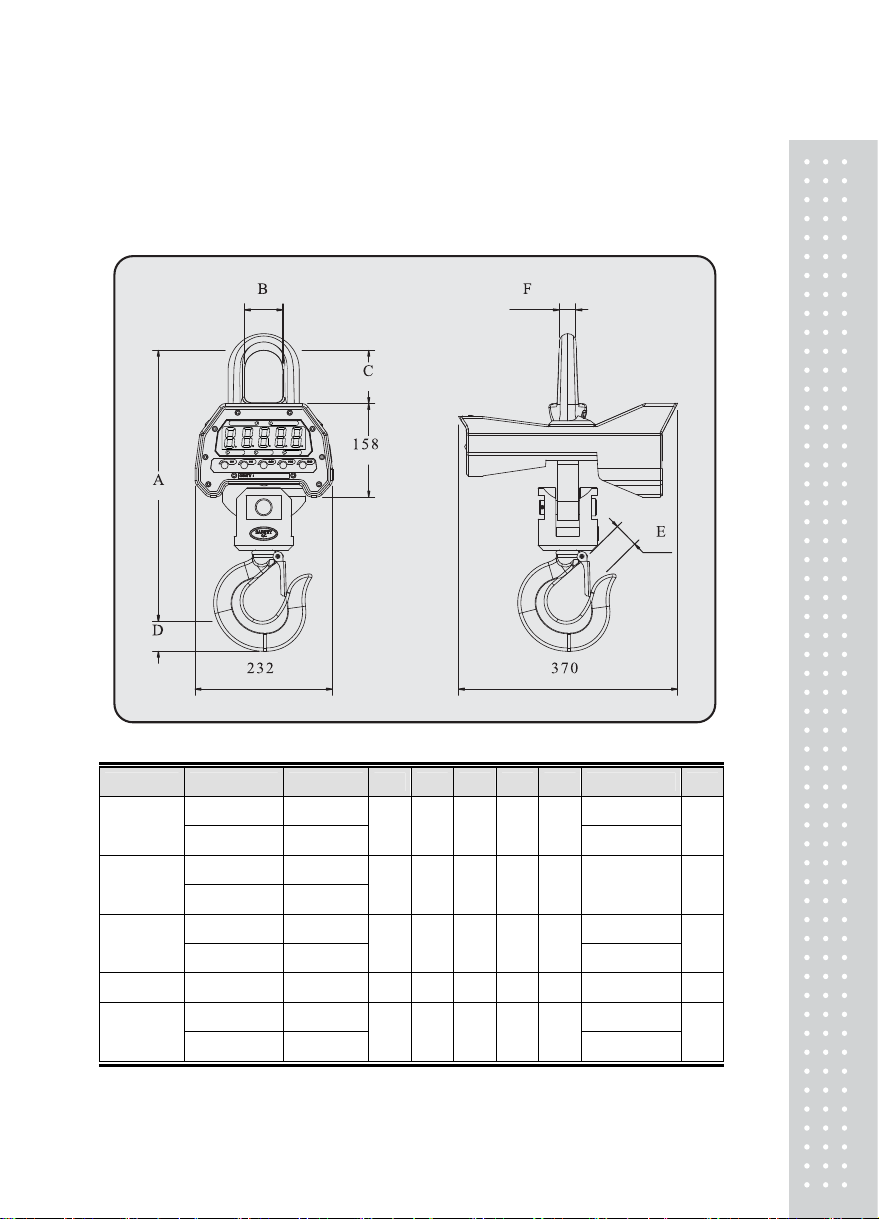
10. PRODUCT SIZE
(1)CASTON-II
MODEL MAX. CA PA DIVISION A B C D E WEIGHT F
0.5THB
1THB
2THB
3THB 3 TON 1 kg 430 57.1 91 47 45 20 kg(9.1 LB) 30
5THB
500 kg 200 g 15 kg
1000 LB 0.5 LB
1 TON 500 g
2000 LB 1 LB
2 TON 1 kg 20 kg
5000 LB 2 LB
5 TON 2 kg 20 kg
10000 LB 5 LB
350 57.1 82 30 26
350 57.1 82 30 26 15 kg 26
430 57.1 91 47 45
474 57.1 1 47 45
6.8 LB
9.1 LB
9.1LB
25
26
30
30
Page 25
(2). CASTON-III(B)
0.5 TON 5 TON
MODEL MAX.CAPA DIVISION A WEIGHT
0.5THD 0.5 TON 200 g 510 26 kg
1THD 1 TON 500 g 510 26 kg
2THD 2 TON 1 kg 515 28 kg
3THD 3 TON 1 kg 515 28 kg
5THD 5 TON 2 kg 538 31 kg
MAX 5000 kg
MIN. : 200 kg
e = d = 2 kg
(UNI
T: mm)
26
Page 26

10 TON 50 TON(CASTON-III(B))
MODEL MAX.CA P A DIVISION A B C D E F G WEIGHT
10THD 10 TON 5 kg 667 360
15THD 15 TON 10 kg 682 360
20THD 20 TON 10 kg 725 360
30THD 30 TON 20 kg 895 440
50THD 50 TON 20 kg 1400 440
845 57.2 42 57.2 44 kg
¢83
886 63.5 50 63.5 53 kg
¢99
990 86 60 86 76 kg
¢126
120
¢138
¢180
108 92 108 220 kg
0
152
0
146
112.
7
(UNI
146 390 kg
T: mm)
27
Page 27

8
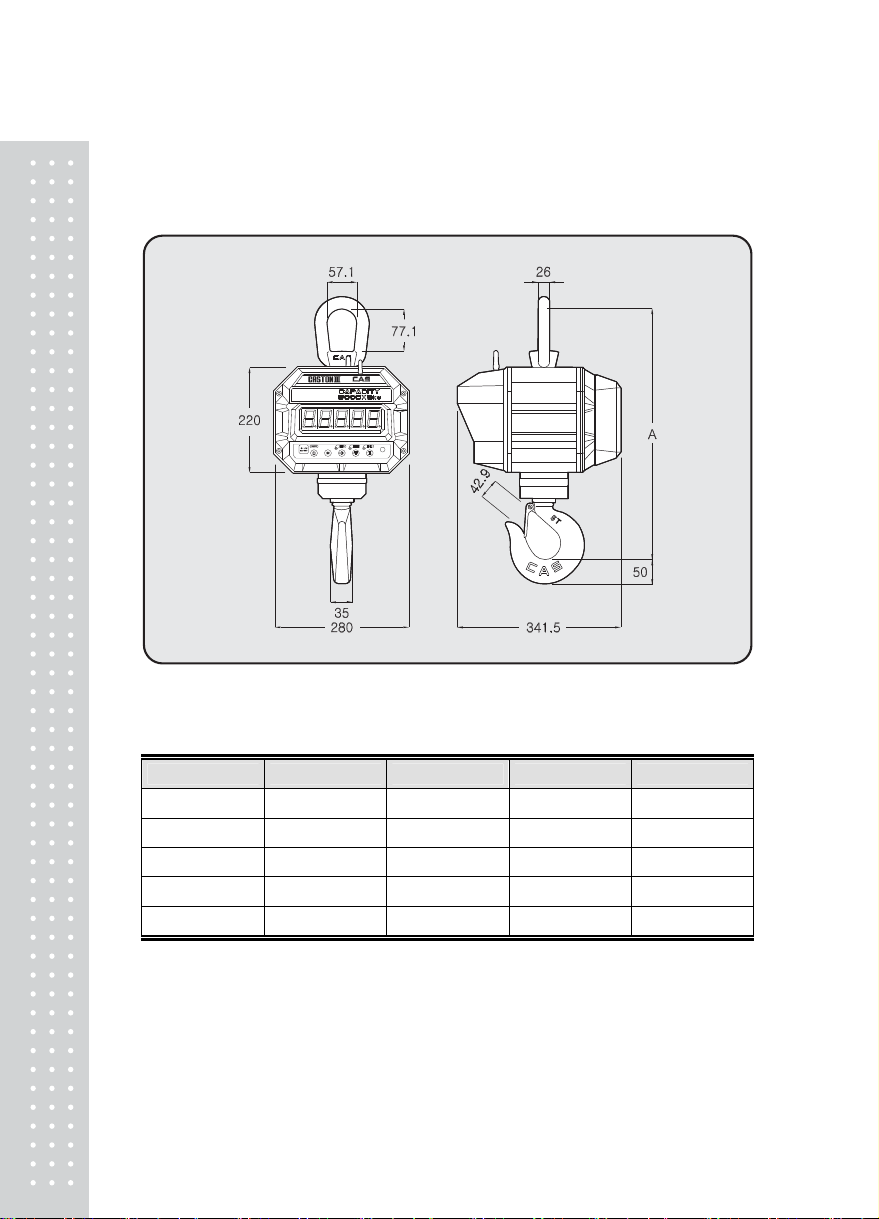
(3) CASTON-III PLUS
2 TON 5 TON
MODEL MAX CA PA
2THD 2 TON 1 kg 515 28 kg
3THD 3 TON 1 kg 515 28 kg
5THD 5 TON 2 kg 538 31 kg
MAX 5000 kg
MIN. : 200 kg
e = d = 2 kg
DIVISION
362
A
(UNI
WEIGHT
T: mm)
2
Page 28

10 TON 20 TON
MODEL MAX CAPA DIVISION A B C D E F G WEIGHT
10THD 10 TON 5 kg 667 362
15THD 15 TON 10 kg 682 362
20THD 20 TON 10 kg 725 362
845 57.2 42 57.2 44 kg
¢83
886 63.5 50 63.5 53 kg
¢99
990 86 60 86 76 kg
¢126
(UNI
T: mm)
29
Page 29

1 1. ERROR MESSAGE
Error Message
Description Solution
"Err 0"
"Err 1"
"Err 3"
The "Err 0" occurs when scale is not stable. Remove unstable facts.
The "Err 1" occurs when a current zero point has
Please call your CAS dealer .
shifted from the last sp an calibration.
The "Err 3" is an overload error . Please remove the weight.
Notice : Specifications are subject to change for improvement without notice.▶
30
Page 30

MEMO
31
Page 31

MEMO
32
Page 32
33
 Loading...