

Cart-Tek GRi-1500LTD, GRi-1500Li User Manual

GRi-1500Li)/)GRi-1500LTD)
User%Manual%Version%1%
%
Your%Cart-Tek%golf%trolley%was%thoroughly%quality%control%checked%and%‘road%tested’%
before%being%shipped%to%your%address.%We%do%everything%possible%to%assure%that%your%
trolley%is%in%perfect%working%order%upon%arrival.%Should%you%have%any%questions%
about%the%performance%of%your%trolley,%please%contact%us%at%
Canada:%JPSMGolf.com%or%toll%free%1-855-839-1600%
For%current%version%of%this%manual,%check%%
http://www.carttek.com/golf-cart-resources/cart-tek-manuals/%%
%
USA:%Carttek.com%or%541-633-4308%
Page%1%of%19%

%
INTRODUCTION%..................................................................................%3%
COMPONENT%IDENTIFICATION%.....................................................%4%
BASIC%SET-UP%......................................................................................%5%
PRECAUTIONS%&%IMPORTANT%CARE%INFORMATION%.............%7%
BATTERY%MAINTENANCE%...............................................................%8%
POWERING%YOUR%GRI-1500LI%.......................................................%9%
PUTTING%YOUR%TROLLEY%INTO%MANUAL%MODE%.....................%9%
REMOTE%TRANSMITTER%..............................................................%10%
REMOTE%CONTROL%MODE%............................................................%11%
PROGRAMMING%YOUR%CADDY%....................................................%12%
TROUBLESHOOTING%GUIDE%........................................................%15%
IMPORTANT%CUSTOMER%CARE%INFORMATION%....................%18%
FOR%WARRANTY,%SPARE%PARTS%AND%ACCESSORIES%...........%19%
%
%
% %
Page%2%of%19%

INTRODUCTION%
QUICK%TIP%
!After!unpacking!the!caddy!and!while!reading!this!manual,!place!
the!battery!on!charger!while!you!assemble!the!unit.!!!Plug!battery!
into!charger!and!charger!into!power!source.!The!battery!may!be!
delivered!with!a!charge!but!should!be!placed!on!the!charger!
before!using!for!the!first!time!to!ensure!full!charge!of!battery.!
%
Thank%you%for%purchasing%the%Cart-Tek%GRi-1500Li%golf%trolley.%Please%
read%this%manual%carefully%before%use.%%%
%
After%unpacking,%please%keep%the%carton%and%all%internal%sections%in%safe%
storage.%In%the%unlikely%possibility%that%you%need%to%return%the%whole%
unit%due%to%a%defective%component,%you%will%need%to%repack%the%unit%in%
the%original%manner%to%ensure%safe%and%secure%transit.%%
Remove%all%components%from%carton%and%check%that%the%following%are%
included%in%the%package:%
%
Main%trolley%frame%
Transmitter%
Drive%wheels%
Anti-tip%wheel%
Lithium%Battery%in%a%Nylon%Battery%Bag%
Battery%charger%
Accessories%
User%Manual%
%
Contents%of%this%manual%cover%assembling%the%trolley,%operating%
instructions,%maintenance,%and%troubleshooting.%%Please%note%that%our%
design%and%manufacturing%policy%is%aimed%at%continuous%improvement,%
this%can%result%in%changes%without%notice%to%the%specifications%contained%
on%our%websites%and%in%this%manual.%%We%know%you%are%eager%to%get%on%
the%course,%but%PLEASE%READ%the%entire%manual%before%starting.%
%
Page%3%of%19%
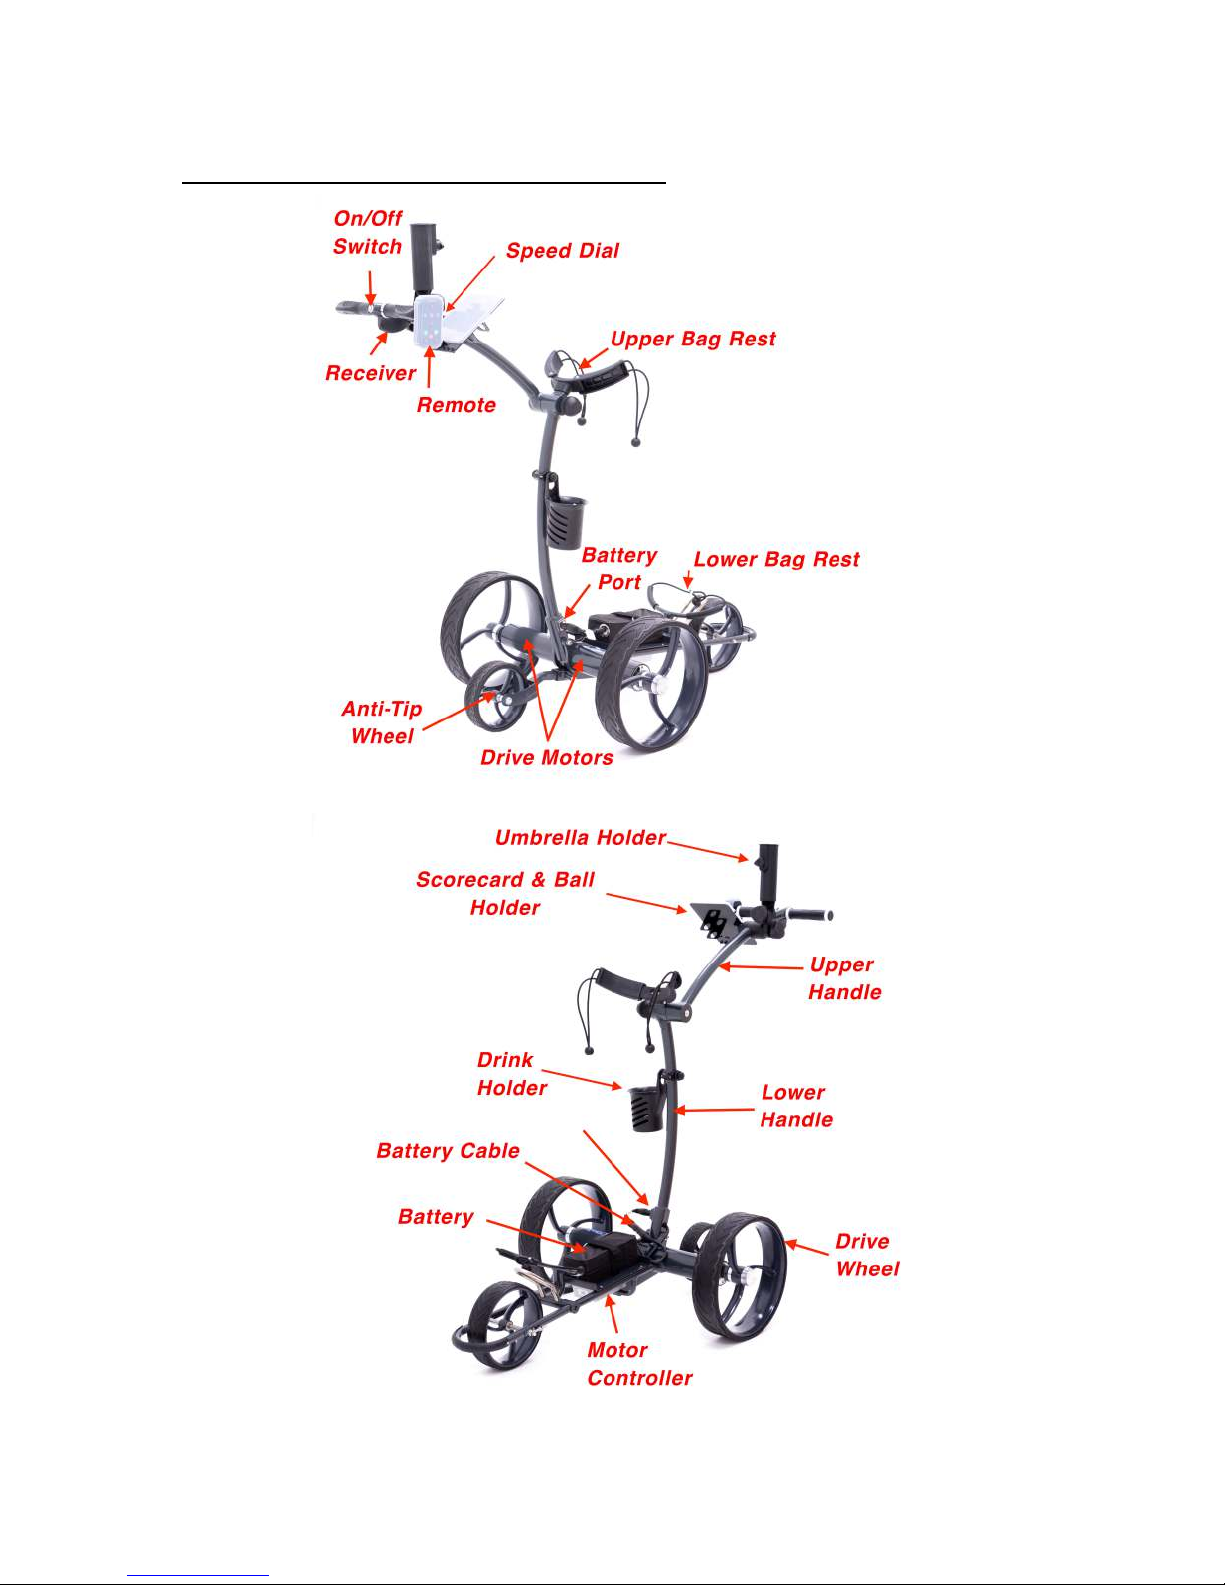
COMPONENT%IDENTIFICATION%
%
% %
Page%4%of%19%

BASIC%SET-UP%
• Install%the%2%large%drive%wheels.%The%wheels%are%unidirectional.%%Wheel%
hubs%are%marked%“L”%for%left,%and%“R”%for%right%as%oriented%behind%the%
cart.%%Depress%knob%on%the%inside%wheel%hub%and%slide%wheel%onto%axle.%
Fully%insert%wheel%onto%drive%collar,%with%the%four%pins%fully%engaged.%
(For%“free%wheel”%mode%depress%and%pull%wheel%out%¼%of%an%inch,%
releasing%pins%and%making%sure%wheels%snaps%into%groove%on%axle.)%%%
%
%
• Install%rear%anti-tip%wheel.%%Under%axle%pull%out%the%anti-tip%wheel%lock%
pin%and%slide%anti-tip%wheel%in%frame%until%locked.%
• Lift%handle%from%lower%caddy%frame.%%You%may%need%to%lightly%hold%
down%lower%frame%with%your%foot.%%
• Lift%upper%handle%and%extend%handle%fully%to%desired%position.%%Lock%
into%position%with%black%locking%knob.%%
%
Page%5%of%19%

• Place%battery%in%tray.%Insert%battery%cable%into%battery%port,%making%
sure%to%align%pins.%Depress%silver%spring%lock%before%removing%cable.%%
To%power%on%the%cart,%press%and%hold%the%on/off%switch%until%you%see%a%
solid%blue%LED.%
• Load%golf%bag%onto%caddy.%%Balance%weight%of%golf%bag%equally%‘side%to%
side’.%%Secure%golf%bag%with%bungees.%%
• Securing%your%golf%bag%on%the%cart%locks%the%cart%in%the%“open”%
position.%%%It%is%important%that%both%top%and%bottom%bag%straps%are%
tight,%and%your%bag%is%firmly%secured%in%the%bag%rests.%%
• Insert%three%AAA%batteries%into%the%remote%control.%%%Turn%on%the%
remote%control%by%depressing%the%left/right%arrows%(blue%buttons).%%
Remote%will%show%three%blue%flashes%indicating%it%is%on.%
%
%
%
% %
Page%6%of%19%
 Loading...