

Page 1
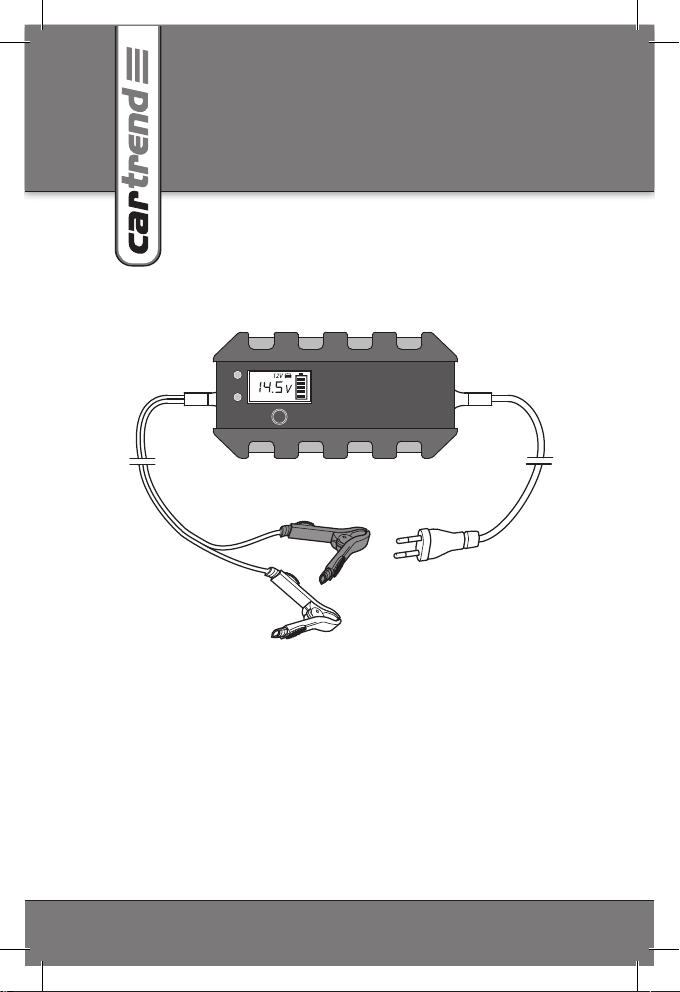
MikroprozessorBatterieladegerät
DP4.0 / DP6.0 / DP10.0
10620, 10621, 10622
Charging
Charged
Green
Reverse
Mode
D Bedienungsanleitung 3
GB Instructions for use 21
F Mode d’emploi 39
I Manuale d’istruzioni 57
CZ Návod k obsluze 75
PL Instrukcja obsługi 93
SK Návod na obsluhu 111
SLO Navodila za uporabo 129
Page 2

2
Mikroprozessor-Batterieladegerät DP4.0 / DP6.0 / DP10.0
Page 3

D Bedienungsanleitung
INHALTSVERZEICHNIS
1. Einleitung 4
2. Lieferumfang 5
3. Bestimmungsgemäßer Gebrauch 5
4. Technische Daten 6
5. Sicherheit 7
6. Produktübersicht 11
7. Bedienung 14
8. Sicherheitsfunktionen 18
9. Reinigung, Pflege und Wartung 19
10. Entsorgung 19
D Bedienungsanleitung
3
Page 4
Mikroprozessor-Batterieladegerät DP4.0 / DP6.0 / DP10.0
EINLEITUNG
Erklärung der Symbole und Signalworte, die in dieser Bedienungsanleitung und/oder am Gerät verwendet werden:
Symbol Erklärung
Symbol/
Signalwort
Achtung! Gefahr von Sachschäden.
Hinweis:
Für das Batterieladegerät wird in dieser Bedienungsanleitung auch
der Begri Gerät verwendet.
Beachten Sie diese Bedienungsanleitung bei der
Verwendung des Geräts.
Lebens- und Unfallgefahr für Kinder!
Beachten Sie Warn- und Sicherheitshinweise!
Gerät nur an witterungsgeschützten Standorten
verwenden!
Schutzisoliertes Gehäuse (Schutzklasse II)
Entsorgen Sie Verpackung und Gerät umweltgerecht!
Mögliche Folgen bei Nichtbeachtung
Gefahr!
Warnung!
Vorsicht!
Unmittelbar drohende Lebensgefahr oder
schwerste Verletzungen.
Schwere Verletzungen, möglicherweise
Lebensgefahr.
Leichte bis mittelschwere Verletzungen.
4
Page 5

D Bedienungsanleitung
LIEFERUMFANG
Kontrollieren Sie unmittelbar nach dem Auspacken den Lieferumfang. Prüfen Sie das Gerät sowie alle Teile auf Beschädigungen.
Nehmen Sie ein defektes Gerät oder Teile nicht in Betrieb.
• Mikroprozessor-Batterieladegerät
• Bedienungsanleitung
Geben Sie alle Unterlagen auch an andere Benutzer weiter!
BESTIMMUNGSGEMÄSSER
GEBRAUCH
Das Ladegerät ist zum Aufladen von oenen und einer Vielzahl von
geschlossenen, wartungsfreien Blei-Säure-Akkus (Batterien) hergestellt, wie sie in Autos, Schien, LKWs und anderen Fahrzeugen
eingebaut sind z. B.:
• Nassbatterien (WET) Blei-Säure-Batterien (Flüssig-Elektrolyt)
• Gel-Batterien (geleeartiges Elektrolyt)
• EFB (enhanced flooded battery)
• AGM-Batterien (Elektrolyt in Glasfaservlies)
• Wartungsfreie Blei-Säure-Batterien (MF)
Dieses Gerät kann von Kindern ab 8 Jahren und darüber sowie von
Personen mit verringerten physischen, sensorischen oder mentalen
Fähigkeiten oder Mangel an Erfahrung und Wissen benutzt werden,
wenn sie beaufsichtigt oder bezüglich des sicheren Gebrauchs des
Gerätes unterwiesen wurden und die daraus resultierenden Gefahren verstehen. Kinder dürfen nicht mit dem Gerät spielen. Reinigung
und Benutzer-Wartung dürfen nicht von Kindern ohne Beaufsichtigung durchgeführt werden.
Das Gerät ist nicht für den gewerblichen Einsatz bestimmt.
Jede andere Verwendung oder Veränderung des Gerätes gilt als
nicht bestimmungsgemäß und birgt erhebliche Gefahren. Für Schäden, die aus bestimmungswidriger Verwendung entstanden sind,
übernimmt der Hersteller keine Haftung.
5
Page 6

Mikroprozessor-Batterieladegerät DP4.0 / DP6.0 / DP10.0
Der Hersteller ist nicht verantwortlich
für Schäden verursacht durch:
• Unsachgemäßen Anschluss und/oder Betrieb.
• Äußere Krafteinwirkung, Beschädigungen des Geräts und/oder
Beschädigungen von Teilen des Geräts durch mechanische Einwirkungen oder Überlastung.
• Jede Art von Veränderungen des Geräts.
• Verwendung des Geräts zu Zwecken, die nicht in dieser Bedie-
nungsanleitung beschrieben wurden.
• Folgeschäden durch nicht bestimmungsgemäße und/oder unsachgemäße Verwendung.
• Feuchtigkeit und/oder unzureichende Belüftung.
• Unberechtigtes Önen des Geräts. Das führt zum Wegfall der
Gewährleistung.
TECHNISCHE DATEN
DP4.0 DP6.0 DP10.0
Eingangsspannung
Ausgangsspannung
Ladespannung
Ladestrom
220 - 240 V AC,
50/60 Hz
64 W
6V DC /
12V DC
6V-Modus:
7,2V / 7,4V
+/- 0,25 V
12V-Modus:
14,5V / 14,8V
+/- 0,25 V
6V-Modus:
2A
+/-10%
12V-Modus:
2A ;
4A (90s) / 2A
(300s)
+/-10%
220 - 240 V AC,
50/60 Hz
100 W
6V DC /
12V DC
6V-Modus:
7,2V / 7,4V
+/- 0,25 V
12V-Modus:
14,5V / 14,8V
+/- 0,25 V
6V-Modus:
2A
+/-10%
12V-Modus:
2A / 6A
+/-10%
220 - 240 V AC,
50/60 Hz
180 W
12V DC /
24V DC
12V-Modus:
14,5V / 14,8V
+/- 0,25 V
24V-Modus:
28,4V / 29,0V
+/- 0,25 V
12V-Modus:
2A / 10A
+/-10%
24V-Modus:
5A
+/-10%
6
Page 7
D Bedienungsanleitung
DP4.0 DP6.0 DP10.0
Rückstrom 4mA 4mA 4mA
Umgebungs-
temperatur
Geeignete
Batteriearten
Sicherung T2A T2A T3.15A
-20 bis +40°C -20 bis +40°C -20 bis +40°C
6V-Modus:
6V Blei-SäureBatterien
(WET, MF, AGM
und GEL) mit
Batteriekapazität 1,2 14Ah
12V-Modus:
12V Blei-Säure-Batterien
(WET, MF, AGM
und GEL) mit
Batteriekapazität 1,2 120Ah
6V-Modus:
6V Blei-SäureBatterien
(WET, MF, AGM
und GEL) mit
Batteriekapazität 1,2 14Ah
12V-Modus:
12V Blei-Säure-Batterien
(WET, MF, AGM
und GEL) mit
Batteriekapazität 1,2 120Ah
12V-Modus:
12V Blei-Säure-Batterien
(WET, MF, AGM
und GEL) mit
Batteriekapazität 1,2 200Ah
24V-Modus:
24V Blei-Säure-Batterien
(WET, MF, AGM
und GEL) mit
Batteriekapazität 14 120Ah
SICHERHEIT
Lesen Sie alle Sicherheitshinweise und Anweisungen. Versäumnisse
bei der Einhaltung der Sicherheitshinweise und Anweisungen können schwere Verletzungen verursachen. Bewahren Sie alle Sicherheitshinweise und Anweisungen für die Zukunft auf.
Lebens- und Unfallgefahr für Kinder!
• Halten Sie das Gerät aus der Reichweite von Kindern fern. Kinder
können die Gefahren, die durch das Produkt entstehen, nicht
erkennen!
• Strangulationsgefahr! Lassen Sie Kinder nicht mit den Bau- und
Befestigungsteilen spielen, sie könnten verschluckt werden und
zum Erstickungstod führen.
7
Page 8
Mikroprozessor-Batterieladegerät DP4.0 / DP6.0 / DP10.0
Verätzungsgefahr!
Batterien enthalten Säure, welche Augen und Haut schädigen. Beim
Laden der Batterie entstehen zudem Gase und Dämpfe, welche die
Gesundheit gefährden.
• Vermeiden Sie jeglichen Kontakt mit ätzender Batteriesäure.
Waschen Sie Hautstellen und Gegenstände, die mit Säure in
Kontakt gekommen sind, sofort gründlich mit Wasser ab. Sollten
Ihre Augen in Kontakt mit Batteriesäure kommen, spülen Sie sie
mindestens 5 Minuten lang mit fließendem Wasser. Setzen Sie sich
mit Ihrem Arzt in Verbindung.
• Verwenden Sie Schutzbrille und säurefeste Schutzhandschuhe.
Schützen Sie Ihre Kleidung, z. B. durch eine Schürze.
• Kippen Sie die Batterie nicht, da Säure auslaufen kann.
• Sorgen Sie immer für ausreichende Belüftung.
• Atmen Sie entstehende Gase und Dämpfe nicht ein.
Explosions- und Brandgefahr!
Beim Laden der Batterie kann Knallgas (gasförmiger Wassersto
und Sauersto) entstehen. Beim Kontakt mit oenem Feuer (Flamme, Glut, Funken) kann es zu Explosionen kommen.
• Laden Sie die Batterie niemals in der Nähe von oenem Feuer
oder an Orten auf, wo es zu Funkenbildung kommen kann.
• Sorgen Sie immer für ausreichende Belüftung.
• Stellen Sie sicher, dass die Netzspannung mit der auf dem Gerät
angegebenen Eingangsspannung (220 - 240V AC) übereinstimmt,
um Geräteschäden zu vermeiden.
• Verbinden und trennen Sie die Batterieanschlusskabel nur dann,
wenn das Ladegerät nicht an die Netzsteckdose angeschlossen
ist.
• Decken Sie das Gerät während des Ladevorgangs nicht ab, da es
dann durch starke Erwärmung beschädigt werden kann.
• Stellen Sie die Verwendung des Geräts sofort ein, wenn Rauch
sichtbar wird oder ein ungewöhnlicher Geruch wahrzunehmen ist.
• Verwenden Sie das Gerät nicht in Räumen, in denen explosive
oder brennbare Stoen lagern (z. B. Benzin oder Lösungsmittel).
8
Page 9
D Bedienungsanleitung
Stromschlaggefahr!
• Ladegeräte können aktive elektronische Implantate wie z. B.
Herzschrittmacher in ihrem Betrieb stören und dadurch Personen
gefährden.
• Setzen Sie das Gerät nicht Regen oder nassen Bedingungen aus.
Vermeiden Sie es, Wasser oder andere Flüssigkeiten darüber zu
verschütten oder zu tropfen. Dringt Wasser in elektrische Geräte
ein, erhöht sich das Risiko eines Stromschlags.
• Stellen Sie sicher, dass alle Stecker und Kabel frei von Feuchtigkeit sind. Schließen Sie das Gerät niemals mit feuchten Händen an
das Stromnetz an.
• Fassen Sie niemals beide Anschlussklemmen gleichzeitig an,
wenn das Gerät in Betrieb ist.
• Ziehen Sie den Netzstecker aus der Netzsteckdose, bevor Sie das
Ladekabel mit der Batterie verbinden, trennen oder wenn Sie das
Gerät nicht mehr benutzen.
• Schließen Sie immer zuerst die positive Ladeklemme (rot) an den
positiven Pol der Batterie an (nicht mit der Karosserie des Autos
verbunden, markiert mit P oder +).
• Schließen Sie dann die negative Ladeklemme (schwarz) an die
Karosserie des Autos an, entfernt vom Batteriegehäuse des Autos,
entfernt von der Batterie und entfernt von der Treibstoeitung.
Dann kann das Ladegerät an eine geeignete Netzstromsteckdose
angeschlossen werden.
• Trennen Sie nach dem Aufladen zuerst das Ladegerät vom Netzstrom. Entfernen Sie dann, in dieser Reihenfolge, zunächst den
Anschluss an der Karosserie (-) und dann den positiven Batterieanschluss (+).
• Entfernen Sie alle Kabel des Geräts von der Batterie, bevor Sie mit
Ihrem Fahrzeug fahren.
• Ziehen Sie das Kabel nur am Stecker aus der Netzsteckdose. Das
Kabel kann beschädigt werden.
• Verwenden Sie kein beschädigtes Gerät. Beschädigungen des
Netzkabels, des Geräts oder des Ladekabels erhöhen das Risiko
eines Stromschlags.
9
Page 10
Mikroprozessor-Batterieladegerät DP4.0 / DP6.0 / DP10.0
• Versuchen Sie nicht das Gerät auseinander zu bauen oder es zu
reparieren. Lassen Sie ein defektes Gerät oder ein beschädigtes
Netzkabel umgehend von einer Fachwerkstatt reparieren oder
ersetzen.
• Kurzschlussgefahr! Achten Sie darauf, dass sich die beiden Batterieklemmen der Ladekabel nicht berühren, wenn der Netzstecker
in die Netzsteckdose eingesteckt ist. Achten Sie auch darauf, dass
die Batterieklemmen und auch die Batteriepole nicht durch leitfähige Objekte (z. B. Werkzeug) verbunden werden.
• Verwenden Sie das Kabel niemals, um das Gerät zu tragen oder zu
ziehen.
Verletzungsgefahr!
• Versuchen Sie niemals, nicht wiederaufladbare, beschädigte oder
gefrorene Batterien aufzuladen.
• Verwenden Sie das Ladegerät nicht für das Aufladen von Trockenzellenbatterien. Diese können platzen und zur Verletzung von
Personen und zu Sachbeschädigung führen.
• Beachten Sie vor der Verwendung des Geräts die Bedienungsanleitung und alle Sicherheitsanweisungen der aufzuladenden
Batterie und des Fahrzeugs.
Beschädigungsgefahr!
• Platzieren Sie das Gerät niemals über oder in Nähe der zu ladenden Batterie. Gase aus der Batterie können das Gerät beschädigen. Stellen Sie das Ladegerät so weit entfernt von der Batterie
auf, wie es die Anschlusskabel zulassen.
• Betreiben Sie das Gerät niemals, wenn es heruntergefallen ist
oder anderweitig beschädigt wurde. Bringen Sie es zur Inspektion
und Reparatur zu einem qualifizierten Fachunternehmen.
10
Page 11
D Bedienungsanleitung
PRODUKTÜBERSICHT
4321
Charging
Charged
Green
Reverse
Mode
5
7 689
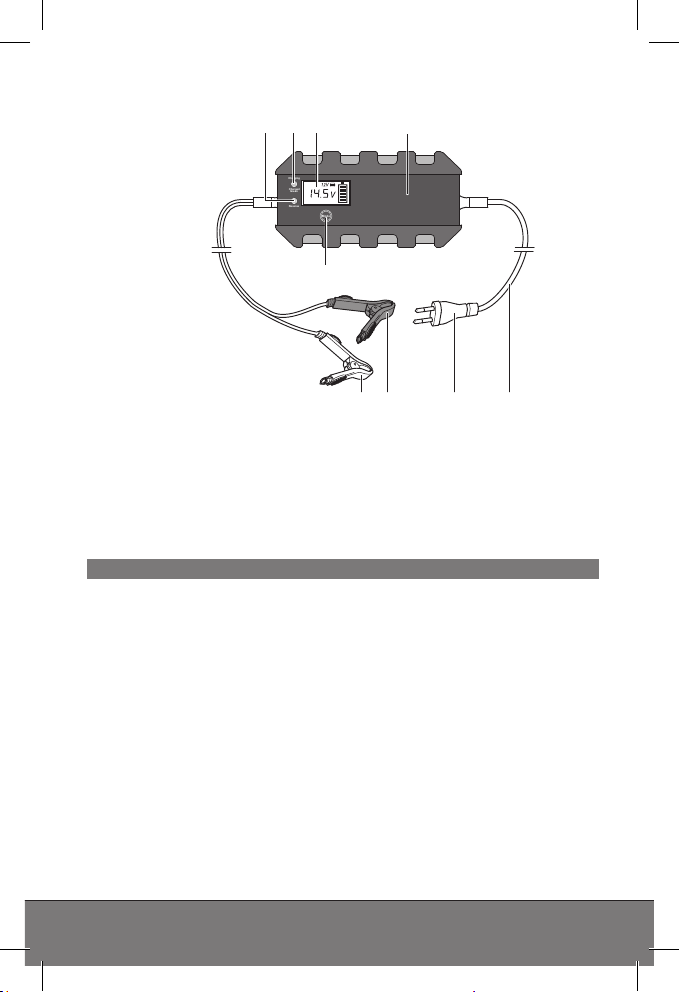
1. LED „Reverse“
2. LED „Charging“/“Charged
Green“
3. Display
4. Batterieladegerät
5. MODE-Taste
Funktionen
Das Ladegerät hat verschiedene Lademodi, die je nach Batterietyp,
Batteriezustand und Umgebungsbedingungen gewählt werden
können. Je nach erkannter Batteriespannung werden die möglichen Lademodi freigegeben.
Das Ladegerät ist mit einer Mikrocomputereinheit (MCU - MicroComputer-Unit) ausgerüstet. Nach der Auswahl des gewünschten
Lademodus erkennt das Ladegerät die angeschlossene Batterie
(Spannung, Kapazität, Zustand) und berechnet daraus die benötigten Ladeparameter (Ladespannung, Ladestrom). Dadurch wird ein
ezientes und sicheres Laden ermöglicht. Bei der Auswahl eines
für die Batterie ungeeigneten Lademodus, oder bei einer defekten
Batterie, findet kein Ladevorgang statt. Das Ladegerät schaltet in
die Fehleranzeige.
6. Stromkabel
7. Netzstecker
8. Polanschlusskabel (+) mit
Klemme (rot)
9. Polanschlusskabel (-) mit
Klemme (schwarz)
11
Page 12
Mikroprozessor-Batterieladegerät DP4.0 / DP6.0 / DP10.0
Durch die Funktion „Erhaltungsladung“ kann das Ladegerät dauerhaft angeschlossen bleiben. Die Batterie wird kontinuierlich überwacht und ggf. der Lademodus wieder aktiviert.
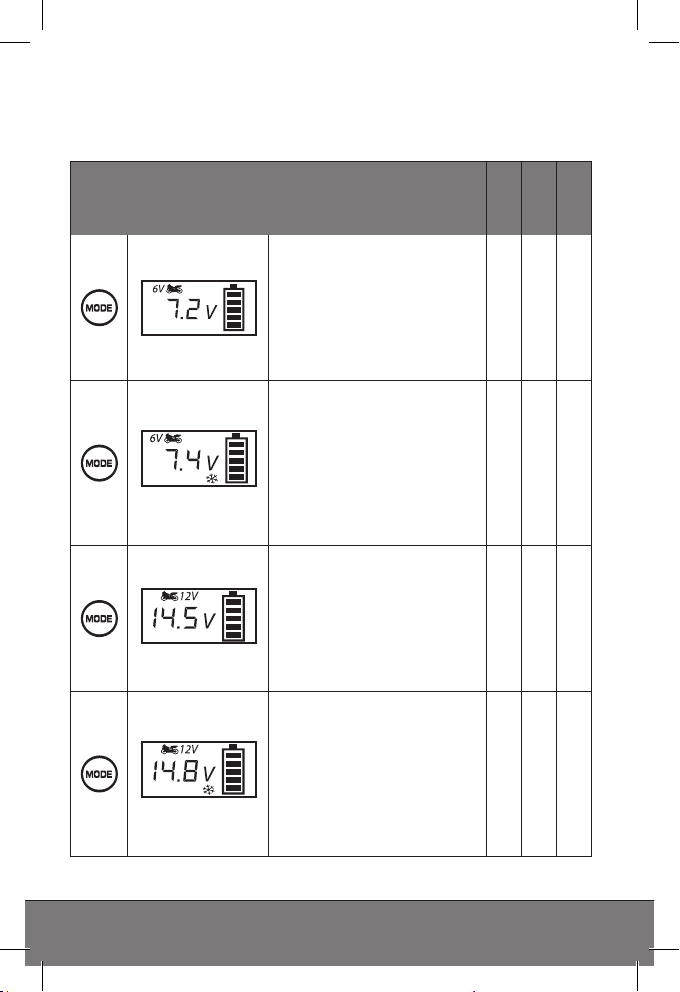
Mögliche Lademodi
DP4.0
DP6.0
Auflademodus 7,2V
Geeignet zum Aufladen
von 6V-Batterien bis zu
einer Kapazität von 14Ah
in normalem Zustand.
Geeignet für WET- und die
meisten GEL-Batterien.
Auflademodus 7,4V
Geeignet zum Aufladen
von 6V-Batterien bis zu
einer Kapazität von 14Ah
bei Temperaturen unter
null Grad.
Geeignet für WET- und die
meisten GEL-Batterien.
Auflademodus 14,5V
Geeignet zum Aufladen
von 12V-Batterien bis zu
einer Kapazität von 14Ah
in normalem Zustand.
Geeignet für WET- und die
meisten GEL-Batterien.
Auflademodus 14,8V
Geeignet zum Aufladen
von 12V-Batterien mit
einer Kapazität über 14Ah
bei Temperaturen unter
null Grad.
Geeignet für WET- und die
meisten GEL-Batterien.
• • -
• • -
• • •
• • •
DP10.0
12
Page 13
D Bedienungsanleitung
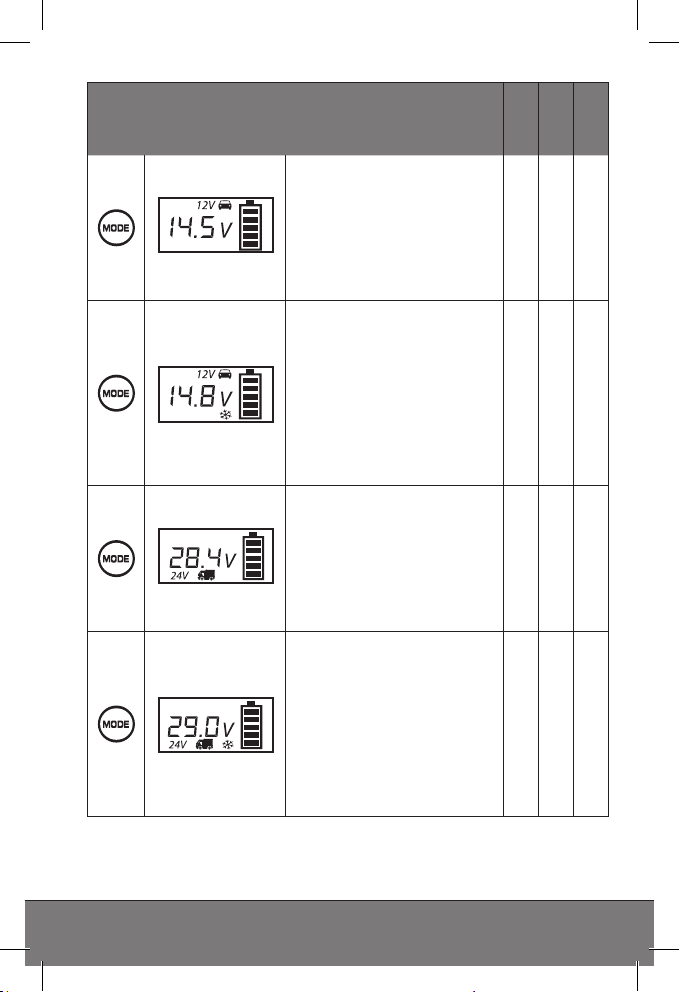
Mögliche Lademodi
Auflademodus 14,5V
Geeignet zum Aufladen
von 12V-Batterien mit
einer Kapazität über 14Ah
in normalem Zustand.
Geeignet für WET- und die
meisten GEL-Batterien.
Auflademodus 14,8V
Geeignet zum Aufladen
von 12V-Batterien mit
einer Kapazität über 14Ah
bei Temperaturen unter
null Grad. Auch geeignet
für viele AMG-Batterien
(mit Elektrolyt absorbierenden Matten).
Auflademodus 28,4VA
Geeignet zum Aufladen
von 24V-Batterien mit
einer Kapazität über 14Ah
in normalem Zustand.
Geeignet für WET- und die
meisten GEL-Batterien.
Auflademodus 29,0V
Geeignet zum Aufladen
von 24V-Batterien mit
einer Kapazität über 14Ah
bei Temperaturen unter
null Grad. Auch geeignet
für viele AMG-Batterien
(mit Elektrolyt absorbierenden Matten).
DP4.0
DP6.0
• • •
• • •
- - •
- - •
DP10.0
13
Page 14
Mikroprozessor-Batterieladegerät DP4.0 / DP6.0 / DP10.0
BEDIENUNG
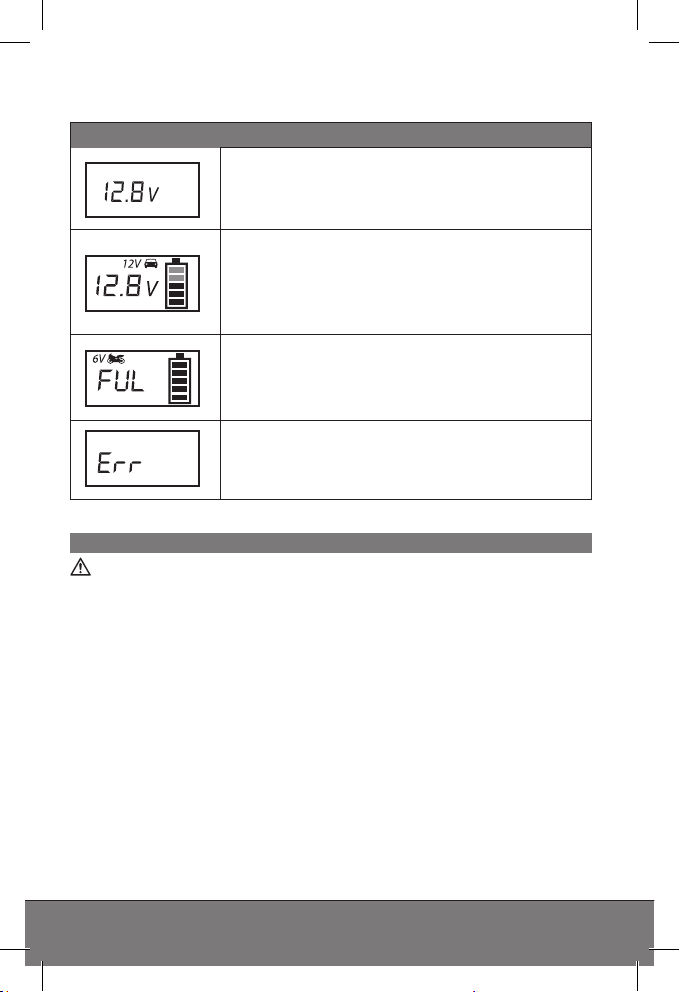
Zustandsanzeigen
Startanzeige (Standby) nach dem richtigen Anschluss einer Batterie. Anzeige der aktuellen
Batteriespannung.
Anzeige des Ladevorgangs im jeweiligen
Modus (die Blöcke innerhalb des Batteriesymbols blinken entsprechend dem Ladezustand).
Anzeige der aktuellen Batteriespannung und
des gewählten Lademodus.
Batterie ist vollständig geladen. (alle Blöcke
innerhalb des Batteriesymbols sind voll). Anzeige der aktuellen Batteriespannung und des
gewählten Lademodus.
Fehleranzeige bei Auswahl eines falschen
Lademodus, Falschanschluss, Kurzschluss
(defekte Batterie) oder Überhitzung.
Vor dem Aufladen
Warnung!
Stellen Sie vor Gebrauch / Einsatz des Geräts sicher, dass Sie die
Anleitung der Batterie sowie des Fahrzeugs gelesen und alle Sicherheitshinweise verstanden haben.
• Verwenden Sie eine Schutzbrille und säurefeste Schutzhandschu-
he.
• Sorgen Sie für eine ausreichende Belüftung.
• Reinigen Sie die Batteriepole. Wenn die Batterie über abnehmba-
re Entlüftungskappen verfügt, füllen Sie jede Batteriezelle bis zu
dem vom Batteriehersteller empfohlenen Pegel mit destilliertem
Wasser auf. Überfüllen Sie die Zellen nicht.
14
Page 15
D Bedienungsanleitung
Ladegerät anschließen
Warnung!
Achten Sie immer auf die richtige Polarität und den festen Sitz der
Batterieklemmen, wenn Sie das Gerät an eine Batterie anschließen
und vermeiden Sie einen Kurzschluss durch Berührung der Batterieklemmen.
1. Schließen Sie das rote (+) Polanschlusskabel am positiven Pol der
Batterie an.
2. Schließen Sie das schwarze (-) Polanschlusskabel am negativen
Pol der Batterie an.
Hinweis:
Die schwarze (-) Klemme kann auch an die Fahrzeug-Karosserie
angeschlossen werden (Beachten Sie dabei die Bedienungsanleitung des Fahrzeugs!). Stellen Sie sicher, dass beide Klemmen guten
Kontakt haben und fest sitzen.
Vorsicht!
Vergewissern Sie sich, dass die Batterieklemmen ordnungsgemäß
angeschlossen sind, bevor Sie das Gerät an die 230V-Netzsteckdose anschließen.
3. Stecken Sie den Netzstecker des Ladegeräts in eine 230V-Netz-
steckdose.
Wenn das Ladegerät richtig angeschlossen ist, startet das Ladegerät mit der Startanzeige (Standby-Modus). In diesem Modus setzt
sich das Ladegerät automatisch auf die Grundeinstellungen zurück.
Wenn die Batterie als defekt erkannt wird oder mit falscher Polarität
angeschlossen wurde, leuchtet die Fehleranzeige (Err). In diesem
Fall, das Ladegerät ausstecken und von der Batterie trennen. Anschließend die korrekte Polarität prüfen.
Im Falle eines Anschlusses mit falscher Polarität leuchtet die LED
„Reverse“(1) rot auf. Der Ladevorgang wird nicht gestartet.
Hinweis:
Eine Batterie wird als defekt erkannt, wenn die Batteriespannung
unter 3,0V (6V-Batterie oder 12V-Batterie) liegt. Lassen Sie die
Batterie von einer Fachwerkstatt überprüfen.
15
Page 16

Mikroprozessor-Batterieladegerät DP4.0 / DP6.0 / DP10.0
Ladevorgang starten
1. Wählen Sie, nach dem Einstecken des Netzsteckers, durch
wiederholtes Drücken der Taste MODE (5) den gewünschten
Lademodus (siehe „Mögliche Lademodi“).
2. Der Ladevorgang beginnt nach kurzer Zeit automatisch mit den
Einstellungen des gewählten Lademodus.
Hinweis:
Haben Sie einen falschen Lademodus gewählt, erscheint die Fehleranzeige (Err). In diesem Fall, das Ladegerät ausstecken und von der
Batterie trennen, kurz warten und wieder einstecken.
• Während des Ladevorgangs blinken die Blöcke innerhalb des Bat-
teriesymbols in Abhängigkeit vom Ladezustand. Die LED „Charging“(2) leuchtet rot.
• Bei voller Batterie leuchten alle fünf Blöcke im Batteriesymbol. Die
LED „Charged Green“(2) leuchtet grün.
• Zusätzlich wird die aktuelle Batteriespannung im Display ange-
zeigt.
• Wenn die Batterie vollgeladen ist, schaltet das Ladegerät auf Er-
haltungsladung um den Ladezustand zu erhalten und die Batterie
vor Überladung zu schützen.
Displaybeleuchtung
Drücken Sie die Taste Mode (5).
Die Displaybeleuchtung wird während des Ladevorgang nach ca.
30Sekunden automatisch abgeschaltet. Durch betätigen der Mode
Taste können Sie die Displaybeleuchtung jederzeit erneut für ca.
30Sekunden aktivieren.
Ladevorgang beenden und Ladegerät trennen
1. Ziehen Sie immer zuerst den Netzstecker aus der 230V-Wechselstromsteckdose.
2. Trennen Sie das schwarze (-) Polanschlusskabel vom negativen
Pol der Batterie ab.
3. Trennen Sie das rote (+) Polanschlusskabel vom positiven Pol der
Batterie ab.
16
Page 17
D Bedienungsanleitung
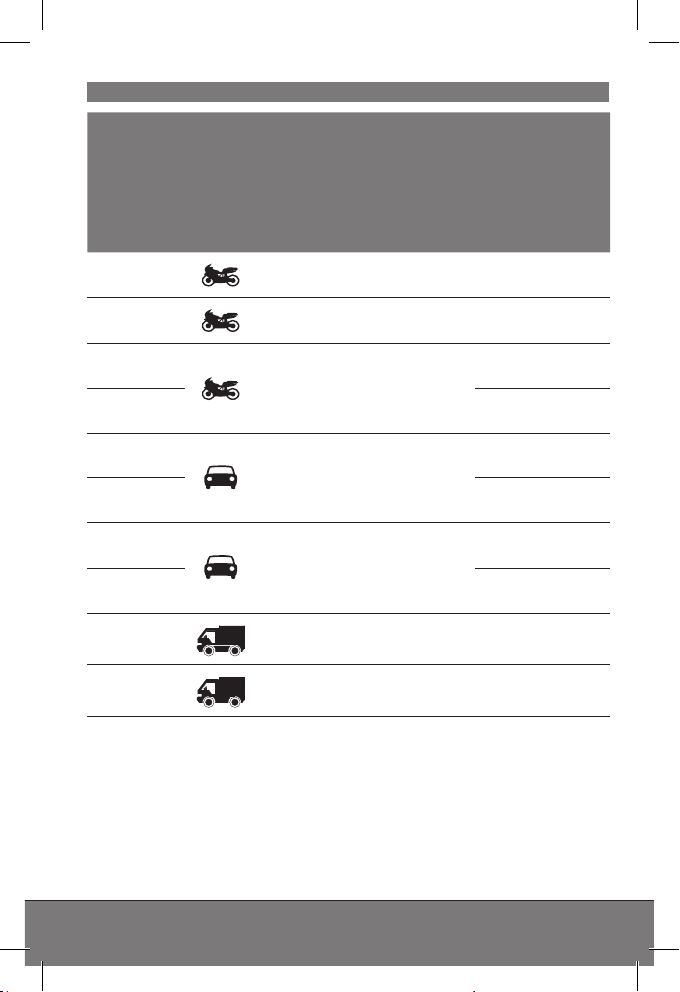
Auflademodus und -zeit
Batteriegröße (Ah)
2
8
2
8 8 5 8
20
60 14 12 8
100
120 28 24 14
20
60
Modus
6V-Modus
normale Bedingungen
6V-Modus
Temperaturen unter 0°C
12V-Modus
normale Bedingungen
12V-Modus
normale Bedingungen
12V-Modus
Temperaturen unter 0°C
24V-Modus
normale Bedingungen
24V-Modus
Temperaturen unter 0°C
Für etwa 80%
Aufladung
(Stunden)
DP4.0
2 2 -
8 8 -
2 2 2
4,5 4 2,5
23 20 12
- - 5
- - 14
DP6.0
DP10.0
17
Page 18

Mikroprozessor-Batterieladegerät DP4.0 / DP6.0 / DP10.0
SICHERHEITSFUNKTIONEN
• Das Ladegerät ist vor Anwendungsfehlern geschützt und bewahrt
die angeschlossene Batterie vor Beschädigungen.
• Keine Überladungsgefahr!
• Die Elektronik Ihres Fahrzeuges wird durch das Ladegerät nicht
beschädigt.
Schutz Beschreibung
Um Beschädigungen des Ladegerätes und der
Batterie zu vermeiden, schaltet sich das Ladegerät selbständig aus und setzt das System in den
folgenden Fällen wieder auf die Grundeinstellungen
zurück:
Abnormaler
Betrieb
Überhitzen
MCUSteuerung
• Kurzschluss
• Falschanschluss
• Oener Schaltkreis
• Anschluss mit umgekehrter Polarität
• Batteriespannung unter 3,0V ±0,5V
Das Ladegerät verbleibt im Standby-Modus und es
leuchtet die Fehleranzeige im Display auf.
Wird das Ladegerät während des Ladevorgangs
oder aufgrund von hoher Umgebungstemperatur zu
heiß, wird die Stromzufuhr automatisch reduziert.
Das Ladegerät fährt mit Erhaltungsladen fort und
erhöht automatisch die Leistung, wenn die Temperatur wieder fällt.
Vollständige Steuerung durch die interne Mikrocomputereinheit (Micro-Computer-Unit, MCU), wodurch
ein schneller, kraftvoller, verlässlicher und intelligenter Aufladeprozess sichergestellt wird.
18
Page 19
D Bedienungsanleitung
REINIGUNG, PFLEGE UND
WARTUNG
• Reinigen Sie die Batterieklemmen jedes Mal nach Beendigung des
Ladevorgangs. Wischen Sie, um Korrosion zu vermeiden, jegliche
Batterieflüssigkeit ab, die eventuell mit den Batterieklemmen in
Kontakt gekommen ist.
• Rollen Sie die Kabel ordentlich auf, wenn Sie das Gerät lagern.
Das hilft, versehentliche Beschädigungen der Kabel und des Geräts zu vermeiden.
• Reinigen Sie das Gerät mit einem weichen Tuch.
• Lagern Sie das Gerät an einem sauberen und trockenen Ort.
Service
Sollten Sie trotz Studiums dieser Bedienungsanleitung noch Fragen
zur Inbetriebnahme oder Bedienung haben, oder sollte wider Erwarten ein Problem auftreten, setzen Sie sich bitte mit Ihrem Fachhändler in Verbindung.
ENTSORGUNG
Die Verpackung besteht aus umweltfreundlichen Materialien, die Sie
über die örtlichen Recyclingstellen entsorgen können.
Werfen Sie Elektrogeräte nicht in den Hausmüll!
Gemäß Europäischer Richtlinie 2012/19/EU über Elektro- und
Elektronik-Altgeräte und Umsetzung in nationales Recht müssen
verbrauchte Elektrogeräte getrennt gesammelt und einer umweltgerechten Wiederverwertung zugeführt werden. Über Entsorgungsmöglichkeiten für Elektronik-Altgeräte informieren Sie sich bitte bei
Ihrer Gemeinde- oder Stadtverwaltung.
Abbildungen können geringfügig vom Produkt abweichen. Änderungen, die dem technischen Fortschritt dienen, vorbehalten. Dekoration nicht enthalten.
19
Page 20

20
Mikroprozessor-Batterieladegerät DP4.0 / DP6.0 / DP10.0
Page 21

GB Instructions for use
TABLE OF CONTENTS
1. Introduction 22
2. Contents 23
3. Normal use 23
4. Technical data 24
5. Safety 25
6. Product Overview 29
7. Operation 32
8. Safety functions 36
9. Cleaning, care and maintenance 37
10. Disposal 37
GB Instructions for use
21
Page 22
Microprocessor Battery Charger DP4.0 / DP6.0 / DP10.0
INTRODUCTION
Explanation of symbols and signal words used in these operating
instructions and/or the device:
Symbol Explanation
Follow instructions when using the machine.
Risk of bodily or fatal injury to children!
Follow warnings and safety instructions!
Only use device in locations protected from weather!
Double-insulated housing (protection class II)
Consider the environment when disposing of the packaging!
Symbol/signal
word
Danger!
Warning!
Caution!
Attention! Risk of property damage.
Note:
These instructions also refer to the battery charging device as
device.
22
Possible consequences of non-observance
Immediate danger to life or severe injuries
Serious injuries, potentially life-threatening
Light to moderate injuries
Page 23

GB Instructions for use
CONTENTS
Be sure to verify contents immediately upon opening the product.
Check the product and all parts for amage. Do not use a defective
product or parts.
• Microprocessor Battery Charger
• operating instruction
Please include all relevant documentation to other users!
NORMAL USE
The charger is intended for charging open and a variety of closed,
maintenance-free lead-acid rechargeable batteries (batteries) as
found in cars, boats, lorries and other vehicles, e.g.:
• wet batteries (WET) Lead-acid batteries (liquid electrolyte)
• Gel batteries (gel-type electrolyte)
• EFB (enhanced flooded battery)
• AGM batteries (electrolyte inside absorbed glass matt)
• Maintenance-free lead-acid batteries (MF)
The unit can be used by children over eight years of age, by people
with reduced physical, sensory or mental capabilities and by people
who lack experience/knowledge in using it provided that they are
supervised while doing soand/or have been shown how to use the
unit safely and understand the potential risks involved. Do not allow
children to play in the unit. Children should not clean the unit or
carry out basic maintenance on it without supervision.
This device is not intended for commercial use.
Any other use or modification of the device is considered improper
and involves significant risks. The manufacturer assumes no liability
for damages due to improper use.
23
Page 24

Microprocessor Battery Charger DP4.0 / DP6.0 / DP10.0
The manufacture is not responsible for damages caused by:
• Improper connection and/or operation.
• External forces, damage to the device and/or damage to parts of
the device due to mechanical impacts or overload.
• Any type of modifications to the device.
• Using the device for purposes not described in this operating
manual.
• Subsequent damages from improper and/or incorrect use and/or
defective batteries.
• Moisture and/or inadequate ventilation.
• Unauthorised opening of the device. This will void the warranty.
TECHNICAL DATA
DP4.0 DP6.0 DP10.0
Input
Output
Charging
voltage
Charging
current
220 - 240 V AC,
50/60 Hz
64 W
6V DC /
12V DC
6V battery:
7,2V / 7,4V
+/- 0,25 V
12V battery:
14,5V / 14,8V
+/- 0,25 V
6V battery:
2A
+/-10%
12V battery:
2A ;
4A (90s) / 2A
(300s)
+/-10%
220 - 240 V AC,
50/60 Hz
100 W
6V DC /
12V DC
6 V battery:
7,2V / 7,4V
+/- 0,25 V
12V battery:
14,5V / 14,8V
+/- 0,25 V
6V battery:
2A
+/-10%
12V battery:
2A / 6A
+/-10%
220 - 240 V AC,
50/60 Hz
180 W
12V DC /
24V DC
12 V battery:
14,5V / 14,8V
+/- 0,25 V
24V battery:
28,4V / 29,0V
+/- 0,25 V
12V battery:
2A / 10A
+/-10%
24V battery:
5A
+/-10%
24
Page 25

GB Instructions for use
DP4.0 DP6.0 DP10.0
Reverse current
Ambient
temperature
Type of batteries
Fuse T2A T2A T3.15A
4mA 4mA 4mA
-20 to +40°C -20 to +40°C -20 to +40°C
6V battery:
6V lead-acid
batteries (WET,
MF, AGM and
GEL) with a
battery capacity of
1,2 - 14Ah
12V battery:
12V lead-acid
batteries (WET,
MF, AGM and
GEL) with a
battery capacity of
1,2 - 120Ah
6V battery:
6V lead-acid
batteries (WET,
MF, AGM and
GEL) with a
battery capacity of
1,2 - 14Ah
12V battery:
12V lead-acid
batteries (WET,
MF, AGM and
GEL) with a
battery capacity of
1,2 - 120Ah
12V battery:
12V lead-acid
batteries (WET,
MF, AGM and
GEL) with a
battery capacity of
1,2 - 200Ah
24V battery:
24V lead-acid
batteries (WET,
MF, AGM and
GEL) with a
battery capacity of
14 - 120Ah
SAFETY
Read all safety guidelines and instructions. Non-compliance with
safety guidelines and instructions can cause electric shock, fire
and/or serious injury. Keep all safety guidelines and instructions for
future reference.
Risk of bodily or fatal injury to children!
• Keep the device out of the reach of children. Children are unable
to assess the risks associated with use of this product!
• Strangulation hazard! Do not allow children to play with the components or fasteners, as they could be swallowed and result in
suocation.
25
Page 26
Microprocessor Battery Charger DP4.0 / DP6.0 / DP10.0
Risk of chemical burns!
Batteries contain acid, which could damage the eyes and skin.
Charging batteries further generates gasses and vapours hazardous
to the health.
• Avoid any contact with caustic battery acid. Immediately thoroughly flush skin and any objects which have come into contact
with acid. If eyes have come into contact with battery acid, flush
eyes with running water at least 5 minutes. Contact your physician.
• Use safety goggles and acid-proof safety gloves. Protect clothing,
e.g. with an apron.
• Never tip the battery, as acid may leak.
• Always ensure adequate ventilation.
• Do not inhale emerging gasses and vapours.
Explosion and fire hazard!
Gaseous hydrogen (detonating gas) may form when charging the
battery. Contact with open fire (flame, embers, sparks) may result in
explosions.
• Never charge the battery close to an open fire or in places where
sparks may occur.
• Always ensure sucient ventilation.
• Be sure the supply voltage matches the input voltage specified on
the device (220 - 240 V AC) to prevent damage to the device.
• Only connect and disconnect the battery connecting cables when
the charger is disconnected from the mains.
• Do not cover the device whilst charging, as it may be damaged
from extreme heating.
• Immediately stop using the device if you notice smoke or an unusual odour.
• Do not use the device in rooms where explosive or flammable substances are stored (e.g. petrol or solvents).
26
Page 27
GB Instructions for use
Risk of electrical shock!
• Chargers may interfere with the operation of active electronic
implants, e.g. pacemakers, thus pose a personal hazard.
• The unit is protected against splash- and hose water. However, be
sure to always keep the unit in a safe location. Avoid pouring or
dripping water or other liquids over it. If water penetrates electrical devices, the risk of electric shock increases.
• Ensure that all plugs and cables are free of moisture. Never connect the device to the mains with wet or moist hands.
• Never touch both connections at once when the device is in uses.
• Unplug from mains before connecting or disconnecting the char-
ging cable with the battery, or when the device is no longer being
used.
• Always connect the positive clamp (red) to the positive battery
pole (not connected to the chassis of the car, marked with P or +).
• Then connect the negative clamp (black) to the car chassis, away
from the battery casing of the car, away from the battery and the
fuel line. The charger can then be connected to a suitable power
socket.
• After charging, first disconnect the charger from the power
supply. Then, in this sequence, disconnect the cable to the car
chassis (-), and then the battery connection (+).
• Remove all device cables from the battery before attempting to
drive your vehicle.
• Always unplug device by the plug. The cable may be damaged.
• Do not use device if damaged. Damage to the power cable, the
device or the charging cable increase the risk of electrical shock.
• Do not attempt to disassemble or repair the device. Immediately have a defective device or damaged power cable repaired or
replaced by a speciality shop.
• Risk of short circuits!! Do not allow the two connectors from
the charging cable to touch if the power plug is plugged into the
power outlet. Be sure not to connect the connectors or the battery
poles through conductive objects (e.g. tools).
• Never use the cable to carry or pull the device.
27
Page 28
Microprocessor Battery Charger DP4.0 / DP6.0 / DP10.0
Risk of injury!
• Never attempt to charge non-rechargeable, damaged or frozen
batteries.
• Do not use this device to charge dry cell batteries. These could
burst, resulting in personal injury and property damage.
• Please read and follow the operating manual and all safety instructions for the batteries to be charged and the vehicle before
using this device.
Risk of damage!
• Never place the device over or near the battery to be charged.
Gasses from the battery could damage the unit.
• Place the device as far from the battery as the connecting cable
will allow.
• Never operate the device if it has been dropped or damaged in any
other way. For inspection and repair, take it to a qualified electrician.
28
Page 29
GB Instructions for use
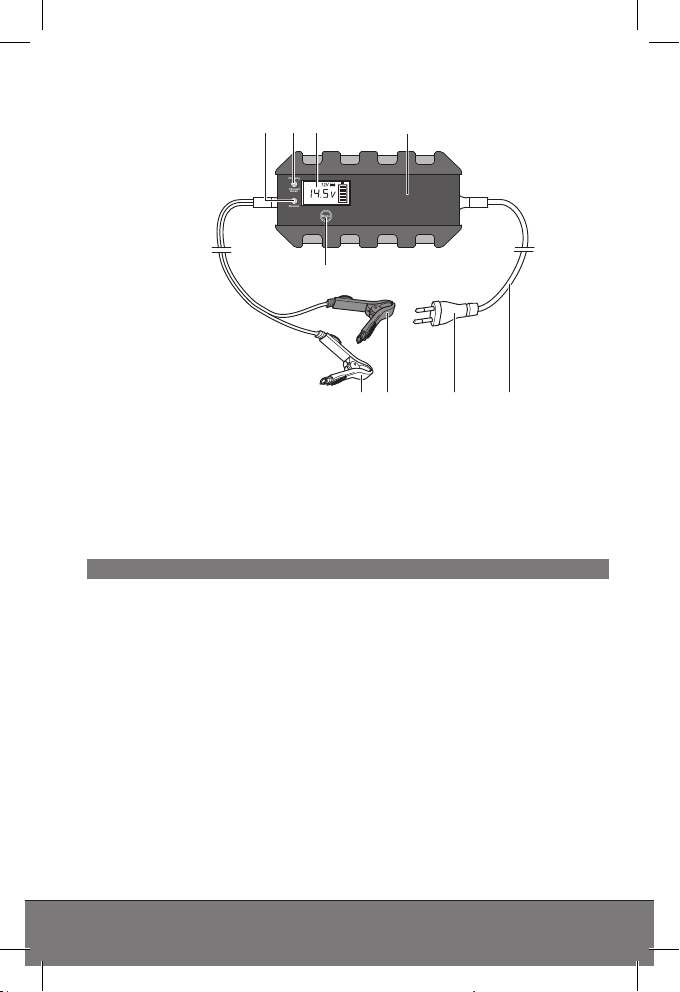
PRODUCT OVERVIEW
4321
Charging
Charged
Green
Reverse
Mode
5
7 689
1. LED „Reverse“
2. LED „Charging“/“Charged
Green“
3. Display
4. Battery charger
5. MODE button
Functions
The charger has dierent charging modes to choose from based on
the battery type, battery condition and the environmental conditions. The charging modes are activated based on the detected
battery voltage.
The charger features a micro-computer unit (MCU). After selecting
the desired charging mode the charger will recognise the battery
connected (voltage, capacity, condition) and compute the necessary charging parameters (charging voltage, charging current). This
allows for ecient and safe charging. When selecting a charging
mode not suitable for the battery or if the battery is defective, the
charging cycle still not start. The charger switches to error indicator.
The “trickle charge“ function allows the charger to be permanently
connected. A full charge will be maintained.
6. Power cord
7. Power plug
8. Terminal connection cable
(+) with clamp (red)
9. Terminal connection cable (-)
with clamp (black)
29
Page 30
Microprocessor Battery Charger DP4.0 / DP6.0 / DP10.0
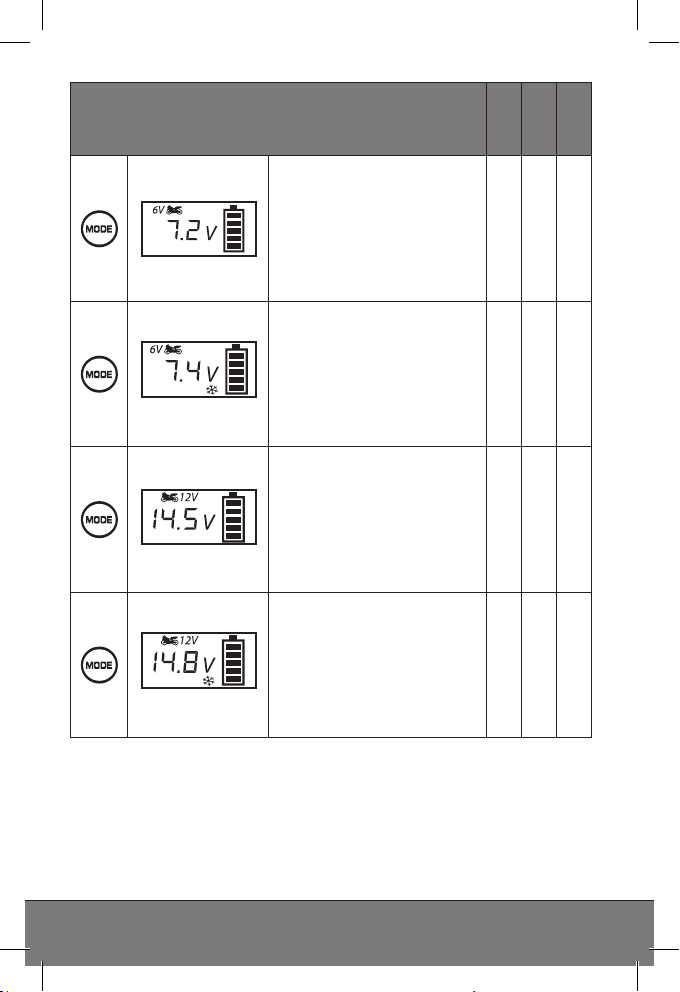
Charging mode options
Charging mode 7.2V
Suitable for charging 6V
batteries up to a capacity
of 14Ah in normal condition.
Suitable for WET- and
most GEL batteries.
Charging mode 7.4V
Suitable for charging 6V
batteries up to a capacity
of 14Ah at temperatures
below zero degrees.
Suitable for WET- and
most GEL batteries.
Charging mode 14.6V
Suitable for charging 12V
batteries up to a capacity
of 14Ah in normal condition.
Suitable for WET- and
most GEL batteries.
Charging mode 14,8V
Suitable for charging 12V
batteries up to a capacity
of 14Ah at temperatures
below zero degrees.
Suitable for WET- and
most GEL batteries.
DP4.0
DP6.0
• • -
• • -
• • •
• • •
DP10.0
30
Page 31
GB Instructions for use
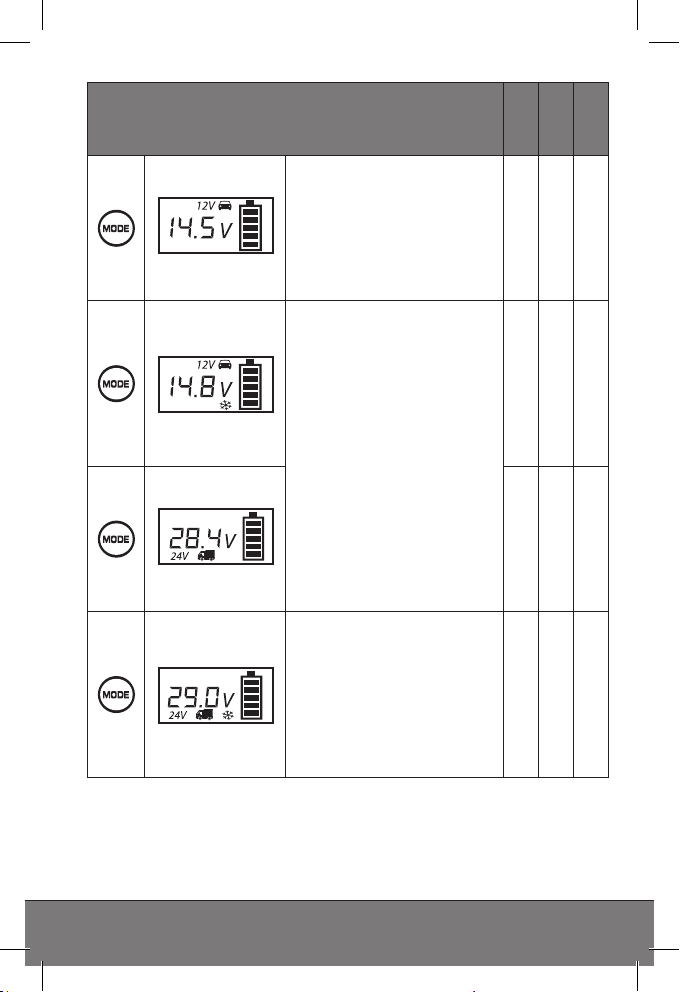
Charging mode options
Charging mode 14.5V
Suitable for charging 12V
batteries with a capacity
above 14Ah in normal
condition.
Suitable for WET- and
most GEL batteries.
Charging mode 14.8V
Suitable for charging 12V
batteries with a capacity
above 14Ah in temperatures under zero degrees.
Also suitable for many
AMG batteries (with electrolyte absorbing mats).
Charging mode 28.4V
Suitable for charging 24V
batteries with a capacity
above 14Ah in normal
condition.
Suitable for WET- and
most GEL batteries.
Charging mode 29.0V
Suitable for charging 24V
batteries with a capacity
above 14Ah in temperatures under zero degrees.
Also suitable for many
AMG batteries (with electrolyte absorbing mats).
DP4.0
DP6.0
• • •
• • •
- - •
- - •
DP10.0
31
Page 32
Microprocessor Battery Charger DP4.0 / DP6.0 / DP10.0
OPERATION
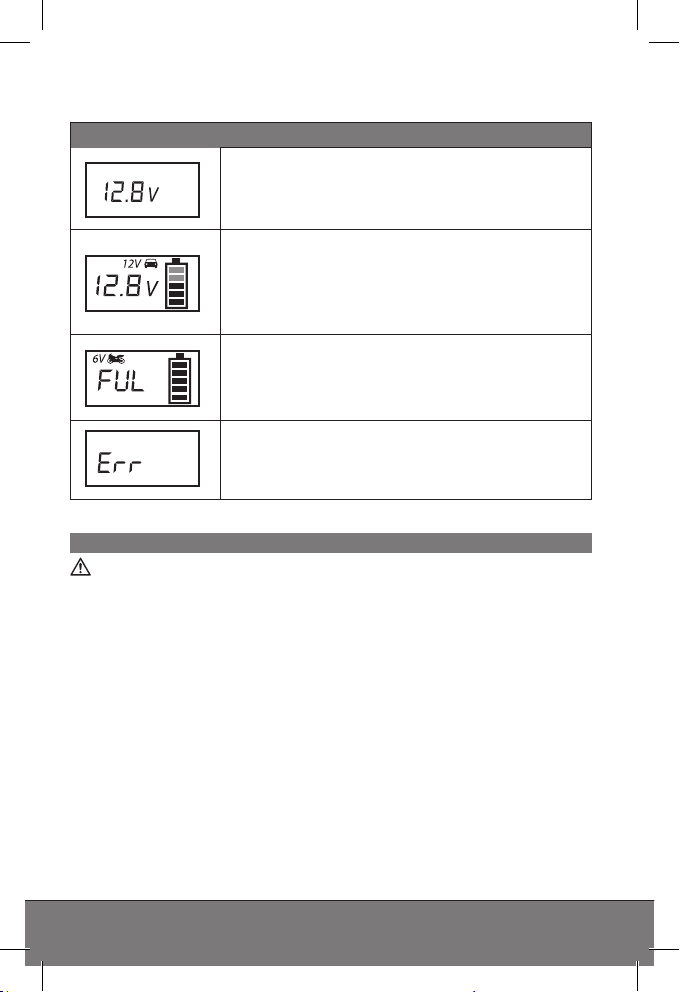
Status indicators
Start indicator (Standby) after correctly connecting a battery. Displays the current battery
voltage.
Displays the charging process in the respective mode (the blocks inside the battery symbol
will flash according to the charging status).
Displays the current battery voltage and the
charging mode selected.
Battery fully charged. (all blocks inside the
battery symbol are full). Displays the current
battery voltage and the charging mode selected.
Error indicator when selecting an incorrect
charging mode, incorrect connection, short
circuit (defective battery) or overheating.
Before use
Warning!
Before using this device be sure to read the operating manual for
the battery and the vehicle and understand all safety notices.
• Use safety goggles and acid-proof safety gloves.
• Ensure adequate ventilation.
• Ensure the battery poles are clean. If the battery has removable
vent caps, fill each battery cell with distilled water to the level recommended by the battery manufacturer. Do not overfill the cells.
32
Page 33
GB Instructions for use
Connect the charger
Warning!
Always ensure correct polarity and firmly seated battery clamps
when connecting the device to a battery, and prevent short-circuits
from the battery clamps touching.
1. Attach the red (+) clamp to the (+) battery terminal.
2. Attach the black (-) clamp to the (-) battery terminal.
Note:
The black (-) clamp can also be connected to the vehicle chassis
(Please refer to the auto maker‘s instructions!). Be sure both clamps
have good contact and are securely seated.
Caution!
Verify the battery clamps are properly connected before connecting
the device to the 230V mains outlet.
3. Plug the charger plug into a 230V power socket.
With the charger correctly connected, the charger will start, show-
ing the start-up display (standby mode). In this mode the charger
will automatically reset to the default settings.
If the battery is detected as defective or connected with the poles
reversed, the error indicator (Err) will light up. In this case, unplug
the charger and disconnect from the battery. Then check the polarity.
When connected with the incorrect polarity, the “Reverse”LED (1)
will light up red. Charging will not start.
Note:
A battery is recognised to be defective if the battery voltage is
below 3.0 V (6 V battery or 12 V battery). Have the battery checked
by a speciality repair shop.
33
Page 34

Microprocessor Battery Charger DP4.0 / DP6.0 / DP10.0
Start charging
1. Repeatedly press the MODE (5) button after plugging into the
mains to select the desired charging mode (see “Charging mode
options”).
2. After a short time charging will start automatically using the
settings for the selected charging mode.
Note:
If an incorrect charging mode was selected, the error code (Err)
will appear. In this case unplug the charger, wait briefly, and plug in
again.
• During the charging process the blocks inside the battery symbol
will flash based on the charging status. The “Charging”LED (2)
will light up red.
• With the battery fully charged, all four blocks inside the battery
symbol will light up. The “Charged Green”LED (2) will light up
green.
• In addition, the display will show the current battery voltage.
• Once the battery is fully charged, the charger will switch to trickle
charge to maintain the charging status and protect the battery
from overcharging.
Display light
Press the Mode (5) button.
The display light will automatically switch o after approx. 30seconds whilst charging. Press the Mode button at any time to light
the display for approx. 30seconds.
Complete charging and disconnect charger
1. Always first unplug the power plug from the 230V alternating
current socket.
2. Disconnect the black (-) clamp from the (-) battery terminal or the
vehicle chassis.
3. Disconnect the red (+) clamp from the (+) battery terminal.
34
Page 35
GB Instructions for use
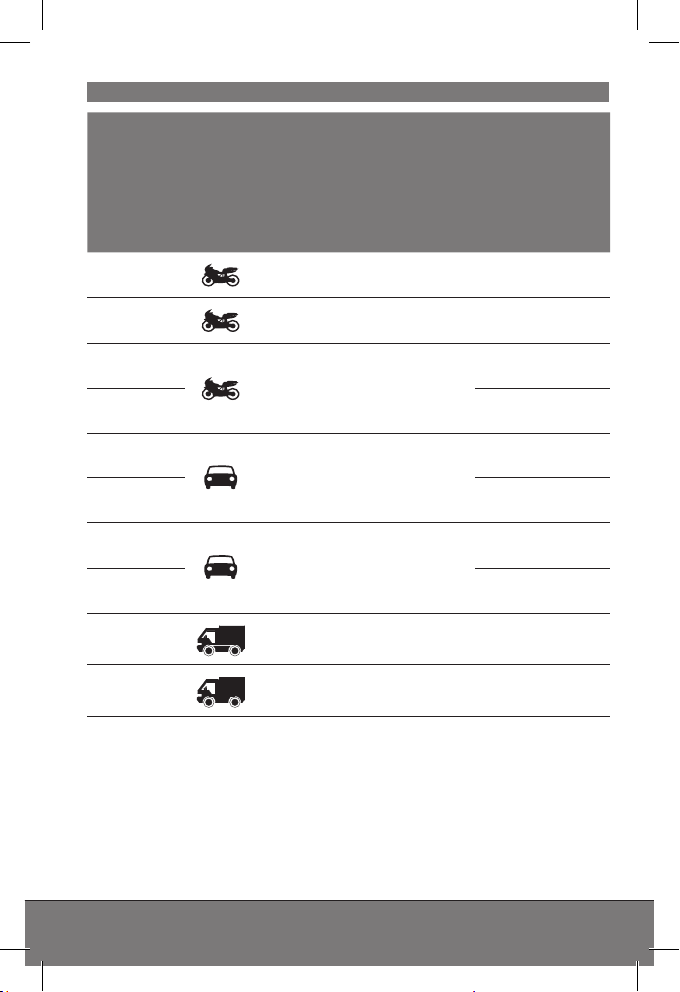
Charging mode and time
Battery size
(Ah)
2
8
2
8 8 5 8
20
60 14 12 8
100
120 28 24 14
20
60
Mode
6V mode
normal conditions
6V mode
temperatures below 0°C
12V mode
normal conditions
12V mode
normal conditions
12V mode
temperatures below 0°C
24V mode
normal conditions
24V mode
temperatures below 0°C
For about 80%
charge (hours)
DP4.0
2 2 -
8 8 -
2 2 2
4,5 4 2,5
23 20 12
- - 5
- - 14
DP6.0
DP10.0
35
Page 36

Microprocessor Battery Charger DP4.0 / DP6.0 / DP10.0
SAFETY FUNCTIONS
• The charge is protected from user error and prevents damage to
the connected battery.
• No risk of overcharging!
• The charger will not damage the electronics in your vehicle.
Protection Description
To avoid damage to charger and
battery, the charger will turn o its own electronic
system and will immediately reset the system to
basic settings in the case of
Abnormal
Operation
Overheat
MCU
Control
• short circuit
• wrong connection
• open circuit
• reversed polarity connection
• Battery voltage below 3.0V ±0.5V
The charger will remain in standby mode and the
display shows the error indicator.
During the charging process, if the charger becomes too hot or due to high ambient temperature, the
power output is automatically reduced.
The charger continues to trickle charge and automatically starts increasing power when the temperature
drops.
Fully controlled by internal Micro-Computer-Unit
(MCU), which assures a faster, powerful, reliable and
smarter charging process.
36
Page 37
GB Instructions for use
CLEANING, CARE AND
MAINTENANCE
• Clean clamps after every charging. To prevent corrosion, wipe
o any battery fluid which may have come into contact with the
clamps.
• Carefully wind the cable when storing the device. This will help
prevent accidental damage to the cable and the device.
• Clean the product with a soft, dry cloth.
• Store the machine in a clean, dry place.
Service
Should you have any questions regarding commissioning or operating in spite of studying these operating instructions, or if a problem
should occur against all expectations, please get in contact with
your specialist supplier.
DISPOSAL
The packaging consists of non-contaminating materials that you
can dispose of at your local recycling point.
Do not throw electrical appliances in with domestic waste!
In accordance with European Directive 2012/19/EC for waste
electrical and electronic equipment (WEEE) and conversion to national law, used electrical appliances must be collected separately
and taken to a recycling point. For ways to dispose of old electrical
appliances please contact your community or city administration.
Illustrations may vary slightly from the product itself. We reserve the
right to modify the product in accordance with technical advances.
Decoration not included.
37
Page 38

38
Chargeur de batterie à microprocesseur DP4.0 / DP6.0 / DP10.0
Page 39

F Mode d’emploi
TABLE DES MATIÈRES
1. Introduction 40
2. Contenu de l‘emballage 41
3. Utilisation conforme 41
4. Données techniques 42
5. Sécurité 43
6. Aperçu du produit 47
7. Utilisation 50
8. Fonctions de sécurité 54
9. Nettoyage, entretien et maintenance 55
10. Mise au rebut 55
F Mode d’emploi
39
Page 40
Chargeur de batterie à microprocesseur DP4.0 / DP6.0 / DP10.0
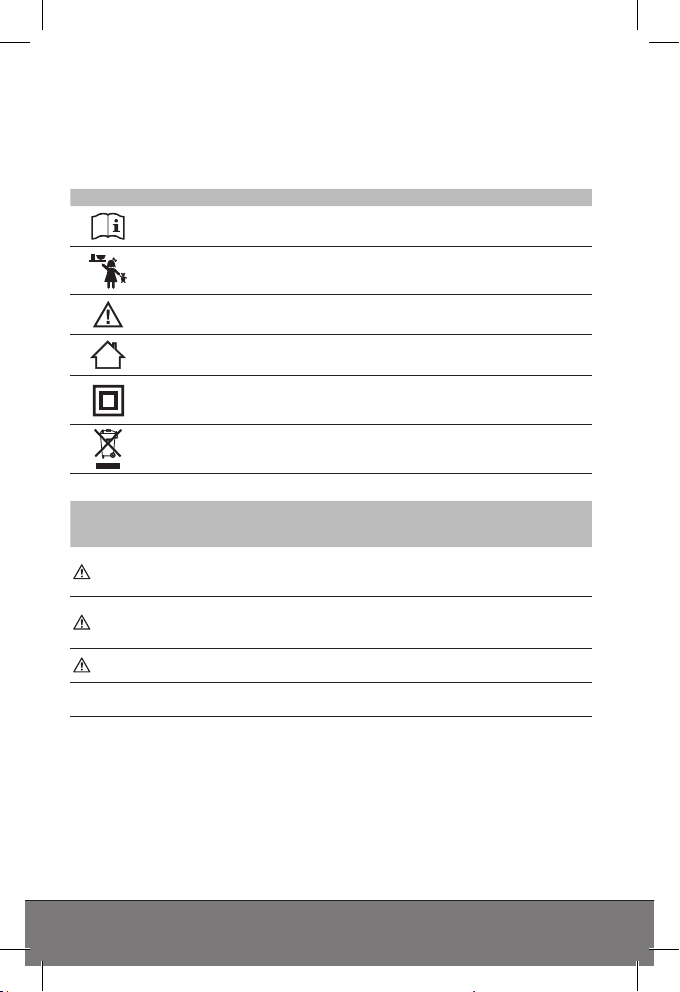
INTRODUCTION
Explication des symboles et mots d‘avertissements qui sont utilisés
dans la présente notice d‘explication et/ou sur l‘appareil:
Symbole Explication
Symbole / mot
d‘avertissement
Attention ! Risque de dégâts matériels.
Remarque :
Le mot « Appareil » est également utilisé pour désigner le chargeur
de batterie dans la présente notice d‘utilisation.
Lorsque vous utilisez l‘appareil, veuillez vous conformer
à la présente notice d‘utilisation.
Risque d‘accident et danger de mort pour les enfants !
Veuillez respecter les consignes de mise en garde et de
sécurité !
Utiliser l‘appareil uniquement dans des endroits
protégés des intempéries !
Carter avec isolation de protection
(classe de protection II)
Éliminez l’emballage et l’appareil de manière
respectueuse de l’environnement !
Conséquences possibles en cas de
non-observation
Danger !
Avertissement !
Prudence !
Danger de mort direct ou risque de blessures
graves
Blessures graves probables danger de mort
Blessures légères à moyennes
40
Page 41

F Mode d’emploi
CONTENU DE L‘EMBALLAGE
Contrôlez le volume de livraison immédiatement après le déballage.
Contrôlez l’appareil et les pièces pour dépister tout endommagement. Ne mettez pas un appareil endommagé en marche.
• Chargeur de batterie à microprocesseur
• notice d‘utilisation
Fournissez tous les documents aux autres utilisateurs !
UTILISATION CONFORME
Ce chargeur est conçu pour recharger toutes les batteries au plomb
(accumulateurs plomb-acide) ouvertes ainsi qu‘un grand nombre
de batteries fermées ne demandant aucun entretien comme celles
installées dans les voitures, les bateaux, les camions et autres
véhicules par ex.:
• Batteries liquides (WET) batteries plomb-acide (électrolyte liquide)
• Batteries gel (électrolyte type gel)
• EFB (enhanced flooded battery)
• Batteries AGM (fibres de verre imprégnées d‘électrolyte)
• Batteries plomb-acide sans entretien (MF)
Cet appareil peut être utilisé par des enfants dès l‘âge de 8 ans,
ainsi que par les personnes dont les fonctions physiques, sensorielles ou mentales sont diminuées ou celles qui manquent
d‘expériences et de connaissances à condition qu‘ils soient surveillés ou qu‘ils aient reçu les instructions sur la sécurité de fonctionnement de l‘appareil et qu‘ils comprennent les risques en résultant.
Les enfants ne doivent pas jouer avec l‘appareil. Le nettoyage et
l‘entretien par l‘utilisateur ne doivent pas être eectués par des
enfants sans surveillance.
L‘appareil n‘est pas prévu pour une utilisation commerciale.
Toute autre utilisation ou modification de l‘appareil est considérée
comme non conforme à sa destination et présente des risques sérieux. Le fabricant ne peut être tenu responsable pour des dommages
résultant d‘une utilisation non conforme.
41
Page 42

Chargeur de batterie à microprocesseur DP4.0 / DP6.0 / DP10.0
Le fabricant n‘est pas responsable des dommages causés par :
• un branchement et / ou un fonctionnement non conformes.
• L‘intervention d‘une force extérieure, les dégradations de
l‘appareil et/ou des pièces de l‘appareil causées par des influences mécaniques ou une surcharge.
• Tout type de modification de l‘appareil.
• L‘utilisation de l‘appareil à des fins non décrites dans la présente
notice d‘utilisation.
• Les dommages consécutifs causés par une utilisation non conforme et/ou incorrecte et/ou par des batteries défectueuses.
• L‘humidité et/ou une aération insusante.
• L‘ouverture non autorisée de l‘appareil. Cela conduit à l‘annulation
de la garantie.
DONNÉES TECHNIQUES
DP4.0 DP6.0 DP10.0
Entrée
Sortie
Tension de
charge
Chargement
en cours
220 - 240 V AC,
50/60 Hz
64 W
6V DC /
12V DC
Mode 6V :
7,2V / 7,4V
+/- 0,25 V
Mode 12V :
14,5V / 14,8V
+/- 0,25 V
Mode 6V :
2A
+/-10%
Mode 12V :
2A ;
4A (90s) / 2A
(300s)
+/-10%
220 - 240 V AC,
50/60 Hz
100 W
6V DC /
12V DC
Mode 6V :
7,2V / 7,4V
+/- 0,25 V
Mode 12V :
14,5V / 14,8V
+/- 0,25 V
Mode 6V:
2A
+/-10%
Mode 12V :
2A / 6A
+/-10%
220 - 240 V AC,
50/60 Hz
180 W
12V DC /
24V DC
Mode 12V :
14,5V / 14,8V
+/- 0,25 V
Mode 24V :
28,4V / 29,0V
+/- 0,25 V
Mode 12V :
2A / 10A
+/-10%
Mode 24V :
5A
+/-10%
42
Page 43
F Mode d’emploi
DP4.0 DP6.0 DP10.0
Courant de
retour
Température
ambiante
Types de
batterie
appropriés
Fusible T2A T2A T3.15A
4mA 4mA 4mA
-20 á +40°C -20 á +40°C -20 á +40°C
Mode 6 V:
Batteries
plomb-acide 6
V (liquide, MF,
AGM et gel)
avec capacité
de 1,2 - 14 Ah
Mode 12 V:
Batteries
plomb-acide
12 V (liquide, MF, AGM
et gel) avec
capacité de 1,2
- 120Ah
Mode 6 V:
6V Batteries
plomb-acide 6
V (liquide, MF,
AGM et gel)
avec capacité
de 1,2 - 14Ah
Mode 12 V:
Batteries
plomb-acide
12 V (liquide,
MF, AGM
et gel) avec
capacité de 1,2
- 120Ah
Mode 12 V:
Batteries
plomb-acide
12 V (liquide,
MF, AGM
et gel) avec
capacité de 1,2
- 200Ah
Mode 24 V:
Batteries
plomb-acide
24 V (liquide,
MF, AGM
et gel) avec
capacité de 14
- 120Ah
SÉCURITÉ
Veuillez lire toutes les consignes de sécurité et les instructions. Le
non respect des consignes de sécurité et des instructions peut provoquer un choc électrique, des brûlures et/ou des blessures graves.
Conservez toutes les consignes de sécurité et des instructions afin
de pouvoir les consulter ultérieurement.
Risque d‘accident et danger de mort pour les enfants !
• Maintenez l‘appareil hors de portée des enfants. Les enfants ne
peuvent pas reconnaître les risques liés à la machine.
• Risque d‘étranglement! Ne laissez pas les enfants jouer avec les
éléments de construction et de fixation. Ils pourraient les avaler et
risquer ainsi une mort par asphyxie.
43
Page 44
Chargeur de batterie à microprocesseur DP4.0 / DP6.0 / DP10.0
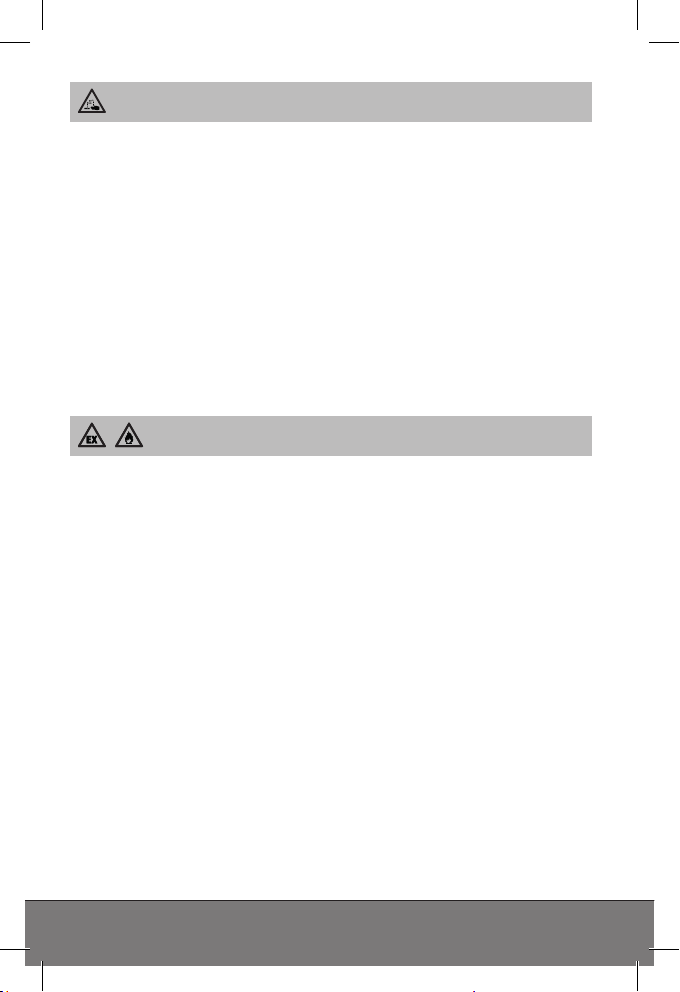
Risque de brûlure !
Les batteries contiennent des acides qui peuvent brûler les yeux
et la peau. Lors de la charge de la batterie, des gaz et des vapeurs
nocifs pour la santé se forment également.
• Évitez tout contacter avec l‘acide irritant de la batterie. Nettoyez
immédiatement à l‘eau les zones de la peau et les objets étant
entrés en contact avec de l‘acide. Si vos yeux devaient entrer en
contact avec de l‘acide de la batterie, rincez-les au moins pendant
5 minutes à l‘eau courante. Contactez votre médecin.
• Utilisez des lunettes de protection et des gants de protection
résistant à l‘acide. Protégez vos vêtements, par ex. avec un tablier.
• Ne renversez pas la batterie car de l‘acide peut s‘en écouler.
• Veillez toujours à ce que l‘aération soit susante.
• N‘inhalez pas les gaz et vapeurs s‘échappant.
Risque d‘explosion et d‘incendie !
De l‘hydrogène gazeux (gaz détonant) peut se former lorsque la
batterie est en charge. Une explosion peut se produire en cas de
contact avec un feu ouvert (flamme, braise, étincelle).
• Ne chargez jamais la batterie à proximité d‘un feu ou d‘objets
produisant des étincelles.
• Assurez toujours une aération susante.
• Assurez-vous que la tension de réseau correspond à la tension
d‘entrée indiquée sur l‘appareil (220 -240 V AC) afin d‘éviter tout
endommagement de l‘appareil.
• Raccordez et débranchez le câble de raccordement à la batterie
uniquement quand le chargeur n‘est pas branché à l’alimentation
électrique.
• Ne couvrez pas l‘appareil pendant le processus de charge car il
peut être endommagé en raison d‘une surchaue.
• Arrêtez immédiatement l‘utilisation de l‘appareil si de la fumée est
visible ou que vous sentez une odeur inhabituelle.
• N‘utilisez pas l‘appareil dans des pièces où sont stockées des
substances explosives ou inflammables (par ex. essence ou solvants).
44
Page 45
F Mode d’emploi
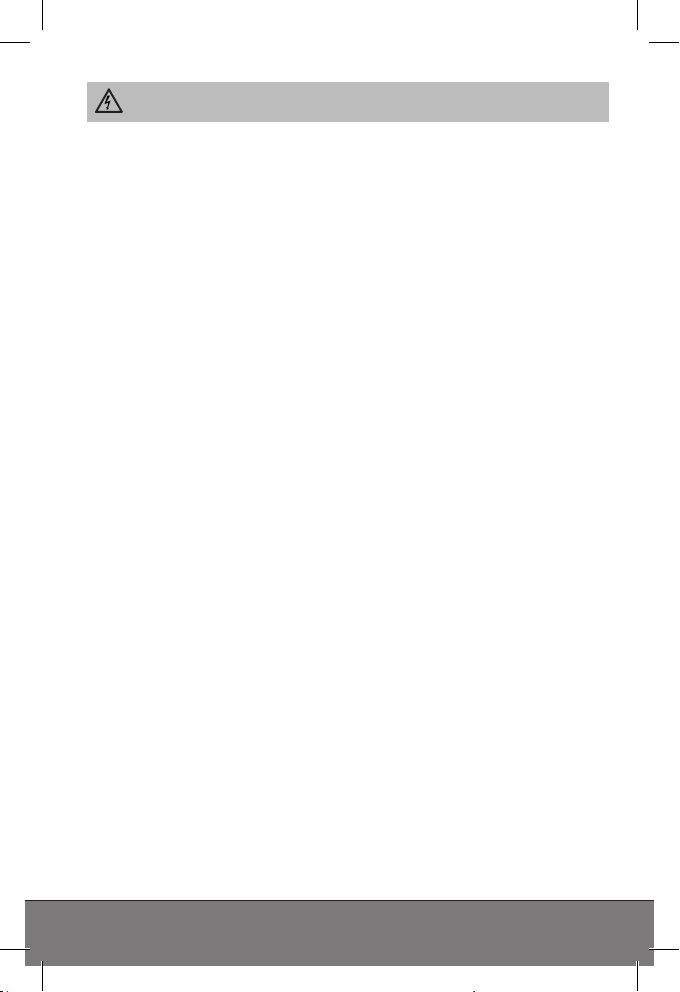
Risque de choc électrique !
• Les chargeurs peuvent gêner le fonctionnement des implants
électroniques comme les pacemakers cardiaques et ainsi mettre
en danger les personnes.
• L‘appareil est protégé contre les éclaboussures et les jets d‘eau.
Malgré tout, assurez-vous que l‘appareil se trouve dans un endroit
sûr. Veillez à empêcher que de l’eau d’autres liquides ne soient
renversés sur l‘appareil. Le risque de choc électrique augmente si
de l’eau pénètre dans un appareil électrique.
• Assurez-vous que les prises et les câbles ne sont pas humides. Ne
raccordez jamais l‘appareil au réseau électrique si vous avez les
mains humides ou mouillées.
• Ne touchez jamais les deux branchements en même temps
lorsque l‘appareil est en service.
• Retirez la fiche secteur de la prise avant de connecter le câble
de charge de la batterie, avant de le débrancher ou lorsque vous
n‘utilisez plus l‘appareil.
• Branchez toujours la pince positive du chargeur (rouge) en premier au pôle positif de la batterie (non relié à la carrosserie du
véhicule et indiqué par la lettre P ou le symbole +).
• Connectez ensuite la pince négative du chargeur (noire) à la carrosserie du véhicule, à distance du boîtier de batterie du véhicule,
de la batterie et de la conduite à carburant. Le chargeur peut alors
être connecté à une prise électrique adaptée.
• Une fois la charge eectuée, débranchez tout d‘abord le chargeur
du circuit électrique. Débranchez ensuite dans l‘ordre suivant la
connexion à la carrosserie (-) puis la connexion à la batterie (+).
• Débranchez tous les câbles de l‘appareil de la batterie avant de
mettre le véhicule en marche.
• Débranchez le câble de la prise uniquement par la fiche. Dans le
cas contraire, le câble peut être endommagé.
• N‘utilisez pas un appareil défectueux. Les dommages du câble
d‘alimentation, de l‘appareil ou du câble de charge augmentent le
risque de choc électrique.
• N‘essayez pas de démonter l‘appareil ou de le réparer. Faites immédiatement réparer ou remplacer un appareil défectueux ou un
câble d‘alimentation endommagé par un atelier spécialisé.
45
Page 46

Chargeur de batterie à microprocesseur DP4.0 / DP6.0 / DP10.0
• Risque de court-circuit ! Veillez à ne pas toucher les deux branchements du câble de charge lorsque la fiche est branchée dans
la prise. Veillez à ce que les branchements et pôles de la batterie
ne soient pas reliés par des objets conducteurs (par ex. outil).
• N‘utilisez jamais le câble pour porter ou tirer l‘appareil.
Risque de blessure !
• N‘essayez jamais de charger des batteries non rechargeables,
endommagées ou gelées.
• N‘utilisez pas l‘appareil pour charger des batteries à cellules
sèches. Celles-ci peuvent exploser et entraîner des blessures
physiques et des dommages matériels.
• Avant d‘utiliser l‘appareil, veuillez observer la notice d‘utilisation et
tous les avertissements de sécurité de la batterie à charger et du
véhicule.
Risque de dégradation !!
• Ne placez jamais l‘appareil au-dessus ou près de la batterie à
charger. Les gaz s‘échappant de la batterie peuvent endommager
l‘appareil. Placez l‘appareil aussi loin de la batterie que le permet
le câble de raccordement.
• N‘utilisez jamais l‘appareil si celuici est tombé ou a été endommagé de quelque autre manière que ce soit. Demandez un entretien
et une réparation auprès d‘un électricien qualifié.
46
Page 47
F Mode d’emploi
APERÇU DU PRODUIT
4321
Charging
Charged
Green
Reverse
Mode
5
7 689
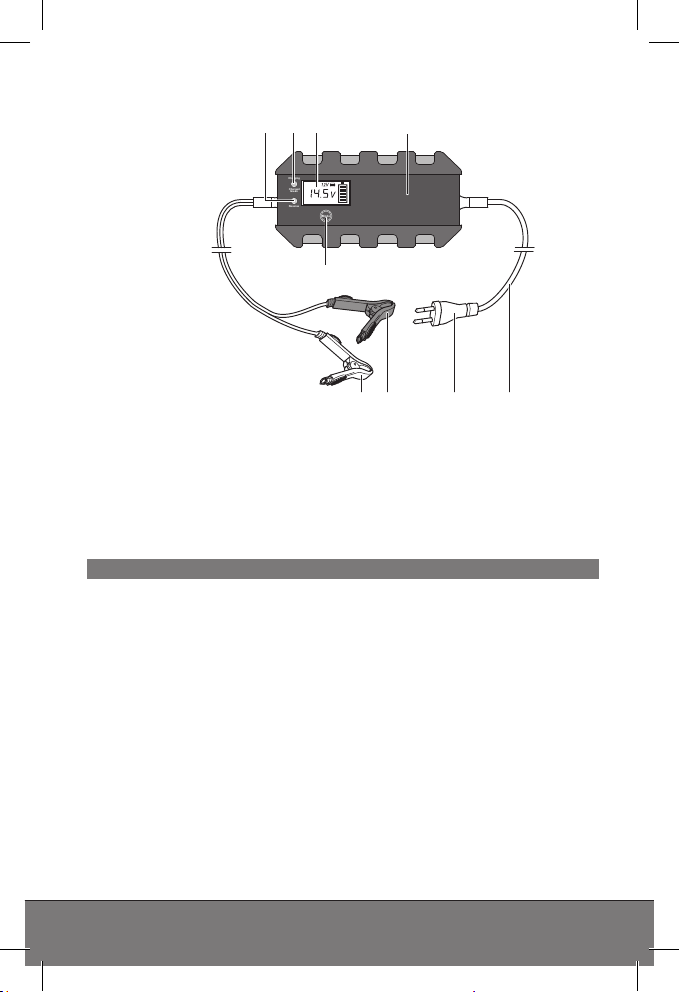
1. LED «Reverse»
2. LED «Charging»/«Charged
Green»
3. Achage
4. Chargeur de batterie
5. MODE-Taste
Fonctions
Le chargeur dispose de plusieurs modes de chargement qui peuvent être sélectionnés en fonction du type de batterie, de l‘état des
batteries et des conditions ambiantes. Les modes de chargement
disponibles sont indiqués en fonction de la tension des batteries
détectée.
Le chargeur est équipé d‘une unité de micro-ordinateur (MCU Micro-computer-unit). Après la sélection du mode de chargement
désiré, le chargeur reconnaît la batterie connectée et se sert des
informations obtenues (tension, capacités, état) pour calculer les
paramètres de charge nécessaires (tension et courant de charge).
Il est ainsi possible d‘obtenir un rechargement ecace et sûr. Si
un mode de chargement inapproprié pour la batterie est sélectionné ou ci celle-ci est défectueuse, le processus de chargement ne
s‘eectue pas. Le chargeur fait apparaître l‘achage d‘erreur.
6. Câble d‘alimentation
7. Fiche d‘alimentation
8. Câble de raccordement polaire (+) avec pince (rouge)
9. Câble de raccordement polaire (-) avec pince (noir)
47
Page 48
Chargeur de batterie à microprocesseur DP4.0 / DP6.0 / DP10.0
Grâce à la fonction «charge de conservation», le chargeur peut rester connecté durablement. La batterie est surveillée en permanence
et le mode de charge est réactivé le cas échéant.
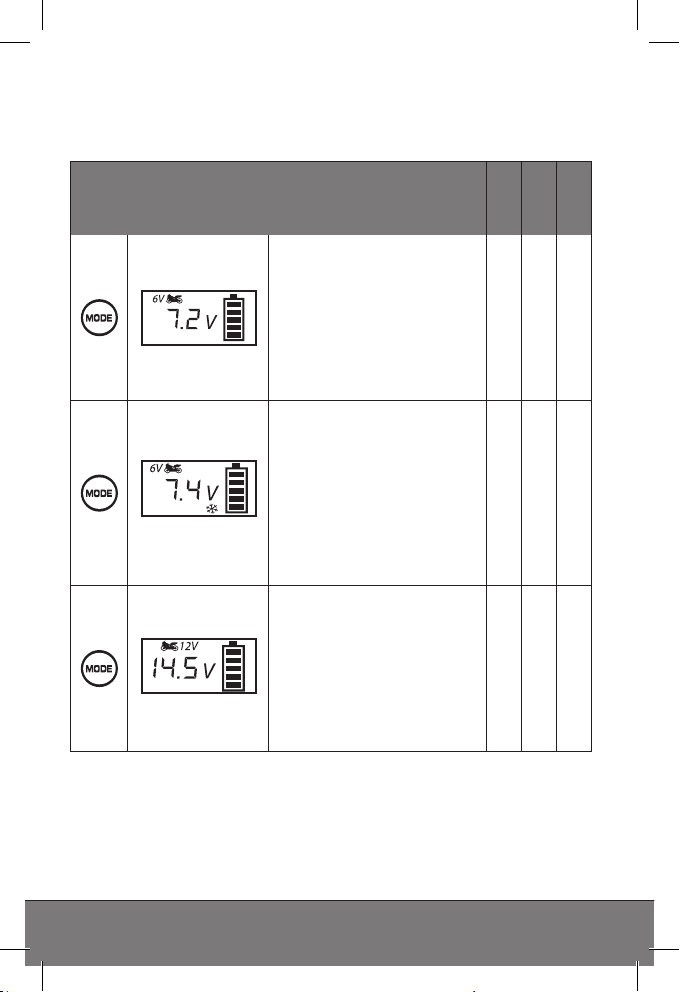
Modes de charge possibles
DP4.0
DP6.0
Mode de charge 7,2 V
Approprié pour recharger
des batteries 6 V jusqu‘à
une capacité de 14 Ah en
état normal.
Approprié pour les batteries WET ainsi que pour la
plupart des batteries GEL.
Mode de charge 7,4 V
Approprié pour recharger
des batteries 6 V jusqu‘à
une capacité de 14Ah
pour des températures endessous de 0.
Approprié pour les batteries WET ainsi que pour la
plupart des batteries GEL.
Mode de charge 14,5 V
Approprié pour recharger
des batteries 12V pour
une capacité jusqu‘à
14Ah en état normal.
Approprié pour les batteries WET ainsi que pour la
plupart des batteries GEL.
• • -
• • -
• • •
DP10.0
48
Page 49
F Mode d’emploi
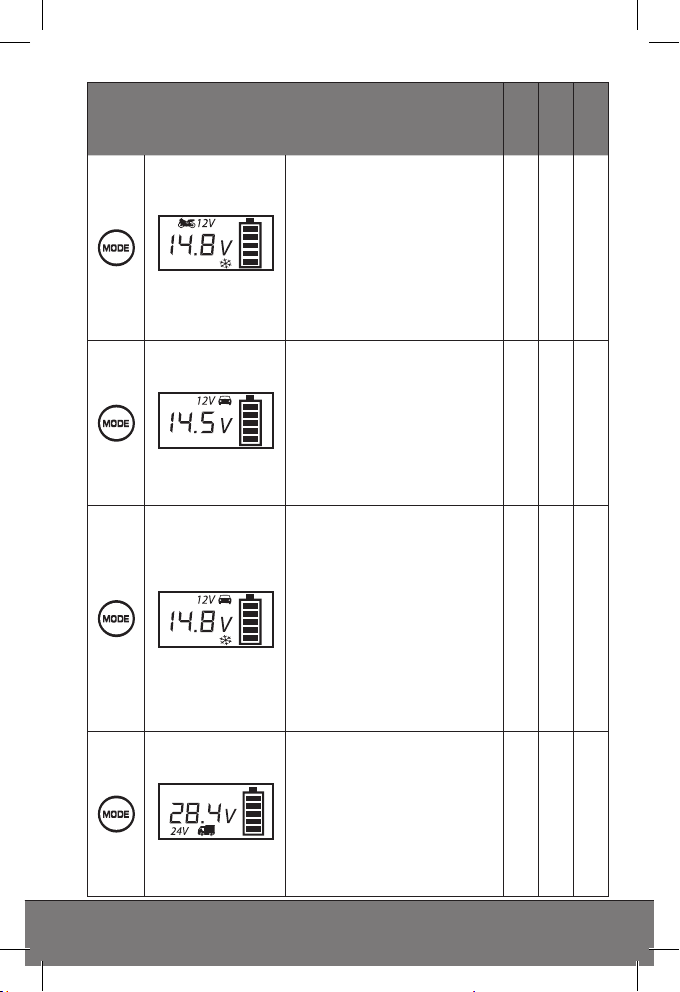
Modes de charge possibles
Mode de charge 14,8 V
Approprié pour recharger
des batteries 12V jusqu‘à
une capacité de 14Ah
pour des températures endessous de 0.
Approprié pour les batteries WET ainsi que pour la
plupart des batteries GEL.
Mode de charge 14,5 V
Approprié pour recharger
des batteries 12V avec
une capacité au-dessus
de 14Ah en état normal.
Approprié pour les batteries WET ainsi que pour la
plupart des batteries GEL.
Mode de charge 14,8 V
Approprié pour recharger
des batteries 12V avec
une capacité au-dessus
de 14Ah pour des températures en-dessous de
0. Approprié également
pour un grand nombre
de batteries AMG (avec
des nattes imprégnées
d‘électrolyte).
Mode de charge 28,4 V
Approprié pour recharger
des batteries 24V avec
une capacité au-dessus
de 14Ah en état normal.
Approprié pour les batteries WET ainsi que pour la
plupart des batteries GEL.
DP4.0
DP6.0
• • •
• • •
• • •
- - •
DP10.0
49
Page 50
Chargeur de batterie à microprocesseur DP4.0 / DP6.0 / DP10.0
Modes de charge possibles
UTILISATION
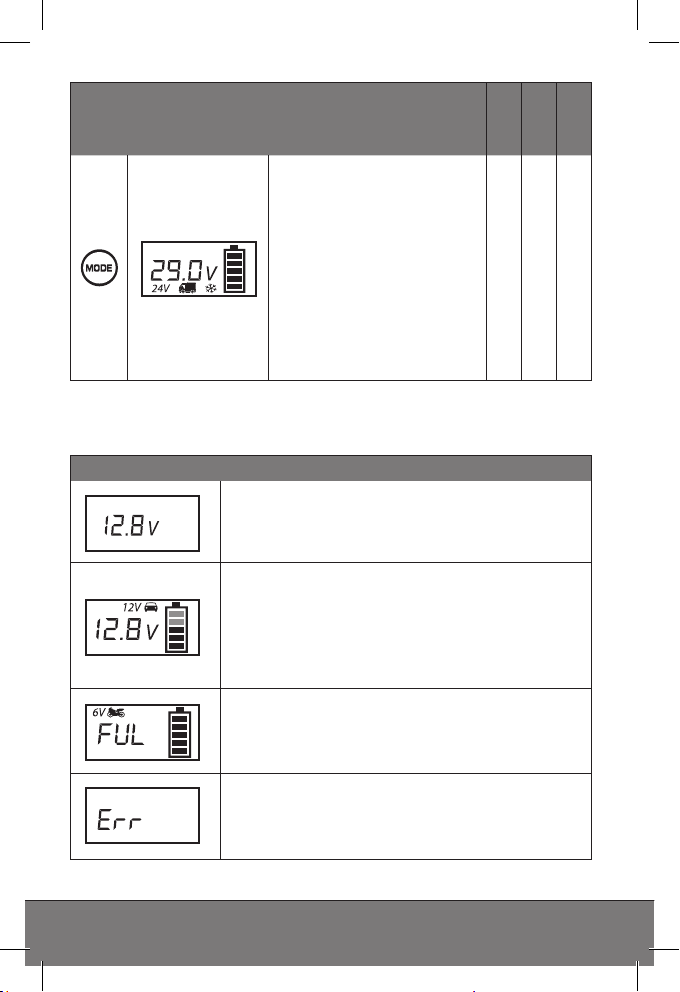
Achage d‘état
Achage de démarrage (Standby) après avoir
connecté la batterie correctement. Achage
de la tension actuelle de la batterie.
Achage du processus de recharge dans le
mode respectif (les blocs dans le symbole
de batterie clignotent pour acher l'état de
charge de celle-ci). Achage de la tension actuelle de la batterie et du mode de chargement
sélectionné.
La batterie est complètement chargée. (tous
les blocs du symbole batterie sont pleins).
Achage de la tension actuelle de la batterie
et du mode de chargement sélectionné.
Achage d'erreur lorsqu'un mode de charge
erroné est sélectionné, en cas de mauvais
raccordement, de court-circuit (batterie défectueuse) ou de surchaue.
Mode de charge 29,0 V
Approprié pour recharger
des batteries 24V avec
une capacité au-dessus
de 14Ah pour des températures en-dessous de
0. Approprié également
pour un grand nombre
de batteries AMG (avec
des nattes imprégnées
d‘électrolyte).
DP4.0
DP6.0
- - •
DP10.0
50
Page 51

F Mode d’emploi
Avant l‘utilisation
Avertissement !
Assurez-vous avant d‘utiliser l‘appareil que vous avez lu et compris la notice d‘utilisation de la batterie et du véhicule et toutes les
consignes de sécurité.
• Utilisez des lunettes de protection et des gants de protection
résistant à l‘acide.
• Veillez à ce que la ventilation soit susante.
• Assurez-vous que les pôles de la batterie sont propres. Si la
batterie dispose de clapets de ventilation amovibles, remplissez
chaque cellule jusqu‘au niveau recommandé par le fabricant de la
batterie avec de l‘eau déminéralisée. Ne remplissez pas trop les
cellules.
Brancher le chargeur
Attention !
Respectez toujours la polarité et veillez au bon maintien des pinces
lorsque vous branchez l‘appareil sur une batterie et évitez un courtcircuit en mettant les pinces en contact.
1. Fixez la pince rouge (+) sur le pôle (+) de la batterie.
2. Fixez la pince noire (-) sur le pôle (-) de la batterie.
Indication:
La pince noire (-) peut également être raccordée à la carrosserie du
véhicule (ce faisant, respectez le mode d‘emploi du véhicule!).
Assurez-vous que les deux pinces aient un bon contact et qu‘elles
tiennent bien en place.
Attention !
Assurez-vous que les pinces de batterie sont correctement branchées avant de brancher l‘appareil à la prise secteur 230 V.
3. Branchez la fiche d‘alimentation du chargeur dans un prise
secteur 230 V.
Si le chargeur est bien connecté, il démarre avec l‘achage de
départ (mode Standby). Dans ce mode, le chargeur revient automatiquement aux paramètres par défaut.
51
Page 52

Chargeur de batterie à microprocesseur DP4.0 / DP6.0 / DP10.0
Si la batterie est reconnue comme étant défectueuse ou si elle a
été branchée avec une polarité inversée, le voyant d‘erreur (Err)
s‘allume. Dans ce cas, débrancher le chargeur et séparer de la batterie. Vérifier ensuite la polarité.
En cas de branchement avec polarité inversée, la LED «Reverse»(1) rouge s‘allume. Le processus de charge ne commence pas.
Indication :
Une batterie est reconnue comme étant défectueuse si sa tension
est inférieure à 3,0 V (batterie 6 V ou batterie 12 V). Faites contrôler
votre batterie par un atelier spécialisé.
Commencer à charger
1. Sélectionnez, après branchement de la fiche secteur, le mode de
charge souhaité (voir «Modes de charge possibles») en pressant
plusieurs fois la touche MODE (5).
2. Le processus de charge commence automatiquement après
quelques instants avec les paramètres du mode de charge sélectionné.
Indication :
Si vous choisissez un mauvais mode de charge, l‘achage d‘erreur
(Err) apparaît. Dans ce cas, débranchez le chargeur, et séparer de la
batterie attendez quelques instants et rebranchez-le.
• Pendant le processus de charge, les blocs à l‘intérieur du symbole
batterie clignotent conformément à son état de charge.
• Les quatre blocs du symbole de batterie sont allumés lorsque la
batterie est pleine.
• De plus, la tension actuelle de la batterie apparaît sur l‘achage.
• Lorsque la batterie est entièrement chargée, le chargeur passe en
charge de conservation afin de conserver la charge actuelle et de
protéger la batterie de toute surcharge.
Éclairage d‘afficheur
Appuyez sur la touche Mode (5).
L‘éclairage d‘achage est mis à l‘arrêt automatiquement pendant
le processus de charge après env. 30 sec. L‘actionnement de la
touche Mode vous permet d‘activer de nouveau et à tout moment
l‘éclairage d‘achage pendant env. 30 sec.
52
Page 53
F Mode d’emploi
Terminez le processus de charge et déconnectez le chargeur
1. Commencez toujours par débrancher la fiche d‘alimentation de
la prise CA 230 V.
2. Retirez la pince noire (-) du pôle (-) de la batterie ou de la carrosserie du véhicule.
3. Retirez la pince rouge (+) du pôle (+) de la batterie.
Mode et temps de chargement
Taille de
la batterie
(Ah)
2
8
2
8 8 5 8
20
60 14 12 8
100
120 28 24 14
20
60
Mode
Mode 6V
conditions normales
Mode 6V températures
inférieures à 0 ºC
Mode 12V
conditions normales
Mode 12V
conditions normales
Mode 12V températures
inférieures à 0 ºC
Mode 24V
conditions normales
Mode 24V températures
inférieures à 0 ºC
Pour environ
80% de la
charge
DP4.0
2 2 -
8 8 -
2 2 2
4,5 4 2,5
23 20 12
- - 5
- - 14
DP6.0
DP10.0
53
Page 54

Chargeur de batterie à microprocesseur DP4.0 / DP6.0 / DP10.0
FONCTIONS DE SÉCURITÉ
• Le chargement est protégé contre les erreurs de maniement et
protège la pile de tout endommagement.
• Aucun risque de surcharge !
• L’électronique de votre véhicule n’est pas endommagé par le
chargeur.
Protection Description
Pour éviter d‘endommager le chargeur et la batterie,
le chargeur décommute son propre système électronique et réinitialise immédiatement le système à la
configuration de base dans le cas de
Fonctionnement
anormal
Surchaue
Contrôle
MCU
• Court-circuit
• Mauvaise connexion
• Circuit ouvert
• Connexion avec polarité inversée
• Tension de batterie inférieure à 3,0 V ±0,5 V
Le chargeur reste en mode Standby et l‘achage
d‘erreur s‘allume à l‘écran.
Pendant le processus de chargement, si le chargeur
est trop chaud, ou en raison d‘une température am-
biante élevée, la puissance de sortie sera automati-
quement réduite.
Le chargeur continue avec la charge d‘entretien
de compensation et commence automatiquement
à augmenter la puissance lorsque la température
baisse.
Contrôlé entièrement par une unité de microproces-
seur ou „Micro-Computer-Unit“ (MCU), qui assure
un processus plus rapide, puissant, fiable et intelli-
gent de chargement.
54
Page 55

F Mode d’emploi
NETTOYAGE, ENTRETIEN ET
MAINTENANCE
• Nettoyez la pince à chaque fois une fois que le processus de charge est terminé. Essuyez tout liquide de la batterie pouvant être
entré en contact avec les pinces pour éviter toute corrosion.
• Enroulez correctement le câble lorsque vous rangez l‘appareil.
Cela permet d‘éviter des dommages par erreur du câble et de
l‘appareil.
• Nettoyez le produit avec un chion doux et sec.
• Stocker l‘appareil dans un endroit propre et sec.
Service
Si après avoir lu soigneusement le présent mode d‘emploi vous avez
encore des questions concernant la mise en service ou l’utilisation
ou si un problème venait à se produire contre toute attente, veuillez
prendre contact avec un commerce spécialisé.
MISE AU REBUT
L’emballage est composé de matériaux respectueux de ’environnement que vous pourrez éliminer dans les points de recyclages
locaux prévus à cet eet.
Ne jetez pas les appareils électriques avec vos déchets ména-
gers !
Conformément à la directive européenne 2012/19/EC relative aux
appareils électriques et électroniques usagés et à sa transposition dans le droit national, vous devez eectuer le tri sélectif des
appareils et les apporter dans des points de collecte spécialisés qui
assureront leur recyclage dans le respect de l’environnement. Pour
connaître les lieux où vous pouvez déposer vos anciens appareils
électriques pour leur mise au rebut, adressezvous à votre mairie ou
à votre administration locale.
Les images peuvent diérer légèrement du produit. Nous nous
réservons le droit d’y apporter des modifications dans l’intérêt du
progrès technique. Décoration non comprise.
55
Page 56

56
Caricabatterie con microprocessore DP4.0 / DP6.0 / DP10.0
Page 57

I Manuale d’istruzioni
SOMMARIO
1. Introduzione 58
2. Fornitura 59
3. Uso conforme 59
4. Dati tecnici 60
5. Sicurezza 61
6. Descrizione del prodotto 65
7. Uso 68
8. Funzioni di sicurezza 72
9. Pulizia, manutenzione e riparazioni 73
10. Smaltimento 73
I Manuale d’istruzioni
57
Page 58
Caricabatterie con microprocessore DP4.0 / DP6.0 / DP10.0
INTRODUZIONE
Spiegazione dei simboli e dei termini di avvertenza che vengono
utilizzati in queste istruzioni per l’uso e/o sull’apparecchio:
Simbolo Spiegazione
Simbolo/termine
di avvertenza
Cautela ! Pericolo di danni alle cose.
Nota:
In questo istruzioni per l’uso si farà riferimento al caricabatterie
anche con il termine apparecchio.
Attenersi a queste istruzioni per l’uso quando viene
utilizzato l’apparecchio.
Pericolo di vita e di incidenti per i bambini!
Seguite le avvertenze e le istruzioni di sicurezza!
Utilizzare l’apparecchio esclusivamente in ambienti
non soggetti ad agenti atmosferici!
Alloggiamento isolato (classe di protezione II)
Smaltimento ecocompatibile della confezione
e del dispositivo!
Possibili conseguenze dovute alla mancata
osservanza
Pericolo !
Avvertenza !
Attenzione !
Pericolo di vita o di lesioni molto gravi
Gravi lesioni, possibile pericolo di vita
Lesioni di lieve o media entità
58
Page 59

I Manuale d’istruzioni
FORNITURA
Controllare la fornitura subito dopo averla aperta. Controllare se il
dispositivo o i pezzi sono danneggiati. Non utilizzare l‘apparecchio
o pezzi guasti.
• Caricabatterie con microprocessore
• istruzioni per l’uso
Consegnare la documentazione completa agli altri utenti!
USO CONFORME
Questo caricabatterie è adatto per ricaricare le batterie piomboacido aperte e molti accumulatori (batterie) piombo-acido chiusi che
non necessitano manutenzione, quali i tipi impiegati su auto, navi,
autocarri e altri veicoli, ad esempio:
• batterie WET, batterie piombo-acido (elettrolita liquido)
• batterie gel (elettrolita in gel)
• EFB (enhanced flooded battery)
• batterie AGM (elettrolita in matrice di fibre di vetro)
• batterie piombo-acido che non necessitano manutenzione (MF)
L‘apparecchio pu essere utilizzato da bambini di età pari o superiore
a 8 anni e da persone con ridotte facoltà fisiche, sensoriali o mentali
non-ché da persone prive di suciente esperienza e/o conoscenza dello stesso se sorvegliate o istruite in merito all‘utilizzosicuro
dell‘apparecchio e consapevoli degli eventuali rischi derivanti da un
utilizzo improprio. I bambini non devono giocare con l‘apparecchio.
Le operazioni di pulizia e dimanutenzione non devono essereeettuate dai bambini senza lasupervisione di un adulto.
L’apparecchio non è destinato all’uso commerciale.
Ogni altro uso o modifica della presa doppia è considerato improprio e può causare pericoli. Per i danni derivati da un uso improprio
del dispositivo, il produttore è esonerato da qualunque responsabilità.
59
Page 60

Caricabatterie con microprocessore DP4.0 / DP6.0 / DP10.0
Il produttore non è da considerarsi responsabile per danni
causati da:
• Collegamento e/o uso non conforme.
• Sforzi esterni, danni all’apparecchio e/o a parti dell’apparecchio
dovuti ad interventi meccanici o sovraccarico.
• Qualsiasi tentativo di modificare l’apparecchio.
• Uso dell’apparecchio per scopi che non sono descritti nelle pre-
senti istruzioni per l’uso.
• Danni dovuti ad un uso non previsto e/o non conforme e/o batterie
difettose.
• Umidità e/o aerazione insuciente.
• Apertura non autorizzata dell’apparecchio. In tali casi la garanzia
decade.
DATI TECNICI
DP4.0 DP6.0 DP10.0
Potenza assorbita
Potenza
Tensione di
carica
Corrente di
carica
220 - 240 V AC,
50/60 Hz
64 W
6V DC /
12V DC
Modalità 6 V:
7,2V / 7,4V
+/- 0,25 V
Modalità 12 V:
14,5V / 14,8V
+/- 0,25 V
Modalità 6 V:
2A
+/-10%
Modalità 12 V:
2A ;
4A (90s) / 2A
(300s)
+/-10%
220 - 240 V AC,
50/60 Hz
100 W
6V DC /
12V DC
Modalità 6 V:
7,2V / 7,4V
+/- 0,25 V
Modalità 12 V:
14,5V / 14,8V
+/- 0,25 V
Modalità 6 V:
2A
+/-10%
Modalità 12 V:
2A / 6A
+/-10%
220 - 240 V AC,
50/60 Hz
180 W
12V DC /
24V DC
Modalità 12 V:
14,5V / 14,8V
+/- 0,25 V
Modalità 24 V:
28,4V / 29,0V
+/- 0,25 V
Modalità 12 V:
2A / 10A
+/-10%
Modalità 24 V:
5A
+/-10%
60
Page 61

I Manuale d’istruzioni
DP4.0 DP6.0 DP10.0
Corrente
inversa
Temperatura
ambiente
Tipo di batterie
Fusibile T2A T2A T3.15A
4mA 4mA 4mA
-20 fino a
+40°C
Modalità 6 V:
batterie
piombo-acido
6 V (WET, MF,
AGM e GEL)
con capacità
batteria 1,2 14Ah
Modalità 12 V:
batterie
piombo-acido
12 V (WET, MF,
AGM e GEL)
con capacità
batteria 1,2 120Ah
-20 fino a
+40°C
Modalità 6 V:
batterie
piombo-acido
6 V (WET, MF,
AGM e GEL)
con capacità
batteria 1,2 14Ah
Modalità 12 V:
batterie
piombo-acido
12 V (WET, MF,
AGM e GEL)
con capacità
batteria 1,2 120Ah
-20 fino a
+40°C
Modalità 12 V:
batterie
piombo-acido
12 V (WET, MF,
AGM e GEL)
con capacità
batteria 1,2 200Ah
Modalità 24 V:
batterie
piombo-acido
24 V (WET, MF,
AGM e GEL)
con capacità
batteria 14 120Ah
SICUREZZA
Leggere tutte le istruzioni e le avvertenze per la sicurezza. La mancata osservanza delle istruzioni e delle avvertenze per la sicurezza
può provocare gravi lesioni. Conservare per future consultazioni
tutte le istruzioni e le avvertenze per la sicurezza.
Pericolo di vita e di incidenti per i bambini!
• Tenere il dispositivo lontano dalla portata dei bambini. I bambini
non sanno riconoscere i pericoli legati al prodotto!
• Pericolo di soocamento! Non permettere ai bambini di giocare
con i componenti di montaggio e fissaggio poiché questi potrebbero venire ingeriti causando soocamento.
61
Page 62
Caricabatterie con microprocessore DP4.0 / DP6.0 / DP10.0
Pericolo di corrosione!
Le batterie contengono acidi che possono essere pericolosi per gli
occhi e per la pelle. Durante il processo di carica vengono emessi
gas e vapori che possono essere dannosi per la salute.
• Evitare qualsiasi contatto con gli acidi corrosivi della batteria.
In caso di contatto con gli acidi della batteria lavare subito con
abbondante acqua corrente la parte del corpo e gli oggetti interessati. Se gli occhi entrano in contatto con gli acidi della batteria
lavarli subito con abbondante acqua corrente per alcuni minuti.
Rivolgersi a un medico.
• Utilizzare sempre occhiali protettivi e guanti antiacido. Proteggere
i vestiti, ad es. con un grembiule.
• Non rovesicare la batteria, perché gli acidi potrebbero fuoriuscire.
• Accertarsi che ci sia sempre un’aerazione suciente.
• Non inalare i gas e i vapori derivanti.
Pericolo d’esplosione e d’incendio!
Durante la ricarica della batteria può prodursi idrogeno in forma
gassosa (gas tonante). Il contatto con fiamme libere (scintille, calore, ecc.) provoca esplosioni.
• Non caricare mai la batteria in prossimità di fiamme libere o luoghi
in cui può verificarsi la formazione di scintille.
• Assicurare sempre una suciente aerazione.
• Accertarsi che la tensione di rete corrisponda a quella d’ingresso
dell’apparecchio (220 - 240 V AC), per evitare di danneggiare lo
stesso.
• Collegare e scollegare i cavi di collegamento della batteria solo
quando il caricabatterie non è collegato alla presa di alimentazione a corrente alternata.
• Durante il caricamento non coprire il caricabatterie, che potrebbe
subire danni a causa di un eccessivo surriscaldamento.
• Sospendere immediatamente l’utilizzo del dispositivo, nel caso in
cui sia visibile del fumo o sia presente un odore insolito.
• Non utilizzare l’apparecchio in locali in cui si trovano materiali
esplosivi o infiammabili (per es. benzina o solventi).
62
Page 63
I Manuale d’istruzioni
Pericolo di folgorazione!
• I caricabatterie possono influire sul funzionamento di impianti
elettronici come ad es. pace-maker e quindi essere pericolosi per
le persone che li portano.
• Il dispositivo è protetto da spruzzi e getti d’acqua. Tuttavia,
accertarsi sempre di conservarlo in un luogo idoneo e sicuro. La
penetrazione di acqua nei dispositivi elettrici accresce il pericolo
di folgorazione.
• Assicurarsi che tutte le spine e i cavi siano privi di umidità. Non
collegare mai il dispositivo alla rete elettrica con mani umide o
bagnate.
• Non aerrare con entrambe le mani i collegamenti quando
l’apparecchio è in funzione.
• Togliere la spina dalla presa di corrente, prima di connettere/sconnettere il cavo di carica alla batteria o nel caso in cui l’apparecchio
non venga più utilizzato.
• Collegare sempre prima il morsetto positivo (rosso) al polo
positivo della batteria (non collegato con la carrozzeria dell’auto,
marcato P o +).
• Collegare poi il morsetto negative (nero) alla carrozzeria dell’auto,
lontano dall’alloggiamento della batteria, dalla batteria e dal tubo
del carburante. Solo a questo punto il caricabatteria può essere
collegato a una presa di rete adatta.
• Una volta terminato il processo di carica, scollegare prima il
dispositivo dalla rete elettrica. Poi, in sequenza, scollegare il collegamento alla carrozzeria (-) e poi quello alla batteria (+).
• Rimuovere tutti i cavi del dispositivo dalla batteria prima di provare ad avviare il veicolo.
• Sconnettere il cavo staccandolo solo tramite la spina dalla presa
di corrente. Il cavo può essere danneggiato.
• Non utilizzare apparecchi danneggiati. Danneggiamenti del cavo
di alimentazione, dell’apparecchio o del cavo di carica aumentano
il rischio di folgorazione.
• Non cercate di smontare o riparare l’apparecchio. Fate subito sostituire o riparare l’apparecchio difettoso o un cavo danneggiato in
un’ocina specializzata.
63
Page 64

Caricabatterie con microprocessore DP4.0 / DP6.0 / DP10.0
• Pericolo di corto circuito! Prestare attenzione a che i due collegamenti dei cavi di carica non si tocchino quando la spina viene
inserita nella presa di corrente. Accertarsi inoltre che i poli della
batteria e i collegamenti non siano collegati a conduttori (per es.
attrezzi).
• Non utilizzare mai l’apparecchio per spostare o trascinare
l’apparecchio.
Pericolo di lesioni!
• Non cercare di caricate batterie danneggiate, non ricaricabili o
congelate.
• Non utilizzare il caricabatterie per caricare batterie a celle secche
Queste potrebbero o scoppiare e causare lesioni a persone o
danni a cose.
• Prima dell’utilizzo dell’apparecchio leggere le istruzioni per l’uso
e tutte le istruzioni di sicurezza delle batterie da caricare e del
veicolo.
Pericolo di danneggiamento!
• Non posizionarlo mai su o in vicinanza di batterie in ricarica. I
gas prodotti dalla batteria possono danneggiare il dispositivo. I
gas emessi dalla batteria potrebbero corrodere e danneggiare
l’apparecchio Posizionare il caricabatterie tanto lontano dalle
batterie quanto lo permette il cavo di collegamento.
• Non mettere mai in funzione il dispositivo nel caso in cui fosse
caduto per terra o risultasse danneggiato in altro modo. Portarlo
da un elettricista qualificato per un controllo ed una riparazione.
64
Page 65
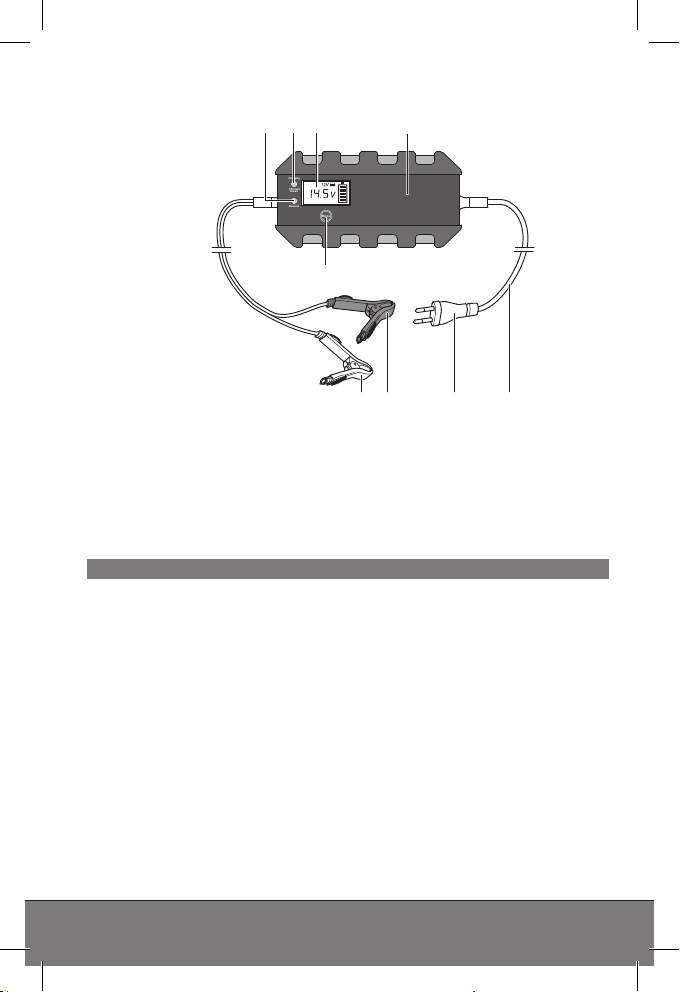
I Manuale d’istruzioni
DESCRIZIONE DEL PRODOTTO
4321
Charging
Charged
Green
Reverse
Mode
5
7 689
1. LED “Reverse”
2. LED “Charging”/“Charged
Green”
3. Display
4. Caricabatterie
5. Tasto MODE
Funzioni
Questo caricabatterie dispone di diverse modalità di ricarica, utilizzabili in base al tipo di batteria, allo stato della batteria e alle condizioni ambientali. A seconda della tensione della batteria vengono
resi disponibili le possibili modalità di ricarica.
È provvisto anche di un’unità micro-computer (MCU - Micro-Computer-Unit). Dopo aver selezionato la modalità di ricarica, il caricabatterie riconosce il tipo di batteria collegata (tensione, capacità,
stato) e determina i parametri di ricarica necessari (tensione di
carica, corrente di carica). In questo modo il processo di ricarica
si svolgerà in modo eciente e sicuro. Se viene selezionata una
modalità di ricarica non adatta o se la batteria è difettosa, la ricarica
non avverrà. Il caricabatterie visualizzerà una segnalazione di errore.
6. Cavo elettrico
7. Spina
8. Cavo collegamento polo (+)
con morsetto (rosso)
9. Cavo collegamento polo (-)
con morsetto (nero)
65
Page 66
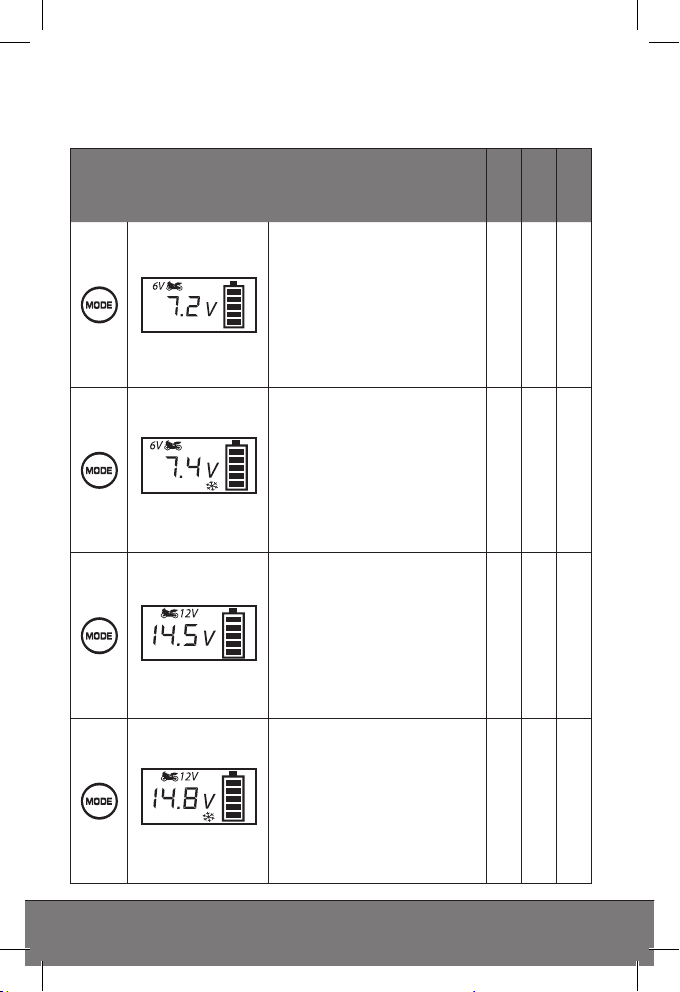
Caricabatterie con microprocessore DP4.0 / DP6.0 / DP10.0
Grazie alla funzione “carica di mantenimento”, il caricabatterie può
rimanere collegato di continuo. La batteria è monitorata di continuo
e, quando necessario, viene attivata la modalità di ricarica.
Modalità di ricarica
DP4.0
DP6.0
Modalità di ricarica 7,2 V
Adatta per caricare batterie 6 V fino a una capacità
di 14 Ah in condizioni
normali.
Adatta per batterie WET e
per la maggior parte delle
batterie gel.
Modalità di ricarica 7,4 V
Adatta per ricaricare batterie 6 V fino a una capacità di 14 Ah a temperature
sotto zero.
Adatta per batterie WET e
per la maggior parte delle
batterie gel.
Modalità di ricarica 14,5 V
Adatta per ricaricare
batterie 12 V fino a una capacità di 14 Ah in condizioni normali.
Adatta per batterie WET e
per la maggior parte delle
batterie gel.
Modalità di ricarica 14,8 V
Adatta per ricaricare
batterie 12 V fino a una capacità di 14 Ah a temperature sotto zero.
Adatta per batterie WET e
per la maggior parte delle
batterie gel.
• • -
• • -
• • •
• • •
DP10.0
66
Page 67
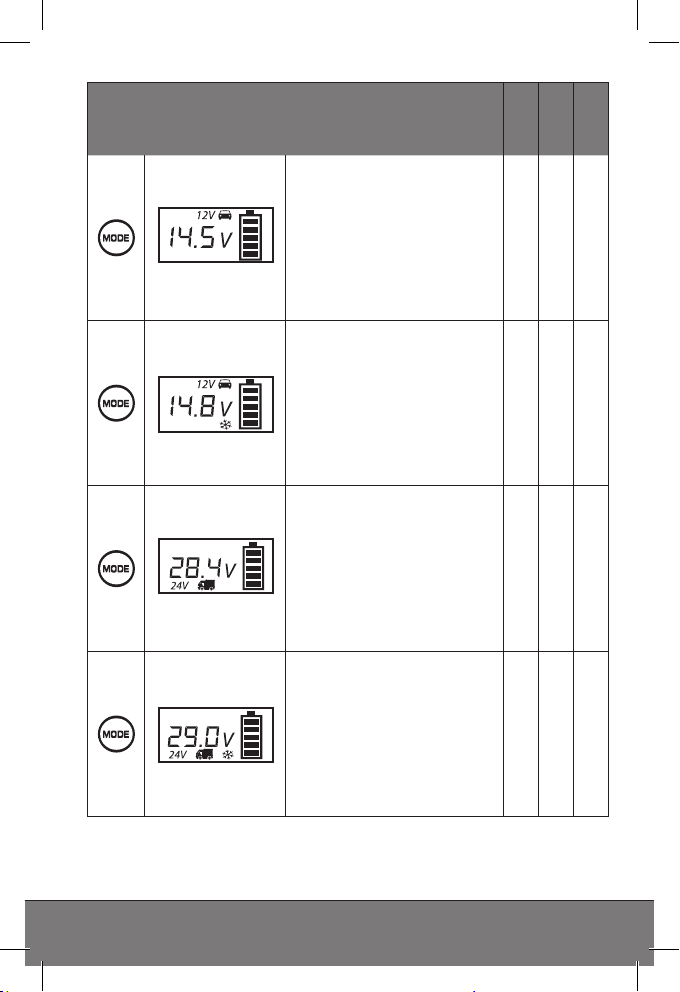
I Manuale d’istruzioni
Modalità di ricarica
Modalità di ricarica 14,5 V
Adatta per ricaricare
batterie 12 V fino a una
capacità superiore a 14 Ah
in condizioni normali.
Adatta per batterie WET e
per la maggior parte delle
batterie gel.
Modalità di ricarica 14,8 V
Adatta per ricaricare
batterie 12 V fino a una
capacità superiore a 14 Ah
a temperature sotto zero.
Adatta per molte batterie
AMG (con strato assorbente elettrolita).
Modalità di ricarica 28,4 V
Adatta per ricaricare
batterie 24 V fino a una
capacità superiore a 14 Ah
in condizioni normali.
Adatta per batterie WET e
per la maggior parte delle
batterie gel.
Modalità di ricarica 29,0 V
Adatta per ricaricare
batterie 24 V fino a una
capacità superiore a 14 Ah
a temperature sotto zero.
Adatta per molte batterie
AMG (con strato assorbente elettrolita).
DP4.0
DP6.0
• • •
• • •
- - •
- - •
DP10.0
67
Page 68
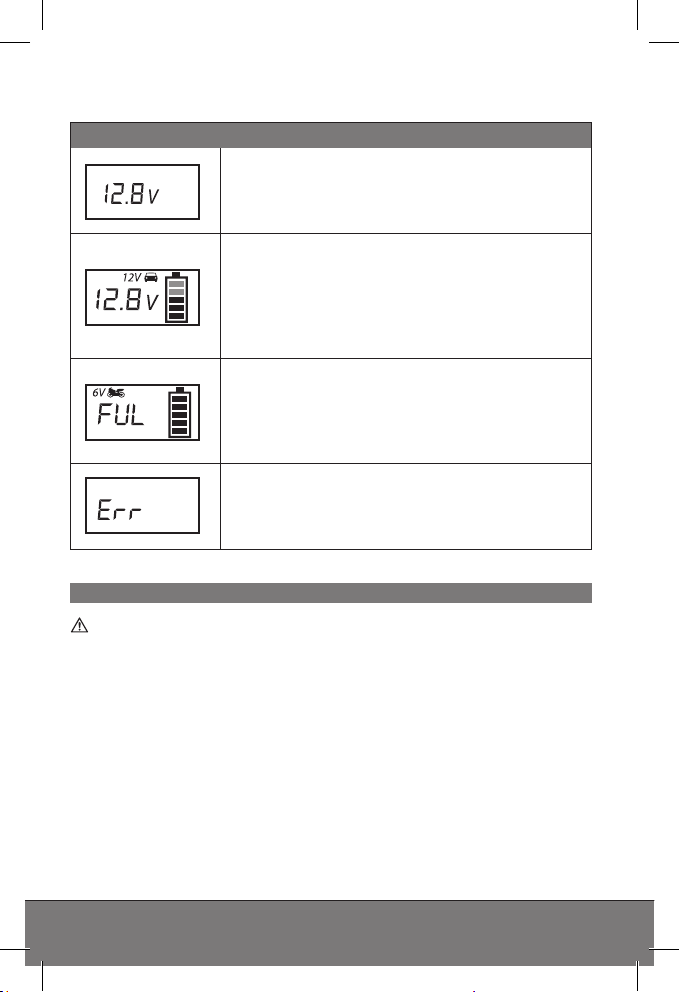
Caricabatterie con microprocessore DP4.0 / DP6.0 / DP10.0
USO
Indicazione di stato
Visualizzazione stato iniziale (stand-by) dopo
che la batteria è stata correttamente collegata. Visualizzazione della tensione batteria
eettiva.
Visualizzazione del processo di ricarica nella
modalità di volta in volta selezionata (i rettangolini all’interno del simbolo della batteria
lampeggiano in base allo stato di carica).
Visualizzazione della tensione batteria eettiva
e della modalità di ricarica selezionata.
La batteria è completamente carica (tutti i
rettangolini dentro il simbolo della batteria
sono pieni). Visualizzazione della tensione
batteria eettiva e della modalità di ricarica
selezionata.
Visualizzazione errore nei seguenti casi: modalità di ricarica selezionata non corretta, collegamento non corretto, cortocircuito (batteria
difettosa) o surriscaldamento.
Prima del processo di carica
Avvertenza!
Prima dell’uso/impiego dell’apparecchio assicurarsi, di aver letto
con attenzione le istruzioni per l’uso delle batterie e del veicolo e di
aver capito le indicazioni di sicurezza.
• Utilizzare sempre occhiali protettivi e guanti antiacido.
• Accertarsi che si sia sempre un’aerazione suciente.
• Assicurarsi che i poli della batteria siano puliti. Se la batteria non
dispone di coperchi di ventilazione, riempire ogni cella della batteria con acqua distillata fino al livello consigliato dal produttore.
Non sovraccaricare le celle.
68
Page 69
I Manuale d’istruzioni
Collegare il caricabatterie
Avvertenza!
Quando si collega il dispositivo a una batteria, prestare sempre
molta attenzione alla corretta polarità e al giusto posizionamento
dei morsetti. Cercare di evitare un cortocircuito dovuto al contatto
dei morsetti.
1. Collegare il morsetto rosso (+) al polo (+) della batteria.
2. Collegare il morsetto nero (-) al polo (-) della batteria.
Avvertenza: il morsetto nero (-) può essere collegato anche alla
carrozzeria del veicolo (fare riferimento alle istruzioni per l’uso del
veicolo!). Assicurarsi che entrambi i morsetti siano correttamente
fissati.
Attenzione!
Prima di collegare il dispositivo a una presa 230 V assicurarsi che i
morsetti della batteria siano debitamente collegati.
3. Inserire la spina del caricabatterie in una presa 230 V.
Se il caricabatterie è collegato correttamente, viene visualizzato lo
stato iniziale (modalità di stand-by). In questa modalità il caricabatterie si resetta in modo automatico alle impostazioni di base.
Se viene rilevato un difetto della batteria oppure se i poli non sono
collegati correttamente, si accende la spia di segnalazione errore
(Err). In questo caso staccare il caricatore dalla batteria e verificare
se la polarità è corretta.
In caso di collegamento con polarità errata, il LED “Reverse” (1) si
illumina in rosso. Il processo di carica non ha inizio.
Avvertenza:
Viene riconosciuta una batteria difettosa quando la tensione batteria è inferiore a 3,0 V (batteria 6V o batteria 12V). Far verificare la
batteria presso un centro specializzato.
69
Page 70

Caricabatterie con microprocessore DP4.0 / DP6.0 / DP10.0
Avvio del processo di ricarica
1. Dopo aver attaccato la spina, premendo ripetutamente il tasto
MODE (5) selezionare la modalità di ricarica desiderata (vedi
“Modalità di ricarica”).
2. Il processo di ricarica si avvia poco dopo, in modo automatico e
con le impostazioni della modalità prescelta.
Avvertenza:
se è stata selezionata una modalità di ricarica non corretta, verrà
visualizzata una segnalazione di errore (Err). In questi casi, staccare
il caricatore dalla batteria, attendere un poco e ricollegarlo.
• Durante il processo di ricarica, i rettangolini dentro il simbolo della
batteria lampeggiano indicando lo stato di carica. Il LED “Charging” (2) si illumina di rosso.
• Quando la batteria è completamente carica, tutti e quattro i rettan-
golini risultano illuminati. Il LED “Charged Green” (2) si illumina di
verde.
• Inoltre, sul display viene visualizzata anche la tensione batteria
eettiva.
• Quando la batteria è completamente carica, il dispositivo passa
alla carica di mantenimento per mantenere appunto la carica e
proteggere la batteria da un’alimentazione eccessiva.
Illuminazione display
Premere il tasto MODE (5).
Durante la ricarica l’illuminazione del display si spegne automaticamente dopo circa 30 secondi. Premendo il tasto MODE è possibile in
qualsiasi momento riattivare l’illuminazione per circa 30 secondi.
Quando la ricarica è ultimata, scollegare il caricabatterie
1. Staccare sempre prima la spina dalla presa a corrente alternata
230V.
2. Staccare quindi il morsetto nero (-) dal polo (-) della batteria o
dalla carrozzeria del veicolo.
3. Staccare il morsetto rosso (+) dal polo (+) della batteria.
70
Page 71
I Manuale d’istruzioni
Modalità e tempi di carica
Dimensioni della
batteria
2
8
2
8 8 5 8
20
60 14 12 8
100
120 28 24 14
20
60
Modalità
Modalità 6V, in condizioni
normali
Modalità 6V, a temperature inferiori a 0°C
Modalità 12V,
in condizioni normali
Modalità 12V,
in condizioni normali
Modalità 12V, a temperature inferiori a 0°C
Modalità 24V,
in condizioni normali
Modalità 24V, a temperature inferiori a 0°C
Per circa l’80%
di carica
(in ore)
DP4.0
2 2 -
8 8 -
2 2 2
4,5 4 2,5
23 20 12
- - 5
- - 14
DP6.0
DP10.0
71
Page 72

Caricabatterie con microprocessore DP4.0 / DP6.0 / DP10.0
FUNZIONI DI SICUREZZA
• Il caricabatteria è protetto dagli errori di applicazione e protegge
la batteria allacciata da guasti.
• Nessun pericolo di sovraccarico!
• L’elettronica del vostro veicolo non viene danneggiata dal carica-
batteria.
Protezione Descrizione
Per evitare danni al caricatore e alla batteria, il caricatore spegne il proprio sistema elettronico e resetta
il sistema riportandolo alle impostazioni di base in
Funzionamento
anomalo
Surriscaldamento
Comando
MCU
caso di
• corto circuito
• collegamento errato
• circuito aperto
• collegamento a polarità inversa
• tensione batteria inferiore a 3,0 V ±0,5V
Il caricabatterie resta in modalità di stand-by e la
spia di segnalazione errore nel display si illumina.
Se, durante il processo di carica, il caricatore si
scalda eccessivamente o la temperatura ambiente è
troppo elevata, la potenza erogata viene automaticamente ridotta. Il caricatore continua con la carica di
biberonaggio e inizia automaticamente ad aumentare
la potenza quando la temperatura diminuisce.
Completamente comandato da una Micro Computer
Unit interna (“MCU”) che garantisce un processo di
carica più rapido, potente, adabile e intelligente.
72
Page 73
I Manuale d’istruzioni
PULIZIA, MANUTENZIONE E
RIPARAZIONI
• Pulire sempre i morsetti dopo il processo di carica. Per evitare corrosioni pulire ogni liquido della batteria che sia entrato a
contatto con i morsetti.
• Avvolgere con cura i cavi dell’apparecchio prima di riporlo. Ciò aiuta ad evitare danneggiamenti accidentali ai cavi dell’apparecchio.
• Pulire il prodotto con un panno morbido e asciutto.
• Conservare l’apparecchio in un luogo pulito e asciutto.
Assistenza
Se, anche dopo aver letto le presenti istruzioni per l‘uso, aveste
ancora domande sulla messa in funzione o l‘uso del martinetto, o
se si verificasse un problema inatteso, mettetevi in contatto con un
rivenditore specializzato.
SMALTIMENTO
La confezione è composta da materiali a basso impatto ambientale,
riciclabili negli appositi siti di raccolta.
Non buttare i dispositivi elettrici nei rifiuti domestici!
Secondo la direttiva europea 2012/19/CE in materia di dispositivi elettrici ed elettronici usati e la relativa conversione in legge
nazionale, le apparecchiature elettriche usate devono essere raccolte separatamente e portate a un impianto di riciclaggio ecologico.
Per informazioni sullo smaltimento degli apparecchi elettrici usati
rivolgersi all’amministrazione cittadina.
Le illustrazioni possono leggermente dierire dal prodotto. Il produttore si riserva il diritto di apportare modifiche funzionali al miglioramento tecnico. Decorazione non inclusa.
73
Page 74

74
Mikroprocesorová nabíječka baterií DP4.0 / DP6.0 / DP10.0
Page 75

CZ Návod k obsluze
OBSAH
1. Úvod 76
2. Obsah dodávky 77
3. Použití ke stanovenému účelu 77
4. Technická data 78
5. Bezpečnost 79
6. Popis výrobku 83
7. Použití 86
8. Bezpečnostní funkce 90
9. Čištění, ošetřování a údržba 91
10. Likvidace 91
CZ Návod k obsluze
75
Page 76
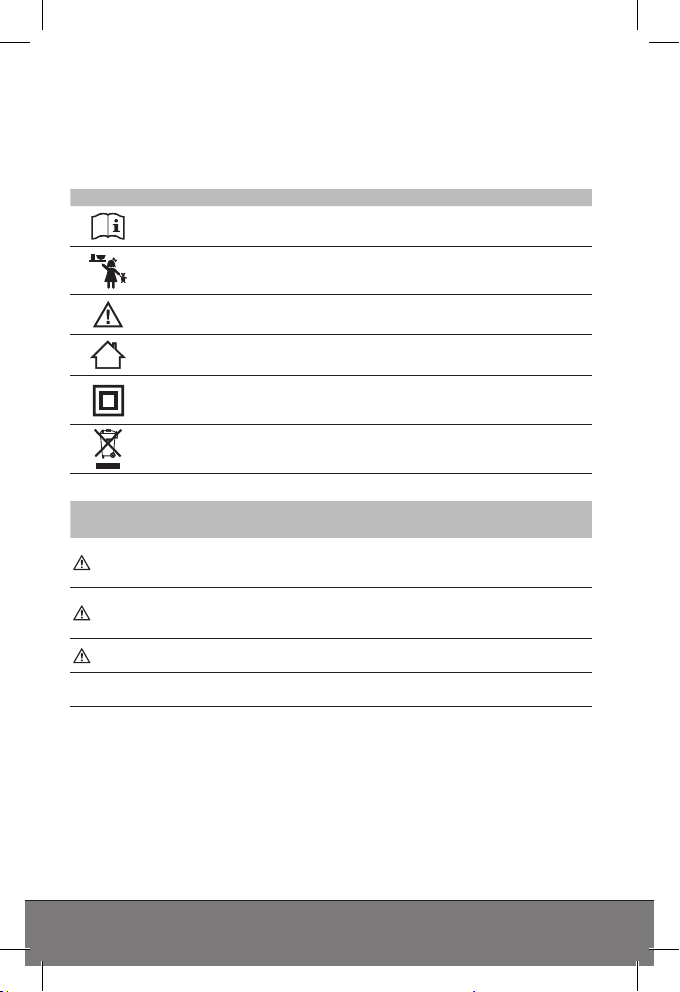
Mikroprocesorová nabíječka baterií DP4.0 / DP6.0 / DP10.0
ÚVOD
Vysvětlení symbolů a signální slov, použitých v tomto návodu k
obsluze nebo na přístroji.
Symbol Vysvětlení
Symbol/
Signální slovo
Pozor! Nebezpečí věcných škod.
Poznámka:
V tomto návodu k obsluze se používá pro výraz nabíječka baterií
popřípadě i výraz přístroj.
Při používání přístroje dbejte vždy na tento návod k
obsluze.
Nebezpečí ohrožení života a nehody pro malé děti!
Dbejte na výstražná a bezpečnostní upozornění!
Přístroj používat jen v místech chráněných před
povětrnostními vlivy!
Těleso s ochrannou izolací (třída ochrany II)
Z likvidujte obal s ohle dem na životni prostředí!
Možné následky nerespektování
Nebezpečí!
Varování!
Pozor!
Přímé ohrožení života nebo hrozba nejtěžších
zranění
Těžká zranění, pravděpodobné nebezpečí ohrožení
života
Lehká až středně těžká zranění
76
Page 77

CZ Návod k obsluze
OBSAH DODÁVKY
Po rozbalení okamžitě proveďte kontrolu kompletnosti dodávky.
zkontrolujte, zda není poškozeno zařízení ani žádná z jeho součástí.
neuvádějte vadné zařízení nebo jeho část do činnosti.
• Mikroprocesorová nabíječka baterií
• návod k obsluze
Předávejte tyto podklady i jiným uživatelům.
POUŽITÍ KE STANOVENÉMU ÚČELU
Nabíječka je vyrobena k nabíjení otevřených a početných
uzavřených, bezúdržbových kyselino-olovnatých akumulátorů (baterií), vestavěných v osobních autech, lodích, nákladních automobilech a jiných vozidlech, jako například:
• mokrých (WET) kyselino-olovnatých baterií (tekutý elekrolyt)
• gelových baterií (gelový elektrolyt)
• EFB (enhanced flooded battery)
• AGM baterií (elektrolyt ve sklolaminátovém rounu)
• bezúdržbových kyselino-olovnatých baterií (MF)
Tento přístroj smějí používat děti starší 8 let a osoby se sníženými
fyzickými, smyslovými nebo duševními schopnostmi nebo s
nedostatečnými zkušenostmi a vědomostmi, pouze pokud jsou
pod dohledem nebo byly poučeny ohledně bezpečného používání
přístroje a rozumějí nebezpečím, které mohou v důsledku použití vzniknout. Děti si nesmějí s přístrojem hrát. Čištění a údržbu nesmějí
provádět děti bez dohledu.
Přístroj není určený pro podnikatelské účely.
Jiná použití nebo změny přístroje platí jako použití k jinému než ke
stanovenému účelu a přinášejí sebou závažná nebezpečí. Výrobce
neručí za škody způsobené jiným použitím než použitím ke stanovenému účelu.
77
Page 78

Mikroprocesorová nabíječka baterií DP4.0 / DP6.0 / DP10.0
Výrobce není zodpovědný za škody způsobené:
• neodborným připojením nebo provozem.
• působením vnějších sil, poškození přístroje nebo jeho částí me-
chanickým zatížením anebo přetížením.
• jakoukoliv změnou přístroje.
• použitím přístroje k účelům, které nejsou popsané v tomto návodu
k obsluze.
• následkem použití k jinému, než ke stanovenému účelu nebo neodborným použitím anebo vadnými bateriemi.
• vlhkostí nebo nedostatečným větráním.
• neoprávněným otevřením přístroje. Toto vede k zániku záruky.
TECHNICKÁ DATA
DP4.0 DP6.0 DP10.0
Vstup
Výstup
Nabíjecí napětí
Nabíjecí proud
220 - 240 V AC,
50/60 Hz
64 W
6V DC /
12V DC
6V režim:
7,2V / 7,4V
+/- 0,25 V
12V režim:
14,5V / 14,8V
+/- 0,25 V
6V režim:
2A
+/-10%
12V režim:
2A ;
4A (90s) / 2A
(300s)
+/-10%
220 - 240 V AC,
50/60 Hz
100 W
6V DC /
12V DC
6V režim:
7,2V / 7,4V
+/- 0,25 V
12V režim:
14,5V / 14,8V
+/- 0,25 V
6V režim:
2A
+/-10%
12V režim:
2A / 6A
+/-10%
220 - 240 V AC,
50/60 Hz
180 W
12V DC /
24V DC
12V režim:
14,5V / 14,8V
+/- 0,25 V
24V režim:
28,4V / 29,0V
+/- 0,25 V
12V režim:
2A / 10A
+/-10%
24V režim:
5A
+/-10%
78
Page 79

CZ Návod k obsluze
DP4.0 DP6.0 DP10.0
Zpětný proud 4mA 4mA 4mA
Provozní
teploty
Typy baterií
Pojistka T2A T2A T3.15A
-20 až +40°C -20 až +40°C -20 až +40°C
6V režim:
6V kyselinoolovnaté baterie (WET, MF,
AGM a GEL) s
kapacitou 1,2 14Ah
12V režim:
12V kyselinoolovnaté baterie (WET, MF,
AGM a GEL) s
kapacitou 1,2 120Ah
6V režim:
6V kyselinoolovnaté baterie (WET, MF,
AGM a GEL) s
kapacitou 1,2 14Ah
12V režim:
12V kyselinoolovnaté baterie (WET, MF,
AGM a GEL) s
kapacitou 1,2 120Ah
12V režim:
12V kyselinoolovnaté baterie (WET, MF,
AGM a GEL) s
kapacitou 1,2 200Ah
24V režim:
24V kyselinoolovnaté baterie (WET, MF,
AGM a GEL) s
kapacitou 14 120Ah
BEZPEČNOST
Přečtěte si bezpečnostní pokyny a pokyny pro použití. Nedodržení
bezpečnostních pokynů a pokynů pro použití může způsobit zásah
elektrickým proudem, vznik požáru a/nebo vážné ublížení na zdraví.
Uschovejte si všechny bezpečnostní pokyny a pokyny pro použití
pro další konzultaci.
Nebezpečí ohrožení života a zranění dětí!
• Uchovávejte zvedák mimo dosah dětí. Děti nerozpoznávají
nebezpečí, která může přístroj vyvolat!
• Nebezpečí uškrcení! Nenechávejte děti si hrát se stavebními a
montážními díly, mohou je spolknout a udusit se.
79
Page 80
Mikroprocesorová nabíječka baterií DP4.0 / DP6.0 / DP10.0
Nebezpečí poleptání!
Baterie obsahují kyselinu, která může zranit oči a pokožku. Při
nabíjení baterie vznikají plyny a páry ohrožující zdraví.
• Vyhýbejte se jakémukoliv kontaktu se žíravou kyselinou z baterie.
Pokožku nebo předměty, které se dostaly do kontaktu s kyselinou
ihned důkladně omyjte vodou. Jestliže se Vám dostala kyselina do
očí, vyplachujte je nejméně 5 minut pod tekoucí vodou. Kontaktujte ihned Vašeho lékaře.
• Používejte ochranné brýle a ochranné rukavice odolné proti
kyselině. Chraňte i Vaše oblečení, např. vhodnou zástěrou.
• Baterii nenaklánějte, kyselina může vytéct.
• Vždy zajistěte dostatečné větrání.
• Nevdechujte vzniklé plyny a páry.
Nebezpečí výbuchu a požáru!
Při nabíjení baterie se může tvořit plynný vodík (Oxyhydrogen). Při
kontaktu s otevřeným ohněm (plameny, žhavé palivo, jiskra) může
dojít k výbuchu.
• Nikdy nenabíjejte akumulátor v blízkosti otevřených plamenů nebo
na místech, kde může docházet ke vzniku jisker.
• Pokaždé zajistěte dostatečnou ventilaci.
• Zajistěte, že odpovídá napětí přívodního proudu vstupnímu napětí
uvedenému na přístroji (220 - 240 V AC), aby jste zabránili jeho
poškození.
• Spojovací kabely akumulátoru připojujte nebo odpojujte v případě,
že nabíječka není připojena ke zdroji střídavého proudu.
• Nepřikrývejte přístroj během nabíjení, jinak může dojít k jeho
poškození přehřátím.
• Přerušte ihned používání přístroje, jestliže je viditelný kouř nebo
cítíte neobvyklý zápach.
• Nepoužívejte přístroj v místnostech, kde se skladují výbušné nebo
hořlavé látky (např. benzín nebo rozpouštědla).
80
Page 81
CZ Návod k obsluze
Nebezpečí zásahu elektrickým proudem!
• Nabíječky mohou rušit aktivní implantáty jako např. kardiostimulátory a ohrozit tím dotyčné osoby.
• Přístroj je chráněný proti stříkající a proudící vodě. I přesto ale
zajistěte, aby se přístroj nacházel vždy na bezpečném místě.
Nedovolte, aby bylo zařízení vystaveno tekoucí nebo kapající vodě
nebo jiným tekutinám. Když voda vnikne do elektrických zařízení,
dojde ke zvýšení rizika zásahu elektrickým proudem.
• Ujistěte se, že jsou všechny zástrčky a kabely chráněné před vlhkostí. Nikdy nepřipojujte zařízení do elektrické sítě mokrýma nebo
vlhkýma rukama.
• Nedotýkejte se současně obou připojovacích svorek během provozu přístroje.
• Při připojování nabíjecího kabelu na baterii, odpojování nebo
nepoužívání přístroje vytahujte vždy zástrčku ze zásuvky přívodu
elektrického proudu.
• Pokaždé připojte kladnou napájecí svorku (červenou) ke kladnému pólu akumulátoru (který není připojený ke kostře vozidla a je
označený P nebo +).
• Poté připojte zápornou svorku (černou) k zápornému pólu baterie (nebo karosérii automobilu), z dosahu palivového potrubí.
Následně můžete nabíječku zapojit do vhodné zásuvky ve zdi.
• Po nabití nejprve odpojte nabíječku od sítě. Poté v tomto pořadí
nejprve vyjměte konektor na těle (-) a poté konektor kladné baterie
(+).
• Odmontujte všechny kabely zařízení z akumulátoru dříve, než
budete zkoušet řídit vaše vozidlo.
• Při odpojování ze zásuvky přívodu elektrického proudu netahejte
za kabel, uchopte vždy jen zástrčku. V opačném případě můžete
poškodit kabel.
• Nepoužívejte vadný přístroj. Poškozený přívodní kabel, přístroj
nebo nabíjecí kabel zvyšují nebezpečí zásahu elektrickým proudem.
• Přístroj nerozebírejte ani neopravujte. Vadný přístroj nebo
poškozený přívodní kabel nechte ihned opravit nebo vyměnit v
odborné dílně.
81
Page 82

Mikroprocesorová nabíječka baterií DP4.0 / DP6.0 / DP10.0
• Nebezpečí zkratu! Dbejte na to, aby se navzájem nedotkly obě
svorky nabíjecích kabelů, jestliže je přístroj připojený do zásuvky s
elektrickým proudem. Dbejte na to, aby nedošlo ke spojení svorek
nebo pólů baterie vodivými předměty (např. nářadím).
• Nepoužívejte kabel na nošení nebo tahání přístroje.
Nebezpečí zranění!
• Nenabíjejte nikdy vadné nebo zmrzlé baterie ani baterie, které
nejsou určené k nabíjení.
• Nepoužívejte přístroj k nabíjení baterií se suchými články. Takové
baterie mohou prasknout a zranit přítomné osoby nebo způsobit
věcné škody.
• Při použití přístroje dbejte vždy na pokyny uvedené v návodu k
obsluze a na všechna bezpečnostní upozornění týkající se nabíjené baterie a vozidla.
Nebezpečí poškození!
• Neumísťuje přístroj nikdy do blízkosti nabíjené baterie. Plyny
vystupující z baterie mohou přístroj poškodit. Stavte přístroj vždy
tak daleko od baterie, jak to umožňuje délka nabíjecích kabelů.
• Nikdy nepoužívejte zařízení, když došlo k jeho pádu nebo když
bylo jinak poškozeno. Odneste jej na kontrolu nebo opravu ke
kvalifikovanému elektrikáři.
82
Page 83
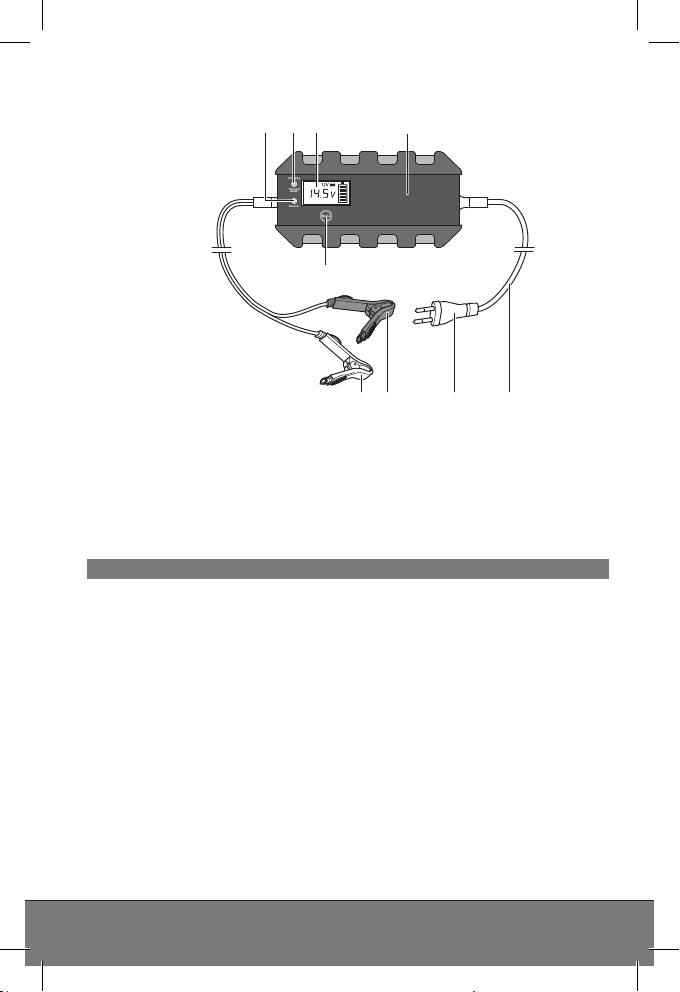
CZ Návod k obsluze
POPIS VÝROBKU
4321
Charging
Charged
Green
Reverse
Mode
5
7 689
1. LED „Reverse“
2. LED „Charging“/“Charged
Green“
3. Displej
4. Nabíječka baterií
5. Tlačítko MODE
Funkce
Nabíječka má různé nabíjecí režimy, které mohou být voleny podle
typu baterie, jejího stavu a okolních podmínek. Podle rozpoznaného
napětí baterie se nabízí možné nabíjecí režimy.
Nabíječka je vybavena jednočipovým počítačem (MCU - MicroComputer-Unit). Po navolení požadovaného režimu nabíjení rozpozná nabíječka připojenou baterii (napětí, kapacitu, stav) a vypočítá z
toho potřebné nabíjecí parametry (nabíjecí napětí, nabíjecí proud).
Tím je umožněné efektifní a bezpečné nabíjení. Po navolení nevhodného nabíjecího režimu nebo připojení vadné baterie nezačne
nabíječka nabíjet. Nabíječka ukáže poruchu.
Funkce „udržování stavu nabití“ umožňuje trvalé připojení nabíječky.
Baterie je neustále kontrolovaná a popřípadě se zase aktivuje režim
nabíjení.
6. Proudový kabel
7. Síťová zástrčka
8. Připojovací kabel (+) se
svorkou (červená barva)
9. Připojovací kabel (-) se svorkou (černá barva)
83
Page 84
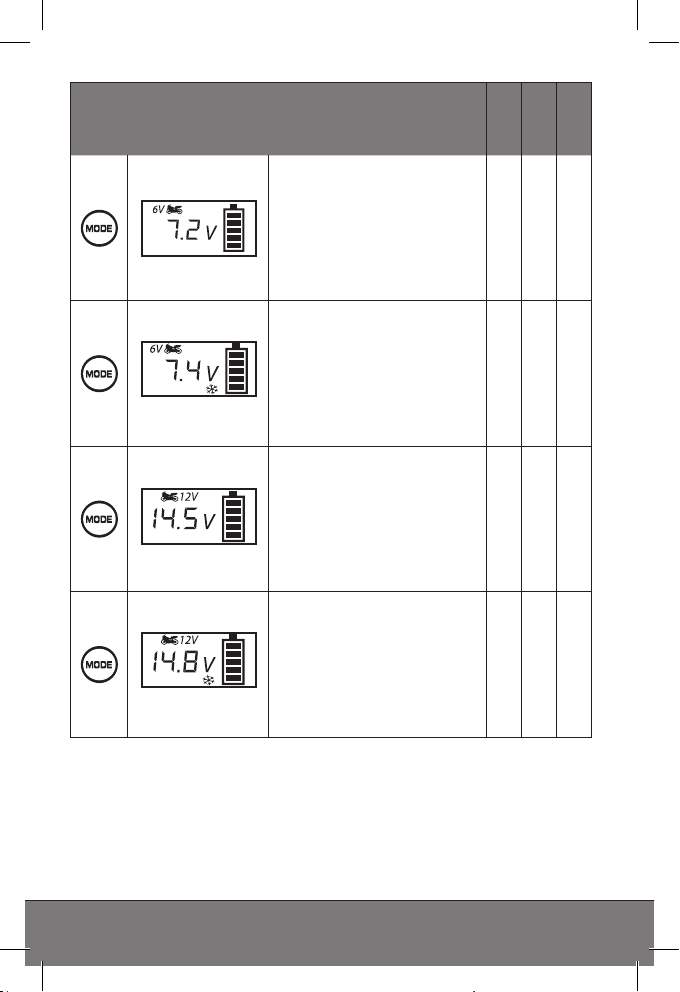
Mikroprocesorová nabíječka baterií DP4.0 / DP6.0 / DP10.0
Možné nabíjecí režimy
Nabíjecí režim 7,2 V
Vhodný k nabíjení baterií
s napětím 6 V až do kapacity 14 Ah za normálních
podmínek.
Vhodný pro WET baterie a
většinu gelových baterií.
Nabíjecí režim 7,4 V
Vhodný k nabíjení baterií s
napětím 6 V až do kapacity 14 Ah při teplotách pod
nulou.
Vhodný pro WET baterie a
většinu gelových baterií.
Nabíjecí režim 14,5 V
Vhodný k nabíjení baterií s
napětím 12 V až do kapacity 14 Ah za normálních
podmínek.
Vhodný pro WET baterie a
většinu gelových baterií.
Nabíjecí režim 14,8 V
Vhodný k nabíjení baterií
s napětím 12 V až do kapacity 14 Ah při teplotách
pod nulou.
Vhodný pro WET baterie a
většinu gelových baterií.
DP4.0
DP6.0
• • -
• • -
• • •
• • •
DP10.0
84
Page 85
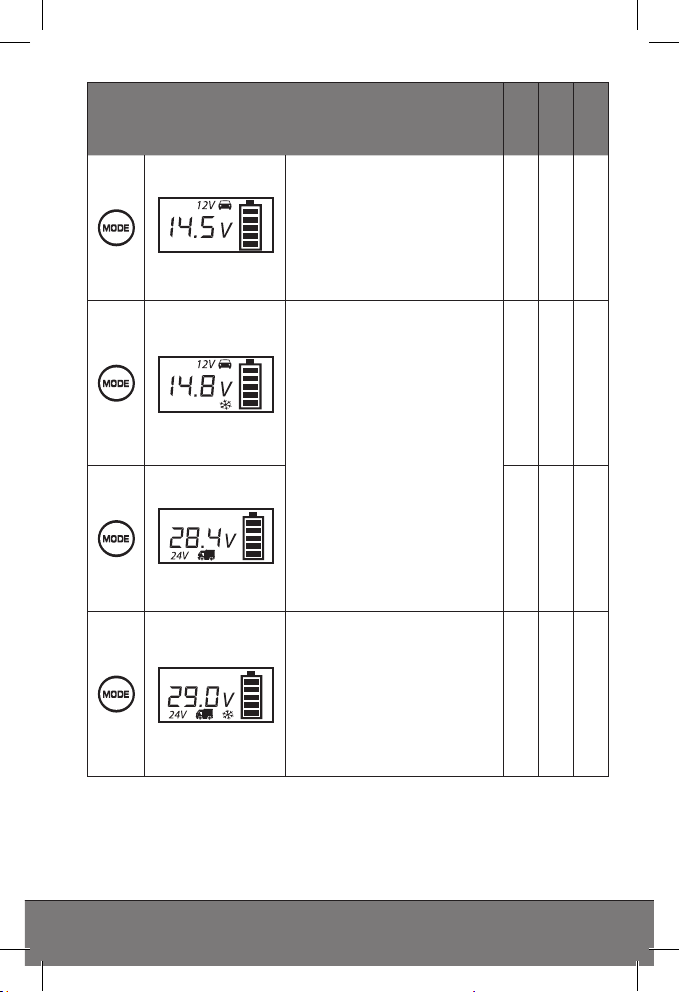
CZ Návod k obsluze
Možné nabíjecí režimy
Nabíjecí režim 14,5 V
Vhodný k nabíjení baterií s
napětím 12 V a s kapacitou přes 14 Ah za normálních podmínek.
Vhodný pro WET baterie a
většinu gelových baterií.
Nabíjecí režim 14,8 V
Vhodný k nabíjení baterií s
napětím 12 V a s kapacitou přes 14 Ah při teplotách pod nulou. Vhodný i
pro mnohé AMG baterie
(s vložkami pohlcujícími
elektrolyt).
Nabíjecí režim 28,4 V
Vhodný k nabíjení baterií s
napětím 24 V a s kapacitou přes 14 Ah za normálních podmínek.
Vhodný pro WET baterie a
většinu gelových baterií.
Nabíjecí režim 29,0 V
Vhodný k nabíjení baterií s
napětím 24 V a s kapacitou přes 14 Ah při teplotách pod nulou. Vhodný i
pro mnohé AMG baterie
(s vložkami pohlcujícími
elektrolyt).
DP4.0
DP6.0
• • •
• • •
- - •
- - •
DP10.0
85
Page 86
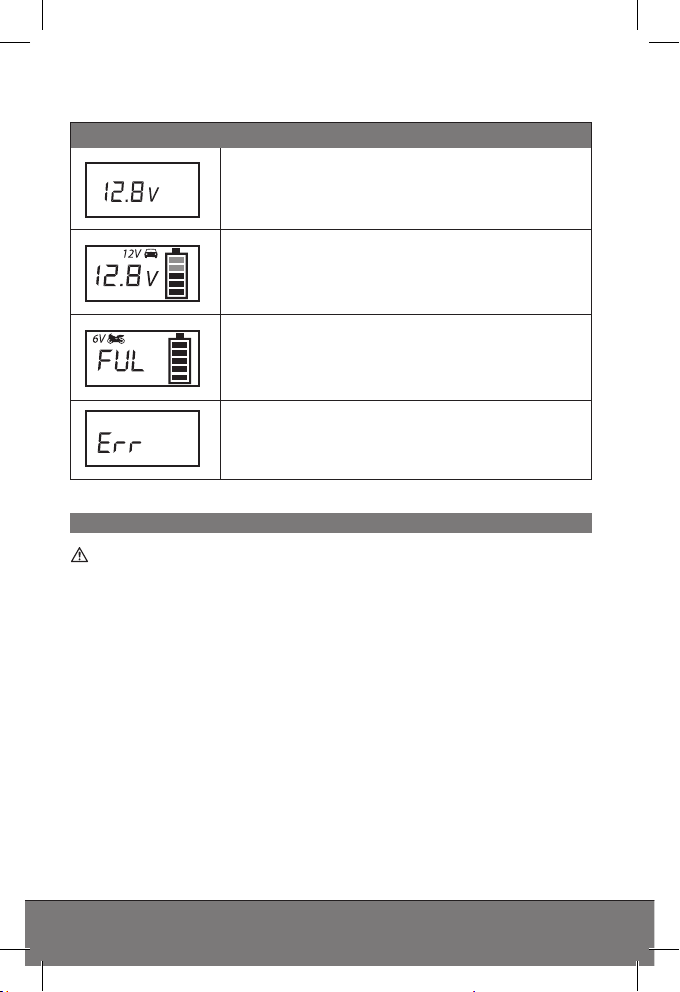
Mikroprocesorová nabíječka baterií DP4.0 / DP6.0 / DP10.0
POUŽITÍ
Zobrazení stavu
Zobrazení startu (Standby) po správném
připojení baterie. Zobrazení aktuálního napětí
baterie.
Zobrazení postupu nabíjení v příslušném
režimu (bloky uvnitř symbolu baterie blikají podle stavu nabití). Zobrazení aktuálního napětí
baterie a zvoleného režimu nabíjení.
Baterie je plně nabitá. (všechny bloky uvnitř
symbolu baterie jsou vyplněné). Zobrazení
aktuálního napětí baterie a zvoleného režimu
nabíjení.
Zobrazení poruchy po volbě nesprávného
režimu nabíjení, nesprávného připojení, při
zkratu (vadná baterie) nebo při přehřátí.
Před nabíjením
Varování!
Před použitím přístroje je nezbytné, aby jste si přečetli návod k obsluze baterie i vozidla a rozuměli všem bezpečnostním upozorněním.
• Používejte ochranné brýle a ochranné rukavice odolné proti
kyselině.
• Zajistěte dostatečné větrání.
• Očistěte póly baterie. Jestliže má baterie odnímatelná odvětrávací
víčka, naplňte každý článek destilovanou vodou na doporučenou
výšku hladiny. Články nepřeplňujte.
86
Page 87
CZ Návod k obsluze
Připojení nabíječky
Varování!
Při připojování přístroje na baterii dávejte pozor na správnou polaritu a pevné držení svorek, zabraňte zkratu jejich dotykem.
1. Připojte červený pólový připojovací kabel (+) na kladný pól baterie.
2. Připojte černý pólový připojovací kabel (-) na záporný pól baterie.
Upozornění:
Černou svorku (-) je možné připojit i na karosérii vozidla (řiďte se
přitom návodem k obsluze vozidla!). Dbejte na to, aby měly obě
svorky dobrý kontakt a pevně držely.
Pozor!
Před připojením přístroje na zásuvku s napětím 230 V se přesvědčte,
že jsou svorky na baterii správně připojené
3. Zastrčte zástrčku nabíječky do zásuvky s napětím 23O V.
Při správném zapojení startuje nabíječka se zobrazením startu
(Standby-Modus). V tomto režimu přejde nabíječka automaticky
zpět do základního nastavení.
Po připojení vadné baterie nebo nesprávně zvolené polaritě svítí
indikace poruchy (Err). V tomto případě vytáhněte přívodní kabel
nabíječky ze zásuvky a nabíječku odpojte od baterie. Potom zkontrolujte zvolenou polaritu.
V případě připojení s nesprávnou polaritou se rozsvítí červená LED
„Reverse“(1). Nabíjení nezačne.
Upozornění:
Baterie se rozpoznává jako vadná, jestliže leží její napětí pod 3,0V
(6V nebo 12V baterie). Nechte baterii zkontrolovat v odborné dílně.
87
Page 88

Mikroprocesorová nabíječka baterií DP4.0 / DP6.0 / DP10.0
Start nabíjení
1. Po zasunutí zástrčky do zásuvky zvolte opakovaným stisknutím
tlačítka MODE (5) požadovaný režim nabíjení (viz „Možné nabíjecí
režimy“).
2. Za okamžik začne nabíjení automaticky s nastavením zvoleného
nabíjecího režimu.
Upozornění:
Jestliže jste zvolili nesprávný režim nabíjení, signalizuje nabíječka
poruchu (Err). V tomto případě vytáhněte přívodní kabel nabíječky
ze zásuvky a nabíječku odpojte od bateri, krátce počkat a zase
zástrčku zastrčit.
• Během nabíjení blikají bloky uvnitř symbolu baterie v závislosti na
stavu nabití. LED „Charging“(2) svítí červeně.
• Při plně nabité baterii svítí v symbolu baterie všechny čtyři bloky.
LED „Charged Green“(2) svítí zeleně.
• Přídavně se zobrazí na displeji aktuální napětí baterie.
• Po úplném nabití baterie se nabíječka přepne do režimu udržování
stavu nabití a současně chrání baterii před přebitím.
Osvětlení dipleje
Stiskněte tlačítko Mode (5)
Osvětlení displeje se během nabíjení po cca 30 vteřinách automaticky vypíná. Stisknutím tlačítka Mode můžete osvětlení displeje
kdykoliv znovu na cca 30 vteřin zapnout.
Ukončení nabíjení a odpojení nabíječky
1. Vytáhněte nejdříve zástrčku nabíječky ze zásuvky s napětím
230V.
2. Odpojte černou svorku (-) od záporného pólu (-) baterie nebo od
karosérie vozidla.
3. Odpojte červenou svorku (+) od kladného pólu (+) baterie.
88
Page 89
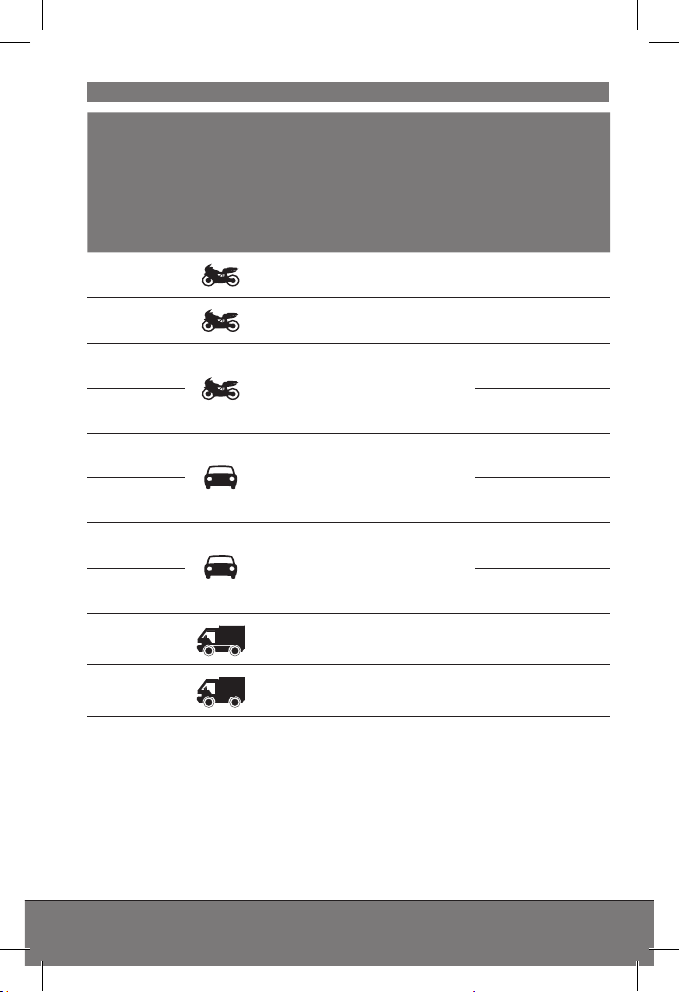
CZ Návod k obsluze
Nabíjecí režim a trvání
Kapacita
baterie (Ah)
2
8
2
8 8 5 8
20
60 14 12 8
100
120 28 24 14
20
60
Režim
6V režim
normální podmínky
6V režim
teploty pod 0 °C
12V režim
normální podmínky
12V režim
normální podmínky
12V režim
teploty pod 0 °C
24V režim
normální podmínky
24V režim
teploty pod 0 °C
Pro cca 80 %
nabití (hodiny)
DP4.0
2 2 -
8 8 -
2 2 2
4,5 4 2,5
23 20 12
- - 5
- - 14
DP6.0
DP10.0
89
Page 90

Mikroprocesorová nabíječka baterií DP4.0 / DP6.0 / DP10.0
BEZPEČNOSTNÍ FUNKCE
• Nabíječka je chráněna před chybami použivatele a uchovává na-
pojenou baterii před poškozením
• Žádná nebezpečí přebiti!
• Elektronika Vašeho vozidla se nabíječkou nepoškodí.
Ochrana Popis
Aby ste se vyhli poškození nabíječky a baterie, nabíječka si vypne svůj elektronický systém a ihned se
zresetuje do základního nastavení v případě
Abnormální
provoz
Přehřátí
Řízeno
mikroprocesorem
• skratu
• nesprávného zapojení
• otevřeného obvodu
• opačně zapojené polarity
• napětí baterie pod 3,0V ±0,5V
Nabíječka zůstane v režimu Standby a na displeji je
signalizována porucha.
Počas procesu nabíjení, v případě že se nabíječka příliš zahřívá kvůli vysoké okolní teplotě, výstupní výkon
se automaticky sníží.
Nabíječka pokračuje v udržovacím režimu a automaticky začne přidávat výkon když klesne teplota.
Plně řízeno interním mikroprocesorem, který zabezpečuje rychlejší, výkonnější, spolehlivý a chytřejší
proces nabíjení.
90
Page 91
CZ Návod k obsluze
ČIŠTĚNÍ, OŠETŘOVÁNÍ A ÚDRŽBA
• Po každém nabíjení vyčistěte svorky. Otírejte vždy tekutinu z baterie, která zůstala na svorkách, aby jste zabránili korozi.
• Před skladováním přístroje pečlivě stočte kabely. Toto pomáhá
vyloučit nechtěné poškození kabelů a přístroje.
• Přístroj čistěte měkkým, suchým hadrem.
• Přístroj skladujte na čistém a suchém místě.
Servis
Jestliže máte po přečtení tohoto návodu ještě otázky týkající se
uvedení do provozu, obsluhy nebo vzniknou neočekávané problémy,
obraťte se na Vašeho odborného prodejce.
LIKVIDACE
Obal je tvořen neznečišťujícími materiály, které můžete zlikvidovat
ve sběrnách recyklovatelného odpadu.
Neodhazujte elektrická zařízení do běžného domovního odpa-
du!
V souladu s Evropskou směrnicí 2012/19/ES pro stará elektrická a
elektronická zařízení a na základě harmonizačního národního zákona musí být použitá zařízení sbírána odděleně a zlikvidována s ohledem na životní prostředí. Ohledně možností likvidace vyřazených
elektrických zařízení se informujte, prosím, ve vaší komunitě nebo
na městské správě.
Uvedené ilustrace se mohou mírně lišit od samotného výrobku.
Vyhrazujeme si právo na provádění změn v důsledku technického
vývoje. Dekorace není součástí.
91
Page 92

92
Ładowarka do akumulatorów z mikroprocesorem DP4.0 / DP6.0 / DP10.0
Page 93

PL Instrukcja obsługi
SPIS TREŚCI
1. Wprowadzenie 94
2. Zawartość zestawu 95
3. Zastosowanie zgodne z przeznaczeniem 95
4. Dane techniczne 96
5. Bezpieczeństwo 97
6. Zarys produktu 101
7. Obsługa 104
8. Funkcje bezpieczeństwa 108
9. Czyszczenie, pielęgnacja i konserwacja 109
10. Usuwanie 109
PL Instrukcja obsługi
93
Page 94
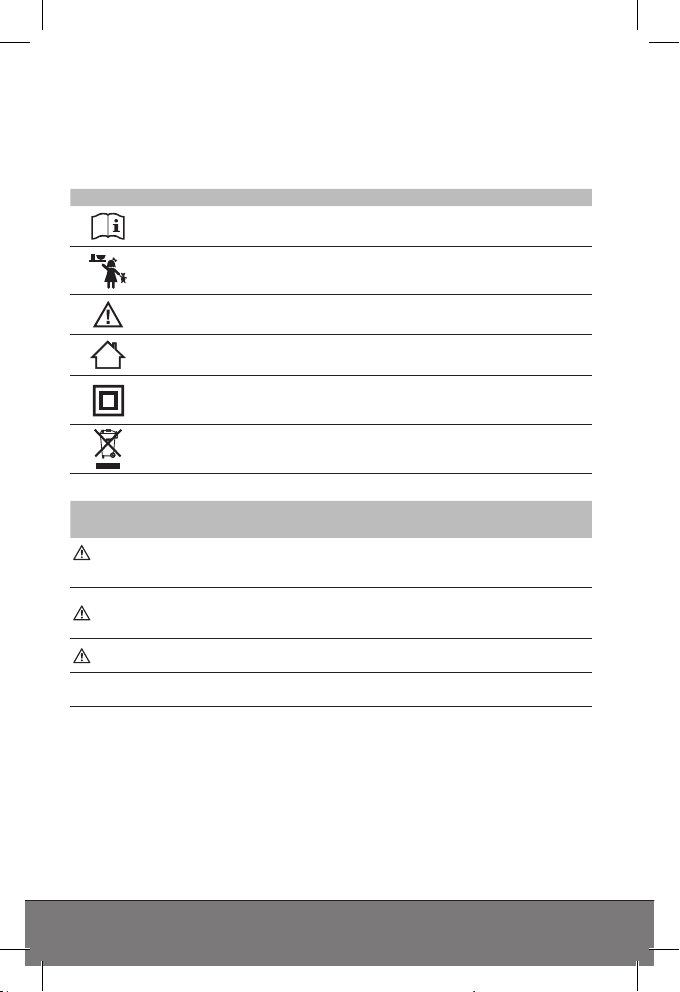
Ładowarka do akumulatorów z mikroprocesorem DP4.0 / DP6.0 / DP10.0
WPROWADZENIE
Objaśnienie symboli i oznaczeń, które znajdują się w instrukcji
obsługi i/lub na urządzeniu:
Symbol Objaśnienie
Symbol/
oznaczenie
Niebezpieczeństwo!
Uwaga! Niebezpieczeństwo uszkodzenia mienia!
Wskazówka:
Pojęcie urządzenia wykorzystane jest w tej instrukcji obsługi także
dla ładowarki akumulatorów.
Przestrzegać tej instrukcji obsługi podczas korzystania z
urządzenia.
Śmiertelne niebezpieczeństwo i niebezpieczeństwo wypadku dla dzieci!
Przestrzegać ostrzeżeń i wskazówek bezpieczeństwa!
Urządzenie stosować tylko w miejscach zabezpieczonych
przed wpływami atmosferycznymi!
Obudowa izolowana ochronnie (klasa ochrony II)
Opakowanie i urządzenie usunąć w sposób przyjazny dla
środowiska!
Możliwe skutki w razie nieprzestrzegania
instrukcji
Bezpośrdnie zagrożenie życia albo bardzo
ciężkie obrażenia.
Ostrzeżenie!
Ostrożnie!
Ciężkie obrażenia, możliwe niebezpieczeństwo utraty życia.
Łagodne do umiarkowanych obrażeń.
94
Page 95

PL Instrukcja obsługi
ZAWARTOŚĆ ZESTAWU
Bezpośrednio po rozpakowaniu sprawdzić zawartość zestawu.
Skontrolować urządzenie, jak i wszystkie jego części, czy nie są
uszkodzone. Nie korzystać z zepsutego urządzenia albo części.
• Ładowarka do akumulatorów z mikroprocesorem
• Instrukcja obsługi
Dokumenty przekazać następnemu użytkownikowi!
ZASTOSOWANIE ZGODNE Z
PRZEZNACZENIEM
Ładowarka została wyprodukowana do ładowania otwartych i
większej ilości zamkniętych, nie wymagających częstej konserwacji
akumulatorów kwasowo-ołowiowych (baterii), które wbudowane
są w samochodach, statkach, samochodach ciężarowych i innych
pojazdach np.:
• Akumulatory mokre (WET) akumulatory kwasowo-ołowiowe
(płynny elektrolit)
• Akumulatory żelowe (żelowy elektrolit)
• Akumulatory z technologią EFB (enhanced flooded battery)
• Akumulatory AGM (elektrolit w macie z włókna szklanego)
• Akumulatory kwasowo-ołowiowe nie wymagające częstej konser-
wacji (MF)
Urządzenie to może być obsługiwane przez dzieci od 8 lat i więcej,
jak również przez osoby o ograniczonej sprawności fizycznej, czuciowej lub umysłowej lub przy braku doświadczenia i wiedzy tylko
wtedy, jeśli są pod nadzorem lub zostały poinstruowane odnośnie
bezpiecznego użytkowania urządzenia i rozumieją wynikające z
tego zagrożenia. Dzieci nie mogą bawić się urządzeniem. Czyszczenie i konserwacja nie mogą być przeprowadzane przez dzieci bez
nadzoru.
Urządzenie nie jest przeznaczone do komercyjnego użytku.
Każde inne zastosowanie albo zmiana urządzenia uchodzi za
użytkowanie nie zgodne z jego przeznaczeniem i wiąże się z
poważnym ryzykiem. Za uszkodzenia spowodowane niewłaściwym
użytkowaniem producent nie ponosi odpowiedzialności.
95
Page 96

Ładowarka do akumulatorów z mikroprocesorem DP4.0 / DP6.0 / DP10.0
Producent nie jest odpowiedzialny za szkody spowodowane
przez:
• Nieprawidłowe podłączenie i/lub nieprawidłową obsługę.
• Zewnętrzne stosowanie siły, uszkodzenia urządzenia i/lub usz-
kodzenia części urządzenia poprzez mechaniczne wstrząsy lub
przeciążenia.
• Każdy inny rodzaj zmiany urządzenia.
• Zastosowanie urządzenia do celów, które nie zostały opisane w
instrukcji obsługi.
• Szkody pośrednie powstałe poprzez nieodpowiednie zastosowanie i/lub niezgodne z przeznaczeniem.
• Wilgoć i/lub niewystarczającą wentylację.
• Niedozwolone otworzenie urządzenia. To prowadzi do utraty pra-
wa gwarancji.
DANE TECHNICZNE
DP4.0 DP6.0 DP10.0
Napięcie
wejściowe
Napięcie
wyjściowe
Napięcie
ładowania
Prąd
ładowania
220 - 240 V AC,
50/60 Hz
64 W
6V DC /
12V DC
Tryb 6V:
7,2V / 7,4V
+/- 0,25 V
Tryb 12V:
14,5V / 14,8V
+/- 0,25 V
Tryb 6V:
2A
+/-10%
Tryb 12V:
2A ;
4A (90s) / 2A
(300s)
+/-10%
220 - 240 V AC,
50/60 Hz
100 W
6V DC /
12V DC
Tryb 6V:
7,2V / 7,4V
+/- 0,25 V
Tryb 12V:
14,5V / 14,8V
+/- 0,25 V
Tryb 6V:
2A
+/-10%
Tryb 12V:
2A / 6A
+/-10%
220 - 240 V AC,
50/60 Hz
180 W
12V DC /
24V DC
Tryb 12V:
14,5V / 14,8V
+/- 0,25 V
Tryb 24V:
28,4V / 29,0V
+/- 0,25 V
Tryb 12V:
2A / 10A
+/-10%
Tryb 24V:
5A
+/-10%
96
Page 97
PL Instrukcja obsługi
DP4.0 DP6.0 DP10.0
Prąd zwrotny 4mA 4mA 4mA
Temperatura
otoczenia
Odpowiednie
rodzaje akumulatorów
Bezpiecznik T2A T2A T3.15A
-20 do +40°C -20 do +40°C -20 do +40°C
Tryb 6V:
akumulatory
kwasowoołowiowe 6V
(WET, MF, AGM
oraz GEL) o
pojemności
akumulatora
1,2 - 14Ah
Tryb 12V:
akumulatory
kwasowoołowiowe 12 V
(WET, MF, AGM
oraz GEL) o
pojemności
akumulatora
1,2 - 120Ah
Tryb 6V:
akumulatory kwasowoołowiowe 6V
(WET, MF, AGM
oraz GEL) o
pojemności
akumulatora
1,2 - 14Ah
Tryb 12V:
akumulatory kwasowoołowiowe 12 V
(WET, MF, AGM
oraz GEL) o
pojemności
akumulatora
1,2 - 120Ah
Tryb 12V:
akumulatory kwasowoołowiowe 12 V
(WET, MF, AGM
oraz GEL) o
pojemności
akumulatora
1,2 - 200Ah
Tryb 24V:
Akumulatory kwasowoołowiowe 24V
(WET, MF, AGM
oraz GEL) o
pojemności
akumulatora
14 - 120Ah
BEZPIECZEŃSTWO
Należy zapoznać się ze wszystkimi wskazówkami bezpieczeństwa
i zaleceniami. Nieprzestrzeganie wskazówek bezpieczeństwa
i zaleceń może spowodować porażenie prądem, pożar i/lub
poważne obrażenia. Zachować na przyszłość wszystkie wskazówki
bezpieczeństwa i instrukcje.
Śmiertelne niebezpieczeństwo i niebezpieczeństwo wypadku dla dzieci!
• Trzymać urządzenie z dala od dzieci. Dzieci nie są w stanie
rozpoznać niebezpieczeństwa związanego z tym produktem!
• Niebezpieczeństwo uduszenia! Dzieciom nie wolno pozwalać
bawić się częściami budowy i zamocowania, ponieważ mogą one
je połknąć co prowadzi do śmierci przez uduszenie.
97
Page 98
Ładowarka do akumulatorów z mikroprocesorem DP4.0 / DP6.0 / DP10.0
Niebezpieczeństwo oparzenia chemicznego!
Akumulatory zawierają kwas, który szkodzi oczom i skórze. Dodatkowo podczas ładowania akumulatorów powstają gazy i opary,
które są szkodliwe dla zdrowia.
• Unikać jakiegokolwiek kontaktu ze żrącymi kwasami akumulatora.
Miejsca na skórze i przedmioty, które miały styczność z kwasem
umyć od razu dokładnie wodą. Jeśli doszło do kontaktu kwasu
akumulatora z oczami, należy je płukać przez co najmniej 5 minut
pod bieżącą wodą. Prosimy o skontaktowanie się z lekarzem.
• Stosować okulary ochronne i rękawice odporne na kwasy. Chronić
ubranie np. za pomocą fartucha.
• Nie przechylać akumulatora, ponieważ kwas może się wylać.
• Zadbać zawsze o wystarczającą wentylację.
• Nie wdychać wydostających się gazów, ani oparów.
Niebezpieczeństwo wybuchu i pożaru!
Podczas ładowania akumulatora może powstać gaz piorunujący
(gazowy wodór i tlen). W razie kontaktu z otwartym ogniem
(płomień, żar, iskra) może dojść do wybuchu.
• Nie ładować nigdy akumulatora w pobliżu otwartego ognia albo w
miejscach, w których może dojść do powstania iskry.
• Zadbać zawsze o wystarczającą wentylację.
• Upewnić się, czy napięcie sieciowe zgadza się z podanym na
urządzeniu napięciem wejściowym (220 - 240V AC), aby uniknąć
uszkodzenia urządzenia.
• Podłączyć i odłączyć kabel akumulatora tylko wtedy, gdy
ładowarka nie jest podłączona do gniazdka.
• Urządzenia nie zakrywać podczas ładowania, ponieważ poprzez
silne ogrzewanie może ono zostać uszkodzone.
• Przerwać od razu pracę urządzenia, jeśli będzie widoczny dym
albo wydobywać się będzie dziwny zapach.
• Nie korzystać z urządzenia w pomieszczeniach, w których
przechowywane są materiały palne (np. benzyna albo rozpuszczalnik).
98
Page 99
PL Instrukcja obsługi
Niebezpieczeństwo porażenia prądem!
• Ładowarka może ingerować w działalności aktywnych, elektrycznych implantów jak np. rozrusznika serca i tym samym stanowić
zagrożenie dla ludzi.
• Upewnić się, że urządzenie znajduje się zawsze w bezpiecznym
miejscu. Nie wystawiać urządzenia na działanie deszczu lub
wilgoci. Unikać wylania albo kapania wody albo innych cieczy
na urządzenie. Jeśli woda wniknie do elektrycznego urządzenia,
zwiększa to ryzyko porażenia prądem.
• Upewnić się, czy wszystkie wtyczki i kable są suche. Nigdy nie
podłączać urządzenia do prądu wilgotnymi rękami.
• Nie dotykać nigdy jednocześnie oba zaciski podłączeniowe, podczas działania urządzenia.
• Zawsze najpierw podłącz dodatni zacisk ładowania (czerwony)
do dodatniego bieguna akumulatora (niepodłączony do nadwozia
samochodu, oznaczony P lub +).
• Następnie podłącz ujemny zacisk ładowania (czarny) do nadwozia samochodu, z dala od obudowy akumulatora samochodu, z
dala od akumulatora i z dala od przewodu paliwowego. Następnie
ładowarkę można podłączyć do odpowiedniego gniazdka sieciowego.
• Po naładowaniu najpierw odłącz ładowarkę od sieci. Następnie
w tej kolejności najpierw usuń złącze na korpusie (-), a następnie
złącze dodatniego akumulatora (+).
• Wtyczkę sieciową wyjąć z gniazdka tylko przed podłączeniem
albo rozłączeniem kabla ładowarki od akumulatora lub jeśli nie
korzystasz już z urządzenia.
• Przed rozpoczęciem jazdy samochodem odłączyć wszystkie kable
od akumulatora.
• Kabel wyciągnąć z gniazdka tylko przy wtyczce. W innym przypadku kabel może zostać uszkodzony.
• Nie stosować uszkodzonego urządzenia. Uszkodzenia kabla
sieciowego, urządzenia albo kabla ładowarki zwiększa ryzyko
porażenia prądem.
• Nie próbować rozkładać albo naprawiać urządzenia. Zepsute
urządzenie albo uszkodzony kabel sieciowy należy niezwłocznie
naprawić albo wymienić w specjalistycznym warsztacie.
99
Page 100

Ładowarka do akumulatorów z mikroprocesorem DP4.0 / DP6.0 / DP10.0
• Niebezpieczeństwo spięcia! Uważać, aby oba zaciski akumulatora przy biegunowym kablu ładowania nie stykały się, jeśli
wtyczka jest podłączona do gniazdka. Upewnić się także, że
zaciski oraz bieguny akumulatora nie stykają się z przedmiotami
przewodzącymi prąd (np. narzędziami).
• Z kabla nie korzystać nigdy do noszenia albo ciągnięcia
urządzenia.
Niebezpieczeństwo zranienia!
• Nie ładować nigdy uszkodzonych lub zamarzniętych akumulatorów oraz takich, które nie są przeznaczone do ponownego
ładowania.
• Ładowarki nie używać do ładowania suchych akumulatorów
płaskich. Te mogą pęknąć i doprowadzić do zranienia osoby albo
uszkodzenia mienia.
• Przed korzystaniem z urządzenia prosimy przestrzegać instrukcji
obsługi i wszystkich wskazówek bezpieczeństwa dot. ładowanych
akumulatorów i pojazdu.
Niebezpieczeństwo uszkodzenia mienia!
• Urządzenia nie umieszczać nigdy ponad albo w pobliżu akumulatora do ładowania. Gazy z akumulatora mogą uszkodzić
urządzenie. Ładowarkę postawić od akumulatora tak daleko, jak
pozwala na to kabel.
• Urządzenia nie używać nigdy, jeśli on spadł na podłogę albo został
uszkodzony w inny sposób.
100
 Loading...