

Page 1

HL1, HL2, HL3 & HL4 Series ALUMINUM HEATED HOLDING
CABINETS & HEATER PROOFERS
OWNERS / OPERATORS MANUAL
HL2-18
MODELS:
HL1 HEATED
CABINETS
(non-insulated)
Models: HL1-5,
HL1-8, HL1-14 &
HL1-18
Formerly models:
HBU5A2GM
HBU8A2GM
HBU14A2GM
HBU18A2GM
HBC10A2GM
HBC16A2GM
HBC28A2GM
HBC36A2GM
HBF5A2GM
HBF8A2GM
HBF14A2GM
HBF18A2GM
Email: technicalservice@carter-hoffmann.com
MODELS:
HL2 HEATER/
PROOFERS
(non-insulated)
Models: HL2-5,
HL2-8, HL2-14 &
HL2-18
Formerly models:
HWU5A2GM
HWU8A2GM
HWU14A2GM
HWU18A2GM
HWC10A2GM
HWC16A2GM
HWC28A2GM
HWC36A2GM
HWF5A2GM
HWF8A2GM
HWF14A2GM
HWF18A2GM
MANUFACTURED BY:
CARTER-HOFFMANN
1551 McCormick Avenue
Mundelein, IL 60060 U.S.A.
Phone: 847-362-5500
Fax: 847-367-8981
Toll Free: 800-323-9793
HL3 HEATED
Models: HL3-5,
HL3-8, HL3-14,
Formerly models:
HBU5A1GM
HBU8A1GM
HBU14A1GM
HBU18A1GM
HBC10A1GM
HBC16A1GM
HBC28A1GM
HBC36A1GM
HBF5A1GM
HBF8A1GM
HBF14A1GM
HBF18A1GM
MODELS:
CABINETS
(insulated)
HL3-18
Formerly models:
HWU5A1GM
HWU8A1GM
HWU14A1GM
HWU18A1GM
HWC10A1GM
HWC16A1GM
HWC28A1GM
HWC36A1GM
HWF5A1GM
HWF8A1GM
HWF14A1GM
HWF18A1GM
MODELS:
HL4 HEATER/
PROOFERS
(insulated)
Models: HL4-5,
HL4-8, HL4-14,
HL4-18
TABLE OF CONTENTS
SAFETY PRECAUTIONS……………………………..…………………. 2
FEATURES & SPECIFICATIONS………..……………..………………. 3-6
UNPACKING, INSPECTION & FREIGHT DAMAGE…………………. 7
INSTALLATION & STARTUP …………………….……………………. 8
DETAILS: CONTROLS AND WATER PANS………………………….. 9
NORMAL OPERATION: HL1 & HL3 HEATED CABINETS………….. 10
NORMAL OPERATION: HL2 & HL4 HEATER PROOFERS ……….. 11
FOOD HOLDING GUIDE………………………………………………... 12
DAILY CLEANING PROCEDURES...………………..………………... 13
CABINET MAINTENANCE………………………………………………. 14
WIRING DIAGRAMS...……………………………………… …………... 15
REPLACEMENT PARTS………………………………………………... 16
TROUBLESHOOTING GUIDE …………………………………………. 17
WARRANTY STATEMENT……….……………….……………………. 18
MANUEL EN FRANÇAIS………………………………………………... 19-36
Part Number: 18400-3130e Printed in The United States of America Rev: KBA120512
Page 2
SAFETY PRECAUTIONS
WARNING: ELECTRIC SHOCK HAZARD
WARNING
All service requiring access to non-insulated components must be performed by
qualified service personnel. Failure to heed this warning may result in severe
electric shock.
CAUTION: ELECTRIC SHOCK HAZARD
Disconnect this appliance from electrical power before performing any
maintenance or service.
CAUTION: BURN HAZARD
Exposed metal surfaces can be hot to the touch and may cause burns.
IMPORTANT SAFETY INSTRUCTIONS
When using electrical appliances basic safety precautions should be followed, including the following:
1) Be familiar with the appliance use, limitations and associated restrictions. Operating instructions must
be read and understood by all persons using or installing this appliance.
2) This appliance must be grounded. Connect only to properly grounded outle t.
3) Use this appliance only for its intended purpose as described in the manual.
a. This equipment is specifically designed to hold pre-cooked food at temperature.
b.
c. This equipment is not designed for industrial or laboratory use.
4) Cleanliness of this appliance and its accessories is essential to good sanitation.
This equipment is intended for use in commercial establishments only.
5) DO NOT submerge this appliance in water. This appliance is not jet stream approved. DO NOT direct
water jet or steam jet at this appliance, or at any control panel or wiring. DO NOT splash or pour
water on, in or over any controls, control panel or wiring. DO NOT use corrosive chemicals or vapors
in this appliance.
6) DO NOT store this appliance outdoors. DO NOT use this product near water – for example,
near a kitchen sink, in a wet basement, or near a swimming pool, and the like.
7) DO NOT operate this appliance if it has a damaged cord or plug, if it is not working properly, or if it has
been damaged or dropped. Do not immerse cord or plug in water, keep cord away from heated
surfaces, and do not let cord hang over edge of table or counter.
8) DO NOT cover or block any openings on the appliance.
9) Only qualified service personnel should service this appliance.
NOTE: The technical content of this manual, including any wiring diagrams, schematics, parts br eakdown
illustrations and/or adjustment procedures, is intended for use by qualified technical personnel and is
subject to change without notice.
2
Page 3
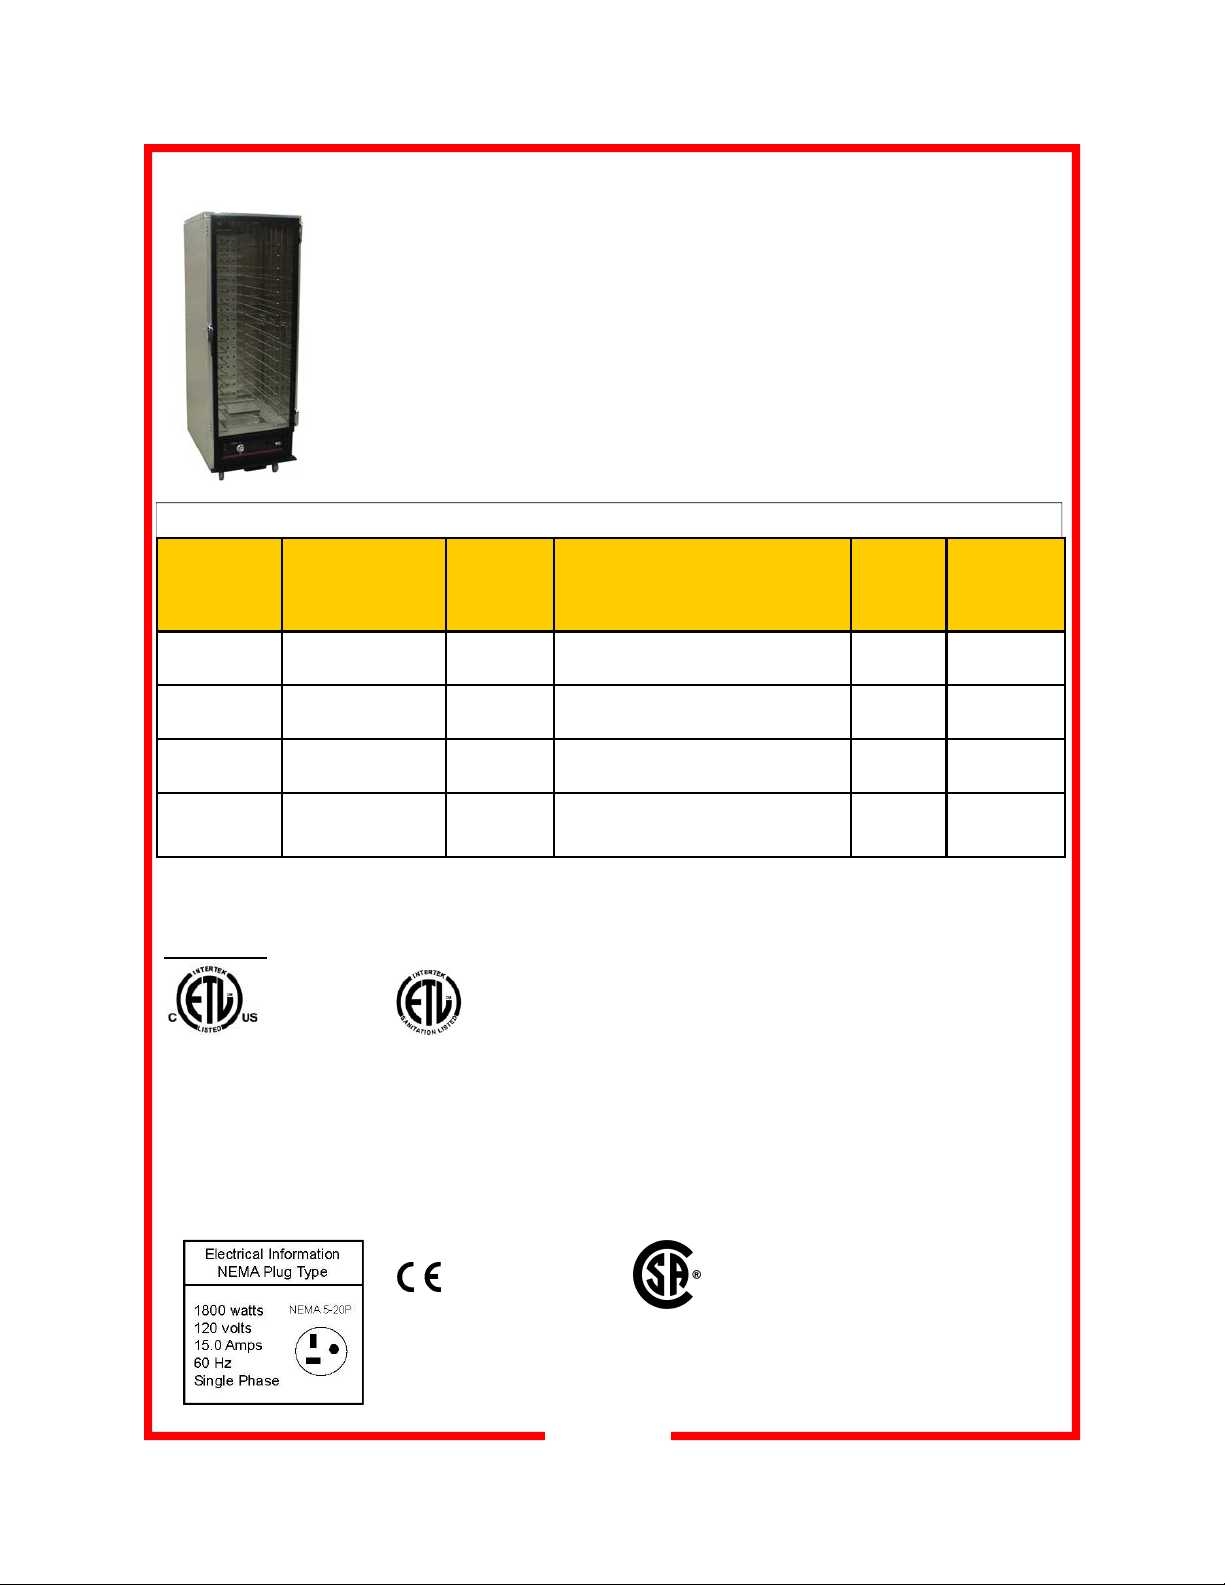
HL1 NON-INSULATED ALUMINUM HEATED CABINET FEATURES & SPECIFICATIONS
HL1 Features & Benefits
Precision-engineered bottom mount heater with superior heat-up and recovery time
Analog heat control. Digital thermometer. Temperature range of 90°- 190°F
Four sizes, available with adjustable universal, fixed universal or adjustable universal slides
All swivel heavy-duty casters, front casters fitted with brakes
Field reversible glass door in heavy-duty extruded aluminum frame is standard, black anodized solid aluminum
door is optional
Fixed wire universal slides for 18”x26” sheet pans and 12”x20”x2.5” steam table pans
Cabinets with Adjustable Universal, Fixed Universal or Angle Slides
Model
Number
Pan/Tray
Capacity*
12”x20” 18”x26”
Slide Pairs
Provided
Overall Dimensions
Height Depth Width
in (mm)
Caster
Diameter
in (mm)
Class 100
Shipping
Weight
lbs (kgs)
HL1-5
(under-counter)
HL1-8
(1/2 size)
HL1-14
(3/4 size)
HL1-18
(full size)
* fixed spacing at 3”
APPROVALS:
3174974
10 5 5 31-1/16 29-1/2 24-11/16
(789) (749) (627)
16 8 8 40-1/16 29-1/2 24-11/16
(1018) (749) (627)
28 14 14 58-1/16 29-1/2 24-11/16
(1474) (749) (627)
36 18 18 70-1/16 29-1/2 24-11/16
(1780) (749) (627)
Conforms to UL Std 197
certified to CAN/CSA Std
C22.2 No. 109
3174974
Conforms to
NSF/ANSI
Std 4
5
(127)
5
(127)
5
(127)
5
(127)
99
(45)
137
(62)
155
(70)
198
(90)
International voltage:
220 volts, 1800 watts,
8.2 Amps, 50 Hz, single
phase, plug cap per
specific country requirements / standards
Canadian Voltage:
120v, 1400 watts,
12Amps, NEMA 5-15P
3
Page 4
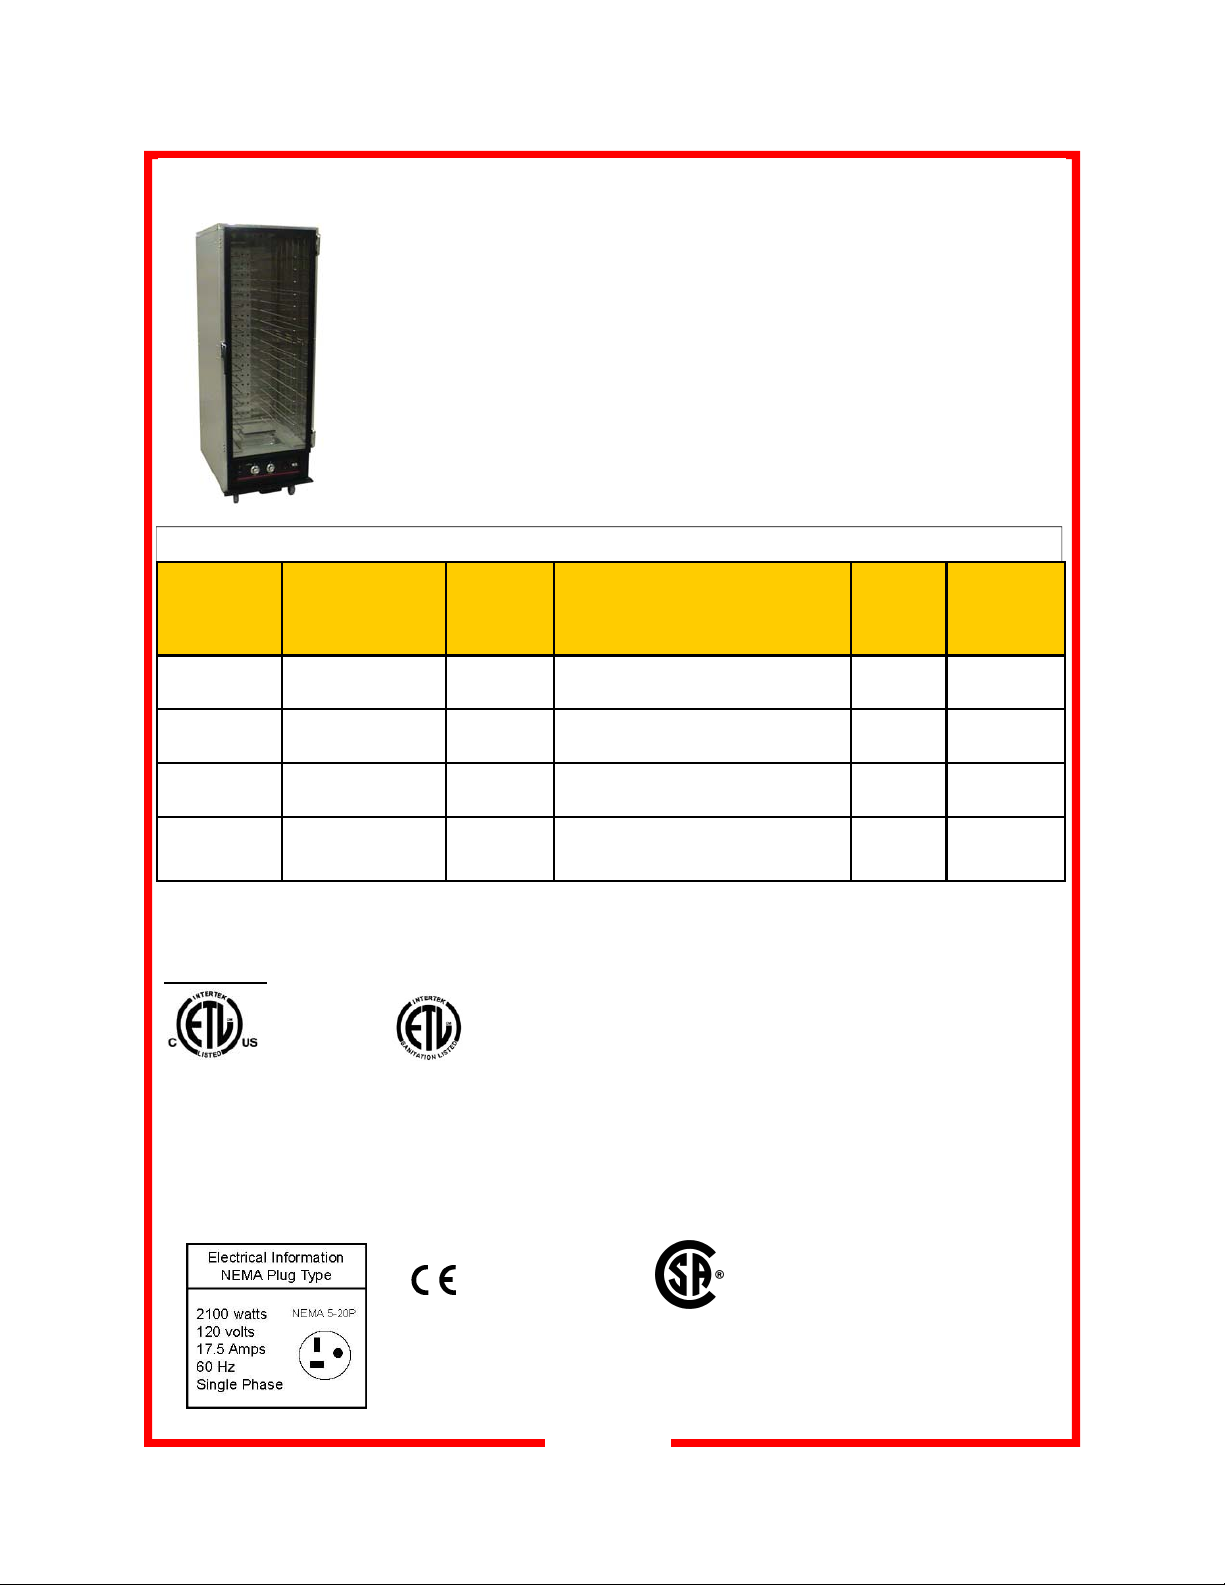
HL2 NON-INSULATED ALUMINUM HEATER/PROOFER FEATURES & SPECIFICATIONS
HL2 Features & Benefits
Precision-engineered bottom mount heater with superior heat-up and recovery time
Analog heat and humidity levels. Digital thermometer. Temperature range of 90°- 190°F
Can be operated with or without humidity. Capable of humidified holding as well as proofing
Four sizes, available with adjustable universal, fixed universal or adjustable universal slides
All swivel heavy-duty casters, front casters fitted with brakes
Field reversible glass door in heavy-duty extruded aluminum frame is standard, black anodized solid aluminum
door is optional
Fixed wire universal slides for 18”x26” sheet pans and 12”x20”x2.5” steam table pans
Cabinets with Adjustable Universal, Fixed Universal or Angle Slides
Model
Number
Pan/Tray
Capacity*
12”x20” 18”x26”
Slide Pairs
Provided
Overall Dimensions
Height Depth Width
in (mm)
Caster
Diameter
in (mm)
Class 100
Shipping
Weight
lbs (kgs)
HL2-5
(under-counter)
HL2-8
(1/2 size)
HL2-14
(3/4 size)
HL2-18
(full size)
* fixed spacing at 3”
APPROVALS:
3174974
10 5 5 31-1/16 29-1/2 24-11/16
(789) (749) (627)
16 8 8 40-1/16 29-1/2 24-11/16
(1018) (749) (627)
28 14 14 58-1/16 29-1/2 24-11/16
(1474) (749) (627)
36 18 18 70-1/16 29-1/2 24-11/16
(1780) (749) (627)
Conforms to UL Std 197
certified to CAN/CSA Std
C22.2 No. 109
3174974
Conforms to
NSF/ANSI
Std 4
5
(127)
5
(127)
5
(127)
5
(127)
99
(45)
137
(62)
155
(70)
198
(90)
International voltage:
220 volts, 2100 watts,
9.5 Amps, 50 Hz, single
phase, plug cap per
specific country requirements / standards
4
Canadian Voltage:
120v, 1400 watts,
12Amps, NEMA 5-15P
Page 5

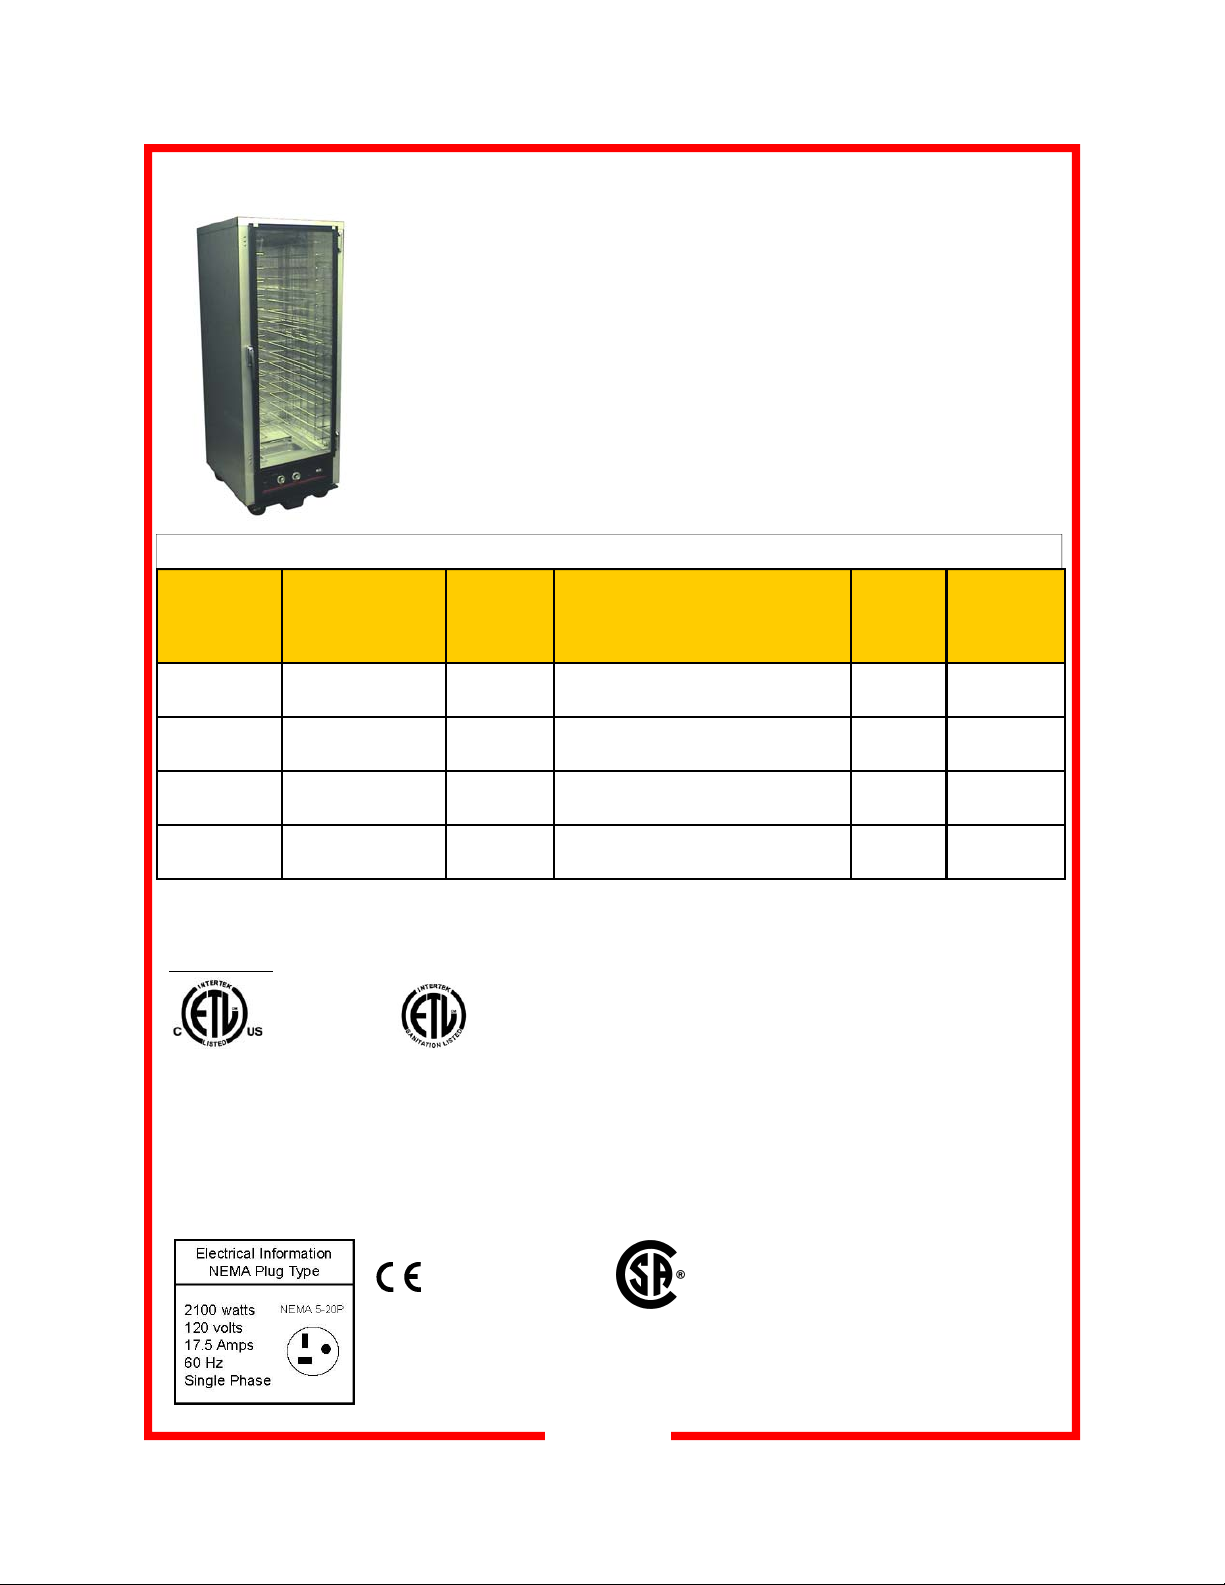
HL3 INSULATED ALUMINUM HEATED CABINET FEATURES & SPECIFICATIONS
HL3 Features & Benefits
Precision-engineered bottom mount heater with superior heat-up and recovery time
Analog heat control. Digital thermometer. Temperature range of 90°- 190°F
Four sizes, available with adjustable universal, fixed universal or adjustable universal slides
All swivel heavy-duty casters, front casters fitted with brakes
Field reversible glass door in heavy-duty extruded aluminum frame is standard, black anodized solid
aluminum door is optional
Fixed wire universal slides for 18”x26” sheet pans and 12”x20”x2.5” steam table pans
Cabinets with Adjustable Universal, Fixed Universal or Angle Slides
Model
Number
Pan/Tray
Capacity*
12”x20” 18”x26”
Slide Pairs
Provided
Overall Dimensions
Height Depth Width
in (mm)
Caster
Diameter
in (mm)
Class 100
Shipping
Weight
lbs (kgs)
HL3-5
(under-counter)
HL3-8
(1/2 size)
HL3-14
(3/4 size)
HL3-18
(full size)
* fixed spacing at 3”
APPROVALS:
3174974
10 5 5 31-5/8 31-1/2 26-1/2
(803) (800) (673)
16 8 8 40-5/8 31-1/2 26-1/2
(1032) (800) (673)
28 14 14 58-5/8 31-1/2 26-1/2
(1489) (800) (673)
36 18 18 70-5/8 31-1/2 26-1/2
(1794) (800) (673)
Conforms to UL Std 197
certified to CAN/CSA Std
C22.2 No. 109
3174974
Conforms to
NSF/ANSI
Std 4
International voltage:
220 volts, 1800 watts,
8.2 Amps, 50 Hz, single
phase, plug cap per
specific country requirements / standards
Canadian Voltage:
120v, 1400 watts,
12Amps, NEMA 5-15P
5
(127)
5
(127)
5
(127)
5
(127)
104
(47)
147
(67)
170
(77)
218
(99)
5
Page 6
HL4 INSULATED ALUMINUM HEATER/PROOFER FEATURES & SPECIFICATIONS
HL4 Features & Benefits
Precision-engineered bottom mount heater with superior heat-up and recovery time
Analog heat and humidity levels. Digital thermometer. Temperature range of 90°- 190°F
Can be operated with or without humidity. Capable of humidified holding as well as proofing
Four sizes, available with adjustable universal, fixed universal or adjustable universal slides
All swivel heavy-duty casters, front casters fitted with brakes
Field reversible glass door in heavy-duty extruded aluminum frame is standard doors are standard, solid
aluminum door is optional
Fixed wire universal slides for 18”x26” sheet pans and 12”x20”x2.5” steam table pans
Cabinets with Adjustable Universal, Fixed Universal or Angle Slides
Model
Number
Pan/Tray
Capacity*
12”x20” 18”x26”
Slide Pairs
Provided
Overall Dimensions
Height Depth Width
in (mm)
Caster
Diameter
in (mm)
Class 100
Shipping
Weight
lbs (kgs)
HL4-5
(under-counter)
HL4-8
(1/2 size)
HL4-14
(3/4 size)
HL4-18
(full size)
* fixed spacing at 3”
APPROVALS:
3174974
10 5 5 31-5/8 31-1/2 26-1/2
(803) (800) (673)
16 8 8 40-5/8 31-1/2 26-1/2
(1032) (800) (673)
28 14 14 58-5/8 31-1/2 26-1/2
(1489) (800) (673)
36 18 18 70-5/8 31-1/2 26-1/2
(1794) (800) (673)
Conforms to UL Std 197
certified to CAN/CSA Std
C22.2 No. 109
3174974
Conforms to
NSF/ANSI
Std 4
International voltage:
220 volts, 2100 watts,
9.5 Amps, 50 Hz, single
phase, plug cap per
specific country requirements / standards
Canadian Voltage:
120v, 1400 watts,
12Amps, NEMA 5-15P
5
(127)
5
(127)
5
(127)
5
(127)
104
(47)
147
(67)
170
(77)
218
(99)
6
Page 7
UNPACKING AND INSPECTION
This appliance
should be
thoroughly
cleaned prior to use.
See the CLEANING
INSTRUCTIONS in
this manual.
NOTE: DO NOT discard
the carton or other
packing materials until
you have inspected the
appliance for hidden
damage and checked it
for proper operation.
1. Remove the cabinet from shipping carton, ensuring that all packing materials and protective plastic has been removed from the
unit.
2. Inspect all components for completeness and condition.
3. If any freight damage is present, a freight claim must be filed immediately with the shipping company.
4. Freight damage is not covered under warranty.
5. Check to insure all components are included: cabinet, instruction
packet and additional accessories.
6. Read operation instructions completely.
7. Appliance should be thoroughly cleaned before use. See
CLEANING INSTRUCTIONS in this manual.
Refer to SHIPPING
DAMAGE CLAIM
PROCEDURE on
bottom of this page.
FREIGHT DAMAGE PROCEDURE
NOTE: For your protection, please note that equipment in this shipment was carefully inspected
and packaged by skilled personnel before leaving the factory. Upon acceptance of this shipment,
the transportation company assumes full responsibility for its safe delivery.
IF SHIPMENT ARRIVES DAMAGED:
1. VISIBLE LOSS OR DAMAGE: Be certain that any visible loss or damage is noted on the freight
bill or express receipt, and that the note of loss or damage is signed by the delivery person.
2. FILE CLAIM FOR DAMAGE IMMEDIATELY: Regardless of the extent of damage. Contact
your dealer immediately.
3. CONCEALED DAMAGE: If damage is unnoticed until the merchandise is unpacked, notify the
transportation company or carrier immediately, and then file a “CONCEALED DAMAGE” claim
with them. This should be done within fifteen (15) days from the date the delivery was made to
you. Be sure to retain the container for inspection.
Carter-Hoffmann cannot assume liability for damage or loss incurred in transit, freight damage is
not covered under warranty. We will, however, at your request, supply you with the necessary
documents to support your claim.
7
Page 8
INSTALLATION AND STARTUP
WARNING:
Risk of personal injury
Installation procedures must be
performed by a qualified technician
with full knowledge of all applicable
electrical codes. Failure could
result in personal injury and property damage.
IMPORTANT:
Power cord is 8' long
If necessary, contact a licensed
electrician to install an appropriate
20 amp electrical circuit with correct
NEMA receptacle.
DO NOT use an extension cord.
CAUTION:
Electrical Shock Hazard
The ground prong of the power
cord is part of a system designed to
protect you from electric shock in
the event of internal damage.
DO NOT cut off the large round
ground prong or twist a blade to fit
an existing receptacle.
IMPORTANT:
Not under warranty
Damage to unit due to being
connected to the wrong voltage or
phase is NOT covered by warranty.
WARNING:
Risk of personal injury
Unit is not waterproof, to avoid
electrical shock, keep unit from being submerged in water. Do not
operate if unit has been in contact
with water.
LOCATION
For proper operation and maximum performance, locate the
unit in an ambient air temperature of 70ºF (21ºC).
Avoid placement in areas near exhaust fans or where there
are active air movements.
For safe operation and maximum performance, locate the
unit at least 2” from any wall or combustible material.
Unit must be on a solid level surface.
GROUNDING INSTRUCTIONS
This appliance is equipped with a cord having a grounding wire with
a grounding plug which must be plugged into an outlet that is
properly installed and grounded. In the event of an electrical short
circuit, grounding reduces the risk of electric shock by providing an
escape wire for the electric current.
WARNING—Improper use of the grounding can result in a risk
of electric shock. Consult a qualified electrician or service agent if
the grounding instructions are not completely understood, or if doubt
exists as to whether the appliance is properly grounded.
START UP
1. Prior to use, thoroughly clean the interior of the unit, per
the instructions in this manual. Familiarize yourself with
the controls.
2. Plug the power cord of the cabinet into a grounded outlet
with a electrical service according to the electrical information provided below. DO NOT MODIFY CORD PLUG.
3. Set POWER switch to the “ON” position.
4. Do not load product into the cabinet. Allow the heat to
remove any residual oils which may adhere to inside metal surfaces. A slight emission of smoke is common during the first few hours of operation.
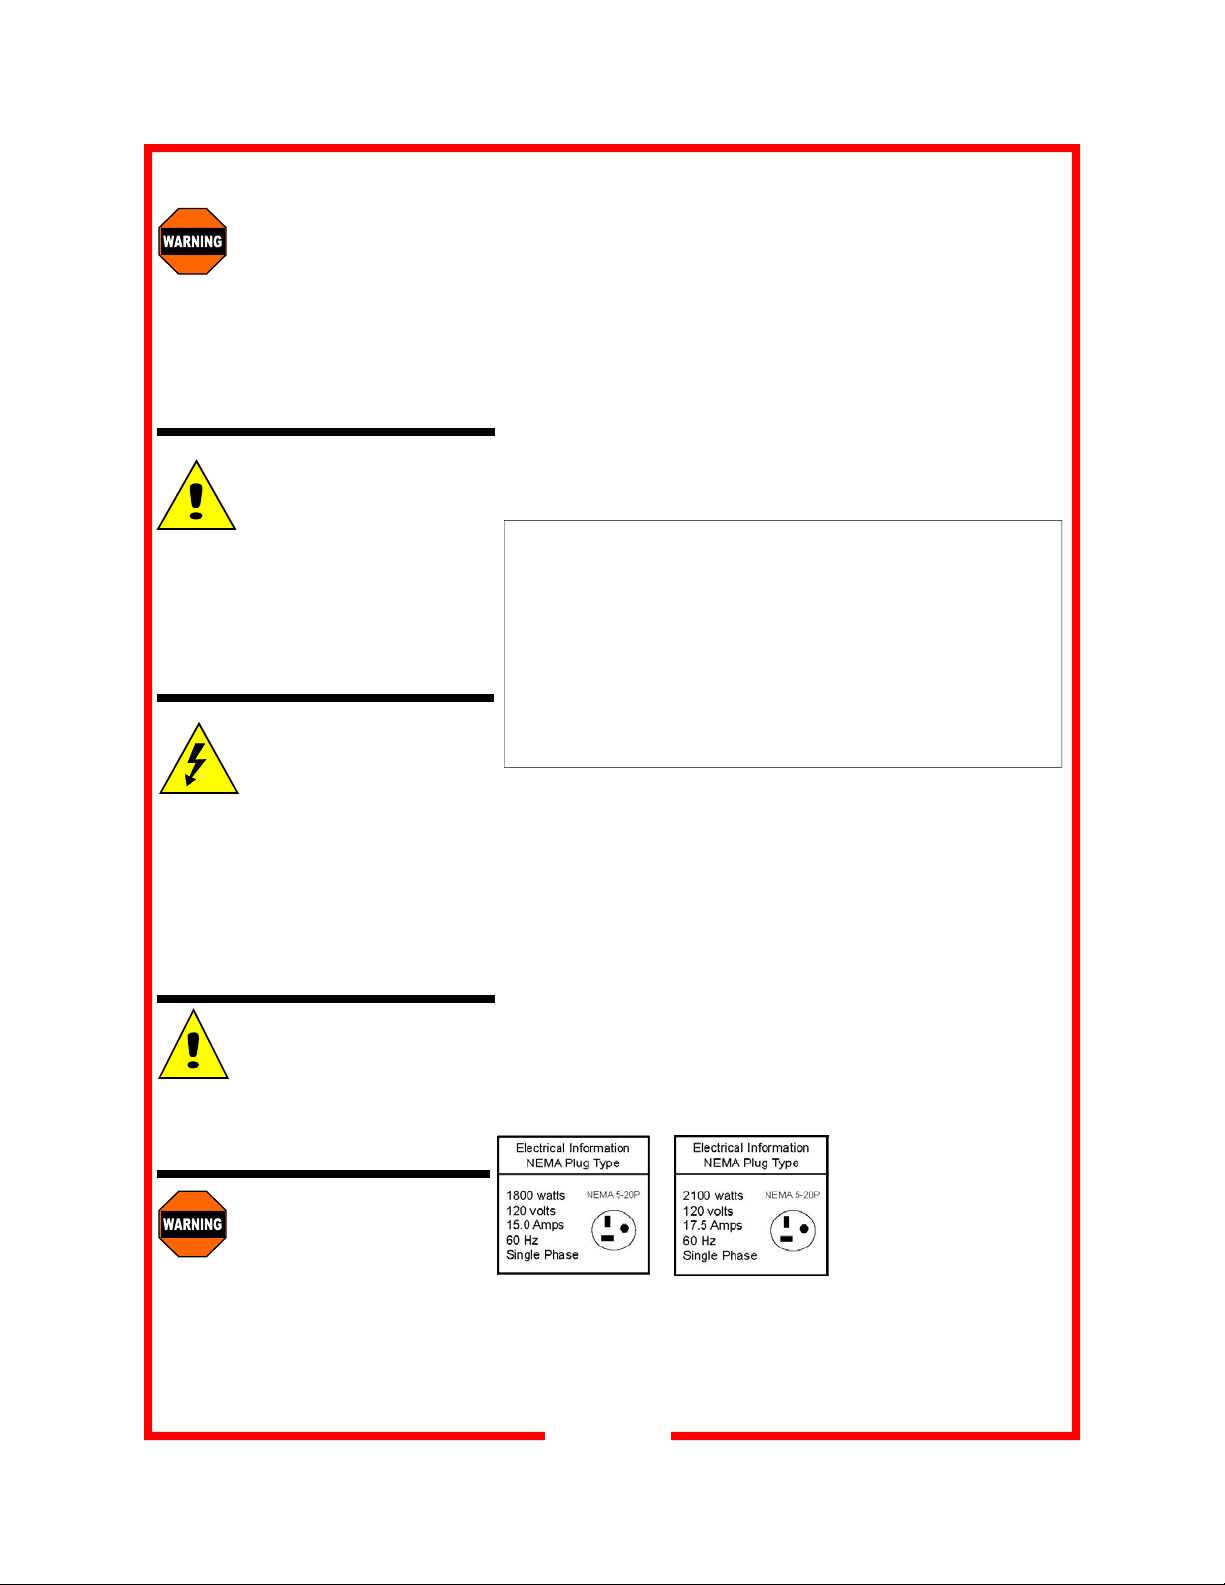
220 volt CE international versions:
HL1 & HL3 Series: 1800 watts, 220
volts, 8.2 Amps, 50/60 Hz, single
phase
HL2 & HL4 Series: 2100 watts, 220
volts, 9.5 Amps, 50/60 Hz, single
phase
HL1 & HL3 Models HL2 & HL4 Models
Plug cap per specific country requirements / standards
Canada: 1400 watts, 120 volts, 12
Amps, single phase, NEMA 5-15P
8
Page 9
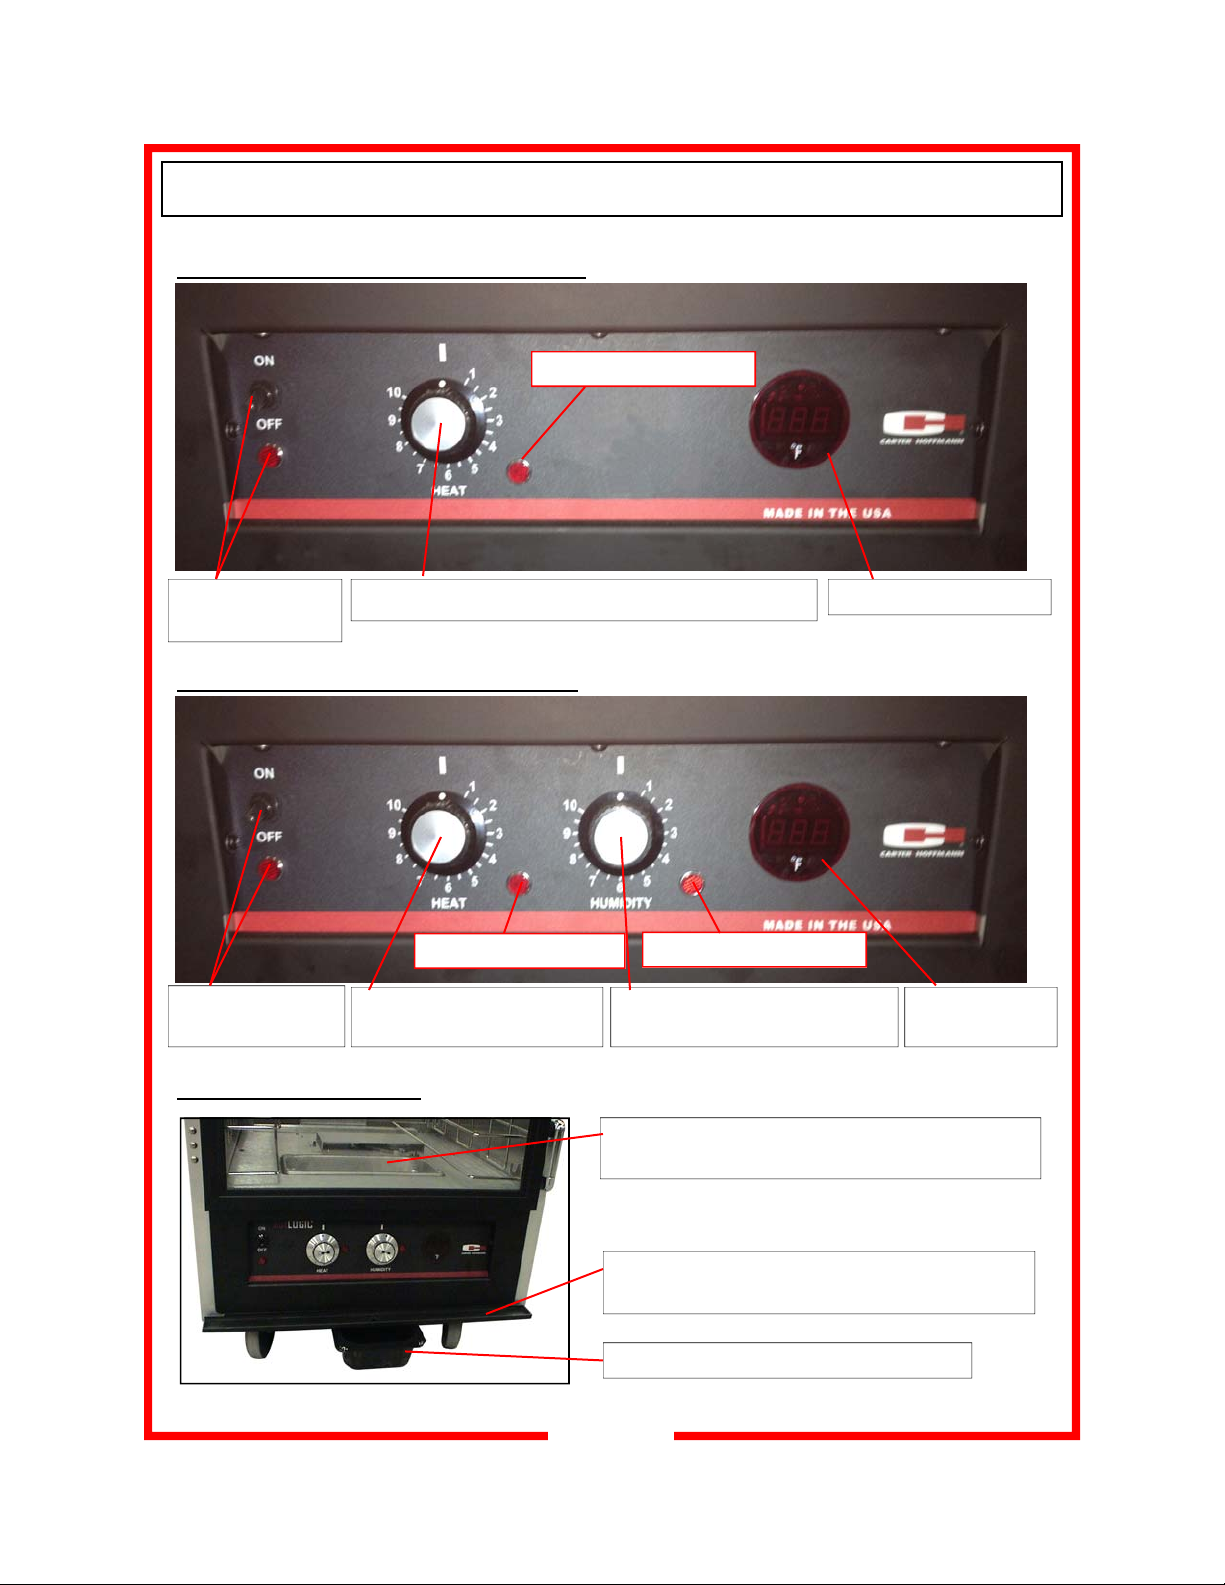
DETAILS: CONTROL PANELS & WATER PANS
HL1 & HL3 Series Heated Holding Cabinets
Heating element cycle light
ON/OFF power switch
and indicator light
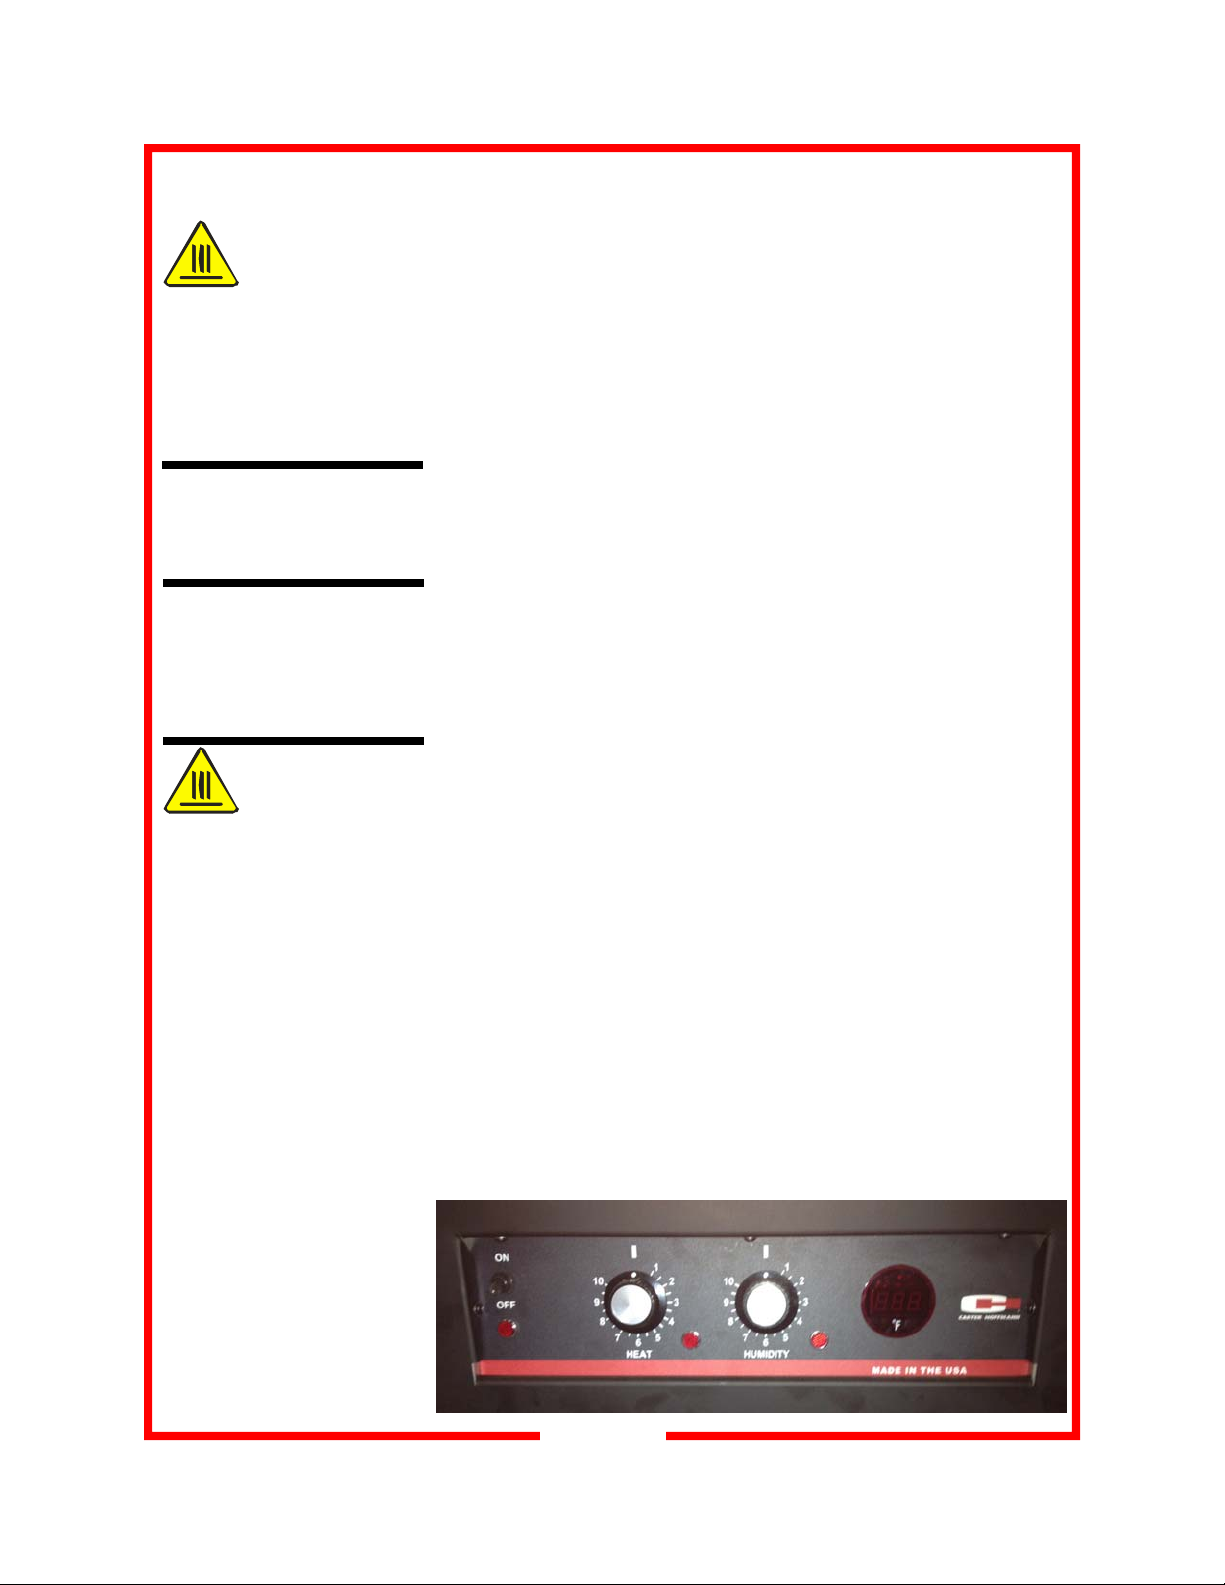
HL2 & HL4 Series Heater/Proofer Cabinets
ON/OFF power switch
and indicator light
WATER PAN LOCATIONS
Heat control knob. Settings from 1 (low heat) to 10 (high heat)
Heating element cycle light
Heat control knob. Settings from
1 (low heat) to 10 (high heat)
Digital temperature read-out
Humidity element cycle light
Humidity control knob. Settings from
1 (low humidity) to 10 (high humidity)
Humidity pan (manual fill): check and fill every 2 hours
when operating cabinet with humidity
Digital temperature
read-out
Water trough for condensation: collects and deposits
condensation into pan below
Condensation pan: check and empty periodically
9
Page 10
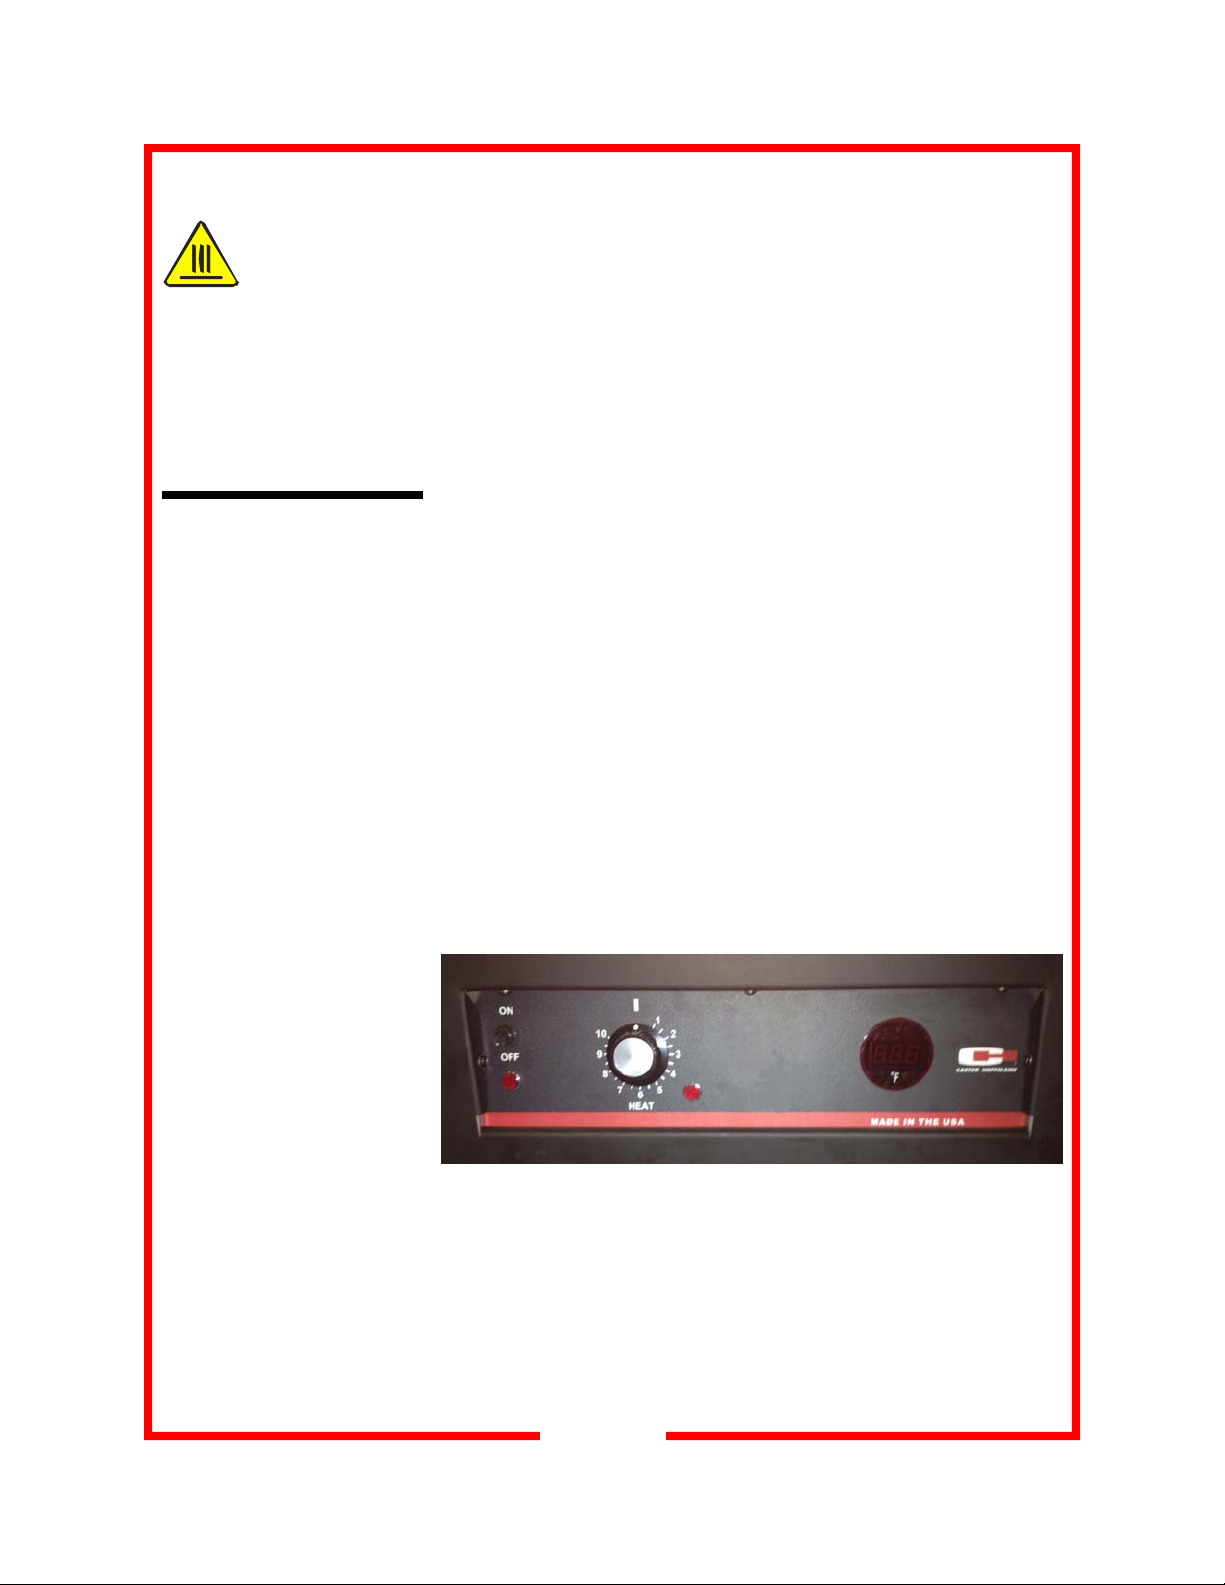
NORMAL OPERATION—HL1 & HL3 HB HEATED CABINETS
CAUTION:
HOT SURFACE
Inner and outer surfaces of
the unit will be very hot during and after operation.
Avoid touching the cabinet
when loading or removing
product.
Operating ranges:
- air temp: 90ºF-190ºF
(32°C - 88°C)
*For food safety reasons,
it is recommended that
the holding temperature
be set at 140°F (60°C) or
higher.
FIRST USE
Before using the cabinet, familiarize yourself with the heater controls. See page 9 for details. Plug the cabinet into a proven power
source. See electrical specifications on page 8.
HOLDING
1. Turn the cabinet on using the power switch located on the far left
side of the control panel. Once the switch is turned on, the
power indicator light will illuminate.
2. A water pan is provided in the base of the cabinet to provide a
small amount of passive humidity, if desired. Fill pan with clean
warm water. Check water level every 2 hours and refill as
needed. This step is optional; cabinet be also be operated
without water in the pan.
3. To adjust the temperature setting, rotate the HEAT dial clockwise to increase temperature and counter-clockwise to decrease
temperature to the desired set point. Temperature dial settings
range from 1 to 10, with 1 being the lowest temperature and 10
being the highest temperature. HEAT cycle light will turn on and
off as the heat thermostat cycles.
4. Wait approximately 25 minutes for the cabinet to preheat. Digital
readout dial on right side of control panel will display actual
cabinet temperature*.
5. Load food pans into cabinet. NOTE: Follow all food safety guidelines. Put hot, cooked food into the cabinet. This cabinet is not
intended to reheat food. Food must be cooked and at safe serving temperature prior to being placed in the cabinet.
6. When removing items, start at the bottom and work up. This will
keep food hotter and eliminate spillage onto lower items.
10
Page 11
NORMAL OPERATION—HL2 & HL4 HW HEATER PROOFERS
CAUTION:
HOT SURFACE
Inner and outer surfaces of
the unit will be very hot during and after operation.
Avoid touching the cabinet
when loading or removing
product.
Operating ranges:
- air temp: 90ºF-190ºF
(32°C to 88°C)
- humidity: 0-90%RH
Water reservoir:
When using the water reservoir for humidified holding or
proofing, check water level
every 2 hours and refill if
needed.
CAUTION:
WATER HAZARD
A water trough is located at
the base of the cabinet to
collect and direct condensation into black plastic condensation pan below. Make
sure to periodically check
and empty the pan to avoid
overflow & slip hazard.
*For food safety reasons,
we recommend that the
holding temperature
should be set at or above
140°F (60°C).
FIRST USE
Before using the cabinet, familiarize yourself with the heater controls. See page 9 for details. Plug the cabinet into a proven power
source. See electrical specifications on page 8.
HOLDING
1. If humidity is desired, a water pan is located at the bottom of the
cabinet. This pan will provide active humidification up to 90%RH
(depending on temperature). Fill water pan with clean warm
water. NOTE: Cabinet may also be operated without water.
2. Turn the cabinet on using the power switch located on the far left
side of the control panel. Once the switch is turned on, the
power indicator light will illuminate.
3. To adjust the temperature setting, rotate the HEAT dial clockwise to increase temperature and counter-clockwise to decrease
temperature to the desired set point. Temperature dial settings
range from 1 to 10, with 1 being the lowest temperature and 10
being the highest temperature.
4. To adjust humidity, rotate the humidity dial clockwise to
increase humidity and counter-clockwise to decrease humidity.
If humidity is not required, rotate dial counter-clockwise to the off
position (line up dot on knob with white hash mark on control
panel).
5. Wait approximately 25 minutes for the cabinet to preheat. Digital
readout dial on right side of control panel will display actual
cabinet temperature*.
6. Load food pans into cabinet. NOTE: Follow all food safety guide-
lines. Put hot, cooked food into the cabinet. This cabinet is not
intended to reheat food. Food must be cooked and at safe
serving temperature prior to being placed in the cabinet.
7. When removing items, start at the bottom and work up. This will
keep food hotter and eliminate spillage onto lower items.
PROOFING
1. Follow instructions above for holding. Note: water pan at base
of cabinet must be filled with clean warm water.
2. For proofing settings, rotate HEAT knob clockwise to 5 to 6
(approximately 90°F to 100°F; 32° to 38°C) and rotate HUMIDITY knob clockwise to 10 (90%+ RH).
3. Allow cabinet to preheat for approximately 25 minutes and load
food according to the instructions above.
11
Page 12

FOOD HOLDING GUIDE
CAUTION: SAFE
FOOD HOLDING
PRACTICES
RECOMMENDED
Cooking food to a safe temperature, holding at a temperature of at least 140°F
(60°C) is critical in the prevention of foodborne illness.
Hold only cooked, hot food
at 140°F (60°C) or higher.
This cabinet is not intended
to cook or reheat food.
Food must be at appropriate temperature before being placed into cabinet.
COOK TO AT LEAST
165°F (74°C) Destruc-
165°F
140°F
41°F
NOTE: Times and temperatures
observed in a test kitchen environment. Times and temperatures
may vary, depending on initial food
quality, initial cooked temperature
and user expectations of acceptable food quality.
tion of most bacteria
HOLD at 140°F (60°C) or
higher
DANGER ZONE: 41°F
to 140°F (5° to 60°C)
Bacteria grow
rapidly
PRODUCT SET TEMPERATURE
Bacon, Canadian 180°F / 82°C 30
Bacon, Crisp (uncovered) 180°F / 82°C 30
Baked Potato 180°F / 82°C 60
Biscuits 170°F / 77°C 60
Casseroles 175°F / 79°C 90
Chops, Sliced Meats 160°F / 71°C 60
Chicken, Fried (uncovered) 170°F / 77°C 30
Chicken, Boneless Breasts 175°F / 79°C 60
Chicken Nuggets, Deep Fried (uncovered) 190°F / 88°C 25
Chicken, Pre-Cooked Grilled Boneless Patties 150°F / 66°C 90
Coffee Cakes (uncovered) 170°F / 77°C 60
Cookies (uncovered) 175°F / 79°C 90
Crab Legs 160°F / 71°C 45
Croissants 170°F / 77°C 45
Eggs 160°F / 71°C 45
Fish, Deep-Fried (uncovered) 170°F / 77°C 30
Fish, Baked 155°F / 68°C 45
Fish, Broiled 155°F / 68°C 45
French Toast 165°F / 74°C 60
Gravies / Sauces 170°F / 77°C 45
Hamburgers / Ground Meat Patties 180°F / 82°C 45
Hot Dogs 180°F / 82°C 90
Muffins 170°F / 77°C 60
Omelets 160°F / 71°C 30
Pancakes 180°F / 82°C 30
Pasta 175°F / 79°C 60
Pastries 165°F / 74°C 30
Pizza (uncovered) 180°F / 82°C 15
Pizza (boxed) 180°F / 82°C 60
Poppers, Deep Fried (uncovered) 190°F / 88°C 25
Poultry, Whole, bone-in 175°F / 79°C 60
Poultry, Cut-up, bone-in 175°F / 79°C 60
Ribs 175°F / 79°C 90
Rice 175°F / 79°C 30
Roasts / Bone-in Meats 165°F / 74°C 90
Sausage 180°F / 82°C 90
Shrimp / Shellfish 150°F / 66°C 60
Soups (broth) 185°F / 85°C 90
Tortillas (soft) 180°F / 82°C 60
Vegetables 175°F / 79°C 45
(°F /°C)
MAXIMUM TIME
(MINUTES)
12
Page 13

DAILY CLEANING PROCEDURES
CAUTION:
ELECTRIC SHOCK
HAZARD
Disconnect appliance from
electric power before cleaning.
CAUTION:
HOT SURFACE
Exposed surfaces can
be hot to the touch and may
cause burns. Allow appliance
to cool before cleaning.
IMPORTANT:
DO NOT spill or pour
water into controls,
control panel or wiring.
Water damage is not covered
by warranty.
CAUTION:
Beware of sharp edges with sheet metal
during cleaning process.
1. After all food products have been removed from the cabinet,
turn the power switch to “OFF” and allow the cabinet to cool
completely.
2. Unplug the unit prior to any cleaning.
3. Remove the rack assemblies.
4. Make sure the power cord is not hooked into the cord hook.
Open cabinet door and empty water reservoir. Remove the
heater module by lifting up the front enough to clear its detent,
and then pull the module out of the cabinet. The power cord
will slide through the access hole at the rear of the cabinet.
5. Inspect and clean the areas where there are vents or filters,
making sure no water gets into the internal controls or
electrical areas of the cabinet.
6. Clean the inside of the cabinet as well as the removed parts.
Reinstall when all parts are dry and clean. Empty and clean
black plastic condensation pan.
7. A solution of two tablespoons of baking soda per quart of
warm water is sufficient for most cleaning jobs. Mild soap or
detergent may be used on heavily soiled interiors—follow
manufacturer’s directions.
8. If cabinet has a clear glass door, clean with window cleaner,
taking care not to get any of the solution on the aluminum cabinet walls. Stubborn deposits may be cleaned with a mild
soap and water and then rinsed with clean water. Use a soft,
non-abrasive cloth to avoid scratching the door.
9. Control panel should be washed with a clean, damp, nonabrasive cloth and chlorine-free detergent. Rinse thoroughly
with clean damp cloth and allow to dry. Do not use abrasive
cleaners, waxes, car polish, or substances containing strong
aromatic solvents or alcohol. If the control knob(s) need to be
removed for cleaning, simply pull the knob out, clean the control panel and knob, and then replace the knob.
CAUTION:
Do not use strong detergents, alkalis, ammonia solutions or
abrasive cleaners. Use only cleaning agents approved for aluminum and only in the recommended manufacturer’s concentration. Do
not use steel wool pads—ferrous deposits will cause rusting.
Use of cleaning agents that are not recommended for aluminum may
cause permanent damage to the cabinet. THIS DAMAGE IS PERMA-
NENT, COSTLY TO REPAIR AND IS NOT COVERED BY THE
WARRANTY.
13
Page 14

CABINET MAINTENANCE
WARNING:
DO NOT perform
these procedures
while the cabinet is turned on
or heated. Turn off the power
and wait for the cabinet to cool
to room temperature.
CAUTION:
Do not move cabinet
unless door is securely closed. Serious damage to
hinges and door may result if
bumped into tables, walls, or
other equipment when the
doors are open.
CASTERS
Some cabinets may have caster bearings that are equipped with
Zerk grease fittings so that they may be easily lubricated with a
grease gun. Lubricate bearings at least once every six months.
HINGE MAINTENANCE
Make sure all joints remain sealed and door latches do not stick. If
necessary, use WD-40 to keep door latches from sticking. Do not
use oil.
REVERSING THE DOOR
Reversing the door takes about 30 minutes & requires two people.
1. Using a small screwdriver, pry off the hinge covers and set
aside. Removing the covers will allow access to the inside
hinge screws. Remove the three screws that hold each hinge
to the cabinet. DO NOT REMOVE THE SCREWS THAT
HOLD THE HINGES TO THE DOOR. Remove the door, taking care not to let it fall.
2. Remove the door strike plate and screws adjacent to the door
opening on the cabinet. Reinstall door strike plate and screws
on opposite side of the cabinet.
3. Screw hinges onto opposite side of the door.
4. With the help of another person, hold door up to the cabinet
and attach with the screws removed in step one. Before tightening the screws, be sure the door is flush, level and square.
Replace the hinge covers.
14
Page 15

WIRING DIAGRAMS
HL1 & HL3 HB SERIES
Standard US Electric: 120 VOLT, 1800 WATT, 15AMP, 1 PH, 60 HZ
International Electric: 220 VOLT, 1800 WATT, 8.2AM P , 1 PH, 50/60 HZ
HL2 & HL4 HW SERIES
Standard US Electric: 120 VOLT, 2100 WATT, 17.5 AMP, 1 PH
International Electric: 220 VOLT, 2100 WATT, 9.5AM P , 1 PH, 50/60 HZ
15
Page 16

REPLACEMENT PARTS
Use only (OEM) original equipment manufacturer replacement parts. Using unauthorized parts may
cause serious injury or damage to the cabinet. Replacement parts should be installed by a qualified
service technician.
Contact Carter-Hoffmann with your model and serial number for replacement parts.
Call: 800-323-9793 or
Email: Service@Carter-Hoffmann.com
Part Number HL1 & HL Series Description
18600-0046 Hi limit—open at 300°F, close at 250°F
18602-0083 On/Off switch 20 Amp
18602-0031 Switch boot
18608-0010 Knob—heat
18605-0022 Power cord-8’
18606-0221 5-20P plug
18612-0131 Heat element 1700 watt, 120v (Standard US cabinets)
18613-0136 Heat element 1700 watt, 220v (International cabinets)
18616-0071 Transformer (Standard US cabinets)
18616-0074 Transformer (International 220v cabinets)
18614-0360 Fan motor
18614-0321 Fan motor blower wheel
18314-0019 1.8 qt. black condensation pan
18600-0017 Thermostat
18614-0322 Muffin fan
18616-0073 Digital thermometer
18616-0071 Transformer for digital thermometer
18601-1171 Red indicator light, power and heat
Part Number HL2 & HL4 Series Description
18600-0046 Hi limit—open at 300°F, close at 250°F
18602-0083 On/Off switch 20 Amp
18602-0031 Switch boot
18608-0010 Knob—heat or humidity
18605-0022 Power cord—8’
18606-0221 5-20P plug
18612-0131 Heat element 1700 watt, 120v (Standard US cabinets)
18613-0136 Heat element 1700 watt, 220v (International cabinets)
18612-0132 Water pan element 350 watt, 120v (Standard US cabinets)
18612-0137 Water pan element 350 watt, 220v (International cabinets)
18616-0071 Transformer (Standard US cabinets)
18616-0074 Transformer (International 220v cabinets)
18614-0322 Muffin fan
18614-0360 Fan motor
18614-0321 Fan motor blower wheel
18314-0019 1.8 qt. black condensation pan
18600-0017 Thermostat—heat element
18600-0016 Thermostat—humidity element
18616-0073 Digital thermometer
18616-0071 Transformer for digital thermometer
18601-1171 Red indicator light, power, heat & humidity
16
Page 17

TROUBLESHOOTING GUIDE
SYMPTOM POSSIBLE CAUSE SUGGESTED REMEDY
No power on display Not plugged in or circuit breaker
tripped
Power cord damaged Check - replace if required
Circuit breaker tripped Check circuit breaker
Power switch damaged or defective Check - replace if required
Food dries out too
quickly
Unit is on, motors
are running but no
heat
Takes too long to
get to temperature
Unit is hot
but low or no airflow
Operation where product temp is too
high; food pans should be covered
Control incorrectly set or defective Check proper operation or calibration
Internal wiring error
Element hi-limit trip / defective Call service technician
Improper voltage Call service technician to verify
Internal wiring error Call service technician
Circulation motor has quit Call service technician
Improper voltage Call service technician to verify
Check or reset circuit breaker
Connect to proper receptacle
Check product temps going into
holding cabinet; cover food pans
of control
Call service technician
incoming voltage matches cabinet
specifications.
incoming voltage matches cabinet
specifications.
NOTE:
The technical content of this manual,
including any wiring diagrams, schematics, parts breakdown illustrations and /
or adjustment procedures, is intended
NOTE:
For warranty service, call Carter-Hoffmann
direct at 800-323-9793 for authorization,
we will dispatch the nearest authorized
service agency.
for use ONLY by qualified technical
personnel
.
17
Page 18

3-YEAR WARRANTY on HOTLOGIX HOLDING CABINETS
Carter-Hoffmann Warranty:
Carter-Hoffmann (“CARTER-HOFFMANN”) warrants to the initial purchaser of its standard Carter
Line Products that CARTER-HOFFMANN will, at its option, repair or replace, during the warranty
period set forth below, any part of such products made necessary due to a defect in material or workmanship which is present when the product leaves its factory and which manifests itself d ur ing th e warranty period under normal use and service.
This warranty applies only to original equipment owned and possessed by the initial purchaser and the
warranty period begins on the date of original shipment from the CARTER-HOFFMANN factory and
extends as follows: to component parts and labor for 12 months (36 months on hotLOGIX holding
cabinets, levels HL3 through HL10, and cook & hold cabinets); to refrigeration compressor unit for
one year (limited to replacement only - not to include labor for removal, repair or replacement).
Repair or replacements under this warranty will be performed, unless otherwise authorized in writing
by CARTER-HOFFMANN, at its factory. All parts or components to be repaired or replaced under this
warranty are to be shipped prepaid to CARTER-HOFFMANN, with reimbursement credit for such part
or component to be given if found by CARTER-HOFFMANN to be defective.
CARTER-HOFFMANN neither makes nor assumes and does not authorize any other person to make or
assume any obligation or liability in connection with its pro ducts other than that covered in this warranty. This warranty applies only within the continental United States and Canada. In Alaska and Hawaii, this warranty applies only to and is limited to the supply of replacement parts.
Warranty Exclusions and Limitations:
Any implied warranty of merchantability or fitness for a particular purpose is hereby specifically dis-
claimed by CARTER-HOFFMANN. There are no warranties, expressed or implied, which extend be-
yond the description on the face hereof. This warranty does not cover and CARTER-HOFFMANN shall
not under any circumstances be liable for any incidental, consequential or other damages (such as in-
jury to persons or property, loss of time, inconvenience, loss of business or profits, or other matters not
specifically covered) arising in connection with the use of, inability to use, or failure of these products.
Specifications subject to change through product improvement and innovation.
Carter-Hoffmann
1551 McCormick Ave.
Mundelein, Illinois, 60060 USA
Phone: 847-362-5500 Toll free: 800-323-9793 Fax: 847-367-8981
Sales and Marketing E-mail: sales@carter-hoffmann.com
Service E-mail: technicalservice@carter-hoffmann.com
Company Website: www.carter-hoffmann.com
18
Page 19

CABINETS RÉCHAUDS & RÉCHAUDS ÉTUVES EN ALUMINIUM
Séries HL1, HL2, HL3 & HL4
MANUEL D’INSTRUCTION
HL2-18
MODÈLES:
HL1 CABINETS
RÉCHAUDS
(non isolés)
Modèles: HL1-5,
HL1-8, HL1-14 &
HL1-18
Anciens modèles:
HBU5A2GM
HBU8A2GM
HBU14A2GM
HBU18A2GM
HBC10A2GM
HBC16A2GM
HBC28A2GM
HBC36A2GM
HBF5A2GM
HBF8A2GM
HBF14A2GM
HBF18A2GM
Courriel: technicalservice@carter-hoffmann.com
MODÈLES:
HL2 RÉCHAUDS/
ÉTUVES
(non isolés)
Modèles: HL2-5,
HL2-8, HL2-14 &
HL2-18
Anciens modèles:
HWU5A2GM
HWU8A2GM
HWU14A2GM
HWU18A2GM
HWC10A2GM
HWC16A2GM
HWC28A2GM
HWC36A2GM
HWF5A2GM
HWF8A2GM
HWF14A2GM
HWF18A2GM
FABRIQUÉ PAR:
CARTER-HOFFMANN
1551 McCormick Avenue
Mundelein, IL 60060 U.S.A.
Téléphone: 847-362-5500
Fax: 847-367-8981
Sans-frais: 800-323-9793
HL3 CABINETS
Modèles: HL3-5,
HL3-8, HL3-14,
Anciens modèles:
HBU5A1GM
HBU8A1GM
HBU14A1GM
HBU18A1GM
HBC10A1GM
HBC16A1GM
HBC28A1GM
HBC36A1GM
HBF5A1GM
HBF8A1GM
HBF14A1GM
HBF18A1GM
MODÈLES:
HL4 RÉCHAUDS/
RÉCHAUDS
(isolés)
HL3-18
Anciens modèles:
HWU5A1GM
HWU8A1GM
HWU14A1GM
HWU18A1GM
HWC10A1GM
HWC16A1GM
HWC28A1GM
HWC36A1GM
HWF5A1GM
HWF8A1GM
HWF14A1GM
HWF18A1GM
MODÈLES:
ÉTUVES
(isolés)
Modèles: HL4-5,
HL4-8, HL4-14,
HL4-18
TABLE DES MATIÈRES
MESURES DE SÉCURITÉ……………………………..…………………….. 20
CARACTÉRISTIQUES ET SPÉCIFICATIONS..…………..……………….. 21-24
RÉCEPTION, INSPECTION & DOMMAGES DUS AU TRANSPORT…... 25
INSTALLATION & DÉMARRAGE …………………….……………………. 26
DÉTAILS: CONTRÔLES ET RÉSERVOIRS D’EAU………..……………… 27
OPÉRATION: HL1 & HL3 CABINETS RÉCHAUDS…………….……........ 28
OPÉRATION: HL2 & HL4 RÉCHAUDS/ÉTUVES …………………..…...... 29
GUIDE DE CONSERVATION DES ALIMENTS DANS UN RÉCHAUD.... 30
PROCÉDURES DE NETTOYAGE QUOTIDIEN...…..……...…………...… 31
ENTRETIEN…………….……………………………………………...…….... 32
SCHÉMA ÉLECTRIQUE...………………………………………………….… 33
PIÈCES ET COMPOSANTES……………………………………………...... 34
GUIDE DE DÉPANNAGE………..……………………………………........... 35
GARANTIE……….……………….…………………….…………………….... 36
Numéro: 18400-3130e Imprimé aux États-Unis d’Amérique Rev: KBA090413
Page 20

MESURES DE SÉCURITÉ
AVERTISSEMENT: RISQUE D’ÉLECTROCUTION
WARNING
Tous les manipulations/ajustements nécessitants l'accès à des composante s électriques non isolées doivent être effectués par un professionnel qualifié. Le nonrespect de cet avertissement peut entraîner un choc électrique sévère.
ATTENTION: RISQUE D’ÉLECTROCUTION
Débranchez cet appareil de l'alimentation électrique avant toute opération de
maintenance ou de service.
ATTENTION: RISQUE DE BRÛLURE
Les surfaces métalliques exposées peuvent être chaudes au toucher et peuvent
causer des brûlures.
CONSIGNES DE SÉCURITÉ IMPORTANTES
Lorsque vous utilisez des appareils électriques, des précautions élémentaires doivent être observées, y com-
pris ce qui suit:
1) Familiarisez-vous avec l'utilisation de l'appareil, les limitations et restrictions qui s'y rattachent. Les
instructions de fonctionnement doivent être lues et comprises par toutes les personnes qui utilisent ou
installent cet appareil.
2) Cet appareil doit être mis à la terre. Raccordez l'appareil uniquement à une prise correctement mise à
la terre.
3) Utilisez cet appareil uniquement pour l'usage prévu, comme décrit dans le manuel.
a. Cet équipement est spécialement conçu pour maintenir des aliments précuits à une
certaine température.
b. Cet équipement est destiné à être utilisé dans des établissements commerciaux seulement.
c. Cet équipement n'est pas conçu pour un usage industriel ou de laboratoire.
4) La propreté de cet appareil et de ses accessoires est indispensable à une bonne salubrité.
5) NE PAS immerger l'appareil dans l'eau. Cet appareil n'est pas étanche. NE PAS diriger de jet d’eau ou
câblage. NE PAS utiliser de produits corrosifs dans cet appareil.
6) NE PAS entreposer cet appareil à l'extérieur. NE PAS utiliser ce produit près de l'eau - par exemple,
7) NE PAS utiliser cet appareil si le cordon ou la fiche est endommagé, s'il ne fonctionne pas correcte-
8) NE PAS couvrir ni obstruer les ouvertures de l'appareil.
9) Seul un professionnel qualifié doit réparer cet appareil.
de vapeur en direction de l’appareil, ou du panneau de commande ou le câblage. NE PAS
éclabousser ou verser de l'eau sur, dans ou au-dessus de tout contrôle, panneau de contrôle ou le
près d'un évier, dans un sous-sol humide ou près d'une piscine, etc.
ment ou s'il a été endommagé ou est tombé. Ne pas immerger le cordon ou la fiche dans l'eau, garder
le cordon éloigné des surfaces chaudes, et ne laissez pas le cordon pendre de la table ou du comptoir.
NOTE: Le contenu technique de ce manuel, y compris les schémas électriques, schémas, illustrations, pro-
cédures d'ajustement, est destiné à être utilisé par un profession nel qualifié et sont sujets à modific ation sans
préavis.
20
Page 21

HL1 CABINET RÉCHAUD NON ISOLÉ CARACTÉRISTIQUES & SPÉCIFICATIONS
HL1 Caractéristiques et avantages
Système de chauffage de précision au bas de l’appareil. Offre une chaleur constante et une récupération rapide
Contrôle électromécanique de la température. Thermomètre digital. Atteint des températures de 90° à 190°F
Quatre dimensions disponibles avec supports universels ajustables, fixes ou à angles
Roulettes pivotantes, roulettes avant équipées de freins
Porte vitrée dans un cadre robuste en aluminium extrudé réversible. Porte pleine en aluminium anodisé noire en
option
Supports universels fixes pour plaques de 18”x26” et bacs 12”x20”x2.5”
Cabinets avec Supports Universels Ajustables, Universels Fixes ou à Angles
Modèle
Capacité
bacs/plaques*
12”x20” 18”x26”
Supports
inclus
(paire)
Dimensions extérieures
Hauteur Profondeur Largeur
pouce
des roues
(mm)
HL1-5
(sous le comptoir)
HL1-8
(1/2)
HL1-14
(3/4)
HL1-18
(pleine grandeur)
10 5 5 31-1/16 29-1/2 24-11/16
(789) (749) (627)
16 8 8 40-1/16 29-1/2 24-11/16
(1018) (749) (627)
28 14 14 58-1/16 29-1/2 24-11/16
(1474) (749) (627)
36 18 18 70-1/16 29-1/2 24-11/16
(1780) (749) (627)
Diamètre
pouce
(mm)
5
(127)
5
(127)
5
(127)
5
(127)
Poids
d’expédition
(classe 100)
lbs (kgs)
99
(45)
137
(62)
155
(70)
198
(90)
* Espace fixe de 3”
LISTÉS:
3174974
Système électrique
Monophasé
Conformes à UL Std 197
certifiés CAN/CSA Std
C22.2 No. 109
NEMA
3174974
Conformes à
NSF/ANSI
Std 4
Voltage international:
220 volts, 1800 watts, 8.2
Amps, 50 Hz, monophasé,
fiche respectant les exigences / normes du pays
spécifié
21
Voltage canadien:
120v, 1400 watts,
12Amps, NEMA 5-15P
Page 22

HL2 RÉCHAUD/ÉTUVE NON ISOLÉ EN ALUMINIUM CARACTÉRISTIQUES & SPÉCIFICATIONS
HL2 Caractéristiques et avantages
Système de chauffage de précision au bas de l’appareil. Offre une chaleur constante et une récupération
rapide
Contrôle électromécanique de la température et de l’humidité. Thermomètre digital. Atteint des températures
de 90° à 190°F
Peut être utilisé avec ou sans humidité en mode réchaud et en mode étuve
Quatre dimensions disponibles avec supports universels ajustables, fixes ou à angles
Roulettes pivotantes, roulettes avant équipées de freins
Porte vitrée dans un cadre robuste en aluminium extrudé réversible. Porte pleine en aluminium anodisé noire
en option
Supports universels fixes pour plaques de 18”x26” et bacs 12”x20”x2.5”
Cabinets avec Supports Universels Ajustables, Universels Fixes ou à Angles
Modèle
Capacité
bacs/plaques*
12”x20” 18”x26”
Supports
inclus
(paire)
Dimensions extérieures
Hauteur Profondeur Largeur
pouce
(mm)
Diamètre
des roues
pouce
(mm)
Poids
d’expédition
(classe 100)
lbs (kgs)
HL2-5
(sous le comptoir)
HL2-8
(1/2)
HL2-14
(3/4)
HL2-18
(pleine grandeur)
* Espace fixe de 3”
LISTÉS:
3174974
10 5 5 31-1/16 29-1/2 24-11/16
(789) (749) (627)
16 8 8 40-1/16 29-1/2 24-11/16
(1018) (749) (627)
28 14 14 58-1/16 29-1/2 24-11/16
(1474) (749) (627)
36 18 18 70-1/16 29-1/2 24-11/16
(1780) (749) (627)
Conformes à UL Std 197
certifiés CAN/CSA Std
C22.2 No. 109
3174974
Conformes à
NSF/ANSI
Std 4
5
(127)
5
(127)
5
(127)
5
(127)
99
(45)
137
(62)
155
(70)
198
(90)
Système électrique
NEMA
Monophasé
Voltage international:
220 volts, 2100 watts, 9.5
Amps, 50 Hz, monophasé,
fiche respectant les exigences / normes du pays
spécifié
22
Voltage canadien: 120v,
1400 watts, 12Amps,
NEMA 5-15P
Page 23

HL3 CABINET RÉCHAUD ISOLÉ EN ALUMINIUM CARACTÉRISTIQUES & SPÉCIFICATIONS
HL3 Caractéristiques et avantages
Système de chauffage de précision au bas de l’appareil. Offre une chaleur constante et une récupé-
ration rapide
Contrôle électromécanique de la température. Thermomètre digital. Atteint des températures de 90°
à 190°F
Quatre dimensions disponibles avec supports universels ajustables, fixes ou à angles
Roulettes pivotantes, roulettes avant équipées de freins
Porte vitrée dans un cadre robuste en aluminium extrudé réversible. Porte pleine en aluminium
anodisé noire en option
Supports universels fixes pour plaques de 18”x26” et bacs 12”x20”x2.5”
Cabinets avec Supports Universels Ajustables, Universels Fixes ou à Angles
Modèle
Capacité
bacs/plaques*
12”x20” 18”x26”
Supports
inclus
(paire)
Dimensions extérieures
Hauteur Profondeur Largeur
pouce
(mm)
Diamètre
des roues
pouce
(mm)
Poids
d’expédition
(classe 100)
lbs (kgs)
HL3-5
(sous le comptoir)
HL3-8
(1/2)
HL3-14
(3/4)
HL3-18
(pleine grandeur)
* Espace fixe de 3”
LISTÉS:
3174974
Système électrique
NEMA
Monophasé
10 5 5 31-5/8 31-1/2 26-1/2
(803) (800) (673)
16 8 8 40-5/8 31-1/2 26-1/2
(1032) (800) (673)
28 14 14 58-5/8 31-1/2 26-1/2
(1489) (800) (673)
36 18 18 70-5/8 31-1/2 26-1/2
(1794) (800) (673)
Conformes à UL Std 197
certifiés CAN/CSA Std
C22.2 No. 109
3174974
Conformes à
NSF/ANSI
Std 4
Voltage international:
220 volts, 1800 watts,
8.2 Amps, 50 Hz, monophasé, fiche respectant les exigences /
normes du pays spéci-
Voltage canadien: 120v,
1400 watts, 12Amps,
NEMA 5-15P
5
(127)
5
(127)
5
(127)
5
(127)
104
(47)
147
(67)
170
(77)
218
(99)
23
Page 24

HL4 RÉCHAUD/ÉTUVE ISOLÉ EN ALUMINIUM CARACTÉRISTIQUES & SPÉCIFICATIONS
HL4 Caractéristiques et avantages
Système de chauffage de précision au bas de l’appareil. Offre une chaleur constante et une récupération
rapide
Contrôle électromécanique de la température et de l’humidité. Thermomètre digital. Atteint des tempéra-
tures de 90° à 190°F
Peut être utilisé avec ou sans humidité en mode réchaud et en mode étuve
Quatre dimensions disponibles avec supports universels ajustables, fixes ou à angles
Roulettes pivotantes, roulettes avant équipées de freins
Porte vitrée dans un cadre robuste en aluminium extrudé réversible. Porte pleine en aluminium en op-
tion.
Supports universels fixes pour plaques de 18”x26” et bacs 12”x20”x2.5”
Cabinets avec Supports Universels Ajustables, Universels Fixes ou à Angles
Modèle
Capacité
bacs/plaques*
12”x20” 18”x26”
Supports
inclus
(paire)
Dimensions extérieures
Hauteur Profondeur Largeur
pouce
(mm)
Diamètre
des roues
pouce
(mm)
Poids
d’expédition
(classe 100)
lbs (kgs)
HL4-5
(sous le comptoir)
HL4-8
(1/2)
HL4-14
(3/4)
HL4-18
(pleine grandeur)
* Espace fixe de 3”
LISTÉS:
3174974
Système électrique
NEMA
Monophasé
10 5 5 31-5/8 31-1/2 26-1/2
(803) (800) (673)
16 8 8 40-5/8 31-1/2 26-1/2
(1032) (800) (673)
28 14 14 58-5/8 31-1/2 26-1/2
(1489) (800) (673)
36 18 18 70-5/8 31-1/2 26-1/2
(1794) (800) (673)
Conformes à UL Std 197
certifiés CAN/CSA Std
C22.2 No. 109
3174974
Conformes à
NSF/ANSI
Std 4
Voltage international:
220 volts, 2100 watts,
9.5 Amps, 50 Hz, monophasé, fiche respectant les exigences /
normes du pays spéci-
Voltage canadien: 120v,
1400 watts, 12Amps,
NEMA 5-15P
5
(127)
5
(127)
5
(127)
5
(127)
104
(47)
147
(67)
170
(77)
218
(99)
24
Page 25

DÉBALLAGE ET INSPECTION
Cet appareil
doit être
nettoyé à fond
avant de l’utiliser.
Voir PROCÉDURES DE
NETTOYAGE dans ce
manuel.
NOTE: NE PAS jeter le
carton ou autres matériaux d'emballage avant
d'avoir vérifié si l'appareil
comporte des dommages
cachés et d’avoir vérifier
le bon fonctionnement de
celui-ci.
1. Retirez le carton d'emballage, assurez-vous que tous les matériaux d'emballage et de protection en plastique ont été retirés de
l'appareil.
2. Inspectez toutes les composantes.
3. En cas de dommages dus au transport, une demande de réclamation doit être déposée immédiatement auprès du transporteur.
4. Les dommages dus au transport ne sont pas couverts par la
garantie.
5. Vérifiez afin de vous assurer que toutes les composantes sont
incluses: cabinet, manuel d’instruction et autres accessoires.
6. Lisez les instructions de fonctionnement.
7. L’appareil doit être nettoyé à fond avant de l'utiliser. Voir PROCÉDURES DE NETTOYAGE dans ce manuel.
Si votre appareil a été
endommagé durant le
transport, reportez-vous à
la PROCÉDURE DE RÉCLAMATION au bas de
cette page.
PROCÉDURE DE RÉCLAMATION POUR COLIS ENDOMMAGÉ
NOTE: Pour votre protection, notez que l'équipement dans cette expédition a été minutieusement
inspecté et emballé par un professionnel qualifié avant de quitter l'usine. Sur acceptation de cette
expédition, la compagnie de transport assume l'entière responsabilité de sa livraison en bon état.
SI LE COLIS EST ENDOMMAGÉ:
1. PERTE OU DOMMAGES VISIBLES: Notez les pertes ou dommages sur le bon de transport ou
le reçu, et faites signer le livreur.
2. COMPLÉTEZ LE FORMULAIRE DE RÉCLAMATION IMMÉDIATEMENT: Quelle que soit
l'ampleur des dégâts, contactez immédiatement votre vendeur.
3. DOMMAGES CACHÉS: Si les dommages sont inaperçus jusqu'à ce que la marchandise soit
déballée, avisez la compagnie de transport ou le transporteur immédiatement, puis déposez
une réclamation avec eux. Cela devrait être fait dans les quinze (15) jours à compter de la d ate
de la réception du colis. Veillez à conserver l’emballage pour l'inspection.
Carter-Hoffmann ne peut pas assumer la responsabilité des dommages ou des pertes subies en
transit, les dégâts dus au transport ne sont pas couverts par la garantie. Nous allons, cependant, à
votre demande, vous fournir les documents nécessaires pour appuyer votre demande de réclamation.
25
Page 26

INSTALLATION & DÉMARRAGE
MISE EN GARDE:
Risque de blessures
L’installation doit être effectuée par
un technicien qualifié en pleine connaissance de tous les codes électriques en vigueurs. Une mauvaise
installation pourrait entraîner des
blessures et des dommages matériels.
IMPORTANT:
Le cordon d'alimentation
est d’une longueur de 8’
Si nécessaire, contactez un électricien agréé pour installer un circuit
électrique de 20 ampères et la prise
NEMA appropriée.
NE PAS utiliser de rallonge.
ATTENTION:
Risque d’électrocution
EMPLACEMENT
Pour un bon fonctionnement et une performance maximale,
localisez l'appareil dans une pièce ou la température ambiante est de 70ºF (21ºC).
Évitez de placer près d’une hotte ou dans une zone avec
beaucoup de courants d’air.
Pour une utilisation sécuritaire et une performance maximale,
placez l'unité à au moins 2 " du mur ou de matières combustibles.
L'unité doit être sur une surface plane et stable.
INSTRUCTIONS DE MISE À LA TERRE
Cet appareil est équipé d'un cordon muni d'un fil de mise à la terre
avec une fiche de mise à la terre qui doit être branchée dans une
prise de courant correctement installée et mise à la terre. Dans le
cas d'un court-circuit, la mise à la terre réduit le risque de choc électrique en fournissant un circuit de fuite au courant électrique.
AVERTISSEMENT- L'utilisation incorrecte de la mise à la terre
peut entraîner un risque d’électrocution. Consultez un électricien
qualifié ou un agent de service si les instructions de mise à la terre
ne sont pas complètement comprises ou s'il existe un doute quant à
savoir si l'appareil est correctement mis à la terre.
La mise à la terre du cordon d'alimentation fait partie d'un système
conçu pour vous protéger contre les
chocs électriques en cas de dommages internes.
NE PAS couper la grande broche
ronde ou forcer une lame pour
s'adapter à une prise existante.
IMPORTANT:
Pas sous garantie
Les dommages causés par une
connexion à une mauvaise tension
ou phase ne sont PAS couverts par
la garantie.
MISE EN GARDE:
Risque de blessures
Cet appareil n'est pas étanche, pour
éviter un choc électrique, gardez
l'unité au sec. Ne pas faire fonctionner si l'appareil a été en contact
avec de l'eau.
DÉMARRAGE
1. Avant utilisation, bien netto yer l'intérieur de l'appareil, conformément aux instructions de ce manuel. Familiarisez-vous avec les
commandes.
2. Branchez le cordon d'alimentation dans une prise mise à la
terre avec une tension électrique selon l'information fournie cidessous. NE PAS MODIFIER LE CORDON.
3. Réglez le commutateur POWER sur la position "ON".
4. Ne pas mettre de produit dans le cabinet. Permettre à la cha-
leur d’éliminer les huiles résiduelles qui peuvent adhérer au x
surfaces métalliques à l'intérieur. Une légère émission de fumée est courante pendant les premières heures de fonctionnement.
Système électrique
NEMA
monophasé
Modèles HL1 & HL3 Modèles HL2 & HL4
Système électrique
NEMA
monophasé
220 volt CE version internationale:
Séries HL1 & HL3: 1800 watts, 220
volts, 8.2 Amps, 50/60 Hz, monophasé
Séries HL2 & HL4: 2100 watts, 220
volts, 9.5 Amps, 50/60 Hz, monophasé
Fiche respectant les exigences /
normes du pays spécifié
Canada: 1400 watts, 120 volts, 12
Amps, monophasé, NEMA 5-15P
26
Page 27

DÉTAILS: CONTRÔLES ET RÉSERVOIRS D’EAU
Cabinets réchauds des séries HL1 & HL3
Élément chauffant en fonction
Interrupteur
MARCHE/ARRÊT
avec témoin lumineux
Réchauds/étuves des séries HL2 & HL4
Interrupteur
MARCHE/ARRÊT
avec témoin lumineux
BACS D’EAU
Contrôle de la chaleur. Niveau 1 (basse température) à 10
(haute température)
Élément chauffant
en fonction
Contrôle de la chaleur. Niveau 1
(basse température) à 10 (haute
température)
Thermomètre digital
Élément d’immersion en
fonction
Contrôle de l’humidité. Niveau 1
(faible taux d'humidité) à 10 (haut
taux d'humidité)
Bassin d’eau (remplissage manuel): vérifiez et remplissez
toutes les 2 heures si vous utilisez l’humidité
Thermomètre digital
Gouttière: récupère et dépose la condensation dans le
bac sous l’appareil
Bac de condensation: surveillez et videz régulièrement
27
Page 28

OPÉRATION—HL1 & HL3 HB CABINETS RÉCHAUDS
ATTENTION:
SURFACES
CHAUDES
Les surfaces intérieures et
extérieures de l'appareil
sont très chaudes pendant
et après l'utilisation.
Évitez de toucher à l'armoire lors du chargement
ou déchargement de produits.
Plage de température de
fonctionnement :
90ºF-190ºF
*Pour des raisons de sécurité alimentaire, il est
recommandé que le maintien de la température soit
fixée à 140°F (60°C) ou
plus.
PREMIÈRE UTILISATION
Avant d'utiliser l'appareil, familiarisez-vous avec les commandes de
température. Voir page 9 pour plus de détails. Branchez le boîtier
sur une source d'alimentation sûre. Voir les spécifications électriques à la page 8.
RÉCHAUD
1. Démarrez l’appareil en utilisant l'interrupteur d'alimentation situé
à l'extrême gauche du panneau de commande. Une fois que le
commutateur est activé, le voyant d'alimentation s'allume.
2. Un bassin d’eau est installé dans le fond de l’appareil pour fournir une petite quantité d'humidité passive, si on le souhaite.
Remplissez le bac avec de l'eau propre et chaude. Vérifiez le
niveau d'eau toutes les 2 heures et remplir si nécessaire. Cette
étape est facultative; le réchaud peut être également utilisé sans
eau dans le bassin.
3. Pour ajuster la température, tournez la molette dans le sens horaire pour augmenter la CHALEUR et dans le sens antihoraire
pour diminuer la température. Les paramètres de numérotation
varient de 1 à 10, 1 étant la température la plus basse et 10
étant la température la plus élevée. Un témoin lumineux s’allume lorsque l’élément chauffant est en fonction et s’éteint lorsque celui-ci à atteint la température.
4. Attendez environ 25 minutes pour le préchauffage. Le thermomètre numérique sur le côté droit du panneau de commande
affiche la température* réelle à l’intérieur de l’appareil.
5. Chargez les aliments dans le réchaud. REMARQUE: Suivez
toutes les consignes de sécurité alimentaire. Mettre des aliments chauds cuits dans l'appareil. Ce cabinet n'est pas destiné
à réchauffer les aliments. Les aliments doivent être cuits et à
une température sécuritaire avant d'être placé dans le réchaud.
6. Lorsque vous retirez des aliments, commencez par le bas et
travaillez vers le haut. Cela permet de garder la nourriture
chaude et d’éliminer les risque de déversements sur les articles
situés en-dessous.
28
Page 29

OPÉRATION—HL2 & HL4 HW RÉCHAUDS/ÉTUVES
ATTENTION:
SURFACES
CHAUDES
Les surfaces intérieures et
extérieures de l'appareil
sont très chaudes pendant
et après l'utilisation.
Évitez de toucher à l'armoire lors du chargement
ou déchargement de pro-
Plage de fonctionnement:
- Température:
90ºF-190ºF (32°C to 88°C)
- Humidité: 0-90%RH
Bassin d’eau:
Lorsque vous utilisez le bassin d'eau, vérifiez le niveau
de l'eau toutes les 2 heures
et remplir si nécessaire.
ATTENTION:
RISQUES LIÉS À
L’EAU
Une gouttière est situé au
bas de l’appareil pour recueillir et diriger la condensation dans un bac en plastique noir. Assurez-vous de
vérifier périodiquement et de
vider le plat pour éviter un
débordement.
*Pour des raisons de sécurité alimentaire, il est recommandé que le maintien
de la température soit
fixée à 140°F (60°C) ou
plus.
PREMIÈRE UTILISATION
Avant d'utiliser l'appareil, familiarisez-vous avec les commandes de
température. Voir page 9 pour plus de détails. Branchez le boîtier
sur une source d'alimentation sûre. Voir les spécifications électriques à la page 8.
RÉCHAUD
1. Si l'humidité est souhaitée, un bac à eau est situé en bas de
l'appareil. Ce bac procure une humidification active jusqu'à 90%
HR (selon la température). Remplissez le bac avec de l'eau
propre et chaude. REMARQUE: Le cabinet peut également être
utilisé sans eau.
2. Démarrez l’appareil en utilisant l'interrupteur d'alimentation situé
à l'extrême gauche du panneau de commande. Une fois que le
commutateur est activé, le voyant d'alimentation s'allume.
3. Pour ajuster la température, tournez la molette dans le sens horaire pour augmenter la CHALEUR et dans le sens antihoraire
pour diminuer la température. Les paramètres de numérotation
varient de 1 à 10, 1 étant la température la plus basse et 10
étant la température la plus élevée. Un témoin lumineux s’allume lorsque l’élément chauffant est en fonction et s’éteint lorsque celui-ci à atteint la température.
4. Pour ajuster l'humidité, tournez la molette dans le sens horaire
pour augmenter l'humidité et antihoraire pour la diminuer. Si aucune humidité est nécessaire, laissez le cadran à ARRÊT.
5. Attendez environ 25 minutes pour le préchauffage. Le thermomètre numérique sur le côté droit du panneau de commande
affiche la température* réelle à l’intérieur de l’appareil.
6. Chargez les aliments dans le réchaud. REMARQUE: Suivez
toutes les consignes de sécurité alimentaire. Mettre des aliments chauds et cuits dans l'appareil. Ce cabinet n'est pas destiné à réchauffer les aliments. Ceux-ci doivent être cuits et à une
température sécuritaire avant d'être placé dans le réchaud.
7. Lorsque vous retirez des aliments, commencez par le bas et
travaillez vers le haut. Cela permet de garder la nourriture
chaude et d’éliminer les risque de déversements sur les articles
situés en-dessous.
ÉTUVE
1. Suivez les étapes ci-dessus. Remarque: le bassin d’eau doit
contenir de l'eau propre et chaude.
2. Pour étuver, ajuster la température à 5-6 (environ 90°F à 100°F,
32 °C à 38 °C) et l’humidité à 10 (90%+ RH).
3. Attendez environ 25 minutes pour le préchauffage.
29
Page 30

GUIDE DE CONSERVATION DES ALIMENTS DANS UN RÉCHAUD
ATTENTION:
BONNE CONSERVATION DES ALI-
MENTS RECOMMANDÉE
La cuisson des aliments à
une température sécuritaire
et le maintien à une température d'au moins 140°F
(60°C) est essentiel dans la
prévention des maladies
d'origine alimentaire. Ne
gardez que des aliments
cuits dans le réchaud. Ce
cabinet n'est pas destiné à
cuire ou réchauffer des aliments. Les aliments doivent
être à la température appropriée avant d'être placé
dans le réchaud.
RÉCHAUD à 140°F (60°C)
ou plus
165°F
140°F
41°F
NOTE: Les temps et les températures ont été observés dans un
environnement de cuisine d'essai.
Les temps et les températures
peuvent varier en fonction de la
qualité des aliments initiale, la température initiale et les attentes des
utilisateurs.
CUIRE AU MOINS À
ZONE DE DANGER:
41°F à 140°F (5°C
à 60°C) Les bacté-
ries se multiplient
rapidement
PRODUIT TEMPÉRATURE
Bacon, Canadien 180°F / 82°C 30
Bacon, Croustillant (à découvert) 180°F / 82°C 30
Pomme de terre cuite au four 180°F / 82°C 60
Biscuit de campagne 170°F / 77°C 60
Casseroles 175°F / 79°C 90
Côtelettes, viandes tranchées 160°F / 71°C 60
Poulet frit (à découvert) 170°F / 77°C 30
Poitrines de poulet désossées 175°F / 79°C 60
Croquettes de poulet (à découvert) 190°F / 88°C 25
Galettes de poulet précuites 150°F / 66°C 90
Gâteau pause-café (à découvert) 170°F / 77°C 60
Biscuits (à découvert) 175°F / 79°C 90
Pattes de crabe 160°F / 71°C 45
Croissants 170°F / 77°C 45
Oeuf 160°F / 71°C 45
Poisson frit (à découvert) 170°F / 77°C 30
Poisson cuit 155°F / 68°C 45
Poisson grillé 155°F / 68°C 45
Pain perdu 165°F / 74°C 60
Sauces 170°F / 77°C 45
Hamburgers / Galettes de viande hachée 180°F / 82°C 45
Hot Dogs 180°F / 82°C 90
Muffins 170°F / 77°C 60
Omelettes 160°F / 71°C 30
Crêpes 180°F / 82°C 30
Pâtes 175°F / 79°C 60
Pâtisserie 165°F / 74°C 30
Pizza (à découvert) 180°F / 82°C 15
Pizza (dans sa boîte) 180°F / 82°C 60
Piment jalapenos frit (à découvert) 190°F / 88°C 25
Poulet entier 175°F / 79°C 60
Poulet avec os (cuisse/poitrine) 175°F / 79°C 60
Côtes levées 175°F / 79°C 90
Riz 175°F / 79°C 30
Rôti / Viande avec os 165°F / 74°C 90
Saucisses 180°F / 82°C 90
Crevette / fruits de mer 150°F / 66°C 60
Soupes (bouillon) 185°F / 85°C 90
Tortillas (souple) 180°F / 82°C 60
Légumes 175°F / 79°C 45
(°F/°C)
TEMPS MAXIMUM
(MINUTES)
30
Page 31

PROCÉDURES DE NETTOYAGE QUOTIDIEN
ATTENTION:
RISQUE D’ÉLECTROCUTION
Coupez l 'alimentation électrique avant de nettoyer l’appareil.
ATTENTION:
SURFACE CHAUDE
Les surfaces peuvent
être chaudes et peuvent causer des brûlures. Laissez l’appareil refroidir avant de le nettoyer.
IMPORTANT:
NE PAS renverser ou
verser d'eau dans les
contrôles, panneau de contrôle
ou le câblage.
Les dommages causés par
l'eau ne sont pas couverts par
la garantie.
ATTENTION:
Méfiez-vous des
bords coupants pen-
dant le nettoyage .
1. Après que tous les produits alimentaires ont été retirés du réchaud, mettez l'interrupteur d'alimentation sur "ARRÊT" et laissez le cabinet refroidir complètement.
2. Débranchez l'appareil avant toute opération de nettoyage.
3. Retirez les supports.
4. Assurez-vous que le cordon d'alimentation n'est pas sur le
crochet. Ouvrez la porte du cabinet et videz le réservoir d'eau.
Retirez le module de chauffage en soulevant l'avant suffisamment pour dégager son cran, puis tirez le module hors de la
chambre. Le câble d'alimentation se glissera à travers le trou
d'accès à l'arrière du réchaud.
5. Inspectez et nettoyer les zones où il ya des évents ou des
filtres en veillant à ce que l’eau ne pénètre pas dans les contrôles internes ou les zones électriques.
6. Nettoyez l'intérieur du réchaud ainsi que les pièces démontées. Réinstallez lorsque toutes les pièces sont propres et
sèches. Videz et nettoyez le bac de condensation en plastique
noir.
7. Une solution de deux cuillères à soupe de bicarbonate de
soude par litre d'eau chaude est suffisant pour la plupart des
tâches de nettoyage. Du savon ou un détergent doux peut être
utilisé sur les endroits très sales: suivre les recommandations
du fabricant.
8. Si le réchaud a une porte en verre, nettoyez avec un nettoyant
pour fenêtre, en prenant soin de ne pas en mettre sur les parois en aluminium. Les dépôts tenaces peuvent être nettoyées
avec un savon doux et de l'eau, puis rincer à l'eau claire. Utilisez un chiffon doux, non abrasif pour éviter de rayer la porte.
9. Le panneau de contrôle doit être lavé avec un chiffon propre,
humide et non abrasif et un détergent non-chloré. Rincez soigneusement avec un chiffon propre humide et laissez sécher.
Ne pas utiliser de nettoyants abrasifs, de cires ou des substances contenant des solvants ou de l'alcool. Si les boutons de
commandes doivent être retirés pour le nettoyage, il suffit de
tirer la poignée, nettoyez le panneau de contrôle et le bouton,
puis replacez le bouton .
ATTENTION:
Ne pas utiliser de détergents forts, des alcalis, des solutions
d'ammoniac ou de nettoyants abrasifs. Utilisez uniquement des produits
de nettoyage approuvés pour l'aluminium. Ne pas utiliser de laine d'acier,
les dépôts ferreux provoqueront de la rouille.
L’utilisation d’agents de nettoyage qui ne sont pas recommandés pour
l'aluminium peut causer des dommages permanents à l'appareil. CES
DOMMAGES SONT PERMANENTS, COÛTEUX À RÉPARER
ET NE SONT PAS COUVERTS PAR LA GARANTIE.
31
Page 32

ENTRETIEN
AVERTISSEMENT:
NE PAS effectuer ces
procédures alors que
le réchaud est en marche.
Coupez l'alimentation et attendez que le cabinet refroidisse à
température ambiante.
ATTENTION:
Déplacez l’appareil
que si la porte est
bien fermée. Les
charnières et la porte peuvent
subir de graves dommages si
la porte est ouverte lors de la
manipulation du réchaud.
NON!
NON!
ROULETTES
Certains réchauds peuvent être équipés de roulettes av ec roulement à billes comprenant un raccord de graissage afin qu'il puisse
être facilement lubrifié avec un pistolet à graisse. Lubrifiez les roulements au moins une fois tous les six mois.
CHARNIÈRES
Assurez-vous que tous les joints sont scellées et que les charnières ne collent pas. Si nécessaire, utilisez du WD-40 pour empêcher les charnières de coller. Ne pas utiliser d'huile.
INVERSION DE LA PORTE
L’inversion de la porte prend environ 30 minutes et nécessite deux
personnes.
1. Avec un petit tournevis, retirez les couvercles de charnières et
mettre de côté. Le retrait des capots permettra l'accès aux vis
de la charnière à l'intérieur. Retirez les trois vis qui maintiennent chaque charnière au cabinet. NE PAS RETIRER les vis
qui retiennent les charnières à LA PORTE. Retirez la porte, en
prenant soin de ne pas la laisser tomber.
2. Retirez la plaque de gâche et les vis adjacentes à l'ouverture
de la porte du cabinet. Réinstallez la gâche de porte et les vis
sur le côté opposé de l'appareil.
3. Vissez les charnières du côté opposé de la porte.
4. Avec l'aide d'une autre personne, tenir la porte au cabinet et
fixez-la avec les vis retirées à l'étape un. Avant de serrer les
vis, assurez-vous que la porte est encastrée, au niveau et
d'équerre. Replacez les couvre-charnières.
32
Page 33

SCHÉMA ÉLECTRIQUE
SÉRIES HL1 & HL3 HB
Voltage américain: 120 VOLT, 1800 WATT, 15AMP, 1 PH, 60 HZ
Voltage international: 220 VOLT, 1800 WATT, 8.2AMP, 1 PH, 50/60 HZ
SÉRIES HL2 & HL4 HW
Voltage américain: 120 VOLT, 2100 WATT, 17.5 AMP, 1 PH
Voltage international: 220 VOLT, 2100 WATT, 9.5AMP, 1 PH, 50/60 HZ
33
Page 34

PIÈCES ET COMPOSANTES
Utilisez seulement des pièces d'origine du fabricant. L'utilisation de pièces non autorisées peut causer des blessures graves ou des dommages à l'appareil. Les pièces de rechange doivent être installés par un technicien qualifié.
Contactez Carter-Hoffmann avec le modèle et le numéro de série de votre appareil pour obtenir de s
pièces de rechange.
Téléphone: 800-323-9793
Courriel: Service@Carter-Hoffmann.com
Numéro de pièce Séries HL1 & HL Description
18600-0046 Thermostat limite haute température 300°F, arrêt à 250°F
18602-0083 Interrupteur Marche/Arrêt 20 Amp
18602-0031 Couvert d’interrupteur
18608-0010 Bouton - Chaleur
18605-0022 Cordon d’alimentation-8’
18606-0221 Fiche 5-20P
18612-0131 Élément 1700 watt, 120v (Américain)
18613-0136 Élément 1700 watt, 220v (International)
18616-0071 Transformateur (Américain)
18616-0074 Transformateur (International 220v)
18614-0360 Moteur du ventilateur
18614-0321 Ventilateur
18314-0019 Bac de condensation noir de 1.8 qt.
18600-0017 Thermostat
18614-0322 Ventilateur axial
18616-0073 Thermomètre digital
18616-0071 Transformateur pour thermomètre digital
18601-1171 Lampe témoin rouge
Numéro de pièce Séries HL2 & HL4 Description
18600-0046 Thermostat limite haute température 300°F, arrêt à 250°F
18602-0083 Interrupteur Marche/Arrêt 20 Amp
18602-0031 Couvert d’interrupteur
18608-0010 Bouton - Chaleur et Humidité
18605-0022 Cordon d’alimentation—8’
18606-0221 Fiche 5-20P
18612-0131 Élément 1700 watt, 120v (Américain)
18613-0136 Élément 1700 watt, 220v (International)
18612-0132 Élément immersion 350 watt, 120v (Américain)
18612-0137 Élément immersion 350 watt, 220v (International)
18616-0071 Transformateur (Américain)
18616-0074 Transformateur (International 220v)
18614-0322 Ventilateur axial
18614-0360 Moteur du ventilateur
18614-0321 Ventilateur
18314-0019 Bac de condensation noir de 1.8 qt.
18600-0017 Thermostat - chaleur
18600-0016 Thermostat - humidité
18616-0073 Thermomètre digital
18616-0071 Transformateur pour thermomètre digital
18601-1171 Lampe témoin rouge
34
Page 35

GUIDE DE DÉPANNAGE
PROBLÈME CAUSE POSSIBLE SOLUTIONS
Ne démarre pas L’appareil n’est pas branché Branchez l’appareil
Les aliments s’assèchent
L’appareil est sous
tension, les moteurs
sont en marche
mais pas de chaleur
Prend trop de temps
à atteindre la bonne
température
L’appareil est chaud
mais peu ou pas de
circulation d'air
Le cordon d’alimentation est endommagé
Le disjoncteur est déclenché Vérifiez le disjoncteur
L’interrupteur est défectueux Vérifiez - remplacez au besoin
La température des aliments est trop
élevée
Contrôles mal réglés ou défectueux Vérifiez la calibration de l’appareil
Erreur de câblage interne Appelez un agent de service
Éléments ou thermostat défectueux Appelez un agent de service
Mauvais voltage Appelez un agent de service pour
Erreur de câblage interne Appelez un agent de service
Le moteur du ventilateur ne fonctionne
plus
Mauvais voltage Appelez un agent de service pour
Vérifiez - remplacez au besoin
Vérifiez la température des aliments
avant de les mettre dans le réchaud;
couvrez les aliments
vérifier le voltage ainsi que les spécifications de l’appareil.
Appelez un agent de service
vérifier le voltage ainsi que les spécifications de l’appareil.
NOTE:
Le contenu technique de ce manuel, y
compris les schémas électriques, schémas, illustrations, procédures d'ajustement, est destiné à être utilisé par un
professionnel qualifié seulement.
NOTE:
Pour obtenir du service sous garantie, appelez Carter-Hoffmann au 800-323-9793
afin d’obtenir une autorisation. Nous enverrons l'agence de service la plus près.
35
Page 36

3 ANS DE GARANTIE sur LES RÉCHAUDS HOTLOGIX
Garantie Carter-Hoffmann:
Carter-Hoffmann ("CARTER-HOFFMANN") garantit à l'acheteur initial de ses produit que CARTERHOFFMANN pourra, à son choix, réparer ou remplacer, pendant la période de garantie indiquée cidessous, une partie de ces produits rendues nécessaires en raison d'un défaut de matériau ou de fabrication qui est présent lorsque le produit quitte son usine et qui se manifeste au cours de la période de
garantie sous des conditions d'utilisation et de service normales.
Cette garantie s'applique uniquement aux équipements d'origine appartenant et en la possession de
l'acheteur initial et la période de garantie commence à la date de livraison d'origine de l'usine CARTER-HOFFMANN et se détail comme suit: 12 mois sur les pièces et la main d'oeuvre (36 mois sur les
réchauds hotLOGIX (niveau HL3 à HL10), et les fours/réchauds), 1 an sur le compresseur de réfrigération (limitée au remplacement de la pièce seulement - ne pas inclure le travail pour l'enlèvement, la
réparation ou le remplacement).
La réparation ou le remplacement sous cette garantie sera effectué, sauf autorisation contraire par
écrit de CARTER-HOFFMANN, dans son usine. Toutes les pièces ou composantes devant être réparées
ou remplacées sous cette garantie doivent être expédiées port payé à CARTER-HOFFMANN, un crédit
de remboursement sera émis si la pièce est reconnue défectueuse par CARTER-HOFFMANN.
CARTER-HOFFMANN fait ni ne suppose et n’autorise aucune autre personne à faire et d'assumer
aucune obligation ou responsabilité en rapport avec ses produits autres que ceux couverts par cette
garantie. Cette garantie s'applique uniquement dans le territoire continental des États-Unis et au Canada. En Alaska et Hawaï, cette garantie se limite à la fourniture de pièces de rechange.
Exclusions et limitations de la garantie :
Toute garantie implicite de qualité marchande ou d'adéquation à un usage particulier est par la p ré-
sente expressément déclinée par CARTER-HOFFMANN. Il n'existe aucune garantie, expresse ou impli-
cite, qui s'étende au-delà de la description ci-dessus. Cette garantie ne couvre pas et CARTER-
HOFFMANN ne peut en aucun cas être tenue responsable des dommages accessoires, indirects ou
autres (tels que les blessures aux personnes ou aux biens, perte de temps, inconvénients, perte commer-
ciale ou de bénéfices, ou d'autres questions ne sont pas spécifiquement couverts) découlant en relation
avec l'utilisation ou l'impossibilité d'utiliser, ou de l'échec de ces produits.
Spécifications sujettes à modifications par l'amélioration des produits et l'innovation.
Carter-Hoffmann
1551 McCormick Ave.
Mundelein, Illinois, 60060 USA
Téléphone: 847-362-5500 Sans frais: 800-323-9793 Fax: 847-367-8981
Courriel Ventes & Marketing: sales@carter-hoffmann.com
Courriel Service: technicalservice@carter-hoffmann.com
Site web: www.carter-hoffmann.com
36
 Loading...