

Page 1
Carson Optical
35 Gilpin Avenue, Hauppauge, N.Y. 11788-4723
Toll-free: 1-800-967-8427
Phone 631-963-5000 | Fax 631-427-6749
info@carsonoptical.com
www.carsonoptical.com
zPix MM-740
Digital Microscope
Instruction Manual
Page 2

Table of Contents
Introduction
Introduction
Features
Minimum System Requirements
For Windows® based PC
For Mac OSX® based PC
Package Contents
Parts and Control Location
Operation
Initialize the product
Using the zPix
Windows
®
®
Taking a Picture
Recording a Video
Mac OS Based PC’s
Specications
Optical Specications
Power Ratings
Physical Property
Care and Storage
Warnings
1
1
2
2
2
3
4
5-7
5-7
8
8
8
9
10
11
11
11
11
12
13
Features
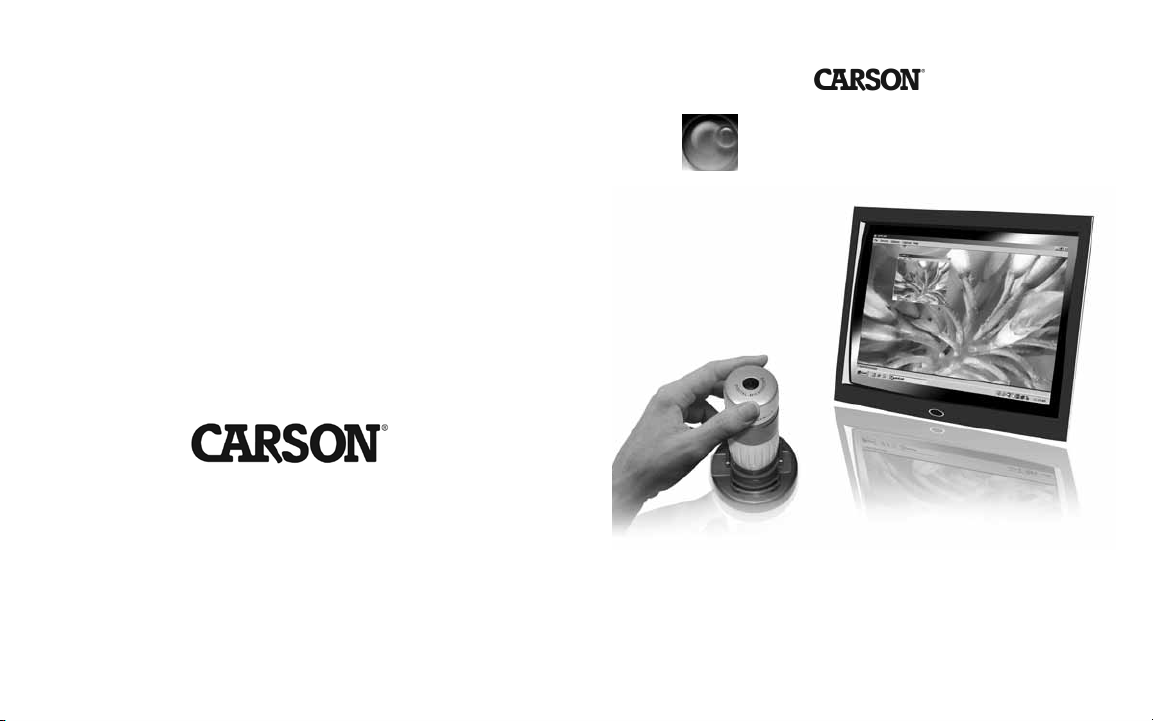
The zPix® Digital Microscopeis a battery free
device to use with a computer via a USB port. Its
objective is a 5x zoom lens enabling specimen to be
viewed at 36x - 176x on a 21” monitor. Snapshots
can be taken by simply pressing the Shutter Button
on the product.
Video recording is also available.
* Shutter Button is not supported in Mac OSX
®
1
Page 3
Minimum System Requirements
For Windows® based PC
1.8 GHz Intel® / AMD Processor
256 mb RAM
USB Version 2.0
CD ROM drive
Free hard disk space of 10MB
Windows® XP SP2 or above, Windows Vista
(32bit or 64bit) and Windows®7 (32bit or 64bit)
For Mac OSX® based PC*
Power PC® G3, G4, G5 or Intel®-based processsor
256 mb RAM
USB Version 2.0
CD ROM drive
Free hard disk space of 10MB
Mac OSX® version 10.4.9 or above
QuickTime® 6.5.1 or above
* Application for Mac OS based PC is unavailable. You may use any of your
applications which support the viewing of a USB Video Class Device.
Windows XP, Windows Vista and Windows 7 are either registered trademarks or trademarks
of Microsoft Corporation in the U.S. and/or other countries.
Apple, Mac OSX and Quicktime are trademarks of Apple Inc., registered in the U.S. and
other countries.
®
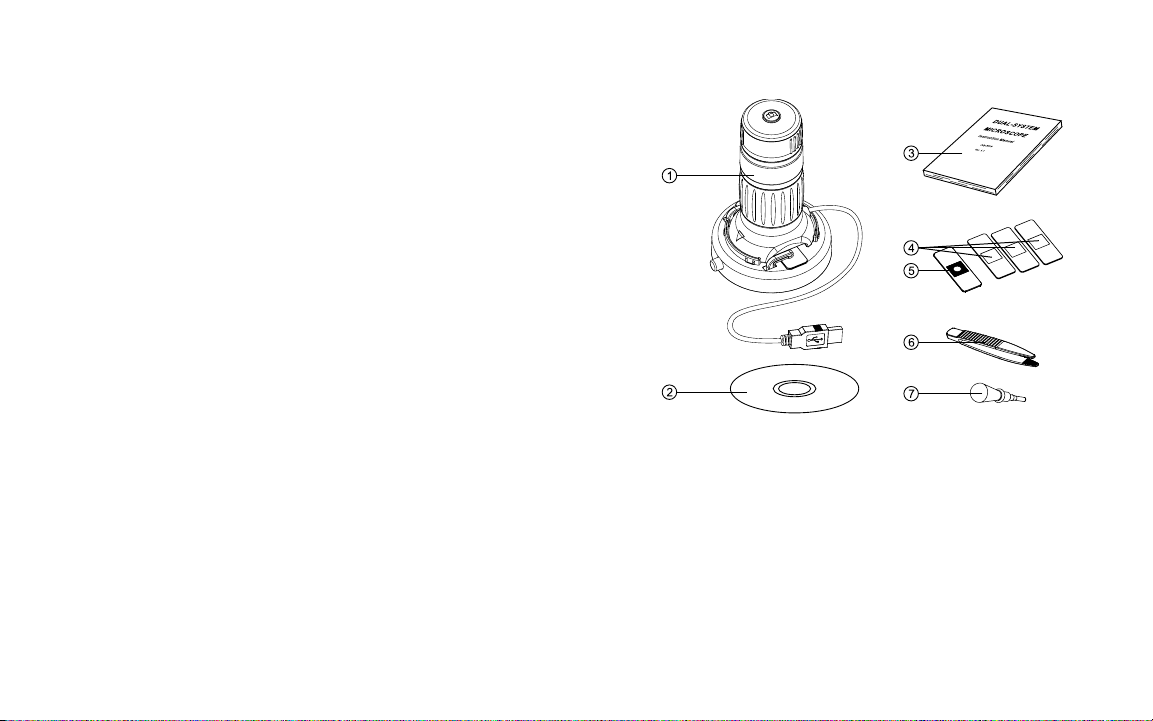
Package Contents
1. Digital Microscope - 1 set
2. Digital ViewerTM (for Windows® only)
and Manual CD - (1 pc.)
3. Instruction Manual
4. Blank Specimen Slide - (3 pcs.)
5. Prepared Slide with Cotton Swatch - (1 pc.)
6. Tweezers - (1 pair)
7. Dropper (1pc.)
32
Page 4

Part and Control Location
1. Shutter Button*
2. Focusing Ring
3. Zoom Control Ring
4. LED Illumination
5. Specimen Stage
6. Specimen Slide Releasing Button
7. USB Cable
Operation
Initialize the Product
Place zPix directly on objects you wish to view or use
the specimen stage to view specimen slides.Push down
on the Specimen Slide Releasing Button (6) on the
Specimen Stage (5) and place the Specimen Slide under the spring action clips. Release the button to secure.
Secure the zPix to the Specimen Stage and connect
the USB Cable (7) to a USB port on your computer.* The LED light will turn on indicating the the
device is powered on. Insert the CD and follow the
prompts to start up the Digital Viewer
TM.
Software.
* Shutter Button is not supported in Mac OSX
®
* We recommend using USB ports located on the back of your computer unit.
54
Page 5

Adjust the position of the Specimen Slide to the
desired focal point. Rotate the Focusing Ring (2)
clockwise or counter-clockwise until the image
shown on the monitor is clear and sharp.
Re-focus after zooming to ensure clear images.
Rotate the Zoom Control Ring (3) clockwise to
zoom in, or counter-clockwise to zoom out.
To capture an image, press the Shutter Button (1)
on the top of the zPix.
76
Page 6

Using the zPix
For Windows
®
zPix comes with a simple companion software,
Digital ViewerTM for previewing, taking images and
recording videos from the microscope on Windows
platforms. The software is located on the included CD
(5). It does not require installation, simply launch the
application to start using it.
For your convenience, you may also copy the Digital
Viewer to your computer to use it without the CD.
Digital Viewer allows you to:
1. Take pictures of your specimen.
2. Record videos of your specimen.
Record a Video
1. With Digital ViewerTM launched, select
“Capture” then “Start Capture”
Taking a Picture
1. With Digital Viewer launched, press the snap
button on the zPix.
2. This will bring up your system photo viewer.
Click the oppy disc icon at the bottom of the
screen to save the picture.
2. Name your video and select a location to save
the video.
3. When the “Ready to Capture” prompt appears,
press “OK” to start.
4. On your keyboard, press the “Esc” key to end
recording.
98
Page 7

For Mac OSX Based PC
36x - 176x @ 21”
46x - 227x @ 27”
Specications
The included Digital Viewer Software is compatible
with Windows only. To use the microscope
with Mac operating systems you will need to use
the existing image/photo capture software on your
computer. The shutter button function is only
available on Windows OS.
Optical Specications
Power Ratings
Physical Property
36x - 176x @ 21”
46x - 227x @ 27”
1110
Page 8

Care and Storage
Warnings
• Clean the zPix casing with moistened cloth
when necessary and then wipe it dry. Never
use chemical detergent to clean the zPix.
• Never leave the zPix in a damp or dusty place.
• In case the zPix will not be used for a pro-
longed time, store the zPix in its original box
and keep it in a well ventilated environment
and away from extreme heat or direct sunlight.
If you experience any trouble installing or using your
zPix, please go to www.carsonoptical.com for updates
or call our toll-free number 1-800-967-8427 to receive
prompt customer service prior to returning the microscope
to your place of purchase.
Never attempt to open or dismantle the zPix.
To avoid possible permanent eye damage, do not
place lighted zPix directly upon human eye.
Please retain these instructions for future reference.
1312
 Loading...