

Page 1
DRAGSTER PRIME Brushless-Regler
für 1:10 Cars
CARSON DRAGSTER Brushless-Regler
D Betriebsanleitung Seite 2 - 22
G Instruction Manual Page 24 - 44
Page 2

D
2 CARSO N DRAGSTER PR IME Brushl ess-Reg ler
Sehr geehrter Kunde
Wir begl ückwünschen S ie zum Kauf Ihres CA RSON Sets, welc hes nach dem heutigen Stan d der Technik gefer tigt wurde.
Da wir stet s um Weiterentwi cklung und Verbess erung unserer Pr odukte bemüht
sind, be halten wir uns eine Än derung in technis cher Hinsicht und i n Bezug auf
Ausstat tung, Materiali en und Design jed erzeit und ohne A nkündigung vor.
Aus gering fügigen Abweic hungen des Ihnen vo rliegenden Pr oduktes gegen über
Daten und Ab bildungen dies er Anleitung könn en daher keinerl ei Ansprüche
abgele itet werden.
Diese Be dienungsanle itung ist Besta ndteil des Produk ts. Bei Nichtb eachtung der
Bedien ungsanleitung u nd der enthaltene n Sicherheits anweisungen erli scht der
Garanti eanspruch. Bewa hren Sie diese Anle itung zum Nachle sen auf und für die
eventuel le Weitergabe des M odells an Dritt e.
Garantiebedingungen
Für dieses Pr odukt leistet C ARSON eine Gar antie von 24 Monaten be treffend
Fehler be i der Herstellu ng in Bezug auf Mate rial und Fertigu ng bei normalem
Gebrau ch ab dem Kauf beim au torisierten Fach händler. Im Falle eines D efekts
während d er Garantiezei t bringen Sie das Mo dell zusammen mi t dem Kaufbel eg
zu Ihrem Fachh ändler.
CARSON w ird nach eigener Ent scheidung, fa lls nicht anders im Ge setz vorgeseh en:
(a)
Den Defe kt durch Repar atur kostenlos in Be zug auf Material u nd Arbeit beheb en;
(b) Das Pr odukt durch ein gl eichartiges o der im Aufbau ähn liches ersetz en; oder
(c) Den Kaufp reis erstatte n.
Alle ers etzten Teile und Pro dukte, für die Ers atz geleiste t wird, werden zum
Eigentum
von CARSO N. Im Rahmen der G arantie leistunge n dürfen neue od er
wieder aufbereite te Teile ver wendet werden . Auf repariert e oder ersetz te Teile
gilt eine G arantie für die Re stlaufzeit de r ursprüngliche n Garantiefris t. Nach
Ablauf de r Garantiefris t vorgenommen e Reparaturen od er geliefert e Ersatzteile
werden in R echnung gestel lt.
Page 3
D
3CARSO N DRAGSTER PR IME Brushl ess-Reg ler
Bedeut ung des Symbols auf d em Produkt, der
Verpacku ng oder Gebrauc hsanleitung: El ektrogeräte
sind Wert stoffe und ge hören am Ende der La ufzeit
nicht in den H ausmüll! Helfe n Sie uns bei Umwelts chutz
und Recou rcenschonung un d geben Sie dieses G erät
bei den en tsprechenden R ücknahmeste llen ab. Fragen
dazu bea nwortet Ihnen di e für Abfallbese itigung
zustän dige Organisati on oder Ihr Fachhänd ler.
Wir wünschen Ihnen viel Spaß mit
Ihrem CARSON Brushless-Set!
Vor dem Gebrauch Ihres neuen CAR SON DRAGSTER
Brushless-Reglers lesen Sie bitte dieses Handbuch
sorgfältig durch!
Von der Garantie ausgeschlossen sind:
• Beschäd igung oder Ausfa ll durch Nichtbeac hten der Sicherhe itsanweisunge n
oder der B edienungsanl eitung, höhere G ewalt, Unfall, f ehlerhafte o der
außerge wöhnliche Beansp ruchung, fehle rhafte Handha bung, eigenmäc htige
Veränder ungen, Blitz schlag oder ande rer Einfluss von H ochspannung od er
Strom.
• Schäden , die durch den Verlus t der Kontrolle übe r Ihr Fahrzeug
entsteh en.
• Reparat uren, die nicht durc h einen autorisie rten CARSON Se rvice durchge führt w urden.
• Verschle ißteile wie etwa S icherungen und B atterien
• Rein opti sche Beeinträc htigungen
• Transpor t-, Versa nd- oder Versiche rungskosten
• Kosten für d ie Entsorgung de s Produkts sowi e Einrichten und vom S ervice
vorgeno mmene Einstell- u nd Wiedereinr ichtungsarbe iten.
• Jeglich e Veränderungen a n Steckern und Kabe ln, öffnen des G ehäuses und
Beschäd igung der Aufk leber.
Durch die se Garantie erhal ten Sie speziell e Rechte, darübe r hinaus ist auch eine
von Land zu L and verschied ene Geltendma chung anderer Ansp rüche denkba r.
Page 4

D
4 CARSO N DRAGSTER PR IME Brushl ess-Reg ler
Inhalt
Vorwor t ..................................................................................................................................................... 2
Liefer umfang..........................................................................................................................................5
Wichtig ....................................................................................................................................................10
1. Basiseins tellungen am Sen der .............................................................................................10
2. Abgleich en des Reglers mi t dem Fernsteuer sender ..................................................11
3. Abbildun g Regler sensor less ................................................................................................ 12
4. LED-Anzeige i m Normalbetri eb .......................................................................................... 13
5. Werkseitige Vore instellungen d es Reglers .....................................................................13
6. Einstellun g des elektron ischen Fahrregle rs über die Setup K arte .......................14
7. Einstellun g der Parameter üb er die Set-up-Taste des Fah rreglers .......................15
8. Auswahl des A kku-Typs ..........................................................................................................16
9. Auswahl Vor wärts-Brem se-Rückw ärts
„Training“/ Vorwär ts-Bremse „R ennmodus“ .................................................................. 17
10. Einstell en der Anfangs- Bremsleistung .............................................................................18
11. Einstell en der Dragbrake (M otorbremse) ........................................................................19
12. Einstell ung Dead-Ban d ...........................................................................................................2 0
13. Auswahl ei nes voreingest ellten Fahrerprof ils
(Gas/Bre ms-Einstellun gen) ....................................................................................................21
14. Vorsichts maßnahmen .............................................................................................................22
Page 5

D
10 CARSO N DRAGSTER PR IME Brushl ess-Reg ler
Vor dem erst en Einsatz Ihres n eues DRAGSTER Br ushless-Regl ers bitte folg endes
Beachten :
• Vor dem Gebr auch Ihres neuen CARSON DRAGSTER PRIME Br ushless-Reg lers
lesen Sie b itte dieses Han dbuch sorg fältig du rch!
• Immer auf d ie richtige Über setzung achten . Das Fahrzeug dar f nicht zu lange
überse tzt sein.
• Nur die ori ginalen und pass enden CARSON SH OOTER BL-Motoren ver wenden.
• Bei defe ktem Kühlventila tor den Fahrbetrie b sofort einst ellen.
• Die Akku kabel (Plus und Mi nus) nicht verpolen . Keine Garantie b ei Kurzschluss .
• Wählen Sie d en richtigen Akk utyp/Unters pannungsschut z (Cut-Off ).
Damit die o ptimale Funktio n des elektron ischen Fahrregle rs nicht durch Vorgaben des Se nders eingesc hränkt wird, so llten vor der Progr ammierung des Fahrregler s bestimmte Ein stellu ngen am Fernsteue rsender zurüc kgesetzt wer den.
• Stellen Sie d en oberen Endans chlag für das Gas/ Brems-Servo au f Maximum,
indem Sie f ür die obere EPA/ATV Einste llung den höchst en Wert wählen.
• Bringen S ie auch den unteren En danschlag des Gas /Brems-Servo a uf die
maxima le Position, indem S ie für die untere EPA/ATV Eins tellung den
höchste n Wert wählen.
• Bringen S ie die Trimmung des Gas/ Bremshebels in d ie Mittelstel lung.
• Wählen Sie d ie Neutralstel lung des Gas/Bre mshebels:
Für Trainingsf ahrten bei z. B . 50/50 Vollgas/Brems e
(mit Rück wärtsfahr t)
Für Rennmo dus bei z. B. 70/30 Vollg as/Bremse
(ohne Rück wärtsfahr t)
Wichtig!!!
1. Basiseinstellungen am Sender
Page 6

D
11CARSON DR AGSTER PRIM E Brushles s-Regle r
• Schalten S ie den Sender ein .
• Schließ en Sie den Regler an d ie Spannungsver sorgung.
• Halten Sie d en SET-Knopf ge drückt und scha lten Sie den Regle r am
Ein/Aus- Schal ter ein, es ertönt e in Signalton.
Die blaue L ED leuchtet.
• Bringen S ie den Gas/Brems hebel in Vollgass tellung.
Die blaue L ED blinkt kurz u nd leuchtet dann dau erhaft.
Es ertö nt ein Signalton.
Die Vollgas stellung ist gesp eichert.
• Bringen S ie den Gas/Brems hebel in Vollbrems stellung.
Die rote LED b linkt kurz. D anach leuchten die r ote und blaue LED daue rhaft.
Es ertö nen zwei Signalt öne.
Die Brems enstellung ist g espeichert.
• Bringen S ie den Gas/Brems hebel in Neutra lstellung.
Die blaue u nd rote LED blinken ku rz und leuchten da nn dauerhaft.
Es ertö nen drei Signaltön e.
• Der Abgleich is t abgeschloss en, alle LEDs sind aus .
• Schalten Sie den R egler aus.
Wenn Sie den R egler wieder ei nschalten, ist de r Fahrregler auf den S ender abgestimmt un d grundsätzlic h betriebsber eit.
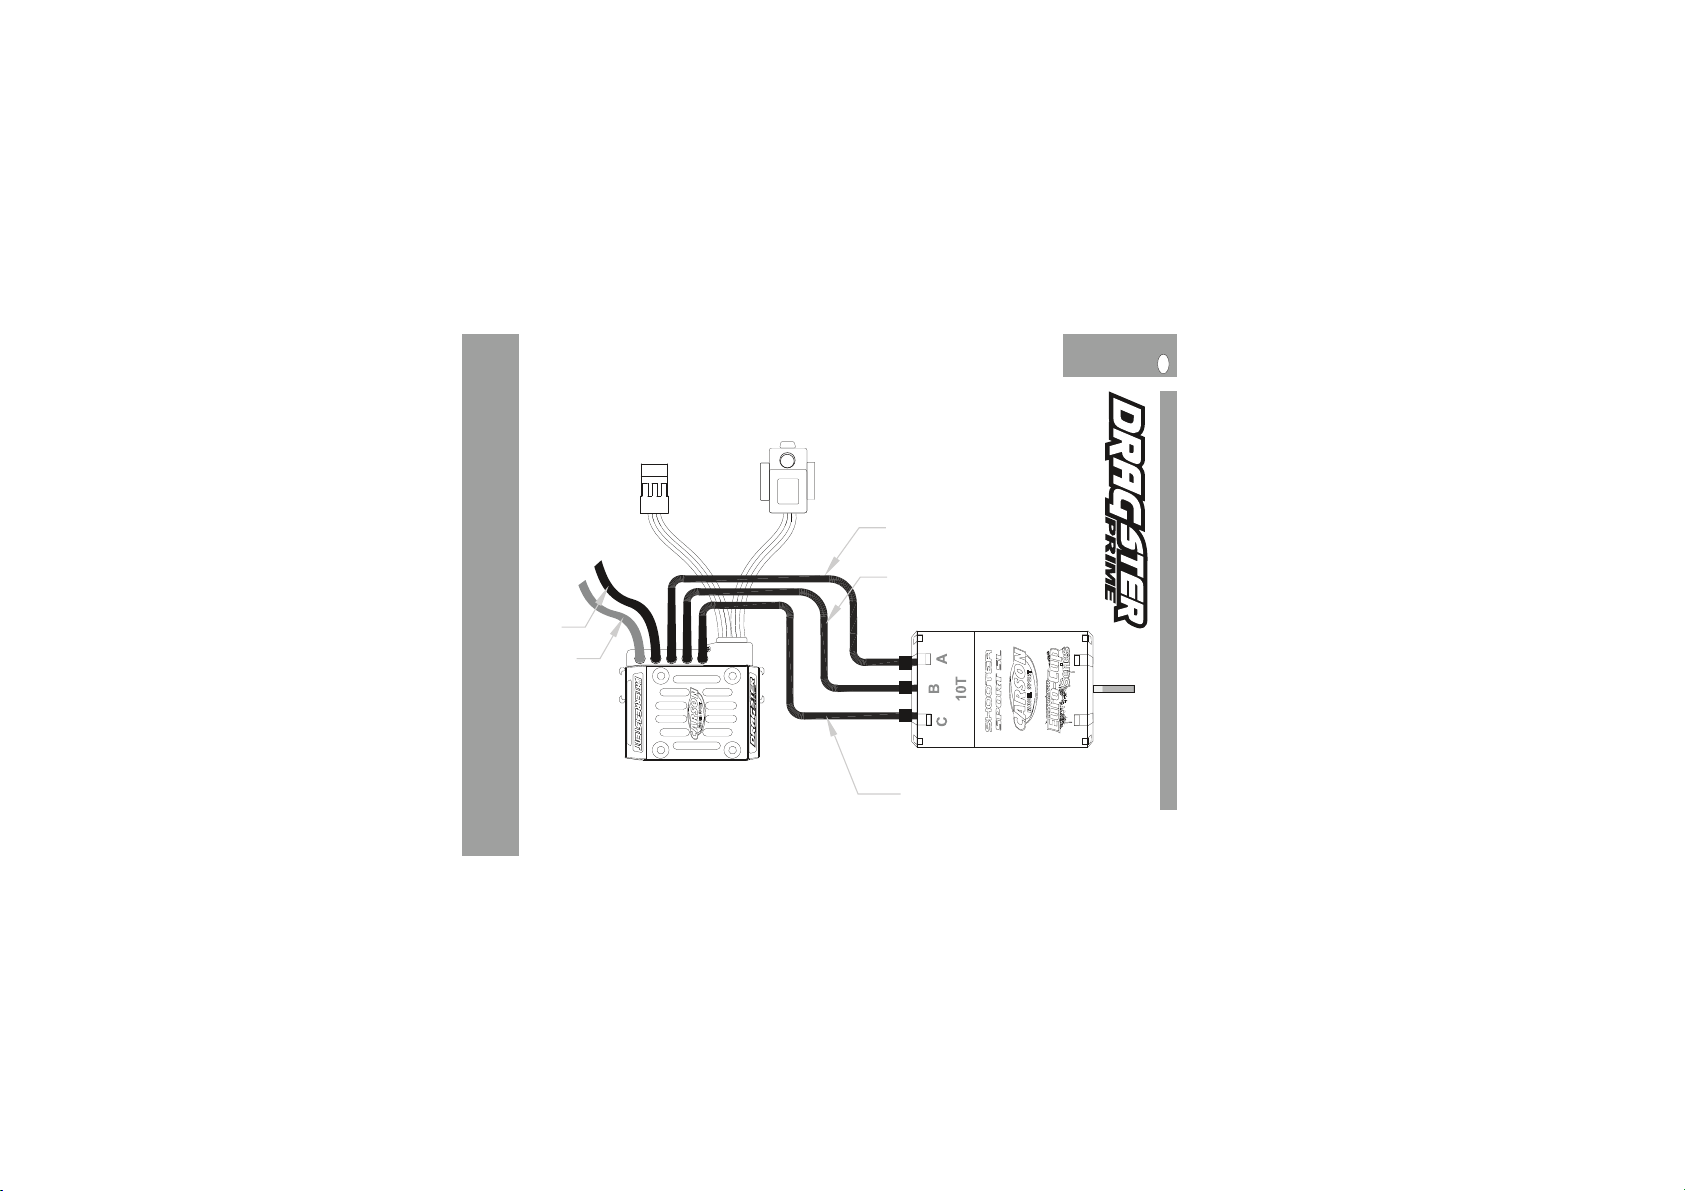
Falls Ihr Mod ell rückwär ts fährt, obwo hl Sie beschleuni gen, müssen Sie 2 de r 3
Motork abel tauschen.
2. Abgleichen des Reglers mit dem Fernsteuersender
Page 7
D
12 CARSO N DRAGSTER PR IME Brushl ess-Regl er
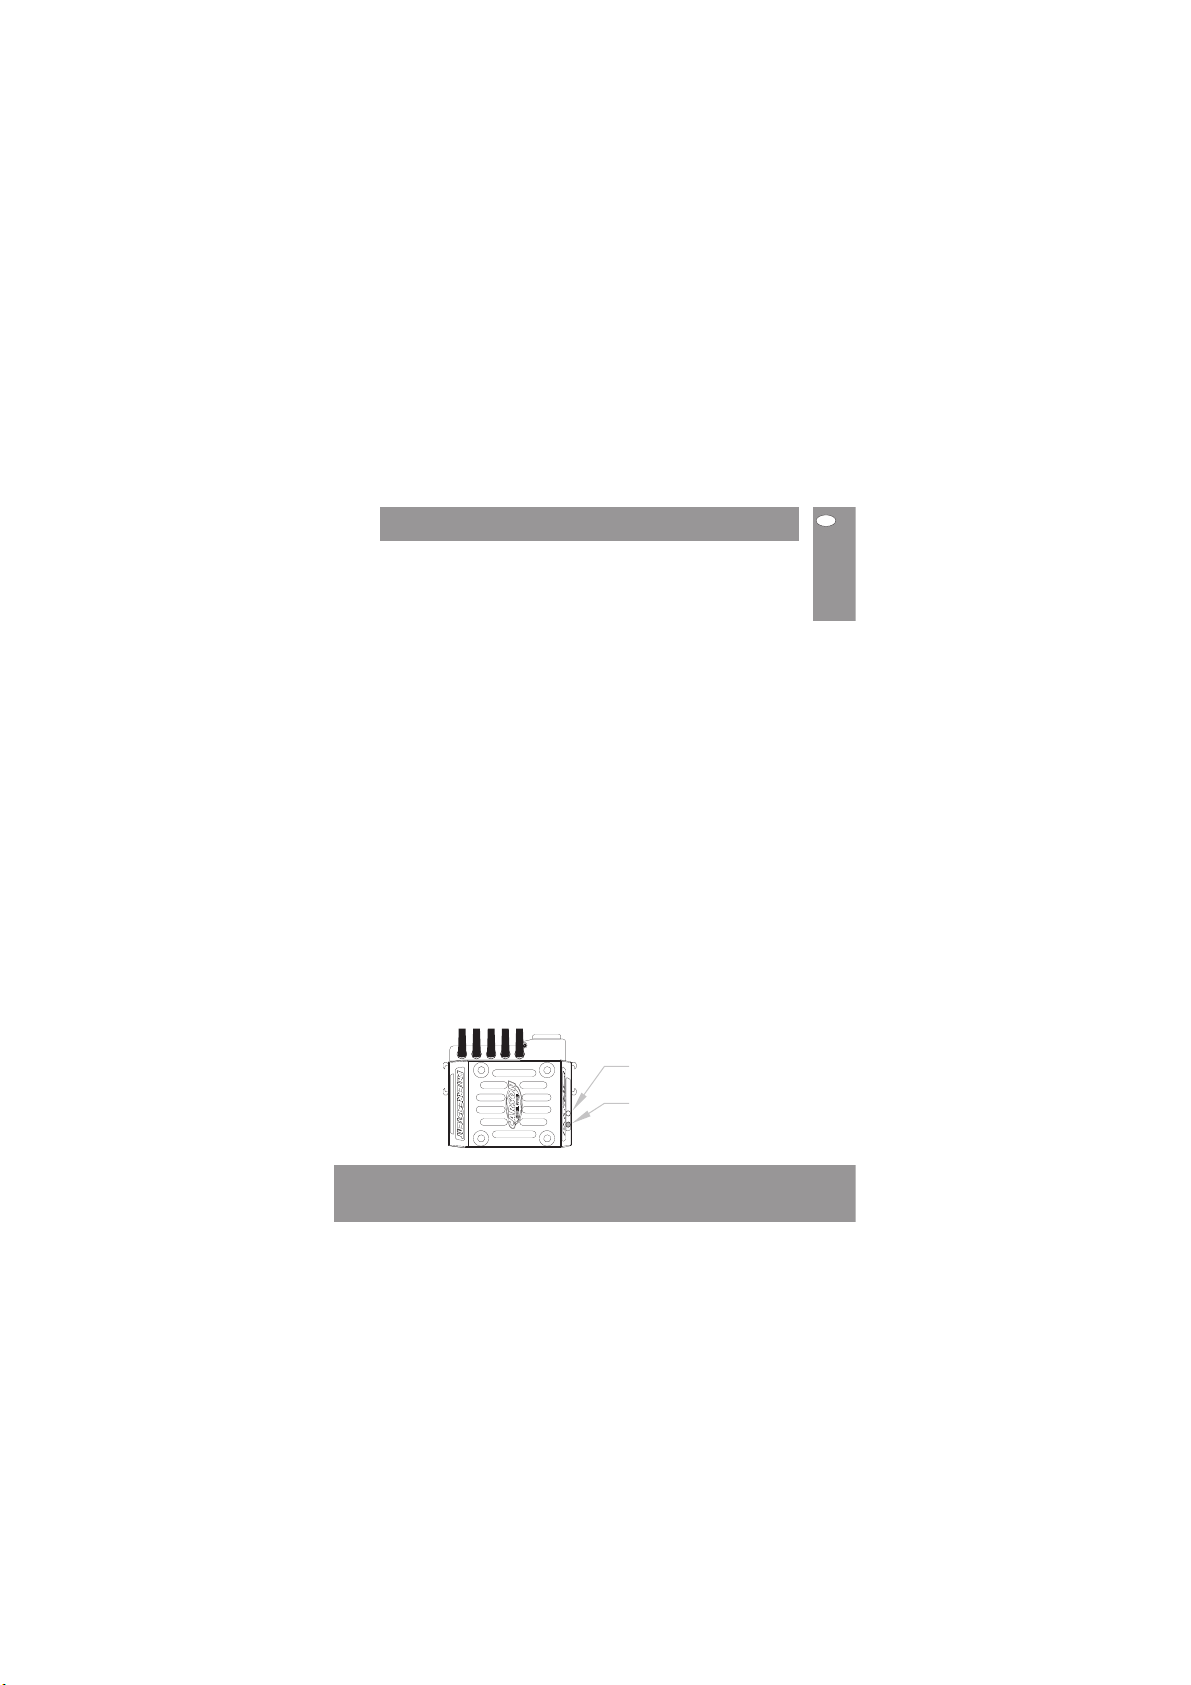
3. Abbildung Regler sensorless
r
+
-
Zum Akku
schwarz
schwarz
schwarz
schwarz
rot
Zum Empfän ger
EIN/AUS Schalte r und SET-Taste
Page 8

D
13CARSON D RAGSTER PRI ME Brushle ss-Regl er
Blaue und r ote LED leuchten: Traini ngsfahrt (Rüc kwärtsfa hrt EIN)
Blaue LED l euchtet: Rennmo dus (Rückwär tsfahrt AUS)
Wenn Sie den Fahr regler zum ers ten Mal in Betrieb n ehmen, ist der Unte rspannungssch utz (Cut-Off ) auf NiMH eing estellt mit 5,4 V. Diese r ist von dem einge setz ten Akkutyp ab hängig. Erst nac h der Auswahl des ver wendeten Akk utyps
wird der p assende Unterspa nnungsschutz a ktiviert :
Rote LED bli nkt: Untersp annungsschutz e in
NiCd/Ni MH:
LED blink t, wenn eine Akku spannung von 4 V
erreich t bzw. unterschritte n wird, Motor läuf t
weiter.
LiPo zwei - oder dreizell ig:
LED blink t, wenn die Akkus pannung 3,0 V pro Zell e
erreicht o der unterschre itet.
Der Motor l äuft nur noch mit h alber Leistung .
Setze n Sie das Modell auße r Betrieb und lad en Sie
den Fahrak ku!
Blaue LED b linkt: Die LED bli nkt wenn der Fahrre gler überhit zt. Die Motorle istung
wird abg estellt. Bitte Fah rregler ausscha lten und warten b is der Regler voll ständig
abgeküh lt hat.
Der Unter spannungsschu tz (Cut-Off ) schaltet den Mo tor ab, wenn die einge stellte
Spannun g unterschrit ten wird.
Untersp annungsschutz NiMH
Maxima le Rückwärt sfahrt 25 %
Anfangs -Bremswirku ng 30 %
Anteil Dra gbrake in Neutra lstellung
des Gas/ Bremshebels 10 %
Dead Ban d Stufe 3
Umschalt ung
Bremsen /Rückwärt sfahrt Nach Löse n der Bremse und
erneute m Zurücknehmen d es
Gas/Bre mshebels aus der
Neutral stellung
4. LED-Anzeige im Normalbetrieb
5. Werkseitige Voreinstellungen des Reglers
Page 9
D
14 CARSO N DRAGSTER PR IME Brushl ess-Reg ler
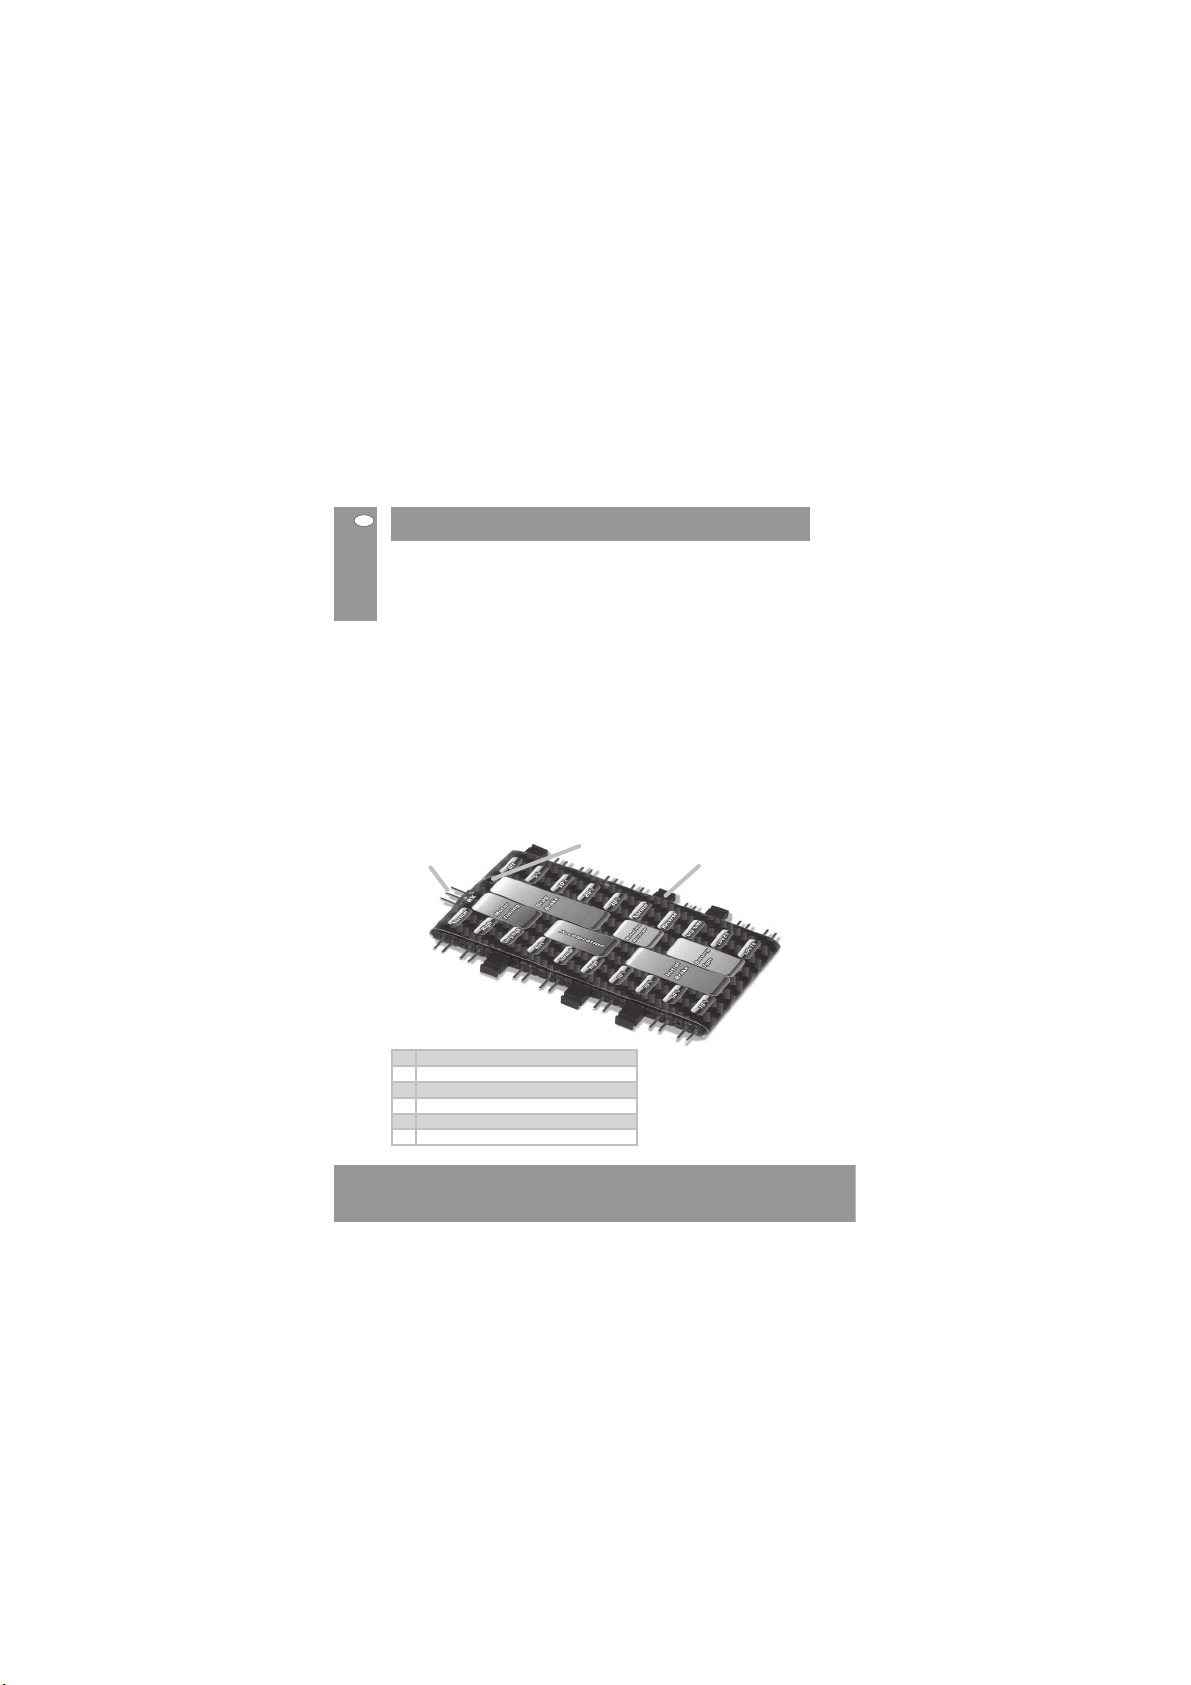
6. Einstellung des elektronischen Fahrreglers über die
Setup Karte
1. S chliessen Sie den Fah rregler an einem vo ll aufgeladen en Akku an. Achten Si e
auf die ric htige Polarität.
2. S chließen Sie das Emp fänger-Kabe l an die Programmi erkarte an und ac hten
Sie erneu t auf die richtige Pol arität.
3. Wä hlen Sie die gewüns chten Funktione n für Ihren Fahrregl er aus und stecken
den Jump er (Stecker) an die entsp rechenden Plät ze.
4. S chalten Sie nun den Fahr regler an und war ten Sie ein paar Sek unden. Die rote
LED an der Se tup-Kart e beginnt zu blinke n. Sie leuchtet dana ch dauerhaft un d
bestät igt hiermit das die E instellungen ge speichert sin d.
5. S chalten Sie den Reg ler aus und lösen Si e den Empfängers tecker von der Kar te
bevor Sie d en Regler erneu t einschalten.
Problembehandlung
Wenn die rote L ED der Setup-K arte nicht leuc htet, versicher n Sie sich, dass der
Empfäng erstecker mit de r richtigen Polar ität angeschlos sen wurde und der
verwen dete Akkupack vo llständig gela den ist.
LED
Anschluss
Empfänger stecker
Jumper
Folgende Wer te
können mit d er Karte
eingestel lt werden:
1 Motor Ti ming
2 Beschl eunigung (Acceler ation)
3 Einstel len der Bremsleis tung
4 Auswahl D ragbrake (Motor bremse)
5 Auswahl d er Drehrichtung ( Rotation)
6 Auswahl d es Akku-Typs
Page 10
D
15CARSON D RAGSTER PRI ME Brushle ss-Regl er
Der Fahrre gler kann nach dem A bgleich mit dem Se nder sofort in B etrieb
genomm en werden, besti mmte Parameter las sen sich aber den in divi duel len
Gegeb enheiten anpass en.
Die Progr ammierung des Re glers erfol gt mit der SET-Taste. Während S ie die Taste
gedrüc kt halten, blinke n nacheinander v erschiedene LE Ds bzw. LED-Komb inationen. Je de LED-Kombi nation steht für ei n bestimmtes Ausw ahlmenü, das durch
loslasse n des SET-Tasters bei der ge wünschten Kombin ation ausgewähl t und
einges tellt werden kann .
Zur Auswahl stehen:
• Akkut yp (NiCd/NiMH , LiPo), Cut-Off
• Trainingsf ahrt/Rennm odus
• Anfangs -Bremswirku ng 0 % - 70 %
• Anteil Fes tstellbremse i n der Neutralste llung des Gas/Bre mshebels
0 % - 45 %
• Dead Ban d Stufe 1 - 5
• Fahrerpro fil 1 - 5: Auswahl aus vi er verschieden en Voreinstellung en
für Gas/ Bremse.
Profil 5 s etzt den Fahrre gler auf die werk seitigen Voreins tellungen zurüc k.
In den einz elnen Menüpunk ten haben Sie ver schiedene Eins tellmöglichkei ten.
Diese wer den durch die Blink frequenz der L EDs unterschied en und durch Drücke n
des SET-Tasters aus gewählt.
Diese wer den durch die Blink frequenz der e inzelnen LEDs unt erschieden un d
durch Drü cken des SET-Tasters zum ent sprechenden Ze itpunkt ausgew ählt. Die
Blinkf requenz der bla uen LED gibt den ak tuell ausgewähl ten Menüpunkt ( zum
Beispie l Akku-Typ, Anfangs- Bremse usw.) an. Die B linkfreque nz der roten LED gibt
die aktu ell ausgewählte E instellung (zum B eispiel 10 %, 20 %, 30 % usw.) an .
Wenn Sie den M enüpunkt anwäh len, blinkt die L ED/blinken die LEDs i n der
Frequenz d er zuvor einges tellten Auswahl.
7. Einstellung der Parameter über die Set-up Taste des Fahrreglers
Blaue LED
Rote LED
Page 11
D
16 CARSO N DRAGSTER PR IME Brushl ess-Reg ler
Mit der Aus wahl eines Akku -Typs wird de r Unterspannung sschutz (NiCd/ NiMH: bei
4 V oder ger inger, LiPo zwei- o der dreizellig: b ei 3,0 V pro Zelle ode r weniger)
aktiv iert.
Wenn Sie ohn e Unterspannungs schutz (Cut-Of f) fahren wo llen, müssen Sie im
Fahrerpro fil Profil 5 (Rüc ksetzen auf we rkseitige Ein stellungen) ausw ählen und
die ander en Parameter ern eut Ihren Ansprüc hen anpassen.
Blink frequenz 1 2 3
Akku-Typ NiCd/NiMH LiPo
(2 Zellen)
LiPo
(3 Zellen)
• Schalten S ie erst den Sende r, dann den Regler ein !
• Halten Sie d en SET-Taster gedrück t, bis die blaue LED au fblinkt. La ssen Sie den
SET-Taster wiede r los. Sie sind in der Au swahl für den Akk utyp.
• Die rote LED b eginnt zu blinken . Dies zeigt an, das s Sie sich im Einstellm odus
für den Ak kutyp befi nden.
• Drücken Si e den SET-Taster erneut kur z, Sie gelange n so zum nächsten Ein stellwe rt. Die rote LED bli nkt im nächsthö heren Takt.
• Durch wie derholtes, ku rzes drücken könn en Sie in einer Endlo sschleife durch
die Einste llwerte scroll en.
• Wenn Sie den g ewünschten Einste llwert erreic ht haben, halten Si e den SETKnopf f ür ca. 2 Sekunden g edrückt, die Ei nstellung wird ge speichert.
• Wenn Sie die Ei nstellung gespe ichert haben , blinken die rote und b laue LED
abwechse lnd 3x um anzuzeig en, dass Sie den Prog rammiermodus v er lassen.
Den Regl er aus und wieder e inschalten um die au sgewählten Einst ellungen
zu akti vieren.
• Wenn Sie den SE T-Taster läng er als 10 Sekunden nic ht drücken, kehrt d er
Regler z u den letzten Ei nstellungen zur ück und ist wiede r betriebsbere it.
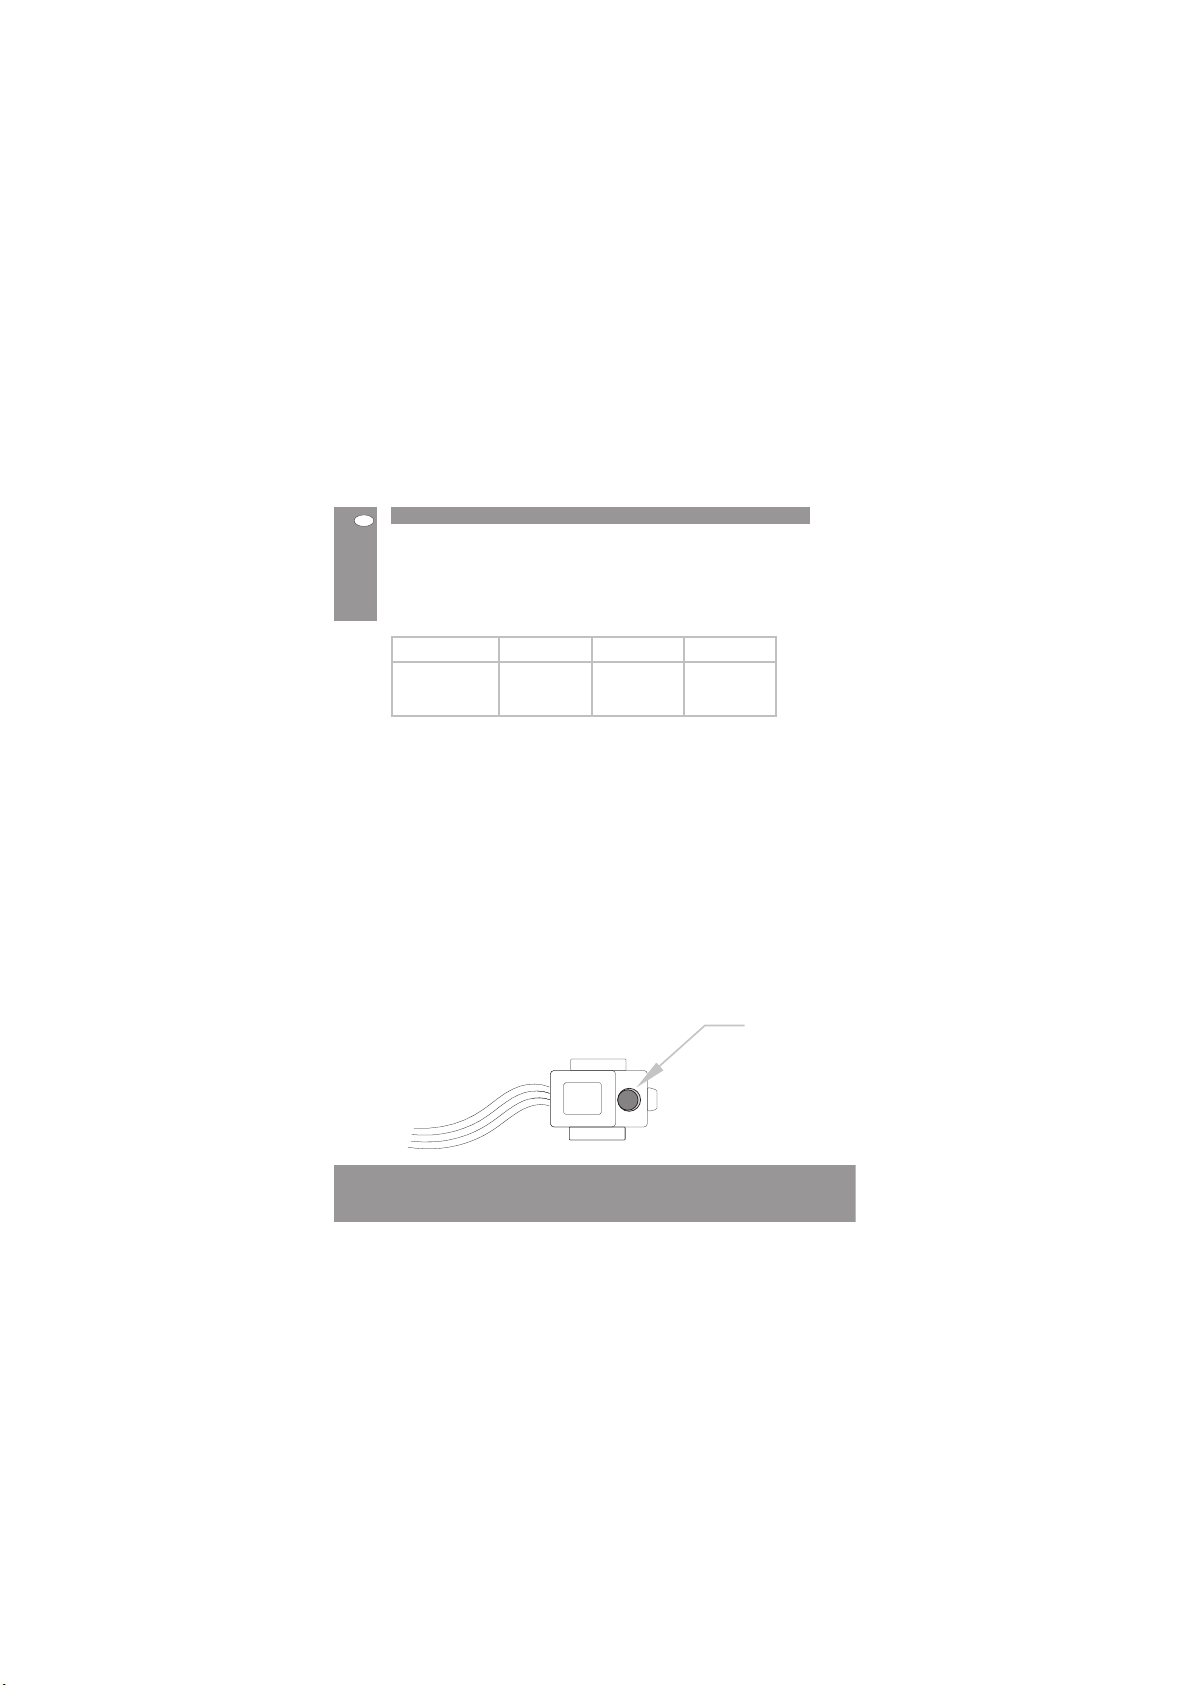
8. Auswahl des Akku-Typs
Set-Taster
ONOFF
Page 12

D
17CARSON D RAGSTER PRI ME Brushle ss-Regl er
9. Auswahl Vorwärts – Bremse – Rückwärts
„Training“/ Vorwärts – Bremse „Rennmodus“
Blink frequenz 1 2
Fahrtric htung nur vorw ärts
Rennmo dus
vorwär ts und rückw ärts
Trainingsf ahrt
• Halten Sie d en SET-Taster gedrück t, bis die blaue LED 2x b linkt. Lasse n Sie den
SET-Taster wiede r los.
• Die rote LED b eginnt zu blinken . Dies zeigt an, das s Sie sich im Einstellm odus
für die Fahr trichtung bef inden.
• Drücken Si e den SET-Taster erneut kur z, Sie gelange n so zum nächsten Ein stellwe rt. Die rote LED bli nkt im nächsthö heren Takt.
• Durch wie derholtes, ku rzes Drücken könn en Sie in einer Endl osschleife durch
die Einste llwerte scroll en.
• Wenn Sie den g ewünschten Einste llwert erreic ht haben, halten Si e den SETKnopf f ür ca. 2 Sekunden g edrückt, die Ei nstellung wird ge speichert.
• Wenn Sie die Ei nstellung gespe ichert haben , blinken die rote und b laue LED
abwechse lnd 3x um anzuzeig en, dass Sie den Prog rammiermodus v er lassen.
Den Regl er aus und wieder e inschalten um die au sgewählten Einst ellungen zu
aktiv ieren.
• Wenn Sie den SE T-Taster läng er als 10 Sekunden nic ht drücken kehrt de r
Regler z u den letzten Ei nstellungen zur ück und ist wiede r betriebs bereit.
Blaue LED
Rote LED
Page 13

D
18 CARSO N DRAGSTER PR IME Brushl ess-Reg ler
• Halten Sie d en SET-Taster gedrück t, bis die blaue LED 3x b linkt. Lassen S ie den
SET-Taster wiede r los.
• Die rote LED b eginnt zu blinken . Dies zeigt an, das s Sie sich im Einstellm odus
für die ma ximale Bremslei stung befind en.
• Drücken Si e den SET-Taster so oft kur z, bis Sie die gewü nschte Einstellun g
erreich t haben. Die rote LED b linkt im jeweils n ächsthöheren Takt .
• Durch wie derholtes, ku rzes Drücken könn en Sie in einer Endl osschleife durch
die Einste llwerte scroll en.
• Wenn Sie den g ewünschten Einste llwert erreic ht haben, halten Si e den SETKnopf f ür ca. 2 Sekunden g edrückt, die Ei nstellung wird ge speichert.
• Wenn Sie die Ei nstellung gespe ichert haben , blinken die rote und b laue LED
3x abwechs elnd um anzuzeig en, dass Sie den Prog rammiermodus v er lassen.
Den Regl er aus und wieder e inschalten um die au sgewählten Einst ellungen zu
aktiv ieren.
• Wenn Sie den SE T-Taster läng er als 10 Sekunden nic ht drücken kehrt de r
Regler z u den letzten Ei nstellungen zur ück und ist wiede r betriebs bereit.
Blinkfreque nz
1 2 3 4 5 6 7 8 9 10
Anfangs -Bremsleistun g (%)
10 20 30 40 45 50 55 60 65 70
10. Einstellen der Anfangs-Bremsleistung (Initial)
Blaue LED
Rote LED
Page 14

D
19CARSON D RAGSTER PRI ME Brushle ss-Regl er
11. Einstellen der Dragbrake (Motorbremse)
Mit der Dr agbrake wird die Re ibung der Kohlen v on Bürstenmotor en simuliert.
• Halten Sie d en SET-Taster gedrück t, bis die blaue LED 4x b linkt. Lassen S ie den
SET-Taster wiede r los.
• Die rote LED b eginnt zu blinken . Dies zeigt an, das s Sie sich im Einstellm odus
für die Fes tstellbremse b efinden.
• Drücken Si e den SET-Taster so oft kur z, bis Sie die gewü nschte Einstellun g
erreich t haben. Die rote LED b linkt im jeweils n ächsthöheren Takt .
• Durch wie derholtes, ku rzes drücken könn en Sie in einer Endlo sschleife durch
die Einste llwerte scroll en.
• Wenn Sie den g ewünschten Einste llwert erreic ht haben, halten Si e den
SET-Kno pf für ca. 2 Sekun den gedrückt , die Einstellung wi rd gespeicher t.
• Wenn Sie die Ei nstellung gespe ichert haben , blinken die rote und b laue LED
3x abwechs elnd um anzuzeig en, dass Sie den Prog rammiermodus v er lassen.
Den Regl er aus und wieder e inschalten um die au sgewählten Einst ellungen
zu akti vieren.
• Wenn Sie den SE T-Taster läng er als 10 Sekunden nic ht drücken kehrt de r
Regler z u den letzten Ei nstellungen zur ück und ist wiede r betriebs bereit.
Blinkfreque nz
1 2 3 4 5 6 7 8 9 10
Dragbr ake (%) AUS 5 10 15 20 25 30 35 40 45
Blaue LED
Rote LED
Page 15

D
20 CARSO N DRAGSTER PR IME Brushl ess-Reg ler
Mit der De ad-Band Einst ellung können Sie de n Fahrregler an den ve rwendeten
Sender a npassen, indem Si e den Übergangsb ereich von der Vorw ärtsfahr t zur
Bremswi rkung veränder n. Stufe 1 bedeute t einen schmalen Ü bergangs bereich,
der beso nders fein abge stufte Sende rsignale erfo rdert. Der bre itere Übergang i n
Stufe 5 genü gt auch einfache n Sendeanlagen .
Blinkf requenz 1 2 3 4 5
Dead Ban d (%) 2 3 4 5 6
• Halten Sie d en SET-Taster gedrück t, bis die blaue LED 5x bli nkt. Lassen Si e den
SET-Taster wiede r los.
• Die rote LED b eginnt zu blinken . Dies zeigt an, das s Sie sich im Einstellm odus
für die Ums chaltverzög erung Dead- Band befinde n.
• Drücken Si e den SET-Taster so oft kur z, bis Sie die gewü nschte Einstellun g
erreich t haben. Die rote LED b linkt im jeweils n ächsthöheren Takt .
• Durch wie derholtes, ku rzes drücken könn en Sie in einer Endlo sschleife durch
die Einste llwerte scroll en.
• Wenn Sie den g ewünschten Einste llwert erreic ht haben, halten Si e den
SET-Kno pf für ca. 2 Sekun den gedrückt , die Einstellung wi rd gespeicher t.
• Wenn Sie die Ei nstellung gespe ichert haben , blinken die rote und b laue LED
3x abwechs elnd um anzuzeig en, dass Sie den Prog rammiermodus v er lassen.
Den Regl er aus und wieder e inschalten um die au sgewählten Einst ellungen zu
aktiv ieren.
•
Wenn Sie den SE T-Taster läng er als 10 Sekunden nic ht drücken kehrt de r Regler
zu den let zten Einstellu ngen zurück und is t wieder betri ebsbereit.
12. Einstellung Dead-Band
Blaue LED
Rote LED
Page 16

D
21CARSON D RAGSTER PRI ME Brushle ss-Regl er
13. Auswahl eines voreingestellten Fahrerprofils
(Gas/Brems-Einstellungen)
Die Prof ile 1 - 4 haben keinen Ei nfluss auf den mi t der Auswahl des Akk utyps
einges tellten Unterspa nnungsschutz .
Fahrerprof il 1 2 3 4
Rück setz en
auf
werk seiti ge
Einst ellun g
5
Cut-Of f wie
gewählt
wie
gewählt
wie
gewählt
wie
gewählt
NiMH
Rückwär tsfahrt
nein ja ja nein ja
Anteil
Rückwär tsfahrt
0 50 50 0 25
Anfangs- Bremsleistung
30 % 30 % 40 % 4 0 % 30 %
Feststel lbremse 15 % 10 % 15 % - 10 %
Dead Band 3 3 4 4 3
• Halten Sie d en SET-Taster gedrück t, bis die blaue LED 6x b linkt. Lassen S ie den
SET-Taster wiede r los.
• Die rote LED b eginnt zu blinken . Dies zeigt an, das s Sie sich im Einstellm odus
für das Fahre rprofil bef inden.
• Drücken Si e den SET-Taster so oft kur z, bis Sie die gewü nschte Einstellun g
erreich t haben. Die rote LED b linkt im jeweils n ächst höh eren Takt.
• Durch wie derholtes, ku rzes Drücken könn en Sie in einer Endl osschleife durch
die Einste llwerte scroll en.
• Wenn Sie den g ewünschten Einste llwert erreic ht haben, halten Si e den
SET-Kno pf für ca. 2 Sekun den gedrückt , die Einstellung wi rd gespeicher t.
• Wenn Sie die Ei nstellung gespe ichert haben , blinkt die rote un d blaue LED
3x abwechs elnd um anzuzeig en, dass Sie den Prog rammiermodus v er lassen.
Den Regl er aus und wieder e inschalten um die au sgewählten Einst ellungen
zu akti vieren.
• Wenn Sie den SE T-Taster läng er als 10 Sekunden nic ht drücken kehrt de r
Regler z u den letzten Ei nstellungen zur ück und ist wiede r betriebsbere it.
Page 17

D
22 CARSO N DRAGSTER PR IME Brushl ess-Reg ler
Vorsichtsmaßnahmen bei Verwendung in feuchten oder
nassen Witterungen
• Bitte im mer sofort nach G ebrauch abtro cknen und säube rn.
• Die Kompo nenten niemals in f euchtem oder nass em Zustand einlag ern.
• Um Korrosi on zu vermeiden, s ollte das Produk t nicht mit Salzwa sser in
Berühr ung kommen. Sollt e doch Salzwass er auf das Produk t gelangen,
muss es sof ort mit frische m Wasser gereinig t werden.
• Das Gehäu se des Fahrregler s ist wasserfes t. Die Anschlüsse z u Fahrakku, Motor
und die Emp fängeranschlü sse sind nicht wass erfest!
Bitte ac hten Sie auf die freil iegenden Ansch lüsse und halten Si e Flüssigkeiten
und Feucht igkeit fern.
• Bei Verwe ndung des Produk ts in nasser oder f euchter Umgebun g, stellen Sie
bitte si cher, dass die anderen e lektronisch en Komponenten w ie Empfänger,
Akku, Se rvo und Motor vor Was ser und Feuchtigke it geschützt s ind.
• Dieses Pr odukt ist nicht f ür den Einsatz in Sc hiffen oder U -Booten geei gnet.
14. Vorsichtsmaßnahmen
Page 18

D
23CARSO N DRAGSTER PR IME Brushl ess-Reg ler
Page 19

24 CARSO N DRAGSTER Br ushless- Regler
GB
Dear Customer
We congratu late you for buyin g this CARSON set, w hich is designed u sing state of
the art te chnology.
According t o our policy of ste ady developme nt and improvement o f our products
we reser ve the right to make chan ges in specifi cations concern ing equipment,
material s and design of this pr oduct at any time wi thout notice.
Specif ications or desi gns of the actual p roduct may var y from those shown in t his
manual or o n the box.
The manua l forms part of thi s product. Shou ld you ignore the op erating and
safet y instruction s, the warranty w ill be void. Keep thi s guide for future r eference.
Limited warranty
This pro duct is warrante d by CARSON agains t manufacturi ng defects in ma terials
and work manship under nor mal use for 24 months fr om the date of purchas e from
authori sed franchise es and dealers. In t he event of a produc t defect durin g the
warrant y period, retu rn the product al ong with your rece ipt as proof of purch ase
to any CARSO N store. CARSON w ill, at its option , unless otherwi se provided by law :
(a) Correct the d efect by repair ing the produc t without chargin g for parts and
labour
(b) Rep lace the produc t with one of the same o r similar design; o r
(c) Refund th e purchase price.
All repla ced parts and pr oducts, and pr oducts on which a r efund is made, be come
the prop erty of CARSO N. New or recondi tioned parts a nd products may b e used
in the per formance of war ranty servi ces. Repaired or r eplaced part s and products
are warra nted for the remain der of the origina l warranty per iod. You will be charge d
for repai r or replacement o f the product mad e after the expi ration of the warra nty
period .
Page 20

25CARSO N DRAGSTER Br ushless- Regler
GB
The exp lanation of the sy mbol on the produc t,
packag ing or instruct ions: Electron ic devices are
valuabl e products and s hould not be dispo sed of with
the house hold waste when th ey reach the end of th eir
running t ime! Help us to prote ct the
environm ent and respec t our resources by han ding this
applian ce over at the relevant r ecycling poin ts.
We wish you lots of fun with your
CARSON Brushless Set!
Please read this manual carefully before using your new
CARSON DRAGSTER Brushless Controller.
The warranty does not cover:
• Damage or f ailure caused by o r attributabl e to acts of God, ab use, accident,
misuse, im proper or abnor mal usage, failur e to follow instruc tions, improp er
install ation or maintenan ce, alteration, li ghtning or other in cidence of excess
voltage o r current;
• Damage ca used by losing contr ol of your car;
• Any repair s other than those p rovided by a CARSO N authorised ser vice facilit y;
• Consumab les such as fuses or b atteries;
• Cosmetic d amage;
• Transpor tation, shippin g or insurance cost s; or
•
Costs of pr oduct removal , installation, s et-up service a djustment or rein stallation.
• Any change s to plugs and cable s, open the housin g and damage the sti cker.
This warr anty gives you sp ecific legal r ights, and you may als o have other rights
which may va ry according to th e country of purcha se.
Page 21

26 CARSO N DRAGSTER Br ushless- Regler
GB
Contents
Preface ...................................................................................................................................................22
Include d Items .................................................................................................................................... 24
Impor tant .............................................................................................................................................32
1. Basic Settings o n the Transmitter ......................................................................................32
2. Synchronis ing the Controller w ith the Remote Transmi tter ..................................33
3. Illustration of t he Sensorless Con troller .........................................................................34
4. LED Display un der Normal Ope ration .............................................................................35
5. Controlle r Pre-set Factor y Defaults ..................................................................................35
6. Setting t he electronic s peed controlle r by means of the setu p card .................36
7. Setting t he Parameters by M eans of the Speed
Controll er Setup Button ........................................................................................................ 37
8. Select ing the Batter y Type ...................................................................................................38
9. Selecting For ward – Brake – Back wards
“Training ”/Forw ard – Brake “Racin g Mode”...................................................................39
10. Setting th e Maximum Brake Per formance.....................................................................4 0
11. Setting th e Drag Brake (Engin e Brake) ............................................................................41
12. Setting th e Dead Band ...........................................................................................................42
13. Selec ting a Pre-pro grammed driver Pr ofiles
(Throt tle/Brake Se ttings) ....................................................................................................... 43
14. Precautio nary measures ........................................................................................................44
Page 22

32 CARSO N DRAGSTER Br ushless- Regler
GB
Before us ing your new DRAGST ER Brushless Cont roller for the fi rst time please
note the fo llowing:
• Please rea d this manual caref ully before usin g your new CARSON D RAGSTER
PRIME Bru shless Controlle r!
• Always make s ure that you have the rig ht gear ratio. The ve hicle must not be
geared lo w over a long period .
• Only use o riginal and suita ble CARSON SHOOT ER BL motors.
• Stop drivi ng immediately i f the cooling fan fa ils.
• Do not conn ect the batter y cable (plus an d minus) with reverse d polarity.
The guara ntee is not valid if a sh ort circuit occu rs.
• Selec t the correct bat tery type /under-voltage pr otection (Cut-O ff).
To ensure that be st operation of th e electronic s peed controlle r is not compromise d
by defaul t settings on the t ransmitter, cert ain settings o n the remote transmi tter
should b e reset before pro gramming the sp eed controller.
• Set the upp er end stop for the t hrottle/bra ke servo to maxim um by selecting
the highe st level for the upp er EPA/ATV se tting.
• Set the low er end stop for the th rottle/brak e servo to maximu m as well by
selec ting the highest l evel for the lower EPA/ATV se tting.
• Set the tri m of the throttle /brake lever to the mi ddle position.
• Selec t the neutral posi tion for the throt tle/brake leve r:
For traini ng journey at e.g. 50/50 f ull throttle/ braking
(with rever se travel)
For racin g mode at e.g. 70/30 full th rottle/bra king
(without r everse travel)
Important!!!
1. Basic Settings on the Transmitter
Page 23

33CARSON D RAGSTER Bru shless- Regler
GB
• Switch on the t ransmitter.
• Connec t the controller to th e power supply.
• Hold dow n the SET button an d switch the control ler on at the on/off s witch;
you will he ar a beep.
The blue L ED lights up.
• Set the thr ottle/brake l ever to the full accel eration positio n.
The blue L ED flashes brie fly and then illum inates permane ntly.
You will hear a be ep.
The full th rottle setti ng is stored.
• Move the thr ottle/brake l ever to the full brak ing position.
The red LED i lluminates brie fly. Then the red LED a nd the blue LED illum inate
perman ently. You will hear two be eps.
The brake s etting is store d.
• Put the thro ttle/brake le ver to neutral.
The blue a nd red LED lamps fla sh briefly and t hen remain illumin ated. You will
hear thre e beeps.
• The synchron ization is comple te, all LEDs are off.
• Switch the control ler off.
When you s witch the controlle r on again, the spe ed controller is
synchr onized to the trans mitter and is fund amentally read y for use.
If your mo del travels back wards, you need to s witch 2 of the 3 motor ca bles.
2. Synchronising the Controller with the
Remote Transmitter
Page 24

34 CARSO N DRAGSTER Bru shless- Regler
GB
3. Illustration Sensorless Controller
r
+
-
To battery
black
black
black
black
red
To receiver
ON/OFF swi tch and SET-butto n
Page 25

35CARSO N DRAGSTER Bru shless- Regler
GB
Blue and re d LED illuminated: Trai ning mode (Revers e travel ON)
Blue LED ill uminated: Racin g mode (Reverse tr avel OFF)
When you op erate the speed c ontroller for the f irst time, the un dervoltage p rotectio n (Cut-Off ) is adjusted on 5.4 V Ni MH.This depends on t he type of bat tery
used. Th e appropriate und ervoltage pr otection is ac tivated after t he battery t ype
being us ed, has been sele cted:
Red LED f lashes: Undervol tage protect ion on
NiCd/Ni MH:
LED flash es when a batter y voltage of 4 V is
reached o r undershot, en gine continues to
run.
Two-cell o r three-cell Li Po:
LED flash es when the batte ry voltage of
3.0 V per cel l is reached or unde rshot.
The engi ne continues to run, b ut only on
half powe r.
Disconti nue using the vehicl e and charge
the batt ery.
Blue LED f lashes: The LED fl ashes if the spee d controller is over heating. The powe r
to the motor i s shut off. Please s witch speed contr oller off and wa it until the
controll er has cooled down .
The low vol tage protecti on (cut-off ) powers down the mo tor if the set volta ge is
not maint ained.
Under voltage protec tion NiMH
Maximu m reverse travel 2 5 %
Initial b raking effe ct 30 %
Percentag e drag brake when
throttl e/brake lever in n eutral 10 %
Dead Ban d Level 3
Switchove r
Brakin g/reverse travel Af ter release of the b rake and the
throttl e/brake lever hav ing been
taken out o f neutral
4. LED Display under Normal Operation
5. Controller Pre-set Factory Defaults
Page 26

36 CARSO N DRAGSTER Br ushless- Regler
GB
6. Setting the electronic speed controller by
means of the setup card
1. Co nnect the ESC to a su itable charged b attery pack . Make sure the pola rity is
correc t.
2. Co nnect the recei ver cable to the pro gram card, makin g sure of the correc t
polari ty.
3. S elect the desir ed function fo r your speed contro ller and inser t the jumper
(connect or) in the appropri ate places.
4. Turn on t he ESC and wait a few se conds. The red LED o n the program car d will
flash, t hen becomes sol id to indicate set tings are saved.
5. Turn of f the ESC and unpl ug the program be fore use again.
Trouble-shooting
If the red LE D on the program car d does not light up, ma ke sure the receiver c able
is connec ted with the corre ct polarity a nd make sure the bat tery pack is full y
charged .
LED
RX (receiver)
connecti on
Jumper
The foll owing values
can be set u sing the card:
1 Motor Ti ming
2 Accelera tion
3 Setti ng the braking po wer
4 Choice dr agbrake
5 Choice of ro tation
6 Choice of b attery typ e
Page 27

37CARSON D RAGSTER Bru shless- Regler
GB
The spee d controller can b e operated imme diately after i t has been synchr onized
with the tr ansmitter. However, sp ecific param eters can be adjus ted to suit
parti cular conditions .
The contro ller is programm ed using the SET bu tton. When you pr ess the button
down, dif ferent LEDs and co mbinations of LED s flash one afte r the other. Each
LED combin ation represent s a particular me nu which can be sel ected and set by
releasi ng the SET button a t the required comb ination.
The following parameters may be selected:
• Batter y type (NiCd/ NiMH, LiPo), Cut-Of f
• Training jou rney/racing mode
• Initial br aking action 0 % - 70 %
• Percentag e drag brake when th e throttle/b raking lever is in ne utral
0 % - 45 %
• Dead ban d Level 1 – 5
• Driver pr ofile 1 - 5: Selec t from four pre- programmed se ttings for
throttl e/brake.
Profil e 5 resets the spee d controller to the f actory defa ults.
You have variou s tuning options wi thin the individu al menu items. The se are
disting uished by the flas hing frequenc y of the LEDs, and are s elected by pres sing
the SET bu tton.
These ar e distinguished by t he flashing fre quency of indi vidual LEDs, and ar e
selec ted by releasing or p ressing the SET bu tton at the corres ponding time. Th e
flashi ng frequency o f blue LED indicates t he current sele cted menu item (e.g.
batter y type, initi al brake, etc.). The f lashing frequ ency of red LED ind icates the
current s elected set ting (e.g. 10 %, 20 %, 30 %, etc .).
When you se lect the menu it em, the LED flashe s/LEDs flash in th e
freque ncy of the previo usly selecte d option.
7. Setting the Parameters by Means of the Speed
Controller Setup Button
Page 28

38 CARSO N DRAGSTER Br ushless- Regler
GB
When the b attery typ e is selected, t he undervolta ge protectio n (NiCd/NiMH: at 4
V or lower, two o r three-cell L iPo: at 3.0 V per cell or low er) is activated .
If you wish to d rive without und ervoltage pr otection (Cut-O ff), you mus t select 5
in the drive r profile (reset t o factory def aults) and reconf igure the other pa rameters
to your requ irements again .
Flashing
freque ncy
1 2 3
Batter y type NiCd/NiMH LiPo
(2 cells)
LiPo
(3 cells)
• Switch on the t ransmitter, then t he controller!
• Hold dow n the SET button un til the blue LED fla shes. Release th e SET button
again. You are i n the battery t ype selecti on facility.
• Press the SE T button again br iefly. This brin gs you to the next se tting.
The red LED f lashes at the nex t highest spe ed.
• By repeat edly pressing br iefly on the SET b utton you can scr oll through the
settin gs.
• When you re ach the required s etting, hold do wn the SET butto n for approx. 2
seconds; t he setting is sto red.
• When you hav e saved the settin g, the red and blue LE D‘s flash alterna tely 3x in
order to in dicate that you have ex ited programmi ng mode. Switch cont roller
off and o n again to activat e the selected s ettings.
• If you do not p ress the SET butt on for more than 10 secon ds the controller
revert s to the last setti ng and is ready for us e again.
8. Selecting the Battery Type
Set-but ton
ONOFF
Page 29

39CARSO N DRAGSTER Bru shless- Regler
GB
9. Selecting Forward – Brake – Backwards
“Training”/Forward – Brake “Racing Mode”
Flashing
freque ncy
1 2
Direc tion of travel only for wards
“Racing m ode”
Forwar ds and backward s
“Training j ourney”
• Press the SE T button down unt il the blue LED light up t wo times. Relea se the
SET but ton again.
• The red LED s tarts flas hing. This shows th at you are in the mode fo r setting the
direct ion of travel.
• Press the SE T button again br iefly. This brin gs you to the next se tting.
The red LED f lashes at the nex t highest spe ed.
• By repeat edly pressing br iefly on the SET b utton you can scr oll through the
settin gs.
• When you re ach the required s etting, hold do wn the SET butto n for approx. 2
seconds; t he setting is sto red.
• Once you have s tored the sett ing, the red and blu e LEDs flashes alte rnate
to show that yo u are leaving the pro gramming mode. T he controller is re ady
for oper ation again. Switc h controller off and on again to acti vate the select ed
settin gs.
• If you do not p ress the SET butt on for more than 10 secon ds the
controll er reverts to the la st setting and is r eady for use again .
Blue LED
Red LED
Page 30

40 CARSO N DRAGSTER Br ushless- Regler
GB
• Press the SE T button down unt il the blue LED light up 3 t imes. Release th e SET
button a gain.
• The red LED s tart flashi ng. This shows that yo u are in the mode for s etting
maximum b rake perform ance.
• Press the SE T button repea tedly until you reac h the required set ting.
The red LED f lash at the nex t highest speed .
• By repeat edly pressing br iefly on the SET b utton you can scr oll through the
settin gs.
• When you re ach the required s etting, hold do wn the SET butto n for approx.
2 seconds; t he setting is sto red.
• Once you have s tored the sett ing, the red and blu e LEDs flashes alte rnate 3
times to sho w that you are leaving t he programming m ode. Switch contro ller
off and o n again to activat e the selected s ettings.
• If you do not p ress the SET butt on for more than 10 secon ds the
controll er reverts to the la st setting and is r eady for use again .
Flashing
freque ncy
1 2 3 4 5 6 7 8 9 10
Initial b rake
perfo rmance
(%)
10 20 30 40 45 50 55 60 65 70
10. Setting the Initial Brake Performance
Blue LED
Red LED
Page 31

41CARSON DR AGSTER Brus hless-R egler
GB
Flashing
freque ncy
1 2 3 4 5 6 7 8 9 10
Drag bra ke (%) OFF 5 10 15 2 0 25 30 35 40 45
11. Setting the Drag Brake (Engine Brake)
The drag b rake simulates the f riction of the br ushes of brush moto rs.
• Press the SE T button down unt il the blue LED light up 4 t imes. Release th e SET
button a gain.
• The red LED s tart flashi ng. This shows that yo u are in the mode for s etting the
parkin g brake.
• Press the SE T button repea tedly until you reac h the required set ting.
The red LED f lash at the nex t highest speed .
• By repeat edly pressing br iefly on the SET b utton you can scr oll through the
settin gs.
• When you re ach the required s etting, hold do wn the SET butto n for approx. 2
seconds; t he setting is sto red.
• Once you have s tored the sett ing, the red and blu e LEDs flashes alte rnate 3
times to sho w that you are leaving t he programming m ode. Switch contro ller
off and o n again to activat e the selected s ettings.
• If you do not p ress the SET butt on for more than 10 secon ds the
controll er reverts to the la st setting and is r eady for use again .
Blue LED
Red LED
Page 32

42 CARSO N DRAGSTER Br ushless- Regler
GB
With the de ad band settin g you can adjust the sp eed controller t o the transmitte r
being us ed by changing the tr ansition from fo rward drive to bra ke action. Level
1 means a nar rower transition a rea which require s particularl y finely tuned
transmit ting signals. Si mple transmit ters are suffi cient for the wide r transition
area at Leve l 5.
Flashing
freque ncy
1 2 3 4 5
Dead Ban d (%) 2 3 4 5 6
• Press the SE T button down unt il the blue LED light up 5 t imes.
Releas e the SET button ag ain.
• The red LED s tart flashi ng. This shows that yo u are in the mode for s etting the
dead ban d delay time.
• Press the SE T button repea tedly until you reac h the required set ting.
The red LED f lash at the nex t highest speed .
• By repeat edly pressing br iefly on the SET b utton you can scr oll through the
settin gs.
• When you re ach the required s etting, hold do wn the SET butto n for approx.
2 seconds; t he setting is sto red.
• Once you have s tored the sett ing, the red and blu e LEDs flashes alte rnate 3
times to sho w that you are leaving t he programming m ode. Switch contro ller
off and o n again to activat e the selected s ettings.
• If you do not p ress the SET butt on for more than 10 secon ds the
controll er reverts to the la st setting and is r eady for use again .
12. Setting the Dead Band
Blue LED
Red LED
Page 33

43CARSO N DRAGSTER Br ushless- Regler
GB
13. Selecting a Pre-programmed driver Profiles
(Throttle/Brake Settings)
Profil es 1 - 4 have no influenc e on the undervol tage protecti on set at the time
when you se lected the ty pe of batter y.
Driver pro file 1 2 3 4 rese t to
factor y
default s
5
Cut-Of f as
select ed
as
select ed
as
select ed
as
select ed
NiMH
Reverse tr avel no ye s yes no yes
Percentage
reverse tr avel
0 50 50 0 25
Initial bra king
perfor mance
30 % 30 % 40 % 4 0 % 30 %
Parking br ake 15 % 10 % 15 % - 10 %
Dead Band 3 3 4 4 3
• Press the SE T button down unt il the blue LEDs light u p 6 times. Releas e the
SET but ton again.
• The red LED s tart flashi ng. This shows that yo u are in the mode for s etting the
driver pro file.
• Press the SE T button repea tedly until you reac h the required set ting. The red
LED flash a t the next highe st speed.
• By repeat edly pressing br iefly on the SET b utton you can scr oll through the
settin gs.
• When you re ach the required s etting, hold do wn the SET butto n for approx. 2
seconds; t he setting is sto red.
• Once you have s tored the sett ing, the red and blu e LEDs flashes alte rnate 3
times to sho w that you are leaving t he programming m ode. Switch contro ller
off and o n again to activat e the selected s ettings.
• If you do not p ress the SET butt on for more than 10 secon ds the
controll er reverts to the la st setting and is r eady for use again .
Page 34

44 CARSO N DRAGSTER Br ushless- Regler
GB
Precautionary measures during use in damp or wet
weather.
• Please alw ays dry off and c lean immediatel y after use.
• Never sto re the component s in a damp or wet conditi on.
• To avoid corrosio n, never allow the pr oduct to come into co ntact with salt
water. If the p roduct comes into c ontact with sal e water, clean with fre sh
water imm ediately.
• The housi ng of the speed cont roller is waterpr oof. The connec tions to the
drive bat tery, the motor and t he receiver conne ctions are not wat erproof!
Please pay a ttention to the ex posed connec tions and keep them a way from
liquids an d moisture.
• When usin g the product in a we t or damp environme nt, please ensure t hat the
other ele ctronic compo nents such as the re ceiver, the batter y, the servo and
the motor a re protected fro m water.
• This prod uct is not suitab le for use on ships or i n submarines.
14. Precautionary measures
Page 35

CARSON-Model Sport
Werkstraße 1 • D-90765 Fürth/Germany
For Germa ny: Service-Hotline:
Mo - Do 8.00 – 17.00 Uhr
Fr 8.00 – 14.30 Uhr
01805–73 33 00
14 ct/min
CARSON-Model Sport
Abt. Service
Mittlere Motsch 9
96515 Sonneberg
www.carson-modelsport.de
 Loading...