

Page 1
X-10NB Chassis
Betriebsanleitung Seite 2 - 12
쮕
Instruction Manual Page 13 - 23
CARSON X10NB Chassis
Page 2
Sehr geehrter Kunde
Wir beglückwünschen Sie zum Kauf Ihres CARSON RC-Modell autos,
das nach dem heutigen Stand der Technik gefertigt wurde.
Da wir stets um Weiterentwicklung und Verbesserung unserer
Produkte bemüht sind, behalten wir uns eine Änderung in technischer
Hinsicht und in Bezug auf Ausstattung, Materialien und Design jederzeit und ohne Ankündigung vor.
Aus geringfügigen Abweichungen des Ihnen vorliegenden Produktes
gegenüber Daten und Abbildungen dieser Anleitung können daher
keinerlei Ansprüche abgeleitet werden.
Diese Bedienungs- und Montageanleitung ist Bestandteil des
Produkts. Bei Nichtbeachtung der Bedienungsanleitung und der
enthaltenen Sicherheitsanweisungen erlischt der Garantieanspruch.
Bewahren Sie diese Anleitung zum Nachlesen und für die even tuelle
Weitergabe des Modells an Dritte auf.
Garantiebedingungen
Für dieses Produkt leistet CARSON eine Garantie von 24 Monaten
betreffend Fehler bei der Herstellung in Bezug auf Material und
Fertigung bei normalem Gebrauch ab dem Kauf beim autorisierten
Fachhändler. Im Falle eines Defekts während der Garantiezeit bringen
Sie das Modell zusammen mit dem Kaufbeleg zu Ihrem Fachhändler.
CARSON wird nach eigener Entscheidung, falls nicht anders im Gesetz
vorgesehen:
(a) Den Defekt durch Reparatur kostenlos in Bezug auf Material und
Arbeit beheben;
(b) Das Produkt durch ein gleichartiges oder im Aufbau
ähnliches ersetzen; oder
(c) Den Kaufpreis erstatten.
Alle ersetzten Teile und Produkte, für die Ersatz geleistet wird, werden
zum Eigentum von CARSON. Im Rahmen der Garantie leistungen
dürfen neue oder wiederaufbereitete Teile verwendet werden.
Auf reparierte oder ersetzte Teile gilt eine Garantie für die Restlaufzeit
der ursprünglichen Garantiefrist. Nach Ablauf der Garantiefrist vorgenommene Reparaturen oder gelieferte Ersatzteile werden in Rechnung
gestellt.
Konformitätserklärung
Hiermit erklärt Dickie-Tamiya GmbH & Co. KG, dass sich dieses Modell
einschließlich Fernsteueranlage in Übereinstimmung mit den grundlegenden Anforderungen folgender EG-Richtlinien: 98/37EG für
Maschinen und 89/336/EWG über die elektro magnetische Verträglichkeit und den anderen relevanten Vorschriften der Richtlinie 1999/5/EG
(R&TTE) befindet.
Die Original-Konformitätserklärung kann angefordert werden:
Dickie-Tamiya GmbH & Co. KG • Werkstraße 1 • D-90765 Fürth •
Germany
Von der Garantie ausgeschlossen sind:
• Beschädigung oder Ausfall durch Nichtbeachten der Sicherheitsanweisungen oder der Bedienungsanleitung, höhere Gewalt, Unfall,
fehlerhafte oder außergewöhnliche Beanspruchung, fehlerhafte
Handhabung, eigenmächtige Veränderungen, Blitzschlag oder
anderer Einfluss von Hochspannung oder Strom.
• Schäden, die durch den Verlust der Kontrolle über Ihr Fahrzeug
entstehen.
• Reparaturen, die nicht durch einen autorisierten CARSON Service
durchgeführt wurden
• Verschleißteile wie etwa Sicherungen und Batterien
• Rein optische Beeinträchtigungen
• Transport-, Versand- oder Versicherungskosten
• Kosten für die Entsorgung des Produkts sowie Einrichten und vom
Service vorgenommene Einstell- und Wiedereinrichtungsarbeiten.
Durch diese Garantie erhalten Sie spezielle Rechte, darüber hinaus ist
auch eine von Land zu Land verschiedene Geltendmachung anderer
Ansprüche denkbar.
Bedeutung des Symbols auf dem Produkt, der
Verpackung oder Gebrauchsanleitung: Elektrogeräte sind Wertstoffe und gehören am Ende der
Laufzeit nicht in den Hausmüll! Helfen Sie uns bei
Umweltschutz und Recourcenschonung und geben
Sie dieses Gerät bei den entsprechenden Rücknahmestellen ab. Fragen dazu beanwortet Ihnen die
für Abfallbeseitigung zuständige Organisation oder
Ihr Fachhändler.
Wir wünschen Ihnen viel Spaß mit Ihrem
CARSON Modellauto und jederzeit gute Fahrt!
Vor dem Gebrauch Ihres neuen Modells lesen Sie bitte dieses Handbuch
sorgfältig durch!
2DCARSON X10NB Chassis
Page 3
Inhalt
on)
ONX10NBChass
Lieferumfang
Vorwort .......................................................................................................................... 2
Lieferumfang ................................................................................................................ 3
Sicherheitsanweisungen ......................................................................................... 4
Zum Betreiben des Motors erforderliches Zubehör ...................................... 5
Für den Zusammenbau erforderliches Werkzeug .......................................... 6
a. Ihre Fernsteuerung .............................................................................................. 6
b. Chassis ...................................................................................................................... 7
c. Einlegen der Empfängerbatterien .................................................................7
d. Funktionstest .........................................................................................................8
e. Letzte Vorbereitungen........................................................................................ 8
f. Es kann losgehen... fast! ..................................................................................... 9
g. Einschalten der RC-Anlage.............................................................................. 10
h. Steuern des Modells ..........................................................................................10
i. Wartung und Pflege ..........................................................................................11
j. Problembehandlung ......................................................................................... 12
Montageanleitung ...................................................................................................24
Ersatzteile ....................................................................................................................48
D
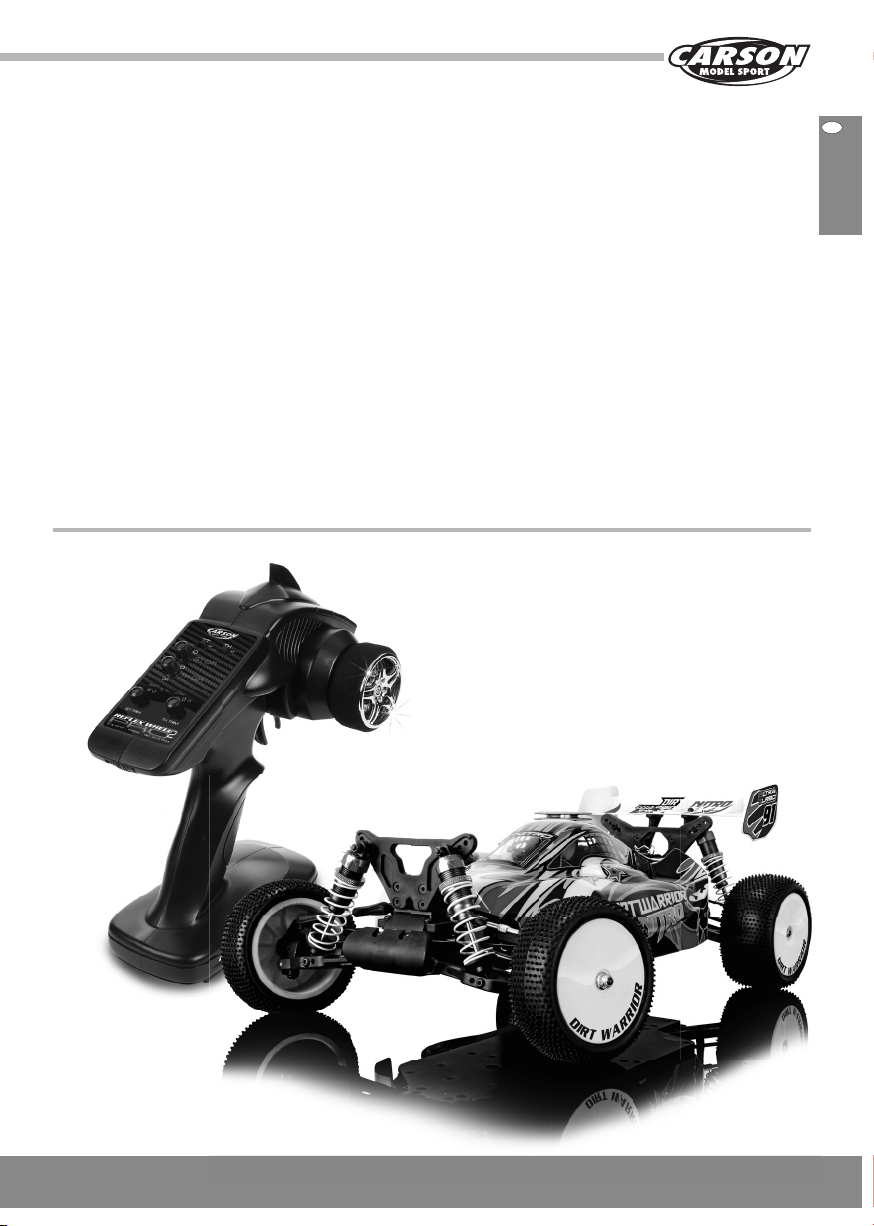
Sender
r
(nur bei RTR-Version)
ei RTR-Versi
Chassis
3CARSON X10NB Chassis
Page 4
Page 5

Bezüglich des Kraftstoffes bitte folgendes
Kra
beachten:
• Unter Verschluss und für Kinder und Tiere unzugänglich
aufbewahren
• Behälter dicht geschlossen halten
• Behälter an einem gut belüfteten Ort aufbewahren
• Von Zündquellen fernhalten – Nicht rauchen
• Nicht verschlucken und Berührung mit der Haut vermeiden
Kraftstoffreste und -behälter müssen als Sondermüll beseitigt werden.
Bei Unfall oder Unwohlsein sofort den Arzt hinzuziehen (wenn möglich
das Etikett des Kraftstoffs vorzeigen).
Zum Betreiben des Motors
erforderliches Zubehör
Zum Schluss
Bitte lesen Sie diese Betriebsanleitung sorgfältig durch, bevor Sie
irgendwelche Arbeiten beginnen.
Nach jeder Fahrt sollten Sie die wichtigsten Bauteile und Verbindungen überprüfen. Eine einzige gelockerte Schraube kann ausreichen, um Ihr Modell in eine gefährliche Situation geraten zu lassen!
Warten Sie Ihr Modell regelmäßig und wechseln Sie defekte oder
abgenutzte Bauteile gegen Original-Ersatzteile aus.
Wir wünschen Ihnen viel Spaß mit Ihrem
CARSON-Modellauto und jederzeit gute Fahrt!
D
Glühkerzenstecker
500905042
Nitroset
500905082
Afterrunöl Luftfilteröl
500905044 500032648
Kraftstoff füllflasche
500013330
CARSON-Kraftstoffe werden empfohlen
Liter Nitromethan N
2,0 16% 500905091 Normal
2,0 25% 500905022 Race
CARSON-ROSSI Glühkerzen
O
N
500905006 Glühkerze Rossi R2 heiß 2 - 3,5 ccm ohne Nitro +0° - +15C°
500905007 Glühkerze Rossi R3 medium 3,5 - 6 ccm ohne Nitro -2° - +18C°
500905008 Glühkerze Rossi R4 kalt 6 - 10 ccm ohne N itro -5° - +20C°
500905009 Glühkerze Rossi R5 extra 3,5 - 10 ccm 10% Nitro -7° - +22°
500905010 Glühkerze Rossi R6 kalt universal 10-13% Nitro +10° - +25°
500905011 Glühkerze Rossi R7 kalt universal 13-15% Nitro +15° - +30°
500905012 Glühkerze Rossi R8 extra kalt universal 13-15% Nitro +20° - +40°
Bezeichnung Motorart Kraftstoffart Temperatur
Kraftstoff
f
O
Verwendung
Für den Sender werden 4 Stück AA Batterien/Akkus benötigt.
5CARSON X10NB Chassis
Page 6
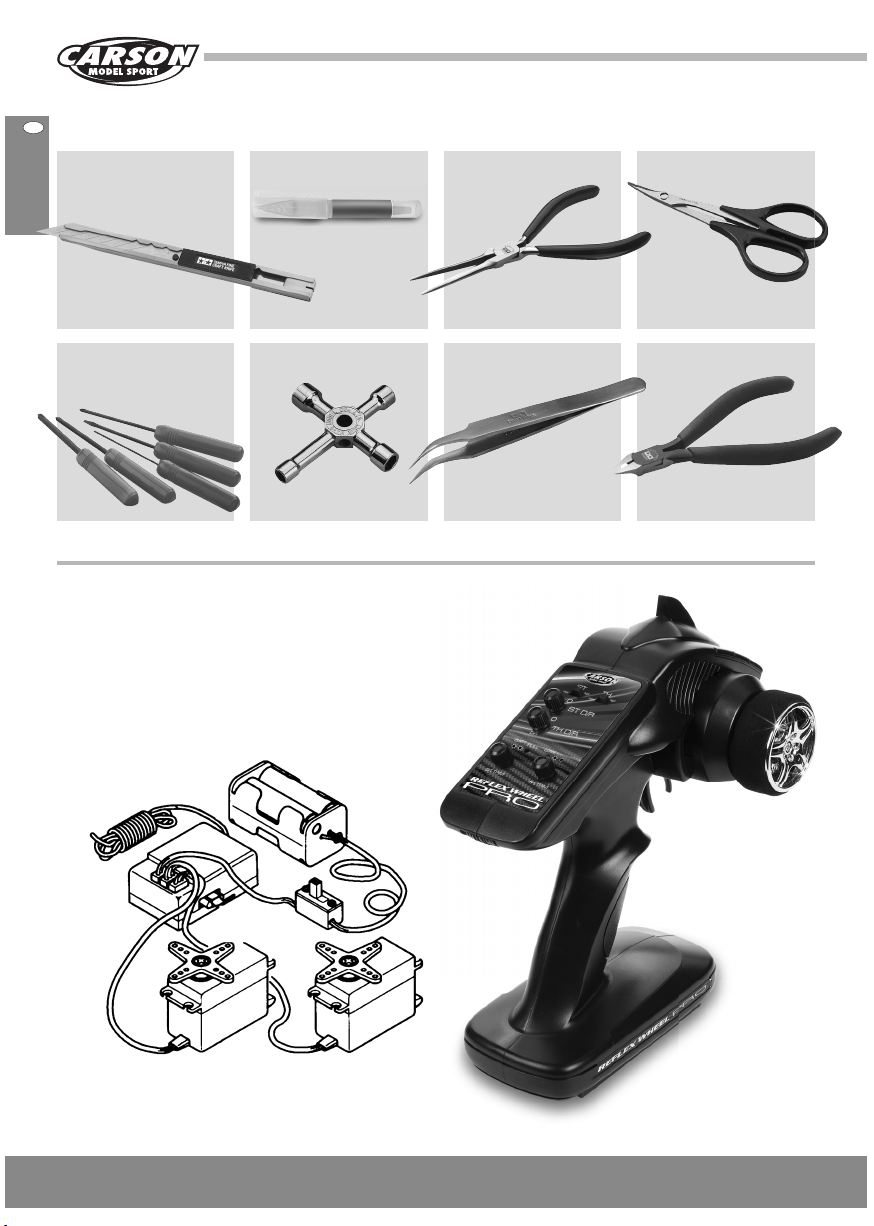
Für den Zusammenbau erforderliches Werkzeug
)
Modellbaumesser 300074053
Sekundenkleber 300053339
Schere 300013305Spitzzange 300074034
(klein und groß) und Inbusschlüssel
1,5 / 2 / 2,5 mm 300074023
a. Ihre Fernsteuerung (nur bei RTR-Version)
Bitte lesen Sie die, Ihrem RC-System beiliegende Anleitung, genau
durch.
Vor dem Einbau müssen die Servos in Mittelstellung gebracht werden.
Dazu schalten Sie bitte den betriebsbereiten Sender und Empfänger
ein. Stellen Sie die Trimmhebel am Sender auf Mittelstellung. Jetzt
schalten Sie den Empfänger und dann den Sender aus. Die Servos sind
jetzt für den Einbau genau auf Neutralstellung.
Empfängerantenne
Kreuzschlüssel 300013118Kreuzschlitz-Schraubendreher
ion
Empfängerakku
Schalter
Pinzette 300074003
Seitenschneider 300074035
Sender
Gasservo
6DCARSON X10NB Chassis
Lenkservo
Page 7
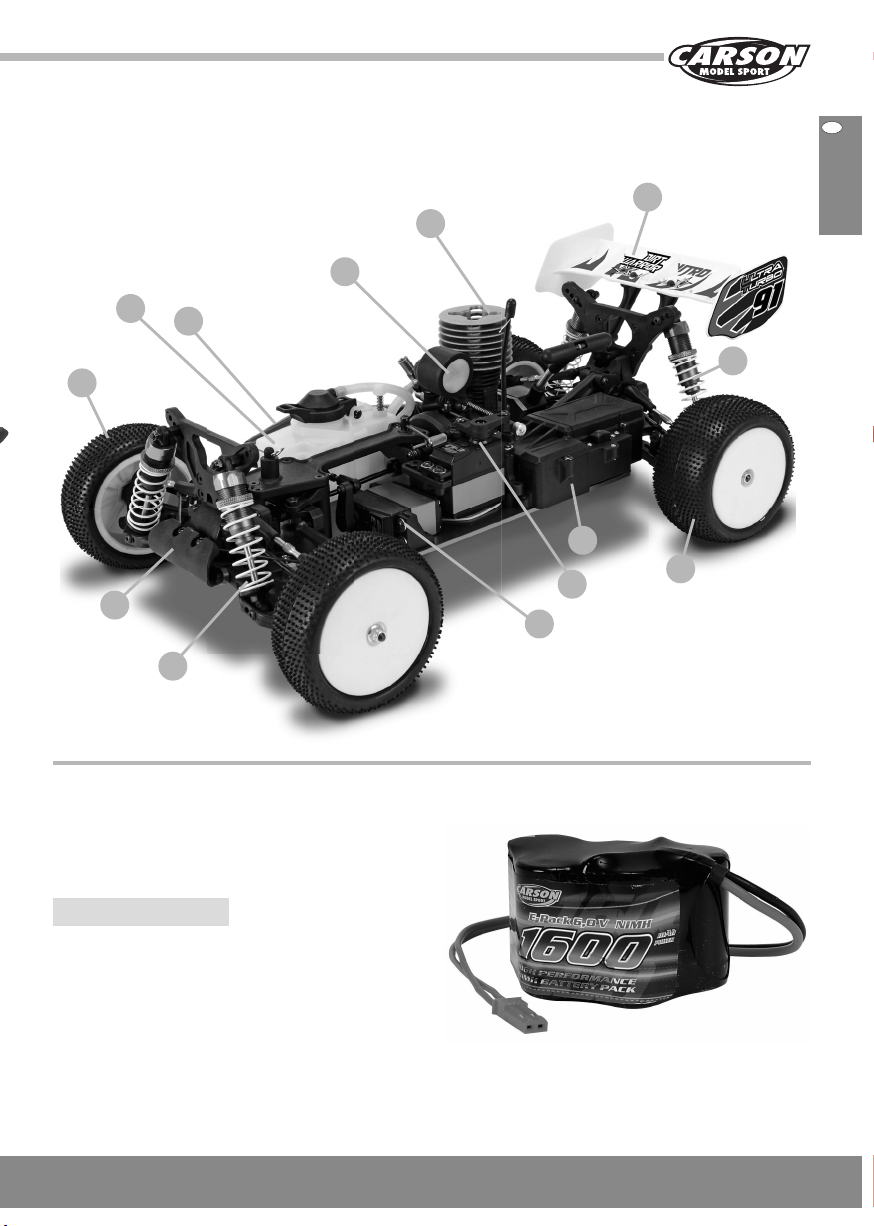
b. Chassis
Tank
Vorderreifen
Chassis
Auspuff
Vorderer Stoßdämpfer
Luftfilter
Motor
Lenkservo
Empfängerbox
Gasservo
Spoiler
Hinterreifen
Hinterer
Stoßdämpfer
D
c. Einlegen des Empfängerakkus
Achten Sie auf die korrekte Polung. Verbinden Sie dann den Akku mit
dem zugehörigen Stecker zum Empfänger. Schwarz muss mit schwarz
und rot mit rot verbunden werden.
Schließen Sie dann das Batteriefach mit der zugehörigen Abdeckung.
Insider Tipp:
Benutzen Sie wiederaufladbare Akkus. Verwenden Sie unseren
NiMh 6 V/ 1100 mAh Akkupack (No 500608104).
Bild 1
7CARSON X10NB Chassis
Page 8
d. Funktionstest
Schalten Sie immer zuerst die Fernbedienung ein, bevor Sie Ihr Auto
einschalten. Nun können Sie Ihr Auto einschalten, indem Sie den EIN/
AUS-Schalter am Auto betätigen. Hinweis: Überprüfen Sie immer die
Einstellung Ihrer Fernbedienung, vor der Benutzung Ihres Autos.
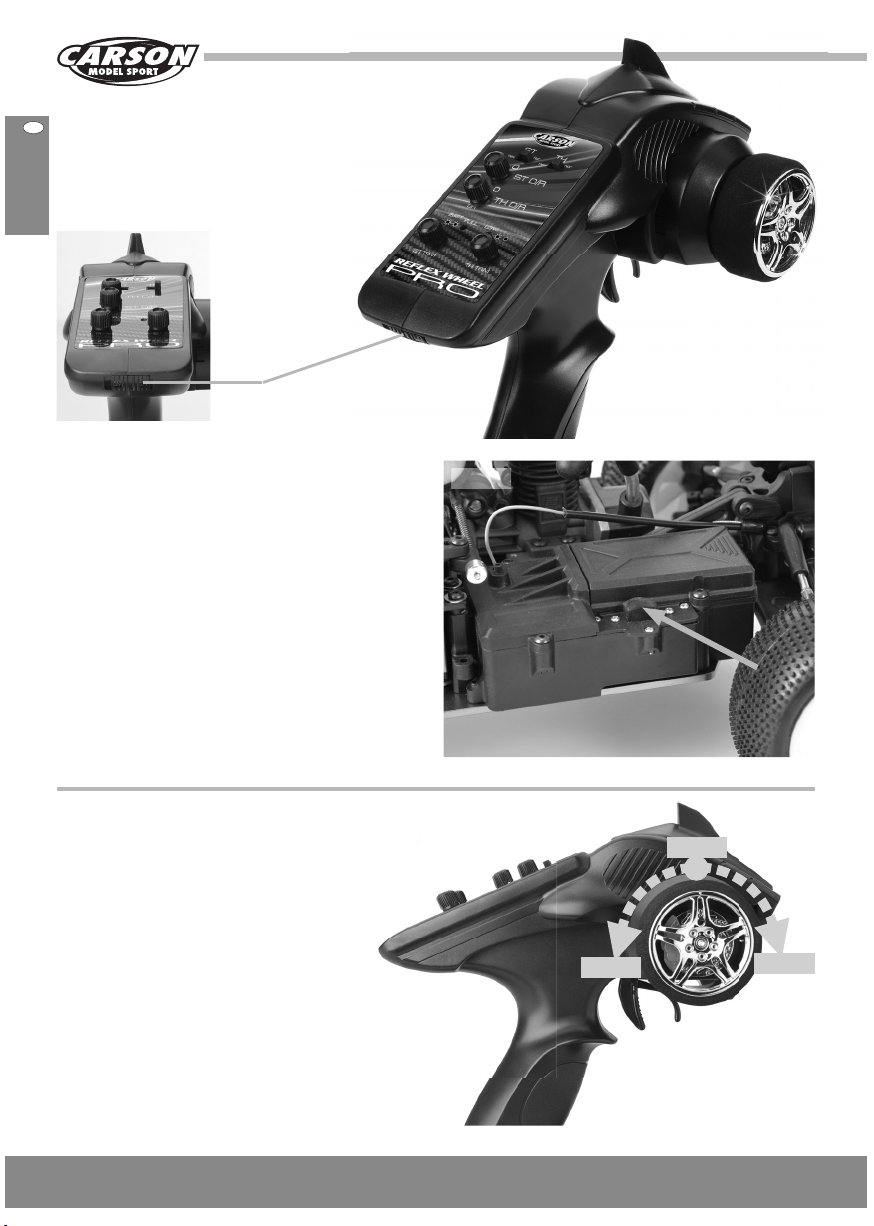
Überprüfen Sie bitte, ob die Lenkung zentriert ist. Sollte dies nicht der
Fall sein, benutzen Sie den ST-Trimm-Knopf links neben dem Lenkrad
(siehe Bild 3). Die Drehung nach links sollte das Auto nach links fahren
lassen, eine Rechtsdrehung nach rechts.
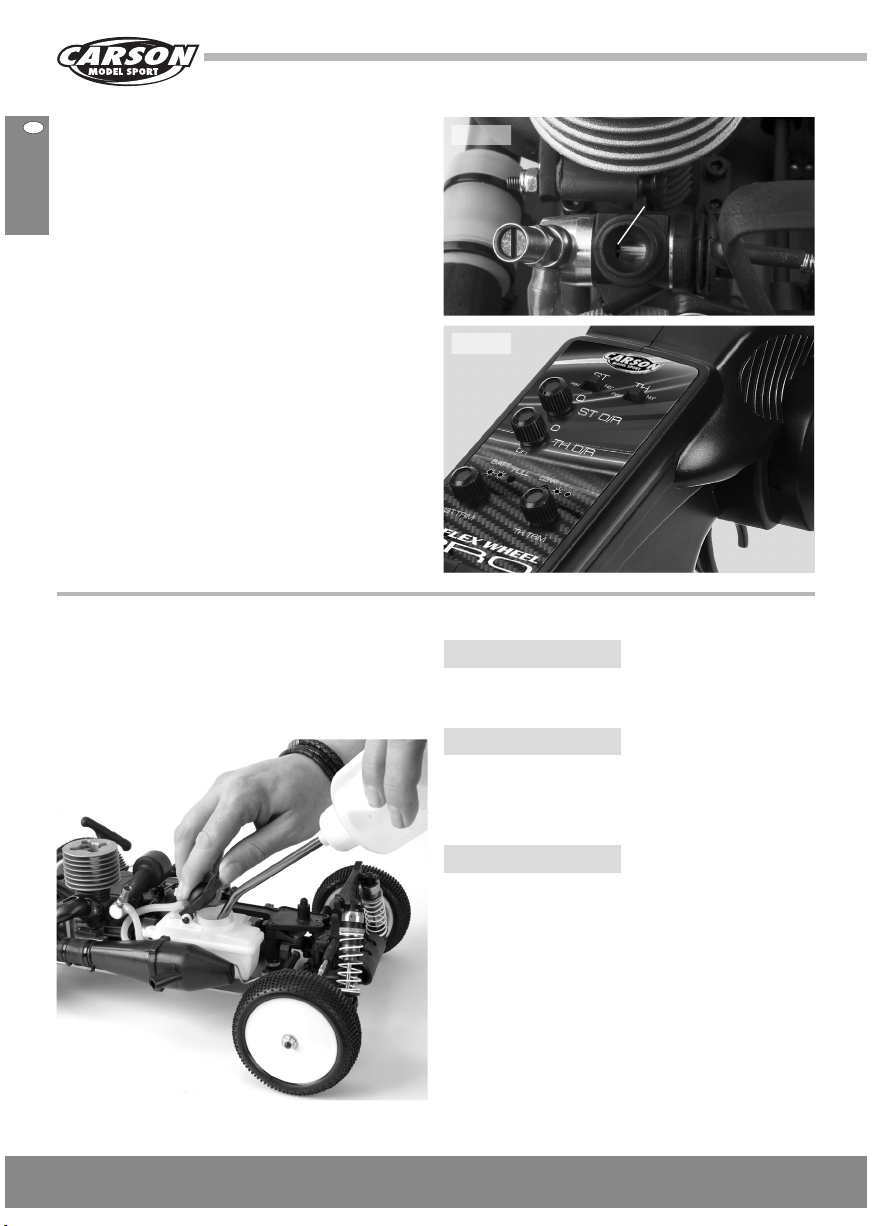
Nun muss der Vergaser in die Neutralstellung gebracht werden.
Entfernen Sie den Luftfilter vom Vergaser.
Im Vergaserhals muß ein Spalt von ca. 1 - 1,5 mm zu sehen sein (siehe
Bild 2). Sollte der Spalt größer sein, kann es sein, dass der Motor mit
zu hoher Drehzahl läuft. Dies kann dazu führen, dass die Bremsen
und/ oder die Kupplungsbeläge vorzeitig ab ge nutzt werden und es
erschwert das Fahren des Autos.
Benutzen Sie den TH-Trimm (siehe Bild 3) um den Servoarm, wenn
nötig, in die neutrale Position zu bringen. In der Neutralposition sollten
die Bremsen nicht schleifen. Die Einstellung erfolgt mit einem 1,5 mm
– Inbusschlüssel über einen Stellring am Bremsgestänge. Wenn Sie mit
den Einstellungen zufrieden sind, bringen Sie den Luftfilter wieder an.
e. Letzte Vorbereitungen...
Stecken Sie die Kraftstoff-Flasche zusammen. Drücken Sie diese
zusammen und stecken Sie die Spitze in einen Kanister mit Nitro Autokraftstoff. Lassen Sie langsam mit dem Druck nach und die Flasche füllt
sich von selbst. Danach, drücken Sie langsam die Flasche zusammen
um den Benzintank Ihres Autos aufzufüllen.
Bild 2
1 - 1,5 mm
Bild 3
Insider Tipp 1:
Der Kraftstoff hält sich länger, wenn Sie diesen an einem kalten,
dunklen und trockenen Platz aufbewahren.
Bild 4
8DCARSON X10NB Chassis
Insider Tipp 2:
Lassen Sie den Glühkerzenstecker niemals länger als 10 Sekunden am
Motor angeschlossen. Wenn Sie diesen zu lange benutzen, kann dies
dazu führen, dass die Glühkerze vorzeitig durchbrennt. Benutzen Sie
wiederaufladbare Glühzünder für längere Lebensdauer.
Insider Tipp 3:
Zum Starten feuerfeste Handschuhe anziehen!
Page 9
f. Es kann losgehen... fast!
Das Einfahren des Motors ist der wichtigste Schritt, um sicherzugehen,
dass Ihr Motor immer schnell und verlässlich läuft. Einfach gesagt:
LASSEN SIE DIESEN TEIL NICHT AUS!
Der Motor ist vom Hersteller schon „Voreingestellt“. Benutzen Sie „Car
Stand“ 908071 oder eine andere Plattform und stellen Sie das Auto
so darauf, dass die Reifen keinen Bodenkontakt haben und sich frei
bewegen können.
Der Gashebel der Fernsteuerung muss in der Position „neutral“ sein.
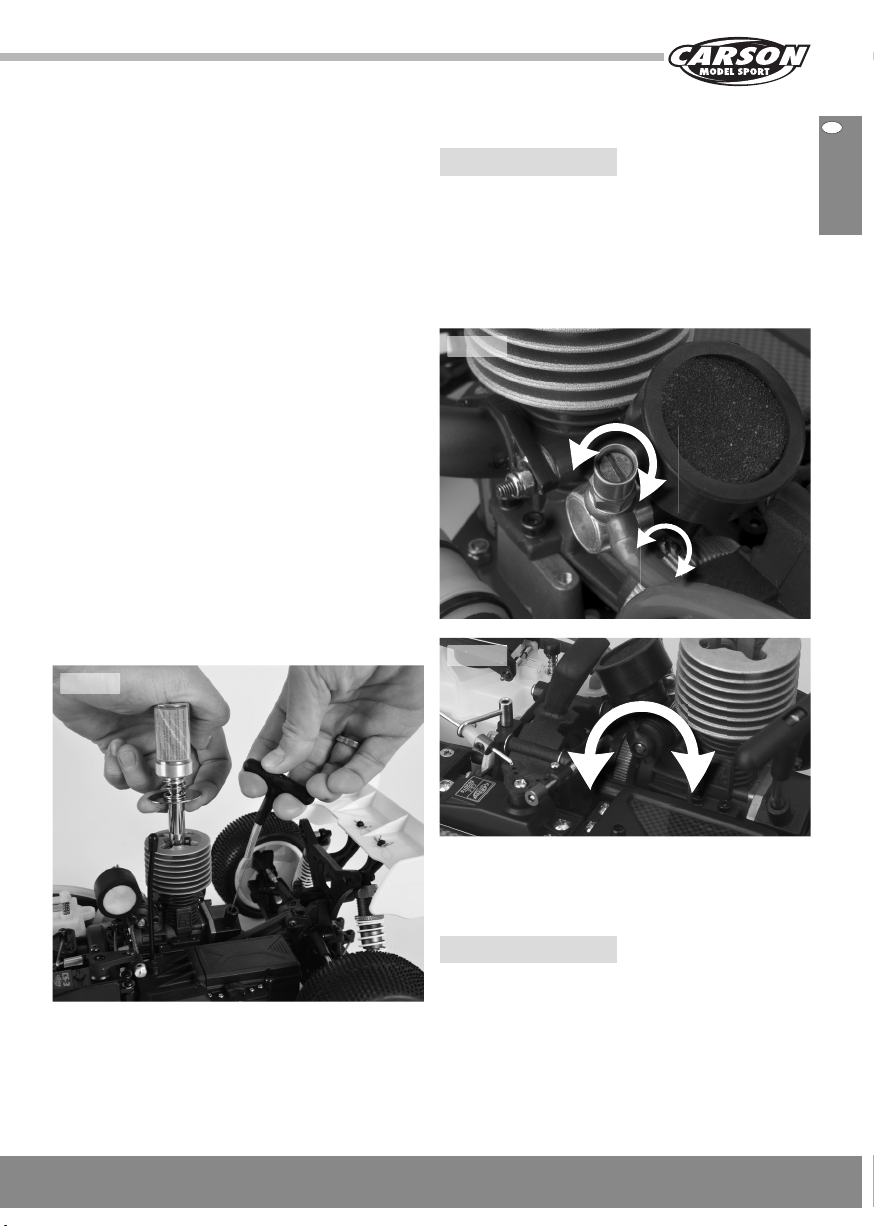
Platzieren Sie den Glühkerzenstecker auf der Glühkerze und ziehen Sie
das Startseil kräftig heraus (siehe Bild 5). Es darf jedoch nicht mehr als
25 cm herausgezogen werden! Wenn Sie es weiter herausziehen, kann
das Seil reißen. Es ist besser, das Startseil kurz und kräftig zu ziehen, als
zu weit heraus. Sollte das Startseil hängen bleiben, rotieren Sie bitte
das Schwungrad etwas mit Ihrem Finger. Das sollte das Seil automatisch wieder in die Startposition bringen. Nach einigen Zügen, sollte
der Motor mit viel Rauch starten.
Sollte der Motor Probleme im Leerlauf haben, drehen Sie bitte die
Schraube für den Leerlauf im Uhrzeigersinn immer um 1/8 Schritte
weiter. Das erhöht den Leerlauf, was ein korrektes Einfahren des
Motors ermöglicht. Führen Sie diesen Vorgang nur in einem gut
durchlüfteten Raum durch, vorzugsweise im Freien, z.B. Ihrer Einfahrt.
Nicht verbranntes Öl des Kraftstoffes kann sich am Auspuff sammeln,
legen Sie etwas unter. Lassen Sie das Auto im Leerlauf über 2 bis 3
Tankfüllungen laufen und überprüfen Sie die Temperatur des Motors
etwa alle zwei Minuten.
Lassen Sie zwischen den Tankfüllungen 10 - 15 Min Pause zum
Abkühlen. Der Motorkühlkörper sollte mit dem Finger berührt werden
können und nicht zu heiß sein. (ACHTUNG! Nicht anfassen!) Sollte die
Oberfläche zu heiß werden, erhöhen (drehen gegen den Uhrzeigersinn) Sie die Hauptdüsennadel um 1/8. Gehen Sie in kleinen Schritten
vor, wenn Sie solche Veränderungen vornehmen.
Bild 5
Tipp:
Werkseinstellung vom Vergaser:
Mit folgender Grundeinstellung springt der Motor sofort an und läuft
sauber und ausreichend fett.
• Leerlaufschraube: ca. 1 mm Luftspalt;
• Hauptdüsennadel: ganz schließen, dann 4 Umdrehungen öffnen;
• Gemisch-Schraube (Anlenkung): mit dem Rand des Lenk hebels
bündig, dann 1 Umdrehung schließen.
Bild 6
fetter
niedrigere
Drehzahl
magerer
höhere
Drehzahl
Bild 7
D
fetter magerer
Sobald der Einfahrprozess abgeschlossen ist, muss die Hauptdüsennadel mindestens 3 1⁄4 Umdrehungen geöffnet sein. Bei hohen
Außentemperaturen wird es nötig sein, die Einstellungen etwas fetter zu
wählen.
Insider Tipp:
Nach der Einlauf-Periode können Sie Ihr Auto bei fetter Vergaser-Einstellung langsam fahren und vermeiden Sie längere Zeiten bei Vollgas.
Stimmen Sie die Einstellung mit 1/8 Drehungen vorsichtig ab. Der
Leerlauf erhöht sich um so mehr, je mehr Sie das Gemisch im Motor
abmagern.
9CARSON X10NB Chassis
Page 10
g. Einschalten der RC-Anlage
.
.
Ziehen Sie die Senderantenne ganz heraus.
Bei nicht vollständig herausgezogener Antenne verringert sich die
Reichweite der Fernsteuerung.
ACHTUNG! Immer zuerst den Sender einschalten!
ON
Einschalten des Empfängers
• Der Ein/Aus Schalter befindet sich auf der Empfängerbox.
• Befestigen Sie das Antennenröhrchen, durch das das
Antennenkabel geführt wird (siehe Seite 73).
•
Setzen Sie die Karosserie auf und sichern diese mit den
Karosseriesplinten
h. Steuern des Modells
• Stellen Sie das Modell so ab, dass die Räder frei in der Luft hängen.
• Drehen Sie das Steuerrad bis zum Anschlag nach rechts und links.
Die Räder sollen dem Lenkausschlag folgen.
• Schlagen die Räder entgegengesetzt ein, betätigen sie den
Servo-Reverse Schalter (ST in Position REV).
• Zum Regeln der Fahrgeschwindigkeit betätigen Sie den
Gas/Bremshebel
- nach hinten (Vorwärtsfahrt, Gas geben) bz w.
- nach vorne (Bremsen, Rückwärtsfahrt).
hängen
links
n
Bild 8
Links
ON
Neutral
Rechts
10DCARSON X10NB Chassis
Page 11

i. Wartung und Pflege
Schäden, die daraus resultieren, dass der Motor nicht eingefahren
wurde und/oder die durch falsche Einstellung entstehen, fallen nicht
unter die Gewährleistungsgarantie.
Es gibt zwei verschiedene Möglichkeiten die Temperatur Ihres Motors
zu überprüfen. Sie können sich eine Temperaturanzeige kaufen. Die
zweite billigere Methode, jedoch weniger genau, ist der „Spucketest“.
Reiben Sie etwas Spucke auf die Oberseite des Kühlkörpers und sie wird
innerhalb von 3 – 4 Sekunden verschwinden (der Siedepunkt von Wasser
ist normalerweise 100°C). Sollte die Spucke sofort verschwinden, ist die
Wahrscheinlichkeit sehr groß, dass der Motor zu heiß gelaufen ist.
Der Motor bringt beste Leistung und kann einfacher wieder neu
gestartet werden bei einer Betriebstemperatur von 100°C bis 125°C.
Abhängig vom Wetter, Luftdichte und Luftfeuchtigkeit, muss die Einstellung des Vergasers vor jedem Gebrauch des Fahrzeuges verändert
werden. Vorsichtiges Einstellen garantiert eine lange Lebensdauer
Ihres Motors. Überhitzung erfolgt, wenn das Gemisch im Motor zu
mager ist, oder wenn die Einstellung des Vergasers nicht der Wetterlage angepasst ist. Durch starke Überhitzung kann es zu Motorschäden kommen.
Es gibt viele Tipps und Infos Online, die Ihnen helfen, Ihren Motor
einzustellen. 3,5 ccm Motoren haben eine sehr lange Lebensdauer und
bei richtiger Wartung und Tuning können Sie das Modell stundenlang
ohne Unterbrechung fahren.
Ausschalten
Nach Beendigung des Fahrens, gibt es zwei Möglichkeiten den Motor
auszuschalten. Die erste Möglichkeit ist, ein Tuch dicht auf das Auspuffrohr zu drücken. Der Motor muss im Leerlauf sein, vorzugsweise
sollten die Bremsen betätigt sein.
Die zweite Möglichkeit besteht darin, den Luftzugang zum Motor
abzuklemmen. Der Kraftstoffschlauch sollte nicht abgeklemmt
werden, weil sich der Motor dadurch überhitzen kann.
Versuchen Sie den übrig gebliebenen Kraftstoff durch den Motor
laufen zu lassen, um so den Tank vollkommen zu entleeren. Die Motordrehzahl wird sich im Leerlauf erhöhen während der Tank sich entleert,
somit sind die o.g. Schritte nicht nötig.
Bild 9
Benutzen Sie dann spezielles Öl (After-run Öl) für den Vergaser, ziehen
Sie das Startseil ein paar Mal, damit sich das Öl im Motor verteilt. Dieser Vorgang empfiehlt sich, wenn Sie planen, das Auto mehr als einen
Tag nicht zu fahren. Methanol verdunstet und wird zu Wasser, was für
die Teile im Inneren des Motors schädlich sein kann. Wir empfehlen,
dass Sie vor jedem Gebrauch Ihres Autos die Festigkeit aller Schrauben, Muttern und Bolzen überprüfen.
Bild 10
Das Auto sollte regelmäßig gereinigt werden. Dazu kann eine strapazierfähige Bürste oder ein Pinsel benutzt werden. Überprüfen Sie vor
dem Start immer die Batterien von Sender und Empfänger.
Insider Tipp:
Benutzen Sie Handschuhe, wenn Sie an Ihrem heißen Auto arbeiten!
D
11CARSON X10NB Chassis
Page 12
j. Problembehandlung
Lesen Sie dies, schon bevor es passiert.
Der Motor springt nicht an
Motor ist
abgesoffen.
Zu viel Benzin ist
im Motor.
Kaputte
Glühkerze
Batterie des
Glühkerzensteckers ist leer.
Motor stirbt plötzlich ab
Überhitzung Überprüfen Sie die Temperatur. Sollte diese über
Die Druckleitung ist unterbrochen
Kontrollverlust/Störungen
Leere/schwache
Akkus
Falsche
Einstellung des
Senders
Das Modell fährt
nicht
Entfernen Sie die Glühkerze. Ziehen Sie das Startseil 6 – 8 mal.
Vorsicht, Kraftstoff kann spritzen.
Entfernen Sie die Glühkerze. Stecken Sie die
Glühkerze in den Zünder. Wenn diese schwarz ist,
ist die Kerze kaputt. Sie sollte hell orange glühen.
Legen Sie eine neue Glühkerze in den Glühkerzenstecker. Wenn diese nur sehr schwach oder
überhaupt nicht glimmt, muss eine neue Batterie
oder Akku eingelegt werden.
130°C liegen, muss das Kraftstoffgemisch angereichert werden. Überprüfen Sie, ob die Räder
sich frei bewegen können.
Befestigen Sie die Kraftstoffleitung des
Auspuffrohres wieder mit dem Benzintankdeckel.
Die Akkus im Sender sollten voll aufgeladen sein.
Ist der Servo sehr langsam, bedeutet dies, dass
die Batterien des Empfängers leer sind.
Richten Sie sich nach der Gebrauchs anweisung,
wenn Sie Ihren Sender einstellen.
Sender oder Empfänger sind nicht eingeschaltet.
Polarität der Akkus oder Akkutyp sind falsch.
Batterien/Akkus zu schwach.
Leerer Tank/kein
Kraftstoff im
Motor
Überhitzung Wenn der Motor bei zu hohen Temperaturen
Schmutziger
Luftfilter
Vergaser ist
locker
Modell fährt
nicht geradeaus
Modell bleibt
nicht stehen
Modell fährt zu
langsam
Füllen Sie den Tank auf. Lassen Sie den Motor
ansaugen, indem Sie das Startseil einmal ziehen
und gleichzeitig mit den Fingerspitzen den
Auspuff zuhalten.
läuft, kann dies dazu führen, dass ein Gaspfropfen entsteht. Lassen Sie den Motor
5 – 10 Minuten abkühlen.
Waschen Sie diesen mit Seife und Wasser, dann
benützen Sie Luftfilteröl
(Art.-Nr. 50 003 2648)
Überprüfen Sie Vergaserhalterungsschraube und
Mutter. Drücken Sie den Vergaser auf den Motorblock, ziehen Sie die Schraube fest, um Falschluft
zu vermeiden.
Lenkungstrim ist nicht korrekt eingestellt.
Radmuttern sind lose.
Trimmung für den Gas/Bremshebel ist nicht
korrekt eingestellt
Motor hat an Leistung verloren.
Die hinteren Radmuttern sind lose.
Staub/Fremdkörper ist in das Getriebe gelangt.
12DCARSON X10NB Chassis
Page 13
Dear Customer
We congratulate you for buying this CARSON RC model car, which is
designed using state of the art technology.
According to our policy of steady development and product
improvement we reserve the right to make changes in specifications
concerning equipment, material and design at any time without
notice.
Specifications or designs of the actual product may vary from those
shown in this manual or on the box.
The manual forms part of this product. Should you ignore the
operating and safety instructions, the warranty will be void. Keep this
guide for future reference.
D
GB
Limited Warranty
This product is warranted by CARSON against manufacturing defects
in materials and workmanship under normal use for 24 months from
the date of purchase from authorised franchisees and dealers. In
the event of a product defect during the warranty period, return the
product along with your receipt as proof of purchase to any CARSON
store. CARSON will, at its option, unless otherwise provided by law:
(a) Correct the defect by repairing the product without charging for
parts and labour
(b) Replace the product with one of the same or similar design; or
(c) Refund the purchase price.
All replacement parts and products, and products on which a refund
is made, become the property of CARSON. New or reconditioned parts
and products may be used in the performance of warranty services.
Repaired or replaced parts and products are warranted for the
remainder of the original warranty period. You will be charged for
repair or replacement of the product made after the expiration of the
warranty period.
Declaration of conformity
Dickie-Tamiya GmbH & Co. KG hereby declares that this model kit
with radio, motor, battery and charger is in accordance with the basic
requirements of the following European directives: 98/37 EG and
89/336/EWG and other relevant regulations of guideline 1999/5/EG
(R&TTE).
The original declaration of conformity can be obtained from the
following address:
Dickie-Tamiya GmbH & Co. KG • Werkstraße 1 • D-90765 Fürth •
Germany
The Warranty does not cover:
• Damage or failure caused by or attributable to acts of God, abuse,
accident, misuse, improper or abnormal usage, failure to follow
instructions, improper installation or maintenance, alteration,
lightning or other incidence of excess voltage or current;
• Damage caused by losing control of your car;
• Any repairs other than those provided by a CARSON Authorised
Service Facility;
• Consumables such as fuses or batteries;
• Cosmetic damage;
• Transportation, shipping or insurance costs; or
• Costs of product removal, installation, set-up service adjustment or
reinstallation
This warranty gives you specific legal rights, and you may also have
other rights which may vary according to the country of purchase.
The explanation of the symbol on the product,
packaging or instructions: Electronic devices are
valuable products and should not be disposed of
with the household waste when they reach the end
of their running time! Help us to protect the
environment and respect our resources by handing
this appliance over at the relevant recycling points.
We wish you good luck and a lot of fun driving
with your CARSON model car.
Before driving your new model carefully read these instructions!
13CARSON X10NB Chassis
Page 14
Contents
itter
Preface ..........................................................................................................................13
Included Items ...........................................................................................................14
Safety Precautions ....................................................................................................15
Additional Items Needed for Starting the Engine ........................................ 16
Tools Needed for the Assembly...........................................................................17
a. Your Radio System .............................................................................................17
b. Chassis ....................................................................................................................18
c. Plug in Receiver Batteries ................................................................................18
d. Check 1...2...3 ........................................................................................................19
e. Final Preparations... ............................................................................................19
f. Showtime... almost! ........................................................................................... 20
g. Turn the Power Switch on ............................................................................... 21
h. How to Control your Model ............................................................................ 21
i. Care and Maintenance .....................................................................................22
j. Troubleshooting .................................................................................................23
Assembly ....................................................................................................................24
Spare Parts ..................................................................................................................48
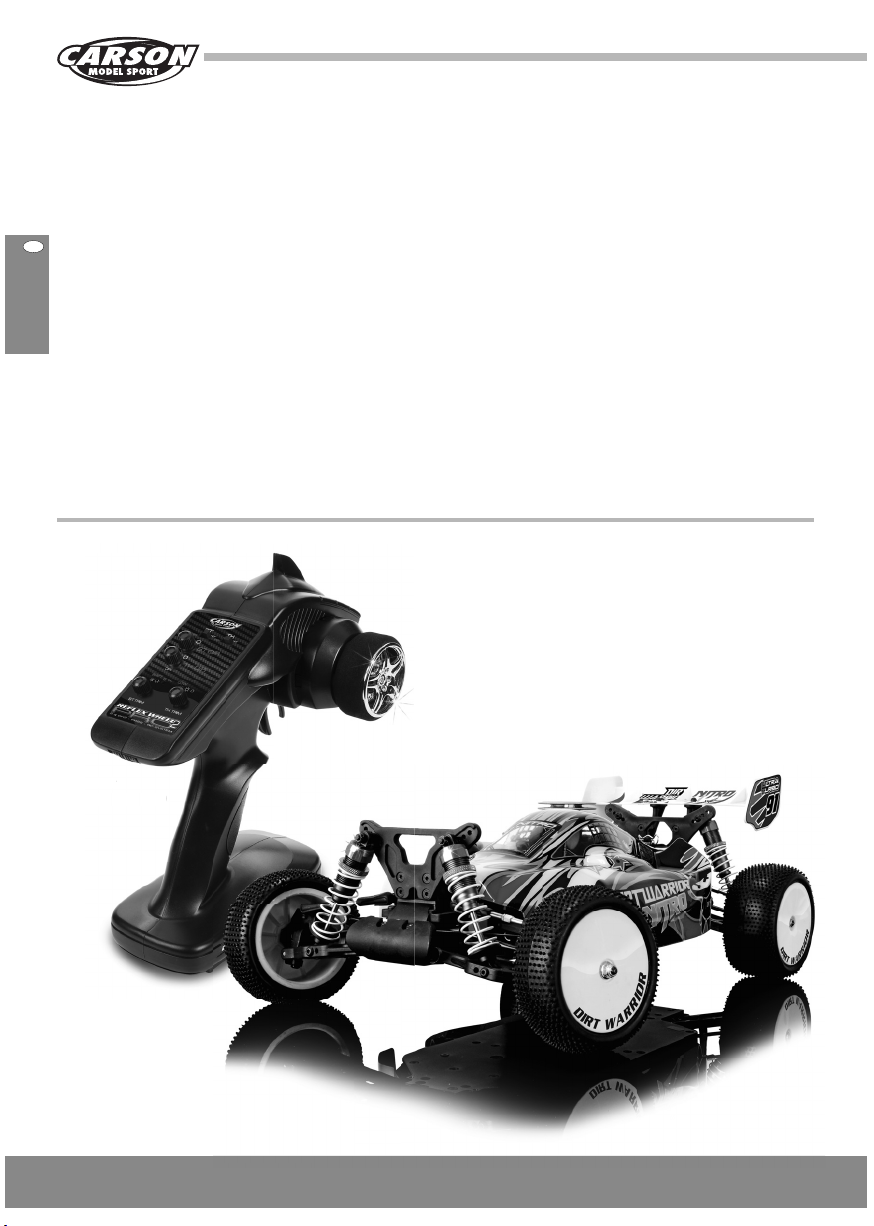
Included Items
Transmitter
(only for RTR version)
for RTR version)
Chassis
14GBCARSON X10NB Chassis
Page 15
Safety Precautions
Safety precautions and operating guidelines
This radio control model vehicle must only be run on the approved
model fuel. Always avoid running radio control models in restricted,
confined or populated areas. Keep away from roads, highways, people
and animals. Never run the model indoors.
No goods, people or animals may be transported using a RC model car
with combustion engine.
Please ensure that you have read all the safety
operating procedures before driving the model!
The body shell should be correctly attached to the vehicle before
driving.
This model is not a toy!
• This radio controlled model is not a toy. Learning how to control it
correctly is a gradual process.
• Children under 14 years of age should be supervised by an adult.
Driving a radio controlled car is a fascinating hobby. However, it has to
be practised with the necessary caution and respect. A radio controlled model car can cause damage and injury and the user is liable for
any such incident. If driven erratically, a fairly heavy remotecontrolled model car which is capable of reaching a high speed can
Never drive without first making sure of the
following points:
• Batteries for transmitter and receiver are well charged and of the
correct voltage.
• Always check the range of radio operation before starting the car.
• Make sure that all servos respond correctly to the signals of the
transmitter.
• All operable parts are in good condition and you have tested their
operation.
• You have made sure that all screws are tightened.
• There is no other RC or similar transmitter nearby, which could
cause interference. Any further radio signal on the same frequency
can cause the loss of control for your model. Always switch on the
transmitter first to avoid any uncontrolled reaction of the receiver
to a foreign radio impulse.
• Fully extend the transmitter antenna and make sure that nobody
in your environment controls a model with the same frequency
(number on the crystal) and that there is no discernable
interference. To end the operation switch off the receiver first,
then the transmitter.
• Keep your car away from high voltage cables or radio masts. Never
use the model during lightning!
• Atmospheric disturbances can affect the signals of your remote
controlling transmitter.
• Do not use the model in wet areas. The electrical connection of the
model is not waterproof. Therefore do not drive while it’s raining,
snowing, or in puddles or wet grass.
instructions and
Allow cooling time for the exhaust and engine components before
removing the body shell. These parts become extremely hot during
operation and could cause serious injury.
Do not operate the model permanently where noise may cause a
nuisance to others, because then you may damage your hearing.
To avoid the model running with a faulty control system causing it to
drive erratically, check that the batteries in the transmitter and receiver
are properly charged.
Always check that all the nuts, bolts and screws and components are
not loose. Retighten and adjust as necessary.
Fill the fuel tank and firmly push the tank lid shut. Clean up any fuel
spillages. Never leave fuel in the fuel tank.
cause substantial damage and injury for which you as the operator are
responsible.
Make sure that you have sufficient insurance cover when practising
your hobby. Only a well maintained model will function in a correct
manner.
Never improvise using unsuitable parts and tools. If necessary only
use original spare parts.
model is functioning correctly and that all nuts, bolts and screws are
properly tightened.
• Always avoid running radio control models in restricted, confined
or populated areas.
• Keep away from roads, highways, people and animals!
• Do not drive, if you are overtired or your reactivity is impaired in
another way.
• Watch your model constantly and do not become distracted.
• The body shell should be correctly attached to the vehicle before
driving.
• Regular maintenance and servicing are required to ensure top
performance.
• Allow cooling time for the engine components before removing
the body shell. Some parts (e.g. the motor and the muffler) become
extremely hot during operation and could cause serious injury.
Pay attention to charge announcement of your transmitter.
• Ensure that the batteries for the radio and receiver are fully charged
and of the correct voltage. When the batteries are running low you
might loose control of your model.
• Never use fully loaded batteries and batteries which have already
run low, or batteries of a different capacity at the same time.
• Never load batteries which are not rechargeable
If you do not use the model for a longer time you must remove the
rechargeable battery.
It is the user’s responsibility to ensure that the
GB
CARSON X10NB Chassis
15
Page 16

Please read the following points concerning the
fuel:
• Keep the fuel in a secure and safe place and away from children and
animals.
• Ensure that the container lid is tightly closed.
• Store the fuel in a well ventilated area and away from moisture.
• Glow fuel is extremely flammable. Do not smoke.
• Avoid skin contact and do not swallow. Read the warning labels on
the container.
Dispose of empty fuel containers in an approved manner. Never throw
empty cans into a fire.
In case of an accident or ingestion contact a doctor immediately.
(Present the label of the fuel container if possible.)
Additional Items Needed for
Starting the Engine
Finally
Please read the instructions before operating your model.
Each time you have finished driving the model, always check the
correct operation of the components. A single loose screw can result in
a dangerous situation for your model. Maintain your model regularly
and replace damaged or worn out parts by genuine spare parts.
We wish you great fun with your CARSON model
car!
Glow plug heater
500905042
Nitroset
500905082
After Run Oil Air Filter Oil
500905044 500032648
Fuel bottle
500013330
CARSON-fuels are recommended
Liter Nitromethan N
2,0 16% 500905091 Normal
2,0 25% 500905022 Race
CARSON-ROSSI glow plugs
O
N
500905006 Glow plug Rossi R2 hot 2 - 3,5 ccm without Nitro +0° - +15C°
500905007 Glow plug Rossi R3 medium 3,5 - 6 ccm without Nitro -2° - +18C°
500905008 Glow plug Rossi R4 cold 6 - 10 ccm without Nitro -5° - +20C°
500905009 Glow plug Rossi R5 extra 3,5 - 10 ccm 10% Nitro -7° - +22°
500905010 Glow plug Rossi R6 cold universal 10-13% N itro +10° - +25°
500905011 Glow plug Rossi R7 cold universal 13-15% N itro +15° - +30°
500905012 Glow plug Rossi R8 extra cold universal 13-15% Nitro +20° - +40°
Article Motor Fuel Temperature
Fuel
O
Verwendung
For the transmitter you need 4 AA batteries/rechargeable batteries.
16GBCARSON X10NB Chassis
Page 17

Tools Needed for the Assembly
)
Modelling knife 300074053
Instant adhesive 300053339
Scissors 300013305Needle nose pliers 300074034
GB
and hex-wrench
1,5 / 2 / 2,5 mm 300074023
Hexagonal wrench 300013118Philips screwdriver (small and big)
a. Your Radio System (only for RTR version)on
Please read the instructions provided with your radio system before
using it.
The servos must be set at the centre position before installation. To set
the servos at a neutral position, turn on the transmitter and receiver.
Set the trim levers in the centre position and turn off the receiver, and
then the transmitter. The ser vos will be in proper neutral position for
installation.
Receiver antenna
Batteries for receiver
Switch
Tweezers 300074003
Side cutter 300074035
Transmitter
Engine throttle
servo
Steering servo
CARSON X10NB Chassis
17
Page 18

b. Chassis
Fuel-tank
Front tyre
Chassis
Front shock unit
Muffler
Air filter
Motor
Receiver box
Throttle servo
Steering servo
Wing
Rear tyre
Rear shock
unit
c. Plug in Receiver Batterie
Make sure positive (+) and negative (-) ends are facing the correct
direction. Then plug the pack into the switch harness, inside the radio
case. Black goes to black and red goes to red. Replace the radio case
cover.
Racer Tip:
Use rechargeable batteries! Use our NiMh 6 V/ 1100 mAh battery pack
(500608104).
18GBCARSON X10NB Chassis
Picture 1
Page 19

d. Check 1...2...3...
Now you can switch on your car using the on/off switch located on the
radio box. Always turn the radio on before turning on your car. Note:
Always check your radio settings before running your car!
Check to make sure your steering is centred. If it is not, use the ST-TRIM
(see picture 3) knob to the left of the steering wheel. Turning left
should make the car turn left. Right=right.
Now it’s time to set the throttle neutral position. Remove the air
cleaner from the carburettor.
The opening on the carb slide should be open very little, from
1-1.5 mm to allow the engine to idle (picture 2). If it is open more than
this, the engine may rev higher than normal until brakes are applied.
This condition may wear out the brakes and/or clutch shoes
prematurely making the car difficult to drive.
Use the TH-TRIM tab (picture 3) to move the servo arm into the neutral
position if necessary. While in neutral, the brakes should not be set
to “drag”. Adjusting the collars with a 1.5 mm hexagonal wrench will
change your drag brake settings. Replace the air cleaner when
everything is adjusted to your satisfaction.
e. Final Preparations...
Assemble the fuel bottle. Fill the fuel bottle by compressing it and then
insert the spout into the fuel. Allow the bottle to decompress and the
suction will fill the fuel bottle. Fill the tank by gently squeezing the
bottle and ensure that the tank lid is firmly shut when finished.
Picture 2
1 - 1,5 mm
GB
Picture 3
Racer Tip 1:
Fuel will stay fresh longer if you store it in a cool, dark and dry place.
Picture 4
Racer Tip 2:
Never leave the glow heater on your engine for more than 10 seconds.
A longer time may cause the glow plug to burn out prematurely. Use
rechargeable glow heaters for longer life.
Racer Tip 3:
To start the motor, use a fireproof glove!
CARSON X10NB Chassis
19
Page 20

f. Showtime... almost!
Engine break-in is the most important step to assuring that your
engine is fast and reliable throughout its life. Put simply:
DON’T SKIP THIS PART!
The engine is pre-set from the factory for break-in. Use a “Car Stand“
50 090 8071 or platform and place the car so that the wheels are off
the ground and rotate freely.
Make sure the throttle is set at neutral with your radio. Place the glow
heater onto the glow plug and give the recoil a sharp pull (picture 5).
Do not pull it more than twelve inches! More than that may break the
cord and this is not covered under warranty. It is better to give the
recoil short sharp pulls rather than long ones. If the pull-start cord gets
stuck, rotate the flywheel a little bit with your finger. This should make
the cord automatically recoil. Within a few pulls, the engine will start
with a good puff of smoke.
If the engine has trouble idling at the rich setting, turn the idle screw
clockwise 1/8th of a turn at a time. This will increase the idle allowing
the car to break-in properly. Try to do this in a well-ventilated area,
such as your driveway. Unburnt oil from the fuel will accumulate under
the exhaust, so be prepared. Let the car idle like this for 2-3 tanks of
fuel checking the engine temperature every 2 minutes.
Please allow a break of 10 – 15 in between filling the tank to allow
the engine to cool down. You should be able to touch the head of the
engine with your fingertips and it will be hot, but not uncomfortably
so. (Attention! Do not touch!) If it seems very hot, richen (turn counterclockwise) the high-end and low-end needles 1/8th of a turn. Always
use small increments when making these kinds of adjustments.
Picture 5
Racer Tip:
Factory setting of carburettor:
With the following basic adjustment the engine starts immediately,
running perfect and rich enough.
• Idle stop screw: approx. 1 mm air gap;
• High speed needle valve: screw in completely, then open 4 full
turns;
• Low speed needle valve (linking): flush with the edge of the linking
arm, then 1 full turn clockwise;
Picture 6
richer
lower
speed
leaner
higher
speed
Picture 7
20GBCARSON X10NB Chassis
richer leaner
After run-in is finished the high speed needle valve should be open at
least 3 and 1⁄4 turns. A richer setup is better if outside temperature is
high.
Racer Tip:
Drive your car slowly with the rich setting shortly after the break-in
period avoiding prolonged periods at full throttle. Gradually lean out
the mixture 1/8 of a turn at a time. The idle will increase the more you
lean the engine out.
Page 21

g. Turn the Power Switch on
Pull the transmitter antenna out completely.
The range of the remote control is reduced if the antenna is not
pulled out completely.
CAUTION!
Always turn the transmitter´s power switch ON first!
ON
GB
Switch on the receiver
• Power switch is on the radio box.
• Fix the receiver antenna and wire (see page 73).
• Put the body on and fix it with the body split pins.
h. How to Control Your Model
• Raise the tyres off the ground
• Turn the steering wheel to the right and left as far as it will go. The
wheels are to follow the steering direction.
• If the wheels operate in the opposite direction, operate the servo
Reverse switch (ST in position REV).
• To regulate the driving speed, actuate the throttle/brake
- backwards (forward driving, accelerating) or
- forwards (braking, reversing).
Picture 8
Left
ON
Neutral
Right
CARSON X10NB Chassis
21
Page 22

i. Care and Maintenance
Failure to follow break-in procedure and/or damage caused by
improper tuning will void your engine warranty.
There are two ways to “temp” your engine. One, purchase a
temperature gauge. The second cheaper, but less accurate method
is the “Spit Test”. Wipe a little bit of saliva on the engine head and it
should burn off in 3 - 4 seconds (the boiling point of water normally is
100 °C). If it evaporates immediately, chances are the engine is running
too hot.
The engine will run best and be easier to restart if run around
100-125 °C. Depending on your weather conditions, air density, and
humidity, your carburettor settings will be changing wherever you
decide to run. Making adjustments in small increments is the best way
to make sure your engine lasts a long time. Overheating is caused by
running the engine too lean, or too much stress on the engine created
by the environment. Extreme overheating will result in internal failure
of engine parts.
There are many online resources that will help you with engine tuning.
3,5 ccm engines are designed to last a long time, and with proper
maintance and tuning, you can drive the model for hours at a time.
After Use
When you have finished running your car, there are two options to
shut the engine down. The first method is to place your thumb over
the exhaust outlet (Wear gloves). Make sure your engine is normal idle,
preferable with the brake activated.
The second method is to pinch off the air supply from the engine.
Do not pinch the fuel line, as this may cause the engine to overheat!
Try and let all the remaining fuel run through the engine, emptying
the fuel tank. The engine will idle high while the tank is emptied, so
the above two steps may not be necessary.
Picture 9
Then apply after-run oil through the carburettor, and pull the pull-start
a few times to get it through the engine. This is recommended if you
plan on storing the car for more than a day. Methanol evaporates in
water and can cause internal corrosion to engine parts. It is always a
good idea to check all the screws, nuts, and bolts before and after each
period of racing.
Picture 10
Keeping the car clean will also make it more fun to work on. This can
be achieved with a large heavy-duty paintbrush, or compressed air.
Always test the transmitter and receiver batteries before starting the
engine.
Racer Tip:
Wear gloves when working on your hot car!
22GBCARSON X10NB Chassis
Page 23

j. Troubleshooting
Please read this in the event of a problem.
Engine won’t start.
Engine flooded.
Too much fuel in
engine
Dead glow plug
heater
Dead glow
heater battery
Engine Stalls
Overheating Check temperature. If over 130, richen carb
Disconnected
fuel pressure
line
Hard to control, glitching
Dead/weak
batteries
Remove glow plug. Pull pull-start 6-8 times.
Beware of spraying fuel.
Remove glow plug. Place glow plug in heater.
If the glow plug does not glow orange the plug
maybe dead.
Place new glow plug in heater. If it glows dim or
not at all, replace heater battery.
mixture. Check to make sure wheels spin freely.
Reattach pressure line from exhaust pipe to fuel
tank lid.
Batteries in transmitter should be fully charged.
Slow servos mean dead receiver batteries.
Empty fuel
tank/ No fuel in
engine
Overheating Running at high temperatures may cause vapour
Dirty air
cleaner
Carburettor
loose
Doesn´t run
straight
Fill fuel tank. Prime engine by pulling pull-start
once while holding finger tip over muffler (Wear
gloves).
lock. Let the car cool down for 10-15 minutes
Wash with soap and water or glowfuel then use
air filter oil.
Check carb-lock bolt and nut. Press carb onto
engine block, tighten nut to prevent air leak.
Steering trim is not adjusted correctly.
Front and rear wheel nuts are too loose.
GB
Improper
transmitter
settings
Model doesn´t
move
Refer to instructions on setting up your
transmitter.
Transmitter or chassis power switch is not ”ON“.
Polarity or battery type is wrong.
Batteries have run down.
Doesn´t stop Throttle trim is not adjusted correctly.
Running too
slowly
Motor has lost power.
Rear wheel nuts are too loose.
Dust or foreign objects are inside gears.
CARSON X10NB Chassis
23
Page 24

Montageanleitung • Assembly
1
Chassis • Chassis
500105302
500405351
500405351
500405351
M3
3 x 10 mm
500105303
3 x 3 mm
500105304
Montage
24
CARSON X10NB Chassis
3 x 10 mm
3 x 10 mm
500105303
500105304
500105304
Page 25

2
Montage Differential • Assembly differential
2.5mm E clip
2,5 mm E clip
:Di complete Front & Rear are same.
*
2,5 x 8 mm
500405362
500105301
3 x 8 mm
500405362
500405362
3 x 8 mm
CARSON X10NB Chassis
Montage
25
Page 26

3
Getriebe vorne • Gear front
3 x 16 mm
500405353
4
Getriebe hinten • Gear rear
Montage
3 x 8 mm
3 x 16 mm
500405353
3 x 16 mm
3 x 8 mm
3 x 16 mm
500405353
26
CARSON X10NB Chassis
500405353
500405362
500105304
500405362
500105304
Page 27

500105304
500105304
3 x 12 mm
3 x 10 mm
CARSON X10NB Chassis
Montage
27
Page 28

5
Antriebswellen • Front Drive Shaft
500405446
500405354
500405354
500405445
500405357
500405354
Montage
500405445
28
CARSON X10NB Chassis
500405354
500405354
500405357
500405354
500405354
500405446
Page 29

5
Vorderachse • Assembly Front end
500405350
500405351
500405445
500405352
500405352
500405357
500405447
500405350
500405351
500405350
500105302
CARSON X10NB Chassis
Montage
29
Page 30

Montage
500405347
30
CARSON X10NB Chassis
Page 31

6
Hinterachse • Assembly Back end
500405354
500405350
500405351
500405354
500405350
500405351
Montage
500405351
500405350
500405351
3 x 8 mm
500405351
CARSON X10NB Chassis
31
Page 32

Montage
500405347
32
CARSON X10NB Chassis
500405347
500405447
Page 33

7
Stabilisator • Anti Rollbar
500405345
3 x 3 mm
3 x 8 mm
500405345
3 x 3 mm
3 x 3 mm
500405345
3 x 3 mm
500405345
Montage
500105305
3 x 10 mm
500405345
3 x 8 mm
500405345
CARSON X10NB Chassis
33
Page 34

8
Mitteldiferenzial • Center differential
500105306
3 x 16 mm
500105308
500105307
3 x 10 mm
Montage
34
CARSON X10NB Chassis
3 x 16 mm
500105309
500105311
500105310
Page 35

9
Servosaver • Servo Saver
500405360
3 x 10 mm
500405360
500405360
3 x 10 mm
CARSON X10NB Chassis
Montage
35
Page 36

10
Oberdeck • Upperdeck
3 x 10 mm
Montage
500105305
500105309
3 x 18 mm
500105304
500405347
36
CARSON X10NB Chassis
500405347
Page 37

11
Chassisversteifung • Chassis brace
3 x 10 mm
500105305
3 x 10 mm
500105309
CARSON X10NB Chassis
Montage
37
Page 38

12
RC-box • RC-Box
3 x 10 mm
500105312
500105312
500105312
500105312
Montage
38
CARSON X10NB Chassis
3 x 10 mm
Page 39

13
Servos • Servos
500105305
3 x 8 mm
3 x 8 mm
500105305
500405347
3 x 10 mm
CARSON X10NB Chassis
Montage
39
Page 40

14
Tank • Fuel tank
15
Motor/Kupplung • Motor/Kupplung
3 x12 mm
Fuel tank
3 x10 mm
Montage
3 x 25 mm
40
CARSON X10NB Chassis
500105314
500105313
Pipe
Page 41

16
3 x 8 mm
3 x 8 mm
500105315
500105315
Luftfilter • Air Cleaner
Montage
CARSON X10NB Chassis
41
Page 42

17
Gas-/Bremsgestänge • Throttle/Brake Linkage
3 x 10 mm
500105316
3 x 10 mm
Montage
42
CARSON X10NB Chassis
Page 43

18
Stoßdämpfer • Shocks
500405342
Oil
Montage
500405342
M3
3 x 16 mm
500405342
CARSON X10NB Chassis
43
Page 44

3 x 20 mm
500405342
M3
19
Spoiler • Wing
Montage
44
CARSON X10NB Chassis
500405342
500800080
500800080
3 x 8 mm
500800080
Page 45

20
Räder • Wheels
Rear
Front
500900099
M4
500405445
CARSON X10NB Chassis
Montage
45
Page 46

21
Karosserie • Body
500800080
Montage
46 CARSON X10NB Chassis
500800080
Page 47

Notizen
47CARSON X10NB Chassis
Page 48

Ersatzteile
Spare Parts
50 040 5350
Suspension/c-hub pin f/r
Querlenker-/Achsschenkelstifte v/h
50 040 5354 2x Achsschenkel-Set vorne
2x Front hub set
50 040 5342 4x Stoßdämpferset vorne/hinten
4x Front/rear shock set
50 040 5345 Stabilisator Set vorne/hinten
Sway bar set front/rear
50 040 5347 7x Gestänge-Set
7x Full turnbuckle set
50 040 5351 Querlenker Set + Halter v/h
Suspension arm + holder f/r
50 040 5352 2x Achsschenkel-Set hinten
2x Rear hub set
50 040 5353 4x Obere Querlenkerhalter v/h
4x Upper turnbuckle holder f/r
50 040 5357 Kugellager-Set
Ball bearing set
50 040 5360 Servosaver/Lenkeinheit
Servosaver/steering set
Ersatzteile
48 CARSON X10NB Chassis
50 040 5362 Di
Di
ial vorne komplett
mplete front
Page 49

Ersatzteile • Spare Parts
0 5445 4x Radmitnehmer-Se
50 04 t
50 040 5446 2x Antriebswellen vorne CVD
5004
500105301 Mitteldifferenzial komplett
Center differential complete
4x Wheel nut set
2x Front set cvd
0 5447 2x Antriebswellen hi + Achsen
2x Rear dogbone + drive cup
500105304 Dämpferbrücke/Getriebegehäuse-Set
Shocktower/Gear box set
500105305 Chassis-Anbauteileset
Chassis parts set
500105306 Zahnradabdeckung/ Bremse
Gearcover/ brakeparts
500105310 Antriebswelle Mitte/vorne
Driveshafts center/front
500105311 Antriebswelle Mitte/hinten
Driveshafts Center/rear
500105312 Empfänger-Box
Receiver-Box
500105313 Motorböcke (2)
Engine mounts (2)
500105314 Kupplung komplett
Clutch complete
500105302 Querlenkerhalter Set vorne/unt.
Suspension arm holder setf./low.
500105303 Chassisplatte
Chassisplate
500105307 Bremsscheiben
Brakediscs
500105308 Mitteldiffhalterung
Centerdiff mounts
500105309 Bremsgeber
Brakepost
500105315 Luftfilterz
Airfilter
Ersatzteile
49CARSON X10NB Chassis
Page 50

Ersatzteile • Spare Parts
500105316 Gestängeset
Linkage set
500900099
Räderset
Wheels Set
500105317 Schraubenset
500800080 Karosserie inkl. Spoiler
Body incl. Wing
Screwset
Ersatzteile
50 CARSON X10NB Chassis
Page 51

51CARSON X10NB Chassis
Page 52

For Germany:
Service-Hotline:
Mo - Do 8.00 – 17.00 Uhr
Fr 8.00 – 14.30 Uhr
01805–73 33 00
14 ct/min
CARSON-Model Sport
Abt. Service
Mittlere Motsch 9
96515 Sonneberg
CARSON-MODEL SPORT
Werkstraße 1 • D-90765 Fürth • Germany
www.carson-modelsport.de
 Loading...