

Page 1

Instruction Manual Page 2 - 29
Betriebsanleitung Seite 30 - 57
CARSON Nitro Buggy CNB 204016
Page 2
2
GB
CARSON Nitro Buggy CNB 204016
Dear Customer
We congratulate you for buying the CARSON RC model car,
which is designed using state of the art technology.
According to our policy of steady development and improvement of our products we reserve the right to make changes in
specifications concerning equipment, material and design of
this product at any time without notice.
Specifications or designs of the actual product may vary from
those shown in this manual or on the box.
The manual forms part of this product. Should you ignore the
operating and safety instructions, the warranty will be void.
Keep this guide for future reference.
Limited Warranty
This product is warranted by CARSON against manufacturing
defects in materials and workmanship under normal use for 24
months from the date of purchase from authorised franchisees
and dealers. In the event of a product defect during the warranty period, return the product along with your receipt as proof
of purchase to any CARSON store. CARSON will, at its option,
unless otherwise provided by law:
(a) Correct the defect by repairing the product without charging
for parts and labour
(b) replace the product with one of the same or similar design;
or
(c) refund the purchase price.
All replaced parts and products, and products on which a
refund is made, become the property of CARSON. New or
reconditioned parts and products may be used in the performance of warranty services. Repaired or replaced parts and
products are warranted for the remainder of the original
warranty period. You will be charged for repair or replacement
of the product made after the expiration of the warranty period.
The Warranty does not cover:
• damage or failure caused by or attributable to acts of God,
abuse, accident, misuse, improper or abnormal usage,
failure to follow instructions, improper installation or maintenance, alteration, lightning or other incidence of excess
voltage or current;
• damage caused by losing control of your car;
• any repairs other than those provided by a CARSON
Authorised Service Facility;
• consumables such as fuses or batteries;
• cosmetic damage;
• transportation, shipping or insurance costs; or
• costs of product removal, installation, set-up service
adjustment or reinstallation
This warranty gives you specific legal rights and you may also
have other rights which may vary according to the country of
purchase.
Declaration of conformity
Dickie-Tamiya GmbH&Co KG hereby declares that this model
kit with radio, motor, battery and charger is in accordance with
the basic requirements of the following European directives:
98/37 EG and 89/336/EWG and other relevant regulations of
guideline 1999/5/EG (R&TTE).
The original declaration of conformity can be obtained from the
following address:
Dickie-Tamiya GmbH&Co. KG • Werkstraße l • D-90765 Fürth •
Germany
The meaning of the symbol on the product, packaging
or instructions:
Electronic devices are valuable products and should
not be disposed of with the household waste when
they reach the end of their running time! Help us to
protect the environment and respect our resources by handing
this appliance over at the relevant recycling points.
We wish you good luck and a lot of fun driving with your
CARSON model car
Before driving your new model carefully read these instructions!
Page 3

3CARSON Nitro Buggy CNB 204016
GB
Contents
Preface ..................................................................................... 2
Included items ......................................................................... 3
Safety precautions .................................................................. 4
For your safety ......................................................................... 5
Introduction ............................................................................. 6
Additional items needed for starting the engine: ................... 6
Tools needed for the assembly ............................................... 8
Becoming familiar with your CARSON Nitro Buggy .............9
Chassis .................................................................................... 9
a. Preparing to run your model ...........................................11
b. Range checking the road control system ....................... 13
c. Double-check the steering and throttle/brake
controls ............................................................................ 14
d. Wetting the air filter ......................................................... 15
e. Force Motor 4.58 cm
3
...................................................... 16
f. Fueling and starting the Force nitro engine ....................17
g. Breaking the Force 28 nitro engine ................................. 19
h. Installing the body ........................................................... 21
i. Adjusting the brake linkage ............................................. 21
j. Adjusting the toe angle .................................................... 22
k. Adjusting the camber angle ............................................ 23
l. Adjusting the 2-speed transmission shift point .............. 23
m. Adjusting shock spring tension .......................................24
n. Adjusting shock dampening and replacement
shock springs ................................................................... 25
o. Adjusting the front and rear differentials ........................ 25
p. Maintaining your CNB ...................................................... 26
q. Troubleshooting guide ..................................................... 27
Assembly ............................................................................... 58
4.58 cm
3
Force nitro engine .................................................. 89
Spare parts ............................................................................ 92
EMS-System spare parts ...................................................... 98
Tuning parts ........................................................................... 99
Included items
Transmitter
Model
Starter
Page 4

4
GB
CARSON Nitro Buggy CNB 204016
Safety Precautions
This model is not a toy!
• This radio controlled model is not a toy. Learning how to
control it correctly is a gradual process.
• Children under 14 years of age should be supervised by an
adult.
Driving a radio controlled car is a fascinating hobby. However, it
has to be practised with the necessary caution and respect.
A radio controlled model car can cause damage and injury and
the user is liable for any such incident.
Make sure that you have sufficient insurance cover when practising your hobby.
Only a well maintained model will function in a correct manner.
Only use approved spare parts and never improvise with any
unsuitable items.
It is the user’s responsibility to ensure that the model is functioning correctly and that all nuts, bolts and screws are properly
tightened.
Pay attention to the charge level indicator
lamps of your transmitter.
• Batteries for transmitter and receiver are well charged and of
the correct voltage.
• Always check the range of radio operation before starting
the car.
• Make sure that all servos respond correctly to the signals of
the transmitter.
• All operable parts are in good condition and you have tested
their operation.
• You have made sure that all screws are tightened.
• There is no other RC or similar transmitter nearby, which
could cause interference. Any further radio signal on the
same frequency can cause the loss of control for your
model. Always switch on the transmitter first to avoid any
uncontrolled reaction of the receiver to a foreign radio
impulse.
• Fully extend the transmitter antenna and make sure that
nobody in your environment controls a model with the same
frequency (number on the crystal) and that there is no
discernable interference. To end the operation switch off the
receiver first, then the transmitter.
• Keep your car away from high voltage cables or radio masts.
• Never use the model during lightning.
• Atmospheric disturbances can affect the signals of your
remote controlling transmitter.
• Do not use the model in wet areas. The electrical connection
of the model is not waterproof. Therefore do not drive while
it‘s raining, snowing, or in puddles or wet grass.
• Always avoid running radio control models in restricted,
confined or populated areas.
• Keep away from roads, highways, people and animals.
• Choose a sufficiently open and large area; it should be free
of obstacles.
• Do not drive, if you are overtired or your reactivity is impaired
in another way.
• Watch your model constantly and do not become distracted.
• The body shell should be correctly attached to the vehicle
before driving.
• Allow cooling time for the engine components before removing the body shell.
• Some parts (e.g. the motor and the muffler) become
extremely hot during operation and could cause serious
injury.
Pay attention to charge announcement of your transmitter.
• Ensure that the batteries for the radio and receiver are fully
charged and of the correct voltage. When the batteries are
running low you might loose control of your model.
• Never use fully loaded batteries and batteries which have
already run low, or batteries of a different capacity at the
same time.
• Never load batteries which are not rechargeable
If you do not use the model for a longer time you must remove
the rechargeable battery.
Safety Precautions and Operating
Guidelines
This radio control model vehicle must only be run on the approved model fuel. Always avoid running radio control models in
restricted, confined or populated areas. Keep away from roads,
highways, people and animals. Never run the model indoors.
Please ensure that you have read all the safety instructions and
operating procedures before driving the model.
The body shell should be correctly attached to the vehicle
before driving.
Allow cooling time for the exhaust and engine components
before removing the body shell. These parts become extremely
hot during operation and could cause serious injury.
Do not operate the model where noise may cause a nuisance to
others.
Ensure that the batteries for the radio and receiver are fully
charged and of the correct voltage.
Turn on the transmitter first, then the receiver. Reverse this
procedure when switching off. Check that the throttle, brakes
and trims are functioning correctly.
Make sure that no other person is operating on the same
frequency as your radio and that there is no discernable interference.
Always check that all the nuts, bolts and screws and components are not loose. Retighten and adjust as necessary.
Fill the fuel tank and firmly push the tank lid shut. Clean up any
fuel spillages.
Never leave fuel in the fuel tank.
Page 5

5CARSON Nitro Buggy CNB 204016
GB
• Never use any fuel in your engine other than glow fuels
specifically designed for use in model car engines. Use of
any other types of fuel can cause severe damage to your
engine and/or personal injury. NEVER USE GASOLINE OR
DIESEL FUEL!
• Never operate your model on any public streets. This could
cause traffic accidents, personal injury or property damage.
• Glow fuel engines emit exhaust vapors that are poisonous
and can be dangerous to your health. lt is important that you
operate your engine in a very well-ventilated area, preferably
outdoors.
• Before starting your engine, make sure that the throttle trim
is set to the idle position. Starting your engine at any setting
above idle can cause the model to lurch out of your hands.
• When our engine is running, there are certain parts that
rotate at high speeds. Be careful not to touch the drive
shafts, gears, clutch assembly or any other moving parts.
Otherwise, serious injury could result.
• It is normal for your engine and tuned pipe to get very hot
during operation. Never touch these parts while they are hot
or you could be burned.
• Model car engines produce vibration when they are running.
lt is important to periodically check the engine mounting
screws and other assemblies to ensure they are tight.
Running your engine with the engine mounting screws loose
can lead to severe engine and/or chassis damage.
For your safety!
Please read these warnings first!
Engine warnings
• Glow fuels like those used in your model are poisonous.
Follow all the precautions that are printed on the fuel
manufacturer‘s container.
• Keep glow fuel out of the reach of children.
• Glow fuel is extremely flammable. Keep away from high heat,
sparks and flame.
Fuel warnings
• Under no circumstances should you operate your model in
crowds of people. Serious injury could result.
• Never operate your model on busy streets or if there are cars
around.
• Do not use your model to chase pets or other animals.
• The receiver and battery boxes are not waterproof; therefore,
do not drive through water, wet grass, mud or snow.
• Because your model is operated by radio control, it is
important to make sure you are using fresh and/or fully
charged batteries. Never allow the batteries to run low or
you could loose control of the model.
• If your model becomes stuck, allow the engine to idle, then
retrieve your model by hand.
• To prevent excessive r.p.m.‘s from damaging your engine
and/or drivetrain components, we suggest reducing throttle
while in the air during jumps.
General warnings
Page 6

6
GB
CARSON Nitro Buggy CNB 204016
Fuel bottle
13330
Fuel
Glow plug heater
905042
Liter Nitromethan Art.-No. Usage
1.0 10% 13897 Run in/Beginner
2.5 10% 13934 Run in/Beginner
1.0 16% 13935
Normal
2.5 16% 13936 Normal
1.0 25% 13937 Race
2.5 25% 13938 Race
CARSON-Fuel
… or
Glow plug heater
and
battery 11585
After run oil Air filter oil
905044 32648
CARSON CNB – You‘ll dominate Unlimited Buggy Class with
the CARSON CNB.
Look closely, you‘ll see an incredibly low CG, clean and easyto-maintain chassis layout, a 2-speed tranny, all-new diff
housings, new multi-support upper arms, thick low-profile
shock towers, and increased suspension travel. The included
race wheels have 17 mm hubs and fit the popular 40 series tires
so you can tune your Buggy to any track surface.
CARSON also features several tuning so you can customize the
Buggy to suit your needs and driving style. From hard-anodized
5 mm shock towers to an optional reverse module, the CNB
will prove itself in every condition, from the backyard basher to
the unlimited Buggy racer. CARSON CNB is the Ultimate Buggy
Racer!
This booklet is designed to help you get
your new CARSON CNB Buggy running as
quickly as possible. This booklet includes
information on taking your CARSON CNB
Buggy from the box through its first run. lt
also includes a chassis tuning section and
a complete parts list with detalled exploded view
drawings. You will find good tips and
recommendations throughout this
booklet, so keep it handy for future
reference.
Introduction
This section lists the recommended tools and supplies that you
need to purchase and have onhand to finish assembling and
to run and maintain your new CARSON CNB Buggy. We have
tested these items extensively with the CARSON CNB Buggy
and found that they offer the best in reliability and value.
Additional items needed for starting the engine:
What fuel do I use?
Fuel can make a big difference in the way your engine
performs. For the break-in period you should use a fuel
specifically designed for R/C car engines that contains no more
than 16% nitromethane. Once the engine has been adequately
broken in (about 45 minutes of run-time) you can switch to an
R/C car fuel containing up to – but no more than – 25% nitromethane.
Nitroset 905029
Racingpack 7,2 V/ 3500 mAh
NiMH
608024
Page 7
7CARSON Nitro Buggy CNB 204016
GB
Please read the following points
concerning fuel:
• Keep the fuel in a secure and safe place and away from
children and animals.
• Ensure that the container lid is tightly closed.
• Store the fuel in a well ventilated area and away from
moisture.
• Glow fuel is extremely flammable. Keep away from heat
sources, naked flames, electrical appliances and batteries.
Do not smoke.
• Avoid skin contact and do not swallow. Read the warning
labels on the container.
Dispose of empty fuel containers in an approved manner. Never
throw empty cans into a fire.
In case of an accident or ingestion contact a doctor
immediately. (Present the label of the fuel container if possible.)
Finally
Please read the instructions before operating your model.
Each time you have finished driving the model, always check
the correct operation of the components. A single loose screw
can result in a dangerous situation for your model. Maintain
your model regularly and replace damaged or worn out parts by
genuine spare parts.
We wish you great fun with your CARSON
model car!
Art.No. Article Motor Fuel Temperature
905006 Glow plug Rossi R2 hot 2 - 3.5 ccm without Nitro +0° - +15C°
905007 Glow plug Rossi R3 medium 3.5 - 6 ccm without Nitro -2° - +18C°
905008 Glow plug Rossi R4 cold 6 - 10 ccm without Nitro -5° - +20C°
905009 Glow plug Rossi R5 extra 3.5 - 10 ccm 10% Nitro -7° - +22C°
905010 Glow plug Rossi R6 cold universal 10 - 13% Nitro +10° - +25C°
905011 Glow plug Rossi R7 cold universal 13 - 15% Nitro +15° - +30C°
905012 Glow plug Rossi R8 extra cold universal 13 - 15% Nitro +20° - +40C°
CARSON-ROSSI glow plugs
Use following fuels for the best
performance:
CARSON „Race Fire“ (Art.-No. 3897) for break-in and normal
use
CARSON „Nitro Fire“ with 16 % (Art.-No. 13935) or
25 % (Art.-No. 13937) after break-in for more power
Do I need a fuel bottle?
Yes. Because fuel is packaged in quarts or gallons, you will
need to use a smaller bottle with an extension wand to fill the
fuel tank. Fueling using this method is much easier and a lot
less messy.The Carson fuel bottle is a good choice. Carson
fuel-bottle 500 ml (No 13306) Use this to fill the fuel tank.
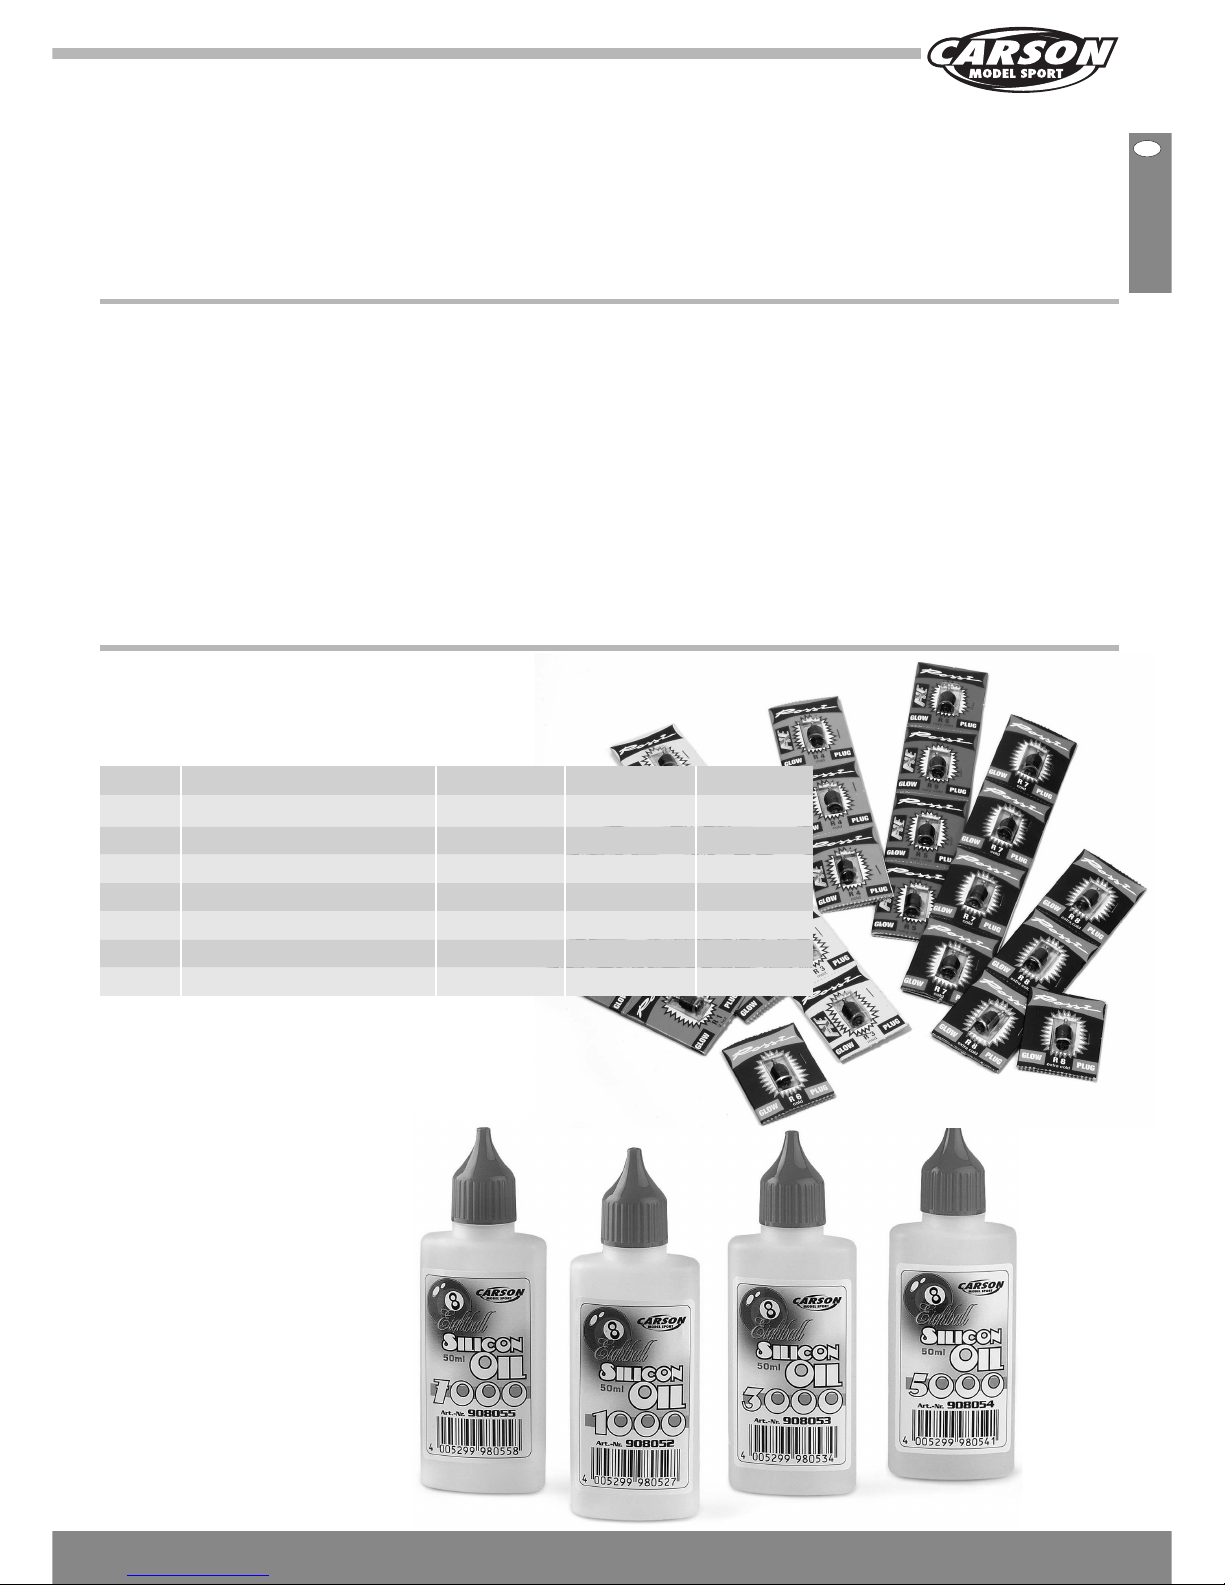
Damper- und siliconoils
908048 Silicon oil 50 ml 300
908049 Silicon oil 50 ml 400
908050 Silicon oil 50 ml 500
908051 Silicon oil 50 ml 600
908052 Silicon oil 50 ml 1000
908053 Silicon oil 50 ml 3000
908054 Silicon oil 50 ml 5000
908055 Silicon oil 50 ml 7000
Page 8

8
GB
CARSON Nitro Buggy CNB 204016
Tools needed for the assembly
Scissors 13305Needle nose pliers 74034
Side cutter 74035
Modelling knife 74053
Hexagonal wrench 13118Philips screwdriver
(small and big)
1,5/ 2 / 2,5 mm 74023
Instant adhesive 53339
Tweezers 74003
How do I remove the glow plug?
A long reach glow plug wrench is necessary to easily and
quickly remove and replace glow plugs. The CARSON
Racing 1/8th scale 4-way wrench works great.
CARSON 4-way wrench
5,5/ 8/ 10/ 17, Art.-No. 13336
What do I use to ignite the glow plug?
A glow starter is a battery-operated device that – when
attached to the glow plug – heats the glow plug so that the
engine can start. The glow starter is then removed after the
engine is running. The CARSON glow starter with meter is a
perfect choice. lt comes complete with a battery, charger and a
built-in meter to let you know if your glow plug is good.
CARSON Glow starter set
Art.-Nr. 11364
Do I need to purchase extra glow plugs?
We recommend using a „medium“ or „hot“ heat-range glow
plug intended specifically for performance engines like the No 3
(905007) during the break-in process. After the break-in period
you may want to use a different heat-range glow plug. Use a
colder glow plug like the No 6 (905010) if you‘re using 25% nitro
fuel.
Do not use glow plugs intended for four stroke airplane engines
or glow plugs with an „idle bar“. Using the wrong type of glow
plug will cause the engine to run erratically and make it
difficult to tune properly. The wrong type of glow plug could
also damage the engine.
In addition to the items listed on the previous page, the
following tools and supplies will also be required to run and
maintain your CARSON CNB:
CARSON NiMH batteries, 4 pieces (3 x for transmitter and
receiver) Art.-No. 609000
Air filter oil 50 ml
Art.-No.32648
Page 9

9CARSON Nitro Buggy CNB 204016
GB
Reverse drive switch
Batterybox
Steering reverse switch
Antenna
Steering trim dial
Power Switch
LED battery indicator
Throttle reverse switch
Throttle/brake dial
Crystal
Throttle/brake
trigger
Steering wheel
Each radio system comes with a sticker on the back of the
transmitter and on the receiver showing which frequency the
radio system operates on. No two radio systems can operate
nearby each other if they are on the same frequency. You can
purchase transmitter and receiver crystals separately and
change them if you plan on running your Buggy with other
people. We have provided a list of the frequencies that are
available for your radio system.
Antenna: Transmits the signal from the transmitter to the
receiver. The antenna should be completely extended during
use.
Battery cover: This cover houses the 8 AA Alkaline
batteries that power the transmitter.
Crystal: This is the frequency crystal of the
transmitter. You can change crystals in both the
transmitter and the receiver so that you and your friends
can drive at the same time. No two radio systems nearby
can be operated on the same frequency.
On/off switch: Turns the transmitter on and off.
Servo reversing switches: Allow you to quickly and
easily change the direction the servos rotate by just
flipping the switches.
Steering wheel: Controls your Buggy‘s steering. Turn
the wheel to the right and the Buggy turns right. Turn the wheel
to the left and the Buggy turns left.
Steering dual rate control dial: This dial adjusts
the overall travel of the steering servo. Push the dial forward for
maximum steering (125%). Pull the dial back to reduce steering
travel (minimum 60%).
Throttle/brake trigger: Controls the speed and
braking ability of your Buggy. Pull the trigger to accelerate,
release the trigger to decelerate, and push the trigger to brake.
Trirn dials: These dials, one for steering and one for
throttle/brake control, allow you to fine tune the servo‘s center
by turning the dials on the transmitter back and forth.
Becoming familiar with your CARSON Nitro
Buggy
Chassis
2-Speed transmission:
The 2-speed transmission automatically shifts from low to high
gear for awesome top speed and features an adjustable shift
point. Tighten the adjustment screw to shift at a higher speed.
Loosen the adjustment screw to shift at a lower speed.
Air filter:
The air filter is made of foam and prevents dirt and debris from
entering the engine through the carburettor. The air filter should
be „wet“ with air filter oil for maximum efficiency.
Battery box:
This is where the receiver battery is mounted. The battery box
protects the batteries from dust, dirt and oil. The battery box is
not waterproof.
Body mount:
Made of high-impact nylon plastic for strength, the body
mount secures the body into place.
Engine:
The CARSON CNB Buggy includes the powerful 4.58 cm3
FORCE engine with pull-starter and tuned pipe for ease of use
and great performance.
Front bumper: Made out of high-impact nylon plas-
tic, the front bumper protects the chassis from most head-on
impacts.
Fuel tank:
The fuel tank holds the fuel that your engine uses. This fuel tank
includes a fuel pressure nipple that connects to the tuned pipe
to pressurize the fuel system and also features a quick-flip type
lid for fast refueling.
EMS-system:
Used to start the engine.
Shock:
Each shock is oil-filled and uses a spring that is well suited for
most off-road conditions. The shocks feature threaded shock
bodies that allow the shocks to be easily tuned for different
driving conditions. The shocks come standard with 1OO Wt oil
and 1.7 mm springs.
Steering servo:
This servo controls the vehicle‘s steering. A „servo saver“ is
used to help prevent the servo gears from being stripped out.
Page 10

10GBCARSON Nitro Buggy CNB 204016
Steering tie-rod:
The tie-rod connects the steering linkage and the castor block.
The tie-rods are adjustable so you can make toe-angle
adjustments to the front wheels.
Tuned pipe:
The tuned pipe is an expansion muffler that greatly increases
the power output of the engine.
Wheel/tire assembly:
The CARSON CNB Buggy includes molded rubber tires with
a tread pattern that is good for most off-road applications. The
wheels are molded in one piece from lightweight, high-impact
plastic for strength.
Receiver box
Motor
Front tyre
Front shock unit
Chassis
Rear shock unit
Rear tyre
Steering servo
Fuel tank
Tuned pipe
Steering rod
On/off switch
Battery box
Body mount
Shock tower
2-Speed-transmission
with reverse gear
Cylinder head
Start EMS
Page 11
11CARSON Nitro Buggy CNB 204016
GB
IMPORTANT
Before continuing, please double-check that you‘ve read and
understood the warnings. It‘s important that you understand
this information before preparing to run your CARSON CNB
Buggy. Also, remember, if you have any questions or encounter
any problems, you can contact us using the Customer Service
Information (see last page).
Included:
Completely assembled the CNB with body having been painted
from the inside, decal sheet, EMS-system including E-starter
and 40MHz radio control as well as 3 servos.
a. Preparing to run your model
Push the telescoping transmitter antenna down into the molded
hole in the top of the transmitter.
Thread the antenna (clockwise) into place and tighten it gently
until it stops.
IMPORTANT: Do not force the antenna into place or tighten
it too strongly. Doing so could cause damage to the antenna
and/or transmitter.
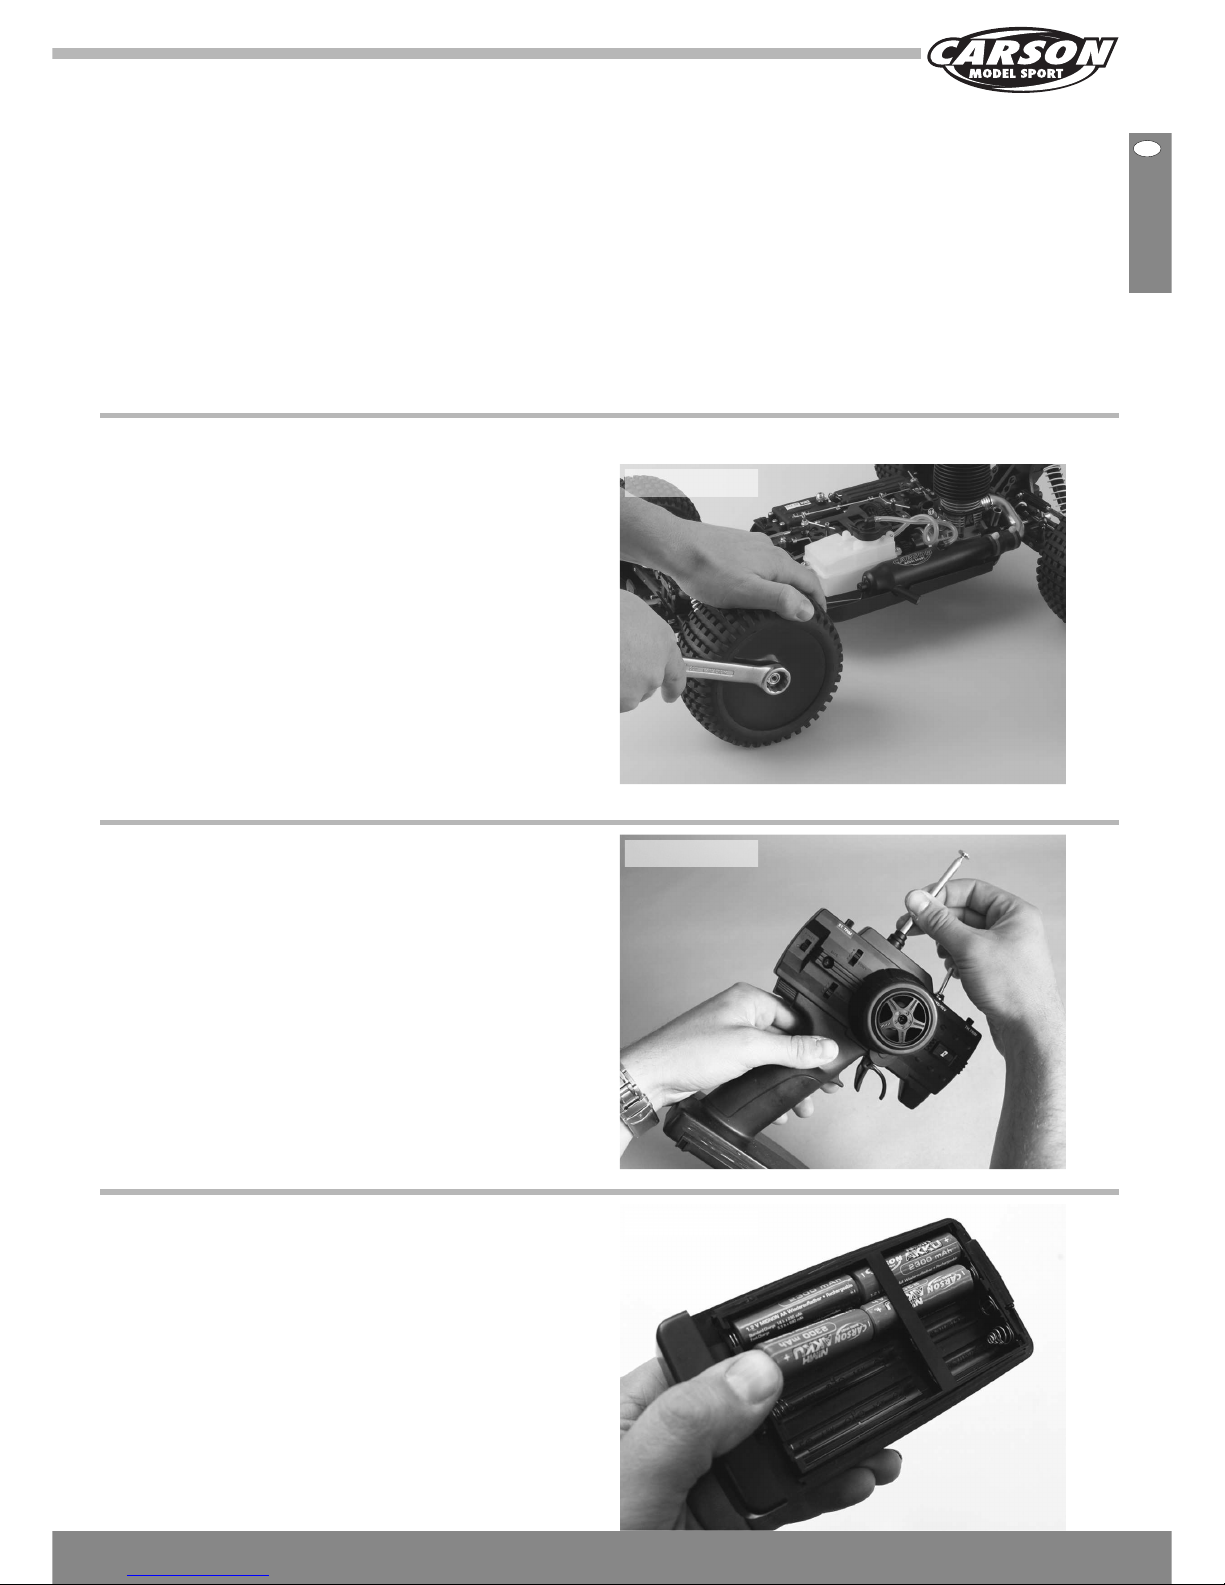
a. Final assembly
Install the tires and wheels onto the chassis, making sure to
tighten the wheel retaining nuts firmly. Notice that the back of
the wheels are molded to key over the hex-shaped wheel hubs.
All four wheels and tires are the same.
Picture 1
Picture 2
Remove the plastic battery cover from the bottom of the
transmitter.
Install 8 AA Alkaline batteries into the battery tray, doublechecking to make sure that the polarity is correct.
Reinstall the battery cover and set the transmitter aside for
now.
Picture 3
Page 12
12GBCARSON Nitro Buggy CNB 204016
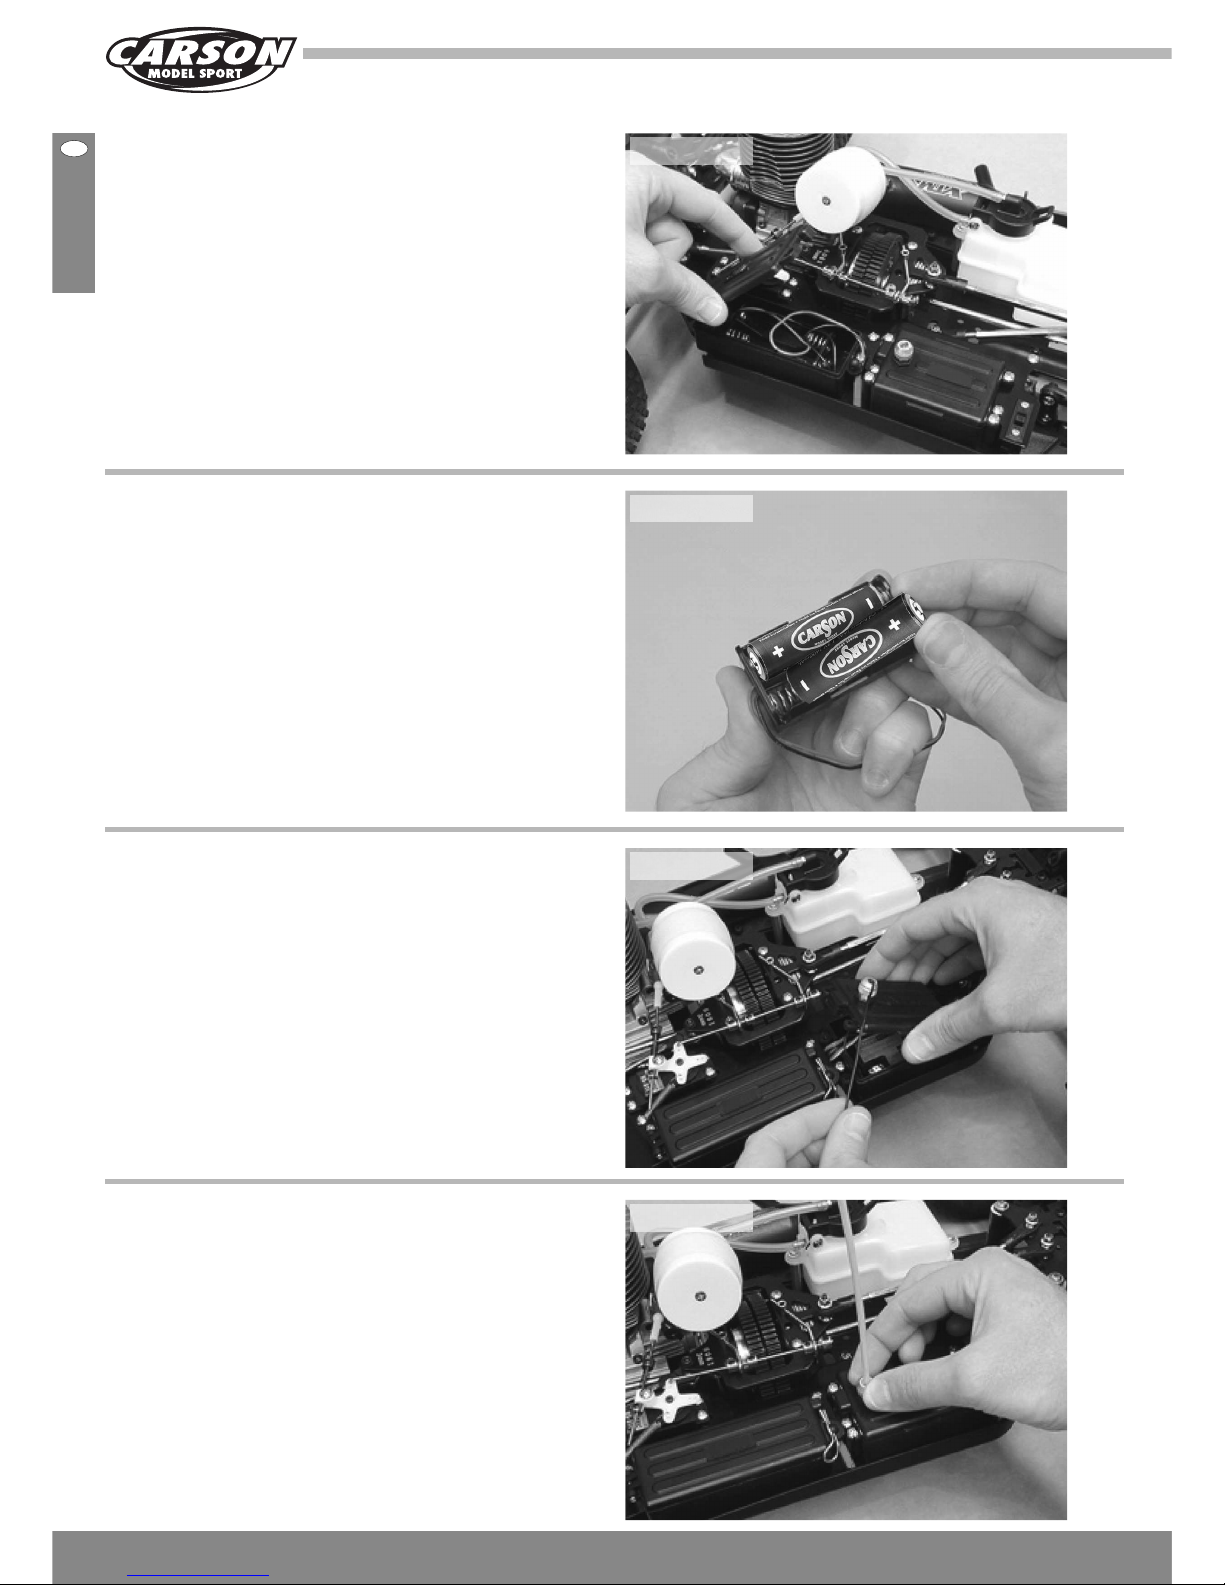
Open the battery box cover by removing the retaining clip and
pulling up on the front of the cover. The battery box cover is
hinged at the back for convenience.
Remove the battery holder from the battery box.
Picture 4
Install 4 AA Alkaline batteries into the battery holder, doublechecking to make sure that the polarity is correct.
IMPORTANT: Make sure that the batteries are pushed firmly into
place. They should not be loose. lf for any reason the plug from
the battery holder (male red plug) is not plugged into the switch
(female red plug), plug them together now. The plugs can fit
together only one way.
Picture 5
Remove the four screws from the receiver mounting box cover,
then remove the cover. Uncoil the receiver antenna and feed it
out through the hole in the cover.
Reinstall the cover, making sure not to pinch any of the wires.
Picture 6
Slide the receiver antenna into one end of the plastic antenna
tube and out the other end.
Push the end of the antenna tube firmly into the metal clamp in
the top of the receiver mounting box cover, then gently tighten
the knurled nut to lock the tube into place.
IMPORTANT Leave the excess antenna hanging from the top of
the tube. Under no circumstances should you cut the antenna
shorter.
Picture 7
Page 13
13CARSON Nitro Buggy CNB 204016
GB
Slide the receiver‘s on/off switch to turn the receiver on. You
should hear the servos move to their proper positions.
Safety Tip:
Always turn on the transmitter first, followed by the receiver.
After you‘re done, turn off the receiver first, then turn off the
transmitter. This will prevent the possibility of a runaway model
or damage to the servos.
Picture 9
Slide the transmitter‘s on/off switch up to turn on the
transmitter. The red LED should glow brightly.
Picture 8
b. Range checking the road control system
To ensure that the radio control system is operating properly
and to prevent any chance of a runaway model, the radio
control system should be range checked before the first run of
the day and/or after a crash. To range check the radio control
system do the following:
With the transmitter and receiver turned on, extend the
transmitter antenna completely. With the Buggy on the ground
(without the engine running) walk away from it. Move the
steering wheel while looking at the Buggy‘s wheels. The wheels
should pivot back and forth as you rotate the steering wheel
back and forth. Because of the Buggy‘s weight and large
wheels, the steering won‘t operate perfectly smoothly unless
you lift the front of the Buggy off the ground. This goes away as
soon as the Buggy starts rolling.
IMPORTANT
lf the radio system does not operate properly, please refer to
the troubleshooting guide on page 27 before continuing further.
Never attempt to operate your Carson CNB if the radio control
system is not functioning properly.
Page 14
14GBCARSON Nitro Buggy CNB 204016
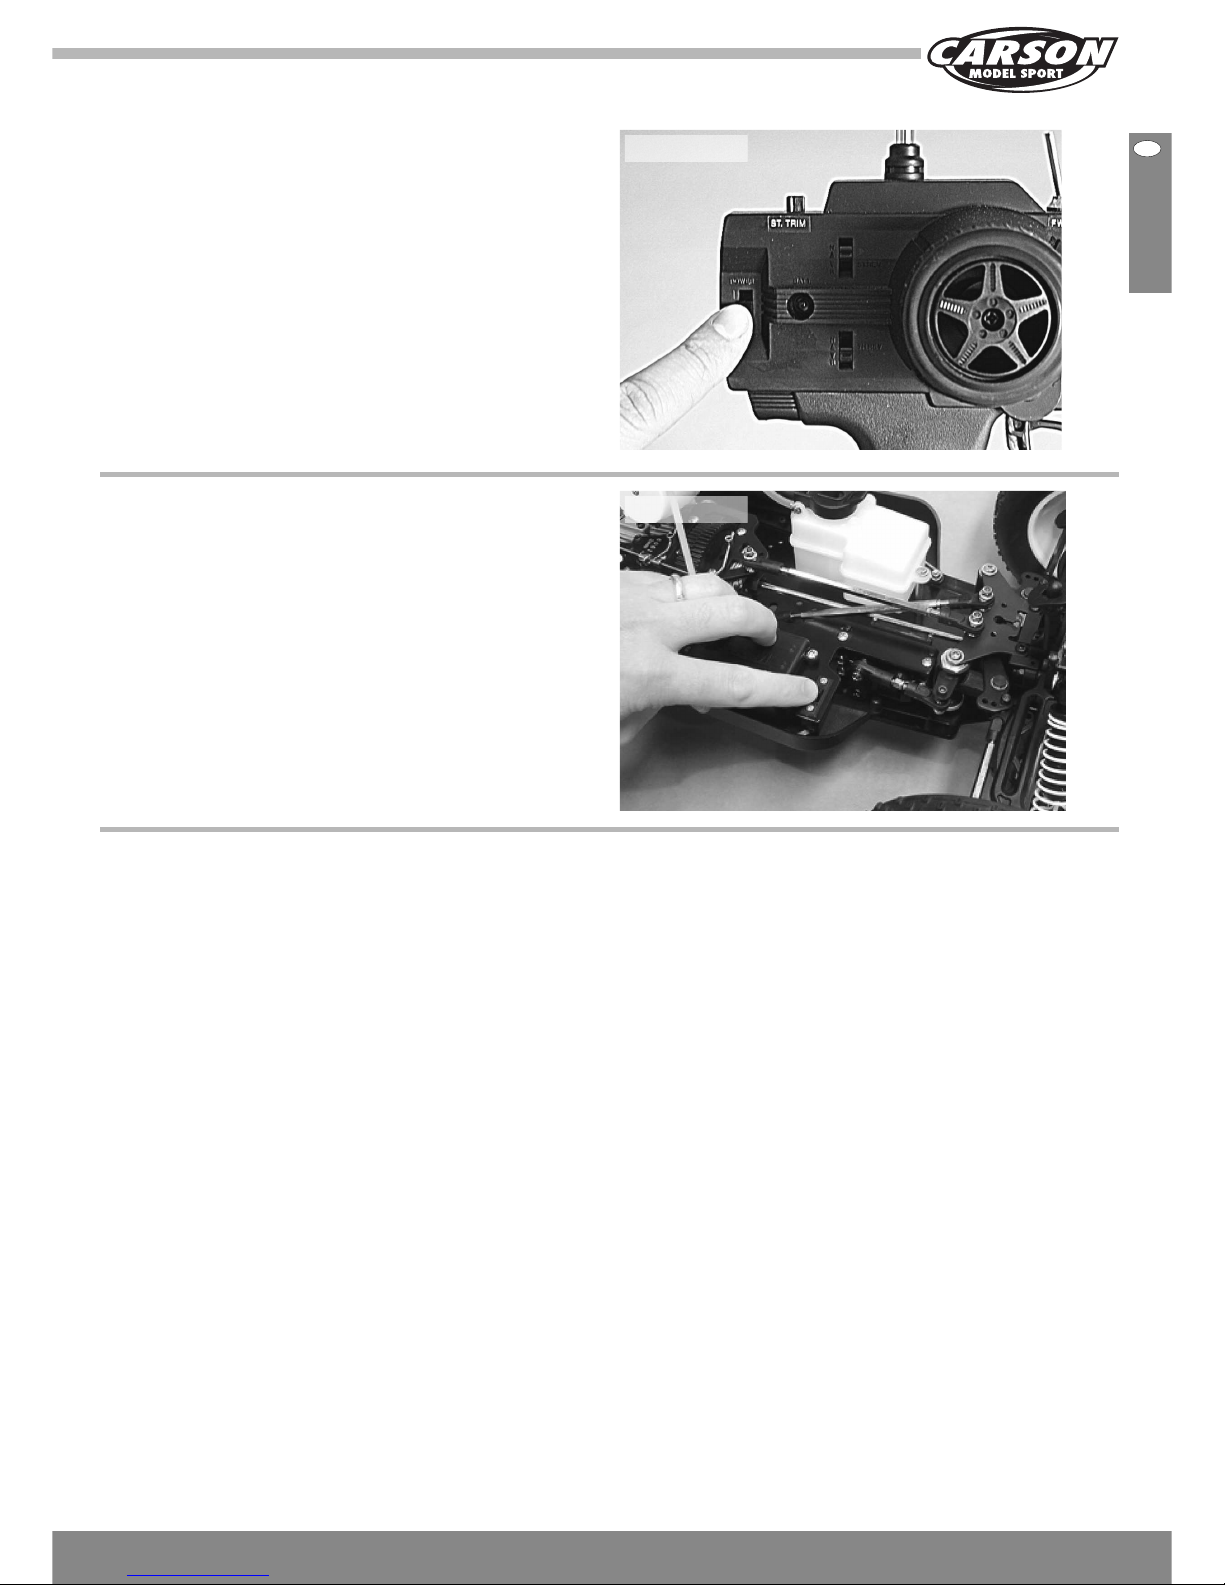
c. Double-check the steering and throttle/brake
controls
PRO TIP: We suggest doing the steering tests while lifting the
front of the Buggy off the ground. This will allow the steering
system to operate smoothly, without any binding.
With the transmitter and the receiver turned on, rotate the
transmitter‘s wheel forward (to the right). The Buggy‘s front
wheels should turn right.
IMPORTANT
lf the wheels don‘t turn right, flip the steering servo reversing
switch on the top of the transmitter to change the direction that
the front wheels turn. Refer to the transmitter photo and
definitions on page 9 if you don‘t remember how to use the
servo reversing switches.
Picture 10
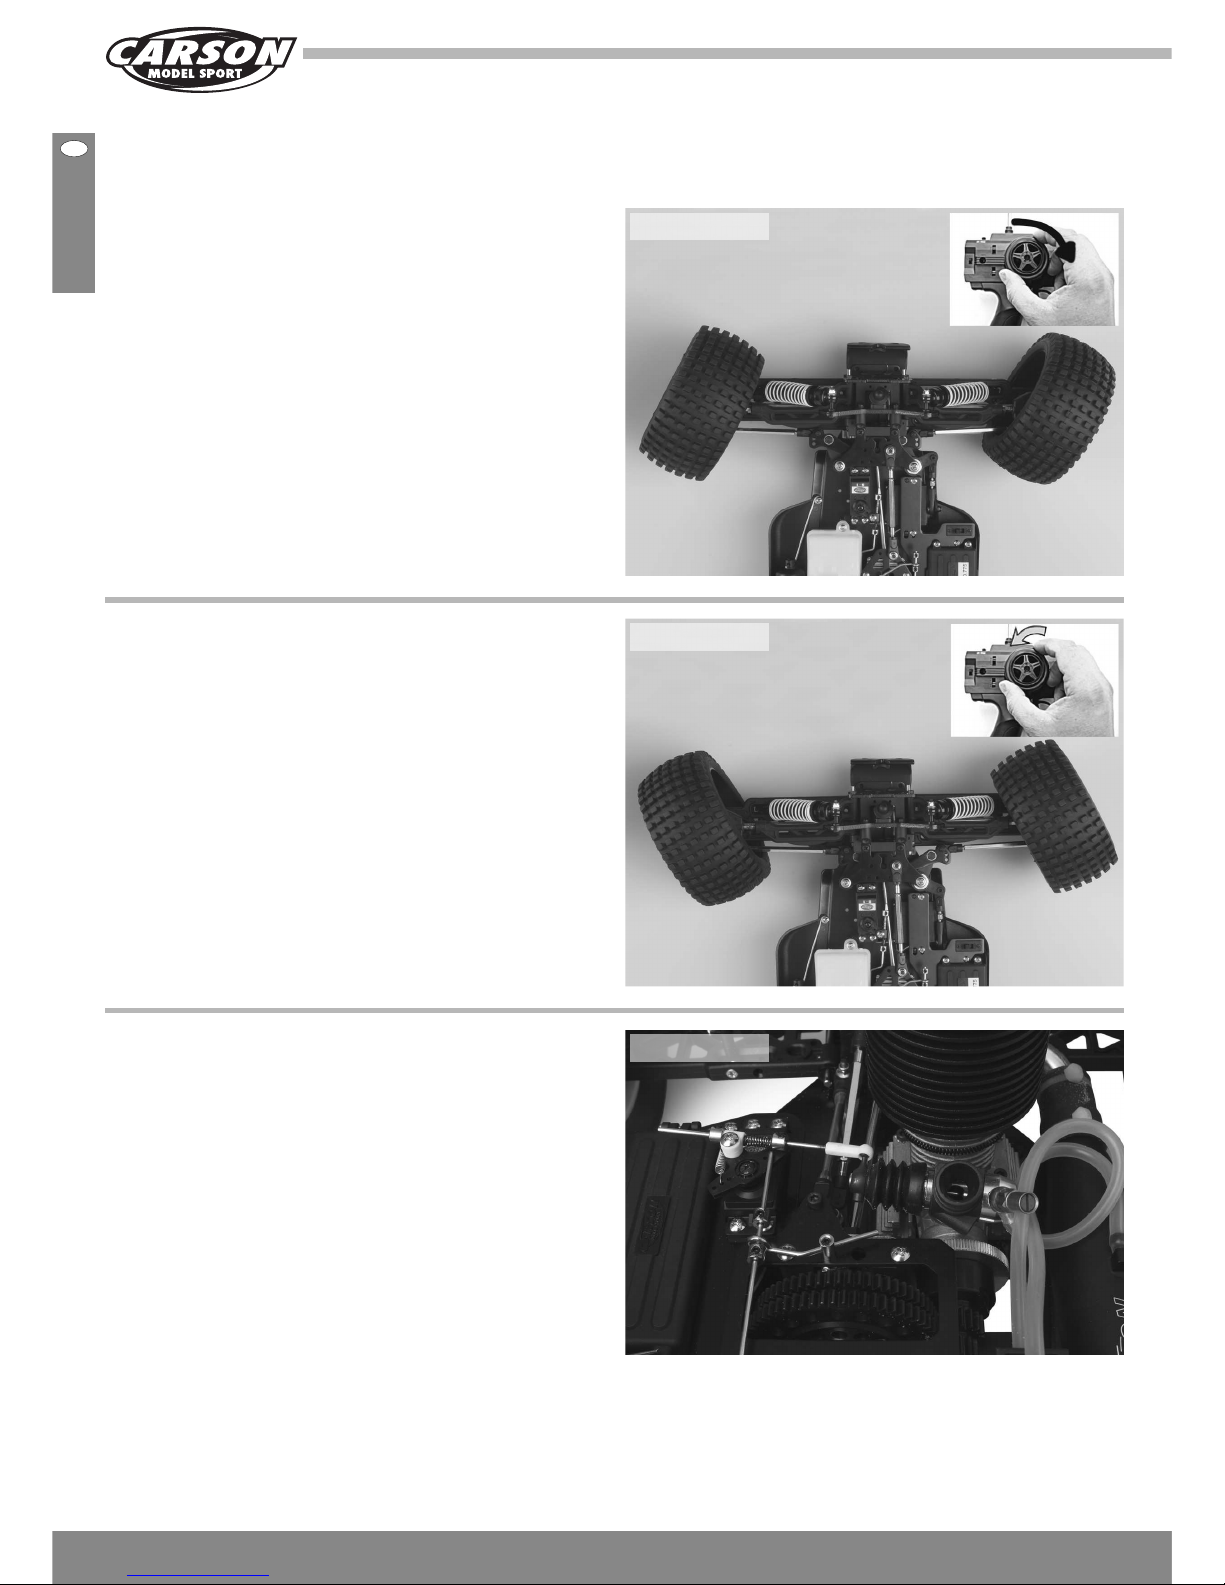
Rotate the transmitter‘s wheel backward (to the left). The
Buggy‘s front wheels should turn left.
Let go of the transmitter wheel. The Buggy‘s wheels should
return to center.
IMPORTANT
lf the wheels do not point straight ahead (center) after you
return the transmitter wheel to center, turn the steering trim
dial on the transmitter to adjust the wheels so that they point
straight ahead. Refer to the transmitter photo and definitions on
page 9 if you don‘t remember how to use the servo trim dial.
Picture 11
• Carefully pull the air filter assembly off of the carburettor, so
that you can see the carburettor barrel.
• Pull back on the throttle trigger. The carburettor barrel
should open completely and the brakes should be disengaged (i.e., the Buggy should roll forward smoothly).
• Let go of the throttle trigger and the carburettor barrel
should return to its idle position – open about 1/16“ (1 mm).
The brakes should still be disengaged, too. lf not see
page 21 „Adjusting the Brake Linkage“.
IMPORTANT
lf the carburettor barrel does not open when you pull back on
the throttle trigger, flip the throttle servo reversing switch on the
top of the transmitter to change the direction.
Picture 12
Page 15

15CARSON Nitro Buggy CNB 204016
GB
• Push the throttle trigger forward. The carburettor barrel
should stay in the idle position – open about 1/16“ (1 mm)
and the brake linkage should move forward and engage the
brakes (i.e., the Buggy will not be able to roll at all).
• Let go of the throttle trigger and the brakes should
disengage.
IMPORTANT
lf you need to adjust the brake linkage, see page 21 „Adjusting
the brake linkage“.
Picture 13
Air filter warning!
Turn off the transmitter and receiver and push the air filter back
onto the carburettor. lf it‘s difficult to push the air filter back
onto the carburettor, apply a thin coat of after-run oll to the
inside of the silicon boot before reinstalling it.
Warning!
Under no circumstances should you operate the engine without
the air filter installed on the carburettor. The air filter prevents
dust and debris from entering the engine and damaging it.
lf you operate your engine at any time without the air filter
installed, the engine will not be covered under warranty should
it need repair.
Upgrade Tip:
To prevent your Buggy from going out of control should the
radio control system encounter signal loss, we suggest using
an electronic failsafe. The failsafe is connected between the
throttle/brake servo and the receiver. The failsafe is designed
to electronically bring the throttle to idle and apply a preset
amount of braking force should the radio control system lose
its signal.
We suggest using the CARSON failsafe 503020.
Picture 14
d. Wetting the air filter
To prevent damage to your engine, we strongly recommend
„wetting“ the air filter element, using a high-quality filter oil or
after run oil.
To wet the air filter element, simply squeeze an ample amount
of air filter oil or after run oil onto the filter element and work it
through the filter element using your fingers. Use enough oil to
completely saturate the filter element. The entire filter element
should be oiled, but not so much that excess oil is dripping
from it.
Picture 15
Page 16

16GBCARSON Nitro Buggy CNB 204016
Upgrade tip:
lf you wil be running your Buggy in extremely dusty conditions,
we suggest using a prefilter sleeve over the air filter.
Wet the main filter element as described before, then simply
slide the prefilter sleeve over the main filter. It‘s not necessary,
nor desirable, to wet the prefilter sleeve.
We suggest using racing 1/8th scale prefilter sleeves
Art.-No. 52175.
Picture 16
e. Force Motor 4,58 cm
3
It‘s now time to become familiar with your
engine. This includes how to set the
carburettor, break in the engine and how
to tune it properly. Please read the next
few pages very carefully.
Warning!
Please read this information
before proceeding!
Your Carson CNB Buggy comes equipped with the user-friendly
and powerful Force 28 nitro engine. Before starting the engine
for the first time, you MUST read this section very carefully. This
section details the different parts of the engine‘s carburretor
and how to adjust the carburretor‘s needle valves to tune the
engine. Failure to read this information may result in your
not knowing how to properly operate your new engine. Not
knowing how to operate your new engine can result in damage
to the engine.
Refer to picture 17 familiarize yourself with your engine‘s
carburretor. All of the carburretor settings come preset from the
factory for initial starting and break-in, but you should have a
small flat blade screwdriver handy to make adjustments to the
carburretor during the break-in process, which will be detailed
in the next section.
Low speed needle
valve
Idle stop screw
High speed
needle valve
Picture 17
Idle stop screw
The idle stop screw adjusts the closure of the carburretor
barrel. We recommend that the idle stop screw be adjusted
so that the carburretor barrel stays open about 1/16“ (1 mm).
Turning the screw clockwise will cause the barrel to stay open
more.
Turning the screw counterclockwise will allow the barrel to
close more. lf the carburetor barrel stays open too far, the
engine will idle very high and the clutch will never disengage.
This will damage the clutch very quickly. lf the idle stop screw
is closed too far, the engine may die during idle. Ideally, the
engine should idle smoothly, yet slow enough so that the clutch
stays disengaged.
1 mm
Picture 18
Page 17

17CARSON Nitro Buggy CNB 204016
GB
High speed needle valve:
The high speed needle valve is preset from the factory for the
initial starting procedure. Do not make adjustments to it at this
time. The high speed needle valve is used to meter the air/fuel
mixture at full throttle. Turn the needle valve clockwise to lean
the mixture or turn the needle valve counterclockwise to richen
the mixture.
The factory setting for the high speed needle valve is 3 full
turns out from bottom.
Turn clockwise
to lean
Picture 19
Turn counterclockwise
to richen
Low speed needle valve:
The low speed needle valve is preset from the factory for the
initial starting procedure. Do not make adjustments to it at this
time. The low speed needle valve meters the air/fuel mixture at
idle and during transition from idle to full throttle. Turn the low
speed needle valve clockwise to lean the mixture. Turn the low
speed needle valve counterclockwise to richen the mixture. The
low speed needle valve is preset from the factory, but minor
adjustments may need to be made to suit your application: fuel
used, glow plug and environment all contribute to the setting.
Do not adjust the low speed needle valve until AFTER the
engine has been broken in.
Picture 20
Turn clockwise
to lean
Turn counterclockwise
to richen
Important tip:
About resetting the low speed needle
valve
lf you need to reset the low speed needle valve to the factory
setting, follow these simple procedures:
Open the carburretor barrel completely. While holding the
carburretor barrel open with your fingers, use a flat blade
screwdriver to turn the low speed needle valve clockwise until
it stops. From this point, turn the low speed needle valve counterclockwise 3 full turns. This is the factory setting.
f. Fueling and starting the Force nitro engine
lf at any time the E.M.S.-starter becomes very tight or difficult
to work – STOP! The engine has become flooded and the
excess fuel must be removed from the engine or damage to the
pull-starter and/or engine could occur. To remove the excess
fuel from the engine follow the procedures listed below:
Completely close the high speed needle valve until it bottoms
out. Do this gently. Don‘t force it!
Remove the glow plug from the cylinder head.
With a rag over the top of the engine, pull the pull-starter cord
several times to expel the excess fuel from the engine.
Check to make sure that the glow plug has not been fouled,
then reinstall it.
Reset the high speed needle valve 3 full turns out from bottom.
WARNING
Under no circumstances should you operate the engine without
the air filter installed on the carburetor. The air filter prevents
dust and debris from entering the engine and damaging it.
lf you operate your engine at any time without the air filter
installed, the engine will not be covered under warranty should
it need repair. Also make sure that you ”wet“ the air filter as
described on page 15.
Warning!
Please read this before starting
your engine for the first time!
Page 18

18GBCARSON Nitro Buggy CNB 204016
Lift the fuel tank lid carefully fill the fuel tank until the fuel level
is just below the top of the fuel tank.
WARNING
Use fuel that is appropriate for nitro car and buggy engines.
Do not use gasoline or diesel fuel! For the break-in period you
should use fuel specifically designed for RX car engines that
contains no more than 16% nitromenthane.
Picture 21
• Using your glow plug wrench, verify that the glow plug is
installed in the cylinder head and tight.
• Open the throttle completely and cover the exhaust opening
in the tuned pipe with your finger.
• Push the shaft of your E.M.S. starter into the flange at the
engine‘s back.
• Push the button at your E.M.S. starter for several short times
until the fuel in the tube reaches the carburettor.
• Remove your finger from the tuned pipe opening and close
the throttle down to the idle position.
• Push the E.M.S. starters button once again a couple of short
times while holding the CNB firmly with one hand.
Picture 22
• Now stick the glow starter with fully charged battery through
the heat sink to the top of the glow plug.
• Keep the carburettor in idle position, firmly hold the CNB
with one hand and push the E.M.S. starter until the engine
starts and runs.
• However the glow starter has to stick onto the glow plug for
around 10 seconds.
Picture 23
Page 19

19CARSON Nitro Buggy CNB 204016
GB
IMPORTANT!
lf the EMS-System does not work properly, please do not
force it! The engine has probably become flooded. Proceed as
described on page 28.
Once the engine is running, to stop the engine, carefully pinch
the fuel line with your fingers until the engine stops. Make sure
to pinch the fuel pick-up line and not the fuel pressure line. The
fuel pick-up line is the one connected to the carburretor.
WARNING
Be careful not to touch any parts of the
engine or the tuned pipe because they
will be hot.
Picture 24
g. Breaking the Force 28 nitro engine
The Force 28 engine is an ABC engine. The cylinder sleeve is
tapered at the top, causing severe resistance when the piston
moves through the top of the stroke. This is normal. When
the engine heats up to operating temperature, this resistance
will decrease and the proper clearance will be achieved. The
break-in procedure will guide you through the steps necessary
to properly break in your new engine. Please follow the steps
closely.
FUEL RECOMMENDATION: Fuel can make a big difference
in the way your engine performs. For the break-in period you
should use a fuel specifically designed for R/C car engines that
contains no more than 16% nitromethane. Once the engine has
been adequately broken in (about 45 minutes of run-time) you
can switch to an R/C car fuel containing up to, but no more
than, 25 % nitromethane.
Air filter:
The air filter is a very important part of your engine. Failure to
use the air filter will damage the engine in a very short period
of time. Make sure that you „wet“ the air filter as described on
page 15 and use a prefilter sleeve if you are driving in dusty
conditions.
Breaking the engine
Warning! Do not adjust the low speed needle valve until
after the engine has been broken in. You can begin to adjust
the low speed needle valve after you have broken in the engine
and after you have read and understood step 2: Fine tuning
the engine below. The high speed needle valve is preset from
the factory for easy starting in most conditions for the break-in
period.
Engine tuning tip:
No two engines will have the exact same needle valve settings
once broken in. Different fuels used, different types and
heat-ranges of glow plugs, the outside air temperature and air
pressure all affect the engine.
The factory needle valve settings on page 14 are break-in
settings. lf you reset the needle valves to the factory settings,
the engine will run very rich and you will need to retune the
engine.
Engine break in tip:
During break-in, it‘s normal for excessive fuel oil and exhaust
residue to drip from the tuned pipe. Break-in the engine without
the body installed. It‘s important that the engine have aid
during the break-in process.
Once the engine starts, keep the glow starter attached to the
glow plug and let the engine run for about 10 seconds without
giving it throttle. This will allow the engine to warm up. At this
point the engine should be running very „rich“ and the engine
will also sound like it‘s running rough.
After the engine has been running for about 10 seconds,
remove the glow starter from the glow plug. Advance the
throttle in short, quick bursts and drive the Buggy for about 2-3
minutes. lf the engine is running rich enough, you should notice
smoke coming from the tuned pipe and the engine should
sound like it‘s running very rough. Also, the Buggy will barely
be moving because the engine is running so rich that it won‘t
produce much power. This is what you want for now.
lf there is not smoke coming from the tuned pipe, richen the
high speed needle valve 1/4 turn. After 2-3 minutes stop the
engine by pinching the fuel line to the carburretor.
Page 20

20GBCARSON Nitro Buggy CNB 204016
Let the engine cool for approximately 10 minutes, then restart
it. Set the high speed needle valve mixture to a slightly leaner
setting, about 1/8 turn more in. Repeat the procedure above,
then stop the engine and let it cool for approximately 10
minutes.
Repeat the procedure above, leaning the high speed needle
valve slightly more each time. In all, you should run the engine
a total of about 45 minutes.
After 45 minutes of run-time the engine will be broken in. Run
the engine with the high speed needle valve set slightly rich,
but lean enough to power the Buggy adequately. At this point
the engine should hold a good setting on the high speed needle
valve and you can begin to fine tune the needle valve settings
to increase performance.
Warning
lt is of the utmost importance that the engine never be leaned
out too much. When running the engine, you should always be
able to see a slight trail of smoke coming from the tuned pipe.
lf you can‘t, stop the engine immediately and richen the high
speed needle valve. You should also make sure there is plenty
of air flowing over the cylinder head to keep the engine from
overheating.
Fine tuning the engine
After your engine has been broken in, you can set the high and
low speed needle valves for optimum engine performance.
Warning about tuning your engine
Be careful to never lean out the engine too much. Remember
that the lubricants for your engine are suspended in the fuel. lf
you lean out the fuel mixture too much you will also be lowering
the amount of lubricant entering your engine. Less lubricant
means more chance of your engine overheating and possible
engine failure.
Setting the high speed needle valve
Start the engine and remove the glow starter from the glow
plug, then allow the engine to warm up for about 10 seconds.
After the engine has warmed up, drive the Buggy as you
normally would. lf the engine seems to be running rich (i.e., not
reaching maximum power), lean the high speed needle valve
about 1/16 of a turn at a time until the desired setting is
achieved. Always make sure that you run the engine slightly
rich – you want to be able to see a faint exhaust trail at all
times.
Setting the low speed needle valve
Start the engine and lean out the high speed needle valve as
per the procedures above. Close the throttle until the engine
slows down enough so that the clutch is disengaged and the
wheels don‘t turn when the Buggy is lifted from the ground.
Allow the engine to idle for about 10-15 seconds.
While holding the Buggy off the ground (making sure to keep
your fingers out of the moving parts), quickly open the throttle
in a short burst. lf the engine just stops running as soon as the
throttle is advanced, the low speed needle valve is too lean and
the engine is not getting enough fuel. With the engine stopped,
richen the low speed needle valve about 1/16 of a turn
(counterclockwise).
lf you quickly advance the throttle and the engine seems to be
very rich during transition (i.e., lots of smoke coming from the
tuned pipe and very rough sounding), the low speed needle
valve is too rich and the engine is getting too much fuel. With
the engine stopped, lean the low speed needle valve about
1/16 of a turn (clockwise).
Restart the engine and repeat the procedure above until
the engine will transition smoothly and quickly. Very slight
hesitation in the transition is normal.
Basic engine maintenance
To keep your engine operating at peak performance there
are some basic maintenance procedures that need to be
performed on the engine on a regular basis:
• After you are finished running the engine for the day, pinch
the fuel line to stop the engine. This will allow the engine to
burn any excess fuel out of the crankcase.
• Remove the air filter element and wash it thoroughly in warm
water and a small amount of liquid detergent. After it‘s clean,
allow it to dry, then reoil it and install it back into the air filter
housing.
• Remove the glow plug from the engine and squirt several
drops of high-quality after-run oil into the glow plug hole.
Pull the pull-start cord several times to distribute the oil
throughout the engine, then reinstall the glow plug. The
after run oil will prevent the inside of the engine (especially
he crankshaft bearings) from rusting.
• Clean the outside of the engine using a heavy brush and
nitro car cleaner, then dry the engine, using a rag or
compressed air.
• Periodically check the condition of the clutch to check for
wear.
• Periodically oil the clutch bell bearings.
• Check the engine‘s cylinder head bolts and backplate
screws after each day of use to ensure that they‘re tight.
This will prevent air leaks from causing erratic engine
performance.
Page 21

21CARSON Nitro Buggy CNB 204016
GB
h. Installing the body
Install the body onto the chassis, using the body clips provided
to hold it in place.
Pro tip:
Other than during the break-in period, always make sure that
you install the body when driving your Buggy. lf your Buggy
flips over, the body will help protect the chassis and its components.
Tuning guide!
Making chassis adjustments
Chassis alignment and geometry are important if you want
your Buggy to perform well. A good performing Buggy means a
Buggy that is easier to drive, too.
Follow our guidelines in this section to get the most out of your
CNB.
IMPORTANT
It‘s very important when making changes to the settings of your
Buggy that you make the settings the same for each side. For
example, if you change the spring tension on the right front
shock, you should change the spring tension on the left front
shock the same amount, etc.
Do not make any changes that are more than 3 degrees from
the initial settings listed or the handling characteristics of your
Buggy will become very poor.
i. Adjusting the brake linkage
The brake linkage on your Buggy is preset from the factory;
however, after running the Buggy for a while you may find that
the brake linkage needs adjusting.
Follow the information below to check and adjust the brake
linkage:
With the transmitter and receiver turned on, and the throttle/
brake trim lever centered, the Buggy should roll forward
smoothly (i.e., the brakes should be disengaged). lf the brakes
are dragging when the throttle trigger is at neutral, the brake
discs will wear out very quickly. To ensure that the brakes are
disengaged, always make sure that there is a 1/16“ wide gap
between the two rear steel adjustment collars and the brake
levers. Both steel adjustment collars should be adjusted so that
they are equal distance behind each of the two brake levers.
This will ensure that both brake levers engage equally during
braking.
To make adjustments to the brake linkage, simply loosen the
grub screw in the adjustment collars behind the brake levers
and reposition them, then retighten the grub screws. Moving
the collars forward, toward the brake levers, will result in the
brakes coming on sooner and more forcefully.
Picture 25
Page 22

22GBCARSON Nitro Buggy CNB 204016
j. Adjusting the toe angle
Picture 26
0° Toe angle
Toe out
Toe in
The toe angle is the angle of both front tires (or rear tires) to
each other, when viewed from above. Toe-in is when the front of
both tires point toward each other and toe-out is when the front
of both tires point away from each other.
For the front tires, toe-in will make your Buggy track
straighter, but the steering will be more sensitive. Toe-out will
desensitize the steering, making the Buggy a little more driverfriendly.
For the rear tires, if you‘re running on a smooth
surface, we suggest no toe-in. lf you are running on a rough
surface, we suggest about 1 - 2 degrees of toe-in. This will give
the rear end a little more „bite.“
Adding more than 3 degrees of toe-in or toe-out will result in
excessive loss of speed and erratic handling.
To adjust the toe-angle of the front tires, turn the tie-rods (steel
rods connecting each wheel to the steering arm) in or out with
an adjustable wrench. To adjust the toe angle of the rear tires,
you need to replace the toe angle block, described below:
To adjust the toe-in on the rear tires, use one of the different
composite toe angle blocks provided in your kit to set the
• To change the rear toe angle block, first remove the two
screws from the bottom of the chassis that hold the toe
angle block screw guard in place, remove the screw guard
from the chassis.
• Next, remove the two screws that hold the toe angle block
in place, then carefully pull out the toe angle block, being
careful not to pull out the hinge pins.
• Install the desired toe angle block. Installation is the reverse
of the disassembly procedure.
Picture 27
desired toe angle. For convenience, the degree of toe angle in
each block is molded into the back of the blocks. The stock
toe-angle block is 2°.
Page 23
23CARSON Nitro Buggy CNB 204016
GB
Picture 28
Picture 29
k. Adjusting the camber angle
Camber is referred to as the amount of the tire‘s surface that
contacts the ground. Tires that are exactly perpendicular to
ground have 0 degrees of camber.
lf the top of the tire leans in toward the chassis, the tire has
negative camber. lf the top of the tire from the chassis, the tire
has positive camber.
Recommended initial settings:
For driving on smooth surfaces set both the front and back
wheels at 0 degrees.
For driving on rough surfaces set the front wheels at -1 degree
and the back wheels at -2 degrees.
Adjust the camber angle of the wheels by turning the upper
turnbuckles in or out using an adjustable wrench.
Negativ camber
Positive camber
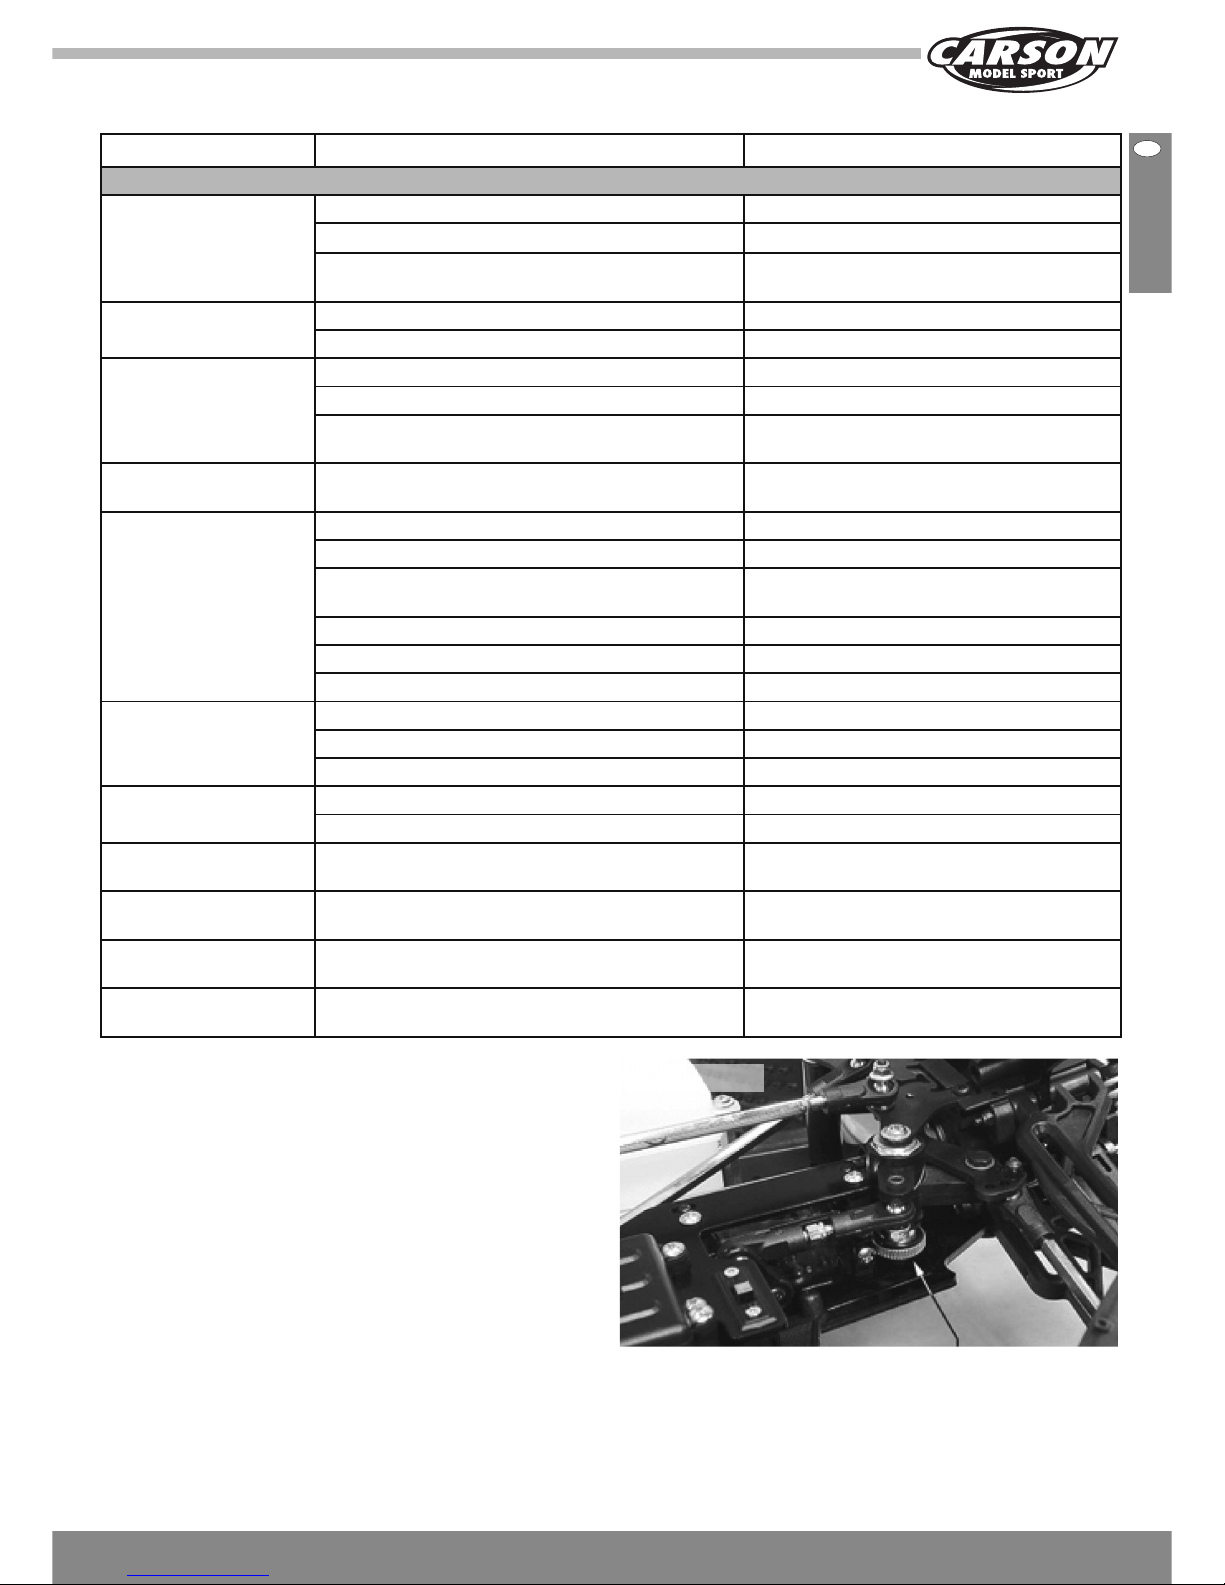
l. Adjusting the 2-speed transmission shift point
The transmission shift point has been preset for you from the
factory, but it is possible to fine tune the adjustment to suit your
driving style. The shift point is the point at which the 2-speed
transmission will shift from first gear to second gear.
Adjust the shift point by turning the small grub screw in the
aluminum 2-speed clutch housing, using a 1.5 mm hex wrench.
Turning the grub screw clockwise will make the transmission
shift at a higher speed.
Turning the grub screw counterclockwise will make the
transmission shift at a lower speed.
The 2-Speed transmission has been preset for you from the
factory. No initial adjustments are necessary. To adjust the
2-speed transmission, you must first locate the small grub
screw in the clutch housing.
To locate the grub screw, lift the Buggy off the ground and
slowly rotate the spur gear assembly until you can see the
small grub screw through the milled access hole in the clutch
housing. Once the small grub screw is visible, use a 1.5 mm hex
wrench to adjust the grub screw.
To make the transmission shift at a higher speed, turn the grub
screw clockwise 1/8th of a turn. To make the transmission shift
at a lower speed, turn the grub screw counterclockwise 1/8th of
a turn.
Picture 30
Adjust grub
screw
Page 24

24GBCARSON Nitro Buggy CNB 204016
Warning!
We suggest making 1/8th of a turn adjustments at a time,
testing the shift point between each adjustment you make, until
you are satisfied with the transmission shift point.
Important!
There are two screws in the 2-speed clutch housing. One is a
grub screw that uses a 1.5 mm hex wrench and the other is a
steel socket-cap screw that uses a 2.5 mm hex wrench. Do not
attempt to adjust the larger screw. This screw holds the clutch
housing onto the transmission shaft.
To reset the 2-speed transmission shift point, please proceed
as follows:
The screw has to be positioned 1 mm below the edge! This is
the basis setting for the 2-speed gear transmission!
Picture 31
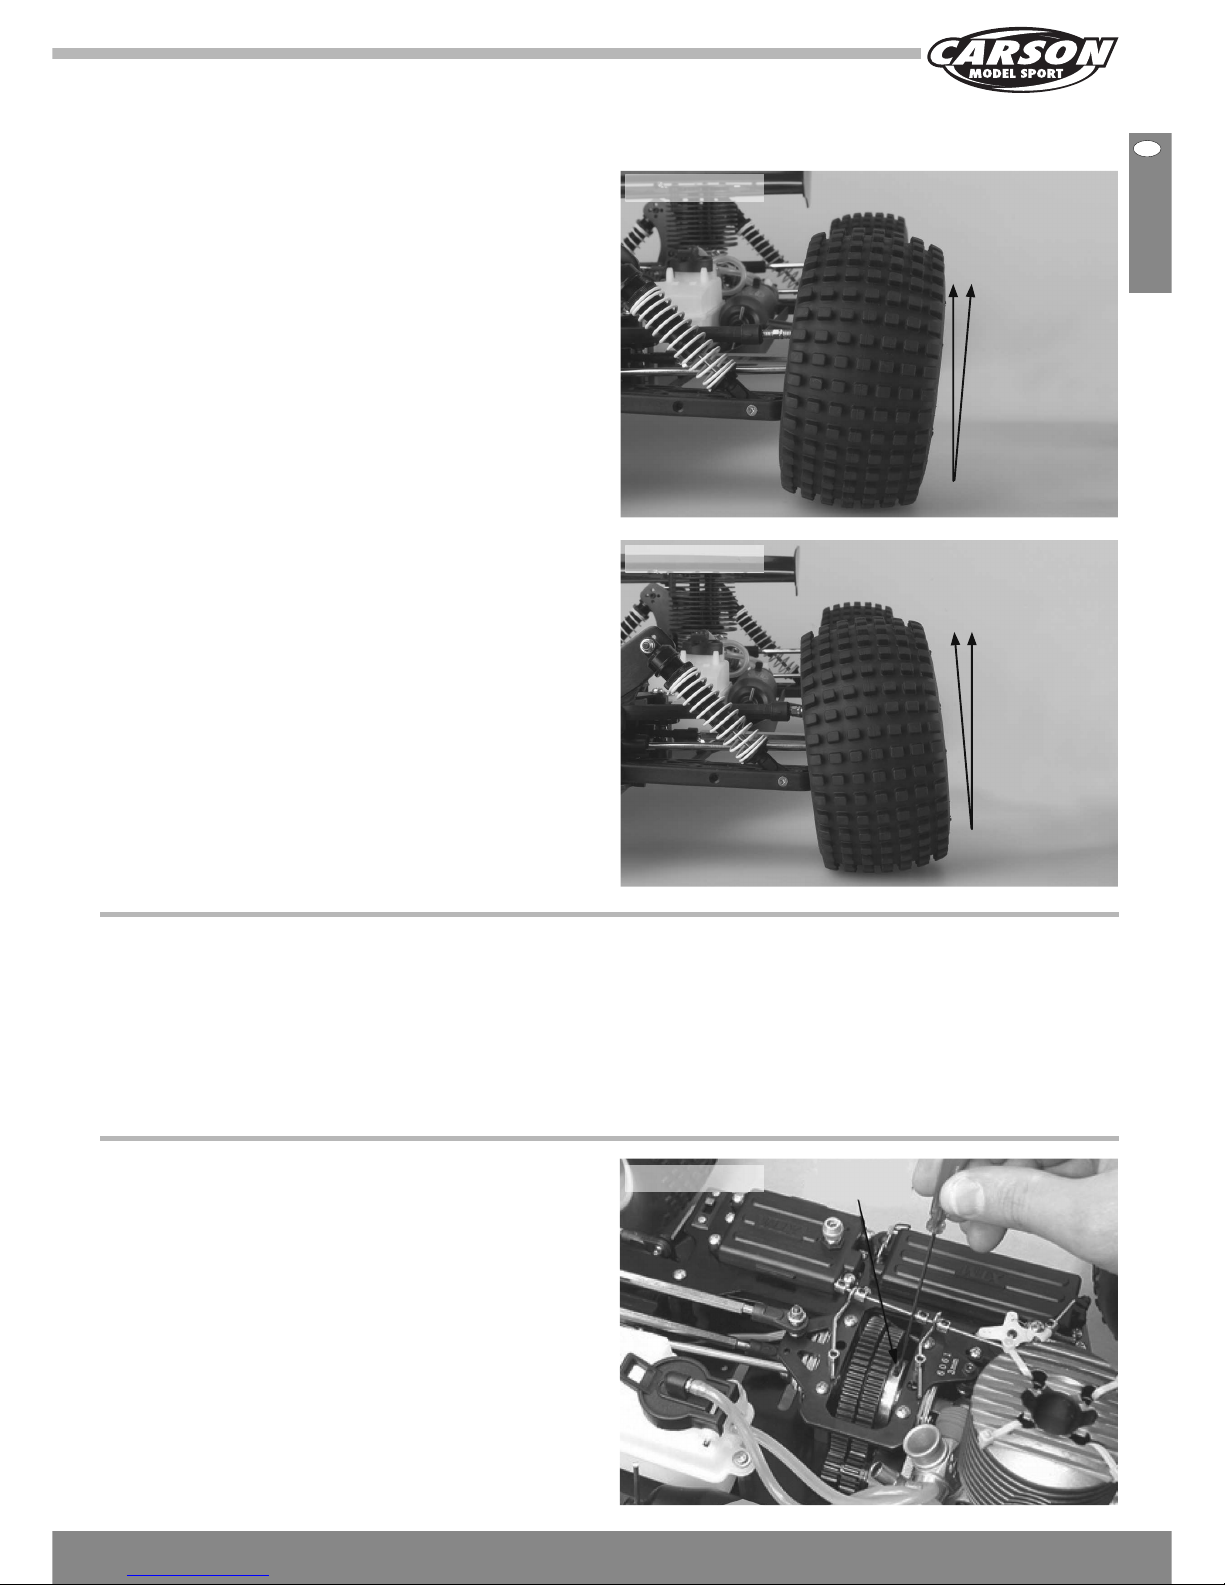
m. Adjusting shock spring tension
By adjusting the spring tension of the shocks, you can increase
steering sensivity, adjust the ride-height of the Buggy and finetune the dampening quality of the suspension system. How you
drive your Buggy will dictate what settings you should be using.
As an example, if you‘re driving your Buggy off-road and going
over lots of jumps, you may want to increase the spring tension
of the front shocks to help prevent the front of the Buggy from
bottoming out.
lf you‘re racing your Buggy, local track conditions will dictate
the settings to use.
Recommended initial settings:
We recommend initially leaving the adjustment rings in the
factory locations. Increase or decrease spring tension by
threading the adjustment ring up or down the shock body.
Threading the ring down increases spring tension and the
Buggy‘s ride height, and will stiffen the overall dampening
characteristics of the suspension.
Threading the ring up decreases spring tension and makes the
dampening characteristics softer.
When adjusting the spring tension, make sure to adjust the
right and left sides equally.
Page 25
25CARSON Nitro Buggy CNB 204016
GB
Picture 32
n. Adjusting shock dampening and replacement
shock springs
Changing the shock oil (the oil inside the shocks) will change
the dampening characteristics of the shocks. Typically, if you
are running on smooth surfaces, use a heavier weight oil. lf you
are running on rough surfaces, use a lighter weight oil.
IMPORTANT We recommend using only 100% silicone
shock oil. Do not use motor oil. The shock oil used in the
CARSON CNB Buggy is 100 Wt shock oil. This is good for allaround use. For racing, you may want to consider using 45 Wt
oil.
Shock springs are easy to change and can make a difference
in the way your Buggy handles relative to the type of terrain
you‘re driving on. lf you drive your Buggy off-road, in a smooth,
high-traction area, use stiffer springs to reduce body roll and
weight shift. lf the area where you drive your Buggy is very
bumpy, you might consider using softer springs to help absorb
the bumps.
lf the area is bumpy and you use harder springs, the Buggy will
have a tendency to jump and hop around. The shock springs
included with the CARSON CNB Buggy are suitable for most
general off-road applications, but experimentation with different
shock springs may be necessary to find a setup that suits your
particular driving style and location.
Picture 33
Soft
Set Art.-No. 205322
Picture 34
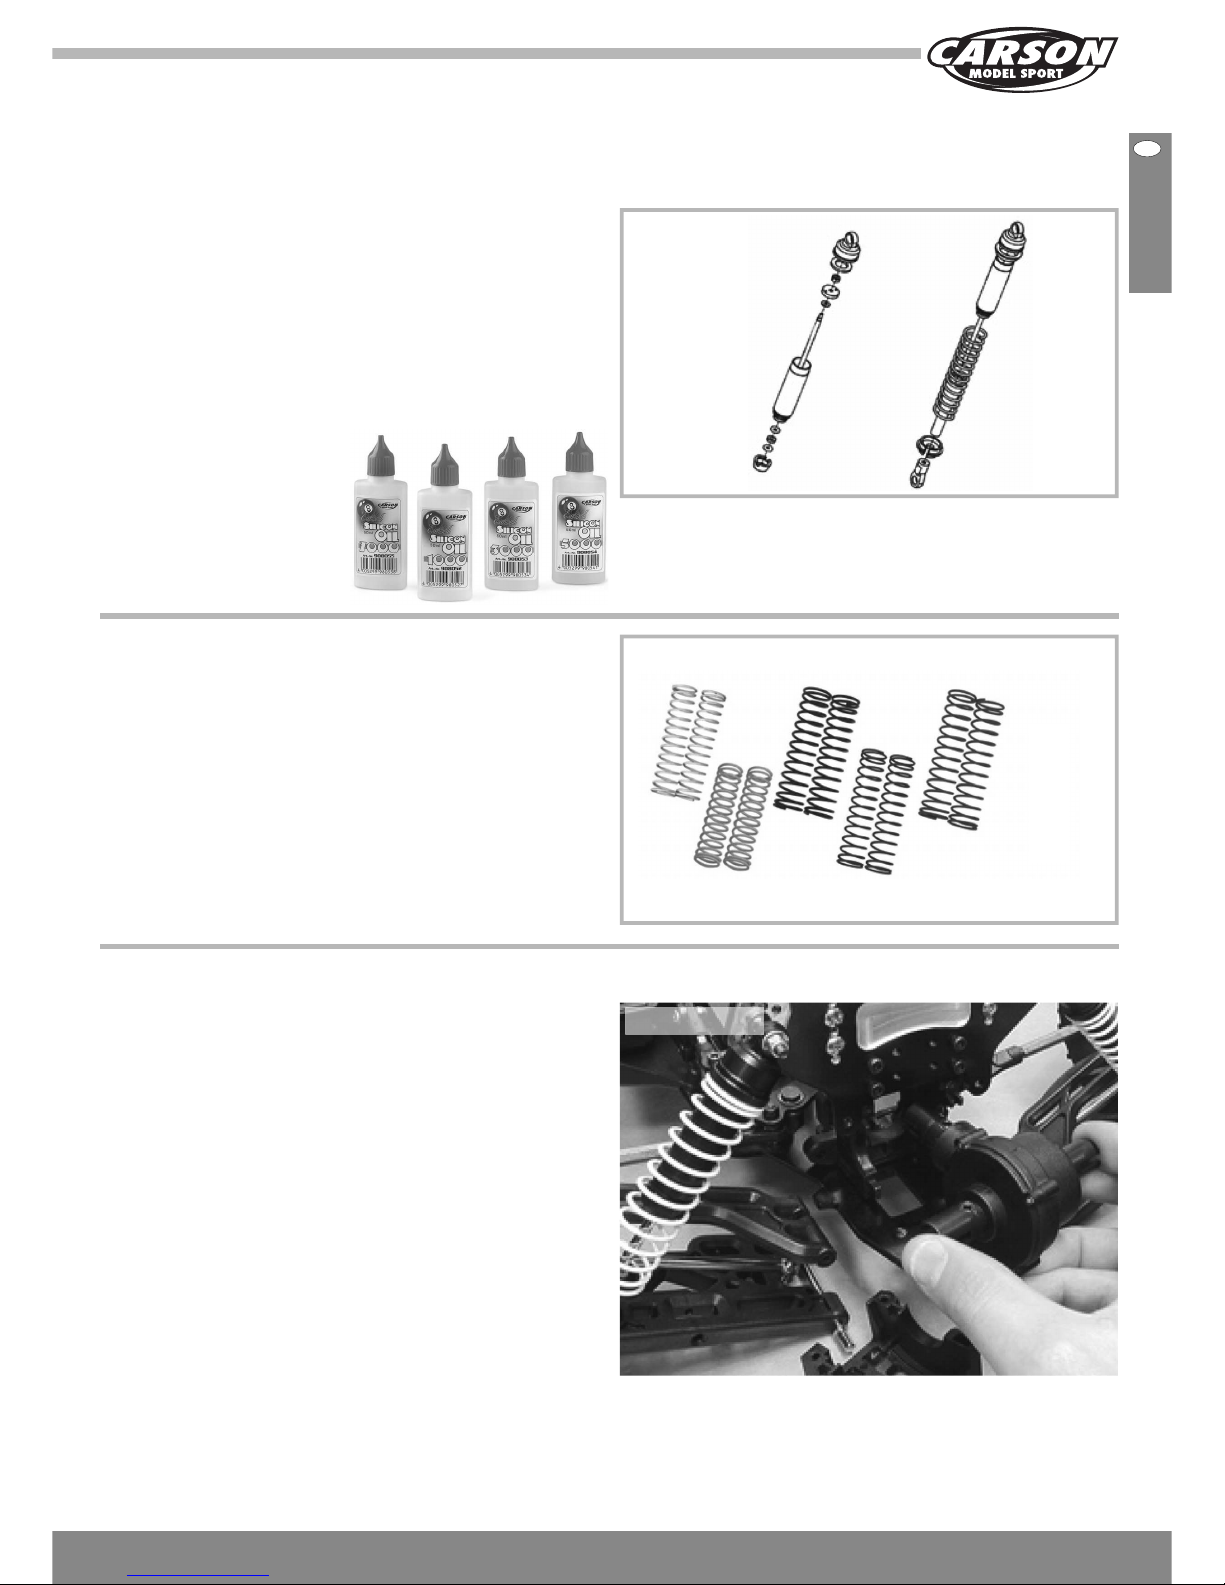
o. Adjusting the front and rear differentials
The CARSON CNB Buggy features front and rear gear
differentials that each feature o-ring seals and cup-style
housings. Both differentials are packed with differential grease
that is good for most driving conditions.
You can make fine-tuned adjustments to each differential by
removing the differentials from the chassis, opening them up
and replacing the grease already inside the differentials with
silicone differential oil.
Adding heavier silicone oil will tighten the differentials and
adding lighter silicone oil will loosen the differentials. lf your
Buggy feels loose during turns, you can tighten the front
differential or loosen the rear differential. lf your Buggy is
pushing during turns, you can loosen the front differential or
tighten the rear differential. We recommend using silicone oil
weights between 1000 (1 K) and 7000 (7 K).
For your convenience, we show you how to remove and
disassemble the front differential. Removing and disassembling
the rear differential is similar. Refer to the parts blow up and
assembly sequence on page 58 if necessary.
Remove the six screws from the bottom of the chassis that hold
the front bumper in place, then remove the front bumper.
Next, remove the screws that hold the upper and lower hinge
pin support plates in place, then remove the two hinge pin
support plates.
Pull the front half of the diff case straight out, then remove the
lower hinge pins and drop the suspension arms.
Firmly pull the differential assembly straight out.
Silicon oils
908048 Silicon Oil 50 ml 300
908049 Silicon Oil 50 ml 400
908050 Silicon Oil 50 ml 500
908051 Silicon Oil 50 ml 600
908052 Silicon Oil 50 ml 1000
908053 Silicon Oil 50 ml 3000
908054 Silicon Oil 50 ml 5000
908055 Silicon Oil 50 ml 7000
Page 26

26GBCARSON Nitro Buggy CNB 204016
Picture 35
Remove the two CVD drive shaft cups from the diff assembly,
then remove the four screws that hold the diff halves together.
Pull the diff halves apart, then pull the diff assembly (w/ring
gear attached) out of the diff housing.
Remove the four screws that hold the diff case together, then
pull the diff case apart to open up the diff. You can now remove
the grease inside the diff and refill the diff with the differential
oil of your choice. Installation is the reverse of the disassembly
procedure.
p. Maintaining your CNB Buggy
Following a simple maintenance schedule will ensure that
your CARSON CNB Buggy engine and radio control system
operate in top condition every time you use them. lt is strongly
suggested.
Check the foam air filter element for dirt blockage. lf the foam
is dirty, remove it from the filter housing and wash it in liquid
soap and warm water. Dry the foam element with a paper towel,
reinstall it and ”wet“ it with after run oil. See page 15 for more
info.
Check the chassis for any loose screws, especially the engine
and the outdrive cup mounting screws. Tighten them if
necessary.
Any screws that are threaded directly into metal should be
secured into place with Blue Lock-Tite. This will prevent the
screws from loosening during use. Screws threaded into nylon
or composite material do not require Lock-Tite.
Check the steering linkage and the throttle/brake linkage for
any signs of wear or misalignment. Tighten and/or readjust
them if necessary. Double-check that the grub screws in the
steel collars are tight.
Once in a while, remove the wheels and clean the wheel
bearings, using a bearing cleaner. This will remove any dust and
grit that may, over time, damage the bearings. After cleaning
the bearings, reoil them using a good quality bearing oil. Never
run the bearings dry or damage to the bearings will result.
When you clean the wheel bearings as described above, also
remove, clean and reoil the clutch bell bearings.
Check the fuel system, including the fuel tank and fuel tubing,
for any signs of cracking or looseness. Replace any fuel tubing
you suspect may be damaged.
Check the condition of the transmitter and receiver batteries
after each time you drive your Buggy. lf you think they might be
low, replace them with a fresh set.
After a period of time the chassis will accumulate a lot of dirt
and debris, especially around the engine area. This buildup
should be cleaned off using a high-powered spray cleaner
like Nitro Car Cleaner. Some nitro car cleaners will damage
anodized andlor plated parts. Test on an inconspicuous area
first.
After cleaning the chassis and engine with Nitro Car Cleaner,
you should oil the moving parts of the chassis. Do not oil the
clutch bell, spur gears or the brake discs.
Picture 36
Always use new fuel and keep the cap on the fuel tightly
closed. As fuel ages it absorbs water, which degrades the fuels
performance and will cause erratic engine operation.
After you have finished using the engine for the day, remove
the glow plug from the engine and squirt several drops of highquality after run oil into the glow plug hole. Pull the pull-start
cord several times to distribute the oil throughout the engine,
then reinstall the glow plug. This will prevent corrosion inside
the engine.
Never leave unused fuel in the fuel tank for more than a
couple of days. The nitromethane and methanol in the fuel will
evaporate, leaving the oil behind. This will eventually turn into a
thick sludge that will require replacement of the fuel tank to fix.
lf you need to remove the engine to clean it or change the
clutch bell, etc., it‘s important that you set the gear mesh
between the clutch bell and spur gears properly when reinstalling the engine; otherwise, the spur gears may be damaged or
the gears may bind. To set the gear mesh, first start by having
the engine mount assembly temporarily in place, then slide the
engine back within the mounts until the teeth on the clutch bell
are even with the spur gears. When satisfied with the alignment,
tighten the four socket-cap screws to secure the engine to the
engine mounts. This will ensure that the clutch bell is lined up
with the spur gears.
Next, place a piece of notebook paper between the clutch bell
and each of the spur gears, and push the engine toward the
spur gears firmly, so that the notebook paper crinkles. When
set properly, there should be very slight play between the gears.
Page 27
27CARSON Nitro Buggy CNB 204016
GB
lf the gears are too tight they will bind and if they are too loose
they will strip out. When satisfied with the alignment, tighten
the four hex screws on the bottom of the chassis. With the
wheels off the ground, you should be able to spin the clutch
bell with your finger. The clutch bell should rotate the spur
gears and other drivetrain components rather easily.
lf it‘s difficult to rotate the clutch bell, your gear mesh is likely
too tight. Readjust the gear mesh, making sure to use a piece
of notebook paper between the gears. When set properly, the
paper should be tightly crinkled, but not ripped or punctured.
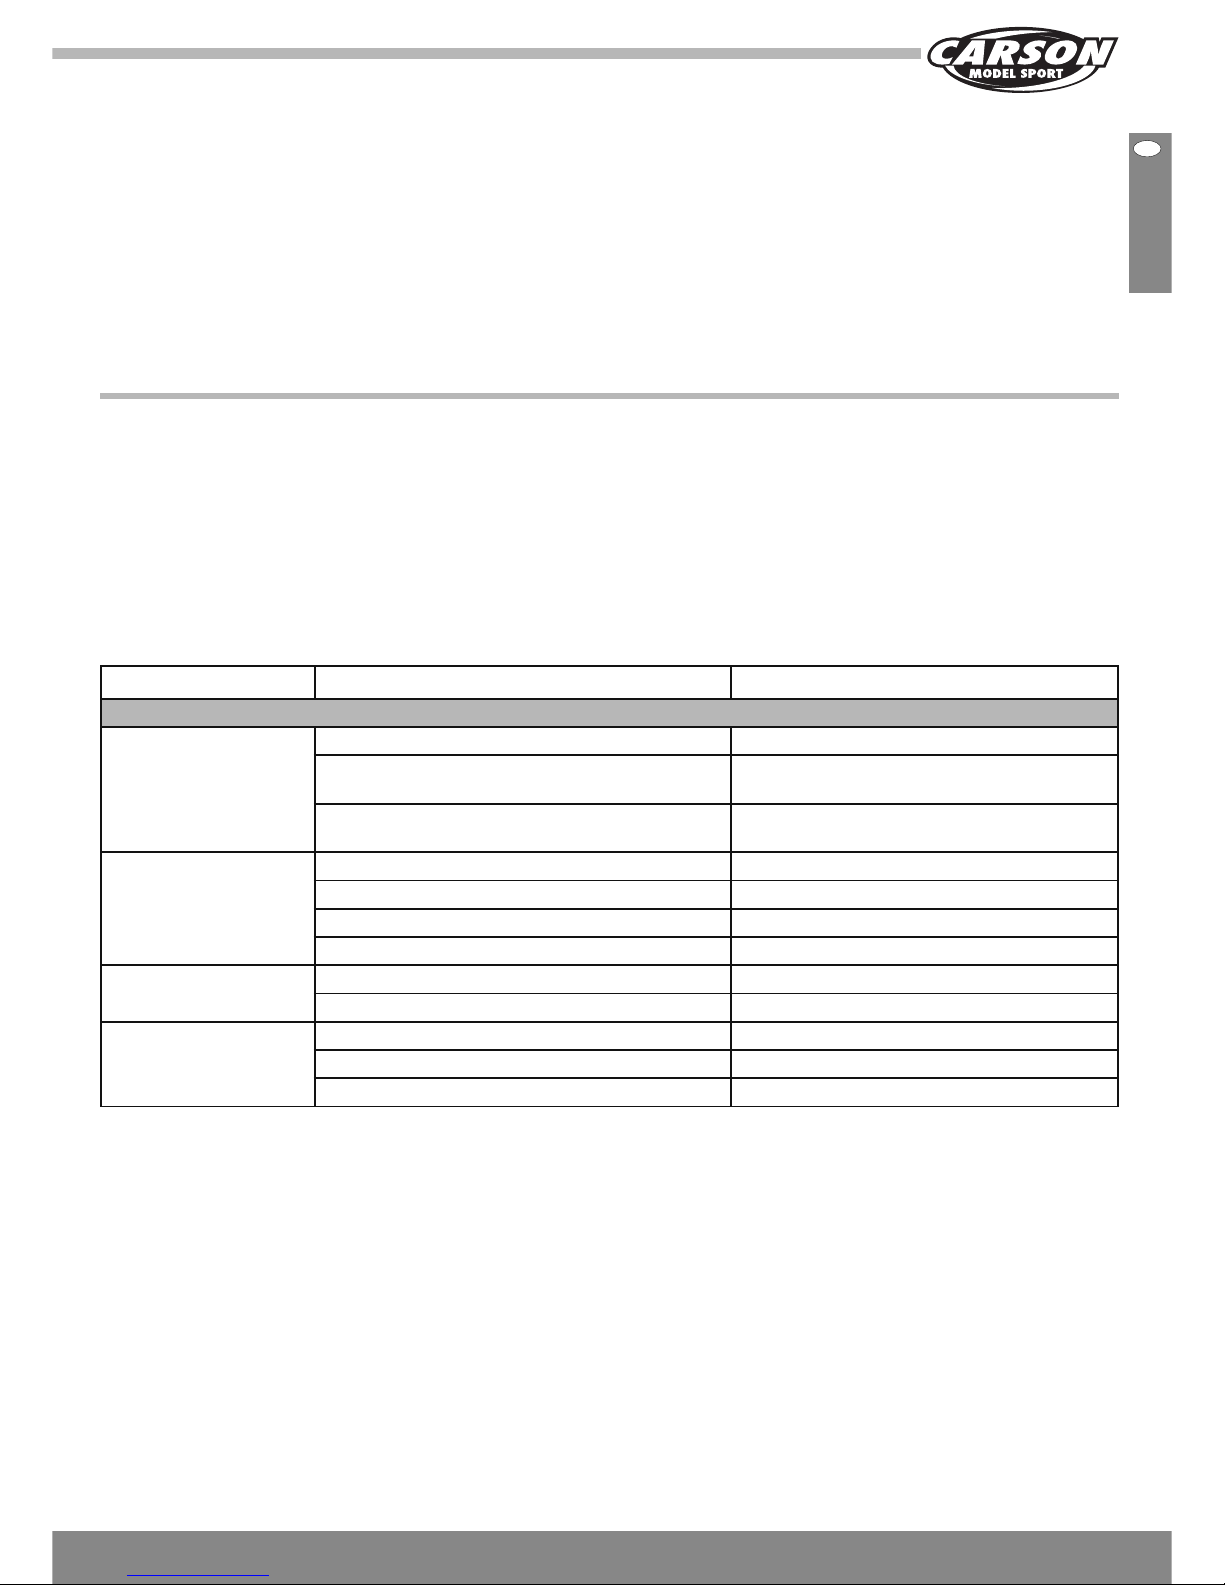
q. Troubleshooting guide
This troubleshooting guide has been provided to help you
diagnose and solve most problems that you may encounter
with your
CARSON CNB Buggy. Most problems encountered can be
solved by carefully following the problem-cause-solution
sections.
lf you cannot solve the problem using this troubleshooting
guide, please feel free to contact us using the
Customer Service Information on page 92.
Problem Cause Solution
If you‘re having a problem with the radio system:
Radio system does not
operate
1. Transmitter and/or receiver batteries are low Replace transmitter and/or receiver batteries
2. Batteries are installed incorrectly Check that the polarity of the batteries is correct
3. Receiver battery connector is loose Check that receiver battery connector is
plugged in and tight
Operating range is short 1. Transmitter antenna is retracted Extended transmitter antenna completely
2. Receiver antenna is not extended Extend receiver antenna completely
3. Receiver antenna is cut Return receiver to Hitec/RCD for repair
4. Transmitter and/or receiver batteries are low Replace transmitter and/or receiver batteries
Servos do not operate
normally
1. Transmitter and/or receiver batteries are low Replace transmitter and/or receiver batteries
2. Servo gear stripped or otherwise damaged Replace with new gear set
When engine is running,
radio system operates
erratically
1. Receiver crystal is loose Remove and reinstall the receiver crystal
2. Receiver battery connector is loose Check that receiver battery connector is tight
3. Damage to receiver after a crash Return to Hitec/RCD for repair
Page 28
28GBCARSON Nitro Buggy CNB 204016
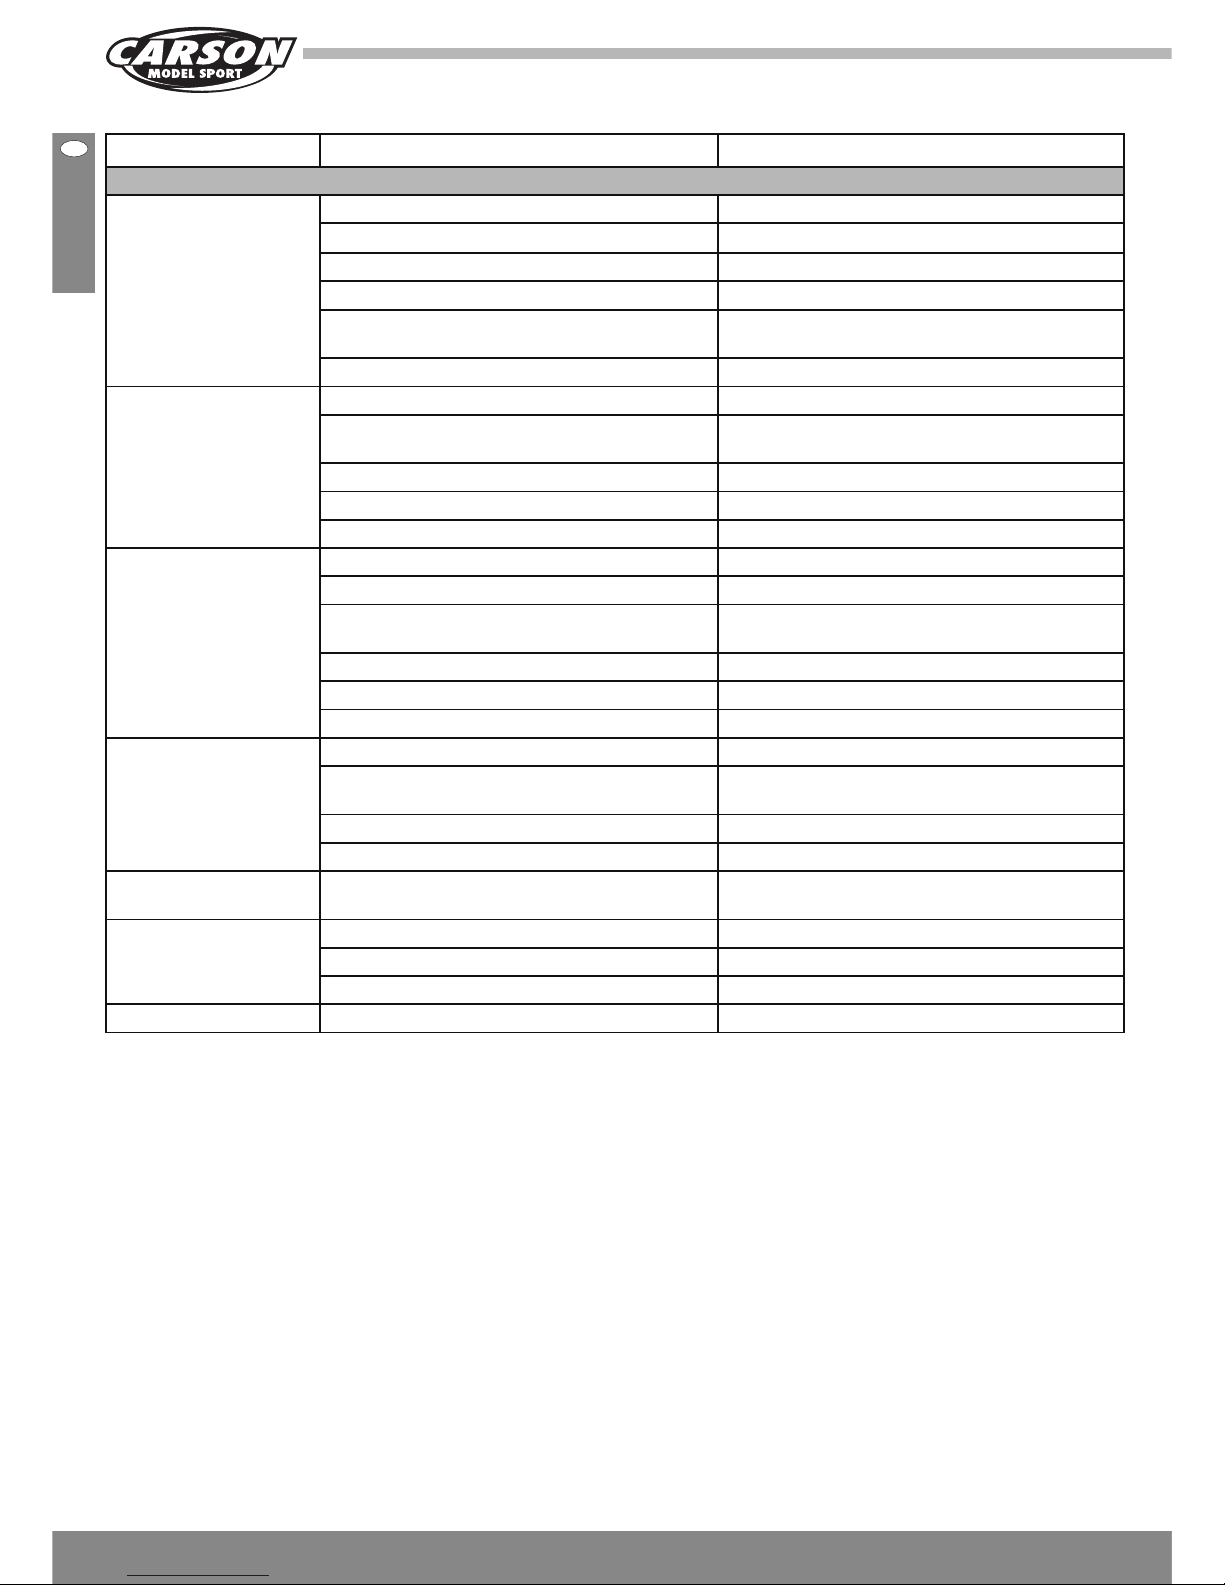
Problem Cause Solution
If you‘re having a problem with the Force 28 Nitro engine:
Engine does not start 1. Failed glow plug Replace glow plug with new one
2. Glow Starter not charged and/or faulty Fully charge glow starter and/or replace
3. Idle mixture screw set too lean Reset idle mixture to factory setting (p 17)
4. Old or contaminated fuel Replace with new fuel
5. Engine flooded with too much fuel Remove glow plug and expel fuel from cylinder
(p 17)
6. Air leak in fuel system and/or engine Replace fuel lines and/or tighten all engine bolts
Engine does not draw
fuel
1. Air leak in fuel system and/or engine Replace fuel lines and/or tighten all engine bolts
2. High speed needle valve fully closed Reset high speed needle valve to factory setting
(p 17)
3. Idle mixture screw set too lean Reset idle mixture to factory setting (p 17)
4. Fuel lines kinked Check and straighten fuel lines
5. Defective fuel tank Replace fuel tank
Engine has poor
performance
1. Failed and/or wrong type glow plug Replace with new recommended glow plug (p 7)
2. Old and/or wrong type fuel Replace with new recommended fuel (P4)
3. High speed needle valve set too rich Reset high speed needle valve to leaner setting
(p 17)
4. Idle mixture set too lean Set idle mixture richer (p 17)
5. Idle mixture set too rich Set idle mixture leaner (p 17)
6. Air leak in fuel system and/or engine Replace fuel lines and/or tighten all engine bolts
Engine overheats 1. Engine running too lean Richen high speed needle valve (p 17)
2. Body too restrictive Open larger vents in body to allow air to enter
and exit
3. Wrong type of fuel used Use fuel recommended only for R/C cars (p 6)
4. Engine not fully broken in Allow engine further break-in time (p 19)
Engine vibrates
excessively
Engine and/or engine mounts loose Tighten all engine and engine mounting bolts
Engine does not idle
down
1. Idle stop screw out of adjustment Adjust idle stop screw to factory setting (p 17)
2. Engine has developed an air leak Check and tighten all engine screws
3. One or more carburretor 0-rings damaged Replace carburretor 0-rings
EMS-Starter Does not work Check the battery
Page 29
29CARSON Nitro Buggy CNB 204016
GB
Problem Cause Solution
If you‘re having a problem with the CNB Chassis:
Buggy pulls to one side 1. Steering trim out of adjustment Readjust trim to center both wheels (p 9)
2. Toe angle out of adjustment Readjust toe angle (p 22)
3. One wheel is hanging or has damaged bearing Remove wheel and clean bearing. Replace if
necessary
Brakes seem ineffective 1. Brake linkage out of adjustment Readjust brake linkage (p 21)
2. Brake disc(s) worn Replace affected brake disc(s)
Clutch does not engage 1. Clutch shoes damaged or worn Replace clutch shoes
2. Clutch bell damaged or worn Replace clutch bell
3. Clutch shoes glazed Remove glaze using fine sandpaper and
reinstall
Clutch does not
disengage
Clutch spring(s) worn or damaged Replace clutch springs
Buggy does not ”go“ 1. Stripped or damaged spur gear(s) Replace spur gear(s)
2. Stripped differential gear(s) Replace differential gear(s)
3. Driveshaft(s) slipping and/or broken Tighten grub screw and/or replace drive
shaft(s)
4. Outdrive cups slipping Tighten grub screw in outdrive cups
5. Clutch not engaging Check clutch assembly and repair or replace
6. Carburretor set too rich Lean high speed needle valve (p 17)
Suspension not smooth
or free
1. One or more shocks sticking Clean and/or rebuild the affected shock
2. Bent shock shaft Rebuild affected shock
3. Bent or otherwise damaged hinge pin Replace hinge pin
Shocks leaking oil 1. Shock seals worn Replace shock seals
2. Bent shock shaft Rebuild affected shock
2-speed transmission
shifts at too low a speed
Shift point not adjusted properly Readjust shift point to shift at a higher speed
(p 24)
2-speed transmission
shifts at too high a speed
Shift point not adjusted properly Readjust shift point to shift at a lower speed
(p 24)
Screws loosen and/or fall
out during use
Vibration under normal use Clean screw(s) and/or replace and use Blue
Lock-Tite to secure them into place
Steering sensitivity is
”sluggish“
Servo saver spring is set too loose Tighten servo saver spring – see below
lf your Buggy‘s steering seems sluggish or slow to react, the
servo saver spring could be too loose. To increase steering
response time, thread the servo saver adjustment ring up to
tighten the servo saver spring.
WARNING Tightening the servo saver spring increases the
chance of damaging the steering servo during a crash. Do so at
your own risk.
FOR MORE TIPS AND TROUBLESHOOTING SOLUTIONS CHECK OUT
www.carson-modelsport.de
Picture 37
Adjust spring tension
Page 30

30DCARSON Nitro Buggy CNB 204016
Sehr geehrter Kunde
Wir beglückwünschen Sie zum Kauf Ihres CARSON RC-Modellautos, das nach dem heutigen Stand der Technik gefertigt
wurde.
Da wir stets um Weiterentwicklung und Verbesserung unserer
Produkte bemüht sind, behalten wir uns eine Änderung in technischer Hinsicht und in Bezug auf Ausstattung, Materialien und
Design jederzeit und ohne Ankündigung vor.
Aus geringfügigen Abweichungen des Ihnen vorliegenden
Produktes gegenüber Daten und Abbildungen dieser Anleitung
können daher keinerlei Ansprüche abgeleitet werden.
Diese Bedienungs- und Montageanleitung ist Bestandteil des
Produkts. Bei Nichtbeachtung der Bedienungsanleitung und
der enthaltenen Sicherheitsanweisungen erlischt der Garantieanspruch. Bewahren Sie diese Anleitung zum Nachlesen und
für die even tuelle Weitergabe des Modells an Dritte auf.
Garantiebedingungen
Für dieses Produkt leistet CARSON eine Garantie von 24
Monaten betreffend Fehler bei der Herstellung in Bezug auf
Material und Fertigung bei normalem Gebrauch ab dem Kauf
beim autorisierten Fachhändler. Im Falle eines Defekts während
der Garantiezeit bringen Sie das Modell zusammen mit dem
Kaufbeleg zu Ihrem Fachhändler.
CARSON wird nach eigener Entscheidung, falls nicht anders im
Gesetz vorgesehen:
(a) den Defekt durch Reparatur kostenlos in Bezug auf Material
und Arbeit beheben;
(b) das Produkt durch ein gleichartiges oder im Aufbau
ähnliches ersetzen; oder
(c) den Kaufpreis erstatten.
Alle ersetzten Teile und Produkte, für die Ersatz geleistet wird,
werden zum Eigentum von CARSON. Im Rahmen der Garantieleistungen dürfen neue oder wiederaufbereitete Teile verwendet
werden.
Auf reparierte oder ersetzte Teile gilt eine Garantie für die
Restlaufzeit der ursprünglichen Garantiefrist. Nach Ablauf
der Garantiefrist vorgenommene Reparaturen oder gelieferte
Ersatzteile werden in Rechnung gestellt.
Von der Garantie ausgeschlossen sind:
• Beschädigung oder Ausfall durch Nichtbeachten der Sicherheitsanweisungen oder der Bedienungsanleitung, höhere
Gewalt, Unfall, fehlerhafte oder außergewöhnliche
Beanspruchung, fehlerhafte Handhabung, eigenmächtige
Veränderungen, Blitzschlag oder anderer Einfluss von
Hochspannung oder Strom.
• Schäden, die durch den Verlust der Kontrolle über Ihr Fahrzeug entstehen.
• Reparaturen, die nicht durch einen autorisierten CARSON
Service durchgeführt wurden
• Verschleißteile wie etwa Sicherungen und Batterien
• rein optische Beeinträchtigungen
• Transport-, Versand- oder Versicherungskosten
• Kosten für die Entsorgung des Produkts sowie Einrichten
und vom Service vorgenommene Einstell- und Wiedereinrichtungsarbeiten.
Durch diese Garantie erhalten Sie spezielle Rechte, darüber
hinaus ist auch eine von Land zu Land verschiedene Geltendmachung anderer Ansprüche denkbar.
Konformitätserklärung
Hiermit erklärt CARSON Modelsport, dass sich dieses Modell
einschließlich Fernsteueranlage in Übereinstimmung mit den
grund legenden Anforderungen folgender EG-Richtlinien:
98/37 EG für Maschinen und 89/336/EWG über die elektromagnetische Verträglichkeit und den anderen relevanten
Vorschriften der Richtlinie 1999/5/EG (R&TTE) befindet.
Die Original-Konformitätserklärung kann angefordert werden.
Bedeutung des Symbols auf dem Produkt, der
Verpackung oder Gebrauchsanleitung: Elektrogeräte
sind Wertstoffe und gehören am Ende der Laufzeit
nicht in den Hausmüll! Helfen Sie uns bei Umwelt-
schutz und Recourcenschonung und geben Sie
dieses Gerät bei den entsprechenden Rücknahmestellen ab.
Fragen dazu beanwortet Ihnen die für Abfallbeseitigung zuständige Organisation oder Ihr Fachhändler.
Wir wünschen Ihnen viel Spaß mit Ihrem CARSON
Modellauto und jederzeit gute Fahrt!
Vor dem Gebrauch Ihres neuen Modells lesen Sie bitte dieses Handbuch
sorgfältig durch!
Page 31

31CARSON Nitro Buggy CNB 204016
D
Inhalt
Lieferumfang
Sender
Modell
Starter
Vorwort ................................................................................... 30
Lieferumfang .......................................................................... 31
Sicherheitsanweisungen ....................................................... 32
Vorsichtsmaßnahmen ............................................................ 33
Einleitung ............................................................................... 34
Zum Betreiben des Motors erforderliches Zubehör ............ 34
Für den Zusammenbau erforderliches Werkzeug ................36
Werden Sie routiniert im Umgang mit Ihrem CARSON
Nitro Buggy ........................................................................... 37
Chassis .................................................................................. 37
Letzte Arbeiten vor Inbetriebnahme ..................................... 39
a. Letzte Montagen .............................................................. 39
b. Fernsteuerung checken ................................................... 41
c. Gas/Bremse ..................................................................... 42
d. Luftfilter befeuchten ........................................................ 43
e. Force Motor 4,58 cm
3
...................................................... 44
f. Betanken des Modells und Starten des Motors ............. 45
g. Einlaufen des Motors ....................................................... 47
h. Montage der Karosserie .................................................. 49
i. Einstellen des Bremsgestänges ...................................... 49
j. Einstellung der Spur ........................................................ 50
k. Einstellung des Sturzes ................................................... 51
l. Einstellung des Schaltpunktes ........................................ 51
m. Einstellen der Federvorspannung ................................... 52
n. Einstellen der Dämpfer und Ersetzen der Federn ..........53
o. Differenzial tauschen ....................................................... 53
p. Wartung ihres CNB Buggy .............................................. 54
q. Fehlersuche ...................................................................... 55
Montageanleitung .................................................................. 58
4,58 cm
3
Force Nitro Verbrennungsmotor ............................ 89
Ersatzteile .............................................................................. 92
EMS-System Ersatzteile ........................................................ 98
Tuningteile .............................................................................. 99
Page 32

32DCARSON Nitro Buggy CNB 204016
Sicherheitsanweisungen
Dieses Modell ist kein Spielzeug!
• Funkferngesteuerte Modelle sind kein Spielzeug, Ihre
Bedienung muss schrittweise erlernt werden.
• Kinder unter 14 Jahren sollten das Modell nur unter Aufsicht
von Erwachsenen in Betrieb nehmen.
Das Fahren von ferngesteuerten Autos ist ein faszinierendes
Hobby, das jedoch mit der nötigen Vorsicht und Rücksichtnahme betrieben werden muss. Ein ferngesteuertes Modellauto, das ein beachtliches Gewicht aufweist und eine sehr
hohe Ge schwindig keit erreicht, kann in einem unkontrollierten
Fahr zu stand er heb liche Beschädigungen und Verletzungen
verursachen, für die Sie als Betreiber haftbar sind.
Vergewissern Sie sich bei Ihrer Versicherung, ob Sie beim Ausüben Ihres Hobbys versichert sind. Nur ein einwandfrei zu sammen gebautes Modell wird erwartungsgemäß funktionieren und
reagieren.
Improvisieren Sie niemals mit untauglichen Hilfs mitteln, sondern verwenden Sie im Bedarfsfall nur Originalersatzteile. Auch
bei einem vormontierten Modell soll ten Sie alle Verbindungen
auf exakten und festen Sitz kontrollieren.
Fahren Sie niemals, ohne sich von den
folgenden Punkten überzeugt zu haben:
• Empfängerakku und Senderakku müssen vollständig
geladen sein.
• Überprüfen Sie vor dem Start die Funkreichweite.
• Überprüfen Sie das ordnungsgemäße Ansprechen der
Servos auf die Steuersignale.
• Alle Funktionsteile des Fahrzeugs sind in einwandfreiem
Zustand und überprüft.
• Sämtliche Schrauben sind auf festen Sitz überprüft.
• Es ist kein RC- oder anderer Sender in der Nähe in Betrieb,
der Funkstörungen verursachen könnte. Störsignale auf
gleicher Frequenz können bewirken, dass Sie die Kontrolle
über Ihr Modell verlieren.
Schalten Sie immer zuerst
den Sender ein, um zu vermeiden, dass der Empfänger
unkontrolliert auf ein fremdes Funksignal reagiert.
• Ziehen Sie die Senderantenne immer vollständig heraus. Bei
gleichzeitigem Betrieb mehrerer Fahrzeuge darf das Modell
nur auf einer freien Frequenz betrieben werden. Schalten Sie
nach Beendigung des Fahrbetriebes zuerst den Empfänger,
dann den Sender aus.
• Fahren Sie auch nicht unter Hochspannungsleitungen oder
Funkmasten oder bei Gewitter!
• Atmosphärische Störungen können die Signale Ihres Fernsteuersenders beeinflussen.
• Die Elektrik des Modells ist nicht wasserdicht. Fahren Sie
deshalb nicht bei Regen, Schnee, durch Pfützen oder nasses
Gras.
• Das ferngesteuerte Modell darf nur auf geeignetem Gelände
und nicht auf öffentlichen Vekehrsflächen betrieben werden.
• Nicht in der Nähe von Personen und Tieren fahren!
• Fahren Sie nicht, wenn sie übermüdet oder anderweitig in
Ihrer Reaktionsfähigkeit beeinträchtigt sind.
• Halten Sie immer direkten Sichtkontakt zum Modell.
• Fahren Sie das Modell nur mit ordnungsgemäß angebrachter
Karosserie.
• Regelmäßige Wartung und Pflege ist für erstklassige Fahrleistung notwendig.
•
Das Modell hat Teile, die sich im Betrieb erhitzen, z.B. die
Ober seite des Motors, die Abgasanlage, das Metallgetriebe
und vieles mehr. Die Berührung dieser Teile während des
Betriebs kann zu Verletzungen führen.
Achten Sie auf die Ladezustandsanzeige Ihres Senders.
• Mit halbleeren Akkus können Sie die Kontrolle über das
Modell verlieren.
• Mischen Sie im Sender niemals volle Akkus / Batterien mit
halbleeren oder Akkus unterschiedlicher Kapazität.
• Versuchen Sie nie, Trockenbatterien zu laden (nur Akkus sind
aufladbar).
Bei längerem Nichtgebrauch ist der Empfängerakku unbedingt
zu entfernen.
Sicherheitsanweisung und bestimmungsgemäße Verwendung
Ein Verbrenner-RC-Modellauto ist ein ferngesteuertes, mit
spe ziel lem Modellkraftstoff betriebenes Modellauto. Es ist ausschließlich für Hobbyzwecke ausgelegt und darf nur auf dafür
vorgesehenen Bahnen und Plätzen, nicht in geschlossenen
Räumen gefahren werden.
Mit einem Verbrenner-RC-Modellauto dürfen keine Güter,
Per sonen oder Tiere transportiert werden.
Um Bedienungsfehler zu vermeiden, muss vor der Benutzung
unbedingt die Gebrauchsanweisung gelesen werden!
Modellautos dürfen nur mit einer Karosserie, die ordnungsgemäß angebracht ist, betrieben werden.
Vor dem Abnehmen der Karosserie den Motor abkühlen lassen,
da Kühlkopf und Auspuff im Betrieb heiß werden.
Das Modell darf nicht dauerhaft in unmittelbarer Nähe von
Personen betrieben werden, da unter Umständen Gehörschäden auftreten können.
Um zu vermeiden, dass das Modell mit Störungen im
Steuerungs system und dadurch unkontrolliert fährt, sind die
Batterien des Senders und des Empfängers auf einwandfreien
Ladezustand hin zu überprüfen.
Die korrekte Montage der Modellautos muss stets vor und nach
jeder Fahrt überprüft werden, gegebenenfalls Schrauben und
Muttern nachziehen.
Die Tankanlage muss vor jedem Gebrauch auf Dichtheit geprüft
werden. Der Tankdeckel muss stets dicht verschlossen sein.
Page 33

33CARSON Nitro Buggy CNB 204016
D
• Verwenden Sie ausschließlich Modellkraftstoff. Verwenden
Sie NIEMALS BENZIN oder ANDERE TREIBSTOFFE, da
diese explodieren und brennen und so zu ernsten
Verletzungen und/ oder Unfällen führen können.
• RC-Modelle niemals auf öffentlichen Straßen fahren lassen.
Dies könnte Verkehrsunfälle, Personen- und/ oder Sachschäden hervorrufen.
• Die Abgase eines mit Verbrennermotor betriebenen
Fahrzeuges sind giftig und können schwerwiegende
Auswirkungen auf Ihre Gesundheit haben. Ihr Fahrzeug
daher nie in geschlossenen Räumen betreiben – vorzugsweise draußen.
• Vor dem Starten Ihres Fahrzeuges sicherstellen, dass der
Gashebel auf Leerlauf gestellt ist. Jede andere Stellung
kann dazu führen, dass Sie die Kontrolle über Ihr Fahrzeug
verlieren.
• Vermeiden Sie beim Betrieb, den Motor, Auspuff und
rotierende Teile, zu berühren, da diese sehr heiß sind und
Verbrennungen verursachen können.
• Bitte in regelmäßigen Abständen sicherstellen, dass die
Motorbefestigungsschrauben sowie andere Teile fest sitzen,
andernfalls kann es zu schweren Motor- und/ oder ChassisSchäden kommen.
Vorsichtsmaßnahmen!
Bitte lesen Sie zuerst die folgenden Warnhinweise!
Motor
• Dieses Modell arbeitet mit giftigem, leicht entzündlichem
Treibstoff. Ein unsachgemäßer Gebrauch kann zu schweren
Unfällen führen. Aus diesem Grund strikt die Vorsichtsmaßnahmen befolgen, die auf dem Treibstoff-Behälter aufgedruckt sind.
• Wir empfehlen zum Einlaufen des Motors unseren „Race
Fire“-Einlaufkraftstoff (Art.-Nr. 13897). Um beim Fahren die
Höchstleistung des Motors nutzen zu können, sollten Sie
unsere „Nitro Fire“-Kraftstoffe verwenden.
• Treibstoff von Kindern fernhalten.
• Glühzünder-Treibstoffe sind extrem leicht entflammbar. Von
Hitzequellen und offenem Feuer fernhalten.
Treibstoff
• WICHTIG! Nach den ersten 10 Minuten Fahrzeit unbedingt
alle Schrauben nochmals nachziehen und ggf. mit Schraubensicherungslack (Art.-Nr. 87004, Tamiya) festziehen.
• Betreiben Sie Ihr Modell niemals in der Nähe von Personen
oder Tieren oder in engen / überfüllten Gebieten, da es zu
ernsthaften Verletzen kommen kann.
• Lassen Sie Ihr RC-Modell nicht auf öffentlichen Straßen
fahren.
• Fahren Sie niemals in der Nähe von Gewässern, durch
nasses Gras, Pfützen oder Schnee, da es zu Störungen der
elektronischen Komponenten führen kann.
• Bitte darauf achten, dass Sie stets frische und/ oder aufgeladene Akkus verwenden. Ein Spannungsabfall führt dazu,
dass Sie die Kontrolle über Ihr Fahrzeug verlieren, was
schwere Unfälle zur Folge haben kann.
• Sollte sich Ihr Modell festgefahren haben, den Motor im
Leerlauf lassen und das Modell per Hand „befreien“.
• Um eine Beschädigung des Motors und/ oder der Antriebskomponenten aufgrund von zu hohen Drehzahlen zu vermeiden, während Sprüngen bzw. in holprigem Gelände die
Gaszufuhr drosseln. Vermeiden Sie längeres Vollgasfahren
und hohe Drehzahlen!
Allgemeine Warnhinweise
Page 34

34DCARSON Nitro Buggy CNB 204016
Mit dem CNB werden Sie in allen Buggy-Klassen dominieren.
Der unglaublich niedrige Schwerpunkt sticht einem sofort ins
Auge. Ebenso die saubere und einfach zu wartende ChassisKonzeption, ein 2-Gang-Getriebe inkl. eines dritten Ganges
für die Rückwärtsfahrt, neu konzipierte Differenzialgehäuse,
innovative Aufhängungsarme, mächtige Öldruckstoßdämpfer
und verbesserte Aufhängungsbeweglichkeit. Die montierten
17 mm Mitnehmer sind mit vielen Reifen kompatibel, sodass
man diesen Buggy jedem Fahrbahnuntergrund anpassen kann.
Darüber hinaus bietet CARSON etliche Tuningmöglichkeiten,
die diesen Buggy zu einem individuellen Highlight machen.
Der CNB meistert bravourös nahezu jedes Gelände – ob als
„Hinterhof“-Geschoss oder uneingeschränkter Off-RoadGigant. Der CNB ist die ultimative Buggy-Rennmaschine!
Diese Anleitung ist als Hilfestellung
gedacht, um Ihnen grenzen losen
Fahrspaß mit Ihrem CNB zu garantieren.
Sie enthält wertvolle Informationen vom
Auspacken Ihres Modells bis hin zur
ersten Fahrt. Darüber hinaus ein Kapitel
über Chassis-Tuning und eine vollständige
Teileliste mit detaillierten Explosionszeichnungen. Sie werden sinnvolle Tipps
und Vorschläge erhalten – bewahren Sie
die Anleitung also gut auf.
Einleitung
Dieses Kapitel befasst sich mit dem Werkzeug, das Sie benötigen, um Ihr vormontiertes Modell fertig zu stellen, zum Laufen
zu bringen sowie für Wartungsarbeiten. Wir haben diese Artikel
selbst am CNB getestet und diese für am geeignetsten und
zuverlässigsten befunden.
Zum Betreiben des Motors erforderliches
Zubehör:
Kraftstoff füllflasche
13330
Kraftstoff
Glühkerzenstecker
905042
Liter Nitromethan Art.-Nr. Verwendung
1,0 10% 13897 Einlaufen/Beginner
2,5 10% 13934 Einlaufen/Beginner
1,0 16% 13935
Normal
2,5 16% 13936 Normal
1,0 25% 13937 Race
2,5 25% 13938 Race
CARSON-Kraftstoffe werden empfohlen
… oder alternativ
Glühkerzenstecker
und
Akku 11585
After Run Öl Luftfilteröl
905044 32648
Nitroset 905029
Racingpack 7,2 V/ 3500 mAh
NiMH
608024
Welchen Treibstoff verwende ich?
Ein großer Leistungsunterschied Ihres Modells ist auf die
richtige Treibstoff-Wahl zurückzuführen. Für die Einlaufphase
sollten Sie einen speziell konzipierten Einlauf-Kraftstoff (wir
empfehlen unsere Art.-Nr. 13897) verwenden, der höchstens
15% Nitromethan enthält. Wenn der Motor eingelaufen ist (ca.
45 min. Einlaufzeit), können Sie auf einen Treibstoff mit bis zu,
jedoch nicht mehr als, 25% Nitromethan umsteigen.
Page 35

35CARSON Nitro Buggy CNB 204016
D
Art.Nr. Bezeichnung Motorart Kraftstoffart Temperatur
905006 Glühkerze Rossi R2 heiß 2 - 3,5 ccm ohne Nitro +0° - +15C°
905007 Glühkerze Rossi R3 medium 3,5 - 6 ccm ohne Nitro -2° - +18C°
905008 Glühkerze Rossi R4 kalt 6 - 10 ccm ohne Nitro -5° - +20C°
905009 Glühkerze Rossi R5 extra 3,5 - 10 ccm 10% Nitro -7° - +22C°
905010 Glühkerze Rossi R6 kalt universal 10 - 13% Nitro +10° - +25C°
905011 Glühkerze Rossi R7 kalt universal 13 - 15% Nitro +15° - +30C°
905012 Glühkerze Rossi R8 extra kalt universal 13 - 15% Nitro +20° - +40C°
CARSON-ROSSI Glühkerzen
Bezüglich des Kraftstoffes bitte folgendes
beachten:
• Unter Verschluss und für Kinder und Tiere unzugänglich
aufbewahren
• Behälter dicht geschlossen halten
• Behälter an einem gut belüfteten Ort aufbewahren
• Von Zündquellen fernhalten – Nicht rauchen
• Nicht verschlucken und Berührung mit der Haut vermeiden
Kraftstoffreste und -behälter müssen als Sondermüll beseitigt
werden.
Bei Unfall oder Unwohlsein sofort den Arzt hinzuziehen (wenn
möglich das Etikett des Kraftstoffs vorzeigen).
Zum Schluss
Bitte lesen Sie diese Betriebsanleitung sorgfältig durch, bevor
Sie irgendwelche Arbeiten beginnen.
Nach jeder Fahrt sollten Sie die wichtigsten Bauteile und Verbindungen überprüfen. Eine einzige gelockerte Schraube kann
ausreichen, um Ihr Modell in eine gefährliche Situation geraten
zu lassen! Warten Sie Ihr Modell regelmäßig und wechseln Sie
defekte oder abgenutzte Bauteile gegen Original-Ersatzteile
aus.
Wir wünschen Ihnen viel Spaß mit Ihrem
CARSON-Modellauto und jederzeit gute
Fahrt!
Wir empfehlen folgende Treibstoffe:
CARSON „Race Fire“ (Art.-Nr. 13897) zum Einlaufen und für
normalen Gebrauch
CARSON „Nitro Fire“, mit 16% (Art.-Nr. 13935) oder
25% (Art.-Nr. 13937) nach dem Einlaufen für mehr Leistung
Benötige ich eine Treibstoffflasche?
Ja, weil diese Methode der Betankung einfacher und sauberer
ist. Die Carson Treibstoff-Flasche 500 ml (Art.-Nr. 13306) ist die
richtige Wahl.
Dämpfer- und Silikonöle
908048 Silicon Oil 50 ml 300
908049 Silicon Oil 50 ml 400
908050 Silicon Oil 50 ml 500
908051 Silicon Oil 50 ml 600
908052 Silicon Oil 50 ml 1000
908053 Silicon Oil 50 ml 3000
908054 Silicon Oil 50 ml 5000
908055 Silicon Oil 50 ml 7000
Page 36

36DCARSON Nitro Buggy CNB 204016
Für den Zusammenbau erforderliches Werkzeug
Schere 13305Spitzzange 74034
Seitenschneider 74035
Modellbaumesser 74053
Kreuzschlüssel 13118Kreuzschlitz-Schraubendreher
(klein und groß)
und Inbusschlüssel
1,5 / 2 / 2,5 mm 74023
Sekundenkleber 53339
Pinzette 74003
Wie entferne ich eine Glühkerze?
Mit einem speziellen Glühkerzenschlüssel kann man Glühkerzen schnell und problemlos auswechseln. Wir empfehlen hierzu
unsere
CARSON Glühkerzenschlüssel
Art.-Nr. 13336 – 5,5 / 8 / 10 / 17
Was verwende ich um eine Glühkerze zu
zünden?
Ein Glühkerzenstecker ist ein akkubetriebener Apparat, der
nach Aufstecken auf die Glühkerze die Wendel zum Glühen
bringt und so der Motor gestartet werden kann. Nachdem der
Motor läuft, wird der Glühkerzenstecker wieder entfernt.
CARSON Glühkerzenstecker-Set
Art.-Nr. 11364
Benötige ich extra Glühkerzen?
Wir empfehlen „mittlere“,oder „heiße“ Glühkerzen (#3 905007
oder #4 905008), die speziell für Hochleistungsmotoren
während der Einlaufphase ausgelegt sind. Nach der Einlaufphase möchten Sie vielleicht auf eine andere Glühkerze umsteigen. Wenn Sie einen 25%igen Treibstoff fahren, verwenden Sie
am besten eine kältere Glühkerze (#5 905009 oder #6 905010).
Verwenden Sie keine Glühkerzen, die für 4-zylindrige Flugzeugmotoren ausgelegt sind und auch keine „Steg“-Glühkerzen.
Unter Einsatz einer falschen Glühkerze läuft der Motor
ungleichmäßig und erschwert jegliches Tuning. Im schlimmsten
Fall kann eine falsche Glühkerze sogar zu einem Motorschaden
führen.
Zusätzlich zu den auf den vorangegangen Seiten aufgeführten
Artikeln, wird folgendes Werkzeug und Zubehör benötigt, um
Ihren CARSON CNB zu fahren und warten:
CARSON NiMH Akkus, 4 Stück (3 x für Sender und Empfänger)
Art.-Nr. 609000
Luftfilteröl 50 ml
Art.-Nr. 32648
Page 37

37CARSON Nitro Buggy CNB 204016
D
Auf der Rückseite von Sender und Empfänger Ihrer Fernsteuerung befindet sich ein Aufkleber, auf dem das Frequenzband des Senders angegeben ist. Versichern Sie sich, dass in
Ihrem Gebiet niemand sonst auf derselben Frequenz fährt wie
Sie. Die Benutzung derselben Frequenz zur selben Zeit kann zu
Kontrollverlust des RC-Modells und somit zu schweren Unfällen
führen.
Antenne: Überträgt das Signal vom Sender zum
Empfänger. Die Antenne muss während des Betriebes
vollständig ausgezogen sein.
Batteriebox: Hier sitzen die 8 AA Mignon-Akkus,
mit denen der Sender arbeitet.
Quarz: Das Frequenzquarz des Senders. Es dürfen
nie zwei Fernsteuerungen gleichzeitig auf derselben
Frequenz betrieben werden.
Ein-Aus-Schalter: Schaltet den Sender ein bzw.
aus.
Servo Reverse-Schalter: Durch Drücken dieser
Knöpfe (befinden sich oben am Sender) kann schnell und
problemlos die Richtung des Servoweges geändert werden.
Die Knöpfe sitzen unter dem abnehmbaren Kunststoffgehäuse.
Lenkrad: Steuert Ihr Modell.
Servowegbegrenzung: Mit diesem Schalter kann die
Feinabstimmung des gesamten Lenkservoweges gemacht
werden. Drücken Sie den Schalter für maximale Steuerung
nach vorne (125%). Ziehen Sie den Schalter zurück, um die
Lenkung zu reduzieren (Minimum 60%).
Gas/ Brems-Hebel: Kontrolliert Geschwindigkeit und
Bremskraft Ihres Modells. Ziehen Sie den Hebel zurück, um zu
beschleunigen, lassen Sie den Hebel los, um die Geschwindigkeit zu drosseln und drücken Sie den Hebel nach vorne, um zu
bremsen.
Trimmung: Diese Rädchen, eines für die Lenkung und
eines für Gas/ Bremse ermöglichen es, durch Vor- oder Zurückdrehen die Servo-Neutralstellung abzustimmen.
Werden Sie routiniert im Umgang mit Ihrem
CARSON Nitro Buggy
Chassis
2-Gang-Schaltgetriebe:
Das 2-Gang-Getriebe schaltet automatisch vom ersten in den
zweiten Gang, um hohe Endgeschwindigkeiten zu erzielen und
verfügt über einen einstellbaren Schaltpunkt. Durch Anziehen
oder Lösen an der Einstellschraube verändern Sie den Schaltpunkt: Anziehen heißt früher schalten und lösen bedeutet
später schalten.
Luftfilter:
Der Luftfilter ist aus Schaumstoff hergestellt und verhindert,
dass über den Vergaser Schmutzpartikel in den Brennraum
gelangen. Der Luftfilter sollte mit Luftfilteröl „getränkt“ sein, um
die Schmutzpartikel besser zu binden.
Batteriebox:
Hier befindet sich der Empfängerakku. Die Batteriebox schützt
die Akkus vor Staub, Schmutz sowie Öl und ist wasserabweisend.
Karosseriehalterung:
Hergestellt aus robustem Nylon-Kunststoff, gibt diese
Halterung der Karosserie die nötige Stabilität.
Motor:
Der CARSON CNB Buggy verfügt über den leistungsstarken
4,58 ccm Force-Motor mit E.M.S.-Adapter und Resonanzrohr
für ein enormes Drehmoment.
Vorderer Rammschutz:
Aus widerstandsfähigem Nylon-Kunststoff hergestellt, schützt
er das Chassis selbst bei härtesten Crashs.
Treibstofftank:
Der Tank ist aus schlagfestem Kunststoff hergestellt, um den
Treibstoff Ihres Modells vor Auslaufen zu schützen. Dieser Tank
beinhaltet ein Druckventil, das durch einen Spritschlauch mit
dem Resonanzrohr verbunden ist und somit ständig Druck
innerhalb des Tanks aufbaut, welcher wiederum dafür Sorge
trägt, dass der Modellbausprit unkompliziert in den Vergaser
gelangt. Ein Schnellverschluss garantiert 100%ige Abdichtung
nach dem Betanken.
EMS-System:
Starten Sie den Motor mit dem EMS-Starter.
Schalter Rückwärtsgang
Batteriebox
Reverseschalter für Lenkung
Antenne
Feinabstimmung der
Lenkung
Ein-/Ausschalter
Power Switch
LED Ladeanzeige
Reverseschalter für Gas
Feinabstimmung
Gas und Bremse
Quarz
Gas-/Bremshebel
Lenkrad
Page 38

38DCARSON Nitro Buggy CNB 204016
Empfängerbox
Motor
Vorderreifen
Vorderer Stoßdämpfer
Chassis
Hinterer Stoßdämpfer
Hinterreifen
Lenkservo
Tank
Resonanzrohr
Lenkgestänge
Ein-/Ausschalter
Batteriebox
Karrosseriehalterung
Dämpferbrücke
2-Gang-Schaltgetriebe
Kühlkopf
EMS Starter
Stoßdämpfung:
Die mit Öl gefüllten Stoßdämpfer werden durch eine Feder
unterstützt, die für härtesten Off-Road-Einsatz ausgelegt ist.
Die Dämpfer verfügen über abgedichtete Gehäuse, die sich
auf die verschiedensten Strecken einstellen lassen. Die
Dämpfer sind werkseitig mit Wt 100-Öl und 1,7 mm starken
Federn ausgestattet.
Lenkservo:
Dieses Servo kontrolliert die Steuerung des Fahrzeuges. Ein
Servo Saver schont das Servogetriebe vor Beschädigung.
Lenkgestänge:
Das Lenkgestänge verbindet die innere Lenkhebelkonstruktion
mit dem Lenkhebel des jeweiligen Rades. Das Lenkgestänge ist
einstellbar und ermöglicht somit in eingebautem Zustand, die
Spur des Fahrzeuges zu modifizieren.
Resonanzrohr:
Dieses Resonanzrohr führt zu einer Leistungssteigerung des
Motors.
Reifen mit Felge:
Riesige Profilreifen für die höchsten Off-Road-Ansprüche.
Einteilige, leichtgewichtige Felgen aus robustem Kunststoff.
Page 39

39CARSON Nitro Buggy CNB 204016
D
Montieren Sie die Reifen ans Chassis. Die Rückseite der Felgen
ist so konzipiert, dass sie sich problemlos auf die SechskantFelgenmitnehmer schrauben lassen. Alle 4 Felgen und Reifen
sind identisch.
Stecken Sie die Antenne in das dafür vorgesehene Loch an der
Oberseite des Senders.
Drehen Sie die Antenne im Uhrzeigersinn so lange vorsichtig
fest bis Sie einen leichten Widerstand spüren. Die Antenne
nicht gewaltsam und/ oder zu fest hineindrehen – dies könnte
die Antenne und/ oder den Sender beschädigen.
WICHTIG
Vor der ersten Fahrt sollten Sie die Anleitung sorgfältig gelesen
und vollständig verstanden haben. Sollten Sie Fragen haben,
wenden Sie sich bitte an unseren Kundendienst (die Adresse
finden Sie auf der Rückseite der Betriebsanleitung).
Lieferumfang:
Fahrfertig aufgebauter CNB mit von innen bedruckter
Karosserie, Dekorbogen, EMS-System inkl. E-Starter und
40 MHz Fernsteuerung sowie 3 Servos.
Letzte Arbeiten vor Inbetriebnahme
a. Letzte Montagen
Bild 1
Bild 2
Den Deckel des Batteriefaches an der Unterseite der Fernsteuerung öffnen. Legen Sie 8 Mignon-Akkus ein. Achten Sie
auf die richtige +/- Polarität! Falsches Einlegen kann Kurzschluss verursachen und zur Beschädigung der Fernsteuerung
führen.
Anschließend das Batteriefach schließen.
Tipp zum schnellen Laden!
Sie benötigen lediglich 8 wiederaufladbare AA Mignon-Akkus
(Art.-Nr. 609000) und ein 230 V Ladegerät. Sie sparen langfristig
Geld, da Sie keine neuen Batterien kaufen müssen.
Bild 3
Page 40

40DCARSON Nitro Buggy CNB 204016
Empfänger:
Öffnen Sie das Batteriefach am Fahrzeug indem Sie den Splint
entfernen und den Deckel vorsichtig nach oben wegziehen. Zur
Sicherheit ist der Deckel am hinteren Teil noch befestigt.
Den Batteriehalter aus der Box nehmen.
Bild 4
Legen Sie 4 AA Mignon-Akkus in die Halterung. Auf die richtige
+/-Polarität achten! Schließen den Deckel des Batteriefaches
und schieben Sie die Splinte wieder in ihre ursprüngliche
Position, damit der Deckel sicher geschlossen ist. Achten Sie
darauf, dass bei Schließen des Deckels keine Kabel eingeklemmt werden!
WICHTIG! Bitte darauf achten, dass die Akkus nicht locker sind.
Sollte der Stecker des Akkuhalters (roter, männlicher Stecker)
nicht ordnungsgemäß in den Schalter (roter, weiblicher Stecker)
gesteckt sein, dies jetzt nachholen. Hier muss man nicht viel
beachten, es gibt nur eine mögliche Steckverbindung.
Bild 5
Entfernen Sie die 4 Schrauben am Deckel der Empfängerbox
und heben Sie den Deckel ab. Die Empfängerantenne herausziehen und durch das Loch am Deckel führen. Den Deckel der
Empfängerbox wieder schließen und sicherstellen, dass keine
Kabel eingeklemmt sind.
Bild 6
Fädeln Sie das Antennenkabel durch das Antennenröhrchen.
Drücken Sie das Ende des Antennenröhrchens in die Metallmutter an der Oberseite der Empfängerbox und drehen Sie
dann die Mutter vorsichtig zu bis das Röhrchen festsitzt.
WICHTIG!
Lassen Sie das überschüssige Stück Antenne aus dem Röhr-
chen hängen. Die Antenne unter keinen Umständen abschneiden!
Bild 7
Page 41

41CARSON Nitro Buggy CNB 204016
D
b. Fernsteuerung checken
Schalten Sie den Sender ein. Die rote LED-Anzeige leuchtet
jetzt auf. Falls nicht oder falls sie blinkt, Polarität oder Ladezustand der Akkus prüfen. Bei Bedarf neue einlegen.
Bild 8
Immer zuerst den Sender, dann den Empfänger einschalten.
Nach der Benutzung zuerst den Empfänger und anschließend
den Sender ausschalten. Halten Sie diese Reihenfolge immer
ein. So vermeiden Sie einen Kontollverlust über das Fahrzeug
und eine Beschädigung der Servos.
Bild 9
Um sicherzustellen, dass die Fernsteuerung einwandfrei
funk tioniert und einen Kontrollverlust über sein Fahrzeug zu
vermeiden, muss die Fernsteuerung immer vor der ersten
Inbetriebnahme des Tages und/ oder nach jedem Crash überprüft werden.
Verfahren Sie wie folgt: Bei eingeschaltetem Sender und
Empfänger die Senderantenne vollständig ausziehen. Stellen
Sie das Fahrzeug auf den Boden, lassen Sie jedoch den Motor
aus und entfernen Sie sich vom Fahrzeug.
Bewegen Sie das Lenkrad während eine zweite Person auf die
Bewegung der Räder achtet. Die Räder sollten sich genauso
nach vorne und hinten bewegen wie Sie das Lenkrad bewegen.
Aufgrund des Gewichts und der riesigen Räder Ihres CNB, wird
die Lenkung jedoch erst 100%ig funktionieren, sobald Sie das
Vorderteil des CNB bzw. die Vorder räder etwas vom Boden
anheben.
WICHTIG!
Sollte die Fernsteuerung nicht einwandfrei arbeiten, lesen
Sie bitte gründlich Seite 55 dieser Bauanleitung bevor Sie
fort fahren. Ihren CNB niemals in Betrieb nehmen so lange die
Fernsteuerung nicht fehlerfrei steuert.
Page 42

42DCARSON Nitro Buggy CNB 204016
c. Gas/Bremse
Wir empfehlen, die Lenktests durchzuführen während Sie
das Vorderteil des CNB vom Boden anheben. Die Lenkungsfreiheit sollte so, ohne jegliche Einschränkungen, gewährleistet
sein.
Bei eingeschaltetem Sender und Empfänger drehen Sie das
Senderlenkrad vorwärts (nach rechts). Die Vorderräder des CNB
sollten sich jetzt nach rechts drehen.
WICHTIG!
Falls sich die Vorderräder nicht nach rechts drehen, betätigen
Sie den Servo-Reverse-Schalter an der Oberseite des Senders
um die Richtung, in die sich die Vorderräder bewegen zu
ändern. Falls Sie vergessen haben, wie Sie die Servo-ReverseSchalter betätigen müssen, lesen Sie sich nochmals gründlich
die Erklärungen hierzu auf Seite 37 durch.
Bild 10
Drehen Sie das Senderlenkrad zurück (nach links). Die Vorderräder Ihres Modells sollten sich jetzt nach links bewegen. Lassen Sie das Lenkrad los. Nun sollten sich die Vorderräder Ihres
Modells wieder in die Neutralstellung (Mitte) bewegen.
WICHTIG!
Falls die Vorderräder nicht mittig stehen, nachdem Sie das
Lenkrad in die Neutralstellung bewegt haben, betätigen Sie
den Servo-Reverse-Schalter an der Oberseite des Senders, um
die Richtung, in die sich die Vorderräder bewegen, zu ändern.
Falls Sie vergessen haben, wie Sie den Servo-Reverse-Schalter
betätigen müssen, lesen Sie sich nochmals gründlich die
Erklärungen hierzu auf Seite 37 durch.
Bild 11
• Ziehen Sie vorsichtig den Luftfilteraufsatz vom Vergaserhals
ab, sodass Sie in den Vergaser sehen können.
• Ziehen Sie den Gashebel zurück. Der Vergaser solIte jetzt
volIständig geöffnet und die Bremsen gelöst sein (d.h. das
Modell sollte langsam geradeaus rollen).
• Lassen Sie den Gashebel los – der Vergaser sollte jetzt in
seiner ursprünglichen Position sein – ca. 1 mm weit geöffnet.
Die Bremsen sollten noch gelöst sein. Falls nicht, bitte
Seite 50 „Einstellung des Bremsgestänges“ durchlesen.
WICHTIG!
Sollte sich der Vergaser nicht öffnen, wenn Sie den Gashebel
zurückziehen, betätigen Sie den Servo-Reverse-Schalter an der
Oberseite des Senders, um die Servo-Richtung zu ändern.
Bild 12
Page 43

43CARSON Nitro Buggy CNB 204016
D
• Schieben Sie den Gashebel nach vorne. Der Vergaser sollte
nun in seiner Neutralstellung sein (ca. 1 mm weit geöffnet)
und das Bremsgestänge sollte sich nach vorne bewegen und
die Bremsen schließen.
• Lassen Sie den Gashebel los und die Bremsen sollten sich
lösen.
WICHTIG!
Sollten Sie das Bremsgestänge einstellen wollen, lesen Sie
sich bitte gründlich Seite 49 „Einstellung des Bremsgestänges“
durch.
Bild 13
Luftfilter-Hinweis!
Schalten Sie den Empfänger und anschließend den Sender
aus und stecken Sie den Luftfilter zurück auf den Vergaser.
Falls sich der Luftfilter nicht problemlos auf den Vergaser
zurückschieben lässt, eine dünne Schicht After Run Öl auf dem
Silikonverbinder anbringen.
VORSICHT! Keinesfalls den Motor laufen lassen solange
der Luftfilter nicht wieder auf dem Vergaser sitzt. Der Luftfilter
verhindert, dass Staub und/ oder Schmutzpartikel in den Motor
gelangen und diesen somit beschädigen. Falls Sie den Motor
laufen lassen ohne dass der Luftfilter installiert ist, verfällt
der Anspruch auf Gewährleistung (Reparaturen sind kostenpflichtig).
Sicherheits-Tipp:
Um einen Kontrollverlust über Ihr Modell zu vermeiden, empfehlen wir den Einsatz einer „Fail-Safe“-Elektronik, die
zwischen Gas/ Brems-Servo und Empfänger angeschlossen
wird. Die Fail-Safe-Elektronik ist so konzipiert, dass sie das Gas
elektronisch in die Neutralstellung bringt und gleichzeitig ausreichend Bremskraft liefert, sollte sich das Modell nicht mehr
fernlenken lassen.
Wir empfehlen die Carson Fail-Safe-Elektronik mit der
Art.-Nr. 503020
Bild 14
d. Luftfilter befeuchten
Um einen Motorschaden zu vermeiden, empfehlen wir, den
Luftfilter mit dem Carson Luftfilteröl (Art.-Nr. 32648) zu
benetzen.
Um den Luftfilter zu befeuchten, eine kleine Menge Luftfilteröl
auf den Luftfilter auftragen und mit den Fingern verteilen.
Verwenden Sie ausreichend Öl, um den kompletten Luftfilter zu
befeuchten, jedoch sollte nichts heruntertropfen.
Bild 15
Page 44

44DCARSON Nitro Buggy CNB 204016
Upgrade Tipp:
Falls Sie Ihren CNB in extrem staubigem Gelände fahren lassen
möchten, empfehlen wir Ihnen, eine Abdeckung über den Luftfilter zu stülpen.
Befeuchten Sie den Luftfilter wie vor beschrieben und anschließend die Schaumstoffabdeckung überziehen. Es ist unnötig, die
Schaumstoffabdeckung zu befeuchten.
Wir empfehlen die Art.-Nr. 52175.
Bild 16
e. Force Motor 4,58 cm
3
Jetzt sollten Sie sich mit Ihrem Motor
vertraut machen – Einstellung des
Vergasers, Einlaufen des Motors.
Lesen Sie die folgenden Seiten
bitte gründlich durch, vor dem ersten
Anlasssen!
Ihr CNB ist mit dem leistungsstarken und benutzerfreundlichen
4,58 ccm Force-Motor ausgestattet. Bevor Sie diesen das erste
Mal starten, MÜSSEN Sie das Kapitel Motor gründlich durchlesen. Es gibt detailliert Aufschluss über die verschiedenen
Vergaserteile und die Einstellung des Motors. Nur wenn Sie
dieses Kapitel gründlich lesen, erfahren Sie, wie Sie Ihren Motor
ordnungsgemäß bedienen und einen Motorschaden vermeiden.
Auf der Abbildung links sind die einzelnen Vergaserteile dargestellt. Die Vergasereinstellungen sind bereits werkseitig getätigt,
um den Motor erstmals starten und einlaufen zu können, jedoch
benötigen Sie einen Schlitzschraubenzieher, um den Vergaser
während der Einlaufphase einzustellen. Die hierfür nötigen
Informationen erhalten Sie auf den nächsten Seiten.
Düsennadel
Leerlauf-Einstellschraube
Hauptdüsennadel
Bild 17
Leerlaufschraube:
Die Leerlaufschraube stellt den Verschluss des Vergasers ein.
Wir empfehlen, dass die Leerlaufschraube so eingestellt wird,
dass der Vergaser ca. 1 mm weit geöffnet bleibt. Dreht man
die Schraube im Uhrzeigersinn, öffnet sich der Vergaser. Dreht
man entgegen dem Uhrzeigersinn schließt man den Vergaser
entsprechend. Ist der Vergaser zu weit geöffnet und dadurch
die Motordrehzahl sehr hoch, schleift die Kupplung und wird
dadurch sehr schnell beschädigt. Ist die Leerlaufschraube zu
weit herausgedreht wird der Motor im Leerlauf/ Standgas
abgewürgt. Die Leerlaufdrehzahl ist optimal eingestellt, wennder Motor rund läuft und die Kupplung noch nicht greift.
1 mm
Bild 18
Page 45

45CARSON Nitro Buggy CNB 204016
D
Hauptdüsennadel:
Die Hauptdüsennadel ist werkseitig für das erste Starten des
Motors eingestellt. An dieser Einstellung in der Einlaufphase
nichts verändern. Über die Hauptdüsennadel stellt man das
Luft/Treibstoff-Gemisch bei Vollgas ein. Dreht man die Hauptdüsennadel im Uhrzeigersinn, wird das Gemisch magerer und
entgegen dem Uhrzeigersinn wird das Gemisch fetter.
Für die Werkseinstellung der Hauptdüsennadel drehen Sie die
Nadel ganz hinein und 3 ganze Umdrehungen wieder heraus.
im Uhrzeigersinn
„magerer“
Bild 19
gegen den Uhrzeigersinn
„fetter“
Düsennadel:
Die Düsennadel ist werkseitig für das erste Starten des Motors
eingestellt. An dieser Einstellung in der Einlaufphase nichts
verändern. Über die Düsennadel stellt man das Luft/Treibstoff-Gemisch bei Leerlauf und während der Beschleunigung
auf Vollgas. Dreht man die Düsennadel im Uhrzeigersinn, wird
das Gemisch magerer und entgegen dem Uhrzeigersinn wird
das Gemisch fetter. Die Düsennadel ist werkseitig eingestellt,
jedoch sind je nach Gebrauch minimale Veränderungen notwendig – abhängig vom verwendeten Treibstoff, der Glühkerze
und den Geländeerfordernissen.
Jedoch erst NACH der Einlaufphase solche Veränderungen
vornehmen.
Bild 20
im Uhrzeigersinn
„magerer“
gegen den Uhrzeigersinn
„fetter“
Tipp:
Zurück zur werkseitigen Einstellung der
Düsennadel
Den Vergaser komplett öffnen. Während Sie den Vergaser mit
Ihren Fingern geöffnet halten, drehen Sie die Düsennadel mit
einem Schlitzschraubenzieher im Uhrzeigersinn bis Sie einen
leichten Widerstand spüren. Aus dieser Position drei volle
Umdrehungen entgegen dem Uhrzeigersinn. Jetzt haben Sie
wieder die ursprüngliche Werkseinstellung.
f. Betanken des Modells und Starten des Motors
Falls der E.M.S.-Starter schwerfällig arbeitet, aufhören! Der
Motor ist abgesoffen und der überschüssige Treibstoff muss
vom Motor entfernt werden, da sonst der Motor beschädigt
werden kann. Den überschüssigen Treibstoff entfernen Sie wie
folgt:
Schrauben Sie die Glühkerze aus dem Zylinderkopf.
Legen Sie einen Lappen über den Kühlkopf betätigen Sie das
E.M.S.-System, um den überschüssigen Treibstoff vom Motor
zu entfernen.
Sicherstellen, dass die Glühkerze nicht beschädigt wurde und
diese anschließend wieder installieren.
VORSICHT! Keinesfalls den Motor laufen lassen solange
der Luftfilter nicht wieder auf dem Vergaser sitzt. Der Luftfilter
verhindert, dass Staub und/ oder Schmutzpartikel in den Motor
gelangen und diesen somit beschädigen. Falls Sie den Motor
laufen lassen ohne dass der Luftfilter installiert ist, verfällt
der Anspruch auf Gewährleistung (Reparaturen sind kostenpflichtig).
Den Luftfilter zudem, wie auf Seite 43 beschrieben, benetzen.
Achtung:
Lesen Sie diese Informationen
vor dem ersten Anlasssen!
Page 46

46DCARSON Nitro Buggy CNB 204016
Öffnen Sie den Tankdeckel und füllen Sie den Tank langsam bis
der Treibstoffstank knapp unterhalb des Einfüllstutzen liegt.
VORSICHT!
Nur speziellen Verbrenner-Treibstoff für RC-Autos verwenden.
Keinesfalls Benzin oder Diesel tanken! Für die Einlaufphase
müssen Sie speziellen Einlaufkraftstoff verwenden.
Bild 21
• Stellen Sie anhand des speziellen Glühkerzenschlüssels
sicher, dass die Glühkerze korrekt im Zylinderkopf festsitzt.
• Öffnen Sie die Vergaserdrossel komplett und dichten Sie mit
Ihrem Finger den Auslass des Resonanzrohrs ab.
• Jetzt stecken sie die Welle Ihres E.MS-Starters in den
Flansch an der Rückseite des Motors.
• Betätigen Sie den Starter kurz bis der Treibstoff durch den
Schlauch bis zum Vergaser gelangt.
• Nehmen Sie den Finger vom Resonanzrohr-Auslass und
schließen Sie gleichzeitig die Vergaserdrossel wieder in
Leerlaufstellung. Halten Sie Ihren CNB mit einer Hand fest
und betätigen nochmals das EMS-System.
Bild 22
• Stecken Sie nun einen Glühkerzenstecker mit geladenem
Akku auf die Glühkerze.
• Lassen Sie den Vergaser noch in Leerlaufstellung, halten
Sie CNB mit einer Hand fest und betätigen Sie den E.M.S.Starter bis der Motor startet und läuft.
• Lassen Sie den Glühkerzenstecker jedoch noch
ca. 10 Sekunden auf der Glühkerze stecken.
Bild 23
Page 47

47CARSON Nitro Buggy CNB 204016
D
Wichtig! Sollte das EMS-System schwerfällig arbeiten,
keinesfalls einen weiteren Versuch unter Krafteinwirkung durchführen! Der Motor ist wahrscheinlich abgesoffen. Fahren Sie
gemäß der Problemlösung, wie auf der vorangehenden Seite
beschrieben fort.
Um den laufenden Motor auszumachen, drücken Sie vorsichtig
den Treibstoffschlauch zusammen. Vergewissern Sie sich,
dass Sie den Treibstoffschlauch und nicht den Druckschlauch
zusammendrücken. Der Treibstoffschlauch führt zum Vergaser!
(Der Druckschlauch führt vom Auspuff zum Tankdeckel.)
Berühren Sie keine heißen Motorteile
oder das Resonanzrohr – Sie könnten sich
ernsthafte Verletzungen zufügen!
Bild 24
g. Einlaufen des Motors
Es ist normal, dass sich der Motor anfänglich schwerfällig
durchdrehen lässt. Sobald der Motor auf Betriebstemperatur ist, läuft er rund und der Widerstand wird geringer. Dieser
Abschnitt schildert Ihnen detailliert die einzelnen Schritte, damit
Sie Ihren neuen Motor ordnungsgemäß einlaufen lassen können. Bitte halten Sie sich an die nachfolgenden Anweisungen.
Für die Einlaufphase sollten Sie einen speziell konzipierten
Einlauf-Kraftstoff (wir empfehlen unsere Art.-Nr. 13897) verwenden, der höchstens 16% Nitromethan enthält. Wenn der Motor
eingelaufen ist (ca. 45 Min. Einlaufzeit), können Sie auf einen
Treibstoff mit bis zu, jedoch nicht mehr als 25 % Nitromethan,
umsteigen.
Luftfilter:
Der Luftfilter ist ein ausgesprochen wichtiges Teil Ihres Motors.
Eine fehlerhafte Anwendung oder Montage wird Ihren Motor
in kürzester Zeit beschädigen. Unbedingt den Luftfilter wie auf
Seite 43 beschrieben, benetzen. Verwenden Sie einen Schaumstoffschutz für staubiges/schmutziges Gelände.
Einlaufen des Motors
VORSICHT! Die Grundeinstellung der Düsennadel erst
verändern nachdem der Motor eingelaufen wurde. Bitte vor
der Einlaufphase die Schritte 1 und 2 „Feinabstimmung des
Motors“ sorgfältig durchlesen.
Die Hauptdüsennadel ist für ein einfaches Starten werkseitig
eingestellt – diese Einstellungen während der Einlaufphase
beibehalten.
• Ist der Motor gestartet, lassen Sie den Glühkerzenstecker
auf der Glühkerze und lassen Sie den Motor ca. 10 Sekunden laufen, ohne Gas zu geben, damit der Motor sich
aufwärmen kann.
• Nachdem der Motor ungefähr 10 Sek. gelaufen ist, entfernen
Sie den Stecker von der Glühkerze. Bewegen Sie den
Gashebel mit kurzen, schnellen Bewegungen vorwärts und
fahren Sie Ihren CNB 2-3 Minuten. Falls das Gemisch „fett“
genug ist, tritt jetzt dicker, blauer Rauch aus dem Resonanzrohr aus. Aufgrund des „fetten“ Gemisches ist das Ansprechen auf Gas jetzt entsprechend geringer. Der CNB bewegt
sich etwas schwerfällig und der
Motor produziert keine hohen Drehzahlen. Sollte kein Rauch
aus dem Resonanzrohr austreten, verstellen Sie die Hauptdüsennadel um eine Viertelumdrehung (90°) entgegen dem
Uhrzeigersinn. Den Motor nach 2-3 Minuten stoppen indem
Sie Treibstoffleitung zum Vergaser zudrücken.
Einlauf Tipp:
Während der Einlaufphase kann es vorkommen, dass unverbrannter Treibstoff und Abgasreste vom Resonanzrohr tropfen.
Tipp! Den Motor ohne Karosserie einlaufen lassen! Es ist
wichtig, dass der Motor während der Einlaufphase ausreichend
Kühlung erhält.
Motor Tuning Tipp:
Motoren haben nach dem Einlaufen nie die exakt gleiche
Düsennadeleinstellung. Faktoren wie verschiedene Treibstoffe,
unterschiedliche Glühkerzentypen und verschiedene Temperaturen, die Außentemperatur und der Luftdruck beeinflussen den
Motor.
Die werkseitigen Vergasereinstellungen von Seite 45 sind
Einlauf-Einstellungen. Falls Sie die werkseitigen Einstellungen
wieder herstellen, wird das Gemisch sehr „fett“ sein und Sie
werden den Motor neu einstellen müssen.
Den Motor ca. 10 Min. lang abkühlen lassen und dann neu
starten. Stellen Sie nun die Hauptdüsennadel so ein, dass das
Gemisch etwas „magerer“ ist – ungefähr um eine Achtelumdrehung im Uhrzeigersinn. Den kompletten Ablauf wiederholen, dann den Motor stoppen und ungefähr 10 Min. abkühlen
lassen.
Page 48

48DCARSON Nitro Buggy CNB 204016
Wiederholen Sie nochmals den kompletten Ablauf und
„magern“ Sie über die Hauptdüsennadel jedes Mal etwas mehr
ab. Insgesamt sollten Sie den Motor also ca. 45 Min. laufen
lassen. Nach 45 Minuten ist der Motor eingelaufen.
Lassen Sie den Motor jetzt mit der Hauptdüsennadel auf „leicht
fett“ eingestellt laufen – jedoch „mager genug“, um Ihren CNB
ausreichend anzutreiben. Jetzt ist der perfekte Zeitpunkt für
leistungssteigernde Feineinstellungen am Vergaser.
WICHTIG!
Der Motor darf nie zu stark „abmagern“. Bei laufendem Motor
muss immer eine leichte Rauchwolke aus dem Resonanzrohr
austreten. Sollte dies nicht der Fall sein, sofort den Motor
stoppen und die Hauptdüsennadel „fetter“ einstellen. Darüber hinaus muss sichergestellt sein, dass der Motor über den
Zylinderkopf ausreichend belüftet wird, um eine Überhitzung zu
vermeiden!
Feineinstellung des Motors
Nachdem Ihr Motor eingelaufen ist, können Sie die Düsen- und
Hauptdüsennadel einstellen, um die max. Leistung aus Ihrem
Motor herauszuholen.
Gefahrenhinweise zum Motortuning
Darauf achten, dass der Motor nie zu „mager“ eingestellt ist.
Denken Sie daran, dass die Schmiermittel für Ihren Motor im
Treibstoff enthalten sind. Falls Sie das Gemisch zu sehr
abmagern, reduzieren Sie auch den Anteil an Schmiermitteln,
die in Ihren Motor laufen. Ein zu geringer Anteil an Schmiermitteln erhöht das Risiko einer Überhitzung und kann im
schlimmsten Fall sogar einen Motorschaden verursachen.
Einstellen der Hauptdüsennadel
Starten Sie den Motor und entfernen Sie den Glühkerzenstecker von der Glühkerze. Anschließend den Motor ungefähr
10 Sek. warmlaufen lassen.
Nachdem sich der Motor aufgewärmt hat, fahren Sie den CNB
wie gewohnt. Sollte der Motor „fett“, laufen (d.h. er erreicht
nicht seine Maximalleistung, „magern“ Sie ihn etwas ab, indem
Sie die Hauptdüsennadel solange jeweils um eine
Sechzehntel-Umdrehung im Uhrzeigersinn verstellen, bis die
gewünschte Einstellung erreicht ist.
Immer sicherstellen, dass Sie den Motor LEICHT „FETT“ fahren
– es muss immer etwas Rauch aus dem Resonanzrohr
austreten.
Einstellen der Düsennadel
Während Sie den CNB in Ihrer Hand halten (keine drehenden
Teile berühren!), geben Sie kurz Vollgas. Sollte der Motor kein
Gas annehmen, ist das Gemisch zu mager und dem Motor wird
nicht ausreichend Treibstoff zugeführt.
Bei angehaltenem Motor über die Düsennadel das Gemisch
„fetter“ machen indem Sie die Nadel um eine SechzehntelUmdrehung im Gegenuhrzeigersinn verstellen.
Starten Sie den Motor erneut und wiederholen Sie obigen
Vorgang bis der Motor rund und sauber läuft.
Falls Sie Vollgas geben und der Motor während der Beschleunigung immer noch „überfettet“ ist (zuviel Rauch tritt aus dem
Resonanzrohr aus), ist die Düsennadel zu fett eingestellt und
dem Motor wird zuviel Treibstoff zugeführt. Bei angehaltenem
Motor über die Düsennadel das Gemisch „abmagern,“ indem
Sie die Nadel um eine Sechzehntel-Umdrehung im Uhrzeigersinn verstellen.
Starten Sie den Motor erneut und wiederholen Sie obigen
Vorgang bis der Motor rund und sauber läuft.
Motorwartung
Um die hohe Leistung Ihres Motors so lange wie möglich
zu erhalten, befolgen Sie bitte die folgenden Wartungsanweisungen:
• Nach der letzten Fahrt die Treibstoffleitung drücken, um den
Motor zu stoppen. Hierdurch wird der überschüssige Treibstoff, der sich noch im Brennraum befindet, verbrannt.
• Überprüfen Sie den Luftfilter regelmäßig und ggf. reinigen.
Entfernen Sie regelmäßig den Schaumstoff und waschen Sie
ihn gründlich mit warmem Wasser und einer kleinen Menge
Spülmittel. Sobald er sauber ist, trocknen lassen, anschließend wieder einölen (überschüssiges Öl mit einem Lappen
entfernen) und ins Gehäuse setzen. Unter Umständen den
Schaumstoff durch einen neuen ersetzen.
• Entfernen Sie die Glühkerze vom Motor und träufeln Sie
einige Tropfen „After Run Öl“ in hinein. Drehen Sie die Glühkerze wieder hinein und betätigen Sie kurz den
EMS-Starter, um das Öl zu verteilen. Das „After Run Öl“
schützt die Kugellager im Motorinneren vor Korrosion und
erhöht die Lebensdauer Ihres Motors.
• Reinigen Sie den Motor von außen mit einer Bürste oder
einem Pinsel mit harten Borsten.
• Überprüfen Sie nach jeder Fahrt die Kupplungsglocke und
das angetriebene Zahnrad auf mögliche Abnutzungserscheinungen.
• Ölen Sie die Lager in regelmäßigen Abständen.
• Nach jeder Fahrt das Chassis reinigen und sicherstellen,
dass alle Schrauben fest sind und keine Teile locker oder
sogar abgefallen sind. Halten Sie das Chassis für die
nächste Fahrt stets in einem guten Wartungszustand.
Page 49

49CARSON Nitro Buggy CNB 204016
D
h. Montage der Karosserie
Montieren Sie die Karosserie unter Verwendung der
beiliegenden Karosseriesplinten auf das Chassis.
Tipp:
Im Gegensatz zur Einlaufphase Ihres Motors, muss die Karosserie immer aufgesetzt sein, wenn Sie Ihr Modell fahren. Bei
Überschlägen schützt die Karosserie das Chassis und seine
Komponenten.
Tuning-Tipps!
Einsstellungen am Chassis
Die Chassisgeometrie ist ausschlaggebend für exzellente
Fahreigenschaften. Folgen Sie unseren Anweisungen und Sie
werden das Beste aus Ihrem CNB herausholen.
WICHTIG!
Sollten Sie Veränderungen an den werkseitigen Einstellungen
Ihres CNB vornehmen wollen, müssen Sie diese unbedingt an
beiden Seiten ausführen.
Wenn Sie zum Beispiel die Federvorspannung am rechten,
vorderen Öldruckstoßdämpfer verändern möchten, muss der
linke entsprechend angepasst werden usw.
i. Einstellen des Bremsgestänges
Das Bremsgestänge Ihres Modells ist werkseitig eingestellt.
Sollten Sie nach einigen Fahrten Modifikationen vornehmen
wollen, gehen Sie bitte wie folgt vor:
Bei eingeschaltetem Sender und Empfänger sowie Gas/BremsTrimmung in Neutralstellung sollte das Modell geradeaus fahren
(die Bremsen sind gelöst). Sollten die Bremsen bei Neutralstellung des Gas-Trimmers schleifen, nutzen sich die Bremsscheiben schnell ab. Um sicherzugehen, dass die Bremsen
gelöst sind, vergewissern Sie sich, dass eine ca. 1,5 mm breite
Lücke zwischen den beiden hinteren Stahl-Einstellringen und
den Bremshebeln ist.
Beide Einstellringe müssen so angeglichen sein, dass der
Abstand zu den beiden Bremshebeln jeweils identisch ist.
Hierdurch wird gewährleistet, dass beide Bremshebel während
des Bremsens gleichzeitig eingreifen.
Um Einstellungen am Bremsgestänge vorzunehmen, lockern
Sie lediglich die Madenschrauben in den Einstellringen hinter
den Bremshebeln und ziehen diese in der gewünschten Posi-
tion wieder fest. Bewegen Sie die Einstellringe vorwärts (zu den
Bremshebeln hin), bewirken Sie ein schnelleres sowie stärkeres
Bremsverhalten.
Bild 25
Page 50

50DCARSON Nitro Buggy CNB 204016
j. Einstellung der Spur
Die Spur ist der Winkel der Vorderreifen (oder Hinterreifen)
zueinander (Ansicht von oben siehe Bild 26). Als Vorspur
bezeichnet man die Reifenstellung in Fahrtrichtung nach innen.
Unter Nachspur versteht man die Reifenstellung in Fahrtrichtung nach außen.
Vorderreifen: Die Vorspur stabilisiert den Geradeauslauf
Ihres Modells, jedoch reagiert die Lenkung sensibler. Die Nachspur desensibilisiert die Lenkung, wodurch das Modell etwas
„bedienerfreundlicher“ wird.
Hinterreifen: Falls Sie auf einer ebenerdigen Strecke
fahren, raten wir Ihnen von Vorspur ab. Fahren Sie in hügeligem
Gelände, empfehlen wir eine Vorspur von 1-2°, was dem Heck
etwas mehr „Gripp“ verleiht.
Empfohlene Grundeinstellungen:
Eine Vor- oder Nachspur von mehr als 3° führt zu einem hohen
Geschwindigkeitsverlust und mangelnder Manövrierbarkeit.
Um die Spur der Vorderreifen einzustellen, drehen Sie die Spurstangen (Stahl-Stangen, welche die Räder mit den Lenkhebeln
verbinden) mit einem passenden Schraubenschlüssel entweder weiter hinein oder heraus. Um die Spur der Hinterreifen
einzustellen, müssen Sie die Querlenkerhalterung, wie unten
beschrieben, austauschen:
Bild 26
0° normal
Nachspur
Vorspur
• Um die Querlenkerhalterung auszutauschen, lösen Sie zuerst
die beiden Schrauben, mit denen der Nabenbolzenstopper
befestigt ist, aus dem Chassisboden und montieren diesen
anschließend vom Chassis ab.
• Jetzt lösen Sie die Schrauben, mit denen die Querlenkerhalterung befestigt ist, ziehen diese dann vorsichtig heraus.
Darauf achten, dass die Querlenkerstifte nicht mit entfernt
werden.
• Um jetzt die Querlenkerhalterung mit der gewünschten Spur
zu installieren, den gleichen Vorgang in umgekehrter Reihenfolge wiederholen.
Bild 27
Um die Spur der Hinterreifen einzustellen, verwenden Sie eine
der verschiedenen, im Lieferumfang enthaltenen Querlenkerhalterungen (0-3°). Als Hilfestellung ist die jeweilige Spur auf der
Rückseite der Querlenkerhalterungen gekennzeichnet.
Page 51

51CARSON Nitro Buggy CNB 204016
D
Bild 28
Bild 29
k. Einstellung des Sturzes
Der Sturz bezeichnet den Winkel, den das Rad zur Senkrechten
hat (bzw. die Bodenfreiheit des Reifens zum Boden). Reifen, die
exakt senkrecht zum Boden stehen, haben einen Sturz von 0°.
Ist das Rad oben nach außen geneigt, ist der Sturz positiv und
negativ bei Neigung oben nach innen.
Empfohlene Grundeinstellungen:
Für ebenerdiges Gelände die Vorder- und Hinterreifen auf 0°
einstellen. Für hügeliges Gelände die Vorderräder auf 1° und die
Hinterräder auf 2° einstellen.
Den Sturz verändert man, in dem man die oberen Gewindestangen entweder nach innen oder außen dreht.
Sturz negativ
Sturz positiv
l. Einstellung des Schaltpunktes
Der Schaltpunkt ist werkseitig eingestellt, jedoch ist es möglich, diese Einstellung speziell auf Ihren individuellen Fahrstil
abzustimmen.
Der Schaltpunkt ist der Punkt, an dem das 2-Gang-Getriebe
vom ersten in den zweiten Gang schaltet.
Den Schaltpunkt stellen Sie ein, indem Sie die kleine Madenschraube mit einem 1,5 mm Inbusschlüssel in das 2-GangKupplungsgehäuse aus Aluminium drehen.
Dreht man die Madenschraube im Uhrzeigersinn, schaltet
man bei höherer Geschwindigkeit (später) und dreht man sie
entgegen dem Uhrzeigersinn, schaltet man bei niedrigerer
Geschwindigkeit (früher).
Das 2-Gang-Schaltgetriebe ist werkseitig eingestellt. Für die
ersten Fahrversuche sind keine weiteren Einstellungen nötig.
Für eine spätere Feineinstellung des 2-Gang-Schaltgetriebes,
ist die kleine Madenschraube im 2-Gang-Kupplungsgehäuse
verantwortlich.
Heben Sie Ihr Modell vom Boden und drehen Sie langsam am
größeren Hauptzahnrad (1. Gang), bis Sie die kleine Madenschraube durch die Öffnung im 2-Gang-Kupplungsgehäuse
sehen können. Jetzt stellen Sie die Madenschraube unter
Verwendung eines 1,5 mm Inbusschlüssels ein.
Möchten Sie bei einer höheren Geschwindigkeit schalten,
drehen Sie die Madenschraube eine Achtelumdrehung im
Uhrzeigersinn. Soll bei einer niedrigeren Geschwindigkeit
geschaltet werden, drehen Sie die Madenschraube eine
Achtelumdrehung entgegen dem Uhrzeigersinn.
Bild 30
Madenschraube
justieren
Page 52

52DCARSON Nitro Buggy CNB 204016
Vorsicht!
Wir empfehlen immer nur in Achtelumdrehungen vorzugehen
und dazwischen immer wieder jede Einstellung zu überprüfen,
bis Sie Ihren gewünschten Schaltpunkt erreicht haben.
Wichtig!
Im 2-Gang-Kupplungsgehäuse sitzen 2 Schrauben. Eine
Madenschraube, für die man einen 1,5 mm Inbusschlüssel
benötigt und eine Zylinderkopfschraube aus Stahl, die einen
2,5 mm Inbusschlüssel erfordert. Unter keinen Umständen
versuchen, die größere Schraube einzustellen, da diese das
2-Gang-Kupplungsgehäuse auf der Getriebewelle befestigt.
Die werkseitige Einstellung des Schaltpunktes stellt man wie
folgt wieder her:
Die Schraube muss 1 mm unterhalb der Kante positioniert
werden! Dies ist die Grundeinstellung für die 2-Gang-Schaltung!
Bild 31
m. Einstellen der Federvorspannung
Das Ansprechverhalten der Lenkung, die Bodenfreiheit Ihres
CNB und die Dämpfungsqualität Ihrer Aufhängung können
durch entsprechende Einstellungen der Dämpfer-Federvorspannung angepasst werden. Ihre Einstellungen hängen ganz
von Ihrem persönlichen Fahrstil ab.
Beispiel: Fahren Sie Ihren CNB in extrem hügeligem Gelände,
sollten Sie die Federvorspannung der Frontdämpfer erhöhen,
um zu vermeiden, dass Ihr CNB aufsitzt.
Empfohlene Einstellungen:
Während der ersten Fahrversuche sollten Sie die werkseitigen
Einstellungen beibehalten. Erhöhen oder reduzieren Sie die
Federvorspannung indem Sie den Einstellring am Dämpfergehäuse nach oben oder nach unten korrigieren. Schrauben
Sie den Ring nach unten, erhöhen Sie die Federvorspannung
und die Bodenfreiheit Ihres CNB, was zudem zu einer härteren
Dämpfung führt. Schrauben Sie den Ring nach oben, reduzieren
Sie die Federvorspannung und die Dämpfungs eigenschaften
werden weicher.
Bei der Einstellung der Federvorspannung darauf achten, dass
jeweils die linke und die rechte Seite gleichmäßig eingestellt
sind.
Page 53

53CARSON Nitro Buggy CNB 204016
D
Bild 32
n. Einstellen der Dämpfer und ersetzen der Federn
Tauscht man das Dämpferöl (das Öl im Inneren der Dämpfer)
aus, verändern sich die Dämpfungseigenschaften der Stoßdämpfer. Für ebene Strecken empfiehlt sich ein härteres Öl und
für hügeligeres Gelände ein weicheres.
WICHTIG! Wir empfehlen, ausschließlich 100%iges Silikon-
Dämpferöl zu verwenden – kein Motorenöl! Das im CNB verwendete Öl ist 100 Wt-Dämpferöl, das für universellen Einsatz
geeignet ist. Für den Renneinsatz empfiehlt sich 45 Wt-Öl.
Dämpferfedern lassen sich leicht auswechseln und können
einen Unterschied im Verhalten ausmachen, wie Ihr CNB auf
unterschiedliches Gelände reagiert. Fahren Sie in ebenerdigem
Gelände wie Waldwegen usw., verwenden Sie härtere Federn.
In einem holprigen Gelände empfehlen sich dagegen weichere
Federn, um Stöße abzufedern.
Verwendet man in holprigem Gelände härtere Federn, springt
der CNB auf und ab. Die im Lieferumfang enthaltenen Federn
sind für so gut wie alle Off-Road-Verhältnisse ausgelegt, jedoch
empfiehlt es sich, mit verschiedenen Federstärken zu experimentieren, um das ideale Set-Up für Ihren individuellen Fahrstil
und Ihr bevorzugtes Gelände zu finden.
Bild 33
Set Art.-Nr. 205322
Bild 34
o. Differenzial tauschen
Der CNB verfügt über Front- und Heck-Differenziale mit jeweils
O-Ring-Abdichtungen und Gehäusen. Beide Differenziale sind
werkseitig mit Differenzialfett eingeschmiert, das für universellen Einsatz ausgelegt ist.
Sie können an jedem Differenzial Feineinstellungen vornehmen,
indem Sie die Differenziale vom Chassis abmontieren, öffnen
und das werkzeitig angebrachte Schmierfett durch SilikonDifferenzialöl ersetzen.
Sollte Ihr CNB während Kurvenfahrten etwas an Haftung
verlieren, können Sie entweder das vordere Differenzial härter
machen oder das hintere weicher machen. Hat Ihr CNB in
Kurven zuviel Gripp, machen Sie das vordere Differenzial
weicher und das hintere härter. Wir empfehlen Silikonstärken
zwischen 30.000 (30 K) und 100.000 (100 K).
Nachfolgend erklären wir Ihnen, wie Sie das vordere Differenzial
ausbauen und zerlegen. Der gleiche Vorgang gilt auch für das
HeckDifferenzial. Orientieren Sie sich hierzu auch an Seite 58,
falls notwendig.
Lösen Sie die 6 Schrauben, mit denen der Front-Rammschutz
befestigt ist aus dem Chassisboden und entfernen Sie den
Rammschutz.
Anschließend entfernen Sie die Schrauben, mit denen die Querlenkergegenhalter montiert sind und nehmen die Halter heraus.
Ziehen Sie die vordere Hälfte des äußeren Differenzialgehäuses
heraus, entfernen Sie die Querlenkerhaltestifte und klappen Sie
die Querlenker nach außen weg.
Dämpfer- und Silikonöle
908048 Silicon Oil 50 ml 300
908049 Silicon Oil 50 ml 400
908050 Silicon Oil 50 ml 500
908051 Silicon Oil 50 ml 600
908052 Silicon Oil 50 ml 1000
908053 Silicon Oil 50 ml 3000
908054 Silicon Oil 50 ml 5000
908055 Silicon Oil 50 ml 7000
Page 54

54DCARSON Nitro Buggy CNB 204016
Bild 35
Ziehen Sie die Differenzialeinheit heraus.
Nehmen Sie die beiden Antriebsknochen von der Differenzial-
einheit ab und entfernen Sie die 4 Schrauben, mit denen die
beiden Differenzialhälften befestigt sind.
Ziehen Sie nun die beiden Differenzialhälften auseinander und
nehmen Sie das Differenzial heraus.
Lösen Sie die 4 Schrauben, um das Differenzial zu öffnen. Jetzt
können Sie das Schmiermittel durch ein Differenzial-Öl Ihrer
Wahl ersetzen.
Für den Zusammenbau wiederholen Sie den gesamten Ablauf
rückwärts.
p. Wartung ihres CNB Buggy
Halten Sie sich an folgende Wartungshinweise, um langjährigen, unbeschwerten Fahrspaß mit Ihrem CNB zu genießen.
Überprüfen Sie den Luftfilter regelmäßig. Falls er verschmutzt
ist, den Schaumstoff aus dem Gehäuse herausnehmen und
gründlich mit warmem Wasser und einer kleinen Menge
Spülmittel oder Flüssigseife waschen. Anschließend trocknen
lassen, wieder ins Gehäuse setzen und mit Luftfilteröl benetzen (überschüssiges Öl mit einem Lappen oder Papiertuch
ent fernen).Von Zeit zu Zeit den Schaumstoff-Filter durch einen
neuen ersetzen.
Kontrollieren Sie das Chassis regelmäßig, ob irgendwelche Teile
und/ oder Schrauben locker sind, sich verbogen haben oder
abgefallen sind.
Alle direkt ins Metall gedrehten Schrauben sollten mit
Schraubensicherungslack gesichert werden, damit sie sich
während des Fahrbetriebes nicht lockern.
Regelmäßig das Lenkgestänge sowie das Gas-/ Bremsgestänge auf Abnutzung oder falsche Einstellung überprüfen
und ggf. festziehen und/ oder einstellen. Sicherstellen, dass die
Madenschrauben in den Stahl-Einstellringen fest sitzen.
Von Zeit zu Zeit sollten Sie die Räder abschrauben und die
Radlager reinigen. Hierzu empfehlen wir ein spezielles LagerReinigungsmittel, das Staub und Schmutz entfernt, um eine
Beschädigung der Lager zu vermeiden. Nach Reinigung die
Lager mit einem hochwertigen Lageröl schmieren. Die Lager
niemals trocken (ungeölt) in Betrieb nehmen – ein sofortiger
Lagerschaden wäre die Konsequenz.
Beim Reinigen der Radlager, wie oben beschrieben, auch die
Lager der Kupplungsglocke herausnehmen, reinigen und ölen.
Überprüfen Sie die Treibstoffanlage inkl. Tank und Treibstoffschlauch auf mögliche Risse oder Instabilität. Ersetzen Sie den
Treibstoffschlauch beim kleinsten Anzeichen einer Beschädigung durch einen neuen.
Überprüfen Sie nach jeder Fahrt den Ladezustand der Senderund Empfänger-Akkus und bei Bedarf aufladen.
Nachdem Sie das Chassis und den Motor gereinigt haben,
sollten Sie alle beweglichen Teile Ihres Chassis ölen. Jedoch
NICHT die Kupplungsglocke, die Zahnräder oder die Bremsscheiben.
Stets neuen Treibstoff verwenden und darauf achten, dass die
Kappe am Treibstofftank und der Deckel des Treibstoffkanisters
fest verschlossen sind. Da Treibstoff altert, absorbiert er
Bild 36
Wasser, was die Treibstoffleistung reduziert und der Motor
somit nicht mehr seine volle Leistung abgibt.
Jeweils nach der letzten Fahrt des Tages die Glühkerze vom
Motor entfernen und einige Tropfen „After Run Öl“ in die
Öffnung fließen lassen, in der vorher die Glühkerze saß. Drehen
Sie die Glühkerze wieder hinein und betätigen Sie im Anschluss
kurz den Anlasser mit Ihrem EMS-Starter, um das Öl zu verteilen. Das „After Run Öl“ schützt die Kugellager im Motorinneren
vor Korrosion und erhöht die Lebensdauer Ihres Motors.
Unverbrauchten Treibstoff nur WENIGE Tage im Tank lassen,
da das Nitromethan und Methanol des Treibstoffs bereits nach
kurzer Zeit verdunstet und nur den Ölanteil zurücklässt, was
in einer dicken Schlacke resultiert und man den Treibstofftank
umgehend auswechseln muss.
Falls Sie den Motor zur Reparatur oder Wartung ausgebaut
haben, beim Wiedereinbau darauf achten, dass das korrekte
Zahnflankenspiel zwischen Kupplungsglocke und Hauptzahnrädern wiederhergestellt ist, ansonsten werden Hauptzahnräder
und Ritzel beschädigt. Hierfür repositionieren Sie die Motorhalterung und schieben anschließend den Motor in den Motorböcken soweit zurück bis Ritzel und Hauptzahnräder ineinander
greifen. Sobald dies der Fall ist, die 4 Schrauben festziehen, um
den Motor in den Motorböcken zu befestigen, was gewährleistet, dass Kupplungsglocke und Hauptzahnräder auf einer Höhe
sind.
Als nächstes nehmen Sie ein Blatt Papier zur Hand und
schieben es zwischen Kupplungsglocke und Hauptzahnräder,
sodass das Papier feststeckt. Ist nur noch ein sehr geringer
Page 55

55CARSON Nitro Buggy CNB 204016
D
q. Fehlersuche
Unsere Artikel unterliegen einer werkseitigen Qualitätsprüfung,
jedoch kann es vorkommen, dass der Betreiber beim Starten
des Motors etc. Schwierigkeiten hat, die vom Startsystem, dem
Treibstoff, der Temperatur/ dem Wetter oder sonstigen Begleitumständen abhängen.
Vor allem bei neuen Motoren können anfangs Startschwierigkeiten auftreten. Für einen solchen Fall halten Sie sich bitte
strikt an unsere nachfolgende „Fehlersuche“.
Sollte sich das Problem anhand unserer Liste nicht lösen
lassen, setzen Sie sich bitte mit unserem Kundendienst unter
der
Hotline 0180-5733-300
(12 ct/min) in Verbindung.
Abstand zwischen den Ritzeln, ist das Zahnflankenspiel perfekt
(das Papier rutscht nicht durch und knittert leicht) – sind die
Ritzel zu eng positioniert, ist der Widerstand erhöht und die
Ritzel klemmen (das Papier reißt) – sitzen sie jedoch zu locker
(das Papier rutscht durch), greifen sie nicht ineinander. Sobald
Sie mit Ihrem Zahnflankenspiel zufrieden sind, ziehen Sie die 4
Inbusschrauben am Chassisboden richtig fest.
Halten Sie nun die Räder vom Boden weg, sollte sich die Kupplungsglocke drehen lassen, die wiederum die Ritzel sowie die
anderen Antriebskomponenten problemlos antreiben sollte.
Lässt sich die Kupplungsglocke nur schwer drehen, ist das
Zahnflankenspiel wahrscheinlich zu eng. Justieren Sie das
Zahnflankenspiel indem Sie ein Blatt Papier zu Hilfe nehmen.
Bei korrektem Zahnflankenspiel, sollte sich das Papier
zwischen die Verzahnung legen, jedoch nicht reißen.
Nach jeder Fahrt das Chassis reinigen und sicherstellen, dass
alle Schrauben fest sind und keine Teile locker oder sogar
abgefallen sind. Halten Sie das Chassis für die nächste Fahrt
stets in einem guten Wartungszustand.
Problem Ursache Behebung
Sollten Sie ein Problem mit Ihrer Fernsteuerung haben:
Die Fernsteuerung lässt
sich nicht bedienen.
1. Die Sender- und/ oder Empfänger-Akkus sind
schwach/ leer.
Akkus austauschen
2. Die Akkus sind nicht korrekt eingelegt. Die Polarität überprüfen.
3. Der Empfängerakku ist nicht eingesteckt. Sicherstellen, dass der Empfängerakku fest
eingesteckt ist.
Die Reichweite ist gering. 1. Die Senderantenne ist nicht herausgedreht. Senderantenne vollständig herausdrehen.
2. Empfängerantenne hängt nicht vollständig heraus. Empfängerantenne vollständig herausziehen.
3. Die Empfängerantenne ist abgeschnitten. Zur Reparatur einschicken.
4. Die Sender- und/ oder Empfänger-Akkus sind
schwach/ leer.
Akkus austauschen.
Die Servos arbeiten nicht
ordnungsgemäß
1. Die Sender- und/ oder Empfänger-Akkus sind
schwach/ leer.
Akkus austauschen.
2. Das Servogetriebe ist beschädigt. Gegen ein neues Getriebeset austauschen
Fehlerhaftes Arbeiten
der Fernsteuerung bei
laufendem Motor
1. Das Empfängerquarz ist locker. Das Empfängerquarz entfernen und neu
installieren.
2. Der Empfängerakku ist nicht eingesteckt. Sicherstellen, dass der Empfängerakku fest
eingesteckt ist.
3. Der Empfänger wurde bei einem Crash beschädigt. Den Empfänger zur Reparatur einschicken.
Page 56

56DCARSON Nitro Buggy CNB 204016
Problem Ursache Behebung
Sie haben Schwierigkeiten mit Ihrem Verbrennermotor:
Der Motor lässt sich
nicht starten
1. Fehlerhafte Glühkerze Die Glühkerze austauschen.
2. Der Glühstarter ist nicht geladen und/ oder
beschädigt.
Den Glühstarter vollständig aufladen und/
oder ersetzen.
3. Die Treibstoffmischung ist zu mager. Die werkseitige Einstellung wiederherstellen
(Seite 45)
4. Alter oder kontaminierter Treibstoff. Tank leeren und mit neuem Treibstoff füllen.
5. Der Motor ist abgesoffen. Schrauben Sie die Glühkerze heraus und
entfernen Sie den überschüssigen Treibstoff
aus dem Brennraum (Seite 45)
6. Undichtigkeit im Treibstoffsystem (Luftblasen im
Treibstoffschlauch)
Die Treibstoffleitungen erneuern und/ oder
alle Schrauben am Motor nachziehen.
Der Motor nimmt keinen
Treibstoff auf
1. Undichtigkeit im Treibstoffsystem (Luftblasen im
Treibstoffschlauch)
Die Treibstoffleitungen erneuern und/ oder
alle Schrauben am Motor nachziehen.
2. Die Hauptdüsennadel ist ganz geschlossen. Die werkseitige Einstellung wiederherstellen
(Seite 45)
3. Die Treibstoffmischung ist zu mager. Die werkseitige Einstellung wiederherstellen.
(Seite 45)
4. Die Treibstoffleitungen sind geknickt. Treibstoffleitungen überprüfen und
ausbeulen.
5. Der Treibstofftank ist defekt. Den Treibstofftank austauschen.
Der Motor hat zuwenig
Leistung
1. Falsche oder fehlerhafte Glühkerze Durch eine neue Glühkerze ersetzen
(Empfehlung siehe Seite 25)
2. Alter und/ oder falscher Treibstoff Tank leeren und mit neuem Sprit auffüllen
(Empfehlung siehe Seite 24)
3. Hauptdüsennadel zu fett eingestellt Hauptdüsennadel magerer einstellen (S. 44)
4. Die Düsennadel ist zu mager eingestellt. Die Düsennadel fetter einstellen (S. 44)
5. Die Düsennadel ist zu fett eingestellt. Die Düsennadel magerer einstellen (S. 44)
6. Undichtigkeit im Treibstoffsystem (Luftblasen im
Treibstoffschlauch)
Die Treibstoffleitungen erneuern und/ oder
alle Schrauben am Motor nachziehen.
Überhitzung des Motors 1. Der Motor läuft zu mager Die Hauptdüsennadel fetter einstellen (S. 44)
2. Zu geringe Luftzufuhr Lufteinlässe in der Karosserie vergrößern, um
die Belüftung zu verbessern.
3. Falscher Treibstoff wurde verwendet Nur speziellen RC-AUTO-Treibstoff
verwenden (Seite 24)
4. Der Motor wurde nicht ausreichend eingelaufen Den Motor nochmals einlaufen lassen (S. 47)
Der Motor vibriert
übermäßig
Der Motor und/ oder die Motorhalterung sind nicht
ausreichend befestigt.
Alle Schrauben am Motor und an der Motorhalterung festziehen.
Der Motor läuft nicht im
Leerlauf
1. Die Leerlaufschraube ist nicht eingestellt. Die werkseitige Einstellung der Leerlaufschraube herstellen (Seite 44).
2. Undichtigkeit am Motor Alle Schrauben am Motor überprüfen und
festziehen.
3. Ein oder mehrere Vergaser-O-Ringe sind
beschädigt
Die Vergaser-O-Ringe austauschen.
Das EMS-System
arbeitet nicht ordnungsgemäß
Arbeitet nicht Überprüfen Sie die Batterie
Page 57

57CARSON Nitro Buggy CNB 204016
D
Problem Ursache Behebung
Probleme mit Ihrem CNB Chassis:
Der CNB bricht nach
einer Seite aus
1. Der Geradeauslauf an der Lenkung ist nicht
korrekt eingestellt.
Stellen Sie den Geradeauslauf über das
Trimm-Rädchen ein (Seite 37)
2. Die Spur ist nicht korrekt eingestellt. Spur nachstellen (Seite 50)
3. Ein Rad läuft schwergängig oder ein Lager ist
defekt
Nehmen Sie das Rad ab und reinigen Sie das
Lager, ggf. austauschen
Die Bremskraft ist nicht
ausreichend
1. Bremsgestänge nicht richtig eingestellt Bremsgestänge neu einstellen (Seite 50)
2. Bremsscheiben sind abgenutzt Bremsscheiben ersetzen
Die Kupplung greift nicht 1. Die Kupplungsbacken sind abgenutzt oder defekt Die Kupplungsbacken austauschen
2. Die Kupplungsglocke ist abgenutzt oder defekt Die Kupplungsglocke austauschen
3. Die Kupplungsbacken sind verglast (rutschen
durch)
Entfernen Sie die Kupplungsbacken und
behandeln Sie die Oberfläche mit feinem
Schmirgelpapier. Anschließend wieder
montieren.
Die Kupplung kommt zu
früh
Die Kupplungsfeder(n) sind abgenutzt oder defekt Die Kupplungsfedern austauschen
Der CNB läuft nicht 1. Abgefahrene oder defekte(s) Zahnräd(er) Die Zahnräder austauschen
2. Abgefahrene Differenzialräder Die Differentialräder austauschen
3. Antriebswelle(n) rutschen durch und/ oder sind
gebrochen
Die Madenschraube nachziehen und/ oder
Antriebswelle(n) austauschen.
4. Die mittleren Getriebeausgänge rutschen durch. Die Madenschraube an den mittleren
Getriebeausgängen nachziehen.
5. Die Kupplung greift nicht. Die Kupplung überprüfen und reparieren oder
austauschen
6. Der Vergaser ist zu fett eingestellt. Die Hauptdüsennadel magerer einstellen
(Seite 45).
Die Aufhängung bewegt
sich nicht leicht und frei.
1. Ein oder mehrere Dämpfer klemmen. Den Dämpfer reinigen und/ oder austauschen.
2. Die Kolbenstange ist verbogen. Den Dämpfer austauschen.
3. Die Befestigungsschrauben sind verbogen oder
anderweitig beschädigt.
Die Befestigungsschrauben austauschen.
Die Dämpfer verlieren Öl 1. Die Dämpfer-Abdichtungen sind undicht. Die Dämpfer austauschen.
2. Die Kolbenstange ist verbogen. Den Dämpfer austauschen.
Das 2-Gang-Schaltgetriebe schaltet zu spät
Der Schaltpunkt ist nicht korrekt eingestellt. Den Schaltpunkt neu einstellen, damit früher
geschaltet wird (Seite 52).
Das 2-Gang-Schaltgetriebe schaltet zu früh
Der Schaltpunkt ist nicht korrekt eingestellt. Den Schaltpunkt neu einstellen, damit später
geschaltet wird (Seite 52).
Schrauben sind locker
und/ oder lösen sich
während des
Fahrbetriebs
Vibration bei normalem Fahrbetrieb Reinigen Sie und/ oder ersetzen Sie die
Schrauben durch neue. Verwenden Sie
Schraubensicherungslack!
Verzögertes Ansprechverhalten
Die Servo-Saver-Schraube ist zu locker eingestellt Die Servo-Saver-Schraube, wie unten darge-
stellt, festziehen.
Auf den nächsten Seiten finden Sie detaillierte Abbildungen,
die Ihnen den Aufbau Schritt für Schritt veranschaulichen und
hierdurch erheblich vereinfachen. Zudem folgt eine Aufstellung
zahlreicher Ersatz- und Tuningteile.
Für mehr Tipps und Tricks:
www.carson-modelsport.de
Bild 37
Federspanung einstellen
Page 58

58 CARSON Nitro Buggy CNB 204016
Montage
3x1 mm
3x
21.8 mm
20x
1.2 mm
8x16x
5 mm
8x16x
5 mm
8x
12x0.2 mm
8x
12x0.4 mm
3x16 mm
002158
205625
002158
002158
205264
205264
205625
205355
205355
Assembly • Montageanleitung
1
Differential front & rear • Differenzial vorne & hinten
2 Bevelgear • Kegelritzel
Liquid screw lock • Schraubensicherungslack
Grease • Fett
Silicon oil • Silikonöl
For front and
rear 2x
Für vorne
und hinten
2x
For front and
rear 2x
Für vorne
und hinten
2x
For front and rear 2x
Für vorne und hinten 2x
Page 59

59CARSON Nitro Buggy CNB 204016
Montage
3 Differential front & rear • Differenzial vorne & hinten
5x4 mm
4x12 mm
3x38 mm
2x10 mm
8x
16x5 mm
205230
205231
205231
205265
205265
205265
205355
205230
205265
002158
205292
205251
205251
205258
205255
205255
4 Gearbox front • Getriebegehäuse vorne
3
For front and rear 2x
Für vorne und hinten 2x
Finished
Fertig
Page 60

60 CARSON Nitro Buggy CNB 204016
Montage
Kit: 205289
Tuning:
Hub carrier l+r
alu blue
Lenkhebelaufnahme
l+r Alu blau 205326
Tuning Tipp
3 mm
3x10 mm
3x16 mm
3x25 mm
5x5 mm
2.5x
16.8 mm
4x12 mm
8x
16x5 mm
205236
205224
205224
205289
205289
205289
205289
205297
205237
205223
205223
002158
002158
5 Front suspension • Vorderachs-Aufhängung
6 Front axle • Vorderachse
Page 61

61CARSON Nitro Buggy CNB 204016
Montage
205291
205290
205244
205244
205287
right
rechts
left
links
205291
5x25 mm
11.5 mm
3x37.5 mm
3 mm
Kit: 205291
Tuning:
Aluminium upper outer
arm blue
Querlenkerhälfte vorne
oben Alu blau 205327
Tuning Tipp
7 Upper arm • Querlenker vorne oben
8 Front suspension • Vorderachs-Aufhängung
Kit: 205287
Tuning:
Lower front suspension
alu blue
Querlenker unten vorne
Alu blau 205324
Tuning Tipp
7
6
For right and left side 2x
Für rechts und links 2x
Page 62

62 CARSON Nitro Buggy CNB 204016
Montage
3 mm
4x8 mm
3x50 mm
4x
67.2 mm
4x12 mm
3x38 mm
205252
205252
205225
205256
205246
205246
205349
left
links
right
rechts
5
Kit: 205288
Tuning:
Lower suspension alu blue
Querlenken hinten
unten 205348
Tuning Tipp
Kit: xxx
Tuning:
Stabilizing rod set
2.5 and 2.8 mm
Stabi-Set
2,5 und 2,8 mm 205348
Tuning Tipp
9 Front suspension • Vorderachs-Aufhängung
10 Gearbox rear • Getriebe hinten
8
8
3
Page 63

63CARSON Nitro Buggy CNB 204016
Montage
3x18 mm
6x32 mm
3 mm
4 mm
3x10 mm
3x25 mm
4x45 mm
4x50 mm
205611
205618
205615
205615
205615
205615
205615
205615
205615
205224
205224
205615
205244
11 Wingmount • Spoilerhalterung
12 Shocktower rear • Dämpferbrücke hinten
Page 64

64 CARSON Nitro Buggy CNB 204016
Montage
3 mm
5x85 mm
64 mm
8x
16x5 mm
3x25 mm
3x
43.5 mm
5x5 mm
2.5x
16.8 mm
8x12x
0.2 mm
205286
205620
205621
205621
205254
205221
002158
002158
205286
205286
205223
205288
13 Upper arms • Querlenker hinten oben
14 Rear suspension • Hinterachsaufhängung
For right side
Für rechte Seite
For left side
Für linke Seite
Page 65

65CARSON Nitro Buggy CNB 204016
Montage
4x8 mm
3 mm
4x
67.2 mm
3x20 mm
3x10 mm
205258
205225
205295
205299
205256
15 Rear suspension • Hinterachsaufhängung
16 Stabilizing pushrod • Stabilisator Anlenkung
For right side and left
side 2x
Für rechte und linke
Seite 2x
Silicon-Oil
Silikonöl/
Getriebeöl 908052-55
Tuning Tipp
908052 Silicon Oil 50 ml 1000
908053 Silicon Oil 50 ml 3000
908054 Silicon Oil 50 ml 5000
908055 Silicon Oil 50 ml 7000
Page 66

66 CARSON Nitro Buggy CNB 204016
Montage
4x4 mm
3x12 mm
3x20 mm
8x
16x5 mm
205299
205299
205299
205336
205346
205346
205337
205338
205334
17 Rear stabilizing bar • Montage Stabilisator hinten
18 Reverse gear • Rückwärtsgang
Finished
Fertig
Page 67

67CARSON Nitro Buggy CNB 204016
Montage
3x3 mm
3x3 mm
5x4 mm
2x10 mm
3x12 mm
6x
13x5 mm
8x10x
0.2 mm
8x16x
5 mm
3x12 mm
205320
205319
205333
205333
205333
205333
205333
205333
205335
205332
205341
205341
205341
205341
205341
205341
205341
205340
205345
205233
205273
205271
205271
205278
205273
205285
205371
205229
205229
205229
205229
19 Reverse gear • Rückwärtsgang
20 2-speed gear mount • Montage 2-Gang-Getriebe
Finished
Fertig
Page 68

68 CARSON Nitro Buggy CNB 204016
Montage
21 Shifting Servo mount • Montage Schaltservo
3x8 mm
2x10 mm
3x10 mm
6x32 mm
205279
205279
205279
205277
205277
205280
205270
205280
205280
205280
205277
205277
Page 69

69CARSON Nitro Buggy CNB 204016
Montage
22 Radioplate • Radioplatte
3x10 mm
4 mm
2x15 mm
205270
205303
205303
205303
205303
205303
205304
205304
205305
205305
205305
205304
205303
908062
205304
205304
205304
Page 70

70 CARSON Nitro Buggy CNB 204016
Montage
3x10 mm
3 mm
3x15 mm
4x16 mm
3x8 mm
3x10 mm
205269
205257
205257
205268
205268
205268
205268
205268
205268
205268
205268
205257
205257
23 Chassis • Chassis
24 Radioplate mount/ Montage Radioplatte
Page 71

71CARSON Nitro Buggy CNB 204016
Montage
3x18 mm
3 mm
3x25 mm
4x12 mm
4x16 mm
205250
205250
205250
205250
205250
205250
205220
205250
205250
205250
205250
25 Chassisbrace/ Chassisabstützung
Page 72

72 CARSON Nitro Buggy CNB 204016
Montage
3x10 mm
3x8 mm
3x10 mm
3x10 mm
4x10 mm
6x32 mm
5x75 mm
205282
205282
205342
205342
205235
205235
205235
205235
205235
205342
205342
205342
205353
26 Fuel Tank • Kraftstofftank
27 Steering rods • Lenkungsstangen
Page 73

73CARSON Nitro Buggy CNB 204016
Montage
3 mm
8x12x
0.8 mm
6x10x
3 mm
5x8x
2.5 mm
3x18 mm
205274
205275
205274
205274
205274
205274
205274
205274
205274
205274
205274
205213
205213
205274
205614
205619
29 Steering • Lenkung
Page 74

74 CARSON Nitro Buggy CNB 204016
Montage
4x10 mm
4x19 mm
3 mm
3x18 mm
205619
205619
205614
205619
205343
205344
205344
205344
205276
30 Steering • Lenkung
31 Chassisbrace front • Chassisabstützung vorne
Page 75

75CARSON Nitro Buggy CNB 204016
Montage
3x16 mm
3x18 mm
3 mm
8x12x
0.2 mm
4x10 mm
4x18 mm
205344
205344
32 Steering • Lenkung
33 Mount chassisbrace front •
Montage Chassisabstützung vorne
Page 76

76 CARSON Nitro Buggy CNB 204016
Montage
4x16 mm
3x3 mm
18 mm
3x12 mm
70 mm
90 mm
18 mm
18 mm
205234
205234
205357
205357
205307
205307
205307
205294
34 Rear axle mount • Montage der Hinterachse
35 Throttle linkage • Gasgestänge
Silicon-Oil
Silikonöl/
Getriebeöl 908052-55
Tuning Tipp
908052 Silicon Oil 50 ml 1000
908053 Silicon Oil 50 ml 3000
908054 Silicon Oil 50 ml 5000
908055 Silicon Oil 50 ml 7000
Finished
Fertig
Page 77

77CARSON Nitro Buggy CNB 204016
Montage
4x4 mm
3x16 mm
5x8x
2.5 mm
5x10x
4 mm
3 mm
5x8x
0.2 mm
3x6 mm
3x10 mm
5x8x
2.5 mm
8x16x
5 mm
905023
905026
905026
905026
905027
905027
905025
905025
205346
205300
205232
205222
205261
205262/205232
205232
205283
205260
905025
Kit: 205383
Tuning:
Pinion gear 14 T
Tuningritzel
14 Z 205315
Tuning Tipp
36 EMS mounting •
Montage der EMS
37 Clutch mounting • Montage der Kupplung
Kit: 205383
Tuning:
Pinion gear 16 T
Tuningritzel
16 Z 205316
Tuning Tipp
Kit: 205383
Tuning:
Pinion gear 19 T
Tuningritzel
19 Z 205317
Tuning Tipp
Page 78

78 CARSON Nitro Buggy CNB 204016
Montage
4x4 mm
5x10 mm
11358
205281
205281
205263
205263
205263
205306
205263
38 Enginemount & Mainfold mount • Motorblöcke &
Krümmer Montage
39 Enginemount • Motorblock Montage
Page 79

79CARSON Nitro Buggy CNB 204016
Montage
28 mm
76 mm
9 mm
9 mm
40 Throttle and gas-linkage • Gas-Bremsgestänge
41 Throttle and gas-linkage • Gas-Bremsgestänge
39
35
Included with servo
bei Servo dabei
High throttle
Gas hoch
Throttle
Gas
Full break
Vollbremsung
Page 80

80 CARSON Nitro Buggy CNB 204016
Montage
3x12 mm
3 mm
3 mm
3x12 mm
3x18 mm
3x30 mm
9 mm
10 mm
205249
205249
205249
205249
205249
205249
205249
205249
Included with servo
bei Servo dabei
29 mm
42 Throttle and gas-linkage • Gas-Bremsgestänge
43 Steering linkage • Lenkgestänge
Included with servo
bei Servo dabei
Reverse Forward
Rückwärts Vorwärts
Page 81

81CARSON Nitro Buggy CNB 204016
Montage
3x8 mm
205622
205622
52031
44 Fuel tube • Benzinleitung
45 Air-cleaner • Montage Luftfilter
Silicone pressure
tubing
Silikon Druckschlauch
Silicone fuel pick-up tubing
Silikon Ansaugschlauch
Tuning:
Air filter oil
Luftfilteröl 32648
Tuning Tipp
Page 82

82 CARSON Nitro Buggy CNB 204016
Montage
2.6 mm
2.5x5.9x
0.5 mm
3 mm
3.5 mm
3.5x
61 mm
3.5x
74 mm
14x66 mm
14x53 mm
46 Shock absorber mount • Montage Stoßdämpfer
For front 2x
Für vorne 2x
205612
For rear 2x
Für hinten 2x
205613
Page 83

83CARSON Nitro Buggy CNB 204016
Montage
80.5x
1.5 mm
107x
1.5 mm
205238
47 Shock absorber mount • Montage Stoßdämpfer
48 Shock absorber mount • Montage Stoßdämpfer
For rear 4x
Für hinten 4x
For rear 4x
Für hinten 4x
After filling with shock
oil, gently pump shock
shaft up and down
several times to
eliminate air bubbles.
Nach dem Auffüllen
mit Dämferöl vorsichtig
mehrere Male auf und
ab bewegen um Luftblasen zu vermeiden.
Page 84

84 CARSON Nitro Buggy CNB 204016
Montage
3 mm
3x20 mm
3 mm
3x20 mm
205613
205612
49 Front shock absorber mount • Montage Stoßdämpfer vorn
50 Rear shock absorber mount •
Montage Stoßdämpfer hinten
For front
Für vorne
For rear
Für hinten
Page 85

85CARSON Nitro Buggy CNB 204016
Montage
17 mm
908005
205624
51 Wheels • Montage Räder
52 Wheels • Montage Räder
Please use CA-glue
Bitte Sekundenkleber
verwenden
For front and rear 4x
Für vorne und hinten 4x
Page 86

86 CARSON Nitro Buggy CNB 204016
Montage
53 Antenna tube installation • Montage Antenne
Route the antenna wire trough the
antenna holder as indicated.
Slide the antenna wire trough the
antenna pipe and slide the antenna
tube into the holder.
Ziehe den Antennendraht
durch den Antennenhalter wie
angegeben.
Ziehe den Antennendraht auch
durch das Antennenröhrchen und
dieses in die Halterung.
Antenna tube
Antennenröhrchen
Receiver
Empfänger
Page 87

87CARSON Nitro Buggy CNB 204016
Montage
205616
54 Wing-antenna mount • Montage Spoiler-Antenne
Antenna tube
Antennenröhrchen
Body
Karosserie
Antenna hole
Antennenöffnung
53
Page 88

88 CARSON Nitro Buggy CNB 204016
Montage
55 EMS-starter • Montage EMS-Starter
Page 89

89CARSON Nitro Buggy CNB 204016
Montage
Art.-Nr. Description Bezeichnung
54435 Lower seal of nozzle case Düsenstockdichtung unten
54436 Upper seal of nozzle case Düsenstockdichtung oben
54472 Piston gudgeon pin Kolben-Bolzen
54498 Throttle boot Regulierungsabdeckung
54499 Throttle screw cap (brass) Gestängeanschluss
54526 Rear packing for fuel mixture Gehäusedichtung hinten
54527 Supply needle valve
”O”-ring 2x
Vergaser O-Ringe 2 Stück
54530 Main needle valve ”O”-Ring Hauptdüsennadel O-Ring
54535 Clutch screw M3x6 Kupplungsschraube M3x6
54536 ”G”-pin snap ring 2 pcs/set Kolbensicherungsring 2 Stück
54537 Front ball bearing 607z Kugellager 607Z vorne
54546 Rear cover bolt M2.6x6 (4) Schrauben F.Deckel M2.6X6
4 Stück
54555 Starting pin 5x2.55 mm Starter-Zapfen 5.2x2x5.5 mm
54556 Pressure spring 8x2.4 mm Druckfeder 8x2,4 mm
54567 Carburetor setting pin 8P Vergasereinspannstift
54568 Drive copper washer Klemmkonus
54581 Main needle seat Düsenstock
54582 Main needle Hauptdüsennadel
54584 Rear bearing Kugellager hinten
54629 Fuel nippel brass Kraftstoffanschlussnippel
54648 A parts assembly f. start engine Seilzugstarter A
54690 Pressure spring 7.2x2.4mm Druckfeder 7,2x2,4 mm
54691 Starter pivot 5.2x2.55 mm Starterzapfen 5,2x2,55 mm
54697 Recoil start unit ass. for 3.5 ccm Seilzugstarter 3,5ccm
m. Flansch
902001 Composite carburetor Vergaser komplett
902004 Carburetor main body Vergaser-Gehäuse
902005 Throttle valve Drossel-Kegelventil
902006 Throttle needle (super/turbo) Drosselnadel
902007 Throttle stop adjustment screw Leerlauf-Einstellschraube
902013 Connecting rod Pleuel
902014 Crankcase 28R Kurbelwellengehäuse 28R
902015 Shaft SG Kurbelwelle SG
902016 Piston & Sleeve complete set Laufgarnitur
902017 Burn room 28R Brennraum
902018 Washer for cylinder head Zylinderkopfdichtung
902019 Cylinder head screws 4 p Zylinderkopf-Schrauben 4 Stück
902020 Shaft OS Kurbelwelle OS
902021 Cylinder head Zylinderkopf
Motor
4.58 cm3 Force nitro engine •
4,58 cm3 Force Nitro Verbrennungsmotor
Force 28R/ABC
Art.-Nr. 901005
Page 90

90 CARSON Nitro Buggy CNB 204016
4.58 cm3 Force nitro engine •
4,58 cm3 Force Nitro
Verbrennungsmotor
Art.-Nr. 901005
Motor
Page 91

91CARSON Nitro Buggy CNB 204016
Motor
Page 92

92 CARSON Nitro Buggy CNB 204016
Spare Parts
Ersatzteile
002158
Ball bearing 8x16x5 mm
Kugellager
205213
Ball bearing flange 8x12x3.5 mm
Kugellager mit Flansch
205214
4x Bushing 6x10x3 mm
4x Sinterlager
205215
2-Speed clutch housing
2-Gang Kupplungsgehäuse
205216
2-Speed one way mount
2-Gangmitnehmer mit Freilauf
205217
Main gear shaft 54 mm
Hauptantriebswelle
205220
Spur gear gard, plastic
Zahnradschutz Kunststoff
205221
2x Wheel shaft
2x Radmitnehmer
908005
4x Wheel nut blue
4x Radmuttern blau
205223
2x Driver washer hex 17 mm
2x Sechskant Radmitnehmer
205224
4x Shock stud
4x Dämpferbolzen
205225
4x Lower hinge pin
4x Querlenkerachse
205226
4x Ball, steel 4.9 mm
4x Kugel
205227
4x Ball, steel 3 mm
4x Kugel
205228
2x Ball stud
2x Kugelbolzen
205229
2x Brake joint
2x Bremsaufnahme
205230
2x Joint 6 mm
2x Antriebszapfen
205231
2x Joint 8 mm
2x Antriebszapfen
908062
10x Body clips
10x Karosserieklammern
205232
Clutch 3-shoes pro w/engine nut
Dreibackenkupplungs-Set
205233
Break level head
Bremshebel
Ersatzteile
Page 93

93CARSON Nitro Buggy CNB 204016
Continuation Spare Parts • Ersatzteile Fortsetzung 2
205234
Rod set
Gestängeset
205235
Steering rod set
Lenkgestängeset
205237
Wheel hub front
Radnabe vorn
205240
Shock rebuild kit
Stoßdämpferreparaturset
205243
4x Hub stud
4x Nabenbolzen
205244
4x Up arm stud front
4x Querlenkerbolzen vorne/oben
205245
4x Up arm stud rear
4x Querlenkerbolzen hinten/oben
205246
4x Hub stud rear 43.5 mm
4x Nabenbolzen hinten
205247
4x Hub stud rear 23 mm
4x Nabenbolzen hinten
205249
Servo rod
Servogestänge
205250
Brace for chassis rear 82.5 mm
Chassisversteifung hinten
205251
Gear box front
Getriebebox vorne
205252
Gear box rear
Getriebebox hinten
205255
Suspension plate holder, plastic 0-3°
Querlenkerhalterung Kunststoff
205256
Front & rear suspension plate
Querlenkergegenhalterung
205257
2x Arm stud stopper
2x Nabenbolzenstopper
Ersatzteile
205258
Up arm carry front
Vorderer Querträgerhalter
205260
Engine nut
Motorenwelleadapter
205261
3x Pro clutch shoes
3x Pro-Kupplungsbacken
52031
2x Air filter sponge
2x Luftfilter
205262
Engine nut
Motormutter
Page 94

94 CARSON Nitro Buggy CNB 204016
Ersatzteile
Continuation Spare Parts • Ersatzteile Fortsetzung 3
205263
Rear adapter
Auspuffkrümmer
205264
F/r differential gear assembly
Diffenrenzial komplett
205265
Differential housing
Diffenrenzialgehäuse
205355
Pinion gear 13 T steel + 43 T
Kegelritzel 13 Z Stahl + Kegelrad 43 Z
205267
Differential set, alu cover
Differenzial-Set mit Aludeckel
205268
Side guard
Seitenschutz
205269
Chassis
Chassisplatte
205270
Radio plate
Radiodeck
205271
Center gear mount
Zahnradhalterung mitte
205273
Brake pad
Bremsbeläge
205274
Servo saver plastic set + screws
Servosaver-Set, Plastik + Schrauben
205275
Servo saver steering plate
Servosaver-Steuerplatte
205276
Servo saver plate
Servosaver-Platte
205277
Servo chassis rod
Servo Chassisstange
205278
Brake disc
Bremsscheibe
205279
Servo mount set
Servohalter Set
205280
Servo mount
Lenkservohalter
205361
Engine mount blue
Motorblöcke blau
205282
Engine mount spacer
Motorbockaufnahme
205283
2 Speed clutch housing
2-Gang-Kupplungsglocke 12 Z +17 Z
205284
2 Speed pinion gear
2-Gangritzel 12 Z + 17 Z
205285
2-Speed clutch
2-Gangkupplung
205286
Rear hub left + right
Hinterradnabe links + rechts
Page 95

95CARSON Nitro Buggy CNB 204016
Ersatzteile
Continuation Spare Parts • Ersatzteile Fortsetzung 4
205287
Suspensionarm lower front
Querlenker unten vorne
205288
Suspensionarm lower rear
Querlenker unten hinten
205289
Hub carrier l+r + 4x rocker pins
Lenkhebelaufname l+r + Schrauben
205290
2x Upper rod 35 mm, 2x 36 mm
2x2 Stellschraubenset
205291
Suspension arm upper front
Querlenker oben vorne
205292
Upper suspension plate f+r
Querlenkergegenhalterung f+h
205294
2x Swing shaft rear middle
2x Antriebsknochen hinten
205295
2x Swing shaft
2x Antriebsknochen
205297
2x cvd universal joint
2x Kardanwelle
205298
Connect head for universal
Stellring mit Welle
205299
Stabilizing mount 3.5 mm
Stabiset
205300
Pro fly wheel
Schwungrad
205303
Receive case
Empfängerbox
205304
Battery case
Batteriebox
205305
Antenna mount alu
Antennenaufnahme Alu
205306
Pro muffler black with CARSON brand
Tuning Resonanzrohr mit CARSON-Logo
205307
Rod stopper set
Stellring
205309
4x Ball end 3 mm for 7 mm ball
4x Kugelkopf 3 mm für 7 mm Kugel
205310
4x Ball end 4 mm for 7 mm ball
4x Kugelkopf 4 mm für 7 mm Kugel
205311
4x Ball end 4 mm for 7 mm ball
4x Kugelkopf 4 mm für 7 mm Kugel
205319
2-Speed gear 61 T steel
2-Gangzahnrad 61 Z Stahl
205320
2-Speed gear 66 T steel
2-Gang- Zahnrad 66Z Stahl
Page 96

96 CARSON Nitro Buggy CNB 204016
Ersatzteile
205331
Reverse system kit
Rückwärts-Getriebe komplett
Continuation Spare Parts • Ersatzteile Fortsetzung 5
205353
Fuel tank
Tank
205335
Bevel gear 15 T
Kegelzahnrad 15 Z
205336
Control head
Kontrollkopf
205339
Washer 6x9x1.5 + 8x12x2 mm
Unterlegscheiben
205332
Reverse control
Rückwärtsmitnehmer
205333
Reverse case
Rückwärtsganggehäuse
205337
Pinion gear
Zahnrad
205338
Pinion gear shaft 103 mm
Zahnradwelle
205340
Pinion gear shaft 14 mm
Kegelradwelle
205341
Reverse rod
Gestänge für Rückwärtsgang
205342
Servo mount and spacer
Servohalter
205343
Swing shaft
Antriebsknochen
205344
Front barre for reverse kit 75 mm
Chassisversteifung vorne
205345
Reverse plate black
Chassisplatte oben schwarz
205346
Ball bearing 8x16x5 mm
Kugellager
205347
Ball bearing 6x13x5 mm
Kugellager
205334
Bevel gear 15 T with mount
Kegelzahnrad 15 Z mit Mount
205349
Suspensionholder front alu 0°
Unterer Querlenkerhalter 0° Alu vorn
Page 97

97CARSON Nitro Buggy CNB 204016
Ersatzteile
205626
Painted body with decals
Bedruckte Karosserie mit Dekorbogen
Continuation Spare Parts • Ersatzteile Fortsetzung 6
205357
Small plastic parts blue
Kleinteileset Plastik, blau
205356
Silicone tube blue
Silikonschlauch mit Kabelbindern blau
205614
Bumper
Spoileraufhängung
205615
Wing mount
Federaufhängung
205616
Bi-level wing, black
Spoiler, schwarz
205617
Front body mounts
Karosseriehalter vorne
205610
Shock tower front, black
Dämpferbrücke vorn, schwarz
205611
Shock tower rear, black
Dämpferbrücke hinten, schwarz
205612
2x Front shocks, white springs
2x
Stoßdämpfer vorn, weiße Federn
205613
2x Rear shocks, white springs
2x
Stoßdämpfer hinten, weiße Federn
205618
Rear body mounts
Karosseriehalterungen hinten
205619
Servo saver metal parts
Servo saver Metallteile
205621
Suspension arms upper rear
Querlenker oben hinten
205622
Air filter assembly blue
Luftfilter Set blau
205624
2x Wheel Set black
2x Rad Komplett-Set schwarz
205625
Differential shims
Differenzial Ausgleichsscheiben
205620
Tumbuckle upper rear
Gewindestange f. Querlenker hi. oben
Page 98

98 CARSON Nitro Buggy CNB 204016
905022
EMS starter complete
EMS Starter komplett
EMS-System spare parts •
EMS System Ersatzteile
905025
EMS-housing-set
EMS-Gehäuse-Set
205346
Ball bearing 8x16x5 mm
Kugellager
905049
Main gear stopper
Hauptzahnradstopper
905023
2x Joints
2x Mitnehmer
905024
Shaft l = 150 mm
Startwelle
905026
Pinion gear with 2 ball bearings
Antriebszahnrad mit 2 Kugellagern
905027
Main gear set 16 T, 12 mm + 14.2 mm
Hauptzahnrad Set 16 Z
905028
Motor
Motor
EMS System
205253
Brace for chassis front
Chassisversteifung vorne
205254
Brace for chassis rear
Chassisversteifung hinten
205272
Main gear plate
Zahnradabdeckung mitte
205296
2x Swing shaft front middle
2x Antriebsknochen mitte vorne
Without reverse gear:
Ausrüstung ohne
Rückwärtsgang:
Page 99

99CARSON Nitro Buggy CNB 204016
Tuning parts
205314
2-Speed clutch housing
2-Gang Kupplungsgehäuse
205321
Spur gear guard alu
Zahnradschutz Alu
205318
Pinion gear 21 T
Tuningritzel 21 Z
205317
Pinion gear 19 T
Tuningritzel 19 Z
205316
Pinion gear 16 T
Tuningritzel 16 Z
205315
Pinion gear 14 T
Tuningritzel 14 Z
205328
Upper suspension holder front 0°
Oberer Querlenkerhalter 0° Alu
205327
Aluminium upper outer arm blue
Querlenkerhälfte vorne oben Alu blau
205326
Hub carrier l+r blue
Lenkhebelaufnahme l+r Alu blau
205325
Lower rear suspension alu blue
Querlenker unten hinten Alu blau
205324
Lower front suspension alu blue
Querlenker unten vorn Alu blau
205323
Hub rear alu blue
Hinterradnabe Alu blau
205363
Dustproof for switch
Staubschutz für Ein-/Ausschalter
205362
Dustproof for shock shaft
Staubschutz für Stoßdämpfer
205351
Suspensionholder rear alu 3°
Unterer Querlenkerhalter 3° Alu vorn
205350
Suspensionholder front alu 2°
Unterer Querlenkerhalter 2° Alu vorn
205348
Stabilizing rod set 2.5 + 2.8 mm
Stabi-Set
205330
Upper suspension holder front 3°
Oberer Querlenkerhalter 3° Alu
205329
Upper suspension holder front 2°
Oberer Querlenkerhalter 2° Alu
Tuningteile
Page 100

For Germany:
Service-Hotline:
Mo - Do 8.00 – 17.00 Uhr
Fr 8.00 – 14.30 Uhr
01805–73 33 00
12 ct/min
CARSON-Model Sport
Werkstraße 1 • D-90765 Fürth / Germany
www.carson-modelsport.de
CARSON-Model Sport
Abt. Service
Mittlere Motsch 9
96515 Sonneberg
 Loading...