

Page 1

Instruction Manual Page 2 - 15
Betriebsanleitung Seite 16 - 29
Mode d‘emploie Page 30 - 44
Instrucciones Página 45 - 59
Istruzioni d‘uso Pagina 60 - 73
CARSON Nitrobone RTR 103014
Page 2

2
GB
CARSON Nitrobone RTR 103014
Dear Customer
We congratulate you for buying this CARSON RC model car,
which is designed using state of the art technology.
According to our policy of steady development and product
improvement we reserve the right to make changes in
specifications concerning equipment, material and design at
any time without notice.
Specifications or designs of the actual product may vary from
those shown in this manual or on the box.
The manual forms part of this product. Should you ignore the
operating and safety instructions, the warranty will be void.
Keep this guide for future reference.
Limited Warranty
This product is warranted by CARSON against manufacturing
defects in materials and workmanship under normal use for 24
months from the date of purchase from authorised franchisees
and dealers. In the event of a product defect during the warranty period, return the product along with your receipt as proof
of purchase to any CARSON store. CARSON will, at its option,
unless otherwise provided by law:
(a) Correct the defect by repairing the product without charging
for parts and labour
(b) replace the product with one of the same or similar design;
or
(c) refund the purchase price.
All replacement parts and products, and products on which
a refund is made, become the property of CARSON. New
or reconditioned parts and products may be used in the
performance of warranty services. Repaired or replaced parts
and products are warranted for the remainder of the original
warranty period. You will be charged for repair or replacement
of the product made after the expiration of the warranty period.
The Warranty does not cover:
• damage or failure caused by or attributable to acts of God,
abuse, accident, misuse, improper or abnormal usage,
failure to follow instructions, improper installation or maintenance, alteration, lightning or other incidence of excess
voltage or current;
• damage caused by losing control of your car;
• any repairs other than those provided by a CARSON
Authorised Service Facility;
• consumables such as fuses or batteries;
• cosmetic damage;
• transportation, shipping or insurance costs; or
• costs of product removal, installation, set-up service
adjustment or reinstallation
This warranty gives you specific legal rights, and you may also
have other rights which may vary according to the country of
purchase.
Declaration of conformity
Dickie-Tamiya GmbH&Co KG hereby declares that this model
kit with radio, motor, battery and charger is in accordance with
the basic requirements of the following European directives:
98/37 EG and 89/336/EWG and other relevant regulations of
guideline 1999/5/EG (R&TTE).
The original declaration of conformity can be obtained from the
following address:
Dickie-Tamiya GmbH&Co. KG • Werkstraße l • D-90765 Fürth •
Germany
The explanation of the symbol on the product,
packaging or instructions:
Electronic devices are valuable products and should
not be disposed of with the household waste when
they reach the end of their running time! Help us to
protect the environment and respect our resources by handing
this appliance over at the relevant recycling points.
We wish you good luck and a lot of fun driving with your
CARSON model car
Before driving your new model carefully read these instructions!
Page 3

3CARSON Nitrobone RTR 103014
GB
Contents
Included items
Transmitter
Model
Preface .......................................................................................... 2
Included items .............................................................................. 3
Safety precautions ....................................................................... 4
Additional items needed for starting the engine ......................... 5
Tools needed for the assembly .................................................... 6
Your 3 channel radio system ........................................................ 6
External view of transmitter .................................................... 7
How to change frequencies .................................................... 7
Features of transmitter ............................................................ 8
Chassis ....................................................................................... 10
a. Plug in receiver battery .......................................................... 10
b. Check 1...2...3 ........................................................................ 11
c. Final Preparations... ............................................................... 11
d. Showtime... almost! ................................................................ 12
e. Turn the power switch on ...................................................... 13
f. How to control your model ..................................................... 13
g. How to change frequencies ................................................... 14
h. Care and maintenance ........................................................... 14
i. Troubleshooting ....................................................................... 15
Assembly ................................................................................... 74
Spare parts ................................................................................. 90
2.5 cm
3
Motor ............................................................................. 93
Page 4

4
GB
CARSON Nitrobone RTR 103014
Safety Precautions
This model is not a toy!
• This radio controlled model is not a toy. Learning how to
control it correctly is a gradual process.
• Children under 14 years of age should be supervised by an
adult.
Driving a radio controlled car is a fascinating hobby. However, it
has to be practised with the necessary caution and respect.
A radio controlled model car can cause damage and injury and
the user is liable for any such incident.
Make sure that you have sufficient insurance cover when
practising your hobby.
Only a well maintained model will function in a correct manner.
Only use approved spare parts and never improvise with any
unsuitable items.
It is the user’s responsibility to ensure that the model is
functioning correctly and that all nuts, bolts and screws are
properly tightened.
Pay attention to the charge level indicator
lamps of your transmitter.
• Batteries for transmitter and receiver are well charged and of
the correct voltage.
• Always check the range of radio operation before starting
the car.
• Make sure that all servos respond correctly to the signals of
the transmitter.
• All operable parts are in good condition and you have tested
their operation.
• You have made sure that all screws are tightened.
• There is no other RC or similar transmitter nearby, which
could cause interference. Any further radio signal on the
same frequency can cause the loss of control for your
model. Always switch on the transmitter first to avoid any
uncontrolled reaction of the receiver to a foreign radio
impulse.
• Fully extend the transmitter antenna and make sure that
nobody in your environment controls a model with the same
frequency (number on the crystal) and that there is no
discernable interference. To end the operation switch off the
receiver first, then the transmitter.
• Keep your car away from high voltage cables or radio masts.
• Never use the model during lightning.
• Atmospheric disturbances can affect the signals of your
remote controlling transmitter.
• Do not use the model in wet areas. The electrical connection
of the model is not waterproof. Therefore do not drive while
it‘s raining, snowing, or in puddles or wet grass.
• Always avoid running radio control models in restricted,
confined or populated areas.
• Keep away from roads, highways, people and animals.
• Choose a sufficiently open and large area; it should be free
of obstacles.
• Do not drive, if you are overtired or your reactions are
impaired in any way.
• Watch your model constantly and do not become distracted.
• The body shell should be correctly attached to the vehicle
before driving.
• Allow cooling time for the engine components before
removing the body shell.
• Some parts (e.g. the motor and the muffler) become
extremely hot during operation and could cause serious
injury.
Pay attention to the charge indications on your transmitter.
• Ensure that the batteries for the radio and receiver are fully
charged and of the correct voltage. When the batteries are
running low you might loose control of your model.
• Never use batteries which have already run low, or batteries
of a different capacity at the same time.
• Never load batteries which are not rechargeable.
If you do not use the model for a longer time you must remove
the batteries.
Safety Precautions and Operating
Guidelines
This radio control model vehicle must only be run on an
approved model fuel. Always avoid running radio control
models in restricted, confined or populated areas. Keep away
from roads, highways, people and animals. Never run the model
indoors.Please ensure that you have read all the safety instructions and operating procedures before driving the model.
The body shell should be correctly attached to the vehicle
before driving.
Allow cooling time for the exhaust and engine components
before removing the body shell. These parts become extremely
hot during operation and could cause serious injury.
Do not operate the model where noise may cause a nuisance to
others.
Ensure that the batteries for the radio and receiver are fully
charged and of the correct voltage.
Turn on the transmitter first, then the receiver. Reverse this
procedure when switching off. Check that the throttle, brakes
and trims are functioning correctly.
Make sure that no other person is operating on the same
frequency as your radio and that there is no discernable interference.
Always check that all the nuts, bolts and screws and components are not loose. Retighten and adjust as necessary.
Fill the fuel tank and firmly push the tank lid shut. Clean up any
fuel spillages.
Never leave fuel in the fuel tank.
Page 5
5CARSON Nitrobone RTR 103014
GB
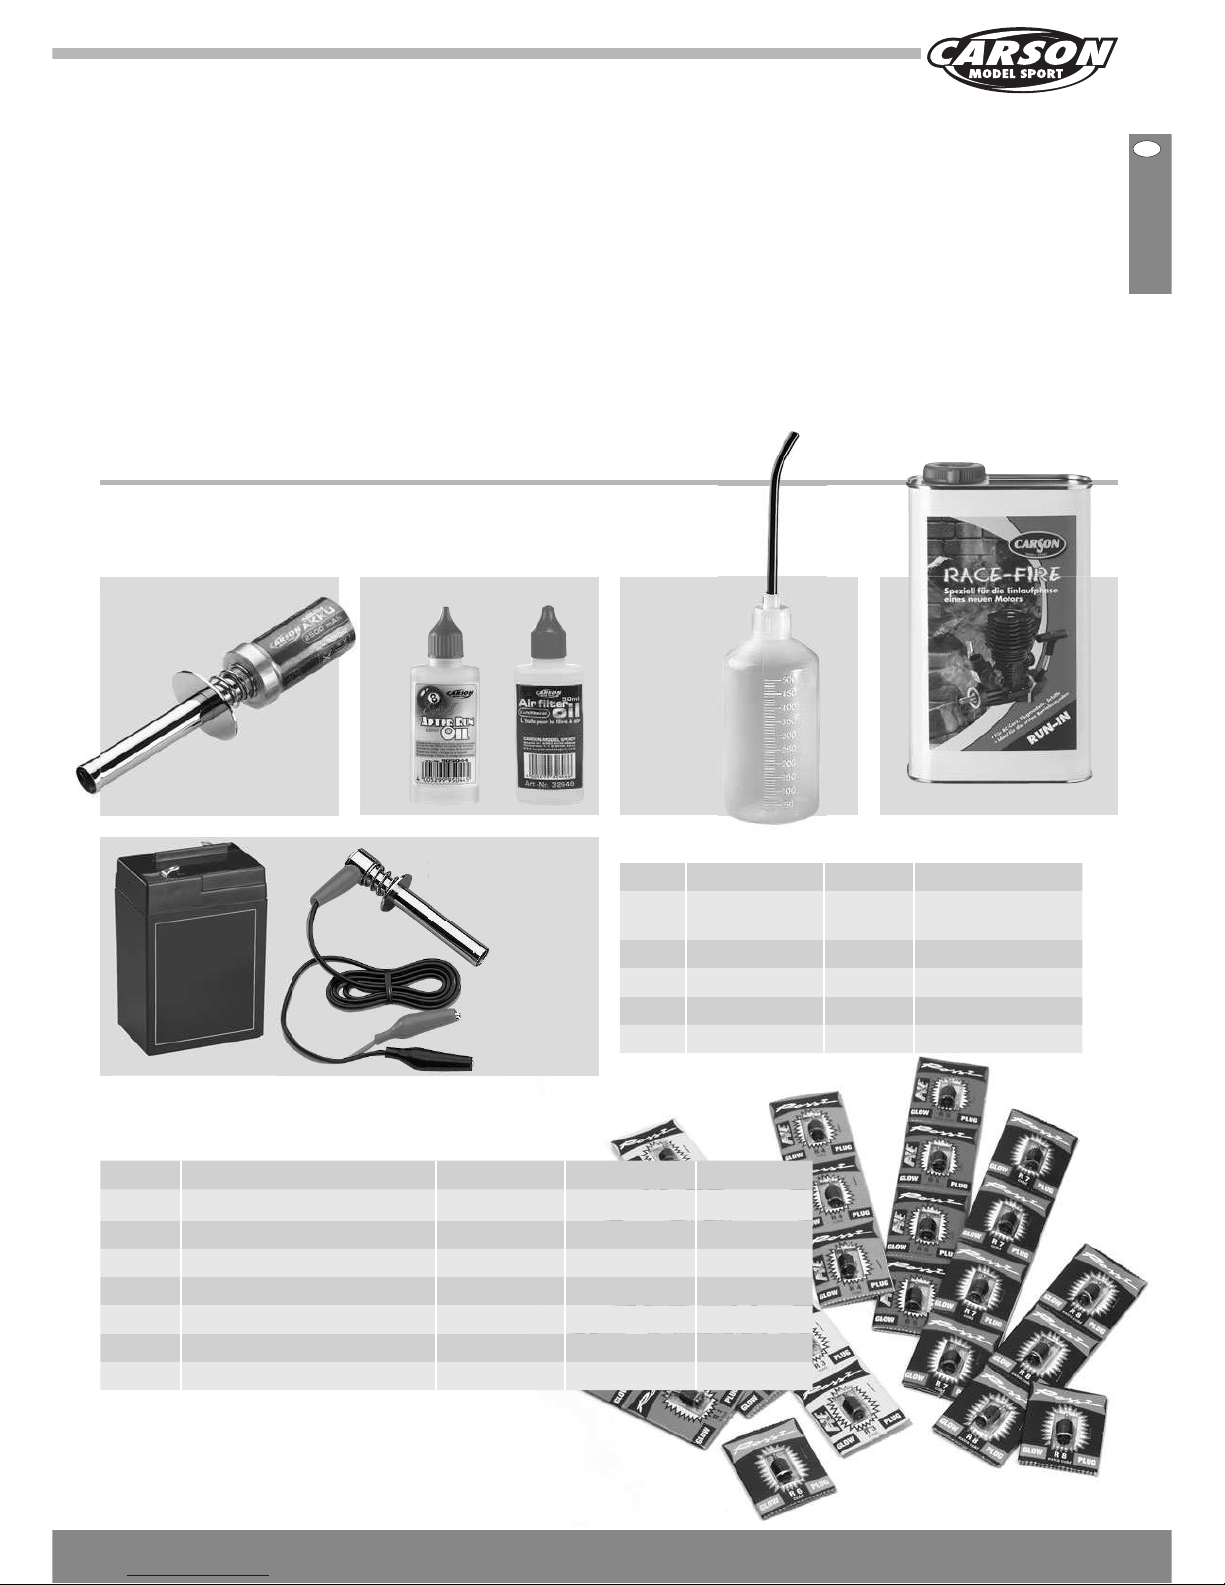
Art.No. Article Motor Fuel Temperature
905006 Glow plug Rossi R2 hot 2 - 3,5 ccm without Nitro +0° - +15C°
905007 Glow plug Rossi R3 medium 3,5 - 6 ccm without Nitro -2° - +18C°
905008 Glow plug Rossi R4 cold 6 - 10 ccm without Nitro -5° - +20C°
905009 Glow plug Rossi R5 extra 3,5 - 10 ccm 10% Nitro -7° - +22°
905010 Glow plug Rossi R6 cold universal 10-13% Nitro +10° - +25°
905011 Glow plug Rossi R7 cold universal 13-15% Nitro +15° - +30°
905012 Glow plug Rossi R8 extra cold universal 13-15% Nitro +20° - +40°
Additional items needed for
starting the engine:
Fuel bottle
13330
Fuel
Glow plug heater
905042
Liter Nitromethan Art.-No. Usage
1,0 10% 905052 Run in/
Beginner
1,0 16% 905053
Normal
2,5 16% 905054 Normal
1,0 25% 905055 Race
2,5 25% 905056 Race
CARSON-Fuel
… or
Glow plug heater
and
battery 11585
CARSON-ROSSI glow plugs
… or
Glow plug
an
d
batte
r
For the transmitter you need 8 AA
batteries/ rechargeable batteries.
After Run Oil Air Filter Oil
905044 32648
Please read the following points
concerning fuel:
• Keep the fuel in a secure and safe place and away from
children and animals.
• Ensure that the container lid is tightly closed.
• Store the fuel in a well ventilated area and away from
moisture.
• Glow fuel is extremely flammable. Keep away from heat
sources, naked flames, electrical appliances and batteries.
Do not smoke.
• Avoid skin contact and do not swallow. Read the warning
labels on the container.
Dispose of empty fuel containers in an approved manner. Never
throw empty cans into a fire.
In case of an accident or ingestion contact a doctor
immediately. (Present the label of the fuel container if possible.)
Finally
Please read the instructions before operating your model.
Each time you have finished driving the model, always check
the correct operation of the components. A single loose screw
can result in a dangerous situation for your model. Maintain
your model
regularly and replace damaged or worn out parts by genuine
spare parts.
We wish you great fun with your CARSON
model car!
Page 6

6
GB
CARSON Nitrobone RTR 103014
Tools needed for the assembly
Scissors 13305Needle nose pliers 74034
Side cutter 74035
Modelling knife 74053
Hexagonal wrench 13118Philips screwdriver
(small and big)
1,5/ 2 / 2,5 mm 74023
Instant adhesive 53339
Please read the instructions provided with your radio system
before using it.
The servos must be set at the centre position before
installation. To set the servos at a neutral position, turn on
the transmitter and receiver. Set the trim levers in the centre
position and turn off the receiver, and then the transmitter. The
servos will be in proper neutral position for installation.
Receiver antenna
Batteries for receiver
Engine
throttle
servo
Steering servo
Switch
Transmitter
Your 3 channel radio system
Tweezers 74003
Page 7

7CARSON Nitrobone RTR 103014
GB
Throttle Trim
Antenna
Power LED
Steering Wheel
ST.TRIM
Steering Trim
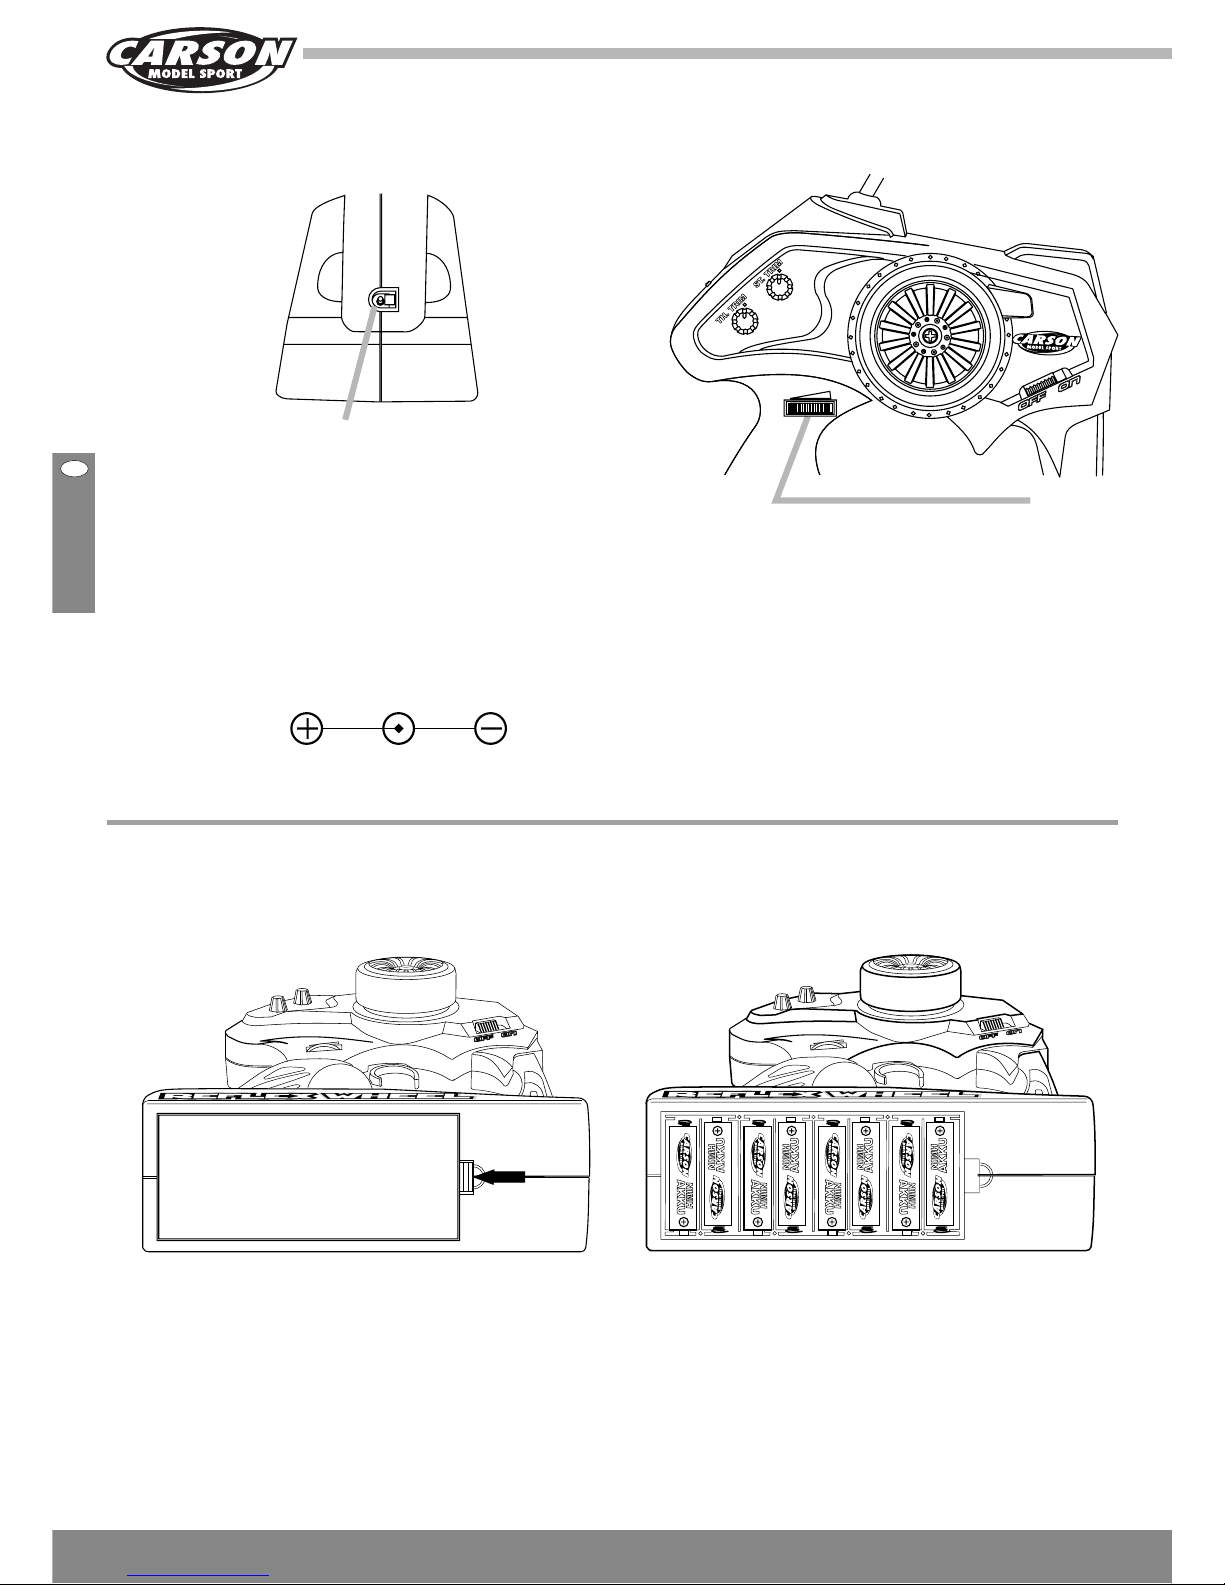
Charging Jack
Power Switch
Throttle Trigger
Crystal
Identification mark:
TX
Battery Cover
Throttel
Servo Reverse
Channel 2
Steering
Servo Reverse
Channel 1
Blinking LED indicates that
the batteries are getting weak.
When LED turns off, the
batteries are dead and need
to be changed to new ones.
Transmitter
• A rapid change of frequencies is possible simply
by unplugging an interchangeable plug-in crystal on
the back of the transmitter and then plugging in
another one.
• The use of crystals, other than CARSON’s, may
damage the radio and invalidates our guarantee
for our products.
Receiver
• Plug an interchangeable crystal into the receiver
for a rapid change of frequencies.
• Make sure that the crystal is fully inserted in the
receiver, not partially
.
External view of transmitter
How to change the frequencies
Third Channel Switch
For additional ON/OFF function
Steering Rate Adjuster
2 7
F M
2
T
X
B
A
N
D
Battery
Compartment
Crystal
Identification mark:
RX
FM 3
c
h RE C
E
I
V
E
R
27 M
h
z
M
A
DE I
N C
HI
N
A
B
A
T
T
.
-
C
H
.
1
-
CH
.
2
-
E
F
L
X
E
F
2
RX
B
A
N
D
Page 8

8
GB
CARSON Nitrobone RTR 103014
Steering Wheel rotates up to 35 degrees to the
right/left
Steering Wheel
Throttle Trigger
Pull the throttle trigger for running forward and push
it for braking and running backwards.
Steering Trim (ST.TRIM)
Rotate the trim to adjust the Steering Servo to the
neutral position. When you adjust the position of
the Steering Servo, set the Steering Rate Adjuster
(ST .D/R) at the maximum position so that the
movement of the Steering Rate Adjuster is
maximised and therefore is easy to adjust.
Throttle Trim (TH. TRIM)
Move the trim tab to adjust the Throttle Servo
to the neutral position.
These Reverse Switches allow the rotation of the
servo(s) to be reversed. The servo(s) rotate(s)
clockwise at NOR position and rotate(s)
counterclockwise at REV position.
f
d
o
r
r
a
w
w
a
k
r
c
d
a
b
Steering Trim
Channel 1
Throttle Trim
Channel 2
Throttle Reverse
Channel2
Steering Reverse
Channel1
Servo Reverse
Features of transmitter
27
FM
2
T X
B AN
D
35°
35°
Page 9

9CARSON Nitrobone RTR 103014
GB
Charging Jack Steering Rate Adjuster
Charging
Jack
Note: ON/OFF Switch should be at "OFF"
position before charging the batteries for the
transmitter. Only Nickel-Cadmium or NickelMetalhydride batteries (Ni-Cd / NiMH), such as
CARSON 609000 or its equivalents, are to be
recharged. If you attempt to recharge other types
of batteries, they may explode and cause injury or
damage to you and others. DO NOT RECHARGE
OTHER TYPES OF BATTERIES, SUCH AS
ALKALINE!
Increments of the Steering Servo Horn can be
adjusted by rotating this Steering Rate Adjuster, in
the range from 10% to 100%. The bigger the
percentage is, the more sensitively the Steering
Servo operates.
* To remove the battery cover, push the cover contacts, especially the negative(-) terminals and
lock and lift the cover. Insert AA batteries recheck that batteries are fitted correctly. Also
respectively NiCd / NiMH rechrgeable batteries make sure the batteries are fully charged.
and pay attention to the polarity. If the transmitter
voltage indicator LED fails to register, check the
Polarity of charging jack
Steering Rate Adjster
How to change transmitter batteries
Push and
lift here
Page 10
10GBCARSON Nitrobone RTR 103014
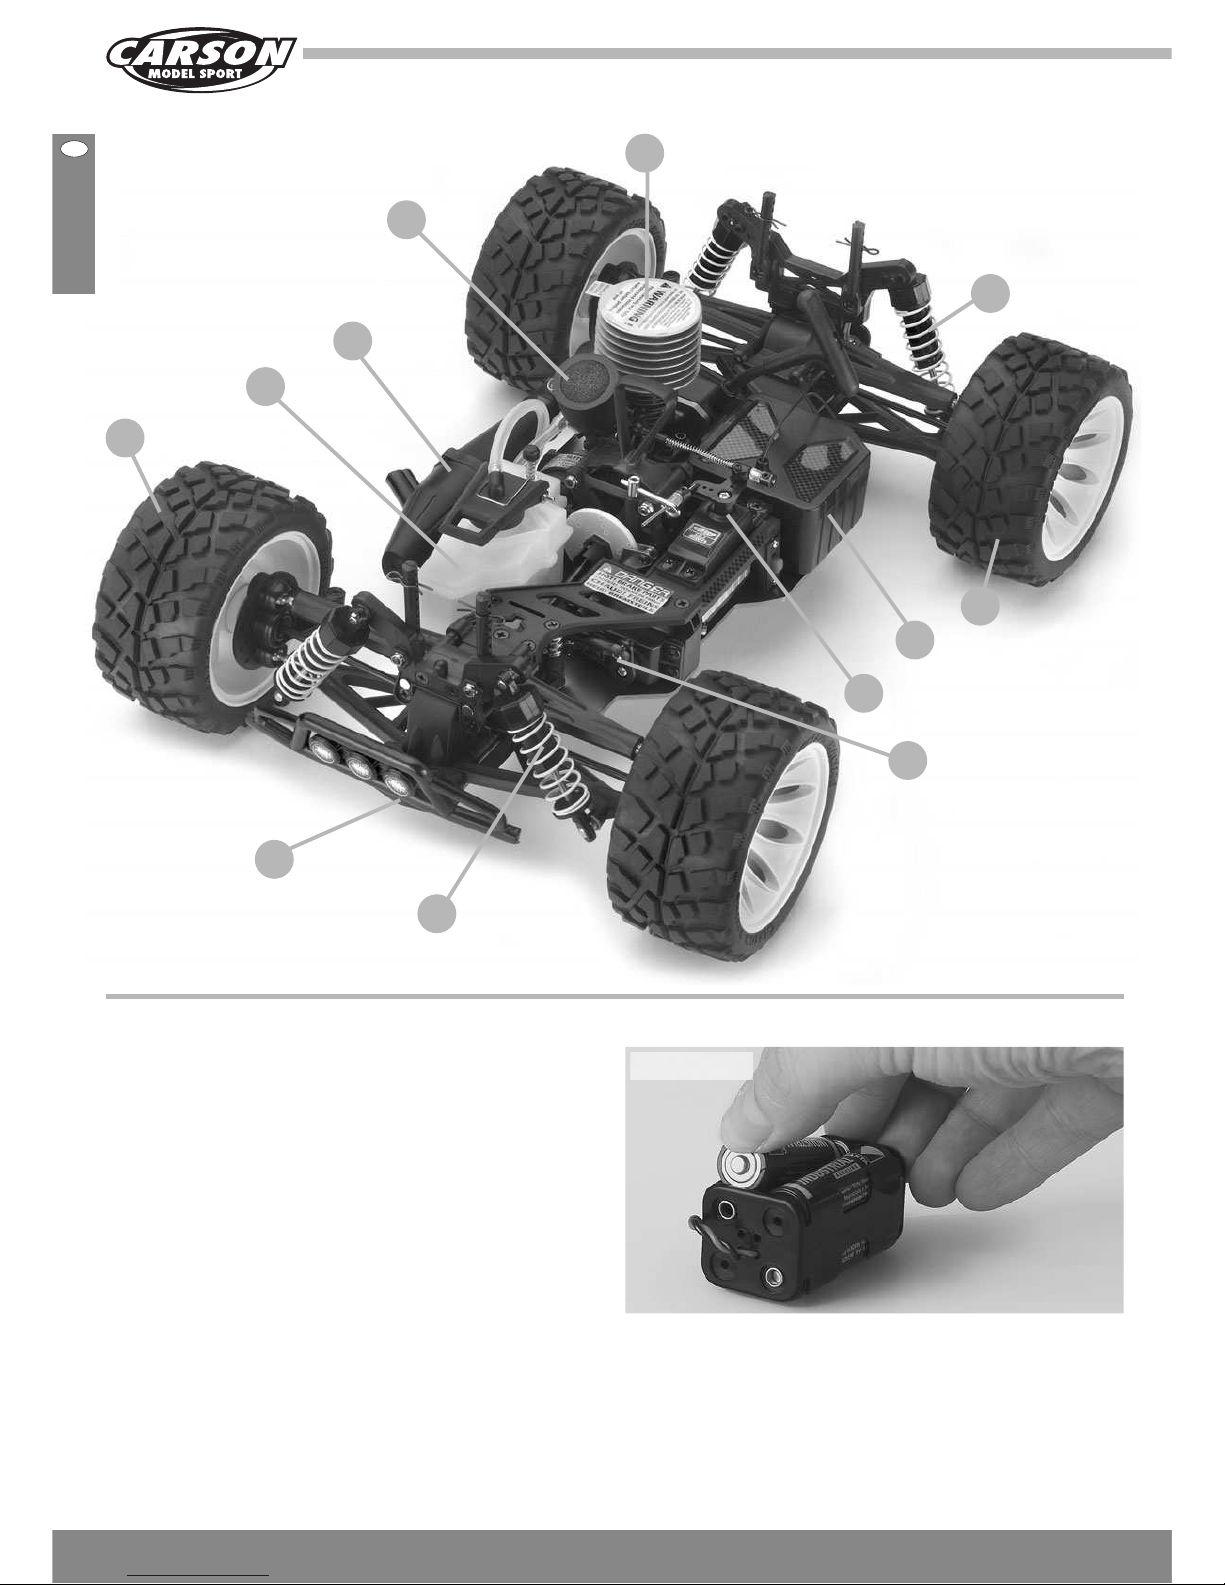
a. Plug in receiver batteries
Insert 4 “AA” batteries into the receiver battery case as shown
(compare picture 1). Make sure positive (+) and negative (-)
ends are facing the correct direction. Then plug the pack into
the switch harness, inside the radio case. Black goes to black
and red goes to red. Replace the radio case cover.
Racer Tip: Use rechargeable batteries! They last longer and are
cheaper in the long run. Replace the 4 “AA“ car batteries with
our NiMh 6V 1100mAh battery pack (608036 JR) (608037 BEC)
for longer life and economy.
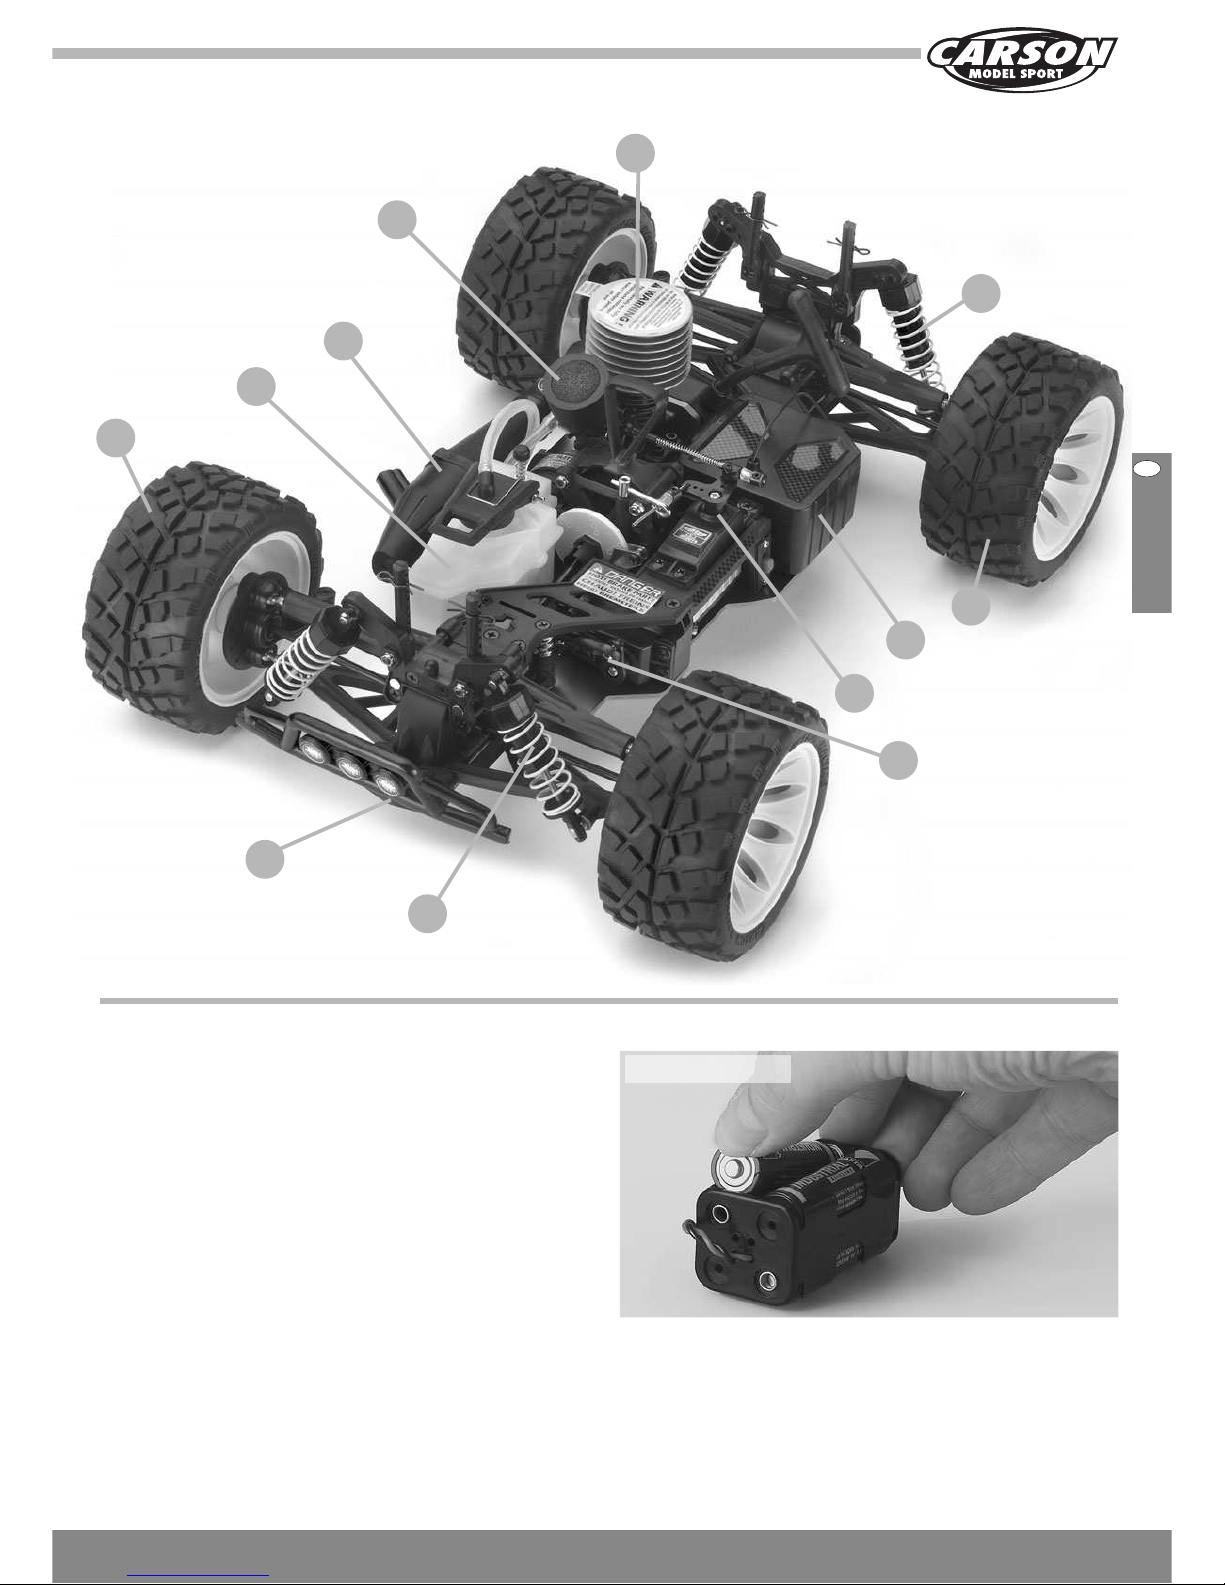
Chassis
Picture 1
Fuel-tank
Motor
Air filter
Muffler
Front tyre
Rear shock unit
Rear tyre
Receiver box
Throttle servo
Steering servo
Front shock unit
Chassis
Page 11

11CARSON Nitrobone RTR 103014
GB
Now you can switch on your car using the on/off switch located
on the radio box. Always turn the radio on before turning on
your car. Note: Always check your radio settings before running
your car!
Check to make sure your steering is centred. If it is not, use
the ST-TRIM knob to the left of the steering wheel. Turning left
should make the car turn left. Right=right.
Racer Tip: Read the Radio manual for more advanced radio
setup information!
Now it’s time to set the throttle neutral position. Remove the
air cleaner from the carburettor. The opening on the carb slide
should be open very little, from 1-1.5 mm to allow the engine to
idle (picture 2). If it is open more than this, the engine may rev
higher than normal until brakes are applied. This condition may
wear out the brakes and/or clutch shoes prematurely making
the car difficult to drive. Use the TH-TRIM tab (picture 3) to
move the servo arm into the neutral position if necessary. While
in neutral, the brakes should not be set to “drag”. Adjusting
the collars with a 1.5 mm hexagonal wrench will change your
drag brake settings. Replace the air cleaner when everything is
adjusted to your satisfaction.
c. Final Preparations...
Assemble the fuel bottle. Fill the fuel bottle by compressing
it and then insert the spout into the fuel. Allow the bottle to
decompress and the suction will fill the fuel bottle. Fill the tank
by gently squeezing the bottle and ensure that the tank lid is
firmly shut when finished.
Racer Tip 1:
Fuel will stay fresh longer if you store it in a cool, dark and dry
place.
Racer Tip 2:
Never leave the glow heater on your engine for more than 10
seconds. A longer time may cause the glow plug to burn out
prematurely. Use rechargeable glow heaters for longer life.
Racer Tip 3:
To start the motor, use a fireproof glove!
1 - 1,5 mm
TH-Trimm
b. Check 1...2...3...
Picture 2
Picture 3
Page 12

12GBCARSON Nitrobone RTR 103014
Engine break-in is the most important step to assuring that
your engine is fast and reliable throughout its life. Put simply:
DON’T SKIP THIS PART!
The engine is pre-set from the factory for break-in. Use a “Car
Stand“ 908071 or platform and place the car so that the wheels
are off the ground and rotate freely. Make sure the throttle is set
at neutral with your radio. Place the glow heater onto the glow
plug and give the recoil a sharp pull (picture 4). Do not pull it
more than twelve inches! More than that may break the cord
and this is not covered under warranty. It is better to give the
recoil short sharp pulls rather than long ones. If the pull-start
cord gets stuck, rotate the flywheel a little bit with your finger.
This should make the cord automatically recoil. Within a few
pulls, the engine will start with a good puff of smoke.
If the engine has trouble idling at the rich setting, turn the idle
screw clockwise 1/8th of a turn at a time. This will increase
the idle allowing the car to break-in properly. Try to do this in
a well-ventilated area, such as your driveway. Unburnt oil from
the fuel will accumulate under the exhaust, so be prepared. Let
the car idle like this for 2-3 tanks of fuel checking the engine
temperature every 2 minutes. Please allow a break of 10 – 15
minutes in between filling the tank to allow the engine to cool
down. You should be able to touch the head of the engine with
your fingertips and it will be hot, but not uncomfortably so. If it
seems very hot, richen (turn counter-clockwise) the high-end
AND low-end needles 1/8th of a turn. Always use small
increments when making these kinds of adjustments.
Racer Tip:
Factory setting of carburettor:
With the following basic adjustment the engine starts immedia-
tely, running perfect and rich enough (outside temperature 8°C).
• Idle stop screw: approx. 1 mm air gap;
• High speed needle valve: screw in completely, then open 4
full turns;
• Low speed needle valve (linking): flush with the edge of the
linking arm, then 1 full turn clockwise;
After run-in is finished the high speed needle valve should be
open at least 3 and 1⁄4 turns. A richer setup is better if outside
temperature is high.
Racer Tip:
Drive your car slowly with the rich setting shortly after the
break-in period avoiding prolonged periods at full throttle. Gradually lean out the mixture 1/8 of a turn at a time. The idle will
increase the more you lean the engine out.
d. Showtime... almost!
Picture 4
richer leaner
Picture 6
richer
leaner
lower
speed
higher
speed
Picture 5
Page 13

13CARSON Nitrobone RTR 103014
GB
• Raise the tyres off the ground
• Turn the steering wheel to the right and left as far as it will
go. The wheels are to follow the steering direction.
• If the wheels operate in the opposite direction, operate the
servo Reverse switch (ST in position REV).
Switch on the receiver
• Power switch is on the radio box.
• Fix the receiver antenna and wire (see page 82).
• Put the body on and fix it with the body split pins.
Left
Right
Neutral
ON
f. How to control your model
e. Turn the power switch on
Pull the transmitter antenna out completely.
The range of the remote control is reduced if the antenna is not
pulled out completely.
CAUTION!
Always turn the transmitter´s power switch ON first!
Page 14

14GBCARSON Nitrobone RTR 103014
g. How to change frequencies
Transmitter
A rapid change of frequencies is possible simply by
unplugging an interchangeable plug in crystal on the back of
the transmitter and then
plugging in another one
of a different frequency.
Crystals for both the
transmitter and receiver
must be matched with
each other.
Make sure that the
crystal is fully inserted
in the transmitter and
receiver, not partially.
Receiver
Plug in an interchangeable crystal into the receiver for a rapid
change of frequencies.
2
TX
B
A
N
D
27
FM
Crystal
Crystal
h. Care and Maintenance
Failure to follow break-in procedure and/or damage caused by
improper tuning will void your engine warranty.
There are two ways to “temp” your engine. We recommend
buying our “Temp Check” infrared thermometer, item number
908072.
One, purchase a temperature gauge. The second che-
aper, but less accurate method is the “Spit Test”. Wipe a little
bit of saliva on the engine head and it should burn off in 3 - 4
seconds. If it
evaporates immediately, chances are the engine is running too
hot.
The engine will run best and be easier to restart if run around
100-125 °C. Depending on your weather conditions, air density, and humidity, your carburettor settings will be changing
wherever you decide to run. Making adjustments in small increments is the best way to make sure your engine lasts a long
time. Overheating is caused by running the engine too lean,
or too much stress on the engine created by the environment.
Extreme overheating will result in internal failure of engine
parts. There are many online resources that will help you with
engine tuning. Our 3,5 ccm engines are designed to last a long
time, and with proper maintenance and tuning, you can drive
the model for hours at a time.
After Use
When you have finished running your car, there are two options
to shut the engine down. The first method is to place your
thumb over the exhaust outlet (Wear gloves). Make sure your
engine is preferably normal idle, with the brake activated. The
second method is to pinch off the air supply from the engine.
Do not pinch the fuel line, as this may cause the engine to overheat! Try and let all the remaining fuel run through the engine,
emptying the fuel tank. The engine will idle high while the tank
is emptied, so the above two steps may not be necessary.
Then apply after-run oil through the carburettor, and pull the
pull-start a few times to get it through the engine. This is
recommended if you plan on storing the car for more than a
day. Methanol evaporates in water and can cause internal
corrosion to engine parts. It is always a good idea to check
all the screws, nuts, and bolts before and after each period of
racing.
Keeping the car clean will also make it more fun to work on.
This can be achieved with a large heavy-duty paintbrush, or
compressed air. Always test the transmitter and receiver batteries before starting the engine.
Racer Tip:
Wear gloves when working on your hot car!
Picture 7
Picture 8
Page 15
15CARSON Nitrobone RTR 103014
GB
Overheating Check temperature. If over 130, richen carb
mixture. Check to make sure wheels spin
freely.
Disconnected
fuel pressure
line:
Reattach pressure line from exhaust pipe to
fuel tank lid.
Dirty air
cleaner:
Wash with soap and water or glowfuel then
use air filter oil.
Carburettor
loose:
Check carb-lock bolt and nut.
Press carb onto engine block, tighten nut to
prevent air leak.
Engine Stalls
Dead/Weak
Batteries:
Batteries in transmitter should be fully
charged. Slow servos mean dead receiver
batteries.
Improper
transmitter
settings:
Refer to instructions on setting up your
transmitter
Transmitter
antenna not
extended
Pull out transmitter antenna to full length.
Loss of control R/C model using same band
(frequency) is nearby
Model doesn´t
move
Transmitter or chassis power switch is not
„ON“
Polarity or battery type is wrong
Batteries have run down
Doesn´t run
straight
Steering trim is not adjusted correctly
Front and rear wheel nuts are too loose
Doesn´t stop Throttle trim is not adjusted correctly
Running too
slowly
Motor has lost power
Rear wheel nuts are too loose
Dust or foreign objects are inside gears
Hard to control, “glitching”
i. Troubleshooting
Please read this in the event of a problem.
Engine Won’t Start.
Engine
flooded. Too
much fuel in
engine
Remove glow plug. Pull pull-start 6-8 times,
Beware of spraying fuel.
Dead glow
plug
heater
Remove glow plug. Place glow plug in
heater.
If the glow plug does not glow orange the
plug maybe dead. See also glow heater.
(Wear gloves)
Dead Glow
heater battery
Place new glow plug in heater. If it glows
dim or not at all, replace heater battery.
Empty fuel
tank/ No fuel in
engine:
Fill fuel tank. Prime engine by pulling
pull-start once while holding finger tip over
muffler (Wear gloves).
Overheating: Running at high temperatures may cause
vapour lock. Let the car cool down for
10-15 minutes
Page 16

30FCARSON Nitrobone RTR 103014
Conditions de garantie
CARSON vous garantit pour 24 mois à partir de la date d‘achat
(pièces justificatives à l‘appui) que la voiture est exempte de
tout défaut. L‘utilisation inappropriée, l‘usure des éléments au
cours de l‘utilisation, les transformations de votre propre chef,
l‘application ou l‘utilisation incorrecte, l‘endommagement des
batteries ou d‘autres équipements au cours de l‘utilisation ou
l‘emploi abusif un l‘endommagement causé par le transport,
n‘est pas couvert par la responsabilité civile. Notre garantie se
limite à la réparation ou à l‘échange des appareils dans l‘état
original et à la hauteur du prix d‘achat. L‘utilisateur de la voiture
assume tous les risques en rapport avec l‘utilisation de la
voiture. Nous nous réservons le droit de modifier ces
conditions de garantie à tout moment et sans préavis. En cas
de réclamation veuillez contacter votre revendeur spécialisé.
La garantie ne couvre pas:
• tout dommage ou défaillance causé par force majeure,
abus, accident, utilisation abusive, erronée ou anormale, non
respect des instructions, mauvaise mise en route ou
maintenance insuffisante, altération, éclair ou tout autre
conséquence d‘une surtension ou d‘un courant excessif ;
• tout dommage provoqué par la perte de contrôle de la
voiture ;
• toute réparation autre que celles réalisées par un organisme
agrée par CARSON ;
• les consommables tels que les fusibles et les batteries ;
• des dommages esthétiques ;
• le transport, l‘expédition et les frais d‘assurance ; et
• les frais de retour, d‘installation, de mise au point et de
remise en route du produit
Cette garantie vous attribue des droits spécifiques, vous
pouvez par ailleurs également prétendre à d‘autres droits en
fonction du pays d‘achat.
Lire attentivement ces instructions avant d‘utiliser ce nouveau modèle réduit.
Cher client
Toutes nos félicitations pour l‘acquisition de votre voiture
en modèle réduit CARSON RC, un modèle dernier cri. En
vertu de notre engagement pour un développement et une
amélioration continus de nos produits, nous nous réservons le
droit d‘effectuer des modifications dans les spécifications de
nos équipements, nos matériaux et de notre conception à tout
moment et sans avertissement préalable. Les spécifications ou
les versions du produit acheté peuvent différer de celles
affichées dans le manuel ou sur l‘emballage. Le présent
manuel fait partie du produit. Tout non-respect des
instructions et des consignes de sécurité qui y sont incluses
dispense le fabricant de toute garantie. Conserver le présent
manuel comme document de référence, et également pour
pouvoir le transmettre par la suite à un tiers avec la voiture.
Déclaration de conformité
Dickie-Tamiya GmbH&Co KG déclare par la présente que ce
kit de modélisme, avec émetteur, moteur, batterie et chargeur
respecte les exigences de base des directives européennes
suivantes : 98/37 EG et 89/336/EWG ainsi que les autres
régulations de la directive 1999/5/EG (R&TTE).
La déclaration de conformité originale peut être demandée à
l‘adresse suivante : Dickie-Tamiya GmbH&Co. KG • Werkstraße
l • D-90765 Fürth • ALLEMAGNE
Signification du symbole se trouvant sur le produit, l‘emballage
et le mode d‘emploi :
Les appareils électroniques sont des produits de
valeur et ne doivent pas être éliminés avec les autres
déchets ménagers une fois parvenus à la fin de leur
cycle de vie. Aidez-nous à préserver l‘environnement
et à respecter nos
ressources en remettant cet appareil aux points de recyclage
concernés.
Nous vous souhaitons beaucoup de plaisir avec la conduite de
votre modèle réduit CARSON.
Page 17
31CARSON Nitrobone RTR 103014
F
Périmètre de livraison
Emetteur
Modèle
Contenu
Préface ........................................................................................ 30
Périmètre de livraison ................................................................ 31
Consignes de sécurité ............................................................... 32
Articles nécessaires au démarrage du moteur ......................... 34
Outils nécessaires au montage de la voiture ............................ 35
Votre ensemble de radiocommande à 3 canaux....................... 35
Déscription de l‘émetteur ...................................................... 36
Comment changer de frequence .......................................... 36
Fonctionnement de l‘émetteur .............................................. 37
Châssis ....................................................................................... 39
a. Alimentation ........................................................................... 39
b. Commandes ........................................................................... 40
c. Ultimes préparations ............................................................. 40
d. Mise en route ......................................................................... 41
e. Allumer l‘émetteur .................................................................. 42
f. Conduite de la voiture ........................................................... 42
g. Changer les fréquences ......................................................... 43
h. Précautions ............................................................................ 43
i. Pannes .................................................................................... 44
Assemblage ................................................................................ 74
Pièces détachées ....................................................................... 90
2,5 cm
3
moteur ........................................................................... 93
Page 18

32FCARSON Nitrobone RTR 103014
Guide des précautions d’utilisation
Ce modèle radiocommandé doit uniquement être utilisé avec le
carburant préconisé.
Toujours utiliser les modèles radiocommandés dans des lieux
sécurisés.
Ne pas utiliser sur les voies de circulation, près du public ou
d‘animaux.
Ne pas utiliser en intérieur.
Lire attentivement les consignes de sécurité et d’utilisation
avant de piloter la voiture.
Le modèle radiocommandé ne doit pas être utilisé dans des
lieux publics.
La carrosserie doit être correctement fixée sur la voiture avant
le démarrage.
Attendre que le moteur et l’échappement soient refroidis avant
de retirer la carrosserie. Ces parties deviennent très chaudes
pendant l’utilisation et peuvent causer des brûlures graves.
Ne pas utiliser dans des lieux pouvant causer des nuisances à
des tiers.
Ne pas utiliser dans des zones humides. Ceci peut causer des
pannes électriques.
Ne jamais utiliser la voiture par temps orageux.
S’assurer que les batteries de l’émetteur et du récepteur sont
entièrement chargées et d’une tension adaptée.
Mettre l’émetteur sous tension en premier, ensuite le récepteur.
Inverser l’ordre pour la mise hors tension. Vérifier que les
commandes fonctionnent correctement.
Vérifier que votre fréquence n’est pas utilisée par un autre
modéliste et qu’il n’y a pas d’interférences visibles.
Toujours vérifier que les écrous et les vis sont correctement
serrés et que toutes les pièces sont fixées. Revisser et ajuster
si nécessaire.
Remplir le réservoir de carburant et refermer soigneusement le
bouchon. Essuyer le carburant renversé.
Ne jamais laisser de carburant dans le réservoir.
Utiliser uniquement dans des lieux correctement aérés.
Consignes de sécurité
Ce modèle n‘est pas un jouet
• Un modèle télécommandé n‘est pas un jouet, sa
manipulation doit être apprise progressivement.
• Les enfants de moins de 14 ans ne doivent pas conduire la
voiture sans être accompagnés d‘un adulte.
La conduite d‘une voiture radiocommandée est une activité
passionnante. Elle doit toutefois être exercée avec la prudence
et l‘attention nécessaires.
Une voiture radiocommandée peut provoquer des dommages
et des blessures si elle n‘est pas conduite de manière
contrôlée, l‘utilisateur est responsable de sa conduite.
Assurez-vous de disposer d‘une couverture d‘assurance
suffisante pour pratiquer cette activité.
Seul un modèle bien entretenu fonctionnera de manière
correcte. N‘utiliser que des pièces détachées homologuées
et ne jamais improviser de réparations avec des éléments
inadaptés.
L‘utilisateur est responsable du bon fonctionnement de la
voiture et du bon serrage de tous les écrous, boulons et vis.
Page 19

33CARSON Nitrobone RTR 103014
F
Lire attentivement les conseils suivants
concernant le carburant :
• Stocker le carburant dans un endroit sécurisé et hors de
portée des enfants et animaux.
• S’assurer que le bidon est correctement fermé.
• Stocker dans un lieu bien ventilé et à l‘abri de l’humidité.
• Le carburant est extrêmement inflammable. Le tenir éloigné
de toute source de chaleur, de flammes nues, d’équipements
électriques et de batteries. Ne pas fumer à proximité.
• Eviter tout contact et ne pas inhaler. Lire les consignes de
sécurité sur le bidon.
• Eliminer les bidons vides dans un lieu approprié. Ne jamais
jeter les bidons vides dans le feu.
Derniers conseils :
Après chaque utilisation, les parties importantes et les connecteurs de la voiture doivent être inspectés. Une pièce
défectueuse peut provoquer à elle seule un accident. Vérifier
régulièrement la voiture et remplacer si nécessaire les pièces
défectueuses avec des pièces de rechange d‘origine.
Nous vous souhaitons beaucoup de plaisir
avec votre modèle réduit CARSON !
Ne jamais démarrer sans avoir vérifié les
points suivants :
• Les batteries de l‘émetteur et du récepteur sont
correctement chargées et sont à la bonne tension.
• Toujours vérifier la portée de la radiocommande avant de
démarrer la voiture.
• Vérifier que les servos répondent correctement aux signaux
de l‘émetteur.
• Toutes les pièces mobiles doivent être en bon état et
fonctionner correctement.
• Vérifier que toutes les vis sont serrées.
• Vérifier qu‘il n‘y a pas d‘émetteur RC ou similaire à proximité
qui pourrait provoquer des interférences. Tout signal radio
de la même fréquence peut entraîner une perte du contrôle
de la voiture. Toujours allumer l‘émetteur en premier pour
éviter toute réaction incontrôlée du récepteur par rapport à
un signal radio extérieur.
• Sortir complètement l‘antenne et s‘assurer qu‘aux alentours,
personne ne commande un modèle réduit avec la même
fréquence (valeur sur le quartz) et qu‘il n‘y a pas
d‘interférence visible. A la fin de l‘utilisation, couper tout
d‘abord le récepteur, puis l‘émetteur.
• Maintenir la voiture éloignée des câbles haute tension ou
des antennes radio.
• Ne jamais utiliser la voiture par temps d‘orage.
• Les perturbations atmosphériques peuvent affecter les
signaux de l‘émetteur.
• Ne pas utiliser la voiture dans les zones humides. Les
raccords électriques de la voiture ne sont pas étanches.
Pour cette raison, ne pas conduire sous la pluie, la neige ou
à travers des flaques d‘eau ou de l‘herbe mouillée.
• Toujours éviter de conduire les modèles radiocommandés
dans des lieux fermés, confines ou densément peuplés.
• Maintenir éloigné des routes, autoroutes, des gens et des
animaux.
• Choisir une zone ouverte de grande taille, de préférence
exempte d‘obstacles.
• Ne pas conduire en cas de fatigue importante ou dans le cas
d‘une réactivité altérée de quelque autre manière.
• Toujours conserver la voiture dans le champ visuel, ne pas
se laisser distraire.
• La carrosserie doit être correctement attachée au véhicule
avant le démarrage.
• Laisser les composants moteur refroidir avant de retirer la
carrosserie.
• Certaines pièces (p.ex. le moteur et le silencieux) peuvent
devenir extrêmement chaudes lors d‘une utilisation
prolongée et peuvent entraîner des blessures graves.
Bien tenir compte des indications de charge de l‘émetteur.
• S‘assurer que les batteries de l‘émetteur et du récepteur
sont correctement chargées et à la bonne tension. Des
batteries déchargées peuvent entraîner une perte de
contrôle de la voiture.
• Ne jamais utiliser simultanément des piles pleines et des
piles partiellement déchargées, ou des batteries de
capacités différentes.
• Ne jamais tenter de recharger des piles.
En cas d‘immobilisation prolongée de la voiture, retirer les
batteries.
Page 20

34FCARSON Nitrobone RTR 103014
Art.No. Article Moteur Carburant Température
905006 Bougie Rossi R2 chaude 2 - 3,5 cm
3
sans nitrométhane +0° - +15C°
905007 Bougie Rossi R3 moyenne 3,5 - 6 cm
3
sans nitrométhane -2° - +18C°
905008 Bougie Rossi R4 froide 6 - 10 cm
3
sans nitrométhane -5° - +20C°
905009 Bougie Rossi R5 extra 3,5 - 10 cm
3
10% nitrométhane -7° - +22°
905010 Bougie Rossi R6 froide universel 10-13% nitrométhane +10° - +25°
905011 Bougie Rossi R7 froide universel 13-15% nitrométhane +15° - +30°
905012 Bougie Rossi R8 extra froide universel 13-15% nitrométhane +20° - +40°
Articles nécessaires au
démarrage du moteur :
Pipette à essence
13330
Essence
Pince à bougie
905042
ence
Litre Nitromethan Art.-No. Application
1,0 10% 905052 rodage/
débutants
1,0 16% 905053
Normal
2,5 16% 905054 Normal
1,0 25% 905055 Race
2,5 25% 905056 Race
Essence CARSON recommandée
… ou pince à bougie
avec batterie
11585
CARSON-ROSSI pince à bougies
… ou pinc
e
avec batter
11
585
L‘émetteur utilise 8 piles ou batteries AA.
Huile de
protection
905044
Huile de
filtre à air
32648
Page 21

35CARSON Nitrobone RTR 103014
F
Outils nécessaires au montage de la voiture
Ciseaux 13305Pinces pointues 74034
Pinces coupantes 74035
Couteau de bricolage 74053
Clé hexagonale (Allen) 13118Tournevis (petit et grand)
et clé à six pas
1,5/ 2 / 2,5 mm 74023
Colle à prise rapide 53339
Lire attentivement le mode d‘emploi fourni avec le système
de radiocommande avant de s‘en servir.
Les servos doivent être réglés sur neutre avant leur
montage dans la voiture. Pour atteindre cette position, allumer
l‘émetteur, mettre les manettes sur neutre et ensuite allumer
le récepteur, les servos sont maintenant au neutre. Eteindre
l‘émetteur tout en prenant soin de ne plus déplacer les servos.
Antenne du récepteur
Batterie du récepteur
Servo des gaz
Servo de direction
Interrupteur
Emetteur
Pincette 74003
Votre ensemble de radiocommande à 3 canaux
Page 22

36FCARSON Nitrobone RTR 103014
27
FM
TH.TRIM
Trim de gaz
Antenne
ST.TRIM
Trim de guidage
Contact de charge
Interrupteur
Quartz:
Marque distinctive
TX
Couvercle du logement de piles
Inverseur
de gaz
voie 2
Inverseur de
direction
voie 1
Déscription de l’émetteur
Comment changer de frequence
Commutateur troisième voie
pour function additionel
Adapteur de braquage
2
T
X
BAN
D
Logement des
piles
Quartz:
Marque distinctive
RX
FM3
c
hR
ECE
IV
ER
2
7M
h
z
M
ADEINCHI
N
A
BA
T
T
.
C
H
.1-
C
H
.2-
EE
FF
LL
XX
EE
FF
2
R
X
B
AND
Gâchette (Gaz)
Témoin d’alimentation
Lorsque la DEL clignote, le
niveau de charge des piles
s’affaiblit.
Lorsque la DEL s’éteint, les
piles sont usées et doivent être
remplacées.
Volant (direction)
Emetteur
Un changement rapide de fréquence est possible
en enlevant le quartz interchangeable sur la face
arrière de l’émetteur pour le remplacer par un
autre de fréquence différente.
L’utilisation de quartz d’une autre marque peut
endommager la radio et annuler notre garantie sur
ce produit.
Récepteur
Remplacer le quartz de réception par un autre
de fréquence différente. Enfoncer complètement
le quartz dans son logement.
Quartz d’émission et réception doivent être de la
même fréquence.
Page 23

37CARSON Nitrobone RTR 103014
F
27
FM
Fonctionnement de lémetteur
Volant
2
TX
BAN
D
Trim de direction
voie 1
Trim de gaz
voie 2
Pour avancer tirer la gâchette pour freiner ou aller
en arrière pousser-la.
Inverseur de direction
voie 1
Ces commutateurs permettent d’inverser le sens
de rotation des servos. En position NOR, la
rotation des servos s’effectue dans le sens des
aiguilles d’une montre, en position REV, en sens
inverse.
Trim de direction (ST. TRIM)
Tourner le bouton de trim pour ajuster le neutre
du servo de direction. Lors du réglage du trim de
direction, amener la molette de dual rate de
direction en position maxi de façon à optimiser
l’efficacité du dual rate et faciliter ainsi son
réglage.
Trim de gaz (TH. TRIM)
Agir sur le trim de gaz pour régler le neutre du
servo de gaz (ou du variateur électronique).
35°
35°
Inverseurs de rotation
Le volant tourne de 35° vers la droite et la
gauche.
Inverseur de gaz
voie 2
Gâchette de gaz
e
n
a
e
v
r
a
è
i
n
r
t
r
a
e
n
Page 24
38FCARSON Nitrobone RTR 103014
Ajustement du braquage
du servo de direction
Comment changer les piles de l’émetteur
Jack de charge
Jack de charge Dual Rate de direction
Le débattement du palonnier de servo de
direction peut être réglé en agissant sur la
molette de Dual Rate de Direction de 10% à
100%. Plus élevé est le pourcentage, plus
grande est la sensibilité du servo de direction.
Note:
L’interrupteur ON/OFF doit être en position arrêt
(OFF) avant de recharger les batteries de
l’émetteur. Seuls des batteries Cadmium Nickel
(Ni-Cd) doivent être utilisées. Ne pas essayer de
recharger des piles non rechargeables!
Polarité du jack de charge
• Pour enlever le couvercle du compartiment à d’alimentation ne s’allume pas, vérifier les contacts
piles, appuyer sur la languette vers l’intérieur et en particulier les bornes négatives et que les piles
enlever le couvercle. sont correctement installées.
Attention: les piles/accus peuvent être éjectées S’assurer également que les piles sont neuves ou
lors de cette opération. les accus bien rechargés.
Si après changement des piles, le DEL témoin
Appuyer
et enlever
Page 25
39CARSON Nitrobone RTR 103014
F
a. Alimentation
Insérer 4 piles «AA» dans le boîtier des piles de réception
comme indiqué. Vérifier attentivement la polarité des piles
(côtés + et -). Connecter ensuite le boîtier sur la prise de
l’interrupteur dans le logement radio. Le noir sur le noir et le
rouge sur le rouge. Replacer le capot du logement radio.
Conseil : Utiliser des batteries rechargeables. Elles durent plus
longtemps et sont plus économiques à long terme. Remplacer
les 4 piles par un pack de batteries 6V Ni-MH 1100 mAh
(Réf. 608036 JR) (Réf. 608037 BEC)
Châssis
Illustration 1
Réservoir
Moteur
Filtre à air
Silencieux
Pneu avant
Pare-chocs arrière
Pneu arrière
Récepteur
Servo des gaz
Servo de direction
Pare-chocs avant
Châssis
Page 26

40FCARSON Nitrobone RTR 103014
c. Ultimes préparations
Assembler la pissette de carburant. La presser et insérer le
bec dans un bidon de carburant Nitro. Relâcher lentement la
pression pour permettre le remplissage de la pissette. Presser
ensuite lentement la pissette pour remplir le réservoir de la
voiture.
Conseil 1:
Le carburant conservera ses qualités plus longtemps s‘il est
entreposé dans un endroit frais, sec et obscur.
Conseil 2:
Ne jamais laisser le chauffe-bougie plus de 10 secondes sur le
moteur sous peine de griller le filament de la bougie prématurément. Utiliser de préférence un chauffe-bougie rechargeable.
Conseil:
Porter des gants ignifuges pour le démarrage!
1 - 1,5 mm
TH-Trimm
Il est maintenant possible de mettre la voiture sous tension à
l’aide de l’interrupteur placé sur le logement radio. Toujours
allumer l’émetteur avant le modèle. Remarque : Toujours vérifier
les réglages de la radiocommande avant d’utiliser la voiture !
Vérifier que les roues du modèle sont droites. Dans le cas
contraire, utiliser le bouton ST-TRIM placé à droite du volant
sur l’émetteur. En le tournant vers la gauche, la voiture tournera
aussi vers la gauche. Inversement pour la droite.
Régler maintenant la position neutre des gaz. Retirer le filtre
à air du carburateur. L’ouverture du tiroir de carburateur doit
être comprise entre 1 et 1,5 mm pour que le moteur tourne au
ralenti. Si l’ouverture est plus importante, le moteur tournera à
un régime trop élevé sans freinage. Ceci entraînera un mauvais
freinage et une usure prématurée des garnitures de frein rendant le modèle difficile à piloter.
Si nécessaire, utiliser la commande TH-TRIM pour placer le
palonnier du servo en position neutre. Dans cette position, les
garnitures de frein ne doivent pas être en contact. Ajuster la
position des bagues d’arrêt sur la direction avec la clé de
1,5 mm. Replacer ensuite le filtre à air quand les réglages sont
satisfaisants.
b. Commandes
Illustration 2
Illustration 3
Page 27

41CARSON Nitrobone RTR 103014
F
Le rodage du moteur est l’étape la plus importante pour
s‘assurer d’obtenir les meilleures performances et une grande
fiabilité. NE PAS OUBLIER CETTE ETAPE !
Le moteur est préréglé en usine pour le rodage.
Utiliser un support et poser la voiture pour que les roues
tournent librement et ne touchent pas le sol.
Avec l‘émetteur sous tension, vérifier que les gaz sont au
neutre. Placer le chauffe-bougie sur le moteur et tirer le lanceur
d’un coup sec. Ne pas le tirer de plus de 25 cm sous peine de
casser la corde. Il est préférable d‘effectuer plusieurs petites
tractions qu’une grande. Si la corde du lanceur se coince,
tourner légèrement le plateau avec les doigts. Ceci permettra
à la corde de s’enrouler automatiquement. Après quelques
tractions, le moteur doit démarrer en émettant un peu de
fumée.
Si le moteur ne tourne pas correctement au ralenti à cause
du réglage de la richesse, visser la vis de ralenti par pas d‘1/8
de tour. Ceci permettra d’augmenter le ralenti et d’effectuer
un rodage correct du moteur. Cette étape du rodage doit être
effectuée dans un endroit bien aéré. Répéter cette étape sur 2
ou 3 réservoirs complets en vérifiant la température du moteur
toutes les 2 minutes. Faire une pause de 10 - 15 minutes entre
deux réservoirs pleins. On doit pouvoir toucher la culasse du
moteur sans se brûler. Si elle chauffe trop, dévisser (sens
trigonométrique) le pointeau ET le contre pointeau d’1/8 de
tour. Toujours procéder par petits incréments pour effectuer
ces réglages.
Conseil:
• Réglage d‘usine de carburateur : avec le réglage suivant,
le moteur démarre immédiatement, évolue parfaitement et
est assez riche pour une bonne lubrification (température
extérieure de 8°C).
• Vis de butée carburateur : Ouverture du tiroir au ralenti
d’environ 1 mm. Pointeau principal : pointeau fermé
complètement puis ouvrir de 4 tours.
Pointeau de reprise : le pointeau doit affleurer la commande,
visser ensuite d’un tour dans le sens des aiguilles d’une
montre.
Après le rodage, resserrer le pointeau principal : il doit alors
être ouvert de 3 tours 1/4.
Si la température extérieure est importante, la carburation doit
être plus riche, ouvrir légèrement le pointeau principal.
Conseil:
Après le rodage, maintenir le réglage du mélange un peu plus
riche que la normale et éviter de rester trop longtemps en
position plein gaz. Réduire ensuite le mélange par pas d’1/8 de
tour. Le régime du ralenti augmentera à mesure que le mélange
s‘appauvrit.
plus riche
plus maigre
régime
inférieur
régime
supérieur
Illustration 5
d. Mise en route
Illustration 4
plus riche plus maigre
Illustration 6
Page 28

42FCARSON Nitrobone RTR 103014
f. Conduite de la voiture
• Soulever les pneus du sol
• Tourner le volant à droite et à gauche jusqu‘en butée.
Les roues doivent suivre le sens de rotation du volant.
• Si les roues tournent dans l‘autre sens, actionner le
commutateur d‘inversion (ST en position REV).
Interrupteur sur le récepteur
• Interrupteur sur le boîtier de réception.
• Fixer l‘antenne du récepteur et le fil (voir p. 82).
• Monter la carrosserie et la fixer à l‘aide des goupilles
fendues.
e. Allumer l‘émetteur
Sortir complètement l‘antenne de l‘émetteur. La portée de la
radiocommande est diminuée lorsque l‘antenne n‘est pas sortie
complètement. ATTENTION !
Toujours allumer l‘émetteur en premier !
MARCHE
Gauche
Droite
Au centre
ON
Page 29

43CARSON Nitrobone RTR 103014
F
g. Changer les fréquences
Emetteur
Un changement rapide des fréquences est possible en
débranchant tout simplement le quartz à l‘arrière de l‘émetteur
et en en branchant un
autre.
Les quartz de
l‘émetteur et du
récepteur doivent être
en correspondance.
Bien vérifier que
les quartz sont bien
entièrement enfoncés
dans leurs logements
respectifs.
Récepteur
Rebrancher un quartz interchangeable dans le récepteur pour
un changement rapide de la fréquence.
2
TX
B
A
N
D
27
FM
Quartz
Quartz
h. Précautions
L’absence de rodage et/ou des dommages causés par une
utilisation incorrecte annulent la garantie.
Il existe deux moyens pour surveiller la température du moteur.
Nous recommandons l’achat de notre thermomètre à infrarouges «Temp-Check» portant le numéro d’article 908072. La
première solution est d’acheter un capteur de température.
La seconde solution, plus économique, est de mettre un peu
d‘eau (salive) sur la culasse et de vérifier qu’elle ne bout qu’au
bout de 3 ou 4 secondes. Si elle s’évapore immédiatement, le
moteur est trop chaud.
Le moteur fonctionne mieux et il est plus facile à démarrer
quand sa température de fonctionnement est de 100 - 125 °C.
Suivant les conditions météorologiques il peut être nécessaire
de modifier les réglages du carburateur. Agir sur les réglages
par petits incréments afin de protéger la longévité du moteur.
Un mélange trop pauvre ou l‘environnement peut provoquer
une surchauffe. Une surchauffe excessive peut endommager
des composants du moteur.
Fin de l‘utilisation
Quand vous avez fini de piloter votre modèle, il existe deux
façons d’arrêter le moteur. La première méthode est d‘obturer
la sortie de l’échappement. Vérifier que le moteur est au ralenti,
de préférence avec les freins serrés.
La seconde méthode consiste à pincer l’arrivée d’air au niveau
de l‘admission. Ne pas pincer l’arrivée de carburant sous peine
de causer une surchauffe ! Il est possible de laisser le carburant
restant alimenter le moteur jusqu’à la panne sèche. Le moteur
tournera au ralenti jusqu’à son arrêt complet sans avoir à appliquer une des méthodes décrites ci-dessus.
Mettre un peu d’huile de stockage dans le carburateur et tirer
le starter plusieurs fois pour répandre cette huile dans tout le
moteur. Ceci est recommandé pour stocker la voiture pour plus
d’une journée. Les vapeurs de méthanol produisent de l’eau
préjudiciable aux parties internes du moteur. Il est également
conseillé de vérifier la présence et le serrage de toutes les vis
et écrous avant et après chaque utilisation. Maintenir le modèle
le plus propre possible pour pouvoir en profiter longtemps.
Pour cela, utiliser un pinceau ou une soufflette. Toujours vérifier
les batteries d‘émission et de réception avant de démarrer la
voiture.
Conseil:
Le port des gants est conseillé quand la voiture est chaude!
Illustration 7
Illustration 8
Page 30

44ECARSON Nitrobone RTR 103014
Surchauffe Vérifier la température. Si elle dépasse
130 °C, enrichir le mélange. Vérifier que les
roues tournent librement.
Pressurisation
carburant
déconnectée :
Reconnecter la durite entre l’échappement
et le réservoir.
Filtre à air
encrassé :
Laver la mousse avec de l’eau savonneuse
et l’imbiber d’huile spéciale.
Carburateur
bouge
Vérifier la clavette et l’écrou de fixation.
Presser le carburateur sur le moteur et serrer l’écrou pour éviter l’entrée d’air.
Le moteur cale
Batteries mortes / vides
La batterie de l’émetteur doit être entièrement chargée. Des servos lents indiquent
que la batterie de réception est vide.
Réglage de
l’émetteur
incorrect
Se reporter à la notice de l’émetteur
Antenne de
l’émetteur non
déployée
Sortir entièrement l’antenne de l’émetteur
Perte de
contrôle
Une voiture radiocommandée utilise la
même fréquence de commande à proximité.
La voiture ne
bouge pas
L‘émetteur ou l‘interrupteur du châssis sont
à l‘arrêt
Mauvaise polarité ou mauvais type des
batteries
Batteries déchargées
Course pas
droite
Réglage de direction défectueux
Boulons des roues avant et arrière
desserrés
Ne s‘arrête
pas
Réglage des gaz défectueux
Voiture trop
lente
Perte de puissance du moteur
Boulons des roues arrière desserrés
Poussière ou corps étrangers dans la
transmission
Difficultés pour contrôler le véhicule
i. Pannes
Il est conseillé de lire ces informations avant la survenue de la
première panne !
Le moteur ne démarre pas
Moteur noyé.
Trop de carburant dans le
moteur
Retirer la bougie. Tirer le lanceur 6 à 8 fois.
Se méfier des projections de carburant.
Bougie morte Retirer la bougie et la placer sur le chauffe
bougie.
Si le filament est noir, la bougie est morte.
S‘il est orange, la bougie est bonne.
Batterie du
chauffe bougie
morte:
Placer une bougie sur le chauffe bougie.
Si elle s’éclaire faiblement ou pas du tout,
remplacer ou recharger la batterie du
chauffe bougie.
Réservoir vide/
Moteur non
alimenté:
Remplir le réservoir. Amorcer le moteur en
tirant sur le lanceur tout en bouchant la
sortie d’échappement.
Surchauffe: Une utilisation à trop haute température
peut causer un serrage du moteur. Laisser
refroidir 5 à 10 minutes.
F
Page 31

45CARSON Nitrobone RTR 103014
E
Estimado cliente
Le felicitamos por la adquisición de su coche radio controlado
CARSON, que ha sido fabricado con tecnología de actualidad.
De acuerdo con nuestra política de constante desarrollo y
mejora de nuestros productos, nos reservamos el derecho de
efectuar cambios en las especificaciones relativas a equipo,
material y diseño de este producto en cualquier momento sin
noticia previa.
Las especificaciones o diseños del producto real podrían variar
de los mostrados en el manual o envase.
Este manual es componente del producto. No cumplir las
instrucciones operativas y de seguridad incluidas invalidará la
garantía. Conserve esta guía como recordatorio o para caso de
pasar el modelo a una tercera persona.
Condiciones de la garantía
Este producto está garantizado por CARSON contra defectos
de fabricación en materiales o mano de obra bajo utilización
normal por un período de 24 meses desde la fecha de adquisición en comercios autorizados.
En caso de defecto del producto durante el período de
garantía, lleve el producto y el ticket o recibo de venta como
prueba de adquisición a cualquier tienda autorizada CARSON.
CARSON podrá a su elección y salvo que las leyes dispongan
otra cosa:
(a) Corregir el defecto mediante la reparación del producto sin
cargo de piezas o mano de obra;
(b) Reemplazar el producto por otro del mismo o similar diseño;
o
(c) Devolver el importe de adquisición del producto.
Todas las piezas y productos reemplazados, así como los
productos cuyo importe haya sido devuelto, pasan a ser
propiedad de CARSON. Se podrán utilizar piezas nuevas o
reacondicionadas para la prestación del servicio de garantía.
Las piezas y productos reparados o reemplazados estarán
garantizados por el período restante al vencimiento de la
garantía. Cualquier reparación o sustitución del producto tras
vencer el período de garantía será abonada por usted.
Esta garantía no cubre:
• Daños o fallos causados o atribuibles a fuerzas de la
naturaleza, abuso, accidente, uso incorrecto, impropio o
anormal, falta de seguimiento de las instrucciones,
mantenimiento o instalaciones inadecuadas, alteraciones,
tormentas eléctricas u otros incidentes causados por exceso
de voltaje o corriente;
• Cualquier reparación no efectuada por un servicio de
reparaciones autorizado CARSON;
• Consumibles como fusibles o baterías;
• Daños estéticos;
• Transportes, embarques y / o costos de seguros; o
Costos de retirada del producto, instalaciones, servicio de
ajuste o reinstalación. Esta garantía le da a usted derechos
legales específicos, y usted también podría tener otros
derechos que variarían de estado en estado.
Declaración de conformidad
Dickie-Tamiya GmbH&Co KG por la presente declara que
este kit de modelo con radio, motor, batería y cargador está
en concordancia con los requerimientos básicos 98/37EG y
89/336/EWG y otras normas pertinentes de la directiva 1999/5/
EG (R&TTE).
El producto que ha adquirido está propulsado por una batería
recargable Ni-MH. La batería es reciclable. Al final de su vida
útil, bajo varias leyes nacionales / estatales y locales, puede
ser ilegal tirar esta batería en los contenedores de basura normal. Pregunte a las autoridades locales responsables sobre las
opciones adecuadas de reciclado o deshecho.
Significado del símbolo en el producto, el embalaje o
las instrucciones de uso. ¡Los electrodomésticos son
objetos de valor y, al final de su vida útil, no deben
tirarse a la basura doméstica! Contribuya a proteger
el medioambiente y los recursos entregando este
aparato en los puntos de reciclaje correspondientes.
La organización responsable de la recogida de
basura o su establecimiento especializado podrán
responder a sus preguntas.
Le deseamos buena suerte y mucha diversión conduciendo su
coche radio controlado CARSON!
Antes de utilizar su nuevo modelo lea estas instrucciones
cuidadosamente!
Page 32

46ECARSON Nitrobone RTR 103014
Contenido del kit
Emisora
Modelo
Indice de
contenidos
Prólogo ....................................................................................... 45
Contenido del kit ........................................................................ 46
Precauciones de seguridad ....................................................... 47
Artículos adicionales necesarios para el arranque del motor .. 49
Herramientas necesarias para el montaje ................................. 50
Su equipo de radio 3 canales .................................................... 50
Vista externa de la Emisora ................................................... 51
Intercambio de los cuarzos de frecuencia ........................... 51
Propiedades especiales de la Emisora ................................. 52
Chasis ......................................................................................... 54
a. Enchúfelo! .............................................................................. 54
b. Probando 1...2...3 ................................................................... 55
c. Últimos preparativos .............................................................. 55
d. Momento de divertirse... casi! ............................................... 56
e. Conecte la emisora ................................................................ 57
f. Volante de dirección (Controles básicos) ............................. 57
g. Cómo cambiar frecuencias ................................................... 58
h. Alimentación de combustible y cuidados............................. 58
i. Guía de problemas .................................................................. 59
Montaje ....................................................................................... 74
Recambios .................................................................................. 90
2,5 cm
3
Motor ............................................................................. 93
Page 33

47CARSON Nitrobone RTR 103014
E
Precauciones de seguridad
Precauciones de seguridad y normas de
operativa
Este modelo radio controlado solo debe ser utilizado con el
combustible de modelismo adecuado. Evite siempre utilizar
modelos radio controlados en áreas restringidas, reducidas o
pobladas.
Manténgalo alejado de carreteras, autopistas gente y animales.
Nunca utilice el modelo en interiores.
Por favor, cerciórese de haber leído todas las instrucciones de
seguridad y procedimientos de operativa antes de utilizar el
modelo.
Los modelos radio controlados no deben ser usados en áreas
públicas o cerca de tráfico.
La carrocería debería estar correctamente fijada al chasis antes
de conducirlo.
Permita cierto tiempo para que el escape y el motor se
enfríen antes de quitar la carrocería. Estas piezas están
extremadamente calientes durante el uso y podrían causar
heridas serias.
No utilice el modelo donde el sonido pueda causar molestias a
otros.
No utilice el modelo en áreas húmedas. Esto podría causar
fallos eléctricos.
Nunca utilice el modelo en situaciones de tormenta eléctrica.
Asegúrese que las baterías de la emisora y el receptor están
completamente cargadas y tienen el voltaje correcto
Primero conecte la emisora, luego el receptor. Invierta el
procedimiento para la desconexión. Compruebe que el
acelerador, frenos y trims funcionan correctamente.
Asegúrese que nadie más está operando en la misma
frecuencia que su radio y que no se aprecian interferencias.
Compruebe siempre que no haya tuercas, tornillos pasadores o
componentes sueltos. Ajuste y reapriete si fuese necesario.
Llene el depósito de combustible y cierre firmemente la tapa.
Limpie cualquier vertido de combustible.
No deje nuca combustible en el depósito. Utilícelo sólo en un
área bien ventilada.
¡Este modelo no es un juguete!
• Los modelos radio controlados no son juguetes, su manejo
debe ser aprendido paso a paso
• Los niños menores de 14 años sólo deberían manejar este
modelo bajo supervisión adulta.
La conducción de coches radio controlados es un fascinante
hobby que debe ser practicado con la necesaria precaución
y respeto. Un coche radio-controlado que tiene un peso
considerable y capaz de desarrollar velocidades muy altas
puede causar daños y lesiones en caso de conducción
incontrolada, siendo el usuario legalmente responsable de ello.
Compruebe que dispone de un seguro con la suficiente
cobertura contra los daños que pueda causar cuando
practique su hobby.
Sólo un vehículo montado correctamente funcionará y r
eaccionará de la manera esperada.
Nunca improvise en las reparaciones y utilice únicamente los
recambios originales si fuese necesario. Igualmente y ante un
modelo premontado, deberá repasar todas las conexiones y
tortillería para asegurarse que están correctamente apretados
ajustados.
Page 34

48ECARSON Nitrobone RTR 103014
Nunca comience a conducir sin haberse
asegurado de los siguientes puntos:
• Las baterías de la emisora y del receptor dan buen voltaje y
no están deterioradas o desgastadas.
• Todos los componentes operativos están en buenas
condiciones y se ha comprobado su correcto
funcionamiento.
• Verificado que todos los tornillos estén correctamente
apretados.
• Compruebe siempre el funcionamiento del sistema de radio
antes de utilizar el coche
• No hay ninguna otra emisora R/C o similar cercana que
pueda causar interferencias.
• La emisora y el receptor están conectados, y se ha
comprobado el buen funcionamiento de todas sus
funciones.
Primero conecte la emisora, luego el receptor. Invierta el
procedimiento para la desconexión.
Asegúrese que nadie más está operando en la misma
frecuencia que su radio y que no se aprecian interferencias.
• Cualquier otra señal de radio en la misma frecuencia puede
causar la pérdida de control de su modelo.
• Siempre apague el motor y desconecte el coche antes de
desconectar la emisora.
• ¡No conduzca bajo líneas de alta tensión, antenas o durante
tormentas eléctricas!
• Las perturbaciones atmosféricas pueden afectar las señales
de su emisora de radio
• Las conexiones eléctricas de su modelo no son estancas.
En consecuencia, no lo maneje en lluvia, nieve, charcos o
hierba húmeda.
• El terreno en el que se pretende operar el modelo no está
abierto al tráfico y no es usado por personas o animales.
• No conduzca si está muy cansado o su poder de reacción
está limitado de algún modo.
• Mantenga siempre contacto visual con el modelo.
• La carrocería debería estar correctamente fijada al chasis
antes de conducirlo.
• Permita cierto tiempo para que el escape y el motor se enfríen antes de quitar la carrocería.
Estas piezas están extremadamente calientes durante el uso y
podrían causar heridas serias.
Preste atención a las instrucciones de carga de su emisora.
• Asegúrese que las baterías de la emisora y el receptor están
completamente cargadas y tienen el voltaje correcto
• Con baterías medio gastadas podría perder el control de su
modelo.
• Nunca utilice baterías recargables o de diferente capacidad.
Nunca intente recargar las baterías.
Si no utiliza el modelo por algún tiempo, la batería recargable
debe ser retirada.
Por favor, lea los siguientes puntos
relativos al combustible:
• Mantenga el combustible en un sitio seguro y fuera del
alcance de niños o animales.
• Asegúrese que el recipiente del combustible está bien
cerrada y apretada.
• Almacene el combustible en un lugar bien ventilado y sin
humedad.
• El combustible glow es extremadamente inflamable.
Manténgalo fuera de fuentes de calor, llamas directas,
dispositivos eléctricos y baterías. No fume cerca del
combustible.
Evite el contacto con la piel y no lo inhale. Lea las etiquetas de
advertencia del bote.
Deshágase de los botes vacíos del modo legalmente
estipulado. Nunca tire botes vacíos al fuego.
Por fin
Después de cada uso, todas las piezas importantes así como
los conectores deberían ser comprobados. Un simple tornillo
suelto puede ser suficiente para dejar al modelo en situación
peligrosa! Verifique el coche periódicamente y cambie las
piezas defectuosas o gastadas por recambio original .
Le deseamos buena suerte y mucha
diversión conduciendo su coche radio
controlado CARSON!
Page 35

49CARSON Nitrobone RTR 103014
E
Artículos adicionales necesarios
para el arranque del motor:
Biberón de
combustible
13330
Combustible
Chispómetro
905042
s
Litros Nitrometano Ref. Uso
1,0 10% 905052 Rodaje/
Principiantes
1,0 16% 905053
Normal
2,5 16% 905054 Normal
1,0 25% 905055 Competición
2,5 25% 905056 Competición
Se recomienda combustible CARSON
… o alternativa
Chispómetro y
Akku 11585
…
o altern
a
C
hispóme
t
Akku
Aceite after run Aceite de filtro
905044 32648
Ref. Articulo Motor Combustible Temperatura
905006 Bujía Rossi R2 hot 2 - 3,5 ccm Sin Nitro +0° - +15C°
905007 Bujía Rossi R3 medium 3,5 - 6 ccm Sin Nitro -2° - +18C°
905008 Bujía Rossi R4 cold 6 - 10 ccm Sin Nitro -5° - +20C°
905009 Bujía Rossi R5 extra 3,5 - 10 ccm 10% Nitro -7° - +22°
905010 Bujía Rossi R6 cold universal 10-13% Nitro +10° - +25°
905011 Bujía Rossi R7 cold universal 13-15% Nitro +15° - +30°
905012 Bujía Rossi R8 extra cold universal 13-15% Nitro +20° - +40°
CARSON-ROSSI Bujía
Para la emisora necesitará 8 baterías AA
Alcalinas o recargables.
Page 36

50ECARSON Nitrobone RTR 103014
Herramientas necesarias para el montaje
Tijeras 13305Alicates de punta fina 74034
Tenacillas 74035
Cutter de modelismo 74053
Llave de cruceta 13118Destornillador Phillips
(pequeño y grande) y Llaves
allen
1,5/ 2 / 2,5 mm 74023
Adhesivo instantáneo 53339
Por favor, lea las instrucciones facilitadas en su equipo de radio
antes de usarlo.
Los servos deben ser centrados en posición neutra antes de
comenzar la instalación. Para efectuar el centrado, conecte
el emisor y el receptor. Coloque las palancas de los trims en
posición central y desconecte el receptor, después el emisor.
Los servos estarán ahora en la posición neutra requerida para
su instalación.
Antena de receptor
Baterias de receptor
Servo de
acelerador
Servo de dirección
Interruptor
Elementos
de control
Su equipo de radio 3 canales
Pinzas 74003
Page 37

51CARSON Nitrobone RTR 103014
E
27
FM
TH.TRIM
Trim de acelerador
Antena
Volante de dirección
ST.TRIM
Tri m de direccion
Jack de carga
Interruptor de
conexión/desconexión
Empuñadura del gas
Cristal
Designación:
TX
Inversor de
acelerador
canal 2
Inversor de dirección
canal 1
Emisora
• Los cuarzos de frecuencia enchufables
intercambiables posibilitan un cambio de
frecuencia sencillo y rápido retirándose
simplemente de la pared posterior del emisor.
• No utilice otros cristales que los suministrados por
CARSON, puede dañar los componentes y
quedaría exenta de la garantía.
Receptor
• El cuarzo intercambiable se enchufa en la parte
superior del receptor para facilitar un cambio
rápido.
• Preste atención a que el cuarzo se inserte
completamente en el receptor y no sólo en
parte o suelto.
Vista externa de la Emisora
Intercambio de los cuarzos de frecuencia
Interruptor canal 3
Para otra función de
Conexión/desconexión
Ajuste de recorrido
de direccion
2
T
X
BAN
D
Compartimiento
de las pilas
Cuarzo de frecuencia
Designación:
RX
F
M3c
h
R
EC
E
IV
E
R
27
Mh
z
MA
D
E
INC
H
IN
A
BA
T
T.-
CH
.1-
C
H
.2
-
EE
FF
LL
XX
EE
FF
2
R
X
B
A
N
D
Conexión
El LED parpadeante indica
que las baterías empiezan a
estar gastadas. Cuando el
LED se apague, las baterías
están gastadas y necesitan
ser cambiadas por nuevas.
Se requieren 8 baterias AA para la emisora
(No incluidas)
Tapa del compartimiento de las pilas
Page 38

52ECARSON Nitrobone RTR 103014
27
FM
Propiedades especiales de la Emisora
El volante de dirección puede girarse a la derecha
o izquierda en 35°
Volante de dirección
Acelerador
Presione el gatillo de la emisora para moverse
hacia adelante, presione si va a frenar o moverse
hacia atrás.
Trim de dirección (ST. TRIM)
Trim de acelerador (TH. TRIM)
Con la palanca del regulador del acelerador
(TH.TRIM) se regula la posición neutra de la
activación del acelerador con la empuñadura,
marcha en vacío en el motor de combustión, motor
“desconectado” en motor eléctrico.
Con el regulador de la dirección (ST.TRIM) se ajusta
la salida recta del vehículo con el volante de
dirección recto.
Para montar los servos direccionales:
1. Colocar en máximo el regulador del mecanismo
de giro del volante. Luego monte el servo en el
modelo de tal manera que el mecanismo de
mando pueda trabajar en el nivel máximo.
2. En caso de que las relaciones geométricas no
admitan que el volante doble completamente,
reajuste un poco el mecanismo de giro del
volante. Esto puede también ser útil para los
circuitos con sólo radios de curva grandes.
Mediante el conmutador inversor del sentido de
giro se puede invertir el sentido de rotación de los
servos. En la posición NOR el servo gira en el
sentido de las agujas del reloj y en la posición
REV en sentido contrario a las agujas del reloj.
2
T
X
BA
ND
35°
35°
Trim de dirección
Chanal 1
Trim de acelerador
Chanal 2
Inversor de acelerador
Chanal 2
Inversor de dirección
Chanal 1
Inversión del sentido de giro
del servo
A
d
e
l
a
n
t
e
s
A
á
t
r
Page 39

53CARSON Nitrobone RTR 103014
E
Jack de carga Regulador del ángulo de dirección
Jack de carga
¡ATENCIÓN! El interruptor ON/OFF
(CONEXIÓN/DESCONEXIÓN) debe aparecer en
la posición « OFF » al efectuarse la carga. Un
instrumento de carga apropiado respectivamente
sólo puede usarse para acumuladores níquelcadmio (Ni-Cd) o hidruro de metal de níquel
(NIMH), aprox. 2x Art. N° N° 54010 o semejantes.
Corre el riesgo de explosión con otros tipos de
pilas que pueden causar daños y heridas.
Nunca intente recargar las pilas alcalinas.
Los ángulos del servo de dirección pueden
ajustarse sincrónicamente hacia ambas
direcciones de aprox. el 10 % ~ 100 %.
El regulador se puede girar en 300° grados. El
ángulo aumenta si el regulador se gira hacia la
derecha y disminuye si el regulador se gira hacia
la izquierda.
• Para abrir el compartimiento de las pilas, presione la lámpara de control, compruebe los contactos,
hacia el centro la lengüeta del compartimiento de sobre todo los negativos y verifique otra vez la
las pilas y levante la tapa de cierre. posición correcta de las pilas. Sólo utilice pilas
totalmente cargadas. Nunca mezcle tipos de
acumuladores o pilas diferentes con estado de
carga diferente.
Cuidado, las pilas se pueden salir si se
ha retirado la tapa. En caso de que no se ilumine
Polaridad del jack o de la toma de carga
Regulador del ángulo de dirección
Cambiar las pilas de la emisora
presione
y levante
Page 40

54ECARSON Nitrobone RTR 103014
a. Enchúfelo!
Inserte 4 baterías “AA” en el portapilas según se muestra.
Asegúrese que los terminales positivo (+) y negativo (-) estén
en la posición correcta. A continuación enchufe el portapilas al
conector del interruptor, dentro de la caja de radio. El rojo va al
rojo y el negro va al negro. Coloque la tapa de la caja de radio.
Consejo: Utilice baterías recargables. Duran más y las
amortizará en poco tiempo. Sustituya el portapilas por nuestro
pack 6 V NiMh 1100 mAh Akku (Art. 608036 JR)
(Art. 608037 BEC).
Chasis
Imagen 1
Depósito
Motor
Filtro de aire
Escape
Neumático delantero
Amortiguador
trasero
Neumático trasero
Caja del receptor
Servo de gas
Servo de dirección
Amortiguador delantero
Chasis
Page 41

55CARSON Nitrobone RTR 103014
E
1 - 1,5 mm
TH-Trimm
Ahora puede conectar su coche a través del interruptor
localizado en la caja de radio. Siempre conecte primero la
emisora antes de conectar el coche. Nota: Compruebe siempre
los reglajes de la emisora antes de utilizar el coche.
Asegúrese que la dirección esté centrada. Si no lo estuviese,
utilice la palanca del trim de dirección (ST-TRIM) para
efectuar el centraje. Girarla hacia la izquierda debería hacer
que el coche girase a la izquierda, y viceversa.
Ahora es el momento para regular el acelerador en su posición neutra. Quite el filtro de aire del carburador. La apertura
de la guillotina debería ser muy pequeña, en torno a 1-1,5 mm
para permitir el ralentí del motor. Si estuviese más abierta, el
motor se revolucionará más de lo normal hasta que se apliquen
frenos. Esta situación desgastará prematuramente las zapatas
de freno y / o embrague, haciendo al coche difícil de conducir.
Utilice la palanca del trim de acelerador (TH -TRIM) para mover
el brazo de servo a la posición neutral, si fuese necesario.
Cuando esté en neutro, los frenos no deberían quedar
ajustados. Ajustando los prisioneros del varillaje con una llave
allen de 1,5 mm podrá cambiar los reglajes del freno. Coloque
de nuevo el filtro de aire cuando todo quede debidamente
ajustado.
b. Probando 1...2...3...
c. Últimos preparativos...
Ensamble el biberón de combustible. A continuación apriételo
e introdúzcalo en el bote de combustible para coches de
automodelismo. Reduzca la presión y el biberón se llenará
solo. Después, introduzca y apriete lentamente el biberón para
llenar su depósito de combustible.
Consejo 1:
El combustible durará más si lo almacena el un lugar oscuro,
fresco y seco. El chispómetro viene junto con el extremo
negativo de la parte superior. Enrosque la tapa firmemente.
Consejo 2:
No deje el chispómetro en su motor durante más de diez
segundos. Un tiempo superior podría causar que la bujía se
fundiese prematuramente. Utilice chispómetros recargables
para mayor duración.
Consejo 3:
¡Para arrancar el motor, utilice un guante ignífugo!
Imagen 2
Imagen 3
Page 42

56ECARSON Nitrobone RTR 103014
El rodaje del motor es el paso más importante para asegurarse
que el motor sea rápido y fiable durante su vida útil. Simplemente:
NO SE SALTE ESTE PASO!
El motor está pre-ajustado de fábrica para el rodaje. Busque un
taco de madera o una plataforma y coloque el coche de modo
que las ruedas giren libremente sin tocar el suelo. Asegúrese
con la emisora que el acelerador está en la posición neutra.
Coloque el chispómetro en la bujía y dele un tirón al
arrancador. ¡No tire más de 25 cm! Más recorrido podría romper
la cuerda. Es mejor dar varios tirones cortos que tirones largos.
Si la cuerda del arrancador se atasca, gire un poco el volante
de inercia con los dedos. Esto debería hacer que la cuerda se
enrolle automáticamente. Tras algunos tirones, el motor
arrancará con una buena nube de humo. Si el motor tuviese
problemas de ralentí con este reglaje “graso”, gire el tornillo
de ralentí a la derecha 1/8 de vuelta cada vez. Esto aumentará
el ralentí permitiendo al motor rodar adecuadamente. Haga
esto en un área bien ventilada, por ejemplo en el exterior de su
casa. El aceite sin quemar del combustible se acumulará en
el escape, así que esté preparado. Deje el coche ralentizar de
este modo durante 2 – 3 depósitos, comprobando la
temperatura del motor cada dos minutos. Por favor, deje
reposar 10 – 15 minutos entre depósito y depósito. Debería
poder tocar la culata del motor con los dedos, estando caliente
el motor pero sin llegar a quemar. Si parece estar demasiado
caliente, “engrase” la carburación (gire a la izquierda) mediante
la aguja de altas y la de bajas 1/8 de vuelta. Efectúe siempre
pequeños incrementos cuando haga este tipo de reglajes.
Consejo:
• Reglaje de fábrica del carburador:
Con los siguientes ajustes básicos el motor arranca
inmediatamente, funciona limpiamente y suficientemente
graso (temperatura exterior 8o)
• Tornillo de ralentí: Aproximadamente 1mm de apertura en el
barril
Aguja de altas: Ciérrela completamente, a continuación abra 4
vueltas completas.
Aguja de bajas (en leva de apertura): Enrásela con el borde de
la leva, a continuación gire a la derecha una vuelta completa;
Tras finalizar el período de rodaje, la aguja de altas debería
quedar abierta al menos 3 y 1⁄4 vueltas. Un reglaje graso es
mejor si la temperatura exterior es alta.
Consejo:
Conduzca el coche lentamente con la carburación “grasa”
durante algún tiempo tras el rodaje, evitando períodos
prolongados a pleno gas. Valla “afinando” gradualmente la
mezcla 1/8 de vuelta cada vez. El ralentí aumentará en la
medida que valla afinando el motor.
Enriquecer
Afinar
Bajas
RPM
Altas
RPM
Imagen 5
d. Momento de divertirse... casi!
Imagen 4
Enriquecer Afinar
Imagen 6
Page 43

57CARSON Nitrobone RTR 103014
E
f. Volante de dirección (Controles básicos)
• Levante las ruedas del suelo y compruebe que todos los
controles responden.
• Gire el volante de dirección a derecha e izquierda a su
máximo recorrido. Las ruedas deberían seguir el giro del
volante.
• Si las ruedas giran en sentido contrario, utilice el interruptor
inversor de servo (ST en posición REV)
• Para regular la velocidad presione el gatillo
(conduciendo hacia delante, para ganar velocidad) o
empújelo (frenos, marcha atrás).
e. Conecte la emisora
Extienda completamente la antena de la emisora.
El radio de acción de la emisora se reducirá si la antena no está
completamente desplegada.
PRECAUCION
¡Conecte siempre primero la emisora!
Conecte el receptor
• El interruptor está en la caja de radio.
• Fije el cable de la antena del receptor (ver página 82)
• Coloque la carrocería y fíjela con los clips de carrocería.
Izquierda
Derecha
Neutro
ON
Page 44

58ECARSON Nitrobone RTR 103014
g. Cómo cambiar frecuencias
Emisora
Es posible efectuar un cambio rápido de frecuencias
simplemente desenchufando el cristal intercambiable
de la parte trasera de la
emisora y enchufando
otro.
Los cristales de la
emisora y el receptor
deben coincidir uno
con el otro.
Asegúrese que el
cristal está
completamente
introducido en la
emisora y el
receptor, no
parcialmente.
Receptor
Enchufe un cristal intercambiable en el receptor para un
cambio rápido de frecuencias.
2
TX
B
A
N
D
27
FM
Cristal
Cristal
h. Alimentación de
combustible y cuidados
La falta de seguimiento del período de rodaje y/o daños causados por modificaciones inadecuadas invalidará la garantía de
su motor.
Hay dos métodos para comprobar la temperatura del motor.
Le recomendamos la compra de un termómetro por rayos
infrarrojos “Temp-Check” con el número de artículo 908072.
Uno, adquirir una sonda de temperatura. El otro método, más
barato per
o menos preciso es el “test de saliva”. Ponga un
poco de saliva en la culata, ésta debería evaporarse en
3 – 4 segundos. Si se evapora inmediatamente, hay
probabilidades que el motor esté funcionando demasiado
caliente.
El motor funcionará mejor y será más fácil de arrancar en
caliente si funciona entre 100 – 125 °C. Dependiendo de las
condiciones ambiéntales, densidad del aire y humedad, los
ajustes de la carburación variarán en el momento de cada
utilización. Efectuar ajustes en pequeños incrementos es el
mejor método para asegurarse que su motor durará largo
tiempo. El sobrecalentamiento es causado por utilizar el
motor demasiado afinado, o con demasiado estrés mecánico
causado por su entorno de funcionamiento. El sobrecalentamiento severo generará fallos de las piezas internas del motor.
Existen muchas fuentes de información “online” que le
pueden ayudar con los ajustes de su motor. Estos motores
están diseñados para durar largo tiempo, y con un adecuado
ajuste y mantenimiento, podrá utilizar su modelo durante horas
cada vez.
Parada
Cuando haya acabado de utilizar el coche, hay dos opciones
para parar el motor. El primer método es poner el pulgar en
la salida del escape. Asegúrese que el motor se encuentra al
ralentí, preferiblemente con los frenos activados. El segundo
método es pinzar la entrada de aire al motor. No pince la
entrada de combustible, ya que causaría sobrecalentamiento
del motor. Pruebe dejar a que el motor consuma todo el
combustible del depósito hasta vaciarlo. El motor se
revolucionará cuando se vacíe el depósito, de modo que los
dos pasos anteriores no serán necesarios.
A continuación aplique aceite “after run” a través del
carburador, y accione el tirador unas cuantas veces para
repartirlo dentro del motor. Esto se recomienda si planea no
utilizar el coche durante más de un día. El metanol se evapora
en agua, que no es buena para las partes internas del motor.
Siempre es buena idea revisar todos los tornillos, tuercas y
pasadores antes de cada sesión de uso. Mantener el coche
limpio hará que sea más agradable trabajar en él. Esto se
puede lograr con un compresor grande similar a los utilizados
para pintar o con aire comprimido. Compruebe siempre las
baterías de la emisora y receptor antes de arrancar el motor.
Consejo:
Utilice guantes cuando trabaje con el coche caliente!
Imagen 7
Imagen 8
Page 45

59CARSON Nitrobone RTR 103014
E
Sobrecalentamiento
Compruebe la temperatura. Si está por
encima de 130o, enriquezca la mezcla.
Compruebe que las ruedas giran libremente.
Toma de presión desconectada.
Recoloque el tubo de presión del escape al
depósito de combustible.
Filtro de aire
sucio.
Lávelo con jabón y agua, a continuación
utilice aceite de filtro de aire.
Carburador
suelto.
Compruebe el pasador de sujeción del
carburador y su tuerca. Presione el
carburador contra el bloque de motor y
apriete la tuerca para evitar tomas de aire.
El motor se para
Baterías
gastadas /
dañadas.
Las baterías de la emisora deberían estar
completamente cargadas. La lentitud de
funcionamiento de los servos significa
baterías de receptor gastadas.
Ajuste inadecuado de la
emisora.
Remítase a las instrucciones de ajuste de su
radio.
Antena de
emisora no
desplegada.
Extienda completamente la antena de la
emisora.
Pérdida de
control
Hay cercano un modelo R/C usando la
misma frecuencia.
El modelo no
se mueve
El interruptor de la emisora o del coche no
está conectado.
La polardad o el tipo de batería es incorrecto.
Las baterías están gastadas.
No va recto El trim de dirección no está correctamente
ajustado.
Las tuercas de rueda delanteras y trasera
están muy sueltas
No para El trim de acelerador no está correctamente
ajustado.
Funciona muy
lento
El motor ha perdido potencia.
Las ruedas están muy sueltas.
Han entrado en los engranajes polvo u otros
objetos.
Difícil de controlar, interferencias
i. Guía de problemas
LEA ESTO ANTES DE QUE OCURRA!
El motor no arranca
Motor ahogado. Mucho
combustible
en el motor.
Quite la bujía. Accione el tirador 6 – 8 veces.
Cuidado con
el combustible
pulverizado.
Bujía fundida. Quite la bujía. Colóquela en
el chipómetro. Si no prende (oscura), está
fundida. Si prende (brillante), está correcta.
Chispómetro
gastado.
Ponga una bujía nueva en el chispómetro.
Si brilla muy levemente o no brilla, cambie la
batería del chispómetro.
Depósito de
combustible
vacío / no hay
combustible
en el motor.
Llene el depósito. Cebe el motor tirando del
arrancador mientras tapa la entrada de aire
del carburador.
Sobrecalentamiento
Rodar a altas temperaturas puede
producir bloqueo de vapores en el motor.
Déjelo enfriar durante 5 – 10 minutos.
Page 46

60ICARSON Nitrobone RTR 103014
Caro Cliente
Ci congratuliamo con lei per l’acquisto di questo modello
radio comandato CARSON,che è stato progettato secondo gli
ultimi ritrovati della tecnica. Per mantenere sempre aggiornati
i nostri prodotti ci riserviamo il diritto di effettuare qualsiasi
aggiornamento tecnico atto a migliorarne le qualità senza alcun
preavviso. Alcune caratteristiche tecniche di questo prodotto
possono perciò essere diverse da quelle illustrate in questo
manuale o sulla scatola.
Condizioni di Garanzia
Questo prodotto è garantito da CARSON, da difetti di fabbricazione nei materiali e lavorazioni, riscontrati nel normale utilizzo
del modello, per 24 mesi dalla data di acquisto presso un
rivenditore autorizzato.
In caso di prodotto difettoso durante il periodo di garanzia,
recarsi con il prodotto e lo scontrino o ricevuta presso qualsiasi
rivenditore CARSON. CARSON a sua discrezione, provvederà
in accordo alle normative vigenti:
(a) riparare il prodotto senza addebitare nulla ;
(b) sostituire il prodotto con un altro uguale o di simili caratte-
ristiche, o
(c) rimborsare il prezzo di acquisto.
Tutte le parti sostituite o rimborsate diventano di proprietà della
CARSON. Le parti nuove sostituite o riparate possono essere
utilizzate per il servizio di garanzia. Le parti riparate o sostituite
in garanzia sono a loro volta coperti da garanzia.
Dalla garanzia sono esclusi:
Danni o guasti causati da eventi naturali, normale usura, abusi,
incidenti, utilizzo non corretto, inosservanza delle istruzioni,
montaggio non corretto, imperizia dell’utilizzatore, mancanza
di manutenzione, fulmini o altri incidenti causati da eccesso di
voltaggio;
Tutte le riparazioni non effettuate da personale autorizzato
CARSON.
Le parti di consumo e le batterie danni estetici non funzionali
trasporto, spedizione o costi assicurativi costi di ritiro del
prodotto, installazioni, regolazioni e reinstallazioni. La garanzia
in ogni caso è applicata in conformità alle vigenti norme nello
stato dove il prodotto è stato acquistato.
Dichiarazione di conformità
Dickie-Tamiya GmbH & Co. KG dichiara che questo modello
in tutte le sue parti, radio, motore, batteria, caricabatteria, è
in regola con le SEGUENTI DIRETTIVE EUROPEE: 98/37EG
e 89/336/EWG Inoltre è conforme alle direttive 1999/5/EG
(R&TTE).
La dichiarazione originale di conformità può essere richiesta
al seguente indirizzo: Dickie-Tamiya GmbH & Co. KG •
Werkstraße 1 • D-90765 Fürth
Il prodotto che avete acquistato è alimentato da batteria
ricaricabile al Ni-MH.La batteria è riciclabile.
Alla fine del suo ciclo, in diverse nazioni e/o leggi locali,
potrebbe essere illegale introdurla nei cassonetti della immondizia. Assicuratevi come procedure per lo smaltimento, con il
vostro locale ufficio smaltimento rifiuti.
Significato del simbolo sul prodotto, sulla confezione
o nelle istruzioni per l‘uso. Gli apparecchi elettrici
sono prodotti riciclabili e quindi, al termine del loro
ciclo di vita, non devono essere gettati tra i rifiuti
domestici! Aiutateci a tutelare l‘ambiente e a preservare le risorse, conferendo questo apparecchio
presso i relativi centri di raccolta. Se avete domande
a questo proposito, vi consigliamo di rivolgervi all‘ente
responsabile dello smaltimento dei rifiuti o al vostro rivenditore
specializzato.
Vi auguriamo buona fortuna e buon divertimento alla guida del
vostro modello Carson.
Prima di utilizzare il vostro nuovo modello leggete attentamente queste istruzioni!
Page 47

61CARSON Nitrobone RTR 103014
I
Contenuti del kit
Trasmettitore
Modello
Contenuto
Prefazione ................................................................................... 60
Contenuti del kit ......................................................................... 61
Misure di Sicurezza .................................................................... 62
Articoli necessari non compresi per la messa in moto
del modello ............................................................................. 63
Utensili necessari al montaggio del modello ............................ 64
Il suo apparato radio 3 canali .................................................... 64
Vista esterna del trasmettitore .............................................. 65
Sostituzione del quarzi di frequenza ..................................... 65
Pecullarita del trasmettitore .................................................. 66
Telaio ........................................................................................... 68
a. Alimentazione ......................................................................... 68
b. Controlli .................................................................................. 69
c. Preparativi finali ..................................................................... 69
d. Messa in strada ...................................................................... 70
e. Interruttore Trasmettitore ....................................................... 71
f. Come controllare il vostro modello ....................................... 71
g. Come cambiare la frequenza ................................................ 72
h. Precauzioni ............................................................................. 72
i. Possibili problemi .................................................................. 73
Montaggio ................................................................................... 74
Ricambi ....................................................................................... 90
2,5 cm
3
Motore ........................................................................... 93
Page 48

62ICARSON Nitrobone RTR 103014
Misure di Sicurezza
Precauzioni di sicurezza e guida operativa
Questo modello radiocomandato deve utilizzare solo miscela
approvata. Evitate sempre di usare il modello in zone vietate,
limitate o popolate. State lontani da strade, autostrade,
persone ed animali.
Non utilizzate mai il modello in luoghi chiusi.
Prima di iniziare ad utilizzare il modello leggere attentamente
queste istruzioni.
Il modello radiocomandato non deve essere mai utilizzato in
luoghi pubblici o vicino al traffico.
La carrozzeria deve essere ben fissata sul modello prima della
messa in moto. Aspettare che il motore e gli scarichi si siano
raffreddati prima di asportare la carrozzeria, queste parti diventano presto caldi e possono causare gravi ustioni.
Non utilizzare in luoghi dove il rumore può disturbare altre
persone.
Non utilizzare in zone umide,per preservare le parti elettriche ed
elettroniche.
Non utilizzare durante temporali ed in presenza di fulmini.
Assicurarsi che le batterie del trasmettitore e della ricevente
siano completamente cariche e con la giusta tensione.
Accendere prima il trasmettitore e poi la ricevente e quando si
spegne fare l’inverso, verificare che i comandi del gas/freno e
dello sterzo funzionino correttamente.
Verificare nessun altro stia utilizzando la vostra frequenza, e
che non vi siano delle interferenze.
Verificare il serraggio dei dadi e delle viti del modello ed usare
se necessario del frena filetti.
Riempire il serbatoio di miscela e chiudere bene il tappo, asciugare la miscela fuoriuscita.
Svuotare sempre il serbatoio dopo l’utilizzo.
Utilizzare solo all’aperto o in luoghi sufficientemente aerati.
Non iniziare a guidare prima di avere
osservato I seguenti punti:
• Le batterie del trasmettitore e della ricevente siano ben
cariche e del corretto voltaggio.
• Controllare sempre le operazioni radio prima di far partire il
modello.
• Assicuratevi che tutti servocomandi rispondano
correttamente al segnale del trasmettitore.
• Tutte le parti del modello siano in buone condizioni ed
assicuratevi della loro funzionalità .
• Dovete essere sicuri che tutte le viti siano ben strette.
• Che non ci siano altri modelli o trasmettitori nelle vicinanze
che possano causare interferenze.
Accendere sempre prima il trasmettitore per evitare reazioni
incontrollate della ricevente o percezione di segnali estranei.
Estraete completamente l’antenna ed assicuratevi che nessuno
intorno a voi utilizzi la stessa frequenza (numero marcato sul
quarzo) e che non ci siano interferenze.
Spegnere sempre prima la ricevente e quindi il trasmettitore.
Tenete il vostro modello lontano da cavi di alta tensione o
antenne radio.
• Non usare mai il modello durante temporali con fulmini.
Potrebbero causare malfunzionamenti elettrici – Non usare il
modello in zone umide.
• Non guidare in presenza di forte vento, pioggia o temporali
• Evitate sempre di guidare il modello in zone ristrette e
limitate o in aree popolate.
• State lontani da strade, autostrade,persone e animali.
• Scegliete un’area sufficientemente aperta e libera di ostacoli.
• Guardare continuamente il modello e non distrasi.
La carrozzeria deve essere fissata correttamente al modello
prima dell’utilizzo.
• Fare raffreddare tutte le componenti del motore prima di
rimuovere la carrozzeria.
• Queste parti durante l’uso diventano estremamente calde e
possono causare gravi ustioni .
• Assicurarsi che le batterie siano ben cariche e del corretto
voltaggio.
• Quando le batterie si stanno scaricando potreste perdere il
controllo del modello.
Dopo l’utilizzo rimuovere le batterie dal modello.
Questo modello non è un giocattolo!
• I modelli radiocomandati non sono giocattoli, l’utilizzo di essi
deve essere imparato passo passo.
• I bambini sotto i 14 anni possono guidare il modello solo
sotto la supervisione di un adulto.
Guidare un modello radiocomandato è un affascinante hobby
che deve essere praticato con la necessaria cautela e rispetto.
Un modello radiocomandato può causare danni e ferite in caso
di perdita di controllo di cui l’utilizzatore è responsabile.
Cautelatevi con una sufficiente copertura assicurativa, che vi
consenta di praticare il vostro hobby in assoluta sicurezza.
Il vostro modello funzionerà bene solo se sarà tenuto in perfetta efficienza. Utilizzare solo ricambi originali e non montare
mai parti non adatte.
La responsabilità del modello è direttamente di chi lo guida,
per cui assicurarsi prima dell’utilizzo che tutto funzioni correttamente e che tutta la viteria sia ben stretta.
Page 49

63CARSON Nitrobone RTR 103014
I
Articoli necessari non compresi
per la messa in moto del modello:
Tenere la miscela in un luogo sicuro e
fuori dalla portata dei bambini e di animali domestici.
• Assicurarsi che il recipiente sia ben chiuso.
• Tenere la miscela in luogo ben ventilato ed asciutto.
• Il carburante è estremamente infiammabile. Tenerlo lontano
da tutte le fonti di calore, da fiamme libere,apparecchi elettrici e
batterie. Non fumare nelle immediate vicinanze.
• Evitate di toccare e Assolutamente Non inalare. Leggere
attentamente le avvertenze riportate sulla confezione.
Buttare il contenitore vuoto negli appositi bidoni.Non buttare il
recipiente anche vuoto sul fuoco.
A Fine Utilizzo
Dopo ogni utilizzo, verificate sempre che tutte le parti siano
in perfetta efficienza, e ricordatevi che un solo particolare
difettoso può causare gravi danni alle persone. Controllate
periodicamente il vostro modello e sostituite le eventuali parti
danneggiate solo con ricambi originali del modello.
Vi auguriamo buona fortuna e buon
divertimento con il vostro modello
CARSON.
Art.No. Articolo Motore Miscela Temperature
905006 Glow plug Rossi R2 hot 2 - 3,5 ccm senza Nitro +0° - +15C°
905007 Glow plug Rossi R3 medium 3,5 - 6 ccm senza Nitro -2° - +18C°
905008 Glow plug Rossi R4 cold 6 - 10 ccm senza Nitro -5° - +20C°
905009 Glow plug Rossi R5 extra 3,5 - 10 ccm 10% Nitro -7° - +22°
905010 Glow plug Rossi R6 cold universal 10-13% Nitro +10° - +25°
905011 Glow plug Rossi R7 cold universal 13-15% Nitro +15° - +30°
905012 Glow plug Rossi R8 extra cold universal 13-15% Nitro +20° - +40°
Riempitore
13330
Miscela
Accendi candela
905042
i
lo:
Litro Nitrometano Art.-No. Utilizzo
1,0 10% 905052 Rodaggio/
principianti
1,0 16% 905053
Normale
2,5 16% 905054 Normale
1,0 25% 905055 Race
2,5 25% 905056 Race
Miscela CARSON
… oppure
batteria 2V con pinza
candela 11585
Candele CARSON-ROSSI
…
oppure
b
atteria
2V
candela
Per la trasmittente necessitano 8
batterie AA Stilo a secco o ricaricabili.
Olio Afterrun olio filtro
905044 32648
Page 50

64ICARSON Nitrobone RTR 103014
Utensili necessari al montaggio del modello
Vi preghiamo di leggere le istruzioni del vostro
radiocomando prima di usarlo.
I servi debbono essere regolati al centro prima di essere installati. Per regolare una posizione neutra accendere il tramettitore
e la ricevente. Regolare i trims in posizione centrale e spegnere
la ricevente. I servi saranno ora regolati al centro e pronti per
l’installazione.
Il suo apparato radio 3 canali
Forbici 13305Pinze 74034
Tronchesine 74035
Cutter 74053
Chiave candela 13118Cacciaviti esagonali mm.
1,5/ 2 / 2,5 mm 74023
Colla istantanea 53339
Antenna ricevente
Batteria ricevente
Servo
gas/freno
Servo sterzo
Interruttore
Trasmittente
Pinzette 74003
Page 51

65CARSON Nitrobone RTR 103014
I
27
FM
TH.TRIM
Trim regolazione
acceleratore
Antenna
Indicatore LED della potenza
Volantino dello sterzo
(comandi principali)
ST.TRIM
Trim regolazione
sterzo
Jack di ricarica
Interruttore ON/OFF
Leva dell’acceleratore
Quarzo di frequenza
Contrassegno:
TX
Inversione
acceleratore
Canale 2
Inversione
sterzo
Canale 1
I LED lampeggianti indicano che gli
accumulatori si stanno scaricando.
Una volta spenti i LED, è
necessario caricare gli
accumulatori.
Trasmettitore
• I quarzi ad innesto sostituibili consentono di
variare con rapidità e facilità la frequenza
grazie all’estrazione dalla parete posteriore del
trasmettitore.
• Se si utilizzano quarzi diversi da quelli
CARSON, il trasmettitore potrebbe
danneggiarsi e la garanzia perdere di validità.
Ricevitore
• Il quarzo sostituibile viene inserito sul lato
superiore del ricevitore per consentirne una
rapida sostituzione.
• Assicurarsi che il quarzo sia inserito
completamente e non solo parzialmente e che
non sia allentato.
Vista esterna del trasmettitore
Sostituzione dei quarzi di frequenza
Regolazione angolo
di sterzata
2
T
X
B
A
ND
Coperchio vano batterie
Quarzo di frequenza
RX
Contrassegno:
F
M
3
chR
EC
EIV
ER
27Mhz
M
A
D
EIN
CHI
N
A
B
A
TT.
C
H.
1
-
CH
.2
-
EE
FF
LL
XX
EE
FF
2
R
X
B
AND
AAx8 necessitano
batterie stilo per
trasmettitore
(non incluse)
Vano batterie
Interruttore 3° canale
Per l’ulteriore funzione ON/OFF
Page 52

66ICARSON Nitrobone RTR 103014
27
FM
Peculiarità del trasmettitore
Il volante può essere ruotato di 35° verso sinistra o
verso destra.
Volante del sterzo
Leva dell’acceleratore
Tirare la leva dell’acceleratore per la marcia in
avanti, premerla per frenare e per innestare la
retromarcia.
Trim dello sterzo (ST.TRIM)
Con il trim dello sterzo (ST.TRIM) è possibile
regolare l'uscita dritta senza dover inserire lo sterzo.
Per montare il servosterzo, attenersi alla seguente
procedura:
1. Posizionare il regolatore dell'angolo di sterzata sul
valore massimo. Montare quindi il servoazionamento
nel modellino in modo che il meccanismo di
comando funzioni alla massima potenza.
2. Se i rapporti geometrici non consentono
un'angolazione completa, registrare leggermente
l'angolo di sterzata. Questo potrebbe essere utile
anche per corse con grandi raggi di curvatura.
Con la leva del trim del throttle (TH.TRIM), è
possibile registrare la posizione di folle
dell'azionamento del gas con leva dell'acceleratore
rilasciata, il minimo con il motore a combustione,
motore “off” nel caso di motore elettrico.
Trim regolazione acceleratore
Grazie all’invertitore del senso di rotazione, è
possibile invertire il senso di rotazione dei
servoazionamenti. Nella posizione NOR, il
servoazionamento ruota in senso orario, mentre
nella posizione REV ruota in senso antiorario.
2
TX
BAN
D
35°
35°
Trim dello sterzo
Canale 1
Trim regolazione acceleratore
Canale 2
Inversione del senso di rotazione del
per il servo gas canale 2
Inversione del senso di rotazione
per il servosterzo canale 1
Inversione del senso di rotazione del
servoazionamento
a
v
a
n
t
a
i
i
/
r
c
e
r
t
a
r
o
m
Page 53

67CARSON Nitrobone RTR 103014
I
Jack di ricarica Regolatore angolo di sterzata
Jack di ricarica
ATTENZIONE: l’interruttore ON/OFF deve trovarsi
nella posizione “OFF” durante la carica. Utilizzare
di volta in volta un caricabatteria adatto per
accumulatori a nickel-cadmio (Ni-Cd) o nickelmetallo-ibrido (NiMH), 2x N° art. 54010 o simili.
L’utilizzo di batterie di tipo diverso comporta il
rischio di esplosione con possibilità di danni a
persone e cose.
Non cercare di ricaricare le batterie alcaline!
Gli angoli di sterzata possono essere regolati in
modo sincrono nelle due direzioni su un valore di
ca. 10~100%.
Il regolatore può essere ruotato di 300°. L’angolo
di sterzata aumenta se il regolatore viene ruotato
verso destra e diminuisce se il regolatore viene
ruotato verso sinistra.
• Per aprire il vano batterie, premere la linguetta particolare quelli negativi (-), e verificare il
dello stesso verso il centro e sollevare il corretto posizionamento delle batterie. Utilizzare
coperchio di chiusura. solo batterie completamente cariche. Non
Attenzione: le batterie potrebbero cadere una mescolare batterie o accumulatori di tipo diverso
volta rimosso il coperchio. Se la spia di controllo oppure batterie con uno stato di carica
non si accende, controllare i contatti, in differente.
Polarità della Jack di ricarica
Regolatore angolo di sterzata
Sostituzione delle batterie del trasmettitore
Premere
e sollevare
Page 54

68ICARSON Nitrobone RTR 103014
Serbatoio
Motore
Filtro
dell‘aria
Silenziatore
Gomme anteriori
Ammortizzatori
posteriori
Gomme posteriore
Scatola ricevente
Servo gas
Servo sterzo
Ammortizzatori anteriori
Telaio
a. Alimentazione
Inserire 4 batterie tipo “AA” nel porta batterie della ricevente
come da foto. Assicuratevi di posizionare le batterie con la
giusta polarità, positivo (+) e negativo (-).Quindi collegate la spinetta della batteria con la spinetta dell’interruttore. Il nero con il
nero ed il rosso con il rosso. Riposizionate il vano batterie.
Consiglio: Utilizzate delle batterie ricaricabili. Hanno una buona
durata e si ammortizzeranno in breve tempo. Sostituire il porta
pile con il nostro pacco batterie 6V NiMh 1100 mAH (codice
608036 JR) (codice 608037 bec)
Telaio
Immagine 1
Page 55

69CARSON Nitrobone RTR 103014
I
c. Preparativi finali
Assemblare il riempitore miscela. Per riempire di miscela il
riempitore, bisogna comprimerlo ed immergerne il beccuccio
nel contenitore della miscela. Lasciare decomprimerlo e
si riempirà di miscela. Riempite il serbatoio premendo
dolcemente sul riempitore ed assicurarsi a fine riempimento
che il tappo sia ben chiuso.
Consiglio 1:
La miscela durerà più a lungo se tenuta in luogo fresco, asciutto ed al buio.
Consiglio 2:
Non lasciare più di 10 secondi la pipette candela collegata
alla candela. Un tempo superiore né può causare la bruciatura
prematura del filamento. Per una maggiore durata utilizzate una
pipetta candela ricaricabile.
Consiglio 3:
Per l’avviamento utilizzare appositi guanti ignifughi!
1 - 1,5 mm
TH-Trimm
Ora potete accendere il vostro modello utilizzando l’interruttore
on/off posizionato sulla scatola radio. Accendere sempre prima
il trasmettitore e dopo la ricevente. Controllate sempre le regolazioni prima di accendere il modello!
Controllate che lo sterzo sia centrato. Se non lo fosse, usate
il pomello ST-TRIM a sinistra del volantino di comando sterzo.
Girando il volantino verso sinistra il modello deve girare a
sinistra e girando a destra il modello deve andare a destra.
Consiglio: Leggere attentamente il manuale della vostra radio
per effettuare le regolazioni avanzate.
Adesso bisogna regolare l’acceleratore in posizione neutra.
Rimuovere il filtro dell’aria.
L’apertura della ghigliottina deve essere molto ridotta, da 1 a
1,5 mm per permettere al motore di girare al minimo.
Se è molto più aperta il motore rimarrà accelerato anche con
il freno azionato, provocando una più rapida usura sia delle
pastiglie dei freni che della frizione, creando difficoltà di guida
del modello. Quindi utilizzate se necessaria la regolazione del
trim TH-TRIM per mettere il servo in posizione neutra. In questa
posizione neutra il freno non deve essere bloccato.
Se necessita agite con chiavetta esagonale da 1,5 mm. sul
collarino della leva freno. Rimontare il filtro aria quando avete
finito le regolazioni.
b. Controlli
Immagine 2
Immagine 3
Page 56

70ICARSON Nitrobone RTR 103014
Un buon rodaggio del motore, assicura buone prestazioni e
lunga vita al vostro motore. Assolutamente:
NON SALTATE QUESTA PARTE!
Il motore è già regolato per il rodaggio. Posizionate il modello
su un supporto in maniera che le ruote siano libere di
muoversi. Assicuratevi che il gas sia in posizione neutra.
Collegate la pipetta candela alla candela e date una tirata
secca. Non tirate più di 25 cm! Se esagerate si può rompere
la corda. E’ meglio dare molti strappetti corti che uno ampio,
non è una motosega!
Se la corda si arrotola, girate con le dita il volano. Questo
movimento fa raccogliere la cordicina dello strappo.
Dopo poche tirate, il motore si avvierà emettendo abbastanza
fumo.
Se il motore regolato così grasso fa fatica a tenere il minimo,
girate la regolazione del minimo di 1/8 di giro alla volta in senso
orario.
Così aumenterete il minimo e farete un buon rodaggio.
Effettuate queste operazioni in un’area ben ventilata, magari sul
marciapiede di casa. L’olio della miscela non bruciato si depositerà sotto la vostra marmitta. Continuate questo rodaggio
per 2/3 serbatoi completi, controllando la temperatura ogni 2
minuti. Aspettate 10/15 minuti da un serbatoio all’altro per permettere al motore di raffreddarsi. Toccando con la punta delle
dita la testa del motore, dovrà essere calda, ma non bollente.
Se vi sembra troppo calda, ingrassate leggermente girando
sempre di 1/8 di giro . Fate sempre delle piccole regolazioni,
quando andate intorno alla carburazione.
Consiglio 1:
Regolazioni alla fabbrica del carburatore:
Con queste regolazioni di base già effettuate dalla fabbrica,
il motore si avvierà immediatamente e sarà ben regolato , le
regolazioni sono effettuate per una temperatura esterna di 8
gradi. Se le temperature esterne sono più alte usare una carburazione più grassa.
Ci raccomandiamo di toccare le regolazioni solo se necessarie,
ed all’occorrenza farsi aiutare da un amico più esperto.
• Vite di arresto ghigliottina: approssimativamente 1 mm. di
apertura
• Spillo del massimo: serrarlo completamente e poi aprire di 4
giri completi
• Spillo del minimo: portarlo rasente alla leva del gas e fare un
giro completo in senso orario
Dopo avere effettuato il rodaggio l’apertura dello spillo del massimo deve essere ridotta a 3 giri e 1/4.
Consiglio 2:
Durante questa fase guidate il modello evitando lunghe
accelerazioni. Gradualmente smagrite sempre con piccole
regolazioni di 1/8 di giro. Smagrendo il minimo si alzerà.
più grasso
più magro
numero di
giri più basso
numero di
giri più elevato
Immagine 5
d. Messa in strada!
Immagine 4
più grasso più magro
Immagine 6
Page 57

71CARSON Nitrobone RTR 103014
I
f. Come controllare il vostro modello
• Alzare le gomme da terra e controllare che i comandi
rispondano.
• Girate il volantino dello sterzo a destra e a sinistra . Le ruote
devono sterzare seguendo i comandi.
• Se le ruote girano in modo inverso, invertite i Reverse del
servo (ST in posizione REV).
• Per regolare la velocità agire sulla leva del gas/freno
indietro (per andare avanti ed accelerare) e/o
in avanti (per frenare o andare in retromarcia).
e. Interruttore Trasmettitore
Estrarre l’antenna del trasmettitore completamente.
La gittata del radiocomando si riduce notevolmente se non
estraete completamente l’antenna.
ATTENZIONE! Accendere sempre prima il trasmettitore!
Interruttore della ricevente
• L’interruttore della ricevente è dentro la scatola di
protezione.
• Inserire l’antenna della ricevente nell’apposita guaina
flessibile (vedi pagina 82).
• Montate la carrozzeria e fissatela con le clips in
dotazione.
Sinistra
Destra
Posizione neutra
ON
Page 58

72ICARSON Nitrobone RTR 103014
g. Come cambiare la frequenza
Trasmettitore
E’ possible sostituire il quarzo semplicemente sfilandolo dal
suo alloggiamento nel retro del trasmettitore e inserendone un
altro.
Assicurarsi che i quarzi
del trasmettitore e della
ricevente siano della
stessa frequenza.
Ricevente
Per un rapido cambio di frequenza sfilare il quarzo ricevente
e sostituirlo conun altro, avendo cura che sia della stessa
frequenza del trasmettitore.
2
TX
B
A
N
D
27
FM
Quarzo
Quarzo
h. Precauzioni
La non esecuzione di un buon rodaggio, e/o il danneggiamento
causato da parti Tuning invalideranno la garanzia sul motore.
Ci sono 2 metodi per provare la temperatura del vostro motore.
Consigliamo l‘acquisto del nostro termometro a infrarossi
„Temp-Check“ con il numero di articolo 908072.
Acquistare una
sonda termica. La seconda meno costosa, ma anche meno
accurata è la tecnica della saliva. Mettere un po’ di saliva sulla
testa del motore e dovrebbe evaporare in 3⁄4 secondi.
Se evapora immediatamente può voler dire che il motore sta
scaldando troppo. Il motore gira bene e si riavvia facilmente
se non supera i 100/125 gradi ti temperatura. A secondo della
temperatura, della densità dell’aria, umidità, il carburatore
va regolato di conseguenza. Fare delle piccole regolazioni è
sempre la cosa migliore, per far durare più a lungo il vostro
motore. Il surriscaldamento è causato da una regolazione
troppo magra, o da un utilizzo in condizioni critiche. Questo
surriscaldamento può danneggiare le parti interne del motore.
Ci sono molti accorgimenti che potete usare per fare durare
più a lungo il vostro motore, e potete guidare il vostro modello
per molte ore. Per spegnere il motore ci sono 2 sistemi. Il primo
metodo è quello di chiudere con un dito lo scarico. Assicuratevi
che il motore sia al giusto minimo e con il freno attivato.
Fine utilizzo
Per spegnere il motore ci sono 2 sistemi. Il primo metodo è
quello di chiudere con un dito lo scarico. Assicuratevi che il
motore sia al giusto minimo e con il freno attivato.
Il secondo metodo consiste nel tappare il filtro dell’aria, quindi
facendogli mancare ossigeno.
Non strozzare mail il tubetto miscela, può causare un surriscaldamento del motore. Nel caso si lasci consumare tutta la
miscela contenuta nel serbatoio, il motore si spegnerà da solo.
Applicare dall’apertura del carburatore un olio “after run” e dare
dei colpetti con lo strappo, in maniera da metterlo in circolo.
Questo passo è necessario se non utilizzate la macchina per
più di un giorno, in quanto il metanolo evaporando lascia dei
residui di acqua che sono dannosi per il motore. E’ consigliabile
controllare sempre che tutte le viti ed i dadi siano ben stretti
ed ove necessario applicare del frena filetti. Mantenere la
macchina pulita aiuta anche a lavorarci intorno. Per pulire si
può utilizzare un compressore ad aria, o appositi prodotti
spray o a pennello.
Controllare sempre le batterie del trasmettitore e della ricevente
prima di mettere in funzione il motore.
Consiglio:
Indossare appositi guanti quando il motore è caldo!
Immagine 7
Immagine 8
Page 59

73CARSON Nitrobone RTR 103014
I
Surriscaldamento
Controllare la temperatura. Se supera 150
gradi, ingrassare la carburazione. Assicuratevi che le ruote girino senza impedimenti.
Tubetto presa
di pressione
staccato
Ricollegare la presa di pressione della marmitta al serbatoio.
Filtro aria
sporco
Lavarlo con acqua e sapone, quindi
imbevetelo con l’apposito olio per filtri. (Nr.
32648)
Carburatore
lento
Controllare il dado bloccaggio carburatore.
Spingere il carburatore nell’apposita sede
e stringere bene il dado per evitare bolle
d’aria.
Calo di prestazioni del motore
Batterie
scariche o
danneggiate
Le batterie del trasmettitore debbono essere
completamente cariche. Se i servi si muovono lentamente si stanno scaricando le
batterie della ricevente
Regolazioni
trasmettitore
sbagliate
Controllare le istruzioni di regolazione del
radiocomando.
Antenna
trasmittente
non completamente estratta
Estrarre l’antenna in tutta la sua lunghezza.
Perdita del
controllo
Nelle vicinanze qualche modello sta usando
la stessa frequenza.
Il modello non
si muove
Il trasmettitore o l’interruttore del modello
non è acceso.
Errata polarità o batteria sbagliata.
Le batterie sono esaurite
Non va dritto Il trim dello sterzo non è regolato bene
I dadi bloccaggio ruote anteriori e posteriori
sono troppo serrati
Non frena Il trim del freno non è regolato bene
Va piano Il motore ha perso potenza
I dadi bloccaggio ruote posteriori sono
troppo stretti.
C’è sporco o corpi estranei negli ingranaggi
Difficoltà di controllo, Interferenze
i. Possibili problemi
Leggere queste avvertenze prima che si verifichino!
Il motore non parte
Motore
ingolfato.
Troppa miscela
nel motore
Smontare la candela, tirare lo strappo 6-8
volte, attenzione agli spruzzi di miscela.
Candela
bruciata
Smontare la candela, collegarla alla pipetta
candela. Se rimane nera vuol I dire che è
bruciata, se diventa arancio è ancora buona.
Alimentatore
candela
scarico:
Montate una candela nuova. Se non si
accende, cambiate la pipetta candela o
sostituite la batteria.
Serbatoio
vuoto/ non
arriva miscela
al motore
Riempite il serbatoio. Tappare con un dito lo
scarico e fare l’avviamento con lo strappo.
Surriscaldamento
Se il motore è molto caldo si può bloccare,
quindi lasciare raffreddare per 5/10 minuti.
Page 60

74 CARSON Nitrobone RTR 103014
Montage
105149
105117
105117
105149
105117
105118
105118
105189
105189
105189
105131
105131
105131
105131
105131
105189
48 T.
105185
105149 10x5x4 mm
Assembly • Montageanleitung •
Assemblage • Montaje • Montaggio
Liquid screw lock • Schraubensicherungslack • Frein filet •
Líquido fijatornillos • Liquid screw lock
Grease • Fett • Graisse
Grasa • Grease
Silicon Oil • Silikonöl • Huile silcone • Aceite de silicona • Silicon Oil
1
Main Gear Unit • Hauptantriebseinheit
• Unité d’entraînement principale
• Unidad de accionamiento principal
• Unità di azionamento principale
Page 61

75CARSON Nitrobone RTR 103014
Montage
105109 3x10 mm
105108
105109
105109
105111
105111
105110
105108
2
Gear box assembly (front/rear) • Montage des Getriebes (vorne/
hinten) • Montage de l’engrenage (avant/arrière) • Montaje del
mecanismo (delante/detrás)
• Montaggio della trasmissione
(anteriore/posteriore)
105189 3x30 mm
105130 M4x3
105130
105189
105112
105112
105110
105148
105149
105149
105149 10x
5x4 mm
105149 15x
10x4 mm
105149
105111
105130
Silicon-Oil
Silikonöl/
Getriebeöl 908052-55
Tuning Tipp
908052 Silicon Oil 50 ml 1000
908053 Silicon Oil 50 ml 3000
908054 Silicon Oil 50 ml 5000
908055 Silicon Oil 50 ml 7000
Page 62

76 CARSON Nitrobone RTR 103014
Montage
105149 10x5x4 mm
105149 15x10x4 mm
105149
105149
105149
105149
105120
105137
105150
105150
105137
105150
105161
105161
105129
105129
105120
105150
105150
105175
78 mm
105175
78 mm
105137
3
Suspension assembly (front/rear)
• Montage der Aufhängung (vorne/hinten)
• Montage de la suspension (avant/arrière)
• Montaje de la suspensión (delante/detrás)
• Montaggio delle sospensioni (anteriore/posteriore)
Page 63

77CARSON Nitrobone RTR 103014
Montage
4
Shocks • Stoßdämpfer • Amortisseur • Amortiguadores •
Ammortizzatori
Kit: Oil
Öl
Tuning: Silicon Oil
Silikonöl
Tuning Tipp
908048 Silicon Oil 50 ml 300
908049 Silicon Oil 50 ml 400
908050 Silicon Oil 50 ml 500
908051 Silicon Oil 50 ml 600
105163
front
vorne
105168
front
vorne
2x
4x
2x
2x
2x
2x
105180
front
vorne
2x
105176
front
vorne
105159
4x
105138
105162
rear
hinten
105169
rear
hinten
2x
4x
2x
2x
2x
2x
105179
rear
hinten
2x
105177
rear
hinten
105159
4x
105138
Page 64

78 CARSON Nitrobone RTR 103014
Montage
105189
105174
105184 3x40 mm
105189 M3x3
105171
105150
105178
105184
105150
105163
105127
5.1
Front Absorber Bridge • vordere Dämpferbrücke • Support
d‘amortisseur avant • Soporte de amortiguadores delantero •
Attacco Ammortizzatore Anteriore
Page 65

79CARSON Nitrobone RTR 103014
Montage
105189 3x40 mm
105189 3x12 mm
105189
105189 3x18 mm
105184
105189
105150
105178
105189
105189
105150
105184
105171
105162
105127
5.2
Rear Absorber Bridge • hintere Dämpferbrücke • Support
d‘amortisseur arrière • Soporte de amortiguadores trasero •
Attacco Ammortizzatore Posteriore
Page 66

80 CARSON Nitrobone RTR 103014
Montage
105189
M3 NUT
105189 M3
105189
105150
105150
105150
105150
105123
105189
E_CLIP 5.2
6
Servosaver complete • Servosaver komplett
• Servosaver complet • Servosaver completo
• Salvaservo completo
Page 67

81CARSON Nitrobone RTR 103014
Montage
PF3x8
TPF3x10
ISO3x10
TPF3x10
ISO3x10
TPF3x10
TPF3x8
105189 TPF3x8
105189 TPF3x10
105189 PF3x8
105189 ISO3x10
105186
105174
Front suspension
Vorderachse
Essieu avant
Eje delantero
Assale Anteriore
Main gear unit
Hauptantriebseinheit
Unité d’entraînement
principale
Unidad de accionamiento
principal
Unità di azionamento
principale
Rear suspension
Hinterachse
Essieu arrière
Eje trasero
Assale Posteriore
7
Assembly onto the chassis • Montage der Baugruppen auf das
Chassis • Montage des groupes sur le châssis • Montaje de los
módulos sobre el chasis • Montaggio dei gruppi sullo chassis
Page 68

82 CARSON Nitrobone RTR 103014
Montage
105189 TT3x10
105189 TPF3x12
105189 TPF3x8
105189 TPB3x8
105157 M3x3
105119
105189
TT3x10
105189
105157
105189
105119
105157
105189
M3x3
105189
M3x3
105189
TPB3x8
8
Steering and throttle servo with rods
• Lenk- und Gas/Bremsservo mit Anlenkung
• Servo de direction et gaz/freins avec articulation
• Servo de gas/freno y direccional con guía
• Servosterzo, servo gas e servofreno con comando
Page 69

83CARSON Nitrobone RTR 103014
Montage
105189 TPF3x8
105189 TMF3x8
105189
108189
105119
105119
105189
9
Radioplate RC-box • RC-Box und Radioplatte
• Boîtier de télécommande et platine radio
• Caja de radio RC y placa de radio • RC box e scheda radio
Page 70

84 CARSON Nitrobone RTR 103014
Montage
105189 HM3x25
105189 M3
105189 HM3x8
105189 TPB2x6
105160 o.Abb.
4x Manifold-gasket-set
4x Krümmerdichtung Set
105189
HM3x8
105189
TPB2x6
105144
105142
105141
105145
105124
105188
13 T/ Zähne
105189
M3 NUT
105189
HM3x25
105189
HM3x10
10
Clutch, manifold and tuned pipe
• Kupplung, Krümmer und Resonanzrohr
• Embrayage, collecteur et tube de résonance
• Acoplamiento, tubo angular y tubo de resonancia
• Frizione, collettore e marmitta a risonanza
Page 71

85CARSON Nitrobone RTR 103014
Montage
105189 TPF3x10
105189 TFM3x10
105122
105189
TPF3x10
105189
TFM3x10
11
Fuel-tank and nitroengine
• Kraftstoff-Tank und Nitromotor
• Réservoir à carburant et moteur nitro
• Depósito de combustible y nitromotor
• Serbatoio carburante e motore nitro
Page 72

86 CARSON Nitrobone RTR 103014
Montage
105189
105189
900048
12
Mounting of the complete tires • Montage der Reifen
• Montage des pneumatiques • Montaje de los pneumáticos
• Montaggio dei pneumatici
Page 73

87CARSON Nitrobone RTR 103014
Montage
Page 74

88 CARSON Nitrobone RTR 103014
Montage
13
Exploded view • Explosionszeichnung • Vue éclatée • Dibujo de
explosión • Disegno esploso
Page 75

89CARSON Nitrobone RTR 103014
Montage
Page 76

90 CARSON Nitrobone RTR 103014
Middle-diff-mount/ car handle
Mittel-Diff.-Halter/Tragegriff
Break-set complete
Komplett-Set Bremse
4x Wheel Hex w/ Pin (4) 12 mm
4x
Felgenmitnehmer 12mm 6-Kant+Stift
Air cleaner/connector/gasket-set
Luftfilter/Verbinder/Dichtungs-Set
105140
105141
Steering/servo-saver-set
Lenkung/Servo-Saver-Set
Differential-Bevelgear-Set
Differenzial-Kegelrad-Set
Manifold/tuned-pipe-set/connector
Krümmer-/Resonanzrohr-Set
Differential-housing w/ screw
Differenzial-Gehäuse mit Schrauben
Crown- & bevelgear-set w/ shaft
Teller-/Kegelrad-Set mit Welle
2x CV10 universal joint differential
2x Mitnehmer Diff-Seite
RC-box/servo mount/upperdeck
RC-Box/Servohalter/Upperdeck
Gearbox front/rear
Getriebegehäuse Vorne/Hinten
2x Upright-set fr/re/le/ri
2x Achsschenkel-Set Vo/Hi/Li/Re
8x Countersunkscrew + washer
8x Senkkopfschraube + U-Scheibe
4x Bodyholder
4x Karosseriehalter
2x Wheelaxle-set
2x Radachsen-Set
75ml Fuel Tank
75ml Kraftstofftank
2x Universal joint gearbox short
2x Mitnehmer Getriebe-Seite kurz
2x
8x
105108
105109
105110
105111
105112
105117
105118
105119
105120
105122
105123
105124
105128
105127
105129
105130
Main-gear-shaft w/ 2 joint-Set
Haupt-Getriebewelle+Mitnehmer-Set
8x Ball end long/A
8x Kugelkopf-Pfannen lang/A
8x Shaft for suspension arm
8x Welle Querlenkerbefestigung
4x Screw pivot-ball M10x7
4x Schraube Pivot-Ball M10x7
8x Pivot-ball sockets short/B
8x Kugelkopf-Pfannen kurz/B
105131
105134
105184
105137
105138
Spare Parts
Ersatzteile
Pièces détachées
Recambios
Ricambi
Ersatzteile
Page 77

91CARSON Nitrobone RTR 103014
Ersatzteile
Spare Parts • Ersatzteile • Pièces détachées • Recambios • Ricambi
Engine mount plate
Motoreinbauplatte
Differential assembly fr/re
Differential montiert vo/hi
16x Ball bearing-set (105/1510)
16x Kugellager-Satz (105/1510)
Flywheel for 2-shoe clutch
Schwungscheibe f. 2-Backenkuppl.
18x Ball-head screw-set
18x Kugelkopf-Set
2-Shoe clutch w. spring
2-Backenkupplung mit Feder
Clutch bell 14 teeth
Kupplungsglocke 14 Zähne
2x Engine mount
2x Motorträger
Clutch bell 15 teeth
Kupplungsglocke 15 Zähne
Engine nut for o.s. shaft
Kurbelwellen-Adapter-Set
Clutch bell 16 teeth
Kupplungsglocke 16 Zähne
Throttle-/brake rod-set
Gestänge-Set Gas/Bremse
4x Spring retainer
4x Federteller
4x Manifold gasket-set
4x Krümmerdichtung
2x Rear shock absorber
2x Dämpfer hinten
2x Front shock absorber
2x Dämpfer vorn
Chassisplate truggy
Chassisplatte Truggy
2x2 Suspension arm
2x2 Querlenker
105142
105144
105145
105146
105147
105148
105149
105150
105151
105152
105153
105157
105159
105160
105162
105163
105164
105161
Steering rod set
Spurstangen-Set
2x Shock absorber set rear
2x Dämpferset hinten
Shock-tower-set
Dämpferbrücken-Set
Mid shafts front/ rear
Mittelwellen vorne/ hinten
2x Dogbone set
2x Antriebsknochen
105170
105169
105171
105174
105175
78mm
62mm
78mm
2x Shock absorber set front
2x Dämpferset vorne
105168
1x 2x 2x
Page 78

92 CARSON Nitrobone RTR 103014
Spare Parts • Ersatzteile • Pièces détachées • Recambios • Ricambi
Screw-set truggy
Schrauben-Set Truggy
Clutch bell 13T
Kupplungsglocke 13Z.
2x Wheel set chrome complete
2x
Felgen/Reifen Set Chrom kompl.
2x Wheel set black complete
2x Felgen/Reifen Set schwarz kompl.
2x Wheel set white complete
2x Felgen/Reifen Set weiß kompl.
2x Main gear
2x Hauptzahnrad
Bumper
Rammer
2x Piston rod set front
2x Kolbenstangen-Set vorne
2x Piston rod set rear
2x Kolbenstangen-Set hinten
Suspensionarm holder set
Querlenkerhalter-Set
2x Front springs
2x Federn vorne
2x Rear springs
2x Federn hinten
105188
900047
105176
105177
105178
105180
105179
105189
105187
900048
Body + spoiler with decals
Karrosserie + Spoiler mit Dekor
Illustration similar
Abbildung ähnlich
900049
105185
48T
105186
Page 79

93CARSON Nitrobone RTR 103014
Motor
2,5 cm3 Motor • Motor • Moteur • Motor •
Motore
Art.-Nr. 901008
Page 80

94 CARSON Nitrobone RTR 103014
Art.-Nr. Description Bezeichnung Description Descripción Elenco ricambi
54435 Lower seal of nozzle
case
Düsenstockdichtung
unten
Bourrage de gicleur
en bas
Junta inferior de toma de
combustible
Guarnizione portaugelli
inferiore
54436 Upper seal of nozzle
case
Düsenstockdichtung oben Bourrage de gicleur
superieur
Junta superior de toma de
combustible
Guarnizione portaugelli
superiore
54499 Rod connector Gestängeanschluss Levier de commande Conexión de varillaje
Attacco tiranteria
54530 Fuel seal Kraftstoffdichtung O-Ring Junta de combustible
Guarnizione carburante
54546 Cover screw 4 pcs. Flanschdeckelschraube
4 St.
Vis de fix. couvercle
de carter 4 p.
Tornillo de tapa abridada 4
pzas.
Vite coperchio con flangia 4St
54550 One Way Bearing Set Klemmrollen-Freilauf Roue libre avec
bague de fixation
Rodillos de bloqueo de la
rueda libre
Corsa libera rulli bloccanti
54553 Rear packing for fuel
mixture
Gehäusedichtung hinten O-Ring de carter
arrière
Junta de cárter atrás
Guarnizione posteriore
alloggiamento
54568 Clamping bushing Klemmkonus Cône Cono de volante inercia
Cono di bloccaggio
54581 Nozzle case Düsenstock Gicleur Portatoberas
Portaugelli
54582 Needle for main
nozzle
Hauptdüsennadel Pointeau gicleur Aguja del surtidor principal
Spina ugello principale
54603 Combustion space Brennraum Chambre de com-
bustion
Cámara de combustión
Camera di combustione
54606 Washer for cylinder
head
Zylinderkopf U - Scheibe Joint de culasse Junta de culata
Rondella di spessore testata
cilindri
54608 Cylinder liner and
piston
Zylinderlaufbuchse +
Kolben
Corps de cylindre et
piston
Camisa del cilindro + pistón
Camicia del cilindro + pistone
54611 Connecting rod Pleuel Bielle Biela
Biella
54615 Carburettor fixing pin Vergasereinspannstift Vis de fix. carburateur Pasador de sujeción
carburador
Attacco carburatore
54617 Drive washer Mitnehmer Disque
d‘entraînement
Dispositivo de arrastre
Trascinatore
54629 Fuel tube connector Kraftstoffanschlußnippel conduite d‘essence Toma de combustible
Nipplo di collegamento carburante
54633 Packing for
carburettor case
Vergasergehäusedichtung O-Ring Junta del cárterdel
carburador
Guarnizione alloggiamento
carburatore
54637 Piston pin Kolbenbolzen Axe de piston Bulón del pistón
Spinotto per pistone
54638 Cylinder head screw 4pZylinderkopfschraube 4St. Vis de fix. culasse 4p Tornillo de culata 4 piezas
4 viti a testa cilindrica
54641 C-ring for piston pin Kolbensicherungsring Description Aro de seguridad del pistón
Anello di sicurezza pistone
54642 Front ball bearing Kugellager vorne pince de l‘axe de
piston
Cojinete de bolas parte
delantera
Cuscinetto a sfere anteriore
54643 Rear ball bearing Kugellager hinten Roulement avant Cojinete de bolas parte
trasera
Cuscinetto a sfere posteriore
54648 Cable pull starter Seilzugstarter Roulement arrière Tirador de arranque
Starter a tirante
54649 Front packing for fuel
mixture
Gemischdichtung vorne Démarreur à tirette Junta de la mezcla parte
delantera
Guarnizione anteriore miscela
105181 Crankshaft OS Kurbelwelle OS Vilbrequin OS Cigüeñal OS
Albero a gomiti OS
54653 Carburettor complete Vergaser komplett Carburateur complet Carburador completo
Carburatore completo
54658 Adjuster cover Regulierungsabdeckung Palonnier Cobertura de la válvula regu-
ladora
Copertura di regolazione
54692 Pressure spring
6x1,9mm
Druckfeder 6x1,9mm Ressort 6x1,9mm Muelle de compresión
6x1,9mm
Molla di compressione
6x1,9mm
54693 Starter pivot 4,2x2mm Starterzapfen 4,2x2mm Pivot starter 4,2x2mm Pivote de arranque 4,2x2mm
Perno dello starter 4,2x2mm
902022 Crankcase Kurbelgehäuse Carter du vilebrequin Caja de cigüeñal
Basamento
902024 Carburettor case Vergasergehäuse Corps de carburateur Carcasa del carburador
Corpo del carburatore
902025 Throttle needle Drosselnadel Pointeau de
carburateur
Aguja de estrangulación
Ago a farfalla
902026 Throttle valve cylinder Zylinder des Schiebe-
ventils
Cylindre de tiroir Cilindro de la válvula corre-
dera
Cilindro della valvola a scorrimento
902028 Cylinder head (milled) Zylinderkopf (ausgefräst) Culasse (fraisé) Culata de motor (fresada)
Testata cilindri (fresata)
902029 Cable pull starter with
flange
Starter-Flansch m.
Zubehör
Démarreur à tirette
avec bride
Brida del arrancador con
accesorios
Flangia dello starter con
accessori
902045 Carburettor seal
screw
Vergaser-AbschlussSchraube
Vis d‘arrêt de
carburateur
Tornillo terminal del
carburador
Vite di chiusura carburatore
Motor
Page 81

95CARSON Nitrobone RTR 103014
Notizen
 Loading...